#carrd tutorials
Explore tagged Tumblr posts
Visit Tumblr Blog
Explore Tumblr blogs with no restrictions, modern design and the best experience.
Last Seen Tumblr Blogs


Fun Fact
In 2020, 44% of users from Denmark used Tumblr daily.
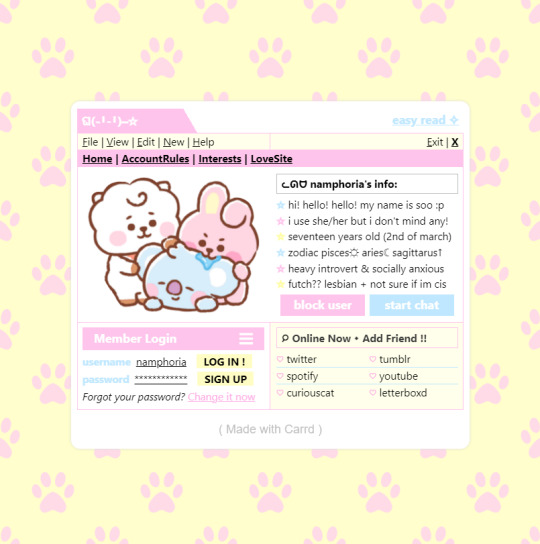
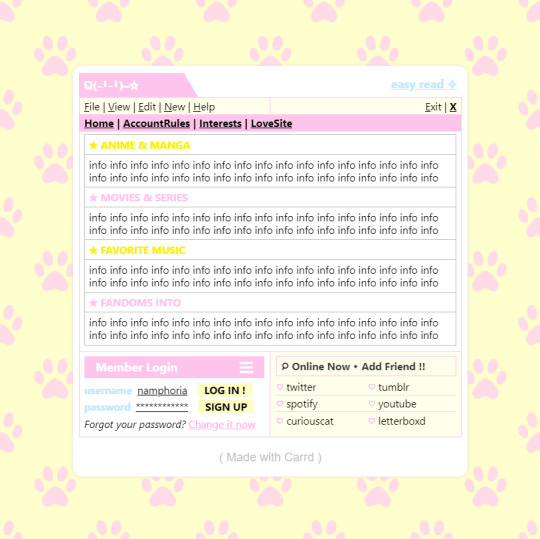
Text
anyone understand carrd? <3
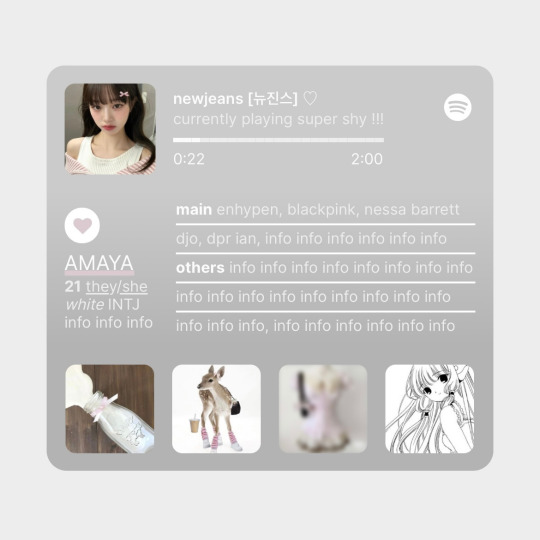
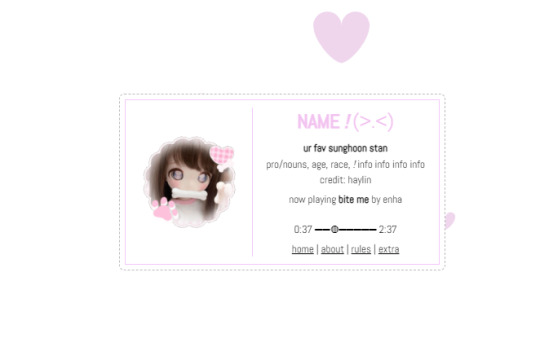
Is anyone familar with carrd and how to set it up? I came across this carrd (art of annacchii) and I’d to try and create something similar for my art commissions and rph commissions!
If you know of a tutorial or anything, please let me know, I’m willing to pay for one done but I can’t do that right now. Pretty low on funds in general lmao and loopy af right now. I’m going to work on saving up for it but I thought why not post and see if anyone knows of any tutorials.
5 notes
·
View notes
Text
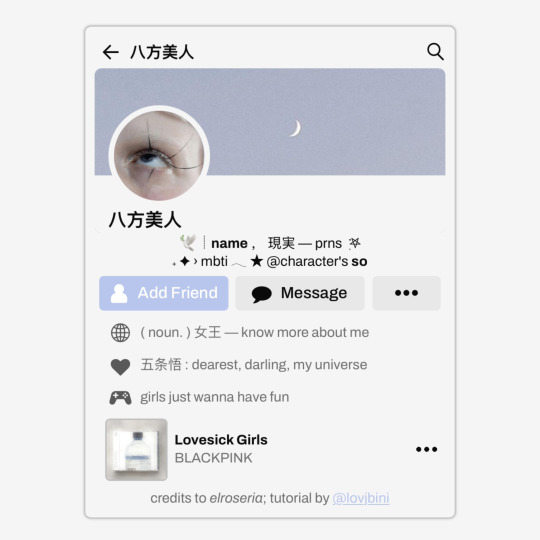
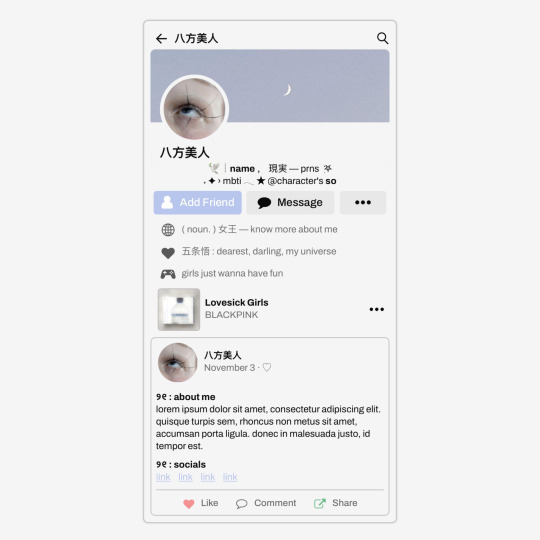
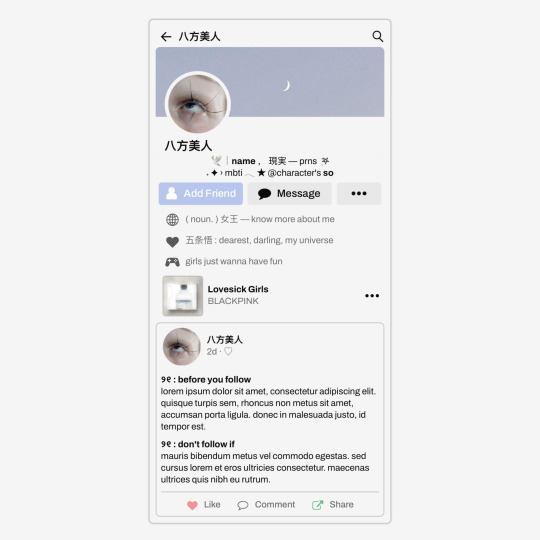
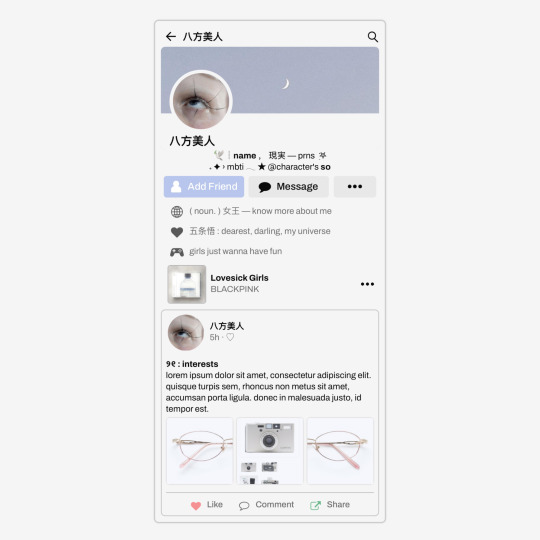
✩ CARRD INSPO by LOVJBINI // © elroseria
like or reblog if you useㅤෆㅤ2024.
✎﹏ please, put “ © elroseria – tutorial by @lovjbini ” in the description if you use our tutorial!
CLICK HERE FOR TUTORIAL
#lovjbini#carrd#carrd.co#carrd co#carrd inspo#carrd tutorial#carrd template#carrd layout#carrd tutorials#carrd templates#carrd layouts#carrd theme#carrd themes#carrd design#carrd designs#carrd stuff#aesthetic#simple#kpop#macbook#pastel colors#pastel aesthetic#kawaii#blue#pastel blue#light blue#facebook
618 notes
·
View notes
Text
========================================================
[tutorial: build your own neocities/nekoweb page]
========================================================
a beginner's guide for making your very own home on the indie web—retro, personal, weird, and 100% yours.
this ain’t an average wix, squarespace, or tiktok aesthetic.
we’re talking full html/css with soul and attitude.
[ prerequisites ]
------------------
> an idea
> basic text editor (vscode, notepad++, or even notepad)
> account on https://neocities.org or https://nekoweb.org
> some gifs or tiles you love (dig deep or make your own)
> optional: image host or gif repo (or self-host everything)
[ feeling overwhelmed? read this. ]
-----------------------------------
you do *not* need to know everything.
html is not a mountain. it's a garden.
you plant one tag. then another. then a style. then a button.
you can build your site piece by piece.
and every piece is a portal to somewhere personal.
you are allowed to make broken pages.
you are allowed to use templates.
you are allowed to start over as many times as you want.
this is *your* world. you control the weird.
[ step 1: create an account ]
-----------------------------
> neocities: https://neocities.org
> nekoweb: https://nekoweb.org
register a name, log in, and enter your file manager.
this is where you upload your files and see your site live.
[ step 2: your first file - index.html ]
----------------------------------------
make a new file: `index.html`
basic starter:
<html>
<head>
<title>my weird little corner</title>
<link rel="stylesheet" href="style.css">
</head>
<body>
<h1>welcome to the void</h1>
<p>this is my page. it’s strange. like me.</p>
<img src="mygif.gif">
</body>
</html>
> upload to the dashboard
> boom. you’re live at
https://yoursite.neocities.org
or https://nekoweb.org/u/yoursite
[ step 3: add a style sheet - style.css ]
-----------------------------------------
create a file called `style.css` and upload it.
here’s some nostalgic magic:
body {
background: url('tile.gif');
color: lime;
font-family: "Courier New", monospace;
text-shadow: 1px 1px 0 black;
}
img {
image-rendering: pixelated;
}
marquee {
font-size: 20px;
color: magenta;
}
link it in your html and the vibes activate.
[ step 4: decorate it like a haunted usb ]
------------------------------------------
> use <marquee> for chaos scrolls
> embed gifs from https://gifcities.org/
> steal buttons from https://cyber.dabamos.de/88x31/
> set up a guestbook at https://www.smartgb.com/
> loop audio with <audio autoplay loop>
> add fake errors, 90s web lore, random link lists
[ step 5: resources, themes, and comfort ]
------------------------------------------
> templates & layouts: https://numbpilled-themes.tumblr.com
> glitchy gifs & buttons: https://glitchcat.neocities.org/resources
> layout builder: https://sadgrl.online/projects/layout-builder/
> free tiled backgrounds: https://backgrounds.neocities.org/
> beginner html intro: https://www.w3schools.com/html/
> pixel fonts & cyber assets: https://fontstruct.com/
remember:
you don't need to know js. you don't need to be a coder.
you just need a mood, a direction, a dream.
the html will follow.
[ bonus concept: shrine pages ]
-------------------------------
> a page just for one character you love
> a room to house digital fragments of your identity
> embed quotes, music, images like altars
> call it shrine.html and link it from your homepage
[ closing mantra ]
------------------
you are not here to be optimized.
you are not a brand.
you are a ghost inside the machine,
carving your initials into the silicon void.
welcome to Your website.
========================================================
#webcore#old web graphics#neocities#web graphics#carrd graphics#carrd resources#rentry decor#rentry graphics#carrd moodboard#carrd inspo#neopets#indie#indie web#early web#webdevelopment#web development#web resources#web design#old internet#old web#oldweb#nekoweb#transparent gif#tiny pixels#pixel gif#moodboard#tutorial#html page#html theme#htmlcoding
434 notes
·
View notes
Note
Heyy!! I love your carrds so so much they're so pretty!! Can you please make a f2u non pro discord nitro themed carrd please please please
HELLO HOPE THIS IS GOOD!
non pro freindly discord nitro themed carrd
get the carrd here look at it here! here is also the image i used for the nitro badges!
REQS ARE OPEN FOR CARRDS!! only req i have is to be following me to ask for a carrd! and I DO CARRD COMMS!! so if you have a specific carrd you want made message abt my prices and what i take!! use my referral code also to help donate and get some money off on buying pro here / use the code manually HXYLIN !
#carrd commissions#carrd stuff#aesthetic#carrd templates#carrd icons#carrd inspo#carrd moodboard#carrd theme#carrd material#carrd packs#carrd req#discord chat#discord server#discord app#discord mobile#carrd template#request#carrd tutorial#free carrd template#carrd profile#strawberry#cutecore#commission#taking commisions#f2u
2K notes
·
View notes
Text
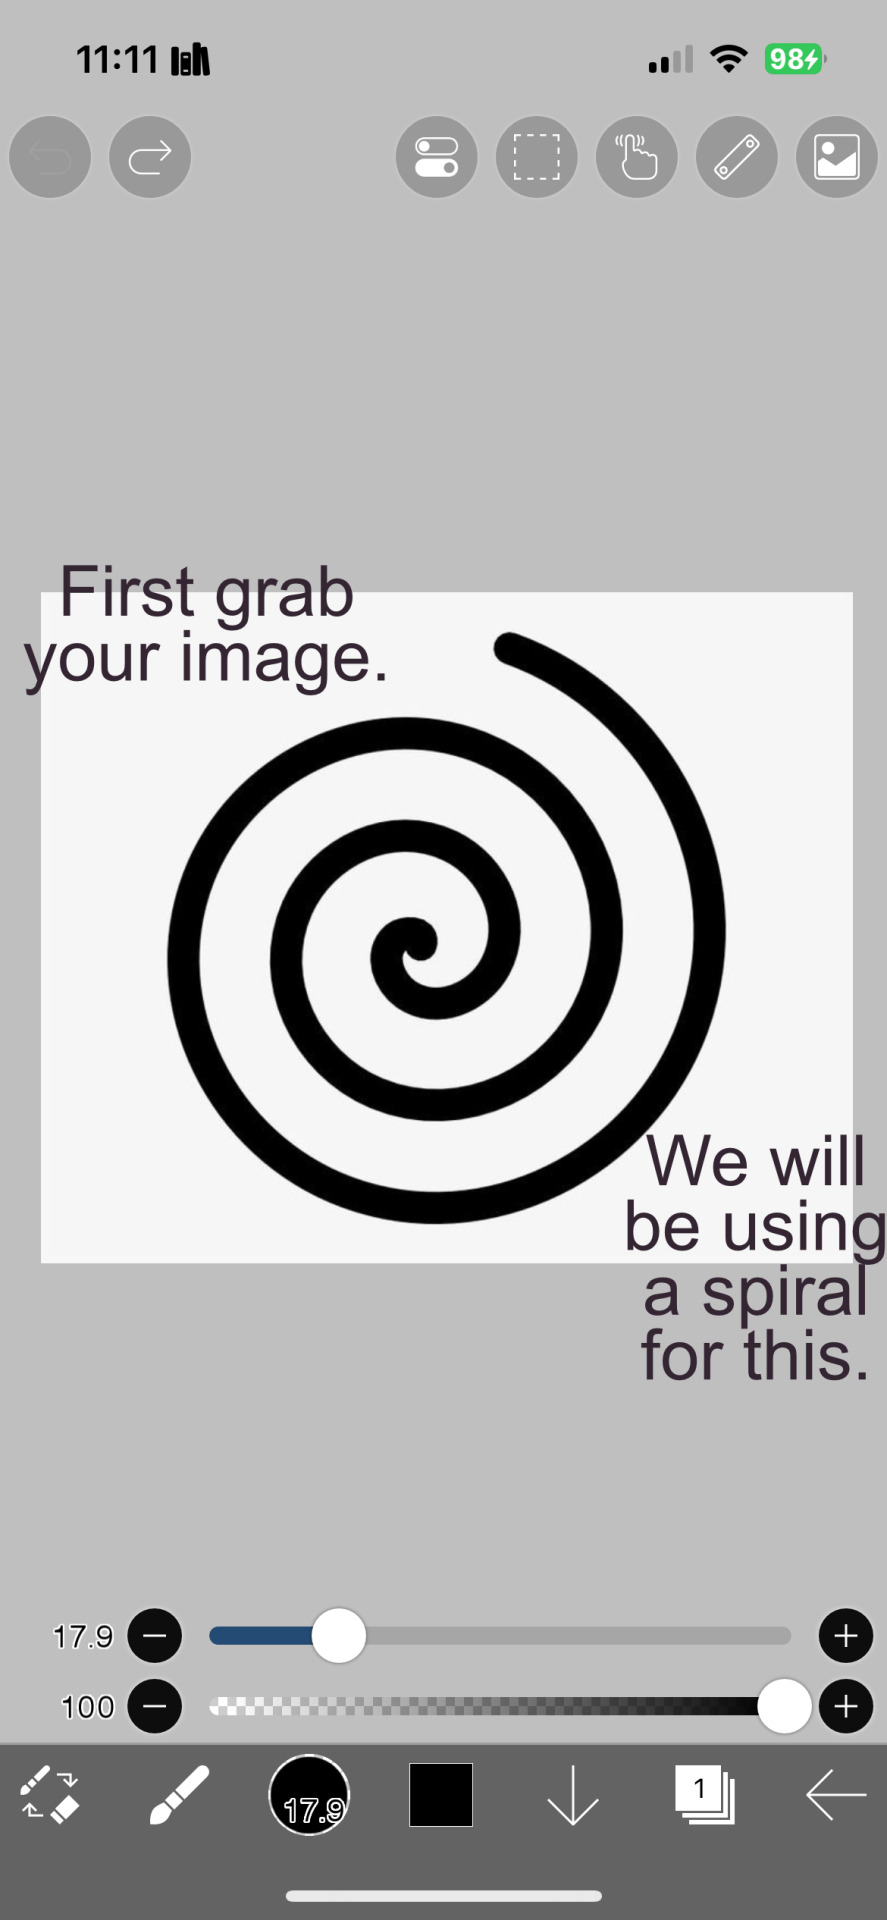
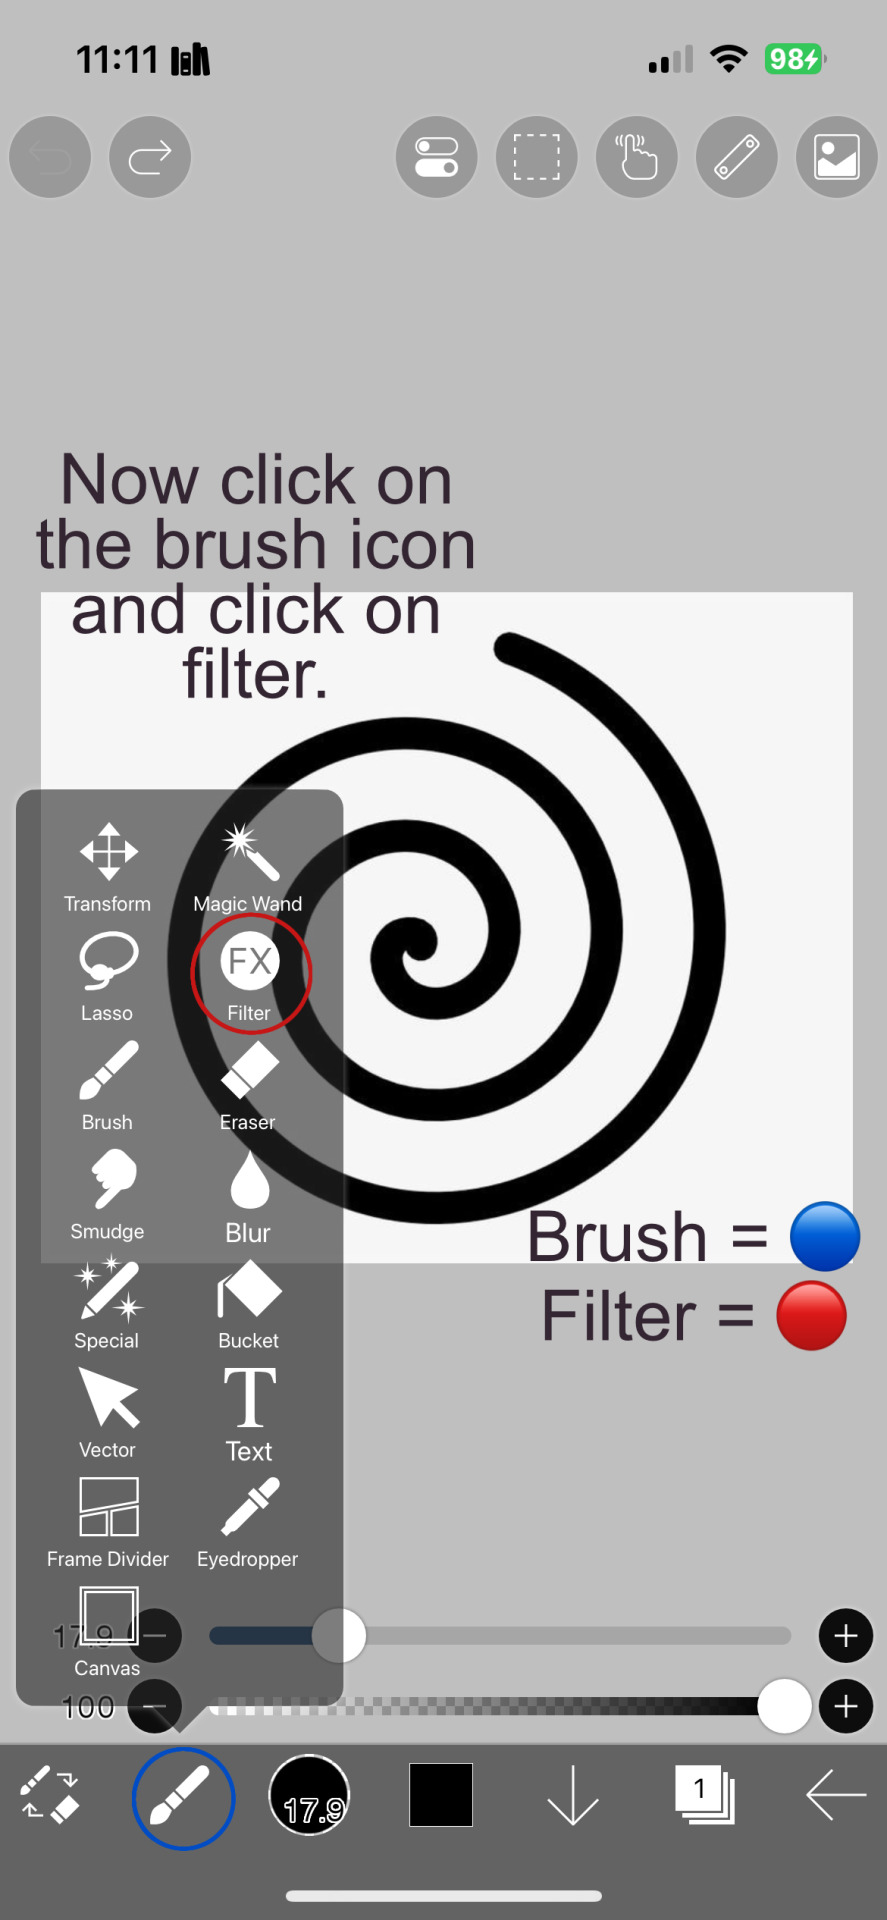
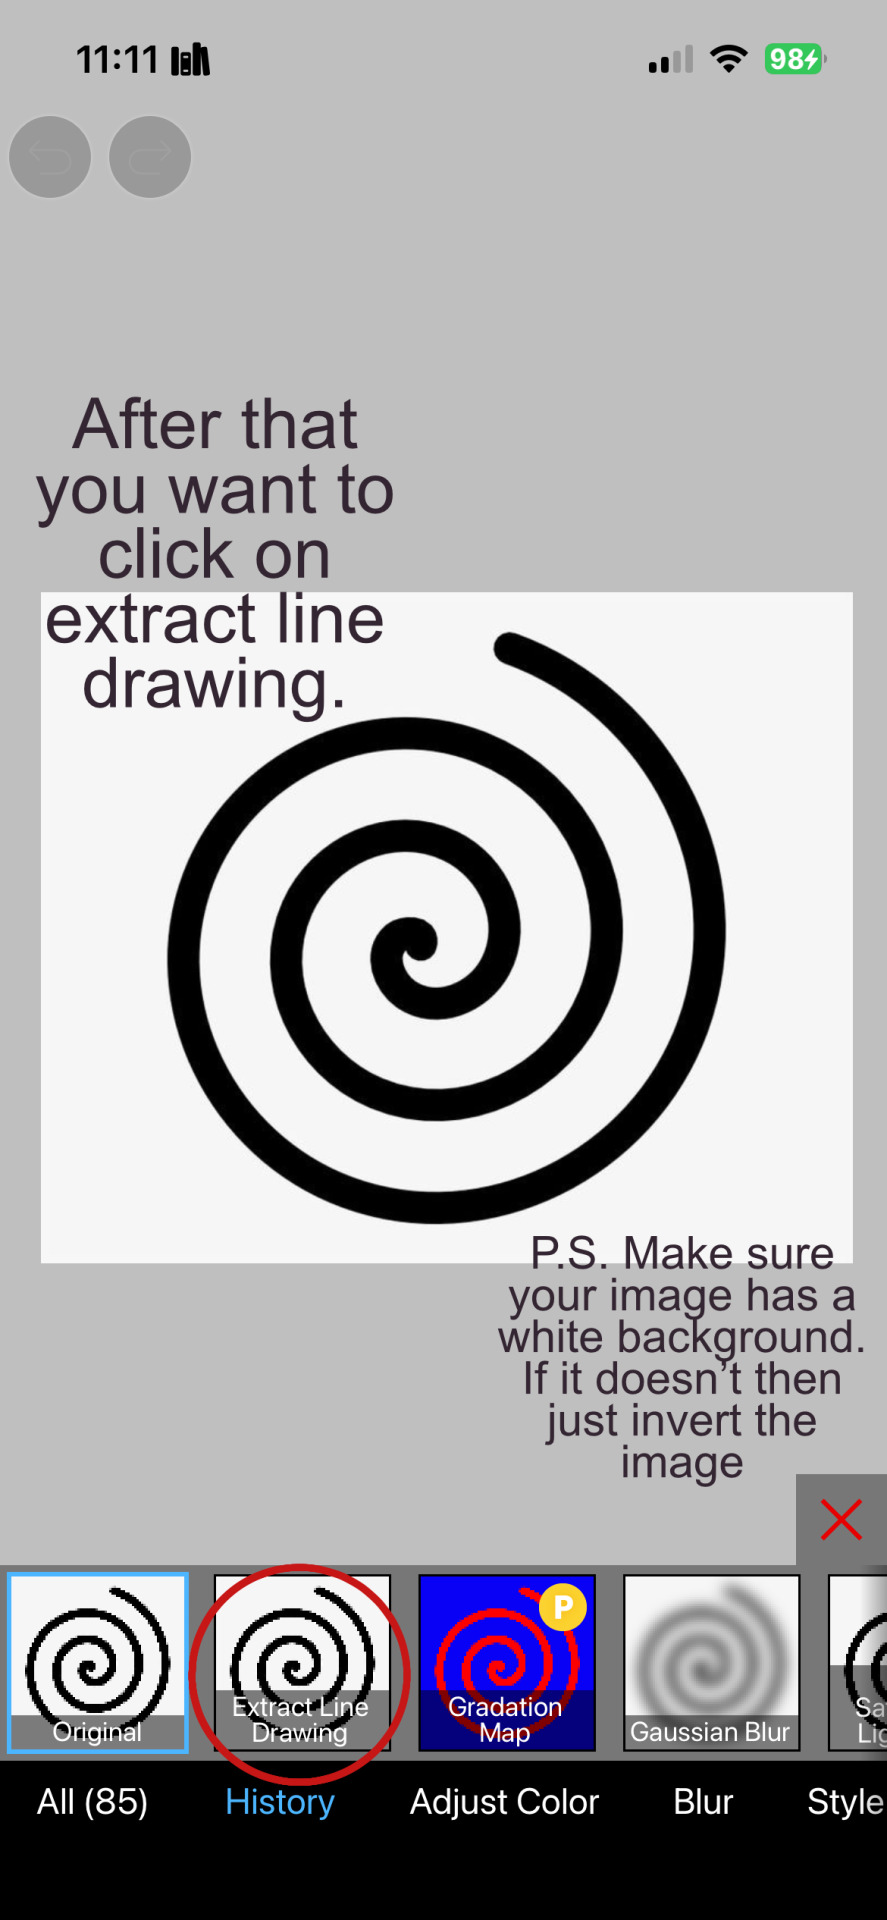
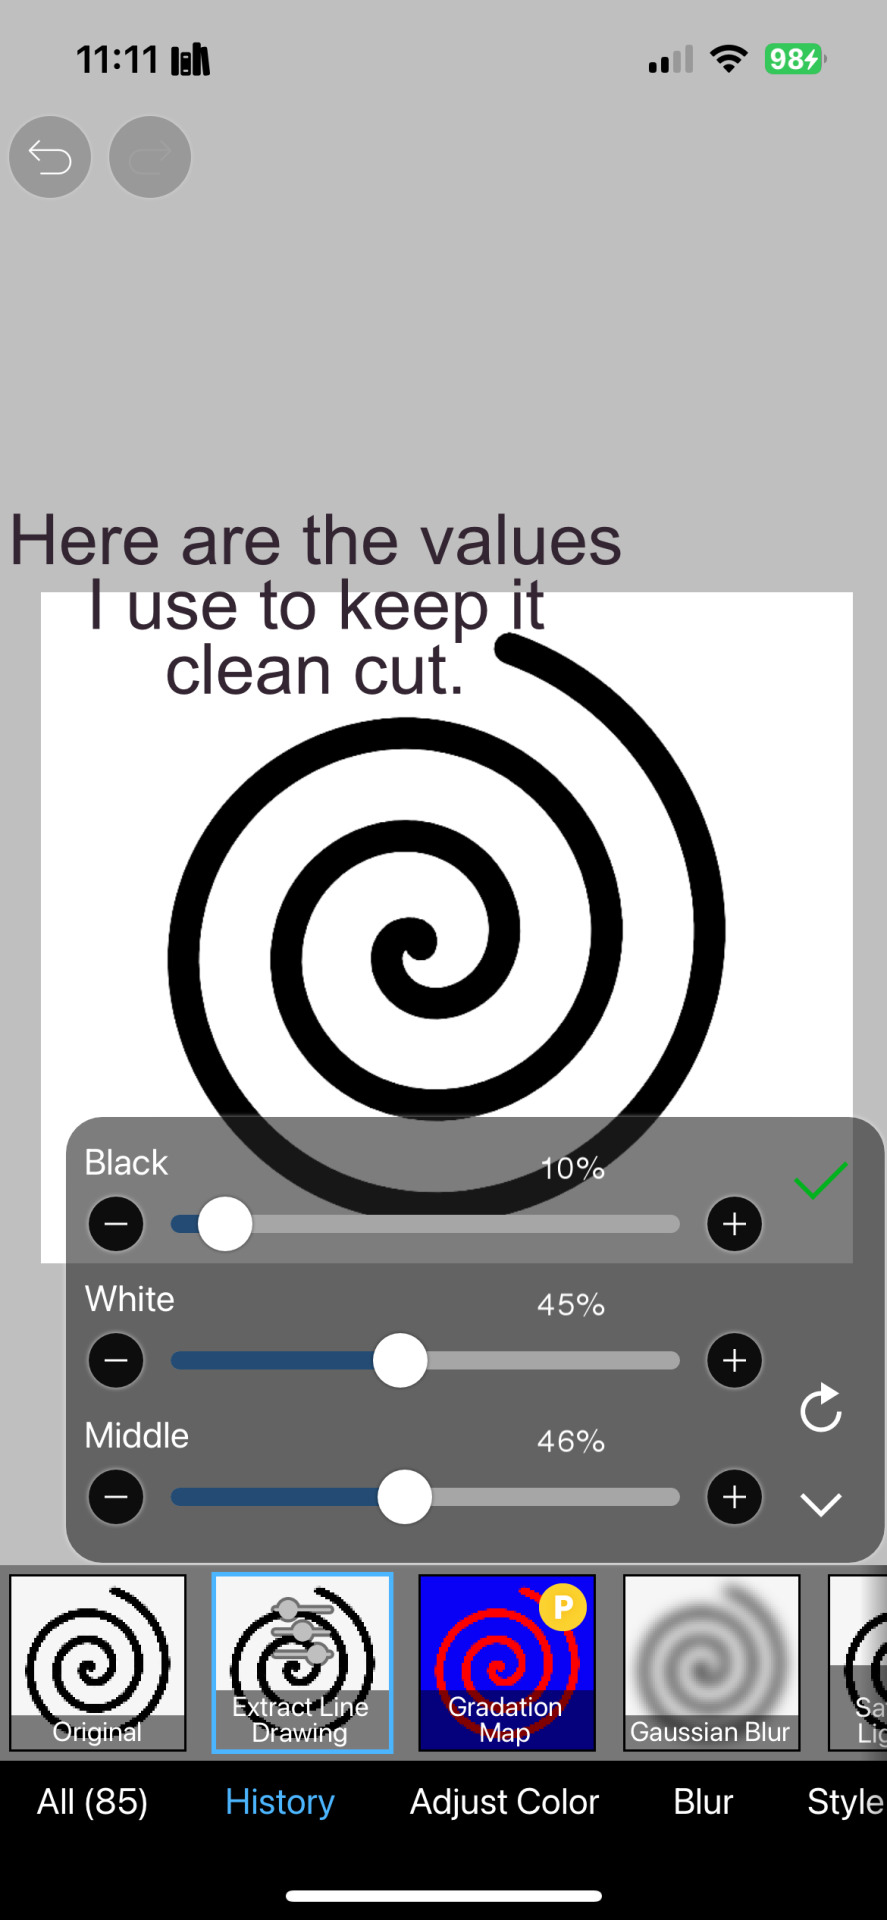
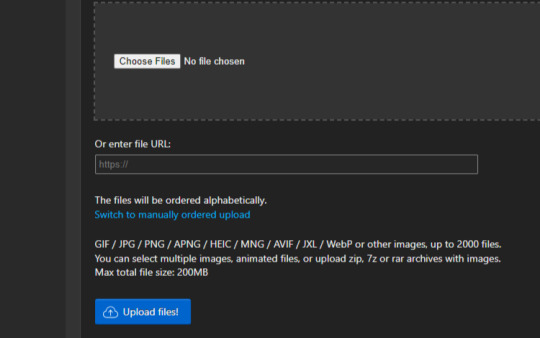
Digital Stamp Making Tutorial
Hello, and welcome to the long-awaited(at least on my part) digital stamp-making tutorial from neosprites! I’d like to preface that I learned what I was doing from this tutorial so it may be a bit redundant, but if anything I get a bit more specific. Thank you so much to @graphic--horde for your work, it changed me as a graphic maker. This is gunna be a long post so feel free to bookmark it for later. Now, onto the show!

The frame I will be using for this tutorial (which is the frame I use on 99.9% of my stamps) I found from the above linked post, which I believe is from a creator that OP lost track of. Its inner dimensions are 94x50 pixels and its outer dimensions are 99x56 pixels. Here it is!

Find your material! - I recommend using websites like Tumblr and searching with the “GIF” filter only on, or alternatives such as Giphy or Tenor. Your browser may let you directly save the .gif file; if not and you are noticing it restricts you to save it as a .webp file you can try an extension like “Save webp as PNG or JPEG” (for Firefox but I image other browsers have similar functions, but I really recommend you switch to Firefox). To use this you will right click on your source .gif like normal but instead of clicking on “Save image as…” click “Save webP as…” and then click “GIF”. You should be redirected to the website ezgif.com where we will actually be doing all of our editing! Here’s the .gif we’ll be working with.

Convert to GIF (optional) - if you used the extension from the above step you should already be ready to click the blue “Convert to GIF” button. If not, go ahead and open ezgif.com and click on “webP” and then “WebP to GIF”; then convert to a gif with the blue button.

Resize the GIF - now that we have a gif ready to edit, let’s make it the right size. The easiest method I have found is to change it directly to the frame’s inner dimensions, 94x50 pixels. [EDIT: Make sure in the aspect ratio drop drop menu you select "stretch to fit" and not "center and crop to fit" like I did in the photo example.] Click “resize” and then type [94] in for the width and [50] for the height. Next press the blue “resize image” button.


Add the frame - next click “overlay” then click the thin blue button that says “Extend canvas size(use if overlay exceeds GIF sizes)”. This will give us some extra room to add the frame onto the design. Next click “Browse…” and find the frame you have saved onto your device, then click the blue “Upload image” button.


After that it’s going to be misaligned, that’s normal! It will say you have the option to drag it into place, but don’t bother. That’s one of the reasons my old stamps look wack, it’s just harder to do. Instead type [44] in for the Left box and [22] in for the Right box. It took me a while to figure out these dimensions to be honest, and I’ve only tested it with this frame so I don't know if it works with others. Then click the blue “Generate image” button.


Crop the transparent edges - click on “crop”. You will have the option to check a box that says “trim transparent pixels around the image” however, I don’t recommend this as it tends to crop a few of the frame’s pixels with it sometimes. Next, set the Left position to [44] and the Right position to [22]. For the other dimensions we will use the outer dimensions of the frame which are 99x56 pixels, this will trim everything except the tiny spaces in between the stamp frame’s spikes. Type the width as [99] and the height as [56] and click the tiny blue button that says “set”. After that click the blue “Crop image” button.


Save and use! - all that's left is to click “save” and upload the graphic to your liking. (best seen on dark mode obviously)

If you’d like to tag me in stamps you’ve made using my tutorial I would love to see them, but it’s not required!! Make sure to always give credit for pictures/gifs when you can and try not to make stuff out of personal/fan art. Thank you to the person in my inbox who requested this tutorial, I had been meaning to for a while but it was just the kick I needed. :)
#carrd graphics#carrd resources#carrd stuff#rentry graphics#rentry resources#rentry decor#rentry pixels#rentry stuff#rentry inspo#deviantart#neocities#mine#my graphics#my tutorials#resources#tutorials#tutorial#how to#stamps#blinkies#graphics#web graphic#old internet#early internet#spacehey#da stamps#page decor#custom#old web#frames
416 notes
·
View notes
Text


jagged, crystalized and pixelated tumblr banner masks!
for the 2 anons that asked!
okay to repost, just dont claim as yours. and free to use (its what they were made for, duh!)
keep in mind gifs dont mesh well with translucent colors if youd like to use these with them :0
#🌫️ i know what you dread | creations#anonymous#carrd resources#rentry resources#rentry#web graphics#rentry tutorial#rentry inspo#rentry gif#rentry decor#rentry graphics#rentry template#image masks#edit resources#editing resources
1K notes
·
View notes
Text

Tutorial on how I cutout my PNGs!!
I use Ibis paint X for this entire process and get all of my images off of Pinterest.
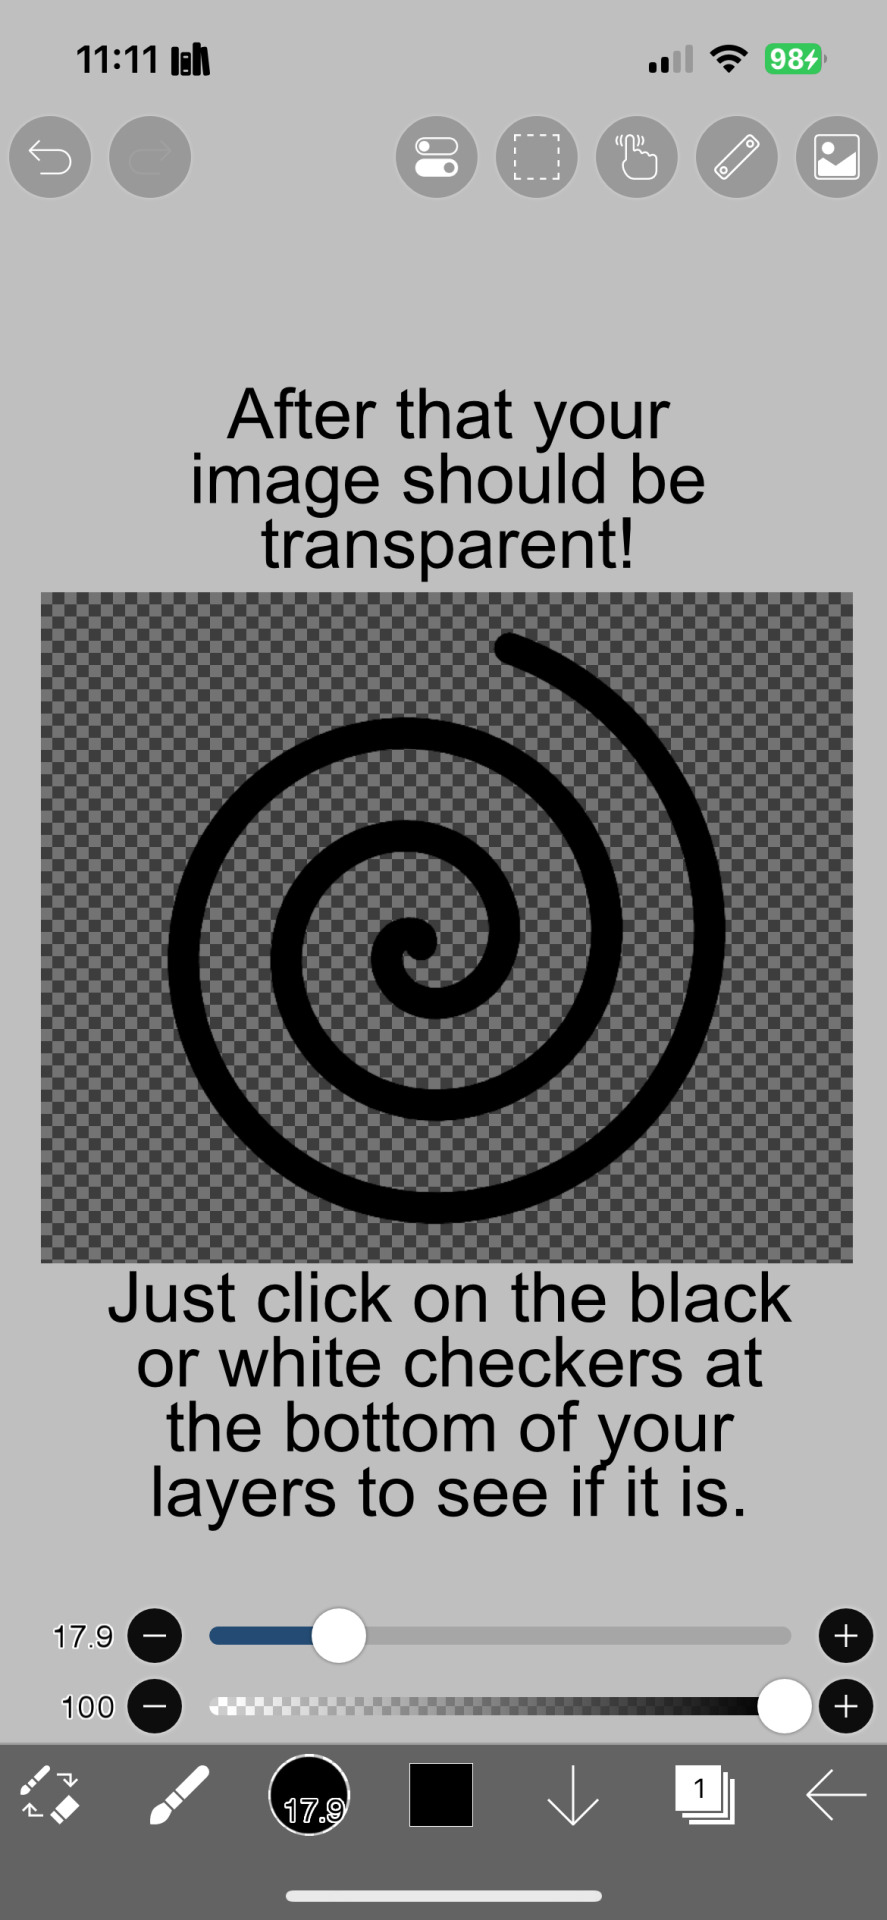
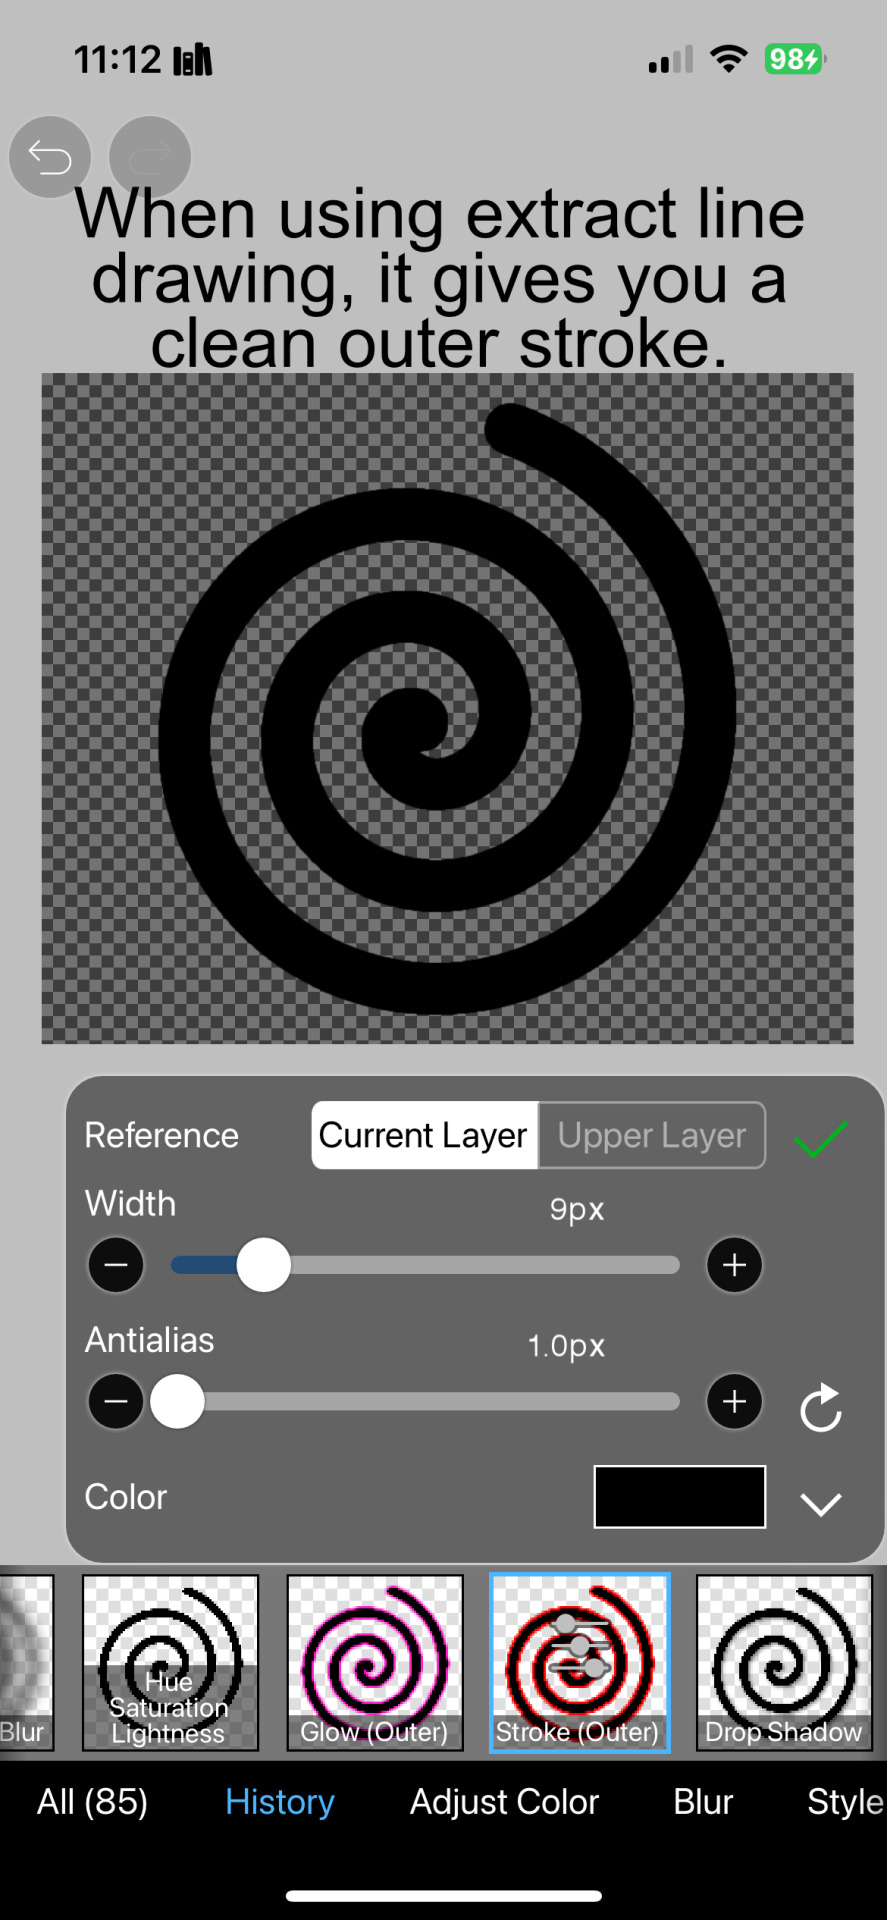
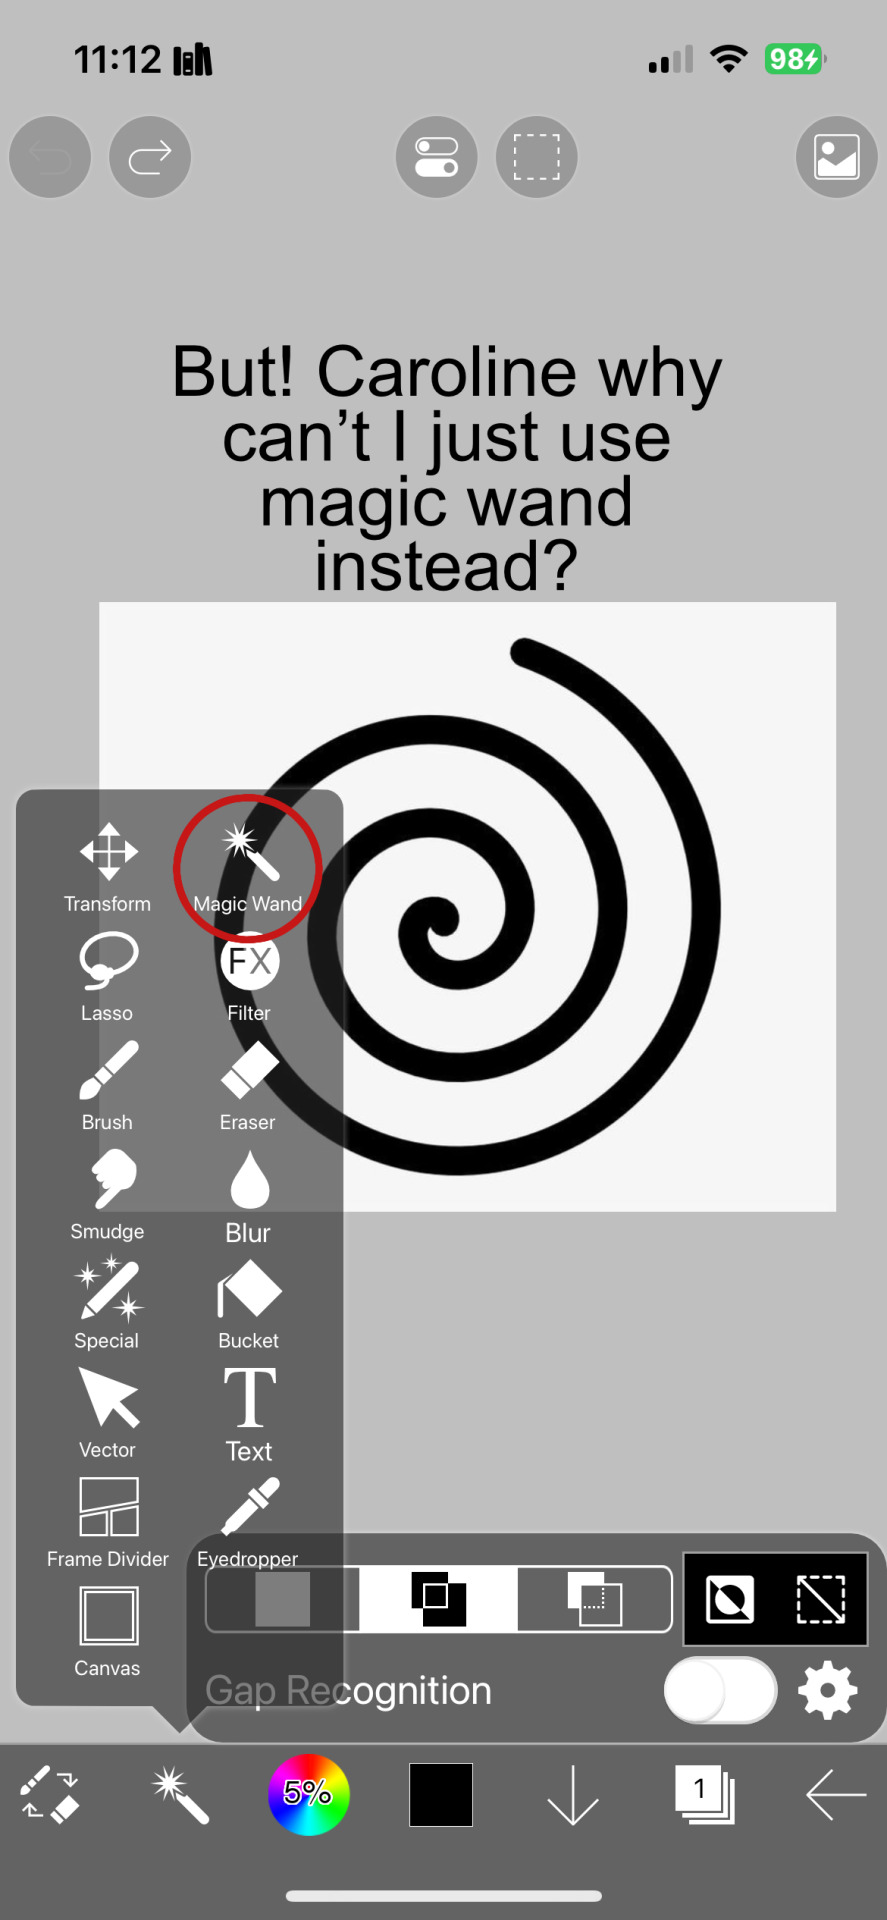


And hopefully this helps! Sorry if I didn't explain certain things well enough or the image ID text is confusing. I don't include it all too often.
#png#answers#rentry decor#rentry#puerileds#transparents#tutorials#talking#my stuff#decor#carrd decor#carrd resources#rentry resources#carrd png#rentry png#gfx#vector#vectors#graphic design#design#pinterest png#ibis paint#carrd stuff#rentry stuff#editblr#Is this enough tags
229 notes
·
View notes
Text


w w w . carrd . co // ⋆ 𐙚 ₊ ˚ 🐇 ⊹ ♡ ˚ .
✿ CARRD INSPO // © misamory
like or reblog if saveㅤ⿻ㅤᐢ..ᐢㅤ♡ㅤ2023.
#⋆ ˚ 。 just an rkive — ★. *#♡✮☁️✧˖°💿⋆。°✩#carrd.co#carrd inspo#carrd template#carrd templates#carrd icons#carrd stuff#carrd material#carrd resources#carrd moodboard#carrd inspiration#carrd#carrd layouts#carrd symbols#carrd help#carrd tutorial#carrd theme#carrd things
2K notes
·
View notes
Text


Lace divider stuff whatever
F2U with like & reblog , I edited pngs from Pinterest to make these. credit is greatly appreciated since this took me a solid 40 minutes
feel free to add to resource rentries, but it has to link back to this post or account.
tagging @smilepilled noticed you enjoy being tagged in things 🤍 unless i mistaked you for someone else
#꒰৯ ̇ ۪ dividers ۪ ྀི#lace dividers#rentry dividers#dividers#rentry icon#rentry tutorial#rentry template#rentry inspo#rentry resources#rentry stuff#rentry pixels#rentry gif#rentry decor#rentry graphics#rentry frame#rentry#carrd resources#f2u with credit#saeriji#template coming soon i promise i js want to post some resources.#postponing the template to be posted next week because i’m busy this week w church.#idk what else to tag#rentry carrd#carrd graphics#carrd inspo#carrd stuff#carrd#carrd decor#carrd dividers#carrd layouts
291 notes
·
View notes
Text

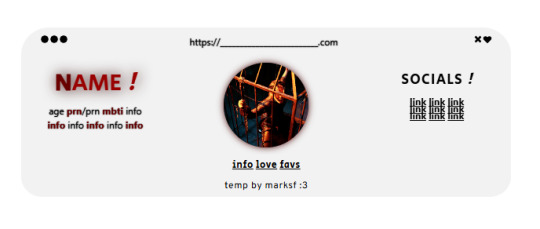
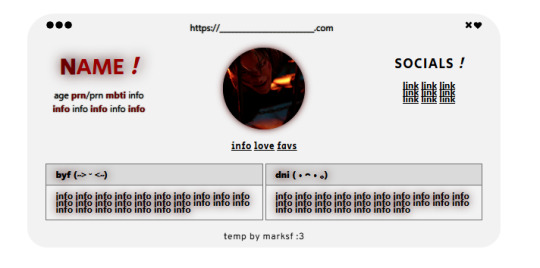
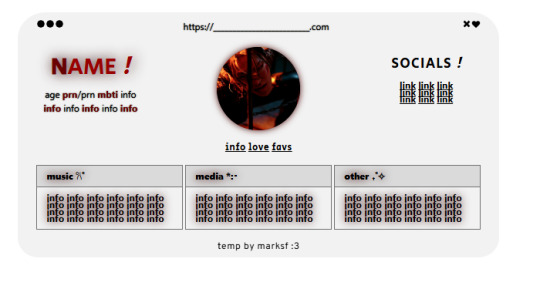
carrd.co template ! ($0+ pay what u want)
non-pro friendly ! preview . buy | refferal code - MARKLEE ♡ kofi
please, do not remove the credit or claim as your own ! you can move the credit but please keep it on the site <3
#marksf#marksf templates#carrd template#carrd#carrd stuff#carrd inspo#carrd resources#carrd commissions#carrd inspiration#carrd templates#template#carrd.co#free carrd template#carrd material#carrd moodboard#carrd layouts#carrd symbols#carrd help#carrd tutorial#carrd theme#carrd things
123 notes
·
View notes
Text

✩ CARRD INSPO by LOVJBINI // © crdais
like or reblog if you useㅤෆㅤ2024.
✎﹏ please, put “ © crdais – tutorial by @lovjbini ” in the description if you use our tutorial!
CLICK HERE FOR TUTORIAL
#lovjbini#carrd#carrd.co#carrd co#carrd inspo#carrd tutorial#carrd template#carrd layout#carrd tutorials#carrd templates#carrd layouts#carrd theme#carrd themes#carrd design#carrd designs#carrd stuff#aesthetic#simple#website#blue#white#wonyoung#jang wonyoung#ive wonyoung#izone wonyoung#izone#ive#ive moodboard#izone moodboard#wonyoung moodboard
630 notes
·
View notes
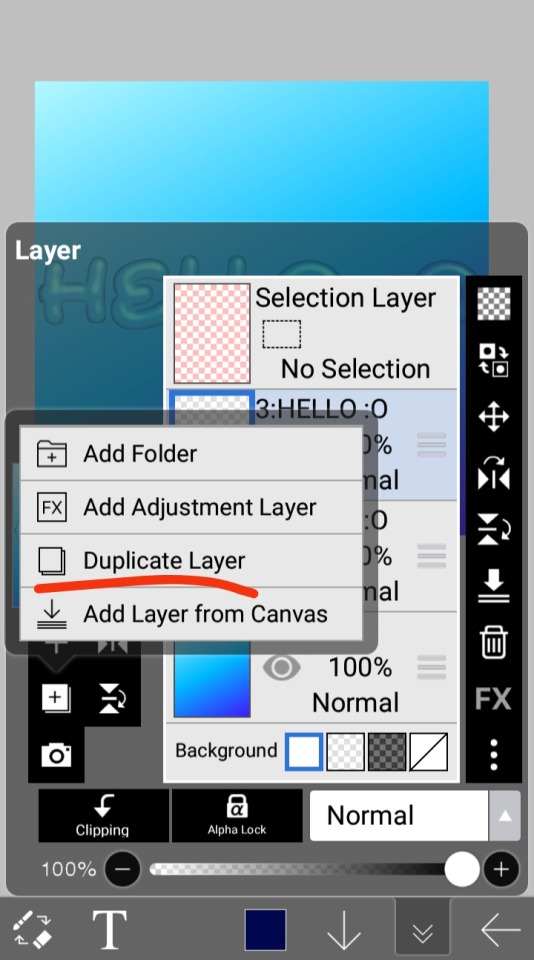
Note
haii i usually use ibis paint to edit and if its not too much trouble i was wondering if you had any tips or like a tutorial on how to make better psds on photopea??(/nf) i tried playing around with the adjustment layers for a bit but it didn’t really turn out the way i wanted it to… 💔 thank you for your time and sorry this was so long 😭
PSD coloring tutorial / Recommendations by a self-taught loser
hello! i don't really know how to make a tutorial on PSDs, but i do have a few recommendations!
a useful setting would be Selective Color ( i apologize if the name is wrong, i have my photopea in spanish and have to translate everything myself 😓😓)

for example, the PSDs i used here barely have any layers, but i used a ton of selective color layers!
basically, from my own experience, i'll say Selective color is to make a specific color kinda .....pop (?. idk how to explain it.
moving on, i also recommend threshold! idk how to explain this one, so i'll just leave an example!
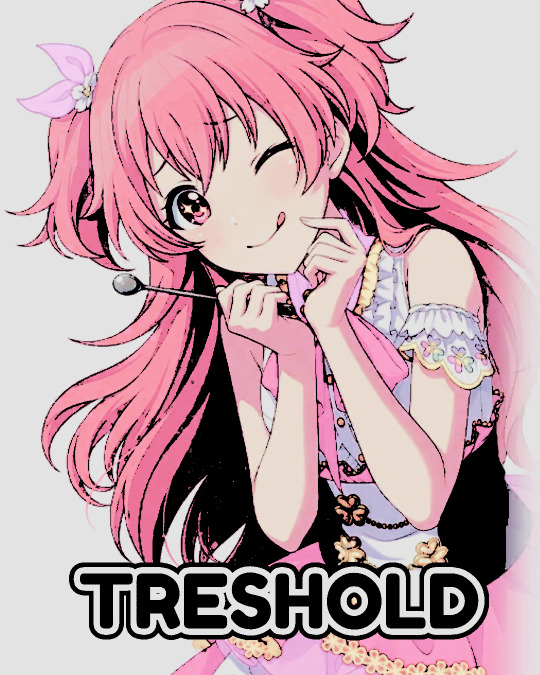
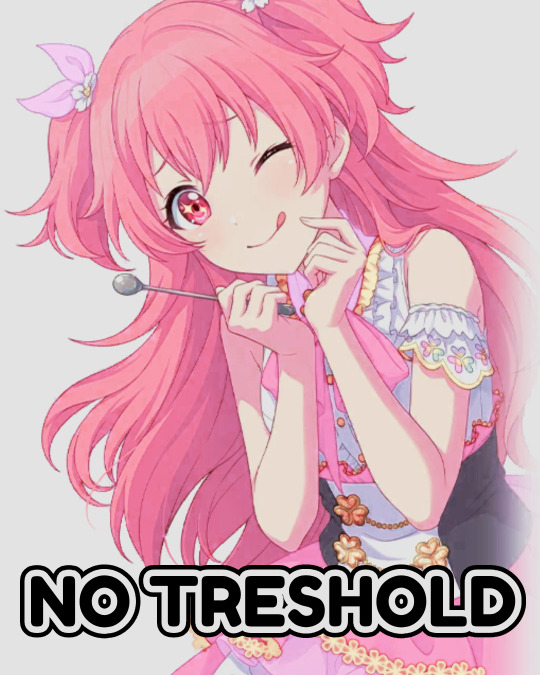
I exagerated it a little to show the effect properly lol, you can adjust it to as little or as much as you want! just remember to set the layer to multiply! (or any blending mode that works for you! many of them work, i just use multiply for... no reason at all actually)
next up, we have Replace Color!


it literally just... replaces colors. most people use it on black! just add the effect, set the color to the one you wish to replace, and start playing with the settings!
-- also, note that when using it on black, you have to turn up the luminosity for it to work!
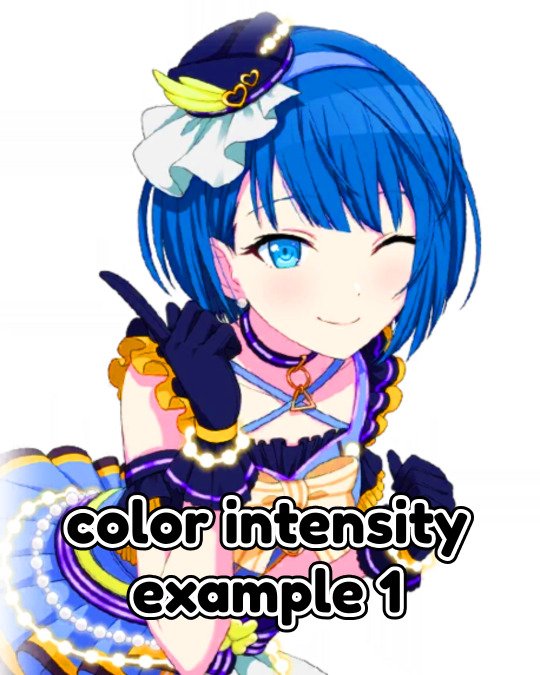
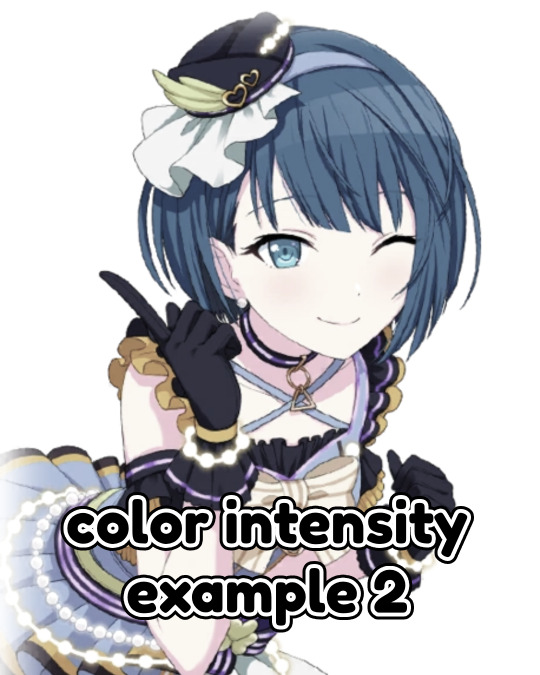
last but not least, Color Intensity!
its just... color intensity. but yeah! its pretty useful! i'll leave 2 examples here.

If anyone has any other tips, feel free to reblog! i kind of learned everything by myself, so im not the best, sorry.
i'll confess i haven't seen it myself, but @/canarysage has a psd tutorial here! so... just saying, you should check that out!
(user canarysage feel free to throw tomatoes at me and boo me off the stage (in other words, feel free to send an ask to be removed!))
...and if i left something out, let me know!
#questions / tutorials。#rentry help#rentry tutorial#photopea tutorial#photopea help#psd help#psd tutorial#rentry#psd#rentry graphics#rentry dividers#carrd material#photopea psd tutorial#coloring help#psd coloring help#photopea coloring tutorial#coloring tutorial#coloring psd
273 notes
·
View notes
Text
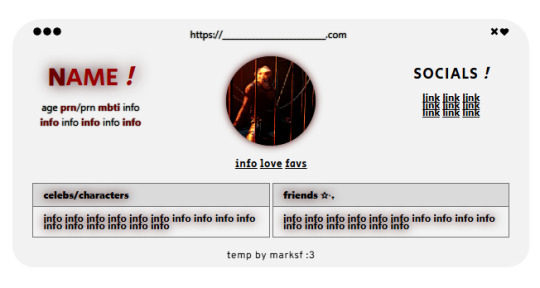
BASIC ACC FREINDLY LIGHT PINK MINIMAL CARRD
Hiii guys, to the comments and everyone i apologize for the inconvenience of the title and everything, the carrd was free at one point but many people kept stealing the carrd and removing creds and giving copies of the carrd and saying they made it. I had sent out posts on here and my discord server letting everyone know if it didn't stop i would start charging for the carrd or just take it away all together and it got progressively worse so i decided to change it to a paid carrd and realized after a couple comments about it on this post that i forgot to change the post and take away the parts where i said free, if you would like the carrd for free there is a tut up on my youtube channel (linked in my pinned post or comms carrd i believe) for it but i won't be giving out copies or temps of it anymore besides the paid one thank you!!
HIIII everyone here's a new carrd! obtain it here look at it here!
REQS ARE OPEN FOR CARRDS!! only req i have is to be following me to ask for a carrd! and I DO CARRD COMMS!! so if you have a specific carrd you want made message abt my prices and what i take!! Donate tips to me so im able to continue making free carrds here! use my referral code also to help donate and get some money off on buying pro here / use the code manually HXYLIN !
#carrd commissions#carrd stuff#aesthetic#carrd templates#carrd icons#carrd inspo#carrd moodboard#carrd theme#carrd material#carrd packs#carrd req#discord chat#discord server#discord app#discord mobile#carrd template#request#carrd tutorial#free carrd template#carrd profile#strawberry#cutecore#commission#taking commisions#f2u#f2ucarrd
1K notes
·
View notes
Note
Hello I know that this rentry is not yours but I wanted to ask you how to make that chibi character thingy move like that (tell me if u understood😭) i tried looking through the internet on how to make rentry graphics or rentry gifs but there's no tuts or anything, I'd so appreciated if you helped me and thank you
sorry for the late reply, i forgot about this ask </3 @bat9litc
ok so first ur gonna download a transparent png of the image u want and make sure u download it twice
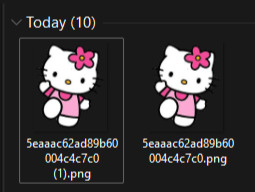
2. then make sure to rotate one of them however u want
3. then go on https://ezgif.com/maker and upload ur images (hold shift to select both) and hit upload
4. then select ur wanted delay time for this gif i selected 30 and make sure to check the "dont stack frames" box then click on "make a gif"
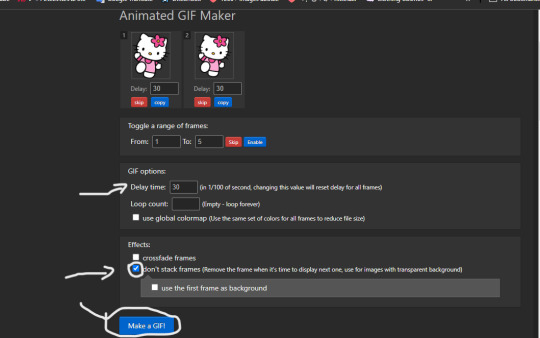
5. k n there u have it :3

btw mine looks weird bc the image was too small so i couldnt rotate properly anyways hope this helped! and again sorry for the delayed reply
im p sure u already learned how to do it by now but i still decided to post this incase u didnt and maybe someone else wants to learn :')
#hello kitty#sanrio#gif#tutorial#gif tutorial#asks#sanrio gif#png#transparent gifs#transparent png#pngs#rentry graphics#rentry resources#rentry stuff#rentry decor#rentry inspo#rentry pixels#rentry gif#rentry tutorial#carrd resources#pastel pink#cute#pink#pixel graphics
178 notes
·
View notes
Text

jelly text tutorial! (works with shapes as well)
what you need: ibis paint x, premium or free version doesnt matter
step 1: color
yes we're starting with color! I highly suggest using multiple colors for a prettier finish. I prefer parallel gradiation but as long as its blurry anything should look nice. pick analogous colors for the best result.

step 2: write the text or draw/import the shape.
as it says! if youre drawing it, make sure its on a new layer above the gradient! I suggest using rounder, bubblier fonts/shapes, one of my favorites to use is starborn on all uppercase. the color you use does not matter as it will be the background color in a short bit
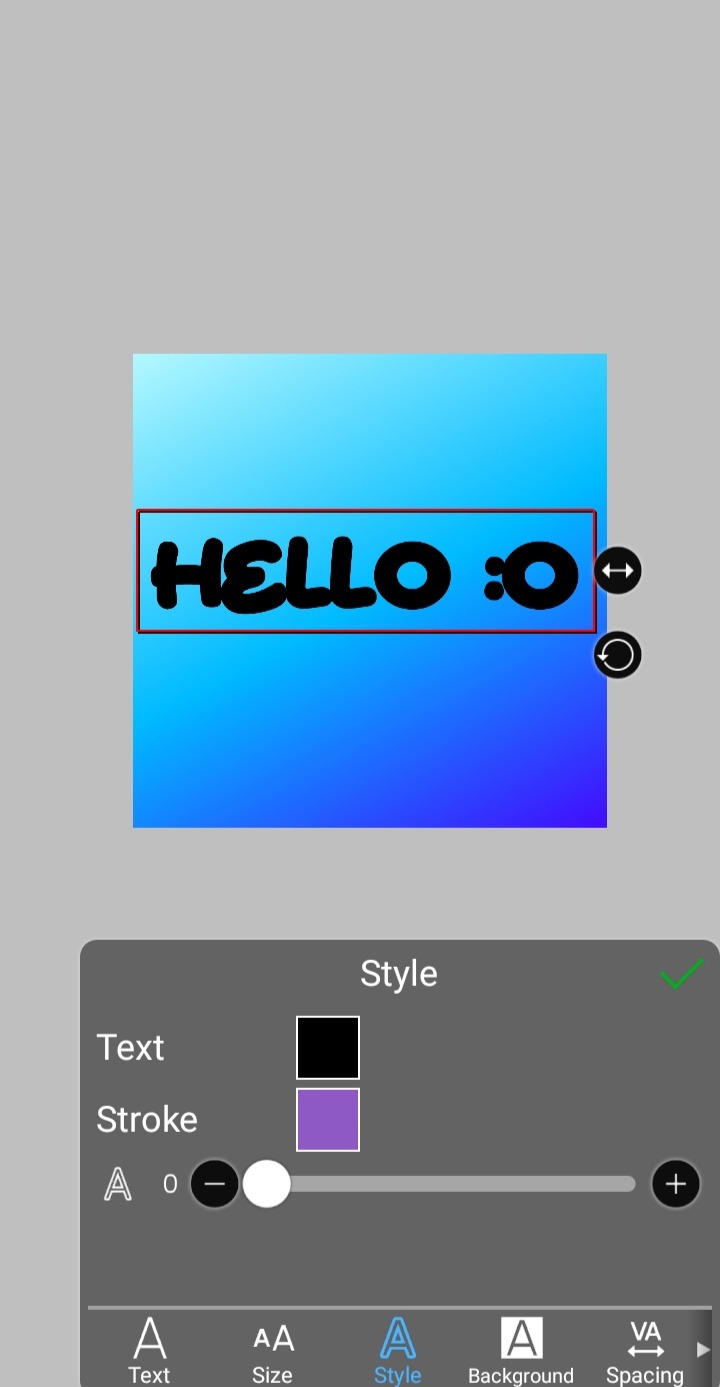
step 3, the jellificationing
this little friend called "water drop (rounded)" in effects under style is your best pal. its here to help you and make the process so much easier.
so just press it and fiddle around with it until you're happy with the result.
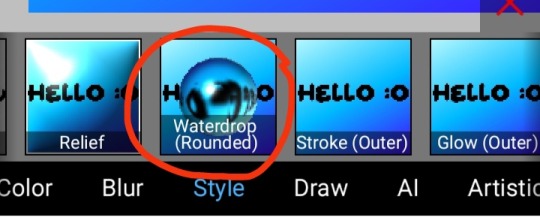
step 4 (optional): refracting
to help it make look more 'realistic' I tend to add another layer of the water drop. to do this I simply copy the previous one and go do the same effect on the top layer
step 4.5: tips
you need to make sure the refractive index for the second one is turned down all the way, or itll look weird, streaky, etc. make sure the highlight and highlight size settings are lower than the previous time you used this effect. and make sure the little sun symbol (the light source) is on the edge of the opposite direction of the previous time you used the effect. so if the first layer of jelliness had the light source coming from the top right, the second layer should br on the very edge of the bottom left.

step 5: begone, background
yeah, we're done with that, this will also be the big reveal of the final image

and then you just crop to fit and then save as a transparent
bam! heres the final thing!

I dont know how good I am at explaining but I hope this helped! if youre confused dont be afraid to ask!
#🌫️ i know what you dread | creations#rentry#rentry inspo#rentry resources#editing resources#editing#editing tutorial#edit tutorial#edit resources#rentry decor#rentry graphics#carrd resources#web graphics
602 notes
·
View notes
Text

𓆩♡𓆪 divider tutorial ˖˚
꒰ step one ꒱ ↳ first, find an image or two on a search engine or pinterest/something like it. it's best to use images with plain color (like white or black) backgrounds.
꒰ search terms to try ꒱ ↳ lace trim ↳ lace divider ↳ floral divider ↳ heart divider ↳ clouds divider ↳ bow/ribbon divider ↳ divider clip art
꒰ step two ꒱ ↳ either copy and paste the image or download and upload the image into remove.bg. use erase/restore as needed.
꒰ step three ꒱ ↳ you're done! pretty simple, right? good work \(^_^)/

#aesthetic dividers#tumblr dividers#post dividers#carrd dividers#divider packs#divider#page dividers#text dividers#cute dividers#tumblr layouts#divider tutorial#graphics tutorial#rentry tutorial#carrd tutorial
144 notes
·
View notes