#also i can see the game's maps now instead of just tilemaps
Text
what’s up my friends my followers my beloveds remember last year when i searched every corner of this virtual earth for signs of Shining Force Chronicles III and found absolutely nothing, barely a screenshot or two?
youtube
anyway today i was not looking for it. Here’s a channel with a full playthrough. enjoy.
#shining force#shining force chronicles 3#shining force final conflict#shining series#in defense of past me these uploads are from last year as well#maybe it takes a while for search engines to index this stuff? hell if i now nowadays#hilariously i was looking for shining force exa mobile on a whim#but since the title confuses searches anyway i just gave up and looked up 'shining force exa' in jp without any indication of mobile#and resigned myself to scroll past a lot of stuff#god i'm losing it. i know it's just the same game i know with graphics i've already seen but oooh my god#at least a recent upload gives me hope that one day exa will surface as well#also i can see the game's maps now instead of just tilemaps#they look very cute
4 notes
·
View notes
Text
Making of Deep Sea Settler
Download any play Deep Sea Settler from itch.io.
Comment on the game jam entry for Deep Sea Settler LDJAM.com.
Deep Sea Settler is a puzzle-ish colony builder made for Ludum dare 48. It's loosely inspired by Reus, Dorfromantik, and Solar Settlers by tumblr's own @brickroaddx. Based on the theme "deeper and deeper", you have to slowly build out your underwater colony by placing buildings in a hostile environment - without destroying said environment.
Day 1
I came up with two main game ideas for this theme: The first was a game about a submarine navigating in complete darkness based on sonar and dead reckoning. The second was an under-water colony builder with an ecological theme.
The first would either have looked really boring, with no visible environments, only 2D submarine controls and instruments, or it would have been too much work to mode the interior of a submarine and interesting underwater environments.
I decided to work on the colony builder, and to set it on a hexagonal grid. You start out just below sea level, and as you go on, the sea bed gets deeper and deeper, sunlight becomes scarce and pressure increases, so the game gets more difficult. (The depth and difficulty mechanic did not make it into the final game, but tiles of varying depth did.)
I started by working on the art and rendering code.

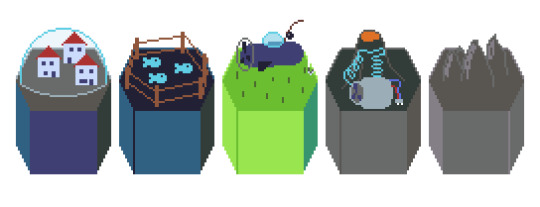
I made a simple renderer for infinite hex tilemaps (stored in a hash table), and drew some tiles. They all had a "base" or "depth" to them, allowing me to raise or lower them a bit without "floating" over the playing field. After seeing the tiles arranged like that, I decided to re-work the tile shape to allow for a better perspective when drawing tile contents, and I drew a bunch of tiles based on an ecological and "humorous" theme:
A fishing submarine with a fishing rod and a fish farm with fish fenced in in a 2D enclosure felt like the peak of humour to me at the time.
Day 2
I drew some graphics for UI elements and cursors, and started making the map clickable and interactive. For this, I repurposed the drawing code and the hex marker that shows the selected tile. After a broad-phase collision check, the game checks if the mouse is inside the drawn tile by checking a collision mask at the positions of nearby tiles, preferring the tile nearer to the "camera" if two or more overlap. This was easier to code than convex hex shape collisions, and allowed me to stay a bit more flexible with depth and overlapping tiles. At this point I was still thinking about making depth a more prominent mechanic, but the interaction with the map and judging of distances got a bit too difficult when tiles were occluded too much.
Then I added the wavy underwater effect. It took me way too long to add it, and although everybody tells me it's a bit too distracting, without it it's not clear that you are underwater, which is an important thing to convey at all times, because of the theme.
I drew some sprites for resources and tile products, but I was still unsure which should become which.
After playing around with different configurations, I decided to focus on just building, without a way to destroy built structures, and without "turns". There were discrete actions, but no "turns" and no way to pass time. There was also no way to accumulate resources over time. The only action was clicking on a tile and building, with instantaneous effects: Left-click a tile, select what to build, repeat.

This gave the way a much more puzzle-ish feel, that I really liked, but it also meshed with the "ecological" theme: Every action is irreversible, every tile is a precious resource, every decision is meaningful. Using a tile for building can cost you food or oxygen production. Expanding can destroy synergies between tiles.
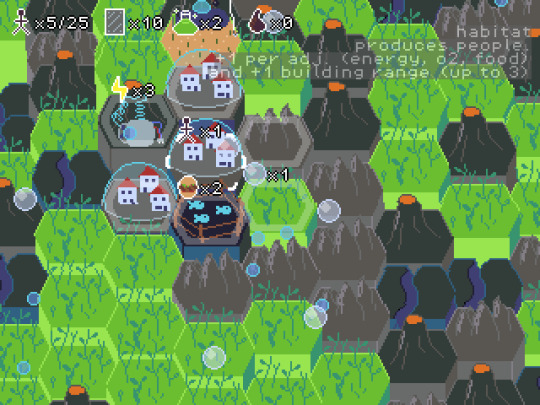
To make this more obvious, I added a UI that shows a tile's output when you hover your cursor over it.

Day 3
The game was "feature-complete" after the second day, but I felt a bit unhappy with the balancing and the UI. I took a third day and spent Monday evening adding mining tiles to make tile space more precious, and UI improvements like drawing the perimeter of the buildable area (instead of the range of the current habitant) when the cursor is outside of the buildable area.
The farms were too easy to build, and the power plants were too difficult, so I added power lines to distribute energy (at the expense of building over more tiles) and mining of rifts for science juice to build farms. This way, food, energy, and oxygen are more of a trade-off, and you can't just tile the world with farms, but you can upgrade some of your farms to undo your worst mistakes. If there are not enough volcanoes where you want to build, you can build power lines, but that will make habitat placement more difficult.
What Went Right
Scope: I am really happy with the tight focus of the game, but at the same time, this game mechanic has "legs". It would be easy enough to add more tile types, make the map bigger, and to increase the goal population in the future based on what I have now. But as it stands, it's an interesting game already. Adding more systems would have made it harder to balance, and I am glad I didn't add turns with actions per turn, or tiles that generate resources over time.
Art: For the most part, I stuck with the db32 palette, plus some transparent shades of those colours in the domes and bubbles. I don't think the tiles are as funny as I first intended, but they are distinctive and legible enough.
Balance: After playtesting the game for hours, it's really easy for me, but it's a decent challenge the first few times. Some of the difficulty stems from not knowing what tiles are available and the lack of undo, but it's replayable for some time without feeling "solved" even after you have internalised all the mechanics. None of the tiles is too abundant or too rare.
Game Design: The core loop is build habitat->connect food and energy->expand range->build habitat, but it's also possible to go back and increase the population of existing habitats by mining, upgrading farms and connecting more energy. In the endgame, the player can sometimes increase the population by densely packing the centre of the map with habitats after spreading on the map, and sometimes, it's the other way round. That gives this game a thinky, puzzle-ish feel.
Tile products follow the pattern [adjacent tiles->built tile->product->habitat], so that there are no loops. It goes kelp->fishing sub->food->habitat; rift->power plant (->power line optionally?)->energy->habitat; kelp forest->oxygen->habitat; farm->food->habitat. Evaluating the output of a tile is straightforward both for the computer and the player.
Theme: I tried to work in an ecological theme, where Oxygen is in short supply, built structures cannot be reverted into pristine nature, and tiles are an important resource. Players picked up on that.
What Went Wrong
Jam Theme: Unfortunately, the jam theme "deeper and deeper" got a bit lost in the process. The game was already difficult enough without making tile depth contribute to building costs, and complicated enough for a jam game without adding more mechanics. Making the terrain generation more extreme would have made tile adjacency hard to determine. I would have needed to use a 3D engine to make 3D game mechanics.
Tutorial: There is no in-game tutorial that introduces the tiles gradually. I added some text on the itch.io download page and the LDJAM submission, but that can easily be missed.
UI: The UI is too busy and the mechanics are not discoverable enough. Adding more things to the UI would make it busier, removing things would make it harder to see what's going on. The UI needs a complete overhaul if I add anything more.
Time: Looking back, I could have implemented all this and some more polish, animations, and sound effects within the time constraints of the compo, if I hadn't had anything else to do that weekend. I really wish I could have added some audio.
What I learned
Don't try making depth a mechanic thing in a 2D game if you can't rotate the camera and look behind things
Some users get annoyed by waves even if they don't get sea-sick
People call every visual effect a "shader", even if it doesn't use the GPU
Hexes are cool. Some games don't work on a square grid
My visual jokes are not as funny as I think they are
I can do LDJAM without feeling hungover and tired on Monday
Try not to accidentally take out the jam theme when cutting down the scope!
Download here: https://blubberquark.itch.io/deep-sea-settler
1 note
·
View note
Video
undefined
tumblr
Liquid Tiles and State Machines
Hello again! I got stuck in a rabbit hole, but I had fun.
One of the things I built is strictly less fun than the other, so I'll lead with it even though it's not what you wanted. The other is the pretty video above.
State Machines
TL;DR: See https://www.npmjs.com/package/@browndragon/sm .
I got annoyed that the big state machines in javascript were too verbose for what I wanted, so I wrote my own. I think I've already written this post, but this time it's even better.
Each "state" (inconsistently called a node) is a function that returns another node. You load some initial node up in a state machine (here called Cursor). The Cursor invokes its current node whenever you call next (and whatever it returns is the next node). However! It's invoked in the context of the Cursor itself, so you get some interesting bells and whistles automatically: this.here is the current node, for instance -- normally it's hard to get access to that in javascript, but not so here. Since they're each function objects, they're less prone to object equality stupidity of certain sorts, and more prone to it of other sorts. There is no method to predeclare the set of states that exist, so your states can create states (by returning inner functions for instance). These are all features I thought I'd need ;).
You can write nodes that assume they're useful for their side effects, or nodes that assume you'll examine the state machine's here. Cursors implement the iterable & iterator interfaces, so you can use them in loops and such also.
However, for more power you need the full Machine (which extends Cursor). This does things like track state for every node (which is why the nodes are not called states...), with advanced features like history, traps (so that if a node returns undefined it can be rebound to actually go to handleUndefined()), and similar. This makes them O(n) in the number of nodes (and indeed, O(n) in the number of calls to next), but sometimes that's the featureset you need!
Give it a try. Or don't!
Liquid Tiles
TL;DR: The demo above, but the code isn't published anywhere [yet].
I kept playing with dough connected by springs, but I think I'd need to do tile deformation or shader tricks to make the dough look good. As written, the arbitrary offsets allowed glue tiles to shift, leaving gaps. Ensuring coverage would require stretching the tiles or having additional backing color. Or: a change in scheme.
Dough is just a really thick liquid, right? (Over a long enough timescale, aren't all solids?) So how would I model a liquid? I might do it with freely chosen blocks connected by links (the current dough system), but that would likely be too chaotic. Instead, I'd probably split the liquid up into regular domains and analyze each domain. So I did that! Liquid tiles are the result, a system similar-to but different-from phaser Tilemaps, but providing a similar grid-based interface to the world.
First, the data structure
I'm continuously at a loss for high quality datastructures, so instead I write my own low-quality ones. I needed a store of tile information -- unindexed integer 2-tuple keys, arbitrary1 values. Easy enough; I wrote a dense one which uses an allocated array of fixed size (so that array[y*width+x] is the value for (x,y)) and a sparse one which uses fully arbitrary (x,y) pairs and stores points under their stringification. As I write this, I realize that these data structures are not so very different in javascript, where arrays can arbitrarily allocate keys, but what's done is done.
I called the keys in this datastructure x,y tuples, but that's not entirely true: they're really u,v tuples; I wrote a little tilemath class to hold the geometry for mapping between an XY space (like phaser) into the UV space of the tiles (like the tilemap indices) and vice-versa. I am pretty sure it still has some ugly edge effects (tiles do nothing to fix the default anchor(0.5, 0.5), potentially favoring the top/left sides! etc), but it's functional by visual test. The naming scheme (xy space vs uv space) provides very sensible method names -- u(x) is pretty unambiguous. There's no obvious uv analogue to width and height, so I settled for uCount and vCount, which is what it is.
Second, a dip in the Pool
Obviously, we need a Pool of tiles (where tiles are just managed instances of Image, Sprite, or subclasses). A Pool is obviously a Group2, providing mechanisms to manipulate its managed contents -- putTileAt and removeTileAt for instance. But then the next question: what are you putting in these tiles; how are you passing the grid-based information which you need to pass to them into them? I say that Tilemap got this right, you're passing them a tileId (whatever your arbitrary first parameter to putTileAt is); I say that Tilemap got this wrong in that it knew that tileIds were lookups into arrays which were preregistered along with spritesheet geometry etc.
Everything else: mappings and shadows
Anyway: I created Conformers to address the problem of how to map tileId onto actual asset. Conformers are functions which take a tile entry (a gameObject, uv coordinates, tileId, maybe other stuff) and makes the game object conform with the other parameters. A simple one can setFrame(someTexture, someFrame) by just looking the tileId up in a big array; a more complex one might play(someAnimation) or do wangId calculations or whatever. This is also a great place to put state transition logic, since you can detect whether this conformation is a change from a previous state, or a put for a state that the tile was already in.
Okay! Now we're ready: since I know I want this to follow dough blobs around, and the doughblobs are acted upon by the rest of the physics system, I needed some ability to have a sprite "cast" an effect into the dough tile system. I called this a ShadowPool (which extends Pool extends AutoGroup extends Group). Every element of the shadow pool's WatchGroup casts a shadow into the pool made of tileIds; each tile's tileId the bitwise or of its place within the element's boundary (so for instance the upper left corner of an element's boundary is 0b0010, the bit for the lower right corner set.) That, at long last, is what the video above is showing, with fancy transition effects.
Next?
The animation of specific dough elements remains tricky; doughjiggle is still going to look bad under this new quantized regime, even as the interior of the dough looks better. But now I can emulate slugs, and spilled paint, and footprints, and other mass nouns without feeling like I've got to pay the cost of a full tilemap. Indeed, since tilemap layers render in one pass, using a pool even for walls might let me do the fabled "figure in front of bush & behind tree" 3/4 view I've been after this whole time. Certainly the ability to "layer" collisions by material type is very valuable to me, and missing from the current tilemap classes.
I'm now imagining a hybrid scheme: dough is drawn as nodules (free moving spheres of dough with weakly drawn borders) on top of a ShadowPool which draws the base of the nodule, thus the outline of the dough group (wang tiles with strongly drawn borders). Dough regions which quiesce could remove the nodule and mark the tiles from the shadow pool as "permanent", so that they can take over the nodule's mass. Animating the movement of the base can add more detail to this, since it can theoretically hide the quantization by masking portions of the tile and sliding it out in the (known!) direction of change. For instance, if the tile had been undefined and now has the bottom right set, it is clearly sliding in from the bottom right. This will cause slightly strange initial effects (of course), but edge effects are to be expected.
Fast moving dough would be represented as nodules (large borders). Slow speed dough would be thin-border nodules on top of a ShadowPool, sticking-and-unsticking the dough and an unstable equilibrium. Stopped dough would be pure ShadowPool entries. Dough spring would be provided via interaction with the shadowpool.
I mean, arbitrary at first. Obviously they're gonna be tiles. ↩︎
As an implementation note, each Pool is actually a singleton group; that's just more convenient to my way of thinking about these things. ↩︎
0 notes
Text
devlog # 6 // hex tilemaps and pathfinding, part 5 (refining pathfinding features)
so, if you can’t tell, i’m absolutely in love with development right now, been typing away for days and days. :’)

mainly, since the last devlog, i’ve spent my time doing two things:
- organising and backing up my development process
- refining the pathfinding system’s features
starting with that first point, once my project files and code started getting to be more than a few lines, i quickly realised that i would need to take some time to start keeping everything even more in order.
i came across trello, a tool where you can make and sort tasks to keep track of what’s going on in your project. currently, this is all entered manually, but i did notice they have a thousand features and other apps and things to take your task-keeping further. right now, i am satisfied and very much served by these simple lists. instead of countless, nondescript notes and word documents on my computer - “rpg notes”, “rpg devlog”, “devlog notes”, “game design”, “game design b”, “design notes”, etc - i keep all of my to-dos in one place.

i also started using github (for unity) to keep changelogs and backups of all of my project files. this is something i had been especially thinking of as the files grew larger and larger, given that if i lost my progress, even though i could definitely put things back together (and perhaps more neatly the second time?), it would definitely throw off my motivation.
it only took a few minutes to set up a github repository(?) and install the associated plugin for unity, though i do not feel at all that i understand how this all really works - for now, the point is that i’ve got a consistent, easy way of tracking changes in my files and making sure i don’t lose them.

okay, now for what we’re really here for: the game, and its pathfinding system(s). what i’m not going to do in this devlog is explain every detail of how i’ve put things together; what i will do is explain (a) what i put together, (b) the patterns and resources i worked from, and (c) some of the challenges that came up throughout. there’s going to be lots of pictures today!
last time, we got to pathfinding in the sense that the game was able to identify the quickest route from our source position to a target tile position, then draw debug lines along that route. in the few days since then, i’ve complicated the system quite a lot.
firstly, i made changes so that the tiles actually have movement costs. i did this by creating a method that would take in the coordinates of a tile, then return its cost.
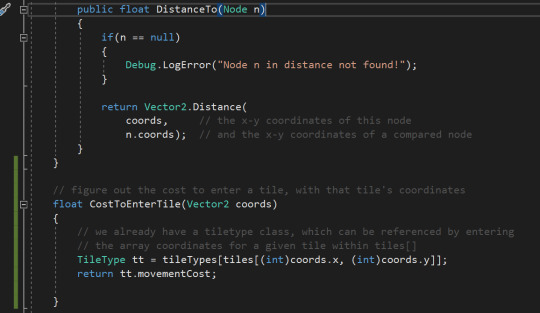
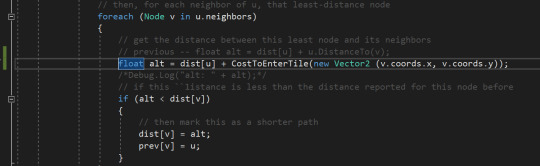
next, we needed to actually put this cost into the algorithm, so instead of the dist, i put in the CostToEnterTile - this piece of pathfinding might look familiar! (i actually ended up putting the distance back into the equation as well, not shown in this image.)
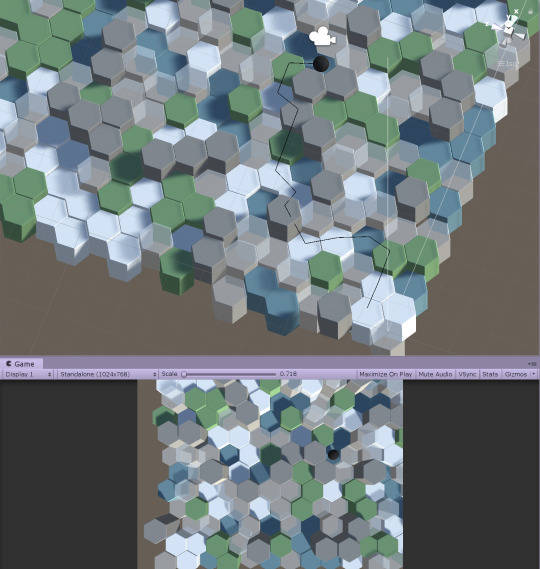
after manually defining the movement cost values for each tileType in the inspector, the game looked like this:
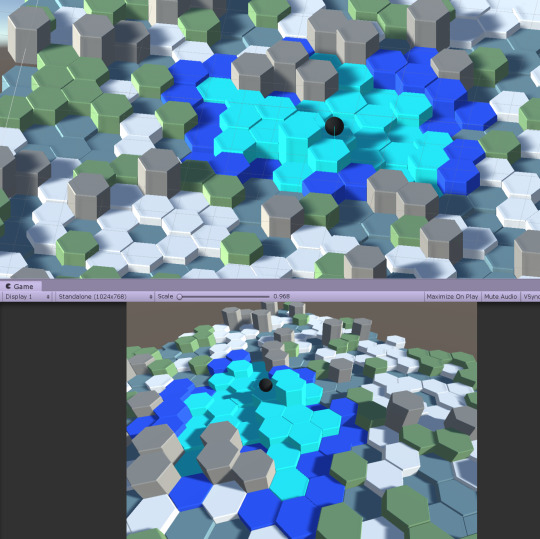
notice how the pathfinding is avoiding grey tiles, and somewhat the blue ones? this is not the “shortest” path, but it is the one that costs the player the least movement (which is what we want)!
next, i put in a method i imagined would be helpful - something called upon Start that would take a unit’s position, figure out if there was a hex below (via raycast), and then take on that hex’s position and array coordinates. for a reason i cannot explain, this works only on this exact player object - not even on copies - and it works about 85% of the time. :’) i don’t understand why at all, and i’ve pored over this code (and updated it) for hours. if you see why this code isn’t working how i intend, please let me know!
this is what it looks like when it does work (player was originally just vaguely, randomly over a tile and is now centered on that tile, internally storing a reference to its coordinates):

and whoa! the tiles are at different heights?
well, yes, because i created something for each tileType called the “height offset range”. this data is used when first instantiating all the hexes. brings a ton more depth into the level. lesgoooo unity 3d!

with this, the tiles start to look more like environmental terrain. it becomes more apparent that the pathfinding is very much avoiding certain tiles.
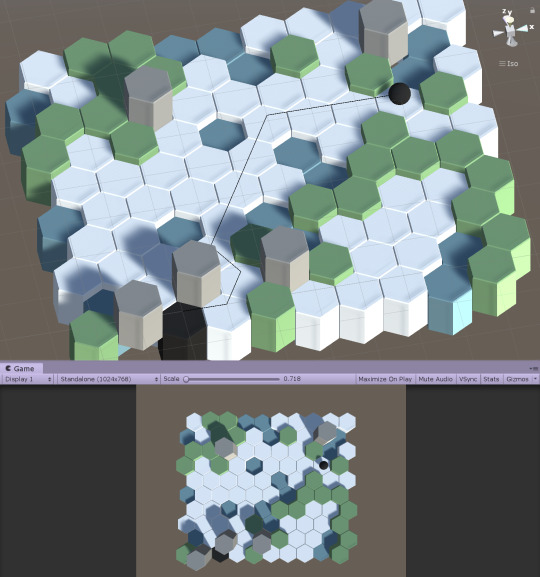
this is just one of many changes i want to implement that will allow the game to generate interesting levels, procedurally, with almost no effort.
check out this “randomly” generated level, which has a more island-y feel, with the increased water tiles.

this was created by altering only 3 or so values, representing the proportions of a given tileType’s likelihood to be the one chosen when a hex is instantiated. (i want to soon move all of these variables into something editable from the inspector, so everything can be easily adjusted from inside unity, not from digging in the code.)
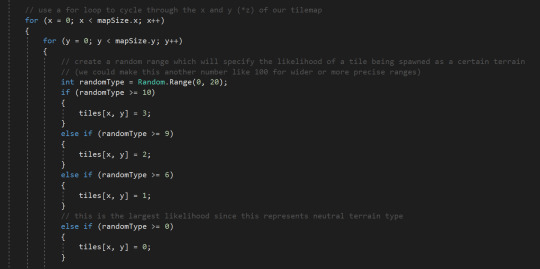
if i alter these few values again (notice below that i only change the 10, 9, and 6), we start generating levels that have quite a different feeling to them, something more rocky.


i even created another tileType (called “null”) which cannot be targeted or walked on. this creates an effect that looks like there are spaces cut out of the map.

it may seem like “well, of course, the pathfinding won’t go along these tiles if they don’t exist”, but they actually do exist; the pathfinding is recognising them and choosing against them. here is the same image as above, but with the null hexes changed to a visible/glassy material.
then, it felt like time to jump more into the code again and figure out how to not just calculate paths, but to actually use them to move the character. again, with insights from quill’s tutorial, i set up some code that would move the unit along the found path, guiding them to a specific “destination”, waiting for them to get close, then moving to the next piece as the next destination. cool shit that i definitely didn’t figure out alone.

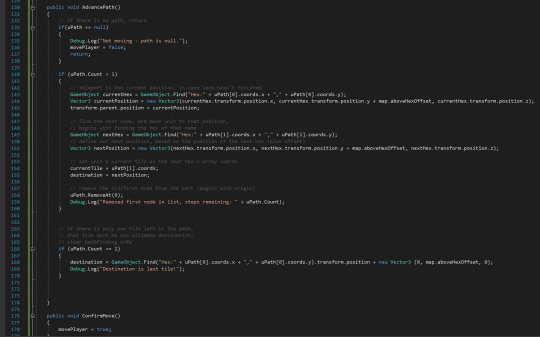
after putting in some debugs (thanks to my virgo), we get a very satisfying list of steps the pathfinding went through to move the player, and our first visual..


! ! !
there remains only one thing to be done, from the two goals i defined for the pathfinding system. one was to be able to find a path and move a character there (which we just did), and the other was .. to highlight possible move spaces? how the fu--
welp, long story short, i panicked a bit because the few guides/tutorials i was finding were v e r y math and big, conceptual engineering (at least that’s how they felt). and when i found what felt like a more accessible tutorial that showed someone using pathfinding for this purpose (highlighting possible movement tiles), their implementation didn’t seem immediately like something i could integrate alongside what i had. i watched a bit, got frustrated and overwhelmed, then decided to relax, ease my mind .. which led me to this video lol? an mit talk about graph theory and breadth first search.
somehow, i found it comforting to just explore the concept without thinking of how to apply it immediately. i was just seeking to understand. and understand i did. right before i went to bed, i decided to write out - from this understanding - what kind of lists, variables, states, methods i would need to get this working. i set it aside, and went to sleep. and when i woke up the next day, this morning, this is what i did.
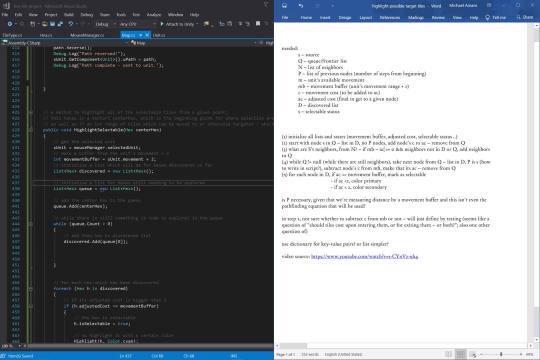
i translated what i had understood directly into new lists, variables, and the like - things i understood. and for the first time on this scale, i was doing this entirely freehand, without any tutorial. and i wrote for the code to do this when the the player was clicked on:
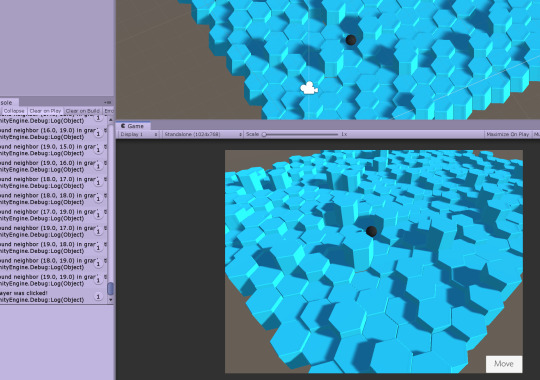
not so impressive? what about this?
that looks like what i asked for!
the only difference between the two is that, in the second implementation of this algorithm, rather than cycling through all of the hexes, i ask the search to stop at a certain point -- something i’m currently calling the movement buffer.
from the game’s movement rules, a player can not only attempt to move within a character’s movement range, but can also exert the player to try to push to a further tile; this has the consequence of the character hurting or overly fatiguing themself, if they do not make a high enough roll to move that amount. that’s what this image shows: the light blue represents the player’s movement, and the darker blue represents those exert/can-try-but-it’s-risky tiles.
i also took care of some other helpful, necessary features (can only select within the highlighted tiles, deselecting the unit will return tiles to their original colors, etc), also free-hand, just by applying the little pieces i know into a greater whole.

i have never felt more confident in my own programming ability; i define goals for my work, i research, i think through them, and then am able to create and refine the code that follows. with that massive update, i will temporarily be pausing on any pathfinding for a while (as both of the goals we defined have been completed!), and looking to other areas to explore.

thank you for joining me on this journey so far. <3 in the next days, i’ll mostly be looking into visuals - shader maths, animation, modeling - trying to get things looking pretty. most likely will be implementing a character stats UI, as well. see you in the next devlog (or find and chat with me on twitter.com/michaelinwords)!
with love and an ever-growing to-do list,
ahn
#dev#gamedev#indie games#indie developer#indie development#game development#art#shaders#math#animation#modeling#ui#character#rpg#turn-based rpg#final fantasy tactics#hex tiles#hex-based#grid#magic#fantasy#graph theory#pathfinding#engineering#mathematics#computer science#unity#unity3d
0 notes
Text
Devlog - 24.02.17
(Cross posted from https://triple.aye.net)
Oops, I missed a week and the devlog is late. Sorry! Game Dev and all that. Shipping late’s what we do…
I put off posting as I was hopeful that I’d have something nice to show, but things haven’t quite worked out as planned:
Next Game
I added a damage effect – the “damage beans” – on the screen edges to indicate that the player’s been hurt. It’s a simple post-process overlay, but with a normal map added you get a nice distortion of the screen as it fades in and out. Standard stuff for the most part. Except I have two versions, one that’s a blood-splat, and one that’s a nice high-res picture of actual baked beans. :D
I’ve also had a quick play with the audio system in UE4. My natural inclination is to integrate FMOD, but I’m hearing from fellow developers on Mastodon that UE4’s system is pretty good, and from the quick tests it might well be. Audio attenuation and geometry occlusion definite seem to work, which could be enough for what I need.
But for the last 10 days or so I’ve been playing around with look and feel tests.
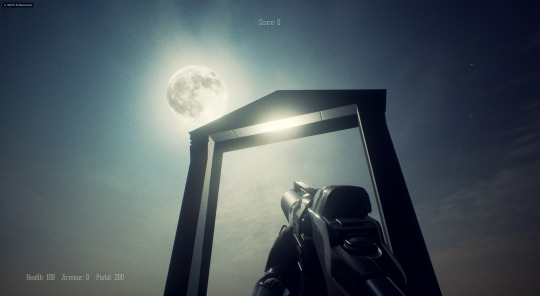
This skybox got me into a lot of trouble.
My intention with Next Game is to do everything quite low-poly and avoid as much texturing as possible. One reason for that is to look different, but texturing and modelling take time, and time/money aren’t something that I have a lot of. If I have to get into texturing then I’d probably go for something old-school, like Gibhard or Strafe, but for obvious reasons I’d like to avoid that. I think every man and his dog will be doing that style in a year or two…
Unfortunately having a super realistic skybox lead me down a path where geometry got a bit too complex, and things rapidly looked incongruous when flat-shaded with high quality lighting. Basically, I couldn’t get it to look good unless it was extremely high-contrast. Which was unplayable. Although, I did spend a day flirting with an entirely black-and-white grading that I might go back to for some levels.
Anyway, I’ve thrown away all that work. All the geometry modelled so far, the test level, the greybox, all the materials and all the textures. That stung a bit.
This week I started again, but from a better footing: I chose a nice, harmonious, palette, and put a simple gradient in the sky-box. The palette is very limited: four base colours, four shades of each colour, and a gradient from top to bottom of each colour. I will most likely add to that over time, but for now this is working well.
UV-unwrapping can be done extremely quickly. Anything single colour can just be atlas unwrapped and pushed over the appropriate shade in the texture, while things with gradients just need a little more attention to align them properly over the gradient. Because the palette is fixed, everything sits in the scene, and with some lightmass settings tweaked I’m getting really rich colour gradients, colour bounces being picked up and deep shadows. It looks better, basically. It’s also super colourful, to the point of being cartoony – far too much for this game – but I find it easier to turn everything up to 11 and then slowly dial it in over time. (Early screenshots of Lumo are practically black because I was shooting for a Scooby-Doo vibe. The final game looks nothing like it…)
What needs sorting out now is the correct scale for things. My character moves extremely quickly, and rocket jumps go for miles. This will take a bit of two-and-fro, but that’s next week’s mission. At the minute everything’s a little too big but I find it quite endearing.
Iterate, iterate.
Neutrino
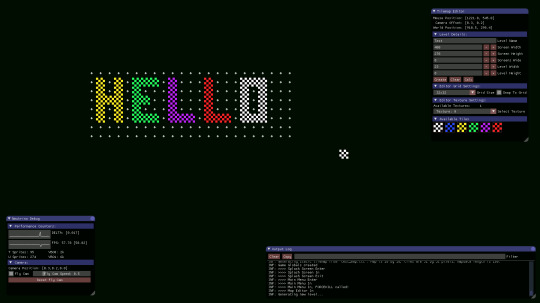
Still train-coding my way through this and the big news is, the tile map editor that I said I’d never write is basically done. It’s missing the ability to create re-usable brushes from placed tiles, so I might go back and add that at some point, but bar some tidying up and deciding on the save format it’s doing what I’ll need. This throw up a couple of interesting things.
I was about to delve into the murk of C’s directory and file-handling, which is annoyingly different depending on the platform, but decided to have a quick search through Github to see what was already out there, and came across this little gem: Tinydir, works brilliantly.
While testing the tilemap editor I thought I’d throw in some massive numbers to see how it performed. Turns out things started crawling pretty quickly, which was er, a shock. After pushing it through Richard Mitton’s Very Sleepy the hot spot seemed to be in how I’m populating the VBOs, which again, was a bit of a surprise. This was supposed to be an optimised version of what I’d written a few years back on iOS…
For some reason I was only getting ~8k sprites per frame. I was expecting quite a few more. The culprit was this line:
mTransform = mTranslate * mRotation * mScale;
Pretty standard stuff, this is just creating the translation matrix which I’m pushing all my vertices through before copying the result into the VBO. (Yes, at some point I should just do all that into the shader…) I’ve done this before and had much better performance, except then I was using my own math class, and this time I’m using OpenGL Math. I figured it’d be better to pass off the optimisation and maintenance of my maths stuff to, well, people that know some maths.
So I dug into the operator * overload:
GLM_FUNC_QUALIFIER tmat4x4<T, P> operator*(tmat4x4<T, P> const & m1, tmat4x4<T, P> const & m2) { typename tmat4x4<T, P>::col_type const SrcA0 = m1[0]; typename tmat4x4<T, P>::col_type const SrcA1 = m1[1]; typename tmat4x4<T, P>::col_type const SrcA2 = m1[2]; typename tmat4x4<T, P>::col_type const SrcA3 = m1[3]; typename tmat4x4<T, P>::col_type const SrcB0 = m2[0]; typename tmat4x4<T, P>::col_type const SrcB1 = m2[1]; typename tmat4x4<T, P>::col_type const SrcB2 = m2[2]; typename tmat4x4<T, P>::col_type const SrcB3 = m2[3]; tmat4x4<T, P> Result(uninitialize); Result[0] = SrcA0 * SrcB0[0] + SrcA1 * SrcB0[1] + SrcA2 * SrcB0[2] + SrcA3 * SrcB0[3]; Result[1] = SrcA0 * SrcB1[0] + SrcA1 * SrcB1[1] + SrcA2 * SrcB1[2] + SrcA3 * SrcB1[3]; Result[2] = SrcA0 * SrcB2[0] + SrcA1 * SrcB2[1] + SrcA2 * SrcB2[2] + SrcA3 * SrcB2[3]; Result[3] = SrcA0 * SrcB3[0] + SrcA1 * SrcB3[1] + SrcA2 * SrcB3[2] + SrcA3 * SrcB3[3]; return Result; }
Ow. That’s creating a lot of vec4 variables over the course of a few thousand sprites.
I admit, I’m learning GLM as I go, and maybe there’re some functions to do mat4 multiplications in place but the docs make my nose bleed, and to be honest I couldn’t be arsed to trawl through it all.
So instead of using a glm::mat4, my matrix is now a simple array, allocated at the start of the function, that only contains the scale and rotation. I can push the sprite corners through this and add the translation, and remove a lot of obviously zero multiplications from the process.
vBL.x = (vBL_Pos->x * s_mTransMat[0]) + (vBL_Pos->y * s_mTransMat[1]) + vPos->x; vBL.y = (vBL_Pos->y * s_mTransMat[3]) + (vBL_Pos->y * s_mTransMat[4]) + vPos->y; vBL.z = vPos->z; etc. etc.
This is fine for 2D stuff, which is all I intend to use this engine for.
And the result? About a 15x speed-up. In fact, I get exactly the same number of sprites out of a single thread on my X1 laptop, as I do on my big fat devrig: ~150k @ 60fps.
I’ll probably look to multi-thread this once the physics engine and fmod have been integrated, but for now it’s more than good enough for a little shoot-em-up.
The moral of the story: Future Gareth, you should probably look into how to use GLM properly.
2 notes
·
View notes
Text
devlog # 5 // hex tilemaps and pathfinding, part 4 (concept + integration of paths)
it’s the big day - we’re going to be implementing a pathfinding system, one way or another. this is going to be a long one.
to start with, not all pathfinding is equal – some pathfinding systems excel in certain areas and struggle in others. it might be helpful to reflect before starting on what kinds of pathfinding will be suited to the different use cases i have in mind.
so, what am i using pathfinding for in the first place?
well, mainly, i’ll need it for (a) highlighting regions where the character could possibly move, showing those predictions, and (b) locating an optimal path to a chosen tile.

in both cases, i’ll need the system to take into account different terrain costs (moving more slowly through water, mud) and heights (for example, a steep cliff face) that will limit how much the player can move in these regions.
i may also need to implement both two-layer levels (things with roofs, or where you can go under/inside) and high one-layer levels (things without any roof, but just dramatic changes in height) – this is not a primary concern, however, and i expect solutions will become more apparent as i understand my own implementation of the pathfinding.
okay, so, now that we understand what kinds of needs there are for this game, what kinds of pathfinding systems are available?
in this introduction to a* algorithms (what i’ll be merging with another tutorial to try to craft a system that matches our needs), we find a very insightful exploration of how pathfinding works.
the basics of each of the systems to follow is that we (as i understand it so far – you should read the tutorial, yourself, since it has really great visuals/graphs):
(1) make a “frontier” list, an expanding ring of tiles to be considered
(2) make a “visited” list that will keep track of tiles we have considered
(3) remove our starting tile from the frontier list, add it to the visited list, then add its neighbors/every touching tile that hasn’t been visited to the frontier list
(4) repeat step 3 for the next tile in the frontier list: remove it from the frontier, add it to visited, and add its neighbors to the frontier, recursively expanding the ring until we have filled all of the map area
this loop so far seems to be called “breadth first search”, an algorithm pattern that just expands and visits every tile.
we can sharpen these algorithms further if we implement code to:
(5) keep track of where we “came from” for each tile and
(6) set a target (early exit) – do a check when visiting tiles to see if that tile is the destination tile; if so, we can exit the loop and report back “came from” to construct a path between our origin and destination
(7) introduce movement costs, numbers we define (maybe 1 for plains/neutral terrain, but 2 for water and 3 for mud), and sort our next-to-be-checked/frontier list by priority of lowest cost (meaning we’ll look for the easiest paths before the harder, more expensive ones); at this point, the pattern is often called “dijkstra’s algorithm” or “uniform cost search” (this will always return the shortest path, but might be relatively slow to find it), OR
(7b) sort the frontier list by a priority of distance, choosing to check what’s closest to the target first; called “greedy best first search” (fast, but unfortunately, this doesn’t always return the shortest path – read the introduction to understand why)
and lastly, we can:
(8) combine both priority queues, sorting our frontier by comparing both movement costs AND closeness to the goal/final tile
with step 8, we construct something that is known as a* pathfinding – the most common and seemingly most competent choice for most pathfinding needs.

[image source here]
thus, returning to our needs, for (a) highlighting regions where the character could possibly move, showing those predictions, and (b) locating an optimal path to a chosen tile, a* seems like it can fulfill both roles. we might find it ideal to implement a simpler dijkstra’s algorithm for (a) in order for the pathfinding to be more performant (not as computationally demanding) – why?
because if we are showing highlighted regions for where characters can possibly move, we might choose to do so in realtime/by just hovering over a character. with this being updated so rapidly, it might save some performance to use a system that is doing less calculating. however, there are also other ways to approach this (such as only running the algorithm when the character is first hovered over, not constantly), so it’s just something to consider. most likely, we will only need to run pathfinding once or twice during a player’s movement phase, meaning the computational load should be minimal. let’s get something working and then we’ll optimise at a later point, considering ways to write more efficient code along the way!

oof that was a lot of technical info. let’s get into writing some actual code now. i’ll be following along with this excellent tutorial series and connecting quill’s implementation with the patterns and needs we’ve explored above.
lesgoooooooooooooooooo!
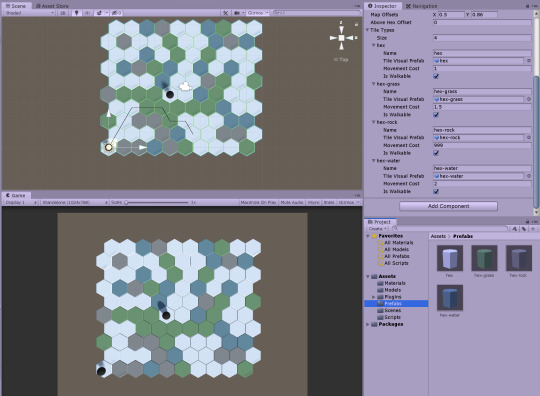
so, one of the first things i did was create a TileType class which keeps track of .. well, tile types. the types of terrain available in the game. this holds a name for the terrain type, a visual prefab of the hex (different colors, materials, etc), and – soon – things like movement cost; in the future, we can easily plug in different materials or different models that more fully represent the terrain.

in addition, i implemented random ranges for terrain types, right before instantiating (putting the hexes in the world), so that there would be variation in the tiles each time they are generated (in the future, i’ll likely do this with a sort of noise to create more artistic distribution).

this automatically creates a more interesting field of tiles. (i’ve also changed our player colors to not be clashing with the new tile colors)

two things pop into my mind here. first, it would be really nice to convert our tile types into enums somehow so that we can reference the terrain types by name OR number. secondly, i also notice that now, if we click to toggle on a hex (when no unit is selected), we will color them black and then white, erasing their original color. maybe we should be storing this information somewhere? this is something to do soon, but for now, let’s keep with the task of pathfinding.
the next major task was to build a graph of nodes (tiles), something which we will not see, visually, but which the computer will need in order to understand how all the hexes relate to each other - this is also why we set up to define which tiles are neighbors, i.e. adjacent / touching each other.

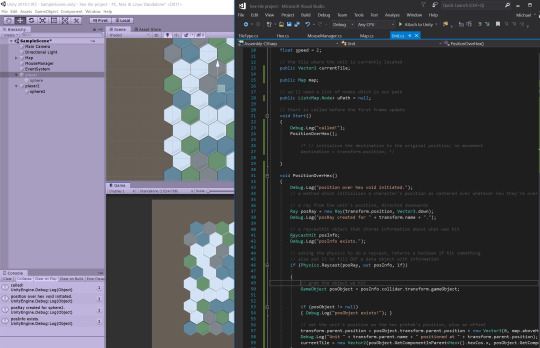
ran into a pretty tough bug when we started adding neighbors to node lists; it took me about 20 minutes to realise we hadn’t initialised the nodes before adding to them (so they were showing up null). this also happened because i am not completely understanding lists and custom classes (our nodes) and such yet, but i am excited that i knew enough about debugging and how to go through each line to identify what the problem was!


once this was sorted, this meant that (theoretically) we had a graph of nodes that contained all of our tilespace, and also were listing data for each tile’s neighbors - you can see an example of conditional/constraint code i used to identify where a neighbor should be.
from here, we are now able to move to the next steps of the pathfinding pattern: i create a list to hold frontier nodes and a list to hold nodes we have not yet explored. then, the big boy math.
i am not going to go through explaining each line, but i assure you that i followed the steps i listed above (again, you can find very complete information on this pattern in this a* introductory tutorial):
(1) make a “frontier” list, (2) make a “visited” list, (3) remove starting tile from frontier list, add it to visited, add its unvisited neighbors to the frontier, (4) repeat step 3 for the next tile in the frontier list, recursively expanding the ring, (5) keep track of where we “came from” for each tile, and (6) set a target; upon finding, exit the loop and report a reversed “came from” list to construct a path between our origin and destination
here’s some of how i implemented that scary math and logic code, for if you like to torture yourself :’) with so much thanks to quill and their amazing channel for making these maths more accessible.


now, once i had followed quill’s tutorial through these 6 steps, customising things as needed to align with how i had already implemented the rest of my assets/scripts, i was so thrilled to check out how our pathfinding looked!
after coding for hours and being entirely ready to enjoy the fruits of my labor, i immediately got a set of errors, the kind that won’t even let the program start. :(
at first this really shook me because i thought i had followed the tutorial pretty intently, so i felt it was likely something i had chosen to change in the process. and how would i ever find what it was, among hundreds of lines of code i barely understood? i had put in the “returned without route” debug message just for thoroughness’s sake, not at all expecting to ever see it. i felt immediately that this revealed what a fraud of a developer i am - that this was confirmation of exactly what i had feared for years, what kept me away from this project: that i was actually incompetent, not capable of this. a lot of hurtful self talk started right away.
and i checked that right away.
i remembered that this was just one of many things i had made across the years, and because i had chosen to trust myself along the way, i would not stop trusting myself now - every change i had put into the code had been purposeful, intentional, and i could rely on that it was doing what i had asked it to do. instead of remaining hurt, i would devote all of that frustration and disappointment and surprise to sorting this out, the same way i had with a million other projects.
i explored the code for hours, placing debugs along the process to clarify exactly what was happening at each step, which things completed and which didn’t.. eventually (among numerous other debugging efforts), i put in a few lines to color a given tile’s neighbors cyan, to make it clear if all the neighbors were being calculated properly. and immediately, it was clear they weren’t – so back to the code where we define how to find neighbors.

if the neighbors aren’t being calculated properly, that’s surely something that would mess up pathfinding, right?
i went through each line of code and adjusted the logic until each of the tiles i clicked show accurate neighbors in cyan.

yay! well, not yet. the way i had implemented this looked accurate, visually, but the underlying code later showed that there were extra neighbors being calculated (and some still missing?) along the edges. after another tiny meltdown and taking the night to breathe, rest, i implemented code that would tell me exactly how many neighbors each tile was reporting. and because i didn’t understand the math’s logic fully, i decided to do what i did know how to do: count. i went through and, checking tile to tile, explored exactly what was leading to mistaken or missing neighbors. it turned out to be that i hadn’t appropriately accounted for the (1) edge tiles, where x == 0 or the y is max, putting the tile at the top of the map, and (2) alternating offsets depending on whether rows were even or odd, how each column of the map snakes back and forth (in other words, adding 1 to y sometimes means putting a hex on the top left, and sometimes it’s on the top right).

solved!
actually, not yet.

back to the code! i went line by line, continuing to add Debug.Log reports at any major step of the process:
what’s our destination tile? “destination tile is...”
did we send this tile and a pathfinding call? “path call sent to map!”
did the map receive it? “path initiated in map.”
what’s our source? our target ..? and so on.
each step through this process helped me understand much more deeply, as i began to feel i was really grasping how and why the code worked (or didn’t work). eventually, i thought: if the code is no longer showing any problems in logic, maybe there are typos? so, i compared my code to quill’s open source files from their website. scanning, scanning .. found something!
an issue in scope. i had defined certain methods within loops, where they needed to be outside - and some were outside when they needed to be inside. a few curly braces later..

B A D A B I N G
B A D A B O O M
“Path complete - sent to unit.”
it works, and it makes sense why it works!
this little black line seems so small, but it represents that the game understands how to navigate basic pathfinding through the hexes -- something i have dreamed of being able to do for years.


and with that, i am going to rest in the beautiful feeling which is trusting myself, knowing there’s no reason i can’t do exactly what i dream of - that the difference between “i don’t know how to” and “i very much know how to” is just whether i’ve devoted the time or not.
in the next devlog, i’ll work on implementing movement costs/further heuristics to make the pathfinding even smarter, then tidy everything up aaaaaand.. whatever else i feel like. until then,
with love and certainty that i am indeed a developer,
ahn
#unity#unity3d#gamedev#game development#game design#indie#indiedev#indie development#indie developer#pathfinding#final fantasy tactics#hexes#turn-based
0 notes
Text
devlog #3 // hex tilemaps and pathfinding, part 2 (setting up a procedural map)
okay. procedural map generation, here we go!

last time, we talked through some of the options available for making tilemaps, namely hand-crafting maps or generating them more procedurally. after discussing a few benefits and challenges for both, i decided that it might make the most sense to start with the procedural side of things, so that’s what we’re doing today.
it all begins with one hex -- and a lovely tutorial.

i crafted this cutie in blender (a free modeling and animation tool). first, we make a cylinder and reduce its vertices to just 6, defining sharp edges. after that, we make a loop cut near the top, then scale down those vertices to add a bevel. just something simple to start with. export!
when bringing the model into unity, blender models seem to do lots of wild things, namely around rotations and scaling (for example, showing the hex as rotated 90 degrees on its side).

the model i’m using changed its orientation, position, and scale multiple times as i set it up, so rather than continue to mess with these discrepancies (namely differences in how blender and unity handle coordinate data), i decided just to orient and scale the model exactly as i desired, then child it to an empty gameobject. making this nested (an adjusted child object inside a neutral parent object) and a prefab (a template i could make endless copies from) assured that the tilemaps’ setup and calculations would be much simpler.
this image shows a few of the nested prefabs together, just to get an idea <3

here comes the scary part:
t h e C 0 D 3
i included (helpful?) comments in most of my coding today, so you can look more closely at those, but the basic procedure for setting up the initial map was as follows:
(1) define that there will be a gameobject we’ll need a reference to - our hex prefab!
(2) define a map size as a vector2; in the tutorial linked above, quill does this in two different variables, but i don’t see why using a vector2 would cause any problems and it’s cleaner, so we’ll see
(3) in the start function (aka when i press play on the game), execute a for loop that goes through each of the x-y coordinate positions and instantiates (creates) a hex there
note: our y coordinate is placed in the 3rd position of the Vector3, which actually represents the z-axis. i set up the coordinates this way in order to preserve our y-axis as vertical. things can certainly be set up differently, and the first few times i programmed the coordinates this way, it used to confuse me quite a lot :o

from there, we get something that looks like this:

so, not exactly ideal-appearing yet, but really quite close to what we need. it may be difficult to identify just by looking, but what’s happening is that the tiles are overlapping because our code is not adequately describing how much space to leave between them. for this, we set up offsets on each axis!
at first, i added multipliers in around the instantiate call so that the tiles would be spaced further apart when created, but i quickly realised this was not a very clean solution. instead of trying to figure out “okay how much do i need to modify the x position, due to the size of the tile?” and hard-coding in those values, i decided to adjust the hex model (inside the prefab) to something that would allow the tiles to be centered at whole numbers (1, 2, 3..) along the x-axis. although there were still hard-coded values for the offsets, these should ideally never change and the rest of our code remains clear, without any surprise, unexplained numbers.

once adjusted, this code results in quite a pleasing set of tiles, or as pleasing as a plain white geometry can be:

and as mentioned before, this gave us cleaner positions along the x-axis, something i hope will be helpful later:

here, i decided to implement a few mostly cosmetic changes, to help things be more organised in the hierarchy - childing every created tile under the map object (which is where the map-generating script is placed) and giving each one a name based on its tilemap coordinates:


so, now that we have these tiles set up, how do we actually .. get them to .. do things? how do we interact with them?
well, following quill’s suggestion in the tutorial series, i create a mouse manager (a script i attach to an object in our scene) which will help us interact with the tiles.
ignore the "Color lightPurple” line for a second; really, the magick starts with our ray. this is an invisible line which begins at one point and is cast out in a direction, for a certain distance (or eternity!). fortunately, unity offers us the function of “Camera.main.ScreenPointToRay” which can take our “Input.mousePosition” and draw a ray between the main camera’s location and the screen coordinates where our mouse is placed. in other words, we are a little closer to being able to click on things!
once we send out the ray, it says “i hit something” or “i didn’t hit anything” - if it does hit something, we give it the data structure of “hitInfo” and say “hey, fill this out so that we can know what the ray hit.” since this is currently in the update function, we will get this information back every single frame. every frame that our mouse is hovering over/touching something with a collider, our code will tell us the name of that object.
then, lastly, we set up to receive mouse input - aka clicks. this code says “when i let up from a left mouse click, grab the mesh renderer component on the ray-touched object, then change its color! that’s why we defined a color up top, in preparation of having many custom colors we might specify in the future.

and this is what that code looks like in action, as far as the clicking:

and lastly, a pretty view of our geometry <3

so, in summary, today we:
- created a hex prefab with a non-absurd rotation and scale
- set up a grid of those hexes which will automatically be spaced out appropriately
- made it so that we can hover or click on a tile and not only get back information on which tile it was, but also effect changes to that tile
whew.
we’re well on our way.
in the next devlog, let’s aim to set up more complex click interactions (like selecting tiles for movement, toggling colors, hovering one color but clicking to change) and some basic pathfinding to be able to move our player from one space to another. maybe we’ll even explore a bit of customising tile colors, heights, and textures to create biomes .. or perhaps save that for another time.
with love and a hex-based personality,
ahn
#hex#hex-based#hex tiles#hex tile#final fantasy tactics#rpg#tactical#tactical rpg#gaming#yeast infection no more program#indie games#indie#indie developer#indie development#procedural#procedural generation
0 notes
Last Seen Blogs

whosiragronsky
Agronsky

boottalk-blog
The 4th eye

a-frog-in-a-bog
This Is A Hater Safe Space

starry-starriie-night
❤ That Lifeless Gamer ❤
waste-book
Waste-Book