#and i get how to make the customization easy for people that are beginners
Explore tagged Tumblr posts
Visit Tumblr Blog
Explore Tumblr blogs with no restrictions, modern design and the best experience.
Last Seen Tumblr Blogs


Fun Fact
There were a total of 171.5 billion posts on Tumblr in 2019.
Text
me when the javascript is javascripting (stackoverflow save me... stackoverflow... save me stackoverflow...)
#html#css#javascript#what do i even tag this as lmao#hashtag me jumping on my seat whenever the javascript works#im making a music player btw that doesn't use the audio tag#im also gonna tag this#neocities#since i would like to give out the code to people if it ever gets decent#and i get how to make the customization easy for people that are beginners#kikiposting to its finest
6 notes
·
View notes
Text
BEGINNERS GUIDE TO BLUESKY
Hiya! Curious about joining bluesky but intimidated by all the features? Already on bluesky but want to learn more? Then welcome to my quick guide on getting started and navigating bluesky!~
What is Bluesky?
it’s a social media site that’s owned by no single person or company. it's aim is to bring back the early days of twitter before bots, elon musk or algorithms took over. Personally I find the site really cozy, wholesome, and engaging. my Bluesky account for example
What’s unique about Bluesky?
→ CUSTOMIZATION: your timeline is very easy to control. There’s tons of options, so be sure to go through each tab in your settings. some options include: turning off autoplay, changing the order in which threaded replies show, changing DM settings, content preferences and lots of visual app settings.
→ MODERATION LISTS: human made, mass blocklists. These are public lists of accounts that when you subscribe to you automatically block or mute everyone in that specific blocklist. A great way to avoid unwanted content, and interactions. ✦ Moderation lists I recommend will be below the cut
→ STARTER PACKS: recommendation lists on who to follow, made by users. You can even curate your own starter pack of recommendations! ✦ Starter pack recommendations will be below the cut
→ FEEDS: public timelines, basically. There are a lot of feeds you can join, or you can even create your own. I made a feed featuring just my pixel art so it doesn’t get cluttered with text posts or other photos in my media tab. ✦ I’ll post feeds I recommend below and link you to a tutorial on how to create your own feed
→ BLOCKING/MUTING: bluesky has a great blocking system. When you block someone they can no longer see, or interact with you. They also have a feature to make your blog inaccessible unless logged in. you can also mute specific people, delete post replies, and even detach your post from a reblog. You can also mute specific words, phrases, tags etc.
→ NSFW: bluesky allows NSFW content, including artwork, porn, lewds etc. They also have a great moderation page to avoid the content completely, censor the content, or show it if you’d wish. ✦ just go to settings > moderation > toggle on NSFW settings and it’ll let you heavily moderate.
→ LABELS: this is a really cool feature on the site, you can subscribe to certain pages that enable a lot of fun/useful labels that help you in different ways! (like pronoun tags, artist tags etc) ✦ Labels to browse will be posted below
→ COMMUNITIES: the vastly diverse communities really feel like the best parts of tumblr. since you can so heavily curate your experience, it can really feel like a calming oasis. Mine is mostly artists, and other creatives.
there’s also a large community of professional artists, art directors, authors, celebrities, and even the best shitposters from twitter. the app really is what you make of it but it’s thriving right now.
RECOMMENDATIONS & LINKS BELOW ⬎
→ MODERATION LISTS:
HATE SPEECH: NAZIS | MAGA | MAGAv2 | MAGAv3 | TRANSPHOBES & HOMOPHOBES | FAR RIGHT | FAR RIGHTv2 | FAR RIGHTv3 | ELON MUSK FANBOYS | ANTI-BLACK | ANTI-VAX
NFT/AI/CRYPTO: MASTERLIST | AI/NFT | AI/NFTv2 | AI FANBOYS | CRYPTO | NFTs
SPAM/SCAMMERS: SPAMBOTS | BOTS | CONTENT SCRAPERS | CONTENT FARMING
✦ to block or mute everyone in the blocklist at once, click subscribe in the top right corner:

→ STARTER PACKS:
ART: PIXEL ART | PIXEL ARTv2 | WOMEN OF PIXEL ART | BADASS DIGITAL ARTISTS | MAGIC THE GATHERING ARTIST | PAINTERS OF BLUESKY | INDIE COMIC CREATORS | LGBTQIA+ COMIC CREATORS | WEBCOMICS ULTIMATE COLLECTION
GENERAL: WOMEN OF BSKY | AUTHORS | LGBTQ NEWS
SHITPOSTERS: JUNIPER | JUNIPERv2 | MASTERLIST | SCIENCE SHITPOSTERS
✦ for more niche starter packs, use the search function. search your specific interest and ‘starter pack’ and you’ll find some!
→ FEEDS:
DISCOVER | WHATS TRENDING | MENTIONS | ART | TRENDING ART
THE GRAM: a timeline for exclusively image posts from those you follow. no textposts etc. ONLYPOST: similar to the gram, it shows a timeline of only those you follow. no reposts, just original posts. 📌: a way to bookmark posts. just reply with the pin emoji.
✦ there’s tons of others feeds as well! just use the feed tab and you can browse feeds or search for specific ones.
✦ TUTORIAL ON HOW TO CREATE A CUSTOM FEED FOR YOUR ART/POSTS
→ LABELS:
SKYWATCH: most popular label. Lots of useful labels!
AI Labels: identifies AI users, can also enable hiding the posters.
Pronouns: self explanatory but useful. can add a badge with your pronouns!
✦ you can search for additional label bots on bluesky!
OTHER RECOMMENDATIONS:
✦ EXPIRIENCE ENHANCING TOOLS RECS ✦ CLEARSKY: TRACK BLOCKS AND BLOCKLISTS ✦ SKYFEED: CREATE CUSTOM FEEDS EASILY ✦ use the block function often. do not entertain trolls or hate speech. ✦ as well as starter packs, there’s also lists! lists can be used in the same way to create curated lists of accounts. it’s a good way to keep track of specific genres of posters you’re interested in, and finding new ones! ✦ hashtags: use them! they’re beneficial in boosting your post. you can even link hashtags in your bio making you easier to find. another method of making you more visible is if you post an ‘interest’ post! basically just type things you’re interested in and it’ll help people find you / vice versa ! ✦ update your profile first thing, like bio avi etc. make a small post so people know you're real. interact and engage! the communities there are so welcoming!
I think that covers abt everything i wanted to cover! Hope this was helpful and thanks for reading lol
#bluesky#bluesky starter pack#bluesky social#bsky.app#bsky#bsky social#bluesky tutorial#bluesky walkthrough#bluesky app#ooooooooook that took forever lol hope its useful!!!!!!!!#long post#text post
6K notes
·
View notes
Text
Originally this was supposed to be a nicest fic where they went to an author meet and greet that Lin Ling likes but ig it turned into this so like the beginning of how Lin Ling found the books series.
Lin Ling clutched onto things like a desperate man trying to stay a float in harsh and dark waters.
Moon had been one of those things. She had given him strength with her words and Lin Ling felt like he made it through the days just only by seeing her face through flashing pixels through a screen. Hearing her voice saying words of encouragement made him feel like he had ample energy to go on with life and live.
She had given him hope and Lin Ling clung to it with all he had.
Moon had been the main thing that supported him through the last two years of his life, the other thing beside her was not as well known and popular as the hero's. But rather a simple books series.
Lin Ling had thought it childish at one point that he clung desperately to words written on paper. He still thought that but not as much as he did before.
-
He saw the books in a small little bookshop window the place was squeezed in between a tiny Arcade and an out of date record shop. The books were worn in use, the spines creased, the pages an soft mix of white and yellow. Lin Ling had taken interest as soon as he caught the glimpse of the book.
Lin Ling walked in the shop without thinking, grabbed the book that was on display, and began to read the synopsis that was on the back.
He didn't notice the shop keeper had walked out from somewhere in between the shelves, but a small graying lady looked at him and smiled. “ I enjoyed that series when I was quite young,” she said, her voice startling Lin Ling, making him jump and almost drop the book.
“I'm sorry I didn't mean to disturbed you.” He apologized, his heart going back to a steady pace after the sudden scare. “It's just that the cover fascinated me.”
Blue and white intricate details were wrapped around the spine and cover of the book emitting a whimsical and calming vibe that Lin Ling had been drawn to immediately at the sight.
“You're fine dear. You're actually the first customer to come in here today in no bother at all really” The lady gestured to the book. “Did you read the summary? If it doesn't interest you I can help you find something more suitable for you. I know people nowadays aren't interested in Found family books.”
His grip tightened about the book but he didn't make a move to put the book back.
Lin Ling shook his head. “No, it's interesting. It's just I was never much of a reader before.”
“Ah,”She shook her head in understanding. “ I understand. Those books are very beginner friendly. A little hefty read with four books in the series but quite compelling.”
Four books in the series, she said and Lin Ling thought of his steadily draining bank account and knew he couldn't afford that. The book was interesting, the summary had drawn his attention and the quick flip through of the pages seemed that the writing style was simple and easy. But four books seemed like a lot which meant a lot more money.
The lady must've seen something flick in his eyes and she spoke up. “There on sale. Everything's on sale.” She looked sad as she said this and Lin Ling felt back about accidentally bringing it up. “We're closing at the end of this month. Not enough attention and we used to have. 130 Yuan for all of them.”
130 Yuan wasn't bad, maybe it stopped him from getting the expensive ramen he got for lunch but he could go to the cheaper one.
The ramen was good in his stomach but the books would cure boredom. And as much as his boss wanted him to work, Lin Ling wanted something for himself. Something that he could enjoy. Something to forget what he did at work and then sneers he received from his boss and co-workers.
He wanted something that was entirely his own.
He grabbed the other three books and put them on the checkout counter.
“I'll buy them.”
#to be hero x#lin ling#nicest#og nice#tbhx lin ling#tbhx#tbhx nice#i love him guys#he deserves happiness
84 notes
·
View notes
Note
Do you have any advice for making it ocs?
If there are two things I love in life, they're IT and OCs. While I might not be the best person to ask, I do have some tips that can hopefully help a few people! Buckle up, this is going to be a long one!

Altering Canon .
First and foremost! I think it's important to not heavily alter the main story of IT when you create a character. This also means don't subtract from canon character's experiences. By that I mean taking a canon characters "scene" and giving it to your character instead.
Altering canon can be fine as long as it's not done to an extreme <3
Relatives .
Making your character related to any canon cast is fine, but with some characters you need to be prepared to explain a LOT. Say if you are making a character related to Beverly Marsh or Henry Bowers, two characters who are both heavily abused by their fathers. It's going to be a lot harder to explain "Where are they?" during certain events of the canon than say a character who isn't overly impactful on the plot.
Arguably, making any relative to any of the Losers cast would be challenging! Off top my head, Richie is probably the easiest to pull off haha.
THAT BEING SAID. There are so many Richie Tozier sisters out there. I'm not trying to say it's overdone but —
Face Claims .
I touched upon this recently, but remember if you're making a child character it's important to choose a face claim that actually looks the part! The main age range is 12-16, however I feel like in the search of the "prettiest face claim" people have chosen actors who when you look at them you go: "That's a grown adult!"
A rule of thumb that might help! Imagine them side by side with the main cast ( especially Ben ) and the image looks funny in your mind, it would probably have looked funny on screen.
Actors age however, and if you have a face claim you really like, choosing a role which you base their main visage around really helps! For example, I chose Elle Fanning for a face claim — and she's quite obviously not a child anymore. So I made sure to indicate which role I base her appearance off of! ( The Neon Demon )
Of course, there are always exceptions! Some people genuinely look older than what they are ( or younger ) and that's okay too! It might just help to specify that in their bio.
Lore .
The best and arguably most important part of your character, their foundation! The fun stuff! Truthfully, the more information you have the better!
Where in Derry do they live? West Broadway? Are they on Witcham Street with Bill? Or perhaps they live in the poorer neighborhood near Beverly. Whichever you choose, should honestly impact your character.
Family, it's so important to include family SOME how. It doesn't matter if they are present in your writing or not but they shouldn't be ignored. You'd be surprised how much fuller your character feels when you shape their world around them, if that makes sense.
Friends, if your character has friends with any of the canon cast, you should absolutely add details about how they get along. ( Or don't! ) if your character has other OC friends, or friends you've created to world build for them — absolutely talk and write about them as well !
ALSO! What is their social standing in school? What sorts of people do they hang around with — cliques! Artist? Music? Popular kids? Band Kids? The list goes on....
There is SO much to go into detail about, and honestly I HIGHLY reccomend writing it all out in one space where people can navigate and learn about your epic lil OC.
Carrd.co - a great and FREE webpage which you can fully customize to suit your OC. Including thousands of free themes you can choose from! It looks professional, and it's easy to navigate and use for beginners too. There IS a paid subscription so that you can have unlimited elements ( basically like unlimited photos, text boxes, links, etc) but free users get up to 100! Which should be more than enough. And if it's not you can make a secondary carrd site and link them together!
Google Docs - Another great tool for begginers! I'll be honest I don't use it but many of my friends swear by it. It's also customizable with thousands of custom themes online to choose from!
Toyhouse - Toyhouse is another popular OC hosting website with many themes to choose from. Many are also paid and created by the community however. Toyhouse requires a generated key to create an account, I might have some spare keys if anyone needs one, but honestly Toyhouse isn't as user friendly as the above options.
Pennywise .
Please please PLEASE! Do not forget about Pennywise. There is a very real looming threat in Derry Maine, and while most choose to write about their characters interaction with the canon cast or other OCs; it's very important to include your character's thoughts on the disappearance of MULTIPLE children in Derry Maine.
They do not need to combat Pennywise, and realistically they wouldn't stand a chance against Pennywise either. But it's also really cool when writers include Penny into their story or lore, otherwise it may as well just be a slice of life fandomless character.
The EDGE .
I understand we all love having that really cool character who is considered to be "dangerous" or "unhinged" and it is 100% okay to go that route too. HOWEVER, if you're going to create a character who is considered to be a "pyromaniac" or a character who is a "stalker" ...
Take it seriously.
While IT has it's fair share of comedic scenes, it also takes it's characters who do Bad things, seriously!
Take Patrick Hockstetter for example. He is mischaracterized to hell and back in the fandom, and more or less made into a joke character. But if you genuinely read into his backstory; he is a terribly creepy person, dark, and absolutely twisted. Disregarding the one scene that EVERYONE tends to focus on; Patrick is a very well written character. And the things he does aren't written to be jokes as the fandom is very much guilty of portraying them to be!
ULTIMATELY it's really not that deep. But these are just a few tips that I have to share. There is so much more when it comes to making a well developed character, but I really hope that it helps! If I can think of anything to add later, or if anyone has any questions I'd be more than happy to help! I LOVE OCs and I love supporting people who wish to create them <3
17 notes
·
View notes
Text
Hey everyone🙂 Long personal post incoming!
I can't believe it has been over a year since I last made some custom content. I wanted to post something at the end of 2024 but it felt a little stupid to do a 2024 Tumblr Top 10 post without even having 10 posts in total (I think?), so I did not. I felt very burned out and just generally bad the whole of last year (which means worse than usual) and lost all interest in Sims because of the stress it gave me. It's still a little weird to make a post like this because technically I didn't go anywhere, I'm still lurking here a few days a week liking posts. I just didn't feel like interacting or doing anything Sims related.
I find it also very difficult to see everyone's beautiful lots and amazing custom content and feeling like my stuff or lots or anything I make will never be good enough or pretty enough and that made me lose interest in everything as well. My lots are simple boxes and I feel envious and sad because I want to have pretty houses for my sims as well. Every time I have a good idea for custom content it turns out to be to difficult, someone else does it better or I find my execution not good enough. It always looks so easy to see other people being succesful doesn't it? Why can't I build like that? Why are all my textures always blurrier? How do people even begin to understand how to make certain things? I'm always struggling so much to make simple recolors and I'm barely ever satisfied about the result.
I have learned a lot over the few years now but I still feel like a beginner. Every time I open SimPe I have to check every little thing again because I still make simple mistakes and don't even start about retexturing things in Photoshop process because I'm honestly just winging it. Every retexture costs me hours or even days of stress and uploading is just as stressful. What if I uploaded the wrong files? What if people look at it and think it's badly done? Couldn't I have done better? I see every little flaw and I know most people won't but it still stresses me out. I wish I could care less about things like that. I tried to avoid uploading in the evening because sometimes I couldn't sleep of the stress and the fear that something in the download was wrong.
I just wanted to get these things off my chest. Maybe some of you will read this and recognize themselves or maybe don't feel stupid if they don't understand retexturing things either because honestly it really is painstakingly difficult unless maybe you are a graphic designer or artisticly talented. Most people are just hobbyists and probably have as little understanding of this all as myself. At least that is what I try to tell myself to feel better about my stuff.
Thank you if you have read all of this and if you haven't that's okay too, we come here to relax and to shop custom content and that's okay.
Of course now I'm going to proofread this post because my anxiety will kill me if I make any spelling error and people see it. (I've changed SimPE to SimPe! How could I let this get through😤.)
To end in a happier note, I actually felt like making custom content this week and I actually finished it too so I will probably make a post and upload it tomorrow or later this week. (Spoiler; it's two book recolors for the Billy! I'm always too excited, I can't keep secrets😁)
39 notes
·
View notes
Text
Ok so incoming gunpla post about tools:
So you’ve started building! It’s fun! It’s cathartic! And they look so cool!
But…
You kinda want them to look Even Cooler.
You also don’t have a ton of cash and you’re feeling intimidated by how deep this hobby can take you (you’ve seen those cool customs online). No worries! Here’s a couple cheapish (<$40) tools to help you get rolling on taking your kits to the next level.
1) Sanding Sponge/Glass File

These are great bc 1) they’re cheap and 2) do the job wonderfully. Specifically they’re for helping to remove Nub marks off the price you’ve cut from the runner. If you don’t know, Nubs are the leftover plastic still attached to the piece after you’ve clipped it from the runner, they’re important to remove bc of how the kit is engineered. Moving gimmicks or the sturdiness of the kit could be compromised if your pieces can’t fit flush.
The sponge is the cheapest option but it also runs out at some point and you’ll need to replace them. However, the glass file will simply just keep rolling. I bought mine from Newtype about a year and a half ago and it’s still doing great. I believe Walmart might have even cheaper options.
2) Gundam Marker
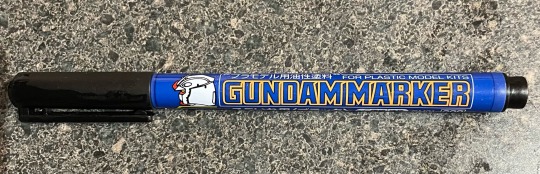
So you know those grooves on a part that’s sunken in? Those are called Panel Lines! Using this pen (it’s basically a Micron pen) you can color in these lines to help give your kit extra depth. This is especially great on kits that are primarily a single color with few variations (think Calibarn).
All you do is draw in your line and then wipe away with your finger or paper towel or what have you. These are super cheap and you’ll run through half a dozen or so HG’s or even MG’s before you need to think about getting a new one. With this you also don’t need to worry about top coating or being mindful about what you’re applying it over (unlike other panel liners where you need to keep some chemistry in mind).
3) Single Blade Nippers
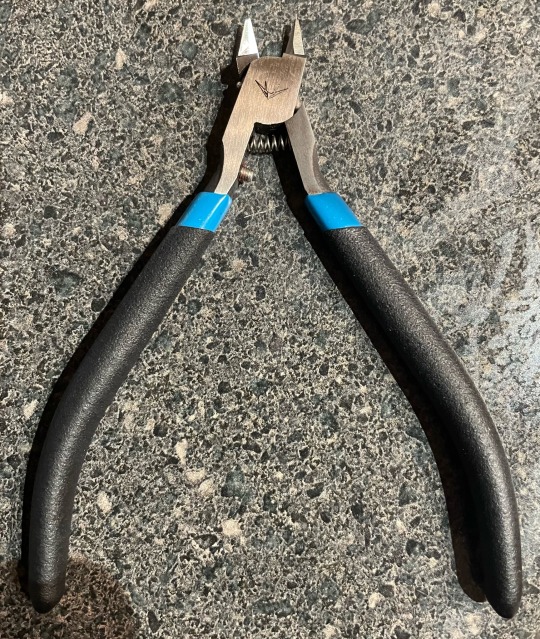
So these are the most expensive item and while double blade nippers work absolutely, you’ll end up creating less work for yourself with single blade nippers as they can make cleaner cuts off the runner meaning you have less nub to clean up.
These ones I snagged from USA Gundam Store (they give a discount for snagging these) and they work great. Not the greatest durability over multiple kits as they really lose that initial sharpness over the first kit or two, but they stay sharp enough to do the job well. There’s several different options out there (some as expensive as $60 or so) but starting out a cheaper pair is great to have.
I used double sided nippers for the longest time but after switching I firmly believe they’re worth the extra $$ to invest in.
To elaborate on 2 bladed vs single bladed a bit: double blades cut from both sides (obviously) but what this means is that there is stress being applied to the piece from each side. This causes stress marks (if you’ve seen a white spot left behind after a clip that’s a stress mark) which either need cleaned up and painted over or it causes a crater in the part (especially easy to do when the nub is especially large) which either never gets fixed or you need to use tamiya cement to melt plastic and then puddy it innnnn and thennnnn sand everything againnnnn and it’s a pain.
Save yourself the headache. Singe blade nippers are the way. I especially hate those beginner nippers that look like this

I hope this helps you dig a little further down into the plastic crack rabbit hole! With just a little extra effort you can really make your kits pop. You can do it!
As always I really love seeing all the new people building gunpla and making it their own (special shout out to that person who bedazzled their guncannon). Love ya friendos
#I’ve been meaning to make this for a while#make sure to check the notes bc I’m sure other will add other easy tools#which is TOTALLY fine to do btw!#good luck peeps#gunpla#gundam#wfm#g witch#witch from mercury#plamo
138 notes
·
View notes
Note
Please tell us how to get into IT without a degree! I have an interview for a small tech company this week and I’m going in as admin but as things expand I can bootstrap into a better role and I’d really appreciate knowing what skills are likely to be crucial for making that pivot.
Absolutely!! You'd be in a great position to switch to IT, since as an admin, you'd already have some familiarity with the systems and with the workplace in general. Moving between roles is easier in a smaller workplace, too.
So, this is a semi-brief guide to getting an entry-level position, for someone with zero IT experience. That position is almost always going to be help desk. You've probably heard a lot of shit about help desk, but I've always enjoyed it.
So, here we go! How to get into IT for beginners!
The most important thing on your resume will be
✨~🌟Certifications!!🌟~✨
Studying for certs can teach you a lot, especially if you're entirely new to the field. But they're also really important for getting interviews. Lots of jobs will require a cert or degree, and even if you have 5 years of experience doing exactly what the job description is, without one of those the ATS will shunt your resume into a black hole and neither HR or the IT manager will see it.
First, I recommend getting the CompTIA A+. This will teach you the basics of how the parts of a computer work together - hardware, software, how networking works, how operating systems work, troubleshooting skills, etc. If you don't have a specific area of IT you're interested in, this is REQUIRED. Even if you do, I suggest you get this cert just to get your foot in the door.
I recommend the CompTIA certs in general. They'll give you a good baseline and look good on your resume. I only got the A+ and the Network+, so can't speak for the other exams, but they weren't too tough.
If you're more into development or cybersecurity, check out these roadmaps. You'll still benefit from working help desk while pursuing one of those career paths.
The next most important thing is
🔥🔥Customer service & soft skills🔥🔥
Sorry about that.
I was hired for my first ever IT role on the strength of my interview. I definitely wasn't the only candidate with an A+, but I was the only one who knew how to handle customers (aka end-users). Which is, basically, be polite, make the end-user feel listened to, and don't make them feel stupid. It is ASTOUNDING how many IT people can't do that. I've worked with so many IT people who couldn't hide their scorn or impatience when dealing with non-tech-savvy coworkers.
Please note that you don't need to be a social butterfly or even that socially adept. I'm autistic and learned all my social skills by rote (I literally have flowcharts for social interactions), and I was still exceptional by IT standards.
Third thing, which is more for you than for your resume (although it helps):
🎇Do your own projects🎇
This is both the most and least important thing you can do for your IT career. Least important because this will have the smallest impact on your resume. Most important because this will help you learn (and figure out if IT is actually what you want to do).
The certs and interview might get you a job, but when it comes to doing your job well, hands-on experience is absolutely essential. Here are a few ideas for the complete beginner. Resources linked at the bottom.
Start using the command line. This is called Terminal on Mac and Linux. Use it for things as simple as navigating through file directories, opening apps, testing your connection, that kind of thing. The goal is to get used to using the command line, because you will use it professionally.
Build your own PC. This may sound really intimidating, but I swear it's easy! This is going to be cheaper than buying a prebuilt tower or gaming PC, and you'll learn a ton in the bargain.
Repair old PCs. If you don't want to or can't afford to build your own PC, look for cheap computers on Craiglist, secondhand stores, or elsewhere. I know a lot of universities will sell old technology for cheap. Try to buy a few and make a functioning computer out of parts, or just get one so you can feel comfortable working in the guts of a PC.
Learn Powershell or shell scripting. If you're comfortable with the command line already or just want to jump in the deep end, use scripts to automate tasks on your PC. I found this harder to do for myself than for work, because I mostly use my computer for web browsing. However, there are tons of projects out there for you to try!
Play around with a Raspberry Pi. These are mini-computers ranging from $15-$150+ and are great to experiment with. I've made a media server and a Pi hole (network-wide ad blocking) which were both fun and not too tough. If you're into torrenting, try making a seedbox!
Install Linux on your primary computer. I know, I know - I'm one of those people. But seriously, nothing will teach you more quickly than having to compile drivers through the command line so your Bluetooth headphones will work. Warning: this gets really annoying if you just want your computer to work. Dual-booting is advised.
If this sounds intimidating, that's totally normal. It is intimidating! You're going to have to do a ton of troubleshooting and things will almost never work properly on your first few projects. That is part of the fun!
Resources
Resources I've tried and liked are marked with an asterisk*
Professor Messor's Free A+ Training Course*
PC Building Simulator 2 (video game)
How to build a PC (video)
PC Part Picker (website)*
CompTIA A+ courses on Udemy
50 Basic Windows Commands with Examples*
Mac Terminal Commands Cheat Sheet
Powershell in a Month of Lunches (video series)
Getting Started with Linux (tutorial)* Note: this site is my favorite Linux resource, I highly recommend it.
Getting Started with Raspberry Pi
Raspberry Pi Projects for Beginners
/r/ITCareerQuestions*
Ask A Manager (advice blog on workplace etiquette and more)*
Reddit is helpful for tech questions in general. I have some other resources that involve sailing the seas; feel free to DM me or send an ask I can answer privately.
Tips
DO NOT work at an MSP. That stands for Managed Service Provider, and it's basically an IT department which companies contract to provide tech services. I recommend staying away from them. It's way better to work in an IT department where the end users are your coworkers, not your customers.
DO NOT trust remote entry-level IT jobs. At entry level, part of your job is schlepping around hardware and fixing PCs. A fully-remote position will almost definitely be a call center.
DO write a cover letter. YMMV on this, but every employer I've had has mentioned my cover letter as a reason to hire me.
DO ask your employer to pay for your certs. This applies only to people who either plan to move into IT in the same company, or are already in IT but want more certs.
DO NOT work anywhere without at least one woman in the department. My litmus test is two women, actually, but YMMV. If there is no woman in the department in 2024, and the department is more than 5 people, there is a reason why no women work there.
DO have patience with yourself and keep an open mind! Maybe this is just me, but if I can't do something right the first time, or if I don't love it right away, I get very discouraged. Remember that making mistakes is part of the process, and that IT is a huge field which ranges from UX design to hardware repair. There are tons of directions to go once you've got a little experience!
Disclaimer: this is based on my experience in my area of the US. Things may be different elsewhere, esp. outside of the US.
I hope this is helpful! Let me know if you have more questions!
46 notes
·
View notes
Note
What's rentry and strawpage? How do they work? Yours are verte cute btw 🩷
thank you so much !! i can't define them myself but rentry and strawpage are often used to create pages online, both following different formats. putting my explanation under the cut to not clog the dash
rentry relies on html, which they explain how to do on their page! it's more complicated than strawpage and isn't as "freehanded", but it gets the work done even if you aren't making it aesthetic. most of the decoration on mine relies on the "metadata" element, which is a whole another can of worms but i managed. expect to type a lot. it doesn't require an account, but you do need a password for your pages to be saved/edited!
strawpage requires an account, and sites can easily be created through desktop or mobile. they have a set of templates you can choose from, or you can just freehand it. it's fairly easy to use once you get the hang of it, i recommend having a lot of pngs/pictures on hand. you can also add an ask box and have a box for people to draw things for you that'll be filed under the "gimmicks" tag. as far as i know, strawpage only allows 2 "sites" per user.
it depends all on you, but despite me using rentry for a long while, i'd recommend strawpage on the account that it's more beginner-friendly and has a lot more customization options in comparison. rentry if you can handle a lot of typing and are up for a challenge.
unlike strawpage, rentry doesn't allow you to upload pictures on site hence the coding/markdown aspect so i recommend using catbox to store any potential pixels or backgrounds you're gonna use.
7 notes
·
View notes
Note
Hi sorry for a random question but what do you need to/how do you rehair a g3 pony? I have a bunch of old ponies sitting around in my house and they aren't in a mint condition so I decided to go search for some custom inspiration and I saw people rehairing them and it looks so good. I've only rerooted dolls with soft heads before.
Hi! G3 ponies are pretty easy to rehair. I use a reroot tool from Dollyhair, and I buy the doll hair from various places. It's been awhile since I've customized a pony, but Shimmerlocks was my go-to, along with some Etsy shops. You'll also need a zip-tie for the tail, an x-acto blade to help remove the head, some clear glue, and pliers.
Once you remove the head, clear out the mane and tail. Cut them as close as you can, then use pliers to clear out the rest from the inside.
For the tail, cut the hair so that it's about two-and-a-half times longer than your desired length. The bundle of hair will be folded in half, plus this leaves room for error that you can adjust at the end. Tie your zip-tie around the center of the hair and cut the ends of it (I've also seen others use string and elastic hair ties for this). Using string or jewelry wire to guide it through, push the middle of the tail through the hole from the outside-in. Remove the string/wire.
From my understanding, rerooting a pony's mane isn't all that different from rerooting a normal doll head. Cut the hair for the mane the same way you did for the tail. Separate some strands, and take your reroot tool to the center of them, making sure they go into the dip in the needle. Don't use too many strands of hair at a time, otherwise your needle may break, but don't use so few that they don't stay in either. You'll pick up on how much to use pretty quickly. Poke the needle through the holes of the pony's hairline, pull it out, then there! The hair should be in. Just do that a gazillion more times. Once all the hair is rooted, put some glue inside the pony's head to ensure that the hair is secured. For G3 ponies, you may need to glue the neck back onto the body.
As I said before, it's been awhile since I've customized a pony myself, so I'm going off memory from about... 2 or 3 years ago? I have been wanting to get back into it, so I can provide a more in-depth tutorial with photos when I do. There are plenty of resources out there for a beginner. I believe most tutorials focus on G1 and G4 toys, but the same techniques carry over to G3 as well. I recommend joining the MLP Arena and/or the MLP Trading Post. Both forums have plenty of friendly people with years of experience who will be more than happy to help someone dipping their toes into the craft. :)
Hopefully this helped, and please share what you end up making. I'd love to see your customs!
3 notes
·
View notes
Text
A Beginners Guide to Night 8 in FNAF 1
Hi! Okay so recently with the movie and Help Wanted 2 I've been sorta coming back into my old FNAF phase, so me and a friend decided to replay the older games - 1-6 mainly and then maybe the others if we were up to it idk - but after beating Night 6 in the first game I was talking to my friend about the night Scott added after FNAF 3 released and apparently people just don't know about this...?
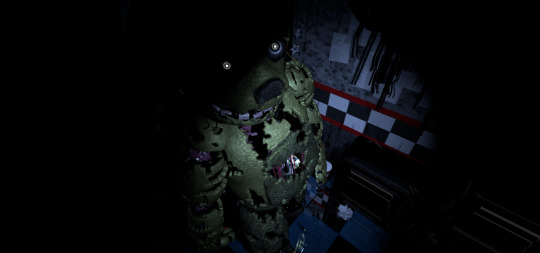
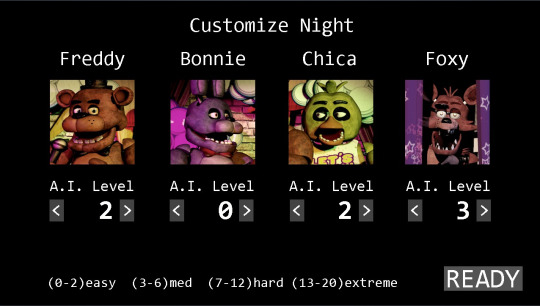
Honestly I'm surprised people aren't more aware of this (they even done a GT live stream about it) but it makes sense since nit a lot of Big YouTubers went back to play it. You can unlock Night 8 by inputting '2023' in the custom night selection screen. From there it'll take you to a normal 'Custom Night' but with the addition of Springtrap from the third game and none of the other animatronics!
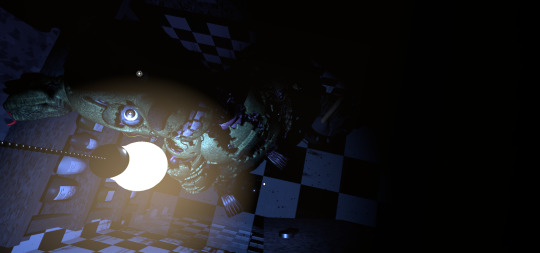
Springtrap will always start the night just out of sight from Cam 7. His AI is set to around 11-13 at the start of the night but by the end will reach 20. The gimmick with him is he's (typically) hiding somewhere in the camera but luckily I went into the files and got the images without any of the UI or static! He can go other directions (for example: Cam 7 to Cam 18) but this is usually how it goes.
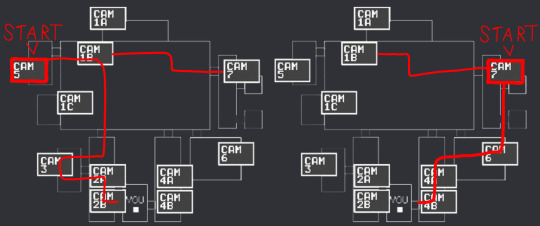
What's important about going against Springtrap is you need to keep a constant watch on him. If you hold a camera open that he's on for 3-4 seconds you'll be able to either hold him back or straight up make him go back to a previous camera. (if you choose to just do nothing and wait by the doors he'll rush to you and jumpscare you after about 40 seconds of inactivity.)
CAM 7 - Restrooms

You can usually point Springtrap out by his eyes, and with this usually being his starting point you should Hopfully be able to catch him in Cam 7 hiding in the boys bathroom. His eyes will usually point him out but the static can make it difficult.
CAM 4A - Right Hallway
This is probably one of the hardest spots to find him in. It's practically impossible to see him in here under normal means BUT he'll always make his way through the kitchen first, and like Chica he'll make some noise when he does, so if you're quick to it you can catch him here after and push him back.
CAM 4B - Right Corner

If you see Springtrap here then he'll be just one stop outside of your office, and he doesn't give you much time to breath either. At his first movement opportunity he'll make his way to your office but I'll get to that in a bit.
CAM 5 - Workroom
After reaching one of your doors, Springtrap's position will reset to either the restrooms, or here. There's actually two positions he can have in this room. Catching him in the doorframe will send him back inside the room at his next movement opportunity but he barely stays there for even a couple seconds so it's pretty hard to catch him.
CAM 1B - Dining Area

He's pretty hard to miss here, but what's important is that he can move here from either the Restrooms or the Work Room and ge can change his route from either of them.
CAM 3 - Supply Closet
This one isn't that complicated. He'll come here after leaving the dining room if he decides to come to your left door.
CAM 2B - Left Corner
Springtrap will up and ignore CAM 2A, and go straight to the corner. If he's here you should follow the same advice as the Right Corner since it's pretty straight forward from here.
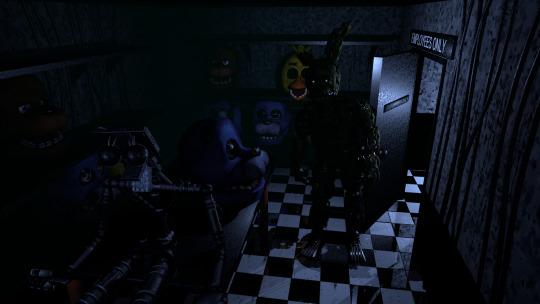
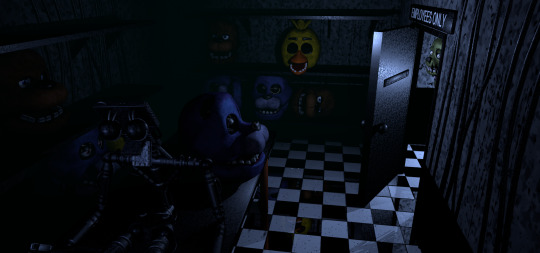
The Office
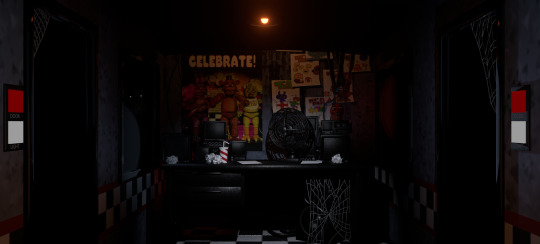
Sooner or later you're going to stumble and he'll make his way to your office, but fortunately because of his glowing eyes you technically never have to use lights to see Springtrap. that aside, you should close the door immediately if you see him through either window.
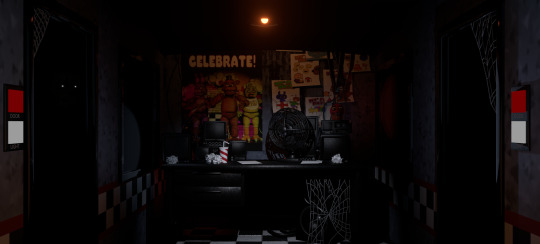

If you don't manage to notice him or close your doors, then you'll have one more opportunity (albeit an easy one to miss.) If you put your cameras down and see Springtrap's eyes then close the door straight away. Any other movement like lights or the camera will cause him to jumpscare you and end your night.
Past that you should be all set! Just manage your power and try to get through the night. I should say, although the other animatronics are out of commission for the night, there's still a minor chance that Yellow Bear or Sparky can make an appearance on certain cameras. Just don't stare at them too long or put your camera down too quick, so have fun and good luck beating Night 8!
#fnaf#five nights at freddy's#freddy fazbear#william afton#purple guy#springtrap#spring bonnie#help wanted#mike schmidt#michael afton#fnaf security breach#five nights at freddy's security breach#sparky#sparky the dog#oc#houx#blender#unreality
52 notes
·
View notes
Note
Do you think Clip Studio is worth the payments? ( asking for a friend/j ) And do the pros outway the cons or is it the other way around? Also, do you use custom brushes? And one last question.. Do you just draw on your laptop? Like, do you use a mouse, touchscreen or maybe a drawing tablet?
I've never seen anybody ask these questions and I'm curious, you don't have to answer though! Have a bagel 🥯🤲 and if you don't like bagels... 🥪🤲 Have a sammich.. and.. if you don't like either uhmm- Have a whole damn cake 🎂🤲 happy birthday [/silly], or hell, take all three! Have a wonderful day ❤️ [/gen]
Do you think Clip Studio is worth the payments?: When it comes to payments, I think it's always better to get it when it's on sale (which do come every now and then), it is a onetime payment and it's better to get it when the price is as low as it can be For pros and cons, the biggest pro of the program is you can get new brushes, blenders, erasers, tools, etc (anything that will help you with drawing easier) from the programs own little assets store (and majority of the brushes are free to download). And it's also easy to import brushes you get from other places (ex: you buy a brush from Kofi made by another artist). Meaning you have options in CSP's own brush store, and also other places on the internet, you aren't stuck with just using the default brushes you're given when you start the program That's the biggest pro to me, besides that you have everything else that comes with your average art program,
I will also mention that clipstudio also has it's own 3D modeler program, like you can import 3D figures and use them as your reference if you can't find one on pinterest. Though I've haven't used it myself so I do not know how easy it is or what the features are, so I can't comment much.
I think the last biggest pro is that if you program crashes (not often, but the chances are never low unfortunately), clip studio will restore your drawing for you and your drawing won't be sent to the shadow realm meaning you don't lose progress. I compare it to dropping your phone and you slowly pick it up out of fear that theres a crack in it only to find out oh there's not one it's fine.
Now for the cons, the biggest is the definitely the price, which is why I recommend getting it while it's on sale while it's at it's lowest. The program is insanely pricey. I also recommend the PRO ver instead of the EX ver. The PRO ver is cheaper and it's main focus is illustrations which is all you need if you're only planning on drawing. The EX ver is both for drawing and animation, while you can still animate on the PRO ver, it limits you insanely, like you can only make 25 second long animations and refuses to let you do more unless you pay for the EX ver. Now I have the EX ver and I'm learning animation, I will say Clip Studio's animation set up and layout is very confusing and tedious to beginners (I had to watch a good amount of tutorials to understand the features and everything), I believe some people compared it to animating on Photoshop, so if you haven't animated on Photoshop before, good luck. I'd say just use another animation program for animating (Flipaclip, ibispaint etc), the only reason why I'm sticking to animating to ClipStudio is because I'm stubborn and don't like switching programs. Clip Studio also has a free trial feature (which I believe lasts for 3 months), now this is good yes, but the problem is that the program refuses you to save your drawings with the free trial. I don't know if this was changed or not since it's been a while when I used the free trial, but if you want to get a hang of the program and test it out, there is a free trial, just be aware that it won't let you save your progress at all which is bull.
Those are my pros and cons, I have a lot more pros than cons but I tried to sum it up as best as I could. It's really your choice to decide if the program is worth it or not (again there is a free trial, and if you do plan on buying it, get it while it's on sale) The assets store with all the downloadable brushes is my biggest pro, but I'm aware other programs like IbisPaint also have that. I think that's all I have to say now for ClipStudio, i've yapped alot gulps.
---- do you use custom brushes?:
A good handful of the brushes I use are brushes I bought from other artists:


These brushes from PharanBrush on Kofi , I'm someone who likes to experiment with alot of brushes, so I often download/buy from other artists (I also have no self control). The EnpitsuP set comes with 100 brushes, alot I know, but your options are endless. The Krupuk set comes with 160 brushes, and alot of them are similar to like copic markers but for digital art. And the last one is BōrupenP sets, these are free and mimic school supplies, if you miss the feeling of drawing on your school books with pens, this one is also neat (plus it's free) Another brushpack I have is Cole's Pencil Pack , it comes with 19 brushes, of all kinds of taste and texture. I use this set alot, especially the "Cream Sketch 2" pencil as it's fun for lineart or sketching.

(Can you tell I like supporting artists) next set I have is Brush Box Vol.1 Markers by Olguioo this set mimics the feel of traditional art and even has a brush that makes your canvas look like paper!! It's very neat
Now of course I do have brushes that are free from the assets store, like these, which you can easily find by searching up their content ID codes:


Ofc there's more, but these are just some I use which I find neat!
---- Do you just draw on your laptop? Like, do you use a mouse, touchscreen or maybe a drawing tablet?:
I use a laptop and a drawing tablet! I specifically use the VEIKK Studio VK1200 pen display, my brother bought me it as a birthday gift this year, but before I had that one, I used the beginners One by Wacom tablet for like 4 years or more, I still use it sometimes, but only when i'm on vacation somewhere I can't bring my main one
OKAY I think that's about everything!!! Very long post so apologies if there are any typos or misspells or repeats! And thank you for the food, in return I will share the food with you because sharing is caring (ALSO if anyone elses wants to add something like other pros or cons about ClipStudio, or other brushes or anything like that, please feel free to leave it in the replies!!!)
#My ass yapped a whole essay here#mono ask#clip studio paint#again sorry for any typos/misspells/repeats LMAO
9 notes
·
View notes
Text
I've got a little bit of a different kind of bookbinding post to share today. Have a look:


I made pamphlets! I've got a bad habit when learning a new craft of looking at easy, highly-recommended beginner projects and saying to myself, "That looks boring, let's do the much harder advanced project that we definitely don't have the skills for." So I actually skipped the part of bookbinding where you learn easy stuff like pamphlets until now, more than 50 books in. But I'm looking at maybe doing some charity commissions for cheap in the near future, and I thought pamphlets would be a good item for that, and it would help if I could show (a) what they look like and what the sizes mean to people who aren't bookbinders, and also (b) that I know how to make them and that they will look nice when I do.
From left to right, that's The Legend of Sleepy Hollow (orange, letter folio), Tam Lin (green, legal quarto) and The Raven (black, letter quarto). They've got cardstock covers and the spines are reinforced and decorated with scraps from other projects. Have a look under the cut for individual photos, interiors, and to hear me talk about materials.


Sleepy Hollow has an orange cover with dark brown over the spine. Usually in a pamphlet the stitching is visible at the spine because it's a single signature, but I wanted to cover it for a couple of reasons. I think it looks more professional, it adds some visual interest, and it protects the stitching from getting snagged on anything. Both pieces are textured cardstock, and the title was printed and pasted onto a bit of scrapbook paper. It's got a line under it because the page I used to print all the titles had a smudge on it, and I miscalculated where it was going to fall on the printed page. So I went over it with a pen and now it looks like it was on purpose. Win-win.


Tam Lin has a smooth cardstock cover and chiyogami on the spine. A while back I bought a pack of assorted strips of chiyogami, about an inch wide, to use as decorative elements, and they're the perfect width for this. The interior images for all three books are free images from rawpixel, and one trick I like to use is to flip the beginning widget over at the end to make an opposing set, like bookends. Reduces the number of images I need to find, and still feels intentional and unified. All three of these are stitched with embroidery floss, so they've got coordinating colors--Sleepy Hollow's is green, Tam Lin's is gold, and the Raven's is red. Customization and theming made easy.


The Raven also has textured cardstock for its cover, but the spine is a scrap of gray book cloth. It also has the only oopsie in its title frame--while I was gluing the back of the red frame piece, it stuck a little to the page I was using as a drop cloth and left a white mark. I tried to cover it with ink but didn't do a very good job. The whole thing's a learning experience. I also played with the margins in this one so I could get the lines to fit better. Poe has a lot of words in each line. I wasn't sure this would work, but in such a small book the narrow margins aren't nearly as jarring as they would be in a full-size one.
Overall this was a really successful experiment. The typesets all together only took about an hour and a half since they didn't need proofreading, and even if they had that's a short job for a story this length. Everything else came together in bits and pieces over a couple of days, less than an hour per book for sure. Spine covers and title frames were all made from scraps so they didn't cost anything or use many materials, and except for the mistake on the Raven cover I think they look really good. And I have so many scraps by now that I could make them look cohesive. In the future I think I'll trim up the fore edges but that's the only thing I'd change. Very pleased, and I think this would make a good charity commission item if there's interest. I'll post more about that when the time comes, if I go ahead with it.
#bookbinding#snek makes books#not sure what else to tag#these were mostly made as proof of concept but they were also really fun
8 notes
·
View notes
Note
do you have any suggestions for making second life characters n models?
OKAY! So basically in terms of pricing it is much cheaper and more accessible to be a furry than a human in second life, usually with people you gotta hunt a bit more but I’ll list you some basics that I think are a good start. Here's a couple things I have off the top of my head, there is a TON of stuff out there on second life but here's the ones I use!
THIS WILL BE LONG SORRY. I REALLY LOVE RAMBLING ABOUT STORES YOU CAN USE IN SECOND LIFE I broke the links by spacing after the colon so if you want to copy and paste it just delete it! You know how tumblr gets with a lot of links LOL
FURRY STUFF:
If you want to be a pony, the Open Pony avatar is free and extremely customizable. You’ll start with only two basic mane and tail items and will probably have to spend some money if you want more stuff, which typically for the pony ranges from 200-600ish lindens depending on where you shop. This is about 3usd, but you can also customize the hair by selecting individual faces in the editor to get the colors and textures you desire.
MAJOR DOWNSIDE TO BEING A PONY THOUGH IS THAT THIS AVATAR WAS MADE BY *THOSE* KINDS OF BRONIES. THERE IS REALLY GROSS STUFF ON THE SECOND LIFE MARKETPLACE FOR THE PONY AVATAR :( USUALLY YOU CAN FILTER ADULT CONTENT BUT SECOND LIFE SEARCH ISN’T ALWAYS SO SEAMLESS. It is extremely unfortunate that this is like, the only up to date my little pony avatar we currently have on the marketplace but we make do, there are a lot of normal horse people out there it just is heinous if you go to my little pony sims.
https: //marketplace.secondlife.com/p/OP-OPEN-PONY-Basic-Pony-Avatar/22771877
Some of the free manes/tails/outfits/etc. I know currently exist are here:
https: //marketplace.secondlife.com/p/OpenPony-Shadowbolt-Suit/22790327
https: //marketplace.secondlife.com/p/HMART-Summer-Dress/23599366
https: //marketplace.secondlife.com/p/NX-Short-Bob-Mane-Add-Me/23761577
https: //marketplace.secondlife.com/p/OP-mesh-brows/24547847
https: //marketplace.secondlife.com/p/OP-I-LOVE-MOM-TATTOO/23808113
https: //marketplace.secondlife.com/p/HMART-Izzy-Mane-Tail/22786915
https: //marketplace.secondlife.com/p/OP-rainbowshine-kit/24806876
https: //marketplace.secondlife.com/p/NX-Rainbow-Bright-Mane-Add-Me/23671728
https: //marketplace.secondlife.com/p/OP-mail-set/24794285
For FURRY furries, like if you want to be an anthro animal, there is a lot of body mods out there for standard human avatar bodies (which I’ll get to in a moment) but for the most bang for your buck, I would recommend the SugarCult Regalia body. It is the easiest to customize if you ever look to wanting to make your own custom skin textures and is also modded a ton in the community so there is a load of content at the ready for it, the body link is here:
https: //marketplace.secondlife.com/p/Sugarcult-Project-Regalia/18217485
This one costs money, but it is pretty good for the price deal, you’ll get multiple body shapes that you can customize and tweak to your liking. When/if you want to shop for custom textures, make sure you look for ones that say are BOMR or BOMR compatible for the best results!
Really good beginner furry heads that have great animation quality and accessible prices are the Happy Paw heads! The link to the Happy Paw store is here:
https: //marketplace.secondlife.com/stores/175788 These heads often have a ton of textures made for them, and you also get a developer’s kit with the purchase of them! I use these heads a lot.
Another good store is Anima, though it recently disbanded. Their products are still available on the marketplace and are good if you want a less toony and more oddball looking furry, the prices are a bit higher but they are also pretty easy to custom make textures for too! And like Happy Paw, a lot of mods are available on the marketplace for them!
https: //marketplace.secondlife.com/stores/244580 Here’s the store link for Anima!
HUMAN/HUMAN ADJACENT STUFF:
You can still use the Regalia bodies for people, but Regalia tends to be more specialized by the community in furry texturing, so finding human skins will be harder if you don’t make your own. There are a LOT of human bodies to choose from, and usually I say the best thing to go with are the ones with a ton of mods for on the marketplace so it is easiest to shop. The ones I use are Belleza Jake and eBody Reborn.
Belleza Jake usually goes on sale pretty regularly while eBody is kind of a fancier body model and costs more LOL it is so pricey to be an up to date human model in second life. Ugh okay I’m like writing this whilst looking at the second life marketplace right now and for whatever reason I literally cannot find the belleza jake bodies. -_- I’ll keep you posted if I can find a link to it because that’s annoying idk why SL does this sometimes.
The body I use aside from jake is the eBody Reborn, and the downside to that is they only allow like, known store owners to get the texture kits from the eBody Reborn if you want to make it, for that you’ll just have to go to the eBody inworld store to get it LMAO it’s pretty pricey though, I got it because it is kind of on sale right now but it’s still probably about ~10usd. There is literally so many mods for it on the marketplace though. I use it because literally everyone and their dog has stuff on sale that’ll usually fit the ebody and it’s perfect if you want to have a billion fun outfits.
ANOTHER downside to the ebody is that the ass is so big, you have to find a good deformer that’ll fit it if you want to make a smaller body that doesn’t have a huge ass. Second Life creators are usually all insanely horny!
HEADS I KNOW OF AND/OR USE:
https: //marketplace.secondlife.com/stores/101160 Raven Bell is what I use for my people avatars, and here is the whole store since it also sells hair that usually is pretty good too! The heads are about 2,000L and more expensive than the furry body entirely though… but! I have wound up using it a ton to make other avatars. There’s an older model of head they have that they no longer support though since it’s old that still has more mods than their more recent stuff from other developers, hilariously enough. If you don’t care for all the fancy new animations you can go to their inworld store and get the old head.
https: //marketplace.secondlife.com/stores/210372 This store has two free anime styled heads that are better than most the anime heads you’ll run into on the marketplace purely because it’s free to use and there’s a texture and developer kit that comes with it. I think it was ripped directly from that pixiv free to use avatar? It’ll say it’s one linden on the marketplace but if you go to their inworld store you can get it free of charge.
Some hair stores that are typically unrigged and can fit most heads with minimal editing (just stretch/rotate/reposition to fit):
https: //marketplace.secondlife.com/stores/167897 This one has some genshin impact hairstyles LOL
https: //marketplace.secondlife.com/stores/68045 this one by far has a TON of random hairs that I use.
Overall, with human avatars it’s much more vast and hinges on what you’re looking to make. Let me know if you or anyone else has any further questions! I usually know a few stores off the bat that can fit specific looks people are going for haha
32 notes
·
View notes
Note
Hi! Gonna start off and say that I love the work you're doing with the Welcome Home neocities website! It's perfectly stylized for the project/puppet show and I can see the work you're putting into it.
I'd love to learn how to make my own neocities website (for fun? For a personal project??), so I was wondering if you could provide some tips and/or pointers for a first-timer.
Thank you!
HAHA well first of all i'm flattered that someone would think i'm skilled enough to be giving pointers in the first place. i still consider myself a novice when it comes to web design (for example, if you're wondering why every page on welcome to welcome home has its own CSS, it's because CSS is Way harder for me to wrap my head around than HTML) so i can't give any Super advanced tips, but i can at least write about what's helped me so far:
GUIDES. neocities has its own tutorial and list of HTML/CSS resources, but user-made guides are your best friend when it comes to figuring out where to go from there. a.n. lucas and pauli kohberger both have really good guides for beginners, but for the more advanced stuff, i found myself referencing the resources on solaria's webspace and sadgrl.online the most. w3schools is also very helpful when it comes to answering more specific questions like "how do i use two different fonts on the same page?" (and probably more.) if all else fails, then usually just googling "how to (x) in HTML" or "how to (x) in CSS" will yield at least one useful result. for making your website more accessible, there's the accessible net directory and this masterpost by foxpunk on tumblr.
it sounds obvious, but it helps to have a solid idea of what kind of site you want to build before you actually dive in, and then snoop around on neocities to get an idea of how other users approach the same topic. for example, i got the idea to start a welcome home wiki on neocities after being reminded of the 8:11 wiki on the same site, and then i spent a couple days just looking up stuff like "wiki" or "fansite" on neocities and then clicking on any page that caught my attention to study it.
layouts! there's no shame in using a premade one, and you can even learn more about HTML/CSS in real time just by messing around with the base code before implementing any intentional changes. sadgrl.online's layout builder is a VERY popular choice, since you can already do a lot with the basic options it offers and it's easy to further customize once you have it set up on your page; it's what i used to make welcome to welcome home. sadgrl.online's webmaster links also feature a bunch of other options under the "layouts" tag, and if none of those work for you, then you can even find something just by looking up template/templates/layout/layouts/HTML/CSS on neocities itself.
side note: if you're reading this and you want to make a wiki then you can also use this wikitable code. it came out after i had already established the Look of welcome to welcome home, so i probably won't implement it any time soon, but i TOTALLY WOULD HAVE if it was around when i first set the site up.
you can scale images up or down using percentage, with 100% being the image's default size. i don't know how helpful or acceptable that is, but i use it a lot.
don't feel pressured to get everything done at once, even if you expect people to be visiting your site frequently. usually if you just slap on an "under construction" gif or even just write "hey this site is still under construction" then people will understand. i don't think i've ever seen anyone get super huffy about slow updates on neocities, anyway.
EDIT: OH. GRAPHICS. i mention all of these on welcome to welcome home's front page but i Also wanted to note them here: betty's graphics and websets by lynn both have HUGE collections of background tiles and other graphics that work especially well if you're going for that old web charm. i also like to use this mirror of patterncooler for backgrounds bc of the customization options. you can also make your own background tile and then use a seamless tile maker like this if all else fails.
EDIT 2: ALSO. obviously. do not be like me and use discord or any other chat client as a filehost, no matter how promising it looks, because one day you WILL get a very nasty surprise when the request signature on those urls expire and the images are no longer accessible on other sites. there are a myriad of other filehosts out there, but personally i recommend file garden (and also donating to file garden if you can, even if only for a couple months. i know i said that just yesterday, but if it gets more folks to subscribe then i'm gonna keep saying it.)
#imaginatorofthings#ask#welcome to welcome home#web design#? yeah i'll slap that tag on there why not#neocities
20 notes
·
View notes
Text
Game Review: Tetris Effect: Connected
General opinion: Positive.
Tetris Effect: Connected is, obviously, a tetris game, with a modern graphical twist. It has classic and VR modes, both of which have their own pros and cons, but are also both worth checking out if you have the ability to. With several different modes, Tetris Effect: Connected offers a lot of different styles of gameplay for varying skill levels.
Starting off, I want to give the game devs credit where credit is due: this game absolutely slaps for it's visuals. A tetris game in the Unreal engine is certainly a choice to make, and they pulled it off really well. Sparkly particles, glowing animations, and surreal visual effects bring a magical experience to a classic arcade game, no matter if you play it in VR or on your screen.
It has both a main campaign where you play through different levels in a story-like sequence, as well as other, more casual AND more intense gameplay options. Marathon modes through themed levels, gimmick modes where you clear "corrupted" blocks or deal with mind boggling effects, and calm modes where you have no game over are all available to play, giving variety for any kind of player.
On top of this, they have colourblind modes of various kinds for the game stages themselves. You can play with classic colours, custom level patterns, or modes that add patterns and colours that make it easier to distinguish the blocks from each other. There's also multiple difficulty levels, ranging from beginner to hard, so you can adjust how many lines you want to clear per level.
The final point I want to praise is the audio experience. It's amazing. There's unique, original tracks made for the game, and the "title song" (used colloquially because it's not actually the title screen song, but it is the one from the first level in the story mode) is ABSOLUTELY incredible in my opinion. Heavy beats that are influenced by the ways you turn, flip, and drop blocks paired with each level having individual themes to them that inspire and match the music playing make it both engaging as well as good to listen to on its own.
And now the negatives...
One major issue I have with this game is that the story mode does not have options for speed, nor do they have a "no game over" setting. This means people like myself, who have visual processing issues as well as mobility issues, have a harder time clearing levels and unlocking the next theme in line. Some levels have rapid speed ups and slow downs that are a bit jarring, and while I understand the fact they might not be able to give the option to not change the speed, I'd have really liked if they'd given an option to have no deaths. It meant, for me, that I got stuck on several levels that I otherwise would have really enjoyed because they went from speed level 3 to speed level 8 or higher all within one lines difference. Having this option for the story mode would have improved the experience immensely for me, as I'm still stuck on the last level in the easy mode.
The only other thing I'd add as a problem is that if you're photosensitive, it could get painful very fast, especially in VR mode. They do have options to turn down or off particles, change graphics settings, etc. but that doesn't change the fact that there are strobing lights on some levels that you cannot turn off.
The above limits the people I can truly recommend the game to, which is genuinely unfortunate, because I know several people who would LOVE this game, if it had the accessibility features mentioned.
Final notes
Overall, it's a great game that brings a really nice, fresh twist on a game that's a decade older than I am. It really justifies itself as an iteration of tetris, much like Jacob Geller has said.
If you liked this review, please go and check out Jacob Geller's video Tetris Effect And Other Games With Immaculate Vibes! It's the video that introduced me to this game, and he makes some really interesting observations on tetris and marble games, and how they interact with their history.
Additionally, I post these in my free time, but if anyone has movie, game, or series recommendations, please feel free to send them in! I really do love reviewing media, and if I can turn this into an actual job it would be incredible.
8 notes
·
View notes
Text
How do you publish a comic on ComicFury? A beginner's overview
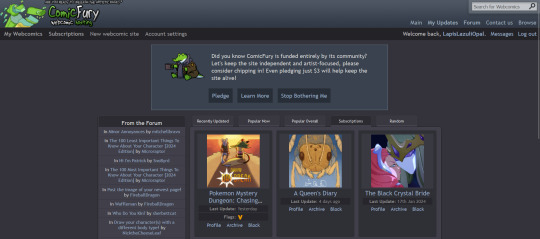
So, you're on ComicFury, see all these cool comics and think you want to make one of your own? Worry not, it's actually pretty easy :D When you have signed up, got accostumed, even subscribed to a few comics, you can go to the "new webcomic site" page to get started
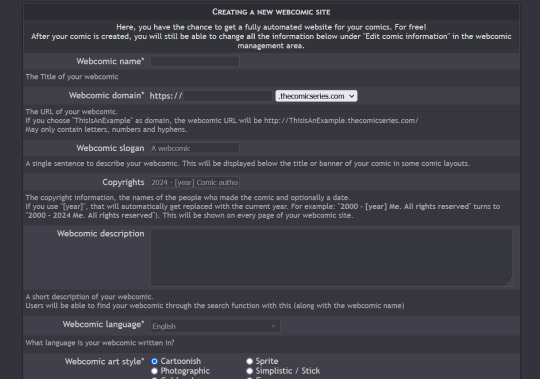
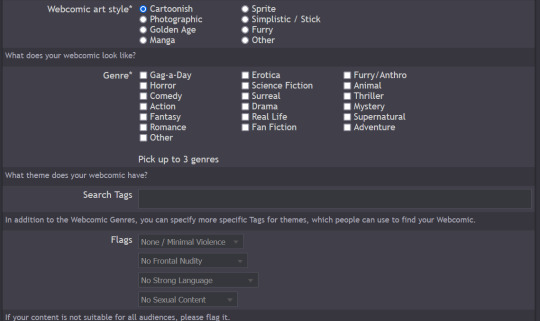
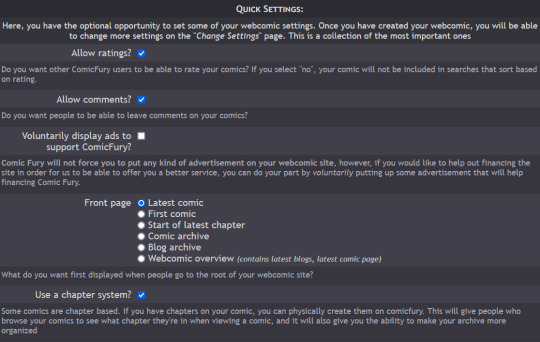
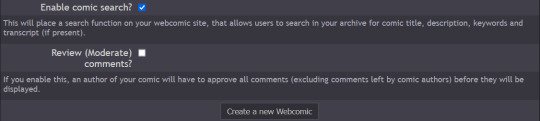
The screenshots cover the whole page, but I will summarize for you: you can chose title, description, slogan, language, style & genre, tags, content warnings and moderation settings (such as allowing comments and ratings)
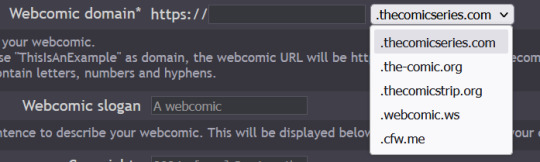
Additionally, you have five different domain options to pick from: .thecomicseries.com, .the-comic.org, .thecomicstrip.org, .webcomic.ws, and .cfw.me
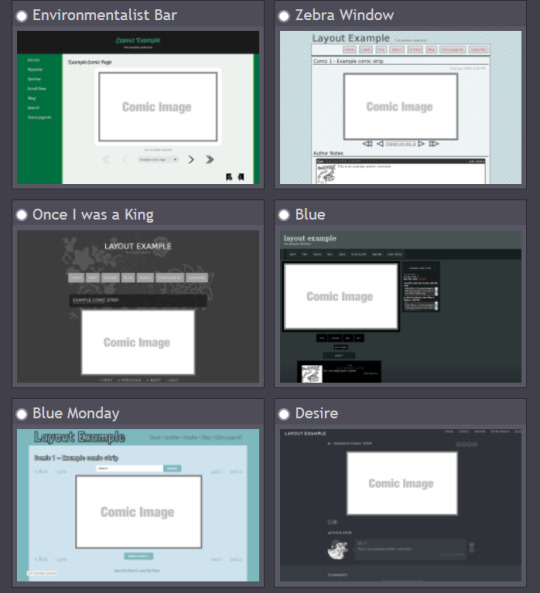
Akin to tumblr's range of default themes to pick from, here you have to pick one default layout you will be able to customize later on (you can also work on the html if you're crafty enough)
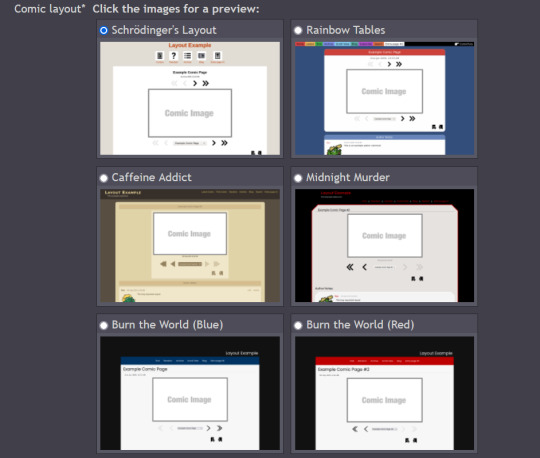
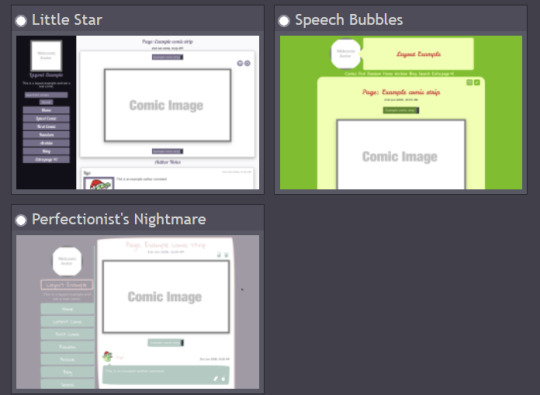
I personally picked "Rainbow Tables" because it already fits well enough the vibes of Wacky Races XD

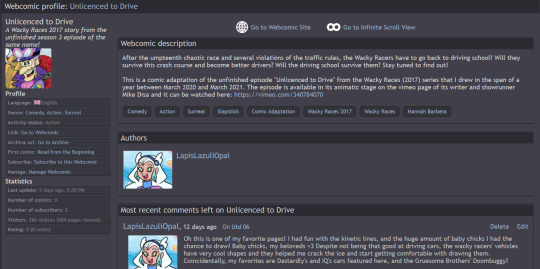
Once you're done, you will find your webcomic or webcomics (there's no limit on how many webcomic sites you can open as far as I know) in the "My Webcomics" page. Your webcomic will have, in addition, a profile page which will be the first thing people will see when they browse on comicfury
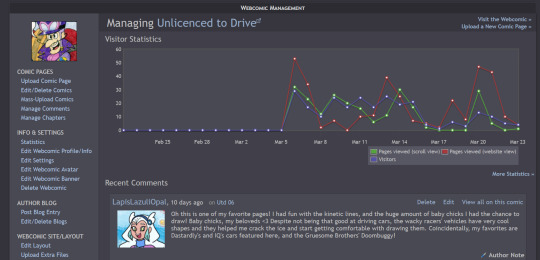
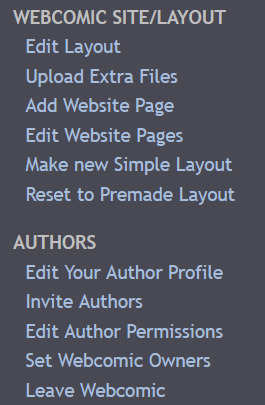
By clicking on "manage webcomic", you can do many things ranging from uploading/editing/scheduling pages to changing the website's layout
So now you want to upload some pages, right? Here we goooo
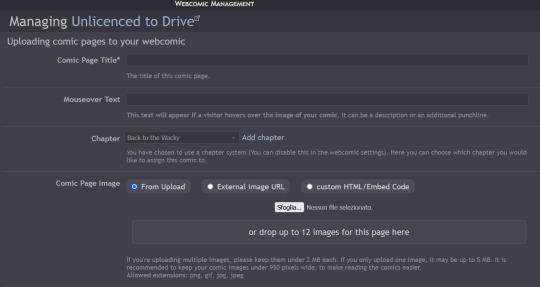
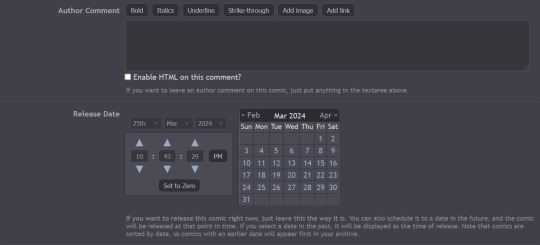
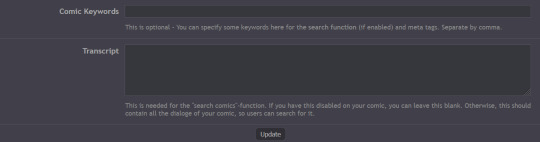
You have to pick a title for the page (could even be just Utd 01, 02 and so on), you can chose a chapter it will belong to (if you want to create chapters) then you can upload up to 12 images in the same page! But remember there's size limits: for multiple images it's maximum 2MB each, for a single image it's maxmimum 5MB. It supports png, gif, jpg and jpeg formats. After putting it some keywords that will make your comic easier to find and adding a transcript of the page if you want, you can upload your page!
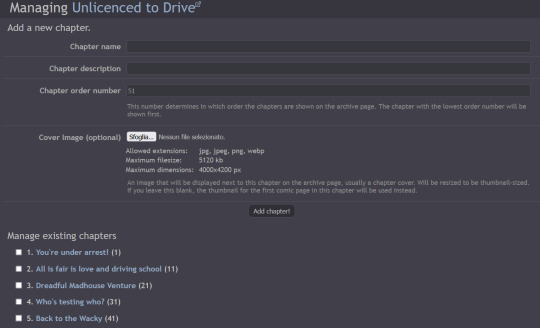
Here's how you can create chapters by clicking on "manage chapters", you pick a name and you can add a description and a cover (that's optional though) As you can see, I have five chapters on my comic for example
Now that you know the basis you can try it out yourself!! Mind you, it doesn't even have to be a comic, I've seen people create websites to host illustrations made for monthly challenges as well, or other webcomics can be made by photographing action figures, it can really be whatever you want! Have fun out there :D

#ComicFury#webcomics#how to use comicfury#I hope this can help anyone who wants to try out making a webcomic!#comic#webcomic#artists on tumblr#indie comics
6 notes
·
View notes