#android file manager for pc
Explore tagged Tumblr posts
Visit Tumblr Blog
Explore Tumblr blogs with no restrictions, modern design and the best experience.
Last Seen Tumblr Blogs


Fun Fact
Tumblr was attacked by a cross-site scripting worm deployed by the Internet troll group GNAA on Dec 3, 2012.
Text
Reverse engineers bust sleazy gig work platform

If you'd like an essay-formatted version of this post to read or share, here's a link to it on pluralistic.net, my surveillance-free, ad-free, tracker-free blog:
https://pluralistic.net/2024/11/23/hack-the-class-war/#robo-boss

A COMPUTER CAN NEVER BE HELD ACCOUNTABLE
THEREFORE A COMPUTER MUST NEVER MAKE A MANAGEMENT DECISION
Supposedly, these lines were included in a 1979 internal presentation at IBM; screenshots of them routinely go viral:
https://twitter.com/SwiftOnSecurity/status/1385565737167724545?lang=en
The reason for their newfound popularity is obvious: the rise and rise of algorithmic management tools, in which your boss is an app. That IBM slide is right: turning an app into your boss allows your actual boss to create an "accountability sink" in which there is no obvious way to blame a human or even a company for your maltreatment:
https://profilebooks.com/work/the-unaccountability-machine/
App-based management-by-bossware treats the bug identified by the unknown author of that IBM slide into a feature. When an app is your boss, it can force you to scab:
https://pluralistic.net/2023/07/30/computer-says-scab/#instawork
Or it can steal your wages:
https://pluralistic.net/2023/04/12/algorithmic-wage-discrimination/#fishers-of-men
But tech giveth and tech taketh away. Digital technology is infinitely flexible: the program that spies on you can be defeated by another program that defeats spying. Every time your algorithmic boss hacks you, you can hack your boss back:
https://pluralistic.net/2022/12/02/not-what-it-does/#who-it-does-it-to
Technologists and labor organizers need one another. Even the most precarious and abused workers can team up with hackers to disenshittify their robo-bosses:
https://pluralistic.net/2021/07/08/tuyul-apps/#gojek
For every abuse technology brings to the workplace, there is a liberating use of technology that workers unleash by seizing the means of computation:
https://pluralistic.net/2024/01/13/solidarity-forever/#tech-unions
One tech-savvy group on the cutting edge of dismantling the Torment Nexus is Algorithms Exposed, a tiny, scrappy group of EU hacker/academics who recruit volunteers to reverse engineer and modify the algorithms that rule our lives as workers and as customers:
https://pluralistic.net/2022/12/10/e2e/#the-censors-pen
Algorithms Exposed have an admirable supply of seemingly boundless energy. Every time I check in with them, I learn that they've spun out yet another special-purpose subgroup. Today, I learned about Reversing Works, a hacking team that reverse engineers gig work apps, revealing corporate wrongdoing that leads to multimillion euro fines for especially sleazy companies.
One such company is Foodinho, an Italian subsidiary of the Spanish food delivery company Glovo. Foodinho/Glovo has been in the crosshairs of Italian labor enforcers since before the pandemic, racking up millions in fines – first for failing to file the proper privacy paperwork disclosing the nature of the data processing in the app that Foodinho riders use to book jobs. Then, after the Italian data commission investigated Foodinho, the company attracted new, much larger fines for its out-of-control surveillance conduct.
As all of this was underway, Reversing Works was conducting its own research into Glovo/Foodinho's app, running it on a simulated Android handset inside a PC so they could peer into app's data collection and processing. They discovered a nightmarish world of pervasive, illegal worker surveillance, and published their findings a year ago in November, 2023:
https://www.etui.org/sites/default/files/2023-10/Exercising%20workers%20rights%20in%20algorithmic%20management%20systems_Lessons%20learned%20from%20the%20Glovo-Foodinho%20digital%20labour%20platform%20case_2023.pdf
That report reveals all kinds of extremely illegal behavior. Glovo/Foodinho makes its riders' data accessible across national borders, so Glovo managers outside of Italy can access fine-grained surveillance information and sensitive personal information – a major data protection no-no.
Worse, Glovo's app embeds trackers from a huge number of other tech platforms (for chat, analytics, and more), making it impossible for the company to account for all the ways that its riders' data is collected – again, a requirement under Italian and EU data protection law.
All this data collection continues even when riders have clocked out for the day – its as though your boss followed you home after quitting time and spied on you.
The research also revealed evidence of a secretive worker scoring system that ranked workers based on undisclosed criteria and reserved the best jobs for workers with high scores. This kind of thing is pervasive in algorithmic management, from gig work to Youtube and Tiktok, where performers' videos are routinely suppressed because they crossed some undisclosed line. When an app is your boss, your every paycheck is docked because you violated a policy you're not allowed to know about, because if you knew why your boss was giving you shitty jobs, or refusing to show the video you spent thousands of dollars making to the subscribers who asked to see it, then maybe you could figure out how to keep your boss from detecting your rulebreaking next time.
All this data-collection and processing is bad enough, but what makes it all a thousand times worse is Glovo's data retention policy – they're storing this data on their workers for four years after the worker leaves their employ. That means that mountains of sensitive, potentially ruinous data on gig workers is just lying around, waiting to be stolen by the next hacker that breaks into the company's servers.
Reversing Works's report made quite a splash. A year after its publication, the Italian data protection agency fined Glovo another 5 million euros and ordered them to cut this shit out:
https://reversing.works/posts/2024/11/press-release-reversing.works-investigation-exposes-glovos-data-privacy-violations-marking-a-milestone-for-worker-rights-and-technology-accountability/
As the report points out, Italy is extremely well set up to defend workers' rights from this kind of bossware abuse. Not only do Italian enforcers have all the privacy tools created by the GDPR, the EU's flagship privacy regulation – they also have the benefit of Italy's 1970 Workers' Statute. The Workers Statute is a visionary piece of legislation that protects workers from automated management practices. Combined with later privacy regulation, it gave Italy's data regulators sweeping powers to defend Italian workers, like Glovo's riders.
Italy is also a leader in recognizing gig workers as de facto employees, despite the tissue-thin pretense that adding an app to your employment means that you aren't entitled to any labor protections. In the case of Glovo, the fine-grained surveillance and reputation scoring were deemed proof that Glovo was employer to its riders.
Reversing Works' report is a fascinating read, especially the sections detailing how the researchers recruited a Glovo rider who allowed them to log in to Glovo's platform on their account.
As Reversing Works points out, this bottom-up approach – where apps are subjected to technical analysis – has real potential for labor organizations seeking to protect workers. Their report established multiple grounds on which a union could seek to hold an abusive employer to account.
But this bottom-up approach also holds out the potential for developing direct-action tools that let workers flex their power, by modifying apps, or coordinating their actions to wring concessions out of their bosses.
After all, the whole reason for the gig economy is to slash wage-bills, by transforming workers into contractors, and by eliminating managers in favor of algorithms. This leaves companies extremely vulnerable, because when workers come together to exercise power, their employer can't rely on middle managers to pressure workers, deal with irate customers, or step in to fill the gap themselves:
https://projects.itforchange.net/state-of-big-tech/changing-dynamics-of-labor-and-capital/
Only by seizing the means of computation, workers and organized labor can turn the tables on bossware – both by directly altering the conditions of their employment, and by producing the evidence and tools that regulators can use to force employers to make those alterations permanent.
Image: EFF (modified) https://www.eff.org/files/issues/eu-flag-11_1.png
CC BY 3.0 http://creativecommons.org/licenses/by/3.0/us/
#pluralistic#etui#glovo#foodinho#alogrithms exposed#reverse engineering#platform work directive#eu#data protection#algorithmic management#gdpr#privacy#labor#union busting#tracking exposed#reversing works#adversarial interoperability#comcom#bossware
352 notes
·
View notes
Text
Heart Toy mayor update continuation
So now onto the other two parts
The album builder is used to build albums for the joi suite later the joi suite can only use the albums built here so its a pre requisite to build albums for later useI
mage Fetching from Image Boards: Fetch random images using tags from popular image boards: Danborou, R34, Realborou, The Great Image Board, and e621. Input your desired tags, separated by spaces, and press the button to fetch images. If the image cannot be found or if the HTTP request fails, an error will be displayed, and the fetch button must be pressed again to retry.
Invalid JSON Errors: If an invalid JSON error occurs, it typically means no image was found for the given tag on the selected site. Try fetching from another site or use a different tag. Album
Management: Create new albums by inputting an album name and saving images directly to them. If no album name is provided, images are saved to the root of the app's storage (counted as an album).
Image Selection from Local Storage: Pick images from your phone's local storage using the file picker. Save them directly to an album or create a new album.
Direct URL Saving: If you have the direct URL to an image, input it and save the image to your selected album. The process is easier on Windows, but somewhat difficult on Android. Album Deletion: Delete selected albums, but requires multiple clicks if the folder is not empty.
File Organization and Limitations: The app uses Android's file system for album management, which can involve some manual navigation (copying and pasting files into albums using the file picker). The app remembers the last location when accessing files via the file picker, making it easier to pick from specific folders. on pc this is much easier as the file explorer can access the persistent storage and copy images with control c control v

Joi Suite Feature List:
Interval Creation & Editing
Interval Object: Tempo: The tempo (beats per minute) for the interval.
BeatTightness: Controls how tight the beats feel, influencing the spacing between beats.
EndTempo: The tempo the interval will gradually reach by the end.
TempoAcceleration: How quickly the tempo changes during the interval.
BeatNumber: The number of beats within the interval.
SyncopalGalop: A setting that modifies the rhythm to alternate 1 and mltiple beat per metronome tick.
Duration: The length of time this interval will last.
Imageshiftperiod: The speed at which images will change during the interval.
Imagefadein: Controls how quickly images fade in.
EndPauseLength: The length of time the pause lasts at the end of the interval.
Interval Editor Window:Input fields for each of the interval parameters (Tempo, BeatTightness, EndTempo, etc.). Add Interval Button: Creates an interval based on the current input and adds it to the interval list. Suggest
Random Values Button: Generates random values for the parameters, which can then be added as a new interval. Range-Based Interval Creation: Enter two values for each and all parameter (in an "x-x" format) to generate random intervals within that range. Interval List: Displays all created intervals as cards.
Card Swap: You can swap the order of two intervals in the list by clicking on their cards.
Delete Last Interval: Removes the most recently added interval card from the list.
Sequence Creation & Management:
Sequence: The collection of intervals you’ve created. You can give it a name, save it, load it, or delete it. Once you’re happy with your sequence, you can start it by pressing the Start Button.
Sequence Start: The interface allows for fullscreen mode once the sequence starts. A small blinker will appear in the bottom right corner, showing the current BPM. The color of the blinker changes based on the rhythm:
Green: Downstroke
Red: Upstroke
Black: after-stroke pause
Inter-Sequence Notifications: before each interval ends, a 5-second message will fade in, showing the tempo, tightness, and beat pattern of the next sequence. If there’s an intermittent pause, the screen will fade to black, and text will instruct the user to breathe, relax, and wait for the pause duration.
Image Display & Album Integration:During the intervals, images from the selected album will fade in. The image transition speed is controlled by the Imagefadein parameter. Images will shift at the speed defined by Imageshiftperiod.
Album Selection: You can change the selected album at any time during the sequence. The next image will fade in from the newly selected album once it’s changed.
Timing & Pause Features:
End Pause: At the end of the interval , a pause will occur. If the inteval has an end pause, the screen will fade to black and instruct the user to breathe and wait. The countdown will guide the user through the pause.
Infinite Inteval: The last interval of the sequence will stretch infinitely until the user stops the sequence. Every 300 seconds (or configurable time), a warning will notify the user that the sequence is ongoing.
Overall User Experience:Interactive and rhythm-driven experience, combining beats, tempos, and visuals from the album. Ability to customize and randomize beats, tempos, and image transitions, creating a personalized rhythmic experience. Seamless transitions between intervals and a clean user interface that helps focus on the rhythm while enjoying the accompanying imagery. for a bit more detailed explanation consult the help menu in each section

Once Again i state that these parts can access adult image boards thus the app is now considered NSFW and ADULTS ONLY because of these additions
19 notes
·
View notes
Note
Hi danie!! ive been super hyperfixated on tkdb and ive been curious about the in game models, ive seen people access them through live td and would liked to do the same. i found your post explaining the process after having the files but i couldn't find one that would explain how to access those files and get them from the phone to the pc!
Hi! Welcome to the hyperfixation!! :'D I thought I explained it briefly in a post but. It's fine I'm planning on making another post with the full step by step process in the future, and making sure it's in my pinned for easier access 👍🏾 but in the meantime I can try and explain!
If you have an iphone you're out of luck unfortunately. Apple doesn't let you access your files to my understanding, even wired in.
If you have an android or you use bluestacks to play the game on your pc(and I'm sure it's accessible if you play tokyo debunker through the pc google play thing but I haven't explored that myself yet) all you need is a wire that connects your phone to your device! You probably already have one of these if you have a USB cable that connects to your phone for charging, but some cables are charge only so do be aware of that.
As a reminder you'll basically only have access to the ones you've seen in game. Sometimes they get cleared too, so you may be missing some you haven't seen in a while. They do also sometimes update sprites, especially to add expressions or features or to fix things. However they may not delete the original folders that contain the old stuff when they redownload them, and AssetStudioGui doesn't try and read them in order of last updated. So you may have to manually go through and figure out which is the newest and which was updated and so on. . .which is much easier from on your phone and i recommend File Manager Plus if you plan on doing this a lot and it's available to you! You could also just delete the contents of the folder and manually redownload everything as you go tbh lol
All you have to do is plug your phone into your PC and navigate to the game files. That should be something like This PC\[PHONE NAME]\Internal storage\Android\data\com.zigzagame.tokyodebunker\UnityCache\Shared . If you have it on an SD card first of all tell me how because that'd make transferring so much easier for me-- and you can't/don't want to remove the SD card to insert into the device, the file path will be a bit different for the first few folders.
The filenames are encrypted so you won't know which is which. You're just gonna have to move all of them unfortunately. This will take A While depending on how much is in there. Once you've done that though you can kind of work around that in the future by only moving any newly updated or added folders, but that requires another app that lets you navigate to the files from your phone(see: previous rec of File Manager Plus) and sorting them by date and. It's a whole thing that can take a long time.
Hopefully that helps! Lmk if you need any further explanation 👍🏾
#danie yells answers#danie yells at tokyo debunker#datamining cw#zombvm4iden#this does work with some other games btw#not all unfortunately but many games i've played or that others have played work the same way and can be datamined the same way#ikemen series does last i checked housamo does obey me classic does i think nightbringer too uuuh twst works the same. . . . . .#the filepath may be totally different for those games tho idr what it was for housamo or obey me
7 notes
·
View notes
Text
The Danganronpa Another games (and the struggle to actually PLAY them)
Soooooooooooooo.... anybody know how to get these games running, perhaps on a Steam Deck?
Background:
It's looking unlikely we're going to see more Danganronpa Proper any time soon, so it's only natural that I'd be starting to look into fangans to try and find something to whet my appetite.
Doing that makes it quickly become clear that there are no "fangan" games as beloved or popular as the Korean-made Danganronpa Another duology. The second is particular beloved online, but of course I want to experience them in storyline order.

I'm also a firm believer that playing a game for yourself is fundamentally different than watching a let's play or whatever. There's nothing like the firsthand experience. Why would you EVER separate yourself from embodying the characters, being a part of the experience? You're losing so much.
The other problem here is that I don't want to try playing them on PC. Because (1) I'm only ever sitting at my PC when I'm working, and (2) it's pretty far isolated from everyone else in the house. I don't want to be sitting at my day-job workstation, alone, trying to get through these things.
But hey... I have other devices. And since the first Danganronpa Another is just an RPGMaker game, that seems simple enough to get running in theory..... right???

Last fall (2024), I tried to get the first "Danganronpa Another ~ Another Despair Academy ~" running on an Android gaming handlheld I have. I managed to play through the Prologue (see above) before... yeah, it died on me. It was too big a file for my handheld to manage, and it couldn't run the rest.
My next logical course of action, then, is to try and play these on a Steam Deck. But the Steam Deck is a damned Linux device. What I DON'T know about Linux could just about squeeze into the Grand fuckin' Canyon.
So uh. That's a current ongoing mission.
If anyone out there knows anything about how to get this going, can you let me know?
#danganronpa another#danganronpa another: another despair academy#Danganronpa Another ~Another Despair Academy~#fangans#fangan#linux#steam deck#HOW TO#help?#super danganronpa another 2
13 notes
·
View notes
Text
Chapter 2 Beta Update~
--Nearly all of Ch2 is available, EXCEPT: The "America" backstory when talking with Lottie (it's just half finished). Overall around ~22k words added, and a few thousand to Chapter 1.
--Reworked the Sex/Gender/Gender Presentation System.
--New and Revised MC Dialogue to Ch1, depending on what Occupation you choose. Not all has been changed, more planned later in the month.
--Various typo fixes, small re-writes and bug fixes.
I wanted to get more done, but alas ><;; 🙏🏽 some IRL came up that i really need to deal with. BUT! I managed to get Ch2 from beginning to end! I hope yall will enjoy the last half of Ch2, I'm very happy with it overall! :"))))
!How to Read/Play!
Click this. Do not play it inside google drive, it doesn't work that way. Download the .html file.
If you have an iPhone, use this guide. I can't help you troubleshoot iphone or MAC problems; I don't have one.
If you have an Android iOS, open the .html file with any intertnet browser app EXCEPT HTML viewer.
If you have a PC, open the .html file with any internet browser.
Please remember the saving/loading can be janky. Do not save and load the same or different "files" rapidly. This is a limitation of HTML.
#im v sorry if theres any glaring bugs; i will squash em as soon as i can 🙇🏽#i will also be a bit slow in answering DMs and messages#anyhoo Lottie's convo ran long (again) bc theres a lot of extra stuff for *every* culture so#i went down a research rabbit hole and wasnt able to finish it all lol ;;;;;#alas!#if:devil's moon#updates & builds#interactive fiction#lackadaisy x reader
84 notes
·
View notes
Text
Diabolik Lovers PSVita Emulation

This is a tutorial on how to emulate and play on your own PC/Android the following Diabolik Lovers titles:
Diabolik Lovers Haunted Dark Bridal - Limited V Edition (with fan-translated english patch)
Diabolik Lovers More Blood - Limited V Edition (with fan-translated english patch)
Diabolik Lovers Vandead Carnival
Diabolik Lovers Dark Fate
Diabolik Lovers Lunatic Parade
Diabolik Lovers Lost Eden
Before we start, the first thing you'll need is something to emulate these games on. This tutorial uses Vita3k, so I reccomend you use that lol. You can download it here: https://vita3k.org
For those who want to play on their PC, keep reading. But for thoes who want to play on their android, scroll further down :)
PC
Unzip the vita3k folder you just downloaded (If you don't have a program to do this, I reccommend WinRAR. [just download it, no need to buy it] But I'm sure any will do)
Open the Vita3k.exe file to install it
Follow the installation instructions
When prompted to install firmware and font files please do so, don't skip by pressing next. You can find them here: firmware and font.
Select the install button for each, and then select said files from your downloads (or wherever you downloaded to files to) when prompted.
Click next when you have installed both. On the next page, click next again after selecting settings and preferences.
Now close Vita3k down and reopen it again.
You are ready to install some Dialover games XD
(if you run into any issues just DM me via either tumblr or discord)
NoPayStation has the PKG for all the above games.
Select the game you wish to download (click the name, it should open a pop-up window)
Then download the PKG file
Keep this pop-up window open, you'll need it for later.
Once done, in Vita3k, click file > install .pkg. Then select the game you just downloaded.
It will ask to verfiy the PKG, so you can select either work.bin OR zRIF. (work.bin involves downloaded another file from NoPayStation. While zRIF is just a code you can copy and paste)
If you chose work.bin: download the work.bin file from the game's pop-up in NoPayStation. then select it when prompted in Vita3k.
If you chose zRIF: copy the zRIF key from the popup window from before. (make sure you select the whole thing, it's quite long). Paste the key where prompted to in Vita3k.
The game should now install (if it hovers around 60-70% for a while don't stress)
Now, if you're installing either HDB or MB, keep reading, otherwise, you should be good to play the game :)
Here are the english patch links for both games: HDB english patch link MB english patch link
Inside Vita3k, right-click on the game you just installed, press Open folder > Application > data. Now replace the GAME.cpk with the one you just downloaded. (it has the english translation in it)
Close Vita3k again, then reopen it.
You are now ready to play Diabolik Lovers >:)
Andriod
Credit to the lovely @mp3minded for this tutorial. I don't have an andriod phone so I didn't consider it, but it's a great idea haha.
Vita3k should have downloaded as an apk.
You should now navigate to wherever the apk file was downloaded using a file manager app on your android. Click on it and install it. (if you don't have one, I have used ZArchiver personally, so you can try that).
Now download firmware and font files. You can find them here: firmware: http://dus01.psv.update.playstation.net/update/psv/image/2022_0209/rel_f2c7b12fe85496ec88a0391b514d6e3b/PSVUPDAT.PUP font: http://dus01.psp2.update.playstation.net/update/psp2/image/2022_0209/sd_59dcf059d3328fb67be7e51f8aa33418/PSP2UPDAT.PUP?dest=us
When asked whether or not to create a new emulator path in Vita3k, make one just to be safe.
You are ready to install some Dialover games XD
NoPayStation has the PKG for all the above games.
Here are the direct links to each of the games;
HAUNTED DARK BRIDAL: https://nopaystation.com/get/PSV/PCSG00272/IFDIABOLIKLOVERS/1/pkg?version=1.01
MORE BLOOD: https://nopaystation.com/get/PSV/PCSG00476/DIABOLIKLOVERSMB/1/pkg?version=1
VANDEAD CARNIVAL: https://nopaystation.com/get/PSV/PCSG00472/DIABOLIKLOVERSVC/1/pkg?version=1
DARK FATE: https://nopaystation.com/get/PSV/PCSG00530/DIABOLIKLOVERSDF/1/pkg?version=1
LUNATIC PARADE: https://nopaystation.com/get/PSV/PCSG00826/DIABOLIKLOVERSLP/1/pkg?version=1
LOST EDEN: https://nopaystation.com/get/PSV/PCSG00910/DIABOLIKLOVERSLE/1/pkg?version=1.01
Select the game you wish to download (click the name, it should open a pop-up window)
Then download the PKG file
Now keep this pop-up window open, as you'll need it to copy the zRIF key.
Once done, in Vita3k, click file > install .pkg. Then select the game you just downloaded.
It will ask to verfiy the PKG, so you can now go back and copy the zRIF key from the popup window from before. (make sure you select the whole thing, it's quite long). Paste the key where prompted to in Vita3k.
The game should now install (if it hovers around 60-70% for a while don't stress)
Now, if you're installing either HDB or MB, keep reading, otherwise, you should be good to play the game :)
Here are the english patch links for both games: HDB english patch link MB english patch link
This is the most complex step, so take it slow if you need to. First, find the new folder you made for your Vita3k Emulation, and follow this exact pathway for each game. HDB; ux0 > app > PCSG00272 > data. MB; ux0 > app > PCSG00476 > data.
Now replace the GAME.cpk file with the one you just downloaded. (it has the english translation in it).
Close Vita3k again, then reopen it and/or clear Vita3k’s cache before you start up the game. Set up your button config in Vita3k too.
You are now ready to play Diabolik Lovers
Gatekeepers of the english fan-translation patch be damned. If Daisuke Iwasaki won't release an offical english version of Diabolik Lovers (and a Chinese one instead apparently 😭) then I'm emulating his damn game. I've bought a bunch of offical merch anyway, not like I haven't supported the company lol.
Happy gaming my fellow vampire enthusiasts :3

45 notes
·
View notes
Note
So how did you get the character files of the ol2 characters? I'm really bad with computer stuff and have no idea how to get them, lol. If you don't want to explain it that's ok, I just thought I'd ask!
You know what, sure. I can give a tutorial on that.
For those reading without context, anon here is asking where I got the sprite files needed for this tutorial. This is also essentially just a basic "how to decompile most Ren'py games" tutorial, just swap out all mentions of OL2 with any ren'py game of choice and it should work (within limits, there are some games where this won't work. But it works for both Our Life games)
This tutorial also requires a computer or laptop running Windows. There might be ways to decompile ren'py games from Mac but I'm not certain and that's not what this tutorial is going to focus on. Android users are just shit out of luck though, sorry.
Step 1: Open the folder containing the game's .exe file
This part differs depending on where you downloaded OL2 from.
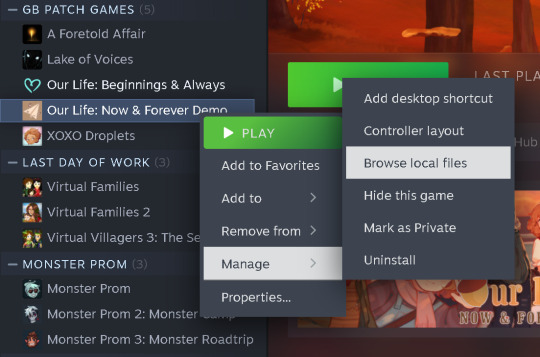
If you downloaded OL2 from Steam: Right-click on OL2 in your Steam library, hover your mouse over the manage submenu and then clock "Browse Local Files"
If you downloaded OL2 from Itch.io: Find where you extracted the game to. If you're unsure, the folder name should look something like "OurLifeNF-[X.X.X]-pc" but with '[X.X.X]' substituted with the version number of your game (for example "OurLifeNF-1.3.5-pc"). Once you find it, double click on the folder to open it
Once you've done either of those things, you should have a window explorer window up that looks something like this
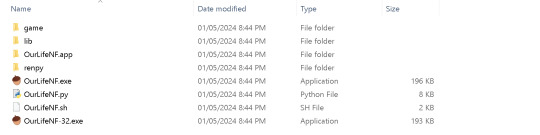
(If you have files that aren't in this screenshot, that's normal, this is just what the folder looks like when you haven't opened the game)
Step 2: Grabbing the archive.rpa file
This is the file that contains all the game's data
From the window you opened up from the last step, double click on the folder labelled 'game'. In that folder, there will be a file titled archive.rpa. Copy that file (don't cut it or drag it out of the game folder, the original file needs to stay in there or your game won't run)


(You can also use the shortcut ctrl + c to copy)
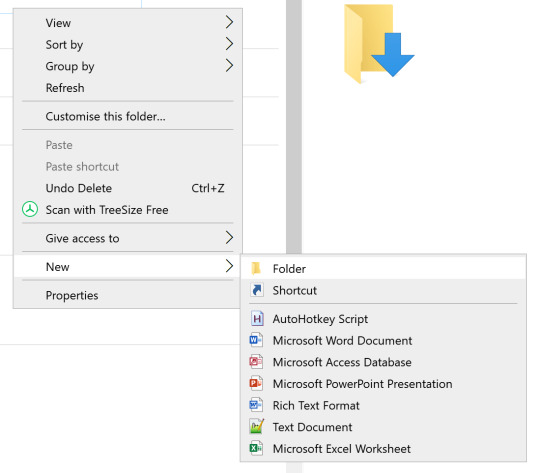
Create a folder somewhere else on your computer, preferably somewhere like Documents, Downloads or Desktop where you can easily access it (to create a folder, right click inside whichever place on your computer you want to create a folder, then hover over the "new" submenu and then click folder). Then paste the archive.rpa file into that folder
Step 3: Download RPA Extract
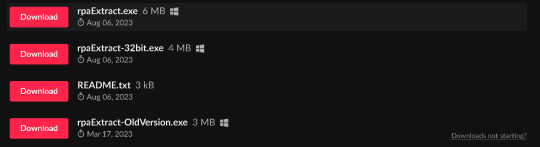
RPA Extract by iwanPlays is the software we're using to decompile the files. Click the link above, click 'No thanks, just take me to the downloads' (or you can give the developer money if you have the means to and want to show them support) and then click 'Dowload' on the first option in the list and download it to the same folder you copied the archive.rpa file to

Step 4: Decompiling the game
Next, drag the archive.rpa file to rpaExtract.exe. You'll probably get this window that pops up.

Click "More Info" and then, at the bottom, click on the "Run Anyway" button that shows up
After that, a command window will show up with all the files being decompiled. Just wait until its down and then exit out of it.
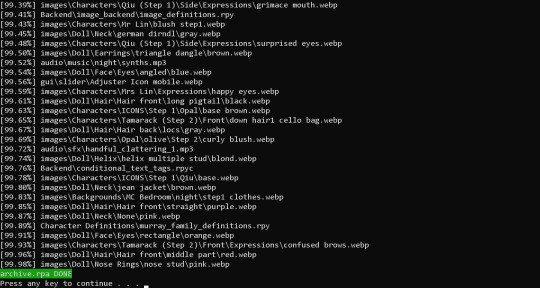
Ta-da, you've got the decompiled files! The sprite files are in the Characters folder which is in the images folder. Have fun!
38 notes
·
View notes
Text
Setting Up Calibre + FanFicFare
I've talked before about using Calibre to download fic off of fiction archives, so that's where I decided to start with this series. If you're interested in learning more about how to download fanfic for offline reading/local archiving, then watch the #ficArchiving tag. And if you're not interested in seeing these posts then that's also the tag to block.
Edit (3/22/25) - I've updated the post due to changes in how FanFicFare works with regards to site ratings metadata - the type of column this information needs to be stored in has changed as it no longer works with selectable, pre-set options as originally outlined. Also adding note that additional plugins are required to make FanFicFare's anthology options available.
(Since this is a long post, I'm sticking it under the cut.)
First some background on what Calibre is. It's an open source eBook manager and is really quite versatile for it's usage, thanks in part to the robust library of plugins that it utilizes. The default Calibre app comes bundled not only with management software but an e-reader, server options for locally hosting your library (or libraries), and a whole host of options for managing metadata. Default metadata being tracked include title, author, series, publishing data, synopsis, and tags, but you can manually add columns for any additional data you want - which comes in handy when managing a local fanfiction archive. You can add columns for the fandom the fic is written for, the included ships, characters, completion status, whether it's a single fic or a series turned into an anthology. If the information is useful for you, then you can add a method to track it.
Now, for what Calibre does not do. Because it only runs on Windows/Mac/Linux systems - aka it only runs on a PC - you cannot install it on your phone or tablet. There's no official Calibre apps for Android or iPhones either, though there are unofficial ones that can work with Calibre in server mode. I've never tried the unofficial apps, however, as they tend to cost money that I don't really think they're worth. That's largely because in server mode you can log in to the local instance of Calibre with a regular old browser. Just book mark the page and, so long as your on a network where the local instance is running, your phone or tablet will have access to every book on your Calibre's library (or libraries, depending on how you set things up). You can then either read the eBook directly on the browser or, my preferred method, download the file and read it on the e-reader app of your choice. (You can also make the server available outside your local network, but I've never bothered to learn to set that up.)
Given everything Calibre can do, I'm not particularly bothered by the lack of official apps for phones or tablets - as far as I'm concerned it doesn't need one.
This post is going to be focused on using Calibre for fanfictions specifically, but if you want more information on the other things it can be used for, the Calibre FAQ pages are quite extensive and goes into detail about it's format support, eBook conversion abilities, device integration, news download services, library management, and more.
Alrighty, so first thing you'll want to do is download the version of Calibre that works with your computer. You can also create a portable version that runs off a USB drive if you prefer. Once you've downloaded and installed Calibre, it's time to decide where you want your fanfics to live. Do you want all your eBooks to live in one spot or do you want separate libraries for fanfiction vs original fiction? Since I like to collect more metadata for my fanfic collection than for my regular eBooks - and then completely different extra data for tracking my Star Trek books, or Doctor Who books - I like to have multiple libraries for managing my eBook files. And Calibre makes managing multiple libraries at one time very, very simple.
In Calibre's header there are going to be a lot of icons - I’ve modified the header toolbar for my Calibre instance, but most of the default options are still visible in the picture below.

Specifically you want the one that looks like four books leaning against each other on a shelf. It should have the default library name displayed there - Calibre Library.
Clicking on that will open the menu used for maintaining multiple libraries. While the application only sets up one library by default, it can link to multiple libraries located anywhere on your computer's filesystem. Since I like to use Dropbox to back up my libraries, I usually locate mine in my local Dropbox folder. You can import existing libraries from one instance of Calibre to another, which makes moving from one computer to another, or maintaining the same library across multiple computers, very simple.
Let’s assume you want to have a separate library just for fanfiction. To that end, you'll want the first option on the menu - labeled "Switch/create library".
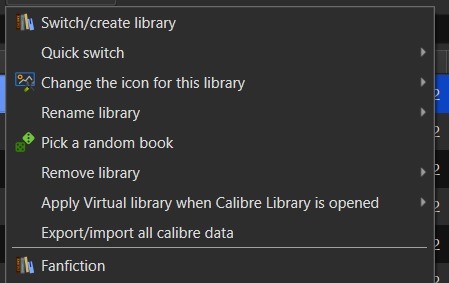
From there you'll want to select the folder - or create a new folder - with the name of the library you want to use in Calibre. I'd recommend something straightforward and call it "Fanfiction". Then you'll select the radio button labeled "Create an empty library at the new location".
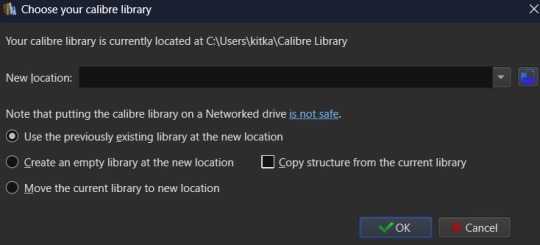
You don't need to copy the current library's structure since every library is created with Calibre's default structure and you won't have added any specialized data tracking at this point to copy over. Once you've set your library location and selected the option for creating a new library, hit the OK button. It'll create the new library and immediately change so that it's managing that library instance instead of the default Calibre Library instance.
If you aren't sure which library is currently open in the Calibre app, then the icon with the four books in the header is where you want to check. It will always be labeled with the name of the currently open library. The most recently opened libraries will be listed at the bottom of the menu opened by that icon for easy switching between libraries and the "Quick switch" option will list all the available libraries registered to your Calibre instance. The icon with the four books is the default icon for a library - if you change the icon for a library then keep in mind that the icon will change in the header when the library is the currently selected on.
Alright, so step one is completed. You now have a dedicated Fanfiction library for maintaining any fics you choose to download. But the default metadata being tracked for the books isn't as robust as it could be. Time to bulk that information up. You'll want to look back at the header again, this time for an icon that looks like a crossed screwdriver and wrench. It's labeled Preferences. Click on that in the center of the icon to bring up the Preferences modal instead of just the menu (which you can access by clicking the associated down arrow beside the icon instead).
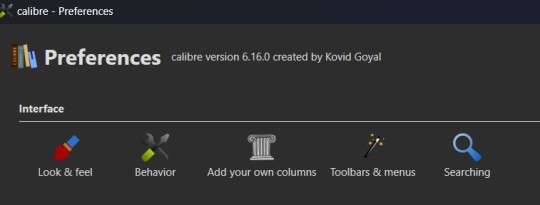
The Preferences modal is where you can access options to tweak the appearance, behavior, and various other functions of Calibre. And I certainly encourage experimenting with the application as it can be customized to your heart's desire to make it meet your accessibility needs. For now, however, we're only interested in the "Add your own columns" option on the top layer of the modal, under "Interface". The associated icon for the "Add your own columns" option is, appropriately, a small Greek column.
This will open the column maintenance modal which presents with a table listing all the existing columns - these all track some kind of metadata for the ebook - and will have checkboxes on the left most of the table indicating whether these columns are displayed on the main interface or are accessible only through the Edit Metadata modal. (We'll get to the Edit Metadata modal later.)
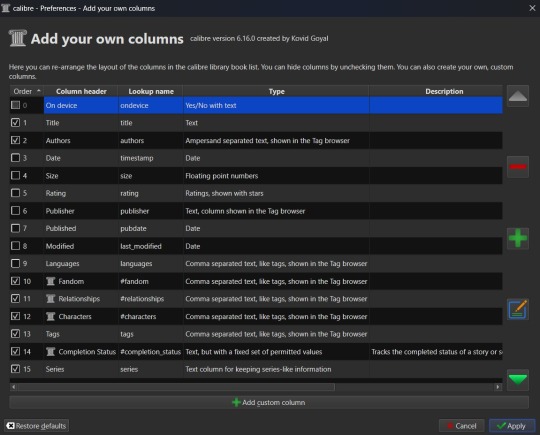
To the right of the table are options for moving a column up or down in the list order, a minus sign used for deleting unnecessary columns, a plus sign for adding new columns, and an edit option for editing existing columns. I'd recommend unchecking columns you don't want displayed in the main table, but not deleting columns. That way you can still store the metadata - and search on it - in that column, but it won't clutter up the main page.
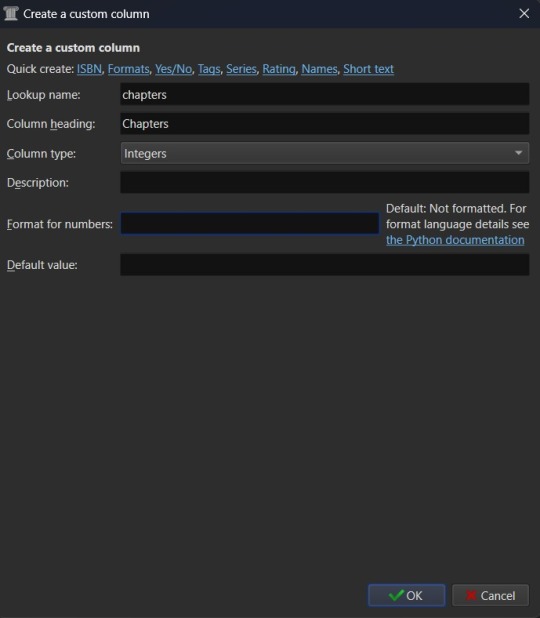
Alright, so now it's time to add some columns. Click the plus button to bring up a custom column form.
The "Lookup name" is what Calibre uses to do searches, so it needs to be something that can be safely saved in a database. "Column heading" is the pretty name that displays either as a column heading in the main Calibre table or as the metadata entry name in the "Edit metadata" modal. "Column type" has a dropdown of the different types of metadata that can be stored in a column and has an option to show checkmarks (a checkbox) for additional true/false parsing. There are a lot of options in the dropdown for metadata types, some of which will offer up additional column creation form options, and this is something that cannot be changed once a column has been saved. If you select the wrong one and realize it later, you'll have to delete the column and create a new one to take it's place. "Description" is there to help clarify things if the "Column header" isn't descriptive enough to make clear what the metadata being tracked by the column is for. And, finally, you can use the optional "Default value" if you want that column to be auto filled with a value you can update later.
Note that the form may add further fields to it, depending on the selected “Column type”.
Since this is going to be tracking fanfiction metadata, some good ideas for creating tag-type metadata columns would be "Fandom", "Ship", and "Characters". You might also consider "Rating", "Content Warnings", “Chapters”, or other data which might be better suited for other types of metadata. We'll start with the "Fandom" column.
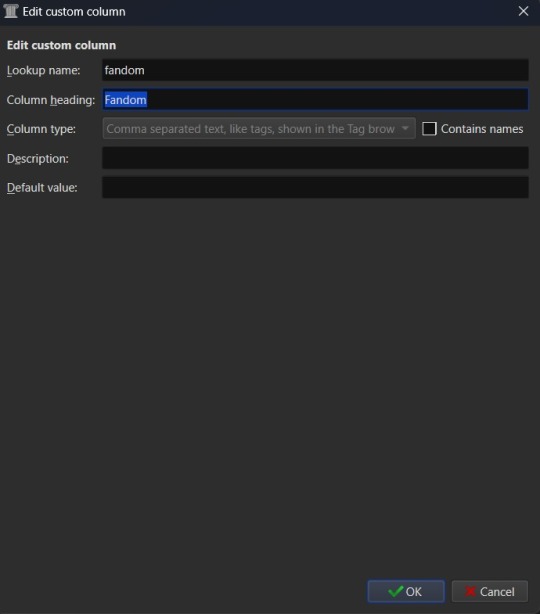
You'll want to set the "Lookup name" to "fandom" (note the lowercase here), the "Column heading" to "Fandom" (uppercase this time), and the "Column type" to "Comma separated text, like tags, shown in the Tag browser". The "Description" is optional, so add what you like (or don't) there and the same goes for "Default value", which you might want to list as "Unsorted" or simply leave blank to indicate the fandom is currently unlisted. Once you're satisfied with your selections, click "OK" and you can either then "Apply" your settings changes or continue on to add more columns.
The "Ship" and "Character" data also work best as comma separated data, so I recommend making those columns in the same fashion as the "Fandom" column. “Chapters” you may want to add as an integer column, shown below.
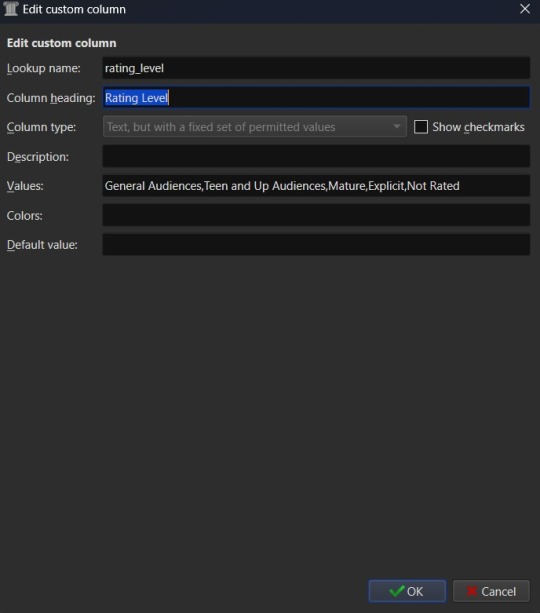
If you're wanting to add "Rating" as a column, then you might want to have specific options for rating a fic, such as limiting the options to the same ones used by Ao3. To this end, you'd fill out the form more like this. "Lookup name" as "rating_level" so as not to confuse it with the existing rating column for star ratings, "Column heading" as "Rating" or maybe "Rating Level", and "Column type" as "Text, but with a fixed set of permitted values". This "Column type" selection will bring up two more inputs on the column creation form - "Values" and "Colors". These two inputs work together and can be edited later. In the "Values" input, you can add a list of comma separated values. In this case the list for "Values" would look like "General Audiences, Teen and Up Audiences, Mature, Explicit, Not Rated". "Colors" is an optional list that will assign a different color to every option on the "Values" list that corresponds to an entry in the "Colors" list. So if you want General Audiences to be blue and no other option to have a color, you'd list "blue" for colors. Or "blue, blue, red, red, red" to have the first to options on the "Values" list as blue and the last three as red. You can play around with this more or leave it blank to have the options all be the same default colors.
Once you've finalized your selections, hit OK to create the column.
Edit (3/22/25) - FanFicFare currently no longer accurately scrapes ratings data into a column setup as "Text, but with a fixed set of permitted values". Instead you will need to use the "Comma separated text, like tags, shown in the Tag browser" option. Fixed values should still work for things like fic status, which have the Completed and In-Progress settings only, but changes either to FanFicFare or Ao3 (and thus any Ao3 clones) have made the fixed values option for ratings fail to correctly connect site tags to the preset values. The good news is that this will now set the ratings for an anthology fic made from a series page with the ratings of all fics within the series - so if some are General Audiences and others are Mature within a single anthology, that will be accurately reflected in your captured metadata after downloading a fic.
After creating all your new columns and selecting which ones you want present on the main table, hit the "Apply" button. You'll likely be prompted to restart Calibre. Do so and when the program reloads it should display the main table with all the columns exactly how you set them up. Which means step two is complete. At this point if you have any fanfiction eBooks already, you can drag and drop them into the table from folder files or use the "Add books" option at the left most side of the header toolbar to start adding those. You can manually update the metadata either by clicking on newly added book and then selecting a column or by clicking the book and then selecting the "Edit metadata" option in the header. So now it's time to take a quick look at the metadata editor modal.
By default, the metadata modal will only have one screen but, because you've added custom columns, there should be tabs at the top. One for "Basic metadata" and one for "Custom metadata". The "Basic metadata" includes options for title, title sort, author(s), author sort, series, series number, file versions (for tracking if you have epub, mobi, pdf, etc files of the same book), cover management options, the star-based rating system, tags, ids, upload date, published date, associated publisher, languages, and "Comments" which is where the story summery/synopsis should go. For regular, non-fanfiction eBooks, you might also take note of the "Download metadata" button which allows for scrapping official metadata off of sites like Barnes and Noble, Amazon, or other eBook sellers or archives.
The "Custom metadata" is where your custom column data will be found. It should be found at the top of the page and fill space downwards with however many custom columns you've added. Inputs that allow for comma separated values will still have a dropdown option associated to allow adding tags you've entered previously for other ebooks. Columns that only allow using preselected data are more likely to appear as select boxes or other form types. This is where you might notice you created a column type incorrectly, so make sure to check over all the data entry options for each metadata type you're collecting. If it doesn't look like it's set up the way you wanted it to be, you can go back to the column editing modal and try again.

The big draw of using Calibre to manage fanfiction eBooks, however, is being able to use Calibre to download the fanfictions from the web and convert them to eBook format for you. And that's where Calibre's plugin library comes in handy.
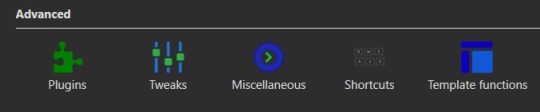
If you were making any edits to an existing eBook, save those and close the metadata editor. Head back over to the Preferences modal and check the Advanced settings options at the bottom of the modal. There should be a green puzzle piece icon labeled "Plugins" - click that to open the Plugins modal.
It will take you to a table used for monitoring and controlling existing plugins and, yes, it does already have 'plugins' installed. These are really more the application's default modules, but because of how Calibre works they can be edited and controlled in the same way that external plugins are. At the bottom of the page you'll see three buttons - "Get new plugins", "Check for updated plugins", and "Load plugin from file". These are concerned with the external plugins that you can add to Calibre. "Get new plugins" will allow you search through the official library of third party plugins available to Calibre - plugins that the Calibre team have vetted to confirm aren't actually malware. But they're by no means the only plugins you can install, as the "Load plugin from file" will allow you to load pretty much any plugin you want to. Such as a plugin for, say… stripping DRM off of purchased eBooks.

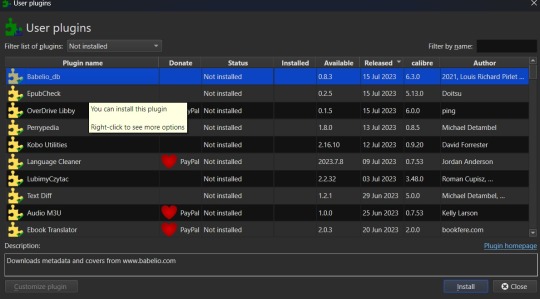
In this case, you want to select the "Get new plugins" option. This brings up a modal for User plugins and the displayed list will automatically be filtered by available plugins that have not yet been installed. You can filter this list further by typing "FanFicFare" into the "Filter by name" text input.
You can then select the FanFicFare plugin and install it. After installing the plugin, you should select the option to restart the application, to ensure that it installed properly. I'd also recommend adding the FanFicFare icon to the optional bottom toolbar instead of the header toolbar, since that'll make it much easier to find since, unless you add more plugins and assign them to that toolbar, it should be the only option on the bar right now.
Edit (3/22/25) - In addition to the FanFicFare plugin, you'll want to include two additional plugins so that FanFicFare can make it's anthology options available. These two plugins are EpubMerge and EpubSplit. These plugins can be used on their own to create anthologies by creating a new epub file from multiple epubs or splitting anthology books into separate epubs for each book contained within. Without these plugins FanFicFare's anthology options will be hidden, as it utilizes them for merging fics in a series together after downloading them separately.
So, full disclosure, you don't need Calibre to run FanFicFare. You could download it and run it from a command line interface instead. However, I prefer it's Calibre interface, especially since it really lets you take advantage of the best Calibre has to offer in metadata tracking, as it can be set up through Calibre to auto fill those columns I walked you through setting up earlier. But I'll get to more on that in a minute.Once Calibre has restarted, you should now have FanFicFare available on one of your toolbars. It's associated icon is a green text bubble with the letters "FF" in it pointing down at a picture of a book.
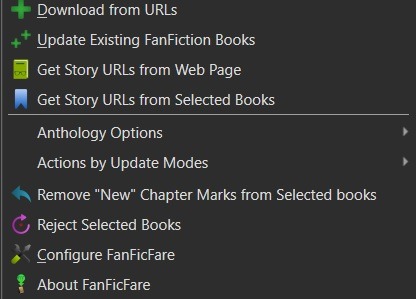
It'll have a small down arrow next to it, which you'll want to select in order to bring up FanFicFare's menu. At this point you can start downloading fics if you want - but let's do a little customizing first. Select the "Configure FanFicFare" option to bring up the configuration modal.
So this modal has a lot going on. And I do encourage doing some exploration on your own, because FanFicFare is a powerful tool made all the more powerful here in conjunction with Calibre's built in tools. Cover generation is very useful, "Reading lists" can be used to auto send new books to any devices you've linked to Calibre when they're connected to the computer, you can tie into email accounts to pull fanfics from email or pull URL links for downloading... there is just so much this plugin can do.
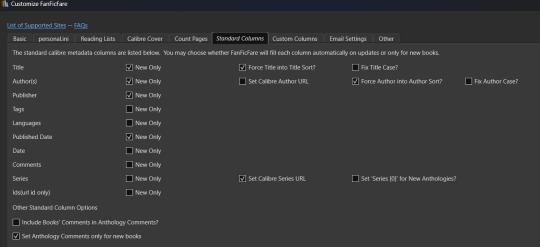
For now, however, we're interested in the column related options. First, check out the tab for "Standard Columns". Look over the options there carefully to make sure that the default settings are actually what you want. They're pretty straight foward - most are determining whether the metadata gets scraped and updated every time you update a fanfic eBook or if they're only scraped for new books. The rest have to do with title and author sorting, setting series related data, and setting the comment data for anthologies.
Once you've set that data how you want, head over to the "Custom Columns" tab where things get more interesting.
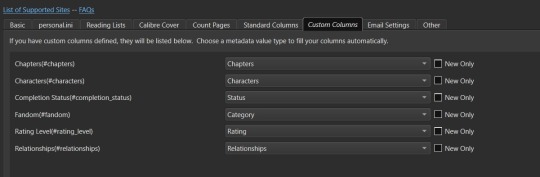
You should now be looking at a list of all those custom columns you created earlier, in alphabetical order. Each column will have a corresponding select box with nothing selected and an unchecked checkbox marked "New Only". This works in a pretty straightforward manner. Let's use "Fandom" as the example. Click the associated select box to open the dropdown and you'll see a bunch of potential metadata that FanFicFare scrapes listed there. It'll all go into the default tags column - found over in the "Standard Columns" section - but you can also parse it out to specific custom columns here. It might give you a few ideas for more columns you want to add for metadata sorting purposes. "Fandom" you'll want to link to "Category". I left "New Only" unchecked so that if I update an eBook later and it has a new fandom attached to the fic then that new metadata will be picked up and added to my Fandom tags for the fic.
Go through each custom column and set them up to be auto filled with the data you think fits it best. Select OK to save your changes and congratulations, this library has now been set up to import fanfiction.
Do keep in mind that FanFicFare's settings are on a per-library basis. So if you decide to do a separate library for different types of fanfics then you'll need to configure FanFicFare separate for every library. You may want separate libraries for different repositories, for example. Though FanFicFare is often smart enough to recognize when it already has an eBook version of a fanfiction from one repository - such as FFnet - when trying to download the same fic from another place - like Ao3.
You may need to make changes later to the personal.ini file associated with the library (which is also set up on a per-library basis) but I'll write up a separate post for that later. While sites protected by Cloud Flare more stringent protections will likely result in 403 responses and failed downloads, most fanfiction sites are going to work with the default FanFicFare settings. You could head over to, say, Archive of Our Own or Twisting the Hellmouth and grab a URL for a story from there. Or a URL for a series, which has links to multiple stories.
Now that the set up is done, it's time for the fun part. Downloading and maintaining fanfiction in your library. I'll be using a few of my fanfictions on Ao3 as example URLs. Awaken, which is already in my fanfiction library. What Balance Means, which is not already in my library. And the two series Hartmonfest 2023 and Eobard vs Eobard.
We'll start with the single URL uploads.
Click on the FanFicFare down arrow to bring up the menu and select the first option on the menu, labeled "Download from URLs". If you have a URL in your clipboard and have the option to grab URLs from the clipboard selected in the FanFicFare configuration (it's a default option, so you most likely do) then you should see that URL prepopulated in the text area when the Story URLs modal loads. You can add more URLs, one per line, to this text area and when you select OK each one will be individually downloaded as a separate epub file. For multi-chapter fics you only need to provide the url for the first chapter. FanFicFare will be able to detect the additional chapters and download them into the same epub file as the first chapter. All providing additional chapter URLs will do is lead to FanFicFare attempting to create multiple epubs of the same fanfic.
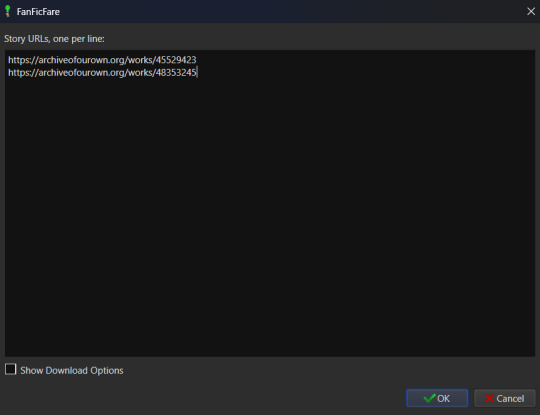
Once you've added your list of URLs to the text area, select OK. FanFicFare will do the rest, fetching metadata for the fic (or fics) and compiling the epub file(s). When it's finished compiling the data but hasn't officially saved the epubs, it will pop up a message letting you know how many "good" and "bad" entries it found.
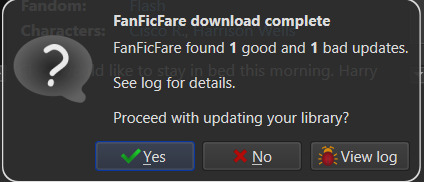
"Good" means it made an epub file and it's good to go. "Bad" could mean that you've already got the fanfic downloaded and no updates - such as new chapters - were available. Or it could mean that it failed to grab the web pages for whatever reason… like Cloud Flare blocking the download. You can go forward with the download at this point, adding the good epubs to your library. Or you could cancel the download, meaning none of the epubs are saved. Before choosing one of those options you can also choose to look at the job output, seen in the pop up as a button labeled "View log". This will display a list of every url you tried to download a fanfic for and information on either it's success or why it failed, the associated URL, and how many chapters were downloaded.
Since I already had Awaken downloaded and there have been no updates since the last time I downloaded it, that is the bad update from my list and the result I was expecting. What Balance Means hadn't been downloaded before, so it was the expected good update. Once Yes is selected in the dialog, the new fanfiction eBooks will be added to the library and will appear at the top of the main list in the application.
That's great for updating one fic at a time or copy-pasting in a list of fanfictions, but let's get ambitious. Maybe you want to import an entire page of bookmarked fanfictions at once or a series of fanfictions as individual books. Instead of copying every single URL by hand, you can take the URL for the series main page or the Bookmarks URL. With that URL copied, you can head over to the FanFicFare menu again, but this time select the option "Get Story URLs from Web Page"
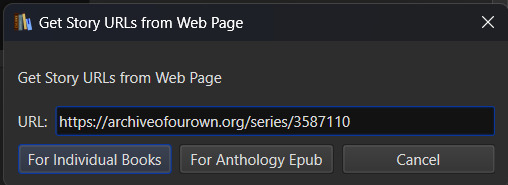
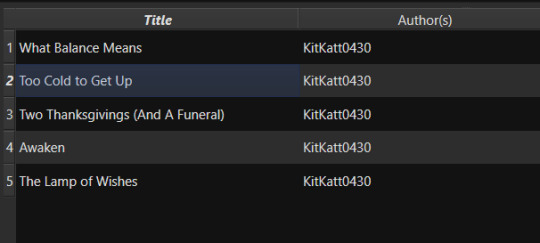
The modal that pops up only allows for inputting one URL - the URL for the page you want it to scour for fanfic URLs. Once you've inputted that URL click the button labeled "For Individual Books." It might take a bit but it's going to pull up the same Story URLs modal from before, this time prepopulated with every URL from the page you gave it. Pretty cool, right? Click OK and watch it run the job just like before.
I gave it the URL for my Hartmonfest 2023 series, which is a complete series and it downloaded all three books. Once they're populated on the list, I could scroll over to the Series column to see that they all are listed as being part of the Hartmonfest 2023 series in the same series order they're listed in on Ao3.
However, what if I'm uploading an unfinished series, like Eobard vs Eobard, and want to be able to track when it updates later on? Single books can track when new chapters are updated; is there any way to do the same thing but on a larger scale? The answer is yes, but you have to upload the series as an anthology.
Head back to the "Get Story URLs from Web Page" option on the FanFicFare menu and give it another series URL. But, this time, click the button labeled For Anthology Epub. This will trigger the Story URLs modal again once it's gathered all the story URLs, but this time it looks a little different.
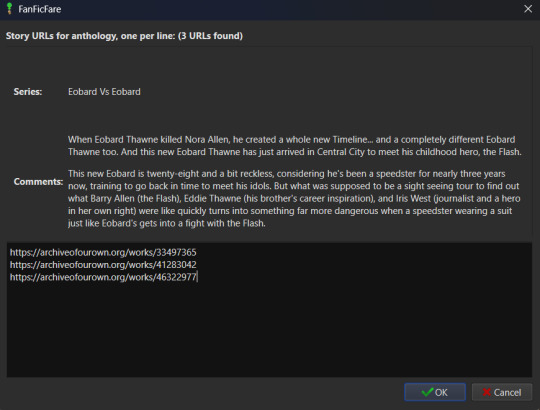
This time there will be text indicating the Series and Comments/description, the information for which will have been taken from the series metadata. The series story URLs will be present in the text area, allowing you to remove a story from the anthology if there's a fic in there you don't want included. Click OK to run the import job, which will run like normal.
When the job completes, there should be multiple good updates listed - one for every URL - but when you click yes to add the eBook to the library, you'll only see one added. It should be named following the convention "<Series Name> Anthology". So now I've got the "Eobard vs Eobard Anthology" in my library.
Last but not least, how to check for updates to incomplete fanfictions or series. It's generally pretty easy to do. Select the fanfiction(s) on the list that you want to check for updates on. If it's a single fanfiction (or several single fanfictions), you go to the FanFicFare menu and click the option "Update Existing FanFiction Books"
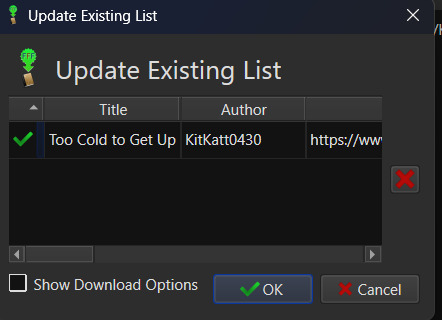
Click OK and let it run. Any fanfictions that don't have new chapters will return as bad entries. Any that have new chapters will be listed as good. Selecting Yes to add the good entries to the list will update the existing epub files with the new chapters.
However, if it's a series you want to update, I recommend doing those one at a time. Select the anthology from the eBook list and head back over to the FanFicFare menu. This time select "Anthology Options"; it'll open a fly-out menu. You want the bottom option, labeled "Update Anthology Epub". The associated URL for the series is saved as part of the eBook's metadata already, so it will pull the series metadata and associated URLs again, before returning you to that same modified Story URLs modal seen before. When you click OK, it'll pull all the fanfictions in the series - new and old - and any new chapters as well, bundling it up in a new eBook file that will replace the old one.
There's still a lot to talk about when it comes to managing fanfictions in Calibre, but I think I'll end here for now. You should be able to download, and manage, fanfiction from most websites at this point. So go back up your bookmarked fics and rest easy knowing that from this point forward a missing bookmark on your bookmarks list is no longer cause for sadness - it'll still be in your local archive to enjoy offline. Just don't go abusing this power, okay guys?
#kitkatt0430 explains#ficArchiving#calibre#fanficfare#the images all have alt text but if you find my image descriptions lacking feel free to add additional descriptions
61 notes
·
View notes
Text
Obsidian And RTX AI PCs For Advanced Large Language Model
How to Utilize Obsidian‘s Generative AI Tools. Two plug-ins created by the community demonstrate how RTX AI PCs can support large language models for the next generation of app developers.
Obsidian Meaning
Obsidian is a note-taking and personal knowledge base program that works with Markdown files. Users may create internal linkages for notes using it, and they can see the relationships as a graph. It is intended to assist users in flexible, non-linearly structuring and organizing their ideas and information. Commercial licenses are available for purchase, however personal usage of the program is free.
Obsidian Features
Electron is the foundation of Obsidian. It is a cross-platform program that works on mobile operating systems like iOS and Android in addition to Windows, Linux, and macOS. The program does not have a web-based version. By installing plugins and themes, users may expand the functionality of Obsidian across all platforms by integrating it with other tools or adding new capabilities.
Obsidian distinguishes between community plugins, which are submitted by users and made available as open-source software via GitHub, and core plugins, which are made available and maintained by the Obsidian team. A calendar widget and a task board in the Kanban style are two examples of community plugins. The software comes with more than 200 community-made themes.
Every new note in Obsidian creates a new text document, and all of the documents are searchable inside the app. Obsidian works with a folder of text documents. Obsidian generates an interactive graph that illustrates the connections between notes and permits internal connectivity between notes. While Markdown is used to accomplish text formatting in Obsidian, Obsidian offers quick previewing of produced content.
Generative AI Tools In Obsidian
A group of AI aficionados is exploring with methods to incorporate the potent technology into standard productivity practices as generative AI develops and speeds up industry.
Community plug-in-supporting applications empower users to investigate the ways in which large language models (LLMs) might improve a range of activities. Users using RTX AI PCs may easily incorporate local LLMs by employing local inference servers that are powered by the NVIDIA RTX-accelerated llama.cpp software library.
It previously examined how consumers might maximize their online surfing experience by using Leo AI in the Brave web browser. Today, it examine Obsidian, a well-known writing and note-taking tool that uses the Markdown markup language and is helpful for managing intricate and connected records for many projects. Several of the community-developed plug-ins that add functionality to the app allow users to connect Obsidian to a local inferencing server, such as LM Studio or Ollama.
To connect Obsidian to LM Studio, just select the “Developer” button on the left panel, load any downloaded model, enable the CORS toggle, and click “Start.” This will enable LM Studio’s local server capabilities. Because the plug-ins will need this information to connect, make a note of the chat completion URL from the “Developer” log console (“http://localhost:1234/v1/chat/completions” by default).
Next, visit the “Settings” tab after launching Obsidian. After selecting “Community plug-ins,” choose “Browse.” Although there are a number of LLM-related community plug-ins, Text Generator and Smart Connections are two well-liked choices.
For creating notes and summaries on a study subject, for example, Text Generator is useful in an Obsidian vault.
Asking queries about the contents of an Obsidian vault, such the solution to a trivia question that was stored years ago, is made easier using Smart Connections.
Open the Text Generator settings, choose “Custom” under “Provider profile,” and then enter the whole URL in the “Endpoint” section. After turning on the plug-in, adjust the settings for Smart Connections. For the model platform, choose “Custom Local (OpenAI Format)” from the options panel on the right side of the screen. Next, as they appear in LM Studio, type the model name (for example, “gemma-2-27b-instruct”) and the URL into the corresponding fields.
The plug-ins will work when the fields are completed. If users are interested in what’s going on on the local server side, the LM Studio user interface will also display recorded activities.
Transforming Workflows With Obsidian AI Plug-Ins
Consider a scenario where a user want to organize a trip to the made-up city of Lunar City and come up with suggestions for things to do there. “What to Do in Lunar City” would be the title of the new note that the user would begin. A few more instructions must be included in the query submitted to the LLM in order to direct the results, since Lunar City is not an actual location. The model will create a list of things to do while traveling if you click the Text Generator plug-in button.
Obsidian will ask LM Studio to provide a response using the Text Generator plug-in, and LM Studio will then execute the Gemma 2 27B model. The model can rapidly provide a list of tasks if the user’s machine has RTX GPU acceleration.
Or let’s say that years later, the user’s buddy is visiting Lunar City and is looking for a place to dine. Although the user may not be able to recall the names of the restaurants they visited, they can review the notes in their vault Obsidian‘s word for a collection of notes to see whether they have any written notes.
A user may ask inquiries about their vault of notes and other material using the Smart Connections plug-in instead of going through all of the notes by hand. In order to help with the process, the plug-in retrieves pertinent information from the user’s notes and responds to the request using the same LM Studio server. The plug-in uses a method known as retrieval-augmented generation to do this.
Although these are entertaining examples, users may see the true advantages and enhancements in daily productivity after experimenting with these features for a while. Two examples of how community developers and AI fans are using AI to enhance their PC experiences are Obsidian plug-ins.
Thousands of open-source models are available for developers to include into their Windows programs using NVIDIA GeForce RTX technology.
Read more on Govindhtech.com
#Obsidian#RTXAIPCs#LLM#LargeLanguageModel#AI#GenerativeAI#NVIDIARTX#LMStudio#RTXGPU#News#Technews#Technology#Technologynews#Technologytrends#govindhtech
3 notes
·
View notes
Note
Hi! Here is Red Thicket and all the works I managed to save from the author (including the sun was in my eyes, the unfinished sequel and the second version)
https://drive.google.com/drive/folders/1EDuL7ji1xa01MUbLxq2AAmDe44eGDQj5?usp=sharing
Most are ".txt" files (because I didn't had a smartphone at the time and
that's the format that worked on my phone), other files are "epub" and "pdf". Some apps don't open ".txt" format so I suggest you try with the app ReadEra (android). That's a good one, reads almost every format. Please tell me if they don't work!
Hello!! Thank you Very much for replying to me and providing me a link!!
I can access all the files on my pc thankfully!!! On mobile it's a bit more tricky, I need to download ReadEra I think, though I almost exclusively read on my laptop, so it's not a big deal for me. I do need to download the epub files and then put them through a converter, but it's all worth it.
Thank you very much for providing the links for these fics!! They were my lifeline during the first few years of high school , and I think the original version of tswime forever changed me. I was very much missing the fics I've read from the author, and cursing myself for never getting around to reading Red Thicket. But now I can!! :3
Thank you so much, you're doing good archival work <3333
#asks#some of these fics changed my brain chemistry and also introduced me to ao3#life changing#i remember reading a new update to tswime during covid then falling down the stairs right after <333 had a bruise for a month#i think that accurately captures the vibe of tswime
5 notes
·
View notes
Text
Nintendo sues Yuzu Switch Emulator
February 28th 2024 Gaming / Nintendo / Lawsuit
KOSAMA
| Writer and Recovering Anime Addict
Nintendo has initiated legal action against the creators of Yuzu, an open-source Nintendo Switch emulator, as revealed by a lawsuit filed in a Rhode Island court on Monday. The lawsuit, detailed across 41 pages, targets Tropic Haze, the entity behind Yuzu, with specific mention of an individual identified by the alias Bunnei, who spearheads Yuzu's development. The genesis of this lawsuit was initially reported by Stephen Totilo, a correspondent for Game File.
Yuzu, which emerged in 2018 shortly after the debut of the Nintendo Switch, is a freely available emulator crafted by the same developers responsible for Citra, a Nintendo 3DS emulator. Essentially, Yuzu functions as software enabling users to engage with Nintendo Switch games on platforms such as Windows PC, Linux (including devices like the Steam Deck), and certain Android devices. While the legality of emulators per se isn't inherently contentious, their employment for pirating copyrighted games is a matter of concern. Nintendo's lawsuit contends that there exists no lawful avenue for utilizing Yuzu.
Within the legal documentation, Nintendo asserts that "there is no lawful way to use Yuzu to play Nintendo Switch games." Nevertheless, this assertion invites scrutiny and potential legal rebuttals on behalf of the emulator developers.
Firstly, the US Copyright Office generally permits users to create duplicates of legitimately acquired software for archival motives, subject to specific conditions. Consequently, accessing personal archival copies could conceivably constitute a lawful purpose for utilizing an emulator such as Yuzu.
Significantly, the Yuzu emulator, being open-source, does not incorporate copies of the necessary "prod.keys" mentioned in Nintendo's lawsuit, which users must supply themselves. This sets Yuzu apart from the Dolphin emulator, which faced removal from Steam in the previous year after Nintendo highlighted its inclusion of the Wii Common Key for decrypting game files.
In the absence of intrinsic capabilities to circumvent digital rights management (DRM), an emulator typically falls within the ambit of legal precedent permitting emulation of one hardware system on another through reverse-engineering methodologies.
Nintendo's legal pursuit against Yuzu reflects a complex intersection of intellectual property rights, digital preservation, and the evolving landscape of emulation technology. As the case unfolds, it promises to shape future discussions surrounding the legality and boundaries of emulator usage within the gaming community.
1 note
·
View note
Text
INFORMATION AND COMMUNICATIONS TECHNOLOGIES
WRITTEN BY ALCUIZAR
SEPTEMBER 18,2023
TRENDS IN ICT
As the world of ICT continues to grow, the industry has focused on several innovations. These innovations cater to the needs of the people that benefit most out of ICT. Whether it is for business or personal use, these trends are the current front runners in the innovation of ICT.
CONVERGENCE.
Technological convergence is the synergy of technological advancements to work on a similar goal or task. For example, besides using your personal computer to create word documents, you can now use your artphone. It can also use cloud technologies to sync files from one device to another while also using LTE technology which means you can access your files anytime, anywhere. Convergence is using several technologies to accomplish a task conveniently.
SOCIAL MEDIA
*Social media-is a website, application, or online channel that enables web users to create, co-create, discuss, modify, and exchange SM.jpguser-generated content. According to Nielsen, a global information and measurement company, Internet users spend more time in social media sites than in any other type of site. With this, more and more advertisers use social media to promote their product.
SIX TYPES OF SOCIAL MEDIA
*Social Networks-These are sites that allow you to connect with other people with the same interests or background. Once a use creates his or her account, he or she can set up a profile, add people, create groups, and share content. Examples: Facebook and Google+
*Bookmarking Sites-These are sites that allow you to store and manage links to various websites and resources. Most of these sites allow you to create a tag that allows you and others to easily search or share them. Examples: StumbleUpon and Pinterest.
*Social News-These are sites that allow users to post their own news items or links to other news sources. The users can also comment on the post and comments may also be ranked. They are also capable of voting on these news articles of the website. Those who get the most amount of votes are shown most prominently. Examples: reddit and Digg
*Media Sharing-These are sites that allow you to upload and share media content like images, music, and video. Most of these sites have additional social feature like liking, commenting, and having user profiles. Examples: Flickr, YouTube, and Instagram.
*Microblogging-These are sites that focus on short updates from the user. Those subscribed to the user will be able to receive these updates. Example: Twitter and Plurk
Blogs and Forums These websites allow users to post their content. Other users are able to comment on the said topic. There are several free blogging platforms like Blogger, WordPress, and Tumblr. On the other hand, forums are typically part of a certain website or web service.
MOBILE TECHNOLOGIES
The popularity of smartphones and tablets has taken a major rise over the years. This is largely because of the devices capability to do tasks that were originally found in personal computers. Several of these devices are capable of using high-speed internet. Today, the latest mobile devices use 4G Networking (LTE), which is currently the fastest mobile network. Also, mobile devices use different operating systems:
1.iOS – used in Apple devices such as the iPhone and iPad
2.Android – an open source operating system developed by Google. Being open source means several mobile phone companies use this OS for free.
3.Blackberry OS – used in Blackberry devices
4.Windows Phone OS – a closed source and proprietary operating system developed by Microsoft
5.Symbian – the original smartphone OS; used by Nokia devices
6.WebOS – originally used for smartphones; now used for smart TVs
6.Windows Mobile – developed by Microsoft for smartphones and pocket PCs

5 notes
·
View notes
Text
ok I'm gonna share my music setup for my pc that allows me to completely own all of my music with no chance of it being stolen by some big corpo.
First things first: music player
if you don't have a music player then listening to your juicy lil mp3s is gonna be hard.
MusicBee is what I currently use. It's easy to use and has some sexy customizable skins.
If you want something that can run on Linux or Android then AIMP has got you
and if you want old school "charm" or are on a Mac then foobar is an option
ok so you have a player now you need music. If you must be a goody two shoes then purchase music from a band's bandcamp page or buy merch. But stealing is awesome so go get yerself
I've been pirating music for almost 20 years now. I've seen things you people wouldn't believe. Dead links off the shoulder of megaupload. I watched download speeds flicker in the dark near The Pirate Bay. All those mp3s will be lost in time, like hard drives in rain. Time to download.
Soulseek requires a bit of setup, but it is extremely worth it. Just make sure to share something of yours too. Not only is it the polite thing to do but many users will not let you download if you don't also have something to share.
I have my entire music folder available so there's at least a few hundred gigs of good shit on there I promise!

when you search it will shit one william things at you. If you are a audiophile ass bitch like me then setting this filer mbr:320 will make sure that you only see files that are minimum 320 bitrate mp3s.
Now if you know anough to care about bitrate then you probably also know that there are evil people out there who are encoding 8kbps into FLAC and other baffling shit so I also use a program to check the quality of files.
I use Spek. I'm sure there are a lot of programs like it.

this is what a true 320kbps mp3 will look like. Not every file will hit that 20kHz line but you can look for the fuzzy edges at the top to indicate that there is no lost audio range.

it is simply the nature of certain types of music that the spectrogram is gonna look like this. use your best judgement. This step is extremely optional.
Now that I have music and have checked the quality it is time to make sure those bastards are tagged correctly.
you can add and alter tags on the files so that your music player of choice knows what its looking at

I'm not gonna get too deep into this because I feel like its pretty self explanatory and this is already running long as hell.
Since this post was originally about cds here's how you burn
You'll need a disc drive and some blank CDs. You can figure out how to get those on your own. I'm not your mom. when making your delicious mix just remember that the standard CD-R has ~80min of space.
Finally if you wanna put your extant CD collection on your computer you're gonna need a ripper.
Exact Audio Copy will do that. uhhh I forget how to set this up cause I did it so long ago.
I hope this helps some people steal all the music in the world and make their own mixtapes.
HOLD THE LINE!! KEEP PUSHING!!!!!
185K notes
·
View notes
Text
The Evolution of Windows Operating Systems: From Windows 7 to Windows Microsoft 11
The Windows operating system has been central to personal and business computing for decades. From the simplicity of Windows 7 to the innovation of Windows Microsoft 11, Microsoft has consistently delivered powerful and user-friendly experiences. Let's explore how these operating systems have evolved and what they offer today.
The Legacy of Windows 7
Launched in 2009, Windows 7 quickly became a favorite for users seeking speed, reliability, and simplicity. It was praised for its stable environment, improved taskbar, and fast boot times. Many users still remember its familiar interface, which balanced classic elements with modern functionality.
Even after newer versions were released, Windows 7 remained popular. Businesses valued its performance and ease of use, especially in office settings where compatibility and consistency were key.
Though Microsoft ended official support in 2020, some users still rely on it for legacy software or older hardware. With a proper license, it remains a viable OS for systems not requiring the latest features.
What Windows 8 Brought to the Table
Microsoft aimed to revolutionize the desktop experience with Windows 8. Released in 2012, it introduced the Start screen—a touch-friendly interface designed for tablets and touchscreen laptops. Although it was a bold move, the drastic change from the traditional Start menu confused some users.
However, Windows 8 was not without strengths. It delivered faster boot times, better battery management, and stronger security than its predecessors. Power users also enjoyed the introduction of features like the task manager upgrade and improved file copying functions.
Despite mixed reviews, Windows 8 laid the groundwork for future developments in the Windows ecosystem. Many of its features were refined in later versions to improve user experience.
Windows Microsoft 11: The Modern Computing Standard
Microsoft took another leap forward with the release of Windows Microsoft 11. It introduced a sleek interface, centered taskbar, and rounded window corners for a modern look. More than design, it focused on productivity and efficiency for today's users.
Some standout features include:
Snap layouts for efficient multitasking
Direct integration with Microsoft Teams
Support for Android apps via the Amazon Appstore
Enhanced security and hardware compatibility
With better system performance, Windows Microsoft 11 caters to both home and business environments. It's optimized for hybrid work, gaming, and cloud-based services, all while ensuring system integrity.
Should You Still Use Windows 7 or Windows 8?
Some users continue using Windows 7 or Windows 8 due to hardware limitations or legacy software dependencies. While they are still functional, using them without updates can pose security risks. If your PC can't support Windows 11, consider upgrading to Windows 10, which still receives updates.
However, if you're purchasing a new system, Windows Microsoft 11 is the recommended option. It ensures compatibility with current software, enhanced protection, and long-term support.
Subheading With Keyword: Why Upgrade to Windows Microsoft 11?
Upgrading to Windows Microsoft 11 has significant benefits. The system runs smoother, handles multitasking more efficiently, and supports the latest hardware. If you use your PC for work, gaming, or content creation, Windows 11 enhances every experience.
Modern apps are built with this OS in mind. Whether you're collaborating in Microsoft Teams, editing media, or running multiple applications at once, Windows 11 delivers.
Buying from reliable vendors ensures you receive a valid license and secure download. If you’re making the switch, choose authentic versions like the ones from SoftwareBase.uk.
Getting Started With Windows 11
Before installing, ensure your PC meets the minimum requirements:
TPM 2.0 enabled
UEFI and Secure Boot
4GB RAM or more
64GB or more of storage
Dual-core processor (1GHz or faster)
Once confirmed, you can install the system using a USB drive or an ISO file. Activation with a valid product key unlocks the full version.
For older PCs that don’t meet these specs, consider Windows 7 or Windows 8 as alternatives, though they lack modern features and support.
Final Thoughts
Microsoft’s operating systems have come a long way. From the reliable simplicity of Windows 7, through the experimental interface of Windows 8, to the polished, future-ready platform that is Windows Microsoft 11, each version has served a purpose.
If you're building or upgrading a PC today, the clear choice is Windows 11. It offers everything a modern user needs—speed, design, compatibility, and robust security.
0 notes
Text
Price: [price_with_discount] (as of [price_update_date] - Details) [ad_1] Product Description If inserting the pendrive is not working, flip it over and insert it again Insert the pendrive,if it's not working,Please pull out, flip and re-insert. 4 IN 1 OTG ADAPTER: Verilux otg adapter combines the Light-ning, Micro USB, Type-C, USB 3.0, 4 interfaces into 4-in-1 type c adapter, allows you can access various phone/tablet devices, plug and Play & easy to use, no need to download any application, just share your photos and videos from your camera/pendrive to your social network freely, No need to use PC anymore, Fast and easy! SUPPORT USB 3.0/USB 2.0 FASTER TRANSFER: The otg type c adapter comes with USB 3.0 port, 10X faster transfer speeds than USB2.0. The Light-ning male to USB female and Micro USB male to USB female support USB 2.0, transfer speed is 480 Mbps. All backward compatible with USB 2.0/ 1.1, which supports keyboard, mouse, USB flash drive, camera, card reader, microphone, electric paino, mixer, audio interface, ect. [Note: Support USB and network port hub, but there may be compatibility issues.] PRE-PURCHASE INFORMATION: This OTG Adapter can only support IOS13 or later systems. We recommend iOS users to upgrade the system to iOS13 or above. Android users, please check whether your phone or tablet supports the otg function! NOTE: Can not directly connect mobile phones and computers, or mobile phones and mobile phones, only USB interface to connect a USB flash drive, card reader, removable hard drive and other devices to the mobile phone/computer, only one mobile phone/computer at a time! MULTI DEVICE DATA MANAGEMENT: You can view photos and movies directly without downloading them to your phone or computer. Type c to usb connector helps you free up space on your devices and acts as an external storage expandable memory. You can manage all data and files (create, copy, move, delete, rename, and so on) directly on this 4-in-1 usb to c type converter. WIDELY COMPATIBLE & PREMIUM TEXTURE: Compatible with IOS and Android system(both TYPE C and Micro USB). plug and play, no need any plugin or driver; Android needs to turn on OTG function(No need to download APP). This 4-in-1 c type adapter is made of frosted aluminum metal. You can transfer data between various devices and easily complete data sharing. With an added little loop on the c type to usb connector, convenient for you to attach it on any keychain or hook, conveient to carry, etc. [ad_2]
0 notes
Text
Life today massively depends on the online transactions and information sharing. Each of such undertakings of confidential information is protected with separate passwords. We are vulnerable in keeping track of all the passwords and require a sophisticated mechanism to manage our authoritative details safely, securely and sagaciously. One which is user-friendly, accessible from anywhere, provides active sync up, backup/restoration if required. Password managers are common on a desktop, however, the need on mobile has increased exponentially in recent years. Especially when you want to create a very secure password that may also be easy to remember. This need has prompted developers to make some of the most advanced applications. Below listed are a few of the best Android apps on google app store. If you are an iPhone user, we have similar password management apps list here. Keeper Password Manager This application provides private digital vault on Android, iOS, Mac and PC platforms that are encrypted and unbreakable. It uses the highest levels of privacy and security (256 bit AES, PBKDF2). Other features include password generator, power sharing, secure file manager, autofill login and password, vault to vault sharing, two-factor authentication, internal controls, Keeper for groups and enterprise. It comes in free and paid versions. Reneph Password Safe Password Safe encrypts stored data securely using 128 bit AES and gives single access only. It doesn’t have any access to the internet. Key functions include categorization of entries, password generator widgets, backup and restore, customized user interface, auto backup,* .csv import/export. Pro version has entry elements reordering facility, encryption up to 256 bit, import/export to excel, auto lock, backup to encrypted CSV, self-destruction. No sync up feature is available on this. LastPass Password Mgr Premium Mobile version of LastPass password manager securely syncs your passwords across all browsers and devices. Essential functions include auto-fill for Android 4.1+ and Chrome (Android 4.3+), earlier versions have “copy” options; auto fill login and forms, biometric authentication (using Samsung S5’s fingerprint reader), password generator, add, update and delete sites, secure notes and form fill, redesigned UI. It offers 14 days free trial and later $12 for a yearly subscription. MSecure - Password Manager Comes with some of the most advanced features, mSecure’s New 3.5 Version of the password manager includes Tablet support, Auto-Login, Auto-sync and more. It is ultra secure, simple & smart and uses 256bit Blowfish encryption. Key features comprise of an auto lock, password generator, sync cloud data protection architecture, auto back on SD and e-mail, user-friendly customized options, categorization of data; sharing via email, SMS or clipboard, auto capture weblog in, can import data from competitor products. 30 days trial and then for $14.99. Dashlane Password Manager Free password manager & secure digital wallet for Android and other devices. By using 256bit AES encryption, it provides firm security to your data, backup/restoration, strong security vault with security breach alerts, password generator, auto fill on Dashlane browser and auto-login for your apps with Dashlane keyboard. Premium version offers features like sync up of all devices; cloud backup, priority user support. Other features are an auto lock after inactivity. The application works in English, Spanish and French. SecureSafe Password Manager SecureSafe protects your passwords and documents from malicious hackers and unauthorized access, using AES-256 and RSA-2048 encryption. Essential functions are one login for all platforms, data sharing between SecureSafe and you is over HTTPS only, additionally encrypted passwords, 24/7 monitoring, data inheritance function if something happens to you, a single login for all devices, offline access to passwords, comes as iPod/iPad app and web app.
Advanced version with premium features comes in PRO, SILVER and GOLD account types. Android Wallet Password Manager aWallet Password manager has features like build in the editor; backup to the Android USB device, CSV format unencrypted data export and auto lock. Professional version contains password generator and CSV Import functions. Security features include user-friendly categorized encryption using AES and Blowfish algorithms with various key sizes. Triple DES with key sizes of 168 and 112 bits. Combinations of multiple criteria to decrypt the data, “Salt” combination with a master keyword to prevent theft, auto-destruction after failed unlocks. It has no internet access permission, however, the only permission it has is to access to the USB device to backup/restore the data files in case your phone is lost. Reneph Password Safe By using AES 128 bit based encryption, Reneph Password Safe doesn’t require permission to access the internet; widgets lets you copy passwords to your clipboard from your home screen. Categorized entries, single master password access, password generator, backup and restore the encrypted database, customized user interface, automatic clearing of the clipboard, auto back up, CSV- import/export and no unnecessary Android rights are some of its key functions. In professional version, entry elements can be defined and reordered, the definition of encryption key size up to 256bit, import/export from/to excel table, auto-lock, encrypted CSV-files, auto-backup to encrypted CSV and self-destruction. It doesn’t have sync up feature. Fasino Password Keeper This app is free. It allows you to store passwords for your accounts safely and securely on your devices. You can export the data and protect them with passwords import from the simple text files. Er.mo My Passwords A simple to use application with AES data storage, multi-window support, strong password generator, backup, restoration of the encrypted database and an offline operating facility to safely store substantial passwords and numbers encrypted. PasswdSafe - Password Safe PasswdSafe is a port of the Password Safe application to Android. Users can sync up the password files from cloud services too by installing the PasswdSafe Sync app. In case of bugs, it is advised to maintain a known good backup NS Wallet This application uses AES cipher algorithm and offers most reliable, secure, theft free and FREE data vault to the users. Works on “privacy are priority” principle, NS Wallet is a fully offline solution. All you need is a master password to it. With “ NS sync” backups in the cloud can also be created. Premium features include various themes, fonts and search criteria. Rhythm Hexise Password Safe Application ensures data privacy without internet permission, auto lock, SD card backup, customized password records on demand, dynamic support, different formats, creating records from pre-defined and new templates, password record management, 90+ icons to categorize, quick search, import/ export data using *.csv file for data exchange with other apps and multi-language support; Password Safe uses 256 bit AES algorithm for encryption. Safe In Cloud Password Manager Facilitates protection to your delicate data with unique and secure passwords, “SafeInCloud” uses 256 bit AES for complete password management. It comes as Free Desktop Application + Mobile Application for Phones and Tablets. Essential functions include strong encryption, cloud sync, password generator and strength analysis, browser integration, cross platform and automatic data import. DataVault Password Manager Ideal app and with unmatched features like multiple data views, flexible template management, on-device backup, password generator, security time out, maximum login attempts and synchronization with DataVault for Mac and DataVault for Windows (sold separately). The interface is optimized for mobile devices & desktop environments. Also, facilitates customized options, SD backup,
sync-ups, smart access control, password hints, online troubleshoot FAQs and personalized settings Ilium E-wallet- Password Manager eWallet application by Ilium software keeps important/authoritative and sensitive details secured behind the 256-bit military-grade AES encryption. PC version eWallet helps sync between multiple eWallets over Wifi. Customize your eWallets with cards, backgrounds, and categories. It auto locks detecting inactivity
0 notes