#at one point i will have all the textured and chalky brushes that there are available
Text
From brain dump sketches
#endhawks#bnha#adelaida art#actually I'm testing and organizing my csp brushes#bc i have no self control and i own too many of them and i keep on buying and downloading more#at one point i will have all the textured and chalky brushes that there are available#so i need to idk categorize them more i guess#“textured brush” category is not specific enough anymore if you have 200 brushes in it :')
280 notes
·
View notes
Text
CSP Pencil Brush Sets!
Part 2 because I still have more!!
1. Chalky pencil

I found the texture in the thumbnail here really cool. That's all.
2. Cheese Pencil Pack (2 NEW)

Thought the thumbnail and preview were cool as hell. Once again texturesweep!!
3. False pencil

This one's similar to one from the last pencil post, but this one feels like it's at the intersection between pencil and pen if that makes sense. He's a little inky.
4. [ CHARCOAL ] Pack

This is a massive pack that's 120 clippy or so but I got the free trial version and have been using it for three years at this point. I definitely recommend this person's assets. And yes this is charcoal but I think charcoal and graphite pair well together so close enough.
5. Set of 22 Realistic Pencils

We're getting kind of repetitive at this point, but these have a wide range of textures/grain levels and shapes so you could definitely find at least one here that works for you.
#weekly brush post#clip studio paint#csp assets#csp brushes#digital art brushes#clip studio paint brushes#honking
290 notes
·
View notes
Text
so, I feel bad this will be long (mod you can put it under a cut if needed?), but I'm also neurotic as fuck so whatever. But on the topic of l1l d3v1l, some of their work came across my feed and, for lack of a better term, triggered me hard. Not because of their content/style/whatever at all! But because my god please please please everyone doing 3D printing, cure and wash your prints properly!!!!!!!!! Another Anon recently made a very very good list of recommendations for them for posting. I am going to toss in my hat for some of the finishing processes. They have a very good base for sculpting, they know how to use their program and their style will evolve naturally over time. They're even using references. They're figuring out joints. Faceups also evolve with practice. Everyone starts somewhere, it's all learning, etc, and no I cannot explain why dust and hair on sticky prints made me react this way. Psychoanalyze me in the comments while I offer some tips on curing/finishing.
Put your UV hood on while it's printing, yes even when you're getting in progress pics unless it's like night or whatever. room temp and humidity while I've left the hood off has absolutely messed with my prints, I used to live in Albany in NYS and I think they're in the same state.
Wash your print properly. Take it off the base, rinse it in whatever the fuck it needs to be washed in (alcohol, water, etc), cut the supports (I do sometimes leave some supports in until after curing. YMMV moment), and then wash it again. Get a soft toothbrush. Scrub. SCRUB. Dry it properly with a paper towel, not air dry. If water washed resin still feels a little tacky, you can give it a wipe with some rubbing alcohol too. Try to only mix water washable with water washable and the same for alcohol. Same with brands, but YMMV with that - washing is really important. If you're unsure because it's a thicker piece let it cure for a bit and then check, wipe with a lower alcohol, dry it, cure again.
AND AGAIN. I cannot stress enough how important that after washing, you cure it properly. You don't need the fancy washing/curing stations and what not if you don't have them. Get a $20 amazon nail UV lamp and set it over your prints. Prop it up a little higher if your print is a bit big. Move it around the print or rotate the print every 60s (or however long your longest setting is on it). Sun curing is fine but sometimes it's not strong enough and you'll need to leave prints in the sun for days before they're cured properly. (same with resin eyes, I see the eyes they made are also sticky/cloudy. That's a not curing long enough issue. Cure it. Cure it again longer. let rest. Poke. Sticky? Cure again. sand if needed, gloss with a thin layer of more resin with a flat brush, cure.) After hitting it with a lamp for a while then leave it in the sun if you want for a day or so.
After all that, aside from print mistakes or support bumps, it should be smooth, maybe a bit soft feeling (not when you press on it though, bad cure), sometimes my partner even says "chalky" texture. Stuff shouldn't stick to it so easily!!! If it still is, revisit 1-3!!!!!
You're offering garage kits, but no one wants a half cured sticky mess they'll have to deal with re-curing and washing before they even get to sand. We can SEE the dust and hair and fiber and fingerprints on the prints in your photos. Even if they're clean seeming in person, the photos don't instill confidence at all in the (semi) finished product of your kits or in the ability to get it casted (casters will reject things if they aren't finished properly to a certain point). Faceups will be infinitely easier to do on a smooth non tacky surface (it seems they're mainly using watercolor pencils to do the eyes from the texture, drag and fall off. Sharpen them, don't soak them in water first unless you know how to control the mush and thick layer that will follow. Doing a dry draft helps a lot), the sealer will stick better if you're sealing before hand. Some people don't seal their 3D prints before painting and that's between them and the 3D printing gods. Or if all of this irrelevant and your stuff is actually cured, dried, and not tacky, dust your workspace, put away any wigs and whatnot, and get rubber gloves.
~Anonymous
20 notes
·
View notes
Text

@wradicall i hope to alleviate your stomach hurt! re: this study post
i'll make a new study with you and share my process behind making these and spruce in some tips i keep in mind with each steps, hopefully it'll be helpful! this process is generally one i use across all photo studies i make; (obviously this is what works for me, if you have a different method that works for you then good)
1. first step is sketching out the outline, but before i do it i determine things that will help me keep the proportions of the picture. i think of them as anchors - darker folds, negative space, major planes. i find it easier to do those small parts and align them than just make a single large outline.

2. i lightly sketch out the contours and these points of interest; i am showing you two steps of that process, because i never get the proportions right on the first try, and i think it's unrealistic to expect that of yourself. better to take time and check with the reference, make deliberate and precise lines, rather than create a lot of messy thick lines just for the sake of speed. this isn't a race~

3. i will be working on the shirt. i block in the separate shapes on different layers for ease of later rendering, trying to use a similar colour i'm seeing in the photo reference. the colour differences will come later, but i find this to be also a helpful exercise in simplifying shapes and colours in general. next, with a rather simple brush (one i use is just a square with a subtle chalky finish) i refine the secondary, larger shade - since i start with a medium shade, i will work on the lighter planes. no ultra darks and no ultra lights yet, we are still laying out the basic foundations of the shirt.
4. i add the darker and lighter bits, fleshing out the creases and paying attention to the colour differences in the shirt. elbow on our right has a redder shadow, shoulder are is a bit more yellow. you think this is a fabric study, no, it's an everything study. while the main point is to focus on how this shirt is structured, i wanna break down what makes it realistic - which is why colours and proportions earlier were taken into consideration, not just the form of the fabric. then, on a separate layer, i paint the pattern. i grab stock patterns when i can, but things like embroidery or non-tiling patterns often need to be done by hand to make them look cohesive with the rest of the pic. we are now working on layers above the sketch, since it's done its job and we don't need it for details.

5. i finish embroidery details. while i like rendering with softer, textured brushes, i use a sharp edged brush for the embroidery because it's not a pattern that fades away. even though it's not a 1 to 1 representation of the reference, it looks good enough for me. then, since emrboidery is on the separate layer, i can shade it so it's not all one shade of vibrant red and matches the lighting. then i get to the final darkest shadows, highlights, details. the last step i find the most satisfying and substantial, because adding that sharpness and refinement brings the whole thing together.

6. it looks weird now, but i then applied literally the same methods to the rest of the individual pieces and now it looks more coherent and put together. (sorry about your face, lady.)

some of these steps i don't carry out because i have them in my head, for example i don't draw over the reference to remember those anchor points. but this is my process, i hope it was a tiny bit helpful. if you need to take extra steps or you think you are slow, that's alright! make the process work for you. don't get bogged down by details and making things too refined, while also try to be deliberate and not too careless in your brushstrokes.
i don't usually post such detailed processes, because i share all my process gifs/breakdowns of various pieces with my patrons. i hope this was understandable, and if you'd like more (or just wanna support me, 'tis but a dollar), please take a gander at my patreon.
happy painting!
#long post#i am SORRY i have lots to say about art#let me know if something needs further explaining i shall do me best#wradicall#art
377 notes
·
View notes
Note
Hello lovely! For the trope thing:
85 and 86 with whoever pops into your head first
Love you 💕
No, I LOVE YOU💕💕
85. Innocent Physical Contact
86. I Didn’t Mean to Turn You On
Din was putting off leaving the ship for his next hunt as long as he possibly could. For one reason or another, that he couldn't put his finger on, he just really was dreading leaving both you and the kid. If he didn't have to leave, then he would still be in bed cuddled up to your warmth nuzzling his face into the crook of his neck. But no, he had gotten up with the intent to be gone by the time you had even got up, but here he was, hours later, having showered, shaved, trimmed his hair, polished his armor, and currently sitting cleaning his amban rifle, as you walked past, asking if he had eaten. When he shook his head you leaned over and pressed a ration bar into his hand, telling him to eat before walking to the cockpit to check on the sleeping child. Din was never one to just sit and enjoy food, always opting to just all but swallow it whole and slam his helmet back on, but this time he actually took his time, though the chalky texture and taste was one he did not enjoy in the slightest. Right after he pulled his helmet back on he stood with a sight, and checked the time. He should honestly be going at this point, if not an hour and a half ago. He grabbed his cloak, and started tucking it into his chestplate, when you reenter the room. You walked over with a smile, and moved his hands securing the fabric softly, but so it wouldn't fall out. Then looking up to his helmet you sighed and kissed the bottom of it, whispering, "For luck." As you pulled back, you noticed that his cowl had been moved when you were tucking in his cloak allowing a sliver of Din's unfairly sun-kissed skin, that hadn't seen the sun, to show. You reached up and brushed your fingers over the spot as you fixed it, feeling him tense immediately at the contact, but brushing it aside, before starting to say, "There ready to g-" But you were interrupted by Din pushing you back against one of the walls, stammering out, "Grogu, the kid, is asleep?" When you nodded you heard him sigh. Little did you know, well for the most part anyway, that your small little touch to Din's neck had stirred him instantly, making him hard and tense. His neck was sensitive for the lack of touch there, so Din had been suprised and instantly horny when you even brushed it. Presently, he grinned against you, pressing his helm to your forehead saying, "Maker, mesh'la, your touch felt better than it should have. I need you now, please." "Din, I-Im sorry I didn't mean to turn you on, I promise." "Its ok, I don't care i just need to be inside you now." Nodding, you allowed Din to strip off your bottoms before kicking your feet apart and pulling his aching and dripping cock from his suit. He wasted no time slamming inside of you, groaning, "Fuck you're always so tight, how are you always so tight…I am sorry, mesh'la, I wasted too much time so I cant take my time with you, but I don't think I could hold back if I did have time…" Then he was slamming into you over and over and over again, to the point you were seeing stars and biting your lip so you didn't scream and wake the child. After a few minutes of the harsh thrusts Din sped up his pace, jackhammering into you, aiming for that spot he knew would have you cumming around him. Which is exactly what you did, and as you came your hands shot up and buried themselves in his cowl, some fingers managing to brush against his skin. You had just needing something to hold on to, but that was the last thing Din needed before he was shooting his load deep inside of you, painting you thoroughly with his seed. As you both came down from your highs, and fixed yourselves up, you kissed the cheek of his helmet and with a giggle said, "Im gonna have to remember you neck is that sensitive for later."
Send me an AU or two??
56 notes
·
View notes
Text
Ignorance is Blitzed (Part One)

When you come into contact with some substance that makes you sick while on a routine building search, Ron realizes he may not be as emotionally detached as he’d thought initally thought.
WARNINGS: you get poisoned and feel pretty shit, there are some potty words, but all in all pretty tame (FOR NOW).
This will probably be at least a two part-er, so let a sister know if you want to be tagged(?)
~
~
~
~
~
You’d barely had a chance to get out of the building you’d been searching before you coughed so violently you fell to your knees, a horrible gasping sound tearing its way out of your throat before you even have a chance to scream for a medic.
You were dying. You had to be dying.
You’d found an ivory crushed tablet at the bottom of a footlocker you’d found inside of the bombed out general store the Nazi’s had been using as sleeping barracks, and instantly pinched some of it between your fingers for closer inspection, rubbing the chalky dust between your fingertips to see if it had the same texture as aspirin.
It wasn’t uncommon for one of you to find medications and other rations in footlockers and other personal items during an inventory search, and most of the time you could easily figure out what it was and whether or not it was something Doc or someone else might need.
But this tablet and it’s powder were unfamiliar (aspirin would’ve had a more obvious, sour odor that you would’ve clocked the minute you’d opened the footlocker’s lid), and when you brought it to your nose to sniff it more critically you instantly regretted it—the smell was chemical and harsh and it burned your nasal passage in a way you’d never experienced before. Your eyes had instantly watered and you’d exhaled sharply through your nostrils in a vain attempt to make the hurt go away.
The pain spread up your head and spiderwebbed into your brain. A bursting prickle of pain behind your eyes flared like a burning star, your face had begun feeling hot and your head was ringing.
It’s too hot in here, I have to get out of here so I can breathe.
You pressed the heels of your hands into your eyes as you stumbled back out the way you had come, bumping heavily between the rough stone of the wall and your friends as you desperately tried to remember the way out.
You felt sick to your stomach as your skin breaks out into a cool sweat. Panic was setting in, with your ability to breath compromised as well as your hearing beginning to go white.
“Y/n?” you think you hear Martin calling your name through the fog that is taking residence in your ear canals, and something is trying to pull your hands from your eyes. “Hey kiddo, what’s wrong? What’d you find—?”
“DON’T!” You blurt, opening your eyes and wishing you hadn't when the room begins to spin. You see the light of the doorway over Bull’s shoulder-Bull? When did he get here?- and you close your eyes and forget everything else except for forward and outside and I can't breathe….
“Hey!” Someone (Luz?) growls as you shove the shape of him out of the way, and you don’t think you’re making sense but you’re talking all the same.
Stop talking, you need air!
When your knees hit the hard ground you barely have a chance to catch yourself on your hands before you dry heave so hard you can feel the ache of it in your ribs. Your heart is beating too fast and hard in your chest and if you could feel your hands you’d use them to tear some of your layers away because you’re boiling alive and there’s nothing you can do about it.
“Fuck, what happened—WHAT HAPPENED?!”
With a great deal of effort you crack your eyes open again and spot Ron Speirs’ signature glare coming your way, shucking off his vest and bag without breaking stride as he neared. You’re aware of Martin and Bull by your sides, but you can’t seem to figure out what they’re saying.
Why is no one helping me? Can’t they see I’m dying?
“Don’t touch the tab- cough cough….the footlocker….!” you try again, tasting blood in your mouth after you released another hacking cough, and you’re dimly aware of Bull pulling your hat off of your head and sigh at the blissful chill of fresh air on your clammy skin.
“We got it, no one’s gonna touch it, y/n—” he murmurs somewhere to your left, and you think you nod in understanding but you can’t be sure/
“What’s happening?” Ron snapped, his rough hands grabbing your face and tilting it up so he could look at it. “Where does it hurt, y/n—?”
“I can’t breathe! It's so hard to breathe— Fuck, i think my brain is melting…”
“Your brain?” his voice is lower in volume now, yet your head still throbs as if he were shouting. Your head is thudding in time with your heartbeat, and you don't realize you’ve been crying until his thumbs brush away from the tears clouding your vision.
A tremble runs through your body and you squeeze your eyes shut as the world tilts from side to side unreliably.
His rough hands are abruptly snatched back, but you can’t open your eyes to keep track of where they have gone.
Suddenly, a set of arms hook under your knees and shoulders and you're lifted from the ground, your head reeling.
“Don’t!” she gasps as the person carrying her begins to quickly walk back the way you’d seen that Speirs had come from. “I’ll get sick on you—!“
“Then get sick on me. It’s not the worst thing to happen to this coat.” Ron says matter-of-factly, making his grip on you painfully tight as he begins barking orders at people around you.
“Ron—” you try again, but your body spasms in his arms as the pain in your head crests to new heights. “Oh, God, I think I’m dying—”
“Shut up.” He hisses, and you think you hear a stain of panic in his command. “Just shut up and try to stay awake”
You sob as you lean your head against his shoulder, your bones too big for your body and your skin aching.
The next time you blink Roe is suddenly there, and your mouth is so dry your tongue creaks as it moves in your mouth.
You’ve been set on a lumpy mattress somewhere and Ron, Nix, Bull, and Roe are standing around you and talking amongst each other too quickly for you to catch.
By some miracle you are able to shove Roe away from your side just in time to avoid your vomit as you lean over the side of the bed and throw up painfully onto the ground where his feet had just been.
Your head is so foggy now, and everything hurts so badly you wish that you would just die and be done with the whole thing.
“Didn’t I tell you to shut up about that?” you hear Ron chide, and hands are smoothing your hair off of your face and neck with a gentleness you didn’t expect from someone so rough. “You heard the Doc, didn’t you?”
You shake your head because you honestly had no idea what Eugene may have said (because up until recently you hadn’t even known he’d been there), letting another set of hands push your shoulders back until you were laying on the mattress again.
You felt Roe rubbing at the skin inside of your elbow as he prepared some sort of injection, and you tried your best to hold still so he could find a vein.
“C’mon, y/n,” Nixon’s voice was far away, and in your delirium you could’ve sworn he sounded just like your dad. “I know it’s tough but try to stay still—”
Home, home, should’ve stayed home. Wouldn’t have died like this at home….
“It’s okay, darlin’” Roe mumbled, cursing in French as another spasm of trembling runs through you. “It’s gonna be over soon—”
Before you can even begin to panic about that promise, hands grab your face again and turn your head away from the doctor, and when you open your eyes all you can see is Ron.
“It’s not poison, you’re not dying, Y/n- look at me! Good, now just look at me and the Doc’ll give you something to make you feel better—”
Th poke of the needle makes you cry out like a baby, but rather than getting angry with you Ron just nods and makes a soft tsking sound under his breath.
“I know, sweetheart. I know.”
You watch those dark eyes of his harden as he shoots a look towards Roe. “How long till that shit kicks in—?”
“Seconds. It may not knock her out, but she should start feeling better right away—”
Speirs didn’t bother waiting for the man to finish before looking back down at you and softening his gaze once more.
He must be scared, he wouldn’t be acting like this in front of other people if he wasn’t scared i might not make it.
Whatever Roe had injected you with was cold in your veins, blissfully cold, and you could feel it turning your spasming limbs to lead with each slowing thud of your heart.
Taking what had to be the first deep breath you’d taken in hours, you watch as Ron nods and makes a point to sync your breathing, his breath cool of your damp face as he exhales with you.
“Good, good. That’s good, sweetheart….”
Your eyes lose their ability to focus, eyelids now too heavy to keep open.
But the idea of letting them close and going to sleep filled you with dread, and even though you couldn’t articulate your concern Ron seemed to read your mind and you felt his lips at the shel of your ear.
“I’ll be here when you wake up. I promise you that you’ll be okay, okay?”
You weren’t sure if he was saying it more to you or to himself or to the other men in the room, but you nodded all the same.
A cool cloth is wiped across your brow and you feel yourself sinking into whatever medicated slumber Roe has concocted for you.
“What the fuck is Pervitin and what the hell was it doing in an SS footlocker?”
Bull’s voice sounds like it’s underwater, and the harder you try to listen and see what the answer is, you quicker you slip into the cool and inviting darkness that curled around the edges of your mind.
I could rest, you think with resigned exhaustion as you let yourself fall from consciousness. It’s been so long since I’ve rested….
The weight of Ron’s hand on your cheek was the last thing holding you to the world, and when that slipped away you followed suit.
And nothing hurt anymore.
******IMPORTANT HISTORICAL CONTEXT:
After discovering boxes of tablets labeled Pervitin on a downed German supply plane (if i remember this correctly), the Allies realized that the Axis countries had developed a performance enhancing drug that would: 1. Keep soldiers awake and active for days at a time without needing sleep/food, 2. Increased aggression and confidence in battle, and 3. Kept soldiers from slipping into ‘shell shock’.
BIG PROBLEM THOUGH, BC PERVITIN IS LITERALLY JUST METH. REALLY REALLY PURE AND CONCENTRATED METH (which is BAD!)!
So, the Allies said to themselves: “Self, self here. Listen- what if we came up with our own Pervitin for our soldiers so they too can be better/faster/stronger?”
So, the Allies came up with Benzedrine- WHICH IS ALSO METH AND STILL VV BAD FOR YOU!
In this story, reader stumbles across some accidentally and unknowingly ends up ingesting it and you get vv sick (which is also a thing that happens to ppl who accidentally inhale amphetamines). Bc I’m a nerd I looked it up that nowadays you’d probably be given some sort of Benzodiazepine/nourishing fluids cocktail to counteract the side effects, so we’re gonna pretend that’s what the cure is in the 40s MKAY? MKAY.
(also tagging @mrsalwayswrite bc rumor has it they also have a soft spot for our dashing murder prince with nice hair and death in his eyes)
#band of brothers imagines#band of brothers x reader#ron speirs x reader#ronald speirs x reader#it's vv bad but I'll just add it to the pile of already burning garbage pile that is my bibliography#Also sorry for the word play I've been hanging out with my dad too much
161 notes
·
View notes
Text
Climbing into a Relationship [Reader x Jungkook]
Warnings: None
Prompt: “You did that on purpose didn’t you?”
Word Count: 2.8k words
Genre: Sports AU! Idol AU! Fluff

The building’s air was filled with early 2000s pop and chalk and if you were a newbie to the gym you would have turned around at the stench of sweat that permeates past the front desk and through the door. This gym was your second home and you needed to move after your long shift, though. You also wanted to talk to someone, but the neon orange band you wore as an invite didn’t seem to bring anyone else looking in the bouldering section over to you. It was a new thing the gym was implementing to try and increase the sense of community in the climbing gym but most people didn’t feel the need to talk when climbing.
Getting up from where you sat on the chalky mats, you put more chalk on your hands and attempted the V4 once again. It was a deceivingly hard climb on the 45 degree wall. Especially for a static climber to do and you once again wished that you were better at throwing yourself from hold to hold.
For now, you just focused on trying out the new beta you had thought up which involved getting both your feet where your right hand was and not barn dooring when you stood up. It would be hard and nearly impossible for someone less flexible than you, but you loved trying and V4s were always hard to do.
Of course you failed at not barn dooring. Quickly and uncontrollably, you moved towards a large hold on the other side of the wall, hitting the back your head harshly. You gasped, the air leaving your lungs as your left hand released its iron grip on the small hold keeping you on the wall, leading you to fall onto the mat.
“You did that on purpose, didn’t you?” A voice cut through your pain and disorientation, surprising you from where you landed on the mat.
“Excuse me?” You asked, looking up at the tall and muscular man who was looking down at you. He was in a baggy shirt and shorts, a pair of tight running pants underneath the shorts, and he looked like he would be an extremely dynamic climber (especially with the excess amount of chalk on his hands that you saw in almost every other dynamic climber). The man looked to be about your age, his wide eyes and small lips pressed into a thin line. What he was asking, you didn’t know, but you knew that he was not acting like a normal climber.
“That move where you swung out and faced away from the wall. You did that on purpose, didn’t you?” He said, trying to recreate the barn door you did.
“No… that’s called a barn door. You don’t want to do that.” You said, getting up and patting down your pants, leaving faded chalk marks in your stead.
“Well why’d you do it then?”
“When I was at that point in the climb, I only had two points of contact on the wall. So when I moved up, that movement lead to me swinging out and away from the wall. It’s called barn dooring. You don’t want to do that.” You said, giving him a once over. His undamaged hands and rented climbing shoes verified what you had suspected: This man was a new climber, “Do you want to try? It’s a hard climb.”
“Uhhhh… you were doing an actual climb?” He asked, his eyes widening and you giggled lightly in retur. He was very cute.
“Yeah. If you look at these holds,” You pointed at the starting point, a small square of purple laminated paper that said V4, “They have this slip of paper. It tells you the grade you’re attempting. It’s a V4 which means that it is 4 levels from a beginner’s climb. The two holds below the start holds are your starting foot holds. You just follow the purple holds up and you have your climb.”
He simply introduced himself before trying and failing to even make it past the start. Which lead to you laughing lightly as he pouted, “That’s really good for a beginner, Jungkook-sshi. I know many people who wouldn’t be able to hold on. How about we do something easier?” You hoped that you adding yourself to his climbing time wouldn��t be something that he’d mind.
You were lonely and stressed, and he was cute and wanted to climb.
“I would really like that if you’d want to climb with a noob.” He said quietly, his eyes downcast as he spoke. Was he shy? But why? You didn’t do something strange, did you?
“What do you suggest I start with?” He asked, this time talking with the same confidence and excitement as before as if the shyness you had originally seen was just a figment of your imagination.
You smiled, happy to see his excitement, “How about with a VB, they’re great warm-ups.”
Turns out, Jungkook was a fairly good climber, his brute strength and sharp mind making him soar through VBs, V0s, and V1s quickly. It was fun to try his dumb betas and show him different tricks, especailly because he loved to try static climbs. Even if he couldn’t really get his foot above his hip nor do the equivalent of a dyno without leaving the wall. He was strong and determined to try and you were happy to share your three years of knowledge.
It wasn’t until the gym was getting ready to close for the night that you were forced to try and figure out if you’ll ever see Jungkook again. He was in rentals and had never climbed in a technical sense before. You were most likely not seeing him again, even if he decides to climb again, unless you tried to keep in contact. You just don’t run into the same people at the gym that often.
“Would you like to grab dinner with me, Jungkook-sshi? There’s a good salad place near here that I love to eat at after a particularly hard day.” You offered awkwardly after coming out of the restroom. Jungkook looked like he had something he wanted to say as well but when you spoke, he shut up, a pink hue rising on his cheeks.
It was cute.
Very cute.
“I think I’d like that a lot, Y/n-sshi.” Jungkook said, his eyes downcast and hand rubbing his neck. You were a little shocked by how shy he was acting as it was so different than almost every other interaction you had with Jungkook up to that point. He was almost a different person with how shy he was acting.
Turns out, he doesn’t really go out much or interact with strangers which was why he was so shy when it came to social interactions. It didn’t fully make sense to you since he was extremely fit and had mentioned that he had some sort of job in dance. Although his awkwardness was really explained when you learned his age.
You actually spat out your drink when you heard his age, “Bwo! You’re only twenty one? Wow! I thought you were at least twenty three!”
“How old are you, Y/n-sshi?” Jungkook asked, his eyes wide. If you didn’t know better, you might have thought that maybe he was worried about your age, but you knew better at this point. He was just a little shocked by your outburst.
“I am twenty five.” You laughed, “But I am still in school. I am hoping to get a PHD in food science.”
“Wow!! That’s cool! What got you into that field? It’s such a strange field!”
“It’s not really. Everything we eat uses it and my first job will probably be working for some junk food company to try and figure out the next combination of taste and texture to get more people to buy it. I got into it because of my second year bio professor. He kind of showed us some ways in which we can use food science to make our food last longer. My goal is to work for some nonprofit and make healthier food last longer in countries that don’t have as much access to it. GMOs and all that stuff.”
“It sounds like you’re very passionate about the work you want to do.” Jungkook said, laughing as you tried to spear a crouton onto your fork, “But I didn’t know GMOs were good. I thought they were bad.”
“They can be but overall they are the future if we want to live for more than one hundred years on this planet. What are you studying in college?”
“Oh… Uhhh… I am still undecided. I started college late and am only starting my second year.” Jungkook said, lowering her eyes in an almost sad way.
“You took a gap year?” He nodded, still not making eye contact with you, “Smart. I honestly wish I did. If I did, I might not have had to take out a loan. Two of my roommates took a gap year as well and they were the ones who really helped us furnish the apartment.”
“I’m also only doing college part time. My job is a priority.” He said, this time looking back at you and smiling. You tried to brush off the rapid beating of your heart you felt when he looked at you this time. You were really starting to like Jungkook.
“That is so cool. Do you have any idea of what you’d want to do after college?”
“Probably the same as what I am doing now in all honesty.” Jungkook responded, finishing off his salad, “Hey… uhhh… Y/n-sshi, can… can I have you number? I’d love to climb with you again.” Jungkook went shy again as he asked you and you really wanted to giggle at how cute he was acting.
“Of course.” You said, a large smile on your face as you pulled out a pen and wrote down your phone number, looking forwards to getting to know Jungkook more… and if things work out in your favor, maybe ask him out on a date.
Annoyingly enough, you stayed up later than you wanted just waiting for Jungkook to text you, something that your roommates took much joy out of making fun of. What was worse was that it took a whole other week before you saw the shy man again. You had been in the gym for two hours before you noticed the workers stop accepting new people coming in and another hour later you were one of the few climbers left in the building. It was strange as the gym was going to be open for another four hours but you guessed that the gym’s owner just didn’t want to let people in or was maybe trying to get some climbing team in for more hard training. Almost half an hour later you saw ten people come into the building, most of which were carrying camera gear or bags. It was strange to say the least.
What was stranger was seeing Jungkook and six other men who looked almost as good as Jungkook walk in almost five minutes later. It was jarring to see so many handsome men in the same setting but here they were. You stood there, staring at the seven men dumbfoundedly until you made eye contact with one of them. Their eyes widened and he seemed to talk to the others before pointing towards you. You quickly looked away, determined to finish off your climbing for the night without looking at them again.
Of course it didn’t work that way. You were trying your hand at a V5 when one of them started to furiously yell at the others in the group of seven. It shocked you out of your focused state and you looked over. All of the seven men were wearing make-up and trying to do some V3 you had managed to do earlier that week. The one who was yelling seemed to just be cut off by Jungkook, and the man’s face seemed to get redder by the minute as he continued to yell. It was funny to a degree but all you could focus on was that Jungkook and you were in the same gym at the same time and he never texted you.
The few other people who were in the gym before the seven started filming had left almost as soon as the camera crew told them that you might be on TV but you didn’t care. You were here to get your climbing fill in, even with your trigger-pull-syndrome and callous riddled hands and even with the possibility of getting filmed. Sure you were annoyed at Jungkook’s lack of messaging but you were honestly there to get a good climbing session in. You weren’t trying to obviously avoid Jungkook by leaving as soon as he went to get water near you when they took a break from filming. Nor when he tried to do a climb on the wall next to the wall you were climbing on.
Really.
You had no reason to avoid him.
You just also happened to have a somewhat long climbing endurance which lead to you calling it a day after almost six hours of climbing in total, the camera crew leaving around the time that you were as well. Jungkook and the other men who were being filmed had left ten minutes ago and the gym would be closing soon. You had felt bad for staying so late but you didn’t want to run into Jungkook at all. The man had to know that what he did was hurtful and rude and overall insensitive to you. He had to know! Why wouldn’t he know?
He has to know.
Really he has to.
Even if he was younger than you by four years and you were being somewhat immature.
As it turns out, Jungkook really didn’t get the message from you that day. It wasn’t until you saw the man a whole two months later that you finally talked again. You were starting to project some new V7 that a climbing friend of yours suggested and for what felt like the fifteenth time, you fell.
“You did that on purpose, didn’t you?” Jungkook asked and when you looked back at him, he was in a spotter’s position.
You rolled your eyes, “I am mad at you mister. Why didn’t you ever text me?”
“I… I was shy. I didn’t know what to say.” Jungkook was looking down, his neck and ears turning red.
You sighed, he was still young, “I understand, Jungkook-sshi. Please don’t be too shy with me tho. I really am not here to scare you.” You got up, not wanting to have to crane your neck to look up at him.
“I know… I just. Do you know who I am, Y/n-sshi?”
“What? You’re Jungkook? You work as a dancer? Should I know who you are?” You almost wanted to scoff. Was he prideful of who he was? Just because he was going to be in some random show?
“I am Jeon Jungkook.”
“A common name. Get on with it.”
“I am part of a band… BTS? Do you know them?” He said this quietly, almost as if he was worried that one of the few other climbers in the gym would hear him.
“I think I’ve heard of them. What’s your point?” You were utterly confused at this point. What was he trying to say? He was part of some random band, but why is that important?
“I’ve been in the idol industry since I was, like, thirteen, Y/n-sshi. I have almost no experience with girls. I mean, I have gotten better but still…” He said, voice was quieter now and he leaned closer to you as if this was some sort of large secret.
“But you have interacted with other people, right?” You asked, raising your eyebrow at him as the two of you walked towards your stuff in the far corner of the gym.
“Yeah but it’s harder with you… because you’re cute and you are a girl.”
You laughed at this, “Yeah? Well you’re cute and you’re a boy.”
He stopped and looked at you with his mouth open, “Are you flirting with me?”
“Why yes I am and I was planning on asking you on a date after we talked more but you never texted me.” You said, crossing your arms and laughing at his shocked expression.
“I… What?”
“Are you really that shocked by me being attracted to you, Jungkook-sshi?”
“You really don’t know why I am?”
“You’re Jeon Jungkook. A guy in a band whose been climbing at my gym lately. I am sure I’d learn more if you actually texted me so we could hang out when I am not in the gym.” You said, a small smile on your face. Jungkook smiled back before running over to get his phone, leaving you slightly confused until:
Xxx-xxx-xxxx:
You said you wanted to go on a date if I texted you?
You looked up and met eyes with Jungkook, a laugh leaving your mouth as you walked over to him.
You:
Yeah.
Xxx-xxx-xxxx:
How about we go on one now?
You:
Sure.
#btsguild#btswriterscollective#btsboulangerie#bts jungkook#jungkook#jeonjungkook#jungkook sports au#bts sports au#kpop#bts fanfiction#bts fan fiction#bts fanfic#jungkook fanfiction#jungkook fan fiction#jungkook fanfic#kpop fanfiction#jungkook oneshot#jungkook one shot#bts oneshot#bts one shot#bts jungkook oneshot#bts jungkook one shot#bts idol au#jungkook idol au#bts fluff#bts angst#jungkook fluff#jungkook angst#writing#bts writing
100 notes
·
View notes
Text
10 Makeup Tips for Disaster-Proof Bridal Beauty

Getting married is meant to be the simplest time of your romantic life, but without proper prep, it is often something of an organizational nightmare. Every bride deserves to seem flawless on their day, whether you're enlisting the pros or going the DIY route. Weddings, however, aren't almost at some point — it's more of a marathon, instead of just a race. So start planning early and do not be afraid to indulge a touch when getting your beauty strategy so as — book a facial (or six) and definitely do your due diligence find an excellent waterproof mascara (trust us thereon one). With this guide, your bridal beauty look, whichever you'll choose, will gorgeously take you from vows to Veuve so you'll say "I do" without having to stress about any unflattering candids throughout your nuptials. we will not guarantee that your wedding guests will behave or the catering won't run out of hors-d'oeuvres but at you'll look great while somebody else handles it for once.
Start Early With Skin Prep
If you haven't been diligent about your skin-care routine, now's the time to start. "Getting regular facials makes an enormous difference in your skin's texture and helps you've got the simplest base for makeup," says makeup artist Tiffany Patton of White Rose Collective in NY City. Schedule monthly treatments (aim for a minimum of three) which will illuminate and firm your complexion, says facialist Regine Berthelot of latest York's Caudalie Vinotherapie Spa at the Plaza Hotel. to stop any last-minute irritation, skip extractions the month before.
Schedule an attempt Run (or Two)
Kate Middleton (a literal princess) is rumored to possess done her own wedding-day makeup — and she or he nailed it — but many brides like better to usher in a professional . to seek out someone who understands your style, consult a couple of different makeup artists early. "You want to ascertain if you're employed well together," says makeup artist Landy Dean. Book a minimum of six months ahead, then schedule a further trial two months before the marriage. "You'll be more settled within the planning and can have a far better pity how you would like to seem," he says.
Make Your Makeup Last
Though it'd feel otherwise, your day may be a marathon, not a sprint, and you will want your makeup to carry up through all photos, dance, toast, and selfie. that creates primer essential: Spread it on your face and eyelids (we love this one from Paula's Choice) and concrete Decay Eyeshadow Primer Potion after cleansing and moisturizing, then top with a foundation to make a smooth base. "Apply everything in thin, even layers," says Patton. That goes for blush, highlighter, translucent powder, and lipstick, too. "Use a lip liner, placed on your lipstick, blot, add more lipstick, blot, and add more lipstick," says Patton. "This process really seals the merchandise to the lips and makes for an ideal stain."
Conceal Last-Minute Breakouts
So, your rehearsal dinner lasted until dawn. No big deal. Put foundation on first. Then, to mask undereye circles, dot a creamy formula on the inner corners of your eyes with a brush and work it outward. Use your fingertip to softly press (not rub) the formula onto skin where it seems darker. To camouflage a zit, tap a rather tacky concealer right top of it with a synthetic bristle brush, says makeup artist Chrisanne Davis. "Don't sweep it back and forth," she says. "It will build up around the blemish." a couple of concealers we love: CoverGirl Outlast All-Day chump Concealer, Nars Soft Matte Complete Concealer, and Lancôme Teint Idole Ultra Wear
Camouflage Concealer. to offer it some endurance, top with translucent powder.
Aim For Looking Like Yourself
Whether you normally wear minimal makeup or whether you favor more avant-garde looks — "Your day isn't a time to experiment," says Dean. "You want your photos to be timeless." One look that never fails: radiant skin, rosy cheeks, flushed lips, and a few definitions on the eyes. employing a gel eyeliner, work it into the bottom of your lashes, then apply it to the upper waterline, says Davis. "It gives you intensity without looking overdone or needing plenty of eye shadow. Plus, the wide-eyed effect is basically dreamy."
Get Glowy (Not Shiny) Skin
"Luminous skin looks ethereal," says Davis. "But you do not need a strobe-light effect across your face in photos." to regulate shine, dust translucent powder across the forehead, sides of the nose, and on the chin with a powder puff. Then apply a soft, shimmery highlighter (Davis loves Nars Copacabana Illuminator) to only the temples and tops of cheekbones. "To brighten eyes, you'll also dab it on the inner corners and under the brow bone," she says. "It's so sheer, it's natural."
Falsies Are Optional but Waterproof Mascara isn't
If you are a big crier, consider before tacking on false lashes. "Tears will lift the lash adhesive right off," says Davis. Curl your lashes and persist with a volumizing mascara instead, and whether you wear falsies or not, waterproof mascara may be a must.
Keep Your Manicure Simple
Truly, your matrimonial manicure is up to you, but a reason why you'll want to stay nails neutral: a bright, punchy polish will distract from your beautiful white gown. Plus, chips are far more noticeable on bright nails (something you are doing not wants to be fussing over on a large day). persist with softer shades and confirm they're sheer, not chalky. Those whose skin has pink undertones should choose a sheer pink polish, like Smith & Cult's nail enamel in Ghost Edit. Women with olive undertones look good in warm beiges, like HIPPxRGB nail enamel in S3. For dark skin tones, either one works — just steer beyond whitish colors, which may come off as gray.
Pack a Touch-Up Kit
Your day is going to be all smiles, kisses, champagne toasts, and even a couple of happy tears — so basically an enormous love fest through which even the foremost well-applied makeup is sure to fade. "Don't expect your initial makeup application to last eight hours," Dean says. Pack a touch-up kit with the essentials — blush, translucent powder, cotton swabs, and tissues — and stash it during a bridesmaid's clutch. And since you will be on your groom's arm for many of the days, ask him to hold a gloss in his pocket. "A pretty lip gloss during a shade almost like the lipstick you were wearing at the start of the day makes touch-ups quicker and easier," Davis says.
Leave Enough Time
Save yourself from any last-minute rushing and append a couple of extra minutes to your prep time. "However long you think that your makeup will take, add half-hour," says Dean says. "The fear is that you're going to be sitting ready, but that rarely happens."
1 note
·
View note
Text
JeffreeStarCosmetics - The best, or just good? ( For eyeshadows, at least ).
Hello everyone!
Today I’ll be doing a review on two of the JeffreeStarCosmetics’ eyeshadow palettes - “Beauty Killer”, and “Blood Sugar”. I won’t be doing a full-on comparison ( not yet, anyways ) but I will be reviewing the palettes based on their price, their reputations, what they were advertised as, and how they actually perform. And, to be thorough, I’ve had both of the palettes long enough to make noticeable dents in some of the shadows, and to give them both a fair try. Also, I will be reviewing each category - Packaging and Presentation, Performance, and Cost. The highest possible score in all three categories is 5 - with that out of the way, let’s begin.
( DISCLAIMER: the following post is just my analysis on how these palettes performed and felt to me. I used my own primers, my own brushes, and my own techniques, meaning the quality I saw may not be what you see. I am not attacking JSC - this is simply a review of how the products worked for me. )


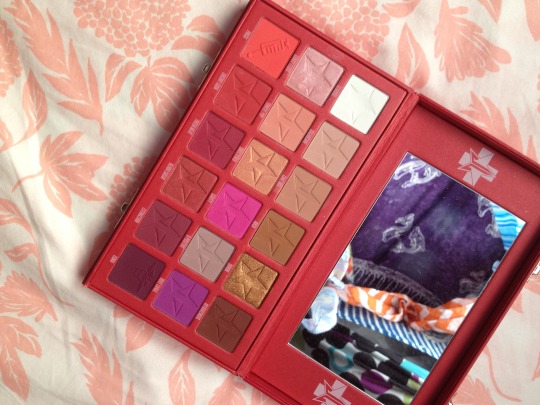
Part 1: Presentation.
Above are the two palettes I’ll be reviewing today. In terms of packaging, they both feel drastically different - Beauty Killer feels like your average, sturdy cardboard palette, and while it’s pretty on the outside it isn’t the most stunning thing. Inside, it comes with a fairly large mirror, and ten massive shadows. The color placement is nice, and the imprints in the shadows are pretty, and add a designer feel to the whole thing. Overall, it’s a nice looking/feeling palette, and receives a 4/5.
Blood Sugar on the other hand feels great. While on the bigger side of the scale, and a bit clunky, it isn’t huge, and the outside feels expensive and nice - like leather. It also looks nice, with small metal clasps to keep it closed, and while simple it does look like a pricey palette. The mirror is noticeably bigger on this palette, and the shadows are just as nice as they were in Beauty Killer - just not as huge. This palette boasts 18 red-toned shadows, with the same imprints on the pans - as well as the addition of a syringe on “Prick” and a caduceus on “Coma”. Overall a beautiful palette - 5/5.

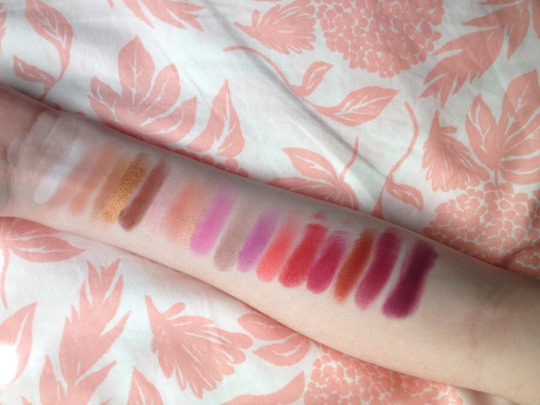
Part 2: Performance. ( swatches above are “Beauty Killer” and “Blood Sugar”, top to bottom, on my clean, un-primed arm )
Here’s the category where it counts - performance is what really matters in these palettes, as it’s kind of a waste to buy a palette that’s pretty in packaging/presentation but horrible in performance. I mainly included the swatches to show the colors a bit better, but please keep in mind that swatches are NOT a good way to judge a palette’s quality. Shadows that swatch poorly can perform amazingly - I’ll get back to that point later.
To start, Beauty Killer has, as previously mentioned, ten shadows. On the website, this palette is described as “Our first ever eyeshadow palette is finally here!!! 10 jaw-dropping shades. Extreme pigment. There are 3 formulas in this palette: matte, frost & glitter.” To clarify, there are 4 mattes ( Star Power, Courtney, Vanity, China White ), 2 glitters ( Expensive, Black Rainbow ), and 4 frosts ( Princess, Violence, Rich B*tch, Confession ). One of the glitters isn’t even a true glitter - “Black Rainbow” is the odd one out in this palette, as it’s a matte, black base with small rainbow glitter scattered throughout it. But the real question here is - are they actually extremely pigmented, like the website claims?
And the answer is, for the most part, yes. The mattes are pigmented, and while a few are chalky ( Star Power, mainly ) the rest are actually really nice and soft. You can probably tell what my favorite is because I’m close to hitting the pan on it - “China White” is a really nice- bone-white shadow that makes a great base for natural looks. The downside? The fallout is ridiculous - you dip into the shadows, and the mattes are so soft that powder goes everywhere, and unless you’re extremely careful it can be tough to gather up the powder to avoid wasting it. As for actual fallout, it isn’t as noticeable with the pale shades - it comes into play with the ones like “Star Power”, “Black Rainbow”, and “Courtney”. These have some fallout to them, but if you use just a tiny bit, you’re fine, and with how pigmented these shadows are, you may not need more than that little bit to get your look done. So, in the case of the mattes and glitters, the “Extreme pigment” claim is true. They also blend nicely, so that’s a plus.
But what about the frosts? For a shadow making up nearly half of the palette, aren’t these important too?
Well, the answer is no, these aren’t heavily pigmented. I know in the swatches, all of them except “Princess” are showing up nicely, but when you apply them to a primed eye they take a lot of building to get much color with a brush - you’re better off pressing them on with your finger to get a soft, purple or gold-tinted shimmer. But despite their lack of pigment with a normal brush ( or a wet one, these shadows do not like water or my setting spray! ) these are actually my favorite shadows in this palette. They have a really nice shimmer to them, an icy glow, if you would, and I like that the colors are so soft - it makes the three crazier colors a lot more wearable for the average person, and the formula is amazing - they aren’t powdery like their matte siblings, and they have a lot less fallout too. If Jeffree were to sell these on their own, I’d probably do my best to get my hands on them all.
Finally, the glitters, who deserve their own segment at the bottom because of how much I hate “Black Rainbow”. “Expensive” is alright, and again is much better off being applied with your finger rather than a brush, but “Black Rainbow”? Absolutely not. The fallout is horrible, the black matte is patchy and hard to blend, and when applied the glitter is so hard to see it may as well not be there. For a glitter, this shade is a failure, but thankfully as a matte it isn’t the worst black I’ve ever tried. It can be used as an accent color, and blended out if you use just the /tiniest/ amount. Nothing more.
So, overall, what is the quality of the “Beauty Killer” palette? It certainly is a beauty, as are most of its shadows, but it isn’t really a killer - its frost shadows are, though, giving it a solid 4/5 again. The frosts themselves get a 5/5.
Next we move on to “Blood Sugar” - one of JeffreeStarCosmetics’ biggest sellers, having sold out every single time it restocked ( and before I could get it, which was part of why this post was delayed so much! ).
So, like I said earlier, “Blood Sugar” has a total of 18 shadows - the website says “Our iconic Blood Sugar palette! Featuring 18 striking eyeshadows and pressed-pigments.This palette is serving three luxurious formulas: matte, metallic and foil. Luxurious red faux leather finish in a metal clasp palette. One of a kind. Extreme payoff.”
Now, I call crap on this claim. Of this palette’s 18 shadows, a whopping 14 are mattes, leaving little room for the two metallics, and the two “foils”. The “foils” are the same formula as the frost shadows I mentioned in my review of “Beauty Killer”, so while this is a minor thing, I was kind of confused as to why they didn’t just call them frosts - but I just wanted to bring that up. I’ll get back to the serious review now.
So, to start, are the mattes as striking, luxurious, and EXTREME-PIGMENT as the website claims they are?
Somewhat. All of the mattes are heavily pigmented, and while “Cavity” feels strikingly similar to “Star Power” from “Beauty Killer”, the colors are just different enough to be different colors - however, like its sister from the same mister, “Cavity” is kind of chalky and its sister just two pans over, “Root Canal”, feels the same. The quality of blending and application is a little worse than the other mattes because of this, but with a little more work they’ll give you the same pretty look the others will. “Extraction”, “Coma”, and “Fresh Meat” also feel chalky to the touch, but unlike the two I just criticized, they don’t suffer any disadvantages from this, and still apply and blend nicely. Other than the shadows/pigments I specifically mentioned, the mattes are soft, with the same powder-iness that “Beauty Killer” had, but this time, they’re creamier and have better pigmentation. “Glucose” specifically is my second favorite white shadow to use as a base for colorful looks. So, for the most part, yes - the mattes are striking, luxurious, and high-PIGMENT. Not quite extreme yet, Blood Sugar.
Now for the two metallics - some of my favorite formulas in this entire palette. Both of them ( “Donor” and “Blood Sugar” ) are stunning - heavy on the pigment and the beautiful, reflective finish, and with the soft, creamy texture and the lack of powder or fallout, they’re the Chad of the frost-metallic-foil shadows that JSC puts out. “Donor” is a little more metallic-y than “Blood Sugar”, and both of them play well with a wet brush - water and my setting spray!
Finally, the foil-frosts. They’re pretty much the same as the originals - just with more powdery-ness, and the same pigmentation. I love them all the same, but the metallics and soft, buttery mattes take the cake on this palette for me.
So, what is my final score for this palette? 4.5/5. It loses a half point because of the chalky shadows, which make up a third of the mattes.
Part 3: Cost.
Finally, you might be thinking to yourself, we’re done! This is the end of the review! And right you are - this is the last segment before I add my notes, and you’re free to go about your day again! ( Assuming you even got here! )
So, “Beauty Killer” retails for $45. For ten shadows, in large pans, is this worth it?
Not really. While I wouldn’t say this is terribly over-priced, I do feel $45 for the quality you get and the color range is a bit much, but with as much product comes in the pans, I can’t complain all that much. It gets a 3.5/5, and overall, a 3.5/5. Not the best, but not the worst. A good palette overall.
As for “Blood Sugar”? At a $52 retail price, I think it’s a bit much. The shadows are good, yes, and very pigmented, but I can get the exact same quality for a fraction of the price - I feel like most of the price tag on this palette goes into the packaging, and while it is nice, I don’t think $34 is a good price for fancy, faux-leather covered cardboard. 4/5, and a overall score of 4.5/5.
Thank you for reading my lengthy review of the JeffreeStarCosmetics “Beauty Killer” and “Blood Sugar” palettes! Please consider leaving a like on this post or following me for more if you enjoyed this, and please keep in mind that again, this is just my own experience. If these palettes are better or worse for you, that’s fine!
( Notes: I used the TooFaced “Shadow Insurance” and Medusa’s Makeup eye primers with these shadows, and the NYX Mattifying setting spray for some of them. )
( Also, for my estimate on the price of the shadows vs the packaging of “Blood Sugar”, I compared it to the “Opalescent” palette BHCosmetics recently put out. It has more shadows, smaller pans, but the same quality - which is why I used it as my example. )
6 notes
·
View notes
Text
Cammi’s Blog Series on Watercolor #1
Due to several requests from many of my twitter mutuals, I’m going to talk about watercolor for a few posts.
This is everything based on my own experiences and my suggestions or methods are in no way “the right way to watercolor.” There’s pros on youtube that can teach you how to watercolor like a champ.

I just draw silly characters!
in THIS post, I will list my suggestions on watercolor supplies to purchase for getting started. Later posts during the week/month of February, I will go into defails on specific kinds of paints, paper, brushes, palettes, and then some. A table of Contents will be added to this original post as more posts are added to this series.
All price estimates are in US dollars
1: My Personal Favorite:

Daniel Smith Essentials Set of 6 ($30 on Amazon)

Daniel Smith Primatek Introductory Set of 6 ($25-30 on Amazon)

Meeden Empty Watercolor tin with 12 half pans ($11 on Amazon)
Interestingly enough, now Daniel Smith has a 15-color pan set for about the same price as this setup, and it has all the essential colors except for New Gamboge, but it doesn’’t include any of the gorgeous Primatek colors, and the lid isn’t made for mixing color (the water spills onto your lap) so you’ll have to buy an additional palette anyway. Still, iif the colors in that set are up your alley, go for it!
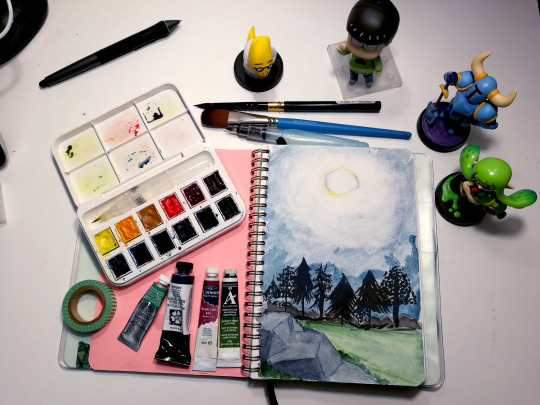
Daniel Smith has been my dominant paint choice for almost a year now; getting them last February and taking a few months to get used to them after using cotmans for two years and artist loft for the 10 years prior. I didn’t think artist grade paint would be worthwhile for the likes of ME because I just draw character doodles and not landscapes or textures that rely on high-pigment paint to really shine, but I was wrong. The colors lay down so much better and you use less paint per drawing because of the high pigment load. I’ve painted a lot more in 2008 than I have in previous years and none of my tubes are close to running out! The Plague Knight and Mona drawing posted above was done with artist grade paint.

I’ve expanded since then, buying another tube of Daniel Smith when I was able to go to Blick with a small wad of cash, or get a Winsor & Newton Artist grade tube for $5 with a Michaels coupon.I also repurposed my Cotman box for my current paint set. I can’t remember how much this whole palette is worth together, but the initial 12-color+metal case setup was about $70 (the primateks gifted to me), and then I added a new color every several weeks or when I felt like I really needed something else.
2: The Simple Budget Grab-n-Go
You are very new to watercolor, not sure if you are willing to commit, or you’re just plain not in a situation where you can be spendy.
Maybe you’ve used those $5 watercolor cake sets and you’re tired of the chalky powder rubbing onto adjacent pages when the paintings dry in your nice Moleskine book
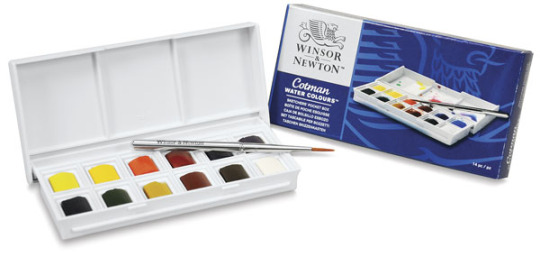
Winsor & Newton Cotman: Sketchers Pocket Box. These days, you can get it for around $13 on Amazon.
There are LOTS of different cotman sets, but this one has two kinds of reds, two blues, two yellows, two greens, and 3 neutrals, which, if you’re a beginner, is a great way to learn about color mixing. It also has some of the most popularly-used colors in the world of paint, such as burnt sienna, french ultramarine, cadmium yellow [hue], alizarin crimson, sap green, and the pthalos, so you can develop familiarity with these and easily find tips and tricks on using them online. Any color you don’t like later on can get tossed in the garbage and replaced with another color (I’ve replaced black with Paynes Grey, white with Cerulean Blue Hue, and Burnt Umber with Van Dyke Brown).
You can make all sorts of colors with this, and you won’t get overwhelmed with having too many colors to glance over.
Refills and additional colors are available for $5+ each
It comes with a small brush. You may not like it.

Cotman Brush Pen Set, $17 on Amazon.
I’m not a fan of color setup except for the inclusion of Paynes Grey, Turquoise, and a really nice purple, but I LOVE this box! It comes with more mixing space on the lid and a waterbrush that I think works really well. It’s a very thin tipped brush, so if you want something to more easily paint over larger areas, I suggest getting a medium size waterbrush listed below.
If you don’t like waterbrushes, a foldable pocket paintbrush can fit in the slot just fine.I’ll have a separate post on paintbrush details.
---
The main issue with cotmans is that they carry less pigment than more expensive pants as these are student grade. Many of the colors are still vivid and wonderful, and you’ll just have to layer some colors a few times to get some really bold color application on the paper. Many people use cotmans just fine.
avoid Van Dyke Brown at all costs. Look at this Banjo!

3: More Colors for your Buck!
You don’t care about mixing or portability, You love color. you want to explore all that’s available in paint or want to build a collection that’s as big as your copics.
You have options, my friend!

Kuretake Gansai Tambi, $30 on Amazon, $40 on JetPens. I do not recommend these if you like to mix colors or complex layering because these don’t handle that well. I’ve tried layering color on commissions and it would just lift the bottom later of paint after it dried a week prior, and this nearly destroyed two commissions. HOWEVER, if your watercolor style is simple shading, bold, flat colors, using the white of the paper for highlights, this set will be a terrific friend of yours. The pinks, greens, and blues are absolutely fantastic and I use it for my Superstar Saga art whenever I’m home.
The paint is really opague unless you water it down a ton. It’s still going to look great regardless.
Smaller sets of this are availablle, but since mixing more than two colors at a time doesn’t work out very well, you might as well go with the largest set.
There’s also the option of larger cotman sets with a half pan set of up to 45 colors for $55 on Amazon.
Paintbrushes
For this post, I’m going to briefly list some travel brushes. a more detailed post about bushes will come in the near future.
The main points are:
You would want a water brush if you like to paint with water in the brush, or paint on the go with no real opportunities to put a water cup down anywhere.
You would want a synthetic paintbrush if the stiffness works with your painting style and you want the brush to hold more pigment than water You can get these in assorted price ranges, but the super cheap ones will wear down and need frequent replacement.
You go for a natural hair paintbrush if you want to make really long paint strokes or paint large areas without having to re-add paint and water to the brush so frequently. Most of these are pretty expensive.
Anyone may tell you “natural hair brushes are the best brushes” but this is completely up to preference and painting habits Any small brush over $10 will last you a long time if you take care of it. Unless maybe it’s from Artist’s Loft.
A good size main brush (particularly if you do A5-sized paintings like me) is a 6 round. if you could only afford one brush, make it this one. This would be your go-to brush that can do thick fills, tight corners and thin lines as you need. Other size and shape brushes can be added to your set as you feel you need or could afford them later on.
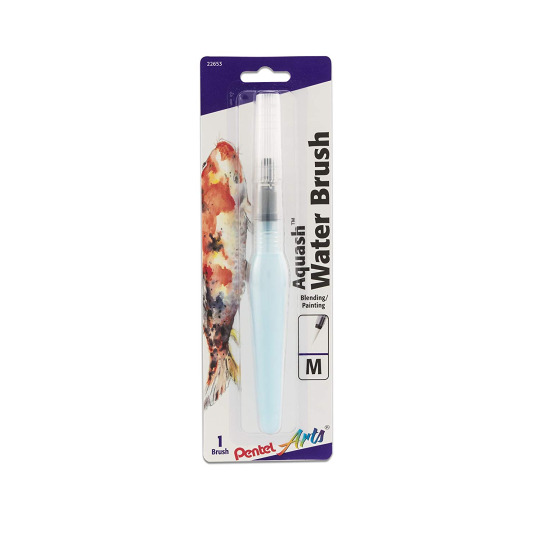
Pentel Aquash waterbrush: $10 on Amazon. You simply fill the barrel with water, and the brush will drip water from the bristles and let you paint without needing to dip the brush into a jar of water. You won’t need a jar of water at all! Some people love the convenience, some people hate how out-of-control the water flow gets.
I recommend the medium for a main brush. If you need a finer point for details, you could get one as a secondary brush, but if you feel you don’t need it, then just the medium is fine.
I just started using the Pentel brand a couple of months ago and can’t give judgement on them yet. Other brands I’ve tried before needed replacing at least twice a year with regular use.


I love travel brushes because I like the bristles to be protected when I take them places. Normal handle bushes can be cheaper or longer. Personally, I don’t look for brand names when picking brushes, I look for the material of the hair.
Both Escoda and DaVinci make great Red Sable brushes, and they have been my mains for two years. Expensive as they were, they are still working great and have perfect sharp points 18 months later. Not to mention, I’ve made the money back through watercolor commissions, in which these brushes allowed me to complete more commissions in less time.
White Taklon has worked well for me for synthetic brushes. Princeton has been my regular brand in late 2008 since I was able to snag those at Michaels in the mixed media brush section.
---
That’s it for now! Next post I’ll cover watercolor paper.
10 notes
·
View notes
Photo

Arteza Woodless Watercolor Pencil Test
Well, I was doing pretty good there and then disappeared for a week. (P.S. I hate school)
Anyway; my triumphant-ish return comes with, to the surprise of no one, a supply test that I finished a couple days ago and just didn’t post for reasons.
I got these pencils for my birthday, after having decided I even wanted them by having seen both woodless and watercolor pencils before and turning them down for various reasons. These satisfied both oddities in one set, so when it came time to put together a wishlist, I very quickly called to mind the video I had seen these in.
Aside from life obligations, the other reason it took me a little while to test these pencils was that I had to think about the best way to do so. How do you test watercolor pencils when you don’t usually work with watercolors at all, and you still want to see how they work as Just Pencils?
Obviously, I ultimately decided there needed to be two test drawings; one "dry," just using the pencils as I would any others, and one "wet," using water to see what I could get them to do. I thought about doing my regular galaxy job, but not knowing what exactly the water would do made me decide against it. Instead, I scrolled through Pinterest until I stumbled upon this picture of someone holding up a flower stem to the moon. That really inspired me, so I ran with the concept.
As pencils, the first thing I noticed (aside from the packaging, but I’ll address that later) was how heavy these are. I’ve heard people talk about the Faber Castell Polychromos being heavier than Prismacolor pencils, but I didn’t really notice that much, and even holding one of each I really have to think about it to notice a difference between the two. These, however, I noticed immediately after opening them, without any other pencils at hand to compare them to. Which I attribute them essentially being pencil cores with no wood casing. Speaking of which...
Now, I don’t know about you guys, but I’ve seen quite a few instances of people using various brands of woodless colored pencils (particularly Koh-i-Noor) and always walking away with at least one broken before all is said and done. Likewise, I was very nervous about these doing the same, so at first, I was skittish about putting too much pressure behind them and I still baby them when I’m moving them around since they really do appear to be just varnished watercolor pigment sticks and have no casing to protect them. But in this regard I think the extra weight ends up being helpful; it ends up accounting for that little bit I’m always holding back in terms of pressure. I did figure out that these appear to be a bit stronger than the other brands that I had seen other artists unwittingly break, so I was able to relax a little, but not by much.
The other thing here is that [I am not an art scientist, but] I think because they’re watercolor pigments when you layer them they appear to darken without as much extra pressure as normal pencils. It’s hard to explain, but I guess it’s like they layer onto themselves better or something? So my precaution wasn’t as much of a hindrance as I thought it might be.
Which I might as well mention here that they feel really smooth when they go down. Not soft like Prismacolors, but they do feel like they just glide around on the paper in a good way. This can feel a little odd when you’re trying to get darker pigment payoff, but not in a way that makes it impossible to work with. It's also odd because it makes them feel about as hard/firm as oil-based pencils like the Polychromos, though they otherwise behave more like wax-based pencils for the most part.
I did notice a couple of the colors felt a little...dry? at first. Chalky isn’t the right word, but it’s the only one that comes to mind. But that seemed to go away after I took water to them and they were left to dry again. I think it might’ve had something to do with just the nature of them being solid watercolors in the same vein as some watercolors drying and cracking after being left untouched for months or years at a time. [Again, I'm not an art scientist, this is just speculation.]
Oddly enough, they kind of reminded me of the Crayola Signature pencils I just tested in that the first couple of layers looked kind of patchy/scratchy, and you can still see that a little in the pink of the background and the moon, since they were only a few layers with lighter colors, but after that and with the darker colors, in particular, they smoothed right out. Though part of this also comes from that smooth feeling I was talking about; it makes it difficult to tell by "feeling" what the pencils are actually doing if that makes any sense. With regular pencils, usually, you can gauge what they're going to do by the resistance/texture of the paper. These just don't do that the same way. But this is one of those things that the more you use the pencils you can get used to it and work with it better.
This made the moon on the “dry” picture more of a challenge, and I steered away from using the black because I was afraid I wouldn’t be able to get it to blend out fully. Also, the white was better than I expected as just a colored pencil, but it just can’t touch Prismacolor in terms of pigmentation and it didn’t blend as happily as the Polychromos one, so I had to try and supplement with my white gel pen to get certain parts of the moon as bright as I wanted. Which, I will say, for whatever reason my gel pen really did not like these pencils, as just pencils or as dried watercolor. I spent a lot of time tapping and scribbling between long strokes to quite literally get the ball rolling again.
As just colored pencils, they worked okay, but with 24 pencils at $13-$17 on Amazon (the highest and lowest prices I’ve seen for them), unfortunately I have to say if you want just colored pencils, I’d still have to insist on Prismacolor, as they’re 24 for $14-$18 on Amazon and just do the job better. They're not terrible; I think I'd recommend these over those Crayola Signature pencils, they just leave a little to be desired when you know there's something better out there.
However, once I added water to the equation, that story changes a bit.
I’m not experienced with watercolor at all, as I already mentioned, (or most kinds of paint for that matter) so this was probably more of a challenge for me than it would be for someone who knows the medium better. I did at least use watercolor paper this time though, after learning my lesson last time, so that was one less thing to worry about. (Which is why the "wet" one is so much brighter; the watercolor paper is white instead of tan, so it doesn't naturally mute the colors.)
I started by just putting down a few layers of pencil as normal, but not too many, then washed over it with water. I suppose I could’ve stopped there, but the shading on the stem went muddy and I noticed that the water really lent itself to the texture of the moon (and made what little gray I had put down almost disappear). And despite my best efforts, the sky was pretty patchy after the first pass.
And so began the battle of applying water, applying color, light and then dark and then light again. The stem gave me the biggest fit as it was really difficult to apply dark or light color and blend it out without the color spreading too far and overtaking to the point of just looking like green mud. This I suspect mostly has to do with how small of an area I was working with. (To be fair, in general, I think with paint bigger areas are easier to work overall.) And for some reason, the light green brings up a considerable amount of yellow when it’s hit with water, which I hadn’t anticipated.
The sky was less trouble than I thought it would be, though I did toy with the area around the moon trying to both keep the glow but darken up the sky. Ultimately I stopped messing with it and decided I’d just live with the sky being a bit pale and the glow a bit uneven. On the other hand, I was much happier using the pink as a watercolor. Picking the pigment up directly from the pencil gave me a much better color payoff, enough that I actually did a wash of water to pale it back out a bit. Also, I think the watercolor sky looks a bit more realistic because of the texture, though the color pencil texture makes the stars look better on the other one.
Naturally, the pencil that suffered the most from my efforts was white. It too worked better as a watercolor than as a pencil, but because I kept painting it on and then neutralizing it, I had to overextend how much I was loading on the brush. So it has become noticeably shorter than the other pencils. (This is also how I learned that the shiny varnish on the pencils apparently doesn’t dissolve in water, or at least not very easily, and seems to have to be sharpened off, as it was a noticeable edge developing as I picked up pigment from the pencil tip).
Which, I did sharpen a couple of pencils. No major issues, though I did notice you have to grip them more attentively because they don’t have the wood grain for the sharpener to grasp to help hold it steady. Also, since the shavings are just bits of pigment, I am saving them and planning to figure out something to do with them so it doesn’t go to waste.
I do like the watercolor moon much better though. I ended up taking a bit of black, light blue, and purple to it since the gray in the set was looking a bit warm, and luckily the water dissolved them pretty straight away, so they blended in to cool the color down and darken it up a bit without overpowering everything. Of the two moons, likewise, the watercolor one is my favorite.
Other than that, as I already mentioned my gel pen did not like going over even the dried watercolor. It kind of makes sense since I’ve tried it over acrylic before and it aggressively didn’t like that either. I guess gel pens just don’t like paint? (They don't tend to like wax-based pencils that much, but they liked the paint even less.)
I definitely need more practice, but their performance with water is what convinced me these were a good investment. I’m not sure how often I’ll get to use them going forward, considering how much I like working on my gray and tan papers that aren’t watercolor friendly, but I will definitely have them on my mind just in case. Mixed media projects, anyone?
Also, after using these I can’t say I understand why you would ever go for watercolor pencils with wood; it seems like it would just get in the way and slow you down. Though it does make me curious about the Derwent Inktense pencils, as they’re water-soluble and aren’t supposed to re-activate after they dry...or the Inktense blocks...
No, bad Mystic, you don’t need any more pencils! Or art supplies, for that matter!
There’s only one glaring issue with the Arteza pencils though that I can’t overlook though; The packaging.
I try not to worry too much about the packaging on pencils. If it holds them nice and sorted just fine, then I usually write off my complaints as personal. But this is a special case. (Pun intended).
The pencils come in a clear plastic blister pack, arranged in two clear plastic trays. Keyword: BLISTER. There is no neat way to cut into the thing, leaving a nasty jagged edge capable of scratching unless you sand it down, and there’s also no way to fully close it back up, so you either cut it all the way open and it’s severed forever, or you do like I did and try to only open it enough to get the pencils out, which makes getting them in and out an absolute chore.
Fortunately, I had enough space in the zipper case I keep my 150 set of Prismacolors in (since I didn’t care for that packaging either) to put them in after realizing just how annoying that blister pack was, but not everyone is going to have a solution like that at the ready. It’s also kind of a shame because I actually liked the plastic trays, but it seems risky to keep them in those without a box to put the trays in. (I do have them in the back of my mind in case I come across a reasonable solution to that problem).
My issue isn’t that the packaging is cheap, my issue is that it isn’t easily reusable and just feels kind of obnoxious to use, even though it does look really good as an unopened display. (But you have to open it to use the pencils, so...)
This made it kind of obvious that even though on Amazon their price is comparable to Prismacolor, more of the money from Arteza went into the pencils themselves and not the packaging since the 24 set of Prismacolors comes in a nice tin that was probably more costly to manufacture.
Again though, my issue isn’t that the packaging itself is cheap. Honestly, I wouldn’t have given it much of a second thought if they came in a paper/cardboard box like a ton of cheap colored pencils (classic Crayola, Rose Art, etc.) do. To be fair, I can understand if they didn’t do that because they are watercolor and were concerned about people using them with water and inadvertently getting the box wet and messing it up, but still (Crayola came out with a set of watercolor pencils and didn't worry about that, for example). Or they could’ve designed the plastic more like the way Tombow Dual Brush Pens come packaged in the 10 marker sets: it looks like a blister pack, but it has little nods at the top like a clasp, so it’s relatively easy to open and close and reuse. It is a little fiddly sometimes and the markers do jostle a bit when you open it because they aren’t fit super snuggly inside, but I’d still much prefer that to the blister pack. Heck, even the Prismacolor Scholar pencils, which are supposed to be a more budget-friendly option to the regular Prismacolors, come in a plastic pack that can double as a stand, and they're $17 on Amazon right now.
And yet I have to concede that I would rather have good pencils with sucky packaging than sucky pencils with good packaging because there is always the option of just buying a better case. So while I do abhor the packaging, I will say it doesn’t mean the pencils aren’t worth buying. It just means I think you should already have another storage system in mind or ready for them before you do so.
I mean, if you don’t care about keeping them sorted and would just as soon throw them all in a regular pencil zip bag, then this is very much a moot point. I’m talking to those of you like me that prefer to have them sorted so you don’t have to spend minutes pawing through them to find the one you’re looking for.
My final verdict? If you’re looking for watercolor pencils, I say give them a try. I’m definitely curious to work with them more. Just make sure you’re prepared to deal with the packaging situation. Though if you’re looking for just regular pencils, sorry, but you’re better off with Prismacolor as far as I’m concerned.
Next up will either be a personal piece doing a bit of experimenting or a commissioned piece; depends on which I have to motivation and time to finish first after doing my school work I may or may not have procrastinated on.
Oh, and there’s a certain redesign I plan on making a journal about when I find the time...And I need to catch up on correspondence, as usual
____
Artwork (c) me, MysticSparkleWings
Inspiration image found on Pinterest
____
Where to find me & my artwork:
My Website | Commission Info + Prices | Ko-Fi | dA Print Shop | RedBubble | Twitter | Tumblr | Instagram
4 notes
·
View notes
Text
When Jeffree Star announced his summer collection for 2018, I was torn. I have been going through my collection and got away around 40% of my liquid lipsticks. And a good percentage of my eyeshadow palettes (I didn’t compare it before and after) to save space while I’m planning on moving. But after a few weeks of its release, I couldn’t help myself I had to get it. And this is the first time I’ve actually purchased one of their palettes, though I’ve had the others on my wish list for a while.
All of the packaging is a vibrant orange with little rain drop textures overtop. The Thirsty Palette also includes a Popsicle design with a wood grain appearance on the inside.
Thirsty Palette
This palette includes 15 shadows including 10 mattes and 5 blinding ultra-metallics. Also he tried to formulate this palette specifically to have minimum fallout with an array of bright colorful and neutrals. The palette itself is $48 and each shade has 0.069 oz or 1.95 g. Since the palette is vegan three of the shades are considered not suitable for the immediate eye area those being: Taste Buds, Biiiitch!, and Splash. This is why it’s considered a pressed pigment palette rather than a pressed shadow palette, since it’s up to the customer to listen or ignore the warning about the shades that may stain the eye or cause irritation due to the dye.
Now this is the first time I’ve tried Jeffree Star’s eyeshadow formula so looking at the ingredients I do find it interesting that a good majority of the shades have the first ingredient being Talc which is known for being more chalky. While the new formula of the ultra-metallics is either mica or polyethylene terephthalate. Now a lot of brands use talc including ColourPop and Urban Decay, while others like Anastasia Beverly Hills does not (at least not in Modern Renaissance and Soft Glam Palette as those are the ones I looked into for comparison). I’ve just been getting more interested in formulas and ingredients as I’ve been debating on testing the waters myself with making my own makeup (not to sell to others at the moment) and have been doing a lot of research into the subject. So I was really curious to test out this formula from Jeffree Star Cosmetics.
The first time I used the palette, I took the Lick across my lid using my fingers and while I noticed pigment on my finger almost nothing transferred to my lids. Which made me really nervous that I destroyed the product by causing it to seal into the pan. On that use, I only had concealer down on my lid that was set with the shade Parched. Now just because it wasn’t pigmented, did not mean I could build it up and it did last the entire day. But I’m positive it wasn’t performing right, so I wasn’t going to give up on the shade since I spent a good amount of money on the palette. When I got home after wearing the shades all day I decided to do some experiments with the ultra-metallic pigments. Here are my results:
Applied over bare skin with a finger: Barely any pigmentation.
Applied over bare skin with a brush: More pigmentation with a brush, needs to be built up.
Applied over primer (NYX Eyeshadow Base in Skin Tone) with a brush: A little pigmentation more just the glitter with the base coming through than the shade itself.
Applied over glitter base with a brush: Stunning pigmentation!
Lesson learned, use a glitter primer and a brush to get the full pigmentation out of the shadow. As I said, it can be done you just have to find the right combination. So I need to remember that when I use these shadows since typically I apply these type of pigments with my finger, but that doesn’t work with this formula. For the swatches below, the ultra-metallic shades are over a glitter base.
Pressed Pigments/Shadows in the palette:
Parched: matte fair beige
Tastebuds: matte baby coral
Biiiitch!: matte flamingo pink
Kumquat: matte bright orange
Stroke: matte terracotta
Divine: metallic silver
Filthy Rich: metallic gold
Lick: metallic topaz
Snatch: metallic pink champagne
Plunge: metallic copper
Subtle: medium cool-toned brown
Quench: matte bright yellow
Submerge: matte bright blue
Splash: matte aquamarine
Drizzle: matte warm chocolate brown
Velour Liquid Lipstick
In the summer 2018 collection, there are eight new limited edition velour liquid lipsticks that range from everyday nudes to reds to bold metallics. Each are available for $18 and contain 0.19 fl oz or 5.6 ml, or you can get all eight together for $105. All of them are also paraben and gluten free.
Shades in the collection:
Cherry Wet: Vibrant red/pink.
Fudge Pop: Warm-toned metallic brown with glitter reflects.
Huntington Beach: Bright teal.
Thirst Trap: Metallic beige champagne.
(818): Bright pink/coral.
Yummy: Burnt orange with a subtle glitter.
Coral Fixation: Vibrant Coral.
Soft Serve: Peachy nude.
Overall Thoughts
The Thirsty Palette is really nice but make sure you don’t use the metallic shadows with your fingers or you won’t have any pigmentation with the shadows. Otherwise, they look wonderful on the eyes and will last all day long. Comparing the shade Splash to Kiki from the Lunar Beauty Life’s A Drag palette, it is so much easier to work with since it’s hella pigmented. And I love that… I still don’t know how to use it in a look, but it’s more what I was expecting from that shadow from the palette. And that gets major points from me. As for the velour liquid lipsticks, I’m probably only going to be wearing Soft Serve and Cherry Wet on the lips but the rest will be used for my eyes as shadow or liner. Or for any fun looks and Instagram photos… but not on the regular basis as coral and orange does not look good at me at all. If you’ve tried this collection, what are your thoughts? If not, would you get any item from it in particular?
Love ya,
Mae Polzine
Join the Howl of the Pack today by subscribing! Or support this blog over on Patreon so I can continue to put out quality content for you! To stay updated on everything I’m doing, follow me on Twitter as that’s where I post quick updates. Also, if you like this post, let me know in the comment section, it really helps me figure out what content you guys appreciate. Don’t be shy I would love to hear from you!
Jeffree Star Cosmetics Thirsty Summer Collection Review & Swatches When Jeffree Star announced his summer collection for 2018, I was torn. I have been going through my collection and got away around 40% of my liquid lipsticks.
#Beauty#cruelty free#Jeffree Star#jeffree star cosmetics#liquid lipstick#makeup#summer collection#thirsty palette#vegan#velour liquid lipstick
2 notes
·
View notes
Text
I remember reading Romeo and Juliet for the first time, I must have only been about eleven or twelve, feverishly turning the pages of my crumpled old copy. I began to search the words for meaning, the hopeless romantic inside me yearning for a resolution other than death. However, when I reached the final act, it became apparent that the curtain had fallen on both the play and the young lovers lives.
Although it may seem cliché as fuck, an impressionable young girl fawning over the actions of two fictional children, I felt a certain numbness upon learning their fate.
I often found a strange sense of calmness amongst the images of decay.
I would romanticise the idea of death, obsessed with finding meaning in the absence of life.
I would wonder what people would think if I ceased to exist, creating elaborate realities in which I had sacrificed myself for the good of others, desperate to discover if my life had a meaning.
Although real life continued to seep into my delusions, like a busy train in rush hour, leaving me stranded at the platform with no hope of ever catching up.
The first time I put a blade to my skin I had hoped to find comfort in the pain, I yearned for the euphoric numbness I had read so much about. However, once again reality crept in. The turn of my mums key in the lock, the familiar mumble of “I’m home” as she struggled to carry her bags through the door.
I’d rush to help, but by then she’d be back at her desk, the door shut and the usual groan of her laptop as it struggled to ventilate against the wooden surface would once again echo down the hall. “Not now” she would snap, her hand shooing me away from the small crack in the doorway.
My dad wasn’t around much. He was always ‘busy’ working, or as I later learnt busy playing house with other women’s children. But my mum, she was the real hero in the house, working long days to keep our family afloat.
I didn’t see my mum as often as I’d like. But I grew accustom to the notes scribbled in haste on the back of envelopes.
“Be home late. Dinner is in the fridge. Will call you later, have a good day, Love you xx”.
I knew it wasn’t because she didn’t love me, in fact it was the polar opposite. She loved me, therefore she had to work. Our relationship would revolve around microwave meals, post-it notes and hushed conversations from the car or the various hotel rooms. The contrast of the harsh crackle of her voice against the humming of her car as she drove became a familiar sound.
At first I used to love being home alone. I would watch whatever I wanted and eat all the things I wasn’t meant to. But as I grew older it became quite lonely. The ache for attention would become unbearable.
At night I would hear my mum cry a lot. The muffled sobs would often lull me to sleep. My heart breaking every time my dad’s seat at the table remained empty.
I always played the understudy in my dads life or perhaps one of those secondary characters you add into a novel to flesh it out. It was almost like I had missed the audition for the main part, spending years of my life playing catch up with the desperate hope that one day the leading actor would fall down and then I could finally be the star.
It never happened. I’m still the understudy, but these days I’ve accepted it. His absence never went unnoticed but with age I learnt not to expect much. That way I was never as disappointed.
I was never good enough to be the leading lady. I never got the right grades, wore the right clothes, had the right attitude. I lived in an emotional prison of my own creation, desperately seeking someone to bail me out.
When I was 14 I was bullied so badly that I began to hurt myself again. I had started dating a boy I’d known since I was very young. My childish delusions of romantic grandeur had lead me to believe he was ‘the one’. I tried to open up to him, foolishly thinking he might be able to pay the bail and set me free. I craved attention, I just really wanted someone to love me.
This of course ended after three short weeks of playground kisses and late night texting. A girl in my friendship group had told everyone I was actually a lesbian. And this was high school after all, so naturally everyone believed it.
The late night texts stopped coming. I convinced myself his phone must be broken. It wasn’t.
He later told me, in front of all his friends, that he couldn’t be seen to be dating the “fat lesbian”.
I was 14, so this was ultimately the end of the world.
I lost all my friends. No one wanted to hang out with the ‘fat lesbian’. They would break my things, steal my money and shove me in the halls. My Facebook account was hacked, slut shaming me, with edited photos of my face on very graphic sexual images. I became a social pariah.
The girl started dating the boy. No one ever believed I wasn’t a lesbian either.
As I’ve grown older I’ve realised how pathetic it all was. I mean who gives a fuck if you like boys or girls anyway. But back then all I wanted to do was die.
I kept a brave face for a while at home, uttering a few words about how my day was fine and school was okay. It wasn’t.
I moved to Australia not long after this. My dad had told me this was my fresh start, a new hope. It wasn’t.
I started at an all girls boarding school, by the sea. My parents were going to move over later in the year, after everything was sorted back home. They never did.
I spent my locked away in my boarding house. I wasn’t allowed to leave.
“You need written parent permission and adult supervision.”
It became very monotonous. I felt almost like I was on auto-pilot for most of that year.
I would wake up, late as usual and have to skip breakfast. I would go to class, making small talk with the day girls, suppressing the deep burn of envy I would feel as they talked about their weekends at the beach or their dinners with their families. I’d then be forced to study in silence until 9pm, before I was able to return to my room. By this point I’d be mentally exhausted, craving the comfort of my bed. Sometimes there would be a slight variation, for example on Thursdays, I’d have to go to chapel. My mum had lied about my religion to get me a place at the school. Something that became achingly obvious with each passing week. I’d often argue with the pastor, telling him he was deluded. As you can imagine, at an Anglican school, this went down like a lead balloon.
It wasn’t long before I had fallen victim once again to the school bully. She weaved an elaborate web of lies that spread across the dormitory like an untamed bush fire.
And once again, one by one, my friends stopped bothering with me.
But this time I was all alone, 10,233 miles from home.
I tried to kill myself in the October of that year. It was the start of summer, one of the hottest days so far. I’d been to the beach for ice cream after school as a treat. It was a good day.
By this point I’d stopped texting my mum, feeding her lies about how wonderful boarding school was. I was angry with her. She’d abandoned me here.
My dad, the fantasist, was of course still determined that everything would work out. He couldn’t seem to accept the reality of the situation. They were never coming to Australia. The dream was dead.
Coming home felt like a relief. The suffocating heat disappearing behind me as the plane drew nearer and nearer to my home.
In my head I’d imagined a reality where everything would be perfect when I got home. My parents would be happy, my friends would love me again. It would be like the end scene from every high school movie I’d ever seen.
It wasn’t.
“Suicide is stupid. Mental Illness is a fantasy. There’s nothing wrong with you. You don’t need to see a therapist you’re 15. Grow up. Get a grip. Stop being so goddamn sensitive.”
My dad’s words echoed in my head, fragments of his harsh sentences tearing open old wounds and creating space for more pain.
I later learnt that my dad had bankrupted us. My mum lost her job. We had nothing. My mum had tried to kill herself that year. No one told me, they didn’t want to worry me - especially since I was “so far away”.
I started a new school, I thought it would be alright. I would be with my childhood best friend. I was wrong.
Her friends were awful. Their false promises of sincerity slipping through loose lips as they sold your personal business to the highest bidder in hopes of maintaining popularity.
Eventually I finished school. I packed up my things and moved away to London. As far as I could feasibly get, much to my mum’s disdain.
A lot happened in the 3 years that followed. I suppose you could say life happened.
In my first week of university, I was sexually assaulted in an alleyway as I stumbled around, drunk and bewildered looking for my bus home. It felt like I wasn’t really there. I failed to believe it was really happening.
I remember the rough texture of his hands against my shoulders as he slammed me against the wall, trapping my body. I remember I cried and screamed, I begged him to stop but he didn’t.
I wish I could say this was my only experience. In fact I wish I could say I made this all up. That it was a lie. But it wasn’t.
It happened again in my second year, I’d gone to a party with some friends, we’d invited a guy that worked with my best friend. He seemed nice, I’d flirted with him over the bar on occasion. We’d matched on Tinder, it all seemed innocent enough.
I was wrong. He’d followed me out of the party, explaining we needed to catch the same bus anyways. His obnoxious voice booming over the hum of the engine as the bus drew closer to my stop.
He followed me off the bus, pleading to use my phone charger. I shrugged and permitted it, my judgement clouded by substance abuse and exhaustion.
He made us a drink and I took it readily, my mouth dry and chalky.
He began to brush the hair from my shoulder, whispering compliments into my ear. It was almost as if he knew exactly what I needed to hear, his words making me believe he cared about me. Making me think maybe he could love me. My mind began to run away with delusions, my vision growing hazier as I sunk into my pillow.
He had laced my drink. I couldn’t feel my body, it was as if my conscious had left my body, as though I was watching from a distance, a bystander to my own destruction.
“You didn’t seem to enjoy that. Do you not like sex? Don’t report me. You probably think I raped you.” He joked as he buckled his belt.
“You did” I muttered, it must have been inaudible as he never responded.
I sat in shower for hours after he left. Hoping the heat of the water would cleanse my skin and burn away any evidence of his touch. It didn’t.
I began to sleep on the sofa, avoiding returning to the scene of the crime. I hated him. I hated how he had ruined the city of my dreams. I blamed him for every grey day. It was almost as if his touch had turned out all the bright lights, as if he had dulled all the colour and now all I could see was darkness and misery.
"You were obviously asking for it, I don’t know why you expect sympathy.” My own father’s words. And just like that I crumbled. The lifelong facade was over.
3 notes
·
View notes
Photo

I've admitted before that even though I might not be the most efficient shopper , when I do make a purchase, I commit—wholeheartedly. This is probably why countless friends, family members, and colleagues are always amazed by the must-have products I've discovered over the years on Amazon. You see, even though I loathe the crowds of Fifth Avenue in NYC (or the mall back home in suburbia), I am not so secretly a wizard when it comes to finding the best products lurking within the behemoth online retailer. And, of course, while I prefer to shop small, there are just some items that are more efficient and affordable to purchase online. So keeping the keyword "affordable " in mind, I pulled together a list of 31 random things I've found on Amazon that people always ask me about. From fashion basics and trendy accessories to nicely priced beauty must-haves and even a few tech gadgets and wellness essentials , all of the below products are easily sourced on Amazon and can be added to your cart with just a few clicks. Even better? Every single item on this list clocks in under $50. Still skeptical? Keep scrolling—you're bound to be pleasantly surprised. Barrettes are still a big trend this year, and buying them in a 10-pack ensures you'll always have one handy in a bag or coat pocket. I wore these tights to a chic winter wedding and was pleasantly surprised not only by how they kept me warm when walking from the ceremony to the venue but also how durable they were on the dance floor. I also acquired this for said wedding. I needed a little sparkle to enhance my all-black ensemble but didn't have time to shop around for a splurge. This simple tennis bracelet did the trick in a pinch—and got me so many compliments! It has been said that these Amazon Essentials tees are comparable to the fashion-girl favorites from Madewell. They say you have to kiss a lot of frogs before you find your prince. You also have to try on a lot of leggings before you find the perfect fit. Go ahead—take these for a spin. You might think that you don't need to opt into the shearling trend this season, and you would be wrong. At this price point, this is a cozy coat you can feel good about buying now (and probably wearing every day until spring). Cuticle oil wasn't even on my radar until I interviewed several nail professionals last year, but after using this top-selling Amazon product, I'm hooked (and so are my mom and sister). No joke, I hand these zit stickers out like candy. My boyfriend and best friend are also big fans. I've waxed poetic about the Wet Brush before, but this product has single-handedly saved my fine hair from serious breakage. I have multiple that I stash in my bedroom, bathroom, and suitcase. I am so 2000 and late on this, but after speaking with several skincare pros, I got turned onto this toner. It was a simple step to add to my routine, but my skin has never felt cleaner or looked better. I used to think that I was so diligent about taking off all of my makeup before bed. A few swipes of this MakeUp Eraser and I realized how much residue was actually getting left behind (ew, gross). Try it and you'll see for yourself! Everyone at Who What Wear who has experienced this magical Revlon machine is hooked. It works great on different hair textures, and at this price, it is absolutely worth buying now. I'm all about setting achievable goals in 2020, and maximum hydration is at the top of my list. This is a low-lift way to do the most for the delicate skin around your eyes, especially during the winter months. Hydration and moisturizing go hand in hand, so you know I am slathering myself in this classic CeraVe cream after every shower. So you want healthy skin, some anti-aging action, retinol, a slight tint, and SPF? How's this for an affordable skincare solution? Not only does this Korean hand treatment feel luxurious, but it also forces me to put down my phone for a few minutes and be in the moment. Win-win. I live in New York City, which means I rarely get to drive anywhere. However, I discovered this product when I was at home for the holidays and immediately purchased multiples to give to my parents and car-owning friends. The universal design works in any type of vehicle and uses magnets to hold up the phone instead of a clunky contraption. Even better? Two come in a set, so you can keep one and give another to a pal. Because I live in NYC and don't drive, I like to keep my MetroCard handy. These pocket stickers are super durable and adhere to a case or caseless phone. I bought these ahead of a long-haul flight to South Africa last year, and have no idea how I traveled without noise-canceling headphones before. They're cheap enough that you don't have to beat yourself up if they get lost in transit but also durable and work great. Unfortunately, I did lose my AirPods on a flight recently. I sucked it up and purchased a new pair along with this bright silicon case—so far, so good. Is it just me, or are these things always in short supply? I like this 10-foot power cable and find it charges faster than the one that came with my phone. So you want to test out a few essential oils but aren't sure where to start? Here, start right here. And get this diffuser, too. I have one at home and another at the office for maximum zen. If taking a gummy vitamin can help me avoid getting sick, why not? These are a top seller on Amazon. You know you're getting older when you actually start singing the praises of dietary supplements. Curious about collagen peptides? This Vital Proteins powder is easy to integrate into your morning routine. I have been taking biotin for years. While some pills can taste chalky or bitter, this brand is totally palatable. This sleep stick is the gift that keeps on giving! Well, I keep giving it to people, and then they give it to someone else, and so on… I used to live in a really bright, eastern-facing apartment and wore this sleep mask religiously. (I am not a morning person.) Now, I mostly keep this sleep mask on hand for flights. It is very soft and helps me relax. These resistance bands are easy to stash in a suitcase for workouts on vacation—and take up way less space than running shoes. Ready to start your plant collection? Succulents are an easy way to add greenery to your home—you'll become a plant person in no time. As I said, hydration is key, but single-use plastics are a definite don't. I like to keep this big water bottle at my desk and refill it at least three times a day. Up next: 82 Random But Essential Items We're Buying Right Now on Amazon
0 notes
Text
Tarte Tartelette In Bloom Clay Palette

Price: $46
Claims:
A best-selling, cult-favorite eyeshadow palette with 12 brightening matte & microshimmer shades.
Amazonian clay: nature’s most perfect ingredient for better, longer, truer wear
mineral pigments: soothe and soften skin
Product performance: Warm-toned assortment of 9 mattes & 3 delicate shimmers ranging from soft nudes to deep chocolates are arranged in rows for 3 easy looks that you’ll wear every day. The superblendable Amazonian clay-infused powder formula glides on like a cream, providing longwearing, intense payoff that’s never chalky or patchy.
Includes 12 eyeshadows:
charmer (off white)
jetsetter (warm taupe)
rocker (shimmering taupe)
smokeshow (black brown)
flower child (peachy nude)
smarty pants (tan)
firecracker (bronze copper)
activist (dark brown)
funny girl (champagne)
sweetheart (peach)
rebel (chestnut brown)
leader (aubergine)

My Thoughts:
Although this isn’t an all matte palette like the last Tarte Tartelette Amazonian Clay Matte Eyeshadow Palette, its still a pretty good palette to have in my collection. I love matte shadows more than anything but I really fell in love with the color scheme of the eyeshadows and the packaging. The outer casing has a water color flower design that is ombre pink to purple. The inner casing includes a big mirror an 12 eyeshadow in a golden encased pan. I love that the names of the eyeshadows are directly below each eyeshadow. The mirror on this palette is amazing because its big enough to show my entire face. A big plus, the mirror stays propped up when I do my makeup. Its my favorite compact to take on trips just because of the mirror. Its always great to travel with this palette because its secure and durable. I dropped it and nothing broke!
Now on to the best part, the eyeshadows! Normally eyeshadow palettes has only a few matte vs shimmer eyeshadow, but this is quite the opposite! Tarte Tartelette In Bloom Clay Palette includes 9 matte and 3 shimmer eyeshadow. Its really not hard to put a look together, whether its a day or night look. What I loved the most is that Tarte finally came out with scented eyeshadows! Each eyeshadow has a vanilla marshmallow scent to it.
Would I purchase Tarte Tartelette In Bloom Clay Palette over course because the color scheme is amazing!
Please keep reading for each individual eyeshadow review!

Charmer (off white):
Matte finish. The texture is dry but a little bit silky. The shadow is not hard when applying to the lid. It does apply unevenly so I had to layer it on to get an even coat. Once that is done Charmer locks in place upon application. Its not powdery so I had no fallout issues at all. Blending it was easy as eating cake. However the biggest issue I had with Charmer is that it started to fade just barely 2 hours of wear. I could even see it creasing. Within 6 hours it was completely off my lid. I think this is the worst shadow in this palette.
Jetsetter (warm taupe):
Matte finish. I can’t resists a taupe color eyeshadow. The shadow is beautiful it reminds me of cappuccino. The texture is soft and smooth. Its easy to apply on the lid because I get an even layer on the first try. Its not powdery, so again I didn’t have any fallout issues. Blends out like a dream. Jetsetter last for 9 hours on the lid before it starts to fade.
Rocker (shimmering taupe):
The finish is more of a frosted sheen. This taupe shadow is to die for. The texture is very soft and dense. When I dip my brush in the pan it ends up picking up way too much product. It also kicks up a lot of powder in the pan which makes it messy. Since the brush has a lot of product on it, it is easy to get an even coat on the lid. On application I did get a bit of fallout. Blending did take a bit of work but it was not that hard. What I hated the most is, around the 7 hour of wear I notice a few creased lines on the lid. Within 9 hours the shadow started to fade. But I think Rocker is beautiful!
Smokeshow (black brown)
Matte finish. The texture is powdery but smooth. On the lid it takes me 2 layers to get an even shade. I can build it up to the point where it is dark as it is in the pan or go for something a little lighter. Blending does take work, but its not that bad. What I hated the most is the amount of fallout. Even if I tapped the brush a zillion times I still have fallout. After 8 hours Smokeshow starts to fade on the lid. I did try to use this powder on my eyebrows like I did with Activist but it was way too dark.

Flower Child (peachy nude):
Matte finish. Soft and dusty texture. With the dusty texture I have to make sure to tap the brush a couple times to avoid fallout. Application does take long, because I have to add a few layers. If I didn’t pack on Flower Child it could end up looking chalky. However it did blend out nicely. I thought Flower Child would be similar to Charmer, where it disappears within 2 hours however Flower Child did not fade until 7 hours later on the lid. The color is worth it because its very pretty.
Smarty Pants (tan):
Matte finish. The texture is thin but dusty. Application was very interesting because Smarty Pants is about 2 shades lighter than my skintone. Its almost the same color of my concealer. I fell in love with this shadow very quickly. The reason why it was interesting because in some lighting I couldn’t tell where I applied Smarty Pants. If I over applied or under I never saw any fall out. I didn’t even have to tap my brush before application! Smarty Pants ( blends out like butter. Smarty Pants last for 9 hours before it starts to fade. All the confusing work leads to the most beautiful color pay off ever, it has to be my favorite shadow in the palette.
Firecracker (bronze copper):
A frost finish. One of my favorites eyeshadows in this palette. The texture almost felt moist. The brush picks up a lot of product. I’ve almost hit the pan with Firecracker but I’ve only used it a few times. My other shadows in this palette I barely even made a dent in them. I do have to layer Firecracker on the lid a few times to get an even frosted finish. But it blends out well with barely even touching it. Last for 8 hours before fading on the lid.
Activist (dark brown):
Matte finish. Has a very thin and dry texture. It takes a few swipes to get enough shadow on the brush. Application is a bit patchy but can be easily fixed with one or two coats. There was no fallout with Activist. However it was difficult to blend it out. It does start to fade around 8 hours on the lid. I use Activist to line my eyebrows everyday, it works perfectly!

Funny Girl (Champagne):
A frosted sheen. The texture is soft and buttery. Application is somewhat smooth. I had to layer it on a few times to get an even coat. However each time I went to apply it I had fallout. No matter what I did this Funny Girl ended up everywhere. But at least my skin look luminous! It blends out with no trouble. During the 6 hour mark of wear I did notice a tiny bit of creasing. It starts to actual fade about 8 hours in, on the lid.
Sweetheart (Peach):
Matte finish. I found this shadow to by more on the mauve side than peach. I thought it was a gorgeous shade in the pan however on the lid it was another story. The texture is dusty and thin. I found it hard to build up Sweetheart to its true shade because it was very sheer. Once I was done layering it on a few dozen times the outcome looked chalky. When blending it out it immediately starts to disappear. 2 hours in of wear and I notice near the lash line Sweetheart started to fade. It was completely gone after the 4 hour mark on the lid.
Rebel (Chestnut Brown):
Matte finish. The texture is smooth and soft. Application was different. I only dipped in the pan 2 twice. After I dipped the pan, I put the first layer on it looked a bit chalky and uneven. I still layered it on with the first dip. With the second dip, the chalky finish started to fade then I got an even coat without any trace with chalkiness. Rebel on the lid last for 9 hours before it starts to fade.
Leader (Aubergine):
Matte finish. Has a dry and thin texture. I didn’t have to use a lot of powder to get an even layer on the lid. With zero fallout. Blends decently I did have to work the brush a bit but it wasn’t too bad. I found during the very beginning of the fading process Leader can look a bit chalky. Then I can see it start fading 5 hours of wear on the lid.
Pros:
Outer water color flower design that is ombre pink to purple
Big mirror
Mirror stays propped up
12 eyeshadows that are labeled
9 matte eyeshadows
3 shimmer eyeshadow
Can use for day & night
Travel friendly
Vanilla & marshmallow scented
Cons:
None

Brows: Activist
Brow Bone: Charmer
Crease: Jetsetter
Outer Corner: Smokeshow
Lid: Rocker
If you found this review helpful please click on the heart or reblog. Feel free to reply with your thoughts on the product.
#Tarte Tartelette In Bloom Clay Palette#Tarte#Tarte Cosmetics#Eyeshadow#Eye#eyes#shadow#shadows#reblog#reblogs#follow#follows#review#reviews#blog#blogs#love#loves#like#likes#heart#hearts#beauty#beauty blog#beauty blogs#beauty review#beauty reviews#beauty product#beauty products#makeup
3 notes
·
View notes
Text
Today I present a Daniel Smith Titanium White and Mars Black watercolor ground review. So many puns came to mind for this supply. I’ll try to keep them to a minimum. If you are not familiar with watercolor ground, it is basically an absorbent primer that allows one to use watercolor, or acrylic paint/ink, on a variety of surfaces and/or build up texture on surfaces. We start with the main feature, and then a couple little tidbits at the end.
So let’s hit the ground running….
The directions on the jar say:
“An excellent ground for watercolor on all surfaces. Absorbent surfaces: Canvas, Paper, Plaster, Hardboard. Non-Absorbent surfaces: glass, plastic, metal- for best results these will need to be abraded before application of the ground. Thick, brushable and heavily pigmented. Allow 24-72 hours to cure before applying watercolor or acrylics. Can be thinned up to 10% with water. Wash brushes immediately after use.”
Ground from this brand also comes in Transparent and Iridescent Gold, but I don’t have those. These are the 4 oz jars. The Titanium White is also sold by the pint. The white is thicker than the black. I’ve had the white for longer, so it could be due to age. It happens to the best of us. The black has a smoother consistency before drying, the white reminds me of buttercream frosting. The 4 oz sized containers are going for around $11-$12 on Amazon. Looks like it can be found for less expensive prices elsewhere.
I know what the directions said, but I’m often fond of looking past such direction. So I applied these to cardboard, along with Canson XL Mixed Media Sketchbook, a Leda Art Supply Sketch Book, and a small and cheap canvas board. A ½ inch flat brush was used for application- as evenly as possible. They say 24-72 hours to cure, but I’m in Arizona, nothing takes that long to dry here. I gave it about 12 hours on the Canson paper. I probably would have waited longer if I had applied it thicker, was building up the ground for shapes, or layering effects. I want to point out that curing denotes something different than ordinary drying (although I’m not sure what), so my semi cavalier treatment of the product might not be suitable in all locations. A friend on Instagram shared that in her experience, if the white ground didn’t cure for at least 24 hours, it made the paint look chalky. Another friend uses the ground on top of Altoids tins to paint on and pretty up her palettes.
I had some reason for buying the Mars Black, but don’t exactly recall. Probably for space painting, as in- “Space the Final Frontier,” so that’s what I’m going with here. And woo-hoo, now there’s an excuse to use that white watercolor that we’re told not to use! Or use those pastel colors that contain the white pigment in the mix, which professional brands Daniel Smith and Holbein both carry. Aren’t we told to never mix white in with other colors? And why is it included in every palette set when no one uses it, or is instructed not to- taking up space where a more usable color could have been?! I’m pointing these contradictions out because it’s one other reason I’m not compelled to always listen to, or follow directions or rules. My supply reviews have a more adventurous creative flavor, than purist views. What’s not acceptable or popular today, might be tomorrow. So really- just do what moves you, that’s all that matters. I love those pastel colors and have a few from Holbein.
Now after saying all that and experimenting, I’m coming right to it- I don’t like the black ground. Everything I used on it looked terrible. I’m showing these as examples of what NOT to do- cardboard for one, which might seem pretty obvious, but I gave it a go anyway. And to further illustrate that, the black ground looks like bad 1970s velvet paintings. Velvet Elvis should leave the building.
This video shows a close up of Luminescent and Primatek Lines from Daniel Smith used on the Mars Black.
Below- the Mars Black ground painted in a Canson XL Mixed Media Sketchbook. The top row are Luminescent and Primatek Lines from Daniel Smith, pastel watercolors from Holbein, and a few Finetec watercolors. White FW Acrylic Ink was used to make stars, and gaseous clouds in the nebula. I became so displeased with the results that I quit part way through my experiments.
Australian artist Cindy Lane has some amazing galaxies that she paints on black pastel matte using various luminous colors from the Daniel Smith line. Folks on Instagram might be familiar with her artistry. Click either link to see her IG account.
On to these disasters- the cardboard. The black one is especially terrible- I used white and pastel watercolors from Holbein, Finetec watercolor, and then Gelly Roll pen to try and help it some. Egads! White watercolor acted the strangest of all, it was difficult to control in some spots, and looks like a toothpaste stain.
General observations before I get into showing more examples. Lifting paint from the surface is easy to do. Using a pointy tipped fountain pen will scrape through the surface, pens didn’t do that well, I tried a Pigma Micron and Gelly Roll. Pencil worked fine, but I didn’t try to sketch a bunch or erase. The texture of the black ground surface reminds me of pastel matte. The white seems to be a little bit more paper like, but like painting on unsized paper. Images lack definition, aliveness, luminosity and depth, everything looks a little dull. In some cases, getting detail was not easy. Anyone that is better with dry brush techniques, might have better luck using ground. This was a frustrating review to do samples for. To queue the song I was hearing in my head when I thought about presenting these- click here.
Titanium White ground in a Leda Art Supply sketchbook. This sketchbook has thin paper, and doesn’t accept watercolor without deteriorating some, at least the way I use watercolor. I thought it would be a good place to try ground. Most of the watercolors used were Daniel Smith Primatek and they looked the best out of anything, and this is the best example I have. Even the gold ring came out sad and dull.
I applied the ground using a brush and a credit card, and also a more uneven application. It sat for months before I painted on it, so it was plenty cured. Close-up to show texture, which worked great for the rock formations.
Lastly, the white ground on a canvas panel, painted with Liquitex Muted Collection and Transparent Collection acrylic inks, which behave much like watercolor. It cured for the proper amount of time before use. This was also a exercise in frustration. The painting on the left is the ground covered canvas panel. The one on the right are the same paints used on an Ampersand Aquabord, included for comparison. Again, tough to get detail or definition, or depth on the ground surface, and I attempted to put in detail. Blasé. No transparent luminosity like there is on the Aquabord.
All I can do in these reviews is present from personal experience, and anything personal comes with bias- pretty much anything anyone ever shares comes from that place- eye of the beholder and such. Some people might like how the black ground looks. These products might work fantastically for others because of their personal preference and/or skill. I didn’t find a lot of examples out there. Here are a couple of links to artists that used ground, whose paintings look good.
Artist Stephanie Law uses watercolor ground in a lot of her paintings to achieve different textures, and layering effects.
This lady on Wet Canvas has a partial example on canvas.
And now that we are all feeling grounded (if this didn’t work, try “Earthing”), here are some Daniel Smith watercolor swatches on regular ‘ol Canson XL paper. I can’t remember what I was going for here, but they are nice to look at. I figured I would pop them in because I don’t know one person into watercolor that doesn’t like looking at swatches. These were personal notes of a sort, so there is sure to be scrawl and misspellings and the swatches were done at random. Other actual reviews on Daniel Smith watercolors can be found here– Part I, and here– Part II which covers the Primatek and Luminous lines.
Explorers’ Sketchbooks– I asked for this book for my birthday (thanks mom & dad). It’s a beast of a book, textbook sized, and features the sketchbooks from 70 explorers. One modern explorer in there is Wade Davis– Explorer in Residence at the National Geographic Society. If you are into outdoors, nature sketching, exploring, travel sketching, looking at handwriting, old documents, history, anthropology, archaeology, it might be interesting to you. If available, it’s a good one to check out from a library.
In closing, I’m sharing a quote from the brilliant Austin Kleon. Today, I resonate with this all the way.
“Try this: Next time you come across someone’s work and you’re not sure exactly how they do it, don’t ask them how it’s done. Don’t go after the “right answer” like some eager honors student. Look closer. Listen harder. Then use your imagination and experiment with the tools you have. Your bad approximation will lead to something of your own.”
The uniqueness and beauty of your personal artistic expression is just that- uniquely yours, right now, this very day. May it continue to deepen, grow and transform, as you do.
Thank’s for taking the time to read this review, it’s for you. Supply reviews happen when I have a supply to review, and always on a Saturday.
Join us for World Watercolor Group! It’s a group for everyone who enjoys watercolor. It is a very active group. There’s also the #WorldWatercolorGroup tag to use when sharing your work on social media. More info in the link above, or click here.
DOODLEWASH REVIEW: Daniel Smith Watercolor Grounds Today I present a Daniel Smith Titanium White and Mars Black watercolor ground review. So many puns came to mind for this supply.
#Daniel Smith Watercolor Ground#Daniel Smith Watercolors#Explorers&039; Sketchbooks#Watercolor Ground
2 notes
·
View notes
Last Seen Blogs

vexingcosmos
Inner Ramblings Unleash

rabisnoodlerabbit
Where i fan over stuff

gytrash-illustrations
Gytrash

racctheace
Racc

captainfile
The Captain