#best photo editing software for beginners
Photo

Pictureeditor.com has the Best Photo Editing Software For Beginners! On our website, you can make the most beautiful and appealing images, reels, and videos for free. We offer advanced editing tools for free online. So take advantage of this free opportunity to create the cutest creation with our tools.
0 notes
Text
✷ Tonk's Art Resources ✷
Hi! No one asked but I wanted to make a big list of art resources I use because I like to try and help people be creative! Not everything I list is free (mostly the books & some PDFs), but I’ll try my best to keep a big portion of it unpaid.
I've also made a carrd with the same links and a set of software links + prices but I'll be updating this with more things I find that I think would be helpful. :)
Drawing
GES DRAW PARTY - Timed model videos
Drawing Tutorials Online - Figure drawing tutorials (& fun SVA student sketchbook videos)
Line of Action - Timed model Photos
3 tips to improve your PEOPLE SKETCHING (fast urban sketching techniques), Sketching Scottie
Creating Backgrounds, Tim Mcburnie
Drawabox
Reference Angle
Kaycem
Colour Theory
Why Color Studies Are So Powerful, Light Ponderings
Marco Bucci
Colour Tips and Tricks, Iniro (PDF)
This post
Animation
The Animator’s Survival Kit, Richard E. Williams (book) - I think this one is a pretty obvious must-have
How to Animate Night In The Woods [Scribble Kibble #103], Crowne Prince - Helped me get a grip on After Effects
Little Miss Hellraiser Toon Boom Harmony Rig, Edu Bruks - Free Toon Boom Harmony rig
Alex Grigg // Animation for Anyone
BaM Animation
Storyboarding
Exploring Storyboarding, Wendy Tumminello (book)
Storyboarding Essentials: SCAD Creative Essentials, David Harland Rousseau & Benjamin Reid Phillips (book)
Storyboard Pro Crash Course/Tips for beginners, OhJeeToriG
A Guide To Storyboards, MagicBunnyArt (PDF)
Character Design
Character Design Crash Course - A huge free course document with assignments you can work through
Delicious in Dungeon - Fundamentals of Character Design, lines in motion
Writing
Writing for Animation, Comics, and Games, Christy Marx (book)
Screenplay: The Foundations of Screenwriting, Syd Field (book) - I have the 1987 edition
Reedsy
How to Plot a Comic From Start to Finish!, McKay & Gray
Portfolio Tips
How to make a Character Design Portfolio, Jackie Droujko
Top Tips on How to Kickstart Your Storyboard Portfolio, Brown Bag Films
25 Tips to Create an Animation Demo Reel, Sir Wade Neistadt
Extras
PuccaNoodles’ Animation/Art Resource Sheet
My Study References Pinterest board
Motivation Station - Playlist of sketchbook videos and some speedpaints that I use to motivate & inspire me
The Illustrated Freelancer’s Guide, Heather Parry & Maria Stoian (PDF) - Really useful for freelancers in the UK
Software substitution chart
Adobe Suite substitute chart
Remember to check out the carrd, it might have a more updated list!
509 notes
·
View notes
Note
sorry i couldn't find out how to ask on your other blog.
that book binding you posted is gorgeous btw !!
I noticed that in one of the photos you included the disclaimer that you also edited it. I just had a question about how you formatted the text.
one of my biggest gripes with AO3 is text formatting (i often feel like i'm reading a legal document vs a novel/story) . Did you change how it is formatted on AO3 compared to printed?
I feel like i'm in the 0.5% that hate AO3 formatting but i thought i might as well ask in case you have any tips for that. >,>
(also how do you decide on the page size, do you just choose a standard size for all your projects? or do you vary it depending on what you are binding?)
thanks so much for taking the time to answer and for sharing your projects :) !!!!!!!!!!!
hey anon! I have asks turned off for the sideblog, but happy to answer here. Thanks very much!
I'm taking this opportunity to info-dump and link a lot of resources. I think they're useful for people new to either typesetting or bookbinding, but not all are directly related to your queries. That said, hope this is of use!
one of my biggest gripes with AO3 is text formatting (i often feel like i'm reading a legal document vs a novel/story) . Did you change how it is formatted on AO3 compared to printed?
I do a fair bit of editing when I'm binding a fic; typesetting is often the longest part of the process. Your mileage will vary depending on your experience with using word processor software, particularly the paragraph style and page style settings. Another factor is how simple/complicated you want your typeset to look. Replicating a published novel in format is difficult but learnable for a complete beginner.
I'm not equipped to give a full tutorial on how to typeset, but I'll point you towards some useful resources for ficbinding then talk about my own process.
ArmouredSuperHeavy has a tutorial on how to make Ao3's HTML downloads into a printable book in Microsoft Word. I use LibreOffice Writer myself, so this adaptation of the same tutorial is what I follow. Both are very helpful to reference as you're learning the typesetting ropes.
Personally, I don't mess around with HTML. I find it easiest to start by doing a Ctrl+A copy of the Entire Work fic view on Ao3 then pasting that into my word processor. This video tutorial by Beautifully Bound runs through how to do this in Microsoft Word using an AO3 fic as an example, including the associated steps needed to make the fic look novel-like. This is probably the best tutorial to address your gripe with AO3 formatting. Other than that, I'd recommend looking into videos or tutorials about typesetting novels for print. Same idea, and you may get more hits than searching for fanbind/ficbind typesetting tutorials.
More under the cut! Once I start yapping, it's hard to shut me up 🤷♀️
As a point of comparison, here's one of my fics on Ao3 and the corresponding typeset side by side:


Beautifully Bound explains this in far better detail than I will, but off the top of my head, the steps involved:
making a new document and setting the default page size to whatever size I want the book's pages to be (A5 or A6 usually). You can also set the margins at this point, taking account of your printer settings.
CTRL+A and copying the entire work's text on AO3 then pasting it into the document.
removing all hyperlinks and AO3 frontmatter, things like the author tags, summary, notes, etc as well as any website text that got copied over alongside the fic.
(optional) running a spell check and ensuring grammar usage is consistent. For me that's substituting em dashes for hyphens between clauses, enforcing curly double quotation marks for dialogue, etc. LibreOffice Writer automates a lot of this with customisable settings, via Tools -> Auto-Correct. Here's also where to make sure character names are all spelled right, convert the text to or from US to UK English, etc.
picking out fonts for the body text, headers, page numbers, etc. This is where you'll want to use paragraph style settings. Page style settings also comes in clutch if, for example, you'd like different headers on alternating pages. I like having the author on the right, the fic title on the left.
setting the body text first line indent to whatever makes sense visually). This in particular helps make the fic feel more like a novel. You can also play around with line spacing and space between paragraphs at this stage. For this A6 typeset, I had a 0.75cm first line indent, 1.15 line spacing, and 0.15 spacing between paragraphs.
(optional) formatting the first line of the work to use small capitals and to add a drop caps to the first letter of the first word. Again, this is a convention in publishing which add a novel-like feeling to a printed fanwork.
Inserting page numbers, adding images, coming up with how I wanted the "copyright" page to look—optional for the most part, but these are details that make a fic appear more like a novel.
For multi-chapter works, there's extra work in formatting chapter titles as headings so that they're referenced correctly in the automatic table of contents word processors can generate.
Once you have a typeset you're happy with, and if you're considering printing and binding it as a book, then you'll need to look into how to create and print signatures. Personally, this is something I had to actually try (and mess up a bunch of times) before I got to grips with it. Understanding how both your printer and your PDF reader work, particularly printer margins and booklet print settings, is key.
I won't go into as much detail on this, but if it's something you have an interest in, I'd recommend starting with DAS Bookbinding's tutorial. DAS has tutorials for everything bookbinding related so when in doubt, check his channel! Plenty of other YouTubers also have good videos on making signatures.
This resource is extremely useful once you've got your head around how to print signatures manually, so here's a link for anyone in that space: GitHub Bookbinding Imposer. Essentially, this does the signature creation for you, removing the need for booklet print settings in your PDF reader.
also how do you decide on the page size, do you just choose a standard size for all your projects? or do you vary it depending on what you are binding?
I have access to both A4 and A5 sized paper and my printer can handle printing on either size. In bookbinding, normally two pages are printed per side of the paper (which are then folded in half as part of a signature). That is, when I print on A4 paper, it's to make an A5 sized book. Printing on A5 paper will yield an A6 sized book.
Before I begin typesetting, I'll usually know what paper I plan to use, so the typeset will be one size down from the paper. So far, I've made softcover pamphlets at A6 size and casebound books in A5. No real method of choice for me, it's whatever I feel most suits the project.
---
If you made it this far anon, thanks for reading! Here's links to a few general resources if bookbinding is something you'd like to explore more:
DAS Bookbinding (YouTube, bookbinding in all forms)
Sea Lemon DIY (YouTube, bookbinding and other crafts)
bitter melon bindery (YouTube, bookbinding, particularly beginner friendly!)
Jess Less (YouTube, demonstrations of fanbinding and re-binding existing novels)
Papercraft Panda (blog, lots of detailed tutorial on bookbinding)
Renegade Bookbinding Guild (collective and website, loads of fanbinding-specific resources from their members and they have a helpful Discord).
16 notes
·
View notes
Text
5 Free Software Tools to Create Stunning Images for Social Media and Blog Posts
Alright, guys, today we're diving into the world of image creation for social media and featured blog posts. Whether you're a seasoned content creator or just starting out on your blogging journey, having eye-catching images is essential for grabbing your audience's attention and driving engagement. But with so many image editing tools out there, which ones should you use? Well, fear not, because I've rounded up the best free software for creating images that will take your social media game to the next level. Let's dive in!
Canva: First up on our list is Canva – the ultimate graphic design tool for beginners and pros alike. With Canva, you can create stunning images for social media, blog posts, presentations, and more, all with drag-and-drop simplicity. Choose from thousands of pre-designed templates, fonts, and graphics, or start from scratch and let your creativity run wild. Canva's intuitive interface and extensive library of assets make it a must-have tool for any content creator.
Adobe Express: Next up, we have Adobe Express – a powerful design tool from the creators of Photoshop and Illustrator. With Adobe Express, you can create stunning graphics, web pages, and video stories in minutes, right from your browser or mobile device. Choose from a variety of professionally designed templates, customize with your own photos and text, and share your creations across all your social media channels with ease. Plus, its seamless integration with other Adobe products makes it a no-brainer for anyone already using Adobe's creative suite.
PicMonkey: Another great option for creating eye-catching images is PicMonkey. With PicMonkey, you can easily edit photos, create graphics, and design collages without any technical know-how. Choose from a wide range of filters, effects, and overlays to give your images that extra pop, or use PicMonkey's powerful design tools to create custom graphics from scratch. Plus, with PicMonkey's user-friendly interface and intuitive features, you'll be creating stunning images in no time.
Pixlr: If you're looking for a free alternative to Photoshop, look no further than Pixlr. With Pixlr, you can edit photos, create collages, and design graphics with ease, all from your web browser or mobile device. Choose from a variety of editing tools, filters, and effects to enhance your images, or start from scratch and let your creativity run wild. Plus, with Pixlr's cloud-based platform, you can access your projects from anywhere and collaborate with others in real-time.
GIMP: Last but not least, we have GIMP – the GNU Image Manipulation Program. While GIMP may not have the most user-friendly interface, it's a powerful open-source alternative to expensive image editing software like Photoshop. With GIMP, you can retouch photos, create custom graphics, and design stunning visuals for your social media and blog posts. Plus, with a little bit of practice, you'll be amazed at what you can accomplish with this free, feature-packed tool.
In conclusion, creating eye-catching images for social media and featured blog posts doesn't have to break the bank. With these free software options, you can easily design stunning visuals that will grab your audience's attention and drive engagement. So why wait? Start creating today and take your content to the next level!
#SocialMediaMarketing#BloggingTips#GraphicDesign#ContentCreation#VisualContent#DigitalMarketing#FreeTools#Canva#AdobeSpark#PicMonkey#Pixlr#GIMP#ContentCreators#VisualMarketing#SocialMediaImages#BlogGraphics#adobeexpress#photoshop alternatives
8 notes
·
View notes
Text
Bookbinding Tips for Beginners by a Beginner.
Trouble Shooting edition.
As I am redoing- and reprinting a text block from scratch. I learned some stuff that may help along the way. This will be brief. I am still compiling all of the photos I need for the potential last post of this little series of mine.
But some trouble shooting.
Printing
Printers are by nature a horrendous beast. Once you think you have them figured out they will either throw a temper tantrum to end all temper tantrums, fuck up the print, or make you grovel by their perch pleading for them to read the file.
"I have single handedly gotten my grandmother, and my mother to realize that there isn't a Nigerian Prince that needs their help. I have recovered corrupt files, and gotten that 90s VCR to work for some inexplicable reason but hell it made ma happy... I am the biped in this equation.... Now print you son of a bitch!"
I can't trouble shoot those moments but I can help make misprints a little less "Void your spine and your soul" at the same time.
This is me advocating for JS Binder- and getting your pdf broken up for the pure simple reason you can track the pages easier. I have had my printer pull two pages at a time and print on one side of one page, and print on the other side of the other page. The easiest thing to do is to pull the pages that have printed, and pull the pages that have misprinted. Stand them up so they're noticeable and allow the rest of the printing to conclude.
Now with adobe you can select what pages you need to reprint from the document in question, and there is a small section around the middle/bottom that has the page count. To reprint only the pages you need track the document number down for the ease of use:
The page count for Adobe looks similar to this.
For the ease of this example I'm just going to say that my printer fucked up the first and second page of the print.
Hit print:
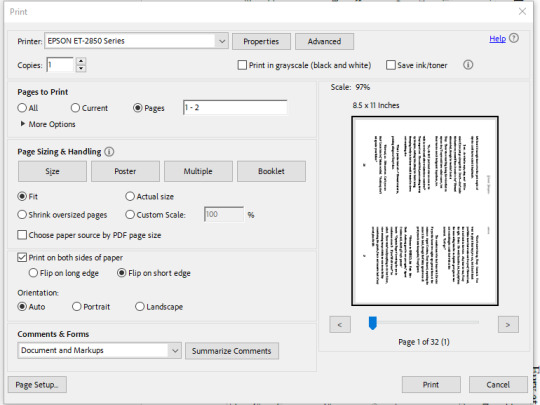
The layout for Adobe PDF reader will look as such.
In the "Pages to be Printed" Section near the top hit "Pages" and manually type in the page numbers. For this example One (1) and Two (2).
Also remember to flip everything on the short edge or else you will be having right-side-up and up-side-down pages alternating. We don't want that. Always ALWAYS make sure to flip on the short edge.
What if the printer misses a few pages? Similar concept but a few more steps before we get back to the print stage.
Best I can say- is if there are a massive amount of missing pages or they just don't look gook.
Check your ink levels. If it's not the ink, do a head cleaning usually there's a setting for that built into the software or on the printer itself. I can only speak to inkjet printers, if you have a toner printer.... damn lucky. Toner printers print damn fast and are quieter and more reliable than inkjet.
Anyway, once the cleaning has been accomplished and it looks like everything is as it should- see above or grin and bear the whole reprint for that section of your bind.
Usually I've gotten away with just going through the software for ink head cleanings. In extreme cases you might have to manually clean the heads. I know certain older printers are like that. Best I can say is find the manual and see how it goes.
IF that doesn't work still....
Invest in a toner printer if you can and borrow your friend's inkjet if you're printing colour covers for your books.
#bookbinding#fan binding#Troubleshooting#DIY#bookbinding for beginners by a beginner#This is short#May be expanded upon later#but unlikely
7 notes
·
View notes
Note
Hello, I'm new to image editing apps. Could you recommend some good apps for editing?
Hello there! So if you want to edit photos in like a professional way and you are able to invest, in my opinion the best editing software out there is Adobe’s Photoshop and Lightroom. But those cost money, if you are a university student you can get a sweet deal for all of the Adobe software’s with the Creative Cloud package (ranges from $15 to $50 a month).
For something more affordable and free (and to also test the waters as a beginner) I would suggest Afterlight photo (an app). I believe it’s free and it has a great range of cool editing options and filters for photo editing. It’s a good way to start and a great app to add cool details to photos (as like Adobe’s Lightroom). Also a big suggestion is Pixlr, it’s very similar to Photoshop and I believe it’s free. It’s been a decade since I’ve last used it, but it’s a great introduction to Photoshop. Super similar, if not literally the SAME.
With Pixlr you can mess around like in Photoshop, learn how to use the tools and learn how to fix photos, enhance them, add details, remove things that shouldn’t be there, etc. the cool thing is that everything is online to learn (I’m self taught) so if there’s a specific thing you want to learn in photo editing you can easily learn it through tutorials online! (Or you can ask me).
I’ve done graphic designing and photo editing professionally for musicians and artists before with Pixlr. This was before I could afford Photoshop (later on the artist helped me out and introduced me to Photoshop and Adobe programs). So I can tell you if you learn how to use it, you can take it far.
So in short, Photoshop is the best to invest and Pixlr is the best to start with to test it out and see if you would like to take it to the next level.
Hope that helps.

2 notes
·
View notes
Text
Tips for portrait photography
Essential Tips for Capturing Stunning Portrait Photography
Portrait photography is an art that requires a balance of technical skills and a keen eye for capturing the essence of your subject. Whether you’re a seasoned photographer or a beginner, understanding the nuances of light, composition, and interaction with your subject can elevate your portraits to new heights. Here are some essential tips to help you capture stunning portraits.
1. Master the Lighting
Lighting is the cornerstone of great portrait photography. The way you light your subject can dramatically influence the mood and impact of the photo.
Front Lighting: Lighting your subject from the front is a technique that inspires clarity and confidence. It evenly illuminates the face, reducing shadows and blemishes, which results in a clean and bright portrait. This type of lighting is perfect for headshots and professional portraits where you want to convey a sense of approachability and sincerity.
Side Lighting: For a more dramatic and character-filled portrait, light your subject from the side. Side lighting creates depth and texture, highlighting the contours of the face and adding a sense of mystery or intensity to the image. This technique is excellent for artistic portraits where you want to capture the emotional depth of your subject.
2. Choose the Right Background
The background of your portrait can either complement your subject or distract from them. Always aim for a background that enhances the overall composition without drawing attention away from the subject. Simple, uncluttered backgrounds work best. You can also use shallow depth of field (achieved by using a wide aperture) to blur the background and keep the focus on your subject.
3. Focus on the Eyes
The eyes are the windows to the soul, and in portrait photography, they are crucial. Ensure the eyes are in sharp focus, as they are typically the first thing viewers notice. Catchlights (reflections of light in the eyes) can add a sparkle and bring your portrait to life. Positioning your light source to create catchlights will make your subject’s eyes more engaging.
4. Experiment with Angles and Composition
Don’t be afraid to experiment with different angles and compositions. Shooting from a slightly higher angle can make your subject’s eyes appear larger and more expressive, while a lower angle can add a sense of power and dominance. Use the rule of thirds to place your subject off-center for a more dynamic and interesting composition.
5. Communicate and Build Rapport
Great portraits capture the personality and essence of your subject, which requires a level of comfort and trust between the photographer and the subject. Spend time getting to know your subject, make them feel at ease, and guide them through different poses and expressions. Genuine emotions and relaxed poses will result in more natural and compelling portraits.
6. Use Reflectors and Diffusers
Reflectors and diffusers are essential tools for controlling light in portrait photography. Reflectors can bounce light back onto your subject to fill in shadows, while diffusers can soften harsh light. These tools are especially useful for outdoor shoots where the lighting conditions can be unpredictable.
7. Post-Processing
Post-processing is the final step to enhance your portraits. Use editing software to adjust exposure, contrast, and color balance. Retouching can help remove blemishes and imperfections, but remember to keep it subtle to maintain a natural look. Enhancing the eyes, sharpening details, and adjusting the overall tone can make your portraits stand out.
By mastering these tips, you can create portraits that not only capture the physical appearance of your subjects but also convey their inner character and emotions. Whether you’re shooting in a studio or on location, the key is to experiment, communicate, and always be mindful of how light and composition can transform your portraits.
2 notes
·
View notes
Text
How to Upload Video to He Tuber: A Step-by-Step Guide
Uploading a video to He Tuber can be a daunting task for beginners. However, with the right guidance, it can be a smooth and easy process. In this article, we will guide you through the steps of uploading a video to He Tuber, so you can share your content with the world.

First, it's important to have a HeTuber account. If you don't have one already, you can create one for free. Once you're signed in, click on the camera icon in the top right corner of the screen. This will take you to the upload page, where you can select the video file you want to upload.
Before uploading your video, it's important to make sure it meets YouTube's guidelines. This includes ensuring that it's not too long, doesn't contain copyrighted material, and doesn't violate any community guidelines. Once you've confirmed that your video meets these requirements, you can proceed with the upload process. By following these simple steps, you'll be able to share your content with millions of viewers on YouTube.
Creating an Account
Sign-Up Process
To upload videos on He Tuber, users must first create an account. The sign-up process is straightforward and easy to follow. Users will need to provide their email address, username, and password to create an account.
After filling in the required fields, users will need to verify their email address by clicking on the verification link sent to their email. Once the email is verified, users can log in to their account and start uploading videos.
Profile Setup
After creating an account, users can set up their profile by adding a profile picture, a cover photo, and a bio. The profile picture and cover photo are essential components of a user's profile as they serve as the first impression for viewers. Users should choose a profile picture and cover photo that are relevant to their channel's content.
In the bio section, users can describe themselves and their channel. It's important to keep the bio concise and informative, highlighting what viewers can expect from the channel. Users should also include links to their social media accounts and website (if applicable) to help viewers connect with them outside of He Tuber.
Overall, creating an account and setting up a profile on He Tuber is a simple process that can be completed in just a few minutes. By following these steps, users can start uploading videos and building their audience on the platform.
Preparing Your Video
Before uploading a video to He Tuber, it's important to make sure it meets certain requirements and is edited and enhanced to the best of your ability. This section will cover those aspects of preparing your video.
Video Requirements
He Tuber has certain requirements for the videos that can be uploaded to the platform. These requirements ensure that the videos are of high quality and can be easily viewed by viewers. Here are the video requirements for He Tuber:
File size: Videos must be less than 128GB in size.
Length: Videos can be up to 12 hours long.
Resolution: He Tuber supports resolutions up to 8K.
Format: Videos must be in one of the following formats: MP4, AVI, WMV, MOV, MPEG, FLV, 3GP, and WebM.
Aspect ratio: He Tuber supports aspect ratios from 16:9 to 4:3.
Make sure your video meets these requirements before uploading it to He Tuber.
Editing and Enhancements
To make your video stand out on He Tuber, it's important to edit and enhance it to the best of your ability. Here are some tips for editing and enhancing your video:
Use a good video editing software: There are many video editing software options available, both free and paid. Choose one that suits your needs and skill level.
Cut out unnecessary footage: Make sure your video is concise and to the point. Cut out any footage that doesn't add value to the video.
Add transitions: Transitions can make your video look more professional and polished. Use them sparingly and appropriately.
Add music and sound effects: Music and sound effects can enhance the mood and tone of your video. Make sure they are appropriate and not too distracting.
Use color correction: Color correction can make your video look more vibrant and appealing. Use it to correct any color issues in your footage.
By following these tips, you can make sure your video is edited and enhanced to the best of your ability before uploading it to He Tuber.
Uploading the Video

Uploading a video to He Tuber is a simple process that can be done in just a few easy steps. In this section, we will guide you through the process of uploading a video to He Tuber.
File Selection
Before you can upload a video to He Tuber, you need to select the video file you want to upload. To do this, click on the "Select File" button on the upload page. This will open a file browser window that will allow you to select the video file you want to upload.
Once you have selected the file, you will see a progress bar that shows the upload progress. The length of time it takes to upload the video will depend on the size of the file and the speed of your internet connection.
Upload Options
After you have selected the video file, you will be presented with a number of upload options. These options allow you to customize the video's title, description, and tags. You can also choose whether you want the video to be public or private.
It is important to note that He Tuber has strict guidelines regarding the content that can be uploaded to the platform. Make sure that your video complies with these guidelines before you upload it.
In conclusion, uploading a video to He Tuber is a simple process that can be done in just a few easy steps. By following the instructions above, you can upload your video to He Tuber and share it with the world.
Video Details
Title and Description
When uploading a video to He Tuber, it is important to provide a clear and concise title and description. The title should accurately reflect the content of the video and be attention-grabbing to entice viewers to watch. The description should provide additional information about the video, such as the topic or purpose, and can include links to relevant websites or social media accounts.
Tags and Categories
Tags and categories help viewers find your video when searching on He Tuber. Choose tags that accurately describe the content of your video, and use relevant categories to make it easier for viewers to find your video. It is important to select tags and categories that are appropriate for your video to avoid misleading viewers.
Thumbnail Selection
The thumbnail is the image that viewers will see when browsing videos on He Tuber. It is important to select a thumbnail that accurately represents the content of your video and is attention-grabbing to entice viewers to click and watch. You can choose a thumbnail from the video itself or upload a custom thumbnail. It is recommended to use a high-quality image with clear and easy-to-read text if applicable.
Overall, providing accurate and attention-grabbing video details is crucial when uploading a video to He Tuber. By following these guidelines, you can help your video stand out and reach a wider audience.
Publishing Your Video
Once you have finished editing your video and are ready to share it with the world, it's time to publish it on He Tuber. Here are some important things to keep in mind when publishing your video.
Privacy Settings
He Tuber offers several privacy settings for your video. You can choose to make your video public, private, or unlisted. Public videos can be seen by anyone on the platform, while private videos can only be seen by people you invite. Unlisted videos can be viewed by anyone with the link, but they won't show up in search results or on your channel page.
When choosing your privacy settings, consider who you want to see your video and how you want it to be discovered. If you're uploading a personal video for friends and family, a private or unlisted setting may be best. If you're creating content for a wider audience, a public setting may be more appropriate.
Scheduling Release
If you want to publish your video at a specific time in the future, you can use He Tuber's scheduling feature. This allows you to set a date and time for your video to be published automatically.
Scheduling your video release can be useful if you want to build anticipation for your content or if you want to make sure your video goes live at a time when your audience is most active. It can also help you stay organized and plan your content strategy in advance.
To schedule your video release, simply select the "Schedule" option when uploading your video and choose the date and time you want it to go live.
By following these tips for publishing your video on He Tuber, you can ensure that your content is seen by the right audience and at the right time.
2 notes
·
View notes
Text
What is the Best Cricut Software in 2023?

Cricut is a powerful and versatile machine that can precisely cut and craft different materials. To help out crafters, Cricut also offers a graphics designing tool called Cricut Design Space. It features a user-friendly interface that is very easy to use and is compatible with multiple devices such as mobile, laptop, PC, and tablet.
As a bonus, the app is free, and you can download it directly from Cricut’s official website. However, you can also use the software if you are unsatisfied with the Design Space. If you are wondering which software is compatible with your Cricut, you don’t need to look further. In this blog, we have the best Cricut Software, along with its pros and cons.
OPTION ONE: ADOBE PHOTOSHOP
Adobe Photoshop is the world’s best photo editing and graphic design software without introduction. Hobbyists and professional designers widely use it to create paintings, drawings, and animations. Photoshop is also used to edit and retouch digital images, and it is quite good at vector art. It’s a robust editing toolkit that helps users to create complex designs from plain elements. When graphic designers need to create bitmaps in multiple layers or handle image masking, they turn to Photoshop.
Photoshop automatically saves your projects to the cloud. Besides the standard function, Photo Shop offers live streaming, project tracking, data storage management, and offline access. It also lets you invite other people to edit files so you can collaborate with team members on various projects. Although it’s not the most affordable software, the value that it brings to the table is hard to beat.
REASONS TO GO FOR IT
Powerful web design tool
Cross-platform Integration
Intuitive interface
A wide array of high-quality templates
REASONS TO AVOID IT
Expensive
OPTION TWO: ADOBE ILLUSTRATOR
For professionals and artists, Adobe Illustrator is the best Cricut software. Adobe Illustrator is a vector graphics program that allows you to create anything, such as text, shapes, and symbols, for your projects. Like Photoshop, it also lets you create complex and beautiful patterns. Use the preset workspace to customize your workforce. Although beginner-friendly, its extensive tools let you create precise and intricate models compatible with the Cricut machine.
Illustrator allows you to use multiple artboards; this feature is handy when working on projects with multiple items. Various plugins expand Adobe Illustrator’s capabilities. These plugins let you create your own custom fonts. If you need software that works well and lets you create anything, and if you’ve no problem paying for it, then Adobe Illustrator is the most suitable option.
REASONS TO GO FOR IT
Compatible with different OS
An extensive set of tools can be further expanded using plugins
Best for creating new shapes
Countless shortcuts
REASONS TO AVOID
Have to pay a monthly fee.
OPTION THREE: GIMP
Although Photoshop is a great software that lets you create everything, its only drawback is its cost. If you want a free alternative to Photoshop, you can opt for GIMP. Like Photoshop, GIMP is free software that offers various features for editing images and creating original illustrations from the ground up. Its extensive brush-based tools range from the clone/heal brush to the brush/burn tool.
These brush-based tools come in handy when working with large, high-resolution images. Most people use GIMP as a photo editor, but it can also be used for graphic designing. GIMP lets you add and edit text, move and control images. It also lets you configure contrasts and curves. GIMP is one of the best Cricut software for beginners who want to create awesome art.
REASONS TO GO FOR IT
User-friendly and customizable interface
Supports different formats
Lots of drawing tools
Advanced processing of graphic files
Multiple drawing tools
REASONS TO AVOID
Can’t handle CMYK color space
OPTION FOUR: CORELDRAW
Those looking for an alternative to Adobe Illustrator don’t need to look any further. CorelDraw is a full-fledged design program that lets you create everything. The program was originally designed as a rival to Adobe Illustrator. Both are great tools for vector designing and cost the same. But unlike Adobe Illustrator, where you must pay monthly, CorelDraw allows you to join for a monthly cost or pay an up-front fee.
CorelDraw gives you access to hundreds of pre-designed templates, which you can use to create stunning designs. It also lets you create designs from scratch with a few clicks. With a simple right-click, you can create complex designs and vectorization. You can design your graphics, convert them to SVG, and then send it to Design Space. CorelDraw’s extensive library of plugins is specially designed for cutting machines such as Cricut. Opt for its trial version if you still decide to go for CorelDraw.
REASONS TO GO FOR IT
Simple and user-friendly interface
A free trial version is available
Works great for vectorization
Offers a range of membership types
REASONS TO AVOID IT
It doesn’t offer tools to create HDR or panoramas.
OPTION FIVE: INKSCAPE
Inkscape is another great alternative to Adobe Illustrator, but unlike Illustrator and CorelDraw, it’s free. Its interface is straightforward, so you will quickly get the hang of it, even if you are a beginner. Inkscape is an open-source vector graphics editor which uses SVG as its primary file type.
Although Inkscape is prone to lag, it can run on low-end laptops and tablets. With Inkscape, you can customize virtually everything- colors, lines, grid, icon type, and other elements. Designers use it to create logos and banners. You can also convert raster images into vectors and save, import, and export your projects in various formats.
REASONS TO GO FOR IT
Beginner-friendly interface
It’s free
Flexible drawing tools
It lets you generate and edit SVG files
Exports in PNG and PDF
REASONS TO AVOID
Poor text editing instruments
#Cricut Software#cricut#art and craft#cricut.com setup windows#design cricut.com download#cricut.com design space#cricut.com/setup#cricut setup
6 notes
·
View notes
Text
Which is the best logo/poster designing software in 2023?
There are many different software options available for designing logos and posters, and the best choice will depend on your specific needs and preferences. Some popular options for logo and poster design include:
Adobe Illustrator: This is a professional-grade vector graphics editor that is widely used by graphic designers. It has a wide range of features and tools for creating logos, posters, and other designs.
Adobe Photoshop: This is a raster graphics editor that is often used for photo editing and manipulation, but it can also be used for logo and poster design. It has a wide range of features and tools, including support for layers, masks, and text effects.
Canva: This is a web-based graphic design tool that is popular for its ease of use and wide range of templates and design elements. It is a good option for beginners or for those who need to create designs quickly.
Inkscape: This is an open-source vector graphics editor that is similar to Illustrator but is available for free. It has a wide range of features and is a good option for those on a budget.
Ultimately, the best software for logo and poster design will depend on your specific needs and design goals. It may be helpful to try out a few different options and see which one works best for you.
#andweart#graphic design#vector#illustrator#logo#logo design#creative logo#united states#designer#graphic art#tumblr things#artists on tumblr#tumblrpost#illustrators on tumblr#writers on tumblr#poets on tumblr#your tumblr year in review#tumblrr tmblr tumblrgram tumblrs tumblraesthetic tamblr tumblrfeed tumblrposts tumblr👽 tum#tumblr milestone#tumblr meta
2 notes
·
View notes
Text
How to Print Your T-shirt in a Few Minutes ( for Beginners) in 2022

We all want to print our shirts and other clothes, but it seems that it takes too long to do so. With a few clicks and a few minutes,
you can print your t-shirts however you like. It's a quick and simple process that only requires printing and some paper.
A lot of people don't know that there are many different ways to print your t-shirt. Place.it.com will help you to print your t-shirts in a few minutes
in this beginner’s guide, we will show you the most important steps and the best ones to print your t-shirt in a few minutes.
Click here to get a free Card gift
let’s start.
Here is what you’ll learn in this guide.
Choose t-shirt design
Choose a template or create your own
Upload your design
Add text or graphic
Preview and printing
Choose a t-shirt design:
There are so many different T-shirt designs out there that it can be hard to decide which one to buy. Luckily, there are a few things you can do to help you choose the right one.
First, think about what message you want your T-shirt to communicate. Are you looking for a funny T-shirt that will make people laugh, or are you looking for a more serious design that will reflect your political beliefs?
Click here to get a free Card gift
Additionally, think about what type of T-shirt you want. Do you want a T-shirt that is plain and simple, or do you want one that is flashy and designed to stand out?
Choose a template or create your own:
When it comes to designing your own t-shirt, there are a few things to keep in mind. First and foremost, make sure that the design is original and catchy. Secondly, consider the size and shape of the shirt. And finally, choose a template that's easy to use.
choose a template from here
If you want to create your own t-shirt, there are a few different templates that you can use. Popular templates include GIMP and Inkscape. Both of these programs are free to use, and both offer a wide range of helpful tools.
Click here to get a free Card gift
Upload your design:
upload your design t-shirt and make some fashion statements with your own personalized shirt! There are many different ways to create a design for your t-shirt, including using graphics software or online design tools.
Upload your design from here
You can also create your own designs using different colors, fonts, and patterns. Once you have your design complete, you can print it out or use an online t-shirt printing service to have it made into a shirt.
Whether you are looking to show your support for a favorite team or just want to look stylish, a design t-shirt is a great way to get your message out there.
Click here to get a free Card gift
Add text or graphic :
Adding text or graphics to your t-shirt can add a personal touch and make your shirt unique. There are a few different ways to add text or graphics to your shirt. You can use a printer, a desktop publishing program, or a photo editing program.
To print text or graphics, use a printer. To print text or graphics from a computer, use a desktop publishing program. To print text or graphics from a photo editing program, use the "Print" option from the "File" menu.
Add graphic from here
To add text or graphics to a shirt using a desktop publishing program, you will need a T-shirt printer and a T-shirt printer paper.
Preview and printing :
review and the print T-shirt printing is a great way to get your T-shirt printed quickly and cheaply. You can choose to have your T-shirt printed directly to your specifications, or have a shirt printing company print it for you and then do the final printing and finishing yourself.
Print Now From Here
There are a few things to keep in mind when printing your own T-shirt. First, make sure that the print quality is good enough that you're happy with it.
Second, make sure that the shirt printing company you choose is experienced in printing T-shirts. Finally, make sure that you get a good deal on printing.
Click here to get a free Card gift
Envato Elements
Constant Contact
Place It
#printmaking#design#t shirt#online tutoring#3d printing#t shitrt#3d modeling#graphic design#fashion#on demand
3 notes
·
View notes
Link
Add a Watermark to Protect Your Photos: With the way, matters may be shared throughout the internet, you may continually manipulate how matters are spread. If you add your paintings to Facebook, Instagram, or any wide variety of different websites humans peruse for exciting artwork, you may ensure that plenty of them will simply shop it to their laptop or publish it to their personal social media systems and could both by chance or accidentally now no longer credit score the unique creator. It’s in reality a problem, however happily we’ve watermarks and emblems to assist make certain our works are continually well attributed.
#photoshop editing tips#best online photo editor#best photo editing app#best photo editing app for android#best photo editing software for beginners#best photo editing software for windows 10
0 notes
Text
Best Photography Techniques by Mohit Bansal Chandigarh

Mohit Bansal, a renowned photographer, has mastered a variety of techniques that elevate his work and inspire others. Here are some of the best photography techniques he employs to create stunning visuals:
Natural Light Mastery
Mohit emphasizes the importance of natural light in photography. He often shoots during golden hour—the time just after sunrise or before sunset—when the light is soft and warm. This technique enhances the mood of the images, making them more inviting.
Rule of Thirds
Utilizing the rule of thirds is a fundamental technique that Mohit incorporates in his compositions. By dividing the frame into a 3x3 grid and placing key elements along these lines or intersections, he creates balanced and visually appealing images.
Depth of Field
Playing with depth of field allows Mohit to draw attention to his subjects while beautifully blurring the background. He often uses a wide aperture to achieve this effect, creating a sense of intimacy in portraits and focus in landscapes.
Candid Moments
Capturing candid moments is one of Mohit’s strengths. He has a knack for being unobtrusive, allowing natural interactions and emotions to unfold. This technique results in authentic photographs that tell genuine stories.
Leading Lines
Mohit skillfully uses leading lines to guide the viewer’s eye through the image. Whether it’s a winding road, a row of trees, or architectural elements, these lines create a sense of depth and movement.
Experimenting with Angles
Changing up the shooting angle can dramatically alter the impact of a photo. Mohit often shoots from high or low perspectives to add uniqueness and drama to his compositions.
Post-Processing Techniques
Mohit believes in the power of post-processing to enhance an image. He uses editing software to adjust exposure, contrast, and color balance, ensuring that his final images reflect his artistic vision while maintaining authenticity.
Storytelling Through Series
Creating a series of images around a specific theme allows Mohit to tell a broader story. By capturing different aspects of the same subject or event, he invites viewers to engage with the narrative on a deeper level.
Conclusion
Mohit Bansal’s photography techniques are a blend of artistry and technical skill. By mastering natural light, composition, and storytelling, he creates captivating images that resonate with viewers. Whether you’re a beginner or an experienced photographer, experimenting with these techniques can elevate your own work and enhance your creative journey. So grab your camera and start exploring these methods to unlock new possibilities in your photography!
0 notes
Text
Video Editing: Mastering the Art of Crafting Compelling Visual Stories.

Video enhancement is a critical factor of contemporary media production, encompassing the system of manipulating and arranging video pictures to create a very last product that communicates a story, message, or idea effectively. From amateur content creators to professional filmmakers, the art of video editing plays a pivotal function in shaping the narrative and emotional effect of a video Orbixcode.
This complete manual explores the essential standards of video enhancing, key techniques, software program alternatives, and best practices that will help you create attractive and polished films.
information on the fundamentals of Video modifying
Video editing entails more than simply cutting and splicing pictures; it’s about crafting a narrative, improving visible and auditory elements, and making sure that the final product resonates with the target audience. right here are the middle components of video modification:
Pictures review and selection:
Organizing photos: before you start editing, arrange your uncooked photos into potential sections. Label and categorize clips primarily based on their content and relevance to the mission.
choosing Key photographs: evaluation all of the photos and select the high-quality photographs that contribute to the tale or message you wish to carry. cognizance on choosing clips which are visually appealing and decorate the narrative.
modifying strategies:
Slicing and Trimming: Use cutting and trimming strategies to do away with pointless parts of the photos and refine the pacing. This involves getting rid of awkward pauses, redundant scenes, or any fabric that doesn’t serve the tale.
Transitions: practice transitions to easily pass from one scene to every other. commonplace transitions encompass fades, dissolves, and wipes, which help hold the glide of the video and decorate viewer engagement.
Audio editing:
Syncing Audio: make sure that audio tracks are nicely synced with the video pictures. That is important for preserving clarity and coherence in speech, sound consequences, and historical past music.
Audio Enhancement: Use audio modifying equipment to beautify sound, cast off heritage noise, and stabilize audio stages. powerful audio editing contributes drastically to the overall professionalism of the video.
Color Correction and Grading:
color Correction: regulate the shade stability, contrast, and brightness of your pictures to correct any inconsistencies and ensure a cohesive look throughout the video.
Color Grading: follow color grading to provide the video a selected temper or fashion. this may consist of improving certain shades, applying filters, or growing a regular color palette.
adding visible consequences:
Images and textual content: include text overlays, titles, and pix to offer context, emphasize key factors, or beautify the visual attraction of the video.
Special effects: Use computer graphics to add factors which include gradual movement, time-lapse, or animations. computer graphics can decorate the storytelling and make the video more engaging.
selecting the proper Video modifying software
the selection of video enhancing software can drastically effect your editing workflow and the excellent of the final product. here are a few famous alternatives, ranging from amateur-pleasant to professional-grade:
Beginner-friendly software:
IMovie: perfect for Mac users, iMovie gives an intuitive interface with fundamental modifying equipment, transitions, and consequences. It’s a first-rate place to begin for those new to video orbixcode modifying.
Home Windows Movie Maker: although discontinued, Windows Film Maker remains an easy alternative for fundamental video-enhancing duties on home Windows structures.
Intermediate software:
Adobe Choicest Elements: A step up from basic editors, Adobe Optimum Elements affords extra superior features inclusive of audio enhancement, results, and transitions, making it appropriate for more special projects.
Filmora: Filmora gives a person-pleasant interface with several effects, transitions, and audio gear, making it a popular choice for intermediate editors.

Professional software:
Adobe Most Suitable Pro: A widely used professional editing software, the most efficient seasoned gives a complete suite of gear for enhancing, color correction, audio blending, and consequences. It integrates seamlessly with different Adobe Creative Cloud applications.
Very Last Cut Seasoned: exclusive to Mac customers, Very Last Reduce Seasoned is an excessive-give-up editing software program regarded for its advanced features, powerful overall performance, and intuitive interface.
Nice practices for powerful Video editing to supply movies that captivate and tell your target market, bear in mind these high-quality Practices:
Plan Your Edit:
Storyboarding: Create a storyboard or a tough outline of your video to visualize the go-with-the-flow and structure orbixcode. This helps in organizing your pictures and making plans for the sequence of scenes.
placing objectives: outline clean targets in your video. recognize what message you want to deliver and how you intend to engage your audience.
This helps in organizing your pictures and making plans for the sequence of scenes.
placing objectives: outline clean targets in your video. recognize what message you want to deliver and how you intend to engage your audience.
Preserve Consistency:
Visible style: make sure that the visual style of your video stays consistent. This consists of color schemes, fonts, and photograph elements.
Pacing and Rhythm: maintain a steady pace and rhythm to keep the target audience engaged. avoid abrupt adjustments in tempo that could disrupt the glide of the video.
Attention to high quality:
Decision and aspect Ratio: Edit your video inside the highest possible decision and make certain it meets the perfect component ratio for the intended platform (e.g., 16:9 for YouTube, 1:1 for Instagram).
Sound first-class: Prioritize clean and crisp audio. suitable sound complements the viewer’s enjoyment and makes the video more professional.
Overview and Revise:
evidence watching: Watch your edited video multiple times to catch any errors or inconsistencies. search for troubles along with mismatched audio, abrupt transitions, or visible system defects.
feedback: seek comments from others to gain specific perspectives and make vital revisions. positive criticism can assist improve the general pleasantness of the video.
Rising tendencies in Video modifying the sphere of video enhancement are usually evolving with technological improvements. Staying up to date with rising trends assists you in decorating your editing skills and staying competitive:
AI-powered enhancing: artificial intelligence is an increasingly number of being used in video enhancement to automate obligations which include scene detection, color correction, and even producing content material. AI gear can streamline the modifying procedure and decorate efficiency.
Digital truth (VR) and Augmented fact (AR): VR and AR technology are developing new opportunities for immersive video stories. Editors are exploring methods to incorporate those factors into storytelling, providing viewers a more interactive and engaging enjoyment.
Social Media Integration: With the upward thrust of social media systems, video content is more and more tailor-made for specific structures. know-how the necessities and options of different social media channels assist you to create films that perform well across various systems.
Conclusion:
Video enhancing is each an art and a technological know-how, concerning the meticulous method of shaping uncooked pictures into a compelling narrative. whether or not you're a hobbyist, a content writer, or a professional editor, learning the fundamentals of video editing, choosing the proper software program, and adhering to high-quality practices are critical for producing motion pictures. orbixcode By staying knowledgeable approximately rising tendencies and constantly refining your talents, you could create engaging and polished films that captivate audiences and efficaciously communicate your message.
1 note
·
View note
Text
How to extract audio from video in editing apps?
This guide will show you how to take the sound from a video and use it by itself. First, we’ll explain how to do it in any video editor, and then we’ll give specific steps for the most common ones.
3 Steps to Extract Audio from a Video
Extracting audio from the video is actually quite easy. The specific steps depend on the software you’re using, but the basic process is the same
Step 1: Open the Video
Open or import the video into your preferred editing software(I prefer Audacity). Make sure to choose a tool that’s compatible with your video format.
Step 2: Extract the Audio
Next, save the video file as an audio file. In some editing software, you’ll need to select Save as audio file. Others may have a simple Extract audio button.
Step 3: Save the Audio File
Finally, choose a format for your audio. Most audio files are MP3 or WAV. MP3 is smaller and accepted in more places, but WAV files sound better. Once you choose a format, choose a location on your device to save it.
The Best Audio Extractors and How to Use Them
Now that you understand how the process works to extract audio from a video, let’s walk through the process in several of the most common video editing apps.

1. Adobe Premiere Pro
Adobe Premiere Pro is like a super cool video editing tool that filmmakers, TV people, and folks who make stuff online use. It’s packed with awesome tools to make videos look amazing, with special effects and all kinds of neat stuff to make top-notch videos.
Compatibility: Mac, Windows
Price: $35.99/month
How to extract audio from a video in Premiere Pro
Open Premiere Pro.
Click on “New Project.”
Name your project and save it.
Choose “Select File.”
Click “Import from Media Browser.”
Under “Audio Options,” select “Extract Audio.”
2. CapCut
CapCut is like a super handy app for editing videos, and the best part? It’s totally free! You can use it on your computer or phone, no matter if you’re using a Mac, Windows, iPhone, or Android. With CapCut, you can do all sorts of cool stuff like cutting, reversing, adding music or cool effects, and then share your awesome videos with everyone!
Compatibility: Online, Mac, Windows, iPhone, Android
Price: Free
How to extract audio from a video in CapCut
Open CapCut in Chrome.
Click on the “+” to start a new project.
Choose “Upload.”
Find your video file.
Click on the “+” in the corner to add it to your timeline.
Right-click on your video in the timeline.
Select “Separate Audio.”
3. Windows Movie Maker
Windows Movie Maker used to be a simple video editing tool made by Microsoft. It was great for beginners who wanted to make and edit videos easily. With features like trimming, adding transitions between scenes, and cool effects, it was a fun way to get started with video editing. However, it’s not available anymore, but it was a popular choice back in the day!.
Compatibility: Windows
Price: Free
How to save audio from a video in Windows Movie Maker
Open Windows Movie Maker
Choose Add Video and Photos
Choose File > Save Movie > Audio Only
Choose a file format for your audio
In my full Blog, I have included many more tools which are free and has mobile apps. Click to read my full Blog on How to extract audio from video in editing apps
0 notes
Text
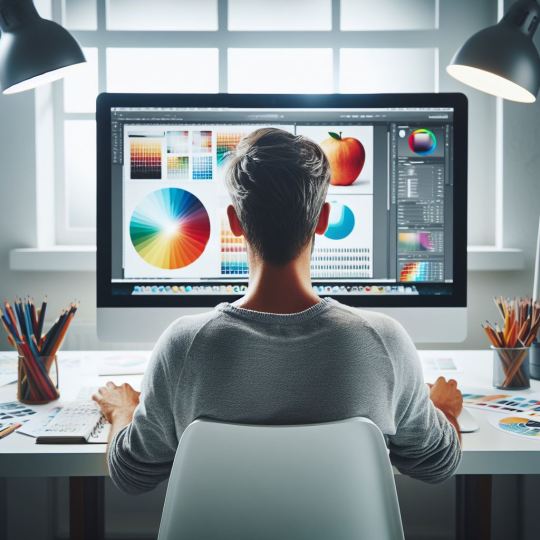
Photo Editing
Introduction to Photo Editing
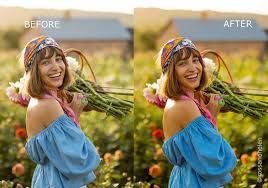
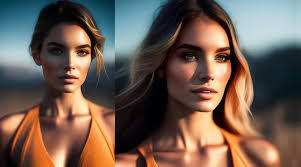
Photo editing has become an essential part of modern photography, enabling photographers and hobbyists to enhance their images and bring out the best in their shots. Whether you're a professional photographer, a social media influencer, or just someone who enjoys taking pictures, understanding the fundamentals of photo editing can dramatically improve the quality of your photos. This comprehensive guide will explore various aspects of photo editing from basic adjustments to advanced techniques, providing you with the knowledge to create stunning images.
The Importance of Photo Editing
In the digital age, capturing a great photo is only half the battle. Even the best cameras can produce images that need a little tweaking to reach their full potential. Factors like lighting, color balance, and composition often require post-processing to ensure that the image looks as vibrant and professional as possible.
Enhance Colors and Lighting: Adjust brightness, contrast, and saturation to make your photos more visually appealing.
Correct Imperfections: Remove blemishes, correct red-eye, and fix other flaws that detract from the image.
Alter Composition: Crop, straighten, and reframe images to improve their composition.
Create Artistic Effects: Apply filters, overlays, and textures to give your photos a unique, creative look.
Before diving into specific editing techniques, it's essential to understand the tools at your disposal. Various photo editing software options range from beginner-friendly apps to professional-grade programs.
Popular Photo Editing Software
Adobe Photoshop:
Overview: The industry standard for photo editing, offering a vast array of tools for everything from basic adjustments to complex image manipulation.
Key Features: Layers, masks, advanced retouching tools, and support for plugins.
Best For: Professionals and serious hobbyists who need advanced features and flexibility.
Adobe Lightroom:
Overview: A powerful tool designed for organizing and editing large collections of photos.
Key Features: Non-destructive editing, presets, and robust organizational tools.
Best For: Photographers who need to manage and process large numbers of images.
GIMP (GNU Image Manipulation Program):
Overview: A free, open-source alternative to Photoshop.
Key Features: Comprehensive tools for editing and manipulating images, supports layers and plugins.
Best For: Users who need advanced editing features without the cost.
Affinity Photo:
Overview: A budget-friendly alternative to Photoshop, offering many of the same features.
Key Features: High-end photo editing tools, RAW editing, and a user-friendly interface.
Best For: Photographers who want professional-level tools at an affordable price.
Canva:
Overview: A user-friendly online platform for basic photo editing and graphic design.
Key Features: Drag-and-drop interface, templates, and basic editing tools.
Best For: Beginners and casual users looking for quick edits and design work.
Basic Photo Editing Techniques
Once you've chosen your editing software, it's time to start enhancing your photos. Here are some basic techniques that form the foundation of photo editing.
Cropping and Straightening:
Purpose: Improve composition by removing unnecessary elements and straightening horizons.
How-To: Use the crop tool to trim the edges of your photo. Many tools also offer a grid overlay to help you straighten the image by aligning key elements with the grid lines.
Adjusting Exposure:
Purpose: Correct the overall brightness of your image.
How-To: Use the exposure slider to increase or decrease the brightness. Be careful not to overexpose (too bright) or underexpose (too dark) your image.
Contrast and Brightness:
Purpose: Enhance the difference between the light and dark areas of your photo, making it more dynamic.
How-To: Adjust the contrast slider to increase or decrease the difference between shadows and highlights. Use the brightness slider to fine-tune the overall lightness of the image.
Color Correction:
Purpose: Ensure that the colors in your photo are accurate and appealing.
How-To: Use the white balance tool to correct any color cast (e.g., too warm or too cool). Adjust saturation and vibrance to enhance colors without oversaturating them.
Sharpening:
Purpose: Enhance the clarity of your image by making edges appear more defined.
How-To: Apply the sharpening tool carefully to avoid creating a grainy or unnatural look. Focus on areas that need more definition, like eyes in a portrait or the edges of objects in landscapes.
Noise Reduction:
Purpose: Minimize graininess or “noise,” particularly in low-light photos.
How-To: Use the noise reduction slider to smooth out the grain, but be careful not to overdo it, as it can lead to a loss of detail.
Advanced Photo Editing Techniques
Once you've mastered the basics, you can explore more advanced techniques to take your photo editing to the next level.
1. Layering and Masking:
Purpose: Allows you to make non-destructive edits, combine multiple images, and apply adjustments selectively.
How-To: Use layers to separate different elements of your photo (e.g., background, subject) and apply masks to control where adjustments are applied. This technique is powerful for compositing images or making complex adjustments.
2. Dodging and Burning:
Purpose: Enhance or darken specific areas of your photo to add depth and focus.
How-To: The dodge tool lightens areas of your photo, while the burn tool darkens them. Use these tools selectively to draw attention to key parts of your image or to create a more balanced exposure.
3. Cloning and Healing:
Purpose: Remove unwanted elements or imperfections from your photo.
How-To: The clone stamp tool allows you to copy pixels from one part of your image to another, effectively “erasing” unwanted objects. The healing brush works similarly but blends the copied area with the surrounding pixels for a more natural look.
4. Advanced Color Grading:
Purpose: Apply a specific mood or aesthetic to your photo through color adjustments.
How-To: Use curves, selective color, or split toning to fine-tune the colors in your image. This technique is often used in cinematic photography to create a specific atmosphere.
5. Working with RAW Files:
Purpose: RAW files contain more data than JPEGs, giving you greater flexibility in editing.
How-To: Open RAW files in a program like Adobe Lightroom or Photoshop. From there, you can adjust exposure, white balance, and other settings with minimal loss of quality. RAW editing is essential for professional photographers who need the highest quality results.
Creative Photo Editing
Beyond enhancing and correcting photos, editing can also be used creatively to produce artistic images. This involves thinking outside the box and using various tools and techniques to transform your photos in unique ways.
1. Applying Filters and Presets:
Purpose: Quickly change the look and feel of your photo.
How-To: Many editing programs come with built-in filters and presets. These are pre-defined adjustments that can dramatically alter the appearance of your image. You can also create your own presets for a consistent style across multiple photos.
2. Adding Textures and Overlays:
Purpose: Enhance your photos with additional visual elements.
How-To: Apply textures (like grunge, paper, or fabric) as an overlay to add depth and interest to your photo. You can also use light leaks, lens flares, or bokeh effects to create a specific mood.
3. Photo Manipulation:
Purpose: Combine multiple images or elements to create a surreal or fantasy composition.
How-To: Use techniques like compositing, where you blend multiple images, or digital painting, where you paint directly onto your photo. This requires a good understanding of layers, masking, and perspective to achieve a believable result.
4. Black and White Conversion:
Purpose: Create timeless, classic images by converting color photos to black and white.
How-To: Use the black and white adjustment layer or desaturation tool to remove color from your image. You can then adjust the contrast and apply filters to enhance the tonal range and bring out details.
Tips for Effective Photo Editing
Work Non-Destructively:
Always use layers, masks, and adjustment layers to ensure that your original image remains untouched. This allows you to experiment and make changes without permanently altering your photo.
Use Shortcuts:
Familiarize yourself with keyboard shortcuts in your editing software. This will speed up your workflow and make the editing process more efficient.
Keep It Natural:
While it's tempting to push adjustments to the extreme, subtlety is often more effective. Aim to enhance your photos without making them look overly edited.
Learn from Others:
Study the work of professional photographers and editors. Tutorials, online courses, and forums are valuable resources for learning new techniques and improving your skills.
Practice Regularly:
The more you edit, the better you'll become. Experiment with different styles and techniques to develop your unique editing style.
The Future of Photo Editing
Photo editing technology is constantly evolving, driven by advancements in software and artificial intelligence (AI). Here’s a glimpse of what the future holds:
1. AI-Powered Editing:
AI is making photo editing faster and more accessible. Tools like Adobe's Sensei and Laminar AI can automatically enhance photos, suggest edits, and even retouch portraits with a single click. As AI technology advances, we can expect more intuitive and powerful editing tools.
2. Augmented Reality (AR) in Editing:
AR is starting to influence photo editing, allowing users to visualize edits in real-time or apply effects that interact with the environment. This technology could lead to new creative possibilities and more immersive editing experiences.
3. Mobile Editing:
With the increasing power of smartphones, mobile editing apps are becoming more sophisticated. Professionals and amateurs alike are turning to mobile apps like Adobe Lightroom Mobile and Snapseed for on-the-go editing. The convenience and accessibility of mobile editing will continue to grow.
4. Collaborative Editing:
As cloud-based tools become more prevalent, collaborative editing is becoming easier. Multiple users can work on the same project simultaneously, whether they are in the same room or across the globe. This is particularly useful for professional teams and creative agencies.
The Importance of Photo Editing
In the digital age, capturing a great photo is only half the battle. Even the best cameras can produce images that need some tweaking to reach their full potential, and post-processing is often required in elements such as lighting, color balance and composition to make your images look as vibrant and professional as possible.
Enhance Colors and Lighting: Adjust brightness, contrast, and saturation to make your photos more visually appealing.
Correct Imperfections: Remove blemishes, correct red-eye, and fix other flaws that detract from the image.
Alter Composition: Crop, straighten, and reframe images to improve their composition.
Create Artistic Effects: Apply filters, overlays, and textures to give your photos a unique, creative look.
Before diving into specific editing techniques, it's important to become familiar with the tools available to you. Various photo editing software options range from beginner-friendly apps to professional-grade programs.
Popular Photo Editing Software
Adobe Photoshop:
Overview: The industry standard for photo editing, offering a vast array of tools for everything from basic adjustments to complex image manipulation.
Key Features: Layers, masks, advanced retouching tools, and support for plugins.
Best For: Professionals and serious hobbyists who need advanced features and flexibility.
Adobe Lightroom:
Summary: A powerful tool for organizing and editing large photo collections.
Key Features: Non-destructive editing, presets, and robust organizational tools.
Best For: Photographers who need to manage and process large numbers of images.
GIMP (GNU Image Manipulation Program):
Overview: A free, open-source alternative to Photoshop.
Main features: Comprehensive tools for image editing and manipulation, support for layers and plugins.
Best For: Users who need advanced editing features without the cost.
Affinity Photo:
Overview: A budget-friendly alternative to Photoshop, offering many of the same features.
Key Features: High-end photo editing tools, RAW editing, and a user-friendly interface.
Best For: Photographers who want professional-level tools at an affordable price.
Canva:
Overview: A user-friendly online platform for basic photo editing and graphic design.
Key Features: Drag-and-drop interface, templates, and basic editing tools.
Best For: Beginners and casual users looking for quick edits and design work.
Once you've chosen your editing software, you're ready to start enhancing your photos. Here are some basic techniques to help you start editing your photos.
Cropping and Straightening:
Purpose: Improve composition by removing unnecessary elements and straightening horizons.
How-To: Use the crop tool to trim the edges of your photo. Many tools also offer a grid overlay to help you straighten the image by aligning key elements with the grid lines.
Adjusting Exposure:
Purpose: Correct the overall brightness of your image.
How-To: Use the exposure slider to increase or decrease the brightness. Be careful not to overexpose (too bright) or underexpose (too dark) your images.
Contrast and Brightness:
Purpose: Enhance the difference between the light and dark areas of your photo, making it more dynamic.
How-To: Adjust the contrast slider to increase or decrease the difference between shadows and highlights. Use the Brightness slider to optimize the overall brightness of your image.
Color Correction:
Purpose: Ensure that the colors in your photo are accurate and appealing.
How-To: Use the white balance tool to correct any color cast (e.g., too warm or too cool). Adjust saturation and vibrance to enhance colors without oversaturating them.
Sharpening:
Purpose: Enhance the clarity of your image by making edges appear more defined.
How-To: Apply the sharpening tool carefully to avoid creating a grainy or unnatural look. Focus on areas that need more definition, such as eyes in a portrait or the edges of objects in a landscape.
Noise Reduction:
Purpose: Minimize graininess or “noise,” particularly in low-light photos.
How to: Use the Noise Reduction slider to smooth out grain, but be careful not to overdo it as this can result in loss of detail.
Advanced Photo Editing Techniques
Once you've mastered the basics, you can explore more advanced techniques to take your photo editing to the next level.
1. Layering and Masking:
Purpose: Allows you to make non-destructive edits, combine multiple images, and apply adjustments selectively.
How-To: Use layers to separate different elements of your photo (e.g., background, subject) and apply masks to control where adjustments are applied. This technique is great for compositing images or making complex adjustments.
2. Dodging and Burning:
Purpose: Enhance or darken specific areas of your photo to add depth and focus.
How-To: The dodge tool lightens areas of your photo, while the burn tool darkens them. Use these tools selectively to draw attention to key parts of your image or to create a more balanced exposure.
3. Cloning and Healing:
Purpose: Remove unwanted elements or imperfections from your photo.
How-To: The clone stamp tool allows you to copy pixels from one part of your image to another, effectively “erasing” unwanted objects. The healing brush works similarly but blends the copied area with the surrounding pixels for a more natural look.
4. Advanced Color Grading:
Purpose: Apply a specific mood or aesthetic to your photo through color adjustments.
How-To: Use curves, selective color, or split toning to fine-tune the colors in your image. This technique is often used in film photography to create a particular atmosphere.
5. Working with RAW Files:
Purpose: RAW files contain more data than JPEGs, giving you greater flexibility in editing.
How-To: Open RAW files in a program like Adobe Lightroom or Photoshop. From there, you can adjust exposure, white balance and other settings with minimal loss of quality. RAW editing is essential for professional photographers looking for the highest quality results.
Creative Photo Editing
Beyond enhancing and correcting photos, editing can also be used creatively to produce artistic images. It's all about thinking outside the box and using different tools and techniques to transform your photos in a unique way.
1. Applying Filters and Presets:
Purpose: Quickly change the look and feel of your photo.
How-To: Many editing programs come with built-in filters and presets. These are predefined adjustments that can drastically change the look of your image. You can also create your own presets to create a consistent style across multiple photos.
2. Adding Textures and Overlays:
Purpose: Enhance your photos with additional visual elements.
How-To: Apply textures (like grunge, paper, or fabric) as an overlay to add depth and interest to your photo. You can also use light leaks, lens flares, or bokeh effects to create a specific mood.
3. Photo Manipulation:
Purpose: Combine multiple images or elements to create a surreal or fantasy composition.
How-To: Use techniques like compositing, where you blend multiple images, or digital painting, where you paint directly onto your photo. This requires a good understanding of layers, masking, and perspective to achieve a believable result.
4. Black and White Conversion:
Purpose: Create timeless, classic images by converting color photos to black and white.
How-To: Use the black and white adjustment layer or desaturation tool to remove color from your image. You can then adjust the contrast and apply filters to enhance the tonal range and bring out details.
Conclusion
Image editing is an essential skill in today's visually driven world. Whether you want to fix small mistakes or create stunning visual art, image editing tools and techniques offer endless possibilities. By understanding the basics and exploring advanced techniques, you can turn your photos into something truly stunning. Remember, image editing is both a science and an art. It requires technical knowledge, creativity and practice. With the right tools and the willingness to keep learning, you can master photo editing and realize your creative vision. Whether you're enhancing snapshots for social media or creating a professional portfolio, photo editing is key to making your images stand out in a crowded digital environment. Photo editing has become an essential part of modern photography, allowing photographers and amateurs alike to enhance their images and get the most out of them. Whether you're a professional photographer, a social media influencer, or simply someone who enjoys photography, understanding the basics of photo editing can greatly improve the quality of your photos. This comprehensive guide will explain the various aspects of photo editing, from basic adjustments to advanced techniques, giving you the knowledge to create amazing images.
#PhotoEditing#PhotoEditor#PhotoRetouching#CreativeEditing#EditMyPic#PhotoManipulation#EditingTips#PhotographyEditing#BeforeAndAfter#EditLikeAPro#EditingSoftware#Retouching#DigitalArt#CreativeRetouch#PhotoshopSkills
0 notes
Last Seen Blogs

bi-and-depressed
jump in the river

sheersockman48
sheersockman

paynemedownli
I'm Batman

jant-mamlka
مركز الشعلة للخدمات المنزلية

sineqdoque
Untitled