#blinkie tutorial
Explore tagged Tumblr posts
Visit Tumblr Blog
Explore Tumblr blogs with no restrictions, modern design and the best experience.
Last Seen Tumblr Blogs


Fun Fact
Mobile US users spent an average of 115.8 minutes on Tumblr app monthly.
Text
It's midnight but fuck it manual blinkies tutorial!!!
@fae-vixen this one is for u >:3
STEP ONE:
Open the art program of your choice. (Use one that can support small canvas sizes - I'm using Ibispaint on an ipad)
STEP TWO:
Create a new canvas. The dimensions of a blinkie are 150 pixels wide and 20 pixels tall.
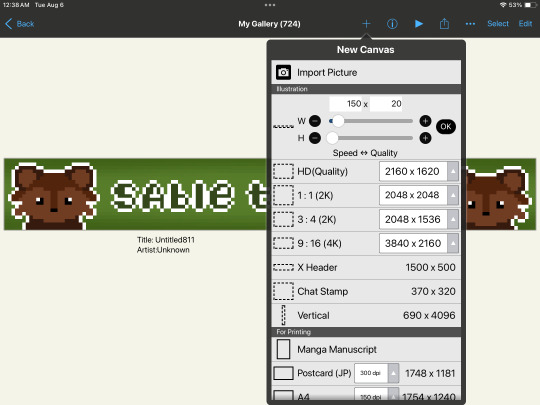
STEP THREE:
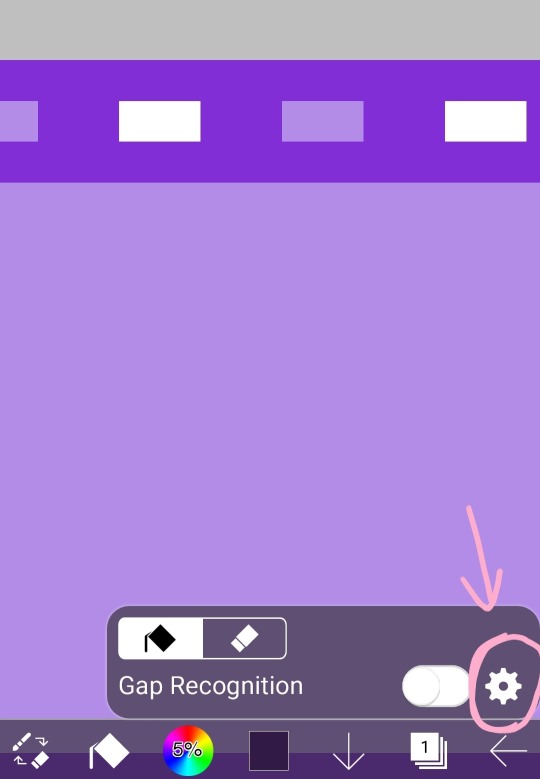
For an easier time seeing the pixels, make sure 'interpolation on zoom in' is turned off (on ibispaint you can access this through the settings function). You can use the 'digital pen' set to size 1 to create individual pixels.
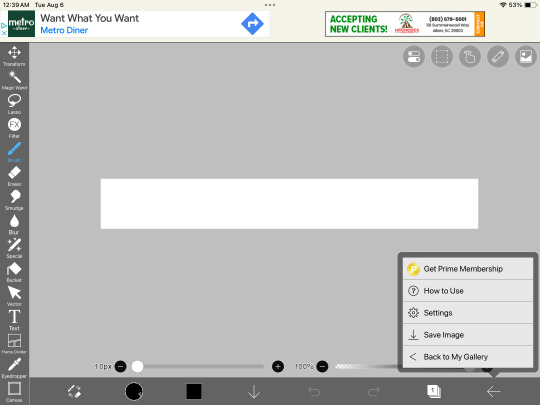

Interpolation on zoom in is directly beneath the black/white bars
STEP FOUR:
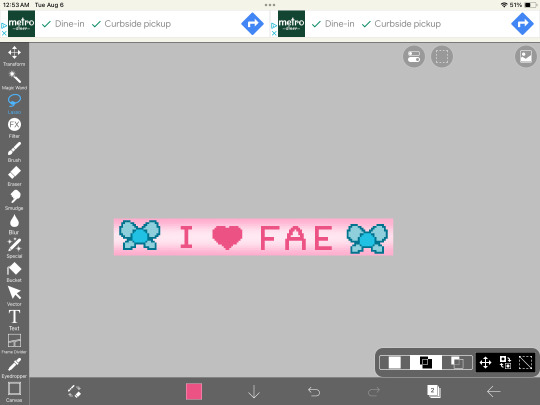
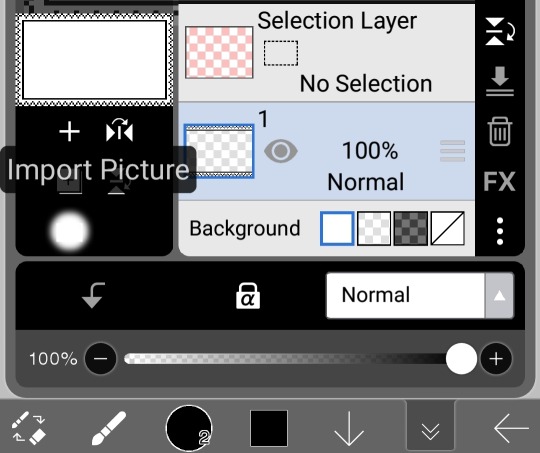
Draw something, whatever you want! Remember that you're going to be animating this, though, so keep the animated parts on a separate layer - in my case I want my fairies to move so they're on their own layer!
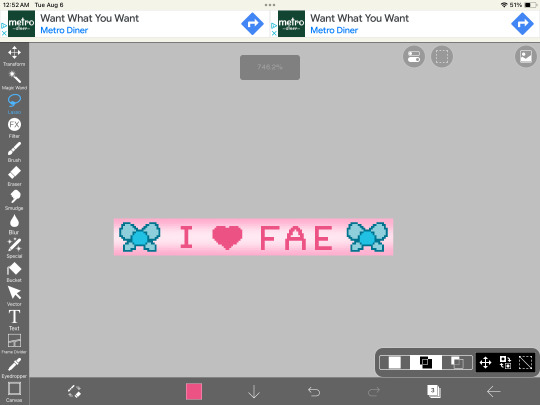
STEP FIVE:
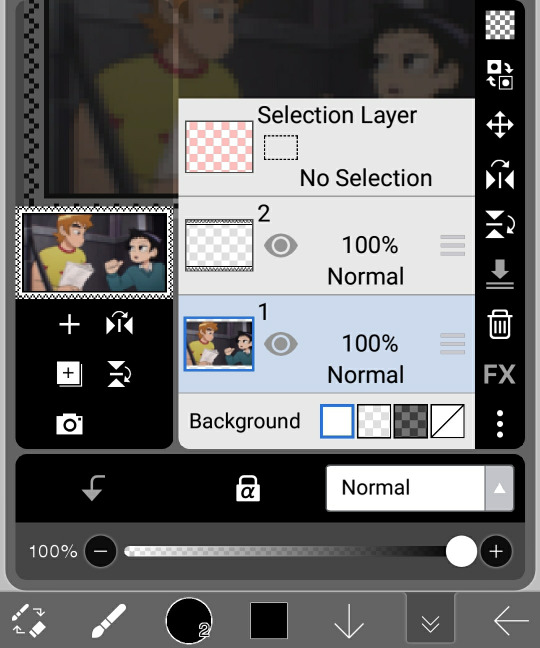
duplicate the layers of the things you want to animate, and then move them a little bit! save the entire canvas as a png - making sure to save each frame separately.

STEP SIX:
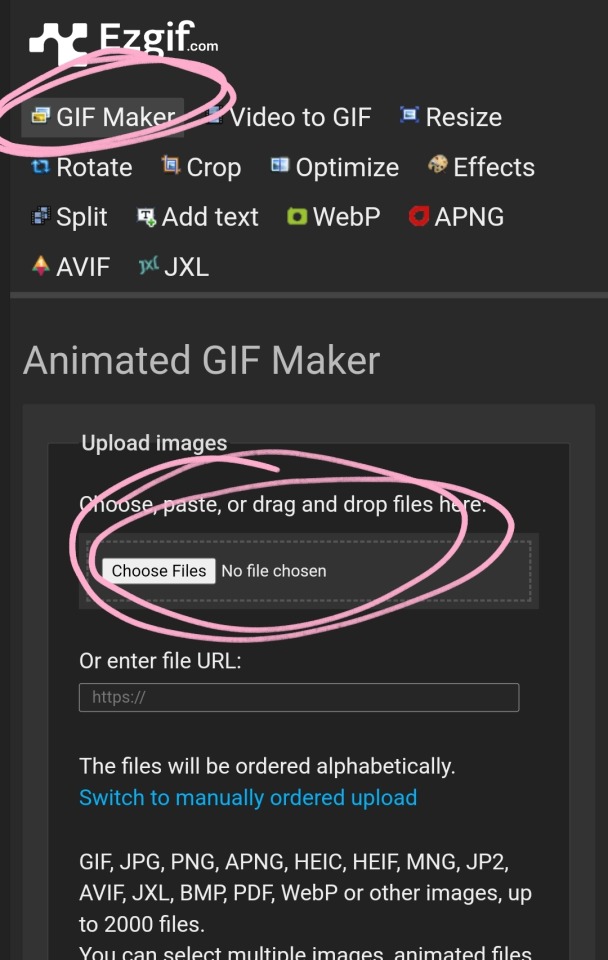
Upload both frames into a gif making software - I'm using ezgif. (Open the website, hit the 'gif maker' button (not the video to gif one), then upload both of your pngs, and you can adjust the settings (speed, etc) from there!)


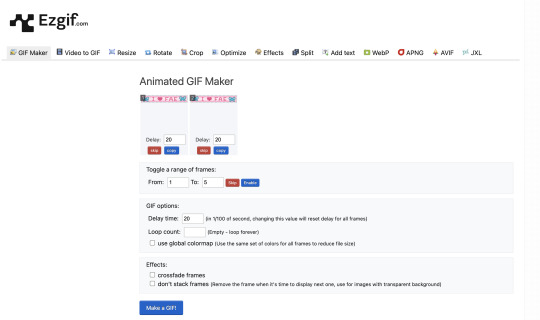
STEP SEVEN:
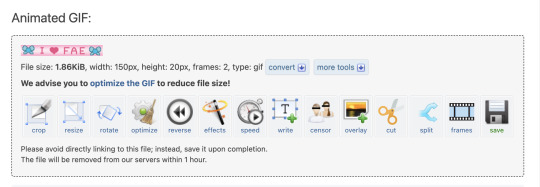
Download the gif you made, and now you've got your very own homemade blinkie!! :D

110 notes
·
View notes
Text
EXPLAINING HOW I MAKE BLINKIES :3
like these guys


websites / apps: blinkies.cafe , ibis paint x , ezgif.com !
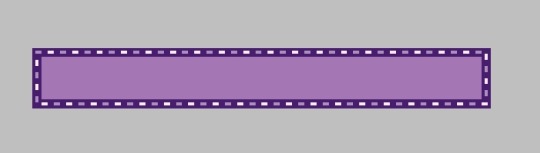
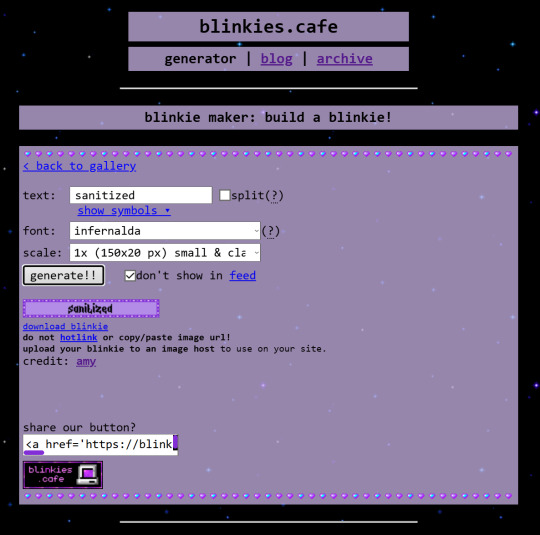
STEP ONE !! go to blinkies.cafe and select a blinkie. i reccomend going to old and selecting one of the very simple ones !! DO NOT SELECT THE GRADIENT ONE YOU WILL SUFFER
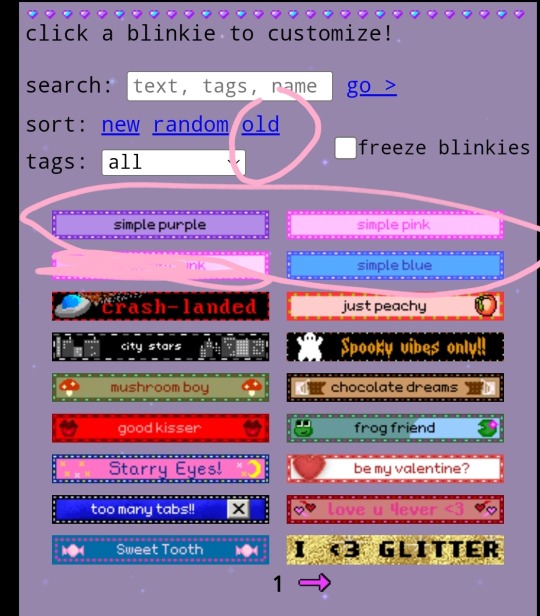
STEP TWO !! click on it btw. anyways, since spaces won't work, put " " !! it will register !! this is also how to make videos on yt title-less i think... anyways, choose the biggest size
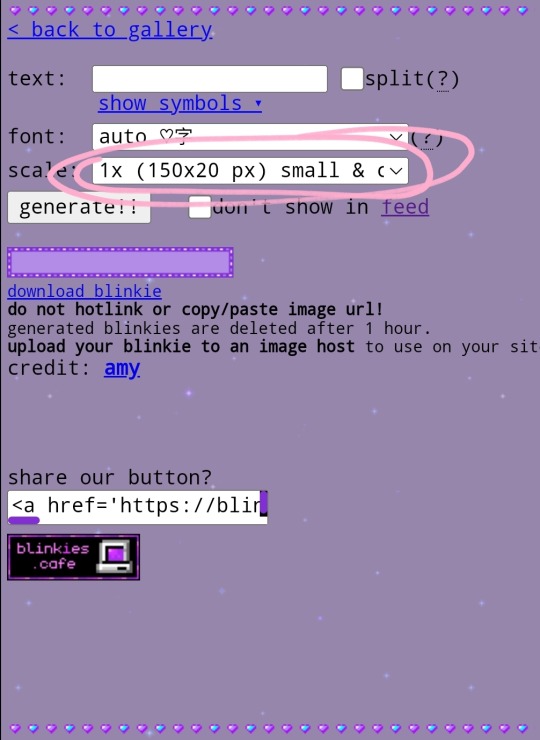
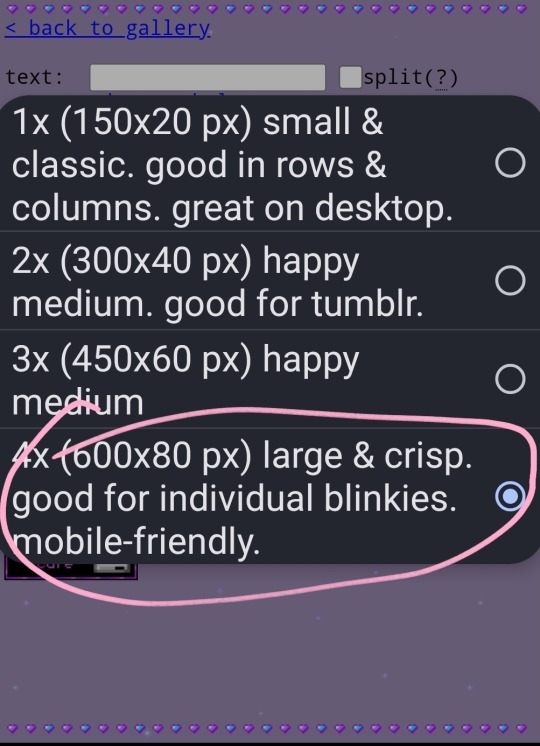
then click generate and download the blinkie!!
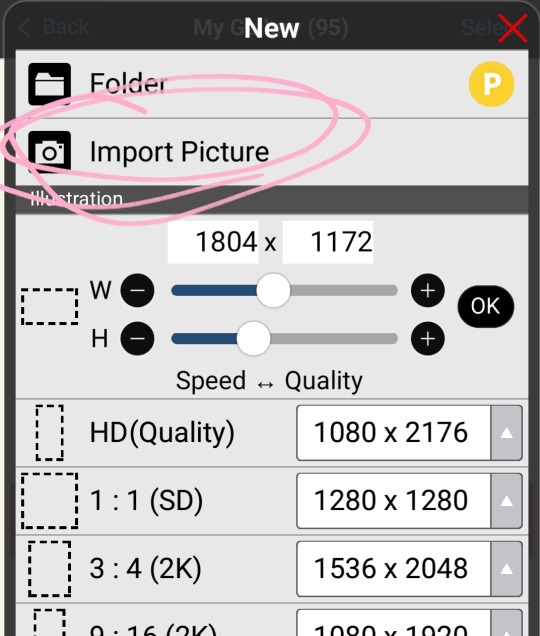
STEP THREE !! import into ibis paint !!
now i reccomend putting a reference of whatever character in your ref window. won't explain that, look it up.
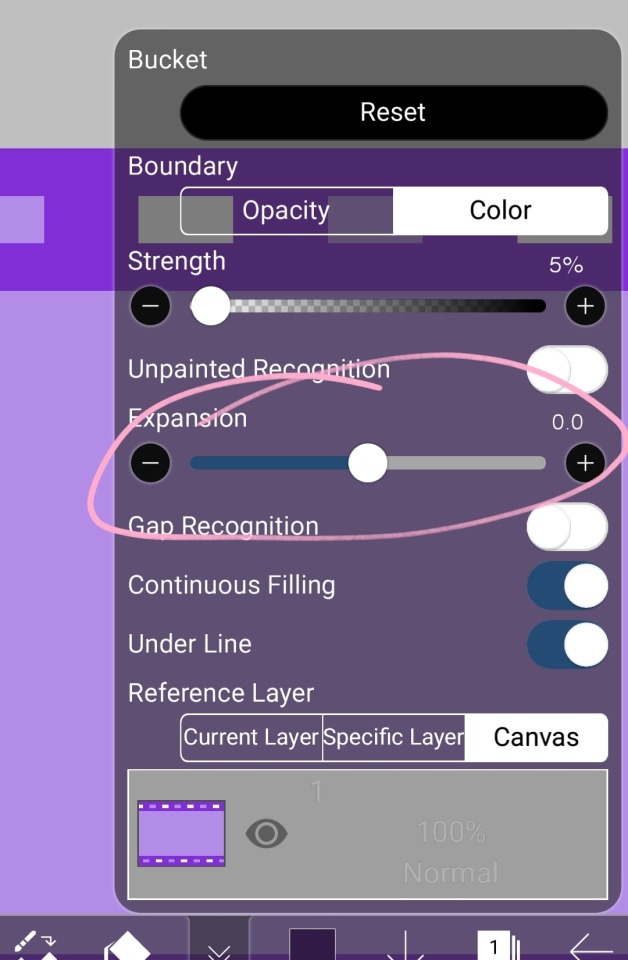
STEP FOUR !! choose colors and recolor with bucket tool on 0
wow, look at that !!
STEP FIVE !! import a transparent image of your character and put the text of your choice.
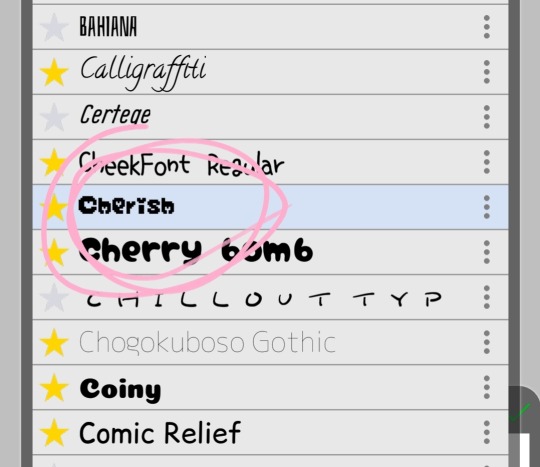
heres the font i use !!
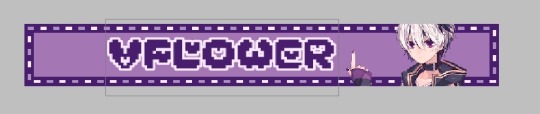
advice for choosing colors of the text: make the body the color of the blinkies border and the outside the brightest light !!
STEP FIVE AND A HALF !! this is optional, but i make a very small border around the text. duplicate layer and bring it on top, make all other layers invisible, alpha lock, make it the color of the border, turn off alpha lock, use bucket tool on expand 0.5 or 1 and tap a few times on the blob, turn other layers back on, put the duplicate under the original thing and merge so it's a small border. it's very subtle but i like it.
see the difference?


STEP SIX !! download it, then flip ONLY THE BLINKIE LAYER horizontal and vertical then save again

if you want another set of words, add them now!!
STEP SEVEN !! go to ezgif.com and imput them
the click upload files. then click make a gif :3

the end (≡・x・≡)
#���� sweet shenanigans#jiraiblr#vflower#blinkie#blinkie tutorial#web graphics#web resources#blinkies#tutorial
160 notes
·
View notes
Note
Where are blinkers typically made? Is there a specific drawing program or dimensions used?
Typically? From other people I hear Aesprite being used often, and Ibis Paint. I use Krita personally, but for making blinkies (especially simple two frame ones), I don't see why you couldn't use just about any drawing program. You just draw out the blinkie, make at least two frames where the dots are alternating, and make them into a gif. Here are some simple tutorials:
https://blinkies.cafe/blog/2022-05-14-how-to-make-blinkies
https://lu-kario.tumblr.com/post/756969246976868352/blinkies-theyre-fun-cute-they-infected-every
https://alfea.tumblr.com/post/173432743960/simple-blinkie-making-tutorial
As for the dimensions, your standard blinkie is 150x20 pixels. Sometimes people make them much bigger so that they're less pixelated/ easier to see. If you want to make a bigger one with the same ratio, you've just gotta multiply the amount. Twice as big is 300x40, three times as big is 450x60, four times is 600x80, etc etc.
Hopefully this is enough info if you want to give blinkie creation a shot. If you want to start even simpler, here are some blinkie making sites! Pixelwavestudio Blinkie Maker is my favorite.
https://blinkies.pixelwavestudio.net/
https://blinkies.cafe/
https://myblinkie.holidaycomments.com/
#i plan to make my own blinkie tutorial some day too#but i want to be super thorough about it#and i dont got time for all that rn lol#blinkies#blinkie#150x20#proship dni
11 notes
·
View notes
Note
can i have a blinkie tenplate? thanks xx


here u go ^^
#my graphics#blinkie tutorial#blinkie template#neocities#blog resources#carrd resources#carrd stuff#carrd graphics#rentry graphics#rentry resources#rentry graphic#blinkies#web graphics#graphics#old web graphics#web graphic
90 notes
·
View notes
Text
Tags Masterlist. Click to find tagged posts.
Updated 31 October 2024.
General tags:
themes - patterns - resources - navigation - sidebar - interactive - header - fansite - contained - fandom - tools - tags - pixels - gif - graphics - dividers - pages - all in one - blinkies - code - colours - html - javascript - no javascript - neocities - templates - tutorial -
Specific tags:
kingdom hearts - seashells - splatoon - summer - steven universe - book - cats - colourful - computer - constellation - cute - eyestrain - facebook - fish - hexagon - horizontal - metal gear solid - music player - particles - pokemon - reddit - simple - social media - space - spongebob - tarot - undertale - water - webcore - writing -
Year of creation:
2013 - 2014 - 2015 - 2016 - 2017 - 2018 - 2019 - 2020 - 2021 - 2022 - 2023 - 2024
Full masterlist page:
More will be added later. Feel free to suggest anything!
#masterlist#themes#sidebar#fandom#dividers#gif#header#resources#patterns#navigation#interactive#fansite#contained#tools#tags#graphics#music player#pages#html#neocities#blinkies#all in one#code#colours#javascript#no javascript#templates#tutorial
87 notes
·
View notes
Note
How do you make your stamps? :0
Disclaimer: this is an obscenely long explanation, with pictures. Efficiency is stupid
So, for the static ones, I make a 99x56 px file on ibis paint x. Other programs are probably available online but I don't use them.
After that, I either upload an image I want to make into a stamp, or I draw one.
Then, I find a frame I want to use. Ill upload them here but let it be known I stole all of these right from deviantart


Most of them are from Lil-Devil-Melii on deviantart. The rest i have no idea. They're not all 99x56px but you can crop the canvas it's fine
Make sure to erase the edges of the picture , so they're transparent. It's not as cute otherwise
Upload those frames over your image in whatever art program you're using and viola, stamp.
For moving ones, it's a lot harder. Mostly because I refuse to download Photoshop.
There are a couple ways to do this. Some are simple animations, like with flashing text and whatnot. For these, you download the individual animation frames from your art program. Make sure it's transparent.
Then, upload each frame to ezgif.com under the option "GIF maker." You can play around with how fast each frame goes and whatnot but in the end, it'll be a stamp with some rad text that moves. This is easy, and doesn't make me want to shit my pants and cry. If you're new, do this. This is fun. This is good. This does not kill me inside
I made that↓ stamp with this method :)

this next one is how we turn gifs into stamps. This one makes me sad. It involves math and sucks. But we gotta do it. For the vibe
First, grab your gif. I'm using this cow gif because it's awesome

Then, I resize it using ezgif. Literally everything for this will be using ezgif. I am a simple man
At this point you should decide what frame to use. I'm using this one because its the first one I clicked
Figured out what size the inside of the frame is. That's what I resize the gif to, so the edges can be transparent. The inside of this one is 93x50 px, so those are the dimensions I'm making the gif.
Figure it out by putting the frame into ibis paint and realizing the canvas to fit just the inside of the frame, then seeing what the dimensions are. But there could be easier ways

Woah it's so small now
Then, still on ezgif, I go to the "crop" option.
Make sureeee to upload the smaller gif
press the button that says "extend canvas size", and then put the "width" and "height" as the dimensions for your FRAME. This'll put a bit of a transparent border around the gif. For this frame, I did 99px and 56px.
The "left" and "top" boxes show how many pixels the cropping happens from the edges of the canvas. The formula for finding that is
(width of gif / 2) - (difference between gif width and frame width / 2) = left box
For me it's (93 / 2) - (6 / 2) = 43.5
Then you do the same.for the height, which for me ends up being 22 from the top
This is reallyyy touchy and annoying though
Here's my result , with no visible difference

Okay so THEN you go to the "overlay" option, under "effects." And upload your frame. If the cropping was done right, you shouldn't have to move the frame at all and can just download it
Here's my result:

if you don't care about transparency, you can resize your gif to be the same size as the frame, and then put the frame over it. But I'm a slut for transparency
Anyways. I'm sorry if anything was unclear, it's two am. And I hope this was helpful :) these really are fun to make once you get it down
also if anyone has an easier way to make stamps from gifs, please god tell me
#web graphics#old web#neocities#custom#custom blinkies#stamps#page decor#web resources#da stamps#deviantart stamps#blinking gif#How to#tutorial#How to make stamps#Spacehey#deviantart#rentry graphics#old internet#early internet#stamp collecting#ezgif#stamp making#stamp template#Stamp frames#blinkies
6K notes
·
View notes
Text
Digital Stamp Making Tutorial
Hello, and welcome to the long-awaited(at least on my part) digital stamp-making tutorial from neosprites! I’d like to preface that I learned what I was doing from this tutorial so it may be a bit redundant, but if anything I get a bit more specific. Thank you so much to @graphic--horde for your work, it changed me as a graphic maker. This is gunna be a long post so feel free to bookmark it for later. Now, onto the show!

The frame I will be using for this tutorial (which is the frame I use on 99.9% of my stamps) I found from the above linked post, which I believe is from a creator that OP lost track of. Its inner dimensions are 94x50 pixels and its outer dimensions are 99x56 pixels. Here it is!

Find your material! - I recommend using websites like Tumblr and searching with the “GIF” filter only on, or alternatives such as Giphy or Tenor. Your browser may let you directly save the .gif file; if not and you are noticing it restricts you to save it as a .webp file you can try an extension like “Save webp as PNG or JPEG” (for Firefox but I image other browsers have similar functions, but I really recommend you switch to Firefox). To use this you will right click on your source .gif like normal but instead of clicking on “Save image as…” click “Save webP as…” and then click “GIF”. You should be redirected to the website ezgif.com where we will actually be doing all of our editing! Here’s the .gif we’ll be working with.

Convert to GIF (optional) - if you used the extension from the above step you should already be ready to click the blue “Convert to GIF” button. If not, go ahead and open ezgif.com and click on “webP” and then “WebP to GIF”; then convert to a gif with the blue button.

Resize the GIF - now that we have a gif ready to edit, let’s make it the right size. The easiest method I have found is to change it directly to the frame’s inner dimensions, 94x50 pixels. [EDIT: Make sure in the aspect ratio drop drop menu you select "stretch to fit" and not "center and crop to fit" like I did in the photo example.] Click “resize” and then type [94] in for the width and [50] for the height. Next press the blue “resize image” button.


Add the frame - next click “overlay” then click the thin blue button that says “Extend canvas size(use if overlay exceeds GIF sizes)”. This will give us some extra room to add the frame onto the design. Next click “Browse…” and find the frame you have saved onto your device, then click the blue “Upload image” button.


After that it’s going to be misaligned, that’s normal! It will say you have the option to drag it into place, but don’t bother. That’s one of the reasons my old stamps look wack, it’s just harder to do. Instead type [44] in for the Left box and [22] in for the Right box. It took me a while to figure out these dimensions to be honest, and I’ve only tested it with this frame so I don't know if it works with others. Then click the blue “Generate image” button.


Crop the transparent edges - click on “crop”. You will have the option to check a box that says “trim transparent pixels around the image” however, I don’t recommend this as it tends to crop a few of the frame’s pixels with it sometimes. Next, set the Left position to [44] and the Right position to [22]. For the other dimensions we will use the outer dimensions of the frame which are 99x56 pixels, this will trim everything except the tiny spaces in between the stamp frame’s spikes. Type the width as [99] and the height as [56] and click the tiny blue button that says “set”. After that click the blue “Crop image” button.


Save and use! - all that's left is to click “save” and upload the graphic to your liking. (best seen on dark mode obviously)

If you’d like to tag me in stamps you’ve made using my tutorial I would love to see them, but it’s not required!! Make sure to always give credit for pictures/gifs when you can and try not to make stuff out of personal/fan art. Thank you to the person in my inbox who requested this tutorial, I had been meaning to for a while but it was just the kick I needed. :)
#carrd graphics#carrd resources#carrd stuff#rentry graphics#rentry resources#rentry decor#rentry pixels#rentry stuff#rentry inspo#deviantart#neocities#mine#my graphics#my tutorials#resources#tutorials#tutorial#how to#stamps#blinkies#graphics#web graphic#old internet#early internet#spacehey#da stamps#page decor#custom#old web#frames
351 notes
·
View notes
Note
if its alright how did you make the status boxes? i.e. in your gyaru/gyaruo post >_<


Hiya!! My BF created the IMVU status boxes / buttons from that post so he made a tutorial detailing how to make them as well!
📖Programs/sites used ☆ Clip studio paint & ezgif (I use ibispaint to make shiny buttons and the process is the same).
⭐️This button doesn’t include these but if you want to have a symbol (like the star from the gyaru buttons) at the front of yours, find an imvu status button (one from the game to use as a base) that includes the symbol you want and in the backgrounds layer recolor it along with the background so they are the same color.
Here’s the finished button from the video with a few alternate color schemes if anyone would like to use them!


I hope this helps & let me know if you have any questions! ♪

#web graphics#graphics#tutorial#rentry graphics#rentry#imvu#buttons#blinkies#old web#pixels#graphic resources#oceancore#starfish#imvu status#gif#decor#shiny buttons#ᯓ ᡣ𐭩🐚asks
430 notes
·
View notes
Text
MY BLINKIE TUTORIAL !!! :D in this video i show you step by step how i make my blinkies! if you want, i could make a tutorial for making stamps as well! please tell me if you found any parts confusing!! it was hard trying to describe everything and make it make sense. hope this helps !!! :]

(here's the result btw :P )
#blinkies#pixel graphics#pixels#monique gibeau#ride the cyclone#monique rtc#gay#tutorial#will wood#rtc musical#noel rtc#gif
145 notes
·
View notes
Note
resident evil banners?
[REQUESTED] Resident Evil Banners


#carrd moodboard#carrd graphics#carrd inspo#carrd stuff#discord chat#discord roleplay#design tutorial#banner design#tumblr banner#banners#carrd resources#discord server discord chat discord roleplay aesthetic#resident evil#leon kennedy#ada wong#ethan winters#discord server discord chat discord roleplay aesthetic banners tumblr banner banner design template aethstetic black and white#design#diy#digital art#blinkies
84 notes
·
View notes
Text
How I make gif stamps in GIMP!
Hi! So I thought I would make a tutorial on how I personally make my animated stamps in GIMP! With images to help!
Firstly, have your stamp base, I use old stamp templates I found or from my own stamps. Then you want to add your gif as a layer.

Once you've opened it as a layer, all the gif layers will appear! You want to first resize the background layer by scaling the layer.

This stamp has an interior width and height of 95x50 pixels, so I make sure to scale the layer to fit. Make sure width and height aren't linked because not all gifs will fit that size naturally.

Then it is very important to merge the background layer with the stamp template layer, this way when you make the gif it looks like a stamp!

Once that's done scale all your other layers to the same width and height so that they too will fit in the stamp! Then what you want to do once that is finished is to open filter > animation > optimise (for gif).

Then once you've done that you can click playback to see if the gif is all right!


Once that's done it is time to export it by going export as, now I always have to change my file to a .gif type in order for it to work. Once you've done that hit export.


Then it will show a pop up window, it is very important you hit check on animation! Otherwise it won't work!

Once that is done, you can now hit the final export and your gif stamp will be made! See my final product below!

#should work the same on a windows computer as well!#tutorial#gimp tutorial#image editing#stamp#stamps#blinkies#web#old web#webcore#old webcore#myspace#heyspace#edit#editing#page decor#help guide#guide
53 notes
·
View notes
Note
this is embarrassing, how do you make stamps? 😭😭
For my picture ones, I use IbisPaint x!
I use this stamp template by AHMED-ART on deviantart for all my stamps!!! (97 x 57)

You can honestly use any stamp template tho! There's tons on deviantart and they're easy to find :3
On ibis, Import a picture layer
Once you do that and size it however you want on your canvas, move your picture layer down to be the first layer

And then boom, you have your very own stamp now :3

If the picture looks too pixelated / bad quality, dw, it's supposed to look like that cause the stamps are rlly tiny 👍 have fun, I hope this was understandable!! ^_^
#not art#tutorial#Michael post#questions#stamp#stamps#deviantart stamp#da stamp#da stamps#deviantart stamps#im gonna fandom tag this#toddallace#wellsgram#veganmargarita#todd x wallace#wallace x todd#wallace wells x todd ingram#todd ingram x wallace wells#todd ingram#wallace wells#sp#scott pilgrim#spto#spvtw#scott pilgrim takes off#scott pilgrim vs the world#blinkie#blinkies#f2u
137 notes
·
View notes
Note
What is your creation process? :3c
hey, thanks for the inquiry! i've been meaning to make a post like this for some time now. NOTE: this will only cover how i make my blinkies. if you want me to go in depth about how i make stamps, please send another ask! i just think they're kind of self explanatory in comparison >_>
MY BLINKIE MAKING PROCESS
for this demonstration, i will make this graphic of Acht Mizuta from Splatoon 3. it's free to use btw:

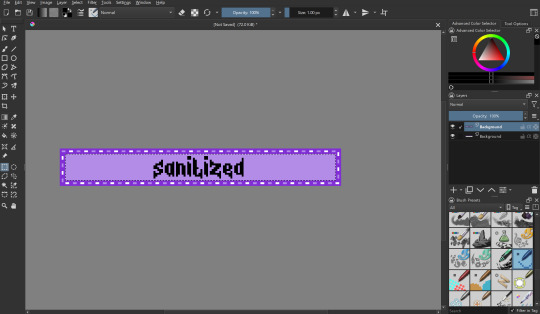
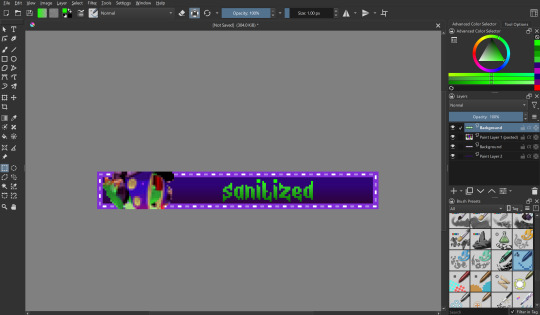
i make my graphics in Krita, which is great for editing pixel art, but does not have an option to disable font antialiasing. this leads me to generate my pixel text through external online services, but i usually generate it on blinkies.cafe and get an editable template to go along with it. my go-to is the simple purple template, since it has a simple palette and the text has its own color so i can put it in a separate layer easier.
i import it as a single frame that i will animate later. usually what i do first is cut+paste the inner content of the blinkie into a separate layer:
then i remove the background with a fill erase on the third mode, and move it around as i see fit. i put it in a separate layer before this so it's easier to color and add things like outlines.

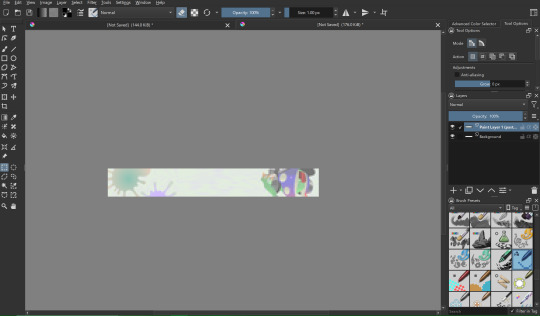
let's import graphics! usually i find a transparent png and overlay it onto the background, but in this case i'm using a full background, so it needs to be prepared:

(source: splatoon 3 side order locker reward banner)
i import the image into a new file with the same resolution as the blinkie. i edit it to have a wider resolution so it fits better:
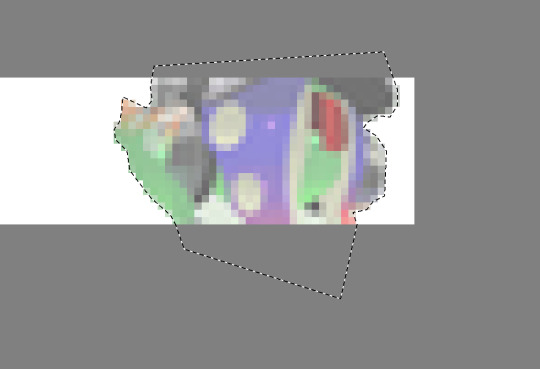
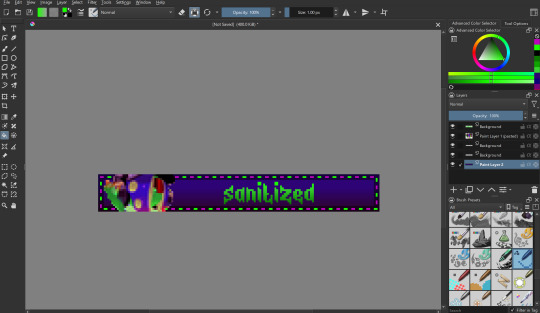
i use a lasso tool to put acht in a separate layer (so they stick out of the frame)
i import the two layers into the original file with the text. though i feel the images could use a little color grading...
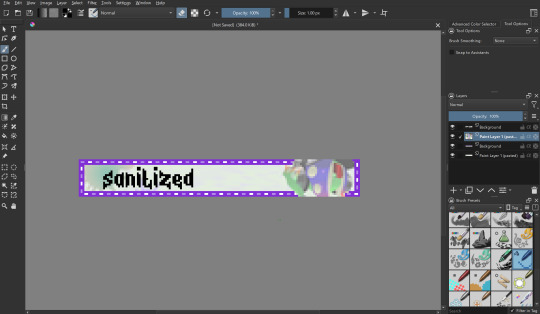
at this point i begin to mess around with the layout a little, trying to match the original "sanitized" theme i had in mind. i also do color grading on the render of acht and change out the background. now we're getting somewhere! i also color the text at this point to be a nice gradient green.
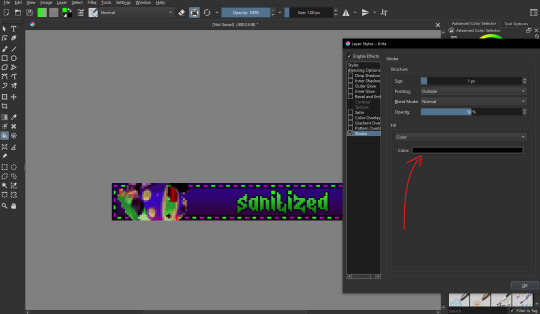
let's color the outer part of the blinkie! i thought i would make the border a transparent black, with the lights being neon green and a dark magenta respectively.
i also want to make the text have a nice little border around it, so i put a stroke filter on the text layer with the following settings. these usually change depending on graphic but the thickness is always 1px (any more and it gets antialiasing)
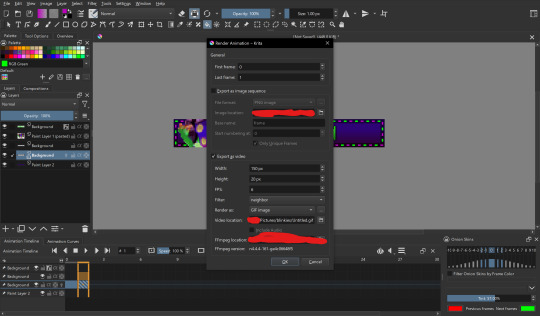
that's it for designing the blinkie, now it's time to animate it! i do this internally in krita, since it has an animation feature:

i make a new frame for the animation and change the colors and positions around. i also set up my clip settings - ending at frame 1 (2 frames - frame 0 and frame 1) at 6fps.

that's pretty much it! the gif is ready to export, just make sure you export it in the right format and don't accidentally compress it or make it too big.
the gif is ready!! wahoo!! i hope this was somewhat enlightening, i'm not the best at explaining stuff but i tried to go in depth as much as i could
#dj's commentary#pixels garage#web graphics#blinkies#dedf1sh#acht mizuta#acht splatoon#blinkies.cafe#tutorial
22 notes
·
View notes
Text

Could someone tell me how to create blinkies? I wanna make some custom ones for fun (_ _)
I have a laptop and a phone as the devices I can use to make them

17 notes
·
View notes
Note
Hi!!! Not a request but I wanted to know how u make ur blinkies? Really curious and i wanna make my own lol! Thanks!!! :D
Haiii I'll try to explain as best as I can!!
So first of all I use photopea to actually make the blinkie

I suggest having a blinkie downloaded so you can use it for the dimensions!! (I don't remember the dimensions so this is easier for me to do)

Once you open the blinkie file (using the open from computer in the websites home page) you can delete the layers and end up with a blank layer like this!!!

Next, I like to create my blinkie border!! Make sure your brush is at 1 px before you start doing it LOL ignore my big ass brush...but yeah I suggest starting with 2 colors if this is your first blinkie so pick your colors and make the border :3

Next you'll get your photo that you're going to use and open it into your file! (You can either copy and paste the photo into the program or download it and go to File -> open and place)
Fix your picture to fit into the blinkie template next!
If you want to squish it / warp it more you can click on this chain button for that :3

Also make sure your photo is below your blinkie border!

The first result should look something like this YAAY!

Next, I just move the colors on the border one over, so that you can get that blink effect all blinkies have!!

The difference is there swear!

Next I go to ezgif and upload my two blinkie pictures there to make the gif!

Awww hell yeeeeahh dog wearing a monster hat
62 notes
·
View notes
Note
How do you glitter-ify an image? (Like what you did with the Centaurworld autism creature)
@hat-stack
YAY!!! I’VE BEEN WAITING TO TALK ABOUT THOSE GIF FOR AGES! Thank you so much for the ask!


(here are some examples of some glitter stuff I did)
First of all, I really think that knowledge is the best thing ever, so I am going to tech how to make those gifs in this post. BUT! If you don’t have the time or just don’t want to, my requests are open for glittering images. Without no further ado, let’s start!
TUTORIAL
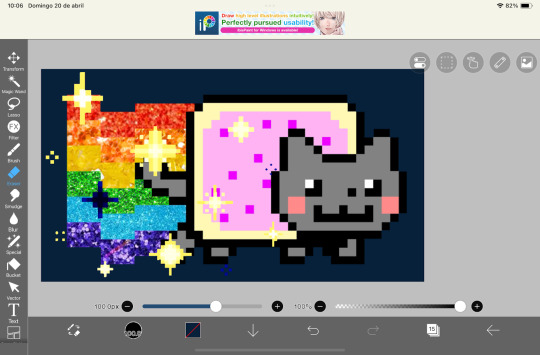
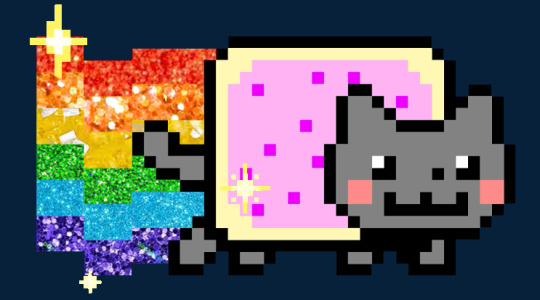
In this post we will go through the steps of making this gif:

First thing you’ll need is the starting image. The best starting images are one with LOW TO NO COMPRESSION and flat colors (I know I used pixel art for this exemple, but glittering pixel art is hell, I only did it because the image was extremely clean).

Once you have your starting point, you need to find glitter images. Just go on google and search “X-color glitter”. Then chose the shade of glitter that best matche your reference and save them, the shade doesn’t need to be perfect, we can edit it slightly once in the editing program. Some glitter finding tips for better end result:
1) Avoid images with gradients
2) Avoid images where the glitter is in perspective or have any variation in size

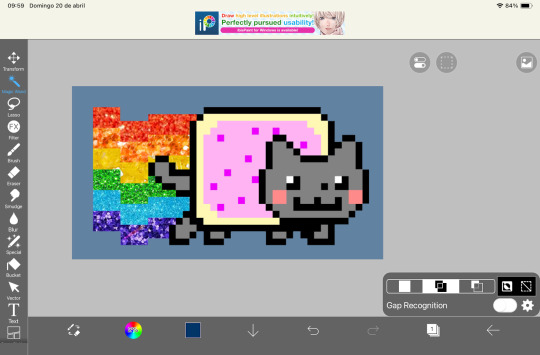
Now that we have all the images that we need, we can go on to IbisPaint (or any other app or software that has clipping layers). Then, with the wand tool or the select by color tool, cut the parts that will turn into glitter in separate layers
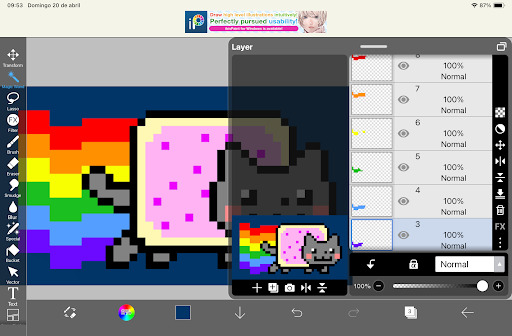
Import your glitter images and fill the entire canvas with them, them clip them to the part

repeat for all colors
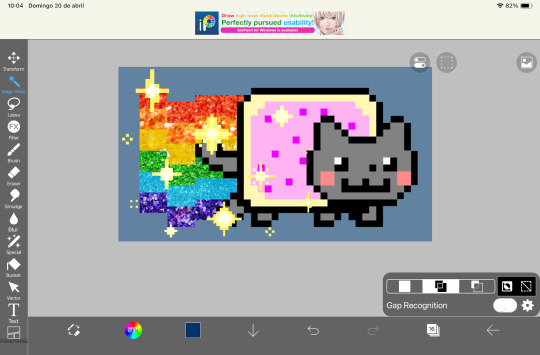
If you wnat stars:
Import the stars that you want. The amount you want in your gif can be different from mine, but have in mind that the image you import needs to have 4 times the number of stars than the amount of them you want per frame
LETS START EXPORTING OUR FRAMES!!
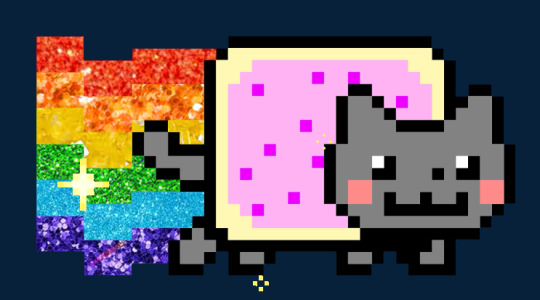
FIRST FRAME
For the stars: Duplicate the layer. Hide one of them and in the other delete 3/4 of all of the stars
For the glitter: Nothing for now
Export
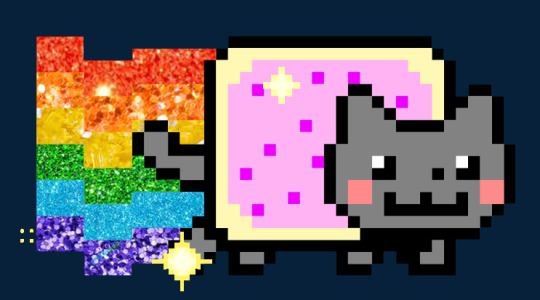
SECOND FRAME
For the stars: Invert the color of the stars from the previous frame to use them as a guide to not repeat any of the stars.
Then duplicate the origional layer, and delete 3/4 of all of the stars again, but make sure to delete the ones you marked in your guide
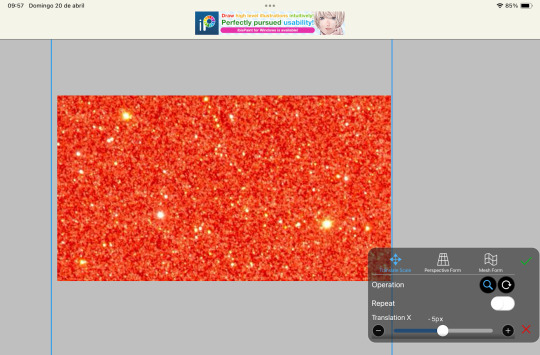
For the glitter: Flip all glitter layers horizontally
Export
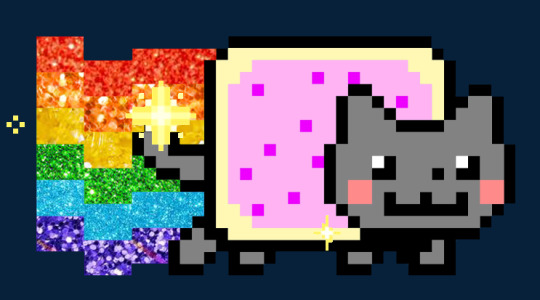
THIRD FRAME
For the stars: Invert the color of the stars from the second frame and merge them in your guide layer. Repeat the last step
For the glitter: Flip all glitter layers vertically
Export
THIRD FRAME
For the stars: Delete all the stars that arent in the guide from the origional
For the glitter: Flip all glitter layers horizontally
Export
Here is the result I got
The FINAL STEP is assembling the gif in this site, import the images, and here are the settings I use:
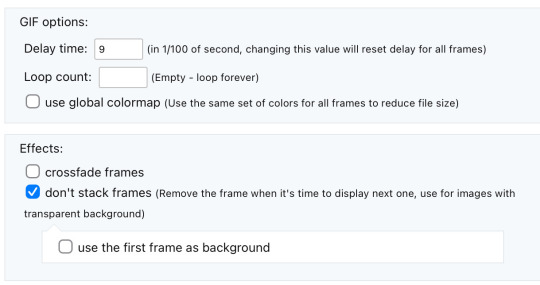
Make gif and TA-DA!!!!! ITS DONE!!!!
Hope this helped anyone out there! Happy glitter!
#glitter#blinkies#web stamps#blingees#my post#my art#sparkle#tutorial#art tutorial#gif#gifs#danganronpa
9 notes
·
View notes