#but tumblr sometimes likes to decide that the 'save' button is actually the 'post' button.
Text
@broken-beak-flower-feast I believe it was you asking about the day Abram is finally introduced to Palmetto as the prince's fiance 💕 guess who's finally having some thoughts about that
(also you send so many wonderful asks that I can't keep up and hope to do them real justice 😭💕 thank you for each of them though I appreciate you so much)
#smh the last post was supposed to be saved to drafts#but tumblr sometimes likes to decide that the 'save' button is actually the 'post' button.#not my favorite little quirk on this site i will admit#whatever#its FINE#IM STILL WRITING#hmmmm i keep thinking about writing Abram in Evermore as well#hmmmmmmmmm#my writing#neil josten#andrew minyard#royal au#andreil
107 notes
·
View notes
Text
How to add a page with custom theme
If you want to create a WIP page, character page, page for all your interests (e.g., reading or gaming catalogue, etc.) or whatever.
I tried to keep this as simple as possible; hope it's helpful!
Note: You can only do this on desktop. And this tutorial was made using the new tumblr layout.
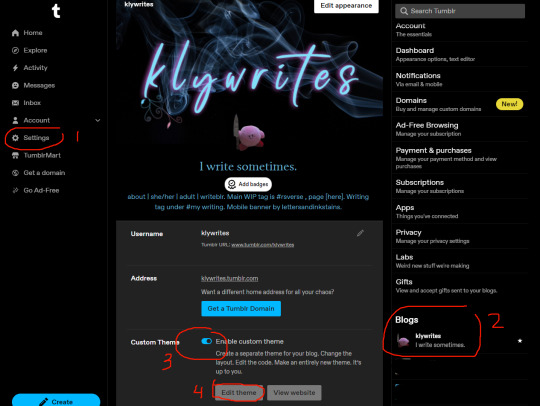
1. Go to Settings.
2. on the right side, under Blogs, click on the blog you want to add a page to.
3. In the middle you will see the basics of your blog that you can edit, such as appearance, enabling asks, choosing whether to show your likes/followers.
Where it says Custom Theme, click the slider to Enable custom theme.
4. Click on the Edit theme button that appears.
Next you will see a left sidebar where you can customize your main theme (theme of your entire blog). On the right side will be a preview of your blog.

But that's a different tutorial. For now we want to create a page.
5. Scroll down and look for Add a page in the left sidebar.

Once you add a page, you can give it the Standard Layout or a Custom Layout or Link.
You can choose which one in the top left corner of the box that appears.

Standard Layout: The page will use your blog's main theme. If you just started out on tumblr you most likely have some default theme. You can type normally in this box, like you would when making a text post.
Link: The "page" can go to an external link.
Custom Layout: The page will have whatever theme you put here in code. Every page can have a different theme. It's great and fun.
6. Choose Custom Layout.
Paste your own code if you know how to make one. Or get one that's made already. Some places to find tumblr themes:
magnus themes
theme hunter
vault themes
shudesigns
glenthemes
You will find some instructions on how to use each theme. I do recommend knowing some basic HTML because it's useful.
7. Once you choose a theme you like, copy the theme's code. Usually the instructions will have a link to an external source like pastebin, where the code's text will be stored.
8. Paste the code in your Custom Layout box.
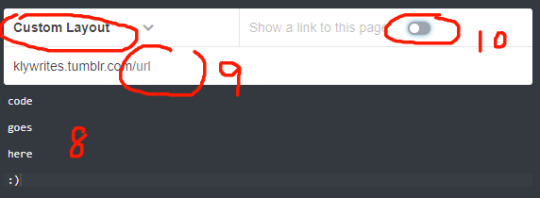

9. Give your page a URL.
10. If you want, you can click the slider to Show a link to this page. If you enable it, a link to the page will appear on your homepage. In this case, give it a title.
Alternatively, you might be using a custom main theme and don't want the link to show up in its default way on your homepage because you would rather play around with the custom code. Or perhaps you want the page to be "secret" (e.g., it's available, but not ready to be shown). Or you might have minor pages and it doesn't really matter to you if people can find it or not. A page could be entirely just for you. In that case, disable Show a link to this page.

You can click Update Preview to see how the page will look. This will show on the right side.

12. When you're done, click Save.
Note 1: The preview isn't always accurate due to spacing constraints so I recommend having your new page open in another tab. (You must save it initially otherwise it won't exist.) So any time you make changes, save your code and see how it looks in another tab.
Edit code > save > open new tab > type in URL of your new page. Any time you make changes, refresh if changes don't show immediately.
Update Preview is good though for minor edits like font colour.
Note 2: If you exit custom theme editing, you will lose prior progress. So remember to save! But sometimes you don't know if you want to keep the changes you made. That's another reason I recommend having your new custom page open in a separate tab. If you exit custom theme, you won't be able to restore previous saves in the event you decide you actually prefer some previous changes. If you keep editing open, you can freely undo (ctrl+z) any changes you made and save when you're happy.
Congratulations you have added a page to your blog and given it a custom theme!
If you're unable to create/save a custom theme and you get the dumb javascript message (“Looks like you’re trying to add some Javascript or invalid html to your page. You’ll need to contact Support if you’d like to use Javascript.”) go here on how to fix that.
54 notes
·
View notes
Text
Pros and cons of Tumblr mobile website
I routinely delete this app cause I be on Tumblr too much and I think it's interesting how the mobile website has just enough good things to warrant using it sometimes, yet is ass enough to keep me from wasting my time online (no offense to my amazing mutuals and stuff I just have hobbies and responsibilities). So I decided to make a post about it
Pros:
Copying prev tags is better than on the app and PC to me tbh. I just like how it looks more and it feels like less work ig
Less ads than on the app!! Mobile adblockers are great [obligatory command to use Firefox]
The dash resets randomly without warning. Normally this would be a con but getting lost in the dash is actually what I don't want to happen so it's a W for me
Sometimes when the dash resets the button to take me back to where I was shows up. It happens more often than when the dash resets on mobile. This is also a pro because of the moments where I'm actually not wasting much time on Tumblr, like if I don't have anything too important coming up
Drafts automatically save because that's a general website function
Cons:
typing out posts is scuffed as fuck. There's this glitch where I'll click on a paragraph to type in it and it automatically starts typing at the bottom of the post instead. very annoying.
No Xkit :(
checking notifications takes a lotttt of extra clicks and reloading the page. I tend to just wait till I'm on PC sometimes cause it's so awkward
The dash resetting is actually really aggravating in situations where I do have enough time to scroll for longer than like... 5 minutes
2 notes
·
View notes
Note
Hey, Pasta! I have a sorta-dumb question, so feel free to ignore it. Soooo, I write fanfic-OC inserts a lot (Daredevil, TFAWS, Shadow and Bone, Daughter of Smoke and Bone), and I used to write the chapters - really more like oneshots - in a Gdoc and webshare it on Twitter because I hate plot and there was no need for any of that fancy fanfic page stuff. However, now that I'm on Tumblr, I have been told that the Gdoc method is insecure and troublesome (true) and that I should, if I may quote my sister, "Just post it in AO3 if you're gonna write so much."
I have the common writer's anxiety, so I've never been comfortable with sharing my work in such a public manner, but I decided that I may just make an AO3 account. But! I wanted the opinion of 1) a seasoned AO3er and 2) a writer I like and admire, so my question for you is: Is AO3 a site that you'd recommend/do you feel like there's a good community over there? Tysm!
This isn't a dumb question at all, and I totally get the anxiety to post in a more public way (and also thank you so much!)!
So I've been on AO3 for about seven years now between my Pasta account and my old account. Before that I was a kid posting my first fics on ffn, I tried LiveJournal at one point, and I've obviously posted on tumblr, so I've tried a faaaairly wide variety of fic sites save for something like wattpad. And I have to say, even with its hiccups, AO3 is hands down my favorite fic site to write on, my favorite site to read on, and - imo - the best fic site out there for posting.
The tagging system is unmatched once you get the hang of it, and it makes it so, so gd easy for readers to find your fic based on whatever niche tropes or tags they might be looking for.
The way you can group fics together in a series is incredibly convenient.
They work hard to protect your fics and fic culture, defending it both from larger corporate entities and from puritans who believe fic shouldn’t exist - your content won’t every be swept away overnight like in the ffn purges of 2007 and 2012.
If your fic is plagiarized, they work fast. It took me less than 2 days to get a response from their team when dealing with the plagiarist last week.
No advertising, so not only are they not bound to rules by said advertisers, but your readers are free to read fic uninterrupted by ads (as always, consider donating if you can since they run on donations and are composed largely of volunteers!).
As the number 1 fic site, people will usually search for fics here first, so if you’re looking for readers or a community, this is the place to go.
As a writer, if you’re worried about troll comments, you can set each fic’s comment section to only registered users (so no guest comments). This weeds out the vast majority of trolls since most don’t want to go to the effort of making an account and waiting to get in. You will still sometimes get people willing to do that, or who’ll still go at you with their actual accounts, but I’ve found far less of an issue on AO3 than elsewhere - you can even set it, in that case, to ‘no comments’ or report the comments to AO3.
In my personal experience, the community is far friendlier on AO3 than on other fic posting sites. Probably 95% of my interactions and the reactions I see in other comment sections are positive, and the 5% is broken down 50/50 between either unintentional rudeness or actual trolls, which is manageable.
A few cons, in the interest of full disclosure, although ultimately I feel these are worth it for such a good site:
The site is mostly staffed by volunteers, and while they do their best, functionality updates can take considerable time. We only recently got a block button (preventing certain users from interacting on your fic), for example, and a mute button (so you no longer see fics from certain users) is still a ways off.
Comments are rare. I know there’s a ton of comments on TRT, and I am incredibly grateful for it and for the way it slides into comments on my other fics, but outside of big fics like that, interaction is a lot lower and it’s just something to know going in (although if you’re going from twitter into a fairly popular ship and/or large fandom, you might get way more interactions than from posting on twitter, so it’s all relative!). This is something I’ve found on most sites, and it’s the exact same way on AO3. Your hits will be highest, followed by kudos, and then comments. Generally speaking on oneshots, a 10% kudos to hits ratio early on (before repeat readers begin to push hits higher, since you can only kudos once but add a hit multiple times) is considered quite good. Lower that further for comments. After a bit, stop tracking the ratio because ultimately it’ll become meaningless, especially for chaptered fics where folks come back to read new chapters.
If you’re writing in google docs and try to copy+paste that into AO3′s form as is, you will learn very quickly that ao3 hates google doc formatting. You’ll get weird spaces where they don’t belong (especially if you use italics), the spacing will get fucked, all sorts of hiccups. I use the method from this tumblr post as a workaround. It’s a few extra steps but it’ll help you loads.
Speaking of: using their form to submit a fic definitely takes some getting used to. It’s a bit clunky I’m told, compared to other sites, but stick with it. My biggest advice here is, after pasting your fic in, do not post it yet. Use the preview function to see just how all the formatting is going to turn out. I’ve often found that it looks fine until I preview, and only then do formatting issues show up, which I can then fix. Again, extra work, but worth it for the pros listed above.
Honestly those are the only cons I can think of, and all of them are generally things you can either work around or adjust to as a writer posting there. They’re also absolutely worth it for such a good site, imo, and it’s the best I’ve found out of all of them. I have zero regrets posting on AO3 instead of another site. And I think you’ll come to love it, too, if you decide to join up!
#ask response#writing#ao3#fic#fanfic#i've also noticed ocs tend to do fairly well on that site compared to others#and even small fandoms have categories so you're able to post for REALLY niche ships and stuff#i absolutely love ao3 and will always prioritize them as my posting main
19 notes
·
View notes
Text
Building on the post I just reblogged because tags got long. I used to hate it here for fandom. I felt bullied. I don't enjoy the super popular things that make the rounds in my primary fandoms, and because in the old days there were no filtering tools except block, I felt like I couldn't get any peace. The popular stuff kept invading my stuff. It made adding tracked tags to my feed impossible - tumblr would chuck the stuff I didn't want to see right on my dash.
In reality, almost nobody was pushing things at me on purpose. But it was so inescapable, it felt targeted. And here's the interesting thing - I used to like this stuff. But when I had some issues with it in canon, and there was no way to interact with my fandom that didn't force me to interact with the stuff I was struggling with, my hurt turned into absolute fucking hatred. I still loathe it with an irrational heat, and I know it's because I remember how fandom made me feel. But fandom wasn't actually (mostly) doing anything to me. It was just being a big noisy fandom, and in years past in other fandoms I'd taken part in that excited chatter. You know what would have helped a ton? Blacklisting tags and terms. But that didn't exist then.
I came from livejournal fandom. Communities were pretty great - they were 100% dedicated spaces to whatever thing you were looking for. Not perfect, but definitely not the disaster area that the average fandom tag is here. I made the mistake of thinking of tag searches here the way I thought of communities on lj, and they are not that. Tags collect whatever is tagged. My first taste of that over ships pales in comparison to what happened when the entire site decided they'd had enough of my crossover fandoms. My ersatz community spaces were suddenly drowning in horrible crap - horrible, horrible crap. I have about 5 saved drafts of rants about that, because every time I see a chin-stroking post wondering why my fandoms suddenly disappeared I feel the need to scream, "did you see the amount of garbage in the tags?" But it wasn't all targeted to attack people using the tag. Some of it was just tumblr having drive-by opinions on current events, as it does, and using the tags because that was literally what their post was about.
I learned a lot about human behavior, specifically humans in group contexts, and I finally started blocking people - sometimes 10-20 accounts a day - to cut down on the noise. I realized that they didn't know who I was, would never know, and if they were saying this out loud, this site was not going to be a place we could find common ground. I have hundreds of accounts blocked from that point in time, but I want to stress that they weren't all actively trying to bully people - they were just gawkers trying to talk about a unique thing happening on the periphery of their universe. And I don't think there needs to be some sort of threshold on how bad a person someone should be before I push the block button. It's not there for me to pass judgment. That conversation didn't need to have me in it, even as a passive witness. It certainly didn't need my voice or my emotional energy.
I'm so glad we have more tools now to filter our experience here - blacklisting tags and terms has lessened the necessity of blocking and allowed me to keep sharing connections with people who are into the stuff I don't like - which is quite like how it used to be with dedicated community spaces elsewhere. But blocking is still a useful tool to cut down on noise and sort out the occasional actual trouble in a fandom tag. Experience has taught me that someone targeting the tag is doing it for attention, and they don't deserve yours. It's also taught me that a significant number of negative, (totally subjective here) bad take or poor taste posts on your tags aren't there to be irritating. Their creator is just kind of careless, using tags and terms without thinking about who will see it, which may feel personal but really isn't. I block those folks, not out of any negative feelings, but just because it's clear we're here for different reasons and we don't need to connect.
Bottom line: your attention and time is valuable. Don't feel bad about using the controls you have to stop giving your time and attention to the things here that make you uncomfortable or angry. If it costs you your peace, it's too damned expensive.
2 notes
·
View notes
Note
Okay so I started writing, HOW DO YOU WRITE?!
I am trying to think of things to write but it is literally impossible to think of things to say. I know what I wanna write, but when it comes to typing it I'm completely lost

ah yes, the eternal question which strikes both reverence and absolute terror in creators far and wide
“where do i begin?”
[everything below this cut was written in a sarcastic 2am frenzy, read at your own risk]
i guess it depends on what you already have: is it a character, a setting, a plot or a dialogue prompt; sometimes you might only have ✨a vibe✨ but none of the formerly mentioned, which is, to put it lightly, the absolute worst in that case i pray upon thee good luck my friend
i mostly start off with a line of dialogue because that’s just what usually comes to me first, everyone’s a little different in that regard though and there’s absolutely no right or wrong answer to what motivates you
from what i have i try to fill in the rest of my blanks, mainly “who could say that?” and “in what context could this line be said?”, often enough i can imagine a scenery and a rough story line around that already; if not, it’s though luck and i procrastinate until the missing puzzle piece just comes to me, forcing it wouldn’t help anyway
it can also really help to bounce your ideas off of someone else; even if they don’t contribute anything new or helpful at all, voicing and describing your thoughts to someone else can help visualise what you’re working with and often enough inspiration strikes you in the process; also every now and then, others do have a sensible thought too jsjsh /lh (to everyone who’s ever had to listen to me ramble about me fics, you’re a god-sent, i love you, mwah mwah <3)
that’s when i usually sit down and prepare to meet my arch nemesis: the first sentence
my tip: just rip the band-aid off; you have to start somewhere and contemplating the first five words for hours on end does absolutely nothing but hold you back and you can come back and edit it later anyway (i almost never actually do that bc spoiler alert: the first sentence won’t make or break your fic; a “bad” first sentence won’t make it unreadable but a neat one also can’t save what is unsavable)
then i proceed to word vomit onto the page, have a couple mental breakdowns every now and then, finish about 95% and procrastinate the ending again (same tip as before: just get it over with, not writing it is not finishing your fic either; also, believe it or not, the end is changeable as well)
i continue by promising myself i will go over and rewrite the abomination again, then i throw it at my best friend so she can tell me that a) i’m in fact not delusional and people won’t think i’m completely weird for writing that and b) yes, i have in fact used the language known to most as “english”; although, deep down, i know i mainly do it so i can further procrastinate actually posting my fic and opening myself to potential criticism from people i do not know
if i’m feeling particularly motivated, i might actually start formatting my tumblr post, putting in the tags and writing the head of the fic (summary, pairing, warnings, author’s note etc)
i receive feedback from my friend, reread my fic a bajillion times just to miss a bunch of typos and grammatical errors, proceed to break my promise and not change my fic at all, paste it into tumblr, and hover over the post button for a disgustingly long time
once i’ve actually decided to press the damn thing, i immediately close tumblr and bring a safe distance between me and the app
now all that’s left to do is wait for validation from strangers on the internet in form of tags, comments or asks
those were a lot of very sarcastic words to basically say that you should just get started and not worry about it too much; every fic is different and sometimes the words seemingly don’t stop flowing and other times it feels like you’ve never seen a word before in your life; you can also flip-flop between these two stages within the same fic
at the end of the day, we write because we like torturing ourselves visualising our ideas on a page so we can share them with others; art is hard so this is the next best medium to share the headcanons and the brain worms and the rants and the incoherentscreaming the voice in your head does when you see your favourite character
we’re no professionals, we’re just silly little people on our silly little blogs sharing our silly little stories with other silly little people on their silly little blogs who in turn share their silly little stories with us
this is my guide to how i write 90% of my stories; why only 90% you ask? because every now and then a monster comes by, takes up all your brain space, ends up being 11k+ words and you just know you would’ve gone absolutely mental writing it without some form of planning before hand
if you don’t write anything like that, the dumpster fire above might help (mainly the beginning because it just got weirder and weirder with every added paragraph)
to close this off, i’ll leave you with some wise words
roses are red,
violets are blue,
don’t ask me for advice,
i ain’t got a clue
this is your sign to never let me write a writing guide, ever
#coffee & tea break#letter from: the lovely yourloc lgh0st ✿#it started off good#and turned weird really quickly#blame it on anything but me#i do hope this somehow helps#and if you didn’t think i was a complete and utter idiot before#how’s your perception of me now?#if you came here looking for actual advice#i’m sorry#i might sit down and write a more serious guide if people are interested#i’m trying to demystify the process of writing with some sarcasm#it’s really not that scary
4 notes
·
View notes
Note
40, 41, 42, 44
40) Describe how you usually masturbate
Usually tucked up in bed, covers up to below my balls, underwear on. I normally start by going on Grindr, I like to talk dirty with people and maybe swap pictures but not any more than that, so I don't normally get much luck there. Then I move to Tumblr and go through all my regular blogs (I don't tend to follow porn accounts because this is just an alt and I want to keep my main dash sfw). Sometimes I'll also go on Reddit; I suppose the advantage to it is that you can pick a sub for what you want to see in that moment, like r/gayfacials or whatever, whereas on Tumblr it's the luck of the draw of what other people have found to post/reblog, but I think I prefer Tumblr, it's more personal and I like when you catch someone's attention by mass reblogging all their stuff and a conversation gets going. Occasionally I'll then go to pornhub or xhamster but more often than not, once I've really gotten going, I use my imagination more than any material. As for how I actually wank, besides the usual, I also like playing with my nipples, pulling back on my foreskin and balls, and sort of wiping my thumb all round the tip of my dick and inside my foreskin and then sniffing it. I just really like the smell of dick and one of the clues that I might be gay for me was realising that most guys don't do that lmao
41) What nearby non sex-toy object would you masturbate with and how?
I've never really been into toys or using stuff but I guess sometimes I do hump my pillow or grind my dick against my mattress (I sleep on my front, so when I get morning wood it's automatically being pressed between me and the mattress and it feels really good)
42) I've definitely had sex dreams more recently than this but I don't remember those too well, whereas this one stuck in my head for obvious reasons. I was at a urinal taking a piss while this (straight) guy I had a crush on irl was standing facing me (the urinal was like, in the centre of a room, not up against the wall?) while we had a chat and then by the end of it I was like hey it's been kinda awkward that I've just had my cock out in front of you this entire time, let's even this out. So he got undressed and there was a moment where we were both standing in front of each other naked like what do we do now? I guess we fuck, that's what naked guys do together right? So then suddenly we were in bed fumbling about with each other but after a couple minutes of him fucking me he decided he couldn't keep it up any longer because he wasn't interested in men and didn't want to have gay sex if he was going to be bad at it, so he just got up and left?? At which point I woke up and was like.....why even in my dreams do I get dumped.......
44) Describe your orgasms
While they feel weaker when I'm just trying to knock a quick one out, normally I like to edge for a while and ramp up in terms of stimulus until my balls feel properly tight and my cock feels turgid and heavy and like that needing to bust sensation is unbearable, and then even when it doesn't look like that much, it feels really powerful. I don't really cum that much, probably because I wank so often lol, and usually it's only the first two pumps that get any airtime and the rest ooze out and drip off my dick onto my belly and pubes. My cum doesn't normally go that far, about up to my belly button or just below usually, but sometimes a stray bit will get higher up my chest; anything last my tits is very unusual, but I can count three times in my life I shot past my head onto the walls or pillow behind me, but in those instances I'd saved up for a while and then edged for hours until it wasn't even fun anymore, it just hurt, so I don't really want to do it again.
1 note
·
View note
Text


So, after my little post where I chastised myself for not queueing properly, somebody asked me how I use the queue effectively, I realised that this is a question, which I am getting asked quite regularly. So I decided to make this little post explaining why I use my queue the way I do in the first place and also how I do it so that others might be able to do this. Apparently, not everybody knows how to use the queue. That's nothing to be ashamed of or find dumb. I needed to figure this out too first.
Why am I using the queue the way I do?
My queue runs on two principles. Usually, I try to queue one reply for each day. I also normally try to make sure it posts at the same hour, so there is consistency. In my case, that is 10 AM my time. Sometimes, like with asks or when I have a new thread partner or just a thread, which really exits me, I use the queue in its old-fashioned way. Ergo I have selected a period, in which my queue runs, and thus have those replies or asks to pop out faster.
Using the queue like this allows me, theoretically, to handle a larger amount of replies. Unfortunately, I am not always as skilled at staying on top of my replies as I like to be, though I reckon that is a problem every roleplayer has once every while. I just have the problem that I often overestimate how much I can handle. I still need to work on this and be less tempted to start new threads every few weeks.
However, even so, the queue takes a lot of stress not just away from me but also from my roleplaying partner as they are not getting bombarded by replies in short succession. It spaces things out and allows us to figure out what to write and how to write it.
How am I using the queue effectively?
On Tumblr, there are actually two ways to use the queue. Depending on my mood and impatience, I use either. For both methods, you need the button, which includes Save as Draft, Post, Put in Queue and something like Publish On/At. (Reminder, I use German Tumblr, so I am translating here.) I am going to explain the more common way first.
The common way is to literally put things in the queue. That is the second option after post btw. If you click on your queue, you are going to notice that on top of it, it has settings, which you can adjust. These settings are the timezone in which you are in (keep an eye on that one; it's gonna be important later), how many times your queue posts (up to 50) and the hours between which that queue runs. Adjust those settings to your heart's content, but make sure your timezone is accurate. We will need that for my main method of queueing.
If you hit Publish On (or however the last option after Post is called), you will be faced with two things: The date and your current hour. Next to the date, you can find a little calendar symbol. Click on that. It will allow you access to a calendar. There you can choose any date you want for that post to be published. Provided it is not in the past obviously. Then if you are like me, you can choose the specific hour, you want that post to be published. Once everything is satisfactory, you hit Publish On and the post enters your queue and shows you the date and hour it will be published. If you do that multiple times, it will arrange itself in chronological order.
That is how I queue my posts. It may be a few extra clicks, but in my opinion, it is worth the effort. I hope I managed to explain this well enough, so you two can use the queue like me.
Yours sincerely,
Miss T.
1 note
·
View note
Text
some tips for writing blogs, especially those who are just starting out. these are some things that works for me and may or may not work for others.
how to add a read more link on mobile
type :readmore: on a free space, then hit the enter or return button
personally i think they’re very helpful because it lessens the space you take up in your dash, and might encourage more people to rb
+ you can also add this on a spot where it gives a sort of cliffhanger, essentially making people want to ‘read more’
headers, banners, and dividers
though not necessary, it’s good to have a title for your work. make sure it’s bold and doesn’t blend in with your notes (aka pairing, warnings, etc.). this also helps when someone wants to look up one of your works in your search bar
i don’t really make banners or covers for my works. but some good apps that i know of would be picsart and canva. if you’re looking for ideas, i definitely recommend going into canva
wondering how to make those really small, thin dividers? you can make them using picsart! to make a divider hit tools > free crop > brush > size (adjust it to your preference > then draw a line along the edge of your photo > save
using the divider you just saved, go back to picsart and edit it again > draw option > hit rainbow square at the bottom left corner > hit suction/droplet symbol right below the check mark > color in the white spots bc for some reason picsart glitches and makes dividers look white-ish
new blog? just opened an account?
this is gonna sound really frustrating. but... tumblr needs to check if you’re a bot or not. what does this mean? it’s likely that your first few posts won’t show up on the search bar. you may not even get to edit your header/pfp yet ://
this happened to me and there was no visibility on my account at ALL. what helped me get ‘verified’ is that i followed a LOT of accounts, liked a bunch of posts, made some posts here and there. now that lets tumblr know you’re not a bot
visibility
the tumblr tagging system usually only allows the first 5 tags in your post to show up. so, what can do you about this? only use FIVE or less tags in your post. wait about 15 minutes or more until you can add some more tags in your post, and they usually all show up like that
another important thing about using tags is not to generalize! especially if you’re using a popular tag. but also don’t specify it too much where barely anyone looks it up. for example, if you’re writing a gn piece about oikawa, i recommend you use the tags such as: oikawa x reader, haikyuu x reader, oikawa x gn!reader, haikyuu headcanons, etc
a good rule of thumb is to use character x reader tags first, then leave the full name or fandom tag last
FOR NSFW: tumblr doesn’t let any tags with nsfw show up. so, give your nsfw works another tag. maybe #namegetspicy idk, you figure it out
FOR WARNINGS: especially if you’re a dark content creator, i highly encourage you to add tw:xyz tags. if you already have a warning note at the top then that’s great. but even better for readers who prefer to actually block these tags that way they never get to see it
another important thing to note is that people have different timezones. it helps if you rb your work at a different time of the day, in case people missed it! (icymi) i’ve noticed that reblogging helps to make your post show up in the tags
interaction + feedback
first and foremost, you are not obligated to write for your followers, and neither are your followers obligated to interact with you. remember that everyone has their own individual lives, and they have their own things to do— so do you, too.
make friends! become mutuals with other writers, visit their ask box. i know it can be daunting having to initiate these things, but you might just turn out to have fun! you can’t expect people to interact with you if you’re not interacting (back). it’s... kind of a two way thing yk? no need to be afraid to interact with other writers. oh, and rb other writers works!
pspsps join tag games or do ask games. it’s fun and very interactive
it never hurts to ask for feedback. i usually do this in a more subtle way because i don’t really expect a full on analysis on my works. maybe a little, is this okay? or feedback appreciated. sometimes it takes a little bit of coaxing for the silent readers
formatting your posts and blog
i generally put in the title at the top in big, bold letters
then comes the header/divider. helps to make the post more... visually appealing ig?
it’s important to add warnings (if any) and the pairing. the audience is not all female, and it might be a little frustrating for male readers having to find out its an x fem reader piece like halfway through your fic
if you have multiple works posted, it’s really really helpful to have a navigation page!
you can organize the posts you make with tags! for example, if you’re shitposting, you can use a specific tag for that. if you have a nsfw related post (ESPECIALLY when your blog is open to the general audience) please make a tag for it
themes + colors
if you have a color in mind but don’t know which direction to go from there, i recommend looking up color + aesthetic
looking to use the same color? download a name color app that’ll give you a hex code for any color you want to use. then, you can type in that hex code for when you’re choosing a color for your tumblr bio
wondering how to make your header image small like mine? just choose a photo for your header and turn off the stretch image option
want to use a different text color that tumblr doesn’t offer? it’s not as complicated as you think. you’ll have to go on a desktop to do this and do some html (but trust me, it’s not very difficult). look up “HTML noob but trying my best - how to use colored text on desktop”
^^ i don’t have the link for the color text tutorial so you can try looking it up
how to make an aesthetic navi and masterlist
step 1: decide a theme! if you’re stuck, think about a character + color/season/mood or look up “[insert] aesthetic” to find some inspiration. or you can try looking at other blogs too
step 2: find a color scheme! it’s easier if you choose fewer colors. if you want to use the same color for both divider and text, download a color name app in order to get the hex code of that color.
step 3: add categories to your navi! most navigation pages include a link to masterlist, about/byi, and rules. your navi should have a title that indicates that it’s... a navigation page. you can add thin colored dividers with the same color to make it easier for followers to navigate
step 4: you can choose to create a ‘cover’ or a picture for your navigation and masterlist! again, i recommend you use the canva app as a starting point
extra: search up emoticon symbols to spice up your titles!
reminder for you as a writer
you’re not obligated to do any of these things. i’ve noticed that we tend to build pressure on ourselves when it comes to content and interaction. remember, this !! is !! for !! fun !! when you realize that it’s no longer fun, then know that it’s time to take a break. and there’s nothing wrong with a bit of self care.
^^ c/p from this post lol
at the end of the day, follower count and interaction doesn’t define you. again for the love of beings, you’re here on your own accord.
will be adding more if needed/asked.
1K notes
·
View notes
Photo

Requested by @tennant!
For this tutorial you will need:
Some basic gif-making knowledge (see my last tutorial!)
I’ll be using CC 2017 to do this, but as long as you have the timeline option, this will work for you! 🥰
So, in a sort of part two to my other gif tutorial, (https://luke-patterson.tumblr.com/post/636980573506813952/) this is a slightly more advanced part of gif-making. But I promise it’s easy when you know how!
Assuming you followed the last one, you’ll already know how to make your gifs into a smart object, so we’ll start there!
PART ONE: BLENDING
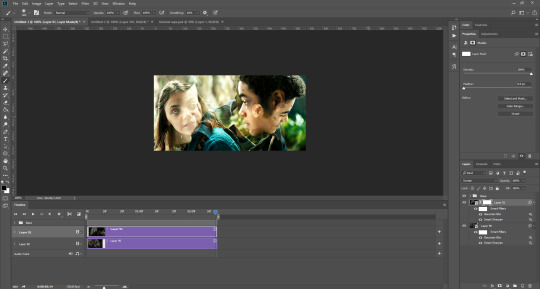
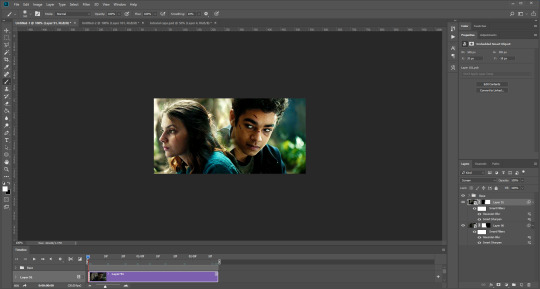
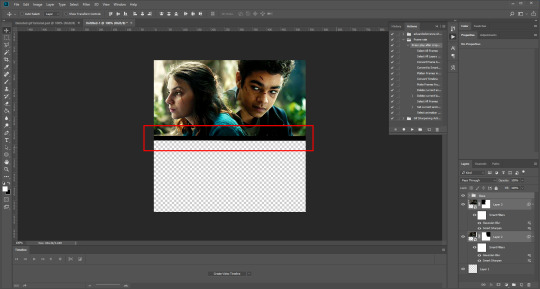
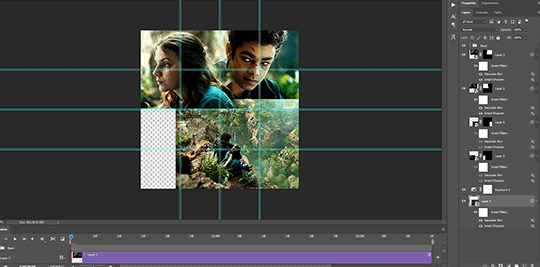
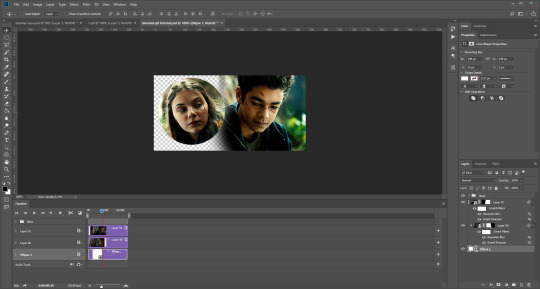
Drag both of your gifs into the same file. For this to work, your gifs have to be the same number of frames, or at least cropped to the same length in the timeline window, otherwise one will loop before the other, and it will mess up the loop of the gif. (For when we get to the multiple gif part, I recommend having between 60-80 frames, so it stays under tumblr’s 10 MB limit.) As this tutorial uses smart layers, they can both be sharpened as well.
(I made this gif 540 px by 268 px, because I’m going to add more to it later. But we’ll cover that further down in part two!)
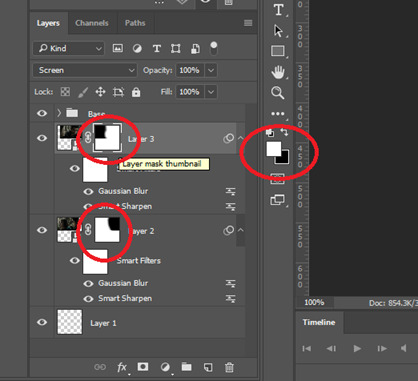
Honestly, I find it so much easier to put my colouring on top of both/all the gifs, and then clip individual layers down onto a specific gif, if that one needs more of its own colouring. That way, the extra layers don’t interfere with the other gif(s). It’s so much less confusing visually for me than having lots of groups with their own colourings, and it makes moving the gifs around simpler.

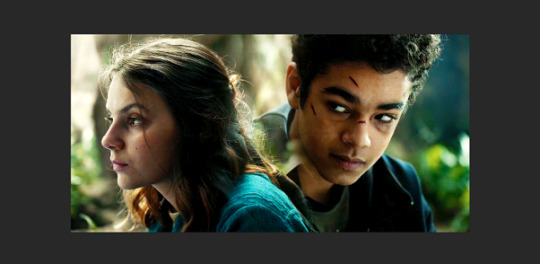
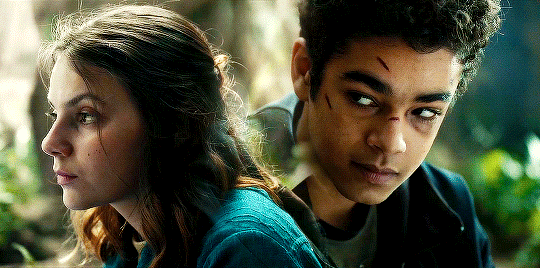
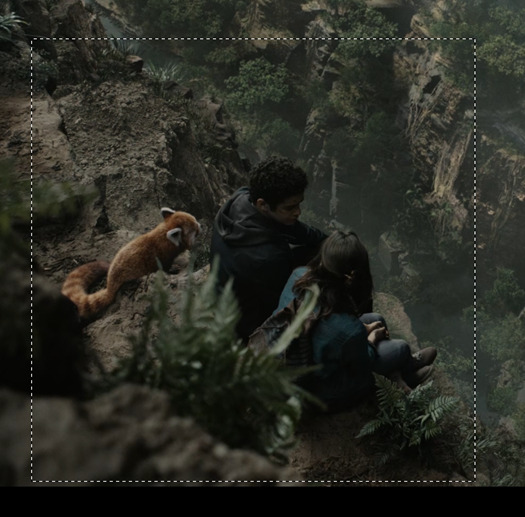
Position them side by side, one on top of the other. Obviously, you can play around with the positioning: this may be easier to do once they are blended, especially as some gifs may be smaller and you need to try them in different places. For example, this is a screenshot of a Lyra/Will set I made in the past, with three blended gifs of different sizes:
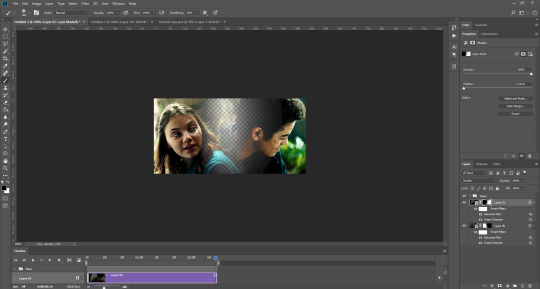
Add a layer mask to both of your gifs. You might not need to edit both, but I usually do, as I like to balance how much one gif blends into another! Using the brush tool (set to black, when you’ve clicked on the layer mask), we want the brush to be very big, and very soft.
The bigger the brush, the more seamless the blending will be! By painting parts of the top gif away, the other gif will start to appear underneath. It’s not always necessary, but I usually like to set my top gif to ‘screen’ as well. This helps the gifs merge into one another even more, especially if you have one gif which is darker than the other!
As you can see, by setting it to screen, the top gif has already started to look blended. Then, you can start to paint. As the brush is so big, you might end up painting away too much of the gifs, like so:
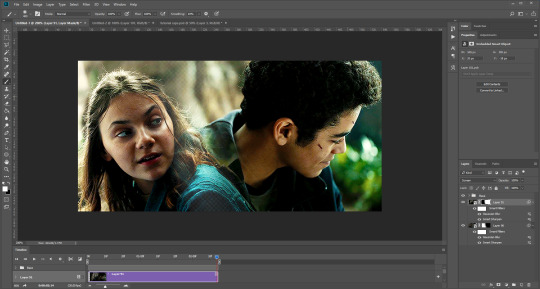
I usually go back and forth, switching between black to remove parts of the gif, and white to add it back (always painting on the layer masks). Sometimes, you might need to make the brush slightly smaller, just to fill in tiny gaps.
Another thing you can do is to add a solid black colour underneath all your gifs, just to fill in any spaces. (Sometimes, I do this on top of gifs too, to create spaces where I want blended gifs to go, like in my current header!):


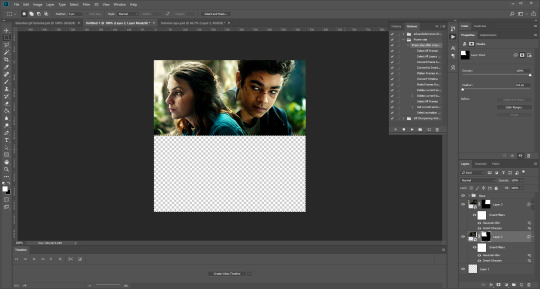
Anyway, back to the original gif. My blended gif is now pretty much how I want it to be, except Lyra is quite far to the left, and Will is taking up a lot of the screen:
So I’m going to see how they look at the start of the gif, to determine how far right I need to move them both to get them mostly in the middle:

And that’s it! Now you can export them [file > export > save for web (legacy)] and you’ll have to change the timing back to 0.05, or use the action I introduced to do this in my last tutorial.
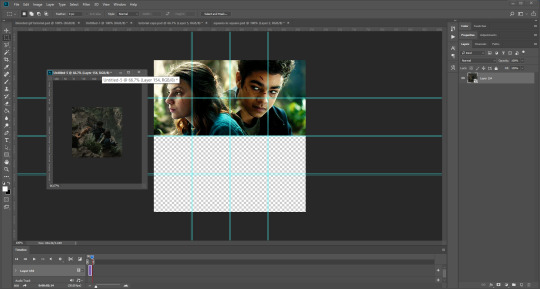
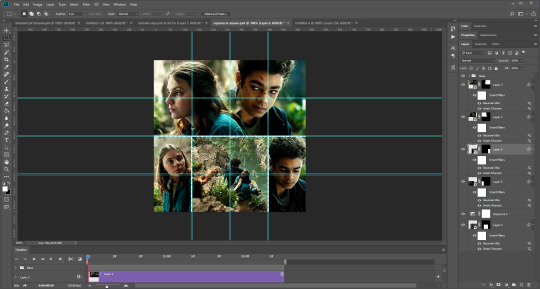
PART TWO: MULTIPLE GIFS
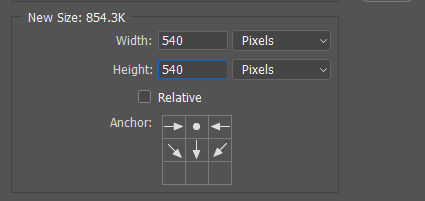
To put more gifs underneath this one I’ve made, I expanded my canvas. Go to image > canvas size. Make sure you click the little ball to the top in the anchor section, so the canvas expands underneath your gif. If you leave it in the centre, it will simply expand from the middle, or the left, right, etc.
Next, we need to remove the black line at the bottom of the gif.
You want to select the space for cropping using the rectangular marquee tool, so in this case, 540 px by 268 px. The tumblr spacing is 4px between each gif in a set, so however many gifs you want, you have to account for 4px less pixels inside your one gif, to give the illusion there are multiple (unless you want them to touch).
For example, (there’s a little maths here: forgive me!) two gifs of equal size, placed side by side, must be 268px in width or length, because (268 x 2) + 4 = 540. (There is one 4px gap in between). For four gifs, it would be (132 x 4) + 12 = 540. (For the three, 4px gaps). For three gifs of equal size, it’s a bit different. These must be 177px, 178px, and 177px, to ensure there is 8px of space left over (two gaps).

Then, make sure the colour white is the primary colour selected on the paint pad (this is vital) and (in this case), the layer mask from before when we blended, is selected. Press ctrl (command on mac), shift, and i to invert your highlighted area (or select > inverse) and then simply delete the excess line, (either using the delete button on windows, or fn + delete on mac, I think!) Then, do this again for the other gif.
And voilà! It’s gone. You can also paint it out (using the black colour as the primary colour to erase), but I would still recommend highlighting the outline of the area you want to erase, using the marquee tool, so that you can paint it out in a straight line, and don’t paint into your gif and erase parts of that by accident.

Now to add in the other gifs! To do this, I use guides, but you can also use lines at a size of 4px, to map out the spaces in between gifs. If you go with lines, just make sure you delete the shapes after. With guides, they are not actually ‘in’ your gif, so you don’t have to remove them before you save. However, guides only work for straight lines, so gifs with other shapes will need to be made using lines, (but I will touch on that at the end!)
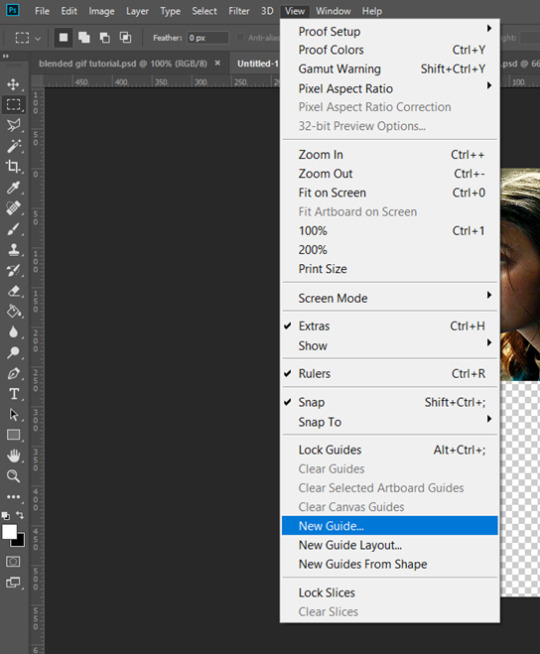
I actually have a few psds saved with guides already on, so that I don’t have to draw them out every time. If I was making a set with three gifs in a row, this would be different, but I usually stick to two or four (or three with one big square/rectangle, and two little squares), so this is my most used psd. The guides are set at: 132 px & 136 px, 268 px & 272 px, and 404 px & 408 px, both horizontally and vertically!
I have a red colour underneath just because I find it easier to see the lines between gifs this way - if you do the same, just remember to turn it off before you save your gif, otherwise it will have the colour red instead of mimicking the transparency between gifs.
Now, make a second gif! I decided to have a square in the middle as you can see in the title, and then two rectangles either side.
Then you want to resize it, in this case to 268 px by 268 px, and drag it across into your main file, or go to layer > duplicate layer, and move it that way. Don’t worry, when you move it, it will show the whole gif as if you haven’t cropped it. The reason I crop and resize it beforehand, is so that I can ensure it will be the correct size when I remove the excess parts of the gifs I don’t want, (rather than making it 268px including the black line for example, which would be wrong.)
Then, as before, position the gif where you want it to go, and highlight the area you want to be in the gif. Whilst this is selected, (again ensure white is the primary colour on your paint pad), click the layer mask:
Then the excess around the gif should be gone! (Making a gif of a gif tutorial... meta, lmao.) This way, if you decide you want to change the shape of the gif, or move it slightly, you can just paint parts in and out, or delete the layer mask, move the gif, and reapply it!
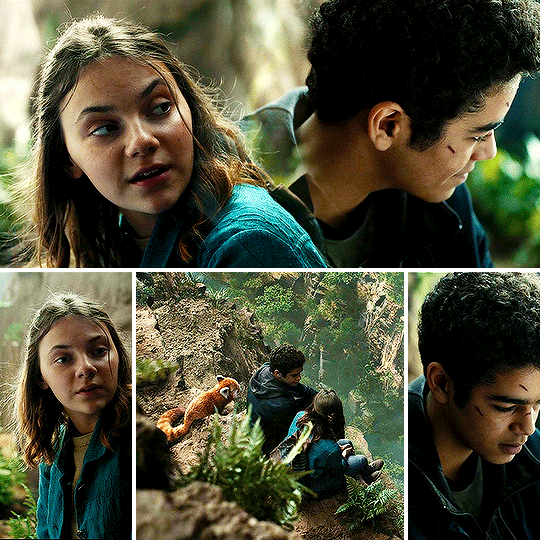
You can then sharpen and adjust your colouring to the gif as needed! Next, go ahead and repeat this process for your other gifs. Selecting the area, adding a mask, and sharpening. By the end, you should have something that looks like this:
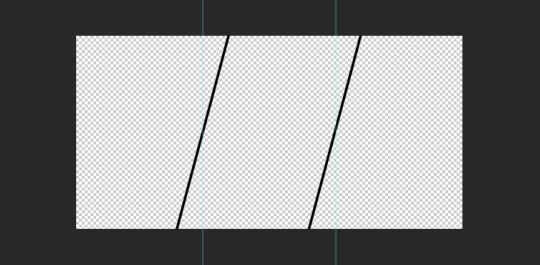
PART THREE: OTHER SHAPES
If you want to use other shapes (which I haven’t tried myself until now, but I can talk you through some thoughts!) You can use the line tool. So, for example you could make a layer with the lines at 4px, merge it, and then at the end delete it from your gif to leave the gaps transparent:
To make a gif any shape you want, choose a shape (either use the shape tool, or get a png of it), and using a clipping mask. Make sure your gif is above the shape layer, then right-click the gif layer, and select create clipping mask to clip it down:
OR you could use a circle, and then delete the circle to make it look transparent:
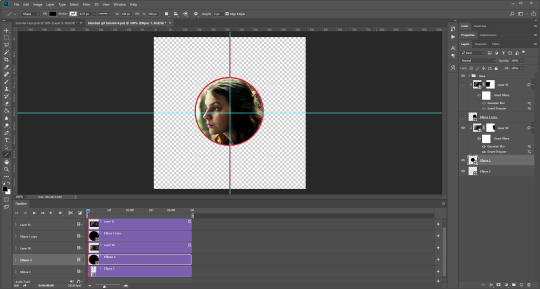
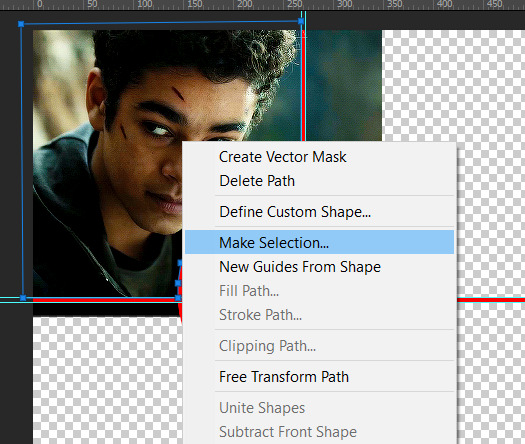
The best way to select items which are not rectangular, (so you can’t use the marquee tool), is to use the pen tool. Click around your gif so that it’s got a border of what you want selected. Once you have outlined your gif, right-click and choose make selection:
Then set the feather radius to 0, and then the area you want should be highlighted in the same way as with the marquee tool above, so you can add a layer mask, etc. However, as the pen tool is not always that accurate, there is a little white gap here where it’s not a perfect circle.
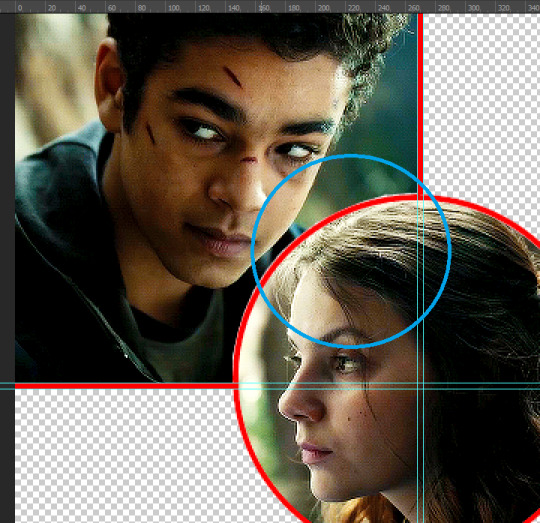
A way to overcome this could be to make all the gifs you want, and then simply add one on top with a white 4px border, so it gives the illusion of being transparent! (As I have done above, but save it as white rather than red!)
If I find a better way to do this in the future, I will update this tutorial. I hope this is helpful, and thank you for reading 🥰💖
#gif tutorial#tutorial*#completeresources#yeahps#chaoticresources#allresources#mikesmom#usertom#usersmile#heavensentnetwork#if there's any mistakes pls let me know#i am so tired rn fjghfjhgfjgh
703 notes
·
View notes
Text
I rewrite Sky High
okay so, disclaimer: sky high was actually pretty damn good for it’s time and a lot of the plot twists/tropes used in it were still just starting out and not as commonplace as they are today. so 10/10 really good movie.
Also as i was writing this, it turned into half analysis of what’s already in the movie and half things I would change about the movie so,,, yeah. enjoy!
***
So the point about Sky High is that and the way the school and hero society as a whole works, is that you, as the audience, are supposed to look at it and know that it’s a flawed system. We’re supposed to see it as an injustice that kids are sorted into hero or sidekick- Sorry, I mean ‘Hero Support,’ on your first day of school based on something you can’t even control.
(This movie was my hero academia-ing it up before it was cool.)
Anyway, the movie calls a lot of attention to it in the beginning, but then doesn't actually give it the resolution it deserves in the end. Which, not cool guys.
The Hero/Sidekick debacle is, on the whole, a very thinly veiled metaphor for the problems minorities face. Specifically, those of the alphabet mafia, or LGBTQ, as we’re more commonly known.
There are a lot of examples for this so I’ll speed through the big ones real quick:
Will’s nerves regarding not having attraction to girls superpowers?
The way he tries to fake having an attraction to girls superpowers to get approval from his dad?
Being literally outed in front of his whole class (by someone named Boomer no less) and then immediately trying to hide it from his parents as long as possible?
The constant references to being a ‘late bloomer’. Doesn’t it remind you of the common phrases: ‘it’s just a phase’ or ‘don’t worry. You’ll start liking [opposite gender] eventually.’ ?
The scene in the kitchen, right after Will introduces the Sidekick Squad (and yes, that is what I’ll be referring to them as for the rest of this essay tumblr post). Will is so obviously trying to gauge how his dad is going to take his friends being sidekicks and also him being a sidekick. I just, this is so blatantly a coming out scene? How does anybody not see it as that?
(also the dad talking so offhandedly about bigotry and the hatred his own father had for sidekicks??? Who else has been there?)
Will telling his dad that he doesn’t care, that he’s proud of being gay to be a sidekick is just,,, *chef’s kiss*
With all of this backing behind Will and him growing into not being ashamed of his lack of powers, My first change would be that Will does not, in fact receive his father’s super strength. It’s just such a cop out! The movie had all this amazing build up, and this brilliant metaphor it could have used and, instead, they threw it all away.
The sudden acquisition of powers and immediate acceptance by his peers, feels too close to someone being ‘fixed’. That Will wasn’t good enough the way he was and had to be better, had to be his father in order to be good enough.
So, no. Will remains powerless.
Instead of the revelation of ‘he’s strong’, we get to let the Sidekick Squad shine.
Lash and Speed still cause a fight between Warren and Will, but when Will is under the table, the sidekicks actually do something.
Will knocks the table over (not, like, lifting Warren up but something closer to pushing him off. I mean, even I could push upwards from underneath a table fast enough that if someone is standing on it, they’d lose their balance and fall to the ground) and that starts things.
The Sidekick Squad all grab forgotten lunch trays or cartons of milk or something and throw it at Warren. It isn’t long then that the whole scene devolves into a food fight (Zach, at least, does not have good aim and probably hits a bystander accidentally, drawing more people in, until the whole cafeteria is involved.) The fight turns into something more playful, but still with that bit of an undertone of trying to actually hurt each other.
Ethan melts at one point and (accidentally) causes Warren to slip and land on his back, Magenta probably punches someone (not Warren) and Zach is just mouthing off to anybody who gets close enough. Near the end, right before Principal Powers shows up, Layla finally gets the right idea and just fire extinguishes the shit out of Warren.
(Side note here: I am very much also nixing the Layla crushes on Will plotline. I love best friends to lovers just as much as the next person but… no. Let kids see boy/girl friendships!
Instead, I will be inserting a Layla/Warren love story and you can consider this the first scene on the road for that.)
Anyway, the whole Sidekick Squad plus Warren ends up in the detention room and all of them are covered in food. Right after Principal Powers leaves, the Sidekick Squad is immediately talking excitedly to each other about how cool they just were and what they did. Basically it’s very wholesome and they’re all hyping each other up and then one of them, Layla or Will, excitedly turns to Warren and goes, ‘and that thing you did with the fireballs? God! I don’t think Lash is going to have any eyebrows for a month’ and the tension between them all but drops.
Warren, of course, tries to push them away and not get involved with their ridiculousness, but the Sidekick Squad is stubborn and by the end of detention, everyone but Warren is in agreement that he’s a part of the Squad now. They will not leave him alone. They also start hanging out at the Paper Lantern all the time just to annoy/make fun of him in that loving way friends do.
(I just want Warren to be a part of the Squad guys. Will calls him his best friend at the end but what did the movie actually do to show they were friends? Nothing, that’s what. I want that fixed.)
So the cafeteria fight boosts the whole Squad’s reputation, right? People think those sidekicks are pretty cool, and they get their fifteen minutes of fame. Only… Will gets a little hooked on the feeling of being popular. He doesn’t want to be a capital-h Hero or anything! But, well… he’d be lying if he didn’t like people thinking he was cool.
The others don’t really care all that much about being cool, but Will does. He hates that he does but what is he supposed to do? He can’t change how he feels. So he starts trying to make himself more popular and sometimes tries dragging his friends into stupid schemes.
And then enter stage right, one Gwen Grayson.
I prefer Gwen being Royal Pain’s daughter, actually. A girl who would’ve had no stock in this fight but her mother, who is sickly and weak and survives mostly because her daughter takes care of her, practically brainwashes Gwen to do her bidding.
Gwen is a minion here, and also, perhaps, a victim.
At first, she follows her mom’s orders and charms Will into dating her. She also feeds into his desire to gain popularity but can’t, in this world, break him from his friends. Actually, Will brings Gwen along to the Sidekick Squad hangouts and, slowly, she becomes a part of the group too.
She starts to doubt her mother. Starts to care for Will and the Squad.
She throws the party, and the Squad is all invited (trying to break them up isn’t conducive to the Plan her mother has anyway and wouldn’t work besides) but she lures Will away to make out and… other things, and he brings her to the Sanctum for privacy just like before. She still steals the pacifier (or whatever death ray equivalent you want idk) but she and Will don’t break up at the end of the night.
It’s not actually until two days later, right before the dance is going to start, does Gwen decide she can’t stand back and let this happen anymore. She spills the whole plot and her betrayal to Will when he comes to pick her up for the dance. She’s crying and apologizing and basically expecting to be hated forever by the only people she thinks ever actually liked her.
And, well. Will is furious at her for lying but there’s more important things to deal with at the moment. They’ll talk more about this and he’ll be angry, but that’s all going to be later. Right now they have a school to save so he grabs her hand and starts running to warn the rest of their friends.
Things happen mostly as canon from that point with minor changes.
It’s Warren who pulls Layla into a kiss before they all split off into groups, telling her to kick ass and stay safe before sprinting off after Speed. There have been scenes throughout the movie where the two are very obviously getting closer and are into each other. And then, before the dance, while Gwen and Will we’re technically going as a couple, the whole Squad was going as a group.
When Warren and Layla saw each other all dolled up, it’s very cliché. Warren says she looks nice and Layla visibly gulps at his outfit of a button down and suit pants, sleeves rolled up to his elbows (because homeboy does not wear a full tux you can fight me on this).
And also, Will doesn’t fight Royal Pain by himself. Instead, Gwen is there with him and they don’t fight with super strength. Gwen’s been helping Will build an arsenal of gadgets a la Batman and the two face off against her mom together, Gwen with her powers, and Will acting as half support and half as a watered-down Batman who still needs some more training before he’s totally polished.
The school falls from the sky, but Gwen buys them time by keeping the anti gravs working through sheer force of will, while Will holds off her mom from attacking her while she’s vulnerable and concentrating. Magenta eventually kills the EMP or whatever it was, and the day is saved.
Gwen passes out, cause ~drama~ but she ends up okay so don’t worry. She’s just exhausted.
The sidekicks get their recognition and then immediately bounce because dances suck and they all agree that they should go to the Paper Lantern instead to celebrate cause they’re tired, alright? Saving the day is hard.
So it’s all of them, a little battered and bruised and exhausted, crowded into this corner booth and laughing and being kids. The camera does it’s fade to comic book page thing, and the narration is something more along the lines of:
“Royal Pain and her cronies got locked away. Gwen and I talked things out, and she’s getting help for all the stuff her mom did to her. We’re taking things slow in the meantime.
The school is undergoing a lot of changes to the curriculum and getting rid of the whole ‘hero/sidekick’ divisions. (Mostly at the urging of my parents… and Layla). Next year is going to look a lot different, I think.
But it’ll be a good different, just like we are. None of us were what we were expected to be, and, I think, we’re going to keep defying expectations. There’s a whole world out there that needs changing.
And I can’t think of a better group of friends to do it with.”
THE END
(just give me found family saves the day by being themselves rather than somebody else, give me them saving the day because they care about each other, give me them fighting for what’s right and fixing things. please i am b e g g i n g.)
***
Additional nitpicks that are small but Very Important to Me
Coach Boomer is still called coach Boomer because there is no way I am missing out on the ‘okay, boomer’ jokes
Layla stays like Layla, but i’d like for the movie to stop trying to make her seem annoying for her beliefs or like she’s wrong to be so vocal about them. Her caring about things that are wrong ends up as the butt of too many jokes and i… do not like that.
Why so many dad/son scenes? Why this janky imbalance parenting dynamic between the Strongholds. Knock that shit off. I want happy functional family thank you very much
Mr Boy and the mad scientist are very obviously in a relationship
Wait, actually: mr boy, mad scientist and Boomer are al in a poly relationship and are ridiculous about it
I’d like to see more of the sidekick classes going over like, ‘the boring’ parts of the job, and teaching the kids how to deal with the aftermath of the heroes heroics, just to hammer in the fact that the system is fucked up and that it’s messed up that the heroes get all the recognition while the sidekicks are left to clean up the mess
Use actual 14 year old actors? These kids look like seniors.
Or, if you want more ‘mature’ characters make it so sky high is like,,, a finishing school or smth. Something kids 16 and over go to.
(What the fuck kind of parent thinks that their freshman child dating a senior is a good idea?? An almost adult coming onto a fourteen year old??? Are you trying to make Will’s parents (particularly the dad) seem like irresponsible assholes??)
Gwen is, at most, a year above Will in this rewrite, kay?
249 notes
·
View notes
Note
So I know this happened a while ago but I really want to know. So do you remember snowtown inn the shorby short story? Well I have always wondered what was going through grillbys mind while shore was lost and when they found her.
HI sorry this took a bit, I got hit with that post vaccine fever and it completely knocked me on my butt for a few days. For those who haven’t read it, on my ao3 there’s a short called Snowstorm Inn that you can check out. I would link it here but tumblr has deemed all links Evil and Rude
Short answer: Panic
Long answer:
Grillby doesn’t doubt your abilities. Truly, he doesn’t. However, whether through some cruel joke of the universe or sheer bad luck, accidents are unfortunate, but rather common occurrence when it comes to you.
If he’s being honest, your alarming lack of self-preservation is also probably to blame. That and your ravenous need for…excitement? Adrenaline? He’s not quite sure what exactly it is that drives that gleam you get in your eyes. It’s part of the reason he was so drawn to you in the first place but by the Angel does it drive him mad sometimes.
He wasn’t surprised that you decided to stay out on the mountain for a few more runs when he called it quits. The growing cold and snowfall had gone from a mild inconvenience to a steadily painful prick against his exposed body but that doesn’t seem to bother you (though your red nose and sniffles said otherwise). But aside from the hilarious and thankfully harmless tumble and a few bruises, you seemed to have enough of a handle on skiing that he felt only a small bit of trepidation about leaving you on the mountain.
But that’s par for the course with him.
So, he’d tucked his scarf around your neck, quietly hid the flutter in his Soul at the sight of you snuggling against his residual warmth and headed back to the lodge with a small knot of anxiety in his chest.
It’s nearly dark now. What’s left of the setting sun is utterly hidden behind the predicted storm that blew in with terrifying speed and intensity.
And you’re not back.
Grillby is sat in a chair near the large window, foot tapping against the ground. A mug of cider is forgotten on the table next to him. His phone rests in his hand, more of a useless thing for him to fiddle with for all the good it’s doing. He’d tried calling you but it had gone straight to voicemail. Stupid, useless thing. He thought these things were bad enough in the underground, with spotty connections and dropped calls but out here, you get one bloody mountain in the way-
The sudden ring and vibration in his hand just about ejects his Soul from his chest with the force of his jump. Flickering harsh reds, Grillby fumbles for the answer button, not bothering to even look at who’s calling him. “Shore?”
The voice that answers him is decidedly not Shore, and Grillby’s Soul plummets into his gut. “Um, it’s me,” Undyne says. It’s hard to hear her, there’s a harsh whistling that probably means she’s still out in the snow.
“What’s happened?” The words are tight and Grillby is already getting to his feet, turning to head back to the lodge exit.
What Undyne says next stops him dead in his tracks.
“Shore’s missing.”
“What do you mean missing?”
Frisk, Sans, Toriel, Asgore and Alphys all look up from their card game, alarm clear on their faces at his words. He ignores them.
“Exactly that!” Undyne snaps. She takes a breath, the sound crackling in his ear. “Paps and I got the bottom of the mountain and she didn’t show up. We waited and waited and tried to go back up but they’d shut the lifts down and the storm started and I can’t see anything with all this stupid snow-!”
Grillby’s started walking again without realizing it. “I’m on my way.”
“No, you can’t come out in this.” Undyne’s voice is sharp, the voice of a captain. “This isn’t like the storms in Snowdin.”
“You think I care about that?” he snarls. “Shore might be hurt!”
“You’re only going to get yourself hurt out here, okay? Look, the resort people are getting mobiles and a search team together. They’re trained for this. Paps and I are going with them, but you need to stay at the lodge, let the others know.”
“I’m not-”
“Stay. Inside.” Undyne hangs up on him.
Stay inside? Not a chance in hell.
A hand on his arm stops him with surprising strength. Sans, phone in his other hand, shakes his head. His usual smile is grimly thin. “grillbz, it’s seriously bad out there.”
“Is that supposed to convince me to just stay here?” Grillby pulls him arm away. All it takes is a blink and Sans is standing in front of the door that leads outside.
“no, i’d hope your own common sense would do that. shore’s the one who’s supposed to-”
“Do not finish that sentence.”
Sans doesn’t flinch under the surge of heat as Grillby struggles with the urge to simply shove the skeleton aside. But his eyes flick to the window where now the snow is falling so heavily the mountain itself is completely obstructed.
“Grillby.” Asgore’s heavy paw lands on his shoulder, making him flinch. “I’m s- absolutely certain that Shore is just fine. I just spoke to the resort staff and they’ve already sent out a team to go up the mountain.”
“And that’s assuming that Undyne and Papyrus don’t find her first.” The queen, with practiced calm, gives Frisk’s hand a reassuring squeeze. “She would not want you hurting yourself looking for her. She’s capable and I know that she is just fine. Come sit down and we’ll all wait here.”
It kills him. It absolutely kills him. But they’re right.
So he sits.
And he waits.
~~~
It takes an eternity. Every time the door opens, Grillby gets to his feet, only for disappointment to sink his flames low. Undyne is forced to come inside, her body simply giving out at the plummeting temperatures. Grillby actually has to be held back at that point, only the fear of burning Asgore stopping him from forcing his way outside. You’re human, you’re warm-blooded so at least your body will last longer but gods he’s terrified. He can’t stop picturing you curled in the snow, frozen, hurt, hunted by any number of the creatures that live out in the deep forests of the mountains.
By the time you’re found, a small crowd has gathered in the lobby of resort. Staff, guests, people who are drawn in the by excitement of a missing person.
Then, shouts. A commotion. Grillby had long ago given up on sitting and he runs to meet the crew that bursts in through the doors, bringing with it a terrible wave of cold and snow that makes his flames gutter.
His fire sinks even lower when he sees you. Your skin is blue. Your lips are color of a horrendous bruised purple, bits of ice and snow clinging to your eyelashes. They’re flickering weakly but it’s the only movement from you at all.
He shoves closer, let him through, he needs to get to you!
One of the rescue team sees him, eyes widening for a moment before tightening with resolve. “Come with me, this way.”
He follows, his Soul wailing silently in his chest at the distance that still remains between you as the rescue team carries you into a side room, shutting the door firmly behind him.
You’ve started to shiver, soft gasps leaving your purpled lips. The humans are peeling off your layers, exposing your skin, what are they doing?
“Can you control your temperature fully?”
He blinks. It takes him a moment to even process that one of the humans is addressing him. He would almost be insulted if he wasn’t nearly out of his mind with panic. “Yes.”
“Come over here, quickly.” The human gestures to Shore, now laid nearly bare save for undergarments but that is quickly covered up by a some kind of shiny silver blanket. “You need to warm her up.”
“Go slow; too fast can trigger shock.”
It’s a true testament of strength that he is able to cool himself at all, when every instinct screams at him to flush himself hotter, warmer, until your skin returns to the soft warm tones he knows so intimately.
He can’t stop the pained gasp that escapes him when he feels how utterly cold you are. Like a stone, like metal in the ice.
Like the dead.
He wraps his arms around you, sinking down to the ground so he can pull you into his lap. His fire crackles reassuringly, tongues of flame creeping slowly over your skin in the thinnest layer he can manage. Come on, come on.
You stir. He nearly sobs.
With the softest of groans, you turn your face into the hand he has placed against your frozen cheek. Melting ice, or maybe tears run slowly from your eyes and sizzle against his fingers.
“I’ve got you, I’ve got you,” he murmurs.
Now that your eyes are free of ice, your eyelids fight to open. A soft and wobbling smile comes to your face. “’m okay,” you croak, as if you weren’t lying nearly frozen to death in his arms.
Grillby’s core shudders. “Yes,” he breathes. You are now.
He’s going to make sure of it.
“I’m cold.”
“I know sweetheart. I have to warm you up slowly.”
“That’s dumb.”
Dear Angel. That light hearted and slightly annoyed tone is so completely you that he can’t help a small snort that perhaps lets loose more of the emotion in his chest. “Yes, yes it is.”
“Can I sleep?”
He glances to one of the other humans. “Is that okay?”
They nod and so he runs a thumb over your face and whispers, “ Yes. You can sleep now. I’ll keep you warm.”
The smile you give him makes his flames quiver and as your eyes close and you slip off to sleep, he hunches over to hide his face in your hair and shakes and shakes and does what he does best.
He keeps you warm.
#grillby#grillby/reader#grillby x reader#undertale#OoF extra#Snowstorm Inn#OoF oneshot#aaaaaah shorby my dear
87 notes
·
View notes
Text
gif tutorial ✨🎥
I got a few requests to make a gif tutorial so here it is. hope it helps :) It’s quite long so I’ll put it all under a read more. If you have any questions, feel free to ask or PM me directly for help!
Alright....sooo, I don’t remember the last time I made a gif tutorial on this site, but I figured I would even though I use the same method a lot of gif makers have been using for years. I have never strayed from this process and I’ve been making gifs on this site for a decade.
There are a couple methods to making gifs. You can import your video directly into photoshop and cut your gif there. OR you can use a separate video player that has a screencapping tool, then import all your frames into photoshop; this is the method I use and it’s how I’ve adapted and perfected my giffing skills over time.
This post will be long, but I want to be as detailed as I can and explain it step by step. It’s really NOT difficult once you get the hang of it, which is probably why I’ve always done it this way.
Disclaimer: There are three programs I use and I highly suggest you look for reliable links yourself if I’m not able to provide one. I use pretty old versions of KMPlayer and Photoshop (I’ll explain why later), so be careful where you go looking for downloads. There are some photoshop downloads here, but I can’t vouch for them.
Let’s start :)
DOWNLOADING VIDEOS
I use a program called 4k Video Downloader to rip HD videos from Youtube. 1080p is the way to go, but obviously that’s not always possible. It’s ridiculously easy, all you do is click the “Paste Link” button and it’ll download your video. Clicking the “Smart Mode” button will let you set the default quality and the folder you want all your videos to be saved to.
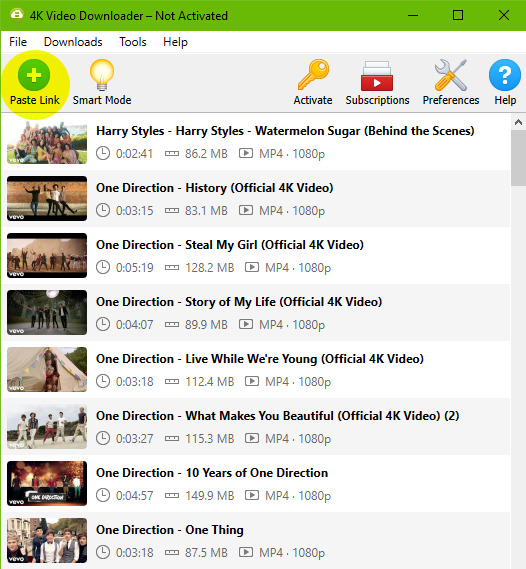
As you can see, here are all the videos I’ve downloaded recently for my gif posts. You can clear this download history list at any time.
SCREENCAPPING
After your video is done downloading, I open the video in KMPlayer. Now, I use an OLD version of this program because this was exactly how I learned to do this back in the day. You can find old versions online, I don’t really know exactly which version mine is because I’ve had it forever, but it’s the old school one that looks like this.

When you open the video, it might stretch the player to full screen so I always adjust it by dragging the corner of the player inward so it shrinks to a more medium size. This will also make your screencaps not so GIANT, which will take longer to load into photoshop.
Anyways, you’re gonna open your video and right click anywhere on the video to select Capture > Frame Extract... (or Ctrl+G on Windows). This window will come up. Make sure all your settings look like this to ensure a really smooth gif.

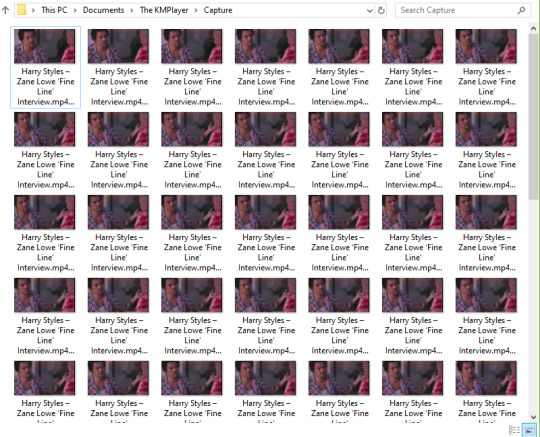
The first thing you should do is click that little “G” button next to the window size at the bottom. That’ll lock in the dimensions of however big you’ve made your video window, and if you stretch it you’ll see these numbers change. If you start capping without remembering to push that and you make your window smaller/bigger, your caps might be a wacky size or look stretched and you’ll have to go back and do it again. Also note the extracting location at the top. All your caps will go directly to a default folder titled “Capture”.
Once all the settings are ready, go to your desired section of the video, pause it, and hit “Start”. Play the video, pause the video when you’ve got all your caps, then hit “Stop”.
Locate your “Capture” folder and doublecheck you got all the caps you want. This is where I take a moment to delete any caps I don’t want in my gif, that way you don’t bother loading them into photoshop and making it take longer than it needs to.
MAKING THE GIF
You’re gonna open whatever version of Photoshop you’re using. I hilariously still use CS3 to make gifs because the next script I’m gonna run doesn’t work in the free download that I have of CS5, but that’s what you get sometimes when you don’t pay for stuff. Hopefully whatever more recent version of PS you use, you have no problems.
Go to File > Scripts > Load Files Into Stack...
This window will come up.
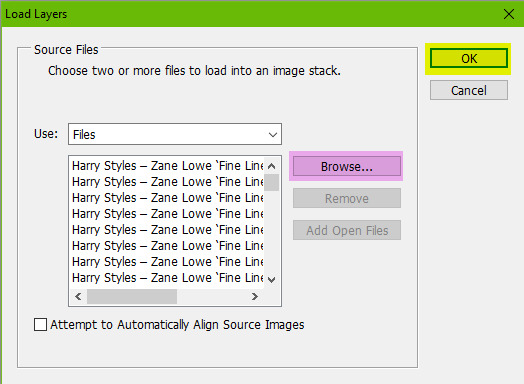
Hit “Browse” and locate your capture folder. Highlight all your caps and press OK. You’ll see them all come up in a list as shown above. Press OK again. Your caps will start to load into one big stack of layers. This will take a minute or so.
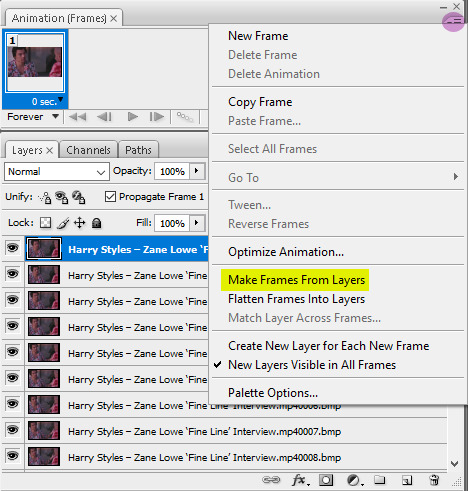
When it’s all loaded in, you’ll see them all stacked in your Layers window (Windows > Layers). You’re gonna open your animations timeline (Windows > Animation) and click the little drop down button in the top right corner of the window and select “Make Frames From Layers”.
Click that drop down menu again and hit “Reverse Frames”. Click that drop down menu again and hit “Flatten Frames Into Layers” (this is so our sharpening action will work later). Click the drop down menu again and select “Select All Frames”. All your frames will be highlighted. This is where you’ll set your animation speed. Under each frame you’ll see “0 sec.” Click on that and select “Other”. Type in your desired speed. I usually go for 0.04 if it has a lot of frames. For less frames, 0.05 or 0.06. This is honestly entirely up to your preference. I actually made myself a photoshop action doing all these repetitive steps so it saves me a few precious long seconds of clicking around over and over. I just run the action after my caps are loaded. If you make gifs a lot, I recommend it.
Next it cropping. The reason I don’t crop right away after the files are loaded into a stack is because I like to see where the subject in the gif moves before I decide where I need to crop. I don’t want to accidentally cut anything off. The subject might sway in and out of frame or be off center if I crop it blindly before seeing exactly where the object moves around. So I’ll play the gif first to see exactly where to crop.
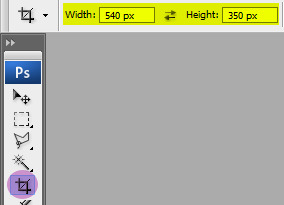
Anyways, you’re gonna set your desired width x height of your gif. I’m making this a big gif so you can see the details better. 540 px is Tumblr’s width for big horizontal gifs. If you’re making a photoset with two gifs side by side the width for Tumblr is 268 px.
Go ahead and crop your gif. It’ll resize itself as well. Play the gif back so you can see if anything gets cut off or it’s not where you want it. You can undo the crop and do it again until you’re satisfied.
Here is what my gif looks like animated and cropped.

As you can see, it plays nice and smoothly due to our screencap settings from before in KMPlayer and with our set gif speed (I used 0.05 here).
Next is sharpening the gif. I use a sharpening action that can quickly sharpen up to 120 frames. You can download it here. Open the action by going to File > Open and locating the file. It’ll be added to your Actions window. (Window > Actions if you can’t see it.) In order for it to run correctly, you have to have the first frame selected on your animation window, as well as “Frame 1″ in the layers window. Just like this:
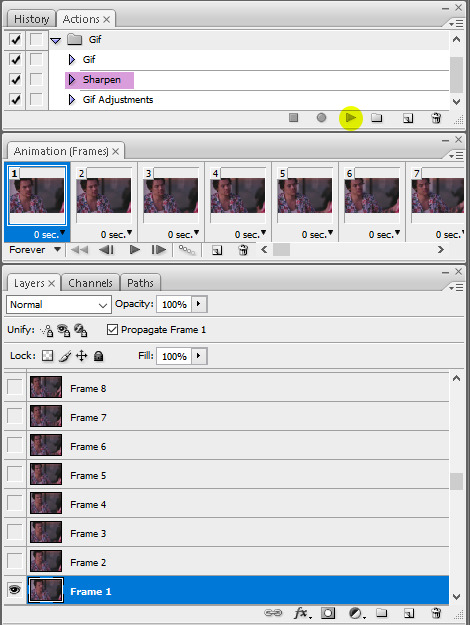
Click the play button on the action and wait a few seconds for all the gifs to finish being sharpened. For any gif with less than 120 frames (which I hope is always, good God) a pop-up will come up when it reaches the end of the frames asking you if you want to stop. Click “Stop”.
Tip: If you think you want to delete more frames, run the sharpening action before you do it. Otherwise you’ll have to flatten your frames into layers again. The first frame and the “Frame 1″ layer should always be the same (the little eye will appear to the left of the layer to let you know it’s visible when you have that specific frame selected) otherwise the action won’t work.
Here is what my gif looks like now that it’s sharpened.
COLORING THE GIF
This is where all the fun (or pain) comes in. All your coloring will be done by using Adjustment Layers (Layers > New Adjustment Layer). I usually go in the same order of adjustments, but this is where personal style comes in and you do no have to do it in the same order I do. You can practice with this part all you want and see how you like to do it.
I start with brightening the gif first and fixing the white balance if a scene needs it. I chose this video specifically so you could see this next handy trick that a lot of people don’t even know about. It’s a dark scene and the white balance makes the subject look quite blue.
I can fix this by starting with a Curves layer. By clicking the third eyedropper tool, you can go and click on a white point in your gif (in this case, I clicked on a white square on his shirt) and bumped up the input number a bit for a little contrast (optional). My curves look like this. Click OK.
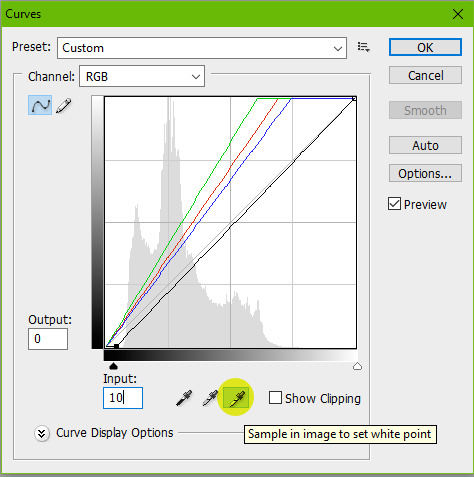
My gif now looks like this.

It’s much better, right? The white eyedropper tool will become a lifesaver sometimes, but it’s not always needed.
Next, I go in with a Levels adjustment to do some more brightening. This is all up to preference, but you can play around with this. I typically like to add more contrast with this layer. I just adjust the sliders until I’m satisfied.
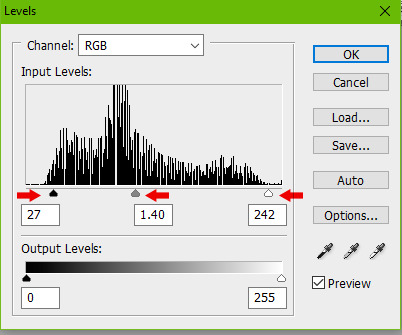
Here is my gif now.
Onto yet another brightening layer. Brightness/Contrast. A couple teeny tiny more positive numbers and I now have this.
Next is Selective Color. I wish I could explain this in a way that makes sense, but this is the layer that takes a bit of practice getting down and boils down to how you like the colors in your gif to look. I personally don’t like a lot of yellow in mine, so I focus a lot on the Yellow and Black sliders in each specific tab. I start in the Reds, then Yellows, Whites, Neutrals, then bump up the Blacks a tiny bit.
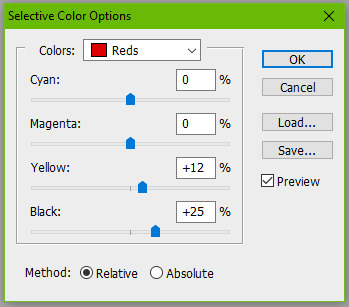

Here is my gif now. It’s a bit more cool toned, which is what I like.

Next I’ll go in with a Color Balance layer and play with the Midtones and Shadows.
Here it is now.

This is usually my last step unless I want to adjust the brightness again (which I do), so I might go back into my Curves and Levels layers to bump it up.

And you can totally stop there, but I would like to mention a few more optional layers to add depending on your gif. If I wanted more saturation, I would add a Hue/Saturation layer at this point, but I think it’s colorful enough so I’m not going to.
Another layer you can use is Gradient Maps.
Setting a black and white gradient map overtop your gif and setting the layer to Soft Light and lowering the opacity to your heart’s desire (you might need to go to the little drop down menu in your animation timeline and hit “Match Layers Across Frames”) can give your gif a very contrast-y look like this.

Or you can change the black color to something else for a different tone, like a dark blue.
Here is my final gif.

If you want to add a caption to your gif, you can do so with your font of choice (Arial and Calibri are good) and add Stroke or a Drop Shadow to it by going to Layer > Layer Style. You can make sure the text is perfectly centered by clicking on your top frame layer under all your coloring adjustments, hitting Select > All, then clicking your text layer again and going to Layer > Align Layers To Selection > Horizontal Centers. Then hit Select > Deselect and go to your little drop down menu in your animation timeline and click “Match Layers Across Frames”.
Here is what it looks like with a caption.
SAVING YOUR GIF
Go to File > Save for Web & Devices...
A big window will come up where you can preview your finished gif by pressing the play button on the right hand side. In the bottom left corner will tell you what size your gif is. Tumblr’s gif limit is a whopping 10 MB, so we’re good.
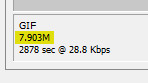
Your gif settings should look something like this.
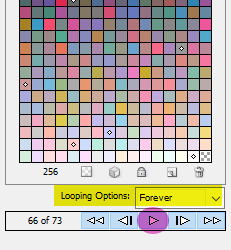
We always want to keep all colors at 256 (the highest). Lowering this number will make our gif file size smaller, but also decrease the quality of the gif itself. If your file size is more than 10 MB, I recommend going back and deleting some frames or making some more curve adjustments. Some users also like to set their gif to “Adaptive” instead of “Selective”. This is up to you.
Click Save and you’re done!
#this took me all day and half the gifs dont even move when you view this post on my desktop theme#LOVE THAT#please view this on the mobile view
221 notes
·
View notes
Text
Summary: When setting up a dating profile, a picture really is worth a thousand words. And it turns out that, sometimes, getting that perfect photo requires the assistance of a helping hand
Words: 1,853
Pairings: Dean, Unnamed OFC - Who may or may not be loosely based on the same woman who inspired this whole thing in the first place
Warnings: Language, Bad Lighting, Impatient Doggies......That should just about cover it
A/N: Umm, so surprise! I did a thing! Inspired by this *gif set* and the subsequent conversation after with the amazing @thoughtslikeaminefield regarding just how it was Dean got that profile picture for the dating app. It was only meant to be a fun little joke type thing of sorts, but after getting love and encouragement from some very fine ladies that I admire greatly, it is now seeing the light of tumblr. Miss MJ was also kind enough to give it a look through for a little clean up and any major mistakes and created the fantastic header! It really does pay to have friends in high places 😊
-x-x-x-x-x-x-x-x-x-x-x-x-x-
This was stupid.
He was, he had no problem saying, one of the best hunters in the world. He had saved the world multiple times. Yeah, ok, maybe Sam helped a little, but still. He had fought both heaven and hell more times than he could count anymore.
And yet, here he stood, unable to get one decent picture of himself.
Stupid.
It was the only thing left to do to complete his profile, to add his profile picture. He had been very tempted to just leave it blank, or just put a logo of something he liked. But that wouldn't do. You go on a dating site and refuse to put up an actual photo of yourself? Pshhh, yeah, because that doesn't just scream: STRANGER DANGER! I HAVE SOMETHING TO HIDE!
The whole point was to attract potential dates, not scare them away before he even had a chance to lay on the charm. And, plus, how would he attract anyone without actually showing off the goods?
Advertising. It's all in the advertising.
The problem was, try as he might, he couldn't get a fitting picture of himself. Not one that truly showed off his full appeal.
What? He wasn't allowed to think himself a handsome son of a bitch without being considered arrogant? Screw that! Body positivity, man. We're all beautiful in our own way, we should all believe it.
Maybe he should put that in his profile too? Didn't chicks dig shit like that? Whatever…
The photo. That was the issue. He couldn't ask Sam to do it, fuck no. He'd never let Dean hear the end of it if he knew he even had a dating profile. Besides, this was none of Sam's business. What Dean did in his private time was his and his alone.
But, as it turned out, Dean wasn't very proficient in the art of selfie-taking. For one, the lighting in the bunker was horrendous. He'd gone all throughout their underground home and the results were either him bathed in shadows or being completely washed out underneath the harsh, fluorescent lights.
And trying to find a flattering angle was damn near impossible! How the hell all those social media people did it was beyond him. Clearly, they were using every filter imaginable to improve their outcome. Not him though. Artificial was not his style. No enhancements needed.
Self. Love. People.
It was as he was pacing around in the garage, trying to formulate his next plan of attack when inspiration struck. He caught Baby's eye — er, headlight, and Yahtzee!
Baby was a total chick magnet. And, where did they both shine the most? That's right, out in the clear wide open. On the road, sun shining, not a care in the world. Natural lighting.
Perfect.
He drove for a while, scouting possible locations along the way while also simply enjoying the quiet time with Baby. Even if he was on a mission.
Eventually, he pulled off the road near a lakefront that also served as a nice walking path for nature lovers. It was a beautiful, clear day, the whole scene very idyllic.
This was it. This was the spot.
However, there was still the hiccup of actually getting the picture taken. After the slightly traumatizing experience of trying to take his selfie, he couldn't bring himself to attempt that avenue again. He thought he could still do it himself regardless. There was a fence nearby, all he had to do was set the timer on the phone and presto! Done!
You would think, that is.
In reality, every time he tried to prop his phone up it would fall back down before he could even make it back to Baby.
Just as he was about to throw the godforsaken device, like an angel from heaven — the fairytale kind, not the dicks with wings — she appeared.
"Need some help there?"
As if he had been caught doing something he wasn’t supposed to, Dean quickly whipped around and was greeted by the lovely sight of a woman, perhaps a little older than himself, walking her two dogs.
He took just a moment, because he simply had too, to admire her beauty. Sun-kissed skin, freckles that put his own to shame, friendly hazel eyes that held a multitude of warmth…
Yes. An angel seemed a very apt description.
Dean cleared his throat before an uncomfortable amount of silence was allowed to pass between them, feeling a slight blush tinged his cheeks when his mind came back around to acknowledge her question.
"Uh, actually I umm… yes," he fumbled out.
Why was he suddenly nervous? He felt so out of place now, he didn't like it. Still, he continued.
"You see, I…"
The woman cut him off — a mercy killing, it felt like to Dean — with a raised hand.
"Let me guess, dating profile?" she asked, not at all trying to hide the knowing smirk.
Something in Dean loosened at the understanding he found in his new acquaintance’s gaze. Shoulders relaxing, he let out a slightly bashful chuckle while giving a one-shoulder shrug.
"Guilty. That obvious, huh?"
She gave a small shake of her head. "Game recognizes game. I have my own experience and horror stories involving the dreaded profile picture. If you want, I can give you a hand?"
Dean's eyes lit up at the offer. He knew it. He was not ashamed of it.
"Yeah?"
She laughed at his eagerness, a sweet-sounding melody, Dean noted to himself.
"Sure. After all, I couldn't just leave you here without putting you out of your misery first. I'm no monster."
She was teasing, of course. It didn't stop Dean from having to bite his tongue and swallow the comment about monsters that begged to be spoken. If only he had a nickel for every time he had heard that line.
"Okay, awesome. Thank you."
"No problem," she replied easily, accepting the phone he was handing over. "And I'm assuming you want that beauty in the photo with you?" she asked him, indicating Baby, earning a proud smile from Dean in return.
As he said, Baby was a total chick magnet.
"Duh."
She laughed again, much louder and freer this time and the sound again had Dean grinning as he made the walk over to his trusty wing woman.
"Nice choice. Okay, then, handsome, what are we going for here?"
Dean faltered in his step slightly. "Uhh, how do you mean?"
"I mean," she paused for a moment, readjusting the grip she had on the two leashes when the pooches started getting antsy. "What vibe are you trying to portray here? Brooding? Mysterious? Friendly?"
"Oh, right!" Dean nodded his understanding.
He thought it over, tilting his head slightly as he contemplated the pros and cons of the different choices in his head.
"May I offer a suggestion?"
"Sure, by all means."
"Well, online dating can be intimidating enough as it is," she began matter-of-factly. "All you've got is a picture and a few words to go on. So, speaking solely on my own experiences, I tend to gravitate towards the more friendly option. You try to be sexy and it feels too put on and forced. You try to be mysterious and all I'm left thinking is what are you trying to hide. But friendly, easy-going and approachable is always a winner. That, makes me want to get to know you a little more. At least enough to read your profile anyways."
Dean, eyebrows raised and mouth pulled down some, nodded in appreciation. This lady really knew what she was talking about.
"Right, so friendly it is, then." He clapped his hands together and went to lean against Baby's side before stopping, thinking it over a second and deciding to hop on the hood instead, talking out his thoughts as he tried to determine the perfect pose.
"So, not too posey, don't try too hard but at least put a little effort in to show I care…." he fidgeted around for a few moments more before falling into a comfortable, casual feeling position. "How's this?" he looked up, waiting for some affirmation.
Dean would be lying if he said her genuine smile didn't make his stomach flutter a bit.
"Looks good. Okay, on the count of three, give me your most inviting smile. No teeth though, just easy breezy. Ready?"
"Ready."
"One, two, three."
She tapped the screen to capture the shot and immediately started walking over after checking the results. "I think we have a winner here."
She handed the phone over to him and he couldn't help the satisfied smile from gracing his lips.
Damn, he looked good.
"Nice," he complimented her photography skills. "Well, Hell, I think you're right, I think this is it."
He made quick work of uploading the photo to the app and confirming his information before finally hitting the 'submit' button to post his profile. He then turned the phone around for her to see again. "Whaddya think?"
She leaned in closer, shoulder bumping his and dogs yapping around their legs as she looked over his full profile before nodding in approval. "Yup, you'll be beating them away with a stick in no time!"
His chest may have puffed up with pride a little. Only a little.
"Yeah? Awesome." He exited out of the app, ignored the text message from Sam wanting to know where the Hell he was and slid his phone into his back pocket.
"Thanks again. It's, ah…" he brought a hand up to rub at the back of his neck. "All pretty awkward, but you were a big help."
She gifted him with a megawatt smile as she untangled her dogs from around his legs, getting them ready to continue their walk. "No problem. Good luck with all that. Stay safe out there!"
She began walking away and Dean found that he couldn't not do it. He had to, right?
Right.
"Hey!" he called out, switching gears and putting on his 'wooing' smile, lowering his voice an octave. "Ya know, maybe if you're not busy, I can take you for a cup of coffee or something sometime? My way of..." Dean let the tip of his tongue sneak out to wet his bottom lip while giving her a once over. "Thanking you, properly?"
She was silent for a moment, brows raising slightly in surprise before a slow smile started to brighten her face up once more. She looked down for a tick, letting out a sound of amusement before meeting his eyes once again.
"That's sweet, and I'm flattered, really, but I'm afraid I can't."
Dean's smile fell some in disappointment. "Oh."
"It's just — your profile says that you’re seeking woman,” she explained, much to Dean's confusion.
"Oh...?" he trailed off, brows pinched as she started walking backward and away from him.
"So am I."
She gave him a wink before turning fully and continuing on. Out of his life.
Dean could only roll his eyes.
"Figures," he muttered grumpily to himself as he made his way back to Baby. "All the good ones are either taken or gay."
-x-x-x-x-x-x-x-x-x-x-x-x-x-
Tagging the cheerleading squad I had behind this: @thoughtslikeaminefield @fangirlxwritesx67 @itmighthavebeenintentional @there-must-be-a-lock @cracksinthewalls @rockhoochie @mskathywriteswords @fookinghelljensensthighs @cherry3point14 @lastactiontricia @icemankazansky @stusbunker @justcallmeasmodeus
#supernatural fanfiction#supernatural fanfic#dean winchester fanfiction#spn fanfic#ofc#dean winchester fanfic#dating is hard#taking a good selfie is harder#baby gets all the chicks#dogs get cranky when their walk is interrupted#this is not your mother's 101 dalmatians meet cute#i can't think of anything else to tag#it's weird being on this side of things#writing is hard!
96 notes
·
View notes
Text
My YCCTEAM'S Wireless Switch Pro Controller - Part 10 (Playtime through Super Mario 3D All-Stars game in Super Mario 64 #1)
Hi guys! Miss me of doing my continue YCCTEAM Controller topic reviewing? After using my controller of testing its buttons, batteries results, and doing gyro/motion controls in check, I decided to bring this for my YCCTEAM Controller topic to finished and give the results for how good was my controller is....almost. For my next one that I said from my April 22nd post, I've recording a video of using my controller during playtime with one of my games I choose. This video I did was back in April 18th; before 5 days later til showing my controller's gyro and motion through 👻Luigi's Mansion 3. Link Here
However though, I actually did 3 or 4 recording clips during the same day and I wanted to merge all 4 to make one video during this month of May 2021; instead of doing one at the time in clips. I can thank for my PicsArt app on my iPad Mini 2 to help me doing video edits and it really works! *thumbs up*

Those screenshots I took back in May 20th, by the way. ⬆️
However, it seems that I can't remove its tradmark on the right side bottom of the recording video. I'm sorry if I'll just leave it like that cause I don't have some money into my Apple account to purchased the PicsArts membership to help me remove its tradmark. At least knowing its small enough to not bother during this video of me playing games with my YCCTEAM Controller I've recorded. Nevertheless, let's get into my next topic part about using my pro switch controller through playtime I've been saving since April 18th. What better ways to show me playing with my controller with a game that I got from last year of Decemeber 2020 as my late Christmas gift: 🌟Super Mario 3D All-Stars! I've waiting for months to ever get started of my new progress through one of three gaming collection at first look. Just hoping that my buddy 🐰🖌Maxwell and his siblings will be ready to bring their reactions; mostly with Maxwell cause he's a big Mario fan and he'll be looking forward of me having fun with this game's progress I'll be bringing soon. Enough talking, let's-a-go for my latest topic part for today!
By the way, the original video's file size number was much larger so I use other video converter sites to turn down the file size smaller; that way I can uploaded through my tumblr blog just as easy.
0:00 to 0:37
Since now this recording video was actually the merge one with different shots I edited by using my PicsArt app, I'll begin saying the first one I did with my pro switch controller is doing Mario's moves through Super Mario 64. You know from my childhood that I happened to play the original Super Mario 64 since childhood. I remember when using my old N64 controller to play as Mario; jumping, running, and walking was a alright experience to begin my journey exercise to rescue Princess Peach from Bowser. Now years later that I got the 3D All-Stars collection version, I'm using my YCCTEAM Controller to get into Super Mario 64 once again. I still got it remember for the controls after learning from my original N64 game years ago, so here I am doing this to test my modern controller at hands. It looks good for starters when I use the left analog stick to move Mario and pressing the A button to perform jumping. I even do altogether while running and pressing the A button to perform a triple jump move.
0:37 to 0:53
Onto the next clip that I edited was pressing the Y button to perform his punching attack; like if I would be using it more often then doing jumping on enemies. At least knowing I've using it for the first boss battle which I'll get to that on my next video next month, by the way. I did five or more times of him throwing punches and the respond works fine. *thumbs up*
0:53 to 1:05
I quickly get into another part by performing Mario's ground pound move attack. I pressed the A button and ZR button while mid air. Just like my previous ones that it can do well when you gonna use for enemies/bosses and doing switching puzzles.
1:06 to 1:52
Finally now we're getting into the last part I've gotten of doing more of Mario's moveset I recorded. First was the jump kick attack after pressing the jump button then pressing X or Y button to kick in midair. Not bad, but barely if using it during my journey to rescue Princess Peach from Bowser sometimes. After that, I'm now doing the running long jump by moving the left analog stick to make Mario run faster a bit. Meanwhile pressing the Y button at the exact time can perform his long jump that I can feel the vibration on my YCCTEAM Controller; which is unexpected to say at least. I should've turned off the controller's vibration off during my recording, though....Just in case if It'll be little annoying when trying to have my gameplay through Super Mario game. Just saying, though. Anyways, I'm doing one more thing before ending this video and give some results about using my YCCTEAM Controller during playtime at first try. This is for the camera adjustment part as I use the right analog stick to move the camera; which Lakitu holding. It's little bit slow though when I'm trying to move the right analog stick quickly, but it was okay when using it for looking things; except looking into Mario's face cause reasons.
Looks like that's all I can bring you in this recording video of how far using my YCCTEAM Controller for Super Mario 64. Just wishing I could bring more of Mario's moves I haven't gone through it yet; such as crouching and doing backwards jumping. I did happened to perform those while not recording, but let's just say they're works fine as well; even could be useful during this game's progress. 🙂👍🏼
My Thoughts:
To my latest topic post for my YCCTEAM Controller review, it was a good start of using it during my playtime with Super Mario 3D All-Stars game and to the controlling respond as well. Testing with Mario's moves of jumping, ground pound attack, and so on was like taking me back when I'm playing with my original N64 controller, except differently since the N64 Controller had one analog stick in the middle bottom in weird design choice honestly. Nevertheless, it was still a good start.
Now if you we're thinking this will be my last topic review post for my YCCTEAM Controller, but I have other recording videos that I'll love to share for next month. So yeah, I'm still continuing this topic til I decided to finished. That being said, I did have good fun testing my controller; especially using through my first gaming progress of Super Mario 3D All-Stars that I promised to share for my upcoming posts soon.
Let's see how my mains reaction after showing my latest topic post for my YCCTEAM Controller.
🐰🖌Maxwell: It was the amazing thing I ever saw! At least during the begin though. ^^* While I give you applause for trying out Super Mario 64 on Switch in this recording, I'll can also give you a thumbs up about this latest topic post for using your YCCTEAM Controller in new test through playtime a bit. 😉👍🏼With this, I'm sure it can work well for your other games like 👻Luigi's Mansion 3 and 👊Super Smash Bros Ultimate. Though you already have.
🐰👊💥May: Indeed. Still our A-Pal will bringing more video recordings for another day soon. So his YCCTEAM Controller topic will continue, but hoping not to long eventually.
🦊⚽️Sam: Yeah. Besides, we like to see if he'll continue his gaming progress through Super Mario 3D All-Stars to share on his posts soon. That and he'll be doing his next items through upcoming topic reviews.
🐰🖌Maxwell and 🐰👊💥May: Huh?
You heard me right, guys. After I'll be done with my YCCTEAM Controller topic soon, I'll get into the next one for my other items that my family give me through stores or brought me online just in case we're still staying in houses til the pandemic can be over. It happens from months ago, by the way.
🐰🖌Maxwell: Guess you'll be doing your busyness through your upcoming topics, huh? Well at least hoping you'll have plenty of time to take it easy and organize your writing. For now though, you'll should keep going on your YCCTEAM Controller topic to continue; we can wait.
Thanks, Maxwell. Also hoping I'll remember when I can sharing one on my Super Mario 3D All-Stars gaming progress in screenshot pics to my Tumblr blog soon; by any chances I'll get. That's all for now. Hope you'll guys will giving a like to my lastest YCCTEAM Controller topic review post. See ya! 🙂👋
Pervious Posts for my YCCTEAM’s Pro Controller Topic:
Wireless Switch Pro Controller for Nintendo Switch/Switch Lite (Part 1) - Link Here #1
My YCCTEAM’s Wireless Switch Pro Controller for Nintendo Switch/Switch Lite Unboxing (Part 2) - Link Here #2
My YCCTEAM’s Wireless Switch Pro Controller for Nintendo Switch/Switch Lite Comparison with my Xbox One (Part 3) - Link Here #3
My YCCTEAM’s Wireless Switch Pro Controller for Nintendo Switch/Switch Lite Comparison with my Nintendo Switch’s Joy-Cons (Part 4) - Link Here #4
Testing Buttons (Part 5) - Link Here #5
Rumble Feature Testing (Part 6) - Link Here #6
Battery Charging Test (Part 7) - Link Here #7
Playtime Battery Life Results (Part 8) - Link Here #8
Gyro and Motion Controls 1st Half (Part 9) - Link Here #9
Gyro and Motion Controls 2nd Half (Part 9.5) - Link Here #10
#yccteam#yccteam controller#switch pro controller#video#video post#recording#super mario 64#super mario 3d all stars#3d collection game#3d game#testing#moves#doing moves#run#walk#jump#ground pound#etc#video edit#picsart#part 10#may 2021#may 24th 2021
7 notes
·
View notes
Photo
so here’s my disclaimer: I hardly know what I'm doing. This is my glued together homemade giffing method that I’ve created over months of just random experimentation and bits and pieces from all kinds of tutorials. there are probably better or more correct ways to do a lot of these things! this also isn’t a completely universal tutorial, some of the specifics are geared towards giffing skam, specifically skam france.
I gif in photoshop cc 2020 on a macbook. Some things like keyboard shortcuts and little things about the photoshop interface will probably vary if you are on a pc/ other version of photoshop!
this is very long and very unprofessional, but I hope there is something in here that someone will find helpful!
we’ll be going from this:
to this:

up to date as of October 25, 2020
downloading clips
selecting what part you’re going to gif
cropping
my action for resizing, converting to a smart object, and sharpening
coloring
exporting and setting the delay
tldr tips
1. downloading clips
4k video downloader (which you can get for mac or pc here) is great for things posted to youtube, especially from skam france because all the clips are on their youtube with no weird geoblocks or anything! it’s really easy, you just have to open the clip in youtube, copy the link, and go into the program and hit paste link. I like to put on smart mode first and set the destination folder so all my clips go into the place I want.
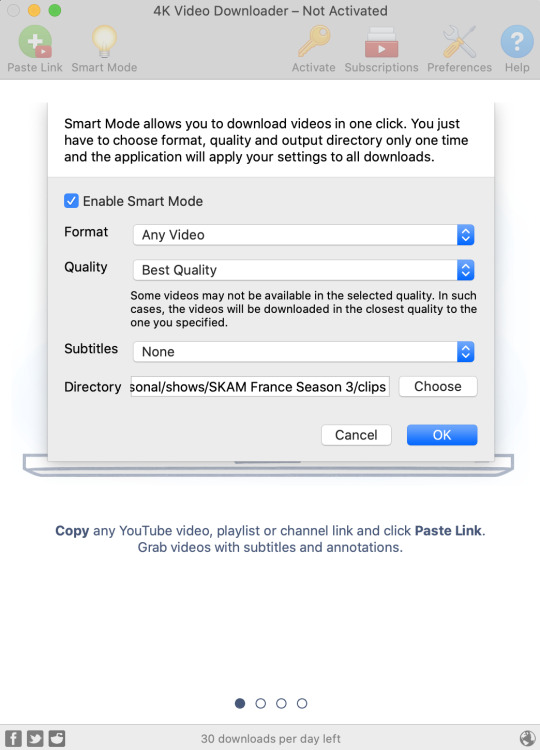
There is a 30 video per day download limit, so if you’re thinking you really want to gif lots of stuff from the show, and want a big chunk or a full season it’s definitely worth hunting for a mega or google drive with full episodes to download because it’s just less hassle! I might come back to this post later and compile a list of all of those, but for now if you type “[remake] no subs google drive” or “[remake] no subs mega” into a google search, you’ll probably find something! the all of skam website has no subs for several remakes, but not all!
If you don’t have enough space on your computer to be keeping full seasons, I know there are methods to get screencaps without having to download (generally for giffing movies and regular tv I think this is a common method), but I’ve never done it so I’ll redirect you to this tutorial that explains it! you should probably just go there for the whole thing tbh it’s much more coherent than this, but I digress.
2. selecting the piece of the video you want to gif
now that you’ve got your episode or clip you’ll want to just open it in photoshop! if you go the screen capping route the way to do that is a bit wonky, so you can keep following the tutorial I linked above and join back in here at coloring if you like!
if the timeline at the bottom doesn’t pop up automatically you can go to window > timeline and turn it on! now you can use the scrubber bar thing to find the moment you want to gif!
The advantage of this over screen capping is you can scrub with more precision. the arrows circled in blue below let you jump only one frame, where in screen capping I'm pretty sure you can only go by ten second or one minute intervals.
I usually drag the scrubber as close as I can to the start of the shot/moment I want to use, fiddle with the arrows circled in blue below to jump forward or back one frame at a time until I'm at the first frame I want. I move the left grey handle to the scrubber and then I hit the play button and let the whole shot/moment play. Pause and repeat the shuffling with the arrows until you’ve landed on the last frame you want to use and move the other grey handle.
the moment you want to use should be between your handles (it’ll look like what I have circled in red), and if you hit play, you should see the thing you want to gif playing on loop above the timeline. the speed will probably be weird, but we’ll deal with that at the end.

now I recommend doing command or control + s to save your gif as a psd (photoshop document). this is a working, editable file which means if photoshop crashes you can open your file right back up and keep working as long as you’re hitting command or control + s at regular intervals as you work. later we’ll go through exporting in gif format that can actually be uploaded to tumblr.
3. cropping
next I crop out any logos or black space at the top and bottom. Just click on the crop tool on the lefthand side of the screen, drag the edges and hit enter when you’re done. you can of course crop out more than just that, but regardless of what you crop out, now is the time to do it.
you can set an aspect ratio for your crop at the top of the screen if you’d like to be positive that all the gifs in your set will be the same:

4. my trusty action: resizing, converting to a smart object, and sharpening with one click
Now is when I use an action I made that does all the resizing, converts to a smart object, and sharpens. I’ll take you through the steps so you can conceptually get what’s going on, but I highly recommend using the actions window to record your process as you follow along so you have this action as well. It easily shaves at least 5-10 minutes off of the whole process, and these steps will be the same every time.
here’s how you make an action: go to window > action and open the action panel. click the plus symbol to start recording a new action:
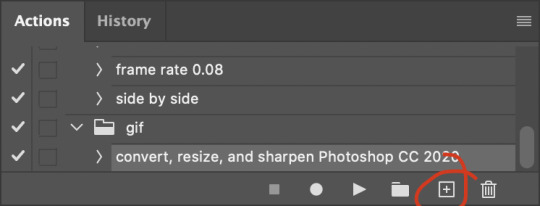
in the window that pops up, give it a name and hit record:

now just continue with the steps below, and it will save them!
first you flatten frames to clips (I think it says flatten to layers on older versions of photoshop). this is in the menu at the top right corner of your timeline:
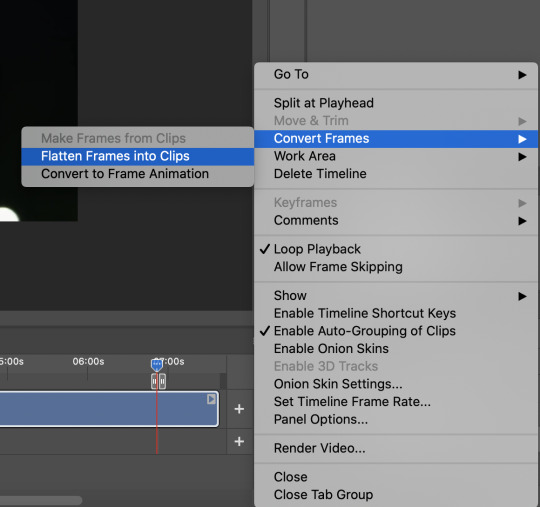
next you convert to frame animation by clicking on the symbol in the bottom left, circled in red:
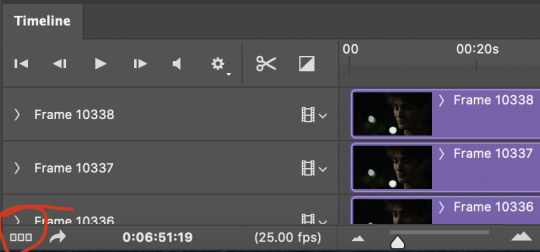
if there is more than one thing in the frame animation, delete the extra one. you don’t need to keep the last one but it won’t let you remove it until there are other frames in there. also go into your layers and delete video group 1 and its contents. don’t ask me why these steps are necessary, I don’t really know, but I’ve noticed it sometimes gets wonky if you don’t do this:
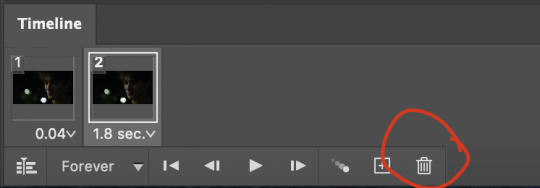

now you want to make frames from layers and delete that first frame that was there before:
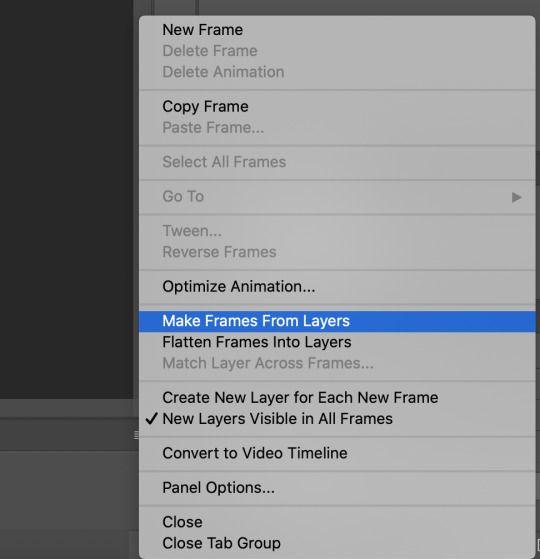
then we return to the timeline:
use command + option + a (control + alt + a for pc I'm pretty sure) to select all layers and then right click within your layers window and select convert to smart object. It’s important to convert to smart object after you go back to the timeline, or the gif won’t move:
next I resize. gifs for tumblr should be 540 pixels wide. for recording your action you should just go into image > image size and only change the width to 540 in case you ever have gifs cropped to different aspect ratios. don’t touch the height, let constrain proportions figure it out!

now, here’s what our base gif looks like, no sharpening, no coloring:
now to sharpen. go to filter > sharpen > smart sharpen. this is up to personal preference, but my go to settings are:
this is what we have after sharpening:

now is when you can stop recording your action.
just press the stop button in the action window:
this action is pretty much universal and after I select the moment the gif will be and crop however I want, I use it on every gif I make! so although this initial setup is tedious, now you’ll never have to do these steps again, and the process is magically much quicker.
5. it’s time to jump into coloring!
I typically start with exposure and sometimes some brightness/contrast. with really dark gifs like this, you kind of have to make it worse before you make it better. I did this:
now the gif looks like this:
we have some static and some ugly bits, and this is where selective color comes in to fix it! boost blacks like this:
and now your gif looks like this:

the skin tone is looking a little sickly and weird, so I go into the yellows and reds in my selective color layer to fix it! I also messed with the greens here because I didn't want color in the background (that part is totally optional and just up to your preference):
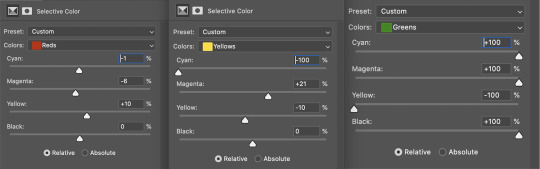
now we have this:
to really take the color 100% out of the background, I did one more separate selective color layer for cyan (again, I just felt like it but this is optional!):

and now the finished gif:
there’s lots of fun extra things you can add like text and tints and overlays and all that I won’t get into, but feel free to reach out for help on those types of things!
this gif was certainly not the most complicated to color. some ridonkulously dark clips (*cough cough* vendredi 20h27 *cough cough*) take tons and tons more effort than this and a lot of the time you’ll want to use color balance layers and vibrance layers and all of that to mess with your coloring.
with all of this coloring business, I really just learned by doing. I don’t know all the technical purposes of each type of adjustment layer, and I tend to stay away from curves just because I find them confusing and annoying. The bottom line is that you should always experiment and find out whatever coloring works for you and run with it! I’m sure every gif maker you talk to does things at least a little differently!
I highly recommend taking the time to go through all the types of adjustment layers and just move the sliders around to see what they do! That’s honestly one of the best ways to learn and decide what you like!
6. now to export and adjust the delay!
the keyboard shortcut for exporting on mac is command + option + shift + s, control + alt + shift + s for pc, otherwise you can go to file > export > save for web
my settings are here:
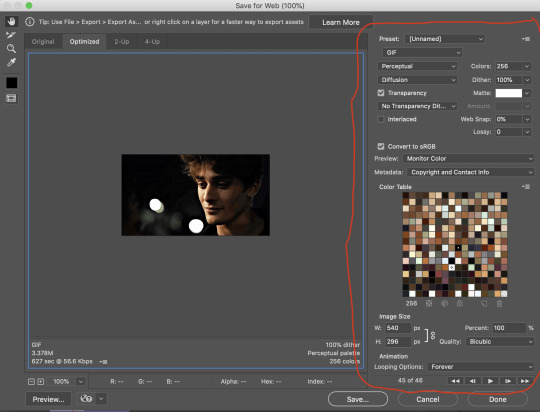
the settings only need to be configured once! otherwise just hit save and follow the pop ups to choose where to save and what name you want to give your gif. Since you saved as a psd way back, that will be the name it’s automatically given, but call it whatever you want!
then I adjust my delay by opening the gif I just exported (not the psd, the .gif file) and using one of my delay actions. I’ve made an action for each delay between 0.05 (real time) and 0.08 (really slow mo for certain super short shots, typically for more ~artsy~ sets).
all my action does is select all frames:
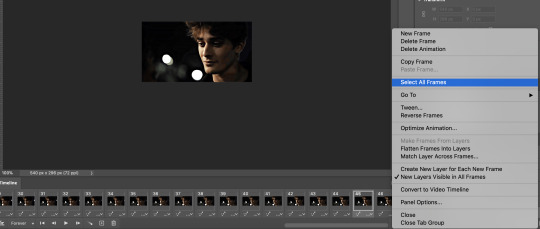
adjust the delay (which will differ based on whether you want them slowed down and by how much):

for reference, this is a 0.05 delay:
and this is a 0.08 delay
now you just export the same way you did before!
remember if you’re recording this as an action, you don’t want to touch the file name, just say yes when it asks if you want to replace the file. if you always save your gifs to the same place, your action will now enable you to override any gif with the incorrect delay with the correct one with one click!
7. tldr: the main tips
for downloading 4k video downloader works well for non geoblocked youtube videos, the all of skam website is another place you can look to download with no subs, here’s the screen capping method if you don’t want to download
The main way I combat dark lighting is to bump exposure to the right, gamma correction to the left, and then enhance black in a selective color layer. The amount of these three adjustments will vary gif to gif. I know lots of people use curves, but I find them really confusing for some reason, so this is my method! As my graphics teacher likes to say: there are always at least 3 different ways to reach the same result!
there’s a little bit of additional coloring on this one, but here’s another before and after example so you can get an idea of how those steps get you a better lit result without making the lighter parts super over exposed:

besides those three steps, you have free rein to use the other selective color channels, as well as color balance, vibrance, hue/saturation, etc. to restore color that was lost or to change the colors altogether! mess around with it and have fun experimenting!
7a. bonus coloring tip:
sometimes you can make use of selective color to completely alter an isolated color in your gif. You can get very adventurous with this, but here's a simple example of changing blue tones to teal (I got away with these gifs being longer because they were in rows of two in the set I posted them in. I'm too lazy to trim frames so I can put them here at 540 px without going over the 10mb limit so just ignore the quality ok):
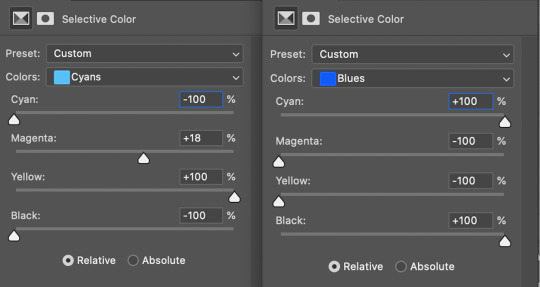
7b. actions, actions, actions!
if you find yourself doing a certain thing over and over, always record it as an action. the amount of time they will save you is honestly really impressive.
You can duplicate actions, so, for example, if you have different sharpening preferences for different shows or scenes, you can duplicate your gif process action and go into the steps, double click smart sharpen, and alter it however you want!
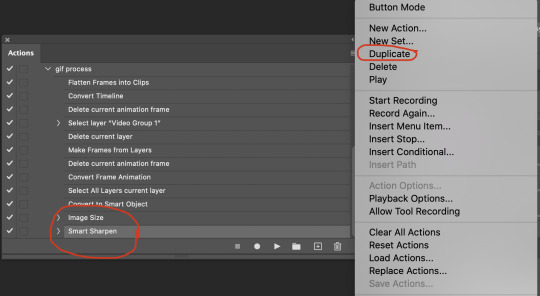
This could also be good to do for the different widths for tumblr if you ever do sets with rows of two or three! Duplicate actions is also how I made my actions that set delay at 0.05, 0.06, 0.07, and 0.08!
when in doubt, always make an action! it’s worth minimizing the tedious bits of the process as much as possible so you can focus on the fun part of seeing your awesome gifs come to life! any little task you find yourself doing often, make an action!
and for now that’s all I have. if any of this made no sense, if you want to suggest a correction or addition I could make, if you’re ever curious how I did something on any gifs I post, or if you have any other sort of questions, feel free to send me an ask or a dm! if I can’t answer your questions I’ll be happy to try to direct you to someone who can or a tutorial to help! again, I'm no expert, not even close, but I hope at least one person will find one thing in this mess that helps.
#this got . so long omg#mystuff#mytutorial#gif tutorial#tutorial#resources#fellow gif making peeps feel free to correct me or give input on how to improve or add to this tutorial!
31 notes
·
View notes
Last Seen Blogs