#channel masking tutorials
Explore tagged Tumblr posts
Visit Tumblr Blog
Explore Tumblr blogs with no restrictions, modern design and the best experience.
Last Seen Tumblr Blogs


Fun Fact
Hackers stole 65M passwords from Tumblr in 2013.
Note
Whai kind of camboys would svt be? What content eo of them would offer?
seventeen as camboys

WARNINGS: smut, public sex, fingering/handjob, sub/dom, degradation, porn, tantric sex, porn asmr, dirty talk, edging, denial, sex toys, porn filters, amateur, sex partners, masturbation, forced orgasm, hand fetish...
seungcheol dom daddy af pov. full-on bdsm content. he’s got the handcuffs, the restraints.. he’s the type to sit back, shirtless, broad shoulders on full display, he’s telling the audience when they’re allowed to touch themselves, making them wait until he gives them the okay. sometimes he’ll tease by stroking himself, not showing his cock on camera. uses a mask too. and prize draw a fan for him to fuck on the channel's birthdays.
jeonghan edging and denial. always with someone new on cameras, he’ll start his stream fully clothed, just smiling that devilish grin, playing with his hair, “oh? you want me to take it off?” but he’ll drag it out for so long, giving lil’ peeks of skin here and there. sometimes he’ll straight up dip after a tease. he moans all breathy, making eye contact with the camera.
joshua hear me out.. asmr & dirty talk. joshua’s got a voice that’ll melt you, so ofc he’d be doing those long, drawn-out sessions where he’s whispering right into your ear, breathing heavy like he’s right next to you. audio experience—close your eyes, and it’s like he’s fuckin’ you with just his voice. “you want me louder? fuck, i’ll give you loud.”
junhui body worship. there for the visuals, his streams are all about him showing off—slow, oiled-up body shots, flexing, maybe even a lil’ self-praise thrown in. “yeah, you like what you see?” it’s basically softcore porn for your eyes, just… him flexing and jerking off like a fuckin’ greek god. “fuck, i make you so wet, don’t i?”
hoshi messy sex, rough sex & overstimulation. everything with hoshi is physical af, like he’s tryna fuck you through the screen. the type that even gets the camera dirty. absolute chaos. every stream is like a workout, sweat dripping down his body while he’s all breathless, flexing between rounds. “fuck, lemme catch my breath,” he’ll say, grinning at the camera, then he’s back at it, moaning loud enough to wake the neighbors.
wonwoo public sex. wonwoo’s always in public spaces, daring his partner to keep quiet while he fucks them somewhere they could get caught. or just masturbating in public. “don’t make a sound, or we’ll get in trouble.” dirty whispers, his hands everywhere while people walk by, totally unaware. pure adrenaline. all of that with him looking around, and them looking at the camera through his glasses.
woozi hands-only content = fingering&handjob masterclass/tutorial. man’s got skills, and he’s showing them off. finger-fucking a silicone cunt or fisting a dildo, or his cock, while he mutters filth under his breath. it’s like a fuckin’ anatomy lesson. he’s so damn precise with it, it almost feels unfair. you know he could make you cum in record time.
minghao tantric sex & roleplay. minghao’s streams are straight-up sensual. artful af. his streams are like some softcore art film, everything in slow motion, dim lights, silk sheets, slow burn. it’s less about the dirty talk and more about the vibe. but when he does speak, it’s smooth, deep, and straight to the point. “you’ve been waiting for this? let’s make it worth your time.” every moan perfectly timed, like he’s orchestrating the whole experience.
mingyu sub humiliation. big puppy turned sub, tied up, begging for more while he gets humiliated. he will moan pout, getting all flustered when called a good boy. the humiliation only turns him on more—loves begging. the bigger they are, the harder they fall.
seokmin sex toy review. mr. too sweet, all polite, “hi, how was your day?” then he gets into it and fuck, you’re blindsided. he’s got this wholesome look, but once he starts testing the toys, he’s so vocal too. moaning, breathless, almost embarrassed at how into it, because he needs to talk about the whole experience, he gets but also loving every second. the type that reads mostly of the streaming comments. “i hope you have a good night.” he’ll flash that sweet smile, by the end of the stream.
seungkwan mean dom, forced orgasm. this man is cruel in the best way. he’s tying someone to a chair, not letting them cum until they’re crying, pleading with him. “aww, baby, you’re all messed up, huh? too bad, i’m not done.” won’t stop until you’re a wreck. every tear is a turn-on for him.
vernon twitter-porn-style, faceless porn. faceless, purple bedroom lights, and it’s just his giant cock on display, no face, no extra fluff. the vids speak for themselves. slow strokes under fuzzy lighting, letting you focus on just the action. simple but devastating. maybe a low grunt or two if you’re lucky.
chan amateur couple content. chan’s a full boyfriend experience—enthusiastic af, experimenting, maybe even bringing in a partner sometimes. he’s loud, whimpering when he gets close, showing off how excited he is to try new things. you’re in it together, and his moans are infectious.
#seungcheol sorteia uma fã pra vc comer#seventeen reactions#seventeen imagines#seventeen headcanons#seventeen scenarios#seventeen#svt imagines#seventeen smut#seventeen x reader#svt smut#seungcheol smut#jeonghan smut#joshua smut#junhui smut#hoshi smut#wonwoo smut#woozi smut#minghao smut#mingyu smut#seokmin smut#seungkwan smut#vernon smut#chan smut#dino smut#soonyoung smut#jihoon smut#scoups smut#the8 smut#dokyeom smut
837 notes
·
View notes
Text
List of gear ideas because masks and tails are not the only ones that exist
[ PT : List of gear ideas because masks and tails aren't the only ones that exist]
Hi ! Here is a list of all the gears I know and can imagine, I will extend the list as my ideas come!
I mostly know gears for therians, so I apologize to those who don't recognize themselves in the list.
If you are looking for gift ideas for a therian friend, if you want to make yourself a new discreet gear to not attract attention, or on the contrary you are trying to find an original gear to express yourself freely in public, I recommend this list!
Happy reading!
Gears that can be worn :
⚝Mask
A classic: I'm talking about the masks that we see everywhere on YouTube shorts and TikTok. Simple and effective. Plus it's a beautiful art, it doesn't surprise me that many are fans of creating it!
⚝Muzzle-mask, beak-mask
These masks are much less known, but I dream of having one one day! It is a mask that covers the lower part of the face, to make it look like a snout or a beack. Unfortunately there aren't many tutorials (on YouTube anyway)
⚝Fur tails
Another great classic, I would pay good money to have one! It's so... perfect. But be careful! Don't buy tails anywhere! Most of the time they come from very cruel fur farms, so I advise you to watch the videos of Torn (therian territory) or PD on the subject to recognize an ethical or cruel tail.(These channels are on youtube) I swear to you that even dyed or so-called "fake" tails can be real and cruel... Be careful!
You can also make tails out of yarn, there are many tutorials and while it does take a lot of time its so worth it!! The result is often so fluffy! (thanks a lot to @newbornlight who suggested I add these tails to my list!)
⚝Collar
Very effective if you are an alter/nonhuman whose type is domesticated ! And even if you are not, it can symbolize your nonhuman identity stuck/domesticated in a human world. There is a more discreet alternative, if you prefer: chokers! I have one that I made myself with black ribbon and a bracelet clasp. I sometimes add a pendant that looks like a small collar tag !
⚝muzzle
May have the same meaning as collar. It can be a good alternative to muzzle-masks which are quite rare.
⚝Fake ears
So cool and often so realistic...
⚝Gloves/mittens
This can make your human paw look like your type's paw! But be careful when you want to buy some, some are not of such good quality so the glue can come off with use (thanks again to @newbornlight who warned me that this could be the case!)
⚝Paw socks
Very comfortable and very euphoric. I like it. (same warning for glue that can coming off)
⚝Shoes
I've seen some amazing digigrade shoes before (to give you an idea of what it looks like, it's a heeled shoe without a heel) including shoes that look like clogs, but there are some for many different species !
I've also seen beings make lines on the white part of their converse to make it look like paws !!!
Some people buy or make shoes with a certain relief on the bottom so that they make tracks resembling the footprints of their type! (thanks to @sillysatyr for adding it to the list :3)
⚝Different shapes of pants
If your type is imposing, you can opt for cargo pants! For theriotypes with long and thin legs, but big hooves/paws, I recommend flared pants! (I think that's what it's called in English)
I have species dysphoria about not being as big and impressive as my theriotype, but since I started wearing cargo pants and other baggy pants, I feel more confident.
⚝A coat with faux fur and/or your theriotype on it
This looks amazing! Thanks to @blazekat031 for the idea!
⚝Fake horns, fake antlers
Awwww those are so cute
⚝Wings
Attached to the arms for birds, on the back for dragons/insects!
It's one of the most gorgeous types of gears, and I imagine it's very effective.
⚝Contact lenses
To change the color of your eye, the shape of your pupil, etc.
⚝Makeup
I don't know if you can really consider this a gear but put a little eye shadow under the nose, a line in the little hollow that connects the nose to the mouth, and black lipstick on the upper lip can be very euphoric for some! Of course there are many other different makeup looks for all types... And don't forget, makeup is not for girls, it's for the skin✨
⚝Nails (claws)
I really like growing my nails out, cutting them into almond shapes so they look like claws. No need to grow them out a lot, or make them very prickly, do as you like!
You can also use fake nails!
⚝Paper claws
There are a lot of different tutorials on youtube, usually they are in origami, so I hope you like folding paper ^^'
⚝Legs/arms warmers
To feel like you have fur on your arms/legs, to protect myself from the cold. I made some out of wool, crocheted.
⚝Kigurumi !
A very comfortable and cute little costume, I would really like to have one! For those who don't know, it's a kind of very soft one-piece pajamas with a hood. On this hood there are sometimes animal ears, sometimes horns, at the back there is sometimes a tail, etc. there are some for many different species!
⚝Claw ring
Rings that look like claws. This is so cool! I'm going to buy some soon!
⚝Any accessory with a theta delta on it
Of course !
⚝Any accessory that represents your type
Of course too
⚝Pin's
There are some really cool pins on theriantropy, I recommend it.
⚝Mermaid tail
I've seen costumes like this before, I think the cetacean therians and mermaidkin might like it.
⚝Tattoo
Whether it's a temporary or permanent tattoo, it can be a great way to get closer to your type. Having your identity or the symbol of it on your body can be very pleasant! I even saw someone with his type's fur pattern tattooed on his shoulder.
I just want to clarify that if you want to get a permanent tattoo, I advise you to think carefully about the location, the shape, etc. to be sure.
⚝Sweatshirts/hats with animal ears/horns/antlers on them!
It's very "normal-like", and it can be very reassuring to feel it on your head.
⚝Deer antlers (in the form of a headband)
Very cute! (credits to @zombi-teeth who suggested it to me in the comments ;3)
Other gears:
⚝Objects that remind you of your habitat as your type
To recreate the atmosphere of your habitat in your house/room!
⚝Figurine of your type
It's funny to have a minature yourself
⚝Blanket whose texture reminds you of your type's fur
Very comforting
⚝Feathers!
I have a collection of feathers at home, I'm not a bird therian but it gives me a "predatory pleasure" to have a piece of prey as a trophy at home! (Without harming an animal, of course! I pick up these feathers from the ground)
⚝Stickers
I will probably give a tutorial later on how to create your own stickers, I will also make drawings to cut out to transform into stickers.
⚝Drawings, paintings, etc. of your type
Art is a great way to express yourself!
⚝A mineral/crystal that is associated with your type
In many cultures, stones are associated with animals. Some even use them for meditation.
Did you know that amber is prehistoric tree resin that has hardened over time? I think this fun fact will please paleotherians ;3
⚝A book about your type or its habitat
Read up on your own species to learn more about yourself.
⚝A prey of your type in plush form!
To hunt or nibble in we get bored.
⚝An object that diffuses the scent of your type's habitat
It could be an essential oil diffuser, a potpourri, or just anything that smells like the forest, for example.
⚝ A Tamagotchi
It's a small virtual animal/creature that you have to take care of. There are many different characters, you will surely find one of the species of your type ! This little retro item can really please anyone who feels lonely as an animal in human society.
⚝A chewable stim toy
For those who have shifts/instincts about chewing/biting things!
⚝A whistle that reproduces the sounds of your type!
I have already seen some very pretty ones in wood for example, they can also be suitable as decorative objects! (credits again to @zombi-teeth who gave me the idea)
Here are all the ideas I have right now, don't forget I'll add more later, there are sooo many different types of gears!
Have a nice day!
#therian#nonhuman#alterhuman#therian gear#alterhuman gear#nonhuman gear#alterbeing#alterbeing gear#fictotherian gear#theriomythic#paleotherian#theriomythic Gear#paleotherian gear#therian mask#therian tail#therianthropy#Species dysphoria comfort#therian gear idea#therian list#🏳️🌈🐾 positivity#gear
397 notes
·
View notes
Text
I generally encourage everyone to recycle and therians are no exception.
It is a beautiful experience to make something new out of what you already have. Cardboard, cans, soda tabs, plastic, boring and/or damaged clothes.
General tip: You can mix laundry softener and acrylic paint to make fabric paint. It may fade over several washes, but the paint keeps very well if placed in a container in the fridge.
I am starting a youtube channel called UrsaCanid where I will be giving tutorials on some of this list as well as video essays about therianthropy and hopefully therian interviews down the line.
Here are some ideas for ways to create joy out of junk:
1. Masks. Thin cadboard like from cereal boxes are perfect for masks and BirdyDogs has youtube tutorial on both feline and canine cardboard masks.
2. T-shirt yarn tails. Look up how to make t-shirt yarn and keep the strad thin. Then follow the typical yarn tail instructions minus brushing it out.
3. Claws. This can be made of either just cardboard or cardboard and metal from a soda can. Either method uses a good bit of hot glue. It is difficult to explain over text, but generally you make a ring out of cardboard for each of your fingers (marking which one is which) then you form the claw with your chosen other material. You then apply it and build it up with hotglue. Fingernail polish works really well for coloring them afterward. I will have a tutorial for this up soon.
4. Make your own kin plush out of t-shirt material and put something important or meaningful inside like at build a bear. You can then paint it or sew on buttons or random trinkets.
5. Paint. Your. Clothes.
6. Collect tiny junk like soda tabs, bread clasps, bottle caps, etc and make jewlery or a sensory jar. This is a particularly scavenger aimed activity.
7. Put packaging that has your theriotype on it up as wall decorations. If it's plastic, sew it onto stuff like a patch.
8. Be resourceful. Nothing, and i mean NOTHING, has only one purpose.
Sploot wide, kick hide, take pride
-UrsaCanid
#therian#bear therian#bear#therianthropy#art#alterhuman#bearkin#otherkin#diy gear#therian gear#alterhuman gear#otherkin gear#reduce reuse recycle#do it yourself
282 notes
·
View notes
Note
hi! would it be possible to post a tutorial of how you created the shapes in this set /post/753222419295158272 thank you :)
sure I made the gifset a while ago so don't have the psds saved but i decided to make a new gifset with a similar shape effect and show you how i made that :)
tutorial below the banner/cut

first start by making and colouring your base gif as you'd like. for the example i'm making today i'd like a pink gif.
for simplicity i'll put all the colouring layers in a group so it is easier to see what's going on with the shapes, but this is not a step i usually take.

once you've got your base gif ready search for the image/shape you would like to appear on your gif. in this case i searched for glinda's crown :)
make sure the image has no background and save it. if needed go to https://www.remove.bg/ and remove the background from the image then save it.
open your saved image in photoshop and drag it onto your gif. typically i drag it on the gray area outside the image canvas so it will land in the centre of the canvas.


if the image is too big resize it by using the transform function (ctrl +t)

right click the image layer and go to "Blending Options" (you can also do this by double clicking the layer (but not on the layer name as this will prompt renaming the layer)


go to color overlay and change the colour to white with blend mode normal and click ok

convert the new image layer to a smart object by right clicking and selecting the relevant option

change the blending mode of the new smart object to 'difference'

go back into blending options now and change the color overlay to the desired colour with the blending mode set to 'color'

at this point you can also add a stroke and drop shadow


this results in the below result

i noticed a bit of background missed from remove.bg

so i now add a layer mask and mask over the errant mark


and that's the basics of how to make a shape like the one in the gifset you linked. you can now add any text or other embellishments you may like.
a few other tips:
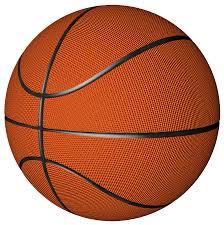
play around with your stroke settings, i did this a lot when making the so highschool gifset (e.g. i think the basketball one used the centre option)
the stroke option will outline what doesn't have a solid fill. to get each part of the basketball outlined like it is in the gifset i used an image like the first one below where the lines on the ball were also transparent to get the strokes i wanted (if that makes sense). if the whole image was solid, like the second image the outline would just be a circle basically.

in most cases the method i showed here is the best method, but for the so highschool book image i did something slightly different where instead of doing a straight smart object i also duplicated the shape on top with all the details left in. i applied the same effects to the bottom layer as above and on the duplicated layer also set that to difference and added a color overlay like the above


gives a result like this:

you can tweak how this looks a bit by using a selective colour layer clipped to the top layer. i wanted a bit more definition on the hat so i ended up with this after tweaking the neutral and blacks channels

overall my advice is to experiment and see what you like as that is what i basically do :)
#asks#resources#ps help#usergif#allresources#yeahps#completeresources#resourcemarket#dailyresources#tutorials#photoshop tutorial#*mine#i hope this helps/makes sense
119 notes
·
View notes
Text
Hair tinsel tutorial

Since so many people loved the tinseled hair idea, I wanted to show how you can easily do these recolors yourself. This tutorial is for those who already worked with SimPE and and create hair retextures before.
You need:
@crispsandkerosene SimStandardMaterial shader to add a mask for the shine
SimPE
Bodyshop
Graphics editor (I use Photoshop 2025 and attach PSD with my recolor as an example)
Let's get to work:
1. Create a recolor of hair with the desired color an usual way in Bodyshop and close it
2. Export the recolor texture with SimPE
3. Open it in a graphics editor
4. Create a group above and add a clipping mask to it in the shape of the hair texture alpha channel
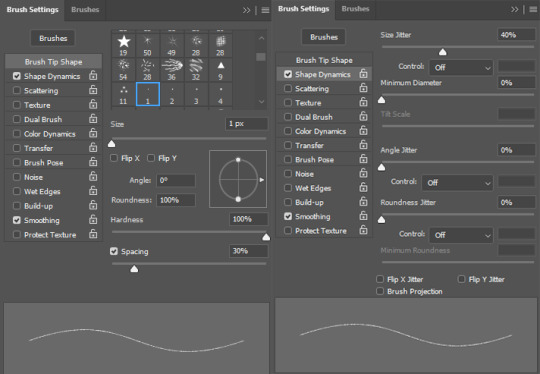
5. In this group, create an empty layer and paint the hair tinsel texture on it to your taste I used the standard Hard Round brush with these settings:
6. Save the resulting texture with transparency (.png, .dds, etc...)
7. Now inside the group create a white layer and add a clipping mask to it with the alpha of the tinsel texture
I prefer to made it a bit crunchy with "Select and Mask" function, I think the shine looks more realistic this way
8. Outside the group create a black layer
9. Leave only the white layer inside the mask and the black layer visible and save this texture, it will be a shine mask
10. Now open the recolor file in simpe and replace the hair texture with a new one with tinsel
11. Clone the texture file to create a shine (EnvCube) mask
12. Give it a new name and press "fix TGI"
13. Replace the texture with the black-n-white one you made earlier
14. Change the texture format to ExtRaw8bit
15. Commit
16. Go to the TXMT resource, make sure that in the cMaterialDefinition tab the Type set to SimStandardMaterial
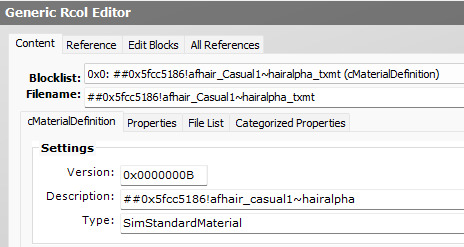
17. Then add EnvCube properties, more about it here in part 2
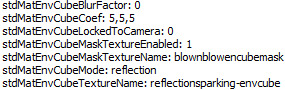
stdMatEnvCubeMaskTextureEnabled must have value: 1 stdMatEnvCubeMaskTextureName must have value of the BW mask name without "_txtr" part
I use these values, but you can change it on your taste:
18. Commit your changes and save file
19. Now check your recolor in game and if everything was done correctly enjoy the result ✨
For clarity, I am attaching a video of the process:
youtube
And of course a recolor file to take a closer look at everything: https://simfil.es/5332368/
114 notes
·
View notes
Text
i was asked by @matthew-macfadyens for a colouring tutorial, so here we go ! i've been making gifs for almost 4 years now and finally feel comfortable and confident in my skills to make a full tutorial on my colouring process. there are so many different ways people colour gifs, and there's no wrong way, this is just how i do it ! i learned to gif by reading so many tutorials and picking and choosing what works for me, so hopefully this can help someone out !
if this tutorial helps you, please considering supporting me ! buy me coffee ♡

TUTORIAL UNDER THE CUT
what you'll need: - photoshop ( i use ps cc 2023 & frame timeline ) - basic ps knowledge ( how to make gifs, how to sharpen gifs, general understanding of adjustment layers, layer masks and blending modes ) - a whole lot of patience
helpful resources:
the beginner's guide to channel mixer by @aubrey-plaza
giffing 101 by @cillianmurphy
gif making for beginners by @hayaosmiyazaki
colouring yellow-tinted shots by @ajusnice
becca's mega colouring tutorial by @nataliescatorccio
@usergif
PART ONE: BASE COLOURING
- step 1: curves - step 2: exposure - step 3: colour balance - step 4: selective colour - step 5: levels - step 6: brightness / contrast - step 7: gradient map
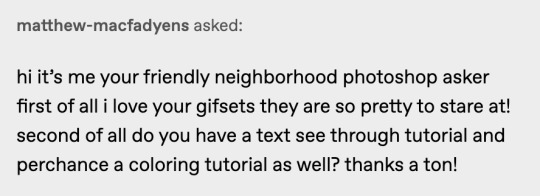
okay so, before we get started, this tutorial is for colouring only. at this point, i've already gotten my screencaps, imported them into photoshop, made the actual gif & sharpened the gif. the above image includes what my typical adjustment layer stack looks like !
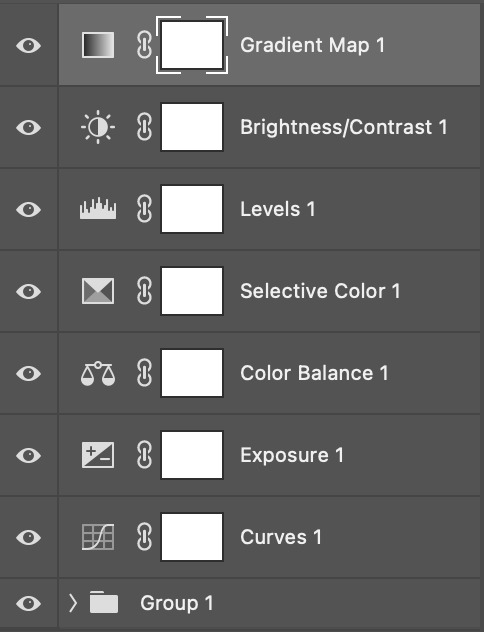
STEP ONE: CURVES
a lot of people do the majority of their heavy lifting in curves...i'm not one of those people. i've never gotten the hang of curves and haven't been able to fully taken advantage of everything it can offer. i use curves to mainly brighten up my gif and to start my process.
i use the "auto" button in the curves function - this automatically corrects the curves for your gif ( mainly the brightness / contrast )
you can see that the auto curves has brightened up the gif and evened out the brightness/contrast. i just find this gives a better starting point for the colouring process.
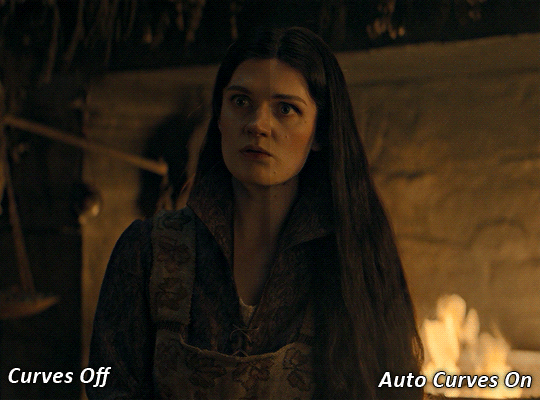
STEP TWO: EXPOSURE
this step is for, you guessed it, brightening the gif more and evening out the contrast and blacks. i don't have any real rules for doing this, the amount i highten the exposure and contrast is different based on the scene and the show, however, i tend to stay around +1 on both exposure and gamma correction.
exposure effects the brightness of the gif and gamma correction effects the blacks and contrast. this step also effects the saturation of the gif, so it's important not to go too crazy. i often end up coming back to this step every now and again to adjust and fiddle with it.
for this gif, i put the exposure at +1.18 and the gamma correction at 0.85
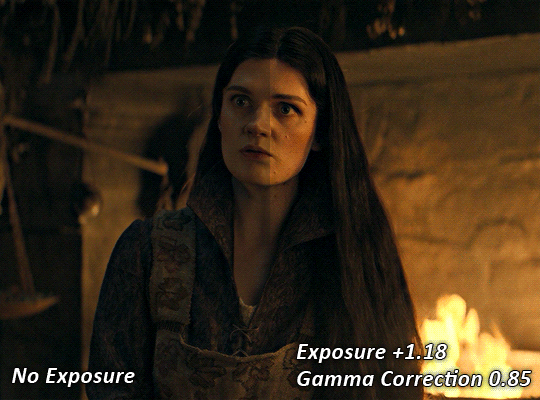
you can see this step serves to add some more brightness and contrast - it also adds some more saturation, that we don't always want, but don't worry, that's what the next steps are for !
STEP THREE: COLOUR BALANCE
i use this step to do a lot of my heavy lifting - i'm a whore for colour balance. this serves to even out the colours and help neutralize the colours for an easier canvas. it's important to understand the basics of colour theory for this, i recommend checking out the channel mixer tutorial i listed above, because a lot of those steps applies to colour balance.
essentially, there's three separate profiles to edit on - highlights, midtones and shadows. in each profile, you have 3 colour sliders. the top one is your cyan to red, middle is magenta to green, and bottom is yellow to blue. the colouring of the scene will decide where to move your sliders.
for example: if your original scene has a cyan tint to it, you'll want to pull your slider to the right, towards the red to help neutralize the cyan. if your scene has a green tint, you'll want to pull it left towards the magenta. as you move the sliders, you'll notice that sometimes it brings out other colours you don't necessarily need, you can adjust the other sliders to help neutralize further.
i always do my main correction in the midtones profile.
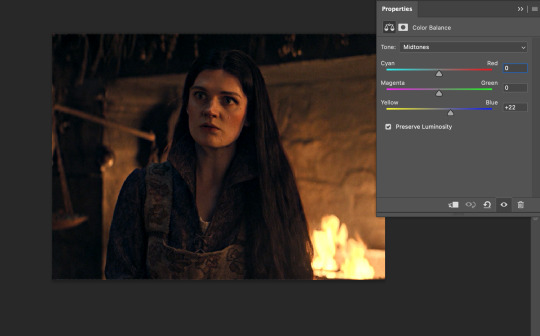
since this scene has a heavy yellow tint, my first step was to adjust the bottom slider. i pulled the slider to the right towards blue at +22. you can see this helped get rid of a lot of the yellow, but adding in the blue warmed up the reds and made it more saturated.
to help with this, i pulled the top slider left towards cyan to help neutralize that red.
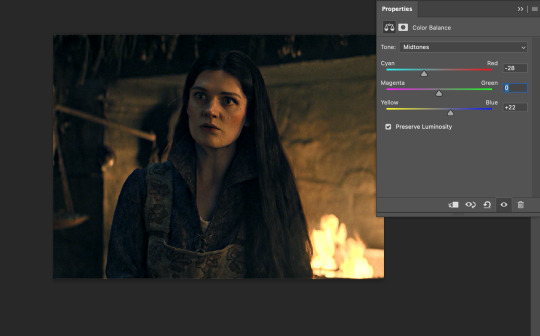
i pulled the top slider to -28 and you can see this cut out that heavy saturation and redness. it's looking a lot better, but now it's a little too green for my liking. this is where that middle slider comes in!
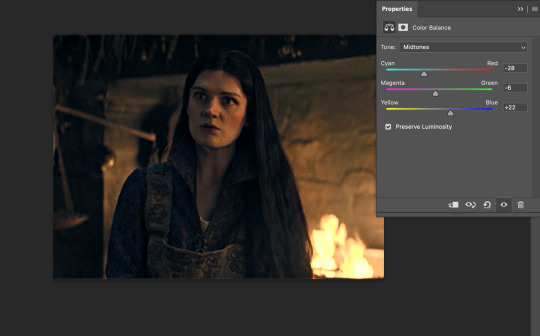
i pulled the middle slider to -6 towards the magenta to help counteract the green that came in. ( i ended up going back in and adjusting the bottom slider to +10 instead, as it was a little to blue )
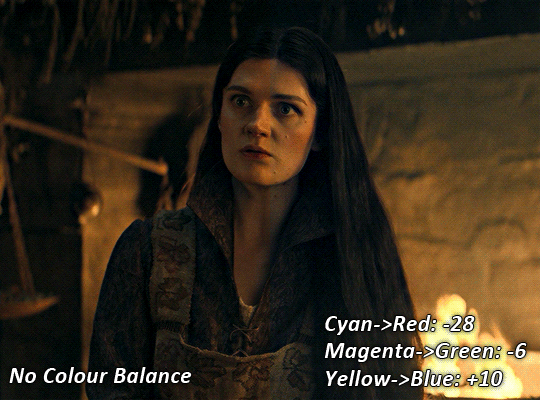
you can see this step really did the heavy lifting, helping to neutralize the canvas so that it's easier to work with...but it's not quite perfect yet!
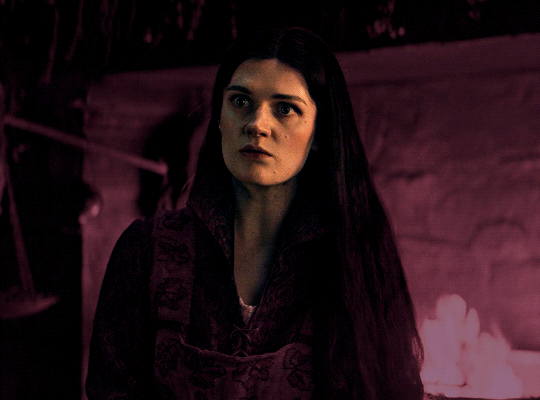
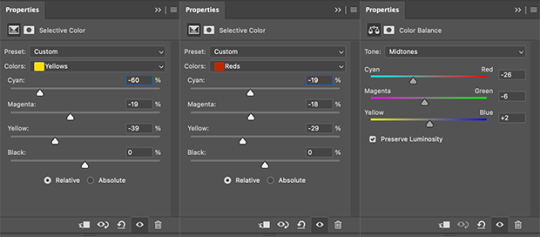
STEP FOUR: SELECTIVE COLOUR
a lot of the same principles around colour theory apply to selective colour! this is where i go to adjust the colours according to what my colour palette is. for this gif, the overall colour is going to be purple, so i'll adjust the individual colours with that in mind.
i only ever adjust my red, yellow, white and black profiles! sometimes i'll do the other colours, but that's only for tweaking the final colour. i normally don't touch them at all.
ps: you'll notice i prefer a cooler toned gif, and almost always go for a more magenta looking red/yellow.
i always start with my yellows:

in the yellow profile, i pull my cyan towards the left to -38 (this helps eliminate the green in the yellows) and my yellow slider to the left to -27 (this cools down the yellows. i top it off by adjusting my magenta slider to -10, to help lower the saturation of the yellows.
you'll notice this step got rid of most of the green undertones - that's because the green was nested inside the yellows, so by taking out a lot of the cyan and yellow, you're left with a warmer yellow as opposed to a cooler yellow.

next i go on to my reds. this step will mainly effect the alys's skin tone, but i'm going to do pretty much the same as above but with much less dramatic of a change. lowering your colours in your red profile too much can lead to a very saturated gif, which is not what i'm going for.
i pulled my cyan slider to -19, magenta to -9 and yellow to -15. you can see this helped add some more cooler tones to the reds.
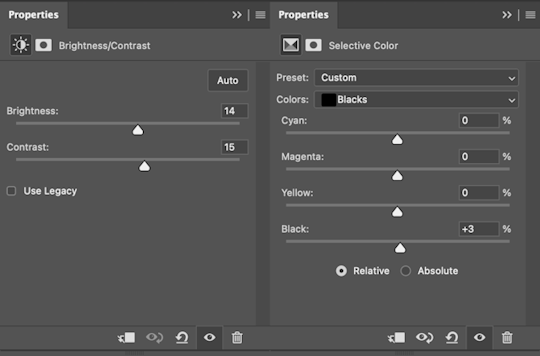
the next profiles are your white and black profiles. i use white to brighten the lightest parts of the gif. no rhyme or reason here, i just pull the black slider towards the left...usually around -25. for the black profile, i always move the black slider towards the right. anywhere from +3 to +8, depending on the gif. for this gif, i did +8. this darkens the blacks and, in my opinion, helps the gif pop!
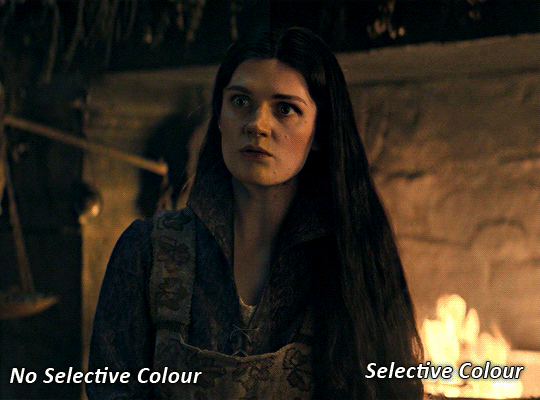
you can see this step got rid of the yellow tint, gave the gif a more neutral look and adjusted the reds to better compliment a purple colour scheme !
STEP FIVE: LEVELS
this adjustment has three toggles - i'm not 100% sure what each toggle really does, i just know that by pulling the leftmost toggle to the right, it darkens your gif, and pulling the rightmost toggle to the left brightens your gif.

this step is so hard to explain, but really i just pull the toggles around until it looks good...sorry !

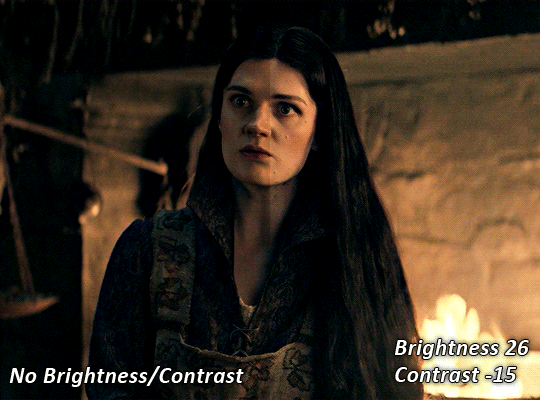
STEP SIX: BRIGHTNESS / CONTRAST
this step is exactly what it says on the tin...it brightens your gif. this step is based on your scene and personal preference, there's no real guide to it.
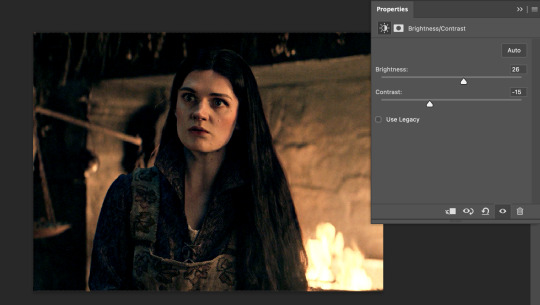
i always pull my brightness slider to the right ( brighter ) and my contrast slider to the left ( less contrast ).
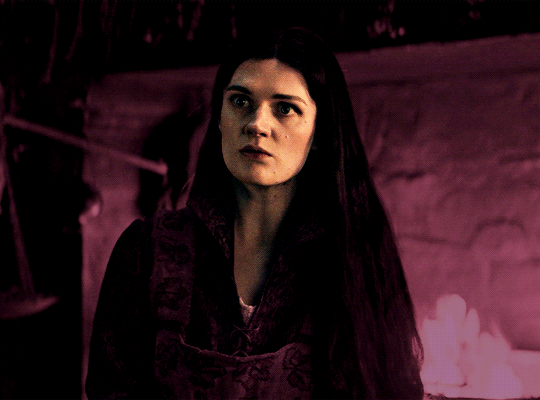
STEP SEVEN: GRADIENT MAP
this last step is something i learned from @nataliescatorccio ! i add a gradient map to the top of my stack, and choose a lighter colour of what i want my overall gif to be. in this case, i used a very light purple!
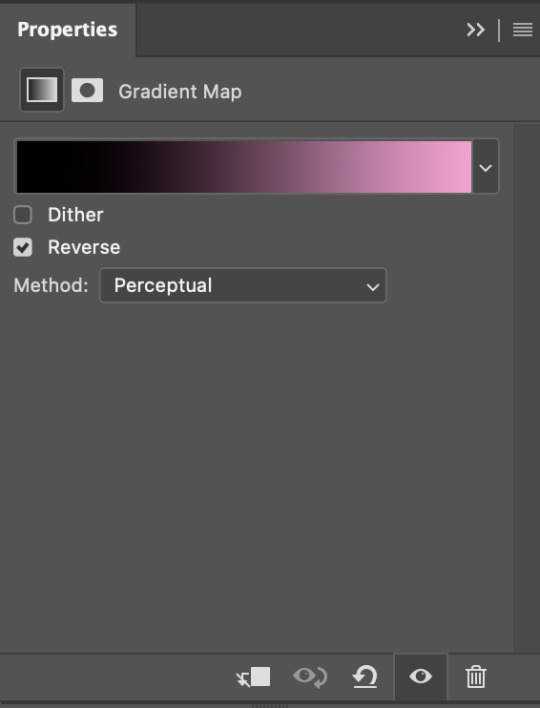
i then set the blending mode to "soft light" and lower the opacity to anywhere from 20-30%. for this gif, i did 30%
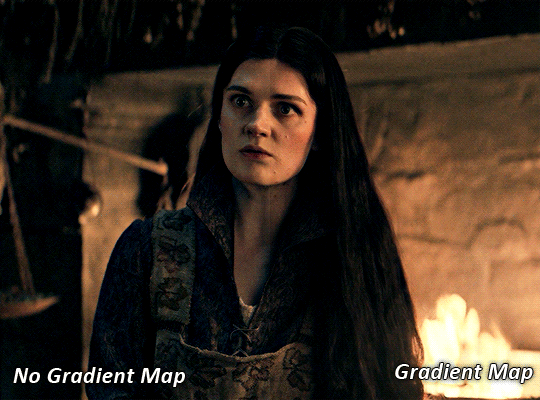
this step will help make your colour pop once you do your main colouring!
PART TWO: PAINTING & COLOURING
- step 1: layer 1 - step 2: layer 2 - step 3: layer 3 - step 4: final touches
okay, so my actual colouring process is based in 3 layers. for this gif, i'm using a deep purple/mauve colour !
STEP ONE: LAYER ONE
between your brightness/contrast and gradient map layers, add another blank layer. change the blending mode of this layer to "colour" and set the opacity to 40%.
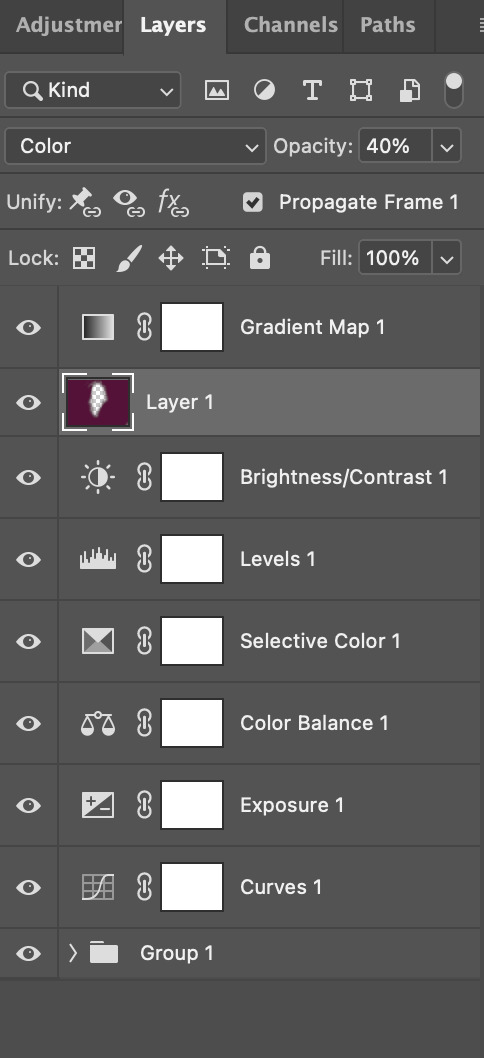
then, using a soft round brush with an opacity of 100% ( size of the brush is your preference, i typically use around 108 ), colour the parts of the gif you want coloured !

you can see this helps us get the canvas to a more uniform purple colour!
STEP TWO: LAYER TWO
for layer two we're going to do the exact same thing. add a layer above your previous, set to "colour" at 40%. we're going to go over the same areas!
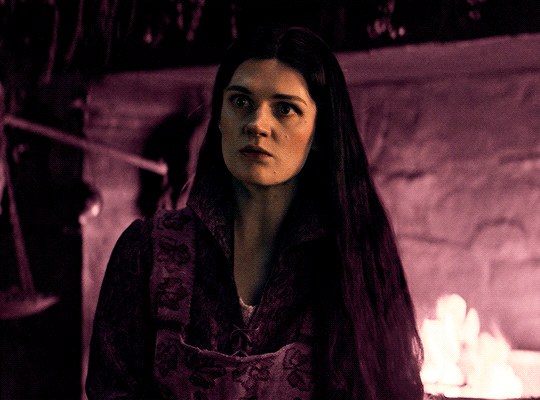
you can see this helped get the purple so much more vibrant and closer to what our final colour is going to be!
STEP THREE: LAYER THREE
for our final layer, add another layer above the previous 2, set your blending mode to "multiply" and your opacity to anything from 60%-100%. for this gif, i did 60% !
now, our colouring is pretty much done but you can see that, now that our colour is down, alys's face is still a little too blue/green/yellow for the background purple. the next step, we're going to adjust and add final touches!
STEP FOUR: FINAL TOUCHES
at this point, i went back into my selective colour layer and adjusted my yellows & reds and went back into my colour balance layer to adjust everything overall.

at this point, i'm going to go in and add some adjustments layers above everything - i usually add some brightness/contrast, and a selective colour layer to darken the blacks.
which brings us to our final result:
#usergif#dailyresources#pscentral#ps tutorial#tutorial#coloring tutorial#allresources#userbecca#tusermich#userjoelle#ughmerlin#mialook#*tutorial#**
222 notes
·
View notes
Text
Tutorial: How I edit my pics (Photoshop)

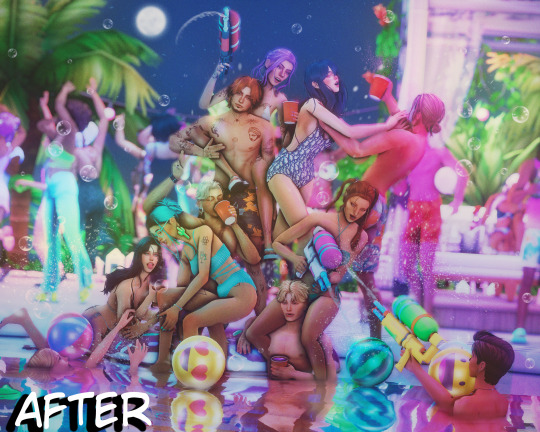
A not so helpful guide by me~
(orig. post)
For the beginning: I use my own Reshade and use only Photoshop to edit. (for videos I use Premiere Pro/After Effects)
Ingame: I use SRWE with the profile 3840x2400 to get it already in a better qualitity. For this pic I also used ReLight.
In Photoshop:
I start with using Topaz Clean with these Settings:
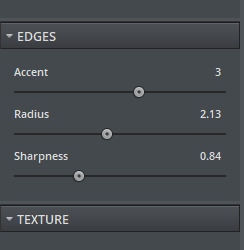
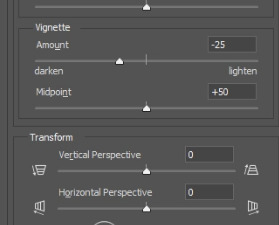
Next I make a Vignette ("Filter"-> "Lens Correction") with these Settings:
After that, I start making a bloom you can use this tutorial for that: https://www.youtube.com/watch?v=aMxnXfN7ZDg
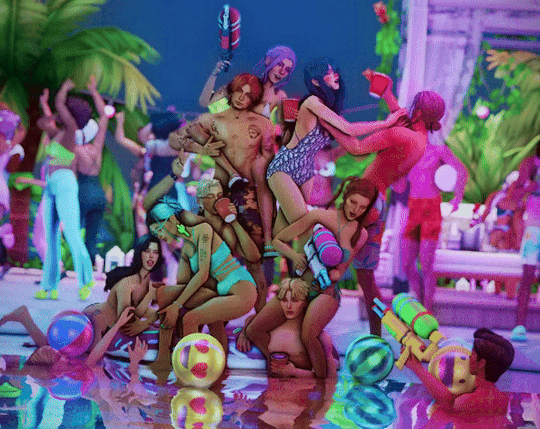
Before and After
Now I put a filmic grain on it . For that I go on "Edit" and click on "Fill"

you want it to look like that
The pic will turn gray but thats normal!:)
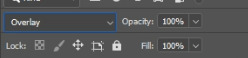
Now I convert it into a smart object by right clicking on the layer.

Next I change the layer to "Overlay"
I continue with going to "Filter" and click on "Noise" -> "Add Noise"
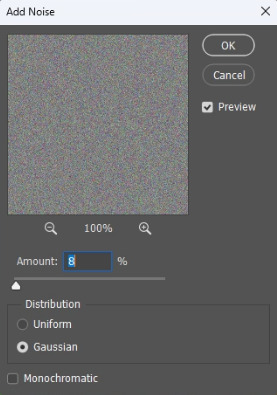
The window will look like that. I like to put the Amount to 8 but that's all preference:)
That's it for the filmic grain. (I made it into an Action so it's faster)
My next step is to put a Curve to make the pic a bit more moody.
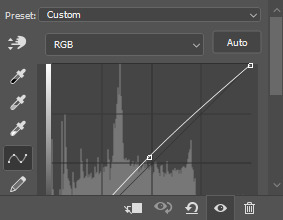
I don't put too much though lol, it also changes depening on the pic.
After that, I put a Color Lookup to change the color a bit.
For that I click on the little half moon bottom right.
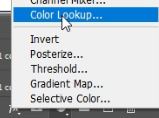
I like to use on of the first 2 Kodak LUTs (Kodak 5205 or Kodak 5218)

I put the Fill of that layer around 40% to make it less strong.
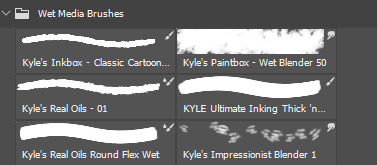
Next I draw hair! (still a noob at it...) I use this Brush "Kyle's Real Oil Round Flex Wet" that comes with Photoshop:

Before and After
For the next step I use 2 Hue/Saturation Layers also on the little halfmoon bottom right.
With that I draw Shadows and Highlights!

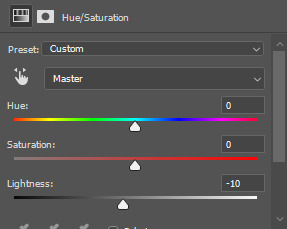
For Highlights For Shadows
After that, I click Ctrl+I to invert the Layers and start drawing on the mask layer.

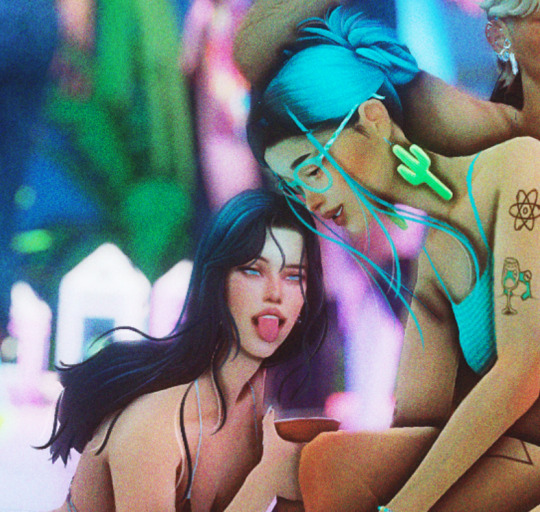
Before and After
The pic is in an area with lots of colored lights, it would naturally reflect on the Sims, so I put some pinkish and blueish colors on highlights like this:

Now to the effects to make it look more fun!
3 of the Sims are using water guns and they splash with it ofc! So I added some water splashes with a brush and put a slight motion blur on it.

and since it's a lot of people, water splashes everywhere. Because of that, in some areas I added some water splashing effects (Photoshop Brush) that are making it look like there is movement.
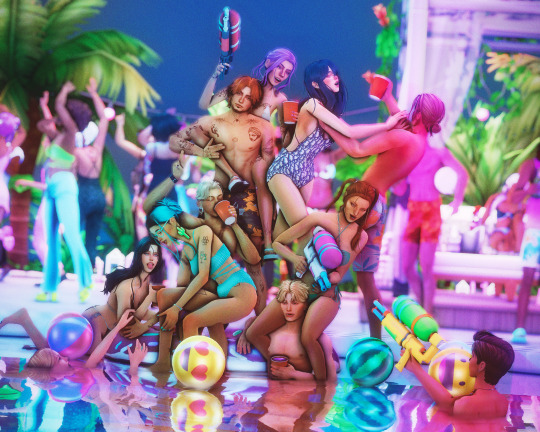
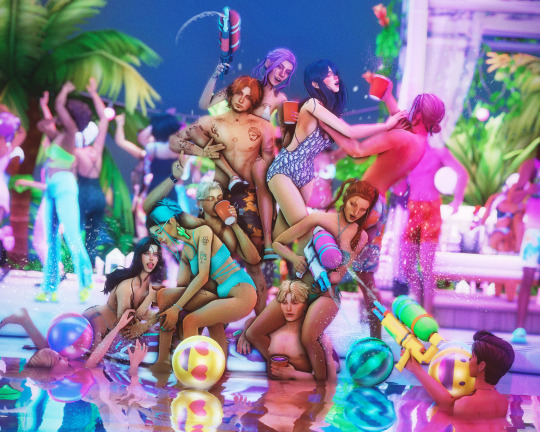
looks way more alive now right?
It still felt a bit "empty" though, so I decided to put a picture of a moon in the sky and added some bubbles (Photoshop Brush) around.
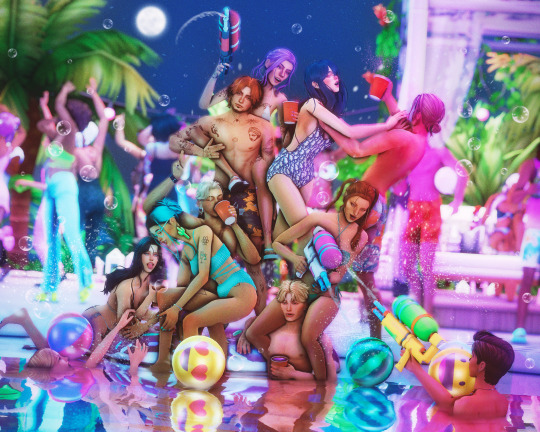
fun fun
Now I put a light leak overlay I found on the internet over the pic.
I put the Fill of that Layer on really low though, so it has a “soft“ effect.
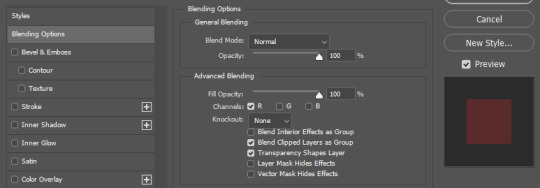
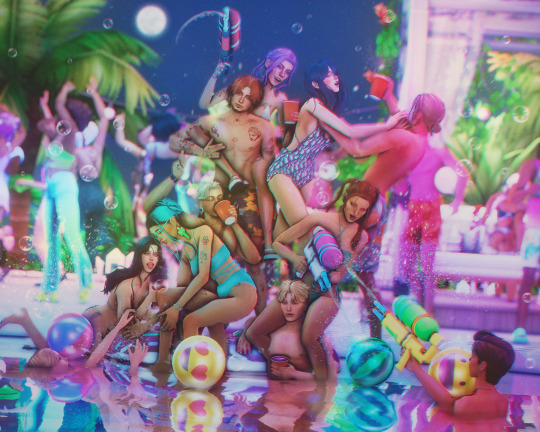
At the end, I made a chromatic aberration (color distortion)
For that I make a Layer copy of the pic and double click the new copy layer and a menu should open.
Under channels uncheck G and B. After that close the window and just resize the Layer a bit.
And that's it! Hope it was helpful somehow:)
152 notes
·
View notes
Text

TSR Workshop pro-tip: Find any game texture
Did you know that you can find and use any game texture for your TSRW project? This way you won't have any redundant textures inside your package. The resource key has to be in this format: key:00000000:00000000:0000000000000000
Here are some useful examples:
Black specular= key:00B2D882:00000000:F961EF123B01E579
1 channel mask= key:00b2d882:00000000:646b487723d17864
Empty normal map= key:00b2d882:00000000:972952e0d3631f66
These are universal textures referenced in a ton of EA CAS items and are safe to use in your own projects. So please, don't import a new empty texture! It'll just be another resource the game has to load.
This will also work with textures from a CC package if you put it in your game files. Check out this tutorial for more info: Link
Of course creating an actual specular or normal map will almost always look better, but a majority of you will stick with empty ones regardless.. I've been guilty of using black speculars myself.
66 notes
·
View notes
Text
tips for 4t3 converters/CAS clothing creators
3 main things:
non-recolorable presets
DDS. settings
Adult to Teen conversions
disclaimer: i'm not a CC expert, but these are things i've noticed and learned these last couple months converting cc. special thanks to thornowl and the other converters in the TS3 Creators Cave discord.
Non-recolorable presets:
we obviously know that ts4 lacks a CASt tool, so ts4 creators rely on recolors. In my conversions, I do include a couple of the item's recolors. these usually are patterns that CASt does not have.
one thing I've noticed more and more converters doing is putting such item recolors in the 'Overlay' tab in TSRW.
let me show you what that looks like for a non-recolorable preset:
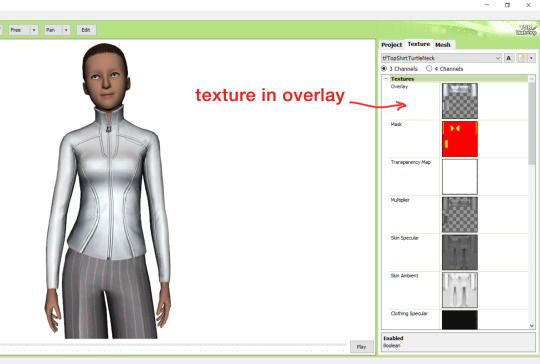
it looks over-saturated, and almost crunchy. but there's another place you can import the recolor into: stencils.
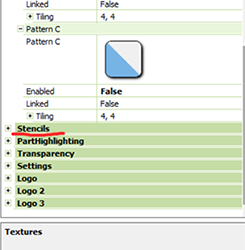
stencils will be found at the bottom, under patterns. hit the plus sign next to stencils to open it.
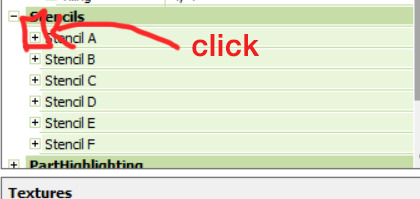
opening it will show you this:
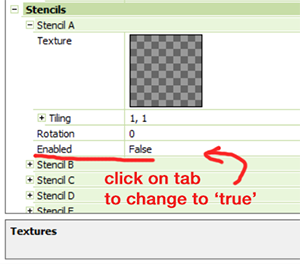
by default, it will be enabled as false. import your recolor into the texture tab as you would do for any other texture tab. make sure you tick the 'false' to 'true.' stencils override overlays, so if you want to use an overlay, enable stencils back to 'false.'
here's what the recolor imported into stencils looks like:

here's the two side by side:
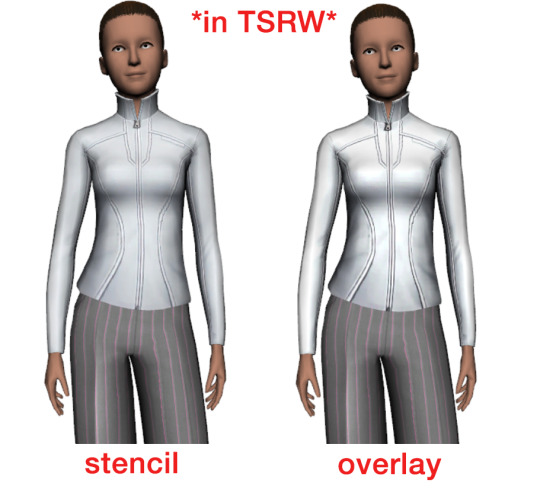
see how different they are? let's see how they are in game:
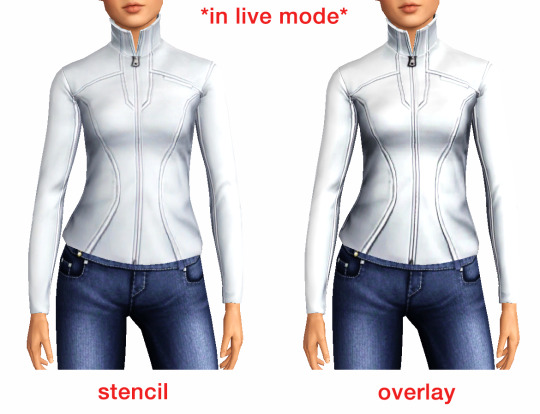
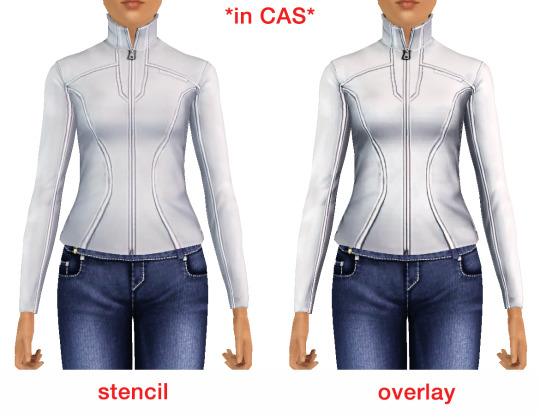
click on the pictures to really see the difference in quality. since TS3 uses DDS. format, it compresses the texture, which results in the crunchy texture. importing the recolor into the overlay tab makes the DDS. compression more noticeable. it ultimately is up to you and whichever one you prefer, but do keep it in mind.
the overlay tab is good for small details that you want to maintain on all recolorable presets, like zippers, buttons, tags, etc. just look at EA clothes for reference, especially their shoes and male clothes.
another thing you can see from the images are the bumps on the mesh. doing normal maps can help you keep those same details on the recolorable presets without importing the recolors.
-----------------
DDS. settings:
something I also see and used to do myself is bloat package files with large file sizes, specifically normal and specular maps, as well as masks. the Sims 3 Tutorial Hub provides a link to plain maps, but the file sizes are unnecessarily big.
let's look at some of EA's maps in TSRW:
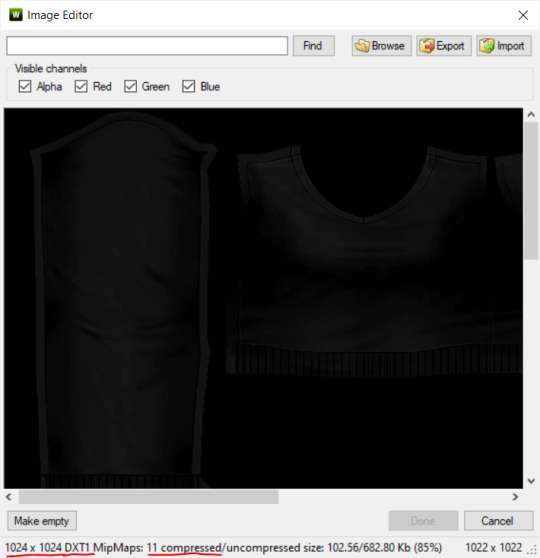
here's the specular from one of the basegame sweaters. notice the image size, DXT format, and compression size.
a lot of converters don't want the shine on regular clothes, so we use a plain, black specular map. but ask yourself, why do you need a 1024 x 1024 purely black specular map with no details?
let's try sizing it down:
notice the difference between the image and compression size. instead of bloating the package file, we can keep it down by using a 32x32 plain black specular map instead, since there aren't details we want from the specular map.
same goes for normal maps:
and masks (meant for 1 channel only):

now, notice how I underlined the info about DXT MipMaps. see how the normal map has a different number there compared to the specular map and mask.
the reason these textures use different DXT is because of the colors and alpha channel.
here's how my DDS. settings appear when saving:
DXT1 (no alpha): this keeps only the 3 color channels and has the strongest compression. it results in half the file size as DXT3/5. 3 channel masks should be saved with this, as they don't need an alpha channel.
DXT1 (1 bit alpha): this includes an alpha, but only black or white. it also results in half the file size as DXT3/5.
DXT3: this one is rarely used for TS3 textures. it really is only used for overlays. it compresses the same as DXT5, but may not be the best for images with smooth-blended alpha regions (Neely).
DXT5: multipliers and normal (bump) maps should only EVER be saved with this. it's best for colors but has a larger file size. this is why it's important to reduce the multiplier and normal map image size, especially if you don't make a normal map.
if you DO decide to do a specular and normal map, they should be regular image size, 1024x1024, and saved in the right format.
here is more information on which textures should use which compression.
-----------------
Adult to Teen Conversions:
the default for converters is obviously AF and AM. a lot of people want the items for teens too. I've seen several converters just enable it in TSRW:
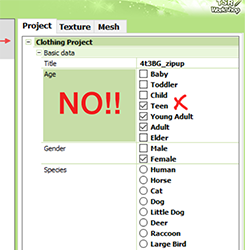
please don't do this. it's honestly the lazy route. you can hardly ever get away this, specifically because of the body differences between adult and teen.
some major issues with this include gaps, seams, and unnatural body characteristics:
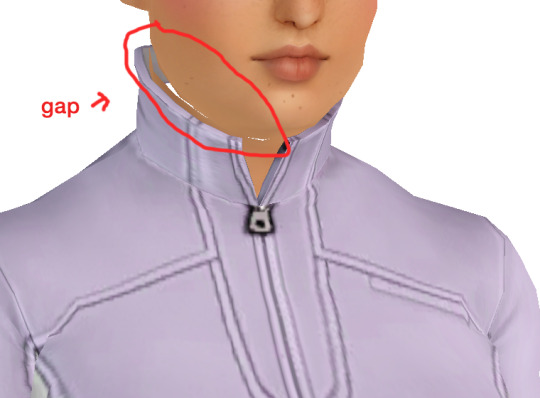
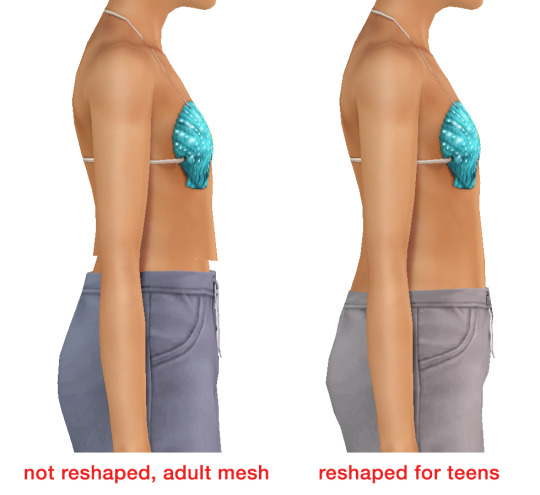
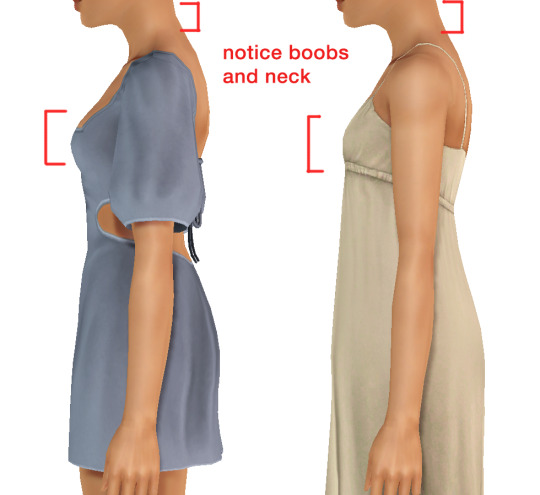
so please, either skip the teen mesh entirely or spend the time reshaping the mesh. @/sweetdevil-sims has a great tutorial on converting meshes from AF to TF here. the inevitable seams on TF meshes are also now fixed, thanks to @/thornowl with their new version of mesh toolkit.
@pis3update
---------------
here are reduced file sizes and corrected settings of the plain mask, specular, and normal:
download
Sources:
Neely, G. ‘Buckaroo’. Working with DDS/DXT Files. Available at: https://www.buckarooshangar.com/flightgear/tut_dds.html (Accessed: 28 May 2024).
180 notes
·
View notes
Text
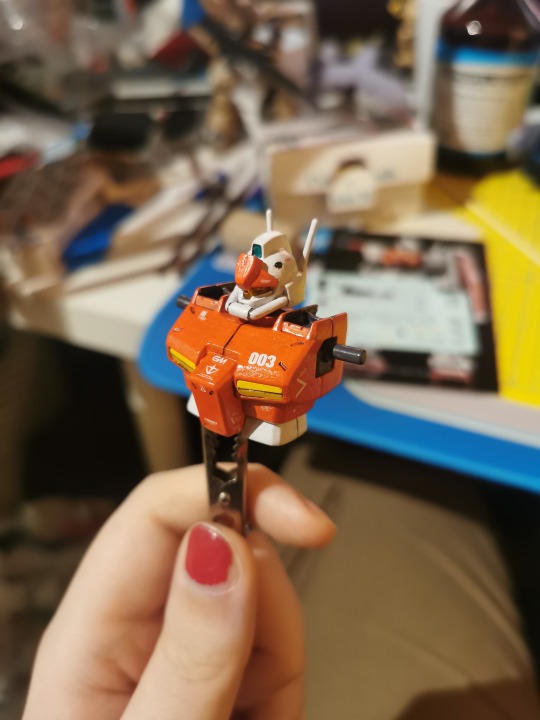
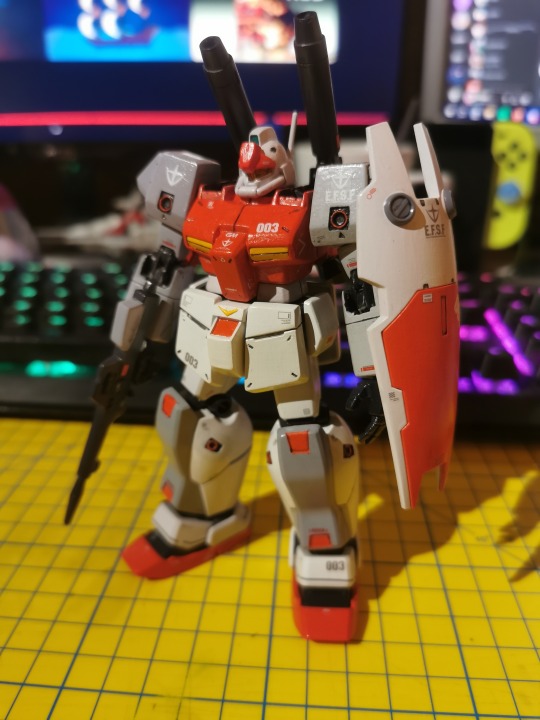
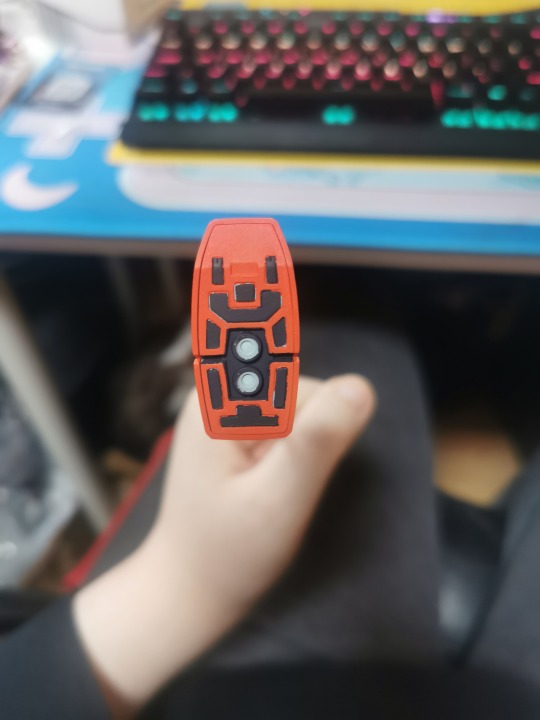
GM Cannon II (Space Command Type)
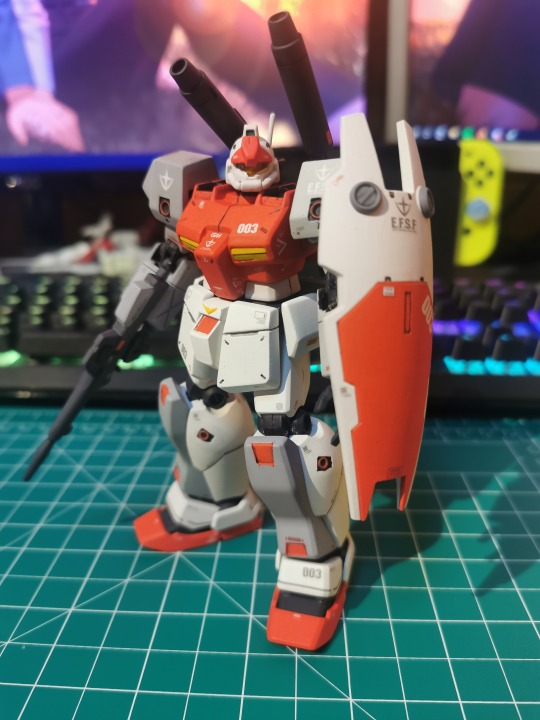
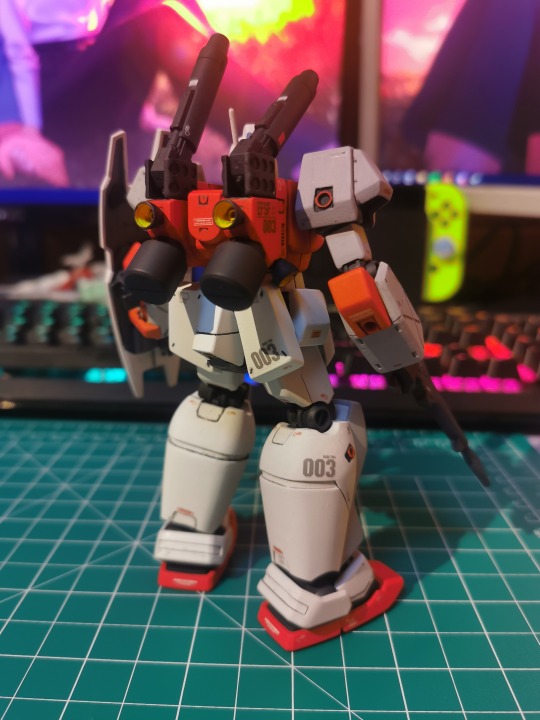
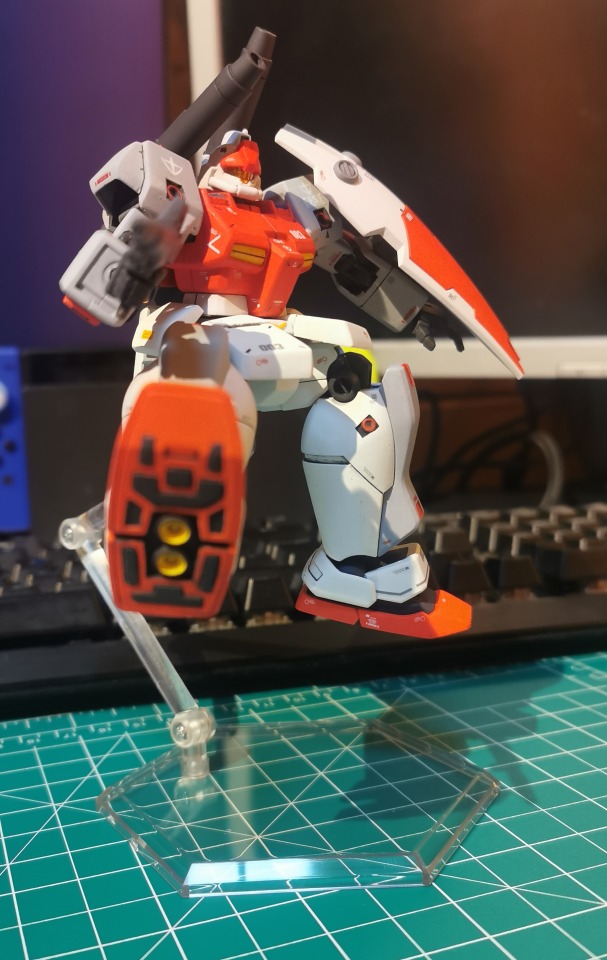
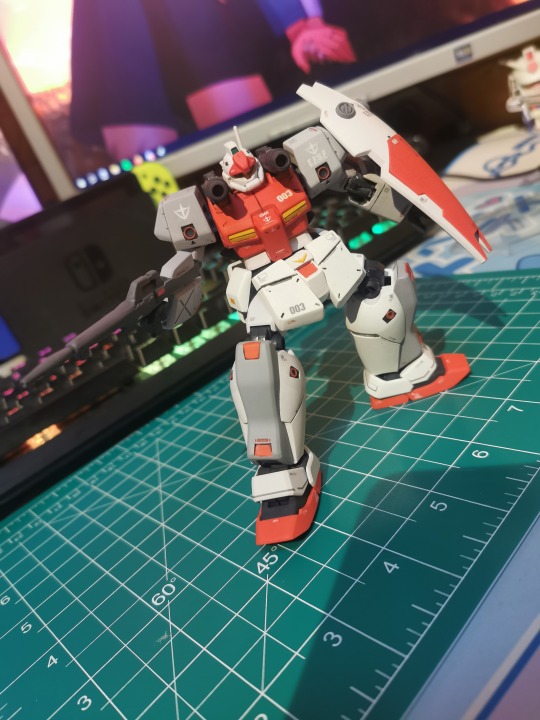
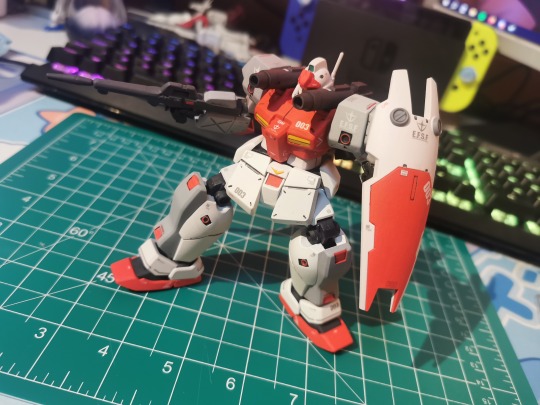
It honestly feels a little surreal posting this right before the new year rolls in, but it also feels so satisfying to put this project behind me so that I can focus on my backlog in 2025. This is a project I started a few months ago at this point, and at long last I can properly show it to you all! It's a custom colour scheme that I decided to paint on the GM Cannon II.
If you don't care to read about the process of painting this thing and just want to see some extra pictures and angles of the finished product, scroll down to the end of the post :)
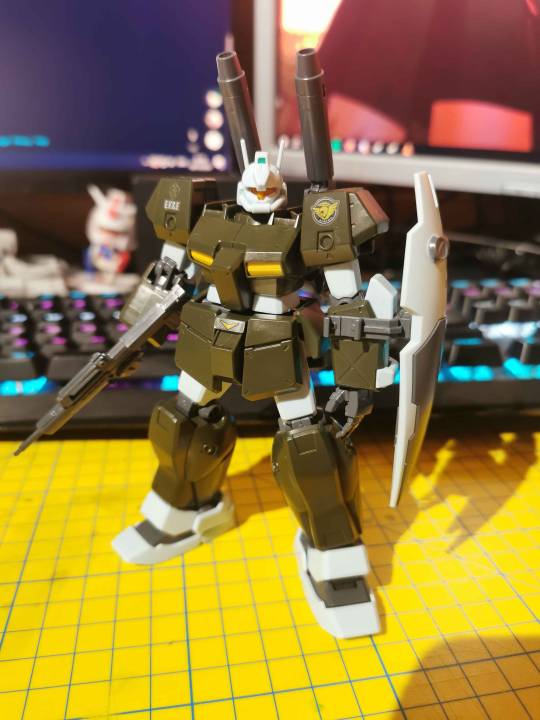
I like the design of this mobile suit but I thought the original colour scheme was kind of gross and unpleasant to look at, so I decided that I would use this kit as a practice to familiarise myself with brush painting techniques. I decided to go for something simple enough and just adapt the GM Space Command colour scheme to use with the GM Cannon II. In case you haven't seen what the kit looks like out of box, here it is:
I originally expected this project to take me a few weeks, but it ended up spanning months, and for a first time attempt at this, I'm actually very proud of it! I think it looks very clean, and despite the GM Cannon II kit being kind of a piece of hot garbage when it comes to articulation and stability, it served as a good practice kit that I considered to be low stakes.
I'm not going to go into the entire process in detail about how to paint this and instead I will just point you towards the Tea and Gunpla youtube channel, specifically their video about brush painting gunpla. All of the videos on their channel are extremely informative, to the point and act as great tutorials for improving your gunpla customization skills.
The Process (Summarised)
To summarise the steps it took from start to finish though, I first had to familiarise myself with how the kit is assembled and identify the seam lines I wanted to remove (mainly around the arms, shoulders and legs). I then had to remove those seam lines, either by using plastic cement or putty, and then I had to sand every single part down so that paint would adhere to it more easily.

From there, I could start painting the kit, initially priming all of the parts and then painting them all with the respective colours I wanted them to be.

From there, my usual process would be to assemble the painted pieces very carefully as to not chip any paint, and then brush paint on a layer of gloss varnish in order to protect the paint and prepare the piece for panel lining and decals. For the decals, I used G-Rework's GM II decals, since there are no decals to be found for the GM Cannon II specifically and the GM II decals looked very good and appropriate for this kit.
This process is repeated for the rest of the kit until everything is ready to be top coated with a matt spray coat.
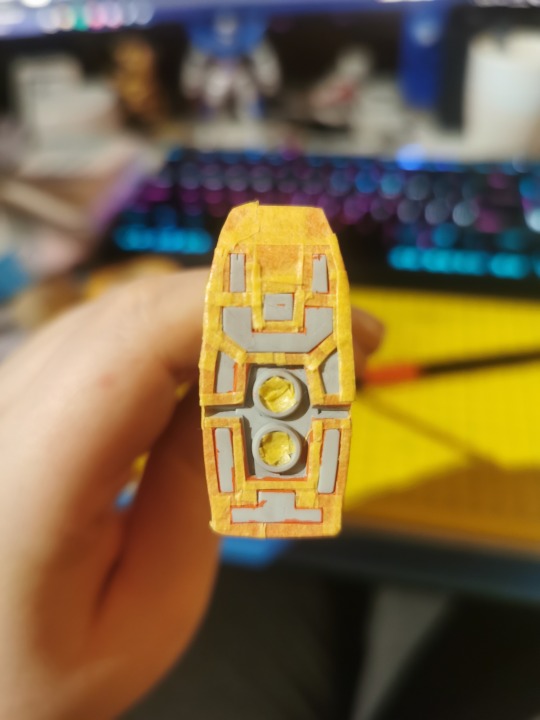
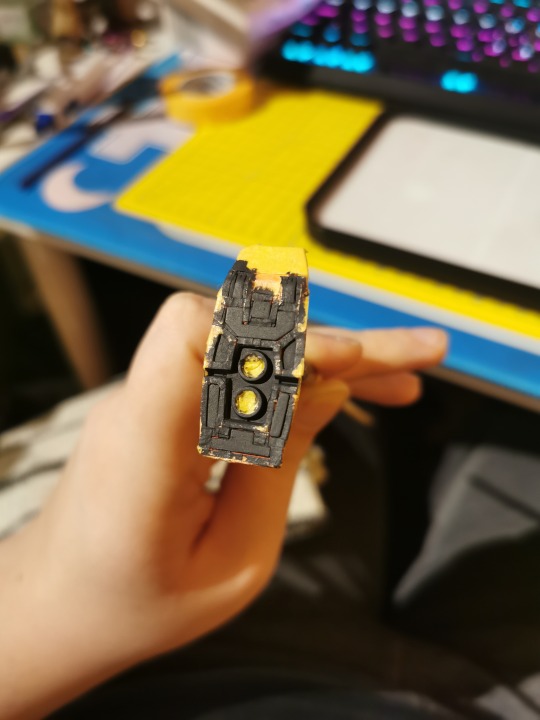
I incorporated some additional techniques to make the painting process a bit easier for myself when working on this kit, and the main one I want to point out is the use of masking tape to cover parts that you don't want to paint over. I found this to be most useful when painting the bottom of the feet, as I wanted to paint the thrusters on the feet as well as extra details in order to make it look nice, but I didn't want to stress myself out with needing to be precise when painting.
Lessons Learned
I highly recommend using masking tape when painting those kinds of details on a piece, though do be careful with it as you also risk the paint building up on the edges of the tape and making the finished paint job uneven and messy.
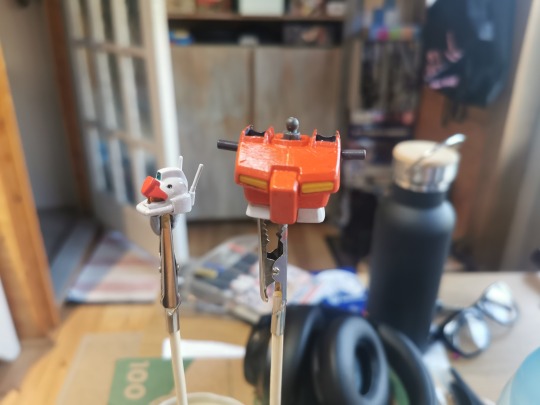
I unfortunately had some breakages on the kit as I was working on this project, the most noticeable one being one of the antennas on the back of the head breaking off. I tried to repair this using a piece of runner, but I decided it would be too much work in the long run so I decided to leave it. It's a practice kit after all, so I allowed myself to make some mistakes!
I also had the shield arm joints snap on me completely because I used too much gloss varnish on them and they stuck together, so do be careful when applying the brush varnish. I ended up fixing the arm using some plastic cement, but they no longer have any articulation and are basically stationary at the elbow joint. In future I will look into perhaps spraying the varnish on using a rattle can instead, but I have no idea when I will start another project like this lol.
This practice kit served as a very good lesson in how to pace my painting projects going forward. When working on this, I did every step one at a time for every piece of the kit. That is to say, I first sanded every piece, then I painted/panelled/decaled every piece, and then I matt coated every piece. That ended up being a mistake on my part, as it was incredibly easy to burn out of working on this project. I ended up missing the simplicity of just snap building a kit, and my one-kit-at-a-time policy will not work here for future. Next time I take on a project like this, I will do the painting in the background of other gunpla projects, and I'll treat it as more of a long-term side project.
I also learned to NEVER MIX PAINTS when working on a project like this, unless I'm mixing a large amount of a colour in advance to use multiple times. I originally didn't intend for the kit to have a two-tone white colour scheme with the offwhite and lighter gray, but a mistake when painting the gun arm made me improvise a bit and adopt the two-tone scheme. It ended up actually being a sort of happy accident, because I think it looks great, but keeping the colours consistent like that was a huge hassle and just added extra stress. In future I will be primarily using paints straight out of the bottle and minimising mixing paints.
One thing I didn't give enough attention to was priming my pieces. I sort of haphazardly primed my pieces for painting, and I should have been a lot more careful with it. I let primer build up in corners and it was unevenly applied, and it ended up making some of the painting take much longer than it should have, especially when painting offwhite on pieces that were originally darker in colour.
The last thing I would really want to mention is that matt coating certain colours, particularly metallic ones like what you can see on the head sensors, is not a great idea as it will end up dulling the colour. perhaps it might be better to spray a glossier coating on it, or leaving it un-coated so that the metallic aspect can shine through a bit more. It still looks pretty good overall I think, but definitely something to experiment with.
In Conclusion...
This was a really fun project, and while it was quite tedious and sometimes annoying, the finished product makes all that suffering worth it. I learned so many things and adopted new techniques that I can transfer into my usual gunpla works, which I'm really happy with. If you have any questions as to the process or anything else, feel free to ask! Reblogs are also appreciated <3
#gunpla#gundam#custom#plamo#plastic model#GM#GM Cannon II#0083#gundam 0083#stardust memory#mecha#mech
46 notes
·
View notes
Note
Hello! Do you have any tips or tutorials you could direct to on how to make 3d sculpting for dolls? I have some 3d sculpting knowledge, but I wouldn't know how to tackle joints for printing
no tutorials unfortunately, since i figured this stuff out for myself. but i can do a quick rundown on how i do it.
firstly, i sculpt my dolls in pieces from the start. i find it easier to keep the joint locations & shapes in mind during the whole process, rather than making a solid statue and chopping it up later. when i'm almost done with sculpting, i add spheres to all round parts of the joints and blend them in; this way i don't need to worry about masking them off during sculpting, or accidentally deforming them.
next, i use the boolean modifier to cut the sockets, as demonstrated on this random wip file.

in the case of this shoulder, i would put a boolean difference modifier on the torso, and then pick the upper arm as the object to cut with, and apply.

which creates a socket. because 3d printing isn't always 100% accurate, i leave 1% of tolerance so the ball can actually fit the socket even if both of them warp ever so slightly in printing.
after the sockets, everything else is quite similar. i cut the elastic channels, magnet holes, and hollows inside large parts using a variety of stock shapes and tools i've pre-made to speed things up.

this, for example, is a tool i use for cutting channels into upper arms and thighs. just position the tool in the middle [unlike in this one, where i've accidentally placed it crooked], put a boolean modifier on the part you are cutting, and select the shape as the cutting tool.
i don't know about how anyone else does these things, but this way has worked well for me.
131 notes
·
View notes
Text
hello there

so.... im thinking of making a youtube channel where i do tutorials on how to draw like super specific things.... im thinking of calling it
oddly specific tutorials? maybe idk
like... how to draw specific characters (character studies), or how to draw like specific things like uhh wings orr a specific hairstyle. stuff like that. and depending on what i want to do and what im interested in i might do like animations and commentary and stuff too.
i prob will include like camera and stuff but im planning on being faceless (using masks n stuff like that) at least for awhile. (im self concious lol
anyways

would anyone actually be interested in content like that? i'll probably post videos and repost links here as well.
24 notes
·
View notes
Text
Dynamic Duo HQ
by phantochor Welcome to the BatChannel! When Robin convinces Batman to start a YouTube channel, Gotham's crime-fighting duo goes viral with self-defense tutorials, villain survival guides, and unexpected hilarity. Behind the masks, it’s a mix of brooding justice and chaotic charm—because even in the shadows, the Dynamic Duo can’t resist a little fun. Words: 1260, Chapters: 1/?, Language: English Series: Part 1 of Billionaires, Bats, and Vlogs Fandoms: Batman - All Media Types, Robin (Comics), Batman and Robin (Comics) Rating: General Audiences Warnings: No Archive Warnings Apply Categories: Other Characters: Bruce Wayne, Dick Grayson, Jason Todd, Tim Drake (DCU), Damian Wayne, Stephanie Brown, Cassandra Cain, Duke Thomas, Mia "Maps" Mizoguchi, Kate Kane (DCU), Alfred Pennyworth Relationships: Dick Grayson & Bruce Wayne Additional Tags: at first it's just Bruce and Dick, Everyone else joins in later, I promise, YouTube, Comedy, Bruce Wayne is So Done, Good Parent Bruce Wayne, Dick Grayson is a Menace, Mischief, Pranks and Practical Jokes, Other Additional Tags to Be Added, Tags Are Hard via https://ift.tt/mNeyvL5
21 notes
·
View notes
Text
How to make a 4 channel mask for objects in the sims 3 with GIMP 2.0 [Tutorial]

Hey guys, i've just made a tutorial on how to make a 4 channel mask with GIMP 2.0
DOWNLOAD
Special Thanks to @johziii for helping me figure this out XD
59 notes
·
View notes
Note
Okay so the dichotomy between your Sakuya Cherry Bomb idea and Yarra's Kuro vtuber is hilarious to me because like.
Sakuya: Fans only know him as Cherry Bomb and don't know anything about him outside of his music.
Vs
Kuro: Vtuber Lore is literally just his life but it should be fine because people dont know vampires are real.
I FUCKING FOUND IT. LINK TO THE CHERRY BOMB POST 🍒💣
Anyway one of the reasons for the difference is I headcanon Sakuya as being a 90s kid! as in, he died in the 90s--
This, naturally, makes him a lot more wary about the info he puts out there on the internet, but it also means his internet experience was molded by Ye Olden Days when creators were a lot less available to their fanbases and interacted with them very little, if at all.
He doesn't even have a fanart hub, and his icon is just a random street in tokyo he thought looked nice.
His classmates REALLY do not get why Sakuya is so paranoid, so Sakuya shows them how easy it would be for a super dedicated person to figure out exactly where Mahiru’s apartment is using his cooking tutorial videos (uploaded under the channel name "Sunny Mama" courtesy of Kuro) and basic realtor research
Things like Mahiru apologizing for any construction noise and using the time stamp to figure out which apartment complexes had construction in their vicinity during that time, floor plans, how even his living situation and the model of his appliances can all be used to narrow down the area he lives in.
“He lives with his uncle and the camera man, which means at least two rooms. We can see the stove top and the front of the oven, so I take a screenshot of that and… Ah, this is the brand. Now I research the model. Okay, I have two components. He mentions that he walks to school, so that’s a two bedroom apartment in Tokyo within walking distance of a high school with good quality appliances, which means I can rule out a lot of run down complexes. This grocery bag was in frame during this video, and a high school kid Mahiru’s age wouldn’t have a license, so now I add that name of the store to my list of things I know are around the complex because when you go grocery shopping, you don’t want to carry the bags a long distance home…”
The faces of his friends are full of horror.
"And that’s not even getting into the drinking with uncle segment that happens in their living room, with full view of the balcony because Mahiru hates the place getting musty so he leaves the curtains open a lot. Knowing what buildings are viewable from there can also tell someone where a place is, especially if you’re thorough enough to consider the angle you’re seeing everything at.” Sakuya glances up and closes his laptop. “So, yeah.”
Mahiru makes a Noise, fretting, "Wait, so what do I do now??"
Sakuya feels a little bad for scaring his friend, but it's for his own good! “Keep your curtains closed, make sure the screws in your door frame are the really long kind to prevent someone from just kicking the door off its hinges, don’t get electronic locks because it’s stupid easy to trick those into unlocking, and just… Be more careful? Wear a mask from now on and go back and edit footage to remove your face from the visible shot. Try and keep things focused on your hands instead, maybe…”
"Should I get rid of the drinking with uncle part? Since that always focuses on Uncle Tooru's reactions..."
"He’s a grown up and an old man. Nobody’s going to be interested in pulling him into a windowless white van unless it’s those creep show friends of his…”
"Wh--Why would anyone be interested in pulling me into a windowless white van?!"
"Sex trafficking."
"Eh?"
"Or stealing your organs."
"Eh?"
“Or even just some obsessive pervert who’s built up some kind of fantasy in their head that you’re fated for one another but you just don’t realize it yet.”
"What."
As you can tell. Yeah. Sakuya really internalized those 90s internet safety psas. He's also well acquainted with the idea of a very dedicated stalker for. Reasons.
Tsubaki voice: that boy just isn't right...
#Anonymous#asks#servamp#thanks for the ask nonny!!#kat's katerwauling#pawprints#sakuya watanuki#mahiru shirota
32 notes
·
View notes
Text
Some Tips for new DBH modders

This will have 2 sections :
1 . QUANTIC dream textures - getting them stable throughout the game
2. Handy tool I found for normal maps.
QD TEXTURES - MY TOOL KEEPS BREAKING?
this is for the 2 ppl that actually mod Detroit and want to make their mods public and usable the entire game. and don't know abt this.
As you probably know, models ( containers ) share textures. So when you update a quantic dream texture for 1 model you need to update every single container/model that shares that texture or else it'll look black and crash your game. Why? because your game is expecting the file in qd format for that container when it's a dds file now.
But I'm sure youve noticed after the 3rd or so containers texture being 'refreshed' ( inserting the texture for each use of it in the tool) it just breaks. The only way around this is to tell the game it should expect a dds format manually.
Ok enough yapping. Here’s the tutorial :
Add your texture like you normally would in the editor. Do this for only one model, u can do it for more just before it crashes if u want too it shouldn’t affect it, I haven’t tested it tho.
Enable editing for all the containers/models that use that texture. So it clones it.
Now,, Repeat these steps for every texture that needs to be made into dds format other than the ones you changed in the editor:
1.Using Rk900 (INTO_3) as an example, I swapped the connor into_2 model face texture so now we need to tell the game to expect a dds for nines face. Get the offset of nines’ face texture. It’s SUPER important that the INTO_3 container is cloned as the offset will be different.
2.go to ( ctrl + g ) to the offset in d26 file. (so 80F5B90F)
3.change the following : we start at ‘0E’ for this example.

Change the 14th and 19th bytes (02) to 01 . it should look like this now
The hex code will change for each texture, but it will always be the 14th and 19th bytes.

4.Repeat for all textures and models that use them :)
Your tool will now load the containers correctly ( they will appear black still, but it will work ingame.)
USEFUL TOOL FOR CREATING NORMAL MAPS:
Normal maps are what gives flat surfaces fake 3d-ness without actually being there ! An example of this is the pores of dbh characters. Normal maps basically allow us to use less polygons which is good for efficiency:))
How do normal maps work ? Well all digital images contain 3 color channels : Red, Green and Blue (RGB) , what normal maps do is assign x,y,z values to these channels. So red would be the x value, green is the y value , blue is the z value . These give us the fake 3d values for each pixel that alter how our game calculates the light ( surface normals ) .
I use this website to generate my normal maps from height maps :
Height maps are black and white images that tell us the height (z value) of each pixel, typically white is high,black is low. Here is an example of the sylus mask I made :

IMPORTANT!! 99% of dbh’s normal maps DONT have a blue channel ( z value) so you HAVE to remove the blue channel completely after generating it from here.
This was how my modified face texture looked like after nuking the blue channel ( in gimp you have to go to colors -> Components -> decompose and delete the blue channel then recompose it )
^^ basically i overlayed the new normal map over connors original one.
Ok thats it. idk if this helps anyone but here u go :P
Pls correct me if I’m wrong abt anything, I’m small brain tbh
10 notes
·
View notes