#chin mudra
Text
𝗖𝗵𝗶𝗻 𝗠𝘂𝗱𝗿𝗮
🖼👩🎨 Artista © Sol García @solesamor

View On WordPress
#arte contemplativo#arte meditativo#arte reflexivo#arte y meditación#Chin Mudra#contemplarte#meditarte#Mujeres Artistas#reflexionarte#sumi-e
0 notes
Text
The Ok Sign's historical ties to Vavooming
When Crowley describes his "hypothetical" (😉) Vavoom scenario in S2, he gesticulates a moving version of the OK hand sign to Aziraphale. The history of this particular gesture is rather interesting... especially when you consider what Crowley is saying when he is choosing to use it.

In modern times, the initial, vertical part of what Crowley is doing while talking about canopies is a sign known as "the OK sign" and, in most places, it is seen as signaling a positive response to something. Even though something that is "okay" is seen as sort of middling-- more "not terrible" than "good"-- the OK hand gesture has a much more positive connotation than the word itself does and generally means that something is excellent. It came to mean that in the United States and many other countries through American political campaigns of the early 19th century. The gesture itself, though, is much, much older than that and can be traced back to ancient Rome and ancient Greece... where it has ties to romantic love.
When painted on vases and the like, the gesture was meant to evoke a kiss through the touching of the tips of the thumb and the index finger. Interesting considering the topic of a vavoomy first kiss in the scene while Crowley is making this gesture, no?
In first century Rome-- a time and place we know to be significant to Crowley and Aziraphale's history-- it was a gesture of assent and if a person made the gesture towards another person in the Greco-Roman world? It was a way of professing romantic love for that person.
While describing a hypothetical scenario for Maggie and Nina that many of us suspect is really a recounting of his and Aziraphale's first kiss, Crowley is gesturing "I love you" to Aziraphale by the social customs of classical antiquity.
There's also a bit of fish, food and Jesus in this as well... so, very Ineffable Husbands. In the modern era, the OK sign is also the gesture used universally by scuba divers to signal that they are feeling good while on a dive. It is also a version of the "chef's kiss"-- the one that is more of an OK sign near the face than kissing the tips of your fingers. In the original version of 'The Prisoner,' the watched prisoners use the OK sign to communicate with each other, which was famously inspired by use of The Sign of the Fish/Jesus Fish as a secret symbol used by early Christians.
The gesture is also used in another unspoken language: Christian monks who took a vow of silence would also use the gesture as a base to indicate other things to communicate-- forming the index finger and thumb into a ring and holding it in front of one's self as Crowley does in this scene would indicate in that language an oblation, or offering, to God.
Crowley then keeps his fingers in the OK position and tips his hand down when he says "together", turning it all into a second gesture-- one that is known as gyan/jnana mudra, which is a hand sign used most frequently in meditation and sometimes in yoga. It is known as the knowledge mudra. Crowley also used it during the Gabriel miracle while Aziraphale used its pair at the same time-- chin mudra-- which is the same gesture, just with the palm facing up, and focuses on similar things.
Both focus on knowledge gained and the calming effects of the unification of the individual soul/ego (represented by the index finger) with the thumb (the supreme soul/paramatman-- the more actualized individual soul made boundless by light and wisdom.) The gesture is done as part of meditation to create a circuit that redirects the prana-- life force/energy-- through the body, alleviating anxiety and calming the mind through a grounding sense of connection, calm and peace.
By connecting the two gestures into one while talking about this canopy scenario, Crowley seems to be connecting the erotic and the spiritual and referencing his millennia-old romantic passion for Aziraphale to Aziraphale by using a gesture for love from antiquity... and that's somehow all before this shows up:

Who knew Richard Curtis films were this hot?
189 notes
·
View notes
Text


Gyan Mudra
Gyan mudra, otherwise known as chin mudra, is a sacred hand gesture or ‘seal’ used to direct energy and maintain focus. Gyan mudra is one of the most important and well known mudras, found across Buddhist, Hindu and Yoga traditions alike. Gyan is Sanskrit for ‘knowledge’ or ‘wisdom,’ and so this gesture is sometimes referred to as the Mudra of Knowledge.
Mudras are hand gestures used in yoga and meditation, which mean ‘mark’ or ‘seal’ in Sanskrit. In the Mudra philosophy, it is believed that our 5 fingers correspond to the 5 elements of the universe - water, earth, ether, air and fire. Each of these elements has a distinct role in the balance of our physical body, state of mind and mental well-being.
65 notes
·
View notes
Text
Who is Goddess Dhumavati?

Dhumavati is the seventh of the ten Mahavidya Goddesses. Devi Dhumavati is an old widow and is associated with things considered inauspicious and unattractive. She is always hungry and thirsty who initiates quarrels.
In characteristics and nature she is compared with Goddess Alakshmi, Goddess Jyeshta and Goddess Nirriti. All these three Goddesses are embodiment of negative qualities but at the same time worshipped at special timings of the year.
As per legend mentioned in Pranatoshini Tantra, once Devi Sati due to satiate her extreme hunger swallowed Lord Shiva. Later on the request of Lord Shiva itself, she disgorged Him. After this incident, Lord Shiva rejected her and cursed her to assume the form of a widow.
Goddess Dhumavati is depicted as an old and ugly widow. She is thin, unhealthy with pale complexion. Unlike other Mahavidya(s), she is unadorned with jewellery. She wears old, dirty clothes and has dishevelled hair.
She is portrayed with two hands. In one of her trembling hands, she holds a winnowing basket and makes either boon conferring gesture or knowledge giving gesture with the other hand. The boon conferring gesture and knowledge giving gesture are known as Varada Mudra and Chin Mudra respectively. She rides on a horseless chariot bearing an emblem of a crow.
Dhumavati Sadhana :
Goddess Dhumavati Sadhana is done to get rid of extreme poverty. She is also worshipped to make body free from all sorts of diseases.
Dhumavati Mantra
ॐ धूं धूं धूमावती देव्यै स्वाहा॥
Om Dhum Dhum Dhumavati Devyai Svaha॥
#spiritualism#astrology#jyotish#vedic astrology#spiritualawakening#hinduism#hindu mythology#imavatar
4 notes
·
View notes
Text
How to Get Rid of Chin Fat
Chin fat, often referred to as a "double chin," can be caused by a variety of factors, including genetics, weight gain, and aging. Many people consider having a double chin as ugly and they find having double chin or chin fat unattractive. Perceptions of beauty are subjective and vary greatly depending on cultural standards, personal preferences, and individual perspectives. While some people might feel self-conscious about having chin fat or a double chin, others might not consider it unattractive at all. Beauty is diverse, and what is considered attractive can differ widely from person to person.
There are many options available to reduce or get rid of chin fat including face yoga, diet, and cosmetic procedures. Let us understand them one by one in-depth.
Face Yoga
Facial yoga, also known as facial exercises or facial muscle training, is a practice that involves a series of exercises designed to tone and strengthen the muscles of the face. The idea is similar to how regular exercise works on the body's muscles: by engaging and stimulating facial muscles, facial yoga aims to improve the skin's appearance, reduce signs of aging, and enhance overall facial symmetry.
There is limited scientific research specifically on facial yoga. A few small studies have shown positive results, such as improved facial muscle tone and skin appearance. For example, a study published in JAMA Dermatology in 2018 found that a 20-week facial exercise program improved upper and lower cheek fullness in middle-aged women.
Some dermatologists and plastic surgeons remain skeptical about facial yoga's efficacy, arguing that while it may have some benefits, it is unlikely to produce dramatic results compared to other treatments like Botox, fillers, or surgical options.
Benefits
Improved muscle tone and firmness
Reduction of fine lines and wrinkles
Enhanced facial circulation
Natural facelift effect
Stress reduction and relaxation
Enhanced skin elasticity
Balanced facial symmetry
Improved jawline and neck definition
Non-invasive and natural
Boosted confidence
Facial exercises
Dumbbell technique: This technique helps to strengthen the muscles in the neck and chin region.
Simha mudra (Lion face): This exercise helps to stretch and tone the muscles in the face, including under the chin. It also restores the facial cells.
Chin lift: This exercise helps to stretch and tone the muscles in the jaw, neck, and throat.
Mouthwash technique: This technique tones your facial appearance while keeping your double chin at bay.
Jaw tight and release: This exercise helps tone the muscles in the jaw and chin area.
Swan neck exercise: This exercise primarily targets the platysma muscle, which is located in the neck and helps to lift and tone the skin around the jawline and neck. Furthermore, it helps to reduce tension in the sides and back of the neck.
Lymphatic drainage massage: It is a gentle massage technique that promotes the flow of lymph fluids and encourages lymph node drainage throughout the body, helping to reduce swelling and improve circulation.
Air kisses exercise: It is beneficial for burning fat around the jawline, resulting in a more defined and attractive pout.
Chin massage: It helps to stimulate blood flow and lymphatic drainage, reducing puffiness and promoting a more defined chin and jawline.
Chin lock or jalandhar bandha: This will help to strengthen and tone the muscles in the chin and neck area, reducing the impression of sagging skin and double chin.
Jaw jut: This exercise works the muscles around the jawline, helping to reduce chin fat.
Tongue stretch: This exercise targets the muscles under the chin.
Neck tilt: This exercise helps reduce neck pain and stiffness, improve posture, and increase flexibility in the neck muscles.
The jaw flex: This exercise helps strengthen the muscles in the jaw and reduce tension, leading to a more defined and sculpted jawline.
Neck roll: This exercise helps tone the muscles in the neck and jaw, improving circulation and reducing fat.
The fish face: This exercise tones the muscles of the cheeks and jaw, helping to reduce chin fat.
Ball exercise: It uses a small ball that enhances muscle engagement in the neck and chin area.
Platysma exercise: The platysma muscle runs from your jawline down to your shoulder. Toning it can help reduce chin fat.
Diet
Losing chin fat, like reducing fat from any specific area of the body, requires an overall approach to weight loss and healthy living. Spot reduction (targeting fat loss in a specific area) is not typically effective, but by losing body fat overall, you can reduce fat under the chin as well. Here’s a dietary approach to help lose chin fat:
Consume fewer calories to lose fat. Calculate your daily caloric needs based on your age, gender, weight, height, and activity level, and aim for a modest calorie deficit (e.g., 500 calories less per day).
Focus on nutrient abundant foods that provide essential vitamins and minerals while being lower in calories.
Increase in protein intake includes lean sources of protein such as chicken, turkey, fish, eggs, tofu, legumes, and low-fat dairy products. Protein helps build muscle, which can increase your metabolism and aid in fat loss.
Incorporate healthy fats like olive oil and fatty fish like salmon. These fats are essential for hormone regulation and can help you feel satisfied after meals and avoid trans fats.
Opt for complex carbohydrates like whole grains (brown rice, quinoa, oats), legumes, and vegetables. These foods are high in fiber, which aids digestion and helps regulate blood sugar levels.
Reduce your intake of refined carbohydrates and sugars found in white bread, pastries, sugary snacks, and sodas, as they can contribute to fat accumulation.
Staying hydrated is crucial for overall health and can help with weight loss. Water aids in digestion, reduces bloating, and can help you feel full, preventing overeating.
Avoid sugary beverages like sodas, sweetened teas, and energy drinks, as they add empty calories and can lead to weight gain.
Integrate fiber-rich foods such as vegetables, fruits, whole grains, and legumes. Fiber helps with digestion, promotes satiety, and can help reduce overall calorie intake.
Pay attention to portion sizes and avoid eating large quantities of food in one sitting.
Try to avoid eating heavy meals or snacks late at night, as this can contribute to weight gain.
High sodium intake can lead to water retention and bloating, which may accentuate the appearance of a double chin. Limit processed foods and opt for fresh, whole foods to reduce sodium consumption.
Incorporate foods that help reduce inflammation in the body, such as leafy greens, berries, nuts, and fatty fish. Chronic inflammation can lead to weight gain and other health issues.
Reducing alcohol intake can help in your overall weight loss efforts.
Eating meals at regular intervals can help regulate your metabolism and prevent overeating.
Cosmetic Procedures
Double chin surgery, also known as submental liposuction or neck contouring surgery, is designed to remove excess fat and improve the appearance of the area under the chin and around the neck. Here are some key facts about double chin surgery:
Purpose of the surgery
The primary goal of double chin surgery is to remove excess fat from the area under the chin, creating a more defined and contoured jawline. In some cases, the surgery also involves tightening loose or sagging skin to enhance the overall appearance of the neck and chin area.
Types of procedures
Liposuction: The most common procedure for treating a double chin is liposuction. This involves the removal of fat through a small incision using a cannula (a thin tube).
Neck lift: For patients with significant sagging skin, a neck lift may be performed in addition to or instead of liposuction. This involves taking out excess skin and tightening the underlying muscles.
Laser-assisted liposuction: Some surgeons use laser lipolysis with traditional liposuction to melt fat and promote skin tightening.
Procedure details
Anesthesia: The procedure is usually performed under local anesthesia with sedation or general anesthesia, depending on the extent of the surgery.
Duration: The surgery typically takes between 1 to 2 hours, depending on the techniques used and the amount of fat to be removed.
Incisions: Small incisions are made under the chin or behind the ears, through which the fat is suctioned out.
Recovery time
Initial recovery: Patients can usually go home the same day as the surgery. Initial recovery typically involves some swelling, bruising, and discomfort, which can last for 1-2 weeks.
Downtime: Most patients can return to work and normal activities within a week, but strenuous activities should be avoided for 2-3 weeks.
Compression garment: Patients may be required to wear a compression garment around the chin and neck for a few days to weeks to reduce swelling and support the new contours.
Results
Immediate vs. Final results: Some improvement is visible immediately after the surgery, but final results typically become apparent as swelling subsides over several weeks to a few months.
Long-lasting results: The results of double chin surgery are generally permanent, especially if the patient maintains a stable weight and healthy lifestyle.
risks and complications
Common risks: As with any surgery, there are risks including infection, bleeding, and reactions to anesthesia. Specific to liposuction, there might be risks of asymmetry, contour irregularities, or skin laxity.
Numbness and sensitivity: Some patients may experience temporary numbness or changes in skin sensitivity in the treated area.
Scarring: Scars from the incisions are usually small and hidden in natural creases, making them minimally visible.
Cost
Price range: The cost of double chin surgery can vary widely depending on the surgeon’s experience, geographic location, and the complexity of the procedure. On average, it can range from $2,000 to $5,000 or extra.
Insurance coverage: Double chin surgery is typically considered a cosmetic procedure, so it is not usually covered by health insurance.

Newly Discovered ‘Mountain Tea’ melts 1lb daily
Alternative treatments
Non-surgical options: Alternatives to surgery include non-invasive treatments like Kybella (injections that dissolve fat), CoolSculpting (fat freezing), and radiofrequency skin tightening. These options can be effective but may require multiple sessions to produce more gradual results.
Double chin surgery can provide significant improvements in the appearance of the neck and jawline, leading to enhanced facial harmony and increased self-confidence. However, like any surgical procedure, it’s important to thoroughly research and consult with a qualified surgeon to ensure the best possible outcome.
0 notes
Text
O Poder do Chin Mudra: Significado e Benefícios
O Chin Mudra, também conhecido como o “gesto da consciência”, é um mudra tradicional amplamente utilizado na prática de meditação e yoga.
A palavra “Mudra” vem do sânscrito e significa “gesto” ou “selo”. Esses gestos são comumente usados nas práticas espirituais para canalizar a energia, equilibrar os elementos do corpo e trazer paz e clareza mental.
Entre os diversos mudras, o Chin Mudra se…
0 notes
Text
Discover the Secret to Radiant Skin with Facial Yoga

Are you tired of trying countless skincare products with little to no results? Wondering how beauty professionals and celebrities maintain their youthful, glowing skin? Face Yoga is not just another beauty fad; it’s a powerful, natural way to achieve healthy, radiant skin. Imagine achieving noticeable results without spending a fortune on creams or undergoing invasive treatments.
Face Yoga consists of specific movements designed to relax your facial muscles and reduce the appearance of wrinkles. You might be skeptical—can simple exercises really make a difference? The answer is yes. These exercises are backed by experts and have been embraced by many who seek a natural approach to skincare. They improve blood circulation, boost oxygen supply to skin cells, and enhance moisture production, giving your skin a youthful glow.
Worried about fitting this into your busy schedule? Don't be. These exercises are simple, take only a few minutes each day, and can be easily integrated into your daily routine. And the best part? You can do them at home, without any expensive equipment.
8 Powerful Facial Yoga Exercises for Glowing Skin
Here are the top facial yoga exercises that could transform your skincare routine:
Forehead Massage: This exercise helps in erasing the wrinkles that appear on the forehead and removes tension between the brows. Just make fists and massage outward from the center of your forehead to your temples with your knuckle’s fingers.
Eye Circles: Tired of puffy and sunken eyes? This exercise increases blood flow around the eyes, reducing puffiness and dark circles. Simply use your index fingers to lightly touch the region surrounding your eyes and move in a circular motion.
V Shaped Pressure: This exercise provides relief to the stressed eye muscles and helps in fighting crow’s feet. Place your index finger on your temple and middle finger on a tear duct to apply V-shaped pressure.
Cheek Massage: Achieve fuller, sculpted cheeks by inflating your cheeks and lightly tapping them with your hands. This strengthens your cheek muscles and reduces wrinkles around the mouth.
Swan Neck: To get a slender neck, turn your head forward and drag your fingertips from your mouth to your collarbone, using mild pressure. This tightens the skin on your neck and reduces drooping and wrinkles.
Lip Pull: This exercise tones your face muscles and offers high cheekbones and a prominent jawline. Sit or stand comfortably, pull your lower jaw out, and lift your bottom lip as much as you can.
Neck Rolling: Ideal for improving posture and relieving neck tightness. Sit comfortably, keep your head forward, and roll your neck in circular motions. This tones the muscles of your chin, jawline, and neck.
Simha Mudra (Lion Pose): This comprehensive exercise enhances facial muscle function and ensures proper thyroid gland function. Kneel, lay your hands on your thighs, open your mouth wide, and stick your tongue out while making a lion-like roar.
Take the Next Step
These exercises are simple and effective, but if you're looking to explore more about facial yoga and how it can benefit you, why not dive deeper? For more detailed guidance and additional facial exercises, check out the detailed blog here.
#Radiant Skin with Facial Yoga#Facial Yoga#Yoga#Facial Yoga Exercises#Facial Yoga Exercises for Glowing Skin#health#yuvaap
0 notes
Text
Surya Namaskar Steps And Benefits For Mind Body And Spirit
Introduction:
Surya Namaskar, also known as Sun Salutation, holds a mystical place in the world of yoga. It is derived from the ancient Vedic tradition and consists of twelve postures that pay homage to the Sun as it provides energy and health to all life on Earth. In this guide, we will see in detail how to do Surya Namaskar and how it affects your overall health.
Understanding Surya Namaskar
Surya Namaskar is a combination of physical postures (asanas), breath control (pranayama), and mindfulness that unites three aspects — mind, body, and spirit. The series includes each posture as well as specific breathing exercises to create a deeper bond between one’s breath and inner self.
Part 2: The Twelve Steps of Surya Namaskar
1. Pranamasana (Prayer Pose):
Pranamasana, or the Prayer Pose, marks the beginning of the Surya Namaskar sequence. Here, you stand at the front of your mat with your feet together. Your palms are pressed together in front of your heart in a prayer position, known as Anjali Mudra. This pose signifies gratitude and reverence as you prepare to embark on your practice. It’s a moment to center yourself, acknowledge the present moment, and cultivate a sense of respect for the journey ahead.
2. Hasta Uttanasana (Raised Arms Pose):
In Hasta Uttanasana, or the Raised Arms Pose, you inhale deeply as you raise your arms above your head. As you do this, you arch slightly backward, lengthening your spine and opening your chest. This pose symbolizes embracing the energy of the sun, which represents new beginnings, vitality, and the dawning of a new day. It’s a gesture of welcoming and openness to whatever lies ahead in your practice and in your life.
3. Hasta Padasana (Hand to Foot Pose):
Hasta Padasana, or the Hand to Foot Pose, involves exhaling as you bend forward from your waist. The aim is to bring your hands to touch the ground beside your feet or as close as possible. This forward fold allows you to surrender to gravity, release tension in your spine and hamstrings, and establish a connection with the earth. It’s a moment of letting go and grounding yourself, preparing both physically and mentally for the movements to come.
4. Ashwa Sanchalanasana (Equestrian Pose):
Ashwa Sanchalanasana, or the Equestrian Pose, begins with an inhalation as you step your right leg back into a lunge position. Your left knee is bent at a 90-degree angle, and your gaze is lifted, symbolizing strength, stability, and determination. This pose represents the readiness to face challenges with grace and poise, embodying the spirit of a warrior as you move through the sequence.
5. Dandasana (Stick Pose):
Dandasana, or the Stick Pose, involves holding your breath as you bring your left leg back to meet the right, forming a straight line with your body from head to heels. Engaging your core muscles, you find strength and balance in this position. It’s a moment of stability and control, where you draw upon your inner strength to maintain alignment and focus.
6. Ashtanga Namaskara (Salute with Eight Parts or Points):
Ashtanga Namaskara is a challenging pose that translates to “salute with eight parts or points.” Here, you exhale as you gently lower your knees, chest, and chin to the ground, keeping your elbows close to your body. Your body touches the ground with eight parts — forehead, chest, two hands, two knees, and two toes. This pose symbolizes surrendering ego and offering humility, as you bow down to the earth and acknowledge your interconnectedness with all beings.
7. Bhujangasana (Cobra Pose):
Bhujangasana, or the Cobra Pose, begins with an inhalation as you slide forward, untuck your toes, and lift your chest, shoulders, and head off the ground. In this backbend, you open your heart, expanding your chest and stretching the front of your body. Bhujangasana symbolizes awakening and renewal, as you rise from the earth with a sense of vitality and awareness.
8. Adho Mukha Svanasana (Downward Facing Dog Pose):
Adho Mukha Svanasana, or the Downward Facing Dog Pose, is initiated with an exhalation. Here, you tuck your toes, lift your hips high, and straighten your arms and legs, forming an inverted V-shape with your body. This pose provides a deep stretch for the back body while grounding through your palms and heels. It’s a moment of surrender and release, as you let go of tension and find stability in the present moment.
9. Ashwa Sanchalanasana (Equestrian Pose — Repeat):
Ashwa Sanchalanasana is repeated in the sequence, this time with the left foot stepping forward between the hands. As you return to this lunge position, you once again embody strength and determination, acknowledging the cyclical nature of life and the opportunities for growth and transformation that each cycle brings.
10. Hasta Padasana (Hand to Foot Pose — Repeat):
Hasta Padasana is also repeated, with the right foot stepping forward to meet the left. This forward fold allows for another moment of surrender and release, as you let go of any remaining tension and find stillness in the present moment.
11. Hasta Uttanasana (Raised Arms Pose — Repeat):
Hasta Uttanasana is repeated, with another inhalation as you sweep your arms out to the sides and then up overhead. Arching slightly backward once more, you embrace the energy of the sun and celebrate the journey of self-discovery and inner strength.
12. Pranamasana (Prayer Pose — Repeat):
Finally, the sequence concludes with Pranamasana, mirroring the beginning of the practice. You exhale as you bring your palms together in front of your heart, grounding yourself once again in gratitude and reverence. This closing gesture signifies the completion of the Surya Namaskar sequence, as you bow your head in humility and honor the divine light within yourself and all beings.
Part 3: The Benefits of Surya Namaskar
1. Improves Flexibility:
The dynamic movements of Surya Namaskar stretch and tone the muscles, ligaments, and joints, enhancing overall flexibility and mobility.
2. Boosts Circulation:
The combination of forward folds, backbends, and inversions stimulates blood flow throughout the body, promoting cardiovascular health and oxygenation of tissues.
3. Strengthens Muscles:
Surya Namaskar engages multiple muscle groups, including the arms, legs, core, and back, resulting in increased strength and stamina.
4. Calms the Mind:
The rhythmic flow of breath and movement in Surya Namaskar induces a meditative state, reducing stress, and anxiety, and promoting mental clarity and relaxation.
5. Enhances Respiratory Function:
Coordinating breath with movement in Surya Namaskar improves lung capacity, respiratory efficiency, and oxygen uptake, benefiting overall respiratory health.
6. Stimulates Digestion:
The gentle compression and release of the abdomen in Surya Namaskar massage the internal organs, aiding digestion, alleviating constipation, and promoting detoxification.
7. Balances Hormones:
The practice of Surya Namaskar regulates endocrine function, balancing hormone levels and promoting reproductive health.
8. Increases Energy Levels:
Performing Surya Namaskar in the morning revitalizes the body and mind, providing a natural energy boost to kickstart the day.
9. Promotes Weight Loss:
Surya Namaskar activates the metabolism, burns calories, and tones the body, supporting weight management and fat loss.
10. Cultivates Mindfulness:
Surya Namaskar fosters mindfulness and self-awareness, enhancing the mind-body connection and promoting a deeper sense of inner peace and well-being.
Part 4: Tips for Practicing Surya Namaskar
1. Start Slow:
If you’re new to Surya Namaskar or yoga in general, begin with a few rounds and gradually increase the number as you build strength and flexibility.
2. Focus on Breath:
Pay attention to your breath throughout the practice, coordinating each movement with a deep inhalation or exhalation. This helps synchronize body and mind.
3. Listen to Your Body:
Honor your body’s limitations and modify the poses as needed to avoid strain or injury. It’s essential to practice with awareness and respect for your body’s signals.
4. Stay Hydrated:
Drink plenty of water before and after practicing Surya Namaskar to stay hydrated and support your body’s natural detoxification process.
5. Practice Regularly:
Consistency is key to reaping the full benefits of Surya Namaskar. Aim to practice daily or at least several times a week to experience noticeable improvements in your health and well-being.
6. Combine with Meditation:
Consider incorporating meditation or mindfulness practices before or after Surya Namaskar to deepen your practice and cultivate inner peace.
7. Seek Guidance:
If you’re unsure about proper alignment or technique, consider attending a yoga class or seeking guidance from a qualified yoga instructor to ensure safe and effective practice.
Part 5: Personal Experiences with Surya Namaskar
The incorporation of Surya Namaskar in one’s daily activities is known to cause a significant transformation at the physical and mental levels. After practicing it regularly, many practitioners have reported higher energy levels, improved flexibility, and overall well-being. There are even instances where people have been able to find a solution to long-term problems like back pains, anxiety, or depression through the consistent practice of Surya Namaskar.
A practitioner said, “In the past, I had persistent lumbar pain caused by my sedentary lifestyle. I practice Surya Namaskar daily and it helps to diminish the pain and stiffness in my back greatly. Also, there is more strength and concentration throughout time.”
Another practitioner reflects that Surya Namaskar has become an integral part of my morning routine. It’s not just a physical practice for me it’s a moving meditation that helps me start my day with intention and clarity. I’ve noticed a profound shift in my mental and emotional well-being since committing to daily practice.
Conclusion:
Surya Namaskar is much more than a series of physical exercises it’s a holistic practice that nourishes the body, mind, and spirit. By embracing the twelve steps of Surya Namaskar and incorporating it into your daily routine, you can embark on a transformative journey toward optimal health, vitality, and inner peace. Whether you’re seeking to improve flexibility, boost energy levels, or cultivate mindfulness, Surya Namaskar offers a path to holistic well-being that is accessible to practitioners of all levels. So roll out your mat, greet the sun, and let the healing power of Surya Namaskar illuminate your life.
Some FAQs
Can Surya Namaskar reduce belly fat?
Yes, Surya Namaskar can be a useful way to reduce stomach fat when paired with a balanced diet and continuous workout. The practice of sun salutation includes movements that are active on the muscle group in the tummy, increase metabolic rate, and burn fat away from different body parts including the belly. Also, the digestion process can be enhanced through the regular engagement of sun salutation, thereby maintaining hormonal balance and reducing stress levels as well hence, this will facilitate the composition of a healthy body that may lead to loss of excess belly fat over time.
Can Surya Namaskar increase height?
Surya Namaskar, a yoga posture that enhances posture and flexibility, does not actually promote height increase but may help to improve appearance. Asanas involved in Surya Namaskar focus on stretching and elongating the spinal cord thus helping in decompressing the vertebrae for better health of the backbone. Also, having a regular practice of yoga which includes Surya Namaskar is also beneficial during growth years as it supports proper bone formation leading to the highest possible vertical development.
Can Surya Namaskar help in weight loss?
When coupled with a well-balanced diet and regular exercise, Surya Namaskar can be an effective part of any weight reduction plan. With its cardiovascular nature, Surya Namaskar enables one to burn calories, elevate heart rate, and lose fat. The sequence is composed of twelve poses that engage multiple muscles in the body thus enhancing metabolism and also increasing blood flow all of which aid in weight loss efforts. Moreover, practicing Surya Namaskar can help lower stress levels as well as control emotional eating and cravings thereby supporting sustainable weight loss objectives. By consistently incorporating this physical activity into their lives while making healthier lifestyle choices, they will gradually start losing pounds.
1 note
·
View note
Text
Symbolic Hand Gesture: Gyan Mudra
Have you ever heard of mudras?
Mudra is an ancient Sanskrit word that means ‘gesture, mark, or seal’. Mudras are gestures or poses that help to balance the body’s energy.
More specifically, hand mudras are hand gestures commonly used in yoga or during meditation. They can help us to go within, calm our mind, find focus and even recharge our energy levels.
How Do Hand Mudras Work?
According to the five elements theory, everything in the universe, including our bodies, is made up of five elements: fire, air, ether or space, earth and water. Each of these elements are also represented in our hands.
By bringing each of our fingers into a certain position we create a different energy flow through our system. Each finger is connected or related to one of the five elements: water, earth, ether, air and fire:
Thumb: Fire
Index finger: Air
Middle finger: Ether
Ring finger: Earth
Pinky finger: Water
Thus, by manipulating the connection of each of the elements represented in our fingers, we can either increase or decrease the prana to a specific part of the body, depending on the position of our fingers. Touching the tips of the fingers to the thumb increases or expands the energy, while touching the tip of the fingers to the base of the thumb reduces the energy flow.
The Gyan Mudra
One of the most common mudras used during meditation is the Gyan mudra, also known as chin mudra. Gyan is a Sanskrit word meaning ‘knowledge’ or ‘wisdom,’ This mudra symbolizes the union of self with the universe as well as focus and transformation. It is believed to support the root chakra and can be used to aid in grounding. The Gyan mudra is mainly used for focus and stability during meditation. This hand gesture encourages concentration, balance and stability.
The Gyan mudra stimulates the pineal gland, a pea-sized gland that is shaped like a pine cone, and it’s located towards the middle of the brain. This gland is connected to the third-eye chakra, located in the center of the forehead.
When the third-eye chakra is blocked, the individual can experience confusion and doubt; hesitation; pessimism, and cynicism or sarcasm. In contrast, an open third-eye chakra helps connect the individual to their higher self while calming the mind and improving their memory, focus, and balance. By awakening the third eye and stimulating its corresponding pineal gland, higher awareness and psychic abilities often begin to develop.
How to do the Gyan Mudra
Bring your thumb and index fingertips together, forming a circle and applying light pressure.
Allow your middle, ring, and pinky fingers to be gently extended. Do this with both hands.
Rest your hands on your knees with your palms up.
Although the Gyan mudra is most often used during meditation, it can be used anytime. Since it encourages memory and focus, it can be used when studying or working on a project. This mudra can also be used during stressful situations, as it helps to reduce anger, stress and anxiety by calming the mind and bringing emotional balance into your life.
So, the next time you find yourself in need of calm and tranquility, give this mudra a try!
If you're interested in more content like this, support me on my official blog at:
Love, Andie🥰
#life#yoga#meditation#mudras#calm#peace#relaxation#energy#witch core#spirituality#spiritual growth#spiritual journey#sprouted lavender.
1 note
·
View note
Text
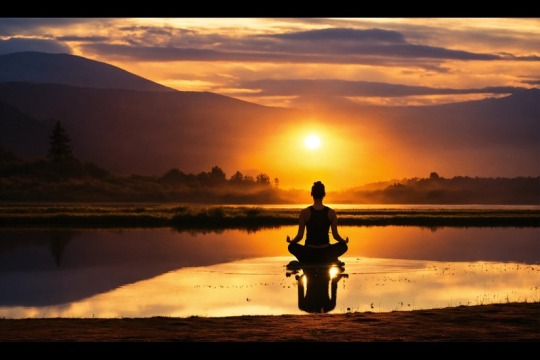
Seated Mediation
We tend to see body, breath, and mind separately, but in meditation they become one. The first thing to pay attention to is the body position during sitting. How you position your body has a lot to do with what happens with your mind and your breath.
As our School comes from Asian traditions, the basic meditation posture is to sit on a mat and cushion on the floor. For Westerners who are used to sitting in chairs, this can often cause discomfort. For this reason, our School allows for many variations to help students find a stable and comfortable posture for sitting meditation. There is absolutely no esoteric significance to the different positions. What is most important in sitting meditation is what we call mind sitting, rather than body sitting-how do we keep our mind just now? In order to do that, a good posture is useful and supports our practice.
Sitting Meditation
Place one or more cushions on a mat sit cross-legged position.
Using a chair. When sitting on a chair, your feet should not extend past the front edge of the row of mats in the row in which you are seated in a group practice setting. You may fold your mat and place it under your chair. You may use the mat for a footrest. For meditation purposes, it is best that you do not lean against the back of the chair, but sit toward the front of the seat, keeping your back erect. Your thighs should be parallel, flat on the floor. Straddling cushions. Stack several cushions on top of one another, straddling them as if riding a horse. Using a meditation bench. Meditation benches have a slanted seat with two legs. First kneel on your mat, then position the bench over your calves behind you, and sit. Keeping your spine straight and shoulders back and loose, tip your head forward very slightly, looking down at the floor at a 45-degree angle. Your eyes should be half open, looking at the floor in front of you.
Place your hands in your lap in in the maha mudra (see Hands below for full description).
Knees and spine
When sitting cross-legged, both knees should rest on the floor, though sometimes it takes a bit of time to be able to get the legs to drop that far. After a while the muscles will loosen up and the knees will begin to drop. To help that happen, sit on the front third on the cushion and adjust the height, shifting your body forward a little bit. The three points: the base of your spine (rear end) and both knees should touch the mat for stability. By imagining the top of your head pushing upward to the ceiling and by stretching your body that way, get your spine straight-then just let the muscles go soft and relax. With the buttocks up on the cushion and your abdomen naturally pushing out a little, there will be a slight curve in the lower region of the back. In this position, it takes very little effort to keep the body upright.
Face, Mouth, and Nose
Once you've positioned yourself, there are a few other things you can check on. The mouth is kept closed. If possible, breathe through your nose. The tongue is pressed lightly against the upper palate. This reduces the need to salivate and swallow. The eyes are kept lower, with your gaze resting on the ground about 70 to 100 cm in front of you. Your eyes will mostly covered by your eyelids, which eliminates the necessity to blink repeatedly. The chin is slightly tucked in, so that your though the position during sitting meditation looks very disciplined head is tilted down at a 45 degree angle. Although the position during sitting meditation looks very disciplined, the muscles should be soft. There should be no tension in the body. It doesn't take strength to keep the body straight. The nose is centered in line with the navel, the upper torso leaning neither forward or back.
Hands
The hands are folded in the maha . The dominant hand is held palm up holding the other hand, also the palms up, so that the knuckles of both hands overlap. The thumbs are lightly touching, thus the hands form an ova, which can rest on the upturned soles of your feet if you're sitting full lotus. If you're sitting Burmese, the maha can rest on your thighs. The center of the cosmos maha should be exactly in the place of your energetic center-danjeon (Kor.), hara (Jap) or tantien (Chi). The position of the hands helps turn your attention inward
Breathing
Pay attention to your breath is the basic foundation for meditation. Our breath is always with us, anytime, anywhere. The word "spirit" means breath. By breathing correctly, you can access "gong-ki"(Kor.)-air energy. How you breath breathe affects your you body and mind: when your mind is agitated, your breath is agitated, when your is agitated; when you're nervous, you breath quickly and shallowly; when your mind is at rest, the breath is deep, easy, and effortless.
During mediation, we encourage you to inhale and exhale through the nose and generally exhale twice as long as inhale,e.g. 3 seconds in, 6 seconds out, 5 seconds in, 10 seconds out. Breathing should be done naturally, not forced or with concentration. During sitting, it is also important to breath quietly, without making noise as it can distract others. Most important is to let breath become relaxed and naturally at ease.
Center
It is important to bring your attention to your center-danjeon (Kor.) tantien (Chi.) hara (Jap.). Your center is located two inches below the naval at the central axis of your body, and is the exact middle point if measured from the top of your head to the bottom of your feet. It's the physical and spiritual energy center of the body. Put your attention there during your practice. As you practice sitting meditation more, you'll become more aware of your center as it becomes stronger. In Zen we say, "This is your don't know center ", the center of our just do it or willpower center.
Discomfort and changing positions
Once in a particular sitting position,you should stay that way until you feel the need to change positions. During a sitting period, if physical pain or drowsiness becomes a distraction, you may stand up for relief. First, do a sitting bow, then quietly stand up, remaining in standing meditation until the discomfort passes. When you are ready, do a standing bow and quietly sit down. Additionally, you may use the standing meditation posture as a transition between different sitting positions. For example, if you experience a lot of pain sitting cross-legged and need to change positions, do a sitting bow, stand up quietly, bow, and then sit down in a kneeling position.
Mind
What you do with your mind is the most important part of meditation. Zen means understanding your true self-what
am I? In order to do that, meditation techniques help us to become clear in the present moment. Below are some simple basic techniques that can start you off with a meditation practice at home. For detailed instructions, please visit one of our Zen centers for an orientation.
Technique 1: Clear mind, clear mind, don't know
This exercise is usually suggested for beginners. When you inhale, repeat quietly inside your mind, "clear mind, clear mind, and as you exhale, say, "I don't know ". Your exhalation with "don't know" should be drawn out about twice as long as your inhalation. It may be unfamiliar at first but if you gently pay attention to each breath and be aware of the words repeated , the exhalation will slowly become longer and more relaxed. If thinking or emotions appear, that's not a problem, just return to your breath and the simple exercise. This technique brings together body, breath and mind in one place, in the present moment. When the words are clear, and you are aware of your breath and can feel your body, then your mind is clear. You can try this method of 10 minutes each time during the sitting and if comfortable, extend to 20 or 30 minutes.
Technique 2: Counting the breath
This practice, often recommended for beginners, brings attention to each breath and helps to still and focus the mind. The count may be done on either the inhalation or exhalation. The count is done either up to three or up to ten and then repeated for the duration of the sitting period. If the count is lost, then the practitioner returns to one and starts again.
Technique 3: Mantra practice
Using a mantra to calm the mind and strengthen the center is another technique used by Zen practitioners. A mantra is a tool to keep our mind clear, while sitting or doing our everyday moment to moment activities. A common mantra to use is repeating "Kwanseum Bosal" (Kor for Bodhisattva of Compassion), the Buddhist name for the emantra of our own compassionate heart. This used technique is to recite the mantra quietly to oneself, repeating it constantly, paying attention to it and allowing all other thinking thinking to drop away. This takes some practice since it is very easy to let one part of the brain "chant" the mantra while the other part is thinking about dinner or going to the movies. When this happens, gently bring the mind back to the mantra without any judgment. When doing mantra practice, it is important to make your direction clear. When the mantra is not clear or there is a lot of thinking, simply ask, "who is repeating this mantra?" This will help bring you back to the present moment and become clear. During sitting, when your mantra is clear, your breath is even and natural, you are aware of your body and you see the floor clearly in front of you, then your mind is clear. For doing mantra practice, we recommend you consult your guiding teacher.
0 notes
Text
@kugel-bitch xxx

She balks a touch at that last bit; the insinuation that her peppery mien may convey an air of insubordination, and after thinking about it for all of five seconds, she decides that he is right. She does have a tendency to let her temper rope her into unseemly behaviors. So, Lute adjusts her carriage, leans back, wills the tension out of her shoulders and reassess the propriety of the words she is about to say; quickly, seamlessly, like a finely tuned machine.
"Well—"
Looking down at her hands, she touches the heels of her palms together so that her fingers form less of an assertive trigon and more of a deferential anjari mudra.
"—I am only suggesting, sir, that it might not be unwise to take some precautionary measures to minimize casualties on our end in the event that we are met with greater push back from the infernal rabble than we have accounted for."
There comes a pause and she straightens her posture just a touch.
"We have stuck tightly to our schedule for as long as most of the miserable vermin still clinging to life down there will remember. They will be expecting us on the eve of the thirty-first of May. I would like to propose that we strike a day early. Catch them off their guard. We focus down their most prominent bastions; The V tower, the Carmine weapons manufacturing facility, the Hazbin hotel and we eradicate any sliver of hope they had of preserving their filthy hides."
He's mostly content to let her fire away at whatever imaginary targets are before her attracting her ire- mostly because it's amusing if not a tad endearing to see bitches squabble and tear each other apart. That was why he hadn't even touched little Miss Vajayjay back during her blasphemous bleeding heart episode because frankly- he didn't have to with the other girls in the bunch ready to pick up on the scent of betrayal and swarm it accordingly- with talons turned in to tear it out of their flock before it could fester and spread to the rest. Also, something about watching chicks tear each other apart was kinda hot- he wouldn't deny it. So when he noted her hesitation with his idle musings implying she was flying a bit too high for her position where the sun might start to melt her wings into more gold he could smelt onto his own if she kept soaring, well...it earned a soft snort on his part as she seemed to start seeing him again for what he was through the fit of her mounting fury over the whole affair- a general...with the general tendency to dirty up her plotting space with his snack and beverage wrappers.
"Greater push back? Well DUH...you saw the look that bitch gave me right? Hilariously worked up. Futile as fuck- but worked up all the same." Shifting so that the bottoms of his robes spilled over the desk's edge as he swung around to sit facing her in her chair, he made a game of brandishing his talons into open claws that he slowly began to close in towards her steepled hands like a carnivorous plant slowly clamping shut. "That's right where we want'em to be! Angry instead of accepting...more prone to making mistakes. Not to mention ~ " Pausing right before he'd claim her hands with the sharp ends of his nails, he allowed them to relax and pulled them back just enough to copy the steepled look himself which he followed up by letting them fall like an axe to bonk hers like some kind of hand shake he'd expect her to recognize later and do back. "-we could use a bit more entertainment after the same old-same old every year, don'tcha think~?"
Though he had to admit, her idea did sound like it could add an extra layer to the current chaos pie. "Hmm? So like- ambush the fuckers? Now there's an idea." Rubbing slightly under his chin as he pondered on it some more, he laughed after a moment and very swiftly scooted a wing behind her chair to scoot both her and her rolly-perch in closer like the proximity was needed to share a secret, though he was all but speaking in hushed tones. "Glad I thought of it! See, that's why you're top bitch around here. Super inspiring ~ just like a lute. Don't I know how to call'em?"

#// bbkbl;sd-#//so sorry he's like this lmao#kugel-bitch#//im picking up on the joke that adam was allowed to name everything basically fft#long post
0 notes
Photo


Gyan Mudra
Gyan mudra, otherwise known as chin mudra, is a sacred hand gesture or ‘seal’ used to direct energy and maintain focus. Gyan mudra is one of the most important and well known mudras, found across Buddhist, Hindu and Yoga traditions alike. Gyan is Sanskrit for ‘knowledge’ or ‘wisdom,’ and so this gesture is sometimes referred to as the Mudra of Knowledge.
Mudras are hand gestures used in yoga and meditation, which mean ‘mark’ or ‘seal’ in Sanskrit. In the Mudra philosophy, it is believed that our 5 fingers correspond to the 5 elements of the universe - water, earth, ether, air and fire. Each of these elements has a distinct role in the balance of our physical body, state of mind and mental well-being.
https://www.soweflow.com/blogs/journal/a-guide-to-mudras?fbclid=IwAR2FcNHP38mxY3sdd8S6kzDqp_yYay01lRHG8hFF26yqDPdf8gAHuH7frzA
12th-century Japanese scroll showing different mudra gestures
160 notes
·
View notes
Text
Chandra Bhedana Pranayama
Chandra Bhedana Pranayama is one of the lesser known yogic breathing techniques in which you inhale through one nostril only, and out through the opposite nostril. Chandra refers to the moon, or ‘tha’ syllable in Hatha, which represents a cooling and calm energy. Bhedana means ‘piercing’, and this is why Chandra Bhedana is also known as the moon piercing breath.
This practice is carried out by inhaling through the left nostril, as this helps to clear any blockages in the Ida Nadi, which begins in Muladhara Chakra and ends in the left nostril. Ida Nadi governs the parasympathetic nervous system, and is therefore related to calmness and relaxation. In Sanskrit, Ida means ‘comfort’, and the Nadis are the energetic channels around the body that allow for the flow of Prana. In Ayurveda and yogic philosophy it is believed to be important to keep the Nadis free from blockages so the Prana can flow properly as it will improve both physical and mental health.
Ida Nadi is said to control all mental processes since it transports prana to the nervous system, which has a calming effect on the mind and body. It is also associated with feminine energy, the right/creative side of the brain, the left side of the body and introversion. Ida Nadi needs to be balanced with Pingala Nadi, which represents masculine energy, and thus our linear and logical side. As an example, if someone is blocked in their Ida Nadi, but has a free-flowing Pingali Nadi, this person may have the strength and energy required for a physical yoga practice, but lack the introspection required for spiritual awakening. In Hatha yoga, there is a big focus on balancing the Nadis for this reason.
Chandra Bhedana is a parallel technique to Surya Bhedana, which is done by inhaling through the right nostril, and can be found here.
How to practice Chandra Bhedana Pranayama
1. Sit comfortably on the mat in any cross legged position.
2. Bring the right hand in Vishnu Mudra (index finger and middle finger bent towards the palm), and use the thumb to close the right nostril.
3. Inhale deeply through the left nostril and fill the lungs completely.
4. Engage the Jalandhara Bandha (chin lock) and Mula Bandha (root lock).
5. Retain the breath for as long as feels comfortable. In yogic texts, it is said that one should hold the breath until perspiration appears. However, listen carefully to your body, and never overdo it.
6. Release the Jalandhara Bandha (chin lock) and Mula Bandha (root lock), and exhale through the right nostril (Pingala Nadi), keeping the left nostril closed.
7. Continue in this manner for 5-10 rounds, or 1-3 minutes. Advanced practitioners can continue up to 80 rounds per sitting.
Tips & Cautions
+ Beginners can practice without retaining the breath, but once they feel comfortable, they can use a ratio of inhalation, retention, exhalation of 1:4:2.
+ Do not perform Chandra Bhedana Prayanama in case of asthma, low blood pressure, cough and cold and issues related to the respiratory system.
+ Practice Pranayama on an empty stomach.
8 benefits of Chandra Bhedana Pranayama
1. Reduces heat in the body
2. Relieves heartburn
3. Refreshes and energises the mind and body
4. Reduces high blood pressure
5. Reduces fever
6. Decreases the flow of bile from the gallbladder
7. Reduces tension, stress and other mental burdens
8. Daily practice can help to steady the mind
1 note
·
View note
Text
In the ancient practice of yoga, hand gestures, known as mudras, hold significant importance in enhancing spiritual and physical well-being.Among these, the "Chin Mudra" stands out as a symbolically rich gesture employed during meditation and pranayama.
0 notes
Text
8/14/23
I feel so remarkably better when I've gotten a full night's sleep. It's absolutely insane. Not just physically, but mental-health-wise. Despite being rainy most of the day, today was really good.
I took my momentum from last night - the conception of the jean piece - and decided to not just elaborate on it... I started it. I immediately started sketching ideas, before I even hit the yoga mat. I wanted to elaborate on that stela idea, telling a dual story through scenes descending down each of the pant legs.
I went with a male kneeling but bowing his head (instead of extended child pose), hands at his knees under the lunar eclipse, and a female kneeling with chin and chest raised, hands in Anjeli mudra under the solar eclipse. I wanted this to represent the catalyst of the narrative... what I'm calling a Reckoning. A moment that I have had quite a few of within myself, but I think a lot of people had when the pandemic hit. A major reverent life event that makes you really take stock of your actions - your self - and really consider where you're going from there. In the case of this one, I'm telling this in the context of a shared event... one that affects all individuals in communities. That's where the eclipse comes in, because good lord... imagine experiencing an eclipse in 4000 BC... You had to be thinking the world was ending... So, the eclipse is really a representation of that, of a major event that makes you and your community take stock... and the duality illustrates potential outcomes based on how that event is processed both at an individual and a communal level. (At least that's where I'm at now).
So I'm still back and forth about the gender assignment, because historically solar = masculine and lunar = feminine... but I honestly didn't really distinguish between the different eclipses. I could easily do a female under the moon and a male under the sun... but... for some reason I'm just being pulled the opposite direction. And maybe that's part of the duality? Maybe a juxtaposition? Maybe a comment about males' resistance to integrating femininity vs. females being more accepting of masculinity? Not really sure yet, honestly. I guess check back for more info on that when I learn more. The real emphasis here was on the gestures and the intentions behind the figures. The man is bowing in resignation, submissively, closed off from the reckoning, rejecting it. The woman is praying in reverence, open to the reckoning, accepting it. That's sorta the takeaway from that scene.
The next scenes in the series are people seated at tables. I wanted the scenes to be nearly identical composition, but very different narratives. On the Light side, there are five people sitting at a big table, Last Supper-style. They're all talking amongst themselves and sharing. On the Dark side, there are five small single tables crammed up next to one another, with individuals at each one with their heads buried in their cell phones. On the Light - taking the reckoning as an opportunity to bond, come together and form a healthy community. On the Dark - continuing to run from the reckoning, hiding in distractions and indulgence, maybe fearing judgement? Being in one's own world, I guess.
The third scenes are sorta... an end result of this. Like... the eclipses are the catalyst, the dinner is the reaction/how the reckoning is processed, and the last scene is the result. On the Light side, I want to continue the theme of going from one figure to five figures... maybe to ten from there? To echo the rhythm from the table/chair legs in the scene above? I'm not entirely sure. Maybe just repeating the five figures, I'm still in the basic stages of this. But the idea of the Light one is a field of corn, with beans growing up the stalk, and squash at the base. What Northeastern Indigenous American tribes called "The Three Sisters". Companion crops that all mutually benefit each other. The corn provides the beans a trellis, the beans nitrogen-fix the soil, the squash gives ground cover to prevent weeds from competing for nutrients. An image of harmony, prosperity and mutual growth. On the Dark side is a row of corn on bare ground. I was tempted to put an invasive species in there too, but I changed my mind and instead wanted to elaborate on the isolation and detachment theme. I kinda want them to be abnormally productive, to kinda imply genetic modification... sorta unnatural looking. But just the plants on barren ground. The juxtaposition in outcomes being...
On the Dark side - by resigning to calamity and turning inward, we respond by dividing and creating our own bubbles, and the end result is something very artificially "productive" but devoid of substance and diversity... at the expense of a community and the ecosystem. Each plant is identical, each is frantically producing fruit that alone lack nutrition, and each is working entirely alone.
On the Light side - by embracing calamity with reverence we open ourselves to new ideas, even within ourselves. Where Dark feels judged, Light finds perspective. We respond by coming together to share ideas and resources, building community and collaborating. The end result is a garden of diverse foods that all mutually benefit from the others. Not just a stable ecosystem, but a flourishing one.
I'm still not entirely sure on this, because I don't really want to play into the "light = good, dark = bad" trope. Because there are benefits from the dark side of this narrative, and there are detriments to the light side. So... just wanted to add that, but I guess this piece is sorta... more focused than being a commentary about just isolation vs community. It's more about how we individually react to looking in the mirror, and how we carry that into society, and what that causes on a societal scale.
The whole plant theme came from my bean plant. It's been acting weird for a while. I'm genuinely shocked it survived, honestly. Its sibling who was planted next to it did not make it. The containers I had them planted in had poor drainage. I made the containers out of big plastic yogurt containers, but the holes were a bit too small and there wasn't enough room between the bottom of the holes and the dish underneath for drainage. The right-hand plant got root rot and died, I had to unravel it from the trellis. The left-hand one survived, but ever since... the leaves from the time period where it was deeply struggling have not grown at all... but the ones above it are getting huge. I pinched off the head so it won't grow any more (it's already over 6 feet tall), and it keeps sending out suckers trying to grow taller... but it won't grow its existing leaves below that point any more. It's very confusing, I'm not really sure if there's anything I can do to help it, or if I'm just going to get beans from only the top 2 feet of the plant. <shrug> But yeah, I got the idea of... flourishing, prosperity... but in plant form. And the first thing that came to my mind was beans. Nothing says "abundance" when it comes to vegetables quite like beans, in my experience. My first green bean plants, good lord... they produced so fucking much, and just wouldn't stop! I swear, my ex and I ate green beans every damn day that summer. And beans are just iconic for their rapid growth. So... I learned a bit more about the Three Sisters and decided it fit pretty well with this idea of community, prosperity, harmony, all that.
So yeah, that's basically the idea as it stands right now. I'll improvise some kind of spacers to separate each scene, likely in some form of organic cellular-type design.
Today, I committed to the Celtic knot design. All day, I listened to Heilung and first added in measurement markers (which is super tough on fabric at the seam of a pant leg) and eventually did the entire design in colored pencil. The entire pant leg, pocket to cuff, on the Dark side.
I decided I was going to paint it today, and I decided to stream that. It's been a long time, so I figured "what's the harm?" I made some dinner. I picked the first two of my chili peppers! I was expecting them to be spicy, they were not! They had no spice at all! I was genuinely shocked, I really didn't expect that. So... I decided to make a from-scratch salsa, which I've never done. I've been making guacamole, but I've never made salsa. So I took the little chilis, and I added in some chopped pickled banana peppers I had left over, and a big tomato that the last delivery guy got me by mistake, and a bunch of onions and some green onions, some lime juice and a few dashes of the ghost pepper hot sauce I have to add some heat, tiny bit of cumin and chipotle chili powder. That shit is good, dogg. XD I might make it a bit spicier, but man, that's gonna disappear real quick. I just made a quesadilla with pepper jack/mexican cheese mix and green onion, and had it with that, and man, that was a really good dinner. Just wanted to share that.
So, I got on and streamed the same shit I was doing earlier. I got the camera set up where I could work and film, and set the mic up and all that. I finished the pencil outline, then started inking the black fill... and finished that too! I was surprised, I didn't think I would finish it today, but it went way faster than I was expecting. That kind of work is so goddamn meditative... and the music is just next level. It just sends me right into trance mode, I swear. 2 hours went by and I had no idea. So... all that's left there is to do the white outlines and do some grey-wash shading to add dimension. Then I need to do the pencil on the other leg, and do the inverse of it on that leg - white fill, black outline and shading on the fill.
I had been back and forth with the fabric paint for a while now, and I've been very vocal about that. I love the opacity, the legibility, but I don't like how it can just... flake off. Especially for pants. So... I tried to water down the paint today. When I did the hoodie, I just used the paint right out of the jar. And I layered it on really thick, to be fair... especially the white. The jar says I can dilute it with up to 25% water, so I went for it. The pants drank up the paint like it was nothing, and I was careful not to flood any areas too much, so... I think it came out really good. I'll have to see in the morning when it's dry, it can be a bit deceiving when it's still wet.
So yeah, that was my day. The sun came out around sunset and I was tempted to go out for a bit, but I knew it was going to be super buggy if I did, so I decided to just keep going and got a tremendous amount of work done. I'm very content. Very pleased with myself. From normal jeans to a Celtic knot 6 cm wide running the whole length of the leg that just needs outlining. :)
I guess that'll do it for tonight. ... I guess I might as well get this out. In just over a week, I'm going to be ending this journal. August 22nd was the date I think I started doing this last year, at least the first dated journal I could find. And it's the 14th today. So... 8 days. It's gonna be a bit weird not doing this... but, in case you missed me writing about this before, I'm going to transition into doing a private handwritten journal for myself, and an art blog for the public. To split this gigantic-scale project up into two healthy habits once it's finished. So... this is going to be no more. I think I'm going to try to download all of my entries and archive them, that's the goal, I need to learn how to do that... it would be a nightmare to do it manually... but yeah. This has been a hell of a journey through an incredibly transformative phase of my life. It's been scary as fuck, as someone with a social anxiety disorder, PTSD, who rarely leaves his house, who is often scared of people... to just stream-of-consciousness dump my brain in a public blog? O.O But the value this as created for me... I really can't even put it into words. Not just as an artist or a writer, but as a person. So yeah, I'm gonna miss this. Just wanted to say that before I go.
0 notes
Text
TYPES OF PRANAYAM: YOGA AWARENESS

Want to do Pranayama but didn’t find a guide to starting? Pranayam essentially means “to gain control”, and the techniques are the process to actually achieve that command over our breath.
The types of Pranayam I’m going to discuss are
Kumbhaka ( Breath retention )
Nadi shodhan (Channel cleaning breath)
Ujayyi Pranayam (Conqueror breath)
Mrigi mudra Pranayam (Deer seal)
Simhasana (Lion Pose)
Surya Bhedana and Chandra Bhedana (Single nostril breath)
Kapalbhati (Skull shining breath)
Bhramri Pranayam ( humming black bee )
1. Kumbhaka ( breath retention )
The practice is known as the central practice of hatha yoga Pranayam series. This technique requires retention of breath in both
Fulness of breath
The emptiness of the breath
With the three locks in the pelvis, diaphragm and throat region at the same time.
Try this way: Inhale and take your head back, tuck your chin in and take your head in front again, such that the chin touches your neck, this makes the neck lock. Now pull the diaphragm upwards to apply bandha or lock in the diaphragm and pull your pelvic region inside to introduce a bandha in the Muladhara.
0 notes
Last Seen Blogs

sagarhospitals
Untitled

saeycng-blog
「 silence. 」
jukbox
JU K BOX


kittymiauuniverse
The Highway's Jammed With Broken Heroes