#colored aluminum wired
Text

#wrapbymm#wordsbymm#mmybsdrow#pourbymm#connecting#copper#galvanized wire#colored aluminum wired#hashtag poetry#Ukraine#the War continues#past two years
2 notes
·
View notes
Text


As originally promised, wire animals. Copper wire base frames with colored aluminum or brass accents. I usually work with 18 gauge copper since it is so malleable. Using colored aluminum wire is a moderate way to give character and flair to simple designs though. After making sever of the large peacocks or as I like to call them Disco Turkeys (thank you Lucid Chart ads). I came to the conclusion, that just like wire sheep, llama, and gnomes; I just hate having to make all the curls. So in the bottom picture are some pocket peacocks and decoy ducklings for those that are on the go.
0 notes
Photo


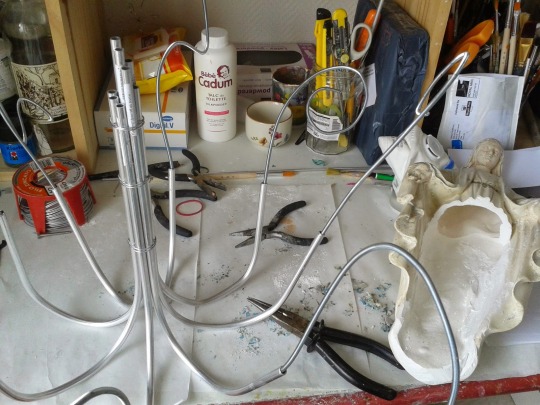


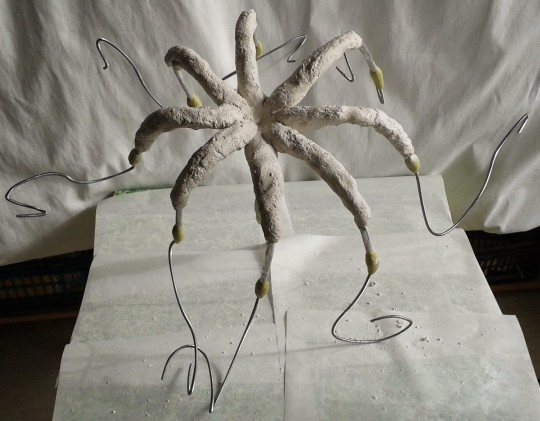


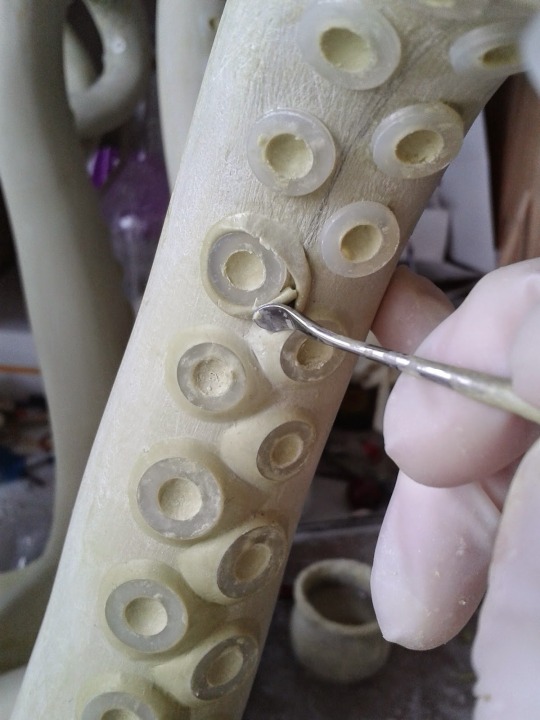
. . . all the tentacles complete — but no, the front one is not right! Some surgery required. Out comes the hacksaw, but only to the wire armature so the arm can be shaped into the correct curves. Then like Dr. Frankenstein I fasten it back together with staples and recover with more resin putty.
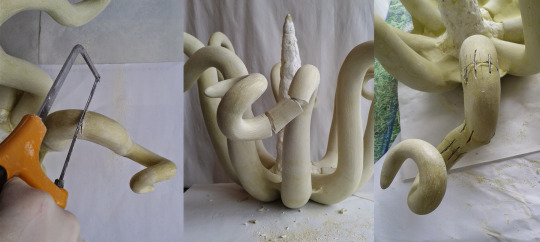
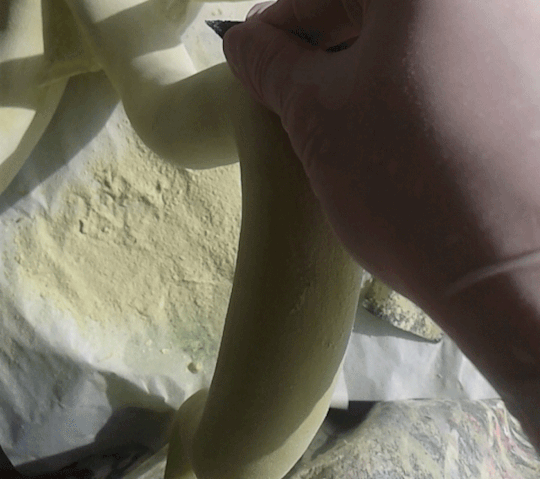
And now is time to sand . . .
and sand and sand and sand until it is time for the little sucker cups . . . M2, M2.5, M3, M4, M5, M6, M8, M10, M12 white nylon washers
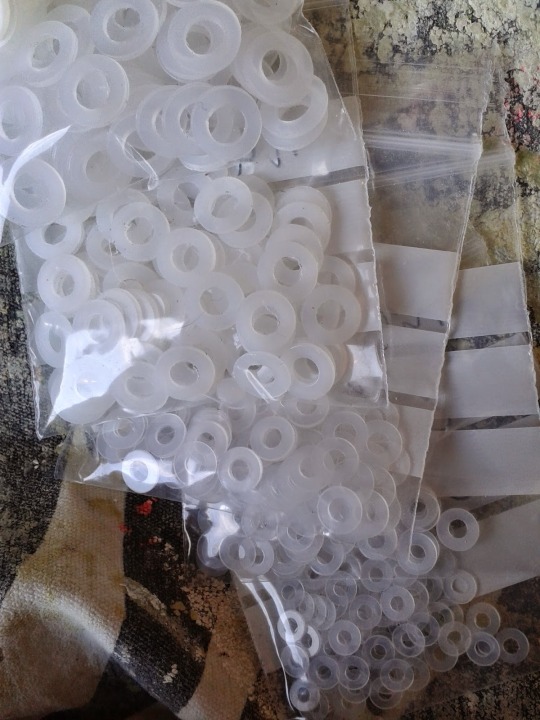
I pulled out my collection of plastic seals and off we went for days of cupping —15 days spent modeling the contours of each of the 663 suction cups


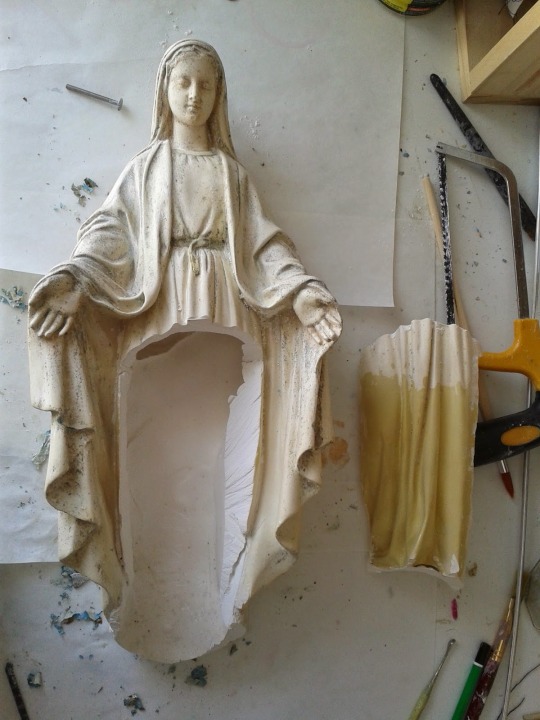
The Blessed Virgin had to be sanded very delicately to give it back some of its immaculateness.
The happiness of some is the dust of others.

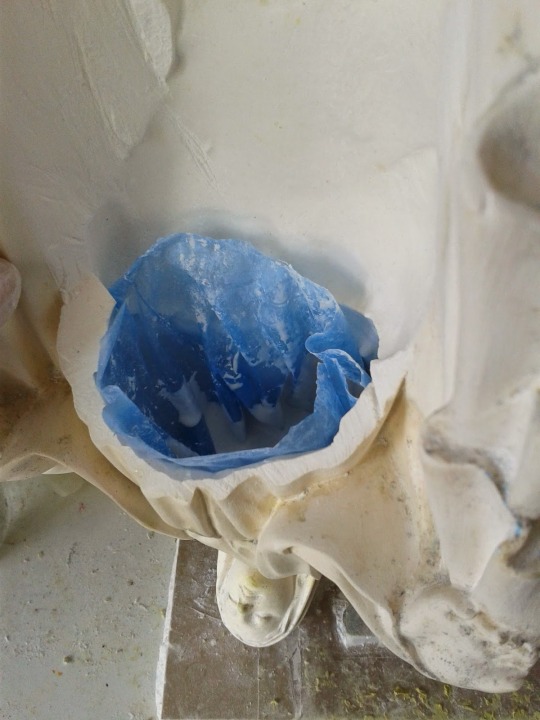


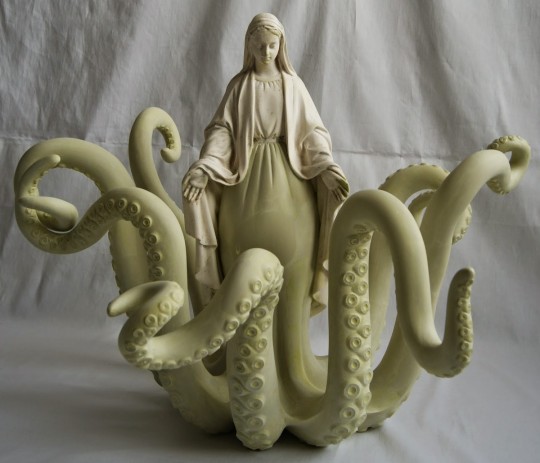

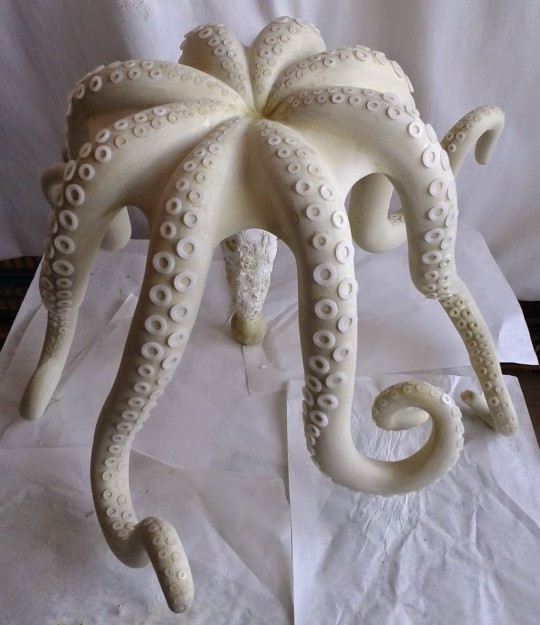
Take advantage of this white octopus, it seems that it is very rare to come across one.
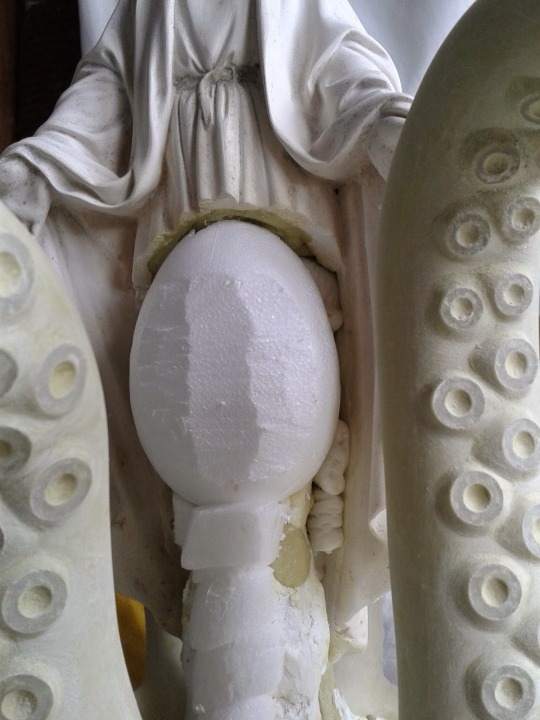
Shortly after I did my little experiments with paintings —
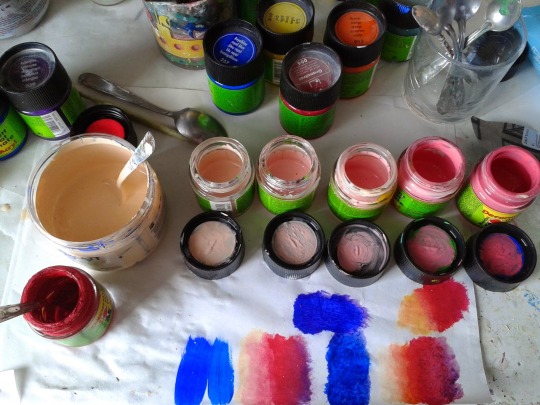
A few days to finish the color, but because it will have to go through a few coats of a special glossy glossy varnish, which makes the viscosity so good... mmm yum. Given the size of the room I could not apply it in one go. The drying takes between 24 and 48 hours, so it will probably take me a week to complete the application of this varnish-resin.

If your head is spinning too much, don't look at this indecent image.


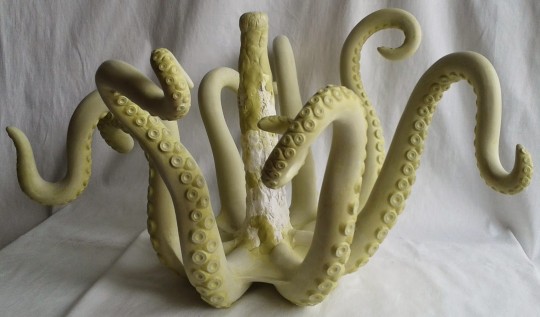
Soasig Chamaillard (French, b.1977)
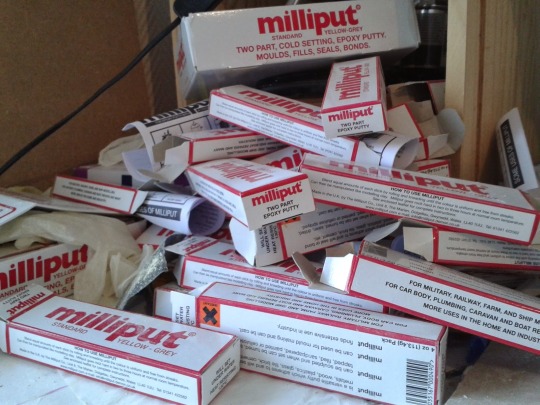
Notre dame du poulpe (Our Lady of the Octopus) - recovery statue with illegible signature, aluminum wire frame, plaster strip, polystyrene, resin (epoxy putty), plumbing seals (plastic washers), acrylic paint, resin varnish - 47 cm high x 70 cm wide - 12 kg - work-in-progress March 20 to May 31, 2015
“I grew up in a Christian Western society. My perspective on life has been a result of my environment and background. The playful interaction of society’s many icons, physical transformations, and the resulting improbable combinations, have culminated in my vision of a woman’s role and place in our society. This inner questioning of a woman’s role, has led me to use one of the most sacred icons in my work, namely, the Virgin Mary. Initially, I begin with damaged statues, either donated or discovered in garage sales, which I then restore and transform. I surely do not mean to shock those who believe but rather to move those who see.” — Soasig Chamaillard
http://www.soasig-chamaillard.com/sculpture-sainte-vierge
https://www.instagram.com/soasigchamaillard/
http://chamailleries.blogspot.com/
https://www.facebook.com/chamaillard.soasig
#art by others#other's artwork#sculpture#Soasig Chamaillard#Madonna#tentacles#W.I.P.#found object#epoxy putty
22K notes
·
View notes
Text
They were out of pliers at meijer so now im just getting 50 yards of aluminum wire and nothing to cut it with
#ill figure something out. ill break it with my bare hands if i have to#shay speaks#oh i go visit my grandparents next weekend im sure theyll get me some if i ask#its for making poseable enstars dollies#i got tatsumi hair colored yarn today while out#i just. forgot to look for aluminum wire and pliers while i was grocery shopping#so im getting the wire at least door dashes. the pliers. not so much
0 notes
Text
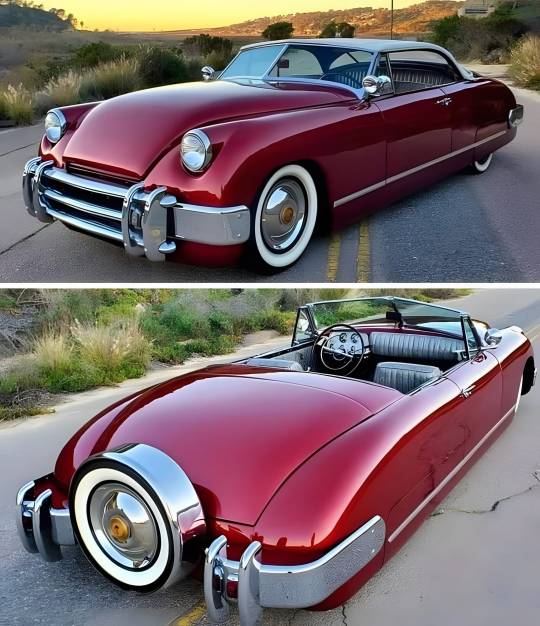
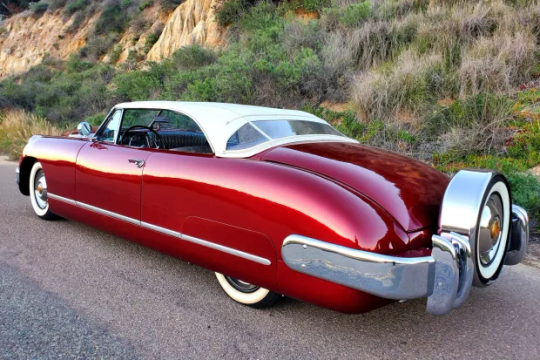
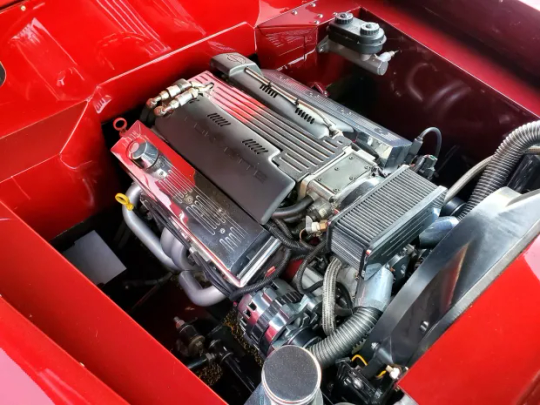
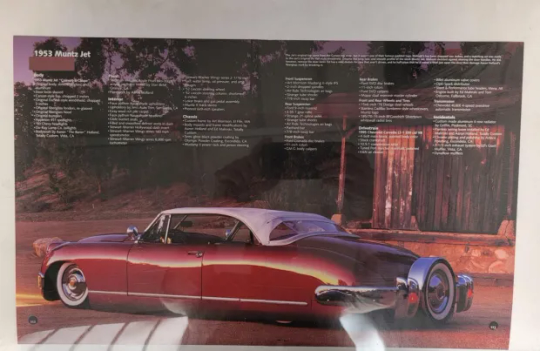
Custom 1953 Muntz Jet Convertible
This 1953 Muntz Jet convertible underwent a three-year custom build under previous ownership, and it was purchased by the seller in 2021. The car is powered by a fuel-injected 5.7-liter LT1 V8 engine paired with a four-speed automatic transmission and a Ford 9″ rear end, and it is finished in Apple Pearl with a white Carson-style removable top over gray snakeskin-style Naugahyde upholstery. Features include custom bodywork, an Art Morrison frame, power-assisted steering, four-wheel disc brakes, airbag suspension, Painless Performance wiring, and more modified and fabricated details. This custom-built Muntz is now offered with a copy of Rodder’s Journal magazine featuring a story on the build and a clean California title in the name of the seller’s business.
Custom 1953 Muntz Jet Convertible
The steel, aluminum, and fiberglass body is mounted on an Art Morrison ladder frame that was boxed and finished in semi-gloss black, and the floor was raised 3″. The exterior was repainted in a Sherwin Williams two-stage Apple Pearl mixed by the late Stan Betz. Features include a chopped Duvall-style windshield, 1950 Chevrolet headlights, dual Appleton spotlights, 1951 Ford Victoria side windows, and a white removable Carson-style top fabricated to match the height of the chopped windshield. Additional equipment includes color-matched rear fender skirts and chrome bumpers. Wear from fitting the top is noted on the rear deck.
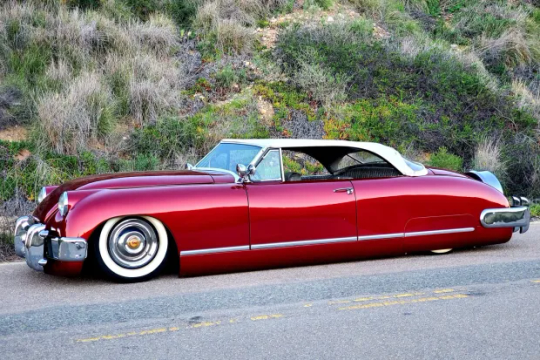
Custom 1953 Muntz Jet Convertible
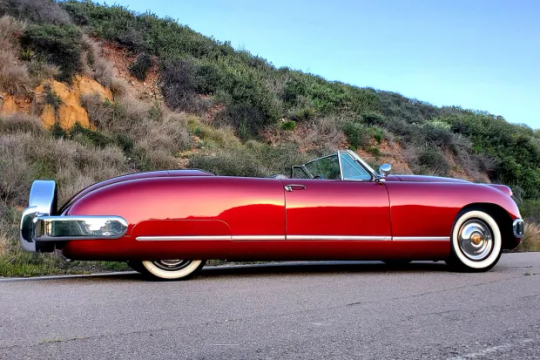
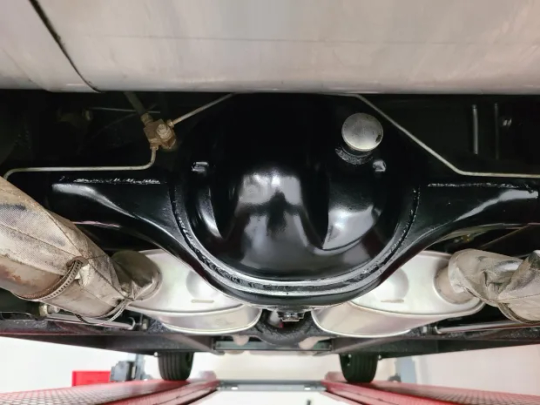
Steel wheels sourced from a 1976 Dodge measure 15″ and are mounted with Cadillac Sombrero-style covers and whitewall tires. A matching spare fitted with a BFGoodrich Silvertown tire is mounted within a rear-mounted Continental-style chrome carrier. A Mustang II front end accommodates power rack-and-pinion steering , and the car rides on an electronically-adjustable Air Ride Technologies airbag suspension system along with 2” lowered front spindles, Strange Engineering tube shocks, a rear Panhard bar, and front and rear sway bars. The seller reports that the front control arm bushings were recently replaced.
Custom 1953 Muntz Jet Convertible
Custom 1953 Muntz Jet Convertible
Braking is handled by GM G-body-sourced calipers matched with Ford Granada discs up front and Ford SVO-specification calipers and discs at the rear.
Custom 1953 Muntz Jet Convertible
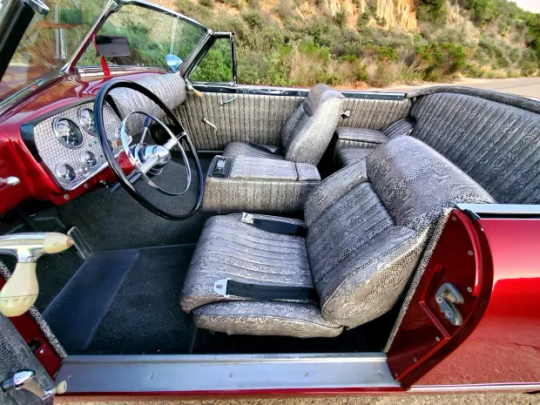
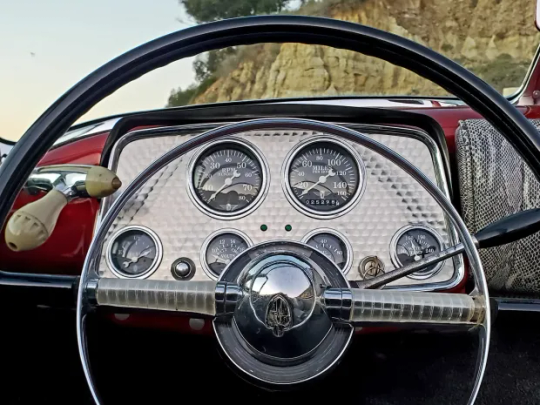
The cabin was customized by Jim’s Auto Trim of San Diego, California, and features Glide bucket seats and a rear bench trimmed in gray snakeskin-style Naugahyde upholstery, along with matching treatments for the dash trim, headliner, and door panels. Additional equipment includes a 1952 Lincoln steering wheel mounted to a shortened Lincoln steering column, gray cut-pile carpet, and a Pioneer stereo housed within a custom center cubby.
The engine-turned “Hollywood” instrument cluster houses Stewart Warner gauges consisting of an 8k-rpm tachometer, a 160-mph speedometer, and auxiliary readings for fuel level, battery charge, oil pressure, and water temperature. The five-digit odometer displays 25k miles, though total chassis mileage is unknown. A Lokar pedal assembly was fitted during the build.
Custom 1953 Muntz Jet Convertible
The Corvette-sourced 5.7-liter LT1 V8 features a polished fuel intake manifold along with billet aluminum valve covers, and additional features include an Opti-Spark distributor, a Griffin aluminum radiator, and a wiring loom sourced from Painless Performance Wiring. A set of long-tube headers are connected to a 2.5″ exhaust system equipped with dual Dynaflow mufflers. The seller reports that the oil was recently changed.
Custom 1953 Muntz Jet Convertible
Power is routed to the rear wheels via a four-speed 4L60E automatic transmission and a Ford 9″ rear end with with 3.55:1 gears and Strange Engineering 31-spline axles. Additional photos of the underside, drivetrain, and suspension components are presented in the gallery below.
Custom 1953 Muntz Jet Convertible
The car was featured in issue #36 of Rodders Journal magazine
#Custom 1953 Muntz Jet Convertible#Custom 1953 Muntz Jet#Muntz Jet Convertible#Custom Muntz Jet Convertible#Muntz Jet#Convertible#car#cars#muscle car#american muscle
109 notes
·
View notes
Text
Word List: Fashion History
to try to include in your poem/story (pt. 2/3)
Exomis - a short, asymmetrical wrap garment pinned at the left shoulder, worn by men in Ancient Greece
Eye of Horus - or Wedjat eye, is an ancient Egyptian symbol that represents the eye of the falcon-headed god Horus and symbolizes healing and regeneration and was often worn for protection
Faience - a man-made ceramic material that was often used in ancient Egypt to make jewelry and devotional objects; it is usually a blue color
Falling Band - a flat and broad white collar often with lace on the edges, worn by men and women in the 17th century
Fibula - served as a pin to both hold garments together and to show status of those with prestige or power within society; was popular in Greek culture
Fichu - a triangular shawl, usually worn by women, draped over the shoulders and crossed or fastened in the front
Fontange - a linen cap with layers of lace and ribbon, worn flat and pinned to the back of the head
French Hood - a rounded headdress for women that was popular in the 16th century (from 1540)
Frock Coat - a collared man’s coat worn through the eighteenth to the twentieth century; rose to prominence mainly in the nineteenth century, especially Victorian England; characterized as a knee-length overcoat, buttoned down to the waist, that drapes over the lower half of the body like a skirt
Frogging - ornamental braid or cording that can function as a garment closure, or be solely decorative
Gabled Hood - a woman’s headdress that is wired to create a point at the top of the head and has fabric that drapes from the back of the head
Gigot Sleeve - a sleeve that was full at the shoulder and became tightly fitted to the wrist; also called leg-of-mutton sleeve
Guipure Lace - a type of continuous bobbin lace made without a mesh ground; its motifs are connected by bridges or plaits
Himation - a rectangular cloak wrapped around the body and thrown over the left shoulder worn by the ancient Greeks
Huipilli/Huipil - a woven rectangular shirt worn by women in Central America beginning in ancient times
Jerkin - a close-fitting men’s jacket, often worn for warmth, sometimes without sleeves; worn over a doublet in the 16th and 17th centuries
Justaucorps - a long-sleeved, knee-length coat worn by men after 1666 and throughout the 18th century
Kaftan - (also caftan) is an ancient garment, which originated in ancient Persia but then spread across Central and Western Asia; a kind of robe or tunic that was worn by both men and women
Katazome (stencil printing) - a traditional Japanese method for printing designs onto fabric using a stencil and paste-resist dyes
Kaunakes - one of the earliest forms of clothing; made from goat or sheep’s wool and meant to be worn around the waist like a skirt, it is recognizable by its fringe detailing
Kente - a Ghanaian strip woven textile that has striped patterns and bright colors with corresponding meanings
Knickerbockers - or “knickers” are full or baggy trousers gathered at the knee or just below and usually fastened with either a button or buckle; were initially worn by men in the late 19th century and gradually became part of women’s fashion; the garment was usually worn as sportswear and became especially popular among golfers and female cyclists, hence the term “pedal pushers”
Kohl - a black material made out of minerals such as galena and used for eyeliner and eye protection in ancient Egypt
Labret - a type of lip-piercing worn by various cultures to indicate wealth, prosperity and beauty
Love Lock - a lock of hair from the nape of the neck hanging over the chest to show romantic attachment; it was a popular hairstyle between 1590-1650
Lurex - a shiny synthetic fiber made of aluminum-coated plastic with a glittering metallic sheen
Mantua - a jacket-like bodice with pulled back overskirt that bustled in the back, often in elaborately patterned fabric, first worn in the 17th century
Medici Collar - a collar that stands upright on the back of the neck and opens in the front; this type of ruff was introduced to France by Marie de’ Medici in the 16th century, taking her name two centuries later
Moccasins - a type of soft animal skin shoe that were worn by Indians in North America
Muff - a tubular padded covering of fur or fabric, into which both hands are placed for warmth
Mule - a backless shoe
Muslin - a simple plain-weave textile made out of cotton and available in varying weights and finishes; historically, there were also varieties of muslin in silk and wool
Needle Lace -often known as “needlepoint lace”; is a term referring to the technique in which the lace is made of entirely needle work; it developed in the 15th century and then became very popular throughout the 16th century
Nemes Headdress - starched, striped linen headdress that draped on the shoulders and had a tail at center back worn only by royals in ancient Egypt
Panes/Paning - a method of decoration using long parallel strips of fabric arranged to reveal a contrasting fabric underneath that was fashionable from the 15th-17th centuries
Panniers - an under-structure used in eighteenth-century fashion that created a shape wide at the sides and flat at the front and back
Pantalettes - (also referred to as pantaloons) are loose, pants-like undergarments that covered women’s lower halves in the late 18th and early 19th century
Particolored - the combination of different colors within the same garment along the vertical axis
Passementerie - an additional accent or embellishment in silk or metallic threads, such as an embroidered braid, tassel or fringe
Pattens - wooden-soled platform over-shoes, which were commonly worn from the 14th century to the 18th century
If any of these words make their way into your next poem/story, please tag me, or leave a link in the replies. I would love to read them!
More: Fashion History
More: Word Lists
#word list#writeblr#spilled ink#dark academia#terminology#fashion history#history#words#studyblr#linguistics#writing prompt#fashion#writers on tumblr#poetry#literature#poets on tumblr#lit#culture#light academia#langblr#fiction#worldbuilding#creative writing#writing tips#writing advice#writing reference#writing resources
144 notes
·
View notes
Text
Taking a wire stripper to her internals, watching as the colorful plastic coatings peel away to reveal shining lengths of copper, silver, aluminum. Feeling the electricity run into your fingers from the newly exposed and vulnerable connections as she squirms and jolts in your hands. Pressing wires together and watching as her body reacts obediently to its electrical impulses, a puppet on strings of metal in your hands.
168 notes
·
View notes
Text
hey, nobody asked me for this but here is a detailed review on polymer and air dry clay

Polymer clay
Before hardening:
• Hard at first, needs to be warmed with hands or put warm water bottle on it
• After you warmed it up - feels like melted plastic, lil stretchy
• Not sticky, doesn't stick to itself right away
• Hard to smooth out, you will leave fingerprints on it
• Slowly melts in your hands, you need to hold your figurine carefully
• Use scissors to cut excess clay
• Hardens in oven (check instructions on your clay for details) Let it cool down after oven cuz it might be fragile in thin places
• Can be stored without a package
After hardening:
• All good! Doesn't crack
• Very hard feels like plastic
• Can bend (i mean with force. It will go back in place when released) it CAN actually break so just don't bend too much
• Very sturdy and water resistant
• Sandpaper it or cut with knife to smooth it out
• If you color it primer is recommended (←undercoat for colors to lay better) needs a few layers to color evenly, at least 2 (more if no undercoat)
(Tip: hydrate acrylics so they don't leave stripes from brushes)
Overall really good for miniatures and small details.
Also perfectly suits for making jewelry. And you can use foil as a base → Glass, metal, wire, and aluminum foil all work well with clay as they are non-porous and won't shrink
Air dry clay
Before drying:
• Very soft, feels like a natural clay
• Sticky
• Easy to smooth out, can be smoothed out with water
• Hardens on air (slowly, time depends on the size of figurine), can be rehydrated with water
• Can't be stored without a package (wrap it in foil or something)
After drying:
• Can crack if dried unevenly (don't put on heat/sun)
• Hard like a rock
• Doesn't bend, more likely to break than polymer clay
• You can sandpaper it too
• Easy to color (with acrylics), doesn't need a primer
Overall easy to work with, not that good for small details and miniatures though
68 notes
·
View notes
Text
Quetzalli's Needle Felting Commissions: OPEN! (5/5 Slots)

That's right, after YEARS of wanting to do some needle felting commissions, I believe I'm finally ready to put this plan in motion!!
If you're interested, make sure to read the important info below, or you can message me for other details! I also may update this post as time goes, on, including adding more categories of figures.
-.-.-.-.-.-.-.-.-
GENERAL INFO
My felted figures are made primarily using Maori wool batting and natural core wool, wrapped atop aluminum wire armatures that make them semi-poseable as well.
Right now, I'm most comfortable making animals (particularly mammals), but I'd be willing to try other creatures and humanoid figures to some degree.
I can make real animals of various species and breeds, including pets, and OCs, both completely original and fan-characters
My figures are typically stylized with a somewhat cartoon-y appearance, especially in the face. If you don't want your figure(s) to look this way, please let me know so we can discuss it. I'm open to making figures in other styles, such as a more realistic look or a chibi-esque style.
Unfortunately, I will only be shipping to the United States as of now.
Though the figures I've made so far range in size, in general, the minimum size is 3 inches tall (bottom of the feet to the top of the head, not including any ears/horns/hair/etc.) or long (the front of the face to the end of the thighs, not including any tail), and the maximum size is 8 inches tall or long. These constraints may change depending on the complexity of the figure(s).
Unless the figure(s) is based on a general species/breed and not a specific animal or character (ex: if you want a German shepherd, but not a personal pet or other specific German shepherd), make sure you can provide reference images from as many angles as possible for the subject(s) you'd like me to make, whether that be photos of a real-life pet, or drawn reference sheets and images of a character.
All transactions will be done via Etsy. I require 50% up front and 50% after the artwork is completed, which can be paid by purchasing corresponding listings on my Etsy shop.
I may not have all of the right wool colors for your subject. If the figure requires me to buy additional wool, the cost of the wool will be added to the total cost and it may take longer for me to make. In this instance, I'll let you know when the wool arrives.
I often make traditional blueprint sketches of my figures before starting. During the process, I may ask for confirmation on the blueprint to ensure I interpret the subject to your liking.
While my figures are somewhat durable and meant to be slightly posed, they are not toys, so avoid being rough with them after you receive them.
I may reject a commission offer for any reason.
Rain World-inspired commissions, unless explicitly agreed to before any payment, will be posted under the "project: rain wool" tag on this blog.
My prices are ultimately based on an hourly rate of $30. Anything on the subject that would require more time to make than the base prices, whether that be because it requires me to add more wool or because its features are more complex, will therefore increase the price.
-.-.-.-.-.-.-.-.-
PRICES
The prices below are base rates for types of figures I already have experience with and examples of. For all figures, the prices may change based on the size and complexity of the figure.
Real-Life-Inspired Animals: $120 to $210


These figures will be animals inspired by real life species and breeds, including pets. While I can vary their size, the minimum size is 4 inches on the longest side (for quadruped animals, this is usually from the tip of the snout to the end of the thighs, not including the tail), and the maximum size is 8 inches on the longest side.
$120 is the base rate for a 4 inch figure, and $210 is the base rate for 8-inch figure, like those shown in the photos. The price may changed based on the complexity of the figure, such as one that requires more colors or has special features (antlers, horns, clothing, accessories, etc).
Rain World-Inspired Slugcats & Lizards: $90 Base per Slugcat, $120 Base per Lizard


These are figures inspired by Rain World's player characters: the slugcats, and a common type of creature in the game: lizards of various colors. The minimum size for a slugcat is 3 inches tall, from the bottom of their feet to the top of their head (not counting the ears), and the maximum size is 8 inches tall. The minimum size for a lizard is 3 inches long from the tip of the snout to the end of the back legs, and the maximum size is 8 inches long.
The base rates are for the respective minimum sizes, and will increase for larger figures. The base price also assumes only 2 colors for the figures (a body color and a "face" color for slugcats, and a body color and head color for lizards), with little to no special features besides perhaps simple scars. More intricate features, such as clothing, detailed markings, special appendages (like Rivulet's gills) or additional colors will cost more depending on the complexity of the additions. I can also make small props for these figures, such as spears and food items, at an extra cost.
-.-.-.-.-.-.-.-.-
PROCESS
If you're interested in a felted figure, fill out this form so I can put you on a waiting list, which will start out at 5 slots for now.
Once I'm available, I'll contact the email you provide to discuss more information about what figure(s) you want, how long it will take to make the artwork, how much it will cost, and any other important details. I will also send you my Terms of Service document, and if you aren't comfortable with any of the terms, I'm willing to negotiate some details before payment. We must both agree, in writing, to the terms before I proceed.
Once the terms have been explicitly agreed to and the price established, I'll send you a listing on Etsy at the price of the first payment. Purchasing this will give you access to a digital file acting as a receipt for your commission. It will also contain the date I plan to start working on your commission, and up until this date you may request a refund.
From there, I will continue to email you update images of the figure(s), and may ask for some feedback before continuing.
Once the final artwork is done, I'll send you another Etsy listing at the remaining payment price with images of the finished figure(s), marked as "Commission for [Buyer Name]: [Figure Name(s)]". After purchasing this, you will be shipped the felted figure(s).
#commissions#art commissions#art#artwork#fiber art#felting#needle felting#traditional#traditional art#animal#animal art#fanart#rain world#project: rain wool#quetzalli needle felts
80 notes
·
View notes
Text

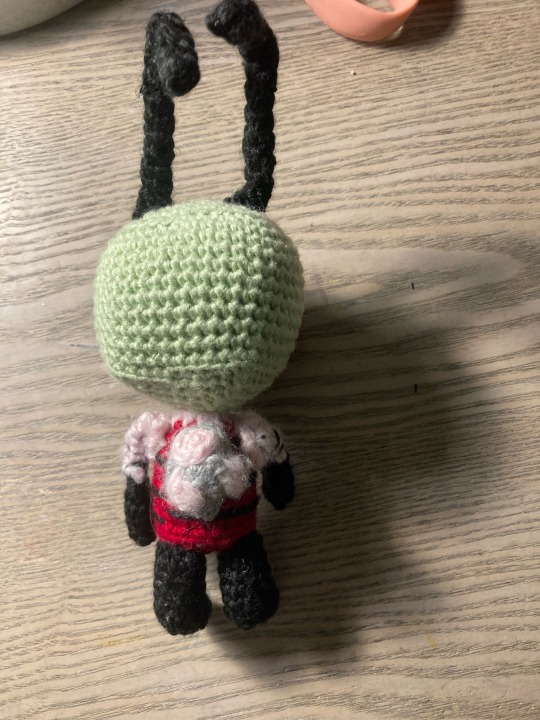
Invader zim crochet pattern
IMPORTANT INFO (PLEASE READ BEFORE YOU GO ON TO THE PATTERN):
THIS PATTERN IS WRITTEN IN U.S. TERMINOLOGY
PLEASE DO NOT SELL MY PATTERN ON ETSY, RAVELRY, OR ANY STORE OF THE LIKE, BUT YOU CAN REPOST IT AS LONG AS YOU LINK IT TO MY BLOG (millys-craft-corner) OR TIKTOK/YOUTUBE (fiestywyvern) FEEL FREE TO SELL ANY FINISHED PRODUCTS. Be sure to link me if you post your Zims as I’d love to see them.
Zim stands at about 5 inches tall or 12.7 cm, not including antennae
Techniques used
Sc
Inc
Dec
Triple dec
Triple inc
Magic ring
Chain
Basic embroidery and sew techniques
Not so well known techniques used
Triple inc- an increase with 3 stitches in one stitch instead of 2
Triple dec- a decrease going across 3 stitches instead of 2
Materials
3.5 mm crochet hook
size 3 or light worsted or light yarn weight in these colors light green, black, deep ruby red, light grey, and light pink
aluminum wire in size 14 or pipe cleaners
black embroidery thread
a medium sized sewing needle
tapestry needle
pliers if you’re using wire
hot glue
light pink felt
stuffing
Head and torso (make 1)- start with green
R1: 4sc in mr (4)
R2: triple inc around (12)
R3: 1 sc, (triple inc, 2sc)x3, triple inc, 1sc (20)
R4: 2sc, (triple inc, 4sc)x3, triple inc, 2sc (24)
R5: 3sc, (triple inc, 6sc)x3, triple inc, 3sc (36)
R6: 4sc, (triple inc, 8sc)x3, triple inc, 4sc (44)
R7: blo
R7-16: sc around (10 rounds) (44)
R17: blo- 4sc, (triple dec, 8 sc)x3, triple dec, 4sc (36)
R18: 3sc, (triple dec, 6sc)x3, triple dec, 3sc (28)
R19: 2sc, (triple dec, 4sc)x3, triple dec, 2sc (20)
R20: sc, (triple dec, 2sc)x3, triple dec, sc (12)
R21: dec around (charge to light pink at the end) (6)
R22: inc around (charge to red at the end) (12)
R23: sc around (12)
R24: inc, sc around (18)
R25-30: sc around (6 rounds) (18)
R31: blo- dec, sc around (12)
R32: dec around (6)
F/o, leave a long tail and 3 embroider stripes, using black yarn, so they cut the torso into thirds
Use the tail to close up piece
Shoulder pads (make 2)- light pink
R1: ch 5 and sc down from the 2nd chain from the hook, ch 1 and turn (4)
R2: 2 dec, ch 1 and turn (2)
R3: dec
F/o and leave a long tail for sewing
Arms (make 2)- start with black
R1: 3sc in mr (3)
R2: sc around (3)
R3: inc around (6)
R4: sc around (6)
R5: dec around (3)
R6: sc around (change to pink at the end) (3)
R7-10: sc around (4 rounds) (3)
F/o leave a long tail for sewing and embroider stripes using sewing needle and black thread
Legs (make 2)- black
R1: 4sc in mr (4)
R2: inc around (8)
R3-7: sc around (5 rounds) (8)
F/o and leave a long tail for sewing
Feet (make 2)- black
R1: 3sc in mr (3)
R2: sc, inc, sc (4)
R3: sc, inc, 2sc inc (6)
R4: 2sc, inc, 2sc, inc (8)
F/o leave a long tail for sewing
Pak (make 1)- light grey
R1: 4sc in mr (4)
R2: inc, sc (6)
R3: 2inc, sc, inc, 2sc (9)
R4: 2sc, 4inc, 2sc, slst (13)
R5-6: sc around (2 rounds) (13)
F/o leave a long tail for sewing
Big pak spot (make 1)- light pink
R1: 4sc in mr (4) Sl st into 1st stitch
f/o and leave a long tail for sewing
Small pak spot (make 2)- light pink
R1: 3sc in mr (3) sl st into 1st stitch
F/o and leave a long tail for sewing
Eyes (make 2)- red
R1: 6sc in mr (6)
R2: inc around (12)
R3: 4sc, 2inc, 4sc, 2inc (16)
R4-5: sc around (2 rounds) (16)
Antennae (make 2)- black
R1: 3 sc in mr (3)
R2-19: sc around (18 rounds) (3)
Assembly
Sew arms to shoulder pads
Sew bottom of feet to the sides of the legs so they create an “L” shape
Sew pak spots to the pak
Sew pak to body
Sew arms to body
Sew legs to body
Sew eyes to the lower left and lower right sides of the head
Cut out eyeshine out of light pink felt and hot glue it or sew it to the eyes
Cut 2 pieces of 5 inches of pipe cleaner/wire and fold in an inch on both sides so it’s 3 inches long. Insert them into each the antennae and sew antennae towards the back of the head. Fold back 1/4 of the antenna so it creates a right angle.
Congrats you just finished your irken invader, now go take over the earth!


262 notes
·
View notes
Text
Figure collecting: Alucard and the dolls of depression
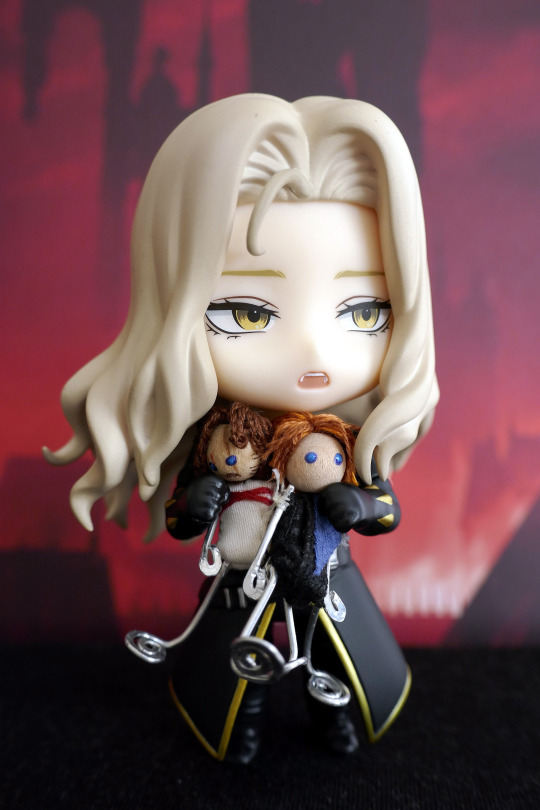
I was pretty hyped for the Alucard Nendoroid until I saw what accessories he came with…or more importantly, what he didn't come with:
- Heirloom sword - necessary, check
- Alucard shield - this is clearly S4 Alucard (who finally got tired of tanking hits with his face), so check
- And… a stick! … A stick?! -_- The same plain Jane stick that was used for something like 5 seconds in S2? Whyyy?

Just say no to stick : (
… Where's his depression dolls - the breakout stars of S3!? This is a LONELY man, he needs his dolls damn it! So I decided to remedy that.


** So... presenting my mini Trevor and mini Sypha dolls! **
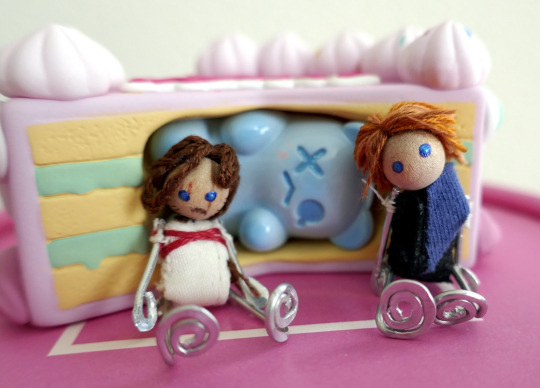
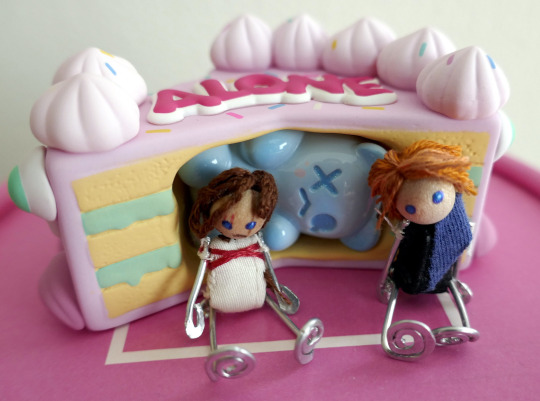
(Yes the cake reads ALONE - yeah I went there!)
These dolls sit at about ¾" tall. I would've liked them smaller since they're out of scale with the Nendo, but even at this size they were already hard enough to make.
The heads are ¼" diameter wood beads, with nail polish eyes (for a shiny plastic button look), colored pencil details, and embroidery thread hair. The bodies are scrap fabric and embroidery thread, built on half of a box clasp (I really wanted to stuff and sew tiny bodies, but it was impossible because the fabric kept unraveling - the clasp helped provide the structure to stitch the fabric around, plus provided holes to hinge the legs off of). Arms and legs are 18 ga aluminum wire, hammered into tiny "spoons" and "ladles" (which came out more like skimmers or potato mashers).

They're nowhere near perfect but they don't need to be. After all the originals were obviously crafted from scraps as well : )

And since I've seen some cute fanart of Alucard in wolf form carrying the dolls, a bonus! This is actually about the right scale : )
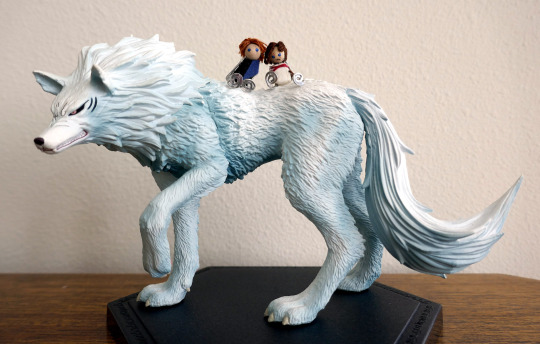
(Le wolf is not Alucard, le wolf is Toriko's Terry Cloth : p Close enough?)
***
BONUS: here's my fanart take on Alucard receiving his dolls : )
#castlevania#alucard castlevania#castlevania netflix#alucard#trevor belmont#sypha belnades#adrian tepes#adrian fahrenheit tepes#nendoroid#action figures
236 notes
·
View notes
Text

Adding on tops of Ups and middle dwellers
Eyebrows grow in larger length
As getting older
Leave bushy distinguished
Or trim down trying to look younger
If one can dreadlock eyebrows of one sided near
Or opposite population opportunity
If I turn my face
Am I seen clear
From a profile
Or head straight up
My mind intact
Let’s carry on
Demo-Blue
In Democracy
#wrapbymm#wordsbymm#connecting#pourbymm#mmybsdrow#wordsbymm||mmybsdrow#mmybsdrow||wordsbymm#you Tiger#vigilante#get up or get out#turquoise#copper#letspin#galvanized wire#colored aluminum wired#bathroom tiles#prunt#billion dollar industry#or millions#as in lower foundations#below middle class#make em work for U S#of a UnitedStates of America#the People as intended#four fathers never wanted squash#and in sports#Woman#just as equal in sports#don’t be afraid#they don’t want you
0 notes
Text
Incomplete V1 figure (about 33% done?) creation process, it's a long post
Step 0 (studying):
I ordered yellow plastic for the wings which will arrive in 3 days.
V1 is basically a ball jointed doll, so I was very excited about making one of these!
(Look at those tasty joints, I love love love that about their character design)
I ended up not doing that when I realized that I would need rubber bands I don't have and that this looks too complicated for me. I haven't used polymer clay in years after all.
I did a couple of messy joint tests earlier today tho

I was very surprised that just passing a wire through 2 pieces worked and I'll keep it in mind for future uses! The 3 piece joint is a bit janky but with some tinkering it could work as a shoulder joint. (thanks to the detachable G1 monster high dolls I had as a kid for the idea, I tried to remember how they worked as well as I could)
I'm going with the exposed wire caveman joint style for this tho, it's especially sexy with my red aluminum. (Exposed veins)
Step 1 (wire skeleton):
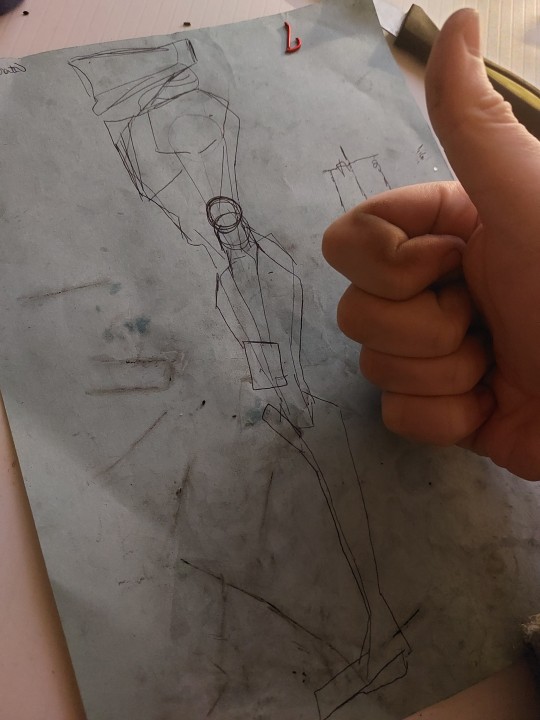

So this is my first time doing this ever, and since I am stupid, I didn't really look up a guide for this.
This was especially hard to do because of her silly neck bend. I had to add that sort of wire triangle you can maybe see in the pic. It was necessary to pass that shoulder wire through.
Next time I'll definitely have one long section that goes "left arm-shoulders-right arm" (and same for the legs and hips) instead of 3 separate loosely attached parts, it'll be way easier and sturdier.
Next I added some padding with aluminum foil (I ran out of it fast tho since it was the end of my roll)

And yeah done!
Step 2 (the first layer):
This is where I'm at right now (it's curing in my oven).
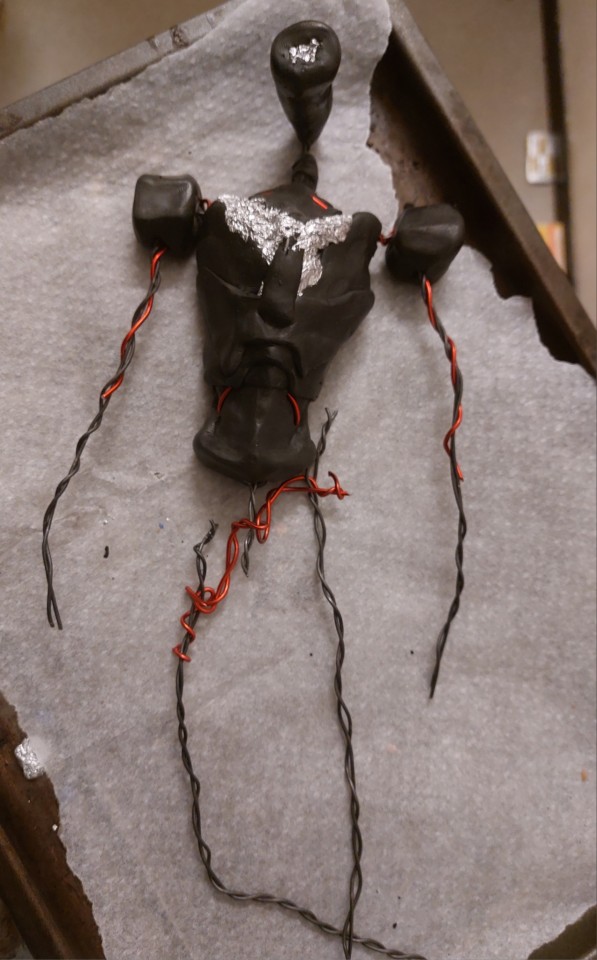
I realized she was too big for my oven tray with this step, but I'm happy with this.
It's just fun to sculpt. I'm doing the front first and then I'll do the back in, hopefully, the most seamless way possible (but if I notice the legs don't look good, I'll mix it up). I'm sooo happy about the red aluminum wire.
I mostly want to do the black first because it's physically underneath the blue plating in the model anyway but also because that pigment is a bitch to get off my hands and I want to be done with it.
Using colored clay is cool because I want to avoid big paint jobs. I have never painted using acrylic paint before, so I'll be keeping it for highlights or small details.
#v1 ultrakill#v1#polymer clay#ultrakill#art#ill reblog as soon as i do enough to warrant a substantial update!#hopefully motivated enough to finish this#my little v1 project
31 notes
·
View notes
Text
Yo dawg, I heard you like dollhouses, so I made a dollhouse to put in your dollhouse...

It's 1:288, so if you're the size of my 1:48 figures (the size I usually work in) it's about Barbie size. Penny for scale, but it's about 18mm square. Just shy of 3/4", but I had to work in mm.
(Bragging and more pics under the cut)
Not everything is exactly to scale. I did the math, using real dimensions, but when it's that small and your hands shake like I do, things do not come out exact. Regardless, me and my tremor-y hands are pretty happy with it.


I made one many moons ago, and it was not great. It's cool to see the difference. 😳 Do not be discouraged, buds. You will get better at what you do. And this one took multiple tries, btw. So if your project does too, it's just free practice. 😊


Anyways, it's mostly cardstock and paper, paint, a little colored pencil, a bit of wire, 2 seed beads, aluminum foil for the mirror, ink, nail polish, glue, and many, many curse words. 😂
165 notes
·
View notes
Text
Gilbert von Obsidian - Shadow Box

Let’s kick things off with Gilbert. Black and red suits him. Don’t you think?
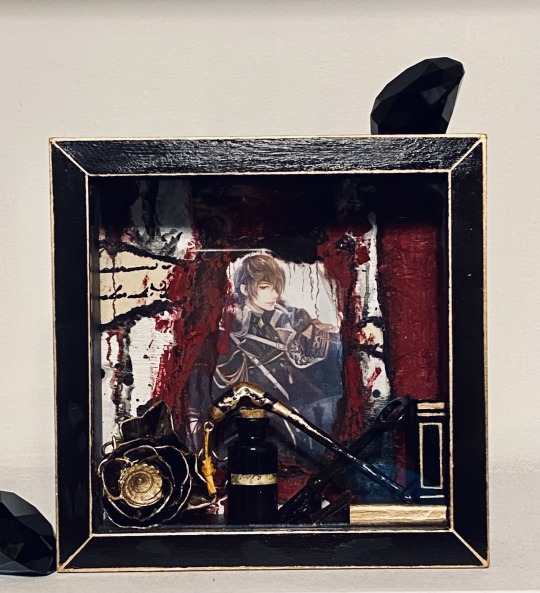
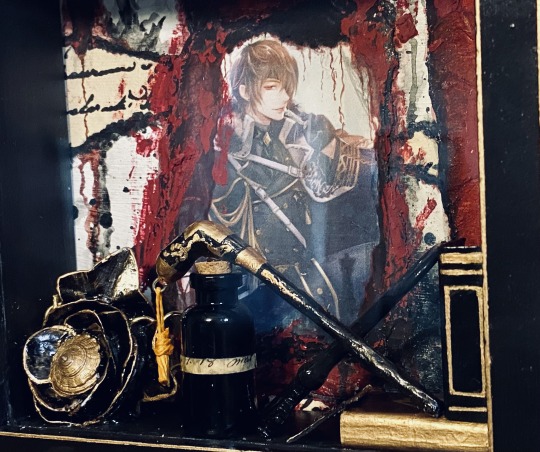
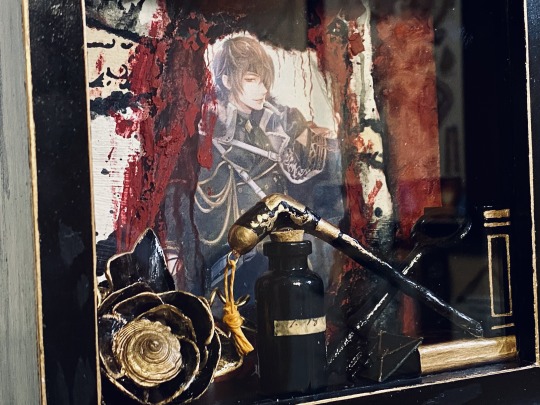
About this box:
I upcycled this from one of those money saver piggy banks "Life is a Journey", that I never used LOL.
Following his color-theme, the box was repainted black and gold-leading.
Everything in the box includes something from his route. (Spoilers). I used several layers of paint, cardstock and various inks and paint mediums to achieve the back drop.
The miniature books, letter, his cane, and the rose are all handmade products. The rose is actually made from seashells. I live near beaches, so I often go shelling and use these in my crafts. The can is made of modeling wire, aluminum foil and clay. Books are from card board.
It's difficult to see, but there is an antique clock key that I picked up years ago from an antique shop. There is a significant black key in his route, so I repainted it and used a lacquer to give a metallic finish.
Poison is often referenced in his events and even in his route, so I simply painted a small vial that I had on hand, and stained some scrapbook paper for that 'old label' look.
This was my first otome craft project and it took weeks because of all the detailed work. This was also my first attempt at mixed media and I'm happy with the results. I have lots ideas and projects that I'm currently working on, but I started with Gil simply because he is the LOML.
#ikepri#gilbert von obsidian#ikemen prince#ikepri gilbert#ikepri gil#ikemen prince gilbert von obsidian#otome crafts#Ikepri Crafts#Cybird Crafts#I love you gilbert#Crafting#Craft is an art too#Shadow boxes#Upcycling
42 notes
·
View notes
Text
heres some of my fibers and metalsmithing work if yall wanna see it :) im putting it all under the cut so i can explain them a bit lmao (and theres also a good amount of them)
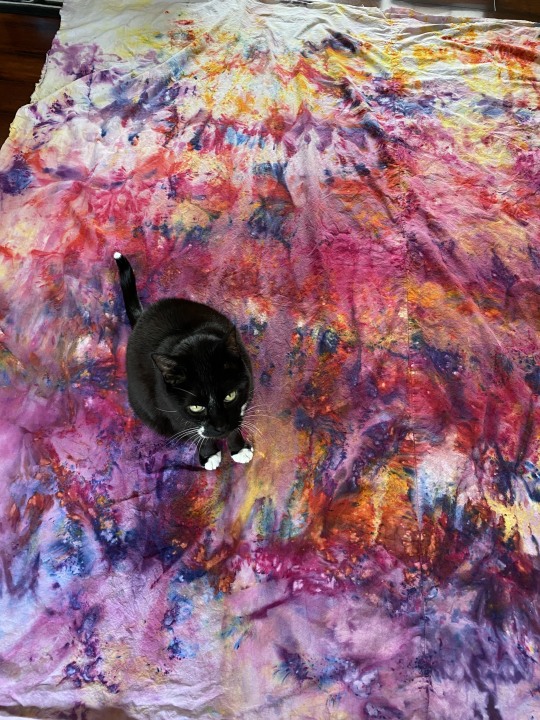
this one is probably my favorite maybe ever. its a self portrait and i dyed the three colors in the background that arent solids and the patterns in my hair and shirt i designed in illustrator and printed them out on fabric with this rly cool fabric printer. this is also 60x80 inches so its big. and the backing fabric is also fully dyed (the photo on the right featuring my cat helping ofc)
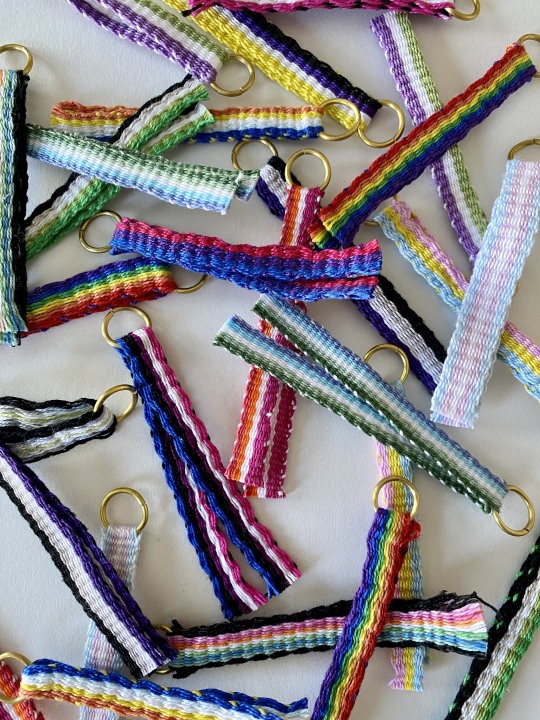
these are little keychains/zipper pulls of pride flags that i dyed most of the colors for (excluding the basic rainbow) and wove on an inkle loom. we sold them to raise money for various queer charities (i started this project after a shooting at a queer club in my state. we donated about $500 to them)

these rings were lost wax cast in sterling silver and bronze. the two on the left are knit and purl stitches and i hand carved them out of wax. the next three are cat food, corn, and a tractor tire and those i designed in a 3d modeling program and 3d printed them out. and the last one is a design from a spoon handle that i took a mold of and then cast.
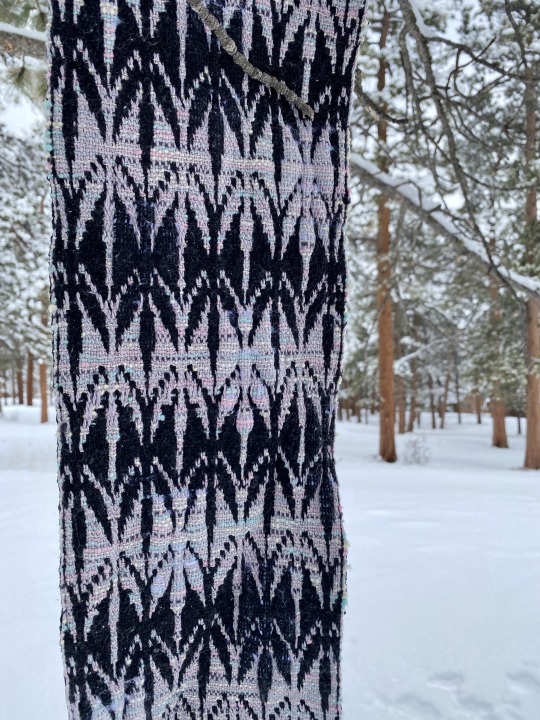
this one is another favorite. instead of weaving just one solid fabric, this is weaving two at the same time (called double weave) and basically the black butterflies can be/are a seperate fabric than the purple ones. but they are interwoven together to make this pattern. it took foreverrrr to weave this and i came up with the pattern myself. (i was also individually picking up the strands to make the pattern based off of my graph paper sketch)
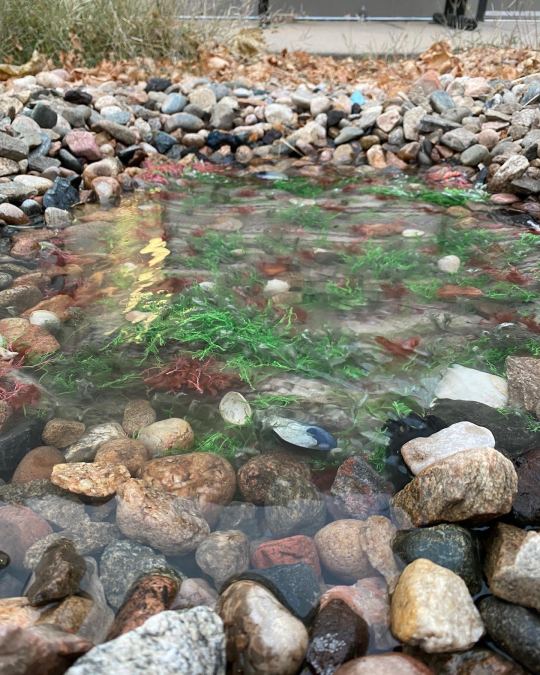

another weaving here that ended up being like 2x3 feet big. i wove it on a giant frame loom i made. its a tide pool and for our critique i submerged it in water and had a little aquarium pump running to create some waves. a fun fact about this piece was i made it when i first started watching foolish. this took absolutely forever and i watched foolish build the xd statue wings at the same time so we were 'suffering' together XD

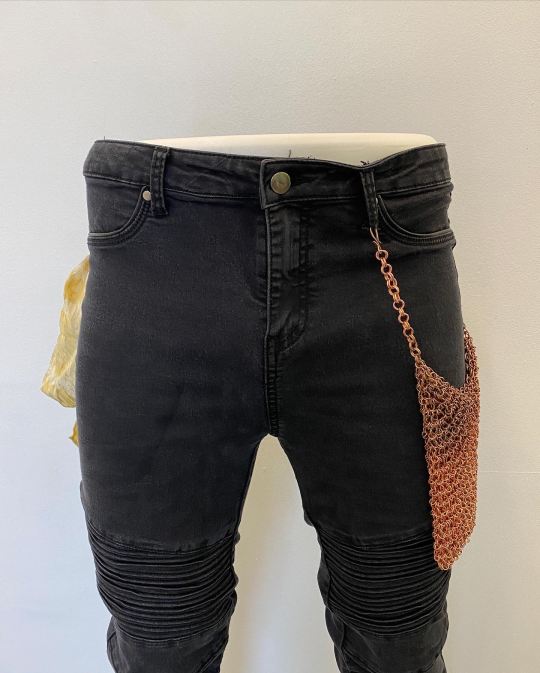
i definitely have more to share if anyone wants to see them but ill end with this one for now. this is a copper chain mail pocket that can be used to help dye fabric. i made all of the jump rings myself (winding wire around a dowel and then sawing the spring into rings and which also took forever) and the chainmail pattern is called japanese 6 in 1. there is one slightly bigger and thicker ring with 6 smaller ones coming off of it. and it is so satisfying to hold bc its so heavy and makes such a nice noise. and the fabric dying bit, when dying with natural dyes (marigolds, logwood, etc) you need a mordant that basically allows the color to 'stick' to the fabric. most of the time, ive used alum which comes from aluminum, but copper also works. so i get to skip the step of pre-soaking the fabric in an alum mixture and can instead just put my marigolds into the copper pocket and that will mordant it and the same time its being dyed. you can see the little yellow fabric sticking out of the pocket there and that was dyed using the bag.
anyway if you made it this far down thanks for reading and id looove to talk more about any of this if you have questions or want to see more works of mine,, i have a lot XD :)
#if you open the read more you also get to see a photo of my cat helping me so id highly recommend :)#jace's art#i guess ill start that tag now just in case
12 notes
·
View notes
Last Seen Blogs

observations-of-an-intp
The World As Seen By An INTP

tayyonce
reputation|lemonade

thessa70
INFJ

amomentoftruth
Exhale

holliedaysims
Hollie