#create tablespace
Explore tagged Tumblr posts
Visit Tumblr Blog
Explore Tumblr blogs with no restrictions, modern design and the best experience.
Last Seen Tumblr Blogs


Fun Fact
The Tumblr app for Google Glass was released on May 16, 2013.
Text
RMAN duplicate command using skip tablespace in Oracle
RMAN duplicate using ‘SKIP TABLESPACE’ skipping all tablespaces Duplicate the database using RMAN and SKIP tablespace, restoring only the necessary tablespace for table recovery. You must include the specified tablespace to create new databases. System tablespaceSysaux tablespaceUndo tablespaces ( all included in RAC) To duplicate a database with RMAN while skipping specific tablespaces, you…
0 notes
Text
Cómo instalar PostgreSQL en Windows paso a paso

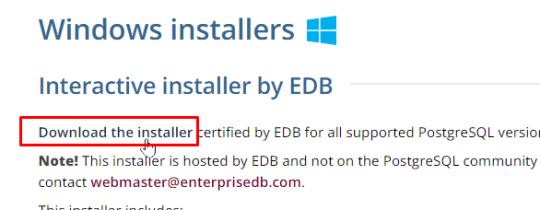
PostgreSQL es un sistema de bases de datos relacional y de código abierto ampliamente utilizado por su robustez y soporte para funciones avanzadas como JSON y operaciones geoespaciales. A continuación, te mostramos cómo instalar PostgreSQL en Windows y realizaremos una práctica personalizada para confirmar que los alumnos completaron la instalación y el uso del sistema. Requisitos previos - Sistema operativo: Windows 10 o superior. - Memoria RAM mínima: 4 GB. - Espacio libre en disco: Al menos 2 GB. - Conexión a internet para descargar el instalador. Para este tema, es importante tomar capturas de pantalla de todo el proceso, para que entregues las evidencias de lo realizado. Paso a paso para instalar PostgreSQL Paso 1: Descargar el instalador - Ve al sitio oficial de PostgreSQL: Descargar PostgreSQL. - Selecciona Windows y haz clic en el enlace para descargar el instalador correspondiente.

Paso 2: Ejecutar el instalador - Una vez descargado, haz doble clic en el archivo postgresql-17.0-1-windows.exe - En la primera pantalla, haz clic en Next.

Paso 3: Selección del directorio de instalación - Elige la carpeta donde deseas instalar PostgreSQL o deja la predeterminada. - Haz clic en Next.

Paso 4: Selección de componentes - Asegúrate de seleccionar: - PostgreSQL Server - pgAdmin 4 (herramienta gráfica para administrar bases de datos) - Haz clic en Next.

Paso 5: Configuración de la contraseña del superusuario - Introduce y confirma una contraseña para el usuario postgres (anótala, la necesitarás más adelante). - Haz clic en Next.

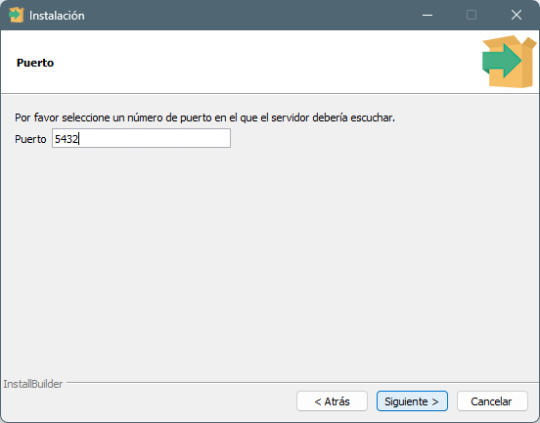
Paso 6: Configuración del puerto de conexión - Deja el puerto predeterminado 5432 (a menos que necesites cambiarlo por alguna razón). - Haz clic en Next.

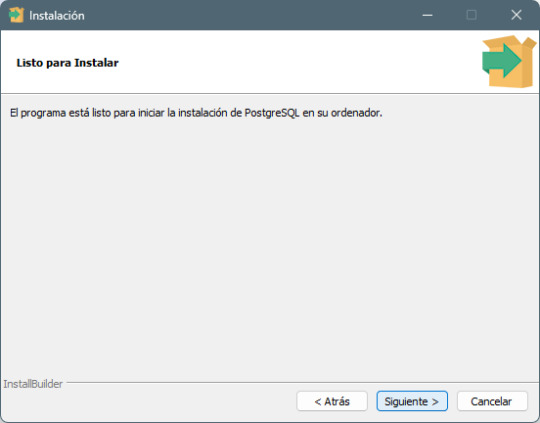
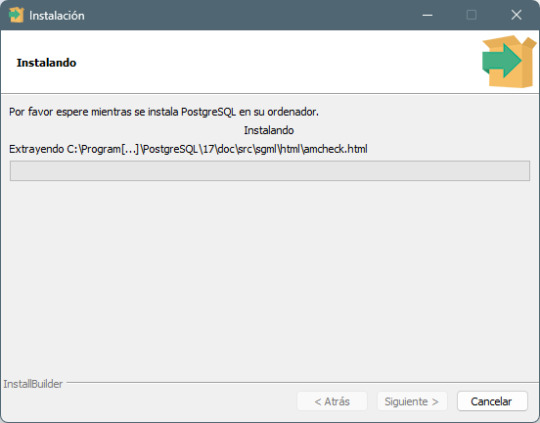
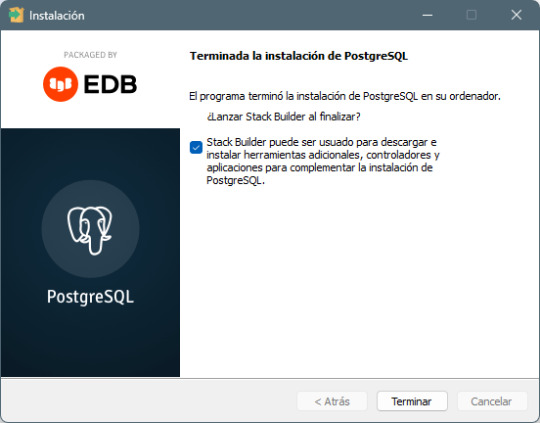
Paso 7: Finalización de la instalación - Haz clic en Next y luego en Finish para completar la instalación. - PostgreSQL y pgAdmin 4 estarán ahora listos para ser usados.
Paso a paso para usar PostgreSQL con pgAdmin 4

Paso 1: Abrir pgAdmin 4

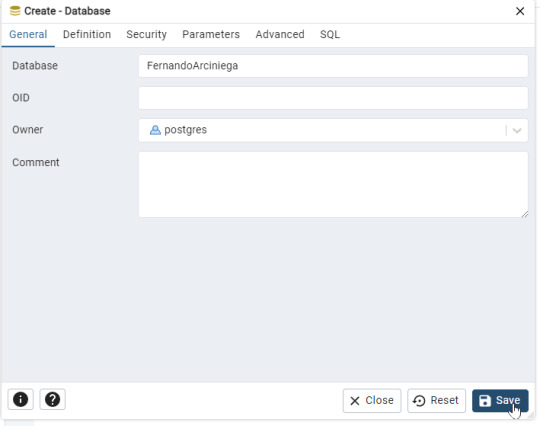
- Desde el menú de inicio, abre pgAdmin 4. - Ingresa la contraseña que configuraste para el usuario postgres. Paso 2: Crear una nueva base de datos - En el panel izquierdo, haz clic derecho sobre Databases y selecciona Create > Database.

- En el campo Database Name, ingresa tu nombre y tu primer apellido (por ejemplo: FernandoArciniega). - Haz clic en Save para crear la base de datos.
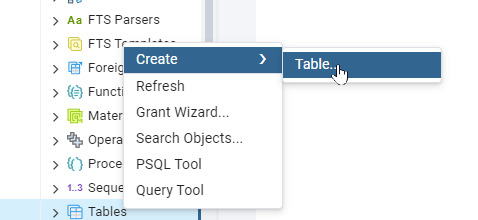
Paso 3: Crear una tabla personalizada - Selecciona tu base de datos y ve a Schemas > Tables.

- Haz clic derecho en Tables y selecciona Create > Table.
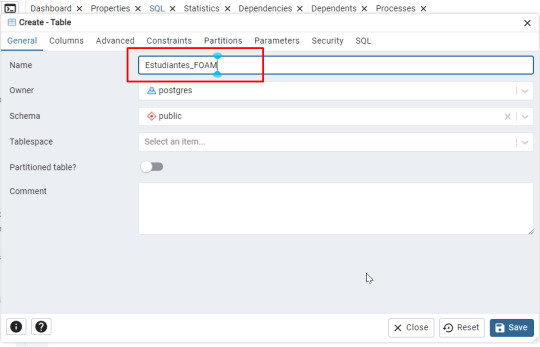
- Asigna un nombre a la tabla, como Estudiantes_ (por ejemplo: Estudiantes_FOAM).
Agrega dos columnas: (Ficha Columns)

- Nombre (Tipo: character varying(50)) - Edad (Tipo: integer)
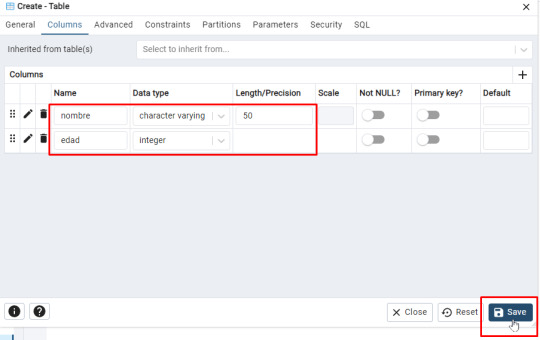
- Guarda la tabla haciendo clic en Save. Aparecerá el siguiente código: -- Table: public.Estudiantes_FOAM -- DROP TABLE IF EXISTS public."Estudiantes_FOAM"; CREATE TABLE IF NOT EXISTS public."Estudiantes_FOAM" ( nombre character varying(50) COLLATE pg_catalog."default", edad integer ) TABLESPACE pg_default; ALTER TABLE IF EXISTS public."Estudiantes_FOAM" OWNER to postgres; Paso 4: Insertar datos en la tabla - Haz clic derecho en la tabla y selecciona Query Tool.
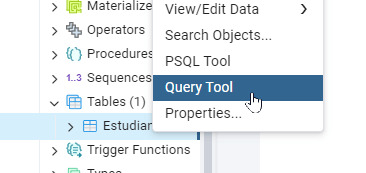
- Escribe la siguiente consulta SQL para insertar un registro: INSERT INTO "Estudiantes_FOAM" (Nombre, Edad) VALUES ('Maria Lopez', 20); - Haz clic en Run para ejecutar la consulta o F5

Paso 5: Verificar los datos - Haz clic derecho en la tabla y selecciona View/Edit Data > All Rows. - Verifica que el registro se haya insertado correctamente.

Inserta 14 registroas más para tener un total de 15 en tu tabla. Práctica: Demostrar la instalación y uso de PostgreSQL Instrucciones personalizadas para la entrega: - Base de datos personalizada: - Cada alumno debe crear una base de datos con su nombre completo. - Tabla personalizada: - Crear una tabla con el nombre Estudiantes_ (por ejemplo: Estudiantes_FOAM). - Inserción de registro: - Inserta 15 registros en total con su nombre y edad. Entrega del trabajo - Formato: Impreso. - Equipos de 4 personas. Read the full article
#basededatosgratuita#basededatosrelacionalWindows#basesdedatosparaprincipiantes#cómousarpgAdmin#conexiónaPostgreSQL#configuraciónPostgreSQL#crearbasededatosenPostgreSQL#crearbasededatospersonalizada#creartablaenPostgreSQL#descargarPostgreSQLgratis#insertardatosPostgreSQL#instalacióndePostgreSQL2024#instalaciónfácilPostgreSQL#instalarpgAdmin4#PostgreSQLejercicios#PostgreSQLinstalaciónWindows#PostgreSQLManagementTool#PostgreSQLparaestudiantes#PostgreSQLpasoapaso#prácticasconPostgreSQL#servidorPostgreSQLlocal#SQLenPostgreSQL#tutorialpgAdminpasoapaso#tutorialPostgreSQLenespañol
0 notes
Text
Custom Game Card Sizes: Standard and Non-Standard Options

In the world of card games, the size of the game cards can significantly impact the overall gaming experience. Whether you are designing a new card game or looking to enhance an existing one, understanding the various options available for custom game card sizes is essential. This article explores standard and non-standard options for custom game card printing, ensuring you make informed decisions for your next project.
Introduction to Custom Game Card Sizes
Custom game card printing allows game developers to tailor their cards' dimensions to suit their games' specific needs. The right card size can enhance gameplay, improve handling, and ensure the cards fit well in players' hands. There are several factors to consider when choosing between standard and non-standard card sizes, each with its own benefits and drawbacks.
Standard Card Sizes
Standard card sizes are commonly used in many popular card games, offering familiarity and ease of production. Here are some of the most widely recognized standard card sizes:
Poker Size (2.5" x 3.5") – This is the most common size for card games. It is easy to handle and shuffle, making it ideal for a wide range of card games.
Bridge Size (2.25" x 3.5") – Slightly narrower than poker size, bridge-size cards are often used in games requiring players to hold multiple cards. The narrower width makes it easier to hold a large hand of cards.
Tarot Size (2.75" x 4.75") – Typically employed in games that demand more intricate artwork or require more specific information on each card, tarot cards are larger than regular playing cards.
Mini Size (1.75" x 2.5") – Mini cards are much smaller and are often used in games with limited tablespace or as secondary cards that complement a main deck.
Non-Standard Card Sizes
While standard sizes are popular, non-standard card sizes offer unique advantages that can set a game apart. Custom game card printing allows for creating cards that deviate from traditional dimensions, providing a distinctive feel and function. Here are some non-standard options to consider:
Square Cards – Square cards are unconventional and can add a unique twist to a game. They are often used for games that involve tile-laying mechanics or spatial elements.
Oversized Cards – Oversized cards can make a game feel more substantial and are ideal for showcasing detailed artwork or providing ample space for game text. These cards are typically larger than standard tarot cards.
Custom Shaped Cards – Custom shapes can enhance a game's thematic elements. For example, a game about wizards might use cards shaped like spell books. Custom shapes can add a tactile element to the game, making it more engaging.
Choosing the Right Card Size
Selecting the appropriate card size for your game involves several considerations. Take a look:
Gameplay Mechanics: Consider how the size of the cards will affect gameplay. Larger cards might be necessary for games that require detailed artwork or extensive information, while smaller cards might be better for games with limited space.
Production Costs: Non-standard sizes can sometimes increase production costs. Be sure to balance the desired aesthetic and functional qualities of your cards with the budget for card game printing.
The Bottom Line
Choosing between standard and non-standard card sizes for custom game card printing is a crucial decision in game design. Standard sizes offer familiarity and ease of production, while non-standard sizes provide opportunities for creativity and differentiation. By considering gameplay mechanics, player experience, and production costs, you can select the perfect card size for your next card game printing project.
0 notes
Text
ORA-25153 Temporary Tablespace Is Empty
During any activity like expdp, rebuild index , creating temporary objects, direct path load etc.. this error usually occur if there is no temporary tablespace in the database. Action: SELECT * from dba_temp_files; SELECT tablespace_name from dba_tablespaces where tablespace_name like '%TEMP%'; --If temp tablespace does not exist, then create it, CREATE temporary tablespace TEMP01…
View On WordPress
0 notes
Text
How do I keep a completed restaurant wall design for seasonal themes fresh?
Restaurant wall design is an ever-evolving canvas that allows eateries to embrace the spirit of each season. Keeping your restaurant's ambiance fresh and inviting year-round is essential for attracting and retaining patrons. In this blog, we'll explore strategies for refreshing restaurant wall design to embrace seasonal themes.

Versatile Color Palettes
Restaurant wall design, Versatile color palettes. Begin with a versatile color palette that can seamlessly transition between seasons. Neutrals like whites, grays, and soft pastels provide a neutral backdrop for seasonal décor and accent colors.
Seasonal Art Rotations
Seasonal artwork, and rotating restaurant wall décor. Consider rotating artwork and décor to reflect the changing seasons. Collaborate with local artists or designers to create pieces that capture the essence of each season.
Wall Decals and Graphics
Wall decals for restaurants, Seasonal wall graphics. Wall decals and graphics are a dynamic way to embrace seasonal themes. From spring blossoms to winter wonderlands, these temporary designs can be easily swapped out.
Seasonal Wreaths and Garlands
Seasonal wreaths, and restaurant wall garlands. Hang seasonal wreaths and garlands on walls to infuse festive charm. Use natural elements like flowers, leaves, or pinecones for an authentic touch.
Ambient Lighting
Ambient restaurant lighting, Seasonal lighting design. Adjust lighting to complement the season. Warm, cozy lighting in autumn and winter, and brighter, cooler lighting for spring and summer.
Seasonal Wall Murals
Seasonal wall murals, Custom restaurant artwork. Invest in custom wall murals that change with the seasons. These large-scale artworks can transport diners to different environments and moods.
Textured Wall Coverings
Textured wall coverings, Seasonal restaurant textures. Use textured wall coverings that evoke seasonal sensations. Think of tactile materials like reclaimed wood for a rustic autumn feel or seashell textures for a coastal summer vibe.
Seasonal Accents
Seasonal wall accents, Decorative elements for restaurants. Incorporate seasonal accents like framed seasonal menus, floral arrangements, or thematic wall sculptures.
Creative Signage
Creative restaurant signage, Seasonal wall signs. Get creative with seasonal wall signage that welcomes guests and showcases special offerings or promotions.
Functional and Decorative Shelving
Decorative restaurant shelving, Seasonal wall shelves. Install wall shelves that serve both functional and decorative purposes. These can hold seasonal decorations or display seasonal ingredients or products.
Seasonal Tablespaces
Seasonal tablespaces, Restaurant table décor. Extend seasonal décor to your table settings. Coordinated tablespaces enhance the overall ambiance.
Window Displays
Seasonal restaurant window displays, Eye-catching storefront décor. Don't forget about window displays. They provide a sneak peek of the seasonal ambiance inside.
Interactive Elements
Interactive restaurant décor, Seasonal photo walls. Consider interactive elements like seasonal photo walls or props that encourage diners to engage with the décor.
Community Engagement
Community engagement in restaurant décor, Seasonal collaborations. Engage with the local community for seasonal décor ideas or collaborate with nearby businesses for cross-promotions.
Sustainability in Seasonal Décor
Sustainable restaurant décor, Eco-friendly seasonal design. Consider eco-friendly and sustainable décor options, such as reusable decorations or décor made from recyclable materials.
By incorporating these strategies, you can keep your restaurant's wall design fresh and engaging, allowing diners to experience the magic of each season. Whether it's the warm embrace of autumn, the cozy charm of winter, the vibrant energy of spring, or the relaxed ambiance of summer, your restaurant wall design can be a dynamic reflection of the changing seasons, continually inviting guests to return for new experiences. One can achieve this by getting in touch with renowned design and build firms such as Flipspaces, who can help you with the same.
0 notes
Text
Create a delightful ambiance and impress your guests with LiveLinen's expert advice on setting the perfect table for any occasion. Unleash your creativity and make every meal a memorable experience. Read now and redefine the way you dine!
#Table setting#Dining in style#Delightful table decor#Table setting tips#Tableware essentials#Table decor ideas#Tablescapes 2023#table decoration#linen
0 notes
Text
The Rewards and the Workings of a Database Management Systems

If the perspective and the context of the IT structure of any organization are taken, the database management system is perhaps one of the most pivotal and important areas to work with and on. To know how the present database management system journeyed this far over the years, we need to observe the rewards this software delivers to an organization. Control over redundancies:Data that is stored in manifolds at different locations is redundant data. Redundancy uses more disk space, causing inconsistency, and the repetition and duplication of effort. Multiple data input locations cause duplication of effort. In reality, only one update should be sufficient. If data in one place is not updated, it might lead to the whole data being inconsistent. There is no way of knowing which is the latest data. Database Management System avoids it and creates only one record. Safekeeping:Relevant reports to assigned people, when they require it, with access denied for others is the way to use these DBMS. This avoids the users from viewing or updating data that is not in their purview. Usually, the users are assigned accounts that are protected with a password by a DB Administrator. Their account restrictions are enforced by the DBMS Software. For instance, for a DB Admin’s account, there are no restrictions, they can create, alter, shut down, and startup a database. Well-organized recovery of data:The end result required when storing data is to have it recovered and retrieved as and when required. This way a Database Management System allows users to complete queries efficiently. Backup & recovery:When a system crashes, a good database management system has the ability to restore itself. If a complex query session was going on at the time of the crash, then it must get the system to its stable and consistent state. The practice of taking a timely backup ensures proper retention of data at all times. Numerous user interfaces:The end users could be any number. They would all come with varying degrees of roles to match their designations. The Database Management System should provide different user interfaces for each of them. Storing program objects:The database provides data structures to store program data. These could be classes, record types, program variables values, etc. These are very important to a programmer. This program data gets discarded after the program completes its execution cycle. The previous versions of earlier years were not equipped to handle the data structures of these variables. Limitations:A good Database must enforce and define some integrity constraints and limitations. For instance, an Admin can specify that in the database of a university, the student’s name must be of at least 3 characters or the grade that they get in exams must be either A, B, C, D, or F. This way a name cannot be less than 3 characters and a student can never receive a grade of Y or Z. Probability for enforcing standards:Administrators of the Databases can enforce standards. These are in line with the company’s IT policy. For example, the standards for names, reports, data elements, etc. Suppleness:A Database Management System needs to be scalable. This way new users or data groups are added. It becomes easier for all. It must also be able to increase or decrease the tablespace size as and when required. Swift response time:A Database Management System should be able to update the records or modify data. These updates and alterations should be available to users in real time. This will prevent users from working on old, redundant, and inconsistent data. Read the full article
0 notes
Text
How to create tablespace in Oracle
In Oracle, a tablespace is a logical storage container that can hold one or more database objects, such as tables, indexes, and other schema objects. The following is an example of a Data Definition Language (DDL) create tablespace in Oracle. Statement to create tablespace in Oracle CREATE TABLESPACE test_ts DATAFILE '/u01/app/oracle/oradata/test_ts01.dbf' SIZE 100M AUTOEXTEND ON NEXT…

View On WordPress
0 notes
Text
What is control file and datafile in Oracle?
What is control file and datafile in Oracle? #oracledba #oracle #shripal #database
In this article, we are going to learn what is control file and datafile in Oracle. Control files In the Oracle database environment, each and every database has its own separate control files. The control files also called binary files which record the physical structure of the oracle database. What is in Controlfile The controlfile also include: Name of the Database.Datafile and Redo log…
View On WordPress
#create datafile in oracle#data file and control file in oracle#how to check control file location in oracle#how to find datafile path in oracle 11g#how to read control file in oracle#oracle database control file example#oracle list datafiles in tablespace#oracle tablespace full#sysaux tablespace in oracle#types of files in oracle database#types of tablespace in oracle#users tablespace in oracle#What are the types of data files?#what is an instance of a database#what is an oracle instance vs oracle database#What is control file and datafile in Oracle?#what is control file in oracle#what is datafile in oracle#What is difference between table and tablespace?#What is Oracle database instance?#What is the difference between tablespace and datafile?#Where are data files stored in Oracle?#Where is the control file in Oracle?#Which mode control files are opened for the instance?
0 notes
Text
Ichiran@home 2021: the ultimate guide
Recently I’ve been contacted by several people who wanted to use my Japanese text segmenter Ichiran in their own projects. This is not surprising since it’s vastly superior to Mecab and similar software, and is occassionally updated with new vocabulary unlike many other segmenters. Ichiran powers ichi.moe which is a very cool webapp that helped literally dozens of people learn Japanese.
A big obstacle towards the adoption of Ichiran is the fact that it’s written in Common Lisp and people who want to use it are often unfamiliar with this language. To fix this issue, I’m now providing a way to build Ichiran as a command line utility, which could then be called as a subprocess by scripts in other languages.
This is a master post how to get Ichiran installed and how to use it for people who don’t know any Common Lisp at all. I’m providing instructions for Linux (Ubuntu) and Windows, I haven’t tested whether it works on other operating systems but it probably should.
PostgreSQL
Ichiran uses a PostgreSQL database as a source for its vocabulary and other things. On Linux install postgresql using your preferred package manager. On Windows use the official installer. You should remember the password for the postgres user, or create a new user if you know how to do it.
Download the latest release of Ichiran database. On the release page there are commands needed to restore the dump. On Windows they don't really work, instead try to create database and restore the dump using pgAdmin (which is usually installed together with Postgres). Right-click on PostgreSQL/Databases/postgres and select "Query tool...". Paste the following into Query editor and hit the Execute button.
CREATE DATABASE [database_name] WITH TEMPLATE = template0 OWNER = postgres ENCODING = 'UTF8' LC_COLLATE = 'Japanese_Japan.932' LC_CTYPE = 'Japanese_Japan.932' TABLESPACE = pg_default CONNECTION LIMIT = -1;
Then refresh the Databases folder and you should see your new database. Right-click on it then select "Restore", then choose the file that you downloaded (it wants ".backup" extension by default so choose "Format: All files" if you can't find the file).
You might get a bunch of errors when restoring the dump saying that "user ichiran doesn't exist". Just ignore them.
SBCL
Ichiran uses SBCL to run its Common Lisp code. You can download Windows binaries for SBCL 2.0.0 from the official site, and on Linux you can use the package manager, or also use binaries from the official site although they might be incompatible with your operating system.
However you really want the latest version 2.1.0, especially on Windows for uh... reasons. There's a workaround for Windows 10 though, so if you don't mind turning on that option, you can stick with SBCL 2.0.0 really.
After installing some version of SBCL (SBCL requires SBCL to compile itself), download the source code of the latest version and let's get to business.
On Linux it should be easy, just run
sh make.sh --fancy sudo sh install.sh
in the source directory.
On Windows it's somewhat harder. Install MSYS2, then run "MSYS2 MinGW 64-bit".
pacman -S mingw-w64-x86_64-toolchain make # for paths in MSYS2 replace drive prefix C:/ by /c/ and so on cd [path_to_sbcl_source] export PATH="$PATH:[directory_where_sbcl.exe_is_currently]" # check that you can run sbcl from command line now # type (sb-ext:quit) to quit sbcl sh make.sh --fancy unset SBCL_HOME INSTALL_ROOT=/c/sbcl sh install.sh
Then edit Windows environment variables so that PATH contains c:\sbcl\bin and SBCL_HOME is c:\sbcl\lib\sbcl (replace c:\sbcl here and in INSTALL_ROOT with another directory if applicable). Check that you can run a normal Windows shell (cmd) and run sbcl from it.
Quicklisp
Quicklisp is a library manager for Common Lisp. You'll need it to install the dependencies of Ichiran. Download quicklisp.lisp from the official site and run the following command:
sbcl --load /path/to/quicklisp.lisp
In SBCL shell execute the following commands:
(quicklisp-quickstart:install) (ql:add-to-init-file) (sb-ext:quit)
This will ensure quicklisp is loaded every time SBCL starts.
Ichiran
Find the directory ~/quicklisp/local-projects (%USERPROFILE%\quicklisp\local-projects on Windows) and git clone Ichiran source code into it. It is possible to place it into an arbitrary directory, but that requires configuring ASDF, while ~/quicklisp/local-projects/ should work out of the box, as should ~/common-lisp/ but I'm not sure about Windows equivalent for this one.
Ichiran wouldn't load without settings.lisp file which you might notice is absent from the repository. Instead, there's a settings.lisp.template file. Copy settings.lisp.template to settings.lisp and edit the following values in settings.lisp:
*connection* this is the main database connection. It is a list of at least 4 elements: database name, database user (usually "postgres"), database password and database host ("localhost"). It can be followed by options like :port 5434 if the database is running on a non-standard port.
*connections* is an optional parameter, if you want to switch between several databases. You can probably ignore it.
*jmdict-data* this should be a path to these files from JMdict project. They contain descriptions of parts of speech etc.
ignore all the other parameters, they're only needed for creating the database from scratch
Run sbcl. You should now be able to load Ichiran with
(ql:quickload :ichiran)
On the first run, run the following command. It should also be run after downloading a new database dump and updating Ichiran code, as it fixes various issues with the original JMdict data.
(ichiran/mnt:add-errata)
Run the test suite with
(ichiran/test:run-all-tests)
If not all tests pass, you did something wrong! If none of the tests pass, check that you configured the database connection correctly. If all tests pass, you have a working installation of Ichiran. Congratulations!
Some commands that can be used in Ichiran:
(ichiran:romanize "一覧は最高だぞ" :with-info t) this is basically a text-only equivalent of ichi.moe, everyone's favorite webapp based on Ichiran.
(ichiran/dict:simple-segment "一覧は最高だぞ") returns a list of WORD-INFO objects which contain a lot of interesting data which is available through "accessor functions". For example (mapcar 'ichiran/dict:word-info-text (ichiran/dict:simple-segment "一覧は最高だぞ") will return a list of separate words in a sentence.
(ichiran/dict:dict-segment "一覧は最高だぞ" :limit 5) like simple-segment but returns top 5 segmentations.
(ichiran/dict:word-info-from-text "一覧") gets a WORD-INFO object for a specific word.
ichiran/dict:word-info-str converts a WORD-INFO object to a human-readable string.
ichiran/dict:word-info-gloss-json converts a WORD-INFO object into a "json" "object" containing dictionary information about a word, which is not really JSON but an equivalent Lisp representation of it. But, it can be converted into a real JSON string with jsown:to-json function. Putting it all together, the following code will convert the word 一覧 into a JSON string:
(jsown:to-json (ichiran/dict:word-info-json (ichiran/dict:word-info-from-text "一覧")))
Now, if you're not familiar with Common Lisp all this stuff might seem confusing. Which is where ichiran-cli comes in, a brand new Command Line Interface to Ichiran.
ichiran-cli
ichiran-cli is just a simple command-line application that can be called by scripts just like mecab and its ilk. The main difference is that it must be built by the user, who has already did the previous steps of the Ichiran installation process. It needs to access the postgres database and the connection settings from settings.lisp are currently "baked in" during the build. It also contains a cache of some database references, so modifying the database (i.e. updating to a newer database dump) without also rebuilding ichiran-cli is highly inadvisable.
The build process is very easy. Just run sbcl and execute the following commands:
(ql:quickload :ichiran/cli) (ichiran/cli:build)
sbcl should exit at this point, and you'll have a new ichiran-cli (ichiran-cli.exe on Windows) executable in ichiran source directory. If sbcl didn't exit, try deleting the old ichiran-cli and do it again, it seems that on Linux sbcl sometimes can't overwrite this file for some reason.
Use -h option to show how to use this tool. There will be more options in the future but at the time of this post, it prints out the following:
>ichiran-cli -h Command line interface for Ichiran Usage: ichiran-cli [-h|--help] [-e|--eval] [-i|--with-info] [-f|--full] [input] Available options: -h, --help print this help text -e, --eval evaluate arbitrary expression and print the result -i, --with-info print dictionary info -f, --full full split info (as JSON) By default calls ichiran:romanize, other options change this behavior
Here's the example usage of these switches
ichiran-cli "一覧は最高だぞ" just prints out the romanization
ichiran-cli -i "一覧は最高だぞ" - equivalent of ichiran:romanize :with-info t above
ichiran-cli -f "一覧は最高だぞ" - outputs the full result of segmentation as JSON. This is the one you'll probably want to use in scripts etc.
ichiran-cli -e "(+ 1 2 3)" - execute arbitrary Common Lisp code... yup that's right. Since this is a new feature, I don't know yet which commands people really want, so this option can be used to execute any command such as those listed in the previous section.
By the way, as I mentioned before, on Windows SBCL prior to 2.1.0 doesn't parse non-ascii command line arguments correctly. Which is why I had to include a section about building a newer version of SBCL. However if you use Windows 10, there's a workaround that avoids having to build SBCL 2.1.0. Open "Language Settings", find a link to "Administrative language settings", click on "Change system locale...", and turn on "Beta: Use Unicode UTF-8 for worldwide language support". Then reboot your computer. Voila, everything will work now. At least in regards to SBCL. I can't guarantee that other command line apps which use locales will work after that.
That's it for now, hope you enjoy playing around with Ichiran in this new year. よろしくおねがいします!
6 notes
·
View notes
Text
Key command options used for backup in RMAN (Recovery Manager) as FOR RECOVER OF COPY, Format
Some of the key command options used for backup in RMAN (Recovery Manager): BACKUP: This is the primary command to create backups. It can be used to back up the entire database, specific tablespaces, datafiles, control files, and archived redo logs. INCREMENTAL LEVEL 0: Creates a full backup of the database or specified objects. This is the baseline for subsequent incremental…
0 notes
Text
CSS should be respected from the very first day

Different kind of organizations have different people for doing the jobs of web development. Like the traditional approach being followed is mainly to deliver a web technology enabled product, is to have following categorized teams
FRONTEND: A team of people who will write the code for the user interface of your application.
BACKEND: A team of individuals which will hide all the spaghettis and handle requests which are generated by the beautiful UIs’ ()developed by the frontend team.
DEVOPS: These people will make the deployment process easy for us, by using technologies like Docker or kubernetes,JENKINS etc. They create CI/CD pipelines to create deployment process smooth.
DATA SCIENTISTS: Whatever data you have, or your application collects, these people will make sense out of that data by using some mathematical algorithms and machine learning tools.
DBA: Database administrators which will handle the allocation of resources/tablespaces/user management/roles over a database
and there are many more categories which I can define and the list will just bore you, however I have listed the main categorization of various teams to deliver a full fledged product for web.
But specifically I want to talk about CSS today, Its not long ago that applications following MVC for example Spring MVC/struts/JSP-servlets etc, mainly handle the Backend/frontend of specific page/feature was done by a single developer.
However due to breakdown of responsibilities, some organizations divide frontend itself in categories.
Framework Developer : Angular/React/Vue
Styling Developer: CSS/SASS/SCSS
User Experience
Wire frame creator: To create a dummy design which will help the investors/Product owners that how the final product will look like.
All these years, I have seen that not all the companies follow these structures. The possible factors which impact these categorizations is funding of the project, number of people in the project with skills, timelines, principles followed by the organization for the delivery of the product.
Because let me tell you this, I have seen(and have done my self) most of these tasks which should be done by the specialists in their domains by myself, But I don’t take it as something wrong, but the inclusion of terms like Full stack and the competition demands from you to be good at multiple skills today.
But I have seen that while interviewing for such positions, people tend to prepare less for CSS and also the organizations hiring for the roles like Full Stack/Frontend technologies ask very less questions from the person in the interview.
I know that stackoverflow/some website/blog will always solve your issue, given that you are not working on some custom created APIs which may have custom exceptions etc specific to the organizations you are working in.
But from my recently gained knowledge about CSS/SCSS I want to tell you that CSS is so powerful technology in itself now, that inclusion of flex and Grid have powered CSS to be taken as A framework in itself now. I was also reading somewhere that animations written in pure CSS are having best performance of all available options and are recommended also. CSS itself have a architecture and project structure for itself for applications. I know JavaScript is magic but sometimes CSS can add more fun to that magic and with very less effort.

If you are creating class every time in your HTML component for a simple functionality, and surviving on margins/paddings, and you don't know how to center a item on the screen, and your screen breaks on different resolutions; I don’t care if you can handle databases/Rest APIs’/UIs’, you are not full stack developer for me.
1 note
·
View note
Note
Hey there! I hope your weekend is going well. I recently convinced some coworkers of mine to try out D&D with me (they are all brand new to TTRPGS but I've been a player for 5 years and DMed a couple of one shots here and there). This is the first time I've run anything serious, and I really want them to enjoy the game. Do you have any advice for things I can do to ensure that? We're planning to have a sort of "tutorial" where I make some basic characters/oneshot for them to get a feel of 1/2
the mechanics of the game before making characters of their own and jumping into the main campaign. Is there anything else I should be doing to help prepare? 2/2 “
I’ve created a template for a tutorial D&D session that may be helpful in giving you an idea of how to structure your first outing. It exposes players to the core gameplay aspects of D&D (talking in character, combat, skills checks, decision making, etc.) but keeps things nice and simple so new players don’t get overwhelmed. You’re smart to make the characters for them! Better to get them invested in the gameplay before diving into complicated and detailed character generation rules. Most people learn best by doing! Rather than starting with a long and rambling explanation of the rules, just start outlying the scenario and teach them what they’ll need as you go.
As far as other things you can do to make it an enjoyable experience, it’s mostly about making everyone feel welcome and comfortable. Try to set up an area for your game with plenty of light, enough tablespace at least for everyone to lay out their sheets and roll dice, and comfortable seating for everyone. I recommend having some snacks and drinks on hand too (though there is some contention among DMs as to whether eating is appropriate at the game table - I am staunchly PRO food and drinks). Don’t forget to have plenty of dice and pencils on hand too! ��Whiteboards can be a great tool for displaying things like iniative and other gameplay reminders.
When dealing with new players, it’s normal for them to sometimes be hesitant. If a player seems unsure of what to do, propose a couple of choices for them. If they have an idea of what they want to do, but aren’t sure how, walk them through it. As they learn what kind of gameplay is best supported by the mechanics, they will get more confident.
Ideally your players will be inclined to be considerate to each other (and you) but as with all cultural things, there are a lot of unspoken rules. Discourage any problematic stuff from the get go so you won’t have problems down the line (i.e. “Yes, you technically can go somewhere seperately from everyone else, but for the most part the game works better if you all stick together” or “You absolutely could take all that gold for yourself, but you’re supposed to share the loot with your party”)
D&D is naturally fun, so don’t worry about making everything perfect. And try to have fun yourself, because the players are going to respond to your feelings and probably reflect them right back at you. Good luck!
34 notes
·
View notes
Text
Recover Table Structure From InnoDB Dictionary
When a table gets dropped, MySQL removes the respective .frm file. This post explains how to recover the table structure if the table was dropped. You need the table structure to recover a dropped table from the InnoDB tablespace. The B+tree structure of the InnoDB index doesn’t contain any information about field types. MySQL needs to know that in order to access records of the InnoDB table. Normally, MySQL gets the table structure from the .frm file. But when MySQL drops a table the respective frm file removed too. Fortunately, there’s one more place where MySQL keeps the table structure. It’s the InnoDB dictionary. The InnoDB dictionary is a set of tables where InnoDB keeps information about the tables. I reviewed them in detail in a separate InnoDB Dictionary post earlier. After the DROP, InnoDB deletes records related to the dropped table from the dictionary. So, we need to recover deleted records from the dictionary and then get the table structure. Compiling Data Recovery Tool First, we need to get the source code. The code is hosted on GitHub. git clone https://github.com/twindb/undrop-for-innodb.git To compile it, we need gcc, bison and flex. Install these packages with a package manager (yum/apt/etc). Then, time to compile. # make cc -g -O3 -I./include -c stream_parser.c cc -g -O3 -I./include -pthread -lm stream_parser.o -o stream_parser flex sql_parser.l bison -o sql_parser.c sql_parser.y sql_parser.y: conflicts: 6 shift/reduce cc -g -O3 -I./include -c sql_parser.c cc -g -O3 -I./include -c c_parser.c cc -g -O3 -I./include -c tables_dict.c cc -g -O3 -I./include -c print_data.c cc -g -O3 -I./include -c check_data.c cc -g -O3 -I./include sql_parser.o c_parser.o tables_dict.o print_data.o check_data.o -o c_parser -pthread -lm cc -g -O3 -I./include -o innochecksum_changer innochecksum.c Recover The InnoDB Dictionary Now, let’s create dictionary tables in the sakila_recovered database. The data recovery tool comes with the structure of the dictionary tables. # cat dictionary/SYS_* | mysql sakila_recovered The dictionary is stored in the ibdata1 file. So, let’s parse it. ./stream_parser -f /var/lib/mysql/ibdata1 ... Size to process: 79691776 (76.000 MiB) Worker(0): 84.13% done. 2014-09-03 16:31:20 ETA(in 00:00:00). Processing speed: 7.984 MiB/sec Worker(2): 84.21% done. 2014-09-03 16:31:20 ETA(in 00:00:00). Processing speed: 8.000 MiB/sec Worker(1): 84.21% done. 2014-09-03 16:31:21 ETA(in 00:00:00). Processing speed: 4.000 MiB/sec All workers finished in 2 sec Now, we need to extract the dictionary records from the InnoDB pages. Let’s create a directory for the table dumps. # mkdir -p dumps/default And now we can generate table dumps and LOAD INFILE commands to load the dumps. We also need to specify the -D option to the c_parser because the records we need were deleted from the dictionary when the table was dropped. SYS_TABLES # ./c_parser -4Df pages-ibdata1/FIL_PAGE_INDEX/0000000000000001.page -t dictionary/SYS_TABLES.sql > dumps/default/SYS_TABLES 2> dumps/default/SYS_TABLES.sql SYS_INDEXES # ./c_parser -4Df pages-ibdata1/FIL_PAGE_INDEX/0000000000000003.page -t dictionary/SYS_INDEXES.sql > dumps/default/SYS_INDEXES 2> dumps/default/SYS_INDEXES.sql SYS_COLUMNS # ./c_parser -4Df pages-ibdata1/FIL_PAGE_INDEX/0000000000000002.page -t dictionary/SYS_COLUMNS.sql > dumps/default/SYS_COLUMNS 2> dumps/default/SYS_COLUMNS.sql SYS_FIELDS # ./c_parser -4Df pages-ibdata1/FIL_PAGE_INDEX/0000000000000004.page -t dictionary/SYS_FIELDS.sql > dumps/default/SYS_FIELDS 2> dumps/default/SYS_FIELDS.sql With the generated LOAD INFILE commands it’s easy to load the dumps. # cat dumps/default/*.sql | mysql sakila_recovered Now we have the InnoDB dictionary loaded into normal InnoDB tables. Compiling sys_parser ys_parser is a tool that reads the dictionary from tables stored in MySQL and generates the CREATE TABLE structure for a table. To compile it we need MySQL libraries and development files. Depending on distribution, they may be in -devel or -dev package. On RedHat based systems, you can check it with the command yum provides “*/mysql_config” . On my server it was the mysql-community-devel package. If all necessary packages are installed, the compilation boils down to a simple command: # make sys_parser /usr/bin/mysql_config cc `mysql_config --cflags` `mysql_config --libs` -o sys_parser sys_parser.c Recover Table Structure Now sys_parser can do its magic. Just run it to get the CREATE statement in the standard output. # ./sys_parser sys_parser [-h ] [-u ] [-p ] [-d ] databases/table It will use “root” as the username to connect to MySQL, “querty” – as the password. The dictionary is stored in SYS_* tables in the sakila_recovered database. What we want to recover is sakila.actor. InnoDB uses a slash “/” as a separator between database name and table name, so does sys_parser. # ./sys_parser -u root -p qwerty -d sakila_recovered sakila/actor CREATE TABLE `actor`( `actor_id` SMALLINT UNSIGNED NOT NULL, `first_name` VARCHAR(45) CHARACTER SET 'utf8' COLLATE 'utf8_general_ci' NOT NULL, `last_name` VARCHAR(45) CHARACTER SET 'utf8' COLLATE 'utf8_general_ci' NOT NULL, `last_update` TIMESTAMP NOT NULL, PRIMARY KEY (`actor_id`) ) ENGINE=InnoDB; # ./sys_parser -u root -p qwerty -d sakila_recovered sakila/customer CREATE TABLE `customer`( `customer_id` SMALLINT UNSIGNED NOT NULL, `store_id` TINYINT UNSIGNED NOT NULL, `first_name` VARCHAR(45) CHARACTER SET 'utf8' COLLATE 'utf8_general_ci' NOT NULL, `last_name` VARCHAR(45) CHARACTER SET 'utf8' COLLATE 'utf8_general_ci' NOT NULL, `email` VARCHAR(50) CHARACTER SET 'utf8' COLLATE 'utf8_general_ci', `address_id` SMALLINT UNSIGNED NOT NULL, `active` TINYINT NOT NULL, `create_date` DATETIME NOT NULL, `last_update` TIMESTAMP NOT NULL, PRIMARY KEY (`customer_id`) ) ENGINE=InnoDB; There are few caveats though. InnoDB doesn’t store all information you can find in the .frm file. For example, if a field is AUTO_INCREMENT, the InnoDB dictionary knows nothing about it. Therefore, sys_parser won’t recover that property. If there were any field or table level comments, they’ll be lost. sys_parser generates the table structure eligible for further data recovery. It could but it doesn’t recover secondary indexes, or foreign keys. InnoDB stores the DECIMAL type as a binary string. It doesn’t store the precision of a DECIMAL field. So, that information will be lost. For example, table payment uses DECIMAL to store money. # ./sys_parser -u root -p qwerty -d sakila_recovered sakila/payment CREATE TABLE `payment`( `payment_id` SMALLINT UNSIGNED NOT NULL, `customer_id` SMALLINT UNSIGNED NOT NULL, `staff_id` TINYINT UNSIGNED NOT NULL, `rental_id` INT, `amount` DECIMAL(6,0) NOT NULL, `payment_date` DATETIME NOT NULL, `last_update` TIMESTAMP NOT NULL, PRIMARY KEY (`payment_id`) ) ENGINE=InnoDB; Fortunately, Oracle is planning to extend the InnoDB dictionary and finally get rid of .frm files. I salute that decision, having the structure in two places leads to inconsistencies. Image credit: m.khajoo https://twindb.com/recover-table-structure-from-innodb-dictionary-recover-table-structure-from-innodb-dictionary/
1 note
·
View note
Text
RMAN QUICK LEARN– FOR THE BEGINNERS
Oracle Recovery Manager (RMAN) is Oracle’s preferred method or tools by which we are able to take backups and restore and recover our database. You must develop a proper backup strategy which provides maximum flexibility to Restore & Recover the DB from any kind of failure. To develop a proper backup strategy you must decide the type of requirement then after think the possible backup option. The recommended backup strategy must include the backup of all datafiles, Archivelog and spfile & controlfile autobackup. To take online or hot backups database must be in archivelog mode. You can however use RMAN to take an offline or cold backup.Note: Selecting the backup storage media is also important consideration. If you are storing your backup on disk then it is recommended to keep an extra copy of backup at any other server. CREATING RECOVERY CATALOG: Oracle recommended to use separate database for RMAN catalog. Consider in below steps the database is already created: 1. Create tablespace for RMAN: SQL> create tablespace RTBS datafile 'D:ORACLEORADATARTBS01.DBF' size 200M extent management local uniform size 5M; 2. Create RMAN catalog user: SQL> create user CATALOG identified by CATALOG default tablespace RTBS quota unlimited on RTBS; 3. Grant some privileges to RMAN user: SQL> Grant connect, resource to CATALOG; SQL> grant recovery_catalog_owner to CATALOG; 4. Connect into catalog database and create the catalog: % rman catalog RMAN_USER/RMAN_PASSWORD@cat_db log=create_catalog.log RMAN> create catalog tablespace RTBS; RMAN> exit; 5. Connect into the target database and into the catalog database: % rman target sys/oracle@target_db RMAN> connect catalog RMAN_USER/RMAN_PASSWORD@cat_db 6. Connected into the both databases, register target database: RMAN> register database; The following list gives an overview of the commands and their uses in RMAN. For details description search the related topics of separate post on my blog: http://shahiddba.blogspot.com/INITIALIZATION PARAMETER: Some RMAN related database initialization parameters: control_file_record_keep_time: Time in days to retention records in the Control File. (default: 7 days) large_pool_size: Memory pool used for RMAN in backup/restore operations. shared_pool_size: Memory pool used for RMAN in backup/restore operations (only if large pool is not configured). CONNECTING RMANexport ORACLE_SID= --Linux platformset ORACLE_SID== --Windows platformTo connect on a target database execute RMAN.EXE then RMAN>connect target / RMAN>connect target username/password RMAN>connect target username/password@target_db To connect on a catalog database:RMAN>connect catalog username/password RMAN>connect catalog username/password@catalog_db To connect directly from the command prompt:C:>rman target / --target with nocatalog Recovery Manager: Release 9.2.0.1.0 - ProductionCopyright (c) 1995, 2002, Oracle Corporation. All rights reserved.connected to target database: RMAN (DBID=63198018)using target database controlfile instead of recovery catalogC:>rman target sys/oracle@orcl3 catalog catalog/catalog@rman --with catalogRecovery Manager: Release 9.2.0.1.0 - ProductionCopyright (c) 1995, 2002, Oracle Corporation. All rights reserved.connected to target database: SADHAN (DBID=63198018)connected to recovery catalog databaseRMAN PARAMETERSRMAN parameters can be set to a specified value and remain persistent. This information is stored in the target database’s controlfile (By default). Alternatively you can store this backup information into recovery catalog. If you connect without catalog or only to the target database, your repository should be in the controlfile.SHOW/CONFIGURE – SHOW command will show current values for set parameters and CONFIGURE – Command to set new value for parameterRMAN> show all;using target database control file instead of recovery catalogRMAN configuration parameters are:CONFIGURE RETENTION POLICY TO REDUNDANCY 1; # defaultCONFIGURE BACKUP OPTIMIZATION OFF; # defaultCONFIGURE DEFAULT DEVICE TYPE TO ; # defaultCONFIGURE CONTROLFILE AUTOBACKUP ON;RMAN>show datafile backup copies; RMAN>show default device type; RMAN>show device type; RMAN>show channel; RMAN>show retention policy;RMAN> CONFIGURE CONTROLFILE AUTOBACKUP ON;old RMAN configuration parameters:CONFIGURE CONTROLFILE AUTOBACKUP OFF;new RMAN configuration parameters:CONFIGURE CONTROLFILE AUTOBACKUP ON; new RMAN configuration parameters are successfully stored CONFIGURE channel device type disk format 'D:oraback%U'; You can set many parameters by configuring them first and making them persistent or you can override them (discard any persistent configuration) by specifying them explicitly in your RMAN backup command. Setting Default Recommended Controlfile autobackup off on Retention policy to redundancy 1 to recovery window of 30 days Device type disk parallelism 1 ... disk|sbt prallelism 2 ... Default device type to disk to disk Backup optimization off off Channel device type none disk parms=‘...’ Maxsetsize unlimited depends on your database size Appending CLEAR or NONE at the last of configuration parameter command will reset the configuration to default and none setting.CONFIGURE RETENTION POLICY CLEAR;CONFIGURE RETENTION POLICY NONE; Overriding the configured retention policy: change backupset 421 keep forever nologs; change datafilecopy 'D:oracleoradatausers01.dbf' keep until 'SYSDATE+30';RMAN BACKUP SCRIPTS:Backing up the database can be done with just a few commands or can be made with numerous options. RMAN> backup database;RMAN> backup as compressed backupset database;RMAN> Backup INCREMENTAL level=0 database;RMAN> Backup database TAG=Weekly_Sadhan;RMAN> Backup database MAXSETSIZE=2g;RMAN> backup TABLESPACE orafin;You may also combine options together in a single backup and for multi channel backup.RMAN> Backup INCREMENTAL level=1 as COMPRESSED backupset databaseFORMAT 'H:ORABACK%U' maxsetsize 2G; backup full datafile x,y,z incremental level x include current controlfile archivelog all delete input copies x filesperset x maxsetsize xM diskratio x format = 'D:oraback%U';run {allocate channel d1 type disk FORMAT "H:orabackWeekly_%T_L0_%d-%s_%p.db";allocate channel d2 type disk FORMAT "H:orabackWeekly_%T_L0_%d-%s_%p.db";allocate channel d3 type disk FORMAT "H:orabackWeekly_%T_L0_%d-%s_%p.db"; backup incremental level 0 tag Sadhan_Full_DBbackup filesperset 8 FORMAT "H:orabackWeekly_%T_FULL_%d-%s_%p.db" DATABASE; SQL 'ALTER SYSTEM ARCHIVE LOG CURRENT'; backup archivelog all tag Sadhan_Full_Archiveback filesperset 8 format "H:orabackWeekly_%T_FULL_%d-%s_%p.arch"; release channel d1; release channel d2; release channel d3; } The COPY command and some copy scripts: copy datafile 'D:oracleoradatausers01.dbf' TO 'H:orabackusers01.dbf' tag=DF3, datafile 4 to TO 'H:orabackusers04.dbf' tag=DF4, archivelog 'arch_1060.arch' TO 'arch_1060.bak' tag=CP2ARCH16; run { allocate channel c1 type disk; copy datafile 'd:oracleoradatausers01.dbf' TO 'h:orabackusers01.dbf' tag=DF3, archivelog 'arch_1060.arch' TO 'arch_1060.bak' tag=CP2ARCH16; }COMPRESSED – Compresses the backup as it is taken.INCREMENTAL – Selecting incremental allows to backup only changes since last full backup.FORMAT – Allows you to specify an alternate location.TAG – You can name your backup.MAXSETSIZE – Limits backup piece size.TABLESPACE – Allows you to backup only a tablespace.RMAN MAINTAINANCE :You can review your RMAN backups using the LIST command. You can use LIST with options to customize what you want RMAN to return to you.RMAN> list backup SUMMARY;RMAN> list ARCHIVELOG ALL;RMAN> list backup COMPLETED before ‘02-FEB-09’;RMAN> list backup of database TAG Weekly_sadhan; RMAN> list backup of datafile "D:oracleoradatasadhanusers01.dbf" SUMMARY;You can test your backups using the validate command.RMAN> list copy of tablespace "SYSTEM"; You can ask RMAN to report backup information. RMAN> restore database validate; RMAN> report schema; RMAN> report need backup; RMAN> report need backup incremental 3 database; RMAN> report need backup days 3; RMAN> report need backup days 3 tablespace system; RMAN>report need backup redundancy 2; RMAN>report need backup recovery window of 3 days; RMAN> report unrecoverable; RMAN> report obsolete; RMAN> delete obsolete; RMAN> delete noprompt obsolete; RMAN> crosscheck; RMAN> crosscheck backup; RMAN> crosscheck backupset of database; RMAN> crosscheck copy; RMAN> delete expired; --use this after crosscheck command RMAN> delete noprompt expired backup of tablespace users; To delete backup and copies: RMAN> delete backupset 104; RMAN> delete datafilecopy 'D:oracleoradatausers01.dbf'; To change the status of some backups or copies to unavailable come back to available: RMAN>change backup of controlfile unavaliable; RMAN>change backup of controlfile available; RMAN>change datafilecopy 'H:orabackusers01.dbf' unavailable; RMAN>change copy of archivelog sequence between 230 and 240 unavailable; To catalog or uncatalog in RMAN repository some copies of datafiles, archivelogs and controlfies made by users using OS commands: RMAN>catalog datafilecopy 'F:orabacksample01.dbf'; RMAN>catalog archivelog 'E:oraclearch_404.arc', 'F:oraclearch_410.arc'; RMAN>catalog controlfilecopy 'H:oracleoradatacontrolfile.ctl'; RMAN> change datafilecopy 'F:orabacksample01.dbf' uncatalog; RMAN> change archivelog 'E:oraclearch_404.arc', 'E:oraclearch_410.arc' uncatalog; RMAN> change controlfilecopy 'H:oracleoradatacontrolfile.ctl' uncatalog; RESTORING & RECOVERING WITH RMAN BACKUPYou can perform easily restore & recover operation with RMAN. Depending on the situation you can select either complete or incomplete recovery process. The complete recovery process applies all the redo or archivelog where as incomplete recovery does not apply all of the redo or archive logs. In this case of recovery, as you are not going to complete recovery of the database to the most current time, you must tell Oracle when to terminate recovery. Note: You must open your database with resetlogs option after each incomplete recovery. The resetlogs operation starts the database with a new stream of log sequence number starting with sequence 1. DATAFILE – Restore specified datafile.CONTROLFILE – To restore controlfile from backup database must be in nomount.ARCHIVELOG or ARCHIVELOG from until – Restore archivelog to location there were backed up.TABLESPACE – Restores all the datafiles associated with specified tablespace. It can be done with database open.RECOVER TABLESPACE/DATAFILE:If a non-system tablespace or datafile is missing or corrupted, recovery can be performed while the database remains open.STARTUP; (you will get ora-1157 ora-1110 and the name of the missing datafile, the database will remain mounted)Use OS commands to restore the missing or corrupted datafile to its original location, ie: cp -p /user/backup/uman/user01.dbf /user/oradata/u01/dbtst/user01.dbfSQL>ALTER DATABASE DATAFILE3 OFFLINE; (tablespace cannot be used because the database is not open)SQL>ALTER DATABASE OPEN;SQL>RECOVER DATAFILE 3;SQL>ALTER TABLESPACE ONLINE; (Alternatively you can use ‘alter database’ command to take datafile online)If the problem is only the single file then restore only that particualr file otherwise restore & recover whole tablespace. The database can be in use while recovering the whole tablespace.run { sql ‘alter tablespace users offline’; allocate channel c1 device type disk|sbt; restore tablespace users; recover tablespace users; sql ‘alter tablespace users online’;}If the problem is in SYSTEM datafile or tableapce then you cannnot open the database. You need sifficient downtime to recover it. If problem is in more than one file then it is better to recover whole tablepace or database.startup mountrun { allocate channel c1 device type disk|sbt; allocate channel c2 device type disk|sbt; restore database check readonly; recover database; alter database open;}DATABASE DISASTER RECOVERY:Disaster recovery plans start with risk assessment. We need to identify all the risks that our data center can face such as: All datafiles are lost, All copies of current controlfile are lost, All online redolog group member are lost, Loss of OS, loss of a disk drive, complete loss of our server etc: Our disaster plan should give brief description about recovery from above disaster. Planning Disaster Recovery in advance is essential for DBA to avoid any worrying or panic situation.The below method is used for complete disaster recovery on the same as well as different server. set dbid=xxxxxxxstartup nomount;run {allocate channel c1 device type disk|sbt;restore spfile to ‘some_location’ from autobackup;recover database; alter database open resetlogs;}shutdown immediate;startup nomount;run { allocate channel c1 device type disk|sbt; restore controlfile from autobackup;alter database mount; } RMAN> restore database;RMAN> recover database; --no need incase of cold backupRMAN> alter database open resetlogs;}DATABASE POINT INTIME RECOVERY:DBPITR enables you to recover a database to some time in the past. For example, if logical error occurred today at 10.00 AM, DBPITR enables you to restore the entire database to the state it was in at 09:59 AM there by removing the effect of error but also remove all other valid update that occur since 09:59 AM. DBPTIR requires the database is in archivelog mode, and existing backup of database created before the point in time to which you wish to recover must exists, and all the archivelog and online logs created from the time of backup until the point in time to which you wish to recover must exist as well. RMAN> shutdown Abort; RMAN> startup mount; RMAN> run { Set until time to_date('12-May-2012 00:00:00′, ‘DD-MON-YYYY HH24:MI:SS'); restore database; recover database; }RMAN> alter database open resetlogs;Caution: It is highly recommended that you must backup your controlfile and online redo log file before invoking DBPITR. So you can recover back to the current point in time in case of any issue.Oracle will automatically stop recovery when the time specified in the RECOVER command has been reached. Oracle will respond with a recovery successful message.SCN/CHANGE BASED RECOVERY:Change-based recovery allows the DBA to recover to a desired point of System change number (SCN). This situation is most likely to occur if archive logfiles or redo logfiles needed for recovery are lost or damaged and cannot be restored.Steps:– If the database is still open, shut down the database using the SHUTDOWN command with the ABORT option.– Make a full backup of the database including all datafiles, a control file, and the parameter files in case an error is made during the recovery.– Restore backups of all datafiles. Make sure the backups were taken before the point in time you are going to recover to. Any datafiles added after the point in time you are recovering to should not be restored. They will not be used in the recovery and will have to be recreated after recovery is complete. Any data in the datafiles created after the point of recovery will be lost.– Make sure read-only tablespace are offline before you start recovery so recovery does not try to update the datafile headers.RMAN> shutdown Abort; RMAN> startup mount; RMAN>run { set until SCN 1048438; restore database; recover database; alter database open resetlogs; }RMAN> restore database until sequence 9923; --Archived log sequence number RMAN> recover database until sequence 9923; --Archived log sequence number RMAN> alter database open resetlogs;Note: Query with V$LOG_HISTORY and check the alert.log to find the SCN of an event and recover to a prior SCN.IMPORTANT VIEW: Views to consult into the target database: v$backup_device: Device types accepted for backups by RMAN. v$archived_log: Redo logs archived. v$backup_corruption: Corrupted blocks in backups. v$copy_corruption: Corrupted blocks in copies. v$database_block_corruption: Corrupted blocks in the database after last backup. v$backup_datafile: Backups of datafiles. v$backup_redolog: Backups of redo logs. v$backup_set: Backup sets made. v$backup_piece: Pieces of previous backup sets made. v$session_long_ops: Long operations running at this time. Views to consult into the RMAN catalog database: rc_database: Information about the target database. rc_datafile: Information about the datafiles of target database. rc_tablespace: Information about the tablespaces of target database. rc_stored_script: Stored scripts. rc_stored_script_line: Source of stored scripts. For More Information on RMAN click on the below link: Different RMAN Recovery Scenarios 24-Feb-13 Synchronizes the Test database with RMAN Cold Backup 16-Feb-13 Plan B: Renovate old Apps Server Hardware 27-Jan-13 Plan A: Renovate old Apps Server Hardware 25-Jan-13 Planning to Renovate old Apps Server Hardware 24-Jan-13 Duplicate Database with RMAN without Connecting to Target Database 23-Jan-13 Different RMAN Errors and their Solution 24-Nov-12 Block Media Recovery using RMAN 4-Nov-12 New features in RMAN since Oracle9i/10g 14-Oct-12 A Shell Script To Take RMAN Cold/Hot and Export Backup 7-Oct-12 Automate Rman Backup on Windows Environment 3-Sep-12 How to take cold backup of oracle database? 26-Aug-12 Deleting RMAN Backups 22-Aug-12 Script: RMAN Hot Backup on Linux Environment 1-Aug-12 How RMAN behave with the allocated channel during backup 31-Jul-12 RMAN Important Commands Description. 7-Jul-12 Script: Crontab Use for RMAN Backup 2-Jun-12 RMAN Report and Show Commands 16-May-12 RMAN backup on a Windows server thruogh DBMS_SCHEDULING 15-May-12 Format Parameter of Rman Backup 12-May-12 Rman Backup with Stored Script 12-May-12 Rman: Disaster Recovery from the Scratch 6-May-12 RMAN- Change-Based (SCN) Recovery 30-Apr-12 RMAN-Time-Based Recovery 30-Apr-12 RMAN – Cold backup Restore 23-Apr-12 RMAN Backup on Network Storage 22-Apr-12 Rman Catalog Backup Script 18-Apr-12 Point to be considered with RMAN Backup Scripts 11-Apr-12 Monitoring RMAN Through V$ Views 7-Apr-12 RMAN Weekly and Daily Backup Scripts 25-Mar-12 Unregister Database from RMAN: 6-Mar-12
1 note
·
View note
Text
SP2-0618: Cannot find the Session Identifier. Check PLUSTRACE role is enabledSP2-0611: Error enabling STATISTICS report
kIsH<X>create user c##test identified by password container=all; User created. kIsH<X>grant create session, unlimited tablespace to c##test container=all; Grant succeeded. kIsH<X>conn c##test/password@xypdb1 Connected. kIsH<X>set autot traceonly SP2-0618: Cannot find the Session Identifier. Check PLUSTRACE role is enabled SP2-0611: Error enabling STATISTICS…
View On WordPress
0 notes