#How to Use a Cricut
Explore tagged Tumblr posts
Visit Tumblr Blog
Explore Tumblr blogs with no restrictions, modern design and the best experience.
Last Seen Tumblr Blogs


Fun Fact
Tumblr Inc. has $15.1M in annual revenue.
Text
How to Use a Cricut Mug Press? [A Comprehensive Guide]
Are you curious to learn how to use a Cricut Mug Press? Well, this guide explores everything you need to know about the use of this machine. With this ultimate guide, you will be ready to use the Cricut Mug Press easily without anyone’s help. However, the Cricut Mug Press is a perfect choice for people who want to create a customized mug with pro quality.
This fantastic tool is compatible with markers, pens, and Infusible Ink transfer sheets. You also need a Cricut Design Space to create a design that can be further cut on the Cricut cutting machine. Moreover, you will need different materials, such as HTV and Infusible ink, to get desirable designs on mugs. After that, we will learn the process of using the Mug Press with step-by-step instructions. Let’s dive into it.
Step 1: Supplies You Need to Use Cricut Mug Press
Before learning how to use a Cricut Mug Press, you first need to know the requirements of supplies. These supplies are essential for using the Cricut Mug Press.
A desktop or laptop for setting up your Mug Press.
You can use any Cricut machine (Maker series, Explore series, and Joy).
Cricut Blank Ceramic Mug
Lint Roller
Butcher Paper
EasyPress mat or heat-resistant surface.
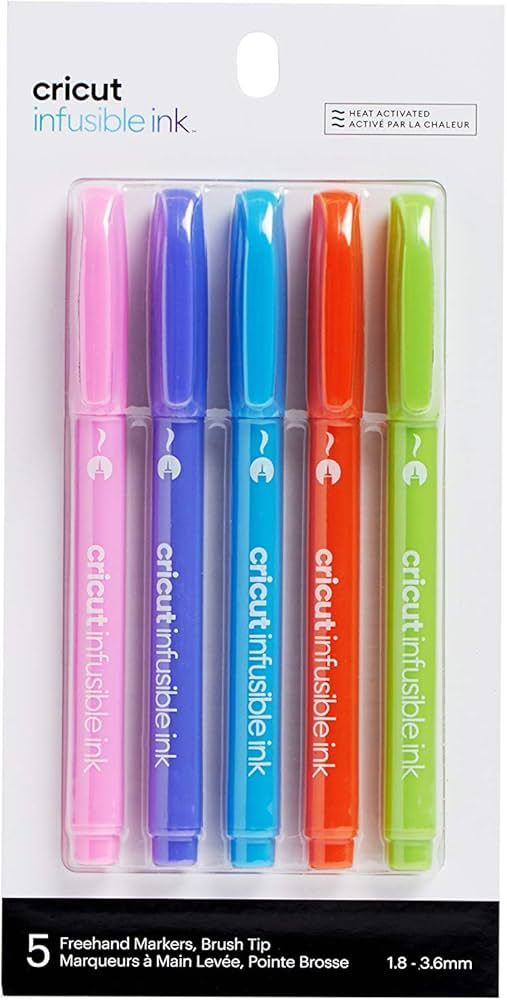
Infusible Ink Transfer Sheets and Infusible Ink Markers/Pens.
Oven Glove
Heat Resistant Tape
Laser copy paper
Step 2: Set Up Your Cricut Mug Press
In order to learn how to use a Cricut Mug Press, you must know about the Cricut Mug Press setup.
Follow the steps carefully to set up the Cricut Mug Press:
Insert the power cable into the back of your Cricut Mug Press, followed by a USB cable. Insert one end into your machine and another end into the computer.
Open the Cricut Design Space on your computer or laptop.
Then, select New Product Setup from the right-side menu.
Afterward, select Heat Press, followed by Mug Press.
You can follow the displayed instructions on the screen to download any updates you need.
While following the instructions, you will need to continue the Activate button to activate your Mug Press.
After this, the update will be completed.
Then, you can unplug the USB cable.
Now, your Mug Press is ready to use. Let’s learn how to use a Cricut Mug Press.
Step 3: Use the Cricut Mug Press
The Mug Press is relatively easy to use. After setting up, you can easily create a pro-customized mug. You can choose the design from Cricut Design Space. Always ensure that you choose the design with the exact size that fits your mug.
Once you have selected the designs, start cutting them using your cutting machine. Make sure your design is mirrored before the cut. You can follow the design given below.
After cutting the material, weed the unwanted materials.
Ensure your mug is clean and there is no dust present on it.
Then, place the design around the mug.
Afterward, you have to place the Cricut Mug Press on an easy press mat or any other heat-resistant surface you have.
Press the power button in your Mug Press, and the button will light the green color.
After that, you will hear the beep sound, meaning it is ready to use. However, you don’t need to set any temperature as it is already smart enough to set the temperature automatically.
Then, put the mug into the press.
It will take 6 minutes to sublimate the design onto the mug.
Finally, it will beep when it is done.
Turn off the device and take out the mug using gloves.
Final Words
In short, you should understand that a Mug Press alone can’t help you customize your mug. For this, you need various types of supplies that we have already mentioned in this post. Once you have all these items, you can proceed with the setup process. For this setup, you need a laptop or computer with a Cricut Design Space. When you are done with your setup, your Mug Press will be ready to use. Finally, you can design your mug like a pro!
FAQs
Question 1: How much time does a Cricut Mug Press take to heat up?
Answer: The only time your Mug Press will take to heat up is 5 minutes. After placing your mug into the press, it will take approx 6 minutes to finish it. However, the Mug Press produces a beep sound when it has finished its task. When you finally take out the mug from the press, it takes 15 to 30 minutes to cool down. Therefore, you must be cautious while taking it outside.
Question 2: Do I need a computer to use the Cricut Mug Press?
Answer: Well, you don’t have to rely entirely on a computer to use the Mug Press. Still, a computer is needed when you want to set up or activate your Cricut Mug Press. Also, you can update your firmware using your computer or laptop. All this is done when you connect your computer to your Mug Press via a USB cable.
Question 3: Is a regular mug compatible with the Cricut Mug Press?
Answer: There is no issue using your regular mug until it is made up of ceramic. Other than this, no materials should be used, such as stainless steel, plastic, etc.). Plus, the mug must be coated with sublimation material, which is suitable for your printer’s sublimation ink and Infusible ink. In short, the regular you buy from a local store is not going to work with the Cricut Mug Press.
Visit - Cricut.com/setup
Cricut Design Space Login
Cricut maker setup
Cricut Mug Press
Cricut Maker Machine
#Cricut Maker Machine#Set Up Cricut Machine#Cricut Mug Press#How to Use a Cricut Mug Press?#How to Use a Cricut#How to Set Up Cricut Maker Machine
0 notes
Text

Going a little insane preparing for LvL Up….
#helluva boss#I learned how to use a cricut and now I’ve got too much power#this is just an excuse to draw Stolas in a little dress and hat#yall don’t understand this sticker making thing is so addictive#lvl up expo
12 notes
·
View notes
Text
many things i have been keeping under wraps at work, such as pronouns, but also, very critically, age. bc i got that ageless mixed race asian swag where i am very clearly not an undergrad but also??? they just don't know. and it WHIPS and it is so funny to ME because all the managers and shift supervisors are like damn this girl in her mid-twenties is so easy to talk to, it's like talking to a peer. surprise bitch i'm older than you. and maybe this means i'm performing psychological experiments on cis men, but i am ngl if i hand you a two page resume that you don't read, it is simply none of MY business if you think i am in my mid-20s. they are going to be so mad when they find out lmao
#mild work crush i fear....his undefinable possibly autistic certainly overworked jock swag has captured the nation#i can't remember if he was the one who jumpscared the managers by just randomly showing up with a wife and baby one day#when they thought he was a confirmed bachelor#it might have been the other shift supervisor who hates talking to people#it def wasn't the business school supervisor bc that guy is tasing himself recreationally while getting an mba. idiot <3#i love my job it is so boring and so entertaining at the same time. it's like the perfect balance of annoying and enriching#i wrote an entire fic at work once. and was still able to do everything i needed to do. and heard an absolutely bananas story#from the housekeeper about suing the city#i love the housekeeper every 3rd word out of her mouth i'm like ma'am are we allowed to say that in 2025 😭#i wish i could work there forever but i cannot. and when i quit the fic and/or zine i write/make about is going to go CRAZYYYYY#i think i text like 5-8 different people at least once a week about stupid shit i witnessed at work and the hot guys also#cannot forget the hot guys. so many hot guys. and they are all so stupid and annoying and sometimes charming also#i wish i could wear shorts to work bc my ass looks great rn from strength training#unfortunately my uniform is athleisure wear that doesn't fit and a free flyers sweatshirt that also doesn't fit lmao#when i learn to dress myself. it's over for you hoes#was talking to my strength trainer this week bc they asked if they could use me as a case study for trauma informed something#i kind of wasn't listening bc i just started talking immediately about the emotional effects of not having severe chronic back pain#and now being stronger has made me at its very base just more confident and kind to myself (inasmuch as i'll ever be)#bc i know my body better and i'm not scared of it and i can predict how it moves and i can trust it in ways i could not before#just from not knowing it? like even beyond the chronic pain i just did not know how my body moved and what it was capable of#& how one thing that is so silly but so nice is the feeling of being attractive as MYSELF for the first time in my life and not just#a vehicle for everyone to project whatever weird mpdg stuff on. and it's NICE and it's FUN that i know how my body moves as itself!!#like idk is finding confidence in my body the poetry. the strength training. the being in my 30s. the being too tired to care anymore#WHO KNOWS. none of my business#in conclusion. i would love to say i haven't been having a five stage mental breakdown all week but i have but i think it finally resolved#and now i have a new bed courtesy of sierra and kelly!!!!#and after i find out how much i owe in 1st/last month's rent? it's cricut time#ok good night#fresno oilers.txt
15 notes
·
View notes
Text
History PSA for writing: prior to at minimum the mid to VERY LATE 1800's most things were made, or at least finished, by hand! If you have a character inspecting furniture in... for example fantasy ancient china... or the english regency... or fucking pseudomedieval times... marveling that they wouldn't have guessed something was made by hand, you have fucked up as an author on the research front.
#quill reads fanfic#look the education goes here because the nitpick is not useful to the author#as they have published and are unlikely to be fixing this error#HOWEVER#my immersion broke enough to send me to tumblr#and it is not a specialist thing!#it's merely thinking how the hell else you would make a bed in this era except by hand!#Magically powered cricut machine or something? I don't know!
29 notes
·
View notes
Text


HELLO 🧍
#LONG TIME NO POST#IM SORRY#but yes take the results of my blood sweat tears and other fluids#these WILL be available as stickers on Etsy soon 🫵#when I figure out how tf to use my cricut#ANYWAYS#tags now lol#twisted wonderland#twst#disney twst#deuce spade#twst deuce#ortho shroud#twst ortho#ruggie bucchi#twst Ruggie#disney twisted wonderland#fairy gala#wish upon a star#camp Vargas
45 notes
·
View notes
Text
How to Use Cricut Pens? (Easy Steps!)
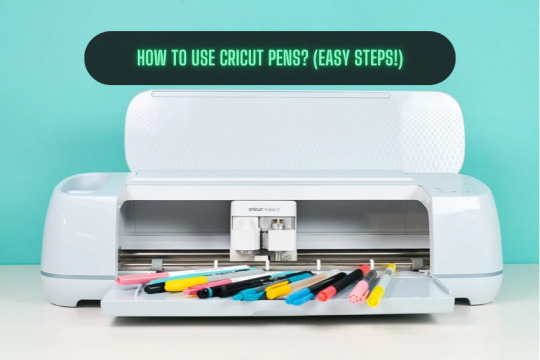
If you are a Cricut user, then surely you know that this brand makes some smart tools and machines. You know about its capabilities and how useful it is. But did you know that apart from cutting materials, you can use pens to simplify the crafting process significantly? But how to use Cricut pens? Cricut machines are not only used for cutting different shapes out of paper or vinyl. These machines use pens to create doodles, illustrations, and intricate designs. However, you need to know some basic steps you need to perform when you are designing your projects to make them better.
Using the pens is easy and straightforward, but the important thing is that you know the process. Read this blog to discover all about Cricut pens and what projects you can make with them.
What Types of Cricut Pens Are Available?
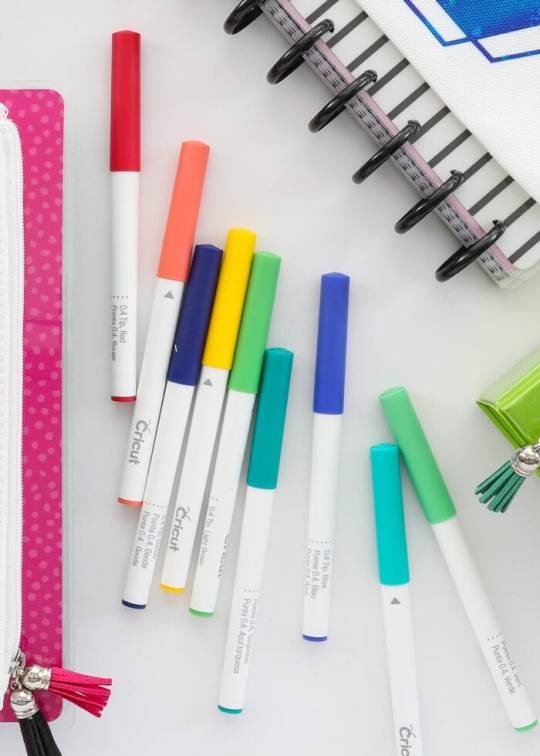
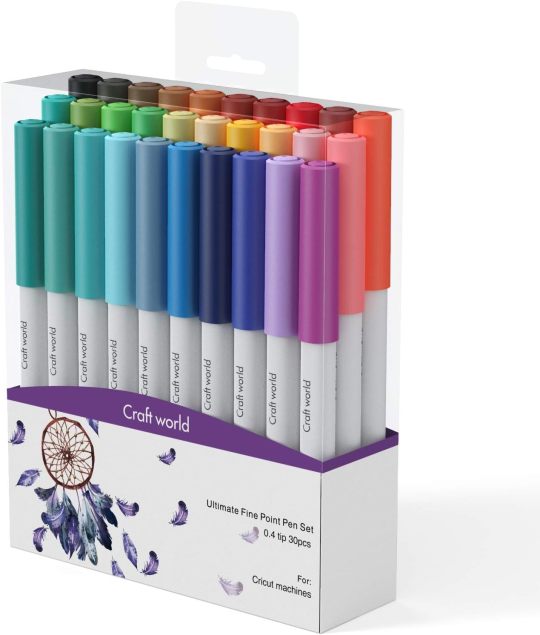
All of the current Cricut machines can use a pen, whether Maker, Explore, or Joy. The Maker and Explore machines have interchangeable pens, and Joy has a lineup of small pens. Joy pens are incompatible with other machines due to their unique, smaller size. Before you proceed with how to use Cricut pens, here is the list of pens that you can use with the machine:
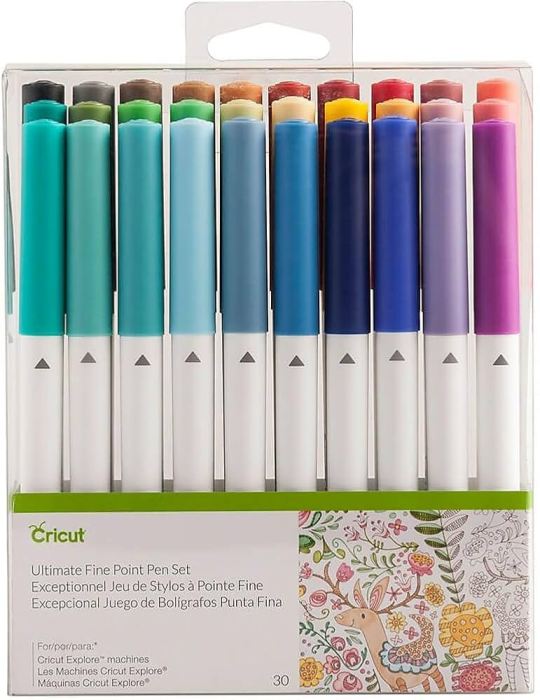
Fine Point Pens
This has an F stamped on it for fine, has a 0.4mm tip, and comes in multiple colors.
Extra Fine Point Pens
These are finer, and the pens are just 0.3mm thick.
1.0 Pens and Markers
They have a thickness of 1.0mm and can be called markers, too.
Gel Pens
Gel Pens have a roller ball instead of a tip and are 0.8 mm in size.
Glitter Gel Pens
It has a roller ball and is 0.8 mm in size.
Calligraphy Pens
These pens have a gray barrel and have C stamped to denote calligraphy.
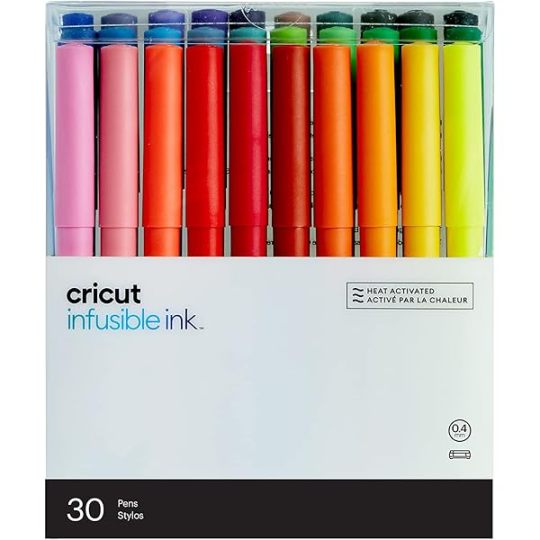
Infusible Ink Pens
It has a 1.0mm tip, and it is used for sublimation and infusing the ink on the surfaces.
How to Use Cricut Pens: Easy and Simple Steps
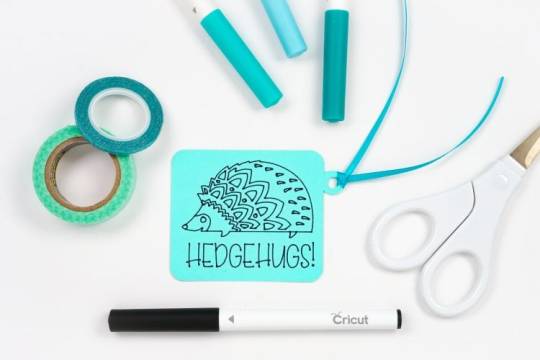
Placing or installing pens is easy, but if you are a beginner, then it will be a new thing for you. Always use the pens carefully, and pens should always be fitted to the clamp A of the cutting machine. Here, I am going to show you something different about using Cricut pens to create a simple gift tag. Now, let’s look at the below process to understand how to use it:
First, go to the Design Space and click on a new project to create a design.
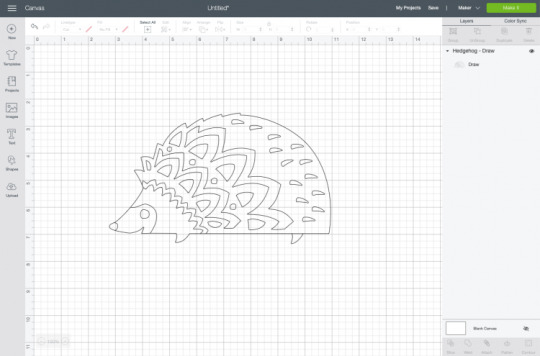
Then, create a design, or you can choose a text that you want to use with your pen. Cricut Design Space has its own vast library of images for your DIY projects.
Now, remember you have to draw, not cut the image. So, go to the Edit toolbar, and from there, select the Draw option in the Layers panel.

When you click the colored square box next to the line type dropdown, you can select the type of pen and choose the Fine Point pen.

After you have completed drawing your design, it is time to add text. In the Font menu, you can filter by Cricut Writing fonts. Choose the writing style font.
You can insert a shape into your Canvas. Then, using the Align tool, you can change its size and color and move it to the back of your Canvas.
Next, select your drawing and text layer and click Attach on the right-hand side of the Layers panel.
On the preview screen, your image will appear on the mat. Click Continue, and in the Make screen option, select the material you are using. Here, I am using cardstock. The Cricut Design Space app will prompt you to insert your pen, and you can use a fine-point blade.
In the last step, you have to insert your mat into the machine, and your machine will draw and cut the tag.
Conclusion
Now you know how simple it was to learn ‘how to use Cricut pens‘.? In this post, I have explained the types of pens and how you can craft your project with the pen. After reading this blog, you can choose a pen for your project, load it into the machine, and start crafting. Start crafting with your pen and unlock the full potential of the machine.
FAQs
How Do You Load the Pen Into Cricut Machine?
When you open the machine, you will see two clamps: Clamp A and Clamp B. To load the pen into your cutting machine, open Clamp A and insert the pen into it. Gently press the pen into the clamp until it fits properly, and you hear a click sound. Then, close the cover, and you are ready to use the machine.
What Are Cricut Pens?
Cricut makes different types of pens, which are great ways to add drawn or handwritten details to your projects. Cricut pens come in different sizes and can be easily loaded into the machine. This can be used for various creative projects, such as writing on gift tag cards or adding doodles.
What Is the Difference Between Cricut Pens and Markers?
A Cricut pen usually has a fine tip, which allows it to create a thinner line, compared to a marker, which has a thick tip and creates a thicker line. Pens are ideal for writing detailed text, signatures, or fine lines within a design, whereas markers are better for filling large areas with color.
Source: How to Use Cricut Pens
#how to use Cricut pens#cricut design space download#cricut design space app#cricut maker#cricut joy#cricut pens
4 notes
·
View notes
Text
I would be so unstoppable with a sticker printer. my local library has a cricut machine but I don't get the time to visit very often
12 notes
·
View notes
Text
i finished some stuff that’s gonna go on my art blog whoo whoo
#finished 2/3 cube pumpkins#finished painting 2 eggs#uhmm what else#oh i also have a perler project to photograph#guys i want a glowforge so freaking bad#do i know how to use a glowforge?#no#i will FIGURE IT OUT#or i guess just a cricut#lol
4 notes
·
View notes
Text
How to Use a Cricut Maker to Create a DIY Project? (Easy Guide)
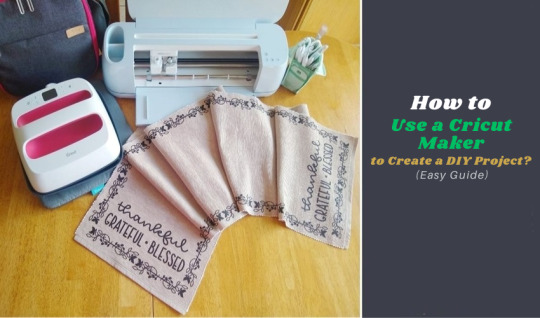
Are you thinking of buying a Cricut Maker? Or you have just got one and are not sure where to start? This guide will walk you through all the different ways to learn how to use a Cricut Maker without any previous experience.
This cutting machine is advanced and unique from other models, like Explore Air 2 and Joy machine. It delivers a wide range of features, tools, and accessories for crafting projects. With this machine, you can cut fabric, vinyl, cardstock, chipboard, and more precisely.
So, if you are a beginner and don’t know how to use this machine—don’t worry; we are here to help! Read this blog, and you will learn how to use it easily.
How to Use a Cricut Maker: Unboxing and Initial Setup
Once you have got your machine in your hands, it is time to check if you have all the necessary supplies and tools that come with the machine or not. So, in order to do that, you must follow these steps:
Step 1: Unbox Your Machine
Carefully remove the machine from the box, ensuring that all packaging materials are removed. Inside the box, you will find the machine, a power cable, a USB cable, a cutting mat, a fine-point blade, and a welcome guide.
Step 2: Positioning Your Machine
Place the machine on a flat surface, ensuring at least 10 inches of space in front and behind the machine. This space allows the cutting machine to move freely during operation.
Step 3: Connecting to Power
Now that you have unboxed your machine, it’s time to take the most important step: giving it life support. To do that, you must insert the power cable into the back of the machine and plug it into an electrical outlet. Once you finish the connection part, let us look into how to activate your machine.
How to Activate a Cricut Maker: Quick and Easy Steps
The first thing to do is activate the machine. To do so, from your Windows/Mac, you must head over to cricut.com/setup from any browser of your choice. Activating the machine is even easier if you have already used the Design Space app. To set up the machine from the app, go to the Menu icon and then select ‘Cricut New Product Setup.’ After that, follow the prompts that let you choose your machine.
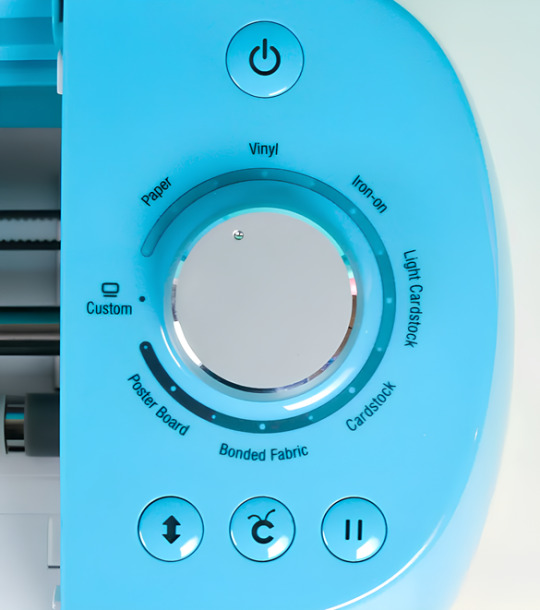
To open the machine, you must lift its lid. This will open the cover of the machine automatically.
Power button: With this button, you can turn the machine on and off.

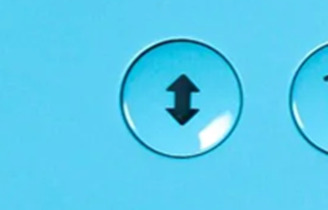
Feeding switch: This button lets you feed your mat into the machine.
Cricut switch: This is the button with the initial C. Press it when you want to start cutting (it is also called the confirm button).

Pause button: This button gives you the flexibility to pause your machine in between. It’s extremely handy if you’re in the middle of a cut and want to change something or for any other reason.

That’s all in terms of design. In the next section, we’ll look at the steps to create a project.
How to Use a Cricut Maker: 5 Easy-To-Follow Steps
To use a machine, follow these detailed steps from setup to your first project. As the Cricut Maker Setup is a versatile cutting machine, it can handle various materials, making it ideal for crafting projects.
Step 1: Connecting to Your Device
In order to get a hold of the machine, you must connect it to your desktop or computer. This is crucial because, without the connection, the machine cannot communicate with your device. Even though the Design Space app can work offline, you still need a connection at least once to save it on the app.
You can connect your machine to your device via a USB cable or Bluetooth. Connect the square end to the machine and the USB end to your PC via USB. To pair your device with the machine using Bluetooth, turn on the machine and then go to the Bluetooth settings.
Visit the official website or surf design.cricut.com and download the Design Space application. It is essential for project creation and supports various platforms, like Mac, iPad, and iPhone.
Step 2: Setting Up Design Space
This is the most important step after connecting the machine and your device (Mac/Windows). Once you have downloaded the app, you must do these things for a smooth experience:
Open the software and fill out the required fields to create an account. The account allows one to save their projects and access various design features.
In the software, select “New Machine Setup” from your profile. Finish the on-screen steps to choose your machine model and perform the setup process. The app will guide you in connecting your device to the machine.
Step 3: Designing Your DIY Project
Now that you have done all this, let’s start creating your first project. To do so, let’s look at these steps:
Start a New Project: Once your machine is connected, you can start a new project using the software. Select the type of project you want to create, such as a card, decal, or label.
Choose Your Materials: Design Space allows you to select the material. If you use cardstock, set the material type accordingly.
Prepare Your Cutting Mat: Place your chosen material onto the mat. Ensure it is aligned correctly and adheres well to avoid shifting during cutting.
Step 4: Start the Cutting Process
Now that you are familiar with downloading the app and activating the machine, let us look at its main purpose: the cutting process. It happens as described below; follow the steps carefully for a seamless cutting.
Load the Mat: Insert the mat into your crafting machine until it clicks into place. This will automatically feed the mat in for cutting.
Start Cutting: Press the “C” button on the machine to begin cutting. Your device will display a percentage of the cut completion and allow you to monitor the progress.
Completion: Once the cutting is finished, the machine will signal it is done. Carefully remove the mat and peel off your cut material.
Step 5: Post-Cutting Steps
It is equally important to know what to do after you are done with your cutting process.
Removing Your Cut Material: Gently lift the material from the machine mat. If you use delicate materials, such as intricate designs, use a spatula tool to help lift them without curling.
Assemble Your Project: Depending on your project, you may also need to assemble various pieces. Follow any additional steps to add embellishments or complete your design.
Conclusion
Don’t be discouraged if your first project isn’t perfect. The more you use your cutting machine, the more comfortable you will become with the process. Take time to explore the features of Design Space, like templates, images, and fonts. This exploration can inspire new project ideas. Using a crafting machine opens up a world of creative possibilities. Following these steps, you can confidently set up your machine, design your projects, and bring your creative ideas to life. Happy crafting!
FAQs
How do you use a Cricut for beginners?
To use a crafting machine as a beginner, unbox your machine and follow the setup steps. Download the Design Space software on your computer or mobile device for project creation. Familiarize yourself with basic operations like uploading images, selecting materials, and changing settings. Start with modest projects, such as stickers or paper cards, to build confidence. Use online resources and community forums to get more support and inspiration.
What do you use a Cricut Maker for?
A Cricut Maker is a versatile creative gadget that can cut materials like vinyl, paper, and fabric. It’s excellent for making unique designs for home decor, apparel, and more. The machine is capable of cutting a variety of materials, making it appropriate for both simple and intricate crafts. Beginners begin with projects such as greeting cards or decals, gradually discovering their full potential as they gain skills.
Do I need a computer to use a Cricut?
While a computer is not required to use a Cricut, it is suggested for maximum performance. The Design Space software can be accessible from a computer, tablet, or smartphone, making design management easier. Using a computer allows for a wider screen and more accurate control when making complex designs. However, several users have operated their machines using mobile apps, allowing them to create while on the road.
Source: How to Use a Cricut Maker
#how to use a cricut maker#cricut design space download#cricut design space app#cricut design space software#Cricut Maker Setup#cricut new product setup#how to setup cricut maker#cricut new machine setup
1 note
·
View note
Text
ao tempted to try and make my own version of the backupsmore sweater fiddleford has as the absolute worst shirt thats in reference to something ever
#learning how to use my moms cricut has made me so powerful but there is some limitations#mostly with changing colors and stuff but mann#mannnn
0 notes
Text
How to Use a Pen on Cricut: A Beginner’s Guide
If you are a Cricut user, then you know that Cricut is a brand that offers crafting machines capable of making a variety of projects using different materials. But did you know that you can now create DIY projects using Cricut pens without cutting any design? Yes, it is possible! Cricut provides many pens and markers in different colors for beautiful crafts. To make projects involving pens, you must know how to use a pen on Cricut.
If you do not know what a Cricut pen is or how to use it, don’t worry. This blog will explain everything related to a pen. To learn all about these pens and how to use them, just read the blog!
What Is a Cricut Pen?
Before we find out how to use a pen on Cricut, we should know what a Cricut pen is. Cricut pens are specially designed to work with Cricut machines to write on various materials. Using this pen, you can make banners, greeting cards, bookmarks, labels, notes, and more.
With Cricut models like Maker, Venture, and Explore, you can use special-sized pens that you can fit into the machine’s pen holder. However, if you want to use a pen with Cricut Joy, you will need to buy a separate pen, which will not work with other Cricut machines. The Cricut Joy is a small machine, so any regular pen will not work with it. You will have to get a pen that is specially made for Cricut Joy.
Types of Cricut Pens
Cricut has a variety of pens, and you can use one of them depending on the project you are making. I am writing about all of them. Here, you will learn about these pens and which one is suitable for your project. It is important to know about pens before learning how to use a pen on Cricut.
Pens
Most Cricut writing projects are made with Cricut pens. You can insert the pen into the machine clamp, which is good for writing. These pens come in a wide variety of thicknesses, colors, sheens, and weights. They have fun color combinations. These pens include fine-point pens, extra fine-point pens, and normal pens. Their thickness ranges from 0.3 to 0.8 mm.
Markers
When you need to write on projects that require thick writing, you can use markers instead of pens. Its thickness ranges from 0.6 mm to 1.0 mm.
Fabric Pens
This pen is specially created to draw on clothes. You can fit the pen into clamp A just like any other pen and start drawing. You can use the Cricut Maker/Explore machines to draw.
Infusible Ink Pens
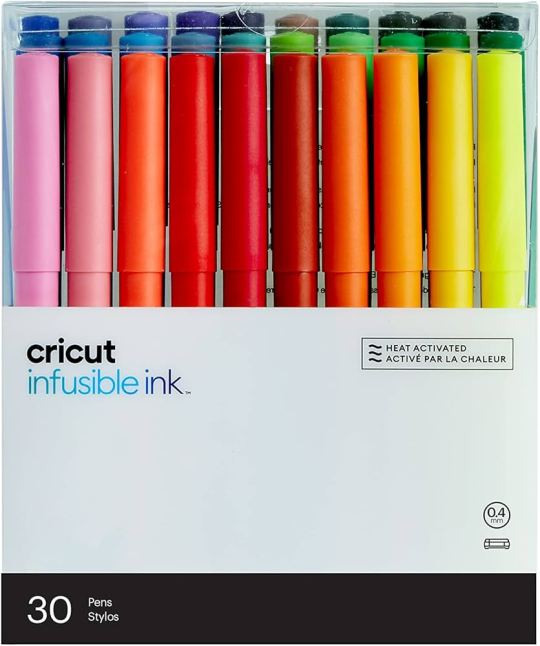
If you want to draw on your sublimation projects, you can use infusible ink pens. It will draw on the infusible ink sheet, and you can transfer it to a mug or coaster project using a heat press machine. Remember, do not use this ink with non-sublimation projects.
Free Hand Markers
These are markers that do not fit in a Cricut machine. If you want to use it, color the design by hand.
How to Use a Pen on Cricut: 3 Easy Instructions
Now you know all you need to know before you go on to learn how to use a Criuct pen. Let’s learn how you can actually use a pen on your project.
Step 1: Insert a Pen into Your Cricut Machine
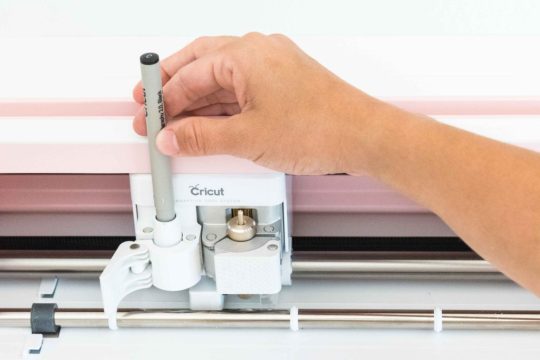
To install the pen, you have to turn the machine on and then open clamp A of your Cricut cutting machine, which is located on the left side. Once the clamp opens, you have to remove the pen cap and press it into the camp. When it reaches its limit, you will hear or feel a click. It means that the pen is well installed. Now, you close the camp.
Step 2: Choose a Design or Font
Before using a pen on your Cricut machine, you should first choose or create a design using the Design Space software. Cricut has thousands of ready-made designs, fonts, and images. You can select any one of them and draw on your machine. If you want, you can also create a design on your own. You also have an option to upload an image from the internet.
Step 3: Draw Your Design
After that, you can draw the design using your material. You must put the material inside the Cricut Maker, Explore, or Venture machine. Once the material is loaded, you can start drawing the design on it, and when it is done, you can unload the material. Your project is now ready.
Conclusion
In conclusion, you have to know that you have learned here how to use a pen on Cricut, and now you can easily create projects with the help of pens. Cricut has various pens, and you can use any that fit the needs of your project. To use a pen on your Cricut machine, you should choose a design that you will draw using your material. Once the design is ready, you can install the pen into the machine and draw the design on it.
Frequently Asked Questions
How Can I Install Cricut Pen?
To draw any image or font on a Cricut machine, you will need to install a pen. You can install it in a few steps. Here is how you can do it.
First, pick a pen suitable for your project.
Then, open the clamp A of your machine.
Next, insert the pen inside the clamp and close the camp
Now, the pen is installed. You can start crafting.
What Can I Make from a Cricut Pen?
A Cricut pen is a tool that can be used for multiple projects. You can create beautiful bookmarks, cards, invitations, coasters, t-shirts, and so much more. If it is someone’s birthday and you want to make banners, you can use a Cricut machine for it. Apart from these, you can make cute doodles, stickers, and labels using these pens. You can use these projects for your home decor, or you can also give them to someone you love.
Can I Write on Fabric with a Cricut Pen?
Yes definitely! Cricut has a fabric pen specifically designed for fabrics. You can use the pen with the Cricut machine and draw any design on the fabric. To use the fabric pen, you must first select a design on the Cricut Design Space app and then install the pen on your cutting machine. After that, load the fabric onto the machine and draw your design on it.
0 notes
Text
How to Use Cricut Mat: A Complete Guide for Perfect Cuts
Do you sometimes wonder how to use Cricut mat? What is a Cricut mat, and do you need it for all of your DIY projects? If you’ve had these questions before starting a craft—don’t worry. You can find the answers to all these questions here by reading this post till the end.
I have been using Cricut for more than five years now, and I have all the info about which Cricut machines and projects require a mat and which mat is suitable for each project. There are also materials that do not need a cutting mat and can be cut on the machine without one. Here, you will learn about all these things. So, let’s begin with the blog!
How Necessary Is a Cricut Mat?
It is important to know how necessary a mat is before learning how to use Cricut mat. A cutting mat is a crucial tool for Cricut machines, whether for cutting or design transfer. Cricut mats are especially important for older machines that don’t handle cut-on materials as smoothly.
A mat ensures smooth and precise cutting, and with the help of the Cricut machine, you get the best results. However, you don’t need a mat for all kinds of materials. For example, if you are using smart materials like infusible ink, you can cut them on your machine without a mat. These materials are best cut on newer machines like Cricut Maker 3, Explore 3, and Joy Xtra.
Different Types of Cricut Mat
When learning how to use Cricut mat, you must know that Cricut offers a variety of mats that you can use according to the requirements of your materials. You should be very sure about the mat you choose for your material. If you choose a thick mat, it will give you trouble in weeding the design. If you choose a thin mat, it will not hold the material properly and won’t give you a good cut. So you should choose the mat very carefully. Here are all those materials and their uses:
1. StandardGrip Mat
This is a basic mat and the most used for any Cricut project. You can use it for almost all kinds of iron-on vinyl materials. With a StandardGrip mat, you can use materials like cardstock, embossed cardstock, and patterned paper. It comes in four different types of sizes.
2. LightGrip Mat
This is a blue-colored cutting mat, which means it has the least adhesive on it and is much less sticky. A LightGrip mat is used for light materials such as tissue paper, printer paper, thin cardstock, washi tape, wrapping paper, and vellum.
3. StrongGrip Mat
For stronger materials, you should use a StrongGrip mat. You can also use it for fabric projects if you do not have a fabric mat. This cutting mat is good with heavy materials like thick cardstock, poster board, chipboard, magnet material, and basswood.
4. FabricGrip Mat
As the name suggests, it is specially designed for fabric materials. It has 2 different sizes: 12 x 12” and 12 x 24”. A FabricGrip mat is used with materials such as fabric, bonded fabric, felt, and crepe paper.
How to Use Cricut Mat: Quick and Easy Steps
To use your Cricut cutting mats, you should follow these steps:
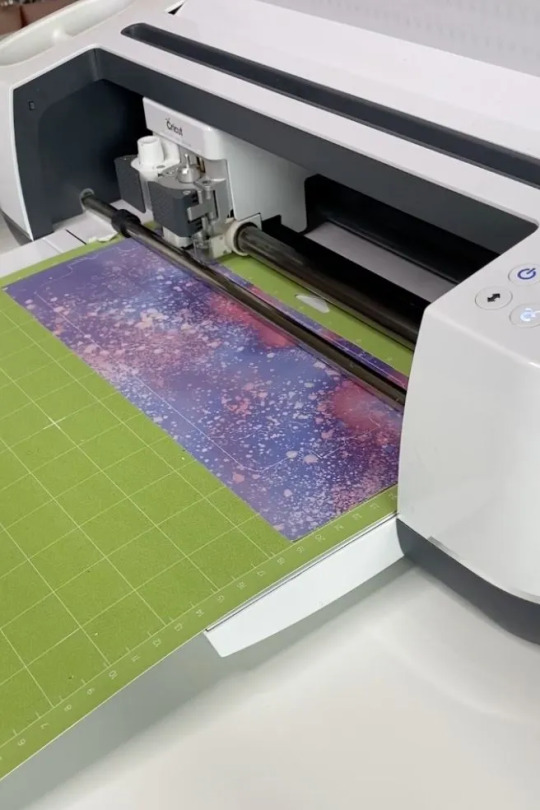
Loading a Mat
Loading and unloading your Cricut mat takes steps to ensure that your materials remain intact:
After placing your material on the cutting mat, you should load it under the two guide tabs of the Cricut machine. Next, hold the mat and then press the Load button on the machine. As you press it, you will see the roller bar begin to move, loading the mat into your machine.
Unloading a Mat
Once the cutting is done, unload the material from the cutting mat. After that, take care not to tear or curl the material during this process. For materials like paper and vinyl, roll the mat over gently and weed from the back of the material. Also, avoid applying too much pressure to the mat to prevent damaging the design and the mat itself.
Conclusion
In the blog, you learned how to use Cricut mat and other important things. Now you know the significance of a mat and when it is essential for certain DIY projects. Some Cricut machines and materials don’t require a mat. Besides cutting materials, mats are also used to transfer designs onto fabrics or surfaces. Heat transfer mats are needed to use heat press machines.
FAQs
Why Do I Need a Cricut Mat?
A Cricut mat performs many essential functions with your Cricut machine. It provides a stable surface for placing materials before inserting them into the machine, ensuring precise and smooth cuts. By holding materials in place, the mat prevents shifting during cutting, which is crucial for achieving designs accurately. Also, the mat makes it easy to transfer materials onto various surfaces, improving versatility in project applications.
Can I Use Cricut Without a Mat?
In many cases, yes! A Cricut mat is necessary to hold materials with older Cricut machines lacking smooth surfaces or advanced features. Trying to cut materials without a mat can damage your design and compromise the quality of the final product. However, smart materials made for use with newer Cricut machines may not require a mat that offers flexibility depending on the material and machine’s abilities.
How Can I Use a Cricut Mat?
Using a Cricut mat is simple: start by selecting a design in the Cricut Design Space app. Next, place your chosen material on the mat, ensuring it stickers properly. After that, insert the loaded mat into the machine, following the machine’s steps. Start the cutting process using the Cricut software, and once the cutting is done, unload the mat from your machine. Lastly, remove your material from the cutting mat, taking care to maintain your cut designs.
Visit: cricut.com/setup
Source: https://cricricutdesigncut.wordpress.com/2024/07/18/how-to-use-cricut-mat-a-complete-guide-for-perfect-cuts/
#design space setup#cricut.com/setup#cricut design space#www.cricut.com/setup login#cricut easy press#cricut setup#digital design#cricut venture#cricut.com/setup mac#cricut design space online#cricut design space app#cricut design space setup#how to use Cricut mat#design.cricut.com download#cricut setup for pc#install cricut explore air 2#install cricut explore air 2 '#cricut setup explore air 2 setup#cricut setup on computer#cricut setup create account#cricut setup maker
0 notes
Text
How to Use a Cricut Mug Press: A Step-by-Step Guide
When I first bought my Cricut Mug Press, I was quite nervous about learning how to use a Cricut Mug Press. It took some time to read many articles and gather all the essential information. Now that I have gained experience using it, I want to share all the basic instructions for using this Cricut machine. If you are uncertain about using it, make sure to read this post to the end.
The Cricut Mug Press is a small yet impressive tool that transforms plain mugs into stylish designer pieces. Despite its compact size, it is incredibly capable and essential for crafting custom mugs for personal use or as gifts for loved ones. So, let’s start with the materials you will need for your project.
Tools and Supplies You Need to Create a Personalized Mug
Before learning how to use a Cricut Mug Press, it is important to know the necessary materials you are going to need. Here is a detailed list:
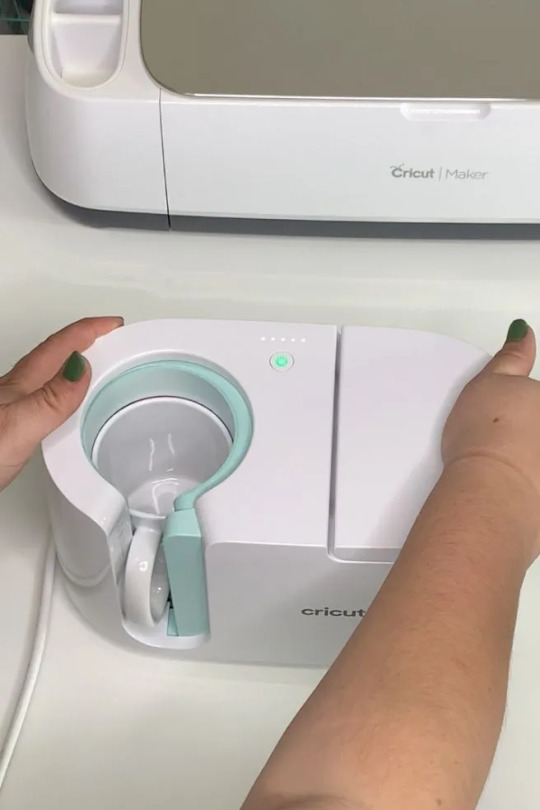
Cricut cutting machine: You will have to use this machine to cut designs from the infusible ink sheet. Suitable Cricut models are Cricut Maker 3, Explore 3, or Joy.
Cricut Mug Press: This is the machine used to transfer the infusible ink design onto your mug.
Sublimation mug: Specific mugs made for the Mug Press machine are necessary because they fit perfectly and ensure the best results. Using other mugs of different shapes and sizes may not fit or work well with the machine.
Infusible ink sheet: This material is basic as it is where you will cut your designs, which will later be transferred onto the mug using heat in the machine.
Heat-resistant tape: It is essential for securing the infusible ink sheet onto the mug during the pressing process.
Lint roller: Used to ensure the surface of the mug is clean and free of debris before applying the infusible ink design.
Weeding tools: These are used to remove excess or unwanted material from the design before transferring it to the mug.
Once you have assembled all these supplies and tools, ensure your setup is ready. Connect your Cricut machine to power and turn it on. Establish a connection between the machine and your device using Bluetooth or USB. Download the Design Space app on your device and log in with your account. This setup is essential before proceeding with the Mug Press.
Before beginning to use the Mug Press, ensure it is on and heating up properly. Following these steps ensures you are ready to create custom mugs with your Cricut machine.
How to Use a Cricut Mug Press in 4 Simple Steps?
When you have assembled all the necessary tools and completed the setup, you can start working on your project. Here are the 4 steps you need to follow to use the Mug Press:
Step 1: Create a Design on Cricut Software

Step 2: Cut and Weed Out the Excess Material

After completing the design, insert the material into the machine and press the Load button. The design will be cut quickly. Once the cutting is done, unload the material and use a weeding tool to peel away any unwanted parts from the design.
Step 3: Transfer the Design to Your Mug

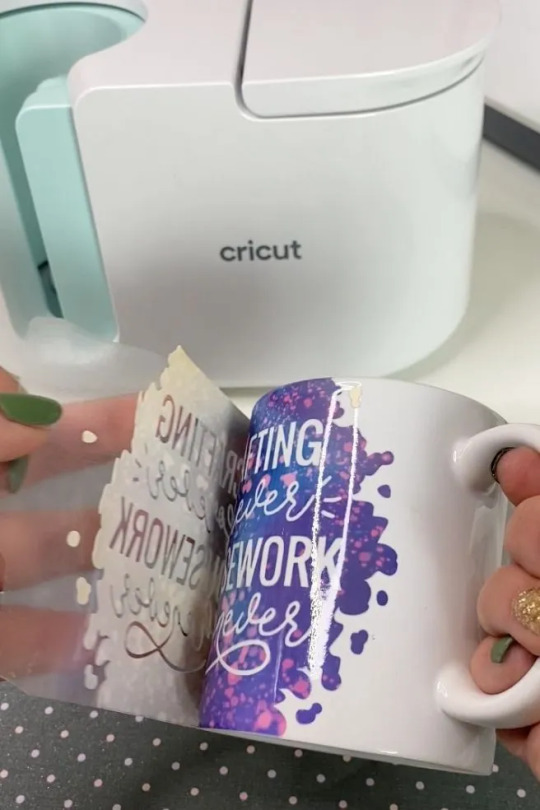
Step 4: Reveal the Final Result

When the pressing is complete, carefully remove the mug from the machine, handling it by the handle to avoid burns. Allow the mug to cool for 20–30 minutes. During this time, it’s important to avoid touching the heated areas to prevent injury. Once the mug has cooled down completely, it will be ready for use, showing your newly transferred design beautifully.
Conclusion
In short, learning how to use a Cricut Mug Press is quite easy. As you can see, the process is simple. First, gather all the necessary tools and accessories and set them up. Once the setup is done, create a design on the Design Space app, cut it on the Cricut cutting machine, and press the design onto the mug using the Mug Press machine. Once the pressing is finished, you will have a beautiful mug ready to use however you like.
FAQs
What Are the Supplies Required for Cricut Mug Press?
To work with a Cricut machine and create designer mugs, you will need some essential supplies:
Cricut cutting machine
Cricut Mug Press
Infusible Ink
Heat-resistant tape
Weeding tool
Lint roller
Sublimation Ink
These tools are important to prepare and execute projects with Cricut effectively.
Do I Need a Computer to Use Cricut Mug Press?
No, not necessarily! You can download the Cricut Design Space app on your computer or any device. If you don’t have a computer, you can use your Android or iOS mobile instead. However, using a computer for the app allows you to work on projects more effectively. Just ensure your computer runs on either Windows or macOS, as Chromebooks do not support the software.
Can I Use Any Mug in Cricut Mug Press?
No, you cannot! The mug used in the Cricut Mug Press must meet specific criteria. It should have a maximum height of 4.72 inches and a diameter between 3.2 to 3.4 inches, with a capacity of 10 to 16 ounces (295 to 450 ml). Also, the mug’s surface should be plain; textured or rough mug surfaces are not suitable for the machine. Ideally, the mug should be white for best results.
Source: how to use a Cricut Mug Press
Visit here to Know More: Cricut Easy Press
Pinterest
0 notes
Text
How to Use Cricut Transfer Tape to Create a DIY Project?

If you wonder about using your Cricut transfer tape, this blog is just for you. Here, I’ll cover the basics of how to use Cricut transfer tape. I’ll cover the main steps in this guide. If you want this method to be easier, keep following my tips and tricks to create a crafting project.
I can teach you its use based on my experience and help you create your first project with your transfer tape and vinyl. Hence, get ready and continue following this post, where you’ll find many informative things.
Introduction to Transfer Tape
As you know, Cricut machines help you design things using different types of materials. They offer certain accessories and tools to reduce your extra effort in using transfer tape. I want to introduce this new accessory under Cricut and reveal its use.
Its basic use is to transfer the vinyl design onto the blank, for instance a coffee mug or tumbler. With this amazing accessory, you can create multiple projects easily without hassle. If I talk about myself, I have explored this accessory many times to create customized items.
How to Use Cricut Transfer Tape With Vinyl?
Finally, you’ll be learning about using a transfer tape for your upcoming projects. In this section, you’ll get some easy steps to get started with your transfer tape project. Let’s explore together.
Step 1: Design a Project on Design Space Canvas
Your first step should be to design your favorite design on the Cricut Design Space canvas. Utilize all the features and tools under the Cricut Design Space. Now, cut that design through your machine using vinyl as a material. Then, remove the excess vinyl with the weeding tool.
Step 2: Cut a Transfer Tape

Once you’ve cut the design on vinyl, start cutting your transfer tape in a slightly bigger size than your design. A transfer tape is reusable; you should always cut it in a bigger size, even if your design is small. This is how you can sustain your accessories for longer.
Step 3: Take off the Backing Paper from the Transfer Tape
In this step, remove the backing or your transfer tape. After use, you can again stick your transfer tape to the backing paper for reuse. Let’s move ahead and learn how to use Cricut transfer tape.
Step 4: Apply Design to Your Transfer Tape

In this step, apply your transfer paper to the design and scrape it well with a scraper. Otherwise, you can use your old cards.
Step 5: Peel off the Backing Paper from Your Design

When you’ve burnished the design on the backing paper, it’s time to peel the backing paper off to get the final design on the tape. Please lift it slowly upside down to avoid ruining the design. Use a weeding tool to do it better.
Step 6: Apply the Design to Your Project

This is the correct time to fix your design on the project and press it gently to let the design stick well to the surface.
Step 7: Remove the Transfer Tape
Once your design is set on the project, you can remove the transfer tape. Before removing it, burn it down on the surface well. Do it again and again until you’re sure that the design stuck well. That’s how to use Cricut transfer tape.
What Else Can I Use Instead of a Transfer Tape?
Yes, there are a few alternatives to using a transfer tape. If you find your transfer tape too sticky or unsuitable for your project type, you can use some other things.
For instance, you can try using painter’s tape. Moreover, contact paper is another good option. Besides, seal saran wrap is also a good option in place of the transfer tape.
Conclusion
So, are you ready to use transfer tape for your projects? I have tried my best to tell you each step, and now it’s your turn to implement everything you’ve learned. This way of DIYing is super easy and cost-effective. As you can save your transfer tape for the next project, you will stay stress-free for the next purchase. As an expert, I will definitely come up with some new tips and tricks to excite all of you who are on this creative journey. Keep exploring new DIY ways till then.
Frequently Asked Questions (FAQs)
Why Choose Cricut Transfer Tape?
Transfer tape is an excellent accessory from Cricut. It helps you apply your cut designs onto the final project’s surface, providing an easy way to transfer the design to the desired blank. Also, it is reusable and sustainable for longer.
Can I Iron the Transfer Tape?
Yes, you can iron-transfer tape. You need a heat press or iron to apply heat to the transfer tape. It works best when you use a heat press to put the design on the blank. However, don’t directly apply the heat to the tape; use a towel instead.
Can I Use Regular Tape Instead of Cricut’s Transfer Tape?
You can use painter’s tape instead of transfer tape. This tape is lightly adhesive, making it ideal for temporary use.
Source: How to Use Cricut Transfer Tape
#how to use Cricut transfer tape#Cricut transfer tape#cricut design space app#cricut design space software#Cricut.com/setup#cricut setup
0 notes
Text
How to Use Cricut Easy Press: A Guide for Iron-on Transfers

The Cricut Easy Press is great for use with traditional heat transfer vinyl. To use this machine, you will need other Cricut machines as well because you can only transfer a design after you’ve made the cut, and for that, you need a Cricut cutting machine. So, let’s discuss the difference between Easy Press and Easy Press 2.
Differences Between Cricut Easy Press and Easy Press 2
The Cricut Easy Press is a first-generation heat press machine that was launched in 2017. Cricut has since launched several other heat press machines. The Easy Press 2 is one of the most important among them. It comes with many updates, but Easy Press has its advantages.
Here are the main differences between the Easy Press and Easy Press 2.
The Cricut Easy Press comes only in one size: a standard size of 9 x 9. Whereas Cricut Easy Press 2 has 3 different sizes. One of them is 9 x 9, which is the same as Easy Press, and the others are 6 x 7 and 12 x 10.
The Easy Press 2 includes a higher temperature capacity, which reaches up to 400°F
The Easy Press 2 heats up 25% faster than the Easy Press.
Easy Press 2 has better edge-to-edge heating, which spreads on the material all over around.
The Easy Press can remember the temperature settings from the last use. Something you could not do in the Easy Press.
Why Do You Need a Cricut Easy Press?
Before you learn how to use Cricut Easy Press, you should know why you need an Easy Press. If you understand its uses, you also know that it is a heat transfer machine, and the same can be done by an electric iron. However, an electric iron will not provide the things that an Easy Press machine will. Here are the reasons why you need Easy Press.
Heat Dispersion
Regular household irons are not made for even dispersion of heat. In iron, heat is focused in the center, but as it moves away from the center, the heat decreases. In the Easy Press machine, the heat temperature is distributed evenly, which is good for the heat transfer of a material.
Temperature and Control Ability

Various materials have many heat transfer needs, so you need a completely different temperature for iron-on than you do for iron-on vinyl. The machine is great at understanding the temperature requirement of a material and can process the exact amount of heat it requires. Also, its heat pressure is easy to control, and it will be good for you if you use it.
Flat and Stable Surface
An Easy Press machine works best when it is used on a flat surface. Therefore, it is highly recommended that a flat surface be used for the heat press. It will help prevent material damage. The Easy Press is a powerful machine that takes care of the material when using it on a surface.
How to Use Cricut Easy Press: 3 Easy Steps
Now, I am going to tell you how to use Cricut Easy Press and print beautiful designs on shirts, t-shirts, and other fabrics:
Step 1: Choose and Cut Your Design
First, you have to choose a design on your Cricut Design Space app. You can select a pre-made design or create a design of your own. Then, the design is cut using a Cricut cutting machine. After that, you can go to use the Easy Press machine.
Step 2: Prepare Cricut Easy Press and Tools
Once you have the design cut out, you can use the Easy Press machine. Before using it, you will need to prepare it. You should place the base material on the mat and heat the machine. Next, adjust the temperature according to the material. You should use the buttons to increase and decrease the temperature. When the heat press is ready, the light turns green, and the machine will beep.
Step 3: Apply Heat and Peel
Once the machine beeps, you can place the design on your fabric along with the mat and apply heat from the heat press machine. You have to keep pressing for about 10 seconds, and then you can release the machine. Now, wait until the material cools down, and then you can peel off the protective sheet and reveal the design. Your beautiful design is done.
Conclusion
Now, you have learned how to use Cricut Easy Press to create beautiful designs on your favorite fabrics and more. Using the heat press machine is easy, and you can do it in a few quick and easy steps. To use the Easy Press machine, you must first cut out a design on the Cricut cutting machine and then prepare the Easy Press machine. After you prepare the machine, you can put the design on your fabric and apply heat to it. After the temperature decreases, peel the protective sheet down, and your design is ready.
FAQs
What Can I Make with My Cricut Easy Press?
The Easy Press machine is useful for all Cricut users. With the help of this machine, you can create multiple things on your own. It will help you make beautiful projects like shirts, coasters, masks, wooden signs, banners, belts, etc. With this heat press machine, you can apply pressure on almost any material cut on a Cricut machine and then stick it where you want.
Do I Need a Cutting Mat for Cricut Easy Press?
Yes, you do! To use the Cricut Easy Press machine, you must use a Cricut mat. If you apply heat to your material, your design may get messed up. The heat of the machine can burn the design, material, or even your fabric. It is this mat that protects them from the high temperatures produced by the machine. The mat is made of a heat-resistant cover, so using the Easy Press is a must.
Do I need a Cricut Easy Press, or can I use an iron?
To be honest, if you just need to use Easy Press once in a while, you can do without the machine. You can use a regular household iron, and your work will be done. But using a regular iron has its risks. It will not give you your desired results. The outcome may not be what you expect. The design may not last long. So, if you want a good and clean finish for your designs on your materials, you must buy an Easy Press machine.
Source: how to use Cricut easy press
Visit here For More Information: Cricut.com/setup
Pinterest
0 notes
Text
How to Use Cricut Mini Press: Beginners Tutorial
Have you added the latest heat press machine in the Cricut family to your crafting collection? Are you wondering how to use Cricut Mini Press to make iron-on projects? If the answer is yes, then you have reached the right place. I even bought this Cricut machine some time back, and I love it. This is the most amazing tool I have got in quite some time.
Cricut Mini Press is not the real name of this machine. Its actual name is Cricut Easy Press Mini. However, among its users, it is famous for its Mini Press name. As the name suggests, it is a compact machine that easily fits in your hand, and you can carry it around in your bag. So, learn a little more about this Cricut heat press machine.
About Cricut EasyPress Mini
Before you learn how to use Cricut Mini Press, you should first learn about the machine.
Key Features
It comes with a protective base, so you don’t have to worry about something getting burned while the machine is on.
There is a button in the machine designed to control its heat level. When you start it to prepare, an orange light lits up, and when the machine is ready to work, the light turns green.
This machine has an auto shutdown feature. If you are worried that you might forget to turn off the machine, you don’t have to worry about it. If you leave the machine on and don’t use it for 13 minutes, it will automatically shut itself off.
Dimensions
If we talk about the dimensions of the machine, the heat plate of the machine is 3.25 inches long and 1.9 inches wide.
The maximum size of the design is recommended to be 4 x 3.5 inches. The other size you can use on the machine should be 1.7 x 5.25 inches.
The height of the machine is 4 inches. Now you can understand how small it is, and you can take it wherever you want and use it however you want.
How to Use Cricut Mini Press: 4 Simple Steps
Before you start working on the machine, you should know the procedure that you have to follow. So, these are the things you have to do before you start working.
Step 1: Heating the Cricut EasyPress Mini
First, you have to plug the machine into a wall outlet. Then press the power button and turn the machine on.
Then, leave the machine in heating mode. It will continue to heat until it reaches its desired temperature. Although it is a small machine, it gets heated very quickly. Therefore, you should not use anything other than the machine to heat it while it is on.
Step 2: Select Your Material
You can set the machine to a low, medium, or high temperature according to your use.
Then, you must select the iron-on vinyl on your machine along with the base material and tap on apply.
Step 3: Set the Time and Temperature
There is no timer on the machine to set how long you have to keep heating the material. So, you have to check the time yourself. Always check the time before you start heating and determine how long you need to heat for. You have to stop it when the time is up.
Step 4: Moving the EasyPress
When you are using the machine, you will need to be careful about its speed. You should not apply too much pressure. At the same time, you do not have to run the machine too fast or too slow. These things can cause marks or lines on the material. You have to run it at normal speed, as you would on a computer mouse or electric iron.
How to Use Cricut Mini Press to Print on a T-Shirt?
Now, you have all the information you need to use Cricut EasyPress Mini. Now, you can work on your iron-on projects. To work on a project, you should be doing the following steps:
To begin a project, you must first go to the Design Space app and choose a design.
After you select the design, customize its size and shape as you want. You can also create a design or upload it on the Cricut app.
Once your design is ready to cut, you will need to cut the design into an iron-on vinyl with the help of a machine.
When your design is ready after cutting, you have to prepare the machine for heat transfer. Set the heat temperature and wait for the machine to heat up. When the green light is up, the machine is ready for heat transfer.
Now, put the design on the t-shirt with the help of a mat and apply the heat with the machine.
After that, wait until the design cools down. This is very important. If you try to peel the protective sheet without letting it cool, the material might come off the fabric, and all your work will be ruined.
In the last step, your t-shirt design is done.
Conclusion
In conclusion, I would say learning how to use Cricut Mini Press is not difficult. After reading the blog, you will feel the same. In this post, you learned about the machine from the beginning. I also wrote about the important things to keep in mind while using the Cricut machine. When you have all the essential info, you can proceed to work on your iron-on projects and create beautiful designs on your clothes with the help of this Cricut EasyPress Mini machine.
FAQs
What Can I Do with a Cricut EasyPress Mini?
With the Cricut EasyPress machine, you can create beautiful designs on shirts, coasters, bags, hats, caps, and so much more. This heat transfer tool is used to adhere a final cut from a Cricut cutting machine onto your desired items. You can use materials like heat transfer paper, iron-on/heat transfer vinyl, and infusible ink sheets and pens with this heat press machine.
Do I Need Cricut Design Space to Use Cricut EasyPress Mini?
Cricut Design Space is very important when working on any Cricut project. For example, while the EasyPress machine transfers the design to an item, you need the Cricut Design app to cut the material on a Cricut machine. You may also need it to adjust the heat on the Cricut EasyPress Mini according to your requirements.
How Long Do I Have to Apply Heat on a Shirt?
The duration of time you need to apply heat for a transfer depends on several factors. It depends on the type of material you are using. Harder materials will take longer, whereas smoother materials will take less time. The duration also depends on the type of shirt. A dark shirt may take as long as 90 seconds, while a light shirt will only take about 45 seconds.
Source: how to use Cricut Mini Press
Visit here For More Information: Cricut heat press
Pinterest
0 notes