#cricut printer setup
Text
Why Won’t My Cricut Design Space Open (Easy Steps)
Why won’t my Cricut Design Space open? This is a question that I frequently receive from many readers. Finally, I got a chance to write something about it. Recently, I experienced the same issue, and it was not opening on my PC at all. At that time, I had to use the Cricut software on my mobile device; thanks to Cricut, it is compatible with smartphones, too.
Now, you might wonder why this happens and what the reasons behind it are. So, I tried to research it, and after extensive research, I figured out that it happens because of third-party virus interference, incorrect network settings, and corrupt cache files. For these reasons, our Cricut app doesn’t open the way we want it to.
But chillax! It’s not a big deal and can be fixed easily with some methods I’ll explain in this blog. Without any further ado, let’s jump into the solutions!
Solution 1: Check System Compatibility
Did you know that system compatibility plays one of the biggest roles in the smooth functioning of any software? Therefore, we check our system requirements to see whether our computer or any devices we want to use the software meet all its needs. To fix the “why won’t my Cricut Design Space opening“ issue, I will walk you through the following system requirements for PC and Mac:
For example, if you are a Windows user, verify the following points:
Now, if you are a Mac user, you have to check the following points:
Once you have ensured the above points, you will be able to fix the “why won’t my Cricut Design Space not Working“ issue quickly. If the above solution doesn’t work for you, you can try the next one.
Solution 2: Check the Internet Connection
Sometimes, the Cricut software will not open properly just because of your unstable internet connectivity. This software requires a constant internet connection to work properly. An unstable connection can cause many issues, hindering you from creating and opening your projects. Although you can create projects offline, sometimes it is better to cross-check.
For both Windows and Mac users, the internet requirements are as follows:
Solution 3: Force Cricut Design Space Reloading
Sometimes, I have seen that a slow speed can cause the “why won’t my Cricut Design Space open” issue on your desktop. However, the software can be sluggish due to several reasons. Therefore, you need to do the force reload.
Here’s how to perform a force reload of the Cricut Design app:
Once you have performed the above steps, you need to make sure whether the errors are resolved or not. If the issues still persist, go and check for the next solution.
Solution 4: Relaunch Cricut Design Space on Mac/PC
Here, we will try one last solution, which is the easiest one. All you need to do is relaunch the Cricut software on a compatible computer, such as a Mac or Windows PC.
For Windows
For Mac
By following the above steps, I assure you that you can fix the “why won’t my Cricut Design Space open” in no time. There are four solutions mentioned above; you can try any of them. One of them must work for you.
Final Words
Finally, I have given all the solutions on Cricut Design Space that won’t open issues. These solutions are really effective and will work for sure, as I have tried them myself. Besides, the Cricut software hardly shows any errors, so if you try to solve the issues by following the above methods, they will be resolved as soon as possible.
FAQs
Question 1: Why Cricut Design Space won’t open?
Answer: Sometimes, Cricut Design Space fails to open due to several reasons. It can also happen due to an unstable internet connection or the presence of viruses. There are other additional causes, which I have mentioned below:
Question 2: What do I need to know before downloading Cricut app?
Answer: Before you download and install the Cricut Design Space app on a desktop or phone, make sure your device meets all the system requirements. The RAM size is the same for Windows, Mac, Android, and iOS, including the 2 GB free disk. However, in terms of operating system, ensure that you are using the latest one.
Question 3: Why is my Cricut stuck on loading?
Answer: If you find your Cricut machine stuck while loading, you should try the following steps:
Visit: install cricut design space app
www.cricut.com setup login
Source: https://connectcricut.com/why-wont-my-cricut-design-space-open-easy-steps/
#install cricut explore air 2#install cricut design space app#cricut.com/setup#www.cricut.com setup login#www.cricut.com#www.cricut.com/setup login#cricut.com setup mac#cricut setup#cricut setup create account#cricut setup for pc#cricut setup explore air 2 setup#cricut setup maker#cricut setup log in#cricut design space#cricut setup on computer#cricut new machine setup#cricut explore air 2#cricutprojects#cricut venture#cricut#setting up my cricut maker#connecting cricut maker to computer#setting up new cricut maker#cricut printer setup
0 notes
Text
How to Connect Cricut Maker to Computer via Bluetooth?
You know what a great job a Cricut Maker machine can do for you. It’s one of the best-sellers in the Cricut lineup. I am also one of the fans of this crafting machine, and I always create something with it. Today, I’m here to share an important aspect of this Cricut model, which is their connection. We all know that in order to operate a Cricut machine, it needs to be connected to your mobile or computer. Here, you’ll learn how to connect Cricut Maker to computer via Bluetooth.
Let’s begin this guide that will tell you everything and cover the computer to teach you the connection method quickly. Don’t forget about the Cricut Design Space software, which is the core of your Cricut machine. I’ll also tell you how you can get the Cricut app on your system. Let’s begin!
How to Download & Install Cricut Design Space?
As I already told you, the Cricut app is necessary to establish a connection between your Cricut and the other device. Let’s check the steps below to learn the steps included in its download and installation.
On Windows
For users who want to connect their Cricut to a Windows computer, let’s check the steps here to get the Cricut software on it.
That’s how to get the Cricut app on a Windows computer. Now, let’s move ahead with the Mac and see how to get the app on it.
On Mac
The steps for downloading the Cricut software on a Mac are below. Check them to get the software.
Now, you have the Cricut app on your Mac system. When you know the Cricut Design Space setup, let’s go through the Bluetooth connection process.
How to Connect Cricut Maker to Computer via Bluetooth?
After setting up the Cricut Design app on your computer, here are the steps to connect your Cricut to a desktop using Bluetooth.
On Windows
If you have a Windows computer, all you need to do is to follow the steps given below. Check them out here.
That’s how to connect Cricut Maker to computer via Bluetooth to a Windows computer. Now, it’s time to learn the steps for a Mac system.
On Mac
To set up your computer on a Mac with Bluetooth, you should perform the steps below to complete the setup process.
These are the simplified steps to set up your Cricut cutting machine on a Mac system. That’s how to connect Cricut Maker to computer via Bluetooth.
FAQs
Why Is My Cricut Maker Bluetooth Not Working?
If the Bluetooth of your Cricut Maker machine is not working, there can be a few reasons for this to happen. For instance, the Bluetooth connection is not ON, or maybe your devices are too far apart from one another. Another reason can be that your devices are not compatible with each other. So, when you work on these things, you will fix the error.
Is a Bluetooth Connection Necessary for My Cricut Maker?
Absolutely not. You don’t have to use a Bluetooth connection to set up your latest Cricut Maker machine. You can rather go for a wired connection such as USB. A wired connection like USB will be beneficial for you to avoid any sort of interference.
How Do I Setup My Cricut Maker on My Mobile Device?
To set up your Cricut cutting machine on your mobile device, follow these steps:
Source: https://desincricut.wordpress.com/2024/04/09/how-to-connect-cricut-maker-to-computer-via-bluetooth/
#Connect Cricut Maker to Computer#cricut.com/setup#cricut.com setup#cricut.com setup download#cricut.com setup windows#cricut.com sign in#cricut.com/create#cricut.com setup mac#cricut.com/register#cricut.com design space#www.cricut.com setup mac#www.cricut.com/setup login#install cricut printer#install cricut design space app#install cricut explore air 2#cricut design space login#cricut design space app#cricut design space download#cricut design space for mac#cricut design space setup#cricut setup#cricut new product setup#cricut create connect to computer#setting up my cricut maker#connecting cricut maker to computer#cricut setup create account#cricut cutting machine setup#cricut setup on computer#cricut printer setup#cricut setup log in
0 notes
Text
How to Connect Cricut to iPad: Two Methods Explained!
As you know, Cricut machines are amazing. You can use them to create thousands of creative stuff like tote bags, keychains, cards, stickers, decals, etc. If I tell you about my crafting journey, it's too long. I started when I was a teenager just for a hobby, but I didn't realize when it would become my business. Well, if I share my story, this blog isn't enough. So, let's discuss the matter we are here for. I know you want a little clarity on how to connect Cricut to iPad. Don't worry; I'll share everything with you to make your work easier.
My blog is dedicated to iPad users who are struggling with their Cricut machines and want to learn how to connect them to an iPad. Let me walk you through this guide and teach you the process.
Introduction to Cricut Design Space
Before we move forward to learn how to connect Cricut to iPad, let's learn about its special software and its excellent features. This application or software is designed for Cricut users to create creative designs. Also, you get multiple features in this software, including different fonts, texts, templates, and designs; you'll be able to design anything you want. To get this software or application, you need to install it from Cricut's official website.
How to Download Cricut Design Space on iPad?
If you want to download and install the Cricut Design app on your iPad device, follow the steps below.
That's it for the Cricut Design Space download on an iPad. Now, let's check its connection process.
How to Connect Cricut to iPad via Bluetooth and USB?
Here comes the final step, which is to connect your Cricut to an iPad. To do this, you'll need to use the Bluetooth pairing option. Go through the steps below to learn the connection process.
Method 1: Using a USB Cable
If you want to connect your Cricut to a wired connection like USB, you need to follow the steps below. A wired connection is helpful in many ways and can be set up hassle-free.
That's how to connect Cricut to iPad with USB. After this, you can utilize your Cricut to create anything.
Method 2: With Bluetooth
Check the steps below to learn Cricut setup on iPad via Bluetooth. This wireless connection is amazing and will work best for you.
That's how to connect Cricut to iPad via Bluetooth. If you want, you can go for a wired connection such as USB.
FAQs
Why Does My iPad Need to Download the Cricut App?
There are certain minimum system requirements you need to check before you download the Cricut app on your iPad. For instance, your iPad version should be 11 or the latest. Also, your internet connection should be strong and within 2-3 Mbps to download and upload. If everything meets, you can connect Cricut to iPad.
How Do I Connect Cricut to My Computer?
To connect your Cricut machine to a computer, follow these steps:
What to Do When My Cricut Is Not Connecting to My iPad?
When your Cricut is not connecting to your iPad it can happen when your Cricut or iPad device is not connected to the power supply. If you're using a USB cable, your cable may be loose, and if you're using a Bluetooth connection, maybe your device's Bluetooth option is not ON.
Visit: www.cricut.com/setup login
install cricut design space app
Source: https://setupcricutoncomputer.wordpress.com/2024/04/06/how-to-connect-cricut-to-ipad-two-methods-explained/
#www.cricut.com/setup login#www.cricut.com/setup#install cricut design space app#install cricut explore air 2#cricut design space#cricut maker bundle#cricut new machine setup#cricut.com/setup#cricut explore 3#cricut.com/setup login#cricut create connect to computer#cricut new product setup#cricut new product device#cricut install setup#connecting cricut maker to computer#cricut setup create account#cricut cutting machine setup#cricut setup on computer#setting up new cricut maker#cricut setup log in#cricut account setup#cricut printer setup#www.cricut.com setup login
0 notes
Text
just thought of a very cute sticker sheet idea. That i would not be able to turn into a sticker sheet due to not having that kind of resources =_=
#i am absolutely nawt using redbubble btw i thought we all agreed that redbubble was insane in like 2018#if i let ppl on redbubble know i exist#theyll take all of my drawings and put them on poorly made pillows manufactured with dinosaur bones and oil#stares longingly at high quality sticker printer + cricut setups and sighs wistfully#pay.txt
3 notes
·
View notes
Text
How to Download Cricut Design Space for Desktop: Full Guide
Hey, are you looking for Cricut Design Space for desktop? Don’t worry — you can easily get it on your Windows or Mac. But the question is, how much time will it take to download the app? Well, depending on your internet speed, it will take less than a minute or a maximum of 5 minutes.
The time is not too much, and that’s fine, but what about the system requirements? Can you download the app to your Chromebook, Linux, or any other device? Well, the answer is a big no. However, you can only get the Design Space on Windows and Mac. You can’t get it on other operating systems. Plus, you can download the app on Android/iOS devices without any hassle.
In this blog, I am going to explain the system needs that must be met before downloading the app. Then, you can easily install it on your desktop. Let’s get into it without much delay!
Minimum System Requirements for Using Cricut Software
Do you know why we need to check system requirements? We need to do this because we will need to download Cricut Design Space for desktop. Whether you are installing it on your computer or mobile, you must ensure the basic needs of your devices.
So let’s start with Windows computers first, and then we will move to Mac.
For Windows
I started my crafting journey with a Windows computer. Thankfully, my computer met all the requirements. Whatever, I have switched to a Mac now. The experience of using it on Mac is superb😍. Let’s see what we need to download the Cricut software on Mac.
For Mac
Download Cricut Design Space for Desktop (Windows)
Below, I have explained the steps to download the Cricut app on a Windows computer. Make sure you have checked the system requirements before downloading it.
Download Cricut Design Space for Desktop (Mac)
So, here you go! Below, I have already covered the steps to teach you how to download Cricut Design Space on Mac. Perform the steps to download the Design Space on a Mac.
If you follow the above steps carefully, you will easily be able to download Cricut Design Space for desktop. Good luck!
FAQs
Question 1: How to download Cricut Design Space on Chromebook?
Answer: Unfortunately, you can’t download the Cricut app on your Chromebook. Since Chromebooks are not supported, you can’t use them on this particular operating system, which also doesn’t support Unix/Linux computers. For more info, you can check the system requirements on Cricut’s official website. There, you will find all the information about compatible operating systems that can run the Design Space.
Question 2: How to find the latest version of Cricut Design Space on a computer?
Answer: To find the latest version of the Cricut Design app, follow the points mentioned below:
Question 3: Why can’t I find my installed Cricut Design Space on my desktop?
Answer: In most cases, when you download and install the Cricut software, it will show up in the same location where you downloaded it. But if you still do not find it for any reason, press the Windows button on your keyboard and type Cricut Design Space. After this, you can find the app.
Visit: cricut.com/setup
www.cricut.com setup login
Install cricut design space app
Source: https://desigcricut.wordpress.com/2024/03/19/how-to-download-cricut-design-space-for-desktop-full-guide/
#cricut.com setup download#cricut.com/setup#cricut.com sign in#cricut.com/create#cricut.com design space#cricut.com/register#www.cricut.com/setup login#cricut install setup#install cricut design space#install cricut design space app#install cricut explore air 2#cricut new product setup#cricut new product device#cricut explore air 2#cricut design space#cricut new machine setup#cricut software app#setting up your cricut maker#cricut create connect to computer#cricut#cricut setup for pc#cricut.com setup mac#cricut design space download#cricut.com setup windows#design.cricut.com/setup#cricut design space login#cricut setup maker#install cricut printer
0 notes
Text
What is the Best HP Printer for Cricut in 2023?
Want to learn about the best HP printers you can use with Cricut? Then, you need to read the post carefully to get all the answers to your questions. Printing a design is an initial phase of crafting, and buying the right equipment helps to achieve satisfactory results.
Printers are one of the most common devices that you can find in a DIY workshop. Not every printer is suitable for Cricut, but Inkjet printers are the best among other printers that provide the best result if you print on a suitable Cricut paper.
This post contains information about some of the best HP printers you can use with Cricut. These printers are the best to print and cut the design through the Cricut machine. These new HP printers come with wireless connectivity and cloud printing, making them faster and more convenient. Below are the details about some of the best HP printer for Cricut:
1. HP Officejet Pro 9015

HP Officejet Pro 9015 Inkjet printer is one of the best HP printers for Cricut. This printer is smaller but can print at a speed of 22 pages per minute. In addition, it consists of an automatic 2-sided copy and scan feature and can handle up to 35-page automatic document feeder at once. This printer is easy to set up, with Wi-Fi connectivity, and can join the Instant Ink program quickly and easily. It comes with the HP smart app, which allows users to use it remotely and keep track of ink levels. It is user-friendly and provides an efficient way to manage costs.
2. HP DesignJet T210
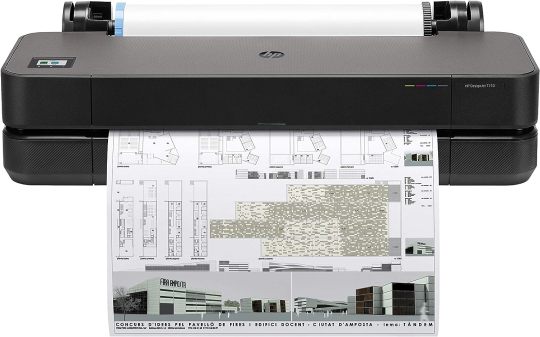
DesignJet T210 is another one of the best HP printers for Cricut that you can use for the printing process. It is a large format printer for anyone looking for precise, accurate line quality and crisp text. It has wireless and wired connectivity features such as Wi-Fi Direct, USB 2.0, and Gigabit Ethernet. This printer works effectively to produce good-quality prints for Cricut and cut designs. You can use this to print multi-size projects automatically. It has a cost-saving feature, such as utilizing 95% less ink for maintenance than comparable plotter printers. The easy setup and networking capabilities make it ideal for any user. It can print up to 24-inch wide media rolls with sharp print quality. Overall, this printer is best for large Cricut projects.
3. HP Envy 5055

It is a wireless all-in-one photo printer, perfect for printing high-quality photos and documents. It has smart connectivity such as Bluetooth and Wi-Fi, improved speed, and faster printing capabilities. The speed is clocked at 10 ppm for monochrome and 7 ppm for the color. You can use it to print and copy stunning photos and documents with clarity and vibrancy. It is easy to set up and lets you use it from any compatible device. HP Envy 5055 is an excellent choice for those who want to print on vinyl.
4. HP Officejet 3830

It is an all-in-one wireless printer that allows for mobile printing. The text quality of the printed text is exceptionally well-shaped and spaced. In addition, the photo printing quality is also very satisfactory. The speed of printing on a monochrome page is 8.5 ppm, and on color paper, it is 6 ppm. This printer can use printable vinyl sheets, cardstock, sticker papers, photo paper, etc. for printing Cricut prints. All in all, this is an excellent way to print for Cricut. You might see a slight color shift while printing gradients. Overall, it is an all-in-one wide format printer that can be used with Cricut.
Conclusion
In conclusion, not every printer is suitable for crafting, but most inkjet printers are. Some suitable HP printers are briefly described, and all are good options for using with Cricut. Yet, HP Officejet Pro 9015 Inkjet Printer is a great choice in HP printers that you can use for crafting. It is fast and has some awesome and suitable features, making it different from other printers. Ultimately, choosing an HP printer for Cricut depends on the crafter's needs. Overall, this post gives information about the best HP printer for Cricut.
Frequently Asked Questions
Is Cricut compatible with HP printers?
Cricut technically works with any inkjet printer! Still, there is a need to check the printer's compatibility with Cricut. The reason for considering a specific printer for Cricut is the paper type or thickness typically that you will use with a Cricut machine, such as cardstock, printable vinyl, sticker paper, waterslide paper, etc.
Can I put vinyl in my HP printer?
Not completely. Even the HP Envy 5055 printer is suitable for printing on vinyl, and printing is not bad for this printer. Yet, a slight color shift can be noticed while printing gradients. You cannot see this color shift with the naked eye. Cyan, magenta, yellow, and black serve as a satisfying color combination for vinyl papers.
Can an HP printer print sticker?
Yes, you can print on stickers made for inkjet printers, which can handle various document types, including labels and stickers. Using your printer, you can create high-quality labels fairly cheaply. Printing labels is much like printing on other paper types, but adjusting the default settings will ensure the best results.
#Best HP Printer for Cricut#cricut new machine setup#cricut#cricut.com/setup windows#cricut.com/setup#cricut setup#cricut explore air 2#crafts#cricutprojects#design.cricut.com#design
0 notes
Text

Trying out my printer/cricut setup with some stickers of my pups!
11 notes
·
View notes
Text
How Do I Set Up My Cricut Maker? [Ultimate Guide]
Buying a new Cricut Maker can be overwhelming for all of us. Initially, setup can be daunting, but once you do it, you will love the overall process. However, you can easily set up any Cricut machine without needing much assistance.
The post is all about how do I set up my Cricut Maker. Through this write-up, we will see the items while unboxing the new Cricut Maker. Further, you will explore the Cricut Maker and its types. Afterward, we will explain the complete process of setting up your Cricut Maker machine.
What Do You Get in the Cricut Maker Box?
Unboxing a new product is always an exciting task. While unboxing the Cricut Maker machine, we got several items that we will be discussing here. However, you always have the option to select the bundles when you buy the machine from Cricut's official website.
Following are the items that you get in the box of the new Cricut Maker:
Apart from these, you will get the following:
The best thing is that we get the blades and tools along with the new Cricut machine. These blades allow us to try various products before buying more blades.
How Do I Set Up My Cricut Maker on a Computer?
When we talk about setting up Cricut Maker machine, it means we want to connect it to our devices like computers or mobile phones. However, there are certain ways to connect these machines to our devices. For example, we can connect our Cricut Maker to our computer or phone via Bluetooth or USB cable. So, it is the users’ choice to choose which way is the most suitable for them.
Below, we explain how to set up Cricut Maker. This method is only applicable for Windows or Mac users only:
How Do I Set Up My Cricut Maker on a Mobile?
Here's how to set up your Cricut Maker on Mobile devices with iOS or Android operating systems:
Cricut Maker is the most advanced and versatile in Cricut's lineup. However, the box contains various items that you can use to make several projects uninterruptedly. In this write-up, we explained the Maker and its features in detail. It helps the users to get an overview of machines so that they can use them without any hassle. After exploring the Maker cutting machine, the blog found out how do I set up my Cricut Maker.
FAQs
Question 1: Can I set up the Cricut Maker easily?
Answer: People think the setup is daunting, but this is not the case. Cricut machines are just like printers. The only difference is that Cricut has blades to cut. However, when you go through the notice period, you will find the setup is too easy and complete in less time. While setting up, you will need to download and install the Design Space app. This app will guide you through the further setup process, making it easy for beginners to set up the machine in one go.
Question 2: How do I connect my mobile phone to my Cricut?
Answer: Here, we are going to show you the method to connect your mobile device to the Cricut machine. Here, we are using iPhone or iOS devices. So, ensure you have an iOS device.
Question 3: Can I use the Cricut without its software?
Answer: No, you must use the Cricut Design Space app to send your design to your Cricut device. The machine is the companion for your Cricut cutting machine. Without this machine, you can't cut anything. However, the Design Space is essential for creating intricate designs and then sending them to the machine. Also, the app is the only way to maintain communication between your computer and Cricut.
Visit: cricut.com/setup
cricut.com/setup
Source: https://cricutmakersetup.wordpress.com/2023/10/21/how-do-i-set-up-my-cricut-maker-ultimate-guide/
#cricut explore air 2#design space setup#cricut maker#cricut.com/setup#cricut.com design space#cricut.com/create#cricut.com sign in#design cricut.com download#digital design
2 notes
·
View notes
Text
Following my office tour from yesterday, and my fanbinding adventure from Thursday, I figured I'd show y'all my extra space and another fanbinding update!

It's just outside of my office area. By my shoe rack because we really are running out of space 😂
On Friday, my partner placed an order for the bulk of my binding needs! Plus: the Cricut Joy! It might be a teensy bit too small for what I wanted it for, but we'll see if I can make do. Even if not, it's still a neat thing to have!
Most of what he ordered came in yesterday, but there are a few more items coming in within the next few days! Nothing worth showing off, but all the supplies are in that blue bin!
So with that: it was time to get my first big project ready! And thus the main source of this update, which is "silly mistakes." And was mostly me screwing around in Scrivener and Adobe with vague ideas because I'm stubborn and like to figure things out on my own. 🙄
What I learned is: I need to figure out a setting for viewing pages in Scrivener. Which I'm fairly sure is doable. And in the meantime do this sorta work in Google Docs.
There were 2 main sources of trouble I believe. The first being: this is a bigger project than the 2 small test prints previous, and so more room to find trouble areas. The second being...I exported the projects differently 🫣 In my defense, the setting I printed my test runs in was "paperback" and I realized yesterday that...that needs to be setup, or else it exports "default." So I went with "default."
Turns out: there are differences between "default" and "paperback" but it was such a relatively small detail compared to others, that it wasn't immediately apparent. As in: I spent all night fixing other problems and got to the end, thinking myself a champion, only to realize: the text here is way too small. Like tiny.
Before this, I'd had to shift a few things between pages (not fun), add blank pages (which screwed up my page numbering), and spent way too much time trying to figure out how to fix the page numbering before I realized: I have to manually update the page numbers, because all I can do in Adobe is fix how the pages are labelled in Adobe. And it was after all that I realized my text size issue.
I'm not sure how or why because Adobe tells me the text is the same font and size as I had it in Scrivener. But the "paperback" export option 100% will print bigger. Someone more familiar with all of this than me is probably laughing but oh well.
Also did I mention I only noticed this after printing all of my signatures?
Yeah.
I was checking that other issues had been fixed. And the way the text printed is as tiny as it looks in Scrivener. And I originally shrank the text in Scrivener because of previous test prints. 😒
Scrivener is great for writing, but not for fanbinding apparently. Or maybe it's fine and I just need to know what the heck I'm doing haha.
Anyway, basically I exported from Scrivener into a PDF like 20 times yesterday adjusting various issues in Scrivener. Then played around in Adobe Acrobat for hours. And even then, I still had to renumber my pages again. Manually. But I finished that this morning! By like 5 AM because I wake up absurdly early.
Which means: I can print today! Maybe I'll even stitch the signatures together, that way I can focus on new skills once all my other supplies come in!
My next step will probably be to learn whether I can use the Cricut for foiling the way I wanted, but I have to wait for my foil transfer kit to come in. Once I know whether I can or not, I'll be able to move onto the rest!
Also, like, why do I have to work this week when I have a new hobby to learn?? 😭
Bonus: the painting I have above my printer!

My mom, sister, and I did some paint class thing together a few years ago. We were all painting a "street lamp in New Orleans." I wanted to give the street a Harry Potter-esque name, but my brain came up with "Blood Dr." and I'm still to this day giggling about it. It also amuses me how gloomy and morbid it is against the brightly colored backdrop.
5 notes
·
View notes
Text
How to Print and Cut on Cricut: Easy-to-Follow Guide
Among various awesome features that Cricut machines offer, Print Then Cut is one of them. It is a worthwhile feature that helps you print and cut projects seamlessly. Almost all the cutting machines of the brand offer this feature. Moreover, crafters with the right knowledge of the process can create a project like a cakewalk. However, some of you can find it difficult to complete the procedure. The good news is that I am going to put together all the vital info and an easy guide on how to print and cut on Cricut. Keep reading the blog till the end to gain in-depth details on each process!
What Are Some Printers Suitable for the Print Then Cut Feature?
There are many laser and inkjet printers that offer great help in making a Print Then Cut project and give flawless results.
Laser
These printers use high heat to fuse toner to the material.
Laser printers work very well on regular papers, some weights of cardstock, and specialty materials specifically manufactured for use with laser printers.
If you are planning to use heat-sensitive material such as iron-on or vinyl on the printer table, you should refrain from using this printer.
InkJet
This is the most suitable type of printer for a plethora of materials, such as printable vinyl, printable iron-on, sticker paper, and many others.
InkJet printers use ink cartridges and small nozzles to spray the fine ink on the chosen material.
Note: It is suggested that you use an InkJet printer to get the best and most accurate results on your Print Then Cut projects. If you are looking forward to Print Then Cut on the Design Space app for iOS devices, make sure the printer is compatible with AirPrint.
What Cricut Machines Offer the Print Then Cut Feature?
Before you learn to print and cut on your machine, it is important to know which devices support the Print Then Cut feature.
Cricut Maker machines
Cricut Explore machines
Cricut Venture
Cricut Joy Xtra
You can choose either of these devices depending on the project design you want to create and the materials you are going to use.
How to Print and Cut on Cricut: 3 Simple Steps
The process of making a DIY project using the Print Then Cut feature includes several steps. Here, I am going to break down all the steps for you to make them simpler and more comprehensible.
Step 1: Preparing a Design for Print Then Cut
A plethora of designs are available solely for Print Then Cut. Below is a quick guide to help you understand how to use a design for this procedure.
In the Design Space app, create a new project.
After that, go to Images.
Next, you need to follow the path Filters > Operation Type > Print Then Cut. (Now, you will see all the designs that are created for Print Then Cut. Also, you will see a little printer on them.)


Then, you will notice that in the Edit bar, our chosen design is already formatted for Print Then Cut.
Once you think the design is completely ready, choose the Make It option and move to the next step, Print Then Cut.
Step 2: Prepare Your Printer for Printing
You need to follow the steps below to prepare your printer and print the design. Follow the steps carefully.
Connect your printer to a power source, keep it near your PC or smartphone, and turn the printer on.
Next, you will need to move to the Design Space app and select your printer name.
After that, you will have to send the design to the printer for printing.
You can select the size of the design before printing on the material.

Once the printing is complete, you can move on to the process of cutting it on your machine.
Step 3: Cut the Design on Your Machine
Before you cut the design on your machine make sure that your setup process is done. After that, follow the steps to cut the design.
Depending on the material you are cutting, load the material to the design you are using with or without the machine. (I am using the Maker 3 model to cut the design.)
After loading the design, press the Go button on the machine to start cutting.
Now, the machine will start the cutting designs.

Wait for the cut to complete, and then unload the design from the machine.
Weed out the extra part, and your Print Then Cut project will be complete.
Final Words
Here, I have tried to share a fundamental guide on how to print and cut on Cricut with all the other essential info. By using all this information, you can easily create a project on any of the Cricut cutting machines without facing any issues. Moreover, make sure to follow all the steps carefully to avoid facing any issues. I hope you will be able to make stunning crafts using Print Then Cut on Cricut in your first attempt. machine. However, it is wise to seek more help if the concepts are still not clear yet.
Frequently Asked Questions
Do I Need to Calibrate My Cricut Machine for Print Then Cut?
All the cutting machines offer the calibrated feature. But, if you are an inaccurate cut, then you need to perform the calibration of your machine. Calibration is a simple process designed for the questions and answers related to machine cuts. This process helps the machine and software provide the pinpoint edge-to-edge cuts flawlessly. You can select the Calibration option in the Design Space app and specify Print Then Cut to complete it by following the on-screen instructions.
How Do You Use Print and Cut on Cricut?
Here is a brief guide with simple steps for printing and cutting on your machine. Follow the guide to get a fundamental understanding of the process.
Start creating a new project on the Design Space app.
After that, choose the Image option.
Next, move to the Filters option and then choose Operation Type.
Now, you have to choose the Print Then Cut option.
Once you are ready, choose the Make It option on the app to print the design.
When the printing is complete, use the machine to cut it.
Finally, finish your DIY project.
Why Is My Cricut Not Cutting Properly on Print and Cut?
In some cases, you can face an accuracy issue while cutting the design in the Print Then Cut project. The primary reason for this problem is that the cutting setting and blade alignments are not perfect for the cut. To get rid of this problem, you can use machine calibration to perfect the device’s cutting alignment. However, make sure to get in touch with the brand customer service team to learn more about fixing the issue.
Source: how to print and cut on cricut
Visit for more info: Cricut.com/setup
Pinterest
You tube
#how to print and cut on cricut#print and cut on cricut#Cricut Explore Software#Cricut Venture#Cricut.com/setup
0 notes
Text
How to Connect Cricut Wirelessly: A Guide for Beginners
Are you a Cricut enthusiast planning to start your crafting journey? Well, you have come to the right place! I am going to walk you through all the essential info you need to learn in order to connect Cricut wirelessly.
Cricut crafting machines come with Bluetooth and USB connectivity to provide the utmost comfort in setting up the device. Crafters familiar with the machine can easily get started with the machine. On the other hand, some new users can find it difficult to complete the setup. In this case, it is best to have a thorough understanding of the process beforehand. So, get through the whole blog and grasp all the vital details and steps to wirelessly set up heat presses and cutting machines.
How to Setup Cricut Cutting Machines Wirelessly?
You can wirelessly connect your cutting machine to both computer and smartphone devices. So, here you will find a quick guide to completing the setup on both devices.
Method 1: Connect Cricut Wirelessly to Your Computer
Begin by unboxing the cutting machine and placing it near your computer device. (Make sure both devices are within the 10-15 feet range.)
(If you are using the Explore One machine, then you should insert the Bluetooth toggle to establish the connection.)
Next, attach the machine plug to a power socket and turn it on by pressing the power button.
From the Settings window on your PC, choose the Devices option.
After that, go to “Bluetooth and other devices,” turn on the Bluetooth toggle, and select “+Add Bluetooth or other device.”
On the next open page, select the Bluetooth option and move forward.
Henceforth, the printer will start looking for the available printers within its range.
Once you see your cutting machine model number on the screen, click on it.
If a prompt comes on the screen to type a PIN, you need to enter 0000 to move forward.
Afterward, the wireless connection process will be complete.
In order to use the cutting machine, you need to complete the setup process through the Design Space app. In the next step, you will learn about the setup process.
Begin by visiting the Cricut official website on your PC.
From the screen, click on the Apps option, which will take you to the Design Space download page.
In the open window, you will see that the Download button is greyed out.
To enable the download button, move to the terms and conditions checkbox and click on it.
After that, you will see that the Download button is now green; click on the button to initiate the download process.
Wait for the design app download process to complete, and then open it after that. (Or you can access the file from the Downloads folder on your device to install it.)
Before the app installation process begins, it will ask if you trust this app and want to open it; click on the correct option to start the installation.
Afterward, a box will show up on the screen to indicate installation progress.
Once the installation process is complete, launch the software/app and complete the login process. (Or create a new account if necessary)
Then, choose the Machine Setup option to search for the cutting machine you are using.
From the result, click on your machine’s name, and the setup process will be complete.
Method 2: Connect Cricut to a Smartphone Wirelessly
The following method will allow you to get complete knowledge of how to connect Cricut wirelessly to a smartphone device.
For the first step, power on your cutting machine and bring the mobile device within its 10-15 feet range.
On the smartphone, tap on the Settings icon and then go to Bluetooth.
Now, turn on the Bluetooth toggle and tap on your machine name based on the result.
Follow the instructions to complete the machine’s Bluetooth connection process.
After completing the Bluetooth connection, the same as the computer device, you need to download the app on your mobile phone. Follow the below guide to do that.
First and foremost, launch the Apple App Store or Google Play Store app on your mobile phone device.
Next, type cricut design space in the search section by tapping on the search bar.
After that, tap on the Search option.
From the list of open results, tap on the correct app icon and then tap on Get to start the downloading. (You might need to type your iTunes password if you are downloading the app on your iOS device.)
Once the downloading is finished, the app icon will appear on your system home screen.
You can open the app from the home screen or from the application downloader you are in.
After opening the app, you are required to complete the account sign-in process. (If you are using the machine for the first time, you need to create a new account.)
On the app, you can tap on the Machine Setup option to search for your cutting machine.
Afterward, follow the on-display instructions, and your machine setup process will be complete.
Here you go! Your machine is ready to create beautiful and stunning DIY projects.
How to Set up Cricut Heat Press Wirelessly?
If you are planning to connect Cricut wirelessly to a heat press machine, then you can do it easily without using any app except EasyPress 3. The following guide will help you complete the process without any issues.
First of all, connect your heat press machine’s plug to a power outlet.
Afterward, go to the Bluetooth page on your phone and establish a wireless connection between both devices.
On your smartphone device, download the Cricut Heat app from the App or Play Store.
Once that process is complete, launch the heat app on your device.
Also, you need to tap on the Sign Up option to initiate the machine setup process.
From the heat press names open on the screen, select your machine’s name, and select Connect.
Now, the app will verify the heat press with your registered email address.
Moreover, select the Activate option after reading the terms and conditions.
Once the machine setup process is complete, a notification will show up on the screen.
Finally, you can use your machine to apply icon-on designs on various products.
Final Words
This piece of content shares all the need-to-know info about the machine setup. You can effortlessly complete the setup process of your device without any issues. However, before downloading the Design Space app, make sure to check the device compatibility and system criteria to avoid any complications. If everything is as required, you are good to go to start using the crafting devices. I wish you a happy crafting journey!
Frequently Asked Questions
Does Cricut Require Bluetooth?
All the newer models of the Cricut machines come with both USB and Bluetooth connectivity technology. However, if you are using the first model of the Explore series, then you need to use the Bluetooth adaptor to establish the wireless connection. All other devices come with built-in Bluetooth to set up the device to a smartphone and computer.
Why Can’t I Connect Cricut Machine Wirelessly?
There could be various reasons if you are unable to make a wireless connection to your machine. Some common ones are given below.
The machine is not compatible with your PC or mobile phone.
The OS of your device has not been updated.
Using the outdated or incompatible Design Space app.
Either of your devices is facing a technical problem.
You are not following the correct connection process.
If you are having these types of problems, then ensure that everything is required or seek help if the problem seems too complex.
Does My Cricut Need to Be Connected to Wi-Fi?
There is no need to connect your machine to Wi-Fi in order to use it. These devices have Bluetooth and USB connectivity options. However, you might need to connect your computer or smartphone to Wi-Fi while downloading the Design Space app to complete the setup.
Source :- https://cricuthelpcenter.wordpress.com/2024/08/29/how-to-connect-cricut-wirelessly-a-guide-for-beginners/
0 notes
Text
“How to Connect Cricut Create to Computer Easy Setup Guide”
To set up your Cricut machine on a Mac, start by visiting cricut.com setup mac and downloading Cricut Design Space for Mac. After downloading, open the installer and follow the prompts to complete the installation. Launch Cricut Design Space, then sign in or create a new account. Connect your Cricut machine to your Mac using a USB cable or Bluetooth, and follow the instructions to pair it. Ensure your machine’s firmware is updated through Cricut Design Space. With these steps, you’ve completed the cricut.com setup mac process and are ready to start crafting.
cricut.com setup mac
www.cricut.com/setup login
install cricut design space app
cricut.com/setup
cricut create connect to computer
setting up your cricut maker
cricut setup on computer
cricut setup download
cricut setup log in
cricut install setup
cricut setup new device
cricut setup website
connecting cricut maker to computer
Cricut Design Space setup
cricut new product setup
cricut maker software
Cricut Design Space setup
cricut setup for pc
cricut design space login
cricut maker new machine setup
how to setup cricut maker
how to setup cricut explore
cricut maker new machine setup
cricut maker machine set up
cricut download laptop install
cricut setup maker
install cricut printer
cricut new product setup
cricut design space for windows
cricut device setup
setup cricut maker machine
#cricut.com/setup#cricut#cricut setup#install cricut design space app#cricut create connect to computer
0 notes
Text
Cricut Explore Air 2 Download Software: Full Tutorial
Hey newbies! If you are here to search for the easy and quick steps to Cricut Explore Air 2 download software, you are in the right place! As a professional crafter for years, I have worked day and night to brush up on my crafting skills. When it comes to choosing the right tools for crafting, my first choice is Cricut. With Cricut machines, I have created thousands of projects so far. But how do I get started with the Cricut machine? What do I need for this? In short, the answer is a Cricut Design Space. This software is a companion to your Cricut machine.
The Cricut software is needed to set up the machine. Without this, you can’t cut any materials. Thus, I will explain to you how to download the software for the Cricut Explore Air 2. In addition, I will teach you about the system requirements needed for using the Cricut machine. Let’s delve into it.
Minimum System Requirements to Download Cricut Software
Hey, let’s explore the system requirements so that we can understand whether our computer is actually able to run the Cricut Design app smoothly or not. Then, we will move to the Cricut Explore Air 2 download software. So, I have mentioned below the system needs for both Windows and Mac computers.
For Windows
For Mac
Now that you have learned about the system requirements needed forthe Cricut Explore Air 2 software download. Let’s explore how to download the Cricut software on Windows and Mac.
Cricut Explore Air 2 Download Software on Your Computer
Now, you have an idea about the system requirements for using the Cricut software. It means you know what operating system you will need and what size of RAM you must have. When you have ensured everything you need, you can start downloading the app to your Windows & Mac as follows:
Windows
Mac
Finally, you have understood the steps for the Cricut Explore Air 2 download software. Download and install the application and start setting up your machine hassle-free.
FAQs
Question 1: Which software do I need to use with Cricut Explore Air 2?
Answer: You will want a Cricut Design Space to use your Cricut Explore Air 2. No matter which Cricut machine you have, the app supports all Cricut machines. It is also compatible with various platforms like Windows, Mac, iOS, and Android. The Design Space app keeps everything, like designs, in one place and saves them for export. However, if you get a paid version of the Cricut app, you will get a plethora of features and resources.
Question 2: Do I need Cricut Design Space for Cricut Explore Air 2 setup?
Answer: You will need a Cricut app to set up and use the Explore Air 2 machine. Design Space is free software that lets you keep all your designs in one place and saves you from having to export them. Using this software, you can set up the Explore machine and Maker, Joy, and Venture.
Question 3: Can I download Cricut software on my smartphone?
Answer: Certainly, yes! Downloading the Cricut app or Cricut Design Space is easy on your smartphone. However, Cricut only supports iOS and Android, so you need to download it via the Play Store or App Store. Although you will only get some of the features on your mobile devices, you can still do many things on it.
Final Words
Overall, I have explained the steps to Cricut Explore Air 2 download software. This guide is for both Mac and Windows users. The process may vary from system to system. Therefore, you will only need to follow those steps for the computer that you are using. The downloading process is almost the same because you do it on a browser, but installation is very different for Windows and Mac computers.
Source: https://desincricut.wordpress.com/2024/04/05/cricut-explore-air-2-download-software-full-tutorial/
#install cricut explore air 2#cricut.com/setup#cricut#cricut com setup#cricut.com setup#cricut setup#cricut.com setup download#cricut.com setup mac#cricut.com setup windows#install cricut printer#install cricut design space app#www.cricut.com setup mac#www.cricut.com setup login#wbn: www#design.cricut.com/setup#cricut design space setup#cricut design space#cricut printer setup#cricut create connect to computer#setting up my cricut maker#connecting cricut maker to computer#cricut setup create account#cricut cutting machine setup#cricut setup on computer#setting up new cricut maker#cricut setup log in#cricut install setup#cricut new product setup#cricut new machine setup#cricut explore 3
0 notes
Text

www.cricut.com setup login
Is home crafting easy? How do I start for the first time? Many beginner crafters have these types of questions. A popular solution that people worldwide use to craft at home is the Cricut machine. Yes, the Cricut machine resembles a printer, but it is equipped with a blade that cuts digital designs like images, text, and shapes with remarkable precision on materials ranging from thin paper to thick wood. Also, you will get free and user-friendly software to prepare your designs and cutting settings to send to Cricut. Cricut Design Space is available at www.cricut.com setup login which you must install.
0 notes
Text
Cricut "Print and Cut" Hack - print bigger
I’ve frequently felt constrained by the registration marks that the Cricut uses.
Understandably, they need to be bold and have a quiet region around them so that the cutter can determine where to line up its cuts.
Cricut also currently only provides 4 preset page sizes to print on, and again seems to assume rather generous print margins.
All these things added up mean that sometimes it’s not possible to place as many pieces on a page as you want. In the example above, I had to use a Tabloid paper size to convince Cricut to let me place the ten objects.
I reckon I should be able to fit even more of them in, and I should be able to do it on an A3 page. But Cricut says this layout is too large, despite the design itself being comfortably smaller than an A3 sheet.
(I’d actually love to fit even more than 11 onto an SRA3 page but making that layout work has so far eluded me, so let’s start with this hack first before trying anything more extreme.)
I discovered this hack by accident. I had taken my sheets to be printed at a print shop and they messed up the scaling. My pages came out about 3% smaller, but my Cricut didn’t complain. It happily executed the cutlines 3% smaller too. Evidently, there’s a generous margin of error for scaling.
So let’s use that to our advantage.
Step 1: Downsize the design in Cricut Design Space
Let’s humour Cricut by scaling the offending design to its recommended size.
(I suggest also keeping a copy of your original design to the side, in case you want to make changes at the original scale. To prevent the app from blocking you from proceeding to the “Make” step, hide the oversized objects.)
Step 2: Print to PDF
Click the “Make” button to proceed to the mat preview.
Do not move the designs on the mat – leaving things in their default position makes for the easiest alignment if you want to exit the Make step and return back to it again. Click “Continue”.
Open the “Print Setup” panel by using the “Send to Printer” button.
In this panel, select “Use System Dialog” to print your file to a PDF
On MacOS, the print dialog always appears behind the Design Space app, so drag the Design Space window out of the way when the “Preparing Print” spinner appears. Now save your file as a PDF instead of printing it.
Step 3: Scale up the PDF
It’s time to do some maths.
We originally had a design that was 39cm on its long edge, but we scaled that down to 37.04.
That means we now want to scale this file up again to be 39cm.
39 / 37.04 = 1.05291576674
This is a little more than 5% larger, which so far I have been able to make work. I don’t know what the upper limits of this technique are.
I’m editing the output file in Affinity Designer. The file that Cricut output has a long edge of 375.mm, so let’s type 375.7mm * 1.05291576674 into the H dimension field to get a new image of size 395.6 * 267.5mm.
While I’m here, I’m also going to set up my print graphics, allowing me to have better control of the bleed than using the normal Print & Cut workflow.
Step 4: Print
Print the file – I don’t have an A3 printer at home so I take my files to a print shop.
Step 5: Cut
Back in Cricut Design Space, choose your material. (You may need to select “I’ve already printed” so that the app lets you do so).
Affix your printed sheet to your cutting mat and load the mat. Press “Go” on your Cricut machine and let it do its cutting magic!
Another tip: If you’ve put graphics too close to the registration corners, you can temporarily place a sheet of white paper over them while the machine does its calibration. I usually just slide the white paper around by hand so I can remove it before the cutting begins. Coincidentally, the layout I’m demonstrating doesn’t use the edges so there’s plenty of “quiet” space to distinguish the registration marks from the artwork.
All done!
Here’s my cut pieces, at the scale that Cricut claimed I couldn’t have.
Actually, the vertical axis is a little bit off but this is good enough for my purposes and the bleed areas did their job. If I wanted to be a bit fussy about things, I would try moving around some of the cut lines, but do not move any cutlines that would change the outer bounds of the print, otherwise you’ll need to update your print file and recalculate its sizing too.
In summary:
Big Cricut wants to stop you from printing big. But follow these steps to break out from their boundaries!
Step 1: Downsize the design in Cricut Design Space
Step 2: Print to PDF
Step 3: Scale up the PDF (optionally, update any graphics)
Step 4: Print
Step 5: Cut
Please let me know if this guide was useful to you! Happy cutting!
"Cricut “Print and Cut” Hack – print bigger" was originally published on Proairesis
0 notes
Text
How to Choose the Best Sticker Printer Machine for Your Needs
Choosing the best sticker printer machine involves evaluating several key factors to match your specific needs. First, consider the type of stickers you plan to print—whether they're for personal use or professional production. Look for a machine that offers high resolution and color accuracy to ensure vibrant, detailed prints. Check the machine’s compatibility with different sticker materials and sizes to ensure versatility. Evaluate the ease of use and setup, especially if you're new to sticker printing. Additionally, consider the cost of consumables and maintenance to gauge the overall value. A good sticker printer machine should balance quality, functionality, and cost-effectiveness, allowing you to produce excellent stickers efficiently.
0 notes
Last Seen Blogs

s50320
ART LOG

dieftpoetsy-blog
𝕯𝖎𝖊𝖋𝖙𝖕𝖔𝖊𝖙𝖘𝖞

inspirationalnaveen
inspirationalnaveen

shenaiweddings
Shenai Weddings

pixiemaia
The Future Is Yours