#install cricut printer
Text
How to Connect Cricut Bluetooth to Computer: Full Guide
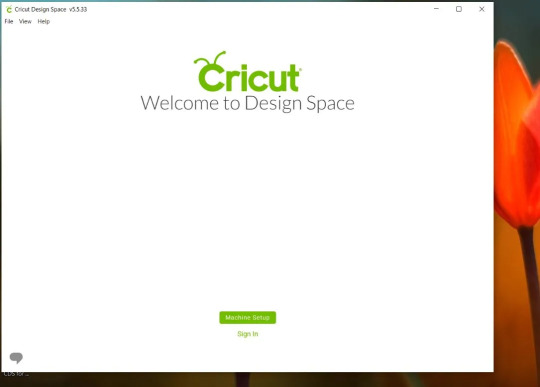
Hey, Cricut folks, I’m going to show you the easiest way to connect Cricut Bluetooth. I know how hard it can be when we get a new Cricut machine. From setup up to performing a test cut, it seems like climbing a mountain. But wait, this is not as difficult as you think!
I recently finished setting up a friend’s machine, in which I briefly taught him how to connect Cricut to computer. Honestly speaking, I didn’t even touch a thing; I was just instructing him to do this and that. Following my instructions, he completed his setup in a matter of minutes. Do you also want me to instruct you on how to set up your Cricut machine? If so, join me on a board to connect your Cricut to your computer using Bluetooth. Let’s start!
Step 1: Unpacking the Cricut Product
In the first step, you must open your new Cricut machine. Be careful while unboxing the box because many accessories are included. You have to ensure that nothing breaks while taking things out. As you can see below, I have unboxed my Cricut Maker 3 machine, and the items inside the box are as follows:
Similarly, when you unbox other Cricut models, such as Cricut Explore or Joy, you will get a few similar items. Now that we have done the unboxing let's proceed with the second step, which is to connect Cricut Bluetooth.
Step 2: Place Your Cricut Machine
Now, you have to find a place where you can locate your machine properly. Ensure the surface is completely flat so that it will be easier to work for you in the future. If you have a table, you can keep it. Otherwise, the floor is also a good idea if you have none.
Now you have chosen the right place, let’s move on to plug the machine. To do this, you have to find a nearby power socket and connect your machine to it.
Once connected, you have to turn on the machine by pressing its power button.
Step 3: Connect Cricut Bluetooth to Your Device
Finally, we are heading to learn how to connect Cricut to a computer via Bluetooth. But here, one question that might arise in your mind is what computer will we connect to? Is this a Mac or Windows or others?
Don’t worry! I have got your back for both the computers. I will show you how to individually connect your Cricut machine via Bluetooth on a Mac or Windows computer. Let’s start with Windows first:
For Windows
For Mac
FAQs
Question 1: Can I connect my Cricut to my laptop?
Answer: As mentioned on its official site, Cricut works with iOS, Windows, Mac, and Android. However, it is not compatible with Chromebook or Unix/Linux. Hence, if you use the operating system mentioned above, you can use any brand’s laptop, such as HP, Acer, Dell, Asus, Lenovo, MSI, and Apple.
Question 2: Is the Internet compulsory for using Cricut Design Space?
Answer: No, it is not necessary to connect the Cricut software to the internet all the time. The internet is only needed when you want to access a certain feature in the app. Otherwise, there is no need to connect it to the internet. The offline option is available for the Cricut app on all devices except Android devices.
Question 3: Can I connect my Cricut machine without Bluetooth?
Answer: Absolutely, yes! You can also connect your Cricut machine and computer via a USB cable. To do this, insert one cable end into the machine’s USB port and the other end into the computer’s USB port. Once connected, you are ready to use the machine for cutting, scoring, and other operations.
Final Words
In conclusion, I discussed how you can connect Cricut Bluetooth to Mac and Windows computers. I explained everything stepwise so that every beginner Cricut user can connect their Cricut wirelessly and hassle-free. The connection is important if you want to set up your Cricut. Hence, connect it and set it up to get started with your Cricut cutting machine. Start setting up your Cricut machine in one go with this simple guide.
Source: https://desincricut.wordpress.com/2024/04/23/how-to-connect-cricut-bluetooth-to-computer-full-guide/
#cricut setup#install cricut design space app#install cricut printer#install cricut explore air 2#www.cricut.com setup login#cricut.com/setup#cricut.com setup download#cricut.com setup#cricut.com setup windows#cricut.com setup mac#cricut.com/create#cricut.com sign in#cricut.com/register#cricut.com design space#cricut#cricut com setup#cricut new#cricut new product device#cricut new machine setup#cricut new product setup#cricut create#cricut create connect to computer
0 notes
Text
How to Download Cricut Design Space for Desktop: Full Guide
Hey, are you looking for Cricut Design Space for desktop? Don’t worry — you can easily get it on your Windows or Mac. But the question is, how much time will it take to download the app? Well, depending on your internet speed, it will take less than a minute or a maximum of 5 minutes.
The time is not too much, and that’s fine, but what about the system requirements? Can you download the app to your Chromebook, Linux, or any other device? Well, the answer is a big no. However, you can only get the Design Space on Windows and Mac. You can’t get it on other operating systems. Plus, you can download the app on Android/iOS devices without any hassle.
In this blog, I am going to explain the system needs that must be met before downloading the app. Then, you can easily install it on your desktop. Let’s get into it without much delay!
Minimum System Requirements for Using Cricut Software
Do you know why we need to check system requirements? We need to do this because we will need to download Cricut Design Space for desktop. Whether you are installing it on your computer or mobile, you must ensure the basic needs of your devices.
So let’s start with Windows computers first, and then we will move to Mac.
For Windows
I started my crafting journey with a Windows computer. Thankfully, my computer met all the requirements. Whatever, I have switched to a Mac now. The experience of using it on Mac is superb😍. Let’s see what we need to download the Cricut software on Mac.
For Mac
Download Cricut Design Space for Desktop (Windows)
Below, I have explained the steps to download the Cricut app on a Windows computer. Make sure you have checked the system requirements before downloading it.
Download Cricut Design Space for Desktop (Mac)
So, here you go! Below, I have already covered the steps to teach you how to download Cricut Design Space on Mac. Perform the steps to download the Design Space on a Mac.
If you follow the above steps carefully, you will easily be able to download Cricut Design Space for desktop. Good luck!
FAQs
Question 1: How to download Cricut Design Space on Chromebook?
Answer: Unfortunately, you can’t download the Cricut app on your Chromebook. Since Chromebooks are not supported, you can’t use them on this particular operating system, which also doesn’t support Unix/Linux computers. For more info, you can check the system requirements on Cricut’s official website. There, you will find all the information about compatible operating systems that can run the Design Space.
Question 2: How to find the latest version of Cricut Design Space on a computer?
Answer: To find the latest version of the Cricut Design app, follow the points mentioned below:
Question 3: Why can’t I find my installed Cricut Design Space on my desktop?
Answer: In most cases, when you download and install the Cricut software, it will show up in the same location where you downloaded it. But if you still do not find it for any reason, press the Windows button on your keyboard and type Cricut Design Space. After this, you can find the app.
Visit: cricut.com/setup
www.cricut.com setup login
Install cricut design space app
Source: https://desigcricut.wordpress.com/2024/03/19/how-to-download-cricut-design-space-for-desktop-full-guide/
#cricut.com setup download#cricut.com/setup#cricut.com sign in#cricut.com/create#cricut.com design space#cricut.com/register#www.cricut.com/setup login#cricut install setup#install cricut design space#install cricut design space app#install cricut explore air 2#cricut new product setup#cricut new product device#cricut explore air 2#cricut design space#cricut new machine setup#cricut software app#setting up your cricut maker#cricut create connect to computer#cricut#cricut setup for pc#cricut.com setup mac#cricut design space download#cricut.com setup windows#design.cricut.com/setup#cricut design space login#cricut setup maker#install cricut printer
0 notes
Text
Why Won’t My Cricut Design Space Open (Easy Steps)
Why won’t my Cricut Design Space open? This is a question that I frequently receive from many readers. Finally, I got a chance to write something about it. Recently, I experienced the same issue, and it was not opening on my PC at all. At that time, I had to use the Cricut software on my mobile device; thanks to Cricut, it is compatible with smartphones, too.
Now, you might wonder why this happens and what the reasons behind it are. So, I tried to research it, and after extensive research, I figured out that it happens because of third-party virus interference, incorrect network settings, and corrupt cache files. For these reasons, our Cricut app doesn’t open the way we want it to.
But chillax! It’s not a big deal and can be fixed easily with some methods I’ll explain in this blog. Without any further ado, let’s jump into the solutions!
Solution 1: Check System Compatibility
Did you know that system compatibility plays one of the biggest roles in the smooth functioning of any software? Therefore, we check our system requirements to see whether our computer or any devices we want to use the software meet all its needs. To fix the “why won’t my Cricut Design Space opening“ issue, I will walk you through the following system requirements for PC and Mac:
For example, if you are a Windows user, verify the following points:
Now, if you are a Mac user, you have to check the following points:
Once you have ensured the above points, you will be able to fix the “why won’t my Cricut Design Space not Working“ issue quickly. If the above solution doesn’t work for you, you can try the next one.
Solution 2: Check the Internet Connection
Sometimes, the Cricut software will not open properly just because of your unstable internet connectivity. This software requires a constant internet connection to work properly. An unstable connection can cause many issues, hindering you from creating and opening your projects. Although you can create projects offline, sometimes it is better to cross-check.
For both Windows and Mac users, the internet requirements are as follows:
Solution 3: Force Cricut Design Space Reloading
Sometimes, I have seen that a slow speed can cause the “why won’t my Cricut Design Space open” issue on your desktop. However, the software can be sluggish due to several reasons. Therefore, you need to do the force reload.
Here’s how to perform a force reload of the Cricut Design app:
Once you have performed the above steps, you need to make sure whether the errors are resolved or not. If the issues still persist, go and check for the next solution.
Solution 4: Relaunch Cricut Design Space on Mac/PC
Here, we will try one last solution, which is the easiest one. All you need to do is relaunch the Cricut software on a compatible computer, such as a Mac or Windows PC.
For Windows
For Mac
By following the above steps, I assure you that you can fix the “why won’t my Cricut Design Space open” in no time. There are four solutions mentioned above; you can try any of them. One of them must work for you.
Final Words
Finally, I have given all the solutions on Cricut Design Space that won’t open issues. These solutions are really effective and will work for sure, as I have tried them myself. Besides, the Cricut software hardly shows any errors, so if you try to solve the issues by following the above methods, they will be resolved as soon as possible.
FAQs
Question 1: Why Cricut Design Space won’t open?
Answer: Sometimes, Cricut Design Space fails to open due to several reasons. It can also happen due to an unstable internet connection or the presence of viruses. There are other additional causes, which I have mentioned below:
Question 2: What do I need to know before downloading Cricut app?
Answer: Before you download and install the Cricut Design Space app on a desktop or phone, make sure your device meets all the system requirements. The RAM size is the same for Windows, Mac, Android, and iOS, including the 2 GB free disk. However, in terms of operating system, ensure that you are using the latest one.
Question 3: Why is my Cricut stuck on loading?
Answer: If you find your Cricut machine stuck while loading, you should try the following steps:
Visit: install cricut design space app
www.cricut.com setup login
Source: https://connectcricut.com/why-wont-my-cricut-design-space-open-easy-steps/
#install cricut explore air 2#install cricut design space app#cricut.com/setup#www.cricut.com setup login#www.cricut.com#www.cricut.com/setup login#cricut.com setup mac#cricut setup#cricut setup create account#cricut setup for pc#cricut setup explore air 2 setup#cricut setup maker#cricut setup log in#cricut design space#cricut setup on computer#cricut new machine setup#cricut explore air 2#cricutprojects#cricut venture#cricut#setting up my cricut maker#connecting cricut maker to computer#setting up new cricut maker#cricut printer setup
0 notes
Text
How to Connect Cricut to iPad: Two Methods Explained!
As you know, Cricut machines are amazing. You can use them to create thousands of creative stuff like tote bags, keychains, cards, stickers, decals, etc. If I tell you about my crafting journey, it's too long. I started when I was a teenager just for a hobby, but I didn't realize when it would become my business. Well, if I share my story, this blog isn't enough. So, let's discuss the matter we are here for. I know you want a little clarity on how to connect Cricut to iPad. Don't worry; I'll share everything with you to make your work easier.
My blog is dedicated to iPad users who are struggling with their Cricut machines and want to learn how to connect them to an iPad. Let me walk you through this guide and teach you the process.
Introduction to Cricut Design Space
Before we move forward to learn how to connect Cricut to iPad, let's learn about its special software and its excellent features. This application or software is designed for Cricut users to create creative designs. Also, you get multiple features in this software, including different fonts, texts, templates, and designs; you'll be able to design anything you want. To get this software or application, you need to install it from Cricut's official website.
How to Download Cricut Design Space on iPad?
If you want to download and install the Cricut Design app on your iPad device, follow the steps below.
That's it for the Cricut Design Space download on an iPad. Now, let's check its connection process.
How to Connect Cricut to iPad via Bluetooth and USB?
Here comes the final step, which is to connect your Cricut to an iPad. To do this, you'll need to use the Bluetooth pairing option. Go through the steps below to learn the connection process.
Method 1: Using a USB Cable
If you want to connect your Cricut to a wired connection like USB, you need to follow the steps below. A wired connection is helpful in many ways and can be set up hassle-free.
That's how to connect Cricut to iPad with USB. After this, you can utilize your Cricut to create anything.
Method 2: With Bluetooth
Check the steps below to learn Cricut setup on iPad via Bluetooth. This wireless connection is amazing and will work best for you.
That's how to connect Cricut to iPad via Bluetooth. If you want, you can go for a wired connection such as USB.
FAQs
Why Does My iPad Need to Download the Cricut App?
There are certain minimum system requirements you need to check before you download the Cricut app on your iPad. For instance, your iPad version should be 11 or the latest. Also, your internet connection should be strong and within 2-3 Mbps to download and upload. If everything meets, you can connect Cricut to iPad.
How Do I Connect Cricut to My Computer?
To connect your Cricut machine to a computer, follow these steps:
What to Do When My Cricut Is Not Connecting to My iPad?
When your Cricut is not connecting to your iPad it can happen when your Cricut or iPad device is not connected to the power supply. If you're using a USB cable, your cable may be loose, and if you're using a Bluetooth connection, maybe your device's Bluetooth option is not ON.
Visit: www.cricut.com/setup login
install cricut design space app
Source: https://setupcricutoncomputer.wordpress.com/2024/04/06/how-to-connect-cricut-to-ipad-two-methods-explained/
#www.cricut.com/setup login#www.cricut.com/setup#install cricut design space app#install cricut explore air 2#cricut design space#cricut maker bundle#cricut new machine setup#cricut.com/setup#cricut explore 3#cricut.com/setup login#cricut create connect to computer#cricut new product setup#cricut new product device#cricut install setup#connecting cricut maker to computer#cricut setup create account#cricut cutting machine setup#cricut setup on computer#setting up new cricut maker#cricut setup log in#cricut account setup#cricut printer setup#www.cricut.com setup login
0 notes
Text
How Do I Set Up My Cricut Maker? [Ultimate Guide]
Buying a new Cricut Maker can be overwhelming for all of us. Initially, setup can be daunting, but once you do it, you will love the overall process. However, you can easily set up any Cricut machine without needing much assistance.
The post is all about how do I set up my Cricut Maker. Through this write-up, we will see the items while unboxing the new Cricut Maker. Further, you will explore the Cricut Maker and its types. Afterward, we will explain the complete process of setting up your Cricut Maker machine.
What Do You Get in the Cricut Maker Box?
Unboxing a new product is always an exciting task. While unboxing the Cricut Maker machine, we got several items that we will be discussing here. However, you always have the option to select the bundles when you buy the machine from Cricut's official website.
Following are the items that you get in the box of the new Cricut Maker:
Apart from these, you will get the following:
The best thing is that we get the blades and tools along with the new Cricut machine. These blades allow us to try various products before buying more blades.
How Do I Set Up My Cricut Maker on a Computer?
When we talk about setting up Cricut Maker machine, it means we want to connect it to our devices like computers or mobile phones. However, there are certain ways to connect these machines to our devices. For example, we can connect our Cricut Maker to our computer or phone via Bluetooth or USB cable. So, it is the users’ choice to choose which way is the most suitable for them.
Below, we explain how to set up Cricut Maker. This method is only applicable for Windows or Mac users only:
How Do I Set Up My Cricut Maker on a Mobile?
Here's how to set up your Cricut Maker on Mobile devices with iOS or Android operating systems:
Cricut Maker is the most advanced and versatile in Cricut's lineup. However, the box contains various items that you can use to make several projects uninterruptedly. In this write-up, we explained the Maker and its features in detail. It helps the users to get an overview of machines so that they can use them without any hassle. After exploring the Maker cutting machine, the blog found out how do I set up my Cricut Maker.
FAQs
Question 1: Can I set up the Cricut Maker easily?
Answer: People think the setup is daunting, but this is not the case. Cricut machines are just like printers. The only difference is that Cricut has blades to cut. However, when you go through the notice period, you will find the setup is too easy and complete in less time. While setting up, you will need to download and install the Design Space app. This app will guide you through the further setup process, making it easy for beginners to set up the machine in one go.
Question 2: How do I connect my mobile phone to my Cricut?
Answer: Here, we are going to show you the method to connect your mobile device to the Cricut machine. Here, we are using iPhone or iOS devices. So, ensure you have an iOS device.
Question 3: Can I use the Cricut without its software?
Answer: No, you must use the Cricut Design Space app to send your design to your Cricut device. The machine is the companion for your Cricut cutting machine. Without this machine, you can't cut anything. However, the Design Space is essential for creating intricate designs and then sending them to the machine. Also, the app is the only way to maintain communication between your computer and Cricut.
Visit: cricut.com/setup
cricut.com/setup
Source: https://cricutmakersetup.wordpress.com/2023/10/21/how-do-i-set-up-my-cricut-maker-ultimate-guide/
#cricut explore air 2#design space setup#cricut maker#cricut.com/setup#cricut.com design space#cricut.com/create#cricut.com sign in#design cricut.com download#digital design
2 notes
·
View notes
Text
Cricut Joy Xtra: A Versatile and Easy-to-Use Crafting Machine
Are you looking for a crafting machine that is space-friendly? Do you find other tools taking too much of your room space? It’s frustrating! Isn’t it? With Cricut Joy Xtra, you don’t have to worry at all about spaces.
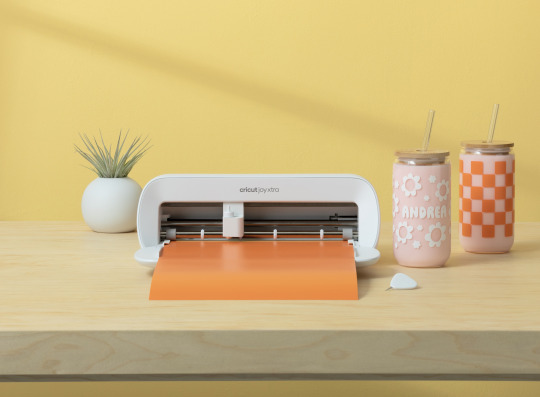
Not only is this wonderful machine small, but it is also highly feasible for small to medium-sized projects. Most importantly, you can create as many crafts as you want. There is no limit to the possibilities. There is something for everyone, be it custom cards, iron-on designs, or stickers. So, let’s start with this machine and see what it entails!
What Can Cricut Joy Xtra Do?
This is an amazing tool for cutting, writing, drawing, and foiling to make popular projects like stickers, custom cards, T-shirts, decals, and more. It is compatible with over 50+ materials, including paper, vinyl, iron-on, and cardstock. One useful plus point for using this machine is that it can sync with your home inkjet printer as well. You can also print and cut designs. With its fine-point blade, it can create intricate designs with almost perfection and precision. In addition, it can write, draw, and foil too.

This tool is also compatible with varying material sizes, like US letter and A4 free. To use the machine, you have to use the Design Space app, which can be connected to it via Bluetooth. You can upload and cut your own designs or choose from the Design Space library.
What Are the Main Features of Cricut Joy Xtra?
The most important aspect of using this machine is that it is beginner-friendly. With the help of the Design Space software, even someone new to Cricut machines can easily create amazing DIY projects. One does not need to be a pro to use this machine.
The app comes with around 3,000 pre-installed “Make It Now” projects. These are in-built projects that are complementary to the software. You will have to connect the machine to your device to use them. First, you need to connect your machine and choose a project. Next, you have to click on “Make It,” and you are good to go. These projects are suitable for various materials and for every skill level, be it a beginner or professional crafter. With the Design Space app and its library of hundreds of fonts, images, and lines, customization isn’t a problem for any art and craft person.
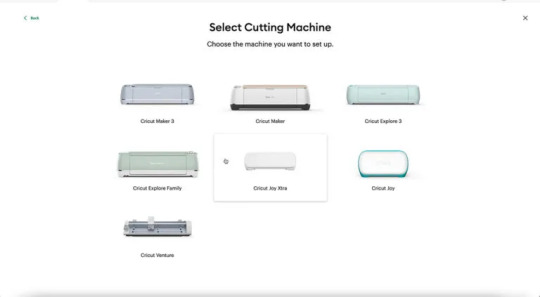
How to Setup Cricut Joy Xtra?
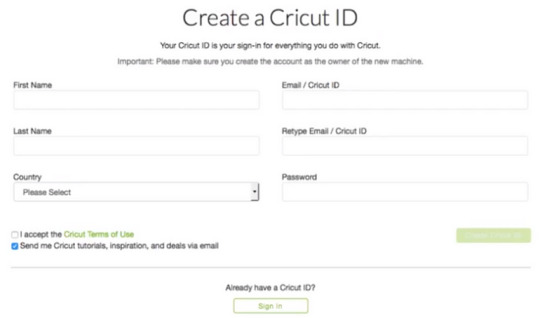
The first step is to download the free Design Space app on your laptop, desktop, tablet, or mobile device. If you don’t already have one, create your Cricut ID.
If you already have one, log into your account, select Machine Setup, and tap on your machine model from the list to begin the setup process.
When prompted, connect your device and machine via Bluetooth. The name of the machine can be found on the bottom of your machine.

Your machine will then begin updating before you can use the Cricut Joy Xtra. Ensure that you have at least 30 cm of space behind your machine, as your designs will roll through the back and might get damaged if hindered. So, have an ideal space of at least 30 cm in front and behind the machine.
In the included welcome pack, you will get some practice materials. To use them, follow the steps on your device to carry out your test cut and insert the vinyl into the machine under the two white tabs. Once setup and activation are done, you can perform the on-screen steps to begin cutting. Once the cut is complete, an unload button will appear on your Design Space screen. Tap this button, and the smart vinyl will unload from the machine.
It can also be used to draw and foil. Simply insert the pen or swap over the blade when prompted to do so in the app. It can cut materials up to 21.6 cm wide and 1.2 m long. When using smart materials, the print and cut function can also be used to create stickers for notebooks, jars, tumblers, and more.
Summing Up
With all these major features, crafting is much easier with the Cricut Joy Xtra. It is a perfect tool for beginners who want to venture into DIY projects for mugs, shirts, cards, stickers, etc. It is perfect for every space with cutting compatibility of over 50 different materials, compact design, and lightweight. We hope that reading this blog will help readers to make informed decisions on their buying journey. Enjoy extra with Cricut!
FAQs
What can I do with a Cricut Joy Xtra?
With this machine, one can do many DIY projects. These include stickers, T-shirts, decals, labels, cards, mugs, and even hats! One only needs a compatible device and a high-speed internet connection to get started on this crafting machine.
What are the dimensions of Cricut Joy Xtra?
The machine’s dimensions are (Width x Length x Height) 12.48 in x 4.46 in x 5.87 in (31.71 cm x 11.32 cm x 14.91 cm), and it weighs 6.03 lbs (2.73 kg). Its sleek design makes it the lightest among its competitors, making it comfortable and portable.
Does Cricut Joy Xtra require a PIN code to connect with Bluetooth?
No, you can follow the basic instructions to pair your machine with your Windows/Mac computer or iOS/Android mobile device, and you’re good to go.
Visit here to Know More: Cricut Explore Software
Twitter
Pinterest
0 notes
Text
How to Connect Cricut Wirelessly: A Guide for Beginners
Are you a Cricut enthusiast planning to start your crafting journey? Well, you have come to the right place! I am going to walk you through all the essential info you need to learn in order to connect Cricut wirelessly.
Cricut crafting machines come with Bluetooth and USB connectivity to provide the utmost comfort in setting up the device. Crafters familiar with the machine can easily get started with the machine. On the other hand, some new users can find it difficult to complete the setup. In this case, it is best to have a thorough understanding of the process beforehand. So, get through the whole blog and grasp all the vital details and steps to wirelessly set up heat presses and cutting machines.
How to Setup Cricut Cutting Machines Wirelessly?
You can wirelessly connect your cutting machine to both computer and smartphone devices. So, here you will find a quick guide to completing the setup on both devices.
Method 1: Connect Cricut Wirelessly to Your Computer
Begin by unboxing the cutting machine and placing it near your computer device. (Make sure both devices are within the 10-15 feet range.)
(If you are using the Explore One machine, then you should insert the Bluetooth toggle to establish the connection.)
Next, attach the machine plug to a power socket and turn it on by pressing the power button.
From the Settings window on your PC, choose the Devices option.
After that, go to “Bluetooth and other devices,” turn on the Bluetooth toggle, and select “+Add Bluetooth or other device.”
On the next open page, select the Bluetooth option and move forward.
Henceforth, the printer will start looking for the available printers within its range.
Once you see your cutting machine model number on the screen, click on it.
If a prompt comes on the screen to type a PIN, you need to enter 0000 to move forward.
Afterward, the wireless connection process will be complete.
In order to use the cutting machine, you need to complete the setup process through the Design Space app. In the next step, you will learn about the setup process.
Begin by visiting the Cricut official website on your PC.
From the screen, click on the Apps option, which will take you to the Design Space download page.
In the open window, you will see that the Download button is greyed out.
To enable the download button, move to the terms and conditions checkbox and click on it.
After that, you will see that the Download button is now green; click on the button to initiate the download process.
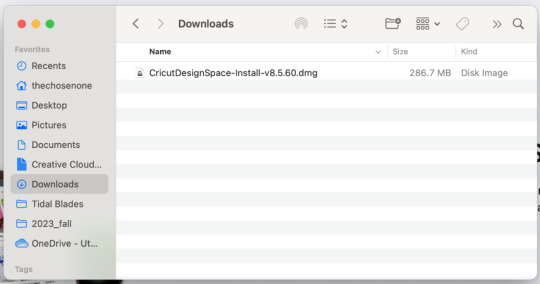
Wait for the design app download process to complete, and then open it after that. (Or you can access the file from the Downloads folder on your device to install it.)
Before the app installation process begins, it will ask if you trust this app and want to open it; click on the correct option to start the installation.
Afterward, a box will show up on the screen to indicate installation progress.
Once the installation process is complete, launch the software/app and complete the login process. (Or create a new account if necessary)
Then, choose the Machine Setup option to search for the cutting machine you are using.
From the result, click on your machine’s name, and the setup process will be complete.
Method 2: Connect Cricut to a Smartphone Wirelessly
The following method will allow you to get complete knowledge of how to connect Cricut wirelessly to a smartphone device.
For the first step, power on your cutting machine and bring the mobile device within its 10-15 feet range.
On the smartphone, tap on the Settings icon and then go to Bluetooth.
Now, turn on the Bluetooth toggle and tap on your machine name based on the result.
Follow the instructions to complete the machine’s Bluetooth connection process.
After completing the Bluetooth connection, the same as the computer device, you need to download the app on your mobile phone. Follow the below guide to do that.
First and foremost, launch the Apple App Store or Google Play Store app on your mobile phone device.
Next, type cricut design space in the search section by tapping on the search bar.
After that, tap on the Search option.
From the list of open results, tap on the correct app icon and then tap on Get to start the downloading. (You might need to type your iTunes password if you are downloading the app on your iOS device.)
Once the downloading is finished, the app icon will appear on your system home screen.
You can open the app from the home screen or from the application downloader you are in.
After opening the app, you are required to complete the account sign-in process. (If you are using the machine for the first time, you need to create a new account.)
On the app, you can tap on the Machine Setup option to search for your cutting machine.
Afterward, follow the on-display instructions, and your machine setup process will be complete.
Here you go! Your machine is ready to create beautiful and stunning DIY projects.
How to Set up Cricut Heat Press Wirelessly?
If you are planning to connect Cricut wirelessly to a heat press machine, then you can do it easily without using any app except EasyPress 3. The following guide will help you complete the process without any issues.
First of all, connect your heat press machine’s plug to a power outlet.
Afterward, go to the Bluetooth page on your phone and establish a wireless connection between both devices.
On your smartphone device, download the Cricut Heat app from the App or Play Store.
Once that process is complete, launch the heat app on your device.
Also, you need to tap on the Sign Up option to initiate the machine setup process.
From the heat press names open on the screen, select your machine’s name, and select Connect.
Now, the app will verify the heat press with your registered email address.
Moreover, select the Activate option after reading the terms and conditions.
Once the machine setup process is complete, a notification will show up on the screen.
Finally, you can use your machine to apply icon-on designs on various products.
Final Words
This piece of content shares all the need-to-know info about the machine setup. You can effortlessly complete the setup process of your device without any issues. However, before downloading the Design Space app, make sure to check the device compatibility and system criteria to avoid any complications. If everything is as required, you are good to go to start using the crafting devices. I wish you a happy crafting journey!
Frequently Asked Questions
Does Cricut Require Bluetooth?
All the newer models of the Cricut machines come with both USB and Bluetooth connectivity technology. However, if you are using the first model of the Explore series, then you need to use the Bluetooth adaptor to establish the wireless connection. All other devices come with built-in Bluetooth to set up the device to a smartphone and computer.
Why Can’t I Connect Cricut Machine Wirelessly?
There could be various reasons if you are unable to make a wireless connection to your machine. Some common ones are given below.
The machine is not compatible with your PC or mobile phone.
The OS of your device has not been updated.
Using the outdated or incompatible Design Space app.
Either of your devices is facing a technical problem.
You are not following the correct connection process.
If you are having these types of problems, then ensure that everything is required or seek help if the problem seems too complex.
Does My Cricut Need to Be Connected to Wi-Fi?
There is no need to connect your machine to Wi-Fi in order to use it. These devices have Bluetooth and USB connectivity options. However, you might need to connect your computer or smartphone to Wi-Fi while downloading the Design Space app to complete the setup.
Source :- https://cricuthelpcenter.wordpress.com/2024/08/29/how-to-connect-cricut-wirelessly-a-guide-for-beginners/
0 notes
Text

www.cricut.com setup login
Is home crafting easy? How do I start for the first time? Many beginner crafters have these types of questions. A popular solution that people worldwide use to craft at home is the Cricut machine. Yes, the Cricut machine resembles a printer, but it is equipped with a blade that cuts digital designs like images, text, and shapes with remarkable precision on materials ranging from thin paper to thick wood. Also, you will get free and user-friendly software to prepare your designs and cutting settings to send to Cricut. Cricut Design Space is available at www.cricut.com setup login which you must install.
0 notes
Text
How to Connect Printer to Cricut Design Space: Full Guide
Welcome to my blog! Are you interested in Cricut machines? So am I. Well, I am a Cricut enthusiast and a seasoned crafter. To date, I have helped many aspiring crafters like you. If you want to learn how to connect printer to Cricut Design Space, I’m here to help you with everything.
I recently started blogging as a homemaker, and this work makes me happy. I get hundreds of messages a day on social media about many queries. And nothing can answer better than a blog, right?
In this guide, you’ll learn the basic connection steps for connecting a printer to your Cricut app. This method is a must-do for using Cricut’s Print Then Cut feature. So, let’s begin our artistic journey with Cricut.
Which Printers Should You Use With Cricut Design Space?

While selecting printers, you should know which are compatible with the Cricut software. As there are many printers on the market, choosing one can be tricky. But I can make your work less complicated by suggesting printers that work well with the Design Space app.
Samsung Laser printers
Canon PIXMA printers
Brother printers (All-in-one)
HP DeskJet printers
These printers are the best selection for the Cricut application. Use them for your printing tasks.
How to Connect Printer to Cricut Design Space?
Here, you will get some straightforward steps to understand the connection between the printer and the Design Space app.
Step 1: Install Your Printer
Before directly jumping into the connection steps, you need to set up your printer and check if it works seamlessly or not. This step is to avoid any interruptions further. Here are some common steps you must follow to learn how to connect printer to Cricut Design Space.
Unbox your printer and install it in a safe place near a power outlet. Also, connect it to a power cord and turn it on.
After installation, you must get the ink cartridges according to your printer type. For more details, you can find a reference in your printer’s manual.
Now, you must insert the papers into the loading tray. Also, ensure that you align them correctly.
In the next step, you should connect your printer to a wireless connection. Set up a Wi-Fi connection on your printer.
The main part is to get printer drivers to understand the computer commands.
After performing all these steps, your printer will be well-prepared for upcoming tasks, and you’ll get everything clear and precise. Let’s delve into the next steps for learning how to connect printer to Cricut Design Space.
Step 2: Download the Cricut Application

On smartphones, you can download and install the software. Then, you need to log in to your Cricut ID by entering your correct details. However, you can also create a new account if you’re a beginner.
Step 3: Connect Printer to Cricut Design Space
It’s time to connect your printer to the Cricut app, which is our first priority. But you can’t do it before taking all the above steps. Check out the steps here for connection.
Launch the Cricut Design app on your computer or mobile device. Also, check if you’re logged in to the account. If not, log in to the account.
Now, it’s time to create a new project or use an existing project to send it to the printer.
To do this, either create your imagination on the canvas or select a design you want to use on your printing project.
When the design is ready, configure the print settings — print size, personal preferences, quality, and alignment.
Once you finish the settings, select your printer under the available list of devices.
Also, check if your printer is ON and on the same Wi-Fi network as your device.
And finally, you can hit the print option to initiate the print job on your printer.
Ultimately, you’ll get a creative reflection of your selected design.
Conclusion
Finally, you know how to connect printer to Cricut Design Space. You can perform all the steps with ease. Also, ensure that you completely install the printer and the Cricut software on your computer. Select a compatible printer that works well with your Cricut machine. In the end, you’ll connect your printer to Design Space and get a print job.
FAQs
Can I Use Any Printer With Cricut?
No, you can’t use any printer with your Cricut machine. All you need to do is choose a specific printer that is compatible with the Cricut Design app. You need a versatile printer that can print on thick materials, including paper, cardstock, printable vinyl, etc. Hence, it’s important to choose your printer carefully.
Can I Print on Fabric With Cricut?
Yes, you can print customized fabric and many other DIY projects related to fabric with your Cricut machine. You can use fabric prints to create perfect banners, embellishments, and pillows. And with Cricut’s Print Then Cut feature, you can create projects better.
How to Connect Cricut Design Space to Device?
Connecting Cricut software to a computer device is easy with a USB cord and Bluetooth. Once you’ve connected your devices with USB and Bluetooth, you can visit design.cricut.com on your internet browser. Then, install the Cricut app on your computer. After that, you can continue with the on-screen directions.
Source: connect printer to cricut design space
Visit here to know more: Cricut.com/setup3
Twitter
0 notes
Text
Cricut Setup Maker 3: A Comprehensive Tutorial
Are you here for the Cricut setup Maker 3? Setting up your first Cricut machine can be a daunting task. But with the right guidance, you can make it happen hassle-free. Without a stepwise tutorial, it might be difficult for you, or you may be stuck in between the machine setup process. So, it is better if you follow me throughout this blog.
Even when I started, I needed some help with setup. Setup is a lengthy process that includes connecting the Cricut to the device, downloading Cricut Design Space, and much more. It will take a couple of minutes, but once you get started, you will never need any help if you intend to set it up again.
So, let’s explore this blog more about it and learn how to setup Cricut Maker 3 on a MacBookby following the steps below.
Minimum System Requirements to Setup Cricut Maker 3
Before you learn Cricut setup Maker 3 for MacBook devices, you should know the system requirements. Below, I have mentioned the primary system needs you will need for your MacBook to run the Cricut app, such as Cricut Design Space.
Operating System: macOS 11 or later
CPU: 1.83 GHz
RAM: 4GB
Disk Space: 2 GB required
MacBook should have a USB port or in-built Bluetooth
Display Screen Resolution: Minimum 1024px x 768px
Cricut Setup Maker 3: Quick and Easy Steps
Setting up a Cricut machine is almost the same regardless of which model you are using. In this Cricut setup, I will explain how to download the Cricut software, connect Cricut to the Mac, and so on. So, let’s start with the method that I have described below:
Step 1: Power on Cricut Maker 3
If you haven’t already, you will need to unbox your machine. After unboxing, you should open the machine lids.
Once you’ve done this, take the power cable and plug it into the wall outlet. Afterward, press the power button on the right side of the machine. Once you have turned on your printer, it’s time to connect it to the MacBook.
Step 2: Connect Cricut to MacBook
Now, let’s connect the Cricut to the MacBook using Bluetooth. Before that, locate your machine and keep it within 10 to 15 feet of your Mac. You can also connect your Cricut to a USB cable, but I will tell you how to do so below. Personally, I prefer Bluetooth over USB as I avoid USB cables.
Here are the steps to connect Cricut Maker 3 to Bluetooth on MacBook:
Choose a surface that is flat.
Then, go to your Apple menu and choose System Preferences.
After that, you need to look for the Bluetooth option.

Now, don’t forget to turn on the Bluetooth.
If the Cricut machine is turned on, you need to select it from the list.
Your Cricut Maker has been successfully connected to your macOS desktop.
Once you have established the connection, you have to download the Cricut software. This is also an essential part of Cricut setup Maker 3. So, let’s dive into it without any further delay.
Step 3: Download Cricut Design Space
Now, let’s see how to download the Cricut app on MacBook:
Launch the Chrome browser on your Mac computer.
After that, you will need to visit design.cricut.com.
Once you have reached the Cricut download page, you will have to hit the checkbox.
Clicking on the checkbox enables the Download tab.
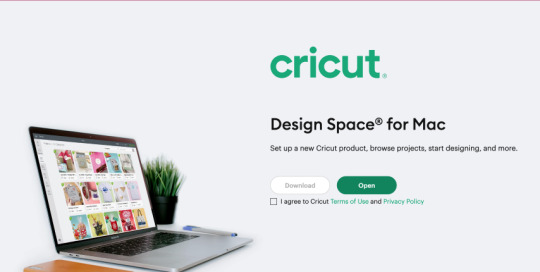
Next, press the Download tab to begin downloading the Cricut Design app on the Mac.
Once you have downloaded the Cricut software on your Mac, you need to find the downloaded file in the Downloads folder.
Then, you need to double-click on the .dmg file.
Afterward, you should start the software installation.
Finally, drag the Cricut icon to the Applications folder icon to begin your Cricut installation.
Step 4: Follow the On-Screen Prompts
Once you have downloaded the Cricut Design app, you will need to launch it. After that, you will have to click on the Product Setup tab to begin the Cricut setup Maker 3. Then, you need to sign in to your Cricut account using your username or password. Next, you need to select the Smart Cutting Machine on the next screen.
Now, you will need to choose the Cricut Maker 3 machine from the given lists and then follow the rest of the instructions given on display.
FAQs
Question 1: What is Cricut Maker 3 setup?
Answer: The Cricut setup is a process of preparing the Cricut machine to perform several operations that it is supposed to do. When you setup Cricut, you can connect it to compatible devices, including Windows, Mac, iOS, and Android. Besides, you also downloaded the Cricut software to perform the complete setup in which you chose a machine to setup.
Question 2: Which software do I need for Cricut setup Maker 3?
Answer: The free Cricut Design Space is software from Cricut that can be used to setup any Cricut cutting machine. Therefore, it is recommended that you download the software from the device you are going to set up your Cricut machine. Once the software is downloaded, users can start the setup process without hassle.
Question 3: Why do I need to setup my Cricut machine?
Answer: It is essential to set up a Cricut machine so that you can use it on your computer or mobile device. If you are using a computer, you only have to set up your Cricut on the computer. Otherwise, do the same thing with your mobile device if you are connecting through it.
Conclusion
In this blog, I have discussed the Cricut setup Maker 3, without which you can’t make a single cut on your cutting machine. I have explained each step separately, along with the system requirements for Mac computers. This setup guide is only for Mac users. Although some steps will be the same for all devices, such as downloading and connecting, Cricut differs for different devices.
Read more: cricut setup for pc
install cricut design space app
Cricut New Machine Setup
Source: Cricut Setup Maker 3
#Cricut Setup Maker 3#Cricut New Machine Setup#cricut design space#cricut design space login#cricut design space app#install cricut design space app#cricut setup for pc
0 notes
Text
How to Connect Cricut Explore Air 2 to Computer: 2 Best Ways
Being a Cricut user, I know how to connect Cricut Explore Air 2 to computer. If you want to learn it, then stick to this blog till the end and follow each step. Let me introduce you—I’m a professional crafter and a passionate Cricut user for the last six years. I have tried almost every Cricut machine for my regular crafts. And I love teaching people about different things. So, this blog post is all I have to connect with my followers and readers.
Today’s post is simple. However, all my users will learn something new like always. I know you might be eager to learn the process. But, wait, are you aware of Cricut Design Space? I hope you’re. But, even if you don’t, I will explain it to you through this blog. Let’s get into it!
A Brief About Cricut Design Space
Before getting started with how to connect Cricut Explore Air 2 to computer, you must know this. If you’re a novice and recently took your step into the Cricut world, you should know that it’s a Cricut specialized software application that you’ll need to download and install in order to use your Cricut machine.
This software offers you with many intriguing features to start designing and set yourself apart from the competition. So, are you ready to stand out from the crowd? Yeah, it’s possible when you know the complete process to set up your Explore Air 2 machine or any Cricut product you have.
How to Connect Cricut Explore Air 2 to Computer?
Computers are the best devices with which to connect your Cricut. Do you know why? These devices are fast in speed and give a better user experience with a wider screen. I also use a computer for all my connection work. Let’s check the methods here.
Method 1: Using a USB Cable
A USB connection is a primary method for connecting Cricut machines to your computer device. So, learn how to connect Cricut Explore Air 2 to computer via USB from the steps below.
To start, get the USB cable that you’ve got with your Cricut machine.
Before that, unbox your machine completely and take off the coverings as well.
After that, take the USB cable and connect one end to the machine and another end to the computer’s USB port.
Now, turn on your devices and check if your computer shows the machine’s connection status.
Then, you can continue installing the Cricut Design Space from cricut.com/setup .
Finally, you’ll start making crafts using your Cricut. That’s how to connect Cricut Explore Air 2 to computer with USB. Now, look at another method. You can use the same procedure with your Mac computer as well.
Method 2: Via a Bluetooth Connection
You know the connection process with a USB cable, which is a basic connection process. However, you must ensure that your PC has USB drivers. Well, moving forward, let’s learn how to connect Cricut Explore Air 2 to computer wirelessly with a Bluetooth connection. Look at the steps below.
In the beginning, make sure that your Explore Air 2 machine is at least 10-15 feet apart from your computer and is ON.
Then, check if your PC has Bluetooth from the Device Manager.
Now, head to the Control Panel and click on the Devices and Printers option.
Thereafter, hit the “Add a device” option.
Next, let your PC identify your Cricut cutting machine.
Choose your Bluetooth device name or Cricut’s name from the list of devices.
You may need to enter the code when you’re asked. (Note: If you don’t know the code, type “0000”).
And then, hit the Next button to finish pairing between your Cricut and computer.
In the last step, hit the Close button to exit from the window.
That’s how to connect Cricut Explore Air 2 to computer. Now, you can utilize your Cricut machine to create fun crafts.
Conclusion
Finally, you know the connection process for a Cricut Explore Air 2 machine on a computer. The connection process is simple and straightforward. Beginners, as well as pro users, can perform this setup quite easily and hassle-free. Also, the USB and Bluetooth setup are great for connecting your Cricut to the computer. Once you connect your Cricut to a computer, you can start making anything you want.
FAQs
Why Is My Cricut Explore Air 2 Not Connecting to My Laptop?
If your Cricut Explore Air 2 is not connecting to a laptop, it may be due to the distance between your devices being more than 10-15 feet in case of a Bluetooth connection. Also, you need to check if your devices have Bluetooth connectivity or not. If you are using a USB connection, make sure that your PC has USB drivers.
How to Connect Cricut Explore Air 2 to Mac via Bluetooth?
These are the steps to connect your Explore Air 2 machine to your Mac via Bluetooth:
Initially, check if your Cricut machine is at least 10-15 feet away from Mac.
Now, check if your Bluetooth option is ON on Mac.
Then, move to the System Preferences and find the Bluetooth option.
After that, select your Cricut model from the list of Bluetooth devices.
If your screen asks you for a code, type “0000.”
Lastly, your devices will connect via Bluetooth.
How Do I Connect My Cricut Explore Air 2 to iOS?
To connect your Cricut to iOS, follow these steps:
First, ensure that your Cricut and iOS devices are at least 10-15 feet apart.
Now, open the Settings app.
Then, check if the Bluetooth option is ON.
After that, select the Bluetooth module from the list of devices.
Next, allow your iOS device to pair with Cricut.
Type “0000” when your screen asks you for a PIN code.
Also, get the Cricut Design Space.
Finally, your devices are connected together.
Source :- https://m2setupdotcouk.wordpress.com/2024/04/05/how-to-connect-cricut-explore-air-2-to-computer-2-best-ways/
0 notes
Text
How to Connect Cricut to App: A Stepwise Setup Guide
So, here you will learn how to connect Cricut to app. Right? But before I dive further into this blog, I would like to clarify one thing. This blog talks about how to connect your Cricut machine to an app (Cricut Design Space), but I don’t think it is the same as connecting Cricut to your computer or mobile phone.
Connecting a Cricut to an app and connecting Cricut to a compatible device are two different things. Don’t get confused! The question is, if both are different, then what are we going to learn from this blog? In this blog, I will teach you how to connect a Cricut machine to an app. However, it is also called a Cricut setup. We will be learning about machine setup on Windows computers. Let’s dive into it without any further ado!
Step 1: Unboxing a Cricut Product
Okay, so to get to the exciting part of the Cricut machine setup, we will first need to unbox the machine. However, if you have already unboxed it, enjoy🥳and move to the second step in order to learn how to connect Cricut to app.
Here, let me share my experience of unboxing my Cricut.
I opened the box’s lid and saw a matted folder over the top surface of the Cricut machine. Here I am, actually, opening my Cricut Explore Air 2 machine. It came with a blue LightGrip mat. Those who got the Cricut Maker machine then will receive a green StandardGrip mat.
The list is long; let me show you what else I got with my Cricut Explore:
Step 2: Open Your Cricut Cutting Machine
To open the Cricut machine, I pressed the Open button (on the left side). As I pressed the button, the rest of the doors opened on their own. Here, Cricut Maker users need to lift the top lid. After that, the front door will open on its own (automatically).
Note: Do not open the doors that open automatically. Just wait and let them open slowly on their own.
When your Cricut is opened, you need to remove the foam and other tape on the side.
Step 3: Plug Into a Cricut Machine
Plugging the power cable into the Cricut cutting machine is the first step in learning how to connect Cricut to app. Now, it’s time to turn it on. Yes! So, let’s grab the power cords that come with our Cricut machine.
You can just plug the main plug into the wall outlet and insert the other into the back of your Cricut machine. But, here, you have to plug in the machine; you don’t need to turn it on the machine here. We’ll do it later.
As the machine is turned on, you need to move to the next step, where we will start setting up our machine.
Step 4: Pair Cricut to a Computer via Bluetooth
I have connected my Cricut using a USB cable, too. Currently, I am using a Bluetooth wireless connection. So, let me show you how to connect Cricut to PC via Bluetooth:
Now, let’s download a Cricut app so that you can understand how to connect Cricut to app, i.e., how to setup Cricut.
Step 5: Download Cricut Design Space
The machine setup requires software called the Cricut Design app. To download the software, you need to go through the steps given below:
Next, follow the prompts until your installation is done. Once done, move to the last steps to learn how to connect Cricut to app.
Step 6: Finish the Cricut Setup
Launch the Cricut Design Space software, and you will see the option to select your Cricut cutting machine on the app. Select the type of machine you want to setup. Next, sign in to your Cricut account. If you don’t have an account, sign up to create one.
Once you have created an account, you need to sign in and then start connecting your Cricut to your app. Although you will get screen prompts to setup the machine, I will explain it briefly.
First, turn on the machine by pressing the power button, and then you need to connect your machine. After that, your setup is done!
HURRAY!!!!!!!!! 😍 YOU DID IT!
FAQs
Question 1: Can I connect my Cricut to an app on my mobile phone?
Answer: Yes, absolutely! Connecting Cricut to the app or setting it up is the same. For this, you will need a Cricut app that you can download from an online app store where you can download the app. For example, if you want to install the Cricut software on iOS, then you can get the application from the App Store, and for Android, you need to go to the Google Play Store. In short, you can easily connect your Cricut machine to an app.
Question 2: Is Cricut machine setup difficult or time-consuming?
Answer: Setting up the Cricut machine is easy and not that time-consuming if you have the right software. The simple-to-use interface of Cricut Design Space will walk you through the easy directions to setup the Cricut cutting machine, which will take you a few minutes. So, install the right software on a compatible device, and then you will be ready to go.
Question 3: Is Bluetooth compulsory for Cricut machine setup?
Answer: No, it is not necessary if your Cricut has a USB cable. Except for the Cricut Joy machine, all the Cricut models have USB ports so that they can be connected via USB cords, too. However, for Cricut Joy users, Bluetooth is compulsory when setting up the machine. In short, Bluetooth is compulsory only for machines for which Bluetooth is not available.
Source: https://desincricut.wordpress.com/2024/04/16/how-to-connect-cricut-to-app-a-stepwise-setup-guide/
#cricut.com/setup#cricut.com setup download#cricut.com setup#cricut.com setup mac#cricut.com setup windows#cricut.com/create#cricut.com sign in#cricut.com/register#cricut.com design space#www.cricut.com setup mac#install cricut printer#install cricut design space app#install cricut explore air 2#cricut explore air 2#cricut create connect to computer#connecting cricut maker to computer#cricut com setup#cricut setup#setting up my cricut maker#setting up your cricut maker#cricut new product setup#cricut design space app#cricut design space#cricut new machine setup#cricut software app#cricut explore 3#cricut account on setup#cricut setup on account#cricut
0 notes
Text
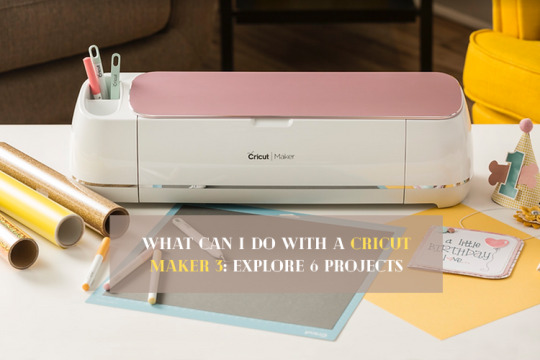
What Can I Do With a Cricut Maker 3: Explore 6 Projects
Recently, I received a command on one of my previous blogs. In this, someone asked, “What can I do with a Cricut Maker 3?” After reading the comment, I wondered whether I had written something on it before. After extensive research, I found out that it still needed to be written, so I finally came up with this blog.
But before writing this post, I discussed it with my friend Jack, who is also a Cricut Maker 3 user. I asked him the same question I got in my comment. He advised me on a few Cricut Maker 3 project ideas that we can create using the Maker 3.
So, are you excited to explore these Cricut Maker 3 projects? Get into this blog and start searching for the idea that you like. I have mentioned the top 6 projects in this blog. Let’s delve into it to learn more.
1. Large Vinyl Decals
Cricut Maker can easily help you get large-size decals. Let me tell you when I made this. I made this up on my friend Andy’s request. He recently bought his new home and wanted to do something for his wall.
He asked me, “What can I do with a Cricut Maker 3? Is there anything that you can advise me on? “As a beginner crafter, he needed something extraordinary, so he helped me make these wall decals. They look stunning! No?
2. Personalized Vinyl Decals
Yes, you can also make personalized decals on Maker 3, as it is capable of making decals easily by cutting the material precisely. So, here is what you have to do: just install Cricut Design Space on your PC and start creating or editing the design on your Design Space app.
Then, just wait for a while; you have to perform the on-screen steps to choose the material. Finally, just cut the material as per your requirements on Cricut. Then, you are ready to go!
3. Thank You Cards
Who doesn’t love the thank you message? So do I. Cricut Maker can cut a wide range of materials with different thicknesses. However, before making these cards, I was lost in my thoughts and thinking - what can I do with a Cricut Maker 3?
Thanks to my friends, who recently gifted me a platinum necklace. Since she doesn’t live here, I had to send her a thank you message to her. Hence, I created this beautiful card using my Maker 3. Can you see those green color cards inside those cutouts? That is nothing but an insert card. It also adds a creative touch to my crafts.
4. Full-Color Stickers
A colorful sticker always looks amazing on a diary or journal. Doesn’t it? Look at those colorful stickers in the picture above. I made those using a Print Then Cut feature, which is easily possible with your Cricut Maker 3. Yes, if you still want to know what I can do with a Cricut Maker 3. Then look no further than such projects. Just use the simple paper and print your images using a compatible printer. Then, set up the materials on Cricut and start cutting it.
5. Personalized Mug
Vinyl-based projects are my favorite, as they look fantastic when made. I made this mug as my first project on my Cricut Maker 3 last January, and today, I finally got a chance to mention it in this blog. I hope it will help you find the answer to your question: What can I do with a Cricut Maker 3?
But do you think only Cricut Maker 3 is enough for this project? The answer is No! You will also need a Mug Press to transfer the vinyl on your mug. However, Maker 3 is for cutting your design, not to transfer it to the mug.
6. Custom Shirts
What about this vinyl shirt? Look at those intricate designs I made on Design Space. Isn’t that enticing? To me, it is wonderful! Try this and make it for your loved ones or yourself. You can create custom shirts in a few simple steps. You will need to create a design on Design Space and then send the command to your Cricut Maker to cut the vinyl. Lastly, I hope you find a satisfactory answer to the question: what can I do with a Cricut Maker 3?
Final Words
In this blog, you will find 6 Cricut Maker 3 projects that you need to make using a Maker 3 cutting machine. This robust machine has a versatile feature that lets you cut 300+ materials quickly without interruption. The precision and quality it offers for your project are just amazing. From large-size wall decals to personalized shirts, I have included many projects in this blog.
FAQs
Should I really buy a Cricut Maker 3?
Yes, you can buy a Cricut Maker cutting machine if you want to make projects that give you amazing results. If your crafting needs are high, then you must get this machine. This die-cutting machine can cut a variety of materials easily in a few minutes. Also, if you are a series crafter, you must try this machine. In my experience, it has been a worthwhile investment until now.
Can I print images using my Cricut Maker 3?
Cricut cutting machines are not made to print any images. They look quite similar, but instead of using ink cartridges to print, they have a built-in blade housing that cuts the materials. The capabilities of cutting the materials for Cricut Maker 3 are high, and you get very precise cuts.
Can I use regular paper in Cricut Maker 3?
Be it delicate paper or cardstock, you can easily cut them on your Cricut Maker 3 machine. However, you can make several exciting projects using this paper or cardstock, such as cards, home decor, gift tags, 3D boxes, banners, party decorations, flowers, and so much more.
For more information visit: cricut.com/setup
Set Up Cricut Maker
Cricut Design Space software
cricut new product setup
Source: What Can I Do With a Cricut Maker 3
#what can I do with a cricut maker 3#cricut maker 3 projects#cricut maker 3 project ideas#cricut maker 3 setup#cricut maker setup#cricut maker 3#cricut design space#cricut design space software#cricut machine set up
1 note
·
View note
Text
“How to Connect Cricut Create to Computer Easy Setup Guide”
To set up your Cricut machine on a Mac, start by visiting cricut.com setup mac and downloading Cricut Design Space for Mac. After downloading, open the installer and follow the prompts to complete the installation. Launch Cricut Design Space, then sign in or create a new account. Connect your Cricut machine to your Mac using a USB cable or Bluetooth, and follow the instructions to pair it. Ensure your machine’s firmware is updated through Cricut Design Space. With these steps, you’ve completed the cricut.com setup mac process and are ready to start crafting.
cricut.com setup mac
www.cricut.com/setup login
install cricut design space app
cricut.com/setup
cricut create connect to computer
setting up your cricut maker
cricut setup on computer
cricut setup download
cricut setup log in
cricut install setup
cricut setup new device
cricut setup website
connecting cricut maker to computer
Cricut Design Space setup
cricut new product setup
cricut maker software
Cricut Design Space setup
cricut setup for pc
cricut design space login
cricut maker new machine setup
how to setup cricut maker
how to setup cricut explore
cricut maker new machine setup
cricut maker machine set up
cricut download laptop install
cricut setup maker
install cricut printer
cricut new product setup
cricut design space for windows
cricut device setup
setup cricut maker machine
#cricut.com/setup#cricut#cricut setup#install cricut design space app#cricut create connect to computer
0 notes
Text
How to Use Cricut Mug Press for Tumblers: Full Tutorial
Now, sublimating thin glass has become easier with a Cricut Mug Press. You can also learn how to use Cricut Mug Press for tumblers. In the beginning, I didn’t even know how to use my Mug Press machine to create a tumbler, so I thought about giving it a try. My attempt was really successful the first time. During this process, I learned effective methods that I will share in this blog.
I understand that it might be intimidating for many crafters, so I found an effective solution that works for all types of thin tumblers. In this tutorial, I made a 20-ounce tumbler using my Cricut Mug Press. Besides these, I will also tell you how to set up this machine. After that, we will learn the step-by-step instructions for making custom tumblers.
So, read the blog till the end and follow each and every instruction to avoid any common mistakes. Visit this blog to learn more!
How to Setup Cricut Mug Press on Your Device?
You can’t learn how to use Cricut Mug Press for tumblers until you set up your Mug Press. So, let’s start setting it up first. Here are the steps to set up a Mug Press:
First of all, you have to go to the browser and search for Cricut Design Space on your computer.
After that, install the Cricut app and launch it.
After launching, you need to create your Cricut ID if you haven’t created it yet.
On the next screen, you will see the Welcome to Cricut Setup page.
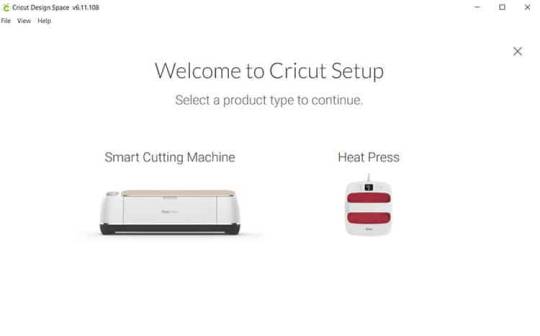
Next, you will need to select the Heat Press and then Cricut Mug Press.
Now, follow the screen prompts to connect your Mug Press, confirm the firmware, and complete the activation process.
Supplies Required for Cricut Tumblers
You will need the following items to make tumblers on Mug Press:
Artesprix Protective Paper
Heat Resistant Mat
Cricut Mug Press
Sublimation printer
Sublimation ink
Heat resistant gloves
Sublimation paper
Infusible Ink
Lint Roller
PYD Life Inserts
Heat Resistant Tape
Tape dispenser
Despite this, you will also need sublimation blanks, as I am using 20 oz skinny tumblers. Now we have gathered the supplies, let’s learn how to use Cricut Mug Press for tumblers. All the easy instructions will make it easier for beginners to sublimate their tumbler hassle-free.
How to Make Tumblers With Cricut Mug Press?
Here, I am going to teach you to make a tumbler with Cricut. Fortunately, my first try went really well without any mistakes. So, let’s see how you can sublimate the tumbler.
Since we are using skinny tumblers, it might not fit well inside the Mug Press. Hence, we need to use PYD life inserts for heat conductive inserts.
It comes in various sizes that are suitable for different blanks. So, the purpose of using these PYD Life inserts is that they can expand the size you press to fit in the Mug Press. Before placing the blanks inside the mug, make sure there are no plastic pieces or straws inside the tumbles, as they can melt. Also, clean the tumbler using the lint roller to remove the dirt and debris.
Besides, I use the protective paper on the outside to protect my heat press. You can also use the tape to secure the paper into its place.
Finally, the tumbler is ready to be pressed in the Mug Press. Now, you need to wrap these inserts around the tumblers, as shown in the picture below.
Tumblers are usually long in shape, so you need to flip it upside down and repeat the same process twice.
Here’s the final result! That’s all in this tutorial. Now, you might have understood how to use Cricut Mug Press for tumblers to make your own tumblers.
FAQs
Question 1: Can you use Cricut Mug Press for any mug?
Answer: Cricut Mug Press can sublimate only those mugs that are labeled as sublimation compatible. They are actually compatible with infusible ink. However, if you are using non-Cricut mugs blank, then I can’t say about the results. Hence, you should always use poly-coated, sublimation-coated products that are suitable for your requirements.
Question 2: Can I use a Cricut Mug Press for my glass cups?
Answer: Yes, you can use frosted glass cups or mugs. In other words, you will need a glass sublimation blank that can easily transfer your design onto it. A normal glass may break while pressing it into the Mug Press. So, make sure you are using the right glass mug, such as a frosted glass cup.
Question 3: How long does it take to sublimate a tumbler in Cricut Mug Press?
Answer: The duration for sublimating the tumbler is about 4 minutes. To sublimate it, however, you will need to wrap butcher paper all around the tumbler and then use tape to secure it. After that, you can put your tumbler into the Mug Press and let it transfer your cut vinyl design to the tumbler.
Final Words
In this blog, I explained how to use Cricut Mug Press for tumblers with an easy example. In size, tumblers vary, hence you need to sublimate them accordingly. For skinny tumblers, you can use the insert sheets to adjust the thickness so that your Mug Press can transfer the design. Despite these, you will need to set up your Mug Press by downloading the Design Space. Also, there are many supplies required to do this project. Ensure you have essential items with you.
Read more: cricut.com/setup mac
install cricut design space app
Cricut Design Space
Source: how to use Cricut mug press for tumblers
#Cricut Design Space#cricut design space for mac#cricut design space setup#cricut design space app#cricut design space download#cricut.com/create#cricut new machine setup#cricut design space login#cricut explore air 2#cricut.com sign in#cricut software app#how to use Cricut mug press for tumblers
0 notes
Text
How to Set Up My Cricut Explore Air 2: A Complete Guide
After buying a Cricut machine, it is normal to worry about the setup process. I felt the same way about how to set up my Cricut Explore Air 2 when I first bought it. Now, after using it for a long time, I am here to help you with the setup!
In this blog, you will find everything you need to know about setting up the Cricut cutting machine. We will start with the system requirements for using Design Space and then cover the machine setup process, how to download the Cricut app, and how to log in with your account. To learn all about setting up your Cricut Explore machine, check out the blog!
Minimalist System Requirements for Cricut Design Space
It is important to know the system requirements in order to learn how to set up my Cricut Explore Air 2. If you are using this model on a computer, these are the specs it should have to run the software smoothly.
How to Set up My Cricut Explore Air 2: Simple Steps
Once you have checked the system requirements for the Explore machine, you can learn how to set it up. To do so, follow these steps.
Now, move on to the next step of downloading and installing the software on your desktop computer so that you can use your machine.
How to Download Cricut Design Space on a Computer?
In order to learn how to set up my Cricut Explore Air 2, you must know how to download the app on your computer. It is essential software for any Cricut machine, and without this app, your machine cannot function. To download it on your operating system, complete the easy steps in the section below:
Conclusion
I wrote the important things about learning how to set up my Cricut Explore Air 2. I am very sure that after reading this blog, you have learned all these things, and you can set up your machine on your own. Now, you know what features your computer should have when using the Design Space app. Also, you can download it and log in with your account by following this post.
FAQs
What Materials Can Be Cut With Cricut Explore Air 2?
This machine is compatible with more than 100+ different types of materials. If you have an Explore machine, you can use materials like paper, cardstock, vinyl, iron-on, glitter iron-on, glitter vinyl, and faux leather to make projects on the machine. Using these materials, you can make thousands of projects on your own for your home, office, and small business.
Does Cricut Explore Air 2 Need a Printer to Make Projects?
Not really! This Cricut machine, like any other model, is capable of making multiple types of projects. For most DIY projects, it does not require a printer. If you want to create projects by cutting material or by writing on a material with a pen, you do not need a printer. However, if you are making printing projects like stickers, decals, etc., you will need a printer.
Does Cricut Explore Air 2 Require an External Bluetooth Adapter?
No, it does not! An external Bluetooth adapter is required only for old Cricut models that do not have a built-in Bluetooth connection. However, the Cricut Explore Air 2 is a relatively new machine that has a built-in Bluetooth connection, so it does not need an external Bluetooth adapter.
Visit: www.cricut.com/setup login
Source: https://cricricutdesigncut.wordpress.com/2024/08/10/how-to-set-up-my-cricut-explore-air-2-a-complete-guide/
#design space setup#cricut setup#cricut.com setup#cricut.com setup mac#cricut.com setup windows#cricut.com sign in#cricut.com setup download#www.cricut.com/setup\cricut explore air 2 setup#digital design#www.cricut.com setup#www.cricut.com/setup login#www.cricut.com/setup#install cricut exlore air 2#install cricut explore air 2#install cricut design space app#install cricut air 2 setup#install cricut explore air 2 setup#cricut create connect to computer#design.cricut.com/setup#design.cricut.com
0 notes
Last Seen Blogs

haiaugroup
Untitled

gmytu
上海代开发票-上海开票+V:hnx618618 (保真)

position-professional
Untitled

hanumaanloni-blog
Hanumaan@Loni

gmtsdy-blog
无标题