#csv button
Explore tagged Tumblr posts
Visit Tumblr Blog
Explore Tumblr blogs with no restrictions, modern design and the best experience.
Last Seen Tumblr Blogs


Fun Fact
Tumblr.com rank in the US is 25.
Text
CoPilot in MS Word
I opened Word yesterday to discover that it now contains CoPilot. It follows you as you type and if you have a personal Microsoft 365 account, you can't turn it off. You will be given 60 AI credits per month and you can't opt out of it.
The only way to banish it is to revert to an earlier version of Office. There is lot of conflicting information and overly complex guides out there, so I thought I'd share the simplest way I found.
How to revert back to an old version of Office that does not have CoPilot
This is fairly simple, thankfully, presuming everything is in the default locations. If not you'll need to adjust the below for where you have things saved.
Click the Windows Button and S to bring up the search box, then type cmd. It will bring up the command prompt as an option. Run it as an administrator.
Paste this into the box at the cursor: cd "\Program Files\Common Files\microsoft shared\ClickToRun"
Hit Enter
Then paste this into the box at the cursor: officec2rclient.exe /update user updatetoversion=16.0.17726.20160
Hit enter and wait while it downloads and installs.
VERY IMPORTANT. Once it's done, open Word, go to File, Account (bottom left), and you'll see a box on the right that says Microsoft 365 updates. Click the box and change the drop down to Disable Updates.
This will roll you back to build 17726.20160, from July 2024, which does not have CoPilot, and prevent it from being installed.
If you want a different build, you can see them all listed here. You will need to change the 17726.20160 at step 4 to whatever build number you want.
This is not a perfect fix, because while it removes CoPilot, it also stops you receiving security updates and bug fixes.
Switching from Office to LibreOffice
At this point, I'm giving up on Microsoft Office/Word. After trying a few different options, I've switched to LibreOffice.
You can download it here for free: https://www.libreoffice.org/
If you like the look of Word, these tutorials show you how to get that look:
www.howtogeek.com/788591/how-to-make-libreoffice-look-like-microsoft-office/
www.debugpoint.com/libreoffice-like-microsoft-office/
If you've been using Word for awhile, chances are you have a significant custom dictionary. You can add it to LibreOffice following these steps.
First, get your dictionary from Microsoft
Go to Manage your Microsoft 365 account: account.microsoft.com.
One you're logged in, scroll down to Privacy, click it and go to the Privacy dashboard.
Scroll down to Spelling and Text. Click into it and scroll past all the words to download your custom dictionary. It will save it as a CSV file.
Open the file you just downloaded and copy the words.
Open Notepad and paste in the words. Save it as a text file and give it a meaningful name (I went with FromWord).
Next, add it to LibreOffice
Open LibreOffice.
Go to Tools in the menu bar, then Options. It will open a new window.
Find Languages and Locales in the left menu, click it, then click on Writing aids.
You'll see User-defined dictionaries. Click New to the right of the box and give it a meaningful name (mine is FromWord).
Hit Apply, then Okay, then exit LibreOffice.
Open Windows Explorer and go to C:\Users\[YourUserName]\AppData\Roaming\LibreOffice\4\user\wordbook and you will see the new dictionary you created. (If you can't see the AppData folder, you will need to show hidden files by ticking the box in the View menu.)
Open it in Notepad by right clicking and choosing 'open with', then pick Notepad from the options.
Open the text file you created at step 5 in 'get your dictionary from Microsoft', copy the words and paste them into your new custom dictionary UNDER the dotted line.
Save and close.
Reopen LibreOffice. Go to Tools, Options, Languages and Locales, Writing aids and make sure the box next to the new dictionary is ticked.
If you use LIbreOffice on multiple machines, you'll need to do this for each machine.
Please note: this worked for me. If it doesn't work for you, check you've followed each step correctly, and try restarting your computer. If it still doesn't work, I can't provide tech support (sorry).
#fuck AI#fuck copilot#fuck Microsoft#Word#Microsoft Word#Libre Office#LibreOffice#fanfic#fic#enshittification#AI#copilot#microsoft copilot#writing#yesterday was a very frustrating day
3K notes
·
View notes
Text
hello my beloved followers does anyone know if there is any way to save a google sheets file as a csv in a specific folder, and replace the current file that is already there
i know there is a download button. this puts it in "downloads" and does not replace the last copy
edit: my personal problem has been solved as i found a unity import-from-google-sheets plugin https://github.com/ssmasrour/Google-Sheets-to-Unity?tab=readme-ov-file thank you everyone
38 notes
·
View notes
Text

Crystalverse!Dan first reference
dear princess celestia i am so scared and frightened
(note: i don't have all that much confidence in my art but i do try my best. all i know is self taught and out of books)
far away in the dantdm multiverse...there is the crystalverse
character design: (i love the way dan's skin is made cause it can be basically anything you want)
i was thinking of the very early old art that was on the first t shirts and mugs and hoodies and stuff (i was too young to get them when i first started watching him and i wish i could get one of the shirts) and the youtooz figures where has has a hoodie jacket.
he wears a shirt and tie because he's a fancy boi ok. the shirt is short sleeve and the white cuffs are part of the jacket
because of some time distortion thing from being so distant in the multiverse (that's my story and i'm sticking to it) he's 22. if you ask him his birthday he can tell you the day and month without issue but the year just comes out in all this static noise...
he has autism and anxiety, and is ftm and bisexual. and he's dating his universe's trayaurus. there will be no burning of any more gay flags istfg
full name is daniel andrew everton. just to drive home that this isn't the youtuber himself if i haven't made it clear yet (is this something you have to clarify? or is it just a given? i feel like i'll get corrected if i do or don't help this project isn't new but posting about it is for me. i mean i know obviously minecraft's not fkin real but idk where people draw the line.)
personality: overall kind, understanding, caring to those he bonds with, INSANELY protective. (like if anyone or anything threatens trayaurus or grim that thing is dead. it's happened) since he moved to the lab he's found a talent for science and inventing that he had no idea he had and now he's studying to be a doctor the same as trayaurus. (all the youtuber characters are just normal people, not big celebrities. if he went down the street in plain clothes nobody would notice him. good for him cause he's shy)
what i'm thinking is all the people who would be youtubers in this world or a different dan universe are normal people and normal people are youtubers in their place
anyway he did have friends in the city he lived in before but he's very anxious around people he doesn't know. he's happier in the lab with just a small circle of people he knows.
he can also be very reckless, doing things without thinking or making up unneccessary solutions to problems that end up backfiring. he's especially reckless when he's riding his minecart (that further down) and he has a lot of cuts and bruises on his arms and legs, which he's awkward about because it might look like something else
some objects: main weapon is his enchanted diamond sword, has sharpness V and unbreaking III. he has trayaurus' name written on it because he thinks of defending him when he uses it.
he actually has a diamond minecart that he brings around with him and rides in and not just a trophy in the treasure room, this one is more like it was in mcsm and the tube heroes toy (anyone still have those?) as in an iron minecart decorated with diamonds. he keeps it in a key, he presses the button and it shoots out light and there it is. it was his first real invention/project he worked on himself, more of a minecart converted to a minature car. it goes zoom zoom and it doesn't need rails
for all the ways csv!dan is different to other universes' dan he still loves drinking tea. i'm pretty sure they all do. this is his special blue mug, trayaurus has a co-ordinating green one.
not on the ref sheet seperate cause he's already wearing them: his goggles, they go beyond an accessory or safety equipment, they're also his comfort object and if he isn't wearing them/doesn't know where they are he starts to panic and he can't work. he actually DOES wear them (over his eyes) when he's doing experiments or battling. trayaurus gave him them when they first became friends, and entirely by accident, they were in a box buried under machine parts and packing peanuts
his right elbow pad has a chip inside it that gets him through the doors of the lab, he and trayaurus got tired of the crappy buttons that don't open the doors properly so eventually they just replaced them.
i'll probably do another refsheet to go along with this but that's the gist for now
#au#dantdm#dantdm au#crystalverse#the diamond minecart#fanfic#dantdm fanart#alternate universe#reference#ref sheet#minecraft#minecraft youtube#mcyt#old mcyt#sword#tea cup#autism#hyper fixation#the fixation is fixating#special interest#au headcanons#danaurus
12 notes
·
View notes
Text
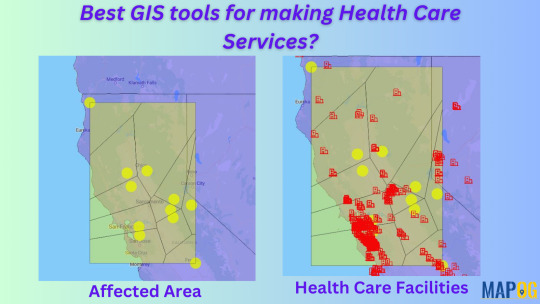
How to use GIS in Disease spreading?
Why is it important to use GIS for Disease mapping?
Mapping disease outbreaks provides critical opportunities to leverage Geographic Information Systems (GIS) for pandemic response, analysis, and decision-making.
Steps to Add GIS Data to an Online Map
Choose an Online Mapping Tool
Choose an online platform to perform the basic needs for creating maps, adding layers and data visualization.
Online mapping platforms are powerful tools that combine geographic data, visualization, and interactivity to solve real-world problems across industries.
There are user-friendly websites for beginners as well as professional users like MAPOG. Where it provides different types of build-in tools.
Prepare Your Data
To prepare GIS data, download the required data in csv, kml. Shapefile or geojason format.
Organize your data layers based on their thematic importance, like roads, administrative boundaries, or climate zones.
Most platforms provide an option to upload or import GIS data directly. Ensure the spatial attributes are preserved during upload.
3. Steps for preparing mapping
By applying these simple steps in MAPOG one can easily make disease spreading maps.
To upload boundary ‘add upload’ > upload vector file to add area of interest > select the vector file > open > upload.
Upload csv data that has latitude and longitude > upload csv file > open > publish.
To change the symbols and color click > ‘Action’ > edit feature > change according to preference for both the layers.
Steps to add polygon in the disease affected area using “point to polygon”
By applying “points to polygon”, it shows the area that is affected.
Click “processing tool” > select “point to polygon” > select the point layer data > click “convert”.
Click the “action” button > rename > style editor > change the symbols and colours.

Conclusion
The purpose of using online map making is to research and make maps affordable, user-friendly, its simplicity and collaborative features make it ideal for individuals that need quick sharable maps without heavy investment in training or setups. Finally, future trends like AI integration mapping show the evolving nature of these platforms.
3 notes
·
View notes
Text
Hood Exporter - Updated
Hood Exporter V1.5
Shift-Click "EXPORT" button to run selected (non-rufio) transform on previously exported hood xml - useful if you want to run several transforms on the same hood.
Census, Memories and WhoKnowWho transforms output files now use the .csv extension (and not .txt) - so you can double-click them and open them directly in MS-Excel.
Added asObjectTitle(guid) and asObjectDesc(guid) custom XSLT functions to return the object's title and description (from the associated CTSS resource).
Updated memories.xslt to include the memory title (CTSS entry).
Resolved issues around Hood Exporter keeping output files locked, should now be able to open output files without the need to close Hood Exporter first.
27 notes
·
View notes
Text
8 Best Shopify Apps For Product Feed [Boost Visibility]
Are you trying to find the high-quality Shopify apps to manipulate product feeds and enhance visibility? Look no further! Experience hassle-free Shopify management with our top-tier Shopify Maintenance Service.
In this weblog publish, we will monitor powerful Shopify apps that can help you gain the fulfillment you want at the Shopify platform.
Whether it’s growing net visitors, generating income leads, or constructing an internet presence, those on hand gear will assist you get more visibility in no time.
Let’s dive in and find out the first-class Shopify apps for product feed!
List Of Shopify Apps For Product Feed
1. Socialwidget – Instagram Feed
Are you searching out an easy and efficient way to boost your product visibility? Look no further!
Socialwidget’s Instagram Feed is one of the quality Shopify apps to help your keep stand out.
Its pre-made templates and customizable product-tagging capabilities make it smooth to display beautifully-embedded Instagram and TikTok feeds right on your website, giving customers the ability to purchase right from the feeds.
Increase conversions and construct agree with with Socialwidget – the nice Shopify product feed app.
Key Features:
Showcase an aesthetically desirable Instagram gallery
Let clients ‘store the appearance’ with five item tags in keeping with image/video
Sort posts from Instagram accounts & hashtags
Increase Instagram fans with profile show
Leverage shoppable Instagram & TikTok feeds to your website online
Pricing:
Starter: Free
Standard: $9.Ninety/Month
Professional: $19.90/Month
Advanced: $49.90/Month
View App
2. FeedHub: Facebook, Google Feed
Boost your online visibility with FeedHub, the excellent Shopify app for product feed control. FeedHub lets you effortlessly create, optimize and publish product feeds to Google Shopping, TikTok and Facebook channels. Let us handle the upkeep while you focus on growth with our Shopify Maintenance Service.
With FeedHub, you could without difficulty configure product feeds to maximise accuracy and optimize your descriptions, titles and images.
Moreover, the app updates feeds in actual-time so that no capacity sale opportunity is overlooked, and also supports localized product feeds to amplify your reach.
Use FeedHub to get the maximum out of online product advertising and boost visibility.
Key Features:
Automate & sync google purchasing, Facebook, & TikTok feeds
Create product feeds w/ rules from collections & editions
Globalize feed in more than one languages & currencies
Optimize feed attributes, titles & pictures
Instantly replace feed on any store modifications
Pricing:
Starter: Free
Standard: $9.Ninety/Month
Professional: $29.Ninety/Month
Advanced: $49.Ninety/Month
View App
three. Pin it: Pinterest Save Button
Pin it: Pinterest Save Button Shopify app
Pin it: Pinterest Save Button is the excellent unfastened Shopify App for product feed.
It permits customers to quickly and effortlessly add the Pinit button functionality to their Shopify keep so that customers can keep their favored products to Pinterest.
With one easy click on, clients can add product pics, pricing, and product links to their Pinterest forums to share with their Pinterest followers, boosting visibility for his or her business.
The Pin it function is a brilliant manner to promote merchandise on Pinterest and in addition interact with customers.
Key Features:
Embed a ‘pin it’ button with one click
Easily upload an ‘upload to cart’ button
Discover content organized in boards
Build a customised Lookbook with option to save merchandise
Integrate pins with website analytics
4. Google Shopping Feed XML/CSV
Google Shopping Feed XML/CSV app for Shopify
Are you looking to boom visibility and income? With the Google Shopping Feed XML/CSV app for Shopify you can quickly and effortlessly boost your shop’s visibility to customers worldwide!
This app creates an XML feed that integrates seamlessly with Google Shopping, allowing store owners to easily and appropriately exhibit their merchandise.
It also helps multi-language, multi-currency, and even neighborhood inventory ads feeds, perfect for groups working in diverse locations.
With this app, you could without problems make certain customers could make informed decisions and make the most of their buying revel in.
Get the maximum out of online purchasing with the Google Shopping Feed XML/CSV app for Shopify—the pleasant product feed apps for Shopify.
Key Features:
Support for more than one countries & currencies
All variations & custom attributes tagging
Support for nearby inventory feeds
Csv record subsequent to the xml feeds
Works on Bing, Meta/Facebook, & marketplaces
Pricing:
Default Plan: $7/Month
View App
five. Google Shopping Feed Advanced
Google Shopping Feed Advanced Shopify app
Boost your product visibility with Google Shopping Feed Advanced – the satisfactory Shopify App for product feed.
With its powerful AI-driven functions, this app makes it less difficult than ever earlier than to maximize your product publicity on Google Shopping, Facebook Ads, Microsoft Ads, TikTok, Pinterest, PriceCheck, Takealot, ShareASale, and different channels.
It facilitates you dynamically map attributes to create powerful product titles, descriptions, and version information like Color, Age & Gender, fix problems in Google Merchant Center, and embed unlimited recommendations.
Now you could take your eCommerce business presence to the next degree thru powerful product records feed control.
So, get ready to increase your product publicity and enhance your income with Google Shopping Feed Advanced!
Key Features:
One-click synchronization of stock and orders
Ai powered product titles & barcodes
Automatically map categories with statistics-manipulation guidelines
Price differentiation for better manipulate over income
Enjoy dynamic discounts & clever feed recommendations
Pricing:
Basic: $20/Month
Premium: $one hundred twenty/Month
Feednexus: $500/Month
View App
6. FeedAPIs For Bing Shopping /MS
FeedAPIs For Bing Shopping /MS app for Shopify
For Shopify merchants in need of a reliable, clean-to-use product feed solution as a way to raise visibility and brings consequences, the FeedAPI for Bing Shopping/MS app ought to pinnacle the listing.
It’s one of the excellent Shopify apps for product feed and without problems integrates with Microsoft Merchant Center Store, allowing you to optimize product statistics feeds and personalize product titles, descriptions, and product sorts for a hit product listings.
With it you may song dynamic remarketing tagging and conversion monitoring and create promotions feed for unique and all products – supplying you with whole manipulate over your product feed.
FeedAPI for Bing Shopping/MS app is your one-stop answer to enhance visibility and maximize your product feed’s potential.
Key Features:
Automatically extract product feed out of your ecommerce save
Submit optimized product statistics to Microsoft merchant center store
Enable conversion monitoring & dynamic remarketing with UTM tag
Optimize campaigns with clever filters & bulk edit alternatives
Create & put up service provider promotions for particular merchandise
Pricing:
Up To 500 Products: $four.Ninety nine/Month
Max one thousand Products: $eight.Ninety nine/Month
Max 5000 Products: $thirteen.99/Month
Max 10000 Products: $17.Ninety nine/Month
View App
7. AfterShip Feed for TikTok Shop
AfterShip Feed for TikTok Shop Shopify app
Are you seeking to expand your keep’s visibility through promoting your merchandise on TikTok Shop? AfterShip’s Feed for TikTok Shop is one of the high-quality Shopify apps for product feed to effortlessly sync and switch product and order information from Shopify to your TikTok Shop — in few clicks!
With Feed for TikTok Shop, you can seamlessly combine with different eCommerce platforms, trouble-free.
Its robust API services assure a clean overall performance and problem-free save control, while its devoted customer support crew affords well timed and complete answers to any of your questions concerning product feed management.
Now, improve your store’s visibility with AfterShip’s Feed for TikTok Shop and take gain of this thrilling new possibility to attain ability customers!
Key Features:
Sync product & fees to TikTok shop & mobile app
Auto satisfy orders from ecommerce keep’s admin
Map products & classes to what merchants want
Immersive mobile shopping with notifications & wishlists
One-click on automobile product sync to TikTok & cell apps
Pricing:
Free: Free
Essentials: $18/month
Pro: $119/month
8. Flexify: Facebook Product Feed
Flexify: Facebook Product Feed Shopify app
Introducing Flexify – the pleasant Shopify app for seamlessly optimizing product statistics for Facebook channels.
Flexify simplifies the method of making wonderful product feeds, routinely including in missing product attributes for boosted visibility and similarly optimizing product listings on Facebook and Instagram – an appropriate answer for traders looking to generate greater income.
With Flexify, you’ll be able to reveal, compare, and improve your product facts to its top of the line level – making the maximum of the huge reach of the two social media giants and the capability to target capability customers.
Make your product records shine with Flexify – the leading Shopify app for product feed optimization.
Key Features:
Automatically create Facebook & Instagram advertisements
Customize ads and targeting options
Supports multiple languages and currencies
Easy checkout revel in for Facebook & Instagram
Monetize & control product feeds in one vicinity
Pricing:
Free-Forever: Free
Premium – Small: $29/Month
Premium – Medium: $forty nine/Month
Premium – Large: $seventy nine/Month
Final Words
The apps we mentioned have the ability to growth your product visibility and amplify your reach.
Feed optimization let you enhance your keep’s universal performance and generate greater conversions.
By taking the time to research and put in force the exceptional product feed app in your precise wishes, you’ll be capable of take your keep and product visibility to the following degree.
Also Read : 6 Best Shopify Apps For Frequently Bought Together
5 Best Inventory Management Apps for Shopify
2 notes
·
View notes
Text


Phylogenesia Automatorum Post-game Devlog #2: The Loop
Friendly reminder: this series of posts will make way more sense if you have game, tried the game out already (you can also rate it here).
The next few days were spent on getting the game loop implemented and the UI up to scratch. Late at night I realised that instead of having the simulation run indefinitely, relying on user input to stop and restart it, the simulation should have a set run time that could be upgraded.
This is honestly super obvious in hindsight, but it sidesteps so many problems, like, players who would rather watch a stable formation oscilate and have points trickle in (and potentially get bored and quit) rather than restart and upgrade their plants.
I was feeling good about this, and now with the basic game object that manages the simulation in place, I needed to get the UI up to scratch. Long-time readers of this blog will know that UI is my absolute bane, and this project is no exception.
Mercifully, some of my UI code from Stellar Terminus came in handy here. You'll notice my fonts are the same, as are my colours, and code that has been adapted and changed many times over from bbtextbox. I also took the object that handles mouseover text that I had developed somewhat recently.
I did up a point tally, as I knew the simulation would get harder and harder to read as more plants were added and the ticks happened faster. And I also added some buttons to control and upgrade the simulation.
At this stage I also converted my hard-coded plant statistics (min/max spawn/sustain ranges, life/death point values and chances etc) to a csv. It was pleasing to know that Gamemaker Studio 2 had a native csv importing function, which was super handy. It also doesn't crash the compilation if you have the csv open in another editor unlike GMS1, and so I was able to rapidly iterate on the values I had given each plant by having the csv open on one monitor and GMS2 in another.
At this stage, I also added two more plants to the database. Creeping Mold (left) was a Magic: The Gathering reference and was conceptualised as a hardy plant that could spread on its own but required many of its friends around it to survive. It also wasn't 100% guaranteed to spread or keep living, which made for interesting patterns. To counteract this, its point gains were quite low, and also had a low chance to even give points in the first place.
The Overhedge (right) was an Over the Hedge reference because I have the brainrot, and this was the polar opposite of the Mold. Overhedge was a plant that had a very low chance to propogate or die, (~2% chance in both cases). It also had a sustain range of 0-8, so it would really just stay and chill where it spawned, providing an anchor for other plants to spawn around it. Naturally, when/if it did spawn and die, it generated quite a few points.


And so ended roughly 3 days of work. I was quite confident at this stage I would get everything done well before the 2 week deadline. Thank you as always for reading, and I'll have both the next part(s) of the devlog, and a post-mortem coming in the next few days!
#gamedev#videogame#gamemaker#devblog#programming#indiedev#cellular automata#incremental#pixelart#roguelike#simulation#life sim
7 notes
·
View notes
Text
Using indeed jobs data for business
The Indeed scraper is a powerful tool that allows you to extract job listings and associated details from the indeed.com job search website. Follow these steps to use the scraper effectively:
1. Understanding the Purpose:
The Indeed scraper is used to gather job data for analysis, research, lead generation, or other purposes.
It uses web scraping techniques to navigate through search result pages, extract job listings, and retrieve relevant information like job titles, companies, locations, salaries, and more.
2. Why Scrape Indeed.com:
There are various use cases for an Indeed jobs scraper, including:
Job Market Research
Competitor Analysis
Company Research
Salary Benchmarking
Location-Based Insights
Lead Generation
CRM Enrichment
Marketplace Insights
Career Planning
Content Creation
Consulting Services
3. Accessing the Indeed Scraper:
Go to the indeed.com website.
Search for jobs using filters like job title, company name, and location to narrow down your target job listings.
Copy the URL from the address bar after performing your search. This URL contains your search criteria and results.
4. Using the Apify Platform:
Visit the Indeed job scraper page
Click on the “Try for free” button to access the scraper.
5. Setting up the Scraper:
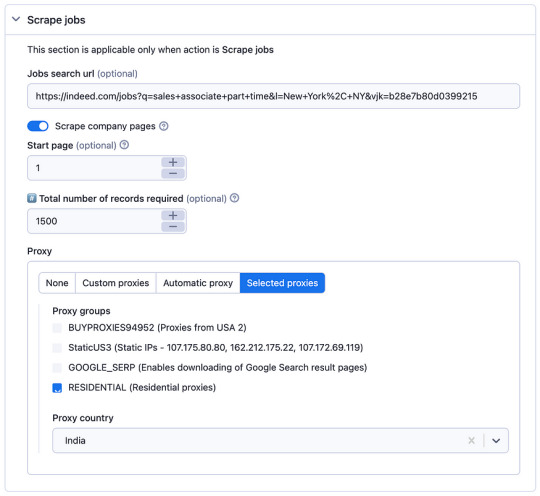
In the Apify platform, you’ll be prompted to configure the scraper:
Insert the search URL you copied from indeed.com in step 3.
Enter the number of job listings you want to scrape.
Select a residential proxy from your country. This helps you avoid being blocked by the website due to excessive requests.
Click the “Start” button to begin the scraping process.
6. Running the Scraper:
The scraper will start extracting job data based on your search criteria.
It will navigate through search result pages, gather job listings, and retrieve details such as job titles, companies, locations, salaries, and more.
When the scraping process is complete, click the “Export” button in the Apify platform.
You can choose to download the dataset in various formats, such as JSON, HTML, CSV, or Excel, depending on your preferences.
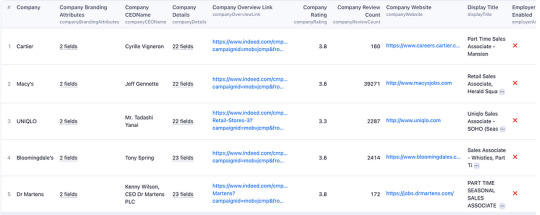
8. Review and Utilize Data:
Open the downloaded data file to view and analyze the extracted job listings and associated details.
You can use this data for your intended purposes, such as market research, competitor analysis, or lead generation.
9. Scraper Options:
The scraper offers options for specifying the job search URL and choosing a residential proxy. Make sure to configure these settings according to your requirements.
10. Sample Output: — You can expect the output data to include job details, company information, and other relevant data, depending on your chosen settings.
By following these steps, you can effectively use the Indeed scraper to gather job data from indeed.com for your specific needs, whether it’s for research, business insights, or personal career planning.
2 notes
·
View notes
Text
Build a Dynamic Dashboard Using VBA and Excel
In today’s fast-paced business world, data visualization and automation have become essential tools for professionals. One of the most powerful ways to combine both is by creating dynamic dashboards using VBA in Excel. With the right VBA (Visual Basic for Applications) skills, you can automate data processing and build interactive dashboards that update with just one click.
In this blog, we'll explore how you can build a dynamic Excel dashboard using VBA, step-by-step. We’ll also show you how you can upgrade your skills with expert training from Innozant Institute, a leading name in smart tech learning.
🧩 What is a Dynamic Dashboard?
A dynamic dashboard is an interactive visual representation of your data that updates in real-time or with minimal manual effort. It includes charts, pivot tables, buttons, drop-downs, and reports that respond to user inputs like date selection, product filter, or region.
Unlike static reports, dynamic dashboards can be reused, refreshed, and reused with just a few clicks. And when combined with Excel VBA automation, they become even more powerful.
🛠️ Why Use VBA in Dashboards?
While Excel’s native tools like PivotTables and slicers are helpful, VBA offers added flexibility. Here’s what VBA can do:
Automate data import and cleanup
Dynamically refresh charts and PivotTables
Hide/show sheets, rows, and columns based on selections
Trigger actions with buttons or UserForms
Save or send dashboard reports in PDF or email
In short, VBA gives life to your static Excel files and makes your dashboards dynamic and intelligent.
📊 Step-by-Step: Build a Dynamic Dashboard Using VBA
Let’s look at how to build a simple yet dynamic sales dashboard using Excel and VBA.
Step 1: Prepare the Data
First, get your data ready. It could be from an Excel sheet, a database, or even an imported CSV file. Make sure it’s well structured — rows for records and columns for fields like Date, Region, Product, Sales, etc.
Step 2: Insert PivotTables and Charts
Use Excel’s built-in PivotTable feature to summarize your data — total sales by region, top products, monthly sales trends. Then, insert PivotCharts based on these tables.
To make the dashboard dynamic, we’ll now connect it with VBA.
Step 3: Add Form Controls (Buttons, Drop-downs)
Go to the Developer Tab in Excel and insert buttons and drop-downs. For example:
Combo box to select Region
Button to refresh data
Button to export dashboard as PDF
Name these controls so you can reference them in your VBA code.
Step 4: Open VBA Editor and Write Code
Press ALT + F11 to open the VBA editor. Create a new module and add code like:
Sub RefreshDashboard()
Sheets("Dashboard").PivotTables("SalesPivot").PivotCache.Refresh
MsgBox "Dashboard Updated!"
End Sub
You can also automate chart updates, formatting, and data filters. Connect your buttons to the macros via "Assign Macro."
Step 5: Add Export or Email Option
Want to share your dashboard? Try this code:
Sub ExportDashboardToPDF()
Sheets("Dashboard").ExportAsFixedFormat Type:=xlTypePDF, Filename:="Sales_Report.pdf"
MsgBox "Dashboard Exported as PDF!"
End Sub
This allows users to download or email the dashboard as a professional PDF report — all from within Excel.
Step 6: Build a UserForm for Advanced Control
Using a VBA UserForm, you can let users select multiple filters (like date range, region, or category) and click a button to view updated results. This adds a sleek, app-like feel to your Excel file.
🎯 Real-World Uses of Dynamic Dashboards
Sales Teams: Track targets, product performance, and regional trends
HR Departments: Monitor hiring status, attrition, and employee engagement
Finance Teams: Compare monthly expenses, profits, and forecasts
Project Managers: View project timelines, milestones, and risks
With just a bit of VBA, your Excel file becomes a powerful business intelligence tool.
📚 Learn Excel VBA Dashboard Design at Innozant Institute
Want to master the art of Excel VBA dashboards? Join Innozant Institute, the fastest-growing training hub for data, digital, and tech skills. Our Excel VBA course covers:
Macro recording and editing
VBA syntax, loops, and conditions
Working with charts, forms, and events
Creating real-time dashboards
Automating reports and emails
✅ Live Projects ✅ Expert Trainers ✅ Hybrid (Online + Offline) Classes ✅ Placement Support
Whether you’re a student, working professional, or business owner, Innozant Institute can help you upgrade your skills and boost your career.
🚀 Final Thoughts
Creating a dynamic dashboard using VBA in Excel is not only fun but also incredibly useful in real-world business situations. It gives you more control, automation, and speed.
If you want to go beyond the basics and become an Excel automation expert, start learning VBA today — and there’s no better place than Innozant Institute to begin that journey.
0 notes
Text
What Can Conversational Forms Help Your ChatBot Do Better?

In today’s fast-moving digital environment, user engagement isn’t just important—it’s essential. Websites must offer smarter, more interactive ways to collect data, provide support, and deliver seamless experiences. One powerful tool leading this transformation is Conversational Forms—a standout feature of WPBot, the advanced WordPress chatbot plugin.
In this article, we’ll explore what conversational forms are, why they outperform traditional web forms, and how you can use them effectively across industries to increase engagement and automate processes.
youtube
What Are Conversational Forms?
Conversational Forms replace static, multi-field forms with an interactive, chat-style interface. Instead of overwhelming users with a block of fields, they simulate a real-time conversation—asking one question at a time and dynamically responding to the user’s input.
With WPBot’s drag-and-drop Conversational Form Builder, you can easily design smart, engaging forms that support:
Multiple input types (text, email, date, file uploads)
Advanced conditional logic
AI-driven responses via OpenAI integration
Why Conversational Forms Outperform Traditional Forms
Here’s why businesses are choosing conversational forms over traditional ones:
✅ Higher Engagement
They feel like chatting with a human instead of filling out a boring form, resulting in more interaction.
✅ Better Completion Rates
Small, focused questions reduce user fatigue and prevent form abandonment.
✅ Real-Time Personalization
Forms adapt based on user input, tailoring the experience for each visitor.
✅ AI Intelligence
With OpenAI, the form can interpret vague answers, ask clarifying questions, and provide smart assistance.
For companies that rely on user input—whether for lead generation, support intake, or service requests—these advantages are game-changing.
Key Features of WPBot Conversational Forms
1. Visual Drag-and-Drop Builder
No coding needed. Design complex forms with:
Text, email, number, and URL fields
Checkboxes and radio buttons
File and image uploads
Calculation and hidden fields
HTML blocks for rich content
Perfect for contact forms, calculators, surveys, and more.
2. Advanced Conditional Logic & Variables
Build intelligent workflows:
Branch questions based on user choices
Show or hide fields based on conditions
Reuse responses with dynamic variables
Example: Ask different sets of questions for “Sales” vs. “Support” queries—all within the same form.
3. OpenAI-Powered Smart Responses
Bring your forms closer to natural human interaction:
Understand and process open-ended input
Clarify vague or incomplete answers
Accept voice, text, file, or image input
This elevates the user experience and reduces the need for human intervention.
4. Pre-Built Templates
Save time with fully customizable templates for:
Contact Forms
Appointment Booking
Customer Feedback
Job Applications
Quote Requests
Quickly deploy common use cases without building from scratch.
5. Data Handling & Notifications
Take control of your form data:
Store submissions in the WordPress database
Export responses as CSV files
Trigger email alerts to admins or users
Use autoresponders for submission confirmation
These features support serious business operations and CRM workflows.
6. Flexible Form Deployment
Show your forms when and where they’re needed:
Launch from chatbot menus
Trigger with keywords like “Book Now”
Embed with shortcodes or widgets
Use click-to-chat buttons for instant interaction
Ensure users always see relevant forms at the right moment.


Real-World Use Cases for Conversational Forms
✅ Lead Generation
Capture and qualify leads naturally without overwhelming visitors.
✅ Customer Support Intake
Collect structured issue data, file attachments, and more to streamline resolution.
✅ Appointment Booking
Effortlessly schedule meetings with form-driven date/time input.
✅ Smart Calculators
Build interactive tools such as:
BMI/BMR calculators
Mortgage estimators
Room painting cost estimators
✅ Job Applications
Enable smooth application flows with file uploads, screening questions, and AI evaluation.
Benefits by Industry
eCommerce: Reduce cart abandonment, offer personalized product recommendations, and gather post-purchase feedback.
Healthcare: Book appointments, run symptom checkers, and collect patient consent forms.
Education: Enroll students, conduct quick assessments, and gather course feedback.
Agencies & Freelancers: Capture project briefs, auto-generate quotes, and screen potential clients.
WPBot vs Other Form Builders: Quick Comparison

Final Thoughts
Conversational Forms are revolutionizing how websites interact with users. By merging the simplicity of chat with the depth of structured data collection, WPBot empowers WordPress site owners to create more personalized, automated, and conversion-driven experiences.
If you want to stay competitive in 2025 and beyond, WPBot Conversational Forms are a must-have tool in your digital strategy.
Try WPBot today and see how chat-based forms can transform your site—from lead generation to support automation and everything in between.
This article was inspired by What Can You Do with Conversational Forms for a ChatBot?
#ConversationalForms#ChatbotDesign#AIChatbot#ChatbotMarketing#ConversationalAI#WPBot#NoCodeTools#SmartForms#Youtube
1 note
·
View note
Text
GMP Consultants: Integrating with Data Integrity and Computer System Validation

In today’s heavily regulated industries, Good Manufacturing Practice (GMP) certification is an indispensable element in delivering products that are consistently produced and controlled to quality standards. GMP is also essential for industries such as pharmaceuticals, biotechnology, food, and cosmetics to protect public health.
Meanwhile, the need for Data Integrity (DI) and Computer System Validation (CSV) is becoming a standard around the world. Regulatory authorities such as the FDA, EMA, and MHRA are looking for more than just good manufacturing, they're looking for credible, reliable data that supports product quality.
That is, when GMP Certification in UAE objectives are coupled with Data Integrity and CSV programs, it buttons up the entire compliance program, increases operational effectiveness, and establishes higher level of trust with the consumers and regulators.
What is GMP Certification?
GMP is proof that the manufacturer has followed specific guidelines for high quality, safety, and efficacy. Those standards pertain to every aspect of your production, from raw materials to human hygiene, down to equipment cleaning and documentation.
Industries that Require GMP
The certification is a must for various sectors such as:
Biopharmaceuticals and biotechnology
Medical devices
Cosmetics and personal care
Food and beverages
Nutraceutical and food supplements
Fundamental Aspects of GMP Regulations
These standards are concentrated on several key points:
Good and well-maintained factory formats
Written instructions and procedures have been given and followed
Correct documentation of manufacturing parameters
Competent and trained personnel
Quality control and complaint management systems
Following these principles will also result in the quality of products being produced and controlled to standards suitable for their intended use.
Responsibility of GMP Certification Consultants
What Are GMP Consultants?
GMP Consultants are professionals who specialize in assisting companies through the GMP obligations maze. They deliver personalized guidance to help meet compliance, pass audits, and stay certified long-term.
Services Offered:
Gap Analysis and Audits (GA&A): Highlighting non-compliance areas and suggesting optimal improvements.
Development of QMS: Layout of systems and procedures in compliance with GMP.
Employee Training and Inner Audits: Training of the staff and enhancement of already established internal audit procedures.
External Certification Audit Preparation: Assisting businesses to prepare for 3rd party audits by certification bodies or regulators.
Advantages of Using Consultants:
Bringing in consultants, you can expect that when companies bring in GMP Certification Consultants, they bring in added value
Industry-specific know-how
Quicker and more streamlined certification timelines
Increased confidence in adhering to and maintaining adherence
Data Integrity and CSV: An Introduction to CSV
What is Data Integrity?
Data Integrity (DI) is about the accuracy, completeness, consistency, and reliability of data during its lifetime. Regulatory agencies insist that all records, including electronic and paper-based records, be subject to the most rigorous level of integrity.
Principles of ALCOA+
ALCOA+ – the basics of data integrity. Since the days of GCP, the principles of data quality have rested on these 6 basic principles:
Attributable: The data should be linked to the person who created it.
Readable: Data shall be capable of being read and maintained.
Contiguous Florentines: Information should be entered promptly into the log from the time of the activity.
Original: The original records should be retained.
Accurate: Data should be representative of what actually occurred.
Plus: Comprehensive, Coherent, Permanent, and Accessible.”
What is CSV?
Computer System Validation (CSV) Computer system validation ensures that a computerized system employed in these regulated activities is able to generate a result that meets its predetermined specifications. CSV ensures that a system works as intended and in accordance with the standard.
Data Integrity, CSV, and GMP Compliance
Why Compliance Relies on Data Integrity?
Without integrity, quality and safety can not be assured. Data Integrity concerns have been taking center stage during regulatory inspections, and in the event of a breakdown, you may end up with warning letters, product recalls, as well as facility shutdowns.
Utilization of Validated Computer Systems for Operations
Computer systems are validated to ensure that:
The data are obtained with high accuracy and repeatability.
Regulatory and business requirements are satisfied by system functions.
Electronic saved records are reliable and auditable.
Advisor Integration Strategies:
DI Risk Assessments and Gap Analysis: Locating the weak spots in data processing and solutions to remedy them.
Validator Master Plans (VMP) Computer Systems: Defining the validation approach, activities, and documentation that will be needed.
Audit Trails, Access Controls, and Electronic Record Management: Appropriate tracking, safeguarding, and managing access to the information across the systems.
Certification and Validation with Consultant Support
The Initial Review of Systems and Practices
The GMP Certification Consultants in Dubai start with a complete examination of existing manufacturing and data management systems with regard to GMP, DI, and CSV requirements.
Planning of Remediation for DI Gaps and Validation Gaps
Corrective action plans are developed following gap analysis, focusing on the highest risk exposure to compliance and product quality.
System Compliance to Requirements (GAMP 5 approach, where applicable)
In accordance with GAMP 5 (Good Automated Manufacturing Practice) principles, the consultation team heads validation activities, providing a risk-based, scalable approach for computer system validation.
Documentation: SOP and Validation Reports Preparation
SOPs, URS, Validation Protocols (IQ, OQ, PQ), and final Validation reports are also developed to show all aspects of compliance.
Training on DI, CSV Principles
The GMP Certification in UAE experts provide various training programs to sensitize and enhance the knowledge of the workforce with regard to Data Integrity and Computer System Validation.
Final Audits and Ongoing Monitoring Measures
A last internal audit declares the company prepared for external audits, and long-term compliance is supported by enforced monitoring schedules.
Challenges in Integration
Legacy System Compliance/Remediation
Systems that are not validated and are older can represent a serious threat to the integrity of data. Replacing these legacy systems to bring them up to code takes time and money.
Adapting to Changing Regulatory Requirements
Regulatory recommendations about DI and CSV are constantly changing. Enterprises need to be aware of and adjust to changing standards in order to stay compliant.
Resource and Knowledge Constraints in SMEs
Some socioeconomic, small and medium-sized enterprises (SMEs) have limited data capability and resources. This makes working with external GMP Consultants in Abu Dhabi all the more important to ensure that you’re both reaching and maintaining compliance.
Future Trends
Emergence of Digital Validation Tool
By automating the validation, CSV tasks are getting faster, and manual activities are decreased, while concessions, accuracy, and audit preparation are improved!
Growing Use of Cloud-Based Platforms and DI Exposure
Although cloud systems bring convenience, economy, and scalability, they also lead to new data security and integrity problems. However, validation and vendor management take on critical importance.
More Regulatory Attention on AI and New Technologies under the Settings
Regulators are likely to issue new guidelines on validating these advanced technologies as artificial intelligence and machine learning enter regulated businesses.
The Main Point!!
Combining the certification, Data Integrity, and Computer Systems Validation is not an option anymore; they are mandatory for any company working in a highly regulated environment. This alignment will not only reinforce compliance but also enhance operational performance, product quality, and consumer confidence.
Through engaging with Good Manufacturing Practice experts, businesses receive the knowledge and structured support required to navigate the intricacies of regulatory environments.
GMP Consultants in UAE assist companies in putting in place strong systems that deliver continued compliance and future success in a very challenging global market.
0 notes
Text
WooCommerce Waitlist nulled plugin 2.5.0

WooCommerce Waitlist nulled plugin Customers can subscribe to email alerts from WooCommerce Waitlist when items that are out of supply come back into stock. Important features: Let customers receive alerts when they purchase an item that is currently out of stock. Simply decide which of the "most sought" items to refill first. Permit customers to easily see and edit their waiting lists. Identify the users who received an in-stock notification. Managing your waitlists is simple with the WordPress admin. You may add waitlist components to any product, anywhere, by using our shortcode. Plug-and-play ease of use: simply install, turn on, and enjoy! Provide back-in-stock notifications to customers to keep them happy. Inform clients when a product is ready for purchase. You can keep an eye on demand for out-of-stock products with the WooCommerce Waitlist plugin, which will notify customers and encourage them to buy. You can make a waiting list of people who are interested in the unavailable item and have it notify them automatically when it becomes available using just a basic nulled plugin. It only takes a few seconds to set up. It's quite easy to implement and will start turning missed opportunities into future sales right away. Consumers are more likely to wait and make a purchase from you rather than your competitors when they sign up for an email alert to be informed when a product is back in stock. It makes clients feel valued by your business and makes it possible for you to prudently replenish inventory in response to demand. How it functions. Customers only need to click a button on the product listing to add themselves to your WooCommerce store's waiting list. Everyone on the list receives an email with a link to the product as soon as you update your stock numbers on the website, making it simple for them to make a purchase. WooCommerce Waitlist is compatible with base products, product variations, and children of group products. Check out who is awaiting what. Store owners can group products based on how many customers are waiting on them using WooCommerce Waitlist. They can quickly decide which products to refill as a result. Using a custom product tab, shop managers can now keep an eye on, manage, and get in touch with customers on each product's waiting list directly from the Edit Product page. You may simply add or remove users from the waiting list, examine lists that have been archived, obtain a CSV file with the names of users on a waiting list or archive, and modify the waiting list's specifications for this product here. Permit users to keep track of their own waiting lists. Customers can review any products for which they have added themselves to a waiting list by clicking the "Your Waitlists" link on the "My Account" page. All of a user's waiting lists may be conveniently managed in one location. Make things function the way you want them to. To help you make the most of the plugin, WooCommerce Waitlist includes a number of settings, such as the following: It is possible to display waitlist buttons on archive sites like the store and product category pages, or opt-in elements when users join up for a queue. Options for integrating WooCommerce with Google Analytics tracking tags. Setting a minimum stock requirement, sending email alerts, and more features are available for WooCommerce Waitlist. Expand and customize Although WooCommerce Waitlist has a "plug and play" default configuration, you may customize it to meet your unique needs with the help of the numerous WordPress action and filter hooks it includes (see documentation for more details). Among the modifications are: Selecting language for emails with notifications Modifying the "join waiting list" buttons' appearance Integrating more features when individuals are put on or taken off of a waiting list. Modifying the design of the "Your Waitlists" page that was included in the "My Account" area. WooCommerce plugin
0 notes
Text

Automate Outreach with WhatsApp Bulk Message Sender in 2025
In today’s fast-moving digital world, brands need more than just visibility — they need speed, personalization, and automation. That’s exactly what a WhatsApp bulk message sender delivers. With billions of users active on WhatsApp, businesses are finding new ways to connect directly with their audiences using real-time messaging platforms. The right tools empower companies to send large volumes of messages without compromising personalization or timing.
Now more than ever, customers demand quick and meaningful communication. While emails are often ignored or end up in spam folders, WhatsApp messages land directly in the inbox — and most are opened within minutes. When combined with smart bulk message sending strategies, this creates a golden opportunity for marketers to boost results.
Streamline bulk message sending and increase engagement using top WhatsApp bulk message sender tools for smart, scalable communication in 2025.
Why You Should Choose a WhatsApp Bulk Message Sender
Unlike traditional marketing channels, WhatsApp has a global reach and boasts open rates above 90%. This makes it one of the most efficient platforms for mass communication. By using a powerful WhatsApp bulk message sender, businesses can automate the delivery of customized content — instantly engaging with thousands of customers.
Additionally, modern tools support rich media formats including videos, images, clickable links, and call-to-action buttons. These features not only enhance engagement but also make messaging more interactive. When paired with strategic bulk message sending, your outreach becomes efficient and scalable — without feeling robotic.
How to Get Started with a Reliable Solution Like Saasyto
One of the top platforms businesses are using in 2025 is Saasyto — a feature-rich WhatsApp bulk message sender designed for marketers who want efficiency and impact. This platform simplifies high-volume messaging while offering automation tools that protect your accounts from being flagged.
To begin, visit web.saasyto.com and register for a free trial. Once inside the dashboard, connect your WhatsApp numbers using a quick QR code scan. Saasyto supports number rotation to spread your activity across multiple accounts, minimizing detection risk.
Step-by-Step Setup with Saasyto
Once you’ve connected your accounts, setting up your first bulk message sending campaign is easy:
Create Your Campaign: Name your campaign and select the WhatsApp numbers to be used.
Import Contacts: Upload contacts via CSV or paste them manually with proper international dialing codes.
Write Your Message: Use the editor to craft a compelling message. Add media and use Spintax (like {Hi|Hello|Hey}) to create variation and avoid spam filters.
Add Personalization: Insert variables like %Name%, %OrderID%, or %Amount% to make each message unique and relevant.
Schedule and Send: Send messages instantly or schedule them. To keep things natural, apply randomized delays of 90–120 seconds between each message.
This structured process ensures your communication remains personal, timely, and compliant — all powered by a reliable WhatsApp bulk message sender.
Automation Features That Supercharge Your Campaigns
Saasyto’s smart automation suite is what sets it apart. These tools save you time and effort while ensuring consistent communication:
Auto Responder: Automatically reply to incoming messages with pre-set replies.
ChatBot: Trigger replies based on user input like “Pricing” or “Support”.
Group Grabber: Extract contacts from WhatsApp groups and convert them into campaign leads.
API Integration: Sync with your backend systems to automate order confirmations, updates, or customer support.
When used strategically, these automation features streamline bulk message sending and give your business a professional edge.
Best Practices to Maximize Campaign Success
Even with the best WhatsApp bulk message sender, success depends on strategy. Here are some proven best practices:
Keep Messages Clear: Write concise, to-the-point content that delivers value fast.
Use Personalization: People respond better to messages that feel tailor-made for them.
Add Visuals: Boost engagement by including images, videos, or buttons.
Schedule Smartly: Choose times when your audience is most active for higher open rates.
Add Clear CTAs: Guide recipients with a direct action like “Click here,” “Reply now,” or “Learn more.”
Don’t Spam: Space your messages appropriately to avoid overwhelming users.
Analyze & Optimize: Test variations and use performance data to improve future campaigns.
A WhatsApp bulk message sender gives you the tools to do just that. With built-in automation, media support, and personalization features, platforms like Saasyto make bulk message sending effortless and impactful.
0 notes
Text
Mastering Selenium WebDriver: Automating Web Testing with Ease
In today’s fast-paced software development world, efficient and reliable testing is essential. Selenium WebDriver is a leading tool for automating web application testing, enabling developers and testers to interact with web browsers programmatically. By replicating real user actions—such as clicking buttons, filling out forms, and navigating between pages—Selenium WebDriver ensures that web applications function as expected across different browsers and platforms.
Manual testing can be time-consuming and prone to human errors. Selenium WebDriver helps overcome these challenges by executing automated scripts that run faster, reduce repetitive workload, and enhance accuracy. Supporting multiple programming languages like Java, Python, and C#, Selenium WebDriver is compatible with popular browsers such as Chrome, Firefox, and Edge. Additionally, it seamlessly integrates with testing frameworks and CI/CD pipelines, enabling continuous testing and early bug detection. If you want to advance your career at the Selenium Training in chennai, you need to take a systematic approach and join up for a course that best suits your interests and will greatly expand your learning path.

Think of Selenium WebDriver as an intelligent virtual tester that interacts with websites just as a human would, but with greater speed and precision. Whether you’re validating a simple website or conducting end-to-end testing for a complex application, Selenium WebDriver provides a robust and scalable solution for web automation.
How Selenium WebDriver Works
Selenium WebDriver automates browser interactions through a series of well-defined steps:
1. Browser Interaction
Sends commands to the browser using a dedicated driver.
Supports various browsers, including Chrome, Firefox, Edge, and Safari.
Can open, navigate, and close web pages automatically.
Allows headless execution for faster, resource-efficient testing without opening a visual browser window.
2. Locating and Interacting with Web Elements
Selenium WebDriver enables automated scripts to interact with elements on a web page:
Identifies elements using locators like ID, Name, Class, XPath, and CSS Selectors.
Performs user actions such as typing input, clicking buttons, and selecting dropdown values.
Handles pop-ups, alerts, and modals to ensure smooth test execution.
Interacts with complex UI components like hover menus, drag-and-drop features, and embedded frames. Professionals in Selenium are in greater demand, and numerous organizations are now providing the Best Online Training & Placement Programs.

3. Automating Test Execution
Executes test scripts automatically, reducing manual effort.
Works with testing frameworks such as TestNG, JUnit, and PyTest for structured testing.
Generates logs and captures screenshots to help debug test failures.
Supports parallel execution to improve efficiency and reduce testing time.
Enables data-driven testing using external files such as CSV, Excel, or databases.
4. Managing Dynamic Elements and Synchronization
Implements implicit and explicit waits to handle dynamic, slow-loading elements.
Manages AJAX-based elements that change without reloading the page.
Ensures elements are visible and clickable before performing interactions.
Helps prevent timing-related issues by synchronizing browser actions with script execution.
Key Benefits of Selenium WebDriver
Increases Efficiency – Reduces manual testing efforts by automating repetitive tasks.
Improves Accuracy – Eliminates human errors and ensures consistent test execution.
Supports Cross-Browser Testing – Verifies application compatibility across different browsers.
Works with Multiple Languages – Supports Java, Python, C#, and other popular programming languages.
Open Source and Community-Driven – Free to use, with continuous updates from a vast developer community.
Final Thoughts
Selenium WebDriver is a game-changer in web testing, making automation accessible and effective for developers and testers alike. Whether you’re a beginner or an experienced tester, mastering Selenium WebDriver will help you streamline testing processes and improve software quality.
0 notes
Text
Migrate Like a Pro: Transition from Squarespace to Shopify Without Hassle

Is Squarespace Holding You Back? Time to Move Up! If you're running an online store on Squarespace and feeling limited by its features, you're not alone. Many eCommerce store owners face challenges with Squarespace's limited scalability, fewer app integrations, and restricted payment gateways. But don’t worry, migrating From Squarespace to Shopify can be your game-changer! Shopify’s powerful platform provides flexibility, customization, and robust eCommerce solutions that can help you grow faster.
Why Migrate from Squarespace to Shopify? Here’s why thousands of entrepreneurs are switching:
More Flexibility & Customization: Shopify offers countless themes, custom coding options, and drag-and-drop builders that allow you to create a personalized, high-converting store.
Wide Range of Apps & Integrations: Shopify’s App Store gives you access to thousands of apps that enhance your store’s functionality, from marketing automation to inventory management.
Better Payment Options: Shopify supports multiple payment gateways, making it easier for customers to pay, which means more conversions for you.
Advanced SEO Capabilities: Shopify is SEO-friendly and helps you rank higher on search engines, driving organic traffic to your store.
Scalability for Growth: Whether you’re a small business or an enterprise-level brand, Shopify grows with you, ensuring that your store is always ready for increased traffic and sales.
Step-by-Step Guide: How to Migrate from Squarespace to Shopify Smoothly
Step 1: Plan Your Migration Before making the switch, assess your current website. Make a checklist of:
Product details (images, descriptions, SKUs)
Customer information (names, emails, order history)
Blog posts and content
URL structure to maintain SEO integrity
Pro Tip: Create a backup of all your data to avoid losing any critical information.
Step 2: Set Up Your Shopify Store
Sign up for a Shopify account and choose a plan that fits your business needs.
Pick a theme that aligns with your brand and customize it to match your store’s style.
Add essential apps for marketing, analytics, and inventory management.
Why This Step is Important: A well-set-up store ensures a smoother transition and a better user experience.
Step 3: Export Data from Squarespace Squarespace allows you to export product data, pages, and blog content. However, not all data will transfer automatically, so you’ll need to manually migrate certain elements like custom pages or blog comments.
Export Guide:
Go to Settings > Advanced > Import/Export
Select Export and download the files in .CSV format
Review your data to ensure it’s clean and ready for import
Step 4: Import Data to Shopify
Use Shopify’s built-in import tool to upload your product data.
Navigate to Shopify Admin > Products > Import and upload your CSV files.
Double-check product descriptions, images, and metadata to ensure everything looks perfect.
Pro Tip: Use apps like Matrixify or Cart2Cart for a seamless data transfer.
Step 5: Design & Customize Your Shopify Store
Choose a theme that reflects your brand’s identity.
Customize your homepage, product pages, and blog posts to create a consistent brand experience.
Add navigation menus, contact forms, and call-to-action buttons for smooth navigation.
Why This Step Matters: A clean, intuitive design improves customer engagement and increases conversions.
Step 6: Redirect URLs to Preserve SEO One of the most critical steps during migration is to set up URL redirects. Since Squarespace and Shopify have different URL structures, you’ll want to redirect old URLs to avoid losing traffic or damaging your SEO rankings.
How to Set Up Redirects:
Go to Shopify Admin > Online Store > Navigation > URL Redirects
Add the old URLs and point them to their new Shopify counterparts
Pro Tip: Use 301 redirects to maintain SEO juice and ensure a smooth transition.
Step 7: Test Your Shopify Store Thoroughly Before launching, run a series of tests to ensure everything is functioning perfectly.
Test Checklist:
Place test orders to check the payment process
Verify that product descriptions and prices match
Check for broken links and page errors
Test website speed on both desktop and mobile
Common Challenges and How to Avoid Them
Data Loss or Formatting Errors: Double-check data before importing and use migration apps to prevent errors. SEO Disruption: Properly set up URL redirects and monitor your rankings post-migration. Design Misalignment: Customize Shopify’s theme to ensure consistency with your brand’s look and feel.
Benefits You’ll Enjoy After Migration
Increased Conversions: Shopify’s high-speed checkout process ensures fewer cart abandonments. Higher Organic Traffic: Advanced SEO tools help you rank better on search engines. Better Customer Experience: A seamless shopping experience leads to happier customers and repeat business.
Ready to Migrate Like a Pro? Let’s Get Started!
Making the switch from Squarespace to Shopify might seem overwhelming, but with the right plan and approach, you can migrate without hassle. Shopify offers limitless possibilities that help your business grow and scale faster. Whether you’re looking to enhance your store’s design, improve SEO, or manage inventory more effectively, Shopify has got you covered.
Set up your Shopify store with experts- OyeCommerz and watch your eCommerce business soar! Contact us now!
0 notes