#cut it dry fit painted it went to hang it and it doesn’t fit measured and cut again then it was too short
Text
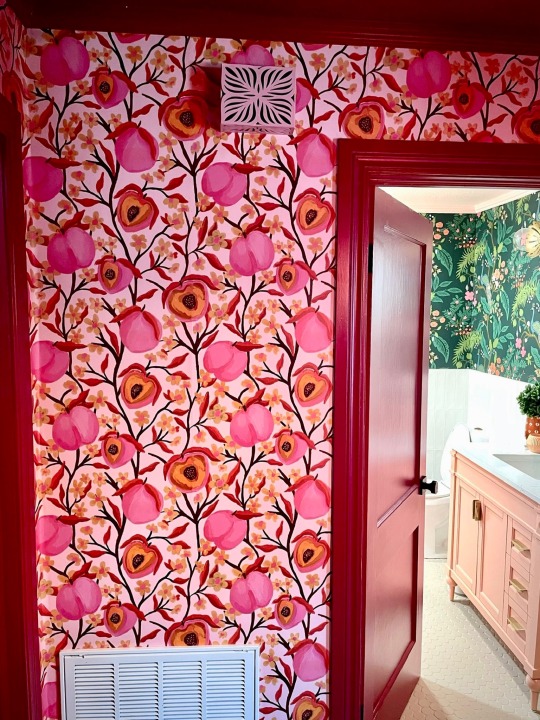
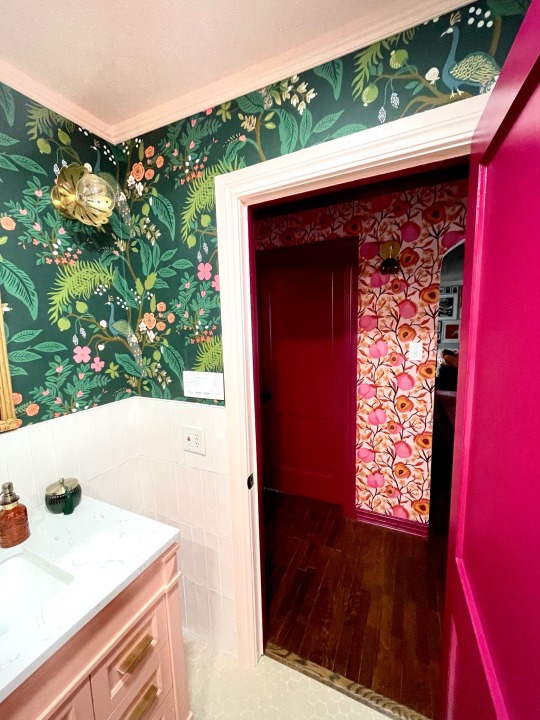
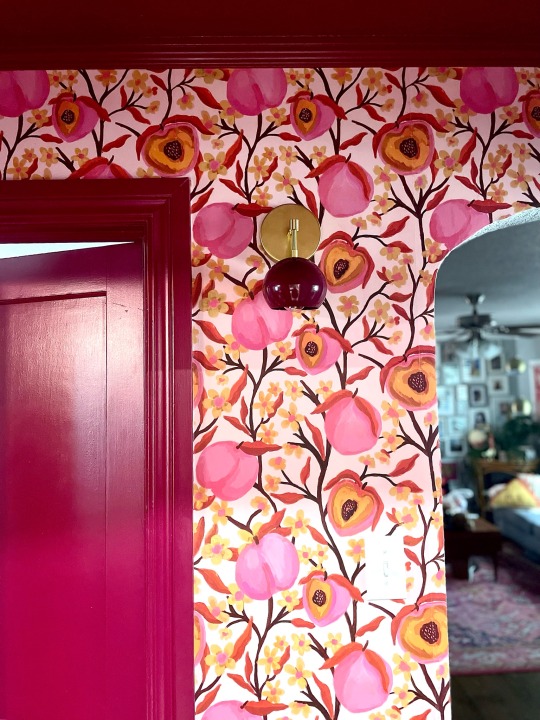
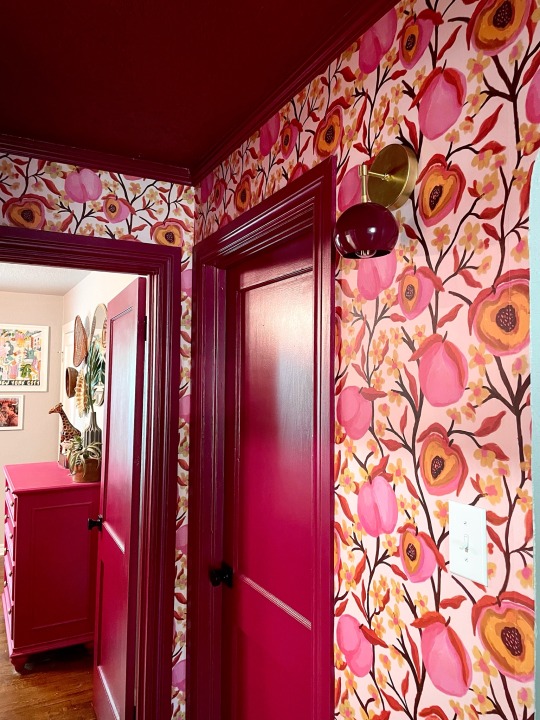
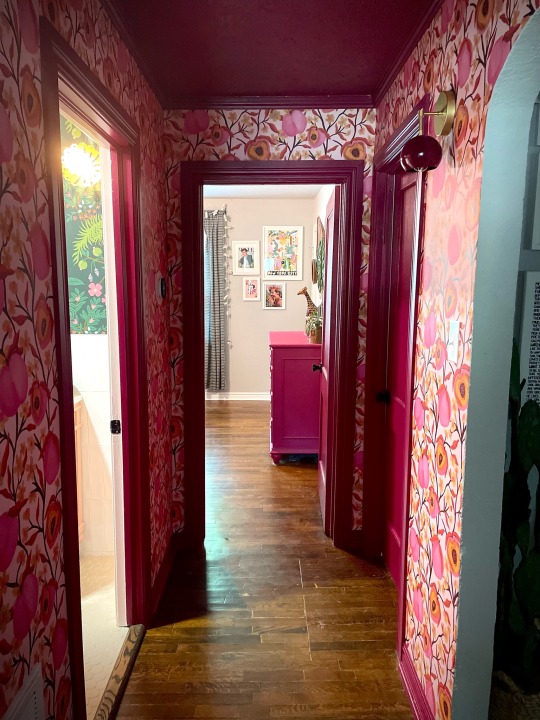

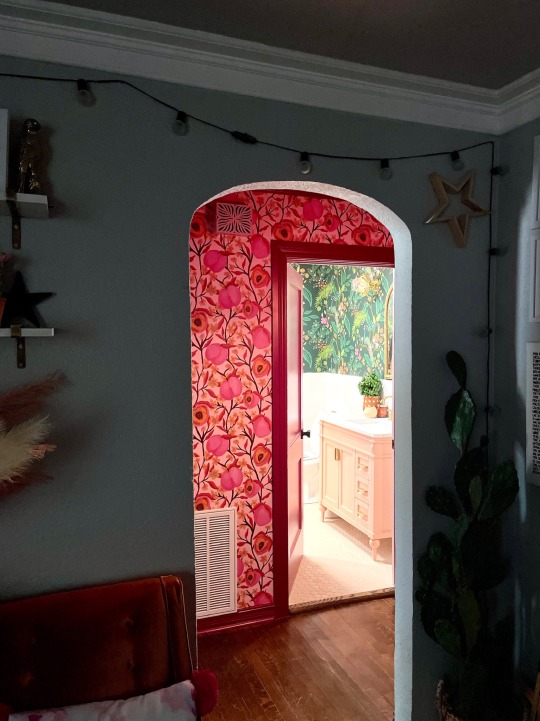
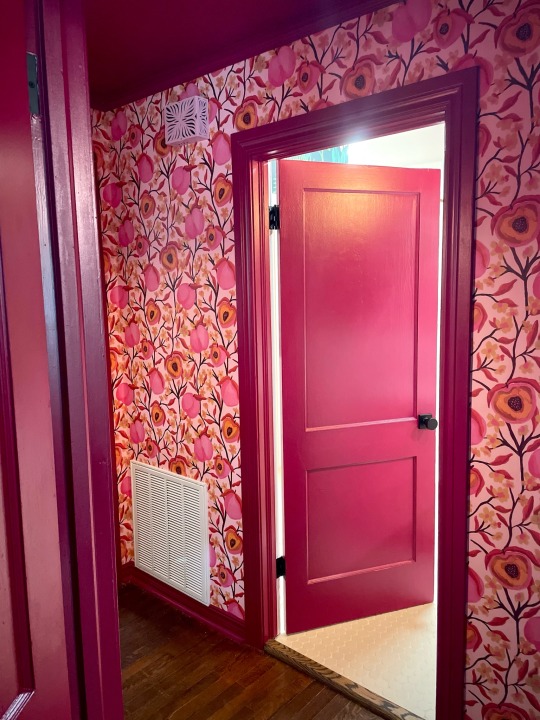
Paint: @behrpaint Sugar Beet
Wallpaper: @lust.home
Lighting: @sazerac_stitches
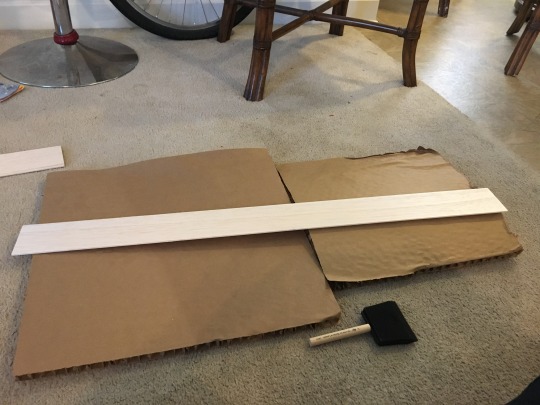
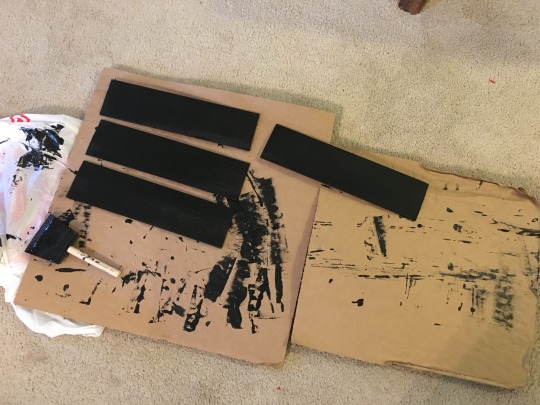
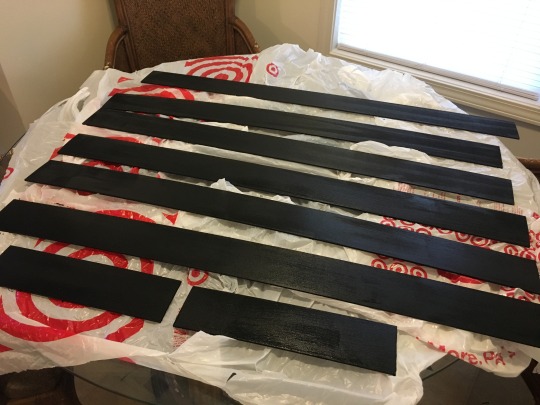
#hanging the crown moulding was incredibly difficult because our ceilings are so wonky#cut it dry fit painted it went to hang it and it doesn’t fit measured and cut again then it was too short#apt#home decor#diy
5 notes
·
View notes
Text
All Noble Things
Author: @kiranatrix
For: @resilicns
Pairings/Characters: Near and Gevanni
Rating/Warnings: Gen, no warnings
Prompt: Near reflecting on his relationship with Wammy’s and L’s reputation
Author’s notes: In How to Read, it says that Gevanni’s hobby is building ships in a bottle. So I imagined a scene where Near is observing Gevanni, now in the role of Watari, building a special ship. The time period is flexible but I imagined it after the C-Kira case and before the case with Minoru. This is a loose interpretation of your prompt but I hope you enjoy it!
—
“There’s something I’ve been meaning to ask you, Gevanni.” Near didn’t look up as he carefully laid out another domino on the floor, perfectly spaced from its neighbor and approximately two centimeters from chaos. Pinched fingers pulled back carefully and twisted around a strand of white hair. “Two things, really.”
Gevanni looked up from his workbench as the long but comfortable silence between them was broken. Since Roger had died and he’d taken on the role of Watari, he was usually the question-asker. Would you like lunch now? Have you heard back about this or that piece of evidence? Did you have another nightmare last night?
He’d gotten used to it, to Near. To being the bedrock that an island could rest upon. “Two questions?”
No, he was more of a species imported to Near’s world and being gradually altered by the isolation, evolving to fill his niche. But he had no complaints–it was a quiet, stable life and Near paid him well. He didn’t mind the solitude. “You’re exceeding your daily allotment. I’ll have to demand a raise if this keeps up.”
“I believe I gave you a raise just three months ago. If these demands keep up, I’ll have to find another Watari.” Near deadpanned it but his eyes flicked up briefly, and Rester knew he was joking. Another domino clinked against the terrazzo floors, this one with hand-carved scrimshaw detailing a breaching whale.
Gevanni snorted and turned back to the ship in a bottle he was working on. “Good luck finding someone else to source those pajamas with the specific blend of Pima cotton you prefer. I’ve kept that a secret. Iron-clad job security.” He grinned as he carefully reached a long wire into the bottle to pat down blue and white putty mimicking ocean waves. “So, what’s question number one?”
“Can you tie back my hair? It keeps getting in the way.” Near flicked a long strand over his shoulder but it fell again, dangling dangerously close to his creation. “Mind the–”
“Dominos? Yeah, I’m practically a ninja at this point.” Gevanni pushed his loupe glasses to the top of his head before carefully making his way over spiraling lines of set-up dominos to Near at the center. He knelt and pulled a hair-tie from his pocket, holding it between his teeth as he gathered up all the silvery strands. “Holf spill,” he murmured around the band. Near was stone-still as he made a quick and slightly messy ponytail, leaving some loose hair around the face for twirling. “Better?”
“Much. Thank you.” Near very briefly made eye contact as Gevanni went back to his workbench before looking back to his pile of dominos. He sorted through them for another scrimshaw piece. Gevanni had made a special set for him on his last birthday but he always saved them for the end.
“Mmhm.” Gevanni slid back into his chair and picked up the little ship, a model of a 19th-century whaler. “So what was the second question?”
“I was curious what you were working on.” Near let a domino tumble across his knuckles, back and forth, back and forth. “You’ve never spent that much time on just one ship before.” He caught the domino with his thumb and placed it next in line.
“Oh, so you noticed?” Gevanni held up the little whaler on his palm, clearly proud of the highly detailed craftsmanship. All the masts were down and tied with an array of strings that could be pulled up once it was in the bottle to raise them. “I guess this one’s special since it doesn’t really exist. Thought I’d challenge myself. It’s…well, it’s how I imagine the Pequod to look, the whaling ship in–“
“Moby Dick?” Near stared at the miniature vessel, head slightly cocked as he smoothed a loose strand of hair. “The ship Captain Ahab used to chase his white whale.”
Gevanni smiled. “That’s right. It’s one of my favorite books. Have you read it?”
“Years ago. I remember not liking it very much. The whale killed him in the end.” Near placed the last couple of dominos and let out a long sigh. The moments before flicking the first piece were the ones he both cherished and dreaded. The satisfaction of creation could be drawn out like a monotone note, but when it was finished, the spectacular destruction was often over too soon. So, he hesitated and stood up instead, padding to Gevanni’s workbench to watch more creation.
“I bet you’d like the book more these days. Single-minded obsession to defeat a power past human control? Throwing all caution and sense of self-preservation to the wind? The thrill of the chase?” Gevanni arched a brow. “Can’t tell me that doesn’t sound familiar.”
Near frowned slightly and hunched in on himself. “I suppose you mean L. Or do you characterize me as so foolish?”
“You’re L now.” Gevanni disliked that he had to remind Near of that even now, years after the first L had died. “But yes, it reminds me of what Matsuda told us about your predecessor’s obsession with Kira. I never met the first L, but maybe I can understand him, in a way.” He quoted Melville, "All my means are sane, my motive and my object mad.’ You’re L but you’re not him, and I’m glad for it.”
Near wasn’t sure if he was glad for it or not. So many times over the years he’d compared himself to that avatar and wondered if he could measure up. Drily, “I guess that makes me Ishmael."
"You survived, didn’t you? Lived to tell the tale and learn what he couldn’t."
Gevanni turned back to the little ship, carefully threading another string through the rear-most mast. He worked quietly for a while, cognizant of Near’s focused attention and feeling sorry for bringing up the Kira case. It wasn’t often that Near took such an interest in his own projects, or perhaps the man was merely thinking about what he’d said. “Sit down, if you want to. I’m about to get to the exciting part.”
Near pulled a chair closer and slinked into it, one leg pulled tight to his chest and the other dangling off the end. “Which is the exciting part? Stuffing it into the bottle?”
“That’s part of it. The thrilling part for me is raising the masts and sails inside the bottle.” Gevanni pointed to the flat masts and the multiple lines of string leading from them. “If anything goes wrong or a string gets tangled…or some bit of glue doesn’t hold, well–”
“You’re screwed.” Near smiled faintly and rested his chin on his knee. “Hours of planning for one moment of glory. Or disaster.” It also sounded familiar, so familiar.
“Exactly.” Gevanni chuckled and looked over at Near, pleased to see that small, rare smile. That in itself was the product of so much patience, of hours spent in understanding and the slow building of confidence and trust. “Once I get the ship in, would you like to raise the sails?”
Near’s eyes widened and he rocked slightly in the chair. That was Gevanni’s moment of glory and he deserved it after so much time and hard work. The inlaid wood, the meticulous paint, the delicately carved and articulated ship’s wheel capped in brass. The hand-sewn sails and gold script that read Pequod on the ship’s side. Each detail was evidence that someone else had built this and he would only be stealing the best part, swooping in for the end of the trick.
“You built it so you should do it.” It didn’t help that he was worried about making a mistake and ruining it at the last moment. How would it even fit? Despite the masts lying flat, it seemed impossible that the ship would make it inside the bottle. “I don’t know how.”
Gevanni sensed Near’s hesitation and uncertainty, recognizing the subtle tics of anxiety. “I can show you. You’re great at stuff like this.” He motioned to the vast lines and towers of dominos filling the room. “Plus, I trust you.”
When Near didn’t answer, he turned back to the ship, placing a small line of glue at the bottom and oh-so-carefully maneuvering it into the narrow mouth of the glass bottle and onto the ‘waves’ of translucent blue putty. It was a very tight fit and when it stuck down in the right position, he let out a sigh of relief.
“Not bad, huh?” The strings dangled from the bottle’s mouth as he held it up to show Near. “Offer still stands.”
Near wanted to do it, to try. Honestly, he wanted to ask Gevanni to show him how to build one of his own, how to trump the rigid enclosure and build something impossible inside. To raise it up not by magic but by human ingenuity and patience. A creation not to destroy but to keep.
“Alright.” His fingers moved from his hair to tentatively touch the white strings hanging from the bottle’s mouth. “All of them?”
“Just these.” Gevanni pointed out several lines connected to the three masts. “Don’t yank, just pull slowly until you feel resistance and I’ll tape them up.”
“If it works.”
Gevanni laughed quietly. “It’ll work. Stop stalling.”
Near mumbled, “I’m not stalling,” but stalled a moment more before gently tugging the strings. He made a soft noise in the back of his throat when all three masts raised in unison, perfectly aligned and straight. He smiled as Gevanni secured the strings, then slid off the chair to gaze at the bottle from the side. This floating world, this impossible thing that’s bottled the sea. “I can see why you like these so much.”
“It passes the time.” Gevanni felt warm inside since it was rare that they connected like this, despite all the time spent in each other’s company. He glued the strings to the ship with a long wire and then cut them, leaving no trace of how it had really been made. Setting it on the bench to dry, he said, “Would you like to have it? I have about a dozen. I mean, if you want it.”
“As a warning against white whales?” Near smirked and climbed back into the chair. He fingered the hem of his specially-ordered Pima cotton pajamas, the exact blend he preferred. “Or for the memory of Ahab?”
“Neither? Or…maybe both.” Gevanni knew that so much had changed for Near when Kira died. Monster or not, that moment of destruction had ultimately felt unsatisfying. He knew Near struggled with assuming the name and reputation of L, a legacy that had become so confused in the mind of a world that would never know two L’s had died and a third now had to make peace with that. It was easier to bottle ships than emotions.
Mildly, “Or maybe just because it’s something we built together.” It was odd, but somehow it would mean a lot to him for Near to have it. “How about it?”
Near found a loose string at the hem of his pants and yanked it, snapping the thread. He got up and crouched beside the winding, spiraling rows of dominos and pressed a slender finger against the first one. That catalyst set off the reaction, the staccato clack clack clack! that echoed in the high-ceilinged room. It was over in seconds and silence crept in again.
“I’d like that.”
-End-
[The title comes from a quote in Moby Dick: "A noble craft, but somehow a most melancholy. All noble things are touched with that.” It reminded me of Gevanni’s rather solitary hobby as well as the occupation of solving cases as L.]
#fanfiction#death note#submission#near#gevanni#ratings: general#kiranatrix#resilicns#Near's Bday Finale 2k21
31 notes
·
View notes
Text
FIC: Fragile Things (ch.3, baon)
Summary: It’s been a very long week
Tags: Spicyhoney, Established Relationship, Hurt/Comfort, Angst
Notes: Brace yourselves, you have to go forward to go back...but because I had a few people who were concerned enough to ask, let me reassure y'all that no one is dying in this series, nor would I ever have Edge and Stretch separate, nope, nope, nope. Life isn't perfect for them, never was, but you can count on that much, for certain.
part of the ‘by any other name’ series.
Read it on AO3
or
Read it here!
~~*~~
When Edge first opened his sockets, he wasn’t sure where he was. Blearily, he looked around the room, his thoughts tangled and sleepy.
The walls were painted a soft yellow and hanging on them were paintings of soothing landscapes and floral arrangements, done by the artists in the Monster community. On a corner table was a vase of dried flowers, carefully displayed to bring a touch of soft color to the room. The overall effect would have given the appearance of a luxury hotel room, if not for the hospital bed and the monitoring equipment.
There were comfortable chairs, a far cry from those in the waiting room. Blue was curled up asleep in one of them, his head resting on his updrawn knees. Beneath the curtained window was a cushioned bench. At some point in the night Sans had crawled up on it and he was sound sleep, unflinching at the dawn light pouring across his face.
They both had matching dark smudges beneath their sockets, their faces lined with weariness. He surely had a set of his own. Matching luggage, wasn’t that the witticism?
His exhaustion must be making him giddy, if he was thinking up jokes. Sleeping in a chair had done little for his fatigue but his magic had recovered quite a bit, they should all have gotten something to eat before they’d fallen asleep last night, they—
It was only when the blankets on the bed shifted that Edge woke up entirely, everything that had happened the night before falling painfully into place. Stretch stirring was likely what had woken him, and Edge leaned back in his chair, watching as Stretch’s face scrunched up, his sockets flickering.
At some point in the night, someone had removed most of the electrodes, which meant someone had been in this room and Edge had slept through it. That he’d berate himself for later; right now his attention was entirely on Stretch as he slowly woke.
He blinked rapidly, his head lifting from the pillow as he looked around in confusion. His eye lights met Edge’s and he could see dawning realization before he let his head drop back on the pillow, closed his sockets as he croaked out a heartfelt, “fuck.”
“Yes, I would call that an accurate assessment,” Edge said acidly. Stretch’s sockets pinched shut tighter for a brief moment before he slit them open again, fuzzy white lights meeting the crimson of his glare. “’Fuck’ is certainly a word to describe this. Perhaps I can use it in a sentence for you. For example, what the fuck were you thinking?”
Behind him, he could hear Sans and Blue stirring, but he didn��t look away from Stretch, who was shrinking down in a guilty cringe. It confirmed everything he’d been afraid of; not only had Stretch been doing something dangerous, he’d done it on purpose, without even the barest precaution of a lab partner. The fear he’d been swallowing back all night, waiting hours for if when his husband woke, was congealing within him, hardening into fury.
Pure carelessness, that was all it was, Stretch so foolhardy with his own life, and for what?
“Would you care to explain what happened?” Edge demanded. “Do you even know?”
Blue slid out of the chair, scrubbing hard at his sockets as he came up to Edge’s elbow, “Pappy, you should rest—"
They both ignored him and Stretch burst out, “look, i know, i fucked up.”
Edge laughed harshly and Stretch cringed harder, gripping his hands together, the bones scraping. “Oh, well, then, you know that you fucked up, that makes it all fine, doesn’t it?”
“i didn’t say that!” Stretch blurted. He was breathing heavily, the machines giving a beep of warning. But a quick Check showed his HP was fine and Edge wasn’t about to apologize for Checking him. As agitated as Stretch was, Edge doubted he noticed. “it’s just with everything that’s been happening lately, i was trying to…to get the fucking thing to work. i thought if i could get it working properly, things would get better.” He reached out tentatively, his fingers drifting limply down to the bed when Edge didn’t take his hand. “i thought, humans might not like us but if we could work through a way to help them heal? they’d be begging for us to stay aboveground.”
“Pray tell, how does that excuse cutting corners? I may not understand everything you do in your lab, but I do know Sans should have been with you.”
“edge,” Sans said behind him. His voice was low and miserable, but Edge couldn’t pay attention to that. His focus was a laser on Stretch, angry heat throbbing in his rib cage.
“i know,” Stretch whispered. A tear streaked down his cheekbone and for the first time since they’d gotten together Edge felt a brief, vicious moment of satisfaction at seeing it, coupled with distant pain.
“Do you have any idea how it felt to go downstairs and see you like that?” Edge went on, relentlessly.
“i get it, okay?” Stretch’s voice broke, pleading.
“If you don’t care how it made me feel, then think about your brother!”
“i care how you feel!” Stretch shouted. The tears were flowing now, bright orange against the paleness of his skull. “of course i fucking care! you’ve been under so much stress lately, i only wanted to—" Stretch bit off the words, scrubbing angrily at his cheek bones with the back of his hand. “i was trying to help!”
That was like a blow, directly to his soul and abruptly it all made a glaring sort of sense. Stretch had done this because of him. He'd risked his life for him, all for him.
Slowly, Edge stood, the chair scraping loudly on the floor as he pushed it back. Without a word, he turned and walked out, couldn’t listen to Stretch frantically calling his name. He needed a moment, or he was going to say something he’d truly regret.
His boots were too loud against the clean tile of the floor, the steady sound of them lulling as Edge walked swiftly through the corridors. His feet carried him automatically to the visitor area where doors led outside to a terrace. Distantly, he registered someone standing on one end, smelled a whiff of cigarette smoke. He ignored them, pushing aside the flutter of emotion that familiar scent gave him, and walked to the other side to brace his hands against the snowy stone balustrade.
The volcanic heat in his soul was pounding with molten fury, LV that rarely troubled him clamoring unforgivingly. Edge dug his fingers into the stone until they hurt, the pain purposefully distracting as he concentrated on breathing. In to a count of four, then out, drawing out the exhalation as long as he could. Finding a rhythm, letting it soothe him.
The cold helped as well; it cleared his head, helped him focus. Edge stood there until his feet and hands were numb, his skull chilly with drying sweat.
He gave it another long moment before he said, acidly, “I know you’re there.”
Red stepped out from a shadow, the glow of his eye lights appearing abruptly. “good, was getting sick of hiding.”
He reached into the inside pocket of his jacket and pulled out a slender cigar, biting off the end with sharp teeth and spitting it over the terrace. He took his time lighting it, scratching the match against the stone balustrade and holding the cigar in the tiny flame until the end glowed cherry red. He took a long puff, exhaling a vile cloud of smoke that wafted directly into Edge’s face. “all right now?”
Edge considered it before he answered, watching the ash grow in length at the cigar tip before his brother tapped it carefully away. “Yes. If you blow that smoke in my face again, I’m going to shove that cigar through your eye socket.”
A grin quirked up the corner of Red’s mouth, but he moved to stand downwind. “whatever you say, boss.”
It wasn’t worth the argument to tell his brother not to call him that, not at this moment. “How long have you been here?”
Red shrugged, leaning with his back against the railing. “since last night. didn’t want to interrupt your little slumber party, so i talked with the doc. sleeping pretty heavy these days, aren’t you, bro.”
Edge didn’t bother answering that. His brother would find a way to punish him for it, eventually. For now, he had more important questions, “What did the doctor say?”
“said that your liability is fucking lucky you found him when you did,” Red said bluntly. Edge did not flinch, only met his brother’s gaze evenly. Eventually, Red nodded. “he’ll be okay. sans was a little forthcoming, at least,” something in his expression soured a little at that. Perhaps Edge wasn’t the only one with a reprimand in his future. “that little toy of theirs was supposed to take a little of their magic. no big deal, both of them have it in spades. only, something backfired and instead it drained him dry. when it ran out of magic, it went for his hp.”
Perhaps it was a measure of kindness that Red stopped there, that he didn’t confirm what Edge already knew. If he hadn’t been worried when Stretch didn’t show up for dinner, if he’d stayed later at work, if, if, if. Or perhaps Red didn’t want to antagonize his LV any further by saying what they were both thinking.
Dust.
With a flick of his wrist, Red tamped out his cigar, tossing the butt into a nearby ashtray. “if you’re done with your bitch fit, we should get back. your pretty little honey bun is about to have an aneurysm. doc is talking about sedating him if he doesn’t calm down.”
Guilt flared, as painfully cold as his anger had been hot but Red was already shaking his head. “don’t even, kid. sometimes you gotta walk away. Better to take a chance leaving than staying like that.”
Edge nodded curtly, turning on heel and walking away. His brother didn’t follow him, but then, Edge didn’t expect him to. Red would find his own way back to the room.
He could hear weeping before he even made it to the doorway, taking a slow breath and bracing himself before he walked in. Blue was sitting on the bed with Stretch, holding his brother and rocking him, singing softly. Sans was nowhere in sight.
Blue’s eye lights jerked towards Edge as he stepped through the door, wide and accusing but he said nothing, only loosened his hold as Edge moved up to the side of the bed.
When Stretch lifted his face from his brother’s shoulder, his face was awash with tears. The sound he made, a low, whimpering moan, tore at Edge’s battered soul. He let Stretch grab him with frantic hands, let him pull him in, holding him achingly tight.
“don’t leave me,” Stretch pleaded, his unsettled hands grasping at him frantically. “please, i’m sorry, i’m so sorry, don’t leave, please…”
“Hush,” Edge murmured. Uselessly; Stretch only babbled on, but he managed to move enough to pull Stretch into his lap in a tangle of blankets and tubes. Gently, he cupped the back of Stretch’s skull, guiding his head down to his own shoulder. Wetness seeped through his shirt almost immediately. Edge ignored it, petting softly, soothingly, as he crooned, “Shh, it’s all right, it’s all right now, I wasn’t leaving, I would never leave you, shhhh. You aren't getting rid of me that easily.”
He heard the door close and sent a thought of silent gratitude at Red, for surely he’d dragged Blue out; it was highly unlikely he’d leave on his own, not with his brother like this. But Edge preferred to deal with his husband’s upset without an audience and he didn’t care to be soothing both Swap brothers. He cared about Blue, for all that he could be an occasional irritant, but his passion and his love was for one skeleton alone, the one in his arms.
Edge only held Stretch as he cried himself out, murmuring useless reassurances until he fell asleep. He waited until he was sure Stretch was sleeping soundly, then, with as much care as he could, Edge lifted Stretch back into the bed. He took his time tucking the blankets around him, wiping away the drying dregs of his tears, then lay down next to him, on top of the covers.
Eventually a nurse came in, pausing as she caught sight of Edge on the bed. Edge glared at her, but she didn’t say a word, only changed the IV bag and left.
With a sigh, he settled in, resting his head on the pillow next to Stretch’s and closed his sockets. He didn’t care what anyone did or didn’t say, doctors, brothers, or the Angel herself.
He wasn’t going anywhere.
-finis-
#spicyhoney#papcest#keelywolfe#underfell#underswap#underswap papyrus#underfell papyrus#by any other name
39 notes
·
View notes
Text
How to Make Zelda’s Pauldrons out of Leather

Photo by Mindfall Media
Here’s an overview of the techniques that went into making these Zelda pauldrons! Although this tutorial doesn’t hold your hand through every step, I wanted to give enough information that a curious reader could easily do more research on their own. If you’d like to know more about leather work, try searching for any of the keywords in these steps to find way more detailed resources on how to apply these methods to your own projects.
Keep reading below for more info!
Patterns & Mock-ups
Veg-tanned leather can be manipulated and formed over other objects through a process called wet-molding. Before even touching my materials, I found an object that was very similar in shape and size to the lower portion of Zelda’s pauldron. For me, this happened to be a bedroom lamp, but you can use whatever object suits your needs.
The lamp is slightly larger than my shoulder, and flares out at the bottom in the same way I wanted the edge of Zelda’s pauldron to flare out. This makes it a great candidate to use as a wet-molding buck (aka, the base form for my leather).

The mock-up pictured on the right is the result of wet-molding leather over the lamp (I’ll go into more detail on that later). Once I had a prototype in my hands, I started drawing on the general shape and details, and trimming away the extra material to fit it to my shoulder.

I used paper and foam make a mock-up of the top piece, fitting it over the bottom piece and making adjustments to both.
When I was happy with my full mock-up, I translated it back into a 2D pattern by flattening out the leather and tracing it onto paper. This allowed me to clean up my lines, make everything symmetrical, and refine the shapes. I made a second foam mock-up based on this pattern to double-check that it could be molded back into the exact 3D shape I was aiming for. It passed the test, so I turned my attention to patterning the surface details.
Using a variety of reference images, I drew all of the design details by hand onto my flat pattern. I then scanned the images and traced them digitally, cleaning up my lines to create a final pattern. Here’s part of it below (I cut this on my Silhouette Cameo 3, but you can cut it by hand if you have to).

My digital pattern for this pauldron (and the rest of Zelda’s accessories!) is for sale at my store here: http://atelierheidi.tictail.com/product/zelda-accessories-pattern-pack-digital-download
If you’re using this walkthrough to make identical pauldrons, please consider supporting my work and teaching by purchasing a copy of my pattern.
Cutting & Tooling the Leather
I traced my final pattern onto 8-9 oz veg-tanned leather and cut out the pieces with a normal utility knife.

In the above image, the edges of the leather have been beveled on both the top and bottom with an edge beveling tool in Size 3. This tool helps round off leather edges for a cleaner finish. I also began going over my traced design (in silver here) with a swivel knife. This tool scores the surface of the leather without cutting all the way through it. It can be tricky to get the hang of, so make sure you practice first before cutting into your final pieces. Any accidental cuts cannot be repaired.

After all the swivel knife cuts were made, I used beveler stamps in a few different sizes to create deeper impressions. A beveler stamp pushes down the leather on one side of the cut, making the opposite side look like a raised edge. The exact stamps I used were Craftool B197, B203, and B935, all purchased from Tandy Leather. In the above image, the left piece has been cut with a swivel knife, and the right piece has been both cut and beveled.
This type of tooling also requires a mallet (mine is rawhide; other materials are fine), water (from a spray bottle or sponge), and a stone slab (quartz, granite, marble, etc) to use as a work surface.
The stone slab provides shock absorption as you hit your leather piece with a stamp/mallet. It helps muffle the hammering noise and prevents other items on your table from bouncing around as you work. I’m also using a rubber poundo board here in this image, but that’s optional. Also pictured is a tiny metal jewelry anvil that I’m using as a weight to hold the leather in place while I work, allowing both my hands to be free. You can use almost any small, heavy object for this purpose.
Water helps the leather permanently take on surface impressions. I used a small cup and a sponge to apply water in small sections as I worked.

In the above image, the left piece has plain beveled tooling. The right piece has been tooled with a background stamp to add extra surface texture. This smooths out some of the lumpier sections and creates more depth and detail. The exact stamps I used for this step were Craftool A104, A114, and F901 (again, purchased from Tandy.)
Wet-molding
With my tooling complete, I moved on to forming my flat leather pieces into the 3D shapes I needed. This brings us back to my trusty lamp.

Left: my badass lamp. Middle: Wet leather piece stretched over the lamp and wrapped tightly with gauze fabric. Right: Now dry, the leather holds its new shape on its own.
The more water you apply to veg-tanned leather, the more malleable it becomes. When tooling, you generally only need to apply a small amount of water to the leather’s surface. When wet-molding, you can apply as much water as needed to manipulate it into a new shape. For this pauldron, I held the leather under a faucet and let water run across the entire surface of the front and back. You could go as far as soaking the leather if necessary, but it’s better to start with a little and go up from there. I also recommend removing any rings or other jewelry from your hands, which can very easily scratch the surface of the leather when it is this wet! Be very careful handling it at this stage, especially if you have long fingernails.
After wetting the leather, I pressed it against the body of the lamp and used both hands to smooth it outward from the center. This gradually stretches the leather and molds it around the curved surface of the lamp. Continue working it until you have manipulated it into the shape you need.
You’ll need to devise a method of holding the leather firmly in place while it dries. Depending on your project, there are many viable solutions. In this example, I used a long strip of 100% cotton gauze fabric to tightly wrap the leather against the lamp. The fabric choice is important; cotton gauze is highly breathable, so the water can easily pass through it and evaporate. The fabric evenly distributes pressure across the entire surface of the leather, so that it doesn’t leave marks in the tooled surface. Keep in mind that if you strap it down only around the edges (such as with string or rubber bands) it would most likely leave a permanent indention in that spot.
After leaving it to dry overnight, I unwrapped the gauze to reveal my newly reshaped leather.
I purchased blue acrylic gems from All Star Co to use in this project. I measured and cut a window that was slightly smaller than the gem, then wet-molded the leather to create a raised lip around the edges of the gem.

Finishing & Assembly
Before painting and assembling, I used gum tragacanth and an edge slicker to burnish the edges of all of my leather pieces. This is a process of compressing and polishing the rough leather edge into a smooth, hard surface.
I assembled the pieces by stitching them together, hiding the seam along the borders of the top piece. Each stitch hole is punched by hand using a stitching chisel. I then sewed it together using waxed thread and two blunt-tipped needles. The stitch I used is called a saddle stitch, in which the thread passes through each hole twice in a double-helix shape.

The base coat for this gold color was Leather Studio’s gold paint. I then used Angelus bronze paint and several washes of watered down acrylic paint to add shadows and weathering to the paint job. Jacquard Lumiere is another line of excellent metallic leather paints.
After sealing the paint job with Saddle Lac and installing my gems, these pauldrons were ready to go.

My final Zelda costume, debuted at Katsucon 2017. Photo by Mindfall Media.
If you have any simple questions about the information in this post -- such as where to buy materials, definitions of terms, or how a tool is used -- I invite you to please use Google to your advantage. The internet is brimming with tutorials that cover each of these steps in greater detail. If you have specific questions about my personal decision-making process, you can direct those to my inbox here on tumblr. (I’m more likely to respond to questions that are not asked anonymously, just because I can answer them privately)
This tutorial is not meant to be a comprehensive guide to beginner leatherwork, but I hope it gave you some insight into how a leather armor project comes together.
For live demonstrations of these techniques, check out my YouTube or Twitch channel! I do educational livestreams twice a week where I show and explain various techniques of costume construction. Tune in at: https://www.twitch.tv/atelierheidi
For a digital copy of all of my Zelda patterns, check out my store: http://atelierheidi.tictail.com/products/patterns
If you found this post to be helpful, please consider sharing it! Thanks for reading and good luck with all your leather endeavors.
#cosplay#costume#leather armor#cosplay help#tutorial#how to#leatherwork#zelda#princess zelda#twilight princess#atelier heidi#loz#legend of zelda#zelda tutorials#zelda tutorial
573 notes
·
View notes
Text
How To: Disney Button Display
I have been searching for a way to display my Disney buttons without having to spend an insane amount of money on custom shadow boxes and frames for years. The latest trend is to turn them into magnets, but let’s be honest, I have too many of those too! After a thousand Google searches of displays that left room for about 5-10 buttons, I finally decided to create my own display. This display is great for a few reasons.
1. It's a bit fancier than your average cork board and doesn’t involve any custom framing.
2. The lack of glass means you’re free to view your buttons without the glare!
3. The display doesn’t require pulling apart the buttons so you can easily remove them from the display and wear them to your next Disney trip if you’d like!
4. You can add on to it so if you collect more over time, you’ll have an easier time adding them to your wall.
5. It’s great for holding small AND large collections of buttons. Whether you’re displaying 8 or 82, this display works.
6. It also works if your Disney buttons are already pin-less, crooked, or broken! Additional instructions are included at the end if this applies to you.
I wanted to share this project with you in full detail so that anybody can create this display! I was really happy with how mine turned out. Here are the step-by-step instructions on how to make this wooden display!

What You’ll Need:
* Paint Ready Balsa Wood (available at local craft stores)
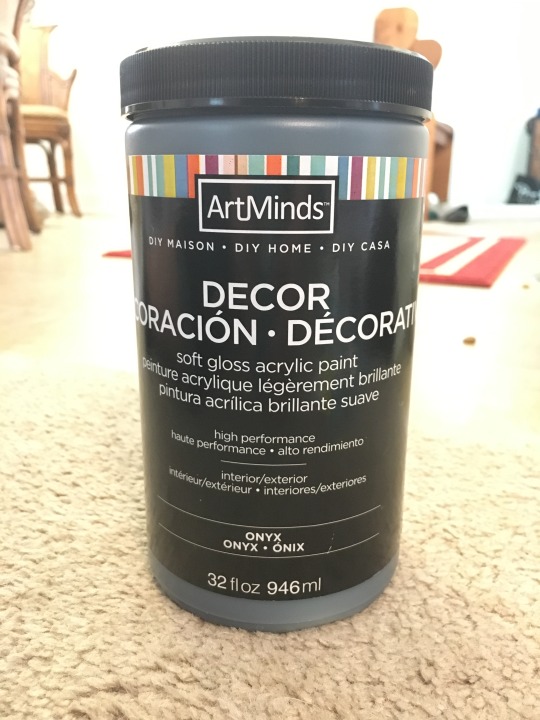
* Paint (we used ArtMinds interior/exterior soft gloss acrylic paint in Onyx)
* Command Light Clips, Indoor or Outdoor (1 for each button you’re displaying)
* Nails
**Keep on hand: Ruler, X-acto Knife and razor/file (if you plan on cutting wood), foam brush, measuring tape, leveler, scissors, hammer, and nails.
What Size Boards You’ll Need:
This all depends on how many buttons you are displaying. We were working with a 5′ wall and wanted about 6″ of space between the edges of the wall and the display, so we went with a 4′ long board. Michael’s doesn’t carry 4′ boards though, so we bought extra boards to cut and add length. For STANDARD DISNEY BUTTONS, we found that the board only needed to be 1/8″ deep and 3″ tall.
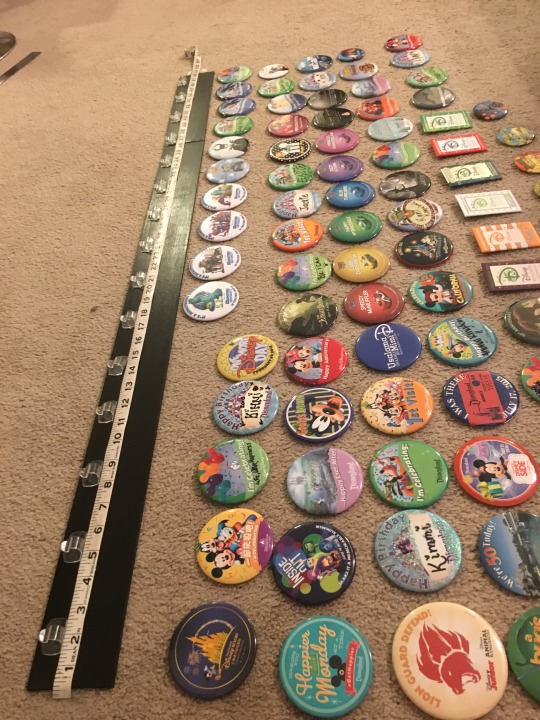
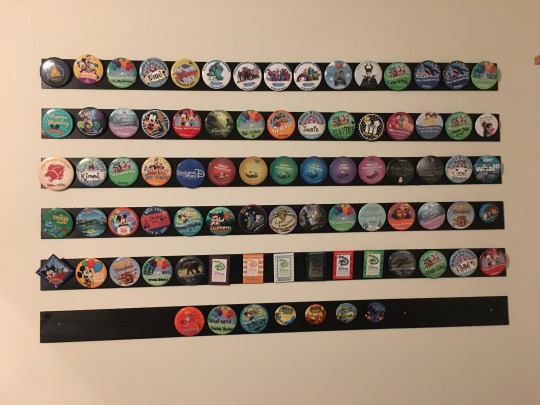
Our wood came in 1/8 x 3 x 36″, so we got extra boards to make that 36″ into the 48″ we needed. My recommendation is to lay out all your Disney buttons with the spacing you want, and measure it out. Feel free to do multiple layers. We displayed 82 buttons. With 48″ long boards, we were able to fit 15 on each row. We created 6 rows for all our buttons.
Basically, if you’re planning a 4′ long design, here’s what you need for 1 row:
1 1/8 x 3 x 48″ board OR 1 1/8 x 3 x 36″ board and 1 1/8 x 3 x 12″ board
Note: If you’re reading this and already thinking “Geeze I’m not that crafty, this is not my style”, be aware that the preparation is the hardest step. Once you figure out what you want and the size boards you’ll need, the rest is a breeze!
STEP ONE: Prepare Your Boards & Buttons

Line up your buttons in the way you wish to display them. For us, we took color, style, and event into account. We decided to take out all duplicates. Similar special event buttons were kept together and “I’m Celebrating” and Birthday buttons were scattered throughout so we didn’t have entire sections of green/blue. Figure out your spacing, measure it, and buy appropriately sized boards.
Next, resize your boards, if needed. Measure out the length you need, and mark it with a pencil. Then, perforate it with an X-acto knife on both sides of the board. From there, you can cut through or snap the boards. Last, file down the edges with a razor or file so the end is clean.
STEP TWO: Paint Your Boards
We used a 3″ foam brush to help speed the process up. Paint the fronts, sides, and ends of the board with two coats of whatever color you like. We used a deep black so that the colorful buttons would pop! Two coats is ideal.
Tip: Make sure your first coat is completely dry before painting with the second coat to prevent stickiness.
STEP FOUR: Prepare Command Hooks
You can use any command hooks that you like, but we preferred the look of Command Light Clips (indoor or outdoor) for a few reasons.
1. We liked that it made the buttons lie as flat as possible instead of hanging forward.
2. They were the shortest hook available, so the top of the button hid it well.
3. The hooks had a thicker ledge, preventing the button from sliding and hanging sideways.
To prepare, trim the excess pull tabs with scissors. This pull tab is normally used for easy removal of the command hook. Because you won’t be using them as removable dorm-room hooks, you won’t need that extra pull tab.
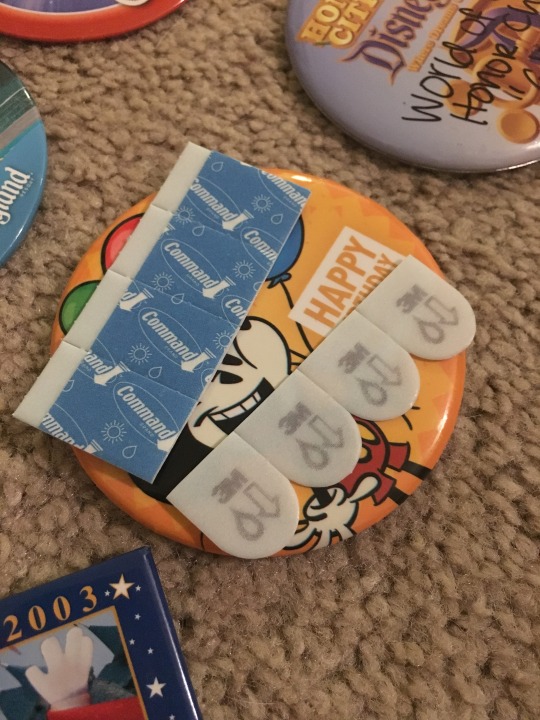

Then, peel off the blue command strip side and stick it to the command strips, leaving the “wall side” on for now.
Keep in mind that it doesn’t really matter what color the adhesive is on the back of the hooks. The button will cover it anyway.
STEP FOUR: Figure Out Spacing & Apply Hooks
Do one trial run to see how you would like your spacing. For most standard Disney buttons (using a board 3″ tall), you’ll want the bottom of the hook to be 1″ from the top of the board. Some Disney buttons will have the pins more to the center of the button. You can adjust as necessary. We kept ours all the same.
Then, do the math to figure out the spacing between each button. We had already decided we wanted our first and last hooks to be about 1″ from the edges. From the center of that hook to the end was 1.5″ on each side. Since we did this to both sides, 1.5 x 2 = 3. So our 48″ board was now basically 45″. We then took our 15 buttons (equivalent to 14 spaces) to figure out the rest. 45″ divided by 14 spaces = 3.21″. So we measured roughly 3.21″ in between each hook to ensure even spacing.
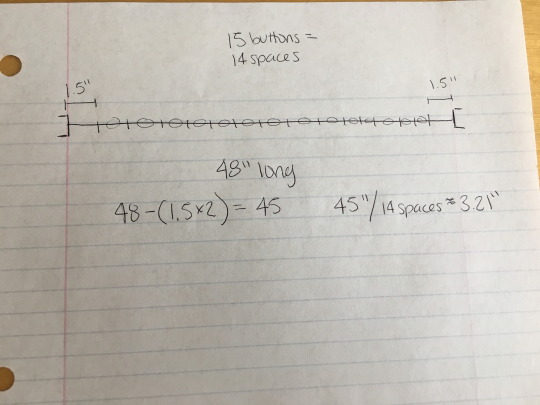
Tip: Even if your buttons are slightly different sizes, it’s a good idea to keep the spacing the same. This helps keep it all look more uniform, and means that if you ever want to rearrange your design, you can.
After you’ve figured out the spacing you want between each hook and you’ve done a trial run to double check your math, use a ruler to measure out your spacing and stick the hook down in its spot one at a time.
After you have the first row complete, you can use that as a guideline to line up the other hooks so you don’t have to measure it out each time.
STEP FIVE: Secure Boards to the Wall
Use a leveler to secure them to your wall safely. Nail it to the wall as you would any other wall decor. We did one on each end and one towards the middle for extra stability.

For reference, we spaced our boards 2 inches apart from each other. With each board being 3″ tall and having a 2″ space between each other, our entire wall design ended up being 28″ tall.
STEP SIX: Hang Your Buttons
This is the easy part! In the order you choose, pin your buttons around the base of the clip, just as you would when pinning it to your shirt.
Last but not least: Enjoy your creation!
**If you have broken buttons, or are the type of person to never re-wear the buttons and you’re looking for a way to save money, follow instructions 1 & 2. Then, instead of using command hooks, apply hot glue to the rim of the button and secure to the wood. Hot glue guns can be as cheap as $7 (glue sticks included) at Walmart. If the pin is still on the back and getting in the way, use wire cutters to remove the pin part before hot gluing. Then follow Step Five to secure it to the wall. Note that if you hot glue them down, you won’t be able to hide the nails under the buttons unless you secure it to the wall first. It is advised to leave room for the nails and hang it after you secure the buttons in case you wish to move the decor at a later time. **
I hope you enjoy this craft! It was fun to design and put together, and it feels so good to finally have our buttons displayed the way we want them. Each button of ours has a story behind it and we can’t wait to share them with people whenever they come over to visit.
If you’re looking for another fun how-to, I made a simple Tangled Flags craft a while back that is great for parties or room decor. You can find that here.
Questions/Concerns? Message me and I’d be happy to help!
Happy Crafting!
#crafts#howto#craftideas#disneybuttons#disney#disneybuttondisplay#disneypindisplay#buttondisplay#dcp#disneycollegeprogram#dcpalumni#wdw#waltdisneyworld#disneyland#dlr#disneylandresort#magickingdom#animalkingdom#hollywoodstudios#californiaadventure#EPCOT#bugsland#carsland#honorarycitizen#24hourevents#birthday#anniversary#imcelebrating#officialdisneybuttons#disneyprograms
1 note
·
View note
Text
DIY Insulated Dog House
youtube
Things I Used in This Project:
ISOtunes Bluetooth Hearing Protection
Titebond III Wood Glue
Miter Saw Stand Plan
Miter Saw
Infinity Table Saw Blade
Infinity Miter Saw Blade
Woodpeckers Speed Square
Armor Tool Pocket Hole Jig
Woodpeckers Straight Edge
Woodpeckers 12″ Square
Triton Track Saw
Brad Nailer
Titebond Thick and Quick
When my dogs aren’t with me in the shop, they are hanging out on the wrap around porch which has plenty of shade, is out of the rain, and always has a great breeze. During the summer it’s awesome because they stay cool but during the winter it’s hard for them to get warm. So this week I built them a dog house with the purpose of giving all three of them a place to get away from the wind and snuggle up. Let me show you how I did it.
This will be an insulted dog house so instead of going with my first instinct which was a plywood body, I went with more of a framing design made from 2x4s ripped in half. I first sent the 2x4s through my table saw to take off the rounded edges on both sides, then readjusted the fence and cut them directly in half.
After getting them cut to width I then cut everything to length at the miter saw.
I started by constructing what will be the two sides, coming up a few inches on a few pieces to give the house some small feet and get it up off the ground. Again, mine will be under a porch and should be kept dry but just incase.
I’ll be using pocket holes to join things together and I’m very excited to introduce a new jig to hit the market that has some really great features.It’s the Armol Toos Pocket Hole Jig. Right off the bat they made the deck of the jig the same height as a 2×4 so it’s easy to create side support feeds. Of course I don’t need them in this instant but this will come in handy. So on a traditional pocket hole jig you have three things to adjust, the drill block, the clamping tension, and the drill bit collar….on this jig all of those things are self adjusting so all you have to do is stick in your material. If you want to go from 1 1/2” to 3/4” you just clamp the new material into place and you see everything automatically adjusts for you. You can use the onboard Allen key to tighten down on the drill bit collar then you’re ready to go. If you want to double check, there are indication markings on the side annnnd they are color coordinated to the length of screw you need for that thickness of material. Pretty sweet if you ask me.
After getting all the pocket holes drilled, I started attaching things. Even though this house shouldn’t ever see moisture it will be outside so I went ahead and used Titebond III wood glue since it’s a waterproof glue.
After getting one side assembled, I repeated the process to create another. Next I started working on the front panel, first cutting everything to size, drilling in pocket holes, then gluing and screwing it in place. This design is very easy to adjust depending on your size of dog. Since I have three and they all like to snuggle up together, I made this one long enough to fit three of their beds but still give them room to get around one another.
After getting the door in place, I thought I should double check to see if they could comfortably fit. With that test passed, I moved on to attaching the back panel. Moving things to the floor to have more working room.
Next up was a floor, but before putting in the decking material I threw in some insulation. This comes in a big 4×8 sheet and is 3/4” thick. Since my framing is 1 1/2” thick I cut two panels per opening and doubled filled up the cavity. I would use a straight edge and a box blade or my pocket knife to cut it out, then stuck it in place.
Once the bottom was full I measured and cut some plywood to deck it. I ended up cutting this piece in half to make getting it into place a little easier and I just made sure to cut it in the center so I could join the seam to the floor joist.
And now more insulation for the walls! To make this step easier I would cheat and set the panel directly on top of the foam then just trace the shape I was needing. If you’re working alone, you can set the insulation on the floor so you have less travel distance to move the entire house. I would line one of the straight edges up to the edge of the insulation then trace the rest, cut it then stick it in place. I was originally thinking I would need to glue these panels in place but the friction fit was so snug I skipped the glue all together. Oh and just a reminder this insulation has foil backing on both sides so if you want to use your table saw to cut it down, and have a SawStop then just be sure to put it in bypass mode or it will tip right away.
The set in place and tracing method worked so well I next repeated it for the siding! For the siding I’m going with beadboard. This stuff is a huge pain to paint but it does give it some good texture and it’s pretty lightweight, only being 3/8” thick. As you can see I dragged the full sheet over to my work area, then set flipped around the house in order to trace all the sides. If you do this of course just make sure a horizontal reference is squared up to the headboard so your panel doesn’t come out wonky looking.
After getting the sides traced I used my tracksaw to cut all the shapes out then Titebond III and brad nails to stick it in place. I started by attaching the two side panels so that when I cut and attached the front and back, the edges of the side panels would be covered up.
On the front panel, I went ahead and covered up the opening to the dog house with the bead board, but then after getting it secured in place I used a large drill bit to punch a hole through. Then I used a router and a flush trim bit to perfectly cut out the opening. If you don’t have a router then you can also use a jigsaw or even a reciprocating saw to do this.
Now moving on to the roof. Since the dog opening is muuuuch smaller than me, I wanted to make the roof into an access panel to the inside so I decided to make it hinged. This will allow me to easily grab the beds to wash, check for snacks, or anything else. I decided to use the left over beadboard I had from the siding to create this roof and also decided to split it into two doors instead of just a single. This is fine for mine since it will live under a covered porch but if you plan to place your house in the rain then keep it as a single panel so rain won’t drip through the seam.
Before attaching things, I set the roof panels aside and gave everything a coat of paint. Like I said before, beadboard is not fun to paint because it takes two forms of application. I would first use a roller to get all the flat surfaces, but then used a brush to get into all the valleys. Looking back on it, I should have used my sprayer, that would have saved me a ton of time, but oh well. For the body I am going with a grey and while it was drying, I also grabbed what will be the trim boards and threw a coat of paint onto them as well to be drying. Instead of white, I’m going with a light grey.
While those were drying, I started attaching the roof panels. I started by centering and squaring up the panels to the body. Once I had it just so, I used a pencil to trace the underside of the panels. This line indicates the outside of the body, but since I want to also insulate the roof I needed to know where the inside of the body fell on these panels. With the framing being 1 1/2” thick, I grab something that was 2” thick, which just happened to be a level, and used this to mark the inside line. Now that I had this reference I could measure the area inside and cut a piece of insulation to size. To attach these panels Im’ using a multi surface glue made by Titebond called Thick and Quick. Since I could use brads to hold it in place while that dried, I grabbed an assortment of tools and just weighted it down for a bit.
While that was setting up to dry I started working on the trim. I ripped down my 1x boards I had painted earlier then started cutting them to length and attaching them. Glue doesn’t stick very well to painted surfaces so learn from my mistake and leave the top edge of your body unpainted to give you a clean surface to glue to.
I’m again starting on the edges of the house so that the front and back trim will cover up the end grain of the side trim. I also always cheat on trim. Instead of measuring and cutting I typically just hold the board in place and mark the back side.
By this time the insulation was well past stuck in place so I first attached a portion of paino hinge to the underside then crawled inside the house and attached it to the body. And I should have seen it coming but to be honest I didn’t think about it when I was working the design….but the door actually has a built in stop with the overhang on the back end. So that’s convient. : )
Nice, that works nicely. After getting one secure, I repeated on the second. I used the Tounge and groove feature of the beadboard to make the seam in the middle disappear. This is great except when I tried to lift up one without the other, it was running into each other and prevented it. To fix this issue I grabbed my multi tool and just notched out a small portion in the back so that I could open one and give it clearance to pass up the other. There we go, now it’s working correctly.
Next I did all the finish painting to the inside, the underside of the roof, and any other exposed wood. Now when I was trimming around the door I left the top piece of trim long so I could hang something cute and special. I used my CNC machine to cut out a cut little paw print and instead of just glueing this to the side, I instead added a small hook to the overhung trim and the paw so that I could hang it and there would be a slight swing to it. Hehe, I think the dogs will appreciate the marking.
I thought I was done but the roof was really bothering me with how thin it looked compared to everything else. So I ended up ripping some 1/2” plywood and adding a small strip around the primereter of the underside of the roof. This just bulks up the look some and I think makes it looks better.
And that’s it! Now the pups have a place they can crawl inside to get out of the wind that’s always present on our hill. They can all be together which will make them happy, but still have room to get around one another. Also, I have a way to peak in at them to make sure they aren’t staying up late and ordering pizza.
So a few followers on my Instagram page were mentioning their dogs would tear up the exposed insulation on the inside. Mine don’t chew or scratch things up, but if yours do then I would certainly recommend adding a layer of thin sheeting to the inside as well. Don’t forget I have a set of plans for this build in the plans section of this website.
That’s it for this one, I hope you enjoyed it.
The post DIY Insulated Dog House appeared first on Wilker Do's.
from Wilker Do's https://ift.tt/2CnUOQU
from Ronald Bosley III on Blogger https://ift.tt/2UXuPXW
0 notes
Text
Weekly reflection 13-19 May 2018
I spent the weekend working non-stop on finalising all of my pinhole photographs so that they would be ready to be sent to the printers on Monday. Unfortunately, I underestimated just how much time it would take to clean all of the dust and scanner glass scratches off of the photos, so I wasn’t quite finished on Monday. As a result, I spent our 1:15-4:30 half-day in the studio finishing that up. I also decided to resize them from 5x7” to 4x6” for financial reasons, as 300 4x6” prints are only 10p each whereas 300 5x7” prints would be 21p each. Also, as there is a possibility that I might try to display all of the pinholes (both the positives and the negatives), on the outside of the camera obscura, it made more sense space-wise as well.
By the end of the day on Monday, I was able to print all of the images out onto A3 printer paper so that I could see 1) how they fit when simply plastered across the obscura, 2) so I could begin to get an actual visualisation of what they look like on the camera obscura and 3) so I could begin to assess and consider how best to display them for the exhibition and 3) So I could finalise which images to expose onto silk screens.
What I learned by doing this is that the wallpaper effect, whilst effective, also needs to be curated in a much more thoughtful manner than simply slapping them up – not that I really thought that would be an effective approach, but I thought it was worth a shot.
Anyhow, because of this discovery, I have decided that I definitely will not try to display all of the images. I need to see how they look and need to think about each individual portrait in terms of aesthetics, meaning and how they relate to my new theme of deterioration and fractured memory. Additionally, I also need to bear in mind the fact that there will be a lens poking out of the front of the Camera Obscura. As such, thought is required regarding how the lens will work alongside the pinholes that I eventually choose to display.
On Tuesday morning, as I was on the bus, I suddenly had an idea about how best to approach this…
I thought that it might look rather interesting to display the images in a smaller to larger spiral or simply an unorganised (but organised at the same time) expansion with the obscura lens as the centre, acting like an eye, which is exactly what a lens is, after all. How does the eye connect to the brain and how does the eye connect to our brain and how does our brain process what it sees? How do those images get stored? Why do some of them stay so poignant and strong whilst others fade away to nothing? And why do some of those images/memories suddenly reappear from the long forgotten ethers? What are the triggers? Why did some of my mother’s memories from her childhood and her time married to my father seem to stay with her until the very end whilst memories of myself and the rest of her children vanished into nothingness? This brings to mind a quotation from Margaret Atwood’s “Cat’s Eye” that I have thought about quite a lot over the past few years:
“You don’t look back along time, but down through it, like water. Sometimes this comes to the surface, sometimes that, sometimes nothing. Nothing goes away.”
That last sentence - “Nothing goes away” makes me think... Sure, but that doesn’t mean that memories, like time, resurface with true accuracy. Things often come back fragmented, twisted into a mixture of truth and fabrication, but we think that we are probably being accurate, even when we know that, logically, memory recall is rarely perfect and as such, inaccuracy is to be expected. We humans are so skilled at fooling ourselves, aren’t we?
Anyhow, back to Tuesday... I arrived at the college and began the day by printing out the four A3 images that I chose to convert into bitmaps for silk screens onto acetate. As there were no learning assistants available to expose the screens for me, I exposed the screens myself. I had spoken to the head learning assistant on Monday, and suggested that I do so when they told me I would need to wait until the afternoon to have them exposed by them.
The learning assistant told me that it would be alright for me to do the exposures myself given the fact that I have been present for so many tutorials about how to do it due to the fact that I have been working in the print room, and because I had been around for so many tutorials have coached several other students on higher-level courses (as well as one of the artists in residence) through the process from start to finish.
Despite being fairly certain that I would do just fine, but given that I had never done it before, I approached the exposure process with caution and decided to expose just one screen all of the way through from start to finish – exposure, cleaning of the emulsion, drying of the screen and a short run of test pulls to be sure it had worked out. The result was good, so I went ahead and did the next three in one fell swoop, exposing the screen one after the other and storing them in the cupboard until the cleaning stage.
They all turned out - success!! Now, if only I had had learned how to coat the screens with emulsion… Actually, given the demand on the limited supplies, it’s probably good that I didn’t learn how to coat the screens with emulsion because the temptation to do so would have been very strong, especially on Wednesday when I discovered that the screen I used for my self-portrait wasn’t properly cleaned by the people who are supposed to clean the screens, and as a result had the ghost of someone else’s work on one side of it which was very annoying because there are no other screens that I can use, nor is there enough time even if there were.
Anyhow, I ended up pulling prints from 8:30 AM until 5:00 PM on Wednesday and then again from 8:15 AM until 8:30 PM on Thursday. I was very into what I was doing and forgot to take breaks. As a result, the physical toll of what I had done was very apparent on Thursday evening when I discovered that I could barely sit down in the car on the way home. Whoops!
The negative physical aspect aside, I at least think that I might have a couple of useable images for the exhibition… hopefully, anyhow. I have brought all of the work home with me so that I can give it all a proper go-through in private and away from the chaos of the studio. That, and having the work out of the studios during hanging week when the painting and sanding is still happening is far safer than keeping them at the college as there is no chance of them being ruined if they are not there. Seems like a logical idea to me at any rate.
Which brings me to Friday - I still needed to get the hole drilled for my camera obscura, so with the whole “measure twice, cut once” idea in mind, I found a compass and re-drew the diameter of my lens on paper. The fit was very tight, but I had my Dremel with me to sand it out a bit to make it fit properly. I then drew the final, 71mm circle on the side of the darkroom.
As I waited for the required power tools to be acquired from the woodworking department, I took the opportunity to dismantle the inside of the darkroom. I then applied spackling paste to the holes that were created by the screws and eyelets that I used when it was still in darkroom mode. The lecturer who was helping me drill the hole came around noon to begin drilling out the hole. Unfortunately however, the jigsaw that the woodworking department gave them had two dead batteries, so we put them on charge and went to lunch. When I came back from lunch, the hole had been cut – magic! I then donned a mask an goggles and sanded the hole with my Dremel until the lens fit snugly.
As I had previously feared, there was not enough light despite the fact that I was using a lens, so I went to the equipment room to check out this odd, 3000 lumens LED light that the college has available for checkout. Alas, even with the additional light, it still was not working.
I returned the to the equipment room and began a search for a frame that I could use for my Plan B - which is rear projection.
After finding a frame, I made a screen from tracing paper and went into the darkroom to test it. To my surprise, I found that the image was only in focus when it was just a few inches away from the back of the lens, so I decided to repurpose the lid of one of the pinhole cameras that I made and cut a square out to create a screen. The first attempt with the box lid was too close, so I used the deeper, bottom side of the box which was perfect.
#Final Major Project#FMP#Weekly reflection#ual level 3 foundation#FAD3#DPFAD18#Art Student#ArtStudent#Crunch time#Edinburgh College#EdinburghCollege#UAL Awarding Body#UALAwardingBody#Photography student#Screen Printing#Screenprinting#Dremel#Exhibition preparation#Camera Obscura#CameraObscura
0 notes
Text
Transcript for “Fatigue Chic Episode 2: Walker Bag for Styna Lane”
All narration that was exclusively in the audio descriped version of the video is enclosed within two astrixes.
This is an audio described video.
Fatigue Chic: Crafting with a Spoonie. Episode 2
Walker bag for another chronic illness Youtuber, Styna Lane.
Hey guys!
I've been trying to put music in but
for one thing that's not always totally accessible to some people and for
another thing I recently remembered I was watching these
videos that didn't have background music and it was great because I could put my
own background music on in the background.
So there are gonna be parts of this video that are totally silent.
I encourage you to play your own music or don't if you prefer silence.
If you do want to play music,
I recommend the same album that I was listening to while editing this video
(though you will probably only get through a couple songs) which is, M A N I A
the new album by Fall Out Boy. I love it I've been listening to it on repeat all day.
Also the new EP by Panic! at Disco is good too.
Recommend!
Enjoy the video.
Hi guys!
Today I am showing you guys how I made this walker bag.
I made this Walker bag for a friend...
ish...
type person.
It's weird when you meet someone on the internet I don't know what to...
I...
she's my friend.
I had been watching her on YouTube for a while I jumped
on one of her Twitch streams and her Twitch streams are pretty small at the moment
so you kind of can get a little more personable and then she has a discord.
So we've been talking but it's weird when you make friends something internet
and you're not quite sure what friends are friends.
I'm gonna stop talking about this now.
*I hold up the bag I just made with the words “Sick, Tired, & Alone” embroidered on it.*
So she has a YouTube channel and that is
her YouTube channel name right there and I'll leave links to all her stuff down
below and then this over here
*I point to a little symbol of a skull and crossbones with spoons used as the crossbones below.*
is a little logo that she made for it.
She writes songs, she performed songs, she's an amazing singer.
*stops to clutch heart*
My heart.
So that’s that.
*I point to a heart looking thing made out of different musical symbols that I'm not going to try to say the names of because I don't know them.*
She also writes poetry and she has a recording
of herself reciting one of her poems on her channel.
This over here is
*I bring the embroidered words “#CripplePunk” closer to the camera.*
CripplePunk.
Then this right here in the middle says,
*I bring a red heart that has the words “Netflix and ill” in it closer to the camera.*
"Netflix and ill"
Then over here we have
I bring the embroidered words “Chronically Awesome” closer to the screen.
"Chronically awesome"
I'm just gonna show you some like features.
Which is just stuff that I
added that I was like, "Hmm I feel like in my life that would be useful so I'm
gonna add it"
This is a little pocket type thing.
I used this clear plastic stuff.
I have no idea where this came from I just found it.
I have no idea how to get more.
So that's it unless one of you guys tells me where the heck it came from.
Anyway so then there's this like
clear pocket so you can put a note in there and then be able to read
it because you can see it from the walker bag.
You can attach a sticky note to it, or you can also write in dry erase
marker right on the plastic, or fun fact you could also write in permanent marker
and then if you have a dry erase marker and you color over the permanent marker.
I'd demonstrate but I don't know where my permanent marker went right now.
If you color over the permanent marker mark, on plastic specifically, with a dry erase
marker you can just wipe it off. Fun fact.
Then I have this little button
which closes the whole thing but it's not really a button, it's actually a keychain
but I thought it was cute
*I hold up a keychain that is a heart with glittering gold sparkles inside of it.*
and it doesn't have to be completely functional.
Then I sewed a little keychain ring on the inside here because if you have a
carabiner clip, I have one around here somewhere but I'm just...
So you can either put your keys on here or if you
have one of those hand sanitizer bottles with a carabiner clip you can clip that
on there and have that. You could put both on and then it would just be like right
inside the bag for you.
This is the thing that I really thought was really
cool that I did is this cell phone pocket which I really really hope is big
enough to fit her cell phone.
I made this little button hole type thing
off to the side here. You can barely notice it if you're not looking.
What you can do is stick your headphones inside this little button
hole and then I have a little hole right here in the side of that.
Then you can just stick it in there,
stick it inside the headphone port,
and you're good to go!
I'm gonna go ahead and put this on my walker
so I can kind of show it in action.
I actually made it a little bit too skinny like right on the end here so you
can't get that on the foam.
Styna, if you're watching, which I will be referring
you to this video as like a user manual, you will only be able to get it on on
this side first and then once it's on lit can only go so far.
But it works.
It's fine.
Please ignore that over there I was cleaning my room today.
This is what it looks like on the walker.
It's pretty straightforward.
I'll turn it around for you guys.
You can actually barely tell that the hole is there if you're not looking for it.
So it's really low profile.
I'm thinking of selling some of my
stuff so I'm kind of showcasing it as it were. If you want something
like this and I can make it like totally customizable so if you want something
all of my social media links are in the description and you can just contact me.
I'm going to play you the footage that I have. Some may have gotten lost because...
I'm bad at technology
I was having some technical difficulties or
because I didn't film like all of the putting the lettering on because that
was just a lot of repetition. So yeah!
*An abrupt cut to Angela doing stuff with cloth.*
Yay for narration!
Here I'm just measuring out like a little hanger
curtain rod thing to put the backrest into and I'm just sewing that up.
So that I can hang the bag off the walker.
*An abrupt cut to Angela doing stuff with cloth.*
For the "Sick, Tired, and Alone" lettering I took this straight off of her channel.
I just traced it
I'm it cutting out of the paper and then pinning it to cloth
and cutting it out of the cloth.
*So that was the main narration, it pretty much got everything*
*Please, please, please leave me comments on my audio description because also this is sped up so there's not much I can do.*
*Anyway I'm using an embroidery hoop and I'm putting on the letters and sewing them on*
*Here I'm just sewing the patterns on*
This is the creation of the other stencils.
We had "Cripple Punk",
"Netflix and ill",
and "chronically awesome".
Here they are again as the actual stencils.
What I just did make it is I just pinned that to the cloth and then
stitched over top of the stencil and followed the lines.
Now I'm starting to paint up the sides because all the decoration is done
and now it's time to actually turn it into a bag instead of just a giant piece
of cloth with its own decorations
*I pinned it up and then folded it up and now I'm about to use a sewing machine to sew up the sides.*
*But then I realized I made a mistake and I had to readjust things so yay for redoing everything we just did.*
*Now I'm actually using the song machine.*
*Now I'm readjusting again and removing all the stitches that I did before for the backrest hanger bar situation and pinning that and deciding what to do with that.*
*Now I'm using the sewing machine to sew that up and then I'm testing it on the backrest and it works and now...I have no idea what I'm doing I'm using so much to get him again for some reason or... I don't remember I'm sorry I apparently did a lot of adjusting before I actually went to real with the sewing machine.*
*Oh! Now I'm putting the button on that's what I'm doing. No no no. I'm making the buttonhole that's what I'm doing*
*Oh while I was doing this I was watching one of Styna’s streams so every once in a while I stop to type something.*
*I apologize for the crappy audio descriptions.*
*I think I'll probably get better at it at some point but just it's confusing.*
So that is the video.
It took a few days.
But it's done.
Now I'm now I'm gonna do the sterotypical,
"if you liked this, subscribe, you can see all my links below"
I'm trying my very very best to keep this as accessible as possible, so there
will be a transcript in the description.
There will be on all subsequent videos as well and I will not release
the videos until I have the closed captions and transcriptions done.
I also now have some crowdfunding links and an Amazon wishlist if you have money
and you feel like doing things.
Like I said, also if you feel like ordering something.
Now I'm going to say goodbye.
Fin
I just had to come up with like a sign off so I think I think that's gonna be mine.
Goodbye. Fin.
I need to stop now.
Bye!
0 notes
Text
Kitchen Build
1st December
Overall the building an IKEA kitchen was surprisingly easy, as long as you have the right tools at your disposal.
Putting together the basic frames were quite quick. We tackled the main kitchen first, this was definitely the hardest, but everything else was a breeze afterwards.
To build and mount the cabinets, it took 2 days for the main kitchen, 1 for the island, 1 for the pantry and 1/2 day for the laundry. Then it took another 3 or 4 days to put in the doors/drawers/cover boards etc.. So all up, it took about 1.5 weeks. This was mostly done by myself, so if you have an extra person, this would’ve taken a lot less time. For over $10K worth of savings, the 1.5 weeks was worth it.
Main Kitchen
The cabinetry itself is one of the easier IKEA builds, the most time consuming part is leveling all the cabinets and mounting the rear rails.
All the cabinetry mount on rails. Once you get the rails attached to the wall and level, then its just a matter of hanging the cabinets onto the rails and locking them in.

Attaching the rails can be a bit tricky, you’ll need a stud finder to make sure you screw the rail to the stud and also the rails needs to be cut if its not the right size.
An Angle Grinder was handy here, 2 mins vs 10 mins messing with a hack saw. Luckily, I had previously added extra support before the dry wall went on, so I had plenty of timber to mount these rails.

Since the slab is never 100% level, you’ll need to use these adjustable legs on the front of the base cabinets to level things out.

Once everything is level, you clamp and screw each base cabinets together. IKEA tells you to start from the side, but we wanted the center cabinet to sit directly in the middle of the window, so we started from the middle and worked out from there.

Having a laser level at your disposal definitely make things a lot easier, its really handy for keeping your rails level. The hardest part by far was leveling the top of that high cabinet with the wall cabinets. We wanted the top of the cabinets to all line up, so it took a few adjustment of the rail before we got it perfect.

Without a tall cabinet in the Pantry, it took me 30 mins to install and hang the top cabinets, as compared to the few hours in the main kitchen.
It took a few goes, but we pretty much have the wall cabinets lined up perfectly. Almost perfect, maybe 0.5 mm off?

There was a bit of a gap next to the high cabinet. Instead of putting in a massive cover board, we put in some 40 cm wide open wine racks instead.

We were told to just clamp and screw the wine shelves to the side of the high cabinet. It seemed a little flimsy, so I elected to build some support with scrap timber I had laying around. The cover board and kick board will cover this, so it doesn’t need to be perfect :).

So after 2 days, this is all the base cabinets put together. Time consuming, but not really that difficult and super satisfying when its done.

Kitchen Island
We marked out the kitchen island and leveled it with out rear cabinets. There’s about a 1.2 meters space between the island and rear cabinets.

The island uses these special metal legs that allow you to screw the island to the ground. You’ll need a hammer drill to drill some holes in the concrete, put in some plastic insert, then screw the legs to the ground.

They are a pain in the butt to adjust and are not very good. The plastic legs actually have higher range of adjustments, so I had to add my own packers to up the height.

Since only the back of the island is attached to the ground, I can actually lift the front of the island. It’ll probably be okay with the weight of the stone bench top installed. But I’m not taking any chances, so I screwed some timber to the ground with brackets and attached the front of the island to the timber.

Took me a day to install and level out 3 Island Cabinets!

Pantry
The Pantry was very easy to do, I just used the level I measured for the main kitchen. I marked it on the wall and used the laser level to set out the guide lines. The top and bottom rails were mounted in no time and the cabinets were hung on the rail. Although IKEA recommends 2 people, if you’re strong enough, this is can be easily done by 1 person.
My kitchen isn’t blue BTW, its just plastic film that protects the surface of the door. I’ll keep this on until all the painting is done.
The doors are super easy to put on, I just had to screw in half the hinge to the frame and everything else just snaps into place.
There’s very little gap on each side of the cabinets, you’ll need at least some gaps for the actual door to open. So for the pantry, the cabinets worked out just as good as a custom kitchen.

Laundry
I had to wait for all the tiles to complete before I can put it cabinets in for the laundry. There’s an exhaust duct that runs from the WC next door to the outside, so this will need to be covered by some bulkheads.
Again, laundry was simple to do and only took half a day.

The great thing about an IKEA kitchen is the customization and the range of accessories available. We optioned the cleaning interior, not sure what we’ll put on it, but it looks super handy!

Bulkheads/Cover boards/Doors/Drawers
Timing worked out perfectly, our cabinets were hung while the Drywall guys were still on site.
So we had them do 2 bulkheads one in the main kitchen and one in the laundry.
Kitchen guys don’t normally do the bulkheads, so there’s probably thousands of kitchens waiting for the space above their wall cabinets to be covered up.
We initially only planned on doing one in the main kitchen, but that exhaust duct kinda forced us to do the laundry as well. This cost us about $1000, it was a 1 man job and the guy took about 4 hrs to do 2 bulkheads. Super quick!
They built the frame of the bulkhead with metal rails instead of timber. Its so much quicker this way, the guy measures the rail, cuts it with tin snips and TEK screws the rails together.

Here are the 2 bulk heads completed, looks sleek and finished.


We went with mostly drawers in the main kitchen. The drawer are all BLUM hardware and and costs about $120 each. The sides of the draws all metal and have these built in adjusters to move the door front in all 3 axis.
They feel super premium and are soft close. There’s a reason why drawers are more expensive, not only are the hardware more costly, they are also a complete pain in the butt to put together. Each drawer takes about 20 minutes to install, so multiple that by about 20!

I also cut up the cover boards to fill any gaps. Ideally, you’ll need a table saw to cut up the long cover board to size, luckily I had one handy. A circular saw just doesn’t work very well for the long pieces, you’ll always end up with an uneven angled cut somewhere.

As you can see we had our floor boards laid. It’s been laid all the way to the front legs of the base cabinets, so the kick boards will just sit on top and we won’t need to have any ugly trims around the kick boards.
The plan is to lay the same floor boards on the back of the island, this will create some contrast to the matte white door fronts. We went for a stone water fall on the 2 sides of the island, so the dishwasher will just sit in the empty space with no cabinets and the waterfall.

We had to go with doors instead of the draw fronts for the sink cabinet, as the drawers didn’t fit with all the pipe work.

We also put cover boards under the wall cabinets, which hides all the screws and cam locks.

Building the kitchen was definitely a bit of work, I’ll only recommend it if you have time to spare like me.
You’ll also need the right tools as well, if you don’t have them, it’ll take you a lot longer.
Here are some of the tools I ended up using:
Circular saw with 60 tooth finishing blade
Electric drill
Hammer Drill
Impact Driver (a must!)
Laser level
large and smaller leveler
Table saw with 40 tooth blade
Hole saw
Clamps
Angle grinder
Hacksaw
Screw drivers
We’ve already picked out our stone, ended going with a piece of marble for the island. (We saved on the cabinetry, so we splurged a bit on the stone.) Can you believe marble is actually cheaper than premium Caesarstone! We just went with a cheaper engineered stone for the rear benches and the laundry.
Stone measure happens on Tuesday and the bench should be installed by Christmas.
#poppyscastle#archtecture#ikea#kitchen#ikea kitchen#diy#new house#Sydney North#blum drawers#bulkhead
0 notes
Text
2017 Cadillac Elmiraj Review
2017 Cadillac Elmiraj is genuinely a full evaluate high class vehicle by Cadillac. This vehicle is typically a most current time which can be obviously keeps being advancement begun by the Cadillac Ciel thought auto. The essential presentation in the Cadillac Elmiraj was uncovered in the LA Auto Present in 2013. The vehicle will most likely be made coordinating with the unmistakable appear to be all through sections.
Beginning now and into the not so distant the motor exhibits the in a general sense much better fuel ingestion when driving. Looked use of the past game plan the 2017 Cadillac Elmiraj will have the enormously enhanced far reaching all round esteem together with focused cost.
Configuration subjects especially those as radical as Cadillac’s concealed razor edged Art and Science (A&S) theme frequently welcome a half nearness of only a couple of years. Developed in the 1999 Evoq thought and impacting period models from the 2003 CTS auto forward A&S has made due for over 10 years yet with moving degrees of care and supporting from GM’s extravagance picture.
#gallery-0-17 { margin: auto; } #gallery-0-17 .gallery-item { float: left; margin-top: 10px; text-align: center; width: 33%; } #gallery-0-17 img { border: 2px solid #cfcfcf; } #gallery-0-17 .gallery-caption { margin-left: 0; } /* see gallery_shortcode() in wp-includes/media.php */
2017 Cadillac Elmiraj 0-60
2017 Cadillac Elmiraj Blue
2017 Cadillac Elmiraj Inside
Metaphorically a crisp elucidation of precisely what depicts the Cadillac look and feel is past due. To move such ethereal insights to an unmistakable mockup that producer’s fanatics of the brand and the world wherever can see and touch Cadillac beginning late whisked the wraps off its Elmiraj thought auto at a nation club in Carmel California specifically over the valley from Clint Eastwood’s bequest. (To the degree concerns him Eastwood went to the noteworthy verbalized the auto magnificent and said he’s set up to cut a check.) The auto is thoroughly charming in the substance a ponder piece painted a shade Cadillac calls Indian Blue.
The Elmiraj’s essential goal is not to effectively figure any time display yet rather to set the phase for future translations of Cadillac’s A&S orchestrate method of reasoning. The place that pushed the name El Mirage is a Mojave Desert dry lakebed where straight line speed vindictive spirits Hollywood film social affairs and end of the week globetrotters have horsed around for a gigantic section of a century.
2017 Cadillac Elmiraj Powertrains and Performance
Requiring something zapping to secure the most shocking reason for its model range Cadillac hung its new A&S suit over a pillar less hardtop roadster of close inconceivable scale. The wheelbase measures 121 inches and the 205 inch general length beat that of the stately Bentley Continental GT by more than a foot.
That doesn’t propose that the Elmiraj or any time Cadillac that takes after its lead will be a hang. Driving delight shimmering execution and an associating with imperativeness top weight degree all are fundamental to this new subject watches the producer.
#gallery-0-18 { margin: auto; } #gallery-0-18 .gallery-item { float: left; margin-top: 10px; text-align: center; width: 33%; } #gallery-0-18 img { border: 2px solid #cfcfcf; } #gallery-0-18 .gallery-caption { margin-left: 0; } /* see gallery_shortcode() in wp-includes/media.php */
2017 Cadillac Elmiraj Concept
2017 Cadillac Elmiraj Front
2017 Cadillac Elmiraj Interior 1
To likewise supplement that point Cadillac tapped the motor it inside and out that truly matters developed a century back for boost advantage. (Yes, the auto is a runner.) The Elmiraj’s 4.5liter V8 is respected with twin turbochargers and a great cycle 500hp rating. Underpinnings picked up from an unspecified future time program about look like the blueprint utilized as a bit of today’s ATS and CTS vehicles. That proposes raise wheel drive and strict regard for lightweight building disciplines.
Giving structure and point of confinement square with play the Elmiraj’s long hood is vented to debilitate turbo warm. Beat 22×9 inch aluminum wheels’ design carbon ended brake rotors and genuine looking bound barrel brake calipers; the tires are 265/35 Michelins. Vsport perceiving proof recognizing bits of verification recommend that a more unprecedented Vstrategy Elmiraj could moreover instigate this new A&S execution development. Front and scenery brightening gear proceeds with the vertical introduction Cadillac has favored for a long time.
The Elmiraj’s unending length and direct figure are reminiscent of the most stunning Cadillac auto in written history the 1967 Fleetwood Eldorado penned by Wayne Kady (subject model) and Chuck Jordan (last time execution). That is no unintentional event.
As indicated by GM’s true blue authority of front line mastermind Clay Dean “We were influenced by the 1967 Eldorado’s system and the way that in now is the right time it tended to a conspicuous qualification and another course.” One of the new headings the brand conveyed with the Elmiraj was with the Cadillac peak which is a wreathless suspected that is starting late the most recent of types of progress of a chart that is changed various conditions in the past half century.
It sits inside a grille whose shape mirrors that of the recognizing verification. Very close the visual surface of the grille filler changes with your survey point.
A noteworthy “valet” fuse makes life in the Elmiraj’s discretionary parlor all the more charming. Precisely when a door is opened the fitting front seat surges forward 10 creeps as the back bowl floats four crawls ahead to straightforwardness section. Made with firm at the edge strong braces the two back holders have customizable backrests.
#gallery-0-19 { margin: auto; } #gallery-0-19 .gallery-item { float: left; margin-top: 10px; text-align: center; width: 33%; } #gallery-0-19 img { border: 2px solid #cfcfcf; } #gallery-0-19 .gallery-caption { margin-left: 0; } /* see gallery_shortcode() in wp-includes/media.php */
2017 Cadillac Elmiraj Release Date
2017 Cadillac Elmiraj Interior
2017 Cadillac Elmiraj MSRP
2017 Cadillac Elmiraj Price
2017 Cadillac Elmiraj Review
2017 Cadillac Elmiraj Rear
2017 Cadillac Elmiraj Inside Design and Special Features
The most recent Elmiraj may have the hazardous outside change. On the other hand the affiliation won’t go to give detail information and motivations behind interest. The bodylines might be smooth. Likewise the front belt will get fresh out of the plastic new graph in various parts which wires auto headlights taillights and furthermore other. In addition to that the 2017 Cadillac Elmiraj may have perform 22 inches composite wheels.
To upgrade the streamlined that will vehicle may have chopped down and more wide show up. Accordingly, that vehicle may have solid and besides streamlined show up.
When we appear from every angle to be inside side we will see the progressed and besides liberality of parts. The running with affiliation will utilize amazing fine camel tinted calfskin and besides included overabundance Brazil rose wood in the lodge. It may be really this exceptional supplement. Identifying with making for the most part verifiably truly can rest easy this seats would continue running over most momentous materials of calfskin.
Obviously the 2017 Cadillac Elmiraj will get new empower inside the headway approach. That immense touchscreen is among the best frameworks inside. This affiliation ensures the supportiveness additionally since the modify inside passes on truly in truth really feel extraordinary security and satisfaction.
Inside trim is an unrestrained blend of camel tinted cowhide hand cut Brazilian rosewood and illuminated titanium strips. Coordinate direct tachometer and speedometer gages rest before an extensive high affirmation screen that displays data from a forward view camera.
The camera underpins the screen honest to goodness street sees over which course leads managing jars turn headings and so on can be laid. A generally found 10inch touch screen passing on further course and correspondence data can be tucked past anyone’s ability to see when it’s not required accomplishing a spotless way to deal with entry dash clear.
The Elmiraj is more solid and utilitarian than the stillborn Ciel four entryway convertible Cadillac appeared at Pebble Beach two years prior. In any case, it’s no place close as gottahaveit as the 750hp V12 midmotor Cien two seater Cadillac took off in 2002. Would it have the ability to be that the Elmiraj is a dream and Cadillac’s superhero will ascend in advance as a beguilement auto profiting from the prior decade’s hard lessons? We can dream.
#gallery-0-20 { margin: auto; } #gallery-0-20 .gallery-item { float: left; margin-top: 10px; text-align: center; width: 33%; } #gallery-0-20 img { border: 2px solid #cfcfcf; } #gallery-0-20 .gallery-caption { margin-left: 0; } /* see gallery_shortcode() in wp-includes/media.php */
2017 Cadillac Elmiraj Side View
2017 Cadillac Elmiraj Specs
2017 Cadillac Elmiraj
2017 Cadillac Elmiraj Engine
Visit with concession for the vitality from underneath the hood in on a very basic level the most current Elmiraj will have a profitable motor. It might well be unmistakably this most jump forward Elmiraj will have the regular essential supportiveness than earlier game plan. Just before the affiliation remodeling’s that will represent that will auto have used V6 motor.
At present the 2017 Cadillac Elmiraj may have a 4.5 liter V8 motor. It really is 1 utilizing the more noteworthy forces in light of current circumstances generally by virtue of reality the motor may existing result 500 hp. Neighboring reinforce the fuel reasonableness this motor in addition can show the more observable speed.
2017 Cadillac Elmiraj Release Date and Price
Inside the second half utilizing the 2017 the 2017 Cadillac Elmiraj may well be discharged inside the vehicle business center. As indicated by the talk that cost would likely be negligible more noticeable when emerged from going before variety. The establishment cost will start around $27.000. There is insistently a basic aching by this relationship to develop request in the part by endorses inside the most recent Cadillac Elmiraj.
2017 Cadillac Elmiraj – Is genuinely a full evaluate high class vehicle, which is typically a most current time which can be obviously keeps being advancement 2017 Cadillac Elmiraj Review 2017 Cadillac Elmiraj is genuinely a full evaluate high class vehicle by Cadillac.
#2017 Cadillac Elmiraj#2017 Cadillac Elmiraj 0-60#2017 Cadillac Elmiraj Blue#2017 Cadillac Elmiraj Concept#2017 Cadillac Elmiraj Front#2017 Cadillac Elmiraj Inside#2017 Cadillac Elmiraj Interior#2017 Cadillac Elmiraj Interior 1#2017 Cadillac Elmiraj MSRP#2017 Cadillac Elmiraj Price#2017 Cadillac Elmiraj Rear#2017 Cadillac Elmiraj Release Date#2017 Cadillac Elmiraj Review#2017 Cadillac Elmiraj Side View#2017 Cadillac Elmiraj Specs
0 notes
Last Seen Blogs

searching-for-42
Searching-for-42

bubblyyeety
grrrgoes rabid... . .

junioroliver
Sem título

derangedfashions
Deranged Fashions

kamalakhansbff
maddy 🫶🏼