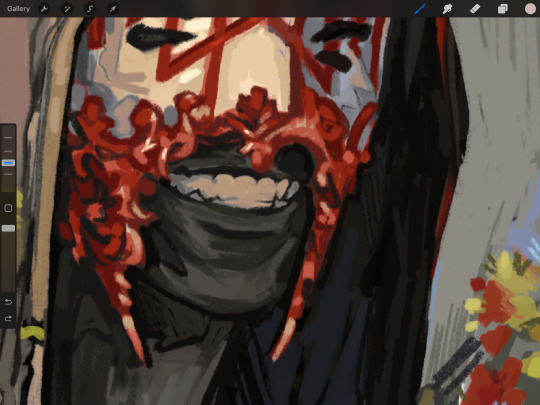
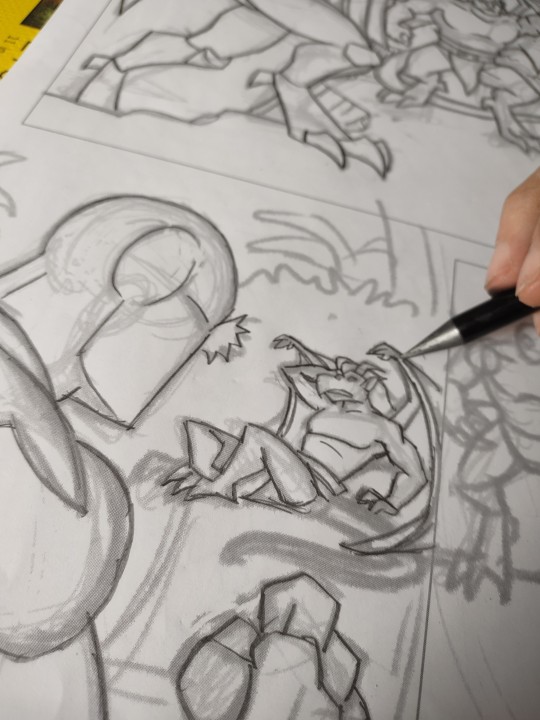
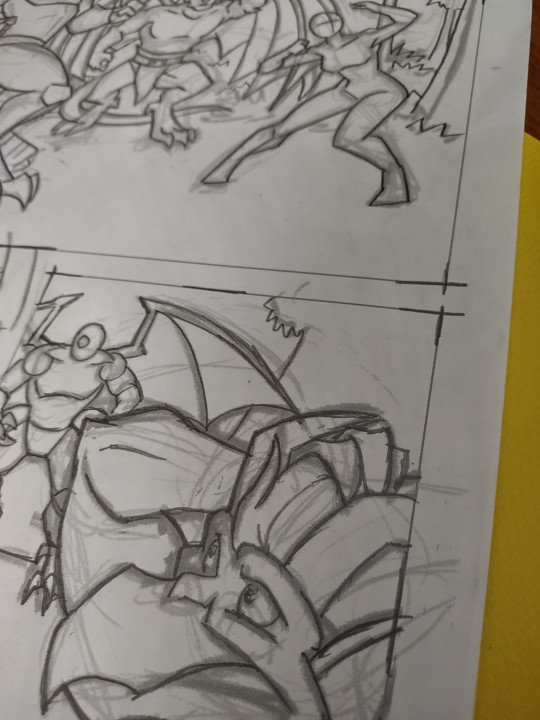
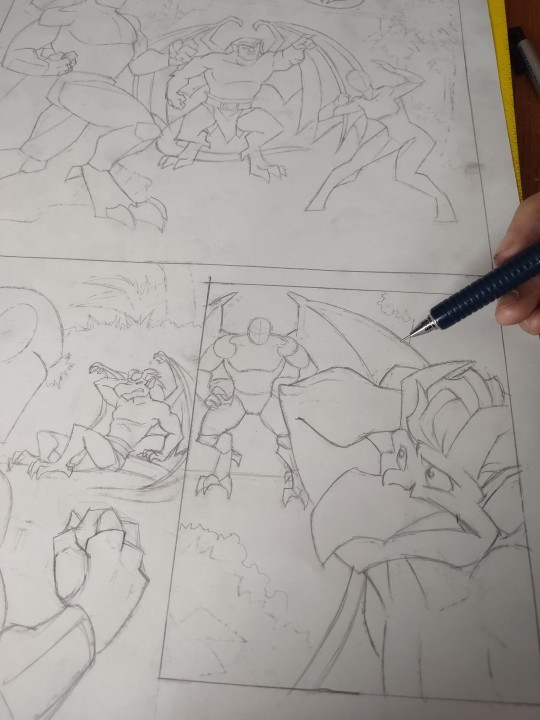
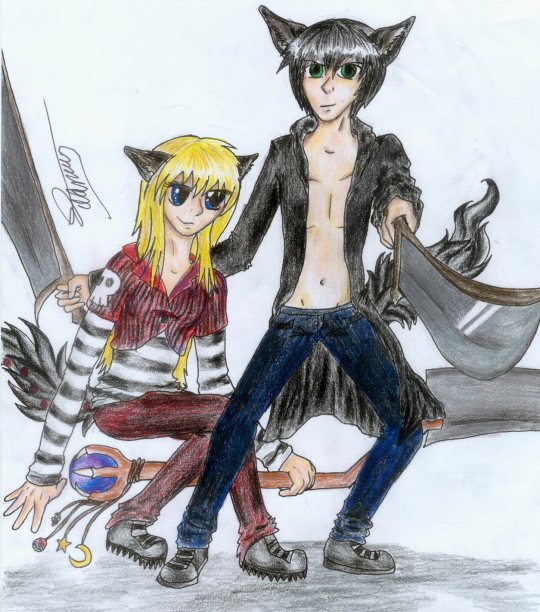
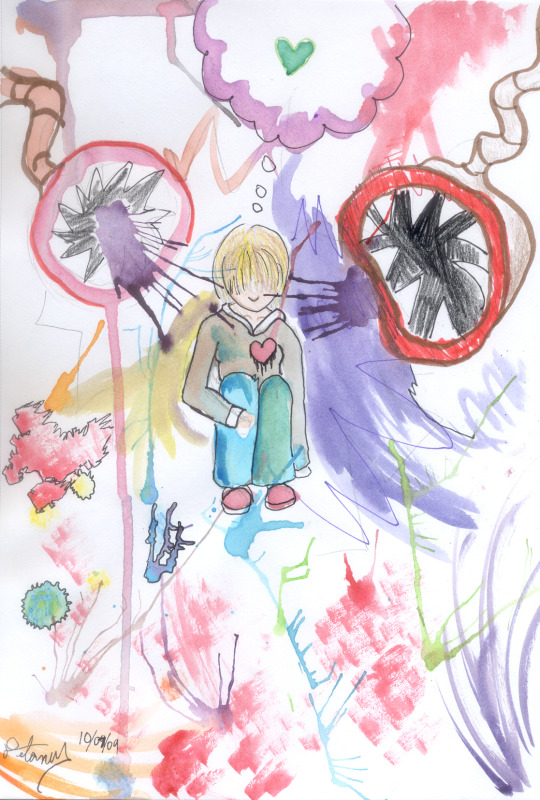
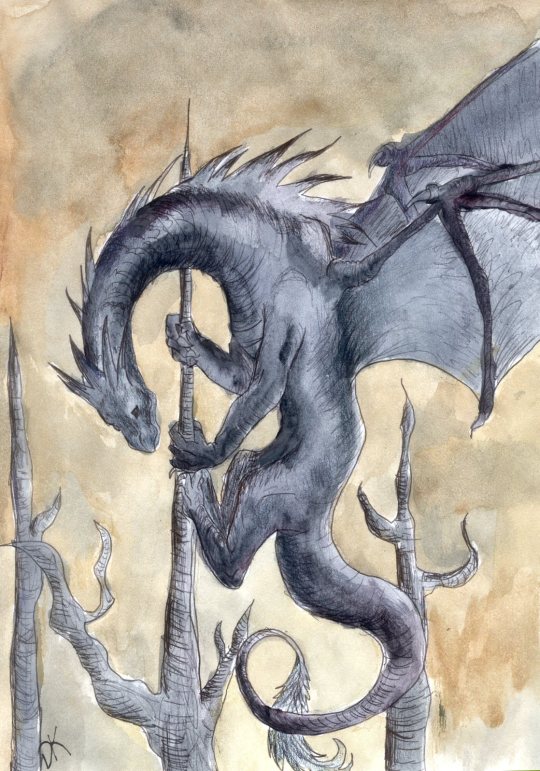
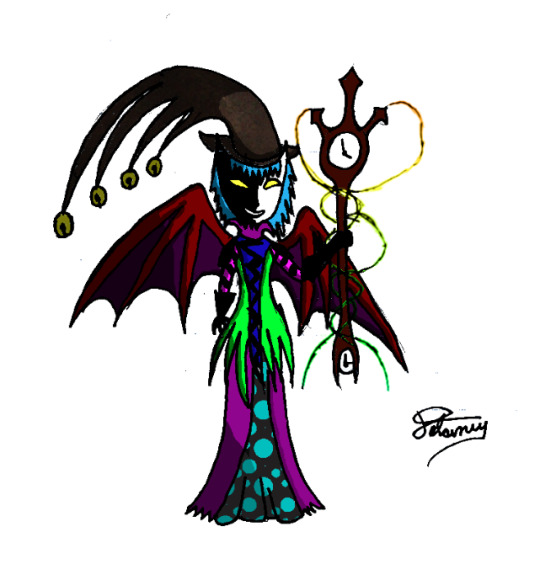
#digitally drew over the pencil in photoshop
Text
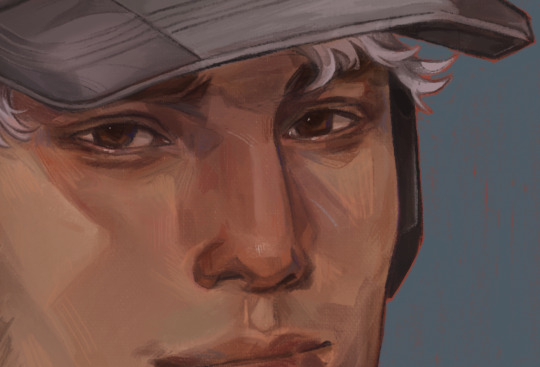
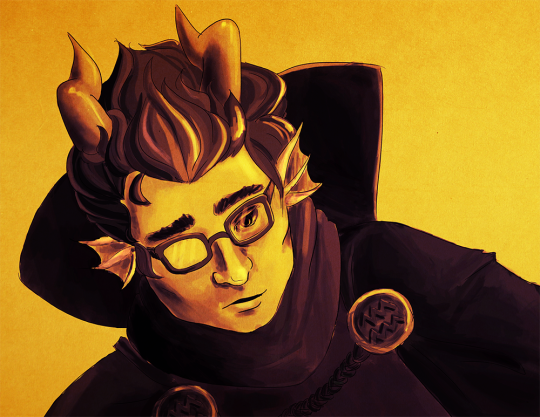
The face when Ida realizes she's catching feelings for the biggest idiot she knows (the MC).
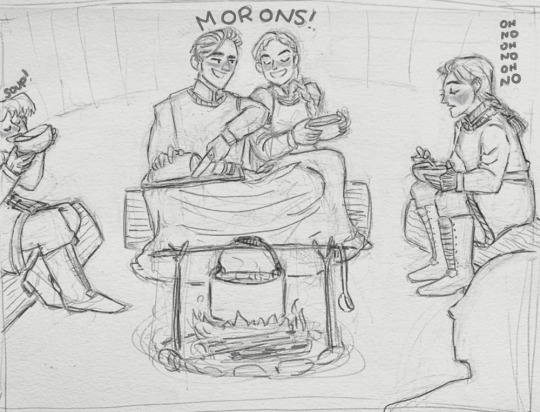
Dropping head canons here - L and Lissa Linnar are platonic besties, but they share one brain cell and they're so physically affectionate, that the whole squad is gossiping and betting on whether they will sleep together or become a couple. Ida even puts money in the betting pool, assuming these dumbfucks are going to get together eventually.
But then Ida catches feelings and responds the only way she knows how, by being a bastard :') Lissa Linnar basically assumes that Ida hates her while Ida thinks she has no chance. Eventually (and this is the part where the actual story might contradict head canon) Lissa Linnar wants to try to shoot her shot because she thinks Ida likes her (same time that Ida gets it into her head that MC and L are just friends and wants to shoot her shot), but then everything major happens, L dies and Ida loses her body.
And now... there are 200 years of hurt feelings!
This was gonna be serious and a little angsty but I really can't stop myself from making it shit-posty.
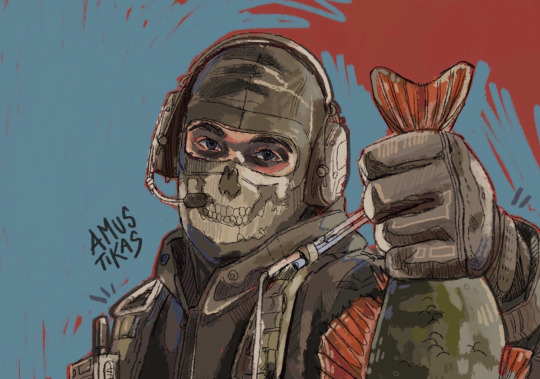
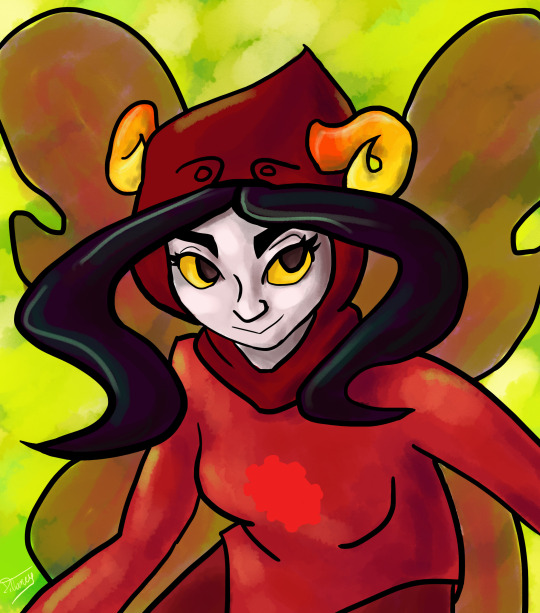
Ouroboros by @honeypeabrain
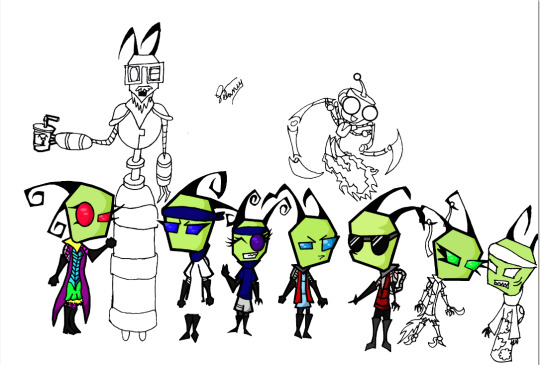
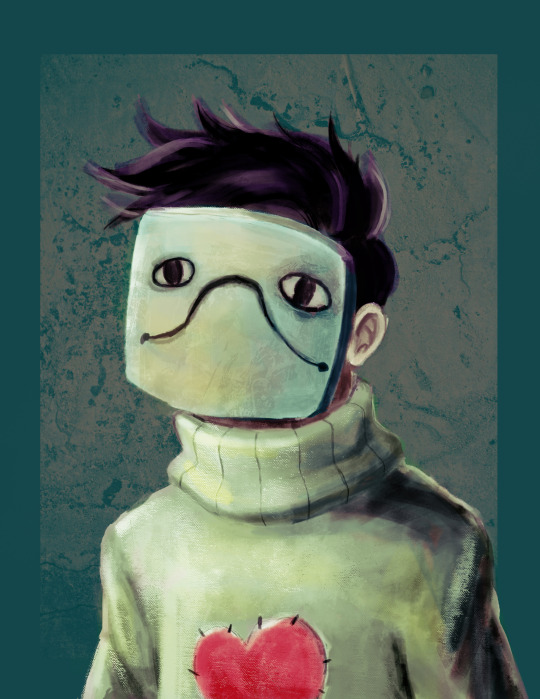
#help i'm drawing#sorry L looks like a complete dweeb here#but the company is supposed to all be wearing the same warm tunics#also#I plan to redraw and paint this#but I did ruin this particular sketch with too much erasing#digitally drew over the pencil in photoshop#MC & L best friends forever is my jam#look at her Ida can't even enjoy her soup#MC & L are so disgusting
34 notes
·
View notes
Note
hi!!! <3 I love your art so much <3 your style is soo good, especially your coloring, it's so pleasant to look at <3 also, mind if I ask what kind of software and brushes do you use? The texture of the sketches, lineart etc. look so nice and I was wondering if there's something like that it Photoshop. Have a great day! <3
Hello!! Thank you for your sweet words!! <3
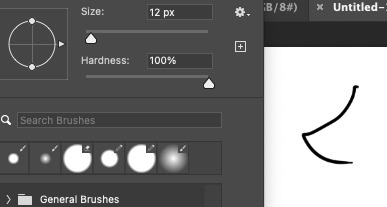
I work on procreate and mostly just use these two basic ah default brushes. I am sure photoshop equivalents exist for both of them out there somewhere!
And since I work a lot with these two I thought I would give ya some extra insight into how exactly I put them to use :)
The 6B Pencil brush has got to be my all time favourite brush and I use it for literally everything!
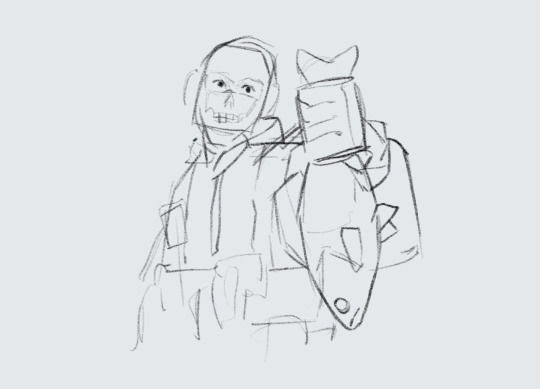
From rough sketches..
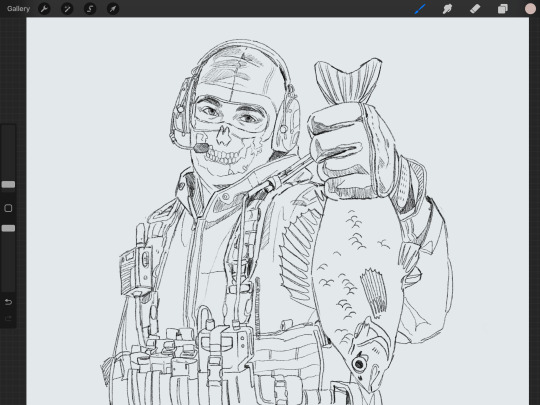
to lineart..
to colouring and details.
This brush is quite pressure sensitive, so you can achieve many different variations of size in one stroke by changing the amount of pressure you apply by hand. Through it all, it maintains it's relatively rectangular shape and brings with it soft grain like texture.
Come to think of it, I think I drew this whole next piece with only the 6B Pencil, start to finish. I think it really goes to show that in the end, it's not really about what brushes or software you use, but about how you make them work for you and how much fun you have while creating. I find that the drawings I have the most fun with end up being my favourites in the long run.
And to me, the 6B is just a damn fun brush to use!
It is perfect for adding silly little shapes and lines all over the place :)
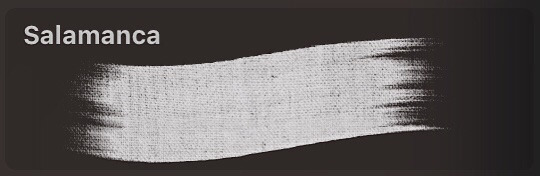
And the other brush I find myself coming back to is Salamanca from the Painting category.
I use it for filling in bigger areas of colour and just colour blocking in general. I like it's subtle canvas texture and the fact that it is not entirely opaque by default, which allows for interesting variations of hues.
But that is not all! I like to size it down to use it to add details and colour to my portraits. I find that it's softness works really well on faces and it's transparency makes it easier to bring in variations of colour.
And would you look at that! More shapes and lines! It's really all I know how to do haha
At the end of the day, I try to just enjoy the process of drawing as much as I can :)
I find that young digital artists often put a lot of emphasis onto finding the correct drawing software and brushes. And while that is important, I find that it is equally as important to throw caution to the wind sometimes and to just try out new things and to not care so much.
I mean hell, people create masterpieces in MS Paint!
My drawing process usually boils down to simply trying to ensure art stays something fun for me, and these two brushes have helped me achieve that over the years.
Hope this has been some help and not all pure gibberish!
195 notes
·
View notes
Note
Artist Questions Ask numbers randomly chosen: 7, 13, 19, 22.
Thanks for the ask!
7. Show us at least one picture you drew or sketched recently that you did not put on a public site.
Sure, I'll grab one of the many doodles I put in my "sketchdump" files that were warmups, random, or just not that interesting:

13. Are you looking to pursue a career in art?
Not professionally, nope. I use my art to aid my author job, though, by illustrating all of my own book covers. I've done art commissions twice in my life and overextended myself and couldn't keep up with them in both instances, so I no longer offer them now. (If you ever ordered one from me and it took ages to refund you, I sincerely apologize.) Art is great as a hobby and a way to visualize characters I write about.
19. What medium/program do you use the most in your art?
It has changed over the years; I started primarily with paper and pencil and gel pen. Once I learned to do digital art, I used primarily one art software at a time. Over the years I've used MS Paint, Paint Shop Pro, Photoshop, and Krita, and now I'm using Clip Studio Paint and also drawing with pencil and pen and marker on paper on the regular as well. ♥
22. List at least one of your “artspirations.”
My art style has been influenced by anime and manga a great deal over the years. A few artist I've been inspired by, and studied the art styles of are Takeshi Obata (the artist for Death Note) and Yuu Watase (the artist for Fushigi Yuugi.)
#ask games#replies#radical-rad1986#threshie#threshasketch#thanks for sending me some replies to the ask game! ♥ I love these things
2 notes
·
View notes
Text
got my income for the month the other day and after 6+ months of not being able to make digital art the way i'm used to with my specific accessibility needs because of physical health symptoms with my hands, i was finally able to buy myself a new Paint Tool Sai license today, since a little while back i successfully installed an optional Windows 10 operating system on my Macbook (Sai doesn't run on Mac, at least not Version 1 which is what i need and have been using for over a decade) that i can switch back and forth between whenever and i am so so so so happy and relieved about it and so fucking excited to get to draw digital lines the way im used to drawing them after trying so many other similar programs and failing to find anything that worked exactly the same as Sai's basic built-in pen stabilizer 😭😭😭😭😭😭
i was able to quickly test out my (also ancient lol) art tablet with it and make sure everything works and it doesnt lag or anything like that and its perfect its exactly like i've always used it, i remembered which pen stabilization number setting i've been using for years and like.
dude. i know i sound dramatic right now LMAO but i CANNOT sketch or draw properly on traditional paper or sketchpads anywhere near what i can do in Sai because of all my tremors and shakiness and sudden muscle movements that make accidental lines and all that. and when i drew just one regular brush stroke in Sai and felt it move like im used to and got that super smooth sensation of 'pretty much just drawing like im holding a pencil/pen but with the shakiness of my lines improved'....almost cried a lil not gonna lie fjsgdgsgdhsgshf its been so many months and i've put so much mental energy into researching how to do that whole windows installation on my 2012 era macbook and somehow did that without completely messing it up and then having to wait until a month where i have enough extra money to buy the official version (Sai is so important 2 me and the most accessible digital art program i've ever used for my specific hand problems and i've used it for so long that i am only comfortable using the officially licensed version of it, yknow?) and also theres just something so nice about finally being able to use it again a few days before my birthday even though that timing wasn't on purpose...
AHHHHH im just so relieved. i feel like im free to just be able to make sketch pages and draw stuff whenever i have free time to and i have an idea in my head again and i havent felt that in so long and it was making my depression so much worse....and also because i've been doing my best to adapt to the similar but different settings in Clip Studio Paint, i have 2 really nice digital art programs with a lot of cool and useful features between the both of them now that i can use to like, mix and match with my art!! which is awesome!! i think Clip will mostly be used by me now for more graphic design type projects since Sai's always been my core art program, but i'd love to experiment with drawing/sketching/painting pieces in Sai and then plopping them into Clip and adding some extra fun effects or background elements or even just easier to repeat patterns with its' huge free-to-use resource library for like stamps and texture effects and more photoshop-y things like that.
ANYWAYS!! im just rambling to myself because im so happy and relieved to have My Art Program back so i thought i would share since its rare for me to feel as happy and excited and get some sense of normalcy back in any capacity these days, being immunocompromised and stuck in my house as long as i have been the past 3 years and counting. it has been a good amount of time since i've felt like i have A Victory To Celebrate and i hope that feeling lingers as long as it can 🥹✌️
2 notes
·
View notes
Text


‘Daydream’ Painting/Digital piece
The illustration within this piece was created using acrylic paints, chalk and markers. I layered it with tracing paper to give it a blurred appearance as well as collaging various flowery imagery to give the piece a more dream like aesthetic. Within photoshop, I drew over the illustration with the pencil tool to make the colours pop more as well as fit in with the text. For this piece i started looking more at filters and ended up using ‘noise’
I wanted to have the aesthetic of an old polaroid image for this illustration, and while editing the piece I decided to add small doodled shapes to give the art an innocent, childlike feeling to link further to the theme.
1 note
·
View note
Text
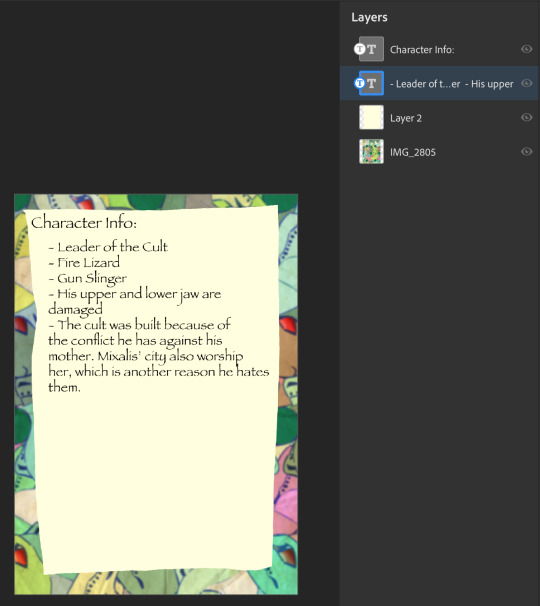
Term Evaluation (part 1)
In these two terms I have created:
Character art - which were made in both Procreate and Photoshop. Sometimes I would start with drawing the line art in Photoshop and when it came to adding colour I would save the line art as a JPEG or PNG and move it over to Procreate.
Key Design - this was one of our first projects to do, it was tasked as our summer project work. I made one for each of my characters in my story using Procreate. Each one was designed to fit the characteristics of the character.
Pixel Art - We used very small pixel sizes as that is the best way to draw in pixel art. They were made in Photoshop, I did find they pretty hard to make as I'm not used to that size of pixels when drawing.
Movie Reviews - The right section we used to draw a character or object that connected to the topic of genre of the movie it self. Illustrations were made with pencil and I sometimes lined then with a lining pen. Then we scored how we thought about the characters, settings, music/surround sound and story out of ten. With then a few written sentences of how we felt about the movie and other things.
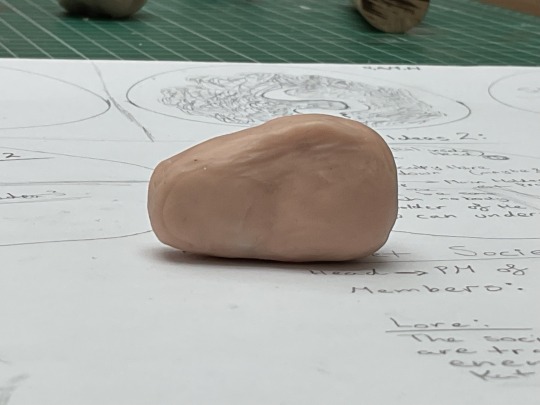
Clay seal mold + Plaster seal - Making the clay version was sort of difficult at times as I wasn't sure at times of how I wanted it to fully look. I did decide to make a texture in the middle around the snake shape to sort of make it look like the sand dunes you'd find in a desert. We then made a wall around the edges of the seal, so that when we poured the plaster in it wouldn't spill out. Mixing the plaster was interesting to do, as it was a first time thing and with it being a thermal reaction you had to tell when it was reading to be poured in the mold by putting a part of your finger in. When I got to that part I found out that I had a reaction to it, which may have been a very slight allergic reaction but am not sure. I was able to complete the task anyway, but wore gloves instead. When hardened, it got removed from the mold and any excess pieces of clay were also removed.
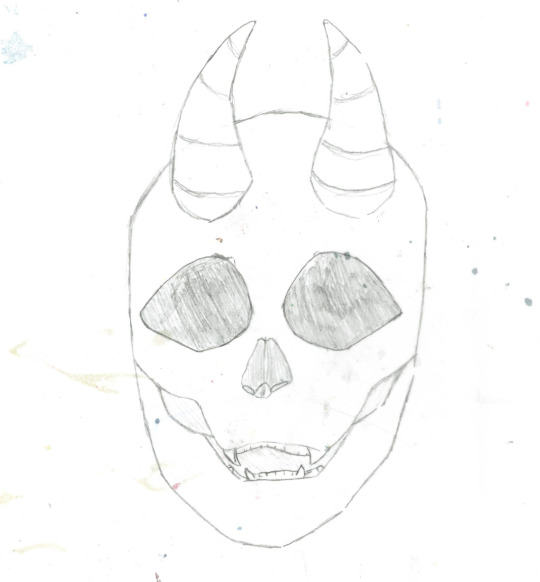
Skull drawing - We drew a normal head drawing first and then traced over the head with a skull design with tracing paper. Digital line art done in Photoshop. This was simple with the first part and then did get a bit hard as I've never drawn a skull before. The line art was sort of easy as I used the paper version and traced over it.
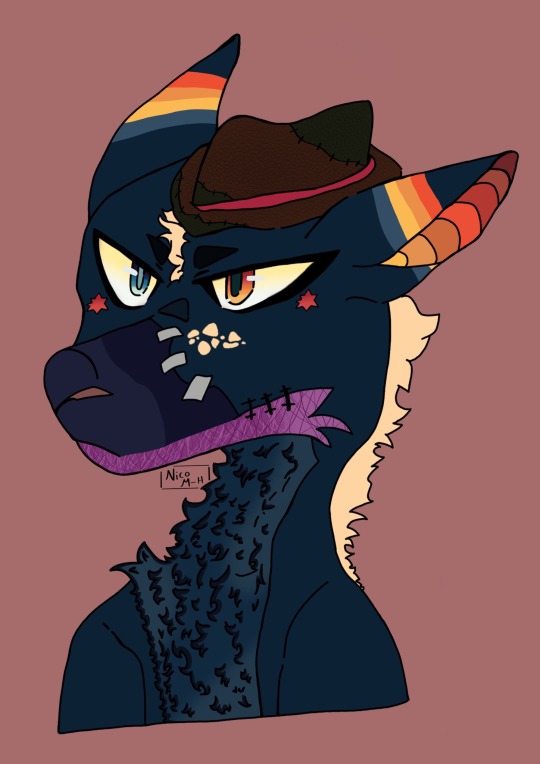
Designing monster from words - Photoshop used for lining and coloured in Procreate. As a class we all picked words which fit with either a part of an animal, colour or shape. Once we had finished creating that list, we then made our own version using all the words from the list. I did find this quite hard, as I've never really done something like this and am more used to when given just one worded or theme prompts for drawing. For the features I tried my best to incorporate them all, but it was slightly harder when it came to the shaping of things.
Taking parts of different monsters from films and creating my own version - Drawn in Procreate. We were given the base layers in Photoshop, for the mix matching of the creature. I then drew the lineart and coloured it in Procreate. I found it quite fun, as I like inventing new things but also taking parts of what I love and taking other things and putting them together.
Character sheets - All were made in Procreate, the ones I made only have a double sided head-shot of the character and the information of the characters. Making them are useful for when it comes to having information and a visual of a character. In a way there is an enjoyment to making them.

Story playlists on Spotify - This was quite simple as I used music which were in my liked but also music I saw fit well with the atmospheric parts of the stories.
Using Moodboards for drawing - We were given a few different mood boards of different parts of animals and objects. We were told to take a few and merge them into one thing, such as an artifact. I took two which I deemed were simple to use and would fit well together. Starting with a rough sketch of the concept and then building it from there on top of it, with finer details.


Gifs - The first was very simple as I only made the colour of the eyes change. It was quite easy to make as it was just a looped animation. The second one was more difficult as it was a big setting area, whilst I made the clouds move in it.

Custom Brushes in Photoshop - It was a progress which I didn't really understand at first, but it was fun to do as I was able to have something of my own in the end.
Headers - Making this was sort of like making the custom brush as I was able to decide which font to use and if I wanted it to have a border or not and the colouration of it too. It was slightly more easy to make, as it didn't feel much of a tedious task.

Super Sculpty ear - It was hard at first to get it look like a proper ear. It looked more from fictional rather than it being from real life. I was able to get help from my tutor though, and was able to make it look more realistic. Now the finished result is better than the first result in my opinion. Making it used the sculpty and modeling it into the right shape, and sculpting tools.
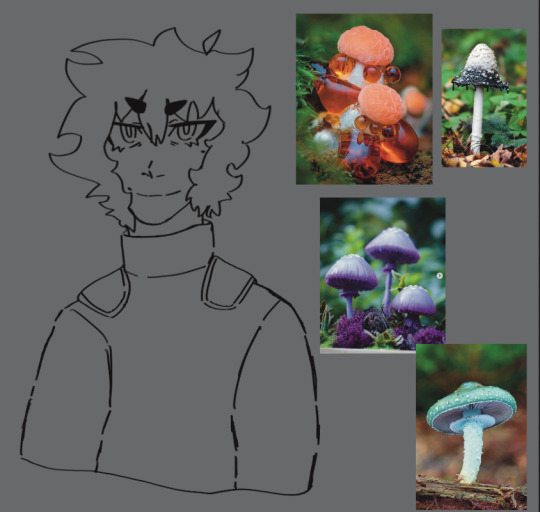
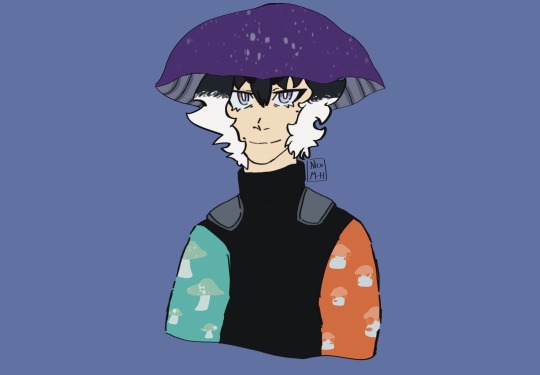
Sticker design - As a class we all made a mushroom person design each. It was quite an easy task with drawing and making the full design but one of our tutors were left with printing them out onto sticker paper. We only recently got them, (at the time this is posted, 18/12/23).
Super Sculpty mold for seal + Resin seal - This is like the first time with the clay and plaster but instead with super sculpty and resin. I found this easier, as the resin mixture had to be poured in by our tutor as it hardens to quickly. But the super sculpty mold was a lot smaller than the clay mold.
Patterned design for character card + Information back - Started off with one design and then with photoshop and also turned it into a custom brush. The pattern was created by making it an overlay and then putting it through symmetry fill and changing the directions it would go into, to get the right pattern wanted. When making the information backing I used the pattern that was made and then boxed it so it would act as the border whilst the writing would go into the boxed area that was inside it. It was hard when making the final decisions for each bit, but after consideration it couldn't be better.

Paper weathered envelope - Making a normal envelope was harder than I thought, so I decided to make it in the shape of the box one that is given on Chinese New Year. This worked a lot better for me, as it brings the flare of interest and love that I have for Asian culture into my work. The box one was smaller than the other but a lot easier to make.
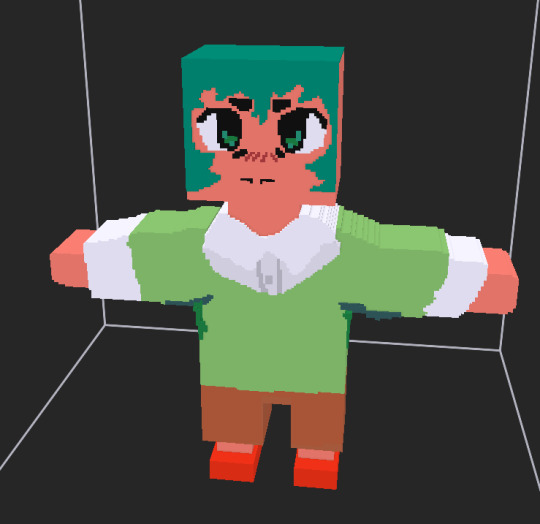
3D models using magic voxel - This was one of my hardest projects, as it was a very new thing and I didn't think I have the true eye to draw properly in 3D. But once I got over the hurdle of the first attempt, it was just seeing it from a new eye and learning the better techniques to get it the right way that was needed. It was still difficult but there was progressed that was made.

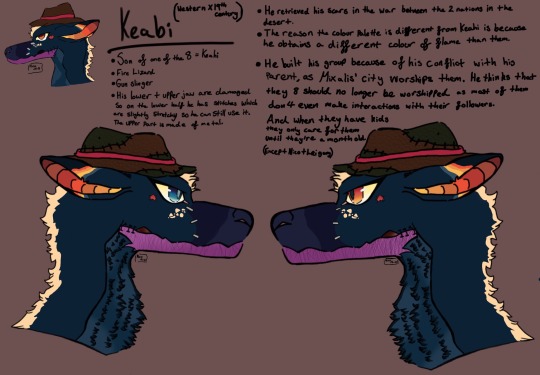
Character art for cards - At first thoughts it was going to be a full-body drawing but in the end turned into a bust drawing. There wasn't the time to make it a full-body drawing and I don't think I drew the sketched anatomy properly at first. I do prefer it as a bust though, and in another day there will be a full-body drawing of Keabi.

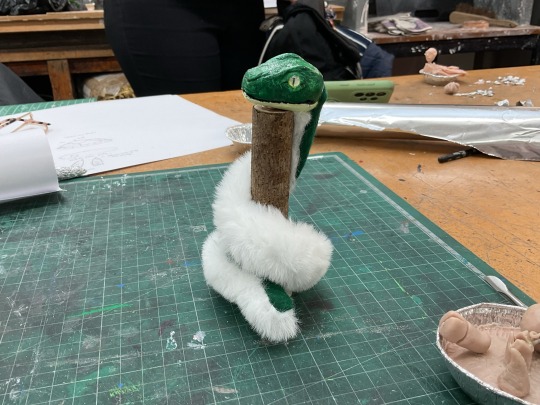
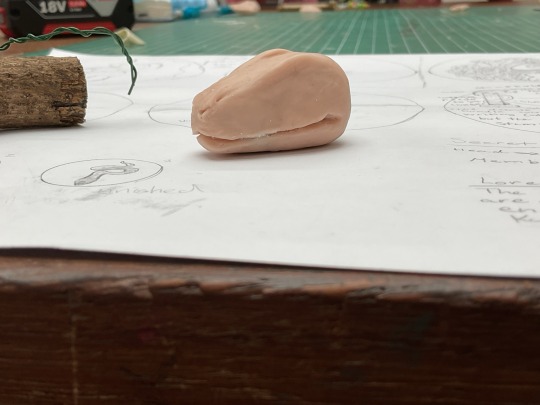
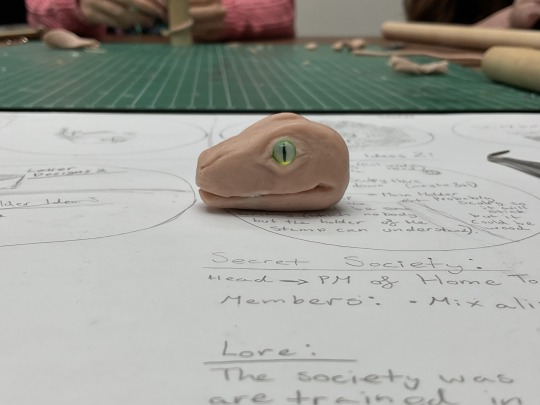
Handle for stamp + sort of art doll snake which is adjustable - Not much work was done on the actual handle of the stamp, instead it was spent upon making the snake that wrapped around it. It was interesting to learn all the new techniques needed to make the actual head and how to keep everything in proportion, but in the end it came out beautifully. There was some hardship when sewing the felt and fur together at the end of the making process, as I didn't know what stitch to us all the time in the end I got my hands on it and had a completed sewn body.
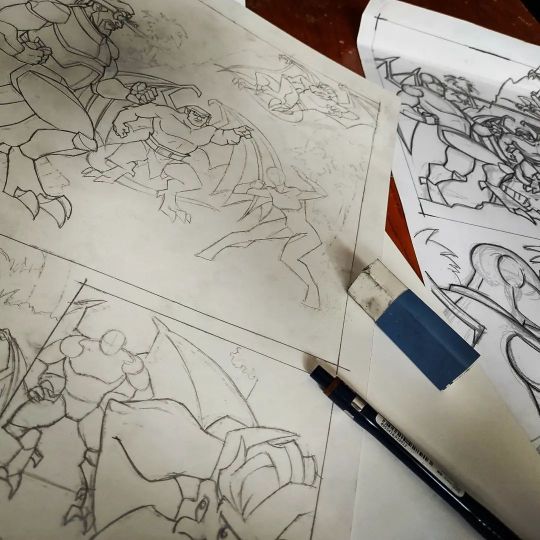
Comic pages - These were fun to make, at times it did remind me of PMVs, as they sort of work in the same way. With it being a slower process of animation and only have small parts of movements to show where the story is going.

1 note
·
View note
Text
Alright so, more than anything else I get questions about comic books. That's all-inclusive, mind you... From writing them to drawing them, getting work doing them, and all points in between. I don't know if I could ever explain all of that in a single post but figured I could at least show you all what I'm doing currently... which is putting together a submission packet for a publisher.
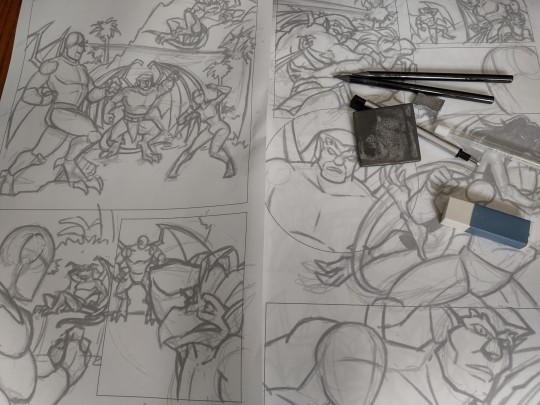
My way of doing things in 2022 are a mix between digital and traditional methods. I started this process by drawing very rough full-page layouts in Photoshop. Actually, that’s a lie. I started this process by looking up the publisher’s submission guidelines and finding out how many pages they want (usually no more than 5), what format, and any restrictions or special requests that come with submitting artwork to them.
And believe me, when I say I drew the first parts rough, we're not just talking ball and stick rough, but blob, scribble, and what-the-hell-was-i-drawing-here rough. What you see in the images above came after about three layers of fine-tuning. Now, I wanna say something about the comic page, itself here, and it’s very important... The temptation to take things panel-by-panel is gonna be huge, buuuut if you're an artist drawing in comic book format, especially if your end product will be printed as an actual book, you gotta keep one thing in mind:
The page, and any page opposite it, should be treated as one whole piece of art.
Yes, the compositions on each individual panel can matter and need to be considered as you go about laying out your art... but the whole of the comic page is your first concern.
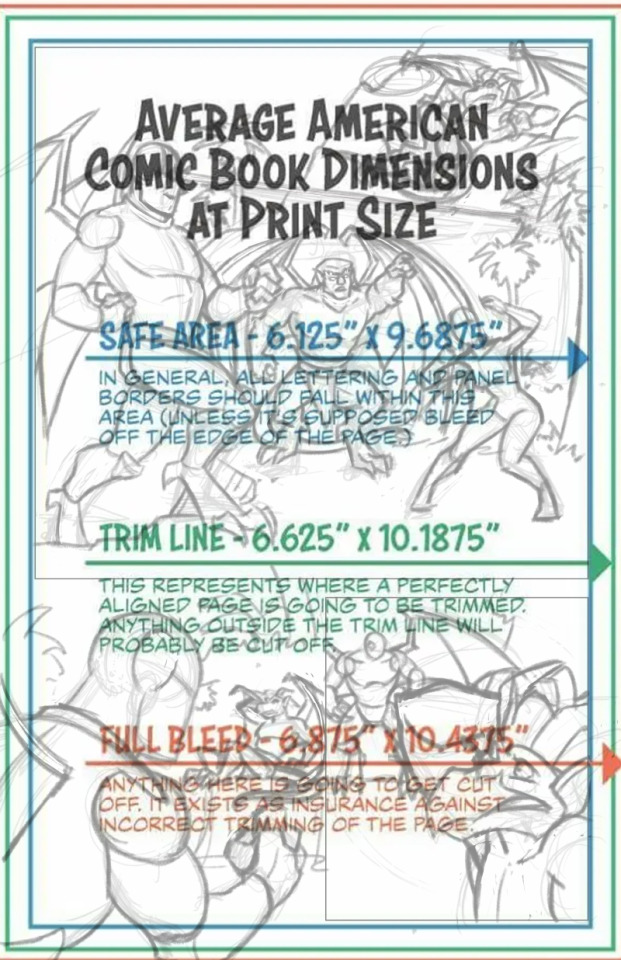
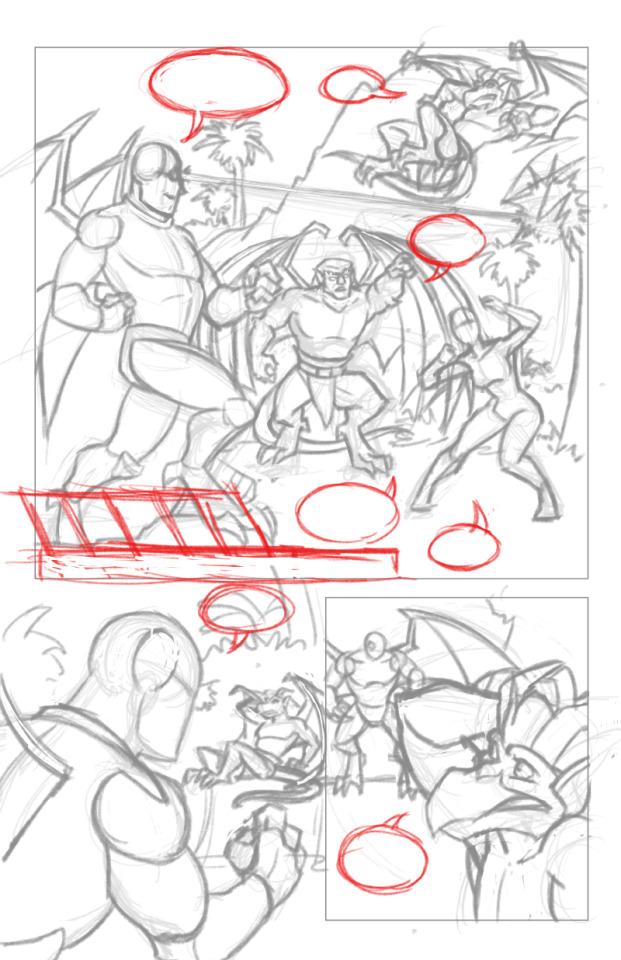
That means changing up camera angles, the size of your figures, and how much or how little background will be seen, etc. are not only paramount to the success of how each panel reads, but the page as a whole. Too -- you’re going to have to keep things like margins, gutters, safe areas and where text boxes and word ballons will fit, in mind. I'll get into more detail about all that in future posts, I’m sure... But for now, here's what my process has been once I finally had digital "breakdowns" of the art and how it would all lay out on a page.
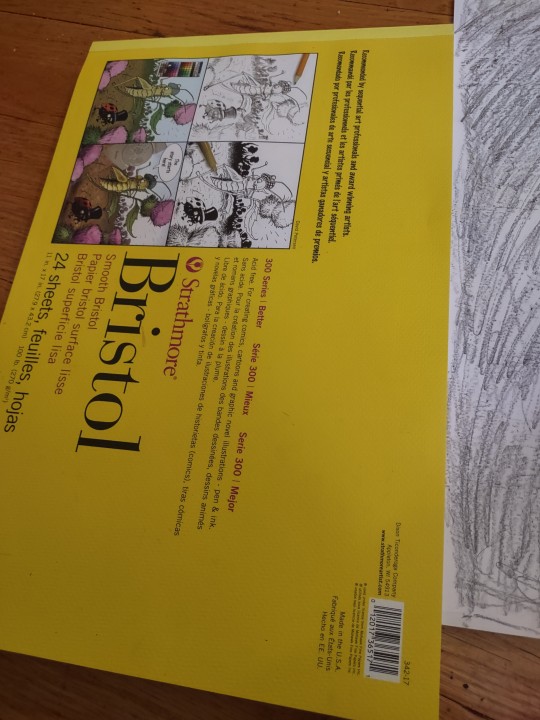
My first stop was the UPS Store, to get some 11"x17" prints of my digital stuff, so it could be transferred onto comic board bristol (100lb. smooth bristol -- sometimes called cold-press board)

Using graphite, I coat the whole back-side of the page with scribbles. You can also use carbon paper, but if you can't find it or it's otherwise cost-prohibitive, just do the scribble method. I find things transfer about the same, if not a bit lighter when using graphite, and I tend to prefer the lines from my breakdowns be lighter at this point, anyway...
Next step is to line the prints up, cabon-side down, onto the bristol. I tape the paper in corners where there is no art needing traced with a little double-sided tape. Then, using my graphite pencil, I pain-in-the-buttingly go over each line to transfer it onto the comic board. I also trace the corners of my panels... I don't trace the whole edge since I'll be using a ruler to get those right on the final art, and really just need guidelines at this point.
Once EVERY DAMN LINE is traced... You get a light transfer to work your final lines off of. Buuuut we're not quite done yet. Grab your work-pencil (I have been a fan of the good ol’ Staedtler Mars pencils with 0.5 lead since the dawn of time), graphite, gum eraser and fine-point eraser, because we’re going to be doing some light detail work on those breakdowns.
The final phase of this process is to go in and lightly re-draw the transferred breakdown lines. try to keep things light as you work. Smudges are the bane of a penciller’s existence and I sometimes work with a sheet of paper under my palm as I begin to work on the bristol, to keep things from smearing around. Once I’ve got my lines covered to a point that I could work off of them without looking at my digital copies to figure out what the heck I was even drawing, the page is ready for the final pencils.
If I was doing the inking for these pages, and (perhaps most importantly) I had an editor who trusted me, I might even be bold enough as to go in and start doing that, to save time. But a pencilling portfolio is hardly the place to show off my inking abilities, so we’ll leave the process right here, for now.
Join me next time as I do finished pencil work on these gargs!
#comic book stuff#how to comic book#my process#comic book design#layout#more than you ever cared to give a crap about
13 notes
·
View notes
Note
I probably won't ever be an expert at digital art, and that's okay. I have a Wacom tablet but it's just sat on my shelf and it's been collecting dust, lol lol. With photoshop and whatever programs being as expensive as they are it's pretty daunting to me to even consider getting into digital art. I just reblog cool art and wish I was as good at it as their creators. It could very well be that I'm underestimating myself, and I have no idea whether I'm good or not because I've never done that much in recent years.
I'm better at doing rough sketches of what I see with a mechanical pencil. I suppose that's the stage I'll be at for the foreseeable future, as I've already got a paid job program thing lined up almost a month after I graduate college.
The sheer volume of art that you make is impressive. Wherever do you find the time? How can I find the time or the courage within myself?
I'm drawing this much only because of this crazy hyperfixation over Jalim, and millions of ideas that bombarding my head every damn minute. Before I fell into HOA fandom I drew like 2-3 artwork for month. Also I'm on vacation and self-isolation now, so I kinda have nothing else to do. And when I'll be back to working stuff, I'm gonna be much less productive in art then now.
Well what I want to say is that's okay not to draw every day/every week etc. If drawing is not related to your work, you just drawing when you have time and power for it. Finding time for your hobby is much harder when you became older, that's harsh and sad but true.
Also for me drawing became an opportunity to express myself, my desires, my dreams, my emotions and my pain. It helps a lot mentally. Facing death and dead people every day as a doctor can be hard, and drawing help to run away from reality sometimes. Maybe that's the reason that I will always try to find out some free time for art
(I don't know If it answered your question. But for me it felt kinda therapeutic)
19 notes
·
View notes
Photo

So I got nominated for best cover artist in this year's Eisners, and lost - but y'know, as they say, it's an honour to be nominated. Especially so when it's amongst some of my art/design heroes like @devilpiggyofficial and @mkhuddleston Covers are a place to stretch a different set of muscles that I don't normally get to. So for the next several weeks, I thought I'd take a moment and share some of my favourite covers I've done over the years and my thinking and process behind them. FIRST UP is my Cover for the Farscape mini-comic I wrote and drew for the series Bluray set. First of it was a bucket list moment to do this cover as I was (and still am) a huge Farscape fan. The idea for the cover stemmed from classic comic book covers by José Luis García-López (Atari Force), Arthur Adams (X-Men), Michael Golden (G.I.Joe Yearbook), and the legendary classic Star Wars poster by British artist Tom Chantrell. These artists formed my psyche and introduced me to worlds undreamed of - so it was a no-brainer to pay homage to them. The original for this piece was conceived digitally, then pencilled and inked traditionally on 13x19 in. 3-ply 500lbs Plate Finish Strathmore board and coloured digitally in Photoshop. A big thank you to my friend @stephenchristy for making this project (and bucket list kick) happen. #comics #art #comicart #comicbook #farscape #thehensoncompany #bluray #specialedition #xmen #atariforce #starwars #gijoe #artprocess #originalart #theraidstudio — view on Instagram https://ift.tt/3jR0XK6
28 notes
·
View notes
Note
hi!! i was legit just wondering how long you’ve been doing digital art. i’ve been doing digital art for ~1.5yrs now but the longer i’ve worked at it the more frustrated i’ve become. i mainly do painting so i’ve been TRYING to translate that into my digital art but i just. cannot. did you have any similar frustrations by chance, or just any in general w digital art, and how did you get past them? im finally trying to dedicate some time to practicing over the summer. v frustrating tho 😔
Oh god, I got my first actual drawing tablet back in high school, I thiiiink in grade 10 or 11? So that would've been 2012-2013ish. But i had attempted (very badly) to do digital art on MS paint and Deviantart since Junior High. I was pretty new to the internet and most of my time was spent searching up digital art and printing them out to hang in my room, and I remember wanting to, but feeling like I'd never be as good as the digital artists I saw. But even when I got my first drawing tablet it took me a long time to even get used to! I know the feeling you're talking about. Its taken me multiple attempts at different things to realize what I like in digital art before I got better at it.
I still sometimes have doubts I'm even improving digitally now, but believe me when I say that even if it doesn't feel like it, you're always improving! I think for me, learning to draw better digitally can be improved by a number of things, namely by your tablet, the program you use, the brushes you use, the techniques you use to draw digitally, and then working at it to find what best works for you & keep working towards improving. My first tablet was a $50 one from amazon & I drew using FireAlpaca, and now I use a 5 year old Wacom tablet on Photoshop 2018. For your tablet, I think you just gotta get comfortable with the works of how to sit with it, hold it, finetune it, etc and it should be good! A more expensive tablet doesn't necessarily mean it'll perform better. Even my coloring/drawing style is different! I found that the way I do it now is better and easier for me, whereas before my art would take DAYS and HOURS for some unfinished, simple looking pieces, whereas now I can do much more detailed stuff more quickly. So I guess here's a few tips of what I personally did that made things easier for me:
Watch other digital artists do speedpaints, look at different tutorials, and try copy their process. You might find something that unexpectedly works for you, makes things less frustrating, and speeds things up while simultaneously making you a better artist! And experimenting with different techniques is just always a good idea
Find different brushes you like, download them, and experiment with them. You might find a brush that's supposed to be used one way, and is useful for another. Additionally, testing the brushes with lowered opacity or flow & different things could help! I used to take FOREVER shading things, lowering the opacity, etc, and then I started trying different brushes. Instead of using the hard round brush with lowered opacity, now I use a cloud brush, a pencil brush, a charcoal brush, a chalk brush, and the soft round brush for blending and shading almost seamlessly. I discovered they work well together by testing them out and watching how OTHER artists used them. There's actually some brush packs that are meant to mimic oil/watercolor/acrylic/etc painting strokes/brushes or palette knives, maybe trying these out could help!
Try different art programs if you can, watch youtube speedpaints of artists using them, watch tutorials on how to navigate said programs, and then try it out yourself. There's links hanging around to get photoshop & other programs for f/r/ee, or you can do the free trials, but there's also always free art programs available too! One artist who greatly influenced my art style uses Paint Tool Sai, but I found that this program just wasn't for me when I tried the techniques she employed on the program she used, and discovered photoshop was most to my liking once I knew how to use it
Set up your digital art workspace the way YOU like it. Usually on most programs there's the ability to switch around or resize or even temporarily switch off/disable the different windows of your workspace within the program, so if you don't like something somewhere, change it! I actually don't like having the color palette window visible in photoshop, so instead I shut it off and just use the HUD color picker & color selection tool when needed. Doing this gives you a more cozy space to work in, think of it as setting up your painting area and adjusting your easel to your liking
So once you've been kinda testing the waters with some or maybe all these things, you start to get more comfortable with digital art, and you'll see yourself getting faster, better, and generally just improving. Also, and I know you know this already & its pretty obvious (otherwise you wouldn't be here lol) that digital art is MUCH different than irl painting. I have a hard time thinking of which is harder or takes longer for me because they both come with benefits and downsides! However, if you WANT to try emulating irl painting with brushes and how you use your layers, you can try that too. Experiment!! A lot of improvement and getting comfortable with digital art is testing different things, seeing what you think works for you, and then keeping at it. But also remember you can switch things up at any time, you might need to do things a few times before you realize you're actually pretty good at it or that you like it, and that you don't need to test all these things at once! Things'll get less frustrating and translate from your imagination better once you've set up a space digitally that you can navigate freely, and become more comfortable with how to use the tools & techniques available
And never give up, I promise you're always improving. I hope this is helpful!
#long post#saavik#you can do it!! i truly believe in you i think you'll improve at a MUCH faster rate than I did. but even if im wrong thats not bad!!#im still improving myself
15 notes
·
View notes
Text
MY REALLY OLD ART A LONG ASS POST
So this first piece I found in a folder on my computer called “Old art organize later” within a folder called “ REALLY OLD ART” I drew this in 2006 and the jpeg was titled:
“My most awesome dragon evur”

Also noted was my attempt at signing my name in Japanesef saldkfjsdlf because i was 11 and anime was THEE coolest thing to me.
Okay the rest is going under a read more because this is gonna be LONG
here are some gems from 2007

yes this is a kk slider gijinka faksdjfalsdjf
next up we have my attempt to make super paper mario characters into handsome anime men
it was a this point i was a young baby on deviant art longing to do “digital” art because thats what all the really cool artists did, i didnt have a tablet and the photoshop-esque thing i had was a pirated copy of JASC Paintshop 7 (or maybe it was 8), so what did I make with newly unlocked DIGITAL ART POWERS??
and this charming thing which was my intepretation of what the The Thing Behind the Wall in Johnny the Homicidal Maniac looked like:
but these were only the beginning of my long and arduous journey as an artist, 2009 came and I entered highschool 13 years old and with nothing but the power of deviant art and being an outcast with 2 friends on my side so here are some of my favorites from that era of Noo art:
^^^ this is in fact EXACTLY what i looked like at 13
its kind of funny bc looking back you can absolutely tell id been drawing dragons/wolves since i was like able to hold a pencil but didnt start drawing humanoid characters until i was 12 afjlakfjs
ANYWAYS CARRYING ON BC THERES PLENTY MORE!! For example my Invader Zim/Naruto OCs
yes one of those aliens was kisame

every day knowing that I get to claim ownership over this is truly exhilarating the girl with the pigtails was my OC that was definitely not just me. Her name was Delainbow, she was Sasuke’s daughter and she is truly the epitome of everything that was good about my childhood

WHAT A LEGEND
this is genuinely what I wanted to be when i was 13 god I love it
oh fuck i missed this one from 2008

god GOd i love these all so much I WAS SO FREE I JUST DREW WHATEVER AND DIDNT CARE
ok just gonna put a few more without comment but these are all 2009 again


Moving on to 2010-2012 era art

shout out to teenage me for still being not the worst at drawing animals

the freaking EDGE

so there was some point here where i started trying to stop drawing “anime” bc i was tired of ppl making fun of me so I figured if I didnt draw anime ppl would take me more seriously when in reality those ppl just sucked and so did my highschool art teacher


like... YUCK???? what the fuck was i was I even accomplishing here aksdjfaskjfkasldjf
my wolves still were still way cooler then the rest of my art lol
alright carrying onto late highschool early college, its summer of 2012 im on tumblr, im a homestuck, and ive gotten a laptop and tablet as a gift for getting into art school (yeah I drew like aformentioned above and still got into art school) sadly i dont have any scans of the stuff i drew for that portfolio, it was mostly still lifes i drew like a boot and a skull haha
okay so here are the gems i made upon finally getting a computer of my own, photoshop and bamboo wacom tablet,
here she is my first attempt to paint in photoshop....s fjaskdjfaskljfklasd

the rest of these are all from like my first fall/winter semester of college when i actually started getting a real art education and not just shitty no budget rural hometown highschool art class

So that picture of zachary which is honestly NOT thaaaaaat bad was one of the first things I ever posted to break 500 notes, i think a fewwww of my homestuck drawings had come close after like months of being on the site but like that zachary was one of the first times id genuinely been a little succesful with sharing my art online and im still very grateful to everyone who liked and reblogged it ^u^
After that well, i do have a lot more bad art but its not quite as funny as my pre-college stuff from that point on you mostly just see me struggling to improve anatomy and struggling to get through school (which ultimately took me 8 years to get through bc art school is terrible on your mental health and i had to do the last 4 years as a half time student)
but thats kind of a sad note to end on so heres just a few more gems i think you all should see if you’ve taken the time to read this haha

Thank you if you took the time to scroll through all of this i hope you had a laugh and that if you’re ever feeling down about your art to remember that we all start at the bottom and you can only go up from there no matter how long it takes you! Don’t give up and honestly just draw your truth <3
12 notes
·
View notes
Photo
For these last seven days (hopefully) of TRUMPTRUMP I’m writing about the project. This is day 6, see the others at www.trumptrump.biz Today: How I did it and what is next,
The drawings would start with what was going on. Most of the time I would just do an online search for “Trump Administration” to see what they were up to. I’d find things in big newspapers, small newspapers, twitter feeds, trade magazines…If nothing turned up for the day that way there was always Trump’s twitter feed which never failed to be filled with horrors. I had two Google calendars for the project: “Trump” and “Trump Done” to keep track of days I might have missed.
Yes, there were days I missed and went back to once in awhile. The biggest gap was in August 2017 when the Unite the Right rally stomped all over Charlottesville where I live. I just couldn’t draw that week, but I went back later and filled in. Most days I would not plan them out but I did try (after the first few months) to have a continuity between days. I did some months as 4-panel comics. Sometimes I would plan them out in my sketchbooks, or draw from other artists’ work to steal things from them and use later.
Later in the project I would look back at past years to echo those drawings, especially at Christmas and New Years. Last fall the ones leading up to the election mirrored those in 2016, with, happily, different results.
For the first few months I drew on notecards, but once Trump took office I drew on vellum finish bristol board. I bought 12x9 in. pads of on sale and chopped the pages in half. I almost always drew in pencil using cheap mechanical pencil from Staples or wherever.
I also used a fancy .3 pencil and a few chunky graphite-holders too. The past few months I’ve also used the super-deluxe Palomino Blackwing. When I drew in ink I used a Pentel brush pen. Large black areas I filled in and any screentones were added digitally in Photoshop.
After drawing I would scan them grayscale at 600 dpi. I saved the scans, and after cropping, adjusting levels and doing a little clean up would save them with file names like 21-01-20.jpg to organize by date. I use Backblaze for off-site backup and Time Machine for local.
TRUMPTRUMP.biz is set up on tumblr. When this thing started in 2016 it was a good platform for quick sites and since I didn’t expect this to go on this long (he was supposed to LOSE) I figured it would be ok.
Tumblr has been fine but if I did this again I would set up a simple Wordpress of Drupal blog on my own space. I don’t like being at the mercy of tech bros and I plan to move TT over to my own space at some point.
I bought TRUMPTRUMP.biz as a domain which is still funny to me. .biz lol. After uploading I’d share on dedicated Facebook, instagram and twitter feeds. I’ve kept all three through the project but after it’s over I’ll be deleting Facebook at least.
Tomorrow the project is done, or rather almost done. As I had planned in 2016, for a week after he is gone I’ll draw beasts and monsters eating the goo he melted down into, pooping it out and maybe eating it again. Trump’s poison lingers.
After TRUMPTRUMP is done I’ll continue drawing LADYH8RS and USAH8RS (including all the congresspeople who voted for the coup). I’ll also draw more poetry comics and a new project, the opposite of TRUMPTRUMP, where I draw nice portraits of government workers who are helpers.
I also plan some print collections of TRUMPTRUMP, similar to the ones Retrofit made, but softcover and spanning whole years. Stay tuned.
I can’t believe this is almost over.
11 notes
·
View notes
Text
Hilary Price of Rhymes with Orange.
From time to time, A Case for Pencils has had experts on the blog. People at the top of their field outside of greyscale single panel cartoons, whom I admire and want to learn more from myself! I decided to have more people from the fields of newspaper strips, graphic novels, painting... people who inspire me and who I think it would be wonderful for artists to hear from. This week is the start of a three part series with the wonderful cartoonists of Rhymes with Orange, Hilary Price and Rina Piccolo.
Bio: Hilary B. Price is a cartoonist, speaker and educator. She has been writing and drawing Rhymes With Orange, her award-winning daily newspaper comic strip, since 1995. At the age of 25, she was the youngest woman ever to have a syndicated strip. It appears in newspapers internationally, and also has appeared in Parade Magazine, People, and Glamour. She has cartoons in the collections of The Library of Congress, The Billy Ireland Cartoon Art Museum at The Ohio State University, and The San Francisco Cartoon Art Museum. She now collaborates on Rhymes With Orange with Canadian cartoonist Rina Piccolo. Hilary teaches single panel cartooning every summer at The Center For Cartoon Studies in White River Junction, VT. She tells stories for The Moth and on NPR, and is hard at work writing a kid's chapter book. When not at her desk, Hilary walks her overly large dog and spoils her hoodlum cat. She lives in western Massachusetts.
Buy prints here!
Tools of Choice: iPad Pro with an Apple Pencil, using the Procreate app. I draw digitally now, but I do it the exact same way I did when I drew with pencils and ink. First a blue pencil sketch over a lettering guide, and then when I am happy with the rough draft, I go over it with my "ink layer." I’ve always colored in Photoshop. I don’t regret switching to a tablet, because it is faster, and I value that. Also, I think I feel more free on the tablet, because I’m not “using good paper.” I can move things around and flip things— all in the service of a better designed cartoon. But before any drawing begins, I work out the idea in a paper notebook.
Tricks: Here’s what I mean by lettering guide:
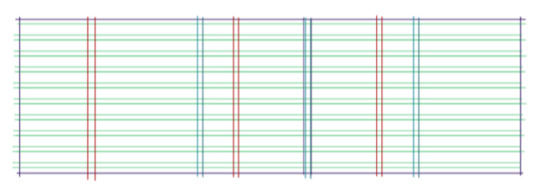
It’s not just good for spacing the text. It’s helpful if you have two panels and you want someone’s eyeballs to be at the same level from one panel to the next.
I work at this desk at night because it is in the warmest room in the house.
During the day, I work at this desk when I am coloring the strip or doing computer work. It has the best view out the window and the cat is nearby.
Here’s an important tool: a pillow. I don’t nap, but I need good sleep, and think it’s necessary to do creative work. Not related to sleep, but I also have a bean bag pillow I rest my left elbow on while I am drawing with my right hand to support myself. You can see it in the photo of the wooden desk.
Another important tool— some free weights and a foam roller. When I was a kid, my grandfather said that I "drew with my nose,” meaning I drew with my face really close to the paper. Fast forward to drawing full-time: I woke up one day and couldn’t lift my arm above my ear. It was temporary, but I had to start being conscious and conscientious about how I held my body. I’m athletic, but still need to strengthen my shoulders, back and core (just for drawing!) so I don't pinch a nerve.
Tool I wish I could use better: I’d like to get more comfortable with a chainsaw… but did you mean drawing tools? In that case: a fountain pen. And I’d like to get better at doing a grey wash on cartoons, so I’m learning how to do that with the Procreate app on the iPad. But a tree fell behind my house in the last storm, and I really do need to feel confident with a chainsaw.
Misc.: The most common mistake I see when people start out is that they think the cartooning is the dessert course of their day, something to do after they come home from work. It’s not a great set up for success— you’re tired, there are dishes to wash, relationships to tend to, etc. Instead, think of cartooning as the vegetable course— good for you, but you have to fight the temptations of other things. Rethink your schedule— where else could it fit in instead of at night? Could it happen away from the house, with fewer distractions? Is there a dedicated time on the weekend? Can you get a buddy where you can hold each other accountable to show up and work? External deadlines are so helpful— if something’s due, you do it. In the absence of a hard deadline, I think the buddy system is the next best thing.
I STILL have to force myself to sit down and work, and not because I don’t like it. It’s just naturally anxiety-producing to do something creative. I bargain, cajole, and bribe myself… every stupid day!
Website, etc.:
Website
Instagram
Facebook
Twitter
————
If you enjoy this blog, and would like to contribute to labor and maintenance costs, there is a Patreon, and if you’d like to buy me a cup of coffee, there is a Ko-Fi account as well! I do this blog for free because accessible arts education is important to me, and your support helps a lot! You can also find more posts about art supplies on Case’s Instagram and Twitter! Thank you!
#Hilary price#rhymes with orange#how to draw cartoons#how Hilary price draws rhymes with orange#how to draw a newspaper comic strip#artists on tumblr
5 notes
·
View notes
Photo
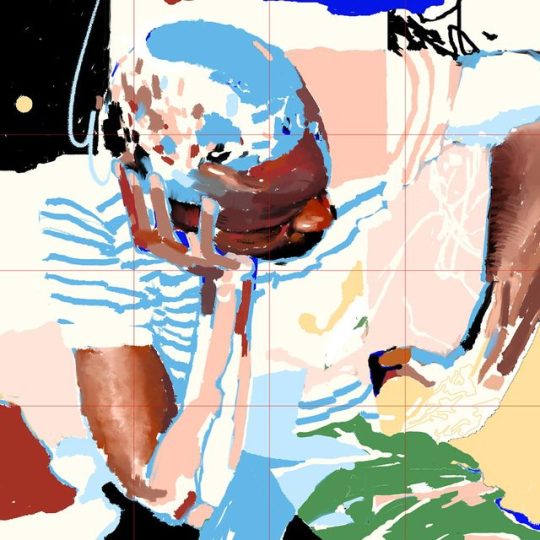
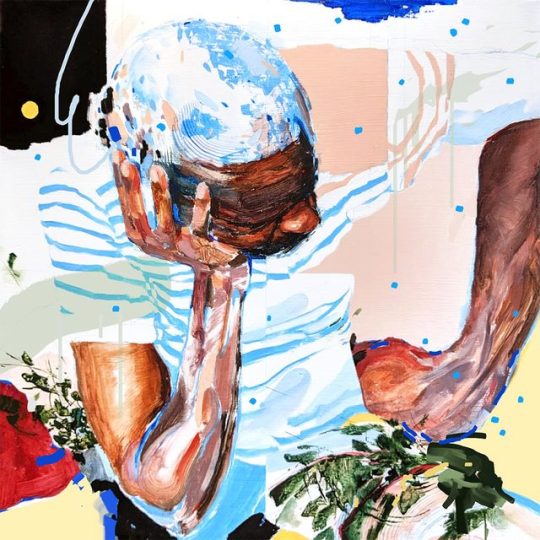
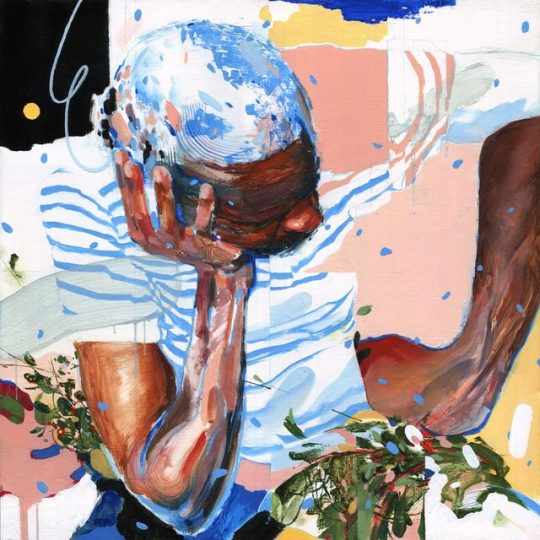
Thought I would share some of my thinking with you guys on this new painting.
Into endless river
Oil and pencil crayon on panel, 16" x 16", 2019
Prints available
It was inspired by this amazing old National Geographic article about this massive boat that carries 1000+ passengers through the Congo River - essentially a travelling merchant town barely floating down the river with a journey that can span several months. The one I read was printed in 1991 and I can’t find it online but you can read a more recent article that isn’t as good here lol - it’s pretty incredible.
Anyways, there was this photo of a man in a cramped coach cabin, seated among 40 others with his head resting in hand, deep in thought and/or exhausted from the voyage. It was a story about survival and struggle and people putting their all into the hopes for a better future for themselves and their family. Uprooting themselves and trading away what they know and love for opportunity. I’m privileged to have been on the receiving end of that kind of story but it’s what my parents went through and their parents before them - and those kinds of stories have always been deeply affecting to me. I never had the intention of making this into a full painting, but I had the biggest urge to sketch it out and after I did, I kinda just kept spending time with it.
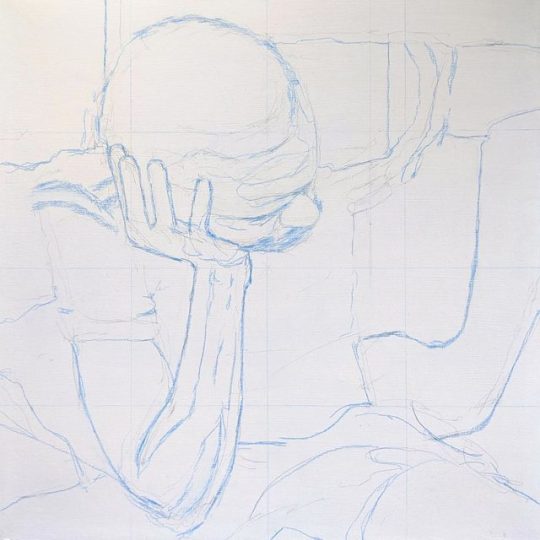
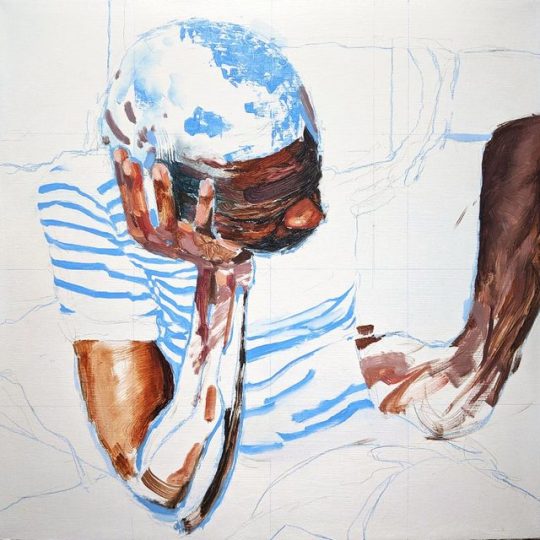
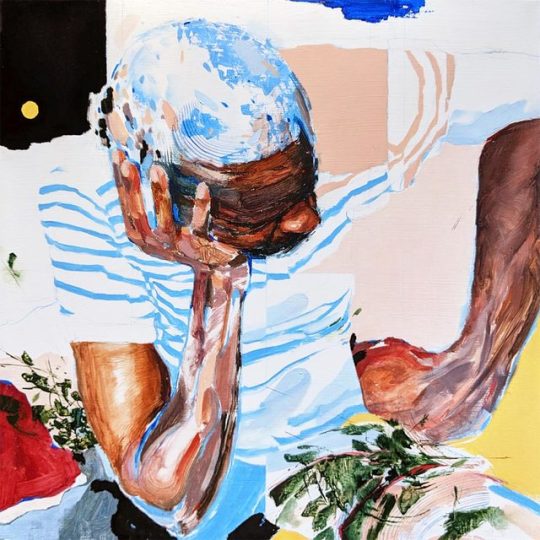
I started with a digital sketch, building out the composition and major forms in light blue (which I like to do with oil paintings as well). The pose had this super heavy, architectural quality to it and the folded stripes of the shirt made for a beautiful contrast. I cropped the composition tightly around the figure to frame him in a state of discomfort and intensity.
I really liked the sketch so I started experimenting with compositional elements and bringing in more colours. I knew that I wanted something really vibrant and crazy - I wanted to somehow convey good vibes and bad vibes in the same image and let whoever’s looking at it reflect off of that. Once I felt like I had a good starting point laid out in Photoshop, I threw a grid over it, drew it out in light blue pencil crayon on my panel and got started.
This is the first painting I’ve made where most of the critical decisions were discovered digitally. Unlike traditional media, it’s basically safe from any kind of commitment and it allowed for really fast, endless exploration. You can pick checkpoints throughout the process and branch out into different options. My intention for the digital stages was to only rough out possibilities - I wanted to save a fair amount of uncertainty for the actual oil painting process. In the future, I’d like to rely less on the digital stuff actually, as it kinda obviously makes things feel more predictable and I felt like it took some of the magic away.
The actual painting process has been pretty different from what I’m used to. It's very flat and pieced together, mostly single layer. Most of the elements have come together in a fragmented, designed way - not a whole lot of blending going on outside of the skin tones. Overall, I’m really happy with how intentional I was with this one, without having it look sterile or over-laboured (I hope). I’m excited to move on and work on more stuff, maybe similar to this one.
Palette:
Titanium white
Mars black
Burnt sienna
Yellow ochre
Cadmium yellow medium
Napthol vermillion
Phthalo blue
French ultramarine blue
Sap green
Viridian
I’m not used to doing this kinda thing - has this been helpful? Is there anything you guys would wanna know next time I do something like this? Send me questions!
#art#art process#process#art tutorial#painting#painting tutorial#artists on tumblr#art guide#oil painting
427 notes
·
View notes
Note
Hello!! 😊❤❤ I hope you are well. I saw your latest sansa piece and it was absolutely beautiful. I mean honestly gorgeous. It just so simple and elegant, but so intricate, especially the amount of details you added to the fabric of the dress. I just wanted to ask, do you make your art by pencil/pen or on your ipad/computer? And which pens or model, tools do you use? I would really appreciate it. And thank you so much for your beautiful work.
wow thank you!
I drew that particular picture in pencil as a rough sketch, then scanned the picture and used photoshop to edit proportions (because sansa was too small compared to dontos, her head needed to be bigger after, the castle was drawn wonky lmao) then printed that out and used that to trace the ‘good’ version on another bit of paper. Then I go over it in black pen. Then I scan THAT in again. The darker grey tone in the background I added in in photoshop with paint tool to make it look more like nightime.
I’ve tried digital colour and digital drawing because i do have a tablet but thats all still very....skills in development lol. Mostly I just draw with pencil.
#digital is hard#my icon i drew in pencil and then managed to colour with the tablet#but thats been the most success i've had#i...shocked myself with that one#idk sometimes it just happens#im never very disciplined with learning new things i just bumble along
9 notes
·
View notes
Text
So... DA Secret Santa gift sent. Recipient really likes it. (Whew!)
I really love my new tablet. Granted I’m not very experienced but I use an ancient relic of a Wacom. A CTE-440. I’m not kidding when I say it’s a dinosaur but it replaces my mouse so I don’t get carpal tunnel in my finger from overuse of the mouse when I play Flight Rising.
I had an older model Huion which I did my other 2 digital pieces on. It was a nice tablet - large work area. The Inspiroy H1161I got last month is even better. I really love it. Nice large work area, I use it with the Scribo pen/stylus to get my main sketch on my computer. Because I was trained 100% traditionally, I’m far more comfortable outlining a pencil sketch with an ink pen than I am scanning it and going over it in Photoshop with a stylus.
I am going to look into Skillshare classes for PS next year. I’ve picked up the basics of the program, but I also got very frustrated at times. I’d paint on the wrong layer for an hour or explode trying to get it to do something. (Free transform was one of those things... I love that function but trying to figure it out? Ooof.) I need more knowledge on handling backgrounds, light source, brushes, skin textures, hair, and everything but the bare basics of how to pick colors, draw straight lines, and blend. Sort of. I’ll get better at it. I’m only halfway competent using masks and selections. Fully understanding that would have made my life so much easier.
In the end I’m not in love with my own art but I don’t hate it, either. For my floundering beginning level it’s pretty darn good.
But I’m still in awe of people like Pooky, Kemvee, Galagraphia, Beastlyart, FreckleF0x and so many others whose many years of practice and skill make digital look effortless.
Oh yeah, I also don’t know how to draw people. I’ve never had a life drawing class so drawing people is done on the basis of line/form/shadow/shape used for basically everything in art. I mostly drew animals and werewolves and monsters throughout my art training.
2 notes
·
View notes
Last Seen Blogs
phantomviola
once we watched a lazy world go by

cpastry
Cpastry

crunchabunchy
Crunchy | KFC Sellout and Art Sketcher
uzuma-take
UzumaTake

maheenbroaches16
Untitled