#docker image creation tutorial
Explore tagged Tumblr posts
Visit Tumblr Blog
Explore Tumblr blogs with no restrictions, modern design and the best experience.
Last Seen Tumblr Blogs


Fun Fact
Forty percent of Tumblr users are between the ages of 18 to 25.
Text
Develop & Deploy Nodejs Application in Docker | Nodejs App in Docker Container Explained
Full Video Link https://youtu.be/Bwly_YJvHtQ Hello friends, new #video on #deploying #running #nodejs #application in #docker #container #tutorial for #api #developer #programmers with #examples is published on #codeonedigest #youtube channe
In this video we will learn how to develop nodejs application and deploy it in docker container. I will show do you build nodejs helloworld application and run it in docker container. You will be able to create nodejs helloworld application & run it in docker container in 10 mins. ** Important Nodejs Packages or Modules ** Express – Express is a node js web application framework that…

View On WordPress
#docker#docker image#docker image creation tutorial#docker image node express#docker image nodejs#docker image vs container#docker tutorial#docker tutorial for beginners#dockerize node js express app#learn docker#node js and express js project#node js and express js tutorial#node js app docker#node js app dockerfile#node js application docker file#node js tutorial#node js tutorial for beginners#nodejs#nodejs projects#what is docker
0 notes
Text
Mastering Docker with LabEx: Your Gateway to Seamless Containerization
Docker has revolutionized how developers and IT professionals manage, deploy, and scale applications. Its containerization technology simplifies workflows, enhances scalability, and ensures consistent environments across development and production. At LabEx, we provide an intuitive platform to learn and practice Docker commands, making the journey from beginner to expert seamless. Here's how LabEx can empower you to master Docker.
What is Docker?
Docker is an open-source platform that automates the deployment of applications inside lightweight, portable containers. These containers bundle everything needed to run an application, including libraries, dependencies, and configurations, ensuring smooth operation across various computing environments.
With Docker, you can:
Eliminate environment inconsistencies.
Accelerate software delivery cycles.
Enhance resource utilization through container isolation.
Why Learn Docker?
Understanding Docker is crucial for anyone working in modern software development or IT operations. Proficiency in Docker opens opportunities in DevOps, cloud computing, and microservices architecture. Key benefits of learning Docker include:
Streamlined Development Workflow: Develop, test, and deploy applications efficiently.
Scalability and Portability: Run your containers across any environment without additional configuration.
Integration with DevOps Tools: Use Docker with CI/CD pipelines for continuous integration and deployment.
LabEx: The Ultimate Online Docker Playground
At LabEx, we provide an interactive Docker Playground that caters to learners of all levels. Whether you're just starting or looking to refine advanced skills, LabEx offers a structured approach with real-world projects and practical exercises.
Features of LabEx Docker Playground
Hands-On Learning: Dive into real-world Docker scenarios with guided tutorials. LabEx's environment allows you to practice essential Docker commands and workflows, such as container creation, image management, and network configuration.
Interactive Labs: Gain practical experience with our Online Docker Playground. From running basic commands to building custom images, every exercise reinforces your understanding and builds your confidence.
Comprehensive Course Material: Our content covers everything from basic Docker commands to advanced topics like container orchestration and integration with Kubernetes.
Project-Based Approach: Work on projects that mimic real-life scenarios, such as deploying microservices, scaling applications, and creating automated workflows.
Community Support: Collaborate and learn with a global community of tech enthusiasts and professionals. Share your progress, ask questions, and exchange insights.
Essential Skills You’ll Learn
By completing the Docker Skill Tree on LabEx, you’ll master key aspects, including:
Container Management: Learn to create, manage, and remove containers effectively.
Image Building: Understand how to build and optimize Docker images for efficiency.
Networking and Security: Configure secure communication between containers.
Volume Management: Persist data across containers using volumes.
Integration with CI/CD Pipelines: Automate deployments for faster delivery.
Why Choose LabEx for Docker Training?
Flexible Learning: Learn at your own pace, with no time constraints.
Practical Focus: Our labs emphasize doing, not just reading.
Cost-Effective: Access high-quality training without breaking the bank.
Real-Time Feedback: Immediate feedback on your exercises ensures you're always improving.
Kickstart Your Docker Journey Today
Mastering Docker opens doors to countless opportunities in DevOps, cloud computing, and application development. With LabEx, you can confidently acquire the skills needed to thrive in this container-driven era. Whether you're a developer, IT professional, or student, our platform ensures a rewarding learning experience.
0 notes
Text
Introduction to Docker BuildKit for Optimized Image Creation
Introduction to Docker BuildKit for Optimized Image Creation Introduction Docker BuildKit is a powerful tool for optimizing Docker image creation. It provides a more efficient, flexible, and scalable way of building images compared to the traditional docker build command. In this tutorial, we will explore the core concepts, terminology, and best practices of Docker BuildKit, as well as provide…
0 notes
Text
Intel Tiber Developer Cloud, Text- to-Image Stable Diffusion

Check Out GenAI for Text-to-Image with a Stable Diffusion Intel Tiber Developer Cloud Workshop.
What is Intel Tiber Developer Cloud?
With access to state-of-the-art Intel hardware and software solutions, developers, AI/ML researchers, ecosystem partners, AI startups, and enterprise customers can build, test, run, and optimize AI and High-Performance Computing applications at a low cost and overhead thanks to the Intel Tiber Developer Cloud, a cloud-based platform. With access to AI-optimized software like oneAPI, the Intel Tiber Developer Cloud offers developers a simple way to create with small or large workloads on Intel CPUs, GPUs, and the AI PC.
- Advertisement -
Developers and enterprise clients have the option to use free shared workspaces and Jupyter notebooks to explore the possibilities of the platform and hardware and discover what Intel can accomplish.
Text-to-Image
This article will guide you through a workshop that uses the Stable Diffusion model practically to produce visuals in response to a written challenge. You will discover how to conduct inference using the Stable Diffusion text-to-image generation model using PyTorch and Intel Gaudi AI Accelerators. Additionally, you will see how the Intel Tiber Developer Cloud can assist you in creating and implementing generative AI workloads.
Text To Image AI Generator
AI Generation and Steady Diffusion
Industry-wide, generative artificial intelligence (GenAI) is quickly taking off, revolutionizing content creation and offering fresh approaches to problem-solving and creative expression. One prominent GenAI application is text-to-image generation, which uses an understanding of the context and meaning of a user-provided description to generate images based on text prompts. To learn correlations between words and visual attributes, the model is trained on massive datasets of photos linked with associated textual descriptions.
A well-liked GenAI deep learning model called Stable Diffusion uses text-to-image synthesis to produce images. Diffusion models work by progressively transforming random noise into a visually significant result. Due to its efficiency, scalability, and open-source nature, stable diffusion is widely used in a variety of creative applications.
- Advertisement -
The Stable Diffusion model in this training is run using PyTorch and the Intel Gaudi AI Accelerator. The Intel Extension for PyTorch, which maximizes deep learning training and inference performance on Intel CPUs for a variety of applications, including large language models (LLMs) and Generative AI (GenAI), is another option for GPU support and improved performance.
Stable Diffusion
To access the Training page once on the platform, click the Menu icon in the upper left corner.
The Intel Tiber Developer Cloud‘s Training website features a number of JupyterLab workshops that you may try out, including as those in AI, AI with Intel Gaudi 2 Accelerators, C++ SYCL, Gen AI, and the Rendering Toolkit.
Workshop on Inference Using Stable Diffusion
Thwy will look at the Inference with Stable Diffusion v2.1 workshop and browse to the AI with Intel Gaudi 2 Accelerator course in this tutorial.
Make that Python 3 (ipykernel) is selected in the upper right corner of the Jupyter notebook training window once it launches. To see an example of inference using stable diffusion and creating an image from your prompt, run the cells and adhere to the notebook’s instructions. An expanded description of the procedures listed in the training notebook can be found below.
Note: the Jupyter notebook contains the complete code; the cells shown here are merely for reference and lack important lines that are necessary for proper operation.
Configuring the Environment
Installing all the Python package prerequisites and cloning the Habana Model-References repository branch to this docker will come first. Additionally, They are going to download the Hugging Face model checkpoint.%cd ~/Gaudi-tutorials/PyTorch/Single_card_tutorials !git clone -b 1.15.1 https://github.com/habanaai/Model-References %cd Model-References/PyTorch/generative_models/stable-diffusion-v-2-1 !pip install -q -r requirements.txt !wget https://huggingface.co/stabilityai/stable-diffusion-2-1-base/resolve/main/ v2-1_512-ema-pruned.ckpt
Executing the Inference
prompt = input("Enter a prompt for image generation: ")
The prompt field is created by the aforementioned line of code, from which the model generates the image. To generate an image, you can enter any text; in this tutorial, for instance, they’ll use the prompt “cat wearing a hat.”cmd = f'python3 scripts/txt2img.py --prompt "{prompt}" 1 --ckpt v2-1_512-ema-pruned.ckpt \ --config configs/stable-diffusion/v2-inference.yaml \ --H 512 --W 512 \ --n_samples 1 \ --n_iter 2 --steps 35 \ --k_sampler dpmpp_2m \ --use_hpu_graph'
print(cmd) import os os.system(cmd)
Examining the Outcomes
Stable Diffusion will be used to produce their image, and Intel can verify the outcome. To view the created image, you can either run the cells in the notebook or navigate to the output folder using the File Browser on the left-hand panel:
/Gaudi-tutorials/PyTorch/Single_card_tutorials/Model-References /PyTorch/generative_models/stable-diffusion-v-2-1/outputs/txt2img-samples/Image Credit To Intel
Once you locate the outputs folder and locate your image, grid-0000.png, you may examine the resulting image. This is the image that resulted from the prompt in this tutorial:
You will have effectively been introduced to the capabilities of GenAI and Stable Diffusion on Intel Gaudi AI Accelerators, including PyTorch, model inference, and quick engineering, after completing the tasks in the notebook.
Read more on govindhtech.com
#IntelTiberDeveloper#TexttoImage#StableDiffusion#IntelCPU#aipc#IntelTiberDeveloperCloud#aiml#IntelGaudiAI#Workshop#genai#Python#GenerativeAI#IntelGaudi#generativeartificialintelligence#technology#technews#news#GenAI#ai#govindhtech
0 notes
Text
How can I create a single Ubuntu Pod in a Kubernetes or OpenShift cluster?. In Kubernetes a Pod is a group of one or more containers, with shared storage/network resources, and a specification for how to run the containers. When a Pod running a single container you can think of a it as a wrapper around a single container. Kubernetes manages Pods rather than managing the containers directly. In this tutorial we will look at how you can deploy an Ubuntu Pod in Kubernetes or OpenShift cluster. This can be for Debug purposes or just testing network connectivity to other Pods and Services in the namespace. Since Pods are designed as relatively ephemeral and disposable entities you should never run Production container workloads by creating Pods directly. Instead, create them using workload resources such as Deployment. We will create a sleep container from Ubuntu docker image using latest tag. Below is the Pod creation YAML contents. $ vim ubuntu-pod.yaml apiVersion: v1 kind: Pod metadata: name: ubuntu labels: app: ubuntu spec: containers: - name: ubuntu image: ubuntu:latest command: ["/bin/sleep", "3650d"] imagePullPolicy: IfNotPresent restartPolicy: Always Then apply the file created using kubectl command: kubectl apply -f ubuntu-pod.yaml You can run below kubectl commands to deploy the Pod in the current namespace: cat
0 notes
Text
It can also save as all (most?) conventional file types, so if you're working with someone who only has Photoshop, you can save as the appropriate file type.
you can import brushes from anywhere
the brushes are EXTREMELY customizable. don't want pressure control for an image? done. love your lineart brush but this picture needs consistent opacity and only line strength? done. you adjust the sensitivity with curves, for each very specific function.
also, Krita has its own gif creation tool. I haven't played with this nearly as much, but here: ( https://docs.krita.org/en/user_manual/animation.html ) is their tutorial for it.
it has customizable workstations so you can save your favorite layout. many variations of light & dark mode to customize to your unique preference. a wide variety of Dockers not even mentioned anywhere in this post yet.
Why Krita is Awesome: A Collection of Reasons Why This Program is Worth Taking a Look At
Krita is a painting program that has been around for a while, and in the last few years, underwent major changes and improvements. Because of these improvements, many artists are using it not just because it is free, but because it offers amazing features. These are by no means all of the great things Krita has to offer, but simply some of my favorite features of the program.
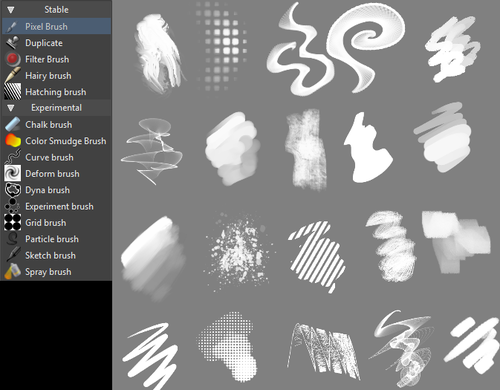
1. The Brush Engines.
Yes, engines. As in plural. There are many. And they all do different things. There is no way you could possibly capture all of its possibilities with one screen shot, but here are just some of the possibilities. Along side standard round, square, and shape, and textured brushes, there are brushes that smear, blend, and create interesting abstract strokes. There are brushes for filters, and one of my favorites, the Experiment Brush, which is basically a pre-filled lasso tool.
Brushes also support weighted smoothing, or brush stabilizers.
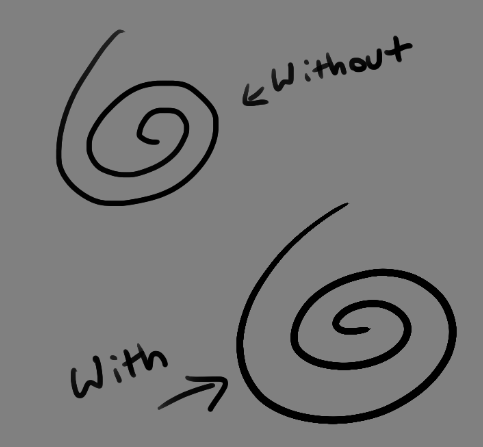
This is incredibly useful for line art. And while I do not usually use this feature, it is something that I feel many programs are lacking, such as Photoshop.
But its brushes aren’t the only thing about Krita with variety.

2. Color Selector Customization.
Whether you prefer something basic, or something more complicated, Krita will likely have what youre looking for. You are not likely to find yourself missing your other program’s color wheels. There are even more options than this, and other color selectors.

Gotta love that customization.
Krita also has some great naviation tools.

3. On the fly rotation, zoom, and brush sizing.
With krita, zooming, rotating, and brush size scaling are all smooth, and dynamic with the use of hot keys. These are features I miss when in other programs. To zoom, Ctrl+Middle mouse button, hover over the screen to zoom in and out. The same with shift rotates (press the ‘5’ key to reset rotation). Holding down shift and draging your brush on the canvas dynamically changes its size, allowing you to see the change, and get the exact size you want without brackets. Brackets also work, if that’s what you are used to. Krita also has highly customizable hot keys.

4. The Pop Up Pallet
The pop up pallet is a set of your 10 favorite brushes (which you can edit), and a built in color wheel that appears when you right click on the canvas. It is incredibly useful for switching between those few brushes that you use in almost every picture.

5. Real time, seamless tiles creation.
Pressing the W key in Krita will infinitely tile your canvas, and allow you to work real time on simple to complex tiled images. You can zoom in and out to see how your tiles work form a distance, and paint freely to create seamless artwork easily, without having to check using filters and manually tiling. Very usefull for patterns, backgrounds, and games.

6. The Symmetry Tool
This one goes without saying, Krita supports both horizontal and vertical symmetry, along with a brush that is capable of radial symmtry with as many directions as you like.

Go nuts, kid.
There are many more reasons why this program is awesome. And it is only going to get more awesome. And the coolest thing about it, is that it is 100% free. So go check it out! There’s nothing to lose. Krita isn’t for everyone, it can be hard to get the hang of, and it is not meant for photo editing, it is a program completely focused on digital painting from start to finish.
Give it a go and see if Krita is the program for you.
#ive used krita since i first discovered it#i dislike gimp for painting bc it looks pixely#and sai costs money#and photoshop costs money#and firealpaca isnt nearly as robust#krita is as good as and in some ways better than photoshop#and its entirely free god fucking bless the linux community
100K notes
·
View notes
Text
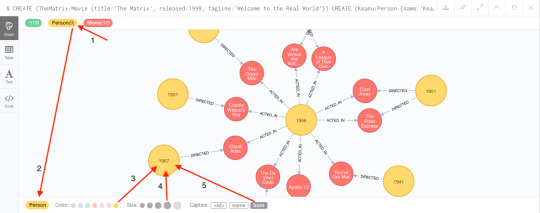
Neo4j Python
要通过python来操作Neo4j,首先需要安装py2neo,可以直接使用pip安装。 pip install py2neo 在完成安装之后,在python中调用py2neo即可,常用的有Graph,Node,Relationship。 from py2neo import Graph,Node,Relationship 连接Neo4j的方法很简单:. The Python Driver 1.7 supports older versions of python, Neo4j 4.1 will work in fallback mode with that driver. Neo4j Cypher Tutorial With Python. In this course student will learn what is graph database, how it is different from traditional relational database, why graph database is important today, what is neo4j, why neo4j is the best graph database available in the market, students will also get the idea about cypher query and uses of cypher query(all CRUD operations and complete sets of uses cases.
Neo4j Python Book
Neo4jDeveloper(s)Neo4jInitial release2007; 14 years ago(1)Stable releaseRepositoryWritten inJavaTypeGraph databaseLicense
Source code:GPLv3 and AGPLv3
Binaries:Freemiumregisterware
Websiteneo4j.com
Neo4j (Network Exploration and Optimization 4 Java) is a graph database management system developed by Neo4j, Inc. Described by its developers as an ACID-compliant transactional database with native graph storage and processing,(3) Neo4j is available in a GPL3-licensed open-source 'community edition', with online backup and high availability extensions licensed under a closed-source commercial license.(4) Neo also licenses Neo4j with these extensions under closed-source commercial terms.(5)
Neo4j is implemented in Java and accessible from software written in other languages using the Cypher query language through a transactional HTTP endpoint, or through the binary 'bolt' protocol.(6)(7)(8)(9)
History(edit)
Version 1.0 was released in February 2010.(10)
Neo4j version 2.0 was released in December 2013.(11)
Neo4j version 3.0 was released in April 2016.(12)
In November 2016 Neo4j successfully secured $36M in Series D Funding led by Greenbridge Partners Ltd.(13)
In November 2018 Neo4j successfully secured $80M in Series E Funding led by One Peak Partners and Morgan Stanley Expansion Capital, with participation from other investors including Creandum, Eight Roads and Greenbridge Partners.(14)
Release history(edit)
Release historyReleaseFirst release(15)Latest
minor version(16)
Latest release(16)End of Support Date(15)Milestones1.02010-02-23Old version, no longer maintained: 1.0N/A2011-08-23Kernel, Index, Remote-graphdb, Shell(17)1.12010-07-30Old version, no longer maintained: 1.1N/A2012-01-30Graph-algo, Online-backup(17)1.22010-12-29Old version, no longer maintained: 1.2N/A2012-06-29Server including Web Admin, High Availability, Usage Data Collection(17)1.32011-04-12Old version, no longer maintained: 1.3N/A2012-09-12Neo4j Community now licensed under GPL, 256 Billion database primitives, Gremlin 0.8(17)1.42011-07-08Old version, no longer maintained: 1.4N/A2013-01-08The first iteration of the Cypher Query Language, Experimental support for batch operations in REST1.52011-11-09Old version, no longer maintained: 1.5N/A2013-03-09Store Format Change, Added DISTINCT to all aggregate functions in Cypher,
New layout of the property store(s), Upgraded to Lucene version 3.5(17)
1.62012-01-22Old version, no longer maintained: 1.6N/A2013-07-22Cypher allShortestPaths, management bean for the diagnostics logging SPI, gremlin 1.4(17)1.72012-04-18Old version, no longer maintained: 1.7N/A2013-10-18Moved BatchInserter to a different package, lock free atomic array cache, GC monitor(17)1.82012-09-28Old version, no longer maintained: 1.8N/A2014-03-28Bidirectional traversals, Multiple start nodes(17)1.92013-05-21Old version, no longer maintained: 1.9.92014-10-132014-11-21Performance improvement on initial loading of relationship types during startup,
Pulled out Gremlin as separate plugin to support different versions(17)
2.02013-12-11Old version, no longer maintained: 2.0.42014-07-082015-06-11Extending model to “labeled” property graph and introduced visual IDE(17)(18)2.12014-05-29Old version, no longer maintained: 2.1.82015-04-012015-11-29Cypher new cost based planner, Fixes issue in ReferenceCache, potential omission, potential lock leak(17)2.22015-03-25Old version, no longer maintained: 2.2.102016-06-162016-09-25Massive Write Scalability, Massive Read Scalability, Cost-based query optimizer,
Query plan visualization(19)
2.32015-10-21Old version, no longer maintained: 2.3.122017-12-122017-04-21Break free of JVM-imposed limitations by moving the database cache off-heap,
Spring Data Neo4j 4.0, Neo4j-Docker Image, Windows Powershell Support, Mac Installer, and Launcher(20)
3.02016-04-16Old version, no longer maintained: 3.0.122017-10-032017-10-31user-defined/stored procedures called APOC (Awesome Procedures on Cypher),
Bolt binary protocol, in-house language drivers for Java, .NET, JavaScript and Python(21)(18)
3.12016-12-13Old version, no longer maintained: 3.1.92018-06-052018-06-13Causal Clustering, Enterprise-Class Security and Control, User-Defined Functions,
Neo4j IBM POWER8 CAPI Flash, User and role-based security and directory integrations(22)(18)
3.22017-05-11Old version, no longer maintained: 3.2.142019-02-262018-11-31Multi-Data Center Support, Causal Clustering API, Compiled Cypher Runtime, Node Keys,
Query Monitoring, Kerberos Encryption, Clustering on CAPI Flash, Schema constraints,
new indexes and new Cypher editor with syntax highlights and autocompletion(23)(18)
3.32017-10-24Old version, no longer maintained: 3.3.92018-11-022019-04-28Write performance is 55% faster than Neo4j 3.2, Neo4j Data Lake Integrator toolkit, Neo4j ETL(24)3.42018-05-17Old version, no longer maintained: 3.4.172019-11-192020-03-31Multi-Clustering, New Data Types for Space and Time, Performance Improvements(25)3.52018-11-29Older version, yet still maintained: 3.5.282021-04-202021-11-28Native indexing, Full-text search, The recommended index provider to use is native-btree-1.0(26)4.02020-01-15Older version, yet still maintained: 4.0.112021-01-112021-07-14Java 11 is required, Multiple databases, Internal metadata repository “system” database,
Schema-based security and Role-Based Access Control, Role and user management capabilities,
Sharding and federated access, A new neo4j:// scheme(27)(28)
4.12020-06-23Older version, yet still maintained: 4.1.82021-03-192021-12-23Graph privileges in Role-Based Access Control (RBAC) security, Database privileges for transaction management, Database management privileges, PUBLIC built-in role, Cluster Leadership Control, Cluster Leadership Balancing, Cypher Query Replanning Option, Cypher PIPELINED Runtime operators, Automatic routing of administration commands(29)4.22020-11-17Current stable version:4.2.5 2021-04-092022-05-16(Administration) ALIGNED store format, Procedures to observe the internal scheduler, Dynamic settings at startup, WAIT/NOWAIT in Database Management, Index and constraint administration commands, Filtering in SHOW commands, Backup/Restore improvements, Compress metrics on rotation, Database namespace for metrics, neo4j-admin improvements, HTTP port selective settings (Causal Cluster) Run/Pause Read Replicas, Database quarantine (Cypher) Planner improvements, Octal literals (Functions and Procedures) round() function, dbms.functions() procedure (Security) Procedures and user defined function privileges, Role-Based Access Control Default graph, PLAINTEXT and ENCRYPTED password in user creation, SHOW CURRENT USER, SHOW PRIVILEGES as commands, OCSP stapling support for Java driver(30)
Old version
Latest version
Future release
Licensing and editions(edit)
Neo4j comes in 2 editions: Community and Enterprise. It is dual-licensed: GPL v3 and a commercial license. The Community Edition is free but is limited to running on one node only due to the lack of clustering and is without hot backups.(31)
The Enterprise Edition unlocks these limitations, allowing for clustering, hot backups, and monitoring. The Enterprise Edition is available under a closed-source Commercial license.
Data structure(edit)
In Neo4j, everything is stored in the form of an edge, node, or attribute. Each node and edge can have any number of attributes. Both nodes and edges can be labelled. Labels can be used to narrow searches. As of version 2.0, indexing was added to Cypher with the introduction of schemas.(32) Previously, indexes were supported separately from Cypher.(33)
Neo4j, Inc.(edit)
Neo4j is developed by Neo4j, Inc., based in the San Francisco Bay Area, United States, and also in Malmö, Sweden. The Neo4j, Inc. board of directors consists of Michael Treskow (Eight Roads), Emmanuel Lang (Greenbridge), Christian Jepsen, Denise Persson (CMO of Snowflake), David Klein (One Peak), and Emil Eifrem (CEO of Neo4j).(34)
See also(edit)
References(edit)
^Neubauer, Peter (@peterneubauer) (17 Feb 2010). '@sarkkine #Neo4j was developed as part of a CMS SaaS 2000-2007, became released OSS 2007 when Neo Technology spun out' (Tweet) – via Twitter.
^https://neo4j.com/release-notes/neo4j-4-2-5/.
^Neo Technology. 'Neo4j Graph Database'. Retrieved 2015-11-04.
^Philip Rathle (November 15, 2018). 'Simplicity Wins: We're Shifting to an Open Core Licensing Model for Neo4j Enterprise Edition'. Retrieved 2019-01-16.
^Emil Eifrem (April 13, 2011). 'Graph Databases, Licensing and MySQL'. Archived from the original on 2011-04-26. Retrieved 2011-04-29.
^'Bolt Protocol'.
^Todd Hoff (June 13, 2009). 'Neo4j - a Graph Database that Kicks Buttox'. High Scalability. Possibility Outpost. Retrieved 2010-02-17.
^Gavin Terrill (June 5, 2008). 'Neo4j - an Embedded, Network Database'. InfoQ. C4Media Inc. Retrieved 2010-02-17.
^'5.1. Transactional Cypher HTTP endpoint'. Retrieved 2015-11-04.
^'The top 10 ways to get to know Neo4j'. Neo4j Blog. February 16, 2010. Retrieved 2010-02-17.
^'Neo4j 2.0 GA - Graphs for Everyone'. Neo4j Blog. December 11, 2013. Retrieved 2014-01-10.
^'Neo4j 3.0.0 - Neo4j Graph Database Platform'. Release Date. April 26, 2016. Retrieved 2020-04-23.
^'Neo Technology closes $36 million in funding as graph database adoption soars'. SiliconANGLE. Retrieved 2016-11-21.
^'Graph database platform Neo4j locks in $80 mln Series E'. PE Hub Wire. Archived from the original on 2019-04-26. Retrieved 2018-11-01.
^ ab'Neo4j Supported Versions'. Neo4j Graph Database Platform. Retrieved 2020-11-26.
^ ab'Release Notes Archive'. Neo4j Graph Database Platform. Retrieved 2021-04-20.
^ abcdefghijk'neo4j/neo4j'. GitHub. Retrieved 2020-01-28.
^ abcd'Neo4j Open Source Project'. Neo4j Graph Database Platform. Retrieved 2020-01-28.
^'Neo4j 2.2.0'. Neo4j Graph Database Platform. Retrieved 2020-01-28.
^'Neo4j 2.3.0'. Neo4j Graph Database Platform. Retrieved 2020-01-28.
^'Neo4j 3.0.0'. Neo4j Graph Database Platform. Retrieved 2020-01-28.
^'Neo4j 3.1.0'. Neo4j Graph Database Platform. Retrieved 2020-01-28.
^'Neo4j 3.2.0'. Neo4j Graph Database Platform. Retrieved 2020-01-28.
^'Neo4j 3.3.0'. Neo4j Graph Database Platform. Retrieved 2020-01-28.
^'Neo4j 3.4.0'. Neo4j Graph Database Platform. Retrieved 2020-01-28.
^'Neo4j 3.5.0'. Neo4j Graph Database Platform. Retrieved 2020-01-28.
^'Neo4j 4.0.0'. Neo4j Graph Database Platform. Retrieved 2020-01-28.
^'2.1. System requirements - Chapter 2. Installation'. neo4j.com. Retrieved 2020-01-28.
^'Neo4j 4.1.0'. Neo4j Graph Database Platform. Retrieved 2020-06-23.
^'Neo4j 4.2.0'. Neo4j Graph Database Platform. Retrieved 2020-11-26.
^'The Neo4j Editions'.
^'The Neo4j Manual v2.1.5'.
^'The Neo4j Manual v1.8.3'.
^Neo4j. 'Staff - Neo4j Graph Database'. Retrieved 2020-06-19.
External links(edit)
Official website
Neo4j Python Book
Retrieved from 'https://en.wikipedia.org/w/index.php?title=Neo4j&oldid=1020554218'
0 notes
Text
Tutorial: launch a web application on EKS
Goal: launch a web application on EKS that load balances traffic to three nginx web servers.
Notes:
Tumblr (or my theme) is converting double dash (”-” followed by “-”) to em dash (”–”). For some commands, you’ll need to replace the em dash with double dashes. (sorry.)
Though this creates a public/private subnet cluster, it will launch the worker nodes in the public network. For better security, the worker nodes should be launches in private subnets.
TOC
Prereqs
Preview Nginx image locally (optional)
Create cluster
Deploy Kubernetes Dashboard (optional)
Running Nginx
Clean up
Part 1: Prereqs
You'll need to install the AWS CLI, eksctl, and kubectl, as well as authenticate with your cluster.
Follow these prerequisite instructions, but stop once the tools are installed. (Don’t create a cluster.)
Optionally, if you want to complete part 2, you should also install Docker locally.
Part 2: Preview Nginx image locally (optional)
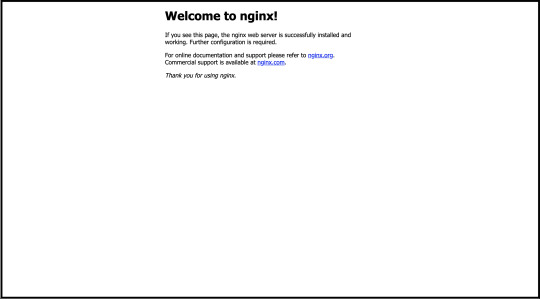
If you’d like a preview of what you will see once completing this tutorial, you can run the Nginx Docker container locally.
docker run --name some-nginx -p 8081:80 -d nginx
Once you do this, visit http://localhost:8081 in browser. You should see this:
After validating, let’s stop the server and clean up resources:
docker stop some-nginx && docker rm some-nginx
Part 3: Create cluster
We’re going to create an cluster with 3 Linux managed nodes. (source):
eksctl create cluster \ --name nginx-webapp-cluster \ --version 1.18 \ --region us-west-2 \ --nodegroup-name linux-nodes \ --nodes 3 \ --with-oidc \ --managed
Let’s confirm successful creation by ensuring three are three nodes:
kubectl get nodes
Part 4: Deploy Kubernetes Dashboard (optional)
While not necessary for this tutorial, this will allow you to view details on your cluster, such as nodes, running pods, etc, and is recommended.
Instructions for running the Kubernetes Dashboard.
Part 5: Running Nginx
1. Create a namespace
kubectl create namespace nginx-webapp
2. Create a file, nginx-webapp-deployment.yaml:
apiVersion: apps/v1 kind: Deployment metadata: name: nginx-webapp namespace: nginx-webapp spec: replicas: 3 selector: matchLabels: app: nginx-webapp template: metadata: labels: app: nginx-webapp spec: containers: - name: nginx-webapp-container image: nginx ports: - name: http containerPort: 80d
3. Run:
kubectl apply -f nginx-webapp-deployment.yaml
4. Create a file, nginx-webapp-service.yaml:
apiVersion: v1 kind: Service metadata: name: nginx-webapp-service namespace: nginx-webapp labels: app: nginx-webapp spec: ports: - port: 80 targetPort: 80 selector: app: nginx-webapp type: LoadBalancer
5. Run:
kubectl apply -f nginx-webapp-service.yaml
6. Confirm three instances of Nginx is running:
kubectl get deployments --namespace=nginx-webapp
(wait for 3/3 ready)
7. Fetch load balancer IP:
kubectl get service --namespace=nginx-webapp
Visit the URL in the EXTERNAL-IP column. (Note: it may take a few minutes for the DNS to replicate, so try again if address not found.)
Part 6: Clean up
EKS is expensive, so make sure you clean up your resource when you are done:
eksctl delete cluster \ --region=us-west-2 \ --name=nginx-webapp-cluster
0 notes
Text
Learn Various Uses of Tensorflow

Tensorflow Applications
TensorFlow, as told before, is a great tool which, if used properly has innumerable benefits. The major uses of the library include classification, perception, understanding, discovering, prediction and creation. Some of the current uses of the TensorFlow system, Tensorflow application and some other awesome projects done by the open source community are listed below:
Deep Speech Developed by Mozilla is a TensorFlow implementation motivated by Baidu’s Deep Speech architecture. You can download the code and modify it under the license at: https://github.com/mozilla/DeepSpeech

Uses of Tensorflow: Deep Speech
RankBrain- Developed by Google, it is a large-scale deployment of deep neural nets for search ranking on www.google.com. It is a part of the search algorithm that’s used to sort through the billions of pages it knows about and find the ones deemed most relevant. It is also the most talked about Tensorflow Applications.
Learn about TensorFlow Pros and Cons

RankBrain: Applications of Tensorflow
Inception Image Classifier, developed by Google, is a baseline model and follow-on research into highly accurate computer vision models, starting with the model that won the 2014 Imagenet image classification challenge and started the era of convolution networks.
Massive multitask for Drug Discovery, Stanford University, is a deep neural network model for identifying promising drug candidates.

Massive Multitask: Tensorflow Applications
On Device Computer Vision for OCR, is an On-device computer vision model to do optical character recognition to enable real-time translation.
Using TensorFlow, we can make algorithms to paint an image or visualize objects in a photograph, we can also train a pc to recognize objects in an image and use that data to drive new and interesting behaviors, from understanding the similarities and differences in large data sets to using them to self-organize, to understanding how to infinitely generate entirely new content or match the aesthetics of other images. We can even teach the computer to read and synthesize new phrases which are a part of Natural Language Processing.
Tensorflow can also be used with containerization tools such as docker, for instance, it could be used to deploy a sentiment analysis model which uses character level ConvNet networks for text classification.
Let’s discuss TensorFlow API

Docker: Uses of Tensorflow
Apart from the general supervised and unsupervised algorithms, machine learning has a great use in recommendation engines and almost every big company is using it in some form or the other. TensorRec is another cool recommendation engine framework in TensorFlow which has an easy API for training and prediction and which resembles common machine learning toolsin Python.

Applications of Tensorflow
You might have seen that your gmail recommends you a quick response to messages that you’ve received, named SmartReply, this was another pet project of Google’s Brain team and is now used in Google Assistant as well. It is a deep LSTM(Long Term Short Term Memory) model to automatically generate email responses

Tensorflow Applications
Other major Tensorflow Applications include :
Speech Recognition Systems
Image/Video Recognition and tagging
Self Driving Cars
Text Summarization
Sentiment Analysis
This was all about the applications of Tensorflow. Next, in the Tensorflow Applications tutorial, let’s see some projects built using Tensorflow. Do you know about Tensorflow Audio Recognition
Products Built Using Tensorflow
There are also a number of mobile applications that are available which exhibit the uses of the machine learning library. Apart from that, there’s a subreddit, r/tensorflow where people post the latest advances and their cool projects with the library. Some other good products built using TensorFlow include:
Google Creative Labs Teachable Machine which uses tensorflow.js which lets you teach using your computer camera, live in the browser.

Applications of TensorFlow
2. Another cool project is Nsynth Super developed again by Google Creative Labs, which lets you make music using completely new sounds generated by the Nsynth algorithm. How Secure is TensorFlow

Nsynth : Use of Tensorflow
3. There’s another project that lets you play with a neural network that can generate strokes based on your handwriting styles. Learn about tensorFlow Wide & Deep Learning

Tensorflow Applications
4. Another interesting project built using Tensorflow is Giorgio Camthat lets you make music by clicking pictures.

Applications of TensorFlow – Giorgio Camthat
So, this was all about TensorFlow Applications. Hope you like our explanation Learn how to install TensorFlow
Conclusion
hence, in this TensorFlow Applications tutorial, we have seen the concept of applications of TensorFlow. Moreover, we discussed TensorFlow Application examples, and a product built using TensorFlow. Moreover, NASA is designing a system with Tensorflow for orbit classification and object clustering of asteroids and will classify and predict near earth objects, how cool is that! Looking at the big picture, this library definitely accelerates the learning by providing the tools that were always missing. furthermore, if you feel any doubt, feel free to ask in the comment tab.
0 notes
Text
Why do we need the Democratization of Machine Learning?

We are living in an era of hype. In this article, I am trying to discover the hype around Artificial Intelligence. The First thing I want to clear is that ML/DL are algorithms, neither conscious nor intelligent or smart machines.
There’s more to Artificial General Intelligence than just Machine Learning or Deep Learning. I agree that Deep Learning has penetrated industries and it holds the potential to disrupt industries, but it is nowhere near to being conscious or an intelligent machines.
The term Masses is so powerful that once aligned together, it brings revolutions.
Singularity, AI taking over the world, End of the world were one of the most used phrases in the media last year. Media being a primary source of information for most of the people, including investors and financial institutions which makes it a vicious circle fuelling the hype and adding air to the bubble. It can be good or bad, but if it bursts it is going to affect us all (includes you too). If you talk to the researchers or the experts, their views on this are poles apart. They echo AI is over-hyped and AGI is far away. We have a long way to go to achieve true Intelligence. Current AI(Deep learning/Machine Learning) applications can only do what they are trained to do. When the knowledge flows from the source to the publications, it gets distorted.
AI is a pie and everyone wants to have a bite of it.
AI/ML tools are limited to the researchers, industry, colleges and labs. They are not accessible to the masses in a simple easy-to-use form. In the last 2–3 years we have seen some pretty interesting use cases of modern deep learning. Apps likes Prisma showed us that we just need to be creative to make it available to the masses. It uses deep learning to extract styles from images(“Vincent Van Gogh’s Starry night”, “Picasso’s Self Portrait 1907”, “Frida Cahlo”) and apply extracted styles on to your images. AI as a lawyer, AI as a painter and AI as a doctor and so on, just name it and you will find a startup/company working on it.
If I talk about industry use cases, Baidu runs a food delivery service and it uses AI to predict how long the food will take to get to the customers. Google uses deep learning for machine translation, search and for other products. Facebook uses it to recognize faces in your images which you upload on Facebook. GANs (Generative Adversarial Network) are the type of neural networks which learns to imitate and produce original content. Google Research used GANs to invent an “encryption” protocol. Andrew Ng, Chief Scientist at Baidu research says
AI is the new electricity
In the next 3–5 years AI/ML is going to affect almost every industry. Infact it is a new industry and it is worth billions of dollars right now. A report by Bank of America Merrill Lynch forecasts it to be USD 14 Trillion by 2025, and it is a HUGE number.

Source: Wall Street Journal
61% of companies in this survey by Wall Street Journal are planning to use AI within 5 years for business analytics, 45% for Machine Learning and 21% for self-learning robots. According Stackoverflow’s Report, the global economy is seeing an explosion in the demand for Machine Learning expertise this year as much as 3700 times more than year 2016. This is HUGE!
And, we are missing out on one very important user group, which is general people. What if users can participate in the creation of the AGI. Creative users, coming out with use cases which we had never thought of. What they need is easy-to-use tools. AI with everyone is the future of AI. Personal computers revolutionised industries and powered people with tools that amplify one’s creativity and productivity. Internet came out and connected us all together. Handheld devices like Mobile and tablets have given us all of that power in our hands. Now it’s time for AI to go into everyone’s hands, next revolution is getting in shape now and everyone has to participate in shaping it. AI can find the cure for diseases which we were unable to cure for centuries like Cancer, Sclerosis and other diseases. It holds the power for a better future, a future which we have always dreamt of.
As far as the world is progressing, most of the programming might not even exist in the future. AI will code for us in the future. Data is one thing which I bet on, second is how we think and how we use AI for our betterment and betterment of the society. We dream of humans and AI working together as companions making world a better place.
It is our responsibility to shape it well, so that it doesn’t go rogue. Our curiosity will lead us there. One day we will reach there, true AGI.
Open Source tools and libraries
Open source datasets to encourage developers
Open educational material like videos, tutorials, articles and easy to unserstand description of research papers.
Open groups to discuss AI/DL and community building.
All of the above do exist in some form, what is not there is a tool for masses to play around with ML/DL and contribute back to the society. Until now.
A revolution is happening right now, the whole world is embracing it. Mate Labs wants to be there as one shoulder for people to bank on and fuel this revolution by enabling everyone with the right tools, libraries, datasets and educational materials. We believe in building a community of enthusiasts, curious and thirsty folks standing for innovation and a bright future.
We have open sourced the implementation of All Convolutional Networks which is available on Github. We have also published a suite of easy-to-run scripts to install Tensorflow and Docker on your system to get you started. More to come soon.
Source
https://medium.com/@matelabs_ai/why-do-we-need-the-democratization-of-machine-learning-80104e43c76f
0 notes
Text
Understanding Docker Playground Online: Your Gateway to Containerization
In the ever-evolving world of software development, containerization has become a pivotal technology, allowing developers to create, deploy, and manage applications in isolated environments. Docker, a leader in this domain, has revolutionized how applications are built and run. For both novices and seasoned developers, mastering Docker is now essential, and one of the best ways to do this is by leveraging an Online Docker Playground. In this article, we will explore the benefits of using such a platform and delve into the Docker Command Line and Basic Docker Commands that form the foundation of containerization.
The Importance of Docker in Modern Development
Docker has gained immense popularity due to its ability to encapsulate applications and their dependencies into containers. These containers are lightweight, portable, and can run consistently across different computing environments, from a developer's local machine to production servers in the cloud. This consistency eliminates the "it works on my machine" problem, which has historically plagued developers.
As a developer, whether you are building microservices, deploying scalable applications, or managing a complex infrastructure, Docker is an indispensable tool. Understanding how to effectively use Docker begins with getting comfortable with the Docker Command Line Interface (CLI) and mastering the Basic Docker Commands.
Learning Docker with an Online Docker Playground
For beginners, diving into Docker can be daunting. The Docker ecosystem is vast, with numerous commands, options, and configurations to learn. This is where an Online Docker Playground comes in handy. An Online Docker Playground provides a sandbox environment where you can practice Docker commands without the need to install Docker locally on your machine. This is particularly useful for those who are just starting and want to experiment without worrying about configuring their local environment.
Using an Online Docker Playground offers several advantages:
Accessibility: You can access the playground from any device with an internet connection, making it easy to practice Docker commands anytime, anywhere.
No Installation Required: Skip the hassle of installing Docker and its dependencies on your local machine. The playground provides a ready-to-use environment.
Safe Experimentation: You can test commands and configurations in a risk-free environment without affecting your local system or production environment.
Immediate Feedback: The playground often includes interactive tutorials that provide instant feedback, helping you learn more effectively.
Getting Started with Docker Command Line
The Docker Command Line Interface (CLI) is the primary tool you'll use to interact with Docker. It's powerful, versatile, and allows you to manage your Docker containers and images with ease. The CLI is where you will issue commands to create, manage, and remove containers, among other tasks.
To begin, let's explore some Basic Docker Commands that you will frequently use in your journey to mastering Docker:
docker run: This command is used to create and start a new container from an image. For example, docker run hello-world pulls the "hello-world" image from Docker Hub and runs it in a new container.
docker ps: To see a list of running containers, use the docker ps command. To view all containers (running and stopped), you can add the -a flag: docker ps -a.
docker images: This command lists all the images stored locally on your machine. It shows details like the repository, tag, image ID, and creation date.
docker pull: To download an image from Docker Hub, use docker pull. For example, docker pull nginx fetches the latest version of the NGINX image from Docker Hub.
docker stop: To stop a running container, use docker stop [container_id]. Replace [container_id] with the actual ID or name of the container you want to stop.
docker rm: Once a container is stopped, you can remove it using docker rm [container_id].
docker rmi: If you want to delete an image from your local storage, use docker rmi [image_id].
Conclusion
Mastering Docker is a crucial skill for modern developers, and utilizing an Online Docker Playground is one of the most effective ways to get started. By practicing Docker Command Line usage and familiarizing yourself with Basic Docker Commands, you can gain the confidence needed to manage complex containerized environments. As you progress, you'll find that Docker not only simplifies the deployment process but also enhances the scalability and reliability of your applications. Dive into Docker today, and unlock the full potential of containerization in your development workflow.
0 notes
Photo

Deploy a Laravel App to Alibaba Cloud Using Docker
In this tutorial, we will deploy a Laravel application using Docker and Alibaba Cloud Container Service.
Prerequisites
Before you begin this guide you’ll need the following:
Docker installed on your local machine (if you can’t install the latest version you can use Docker Toolbox)
Composer installed on your computer
Preparing the Application for Deployment
First of all, you need a Laravel application that you can Dockerize. You can just copy my example from GitHub and push to your own git repository or you can create a new Laravel app using Composer with this command: composer create-project --prefer-dist laravel/laravel appname
We need to add some files to the root of the Laravel app.
You have to create an environment configuration file for the production environment, let’s call it .env.prod. You can copy your existing .env file, but don’t forget to modify the values(for example, set APP_ENV to production).
We will need a configuration file for the web server as well(we will use Apache), create a vhost.conf file for our virtual host.
<VirtualHost *:80> DocumentRoot /app/public <Directory "/app/public"> AllowOverride all Require all granted </Directory> ErrorLog ${APACHE_LOG_DIR}/error.log CustomLog ${APACHE_LOG_DIR}/access.log combined </VirtualHost>
To build our container we need a Dockerfile, we will use multi-stage build:
#Install the dependencies using composer FROM composer:1.7 as build WORKDIR /app COPY . /app RUN composer install COPY .env.prod .env #Application FROM php:7.2-apache RUN docker-php-ext-install mysqli pdo pdo_mysql EXPOSE 80 COPY --from=build /app /app COPY vhost.conf /etc/apache2/sites-available/000-default.conf RUN chown -R www-data:www-data /app \ && a2enmod rewrite
We also need to exclude some files and folders from the container, so you should create a .dockerignore file (you can extend this list if you want):
.git/ vendor/ node_modules/ yarn-error.log
Creating a Repository in Alibaba Cloud Container Registry
On the Alibaba Cloud Console, go to Products > Elastic Computing > Container Registry.

First, you need to set the registry login password.
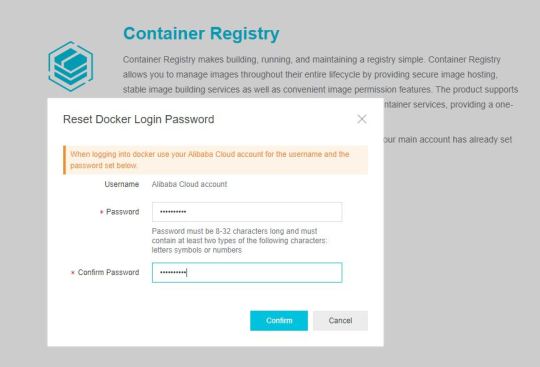
We have to create a namespace, then we can create a repository for the application.
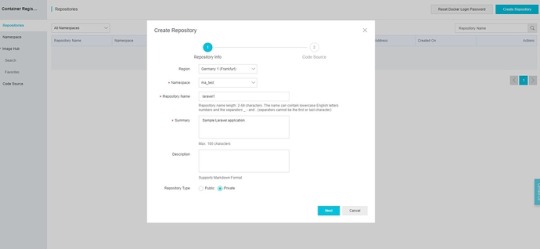
Make sure that you set the repository type to Private, otherwise the repository will be accessible without the password. You can select the region of your repository as well.
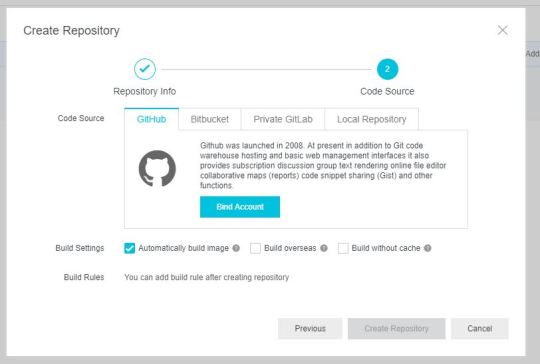
The Container Registry supports GitHub, GitLab and Bitbucket as a code source which is really useful. If you use one of them you can choose that, but for the simplicity, we will use the Local repository option in this tutorial.
You need to build the container on your local computer and push it to the registry (if you choose a Git hosting service Container Registry will build the containers automatically, so you can skip these steps.)
Run the following command in the root of your Laravel app to build the container (you can replace test/laravel:1.0 tag with your own).
docker build -t test/laravel:1.0 .
If you click on manage at the right of your repository in the Container Registry, you can find the address of your repository and a guide about how to log in to the registry and push an image to the repository.
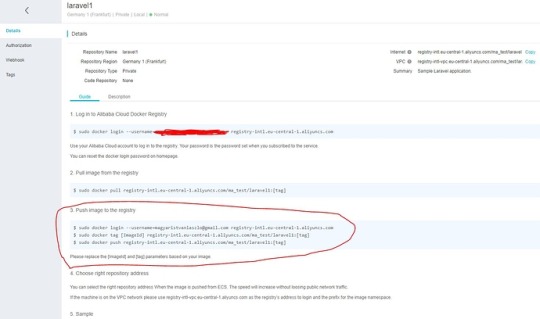
So you have to run the following commands, but with your own region, namespace and repository:
docker login [email protected] registry-intl.eu-central-1.aliyuncs.com docker tag test/laravel:1.0 registry-intl.eu-central-1.aliyuncs.com/ma_test/laravel1:1.0 docker push registry-intl.eu-central-1.aliyuncs.com/ma_test/laravel1:1.0
When you successfully pushed the image, you will see it under the Tags tab.

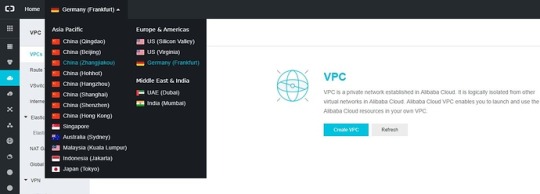
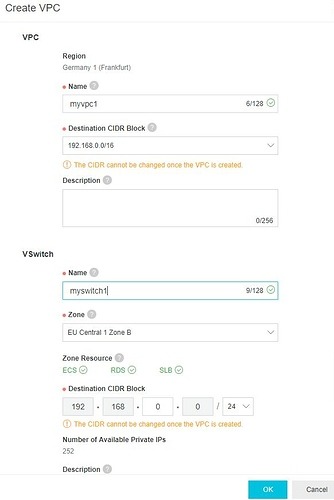
Creating a VPC
On the Alibaba Cloud Console go to Products > Networking > Virtual Private Cloud and activate VPC.
Choose your region from the top menu and create a VPC and a VSwitch.
Creating a Cluster
First you need to enable RAM (Products > Monitor and Management > Resource Access Management), then you can go to Products > Elastic Computing > Container Service.
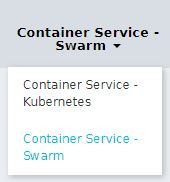
Container Service supports both Swarm and Kubernetes. Now we will use Swarm, so you should select Swarm from the left menu.
Click on the Create Cluster button and configure your cluster (don’t forget to select the same region that you selected for your VPC).

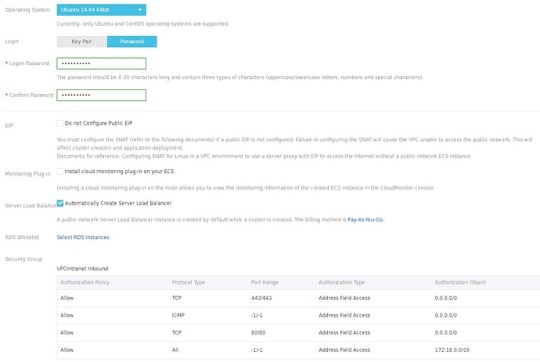
I chose 2x (2 nodes) 1 Core 1GB ECS instances for the demo, but you can choose a different configuration if you want.
In the Login section, you need to create SSH keys or set a password. I highly recommend SSH keys, but for the simplicity, you can use passwords for now.
When you have finished with the configuration you can click on the Create button (a confirm dialog will show up with pricing information).
When the cluster creation is finished and you can see your cluster in the cluster list, click on Manage.
You need to log in to your private repository to access the images, so click on the Log on to Hub button. If you don’t know what the repository’s domain name is, you should go to the Container Registry control panel and click on Manage at the right of your repository. Copy the VPC address (for example: registry-intl-vpc.eu-central-1.aliyuncs.com/ma_test/laravel1) — that is your Repository Domain Name. Your username and password is the username and password of your registry.
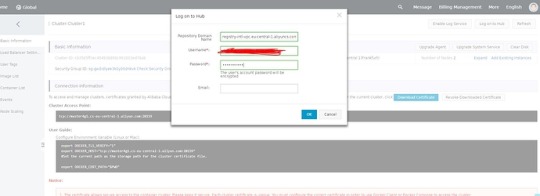
Now the cluster nodes can pull your image from the private repository.
Deploying the Application
On the Container Service control panel click on Applications from the left menu, then click on Create Application.
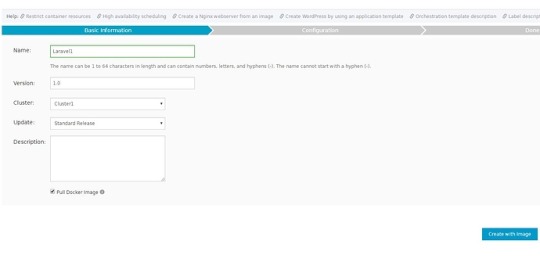
Set the name and the version, check Pull Docker Image (this will ensure that you definitely end up with the latest version), then click on Create with Image button.
The post Deploy a Laravel App to Alibaba Cloud Using Docker appeared first on SitePoint.
by Magyar András via SitePoint https://ift.tt/2OcEBAP
0 notes
Text
Deploy a Spring Boot Java app to Kubernetes on GCP-Google Kubernetes Engine

Kubernetes is an open source project, which can run in many different environments, from laptops to high-availability multi-node clusters, from public clouds to on-premise deployments, and from virtual machine (VM) instances to bare metal. You'll use GKE, a fully managed Kubernetes service on Google Cloud Platform, to allow you to focus more on experiencing Kubernetes, rather than setting up the underlying infrastructure. In this post , i will show you the steps to deploy your simple react application to GCP app engine service . Before going for actual deployment you should consider below pre-requisites - GCP account – You need to create at least Free tier GCP account by providing your credit card details which will be valid for 3 months. You can create it using https://cloud.google.com/ Github project - Spring boot project on github (https://github.com/AnupBhagwat7/gcp-examples) Below are the steps to deploy application to App Engine - - Package a simple Java app as a Docker container. - Create your Kubernetes cluster on GKE. - Deploy your Java app to Kubernetes on GKE. - Scale up your service and roll out an upgrade. - Access Dashboard, a web-based Kubernetes user interface. 1. GCP Setup Go to Google cloud console(https://console.cloud.google.com/) and click to open cloud shell -

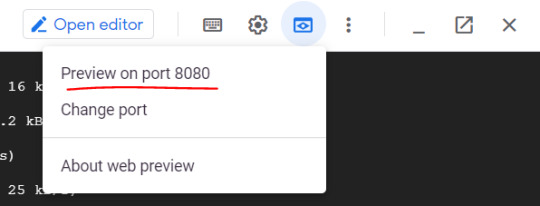
Run the following command in Cloud Shell to confirm that you are authenticated: gcloud auth list This command will give you below output - Credentialed Accounts ACTIVE ACCOUNT * @ To set the active account, run: $ gcloud config set account `ACCOUNT` Now run the below command to get the list of projects present under your GCP account - gcloud config list project If project is not set then you can do it by using below command - gcloud config set project 2. Package your java application Get the application source code from github - git clone https://github.com/AnupBhagwat7/gcp-examples.git cd gcp-demo-springboot-app Now run the project in gcp cloud shell - mvn -DskipTests spring-boot:run once the application is started , you can click on web preview as shown below -
You will be able to see your application launched in browser as below -

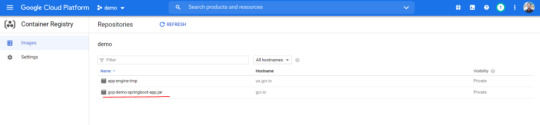
3. Package the Java app as a Docker container Next, you need to prepare your app to run on Kubernetes. The first step is to define the container and its contents. You need to take below steps to package your application as a docker image - Step 1: Create the JAR deployable for the app mvn -DskipTests package Step 2: Enable Container Registry to store the container image that you'll create gcloud services enable containerregistry.googleapis.com Step 3: Use Jib maven plugin to create the container image and push it to the Container Registry mvn -DskipTests com.google.cloud.tools:jib-maven-plugin:build -Dimage=gcr.io/$GOOGLE_CLOUD_PROJECT/gcp-demo-springboot-app.jar Step 4: If all goes well, then you should be able to see the container image listed in the console by navigating to CI/CD > Container Registry > Images. You now have a project-wide Docker image available, which Kubernetes can access and orchestrate as you'll see in next steps .
Step 5: You can locally test the image with the following command, which will run a Docker container as a daemon on port 8080 from your newly created container image: docker run -ti --rm -p 8080:8080 gcr.io/$GOOGLE_CLOUD_PROJECT/gcp-demo-springboot-app.jar Step 6: You can go to web preview feature of cloud shell to check if docker container is started successfully .You will see response in browser -

4. Deploy your application to Google Kubernetes Step 1: Create a cluster You're ready to create your GKE cluster. A cluster consists of a Kubernetes API server managed by Google and a set of worker nodes. The worker nodes are Compute Engine VMs. First, make sure that the related API features are enabled gcloud services enable compute.googleapis.com container.googleapis.com Create a cluster named springboot-java-cluster with two n1-standard-1 nodes using below command - gcloud container clusters create springboot-java-cluster --num-nodes 2 --machine-type n1-standard-1 --zone us-central1-c This will take few minutes to create a cluster. You can see all the clusters by navigating to Kubernetes Engine > Clusters

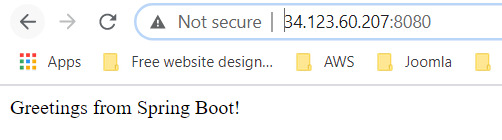
It's now time to deploy your containerized app to the Kubernetes cluster. You'll use the kubectl command line (already set up in your Cloud Shell environment). The rest of the tutorial requires the Kubernetes client and server version to be 1.2 or higher. kubectl version will show you the current version of the command. Step 2: Deploy app to Kubernetes cluster A Kubernetes deployment can create, manage, and scale multiple instances of your app using the container image that you created. Deploy one instance of your app to Kubernetes using the kubectl run command. kubectl create deployment springboot-java --image=gcr.io/$GOOGLE_CLOUD_PROJECT/gcp-demo-springboot-app.jar To view the deployment that you created, simply run the following command: kubectl get deployments To view the app instances created by the deployment, run the following command: kubectl get pods At this point, you should have your container running under the control of Kubernetes, but you still have to make it accessible to the outside world. Step 3: Allow external traffic By default, the Pod is only accessible by its internal IP within the cluster. In order to make the springboot-java container accessible from outside the Kubernetes virtual network, you have to expose the Pod as a Kubernetes service. In Cloud Shell, you can expose the Pod to the public internet with the kubectl expose command combined with the --type=LoadBalancer flag. The flag is required for the creation of an externally accessible IP. kubectl create service loadbalancer springboot-java --tcp=8080:8080 O/P: service/springboot-java created The flag used in the command specifies that you'll be using the load balancer provided by the underlying infrastructure. Note that you directly expose the deployment, not the Pod. That will cause the resulting service to load balance traffic across all Pods managed by the deployment (in this case, only one Pod, but you'll add more replicas later). The Kubernetes Master creates the load balancer and related Compute Engine forwarding rules, target pools, and firewall rules to make the service fully accessible from outside of Google Cloud. To find the publicly accessible IP address of the service, simply request kubectl to list all the cluster services. kubectl get services O/p: NAME TYPE CLUSTER-IP EXTERNAL-IP PORT(S) AGE kubernetes ClusterIP 10.3.240.1 443/TCP 44m springboot-java LoadBalancer 10.3.250.58 34.123.60.207 8080:32034/TCP 85s Notice that there are two IP addresses listed for your service, both serving port 8080. One is the internal IP address that is only visible inside your Virtual Private Cloud. The other is the external load-balanced IP address. In the example, the external IP address is aaa.bbb.ccc.ddd. You should now be able to reach the service by pointing your browser to http://34.123.60.207:8080
Step 4: Scale your application One of the powerful features offered by Kubernetes is how easy it is to scale your app. Suppose that you suddenly need more capacity for your app. You can simply tell the replication controller to manage a new number of replicas for your app instances. kubectl scale deployment springboot-java --replicas=3 O/P: deployment.apps/springboot-java scaled kubectl get deployment NAME READY UP-TO-DATE AVAILABLE AGE springboot-java 3/3 3 3 23m Step 5: Roll out an upgrade to your service At some point, the app that you deployed to production will require bug fixes or additional features. Kubernetes can help you deploy a new version to production without impacting your users. You can launch editor in CLOUD Shell and update the controller to return a new value as shown below-

Use Jib maven plugin to build and push a new version of the container image. mvn -DskipTests package com.google.cloud.tools:jib-maven-plugin:build -Dimage=gcr.io/$GOOGLE_CLOUD_PROJECT/springboot-java:v2 In order to change the image label for your running container, you need to edit the existing springboot-java deployment and change the image from gcr.io/PROJECT_ID/springboot-java:v1 to gcr.io/PROJECT_ID/springboot-java:v2. You can use the kubectl set image command to ask Kubernetes to deploy the new version of your app across the entire cluster one instance at a time with rolling updates. kubectl set image deployment/springboot-java springboot-java=gcr.io/$GOOGLE_CLOUD_PROJECT/springboot-java:v2 Step 6: Rollback to previous version Perhaps the new version contained an error and you need to quickly roll it back. With Kubernetes, you can roll it back to the previous state easily. Roll back the app by running the following command: kubectl rollout undo deployment/springboot-java This marks the end of this tutorial. Thanks for following. Github link - https://github.com/AnupBhagwat7/gcp-examples/tree/main/gcp-demo-springboot-app Read the full article
0 notes
Photo

How to Automate App Deployment to Alibaba ECS with Mina
This article was created in partnership with Alibaba Cloud. Thank you for supporting the partners who make SitePoint possible.
Think you got a better tip for making the best use of Alibaba Cloud services? Tell us about it and go in for your chance to win a Macbook Pro (plus other cool stuff). Find out more here.
Mina is a deployment automation tool and a deploy Bash script generator from the Rails world, which came into the spotlight after development companies noticed its advantages over Capistrano. Mina, in contrast to Capistrano, uses only one SSH connection to the deployment server, and executes a batch of bash commands there. This makes it a lot faster than Capistrano, which opens a separate SSH session for every command.
In this article we will go through setting up Mina for the deployment of a basic Django app - an unorthodox toolset for the Django world, which tends to use Docker or Fabric more. Given Mina's simplicity and flexibility, we feel it is worth exploring its use in the deployment of Python web apps.
Django, a "web framework for perfectionists with deadlines," has been around for some time now. It started off as a content-management oriented web framework, created in-house by web developers at Lawrence Journal World for its news web portal. It was published in 2005, and from there it took off and the rest is history. It became one of the most serious and widely adopted web frameworks, competing with Ruby on Rails. It is in use by Instagram, Disqus, the Washington Times, Mozilla, Bitbucket and others. It's still thriving.
Django docs suggest Apache with mod-wsgi as the first-choice, and it may be a prevalent option. But since we are performance-obsessed, for this tutorial we decided to cover the deployment of a Django application to Alibaba's ECS cloud instance with an NGINX and uWSGI stack.
NGINX is a web server notorious for its efficiency, being event-based, and it includes caching options, so it is often an ideal solution. uWSGI is an application server container - an implementation of WSGI, Python's standard web interface. It plays along with NGINX very well.
Getting Started
The first thing we will do is create our ECS instance in the Alibaba Cloud backend console.
The process is straightforward. We will choose Ubuntu 16.04 LTS for our operating system / OS image. Upon creation, we will want to make sure our instance is assigned to proper security groups. In Alibaba terminology, these are firewall rules for different ports. This is usually something that works by default, but in case of any issues with web access to our instance later on, make sure to check this off.
The security groups page can be accessed through the Elastic Compute Service submenu on the left.
The next thing to do upon creation of our instance is to set it up for SSH key access.
Perhaps the most straightforward way to do this is to set the instance up, at creation, with a password. Then we can just do the standard ssh-copy-id from our starting system - presumably a local device.
ssh-copy-id [email protected], executed from our local device (where we will replace the xxx... sequence with our Alibaba ECS instance public IP address) will prompt us for the password, and upon typing it, our key-based access should be set up.
When we log into our instance via ssh, we will do apt-get update to make sure our apt sources are up to date, and then we install git, curl, wget: apt-get install git curl wget -y
Installing the Server Environment
The default Python version that comes as default with Ubuntu 16.04 LTS is the ancient 2.7. In order to run the latest version of Django, we need Python 3+. One of the less painful ways to fix this is to install pyenv, a Python version manager.
It allows us to change the Python version used globally, or per-project. Before we install pyenv, as per the pyenv wiki, we will install prerequisites:
apt-get install -y make build-essential libssl-dev zlib1g-dev libbz2-dev libreadline-dev libsqlite3-dev llvm libncurses5-dev libncursesw5-dev xz-utils tk-dev liblzma-dev zlib1g-dev libffi-dev
Then we can install pyenv:
curl -L https://github.com/pyenv/pyenv-installer/raw/master/bin/pyenv-installer | bash
Upon completion, the pyenv installer will prompt us to add a couple of lines to the ~/.bash_profile, which we will do:
Now we update the PATH in our working session by doing source ~/.bash_profile in our terminal.
Provided that we did this correctly, we should now be able to install Python version 3.7.0:
Doing pyenv versions in the server terminal should show us two items now: system and 3.7.0, presuming that we installed the 3.7.0 version successfully.
pyenv global 3.7.0 will make our 3.7.0 version the global python version on our system. Should you have issues with pyenv, this is the url to visit.
Server stack
The usual default with Ubuntu images is Apache server, which comes preinstalled. If it is running, we should stop it with service apache2 stop, and then install nginx with apt-get install nginx -y. This should install and start the NGINX server, which should be visible when we visit our server's public IP address.
We will also install uWSGI: pip install uwsgi (Python pip is presumably installed when we installed pyenv).
We will also make sure we have Django installed: pip install django. We could be using virtualenv here to ensure a contained isolated environment for our app, but for the sake of keeping this tutorial simple, we will skip it.
In more complex cases, though, it is probably a wise choice.
This guide presumes we have directed our domain's A records to our server IP address, so myxydomain.com is presumed in the rest of this guide to be pointed to our ECS server's public IP.
Now we will create the NGINX virtual host for our website. The file can be found here. We will just go over couple of things:
server unix:///tmp/minaguide.sock;
Here we are connecting - with NGINX - to the Unix socket that uWSGI will create in the /tmp directory, and /tmp is recommended for otherwise possible permissions complications that may arise from a more complex directory tree. This is what /tmp is for.
include /root/project/minaguide/uwsgi/uwsgi_params;
This (/root/project/minaguide) is a directory of our django project on the server, and within it, we will have a uwsgi subdirectory with a uwsgi_params file, which will hold some uWSGI variables. We will come back to this later, and to setting up our uWSGI app.
We now have the base server environment we need for deployment.
Setting Up Mina
We are setting up Mina on the machine from which we are doing the deployment. Presuming the device is also Linux / Ubuntu (and things shouldn't be much different for Mac users - nor for Windows users, as long as they use Windows Subsystem for Linux ), we will want to make sure we have Ruby and rubygems installed - apt-get install ruby -y should do the trick.
When we have done this, we will have the gem command available, so we will do gem install mina.
Now - also on our local machine - we will create a directory dedicated to our project, and do mina init there.
This creates a config/deploy.rb file in our project directory, which we will edit to configure Mina:
The post How to Automate App Deployment to Alibaba ECS with Mina appeared first on SitePoint.
by Tonino Jankov via SitePoint https://ift.tt/2DDimDX
0 notes