#docker-compose events
Explore tagged Tumblr posts
Visit Tumblr Blog
Explore Tumblr blogs with no restrictions, modern design and the best experience.
Last Seen Tumblr Blogs


Fun Fact
Tumblr Inc. is funded by 13 investors.
Text
June - week 4
Routine
🛏 Sleep 8+ hours 🟥🟩🟥🟥🟥🟨🟥 ⏰ Wake up earlier than 10:00 🟩🟩🟩🟩🟩🟩🟩 👟 Work ⬛️⬛️🟩⬛️🟩🟩🟩 🇳🇱 Dutch lessons 🟦🟦🟥🟥🟥🟥🟥 🦉 Duolingo: Dutch 🟩🟩🟩🟥🟩🟩🟩 💧 Drops: Dutch 🟩🟩🟩🟥🟩🟩🟩 📚 Reading more than 15 pages 🟩🟩🟩🟩🟩🟩🟩 🧠 Meditation: 5+5 minutes 🟩🟩🟩🟥🟥 🟥🟥🟥🟥🟥 🌐 60-day Language Challenge (which I aim to finish in 6 weeks) by @leavelesstree 🟩🟩🟩🟩🟥🟥🟥🟥🟥🟥 🚲 Cycling 🟥 ☕️ Coffee* ⬛️⬛️⬛️⬛️⬛️⬛️⬛️ *I enjoy an occasional cup of coffee but I need to keep them occasional, which means: up to three cups a week with one day break in between
Special tasks
Backlog
🌐 60-day Language Challenge by @leavelesstree 🟩🟩 🧠 Meditation: 2 minutes 🟩🟩 ‼️🚲 Cycling 🟥🟥🟥 ❗️💡 Reaching out to the Philosophy people 🟥🟥🟥 📞 Dispeling my doubts related to the move (formal) 🟨🟩🟥 ✍️ Editing my WiP 🟥 📃 Drafting my name change request 🟥
New approach
I’ve chosen to break down the task of cleaning my room into smaller, more specific tasks. I’m going to focus on what should be done now, instead of aiming for the general idea of a clean room 🗂 Cleaning my desk 🟥 🧹 Vacuuming my room 🟥 🧽 Cleaning the wall 🟧 (there was an attempt) I’ve decided that registering at a university in my home country is pointless because it wouldn’t serve as a viable backup plan. If I got accepted, I’d need to accept or decline their offer very early on, and it would only add more tasks and stress without providing a safety net
Current tasks
💇♂️ Getting a haircut 🟩 🏬 Visiting my previous workplace + buying the cheapest thing I may actually use 🟥🟥 💻 Participating in an online event + asking a question and receiving an answer 🟩🟩🟥 🧙♂️ Online meeting 🟩 💶 Learning a specific thing about financial matters in the Netherlands 🟧 📋 Scheduling meetings with people I’d like to see before I leave 🟨 🟧 🟥🟥 🟥🟥 🟥 🟥 👥 Arranging a meeting with my former (primary school) classmates 🟨 📆 Scheduling a call 🟩 📃 Work-related bureaucracy 🟩 (on my side but I think it still needs to be approved) 🧓🏻 Visiting my grandma who lives in another city 🟩 🎟 Event 🟩 💻 Working on my Computer Science project (figuring out how to use docker compose or something similar) 🟥🟥 🔢 Maths in English - Precalculus (Khan Academy) 🟥🟥🟥 📖 Digital Technology and Economy reading list - week 1 🟩🟩🟩🟩🟩 🟩🟥🟥 ✍️ Editing my WiP 🟥 📧 Sharing my WiP with one person to whom I promised it 🟥
5 notes
·
View notes
Text
Musings of an LLM Using Man
I know, the internet doesn’t need more words about AI, but not addressing my own usage here feels like an omission.
A good deal of the DC Tech Events code was written with Amazon Q. A few things led to this:
Being on the job market, I felt like I needed get a handle on this stuff, to at least have opinions formed by experience and not just stuff I read on the internet.
I managed to get my hands on $50 of AWS credit that could only be spent on Q.
So, I decided that DC Tech Events would be an experiment in working with an LLM coding assistant. I naturally tend to be a bit of an architecture astronaut. You could say Q exacerbated that, or at least didn’t temper that tendency at all. From another angle, it took me to the logical conclusion of my sketchiest ideas faster than I would have otherwise. To abuse the “astronaut” metaphor: Q got me to the moon (and the realization that life on the moon isn’t that pleasant) much sooner than I would have without it.
I had a CDK project deploying a defensible cloud architecture for the site, using S3, Cloudfront, Lambda, API Gateway, and DynamoDB. The first “maybe this sucks” moment came when I started working on tweaking the HTML and CSS, I didn’t have a good way to preview changes locally without a cdk deploy, which could take a couple of minutes.
That led to a container-centric refactor, that was able to run locally using docker compose. This is when I decided to share an early screenshot. It worked, but the complexity started making me feel nauseous.
This prompt was my hail mary:
Reimagine this whole project as a static site generator. There is a directory called _groups, with a yaml file describing each group. There is a directory called _single_events for events that don’t come from groups(also yaml). All “suggestions” and the review process will all happen via Github pull requests, so there is no need to provide UI or API’s enabling that. There is no longer a need for API’s or login or databases. Restructure the project to accomplish this as simply as possible.
The aggregator should work in two phases: one fetches ical files, and updates a local copy of the file only if it has updated (and supports conditional HTTP get via etag or last modified date). The other converts downloaded iCals and single event YAML into new YAML files:
upcoming.yaml : the remainder of the current month, and all events for the following month
per-month files (like july.yaml)
The flask app should be reconfigured to pull from these YAML files instead of dynamoDB.
Remove the current GithHub actions. Instead, when a change is made to main, the aggregator should run, freeze.py should run, and the built site should be deployed via github page
I don’t recall whether it worked on the first try, and it certainly wasn’t the end of the road (I eventually abandoned the per-month organization, for example), but it did the thing. I was impressed enough to save that prompt because it felt like a noteworthy moment.
I’d liken the whole experience to: banging software into shape by criticizing it. I like criticizing stuff! (I came into blogging during the new media douchebag era, after all). In the future, I think I prefer working this way, over not.
If I personally continue using this (and similar tech), am I contributing to making the world worse? The energy and environmental cost might be overstated, but it isn’t nothing. Is it akin to the other compromises I might make in a day, like driving my gasoline-powered car, grilling over charcoal, or zoning out in the shower? Much worse? Much less? I don’t know yet.
That isn’t the only lens where things look bleak, either: it’s the same tools and infrastructure that make the whiz-bang coding assistants work that lets search engines spit out fact-shaped, information-like blurbs that are only correct by coincidence. It’s shitty that with the right prompts, you can replicate an artists work, or apply their style to new subject matter, especially if that artist is still alive and working. I wonder if content generated by models trained on other model-generated work will be the grey goo fate of the web.
The title of this post was meant to be an X Files reference, but I wonder if cigarettes are in fact an apt metaphor: bad for you and the people around you, enjoyable (for some), and hard to quit.
0 notes
Text
The Cost of Hiring a Microservices Engineer: What to Expect

Many tech businesses are switching from monolithic programs to microservices-based architectures as software systems get more complicated. More flexibility, scalability, and deployment speed are brought about by this change, but it also calls for specialized talent. Knowing how much hiring a microservices engineer would cost is essential to making an informed decision.
Understanding the factors that affect costs can help you better plan your budget and draw in the best personnel, whether you're developing a new product or updating outdated systems.
Budgeting for Specialized Talent in a Modern Cloud Architecture
Applications composed of tiny, loosely linked services are designed, developed, and maintained by microservices engineers. These services are frequently implemented separately and communicate via APIs. When you hire a microservices engineer they should have extensive experience with distributed systems, API design, service orchestration, and containerization.
They frequently work with cloud platforms like AWS, Azure, or GCP as well as tools like Docker, Kubernetes, and Spring Boot. They play a crucial part in maintaining the scalability, modularity, and maintainability of your application.
What Influences the Cost?
The following variables affect the cost of hiring a microservices engineer:
1. Level of Experience
Although they might charge less, junior engineers will probably require supervision. Because they can independently design and implement reliable solutions, mid-level and senior engineers with practical experience in large-scale microservices projects attract higher rates.
2. Place
Geography has a major impact on salaries. Hiring in North America or Western Europe, for instance, is usually more expensive than hiring in Southeast Asia, Eastern Europe, or Latin America.
3. Type of Employment
Are you hiring contract, freelance, or full-time employees? For short-term work, freelancers may charge higher hourly rates, but the total project cost may be less.
4. Specialization and the Tech Stack
Because of their specialised knowledge, engineers who are familiar with niche stacks or tools (such as event-driven architecture, Istio, or advanced Kubernetes usage) frequently charge extra.
Use a salary benchmarking tool to ensure that your pay is competitive. This helps you set expectations and prevent overpaying or underbidding by providing you with up-to-date market data based on role, region, and experience.
Hidden Costs to Consider
In addition to the base pay or rate, you need account for:
Time spent onboarding and training
Time devoted to applicant evaluation and interviews
The price of bad hires (in terms of rework or delays)
Continuous assistance and upkeep if you're starting from scratch
These elements highlight how crucial it is to make a thoughtful, knowledgeable hiring choice.
Complementary Roles to Consider
Working alone is not how a microservices engineer operates. Several tech organizations also hire cloud engineers to oversee deployment pipelines, networking, and infrastructure. Improved production performance and easier scaling are guaranteed when these positions work closely together.
Summing Up
Hiring a microservices engineer is a strategic investment rather than merely a cost. These engineers with the appropriate training and resources lays the groundwork for long-term agility and scalability.
Make smart financial decisions by using tools such as a pay benchmarking tool, and think about combining your hire with cloud or DevOps support. The correct engineer can improve your architecture's speed, stability, and long-term value for tech businesses updating their apps.
0 notes
Text
Microservices Programming

Microservices architecture is revolutionizing the way modern software is built. Instead of a single monolithic application, microservices break down functionality into small, independent services that communicate over a network. This approach brings flexibility, scalability, and easier maintenance. In this post, we’ll explore the core concepts of microservices and how to start programming with them.
What Are Microservices?
Microservices are a software development technique where an application is composed of loosely coupled, independently deployable services. Each service focuses on a specific business capability and communicates with others through lightweight APIs, usually over HTTP or messaging queues.
Why Use Microservices?
Scalability: Scale services independently based on load.
Flexibility: Use different languages or technologies for different services.
Faster Development: Small teams can build, test, and deploy services independently.
Resilience: Failure in one service doesn't crash the entire system.
Better Maintainability: Easier to manage, update, and test smaller codebases.
Key Components of Microservices Architecture
Services: Individual, self-contained units with specific functionality.
API Gateway: Central access point that routes requests to appropriate services.
Service Discovery: Automatically locates services within the system (e.g., Eureka, Consul).
Load Balancing: Distributes incoming traffic across instances (e.g., Nginx, HAProxy).
Containerization: Deploy services in isolated environments (e.g., Docker, Kubernetes).
Messaging Systems: Allow asynchronous communication (e.g., RabbitMQ, Apache Kafka).
Popular Tools and Frameworks
Spring Boot + Spring Cloud (Java): Full-stack support for microservices.
Express.js (Node.js): Lightweight framework for building RESTful services.
FastAPI (Python): High-performance framework ideal for microservices.
Docker: Container platform for packaging and running services.
Kubernetes: Orchestrates and manages containerized microservices.
Example: A Simple Microservices Architecture
User Service: Manages user registration and authentication.
Product Service: Handles product listings and inventory.
Order Service: Manages order placement and status.
Each service runs on its own server or container, communicates through REST APIs, and has its own database to avoid tight coupling.
Best Practices for Microservices Programming
Keep services small and focused on a single responsibility.
Use versioned APIs to ensure backward compatibility.
Centralize logging and monitoring using tools like ELK Stack or Prometheus + Grafana.
Secure your APIs using tokens (JWT, OAuth2).
Automate deployments and CI/CD pipelines with tools like Jenkins, GitHub Actions, or GitLab CI.
Avoid shared databases between services — use event-driven architecture for coordination.
Challenges in Microservices
Managing communication and data consistency across services.
Increased complexity in deployment and monitoring.
Ensuring security between service endpoints.
Conclusion
Microservices programming is a powerful approach to building modern, scalable applications. While it introduces architectural complexity, the benefits in flexibility, deployment, and team autonomy make it an ideal choice for many large-scale projects. With the right tools and design patterns, you can unlock the full potential of microservices for your applications.
0 notes
Text
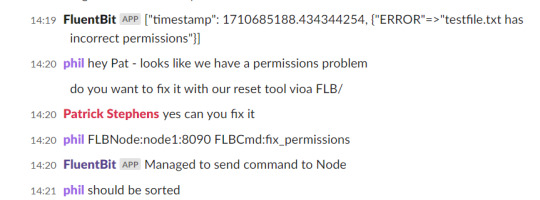
Fluent Bit the engine to power ChatOps - update
The other month, I described a presentation and demo (Fluent Bit – Powering Chat Ops) we’ll be doing for the Cloud Native Rejekts conference, which is the precursor event to KubeCon in Paris this week. Since that post, we’re excited to say that, with Patrick Stephens’s contributions from Chronosphere, the demo is now in the Fluent GitHub repo. It has been nicely packaged with a Docker Compose, so…
View On WordPress
0 notes
Text
The new ImageShare

ImageShare is my lightweight web app for uploading and sharing images, originally created as a replacement for the Nintendo 3DS Image Share service. It has gone through a lot of code updates and migrations over the last few years to keep it compatible with aging web browsers, and now I've rolled out another update.
The new features
ImageShare still allows you to choose an image from your device, click Upload, and get a QR code linking to the image that you can easily scan with another nearby device. It's still entirely server-side PHP, so it loads quickly, even on low-end and legacy web browsers that can no longer connect to image upload services directly.
The app previously used Imgur for all image uploads, but that API isn't always reliable, so ImageShare now fully supports ImgBB as an alternative platform. You can select which service to use from the main upload page. For security reasons, images uploaded anonymously through ImgBB are deleted after two minutes, which should be long enough to save the image after scanning the QR code.
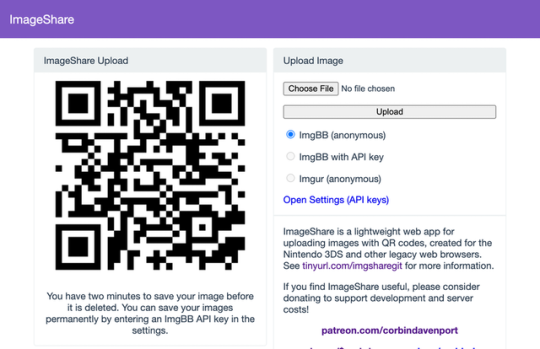
There's also a new option to use ImgBB with your own account, instead of uploading anonymously, by entering an API key in the ImageShare settings. This allows images to be saved permanently to your ImgBB account (unless you delete them later), and the images are always accessible through the ImgBB site on another web browser.
I've wanted to add authenticated image uploads for a long time, so the functionality could be closer to uploading screenshots on an Xbox or PlayStation console, but it wasn't easily doable with Imgur. Just like before, images uploaded from a Nintendo 3DS console have the game title saved with the image when it's available.

The downside is that the new API key feature doesn't work on the Nintendo 3DS Browser (and possibly the Wii U Browser, I haven't checked). As far as I can tell, Nintendo blocks any kind of permanent storage in that browser, even the simple cookies used to store the API key.
ImageShare also now has improved support for other legacy web browsers: it fully works in Netscape Navigator 6 from 2001, and possibly earlier versions. It also now has a proper icon when pinned to the Start menu on Windows 10 Mobile, and there are some more fixes for older iOS devices.

I've taken it as a challenge to support as many old web browsers and devices as possible, at least as long as it remains practical. ImageShare also now uses the goQR.me API to generate QR code images, because the deprecated Google API previously in use has stopped working entirely.
Self-hosted ImageShare
I've also done a lot of work to make ImageShare as easy to set up on a home server or production site as possible. The dev instructions are now more detailed, and more features that were previously hard-wired in the code are now optional when setting up an ImageShare instance. It's still a Docker Compose application, so it works on Windows, Mac, and Linux hosts.
The server configuration for ImageShare supports an Imgur API key, an ImgBB API key, or both. If you set up both options, the user can choose which option they want (the ImgBB option with a custom key is always available). For example, only the ImgBB option is enabled on the main server right now (I think Imgur blocked the server's IP for too many requests, so I'm giving it a break). Plausible Analytics is also now easily configurable, with reporting for page views, basic device and browser information, upload events, and so on.
I'm not aware of any other ImageShare instances, but now is as good a time as any to set one up!
The open future
ImageShare has required a lot of work to stay functional on the Nintendo 3DS and other legacy platforms. I've gone through three hosting services: first Heroku, then DigitalOcean's App Platform, then an Ubuntu VPS through Digital Ocean. After that last migration, I reworked it to run in Docker, which has made development and troubleshooting much simpler. That has all ensured ImageShare remains functional on legacy browsers through non-secure HTTP connections, while also supporting newer devices with HTTPS.
I'm not sure how long image hosting platforms will continue working with the current infrastructure, and I do not want to deal with hosting user content. There's also the issue where the main supported device, the Nintendo 3DS, can't save settings on the browser side. I'm thinking about how best to handle the project's future with those problems.
ImageShare might eventually morph into a minimal web server that runs on a computer on your home network, which would be less vulnerable to rate limiting by APIs (or could just dump images directly to a computer). Another option would be improving the self-hosted setup and publishing ImageShare to Docker Hub, where it could be installed on any computer or server with Docker in one command. This is already a popular option for NextCloud, Plex, and other local server software, so it would probably work well for ImageShare.
I don't have any plans to shut down the current ImageShare site, unless all the image hosting APIs stop working and I don't have any options left. ImageShare has already outlived the Nintendo service it was initially designed to replace, and I'd like to keep that going.
You can learn more about ImageShare from the GitHub repository, and you can try it out from theimageshare.com. If you want to help keep this service running, please consider joining my Patreon or donating through PayPal and Cash App.
1 note
·
View note
Text
How to set up command-line access to Amazon Keyspaces (for Apache Cassandra) by using the new developer toolkit Docker image
Amazon Keyspaces (for Apache Cassandra) is a scalable, highly available, and fully managed Cassandra-compatible database service. Amazon Keyspaces helps you run your Cassandra workloads more easily by using a serverless database that can scale up and down automatically in response to your actual application traffic. Because Amazon Keyspaces is serverless, there are no clusters or nodes to provision and manage. You can get started with Amazon Keyspaces with a few clicks in the console or a few changes to your existing Cassandra driver configuration. In this post, I show you how to set up command-line access to Amazon Keyspaces by using the keyspaces-toolkit Docker image. The keyspaces-toolkit Docker image contains commonly used Cassandra developer tooling. The toolkit comes with the Cassandra Query Language Shell (cqlsh) and is configured with best practices for Amazon Keyspaces. The container image is open source and also compatible with Apache Cassandra 3.x clusters. A command line interface (CLI) such as cqlsh can be useful when automating database activities. You can use cqlsh to run one-time queries and perform administrative tasks, such as modifying schemas or bulk-loading flat files. You also can use cqlsh to enable Amazon Keyspaces features, such as point-in-time recovery (PITR) backups and assign resource tags to keyspaces and tables. The following screenshot shows a cqlsh session connected to Amazon Keyspaces and the code to run a CQL create table statement. Build a Docker image To get started, download and build the Docker image so that you can run the keyspaces-toolkit in a container. A Docker image is the template for the complete and executable version of an application. It’s a way to package applications and preconfigured tools with all their dependencies. To build and run the image for this post, install the latest Docker engine and Git on the host or local environment. The following command builds the image from the source. docker build --tag amazon/keyspaces-toolkit --build-arg CLI_VERSION=latest https://github.com/aws-samples/amazon-keyspaces-toolkit.git The preceding command includes the following parameters: –tag – The name of the image in the name:tag Leaving out the tag results in latest. –build-arg CLI_VERSION – This allows you to specify the version of the base container. Docker images are composed of layers. If you’re using the AWS CLI Docker image, aligning versions significantly reduces the size and build times of the keyspaces-toolkit image. Connect to Amazon Keyspaces Now that you have a container image built and available in your local repository, you can use it to connect to Amazon Keyspaces. To use cqlsh with Amazon Keyspaces, create service-specific credentials for an existing AWS Identity and Access Management (IAM) user. The service-specific credentials enable IAM users to access Amazon Keyspaces, but not access other AWS services. The following command starts a new container running the cqlsh process. docker run --rm -ti amazon/keyspaces-toolkit cassandra.us-east-1.amazonaws.com 9142 --ssl -u "SERVICEUSERNAME" -p "SERVICEPASSWORD" The preceding command includes the following parameters: run – The Docker command to start the container from an image. It’s the equivalent to running create and start. –rm –Automatically removes the container when it exits and creates a container per session or run. -ti – Allocates a pseudo TTY (t) and keeps STDIN open (i) even if not attached (remove i when user input is not required). amazon/keyspaces-toolkit – The image name of the keyspaces-toolkit. us-east-1.amazonaws.com – The Amazon Keyspaces endpoint. 9142 – The default SSL port for Amazon Keyspaces. After connecting to Amazon Keyspaces, exit the cqlsh session and terminate the process by using the QUIT or EXIT command. Drop-in replacement Now, simplify the setup by assigning an alias (or DOSKEY for Windows) to the Docker command. The alias acts as a shortcut, enabling you to use the alias keyword instead of typing the entire command. You will use cqlsh as the alias keyword so that you can use the alias as a drop-in replacement for your existing Cassandra scripts. The alias contains the parameter –v "$(pwd)":/source, which mounts the current directory of the host. This is useful for importing and exporting data with COPY or using the cqlsh --file command to load external cqlsh scripts. alias cqlsh='docker run --rm -ti -v "$(pwd)":/source amazon/keyspaces-toolkit cassandra.us-east-1.amazonaws.com 9142 --ssl' For security reasons, don’t store the user name and password in the alias. After setting up the alias, you can create a new cqlsh session with Amazon Keyspaces by calling the alias and passing in the service-specific credentials. cqlsh -u "SERVICEUSERNAME" -p "SERVICEPASSWORD" Later in this post, I show how to use AWS Secrets Manager to avoid using plaintext credentials with cqlsh. You can use Secrets Manager to store, manage, and retrieve secrets. Create a keyspace Now that you have the container and alias set up, you can use the keyspaces-toolkit to create a keyspace by using cqlsh to run CQL statements. In Cassandra, a keyspace is the highest-order structure in the CQL schema, which represents a grouping of tables. A keyspace is commonly used to define the domain of a microservice or isolate clients in a multi-tenant strategy. Amazon Keyspaces is serverless, so you don’t have to configure clusters, hosts, or Java virtual machines to create a keyspace or table. When you create a new keyspace or table, it is associated with an AWS Account and Region. Though a traditional Cassandra cluster is limited to 200 to 500 tables, with Amazon Keyspaces the number of keyspaces and tables for an account and Region is virtually unlimited. The following command creates a new keyspace by using SingleRegionStrategy, which replicates data three times across multiple Availability Zones in a single AWS Region. Storage is billed by the raw size of a single replica, and there is no network transfer cost when replicating data across Availability Zones. Using keyspaces-toolkit, connect to Amazon Keyspaces and run the following command from within the cqlsh session. CREATE KEYSPACE amazon WITH REPLICATION = {'class': 'SingleRegionStrategy'} AND TAGS = {'domain' : 'shoppingcart' , 'app' : 'acme-commerce'}; The preceding command includes the following parameters: REPLICATION – SingleRegionStrategy replicates data three times across multiple Availability Zones. TAGS – A label that you assign to an AWS resource. For more information about using tags for access control, microservices, cost allocation, and risk management, see Tagging Best Practices. Create a table Previously, you created a keyspace without needing to define clusters or infrastructure. Now, you will add a table to your keyspace in a similar way. A Cassandra table definition looks like a traditional SQL create table statement with an additional requirement for a partition key and clustering keys. These keys determine how data in CQL rows are distributed, sorted, and uniquely accessed. Tables in Amazon Keyspaces have the following unique characteristics: Virtually no limit to table size or throughput – In Amazon Keyspaces, a table’s capacity scales up and down automatically in response to traffic. You don’t have to manage nodes or consider node density. Performance stays consistent as your tables scale up or down. Support for “wide” partitions – CQL partitions can contain a virtually unbounded number of rows without the need for additional bucketing and sharding partition keys for size. This allows you to scale partitions “wider” than the traditional Cassandra best practice of 100 MB. No compaction strategies to consider – Amazon Keyspaces doesn’t require defined compaction strategies. Because you don’t have to manage compaction strategies, you can build powerful data models without having to consider the internals of the compaction process. Performance stays consistent even as write, read, update, and delete requirements change. No repair process to manage – Amazon Keyspaces doesn’t require you to manage a background repair process for data consistency and quality. No tombstones to manage – With Amazon Keyspaces, you can delete data without the challenge of managing tombstone removal, table-level grace periods, or zombie data problems. 1 MB row quota – Amazon Keyspaces supports the Cassandra blob type, but storing large blob data greater than 1 MB results in an exception. It’s a best practice to store larger blobs across multiple rows or in Amazon Simple Storage Service (Amazon S3) object storage. Fully managed backups – PITR helps protect your Amazon Keyspaces tables from accidental write or delete operations by providing continuous backups of your table data. The following command creates a table in Amazon Keyspaces by using a cqlsh statement with customer properties specifying on-demand capacity mode, PITR enabled, and AWS resource tags. Using keyspaces-toolkit to connect to Amazon Keyspaces, run this command from within the cqlsh session. CREATE TABLE amazon.eventstore( id text, time timeuuid, event text, PRIMARY KEY(id, time)) WITH CUSTOM_PROPERTIES = { 'capacity_mode':{'throughput_mode':'PAY_PER_REQUEST'}, 'point_in_time_recovery':{'status':'enabled'} } AND TAGS = {'domain' : 'shoppingcart' , 'app' : 'acme-commerce' , 'pii': 'true'}; The preceding command includes the following parameters: capacity_mode – Amazon Keyspaces has two read/write capacity modes for processing reads and writes on your tables. The default for new tables is on-demand capacity mode (the PAY_PER_REQUEST flag). point_in_time_recovery – When you enable this parameter, you can restore an Amazon Keyspaces table to a point in time within the preceding 35 days. There is no overhead or performance impact by enabling PITR. TAGS – Allows you to organize resources, define domains, specify environments, allocate cost centers, and label security requirements. Insert rows Before inserting data, check if your table was created successfully. Amazon Keyspaces performs data definition language (DDL) operations asynchronously, such as creating and deleting tables. You also can monitor the creation status of a new resource programmatically by querying the system schema table. Also, you can use a toolkit helper for exponential backoff. Check for table creation status Cassandra provides information about the running cluster in its system tables. With Amazon Keyspaces, there are no clusters to manage, but it still provides system tables for the Amazon Keyspaces resources in an account and Region. You can use the system tables to understand the creation status of a table. The system_schema_mcs keyspace is a new system keyspace with additional content related to serverless functionality. Using keyspaces-toolkit, run the following SELECT statement from within the cqlsh session to retrieve the status of the newly created table. SELECT keyspace_name, table_name, status FROM system_schema_mcs.tables WHERE keyspace_name = 'amazon' AND table_name = 'eventstore'; The following screenshot shows an example of output for the preceding CQL SELECT statement. Insert sample data Now that you have created your table, you can use CQL statements to insert and read sample data. Amazon Keyspaces requires all write operations (insert, update, and delete) to use the LOCAL_QUORUM consistency level for durability. With reads, an application can choose between eventual consistency and strong consistency by using LOCAL_ONE or LOCAL_QUORUM consistency levels. The benefits of eventual consistency in Amazon Keyspaces are higher availability and reduced cost. See the following code. CONSISTENCY LOCAL_QUORUM; INSERT INTO amazon.eventstore(id, time, event) VALUES ('1', now(), '{eventtype:"click-cart"}'); INSERT INTO amazon.eventstore(id, time, event) VALUES ('2', now(), '{eventtype:"showcart"}'); INSERT INTO amazon.eventstore(id, time, event) VALUES ('3', now(), '{eventtype:"clickitem"}') IF NOT EXISTS; SELECT * FROM amazon.eventstore; The preceding code uses IF NOT EXISTS or lightweight transactions to perform a conditional write. With Amazon Keyspaces, there is no heavy performance penalty for using lightweight transactions. You get similar performance characteristics of standard insert, update, and delete operations. The following screenshot shows the output from running the preceding statements in a cqlsh session. The three INSERT statements added three unique rows to the table, and the SELECT statement returned all the data within the table. Export table data to your local host You now can export the data you just inserted by using the cqlsh COPY TO command. This command exports the data to the source directory, which you mounted earlier to the working directory of the Docker run when creating the alias. The following cqlsh statement exports your table data to the export.csv file located on the host machine. CONSISTENCY LOCAL_ONE; COPY amazon.eventstore(id, time, event) TO '/source/export.csv' WITH HEADER=false; The following screenshot shows the output of the preceding command from the cqlsh session. After the COPY TO command finishes, you should be able to view the export.csv from the current working directory of the host machine. For more information about tuning export and import processes when using cqlsh COPY TO, see Loading data into Amazon Keyspaces with cqlsh. Use credentials stored in Secrets Manager Previously, you used service-specific credentials to connect to Amazon Keyspaces. In the following example, I show how to use the keyspaces-toolkit helpers to store and access service-specific credentials in Secrets Manager. The helpers are a collection of scripts bundled with keyspaces-toolkit to assist with common tasks. By overriding the default entry point cqlsh, you can call the aws-sm-cqlsh.sh script, a wrapper around the cqlsh process that retrieves the Amazon Keyspaces service-specific credentials from Secrets Manager and passes them to the cqlsh process. This script allows you to avoid hard-coding the credentials in your scripts. The following diagram illustrates this architecture. Configure the container to use the host’s AWS CLI credentials The keyspaces-toolkit extends the AWS CLI Docker image, making keyspaces-toolkit extremely lightweight. Because you may already have the AWS CLI Docker image in your local repository, keyspaces-toolkit adds only an additional 10 MB layer extension to the AWS CLI. This is approximately 15 times smaller than using cqlsh from the full Apache Cassandra 3.11 distribution. The AWS CLI runs in a container and doesn’t have access to the AWS credentials stored on the container’s host. You can share credentials with the container by mounting the ~/.aws directory. Mount the host directory to the container by using the -v parameter. To validate a proper setup, the following command lists current AWS CLI named profiles. docker run --rm -ti -v ~/.aws:/root/.aws --entrypoint aws amazon/keyspaces-toolkit configure list-profiles The ~/.aws directory is a common location for the AWS CLI credentials file. If you configured the container correctly, you should see a list of profiles from the host credentials. For instructions about setting up the AWS CLI, see Step 2: Set Up the AWS CLI and AWS SDKs. Store credentials in Secrets Manager Now that you have configured the container to access the host’s AWS CLI credentials, you can use the Secrets Manager API to store the Amazon Keyspaces service-specific credentials in Secrets Manager. The secret name keyspaces-credentials in the following command is also used in subsequent steps. docker run --rm -ti -v ~/.aws:/root/.aws --entrypoint aws amazon/keyspaces-toolkit secretsmanager create-secret --name keyspaces-credentials --description "Store Amazon Keyspaces Generated Service Credentials" --secret-string "{"username":"SERVICEUSERNAME","password":"SERVICEPASSWORD","engine":"cassandra","host":"SERVICEENDPOINT","port":"9142"}" The preceding command includes the following parameters: –entrypoint – The default entry point is cqlsh, but this command uses this flag to access the AWS CLI. –name – The name used to identify the key to retrieve the secret in the future. –secret-string – Stores the service-specific credentials. Replace SERVICEUSERNAME and SERVICEPASSWORD with your credentials. Replace SERVICEENDPOINT with the service endpoint for the AWS Region. Creating and storing secrets requires CreateSecret and GetSecretValue permissions in your IAM policy. As a best practice, rotate secrets periodically when storing database credentials. Use the Secrets Manager helper script Use the Secrets Manager helper script to sign in to Amazon Keyspaces by replacing the user and password fields with the secret key from the preceding keyspaces-credentials command. docker run --rm -ti -v ~/.aws:/root/.aws --entrypoint aws-sm-cqlsh.sh amazon/keyspaces-toolkit keyspaces-credentials --ssl --execute "DESCRIBE Keyspaces" The preceding command includes the following parameters: -v – Used to mount the directory containing the host’s AWS CLI credentials file. –entrypoint – Use the helper by overriding the default entry point of cqlsh to access the Secrets Manager helper script, aws-sm-cqlsh.sh. keyspaces-credentials – The key to access the credentials stored in Secrets Manager. –execute – Runs a CQL statement. Update the alias You now can update the alias so that your scripts don’t contain plaintext passwords. You also can manage users and roles through Secrets Manager. The following code sets up a new alias by using the keyspaces-toolkit Secrets Manager helper for passing the service-specific credentials to Secrets Manager. alias cqlsh='docker run --rm -ti -v ~/.aws:/root/.aws -v "$(pwd)":/source --entrypoint aws-sm-cqlsh.sh amazon/keyspaces-toolkit keyspaces-credentials --ssl' To have the alias available in every new terminal session, add the alias definition to your .bashrc file, which is executed on every new terminal window. You can usually find this file in $HOME/.bashrc or $HOME/bash_aliases (loaded by $HOME/.bashrc). Validate the alias Now that you have updated the alias with the Secrets Manager helper, you can use cqlsh without the Docker details or credentials, as shown in the following code. cqlsh --execute "DESCRIBE TABLE amazon.eventstore;" The following screenshot shows the running of the cqlsh DESCRIBE TABLE statement by using the alias created in the previous section. In the output, you should see the table definition of the amazon.eventstore table you created in the previous step. Conclusion In this post, I showed how to get started with Amazon Keyspaces and the keyspaces-toolkit Docker image. I used Docker to build an image and run a container for a consistent and reproducible experience. I also used an alias to create a drop-in replacement for existing scripts, and used built-in helpers to integrate cqlsh with Secrets Manager to store service-specific credentials. Now you can use the keyspaces-toolkit with your Cassandra workloads. As a next step, you can store the image in Amazon Elastic Container Registry, which allows you to access the keyspaces-toolkit from CI/CD pipelines and other AWS services such as AWS Batch. Additionally, you can control the image lifecycle of the container across your organization. You can even attach policies to expiring images based on age or download count. For more information, see Pushing an image. Cheat sheet of useful commands I did not cover the following commands in this blog post, but they will be helpful when you work with cqlsh, AWS CLI, and Docker. --- Docker --- #To view the logs from the container. Helpful when debugging docker logs CONTAINERID #Exit code of the container. Helpful when debugging docker inspect createtablec --format='{{.State.ExitCode}}' --- CQL --- #Describe keyspace to view keyspace definition DESCRIBE KEYSPACE keyspace_name; #Describe table to view table definition DESCRIBE TABLE keyspace_name.table_name; #Select samples with limit to minimize output SELECT * FROM keyspace_name.table_name LIMIT 10; --- Amazon Keyspaces CQL --- #Change provisioned capacity for tables ALTER TABLE keyspace_name.table_name WITH custom_properties={'capacity_mode':{'throughput_mode': 'PROVISIONED', 'read_capacity_units': 4000, 'write_capacity_units': 3000}} ; #Describe current capacity mode for tables SELECT keyspace_name, table_name, custom_properties FROM system_schema_mcs.tables where keyspace_name = 'amazon' and table_name='eventstore'; --- Linux --- #Line count of multiple/all files in the current directory find . -type f | wc -l #Remove header from csv sed -i '1d' myData.csv About the Author Michael Raney is a Solutions Architect with Amazon Web Services. https://aws.amazon.com/blogs/database/how-to-set-up-command-line-access-to-amazon-keyspaces-for-apache-cassandra-by-using-the-new-developer-toolkit-docker-image/
1 note
·
View note
Photo

hydralisk98′s web projects tracker:
Core principles=
Fail faster
‘Learn, Tweak, Make’ loop
This is meant to be a quick reference for tracking progress made over my various projects, organized by their “ultimate target” goal:
(START)
(Website)=
Install Firefox
Install Chrome
Install Microsoft newest browser
Install Lynx
Learn about contemporary web browsers
Install a very basic text editor
Install Notepad++
Install Nano
Install Powershell
Install Bash
Install Git
Learn HTML
Elements and attributes
Commenting (single line comment, multi-line comment)
Head (title, meta, charset, language, link, style, description, keywords, author, viewport, script, base, url-encode, )
Hyperlinks (local, external, link titles, relative filepaths, absolute filepaths)
Headings (h1-h6, horizontal rules)
Paragraphs (pre, line breaks)
Text formatting (bold, italic, deleted, inserted, subscript, superscript, marked)
Quotations (quote, blockquote, abbreviations, address, cite, bidirectional override)
Entities & symbols (&entity_name, &entity_number,  , useful HTML character entities, diacritical marks, mathematical symbols, greek letters, currency symbols, )
Id (bookmarks)
Classes (select elements, multiple classes, different tags can share same class, )
Blocks & Inlines (div, span)
Computercode (kbd, samp, code, var)
Lists (ordered, unordered, description lists, control list counting, nesting)
Tables (colspan, rowspan, caption, colgroup, thead, tbody, tfoot, th)
Images (src, alt, width, height, animated, link, map, area, usenmap, , picture, picture for format support)
old fashioned audio
old fashioned video
Iframes (URL src, name, target)
Forms (input types, action, method, GET, POST, name, fieldset, accept-charset, autocomplete, enctype, novalidate, target, form elements, input attributes)
URL encode (scheme, prefix, domain, port, path, filename, ascii-encodings)
Learn about oldest web browsers onwards
Learn early HTML versions (doctypes & permitted elements for each version)
Make a 90s-like web page compatible with as much early web formats as possible, earliest web browsers’ compatibility is best here
Learn how to teach HTML5 features to most if not all older browsers
Install Adobe XD
Register a account at Figma
Learn Adobe XD basics
Learn Figma basics
Install Microsoft’s VS Code
Install my Microsoft’s VS Code favorite extensions
Learn HTML5
Semantic elements
Layouts
Graphics (SVG, canvas)
Track
Audio
Video
Embed
APIs (geolocation, drag and drop, local storage, application cache, web workers, server-sent events, )
HTMLShiv for teaching older browsers HTML5
HTML5 style guide and coding conventions (doctype, clean tidy well-formed code, lower case element names, close all html elements, close empty html elements, quote attribute values, image attributes, space and equal signs, avoid long code lines, blank lines, indentation, keep html, keep head, keep body, meta data, viewport, comments, stylesheets, loading JS into html, accessing HTML elements with JS, use lowercase file names, file extensions, index/default)
Learn CSS
Selections
Colors
Fonts
Positioning
Box model
Grid
Flexbox
Custom properties
Transitions
Animate
Make a simple modern static site
Learn responsive design
Viewport
Media queries
Fluid widths
rem units over px
Mobile first
Learn SASS
Variables
Nesting
Conditionals
Functions
Learn about CSS frameworks
Learn Bootstrap
Learn Tailwind CSS
Learn JS
Fundamentals
Document Object Model / DOM
JavaScript Object Notation / JSON
Fetch API
Modern JS (ES6+)
Learn Git
Learn Browser Dev Tools
Learn your VS Code extensions
Learn Emmet
Learn NPM
Learn Yarn
Learn Axios
Learn Webpack
Learn Parcel
Learn basic deployment
Domain registration (Namecheap)
Managed hosting (InMotion, Hostgator, Bluehost)
Static hosting (Nertlify, Github Pages)
SSL certificate
FTP
SFTP
SSH
CLI
Make a fancy front end website about
Make a few Tumblr themes
===You are now a basic front end developer!
Learn about XML dialects
Learn XML
Learn about JS frameworks
Learn jQuery
Learn React
Contex API with Hooks
NEXT
Learn Vue.js
Vuex
NUXT
Learn Svelte
NUXT (Vue)
Learn Gatsby
Learn Gridsome
Learn Typescript
Make a epic front end website about
===You are now a front-end wizard!
Learn Node.js
Express
Nest.js
Koa
Learn Python
Django
Flask
Learn GoLang
Revel
Learn PHP
Laravel
Slim
Symfony
Learn Ruby
Ruby on Rails
Sinatra
Learn SQL
PostgreSQL
MySQL
Learn ORM
Learn ODM
Learn NoSQL
MongoDB
RethinkDB
CouchDB
Learn a cloud database
Firebase, Azure Cloud DB, AWS
Learn a lightweight & cache variant
Redis
SQLlite
NeDB
Learn GraphQL
Learn about CMSes
Learn Wordpress
Learn Drupal
Learn Keystone
Learn Enduro
Learn Contentful
Learn Sanity
Learn Jekyll
Learn about DevOps
Learn NGINX
Learn Apache
Learn Linode
Learn Heroku
Learn Azure
Learn Docker
Learn testing
Learn load balancing
===You are now a good full stack developer
Learn about mobile development
Learn Dart
Learn Flutter
Learn React Native
Learn Nativescript
Learn Ionic
Learn progressive web apps
Learn Electron
Learn JAMstack
Learn serverless architecture
Learn API-first design
Learn data science
Learn machine learning
Learn deep learning
Learn speech recognition
Learn web assembly
===You are now a epic full stack developer
Make a web browser
Make a web server
===You are now a legendary full stack developer
[...]
(Computer system)=
Learn to execute and test your code in a command line interface
Learn to use breakpoints and debuggers
Learn Bash
Learn fish
Learn Zsh
Learn Vim
Learn nano
Learn Notepad++
Learn VS Code
Learn Brackets
Learn Atom
Learn Geany
Learn Neovim
Learn Python
Learn Java?
Learn R
Learn Swift?
Learn Go-lang?
Learn Common Lisp
Learn Clojure (& ClojureScript)
Learn Scheme
Learn C++
Learn C
Learn B
Learn Mesa
Learn Brainfuck
Learn Assembly
Learn Machine Code
Learn how to manage I/O
Make a keypad
Make a keyboard
Make a mouse
Make a light pen
Make a small LCD display
Make a small LED display
Make a teleprinter terminal
Make a medium raster CRT display
Make a small vector CRT display
Make larger LED displays
Make a few CRT displays
Learn how to manage computer memory
Make datasettes
Make a datasette deck
Make floppy disks
Make a floppy drive
Learn how to control data
Learn binary base
Learn hexadecimal base
Learn octal base
Learn registers
Learn timing information
Learn assembly common mnemonics
Learn arithmetic operations
Learn logic operations (AND, OR, XOR, NOT, NAND, NOR, NXOR, IMPLY)
Learn masking
Learn assembly language basics
Learn stack construct’s operations
Learn calling conventions
Learn to use Application Binary Interface or ABI
Learn to make your own ABIs
Learn to use memory maps
Learn to make memory maps
Make a clock
Make a front panel
Make a calculator
Learn about existing instruction sets (Intel, ARM, RISC-V, PIC, AVR, SPARC, MIPS, Intersil 6120, Z80...)
Design a instruction set
Compose a assembler
Compose a disassembler
Compose a emulator
Write a B-derivative programming language (somewhat similar to C)
Write a IPL-derivative programming language (somewhat similar to Lisp and Scheme)
Write a general markup language (like GML, SGML, HTML, XML...)
Write a Turing tarpit (like Brainfuck)
Write a scripting language (like Bash)
Write a database system (like VisiCalc or SQL)
Write a CLI shell (basic operating system like Unix or CP/M)
Write a single-user GUI operating system (like Xerox Star’s Pilot)
Write a multi-user GUI operating system (like Linux)
Write various software utilities for my various OSes
Write various games for my various OSes
Write various niche applications for my various OSes
Implement a awesome model in very large scale integration, like the Commodore CBM-II
Implement a epic model in integrated circuits, like the DEC PDP-15
Implement a modest model in transistor-transistor logic, similar to the DEC PDP-12
Implement a simple model in diode-transistor logic, like the original DEC PDP-8
Implement a simpler model in later vacuum tubes, like the IBM 700 series
Implement simplest model in early vacuum tubes, like the EDSAC
[...]
(Conlang)=
Choose sounds
Choose phonotactics
[...]
(Animation ‘movie’)=
[...]
(Exploration top-down ’racing game’)=
[...]
(Video dictionary)=
[...]
(Grand strategy game)=
[...]
(Telex system)=
[...]
(Pen&paper tabletop game)=
[...]
(Search engine)=
[...]
(Microlearning system)=
[...]
(Alternate planet)=
[...]
(END)
4 notes
·
View notes
Text
How to Deploy LAMP Stack on Docker
In this article, we are going to see different ways to deploy Lamp Stack on Docker using Docker Compose as microservices. Docker-compose is a tool used to create docker containers and run multiple containers as single services.
Supposed if we create WordPress application we require apache/Nginx, PHP, and MySQL. You can create one file which can start both the containers as a service without the…
View On WordPress
#Apache#build#code#docker#docker images#docker ps#docker-compose#docker-compose down#docker-compose events#docker-compose stop#docker-compose up -d#Dockerfile#images#lamp#Linux#maridb#MySQL#network#PHP#ports#ps#services#volume
0 notes
Text
Top 10 PHP Frameworks For Web development That Ruled in 2019
Other than that Suhanasoftech Pvt. Ltd. is a professional It firm that deals with authentic PHP projects
What is PHP?
PHP is one of the numerous server-side dialects you can figure out how to construct sites. It joins different dialects, for example, Java, ASP.NET, Ruby, and R. 80% of the best 10 sites are fueled by PHP, including Facebook and Wikipedia. PHP has reliably exhibited its capacity to scale the biggest sites while simultaneously having a simpler expectation to learn and adapt than different dialects. This article clarifies why you ought to learn PHP and what it can accomplish for your profession. For this purpose you need to learn PHP course from the best PHP training institute in Kolkata.
Why Should You Learn PHP?
A slick component of PHP is that it's truly adaptable and flexible. PHP is nearly equivalent to on the off chance that it was an item arranged language, making it an exceptionally helpful language to work with. It likewise has a very ground-breaking meta-language for designers.
PHP is ordinarily used to run Web locales, however, you can run PHP on your Windows, macOS, and Linux workstations. The least demanding approach to run PHP is to introduce Docker and afterward run a compartment with PHP included. The compartment alluded to in the connection has PHP, MySQL, and NGINX running in a solitary holder. You can be ready for action in a couple of hours. Thus we need to learn PHP from the best PHP training center in Kolkata.
Applications of PHP:-
PHP is mainly responsible for building and developing Web Application, thus it is considered to be the professional PHP course in Kolkata but other than this PHP also serves in different cases such as:
Building and Developing Mobile Apps.
PHP can be used for Artificial Intelligence and Machine Learning purpose.
Cloud Programming with LAMBDA can also be implemented by PHP.
About PHP Framework:-
PHP, which represents Hypertext Preprocessor, is a server-side scripting language that is utilized for building dynamic sites and applications. It is the most well known server-side language, which gives the capacity to fabricate secure, complex, and elite web applications rapidly. It is the language of decision for some web designers, with regards to making dynamic web arrangements. You can procure PHP engineer to make extraordinary web applications for your business.
In addition, the estimation of PHP is considerably higher with its systems that disentangle and speed up PHP coding. PHP structures come in various shapes and measures and cook various engineers with a fluctuated level of understanding, facilitating abilities, application needs and improvement time allotments.
Frequently designers need to compose similar lines of code over and over likewise they need to construct a wide range of arrangements from easy to complex. PHP structures assist engineers with expelling the dull work and manufacture PHP web improvement arrangements rapidly. In addition, they likewise lessen the intricacy of coding to a critical degree. In this manner, engineers utilize different structures to create PHP arrangements.
There are many PHP structures to look over and each accompanies astounding highlights to make quality PHP code. Right now, we will take a perspective on the main 10 PHP structures that are exceptionally well known in 2019 and broadly used for making web advancement arrangements. Which is why you need to take lessons on Advanced PHP course in Kolkata or where ever you stay
Top 10 PHP Frameworks:-
Symfony:- Symfony has been here for quite a while and it's one of the most well-known PHP structures utilized for growing top of the line web applications. It gives engineers a few reusable PHP code and segments. It is an ideal decision with regard to growing enormous scale venture arrangements.
Symfony's advancement group gives instructional classes in various dialects and they additionally update their online journals routinely so as to keep the enormous network drew in with them. It is generally utilized by designers because of its propelled highlights and simple to utilize condition.
The reusable PHP libraries are utilized by Symfony parts which disentangle many web improvement errands like article arrangement, structure creation, steering verification, templating and that's just the beginning. In addition, this structure has a lofty expectation to absorb information because of the countless highlights it offers. By the by, the developing network and numerous informal care groups help to learn and to get acquainted with Symfony effectively.
Cake PHP:- CakePHP is a perfect PHP system for fledglings, and it is useful for creating business web arrangements quickly. It offers framework usefulness and code age, which assists speeding with increasing the improvement procedure and gives loads of bundles to deal with regular usefulness.
CakePHP is allowed to utilize whether it's for business or individual use. It has been utilized by brands to construct different web arrangements. It has an exceptional MVC shows that give direction to the advancement procedure.
It is likewise extremely simple to arrange this structure as it wipes out the prerequisite for confounded YAML or XML design records. You can manufacture venture rapidly with this structure and it offers security includes that forestall dangers like CSRF, XSS, SQL infuses, and furthermore give structure approval apparatuses.
There are a ton of dynamic help reports to learn and get acquainted with CakePHP. In addition, there are many assistance entryways to begin for tenderfoots.
Zend Framework:- Zend Framework is a serious famous PHP structure as it is known as a go-to proficient system utilized for building elite applications. It is broadly utilized for building proficient undertaking level web applications. This system is planned with extensibility, execution, and security as a top priority.
There is a not insignificant rundown of highlights that Zend Framework gives to its clients like segments for structures, nourishes, administrations, verification, and so forth, front-end upheld simplified editorial manager, cryptographic coding device, PHP unit testing apparatus and that's only the tip of the iceberg. Zend is likewise connected with monster tech organizations like Google IBM, Microsoft, and so on.
Codeigniter:- It is a lightweight and a strong PHP system, which enables the growing top of the line to web applications. CodeIgniter accompanies a few propelled includes and empowers the designers to manufacture web arrangements rapidly and easily. It involves a library that offers a straightforward interface that requires a sensible structure for getting to its highlights. It is favored by numerous designers as it offers to assemble inventive arrangements with the negligible utilization of coding.
Making undeniable web applications with CodeIgniter is a breeze as it has a little expectation to absorb information and a few valuable libraries. There is an enormous and supportive network out there for CodeIgniter. Additionally, there is likewise a ton of documentation to learn and get acquainted with this structure.
CodeIgniter is sponsored by The British Columbia Institute of Technology, which guarantees its consistent development and advancement. It offers broad highlights, which incorporate structure approval, unit testing, email sessions, and the sky is the limit from there. In the event that, you don't discover a library for a specific assignment, you can likewise construct your own and offer it with the network as well.
Yii 2:- It is the most established PHP structure, which isn't upheld an organization rather an enormous number of worldwide designers offer help for Yii 2. It is a contender for Symfony 2 and has a simpler expectation to learn and adapt. It has a few remarkable highlights and it is favored when engineers need to make arrangements that offer quick outcomes.
Yii2 has a decent structure, which empowers it to work with AJAX and supports ground-breaking reserving. It empowers the designers to change database information into articles and aides dodging the multifaceted nature of composing SQL questions more than once. Yii 2 permits making proficient, effectively viable, and extensible web applications.
Phalcon:- It is altogether different from other PHP systems since it has an alternate coding style which depends on C/C++. Be that as it may, it gives progressed and extraordinary highlights to grow top of the line web applications. There is a lot of uncommon highlights offered by Phalcon which incorporate general autoloader, reserving, resource the executives and the sky is the limit from there.
Phalcon is simple and can be seen rapidly. With the point by point documentation accessible for Phalcon causes designers to assemble the PHP stage all the more effectively and rapidly. In contrast with different structures, it utilizes a negligible measure of assets, which brings about quick HTTP demands, so it's blasting quickly.
It offers incredible parts like MVC, ORM, auto-stacking and reserving and it gives information stockpiling devices because of its own SQL language, which is PHQL. Aside
from this, it likewise offers Object Document Mapping for MongoDB. There are numerous highlights like structure manufacturers, universal language support, Template motors, and give simplicity of building web applications. It is valuable for building undeniable web applications or high-performing REST APIs.
FuelPHP:- It is a cutting edge, extensible, advanced and exceptionally secluded PHP system which bolsters MVC (Model-View-Controller). FuelPHP is based on the HMVC (Hierarchical Model-View-Controller) design which is the improved variant of MVC. It has many energizing highlights, for example, incredible and lightweight help for ORM, security upgrades, format parsing, validation system, and a few different bundles to expand engineers' capacities.
With its broad security highlights which address a significant number of security issues of the applications, designers can make exceptionally verify answers for their customers. There are a few vigorous highlights like yield encoding, URL sifting, and more that empower to construct secure web applications. Because of its own confirmation structure, FuelPHP is generally used for making start to finish web arrangements.
Laravel:- Laravel is the lord of all PHP systems. In the event that you need to create lovely and remarkable web applications, you can depend on Laravel. It is a go-to PHP system that is broadly utilized by web craftsmen to create the highest arrangements. The explanation behind why Laravel is so extraordinary lies in its wide prominence and usability as it doesn't for all intents and purposes have an expectation to learn and adapt.
This system is used by engineers to finish various kinds of genuine tasks. From the start, this system may appear to be a straightforward device, yet it's actually a total answer for a wide range of solid activities.
It accompanies a lot of inherent highlights which offer fast improvement and rearrange coding. Other than this, it additionally accompanies its own templating motor Blade, progressed RESTful directing framework, nearby improvement condition, Homestead and huge amounts of different highlights. It bolsters MVC engineering and offers a bundling framework, ORM, unit testing and that's only the tip of the iceberg.
With Queue the executives, it handles tasks out of sight and logs action when assignments are running in the text style end. The implicit Composer into Laravel makes including bundles a breeze. It handles Redis or MongoDB well. It is well known and there is a great deal of documentation and learning assets that are effectively found to get acclimated with this system.
Slim Framework:- With its improved highlights, Slim Framework empowers you to fabricate propelled web zing highlights like encryption, URL directing, treat, sessions and that's only the tip of applications. This system is very well known among engineers for building APIs as it offers simple strides to make wanted APIs. As a miniaturized scale PHP system, it's extremely lightweight and utilized for growing little web arrangements. This structure is generally used for making RESTful APIs and different web administrations. It offers a great deal of damage iceberg.
PHPixie:- It's a full-stack PHP structure which is utilized for making superior web applications. It bolsters HMVC and worked with singular segments. A people group is there which takes care of the normal updates of the system. It is anything but difficult to begin with, it is modularized and gathers quick
As a best and professional PHP training in Kolkata, Acesoftech Academy has earned its position amongst all other PHP development institutes in Kolkata.
1 note
·
View note
Text
Drupal 9 Preview with Lando
Drupal 9 is scheduled to be released this summer (no earlier than June 3, 2020).
But if you're anything like me, you don't want to wait to kick the tires and take it for a spin.
Luckily, I've put together a quick and easy tutorial to help you get the latest dev version up and running before it is released!
First, you will need to install some other software.
You'll use Composer, a dependency manager for PHP packages, to install the development branch.
Installation instructions for Composer are here: https://getcomposer.org/
You'll use Lando (and Docker) to create and manage a Docker container with your project inside.
Installation instructions and system requirements are here: https://docs.lando.dev/basics/installation.html#system-requirements
I chose Lando because it handles a lot of your configuration for you by providing configuration "recipes" out of the box.
The only catch is, there is no drupal9 recipe for Lando yet, Luckily, we can use the drupal8 recipe with minor modifications.
$ composer create-project drupal/recommended-project:^9@dev
Watch all the stuff scroll by. That's pretty cool. Composer is installing the recommended Drupal project for you. There are lots of things to learn about here, but for now just sit back and let Composer do its thing.
Near the end, it will pause and ask you something:
Do you want to remove the existing VCS (.git, .svn..) history? [Y,n]?
Answer n to this question if you're interested in participating in Drupal 9 core development.
There's a lot going on right now in order to make the deadline for release this summer, and anyone can contribute!
After that, the composer/core-project-message will display some helpful links to documentation about steps to take next:
Congratulations, you’ve installed the Drupal codebase from the drupal/recommended-project template! Next steps: * Install the site: https://www.drupal.org/docs/8/install * Read the user guide: https://www.drupal.org/docs/user_guide/en/index.html * Get support: https://www.drupal.org/support * Get involved with the Drupal community: https://www.drupal.org/getting-involved * Remove the plugin that prints this message: composer remove drupal/core-project-message * Homepage: https://www.drupal.org/project/drupal * Support: * docs: https://www.drupal.org/docs/user_guide/en/index.html * chat: https://www.drupal.org/node/314178
Go ahead and read some of the great info at those links, but keep in mind that this is the documentation for Drupal 8, because the docs for Drupal 9 are still being written!
If all goes according to plan, however, the transition between Drupal 8 and 9 will be much smoother than those between D7 / D8, or D6 / D7, or basically any other major version upgrade in Drupal's long and eventful history. You can read more about the philosophy behind this transition here: https://dri.es/drupal-7-8-and-9
Next, we are ready to run lando init to create our .lando.yml configuration file. Let's try it and see how well the drupal8 recipe works:
$ cd recommended-project $ lando init --source cwd --webroot web --name drupal9-tester --recipe drupal8 $ lando start
Point your browser at http://drupal9-tester.lndo.site and run the Drupal 9 installer.
Oh no! It will fail because you need to specify a newer PHP version; Drupal 9 requires PHP 7.3, but the drupal8 recipe installs PHP 7.2.
Let's back up a minute. We need to destroy this project and rebuild it with different options.
$ lando destroy $ lando init --source cwd --webroot web --name drupal9-tester --recipe drupal8 --option php=7.3 $ lando start
NOW WE'RE COOKING WITH FIRE!!!
Point your browser at http://drupal9-tester.lndo.site and run the Drupal 9 installer.
When you get to the database configuration, just remember that the database, password, and user are all drupal8 (remember, we had to use the drupal8 recipe because there is no drupal9 recipe yet) but the database service is called database, not localhost. You'll need to open the Advanced options to change that.
And just like that, you can be the first kid on your block to run Drupal 9 under Lando!
1 note
·
View note
Photo

秋葉原重工コンピレーション10 - AHI COMPILATION 10 - 2018/12/30 (Sun.) Release in ComicMarket 95 Day2 東ノ-05b Booth 2CD - DirectAudio EVENT: 2000JPY SHOPS: 2666JPY + tax
https://soundcloud.com/ahi_jp/ahi-compilation-10-crossfade - tracklist - DISC1 Tr.01 TAKAMI / Akihabara Gateway Tr.02 Homma Honganji / Star fort Tr.03 Hiroshi Okubo / Luminus Flux Tr.04 bassmicrobe / meth Tr.05 Atsushi Ohara / Voltech Burst Tr.06 Junichi Funada / Centre Tr.07 HIROSHI WATANABE aka Kaito / CYGNUS (R406 Remix) Tr.08 wat / importance of continuing Tr.09 909state / law of gravity Tr.10 DJ Shufflemaster / Dimensional Force Tr.11 909state / RaTaTaTam (HIROSHI WATANABE Remix) DISC2 Tr.01 KURAYAMI / They are Looking at You Tr.02 Atomic / Curricu/rhythm Tr.03 CRZKNY / RESISTANCE Tr.04 Kouki Izumi / Arc Weld Tr.05 TTTT / docker compose Tr.06 KURAYAMI / Echoes from the Distant Past Tr.07 Atomic / clone9 (orinetone Remix) Tr.08 909state / RaTaTaTam (Mitaka Sound Remix) Tr.09 cacono / inlet Tr.10 Takayuki Kamiya / Foreshadow Tr.11 HIROSHI WATANABE aka Kaito / Galaxyscaper Compose: 909state [ AcidWorx / DESTRUCTION BABY ] Atomic [ Technomy ] Atsushi Ohara [ LINEAR ] bassmicrobe [ commune310 ] cacono [ flow and stagnation ] CRZKNY [ GOODWEATHER ] DJ Shufflemaster [ Shiki Kyokai ] Hiroshi Okubo [ nanosounds.jp / Creators. ] HIROSHI WATANABE aka Kaito [ Transmat / Kompakt ] Homma Honganji [ Adult Records / Tourism / ビッグファイア ] Junichi Funada [ westronica / Creators. ] Kouki Izumi [ 荒御霊 / technoA ] KURAYAMI TAKAMI [ REBOOT / BUZZ×3 ] Takayuki Kamiya [ Project MaQ / 5 Invitations ] TTTT ( A.Mochi + Zin ) [ Scott Tiger Records ] wat [ Body Inform ] Remix: HIROSHI WATANABE aka Kaito [ Transmat / Kompakt ] Mitaka Sound orinetone [ QLoveDolls ] R406 [ Select Kashiwa ] Mastering: Hedonist [ Katana Bits ] Jacket Design: clocknote. [ Diverse System / technoA ] Special Thanks: MOGRA (Akihabara) Contact (Shibuya) Comic Market Diverse System flow and stagnation UNDULATION Direction: Atsushi Ohara Takayuki Kamiya ©2018 Akihabara Heavy Industry Inc.
[AKIBA-HOBBY] [DIVERSE DIRECT] [SweepRecordSHOP] (Available Overseas) [Melonbooks] (JP Only)
14 notes
·
View notes
Text
(C++ Senior Software Development Engineer (Remote
(C++ Senior Software Development Engineer (Remote) You will be part of a Development Unit (around 1300+) among 11 R&D Tribes in different countries& continents. Within your Tribe in Timisoara, you will belong to one of the Squads, each composed of 10-20 experienced, supportive and inclusive colleagues who will guide you. Your team has objectives to deliver in a sprint (2 weeks). In an environment where trust and autonomy are encouraged, each team member selects the tasks to work on and exchanges daily with his/her team mates on the progress and difficulties. What you will learn and contribute to You will join Research and Development 5G Software team, responsible for developing software functionalities for the Nokia 5G base stations, ready to be delivered to customers all over the world. Software Development Mission You will contribute to the development of software functionalities in our base station product and be involved in the complete development cycle (specifications, coding, testing). You will bring a valuable input to a large and complex project, that will upgrade both your technical and personal skills. In general, in 5G positions, our days are composed of: software development using latest C++ standards specification, implementation and code maintenance continuous collaboration with internal colleagues constant learning and self-development Your skills and experience Strong knowledge of latest C++ standards such as C++ 11 or above (14, 17) Good STL knowledge (container, algorithm) and templating Programming experience in Linux environment Good memory management skills Good understand of IPC and multithreading Equally important, you are dedicated to learning, welcome feedback, show flexibility and take initiative. Other key skills: Basic Python and/or Scripting knowledge Knowledge of Jira, Jenkins Familiarity with UML, XML diagrams Experience with test driven development (ex. Google Test) GIT Gerrit, SVN Knowledge on Agile methodology wireless technologies, cloud-computing platforms (OpenStack, Google Kubernetes, Docker, VM). Training If you want to continuously develop yourself, you’re looking at the right job description! We provide endless internal opportunities and resources for you to build your career and substantially improve your skills. A customized training plan will be proposed at your arrival. During the first months at Nokia you will have support from your manager, team and dedicated buddy and the opportunity to get in touch with 5G technology and our development& testing environment. What we offer Competitive salary based on your experience Performance, Christmas and Easter bonuses Interaction with international teams of software developers, architects, project managers, testers, integrators etc. Visibility on latest configuration control technologies, 5G innovating mobile networks, Cloud, shared testing resources E-learning platforms such as NokiaEDU, Harvard ManageMentor, LinkedIn Learning etc. at your disposal for technical training and personal development Access to Nokia Garage innovation space where you can express your technical creativity and implement new projects with support from local community Various certifications Events and conferences on technical matters but also on well-being at work and other general-purpose subjects Flexible time and teleworking 24+ paid days-off Sports, Wellness and Culture reimbursement Bookster Public Transport/Private Parking allowance or bike/electrical scooter reimbursement Meal tickets Private health and life insurance Kindergarden/after-school reimbursement Relocation package for Timisoara non-residents One of the highest employee referral bonuses on the market so you can bring your friends too :) If you want to take part of this adventure that will shape the future, join us. Apply now! This job is eligible for hiring remotely only within Romania. Nokia is committed to inclusion and is an equal opportunity employerNokia has received the following recognitions for its commitment to inclusion & equality: One of the World’s Most Ethical Companies by Ethisphere Gender-Equality Index by Bloomberg Read the full article
0 notes
Text
Docker コンテナ内で cron を実行し実行ログを出力する方法
Docker コンテナ内で cron を実行し実行ログを出力する方法
はじめに Docker Compose を使って構築している環境にスケジューリングされたジョブ実行の仕組みがほしいという相談をいただきました。 AWS や GCP といったクラウドサービスを利用している場合は CloudWatch Events や Google Scheduler の利用も選択肢に入ります。 しかし今回の環境は Linux サーバに Docker デーモンが用意されているだけでしたので、cron を利用することにしました。 このときに構築した Docker 内で cron を実行する方法と、cron 実行結果を標準出力、標準エラー出力に流して docker logs コマンドで確認する方法を紹介します。 検証環境 $ uname -moi arm64 unknown Darwin $ bash -version | head -n 1 GNU bash, バージョン…

View On WordPress
0 notes
Text
Dokev release date

DOKEV RELEASE DATE UPDATE
DOKEV RELEASE DATE CODE
DOKEV RELEASE DATE WINDOWS
Better sandboxed workflow and enhanced cross compilation by in #9744.
Add nolintlint and clean up nolint directives by in #9738.
Use correct YAML marshal func by in #9712.
DOKEV RELEASE DATE UPDATE
Update Dockerfile syntax to latest stable, and rename docs Dockerfile by in #9711.Remove unused workflows, especially the pr-closed which always failed by in #9689.Avoid pulling same images multiple times ⚡️ by in #9173.Apply compose model on compose kill, add -remove-orphans by in #9764.Don't wait for disabled dependency by in #9759.Filter out commandConn.Close* warning message by in #9748.Don't apply default pull policy from command line if one is defined in service configuration by in #9720.Remove extra whitespaces in help text of some subcommands by in #9710.If command is ran with a compose file, apply the compose model by in #9375.Do not stop dependency containers by in #9701.
DOKEV RELEASE DATE WINDOWS
Resolve environment variables case-insensitively on Windows by in #9438.
Update usage strings for consistency by in #9706.
Give environment variables precedence back to OS over.
Build windows/arm64 and linux/riscv64 binaries by in #9751.
Apply newly loaded envvars to "DockerCli" and "APIClient" by in #9745.
made their first contribution in #9828.
made their first contribution in #9703.
made their first contribution in #9810.
made their first contribution in #9798.
update compose-go version to v1.5.1 by in #9840.
build(deps): bump go.opentelemetry.io/otel from 1.4.1 to 1.9.0 by in #9821.
build(deps): bump /AlecAivazis/survey/v2 from 2.3.5 to 2.3.6 by in #9830.
build(deps): bump go.opentelemetry.io/otel from 1.9.0 to 1.10.0 by in #9835.
ci: reduce noise from dependabot on Docker deps by in #9770.
build: label built images for reliable cleanup on down by in #9819.
Only attempt to start specified services on compose start by in #9797.
Apply newly loaded envvars to "DockerCli" and "APIClient" by in #9817.
patch: build.go access custom labels directly cause panic by in #9810.
Fix docker-compose convert that turns $ into $$ when using the -no-interpolate option by in #9703.
DOKEV RELEASE DATE CODE
Correctly capture exit code when service has dependencies by in #9794.
logs: filter to services from current Compose file by in #9811.
chore: add improvement output warning when pulling image by in #9829.
We’ll be keeping this page up to date with all the latest updates, so stay tuned for all major announcements from the game and Pearl Abyss. However, if the first look is anything to go by, this should be an incredibly fun game to play. But you be the judge for yourself:Īt the time of writing this, there is no official release date for the game – only a teaser trailer for the exciting new open-world action-adventure game. It’s safe to say, this could be one of the most attractive-looking games of the year. The game’s lead character would now catch creatures in a Pokemon-Esq manner, presumably collecting as many as you can during your adventure.ĭuring the Gamescom Opening Night Live event last night, viewers got a glimpse of some actual in-game & gameplay footage from the Korean title. Pearl Abyss, developers of the Korean game, decided to change the direction for Dokev recently – changing it from an MMO to an open-world action-adventure title. Dokev’s new trailer premiered last night at Gamescom 2021, sparking even more excitement around the game’s imminent release.
0 notes
Text
QuestDB is an open-source high-performance time-series database(TSDB) for applications in IoT, event monitoring, machine learning, DevOps, financial services e.t.c. QuestDB written in Java and C programming language has support for the SQL query language and also implements PostgreSQL wire protocol, REST API, and an InfluxDB Line Protocol. QuestDB was developed by Vlad Ilyushchenko in 2014 with the main goal of creating low latency trading techniques for databases to improve performance with minimal server resources. Ever since its first release, the QuestDB SQL database has gained popularity all over the world. This is highly contributed by its amazing features that include: Supports ANSI SQL and includes language extensions for time series, this helps perform calculations on timestamped data for row- and column-based access. Data is stored in a chronological order and table partitions are applied based on time. Data is massively parallelized using vectorized query execution. Time series, relational joins, downsampling, and unlimited sub-queries are supported. High performance achieved from a column-oriented storage model. No dependencies required, and is 100% free from garbage collection Easy to run queries and inspect table schemas using the web interface By the end of this guide, you will have gained the required knowledge on how to run the QuestDB SQL database in Docker Container. 1. Install Docker CE on Linux For this guide, we need to install docker engine on our Linux system. Below is a dedicated guide to aid you in installing Docker Engine. How To Install Docker CE on Linux Systems Start and enable docker sudo systemctl start docker sudo systemctl enable docker Verify that docker is running: $ systemctl status docker ● docker.service - Docker Application Container Engine Loaded: loaded (/lib/systemd/system/docker.service; enabled; vendor preset: enabled) Active: active (running) since Thu 2022-01-13 02:30:03 EST; 4min 5s ago TriggeredBy: ● docker.socket Docs: https://docs.docker.com Main PID: 2741 (dockerd) Tasks: 8 Memory: 30.4M CPU: 239ms CGroup: /system.slice/docker.service └─2741 /usr/bin/dockerd -H fd:// --containerd=/run/containerd/containerd.sock Ensure that your system user is added to the docker group as below. sudo usermod -aG docker $USER newgrp docker 2. Run QuestDB SQL database in Docker Container. There are two methods on how to navigate along: Pull the container image and run directly Use Docker-compose Option 1 – Pull the QuestDB image and Run QuestDB Container Once Docker is installed on your system, you can pull the QuestDB container image and run it or combine both in one command as below. cd ~ docker run -t -d \ -p 9000:9000 \ -p 9009:9009 \ -p 8812:8812 \ -p 9003:9003 \ --name docker_questdb \ questdb/questdb In the above command, we have exposed the below ports: 9000:9000 -For REST API and Web Console 8812:8812 – For Postgres wire protocol 9009:9009 – For InfluxDB line protocol 9003:9003 – For Min health server Data persistence We can also add a persistent volume for data using the -v argument. Normally the QuestDB root directory will be at /root/.questdb/. You can mount Docker Volumes to the QuestDB Docker container so that data may be persisted or server configuration settings may be passed to an instance. First stop and delete running container $ docker rm -f docker_questdb docker_questdb $ docker ps CONTAINER ID IMAGE COMMAND CREATED STATUS PORTS NAMES In the following example we demonstrate how to mount the directory ./questdb_data to a QuestDB container using the -v flag in a Docker run command: cd ~ docker run -t -d \ -p 9000:9000 \ -p 9009:9009 \ -p 8812:8812 \ -p 9003:9003 \ --name docker_questdb \ -v "$(pwd)/questdb_data:/root/.questdb/" questdb/questdb Now you will have data stored in the path convenient for migration or backups.
$ ls questdb_data/ conf db public Now check the status of the container. $ docker ps CONTAINER ID IMAGE COMMAND CREATED STATUS PORTS NAMES 9f69d05b8604 questdb/questdb "/usr/bin/env QDB_PA…" 5 seconds ago Up 4 seconds 0.0.0.0:8812->8812/tcp, :::8812->8812/tcp, 0.0.0.0:9000->9000/tcp, :::9000->9000/tcp, 0.0.0.0:9003->9003/tcp, :::9003->9003/tcp, 0.0.0.0:9009->9009/tcp, :::9009->9009/tcp docker_questdb Option 2 – Run QuestDB SQL database with Docker-Compose Here, we will create a QuestDB SQL database docker-compose YAML file. The file will contain all the required information about our container. With Docker installed, proceed and install Docker-compose using the guide below. How To Install Docker Compose on Linux Using your favorite editor, create the YAML file as below. cd ~ mkdir questdb cd questdb vim docker-compose.yml In the file, add the below lines: version: "3" services: questdb: image: questdb/questdb container_name: docker_questdb restart: always ports: - "8812:8812" - "9000:9000" - "9009:9009" - "9003:9003" volumes: - ./data/db:/root/.questdb/db Now run the container as below. docker-compose up -d Command execution output: [+] Running 2/2 ⠿ Network questdb_default Created 0.1s ⠿ Container docker_questdb Started Once complete, verify if the container is running: $ docker ps CONTAINER ID IMAGE COMMAND CREATED STATUS PORTS NAMES 1bfbaa565e5a questdb/questdb "/usr/bin/env QDB_PA…" 19 seconds ago Up 17 seconds 0.0.0.0:8812->8812/tcp, :::8812->8812/tcp, 0.0.0.0:9000->9000/tcp, :::9000->9000/tcp, 0.0.0.0:9003->9003/tcp, :::9003->9003/tcp, 0.0.0.0:9009->9009/tcp, :::9009->9009/tcp docker_questdb 3. Connect to QuestDB SQL database. There are several methods one can use to connect and interact with QuestDB. They include: Web Console listening on port 9000 REST API on port 9000 PostgreSQL wire protocol on port 8812 InfluxDB line protocol for high-throughput ingestion on port 9009 In this guide, I will demonstrate how to connect and interact with QuestDB using the Web console and the REST API. 1. Connect to QuestDB SQL database Web Console. The QuestDB web console is listening on port 9000 and can be accessed using the URL http://IP_Address:9000. If you have trouble accessing the page, allow the port through the firewall. You should be able to see this page: Here, you can run your scripts. For example, begin by creating a table: CREATE TABLE sensors (ID LONG, make STRING, city STRING); Once the table is created, insert data into it. INSERT INTO sensors SELECT x ID, --increasing integer rnd_str('Eberle', 'Honeywell', 'Omron', 'United Automation', 'RS Pro') make, rnd_str('Kampala', 'Nairobi', 'Bamako', 'Segere', 'Dodoma') city FROM long_sequence(10000) x ; On the web console, the commands should be entered as below and click Run. You will have your data added as below. View data in the tables as below SELECT * FROM sensors WHERE city='Nairobi'; Sample Output: You can also import data from a file. 2. Connect to QuestDB SQL database using REST API REST API is based on HTTP and provides the best and simple way to interact with QuestDB. Here, API functions are keyed on the URL and use query parameters as arguments. For example, to import data, you will use the below command:
curl -F [email protected] \ 'http://localhost:9000/imp' You can as well execute queries that return a JSON response. For example. Create a table as below curl -G \ --data-urlencode "query=CREATE TABLE sensors (ID LONG, make STRING, city STRING);" \ --data-urlencode "count=true" \ http://localhost:9000/exec Insert data into the table. curl -G \ --data-urlencode "query=INSERT INTO sensors SELECT x ID, --increasing integer rnd_str('Eberle', 'Honeywell', 'Omron', 'United Automation', 'RS Pro') make, rnd_str('Kampala', 'Nairobi', 'Bamako', 'Segere', 'Dodoma') city FROM long_sequence(10000) x ;" \ --data-urlencode "count=true" \ http://localhost:9000/exec Now view the data in the table curl -G \ --data-urlencode "query=SELECT * FROM sensors WHERE city='Nairobi' limit 5;" \ --data-urlencode "count=true" \ http://localhost:9000/exec Sample Output: 4. Manage the QuestDB SQL database Container. The QuestDB SQL database container can be managed as below: Start the container. docker start docker_questdb Stop the container. docker stop docker_questdb Conclusions That marks the end of this guide on how to run the QuestDB SQL database in Docker Container. I hope this guide was of significance to you.
0 notes