#dotenv module
Explore tagged Tumblr posts
Visit Tumblr Blog
Explore Tumblr blogs with no restrictions, modern design and the best experience.
Last Seen Tumblr Blogs


Fun Fact
Average visit duration of Tumblr.com is 10 mins and 25 secs.
Text
Access Environment Variable in Nodejs JavaScript Application | Reading ENV Variable Example
Full Video Link https://youtu.be/dxrNopL1sbQ Hello friends, new #video on #reading #accessing #environmentvariables in #nodejs #projeect #application #tutorial #examples is published on #codeonedigest #youtube channel. @java #java #aws #a
In this video, we will read the environment variable in nodejs javascript project. We will learn what “dotenv” module in nodejs javascript. How to use “dotenv” package in our nodejs javascript project. ** Important Nodejs Javascript Packages or Modules ** Dotenv – DotEnv is a lightweight npm package that automatically loads environment variables from a .env file into the process.env object. To…

View On WordPress
#dotenv#dotenv example#dotenv in node js#dotenv module#dotenv module in node js#dotenv module not found#dotenv nodejs#dotenv package#dotenv package install#dotenv package nodejs#dotenv package.json#dotenv tutorial#dotenv tutorial nodejs#environment variable#environment variables#javascript environment variable#linux environment variables#node js javascript#node js javascript tutorial#nodejs#python environment variables#set environment variables
0 notes
Text
Backend Web Development Using Node.js

Node.js has revolutionized web development by enabling developers to write server-side code using JavaScript. If you're already comfortable with JavaScript on the frontend, transitioning to backend development with Node.js is a logical next step. In this post, we'll introduce the fundamentals of backend development using Node.js and how to build scalable, efficient web applications.
What is Node.js?
Node.js is a JavaScript runtime built on Chrome’s V8 engine. It allows developers to use JavaScript to write backend code, run scripts outside the browser, and build powerful network applications. Node.js is known for its non-blocking, event-driven architecture, making it highly efficient for I/O-heavy applications.
Why Use Node.js for Backend Development?
JavaScript Everywhere: Use a single language for both frontend and backend.
Asynchronous and Non-blocking: Great for handling many connections at once.
Vast Ecosystem: Thousands of modules available via npm (Node Package Manager).
Scalability: Ideal for microservices and real-time applications like chats or games.
Setting Up a Node.js Project
Install Node.js from nodejs.org
Create a new project folder:
Initialize the project:
Create your main file:
Basic Server Example
const http = require('http'); const server = http.createServer((req, res) => { res.writeHead(200, {'Content-Type': 'text/plain'}); res.end('Hello, Node.js Backend!'); }); server.listen(3000, () => { console.log('Server running on http://localhost:3000'); });
Using Express.js for Easier Development
Express.js is a popular web framework for Node.js that simplifies routing and middleware management.npm install express const express = require('express'); const app = express(); app.get('/', (req, res) => { res.send('Welcome to the Node.js backend!'); }); app.listen(3000, () => { console.log('Express server running on http://localhost:3000'); });
Common Backend Tasks with Node.js
Handle routing and API endpoints
Connect to databases (MongoDB, PostgreSQL, etc.)
Manage user authentication and sessions
Process form data and JSON
Serve static files
Popular Libraries and Tools
Express.js: Web framework
Mongoose: MongoDB object modeling
dotenv: Environment variable management
JWT: JSON Web Tokens for authentication
Nodemon: Auto-restart server on code changes
Best Practices
Use environment variables for sensitive data
Structure your project using MVC or service-based architecture
Use middleware for error handling and logging
Validate and sanitize user input
Secure your APIs with authentication and rate-limiting
Conclusion
Node.js is a powerful and flexible choice for backend development. Its ability to use JavaScript on the server-side, combined with a rich ecosystem of libraries, makes it ideal for building modern web applications. Start small, experiment with Express, and gradually add more features to build robust backend services.
0 notes
Text
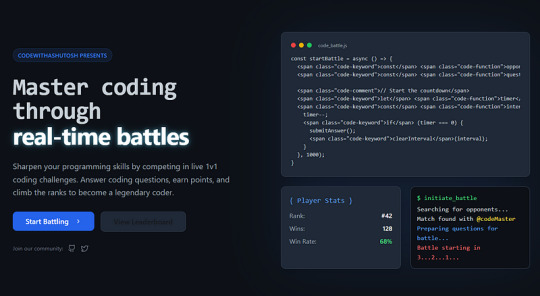
CodeBattle: The Ultimate 1v1 Real-Time Coding Battle Platform
Introduction
Hello coder! How are you , In the world of competitive programming and coding challenges, real-time battles are becoming increasingly popular. CodeBattle is a cutting-edge 1v1 real-time coding battle platform designed to test programmers’ skills in a fast-paced MCQ-based format. Whether you’re a beginner or an experienced coder, CodeBattle offers an exciting and challenging way to improve your coding knowledge.
In this article, we will dive deep into the development of CodeBattle, covering project structure, technology stack, real-time matchmaking, styling tips, and live demo setup. Additionally, we will provide code snippets to help you understand the implementation better.
Features of CodeBattle
Real-time 1v1 Coding Battles
MCQ-based Questions with a 20-second timer
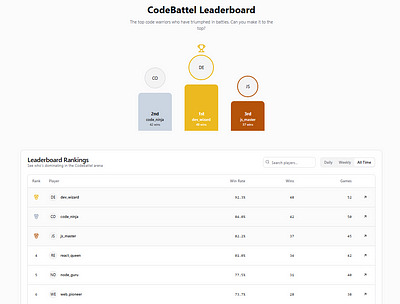
Live Scoreboard
Leaderboard System (Daily, Weekly, and All-time Rankings)
Secure Authentication (Google/Firebase Login)
Admin Panel to manage questions & users
Fully Responsive UI
Tech Stack: React (Next.js), Node.js, Express.js, MongoDB, and Socket.io
Project Structure
CodeBattel/ ├── frontend/ # React (Next.js) UI │ ├── components/ # Reusable Components │ ├── pages/ # Next.js Pages (Home, Play, Leaderboard, etc.) │ ├── styles/ # CSS Modules / Tailwind CSS │ └── utils/ # Helper Functions │ ├── backend/ # Node.js Backend │ ├── models/ # MongoDB Models │ ├── routes/ # Express Routes (API Endpoints) │ ├── controllers/ # Business Logic │ ├── config/ # Configuration Files │ ├── socket/ # Real-time Matchmaking with Socket.io │ └── index.js # Main Server Entry Point │ └── README.md # Project Documentation
Building the Frontend with React (Next.js)
1. Installing Dependencies
npx create-next-app@latest codebattel cd codebattel npm install socket.io-client axios tailwindcss npm install --save firebase
2. Setting up Tailwind CSS
npx tailwindcss init -p
Edit tailwind.config.js:module.exports = { content: ["./pages/**/*.{js,ts,jsx,tsx}", "./components/**/*.{js,ts,jsx,tsx}"], theme: { extend: {}, }, plugins: [], };
Developing the 1v1 Battle System
1. Setting Up Real-Time Matchmaking
import { io } from "socket.io-client"; import { useEffect, useState } from "react";const socket = io("http://localhost:5000");export default function BattleRoom() { const [question, setQuestion] = useState(null); const [timer, setTimer] = useState(20); useEffect(() => { socket.emit("joinBattle"); socket.on("newQuestion", (data) => { setQuestion(data); setTimer(20); }); }, []); return ( <div> <h1>CodeBattel</h1> {question && ( <div> <h2>{question.text}</h2> <ul> {question.options.map((opt, index) => ( <li key={index}>{opt}</li> ))} </ul> <p>Time Left: {timer} sec</p> </div> )} </div> ); }
Building the Backend with Node.js & Socket.io
1. Installing Dependencies
npm init -y npm install express socket.io mongoose cors dotenv
2. Creating the Server
const express = require("express"); const http = require("http"); const { Server } = require("socket.io"); const app = express(); const server = http.createServer(app); const io = new Server(server, { cors: { origin: "*" } });let rooms = []; io.on("connection", (socket) => { socket.on("joinBattle", () => { if (rooms.length > 0) { let room = rooms.pop(); socket.join(room); io.to(room).emit("newQuestion", { text: "What is React?", options: ["Library", "Framework", "Language", "None"] }); } else { let newRoom = "room-" + socket.id; rooms.push(newRoom); socket.join(newRoom); } }); });server.listen(5000, () => console.log("Server running on port 5000"));
Live Demo Setup
Clone the repo:
git clone https://github.com/ashutoshmishra52/codebattel.git cd codebattel
Install dependencies:
npm install && cd backend && npm install
Run the project:
npm run dev
Open http://localhost:3000 in your browser.
FAQ
Q1: What is CodeBattle?
CodeBattle is a 1v1 real-time coding battle platform where players answer multiple-choice questions under a 20-second timer.
Q2: How does matchmaking work?
Players are randomly paired in real time using Socket.io.
Q3: Can I add my own questions?
Yes! The Admin Panel allows you to add/edit/delete MCQs.
Q4: How do I contribute?
Check out the GitHub repository and submit a pull request.
About the Author
Ashutosh Mishra is a full-stack developer, AI researcher, and content writer with 4+ years of experience. He is the founder of CodeWithAshutosh, a platform dedicated to teaching web development, AI, and competitive coding.
For more coding tutorials and projects, follow Ashutosh Mishra.
Conclusion
CodeBattle is an innovative way to enhance your coding skills in a competitive environment. With real-time battles, an engaging UI, and a powerful backend, it stands out as a top-tier coding battle platform. Start coding, challenge your friends, and rise up the leaderboard!
0 notes
Text

Stress
You write a script to automate sending daily email reports using Python. We'll use the smtplib library to send emails and the email.mime modules to create the email content. Here's a step-by-step guide:
Step 1: Install Required Libraries
First, ensure you have the necessary libraries installed. You can install them using pip if they are not already installed.pip install smtplib pip install email
Step 2: Set Up Email Credentials
You need to have the credentials for your email account (e.g., Gmail). For security reasons, it's better to store these in environment variables or a configuration file.
Step 3: Create the Python Script
Here's a sample script that sends an email report daily:import smtplib from email.mime.multipart import MIMEMultipart from email.mime.text import MIMEText import os # Function to send email def send_email(subject, body, to_email): # Email credentials email_address = os.environ.get('EMAIL_USER') email_password = os.environ.get('EMAIL_PASS') # Create the email msg = MIMEMultipart() msg['From'] = email_address msg['To'] = to_email msg['Subject'] = subject # Attach the body with the msg instance msg.attach(MIMEText(body, 'plain')) # Create server object with SSL option server = smtplib.SMTP_SSL('smtp.gmail.com', 465) server.login(email_address, email_password) # Send the email server.send_message(msg) server.quit() print("Email sent successfully") # Function to generate the report def generate_report(): # Implement your report generation logic here report = "This is a sample report." return report # Main function to send daily email report def main(): report = generate_report() subject = "Daily Report" body = report to_email = "[email protected]" # Change to the recipient's email address send_email(subject, body, to_email) if __name__ == "__main__": main()
Step 4: Setting Up Environment Variables
To keep your email credentials secure, set them as environment variables. You can do this in your operating system or by using a .env file with the dotenv package.
Using Environment Variables Directly
Set your environment variables:
On Windows:
setx EMAIL_USER "[email protected]" setx EMAIL_PASS "your_password"
On macOS/Linux:
export EMAIL_USER="[email protected]" export EMAIL_PASS="your_password"
Using a .env File
Create a .env file with the following content:[email protected] EMAIL_PASS=your_password
Then, update the script to load these variables:from dotenv import load_dotenv # Load environment variables from .env file load_dotenv()
Install the python-dotenv package if you use the .env file method:pip install python-dotenv
Step 5: Automating the Script Execution
To run the script daily, you can use a scheduler.
On Windows
Use Task Scheduler to run the script daily.
Open Task Scheduler.
Create a new task.
Set the trigger to daily at your desired time.
Set the action to start a program and browse to the Python executable, then add the script path as an argument.
On macOS/Linux
Use cron to schedule the script.
Open the terminal.
Type crontab -e to edit the cron jobs.
Add a new line for the daily schedule (e.g., to run at 7 AM every day):
0 7 * * * /usr/bin/python3 /path/to/your_script.py
Summary
Install required libraries using pip.
Set up email credentials securely using environment variables or a .env file.
Write the Python script to generate the report and send the email.
Automate the script execution using Task Scheduler (Windows) or cron (macOS/Linux).
This setup will ensure your script runs daily and sends the email report automatically. If you have any specific requirements or encounter issues, feel free to ask!
0 notes
Text
Extracting Structured Data from PDF Files using OpenAI & Langchain

Aim
The aim of this project is to create a paper parser which extracts questions from an exam file and parses it into JSON format leveraging langchain and openAI.
Technologies Used:-
The code is written in JavaScript and utilizes the following technologies: dotenv: A module for loading environment variables from a .env file. zod: A TypeScript-first schema validation library. Langchain : A framework designed to simplify the creation of applications using large language models. fs: A built-in Node.js module for working with the file system.
for more details: Extracting Structured Data from PDF Files using OpenAI & Langchain
0 notes
Link
Nuxt.js provides an Axios module for easy integration with your application. Axios is a promise-based HTTP client that works in the browser and Node.js environment or, in simpler terms, it is a tool for making requests (e.g API calls) in client-side applications and Node.js environment. In this tutorial, we’re going to learn how to use the Axios module and how to make a request on the server-side using asyncData and fetch. These two methods make a request on the server-side but they have some differences which we’re also going to cover. Finally, we’ll learn how to perform authentication and secure pages/routes using the auth module and auth middleware. This article requires basic knowledge of Nuxtjs and Vuejs as we’ll be building on top of that. For those without experience with Vuejs, I recommend you start from their official documentation and the Nuxt official page before continuing with this article.
What Is The Nuxt.js Axios Module?
According to the official Documentation,
“It is a Secure and easy Axios integration with Nuxt.js.”
Here are some of its features:
Automatically set base URL for client-side & server-side.
Proxy request headers in SSR (Useful for auth).
Fetch Style requests.
Integrated with Nuxt.js Progressbar while making requests.
To use the axios module in your application, you will have to first install it by using either npm or yarn. YARN
yarn add @nuxtjs/axios
NPM
npm install @nuxtjs/axios
Add it into your nuxt.config.js file:
modules: [ '@nuxtjs/axios', ], axios: { // extra config e.g // BaseURL: 'https://link-to-API' }
The modules array accepts a list of Nuxt.js modules such as dotenv, auth and in this case, Axios. What we’ve done is to inform our application that we would be using the Axios module, which we reference using @nuxtjs/axios. This is then followed by the axios property which is an object of configurations like the baseURL for both client-side and server-side. Now, you can access Axios from anywhere in your application by calling this.$axios.method or this.$axios.$method. Where method can be get, post, or delete.
Making Your First Request Using Axios
For this tutorial, I’ve put together a simple application on Github. The repository contains two folders, start and finish, the start folder contains all you need to get right into the tutorial. The finish folder contains a completed version of what we would be building. After cloning the repo and opening the start folder, we would need to install all our packages in the package.json file so open your terminal and run the following command:
npm install
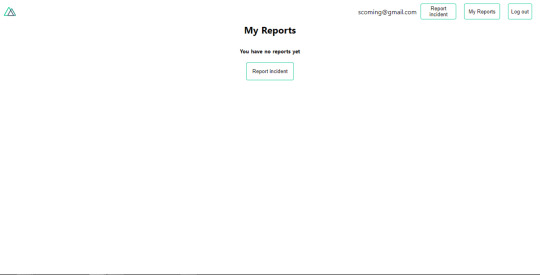
Once that is done, we can start our app using the npm run dev command. This is what you should see when you go to localhost:3000.
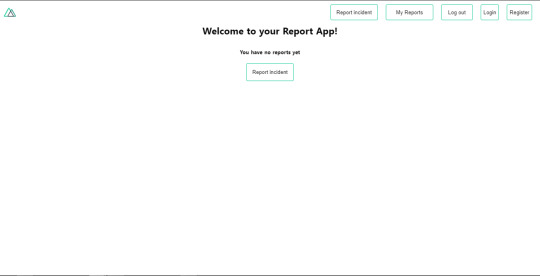
Our application’s landing page. (Large preview)
The next thing we have to do is to create a .env file in the root folder of our application and add our API URL to it. For this tutorial, we’ll be using a sample API built to collect reports from users.
API_URL=https://ireporter-endpoint.herokuapp.com/api/v2/
This way, we do not have to hard code our API into our app which is useful for working with two APIs (development and production). The next step would be to open our nuxt.config.js file and add the environmental variable to our axios config that we added above.
/* ** Axios module configuration */ axios: { // See https://github.com/nuxt-community/axios-module#options baseURL: process.env.API_URL, },
Here, we tell Nuxt.js to use this baseURL for both our client-side and server-side requests whenever we use this Axios module. Now, to fetch a list of reports, let us open the index.vue file and add the following method to the script section.
async getIncidents() { let res = await this.$store.dispatch("getIncidents"); this.incidents = res.data.data.incidents; }
What we have done is to create an async function that we call getIncidents() and we can tell what it does from the name — it fetches a list of incidents using the Vuex store action method this.$store.dispatch. We assign the response from this action to our incidents property so we can be able to make use of it in the component. We want to call the getIncidents() method whenever the component mounts. We can do that using the mounted hook.
mounted() { this.getIncidents() }
mounted() is a lifecycle hook that gets called when the component mounts. That will cause the call to the API to happen when the component mounts. Now, let us go into our index.js file in our store and create this action where we’ll be making our Axios request from.
export const actions = { async getIncidents() { let res = await this.$axios.get('/incidents') return res; } }
Here, we created the action called getIncidents which is an async function, then we await a response from the server and return this response. The response from this action is sent back to our getIncidents() method in our index.vue file. If we refresh our application, we should now be able to see a long list of incidents rendered on the page.
List of incidents on landing page. (Large preview)
We have made our first request using Axios but we won’t stop there, we are going to be trying out asyncData and fetch to see the differences between them and using Axios.
AsyncData
AsyncData fetches data on the server-side and it’s called before loading the page component. It does not have access to this because it is called before your page component data is created. this is only available after the created hook has been called so Nuxt.js automatically merges the returned data into the component’s data. Using asyncData is good for SEO because it fetches your site’s content on the server-side and also helps in loading content faster. Note that asyncData method can only be used in the pages folder of your application as it would not work in the components folder. This is because asyncData hook gets called before your component is created.
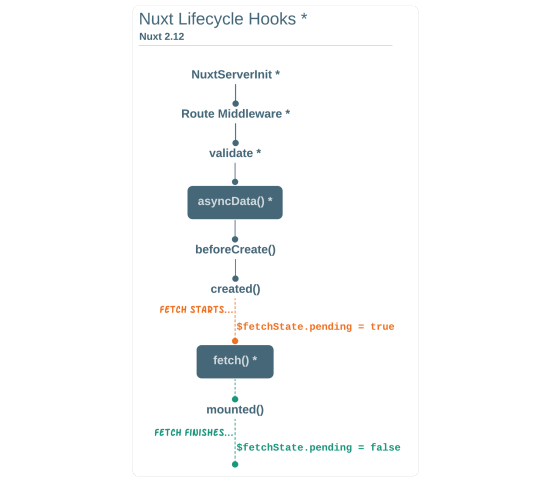
Image from Nuxt blog. (Large preview)
Let us add asyncData to our index.vue file and observe how fast our incidents data loads. Add the following code after our components property and let us get rid of our mounted hook.
async asyncData({ $axios }) { let { data } = await $axios.get("/incidents"); return { incidents: data.data.incidents }; }, // mounted() { // this.getIncidents(); // },
Here, the asyncData method accepts a property from the context $axios. We use this property to fetch the list of incidents and the value is then returned. This value is automatically injected into our component. Now, you can notice how fast your content loads if you refresh the page and at no time is there no incident to render.
Fetch
The Fetch method is also used to make requests on the server-side. It is called after the created hook in the life cycle which means it has access to the component’s data. Unlike the asyncData method, the fetch method can be used in all .vue files and be used with the Vuex store. This means that if you have the following in your data function.
data() { return { incidents: [], id: 5, gender: 'male' }; }
You can easily modify id or gender by calling this.id or this.gender.
Using Axios As A Plugin
During the process of development with Axios, you might find that you need extra configuration like creating instances and interceptors for your request so your application can work as intended and thankfully, we can do that by extending our Axios into a plugin. To extend axios, you have to create a plugin (e.g. axios.js) in your plugins folder.
export default function ({ $axios, store, redirect }) { $axios.onError(error => { if (error.response && error.response.status === 500) { redirect('/login') } }) $axios.interceptors.response.use( response => { if (response.status === 200) { if (response.request.responseURL && response.request.responseURL.includes('login')) { store.dispatch("setUser", response); } } return response } ) }
This is an example of a plugin I wrote for a Nuxt application. Here, your function takes in a context object of $axios, store and redirect which we would use in configuring the plugin. The first thing we do is to listen for an error with a status of 500 using $axios.onError and redirect the user to the login page. We also have an interceptor that intercepts every request response we make in our application checks if the status of the response we get is 200. If that is true we proceed and check that there is a response.request.responseURL and if it includes login. If this checks out to be true, we then send this response using our store’s dispatch method where it then mutated in our state. Add this plugin to your nuxt.config.js file:
plugins: [ '~/plugins/axios' ]
After doing this, your Axios plugin would intercept any request you make and check if you have defined a special case for it.
Introduction To The Auth Module
The auth module is used for performing authentication for your Nuxt application and can be accessed from anywhere in your application using $this.auth. It is also available in fetch, asyncData, middleware and NuxtInitServer from the context object as $auth. The context provides additional objects/params from Nuxt to Vue components and is available in special nuxt lifecycle areas like those mentioned above. To use the auth module in your application, you would have to install it using yarn or npm. YARN
yarn add @nuxtjs/auth
NPM
npm install @nuxtjs/auth
Add it to your nuxt.config.js file.
modules: [ '@nuxtjs/auth' ], auth: { // Options }
The auth property accepts a list of properties such as strategies and redirect. Here, strategies accepts your preferred authentication method which can be:
local For username/email and password-based flow.
facebook For using Facebook accounts as a means of authentication.
Github For authenticating users with Github accounts.
Google For authenticating users with Google accounts.
Auth0
Laravel Passport
The redirect property accepts an object of links for:
login Users would be redirected to this link if login is required.
logout Users would be redirected here if after logout current route is protected.
home Users would be redirected here after login.
Now, let us add the following to our nuxt.config.js file.
/* ** Auth module configuration */ auth: { redirect: { login: '/login', logout: '/', home: '/my-reports' }, strategies: { local: { endpoints: { login: { url: "/user/login", method: "post", propertyName: "data.token", }, logout: false, user: false, }, tokenType: '', tokenName: 'x-auth', autoFetchUser: false }, }, }
Please note that the auth method works best when there is a user endpoint provided in the option above. Inside the auth config object, we have a redirect option in which we set our login route to /login, logout route to / and home route to /my-reports which would all behave as expected. We also have a tokenType property which represents the Authorization type in the header of our Axios request. It is set to Bearer by default and can be changed to work with your API. For our API, there is no token type and this is why we’re going to leave it as an empty string. The tokenName represents the Authorization name (or the header property you want to attach your token to) inside your header in your Axios request. By default, it is set to Authorization but for our API, the Authorization name is x-auth. The autoFetchUser property is used to enable user fetch object using the user endpoint property after login. It is true by default but our API does not have a user endpoint so we have set that to false. For this tutorial, we would be using the local strategy. In our strategies, we have the local option with endpoints for login, user and logout but in our case, we would only use the *login* option because our demo API does not have a *logout* endpoint and our user object is being returned when *login* is successful. Note: The auth module does not have a register endpoint option so that means we’re going to register the traditional way and redirect the user to the login page where we will perform the authentication using this.$auth.loginWith. This is the method used in authenticating your users. It accepts a ‘strategy’ (e.g local) as a first argument and then an object to perform this authentication with. Take a look at the following example.
let data { email: '[email protected]', password: '123456' } this.$auth.loginWith('local', { data })
Using The Auth Module
Now that we have configured our auth module, we can proceed to our registration page. If you visit the /register page, you should see a registration form.
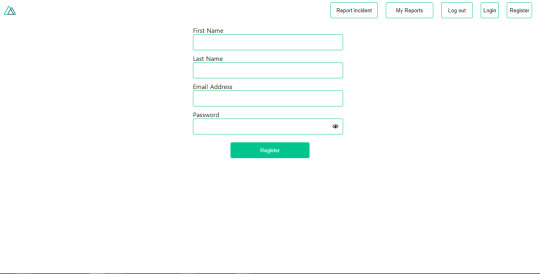
Register page. (Large preview)
Let us make this form functional by adding the following code:
methods: { async registerUser() { this.loading = true; let data = this.register; try { await this.$axios.post("/user/create", data); this.$router.push("/login"); this.loading = false; this.$notify({ group: "success", title: "Success!", text: "Account created successfully" }); } catch (error) { this.loading = false; this.$notify({ group: "error", title: "Error!", text: error.response ? error.response.data.error : "Sorry an error occured, check your internet" }); } } }
Here, we have an async function called registerUser which is tied to a click event in our template and makes an Axios request wrapped in a try/catch block to an endpoint /user/create. This redirects to the /login page and notifies the user of a successful registration. We also have a catch block that alerts the user of any error if the request is not successful. If the registration is successful, you would be redirected to the login page.
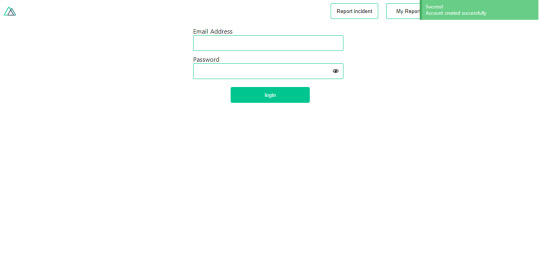
Login page with notification component. (Large preview)
Here, we’re going to make use of auth authentication method this.$auth.loginWith('local', loginData) after which we would use the this.$auth.setUser(userObj) to set the user in our auth instance. To get the login page working, let’s add the following code to our login.vue file.
methods: { async logIn() { let data = this.login; this.loading = true; try { let res = await this.$auth.loginWith("local", { data }); this.loading = false; let user = res.data.data.user; this.$auth.setUser(user); this.$notify({ group: "success", title: "Success!", text: "Welcome!" }); } catch (error) { this.loading = false; this.$notify({ group: "error", title: "Error!", text: error.response ? error.response.data.error : "Sorry an error occured, check your internet" }); } } }
We created an async function called logIn using the auth method this.$auth.loginWith('local, loginData). If this login attempt is successful, we then assign the user data to our auth instance using this.$auth.setUser(userInfo) and redirect the user to the /my-report page. You can now get user data using this.$auth.user or with Vuex using this.$store.state.auth.user but that’s not all. The auth instance contains some other properties which you can see if you log in or check your state using your Vue dev tools. If you log this.$store.state.auth to the console, you’ll see this:
{ "auth": { "user": { "id": "d7a5efdf-0c29-48aa-9255-be818301d602", "email": "[email protected]", "lastName": "Xo", "firstName": "Tm", "othernames": null, "isAdmin": false, "phoneNumber": null, "username": null }, "loggedIn": true, "strategy": "local", "busy": false } }
The auth instance contains a loggedIn property that is useful in switching between authenticated links in the nav/header section of your application. It also contains a strategy method that states the type of strategy the instance is running (e.g local). Now, we will make use of this loggedIn property to arrange our nav links. Update your navBar component to the following:
<template> <header class="header"> <div class="logo"> <nuxt-link to="/"> <Logo /> </nuxt-link> </div> <nav class="nav"> <div class="nav__user" v-if="auth.loggedIn"> <p></p> <button class="nav__link nav__link--long"> <nuxt-link to="/report-incident">Report incident</nuxt-link> </button> <button class="nav__link nav__link--long"> <nuxt-link to="/my-reports">My Reports</nuxt-link> </button> <button class="nav__link" @click.prevent="logOut">Log out</button> </div> <button class="nav__link" v-if="!auth.loggedIn"> <nuxt-link to="/login">Login</nuxt-link> </button> <button class="nav__link" v-if="!auth.loggedIn"> <nuxt-link to="/register">Register</nuxt-link> </button> </nav> </header> </template> <script> import { mapState } from "vuex"; import Logo from "@/components/Logo"; export default { name: "nav-bar", data() { return {}; }, computed: { ...mapState(["auth"]) }, methods: { logOut() { this.$store.dispatch("logOut"); this.$router.push("/login"); } }, components: { Logo } }; </script> <style></style>
In our template section, we have several links to different parts of the application in which we are now using auth.loggedIn to display the appropriate links depending on the authentication status. We have a logout button that has a click event with a logOut() function attached to it. We also display the user’s email gotten from the auth property which is accessed from our Vuex store using the mapState method which maps our state auth to the computed property of the nav component. We also have a logout method that calls our Vuex action logOut and redirects the user to the login page. Now, let us go ahead and update our store to have a logOut action.
export const actions = { // .... logOut() { this.$auth.logout(); } }
The logOut action calls the auth logout method which clears user data, deletes tokens from localStorage and sets loggedIn to false. Routes like /my-reports and report-incident should not be visible to guests but at this point in our app, that is not the case. Nuxt does not have a navigation guard that can protect your routes, but it has is the auth middleware. It gives you the freedom to create your own middleware so you can configure it to work the way you want. It can be set in two ways:
Per route.
Globally for the whole app in your nuxt.config.js file.
router: { middleware: ['auth'] }
This auth middleware works with your auth instance so you do not need to create an auth.js file in your middleware folder. Let us now add this middleware to our my-reports.vue and report-incident.vue files. Add the following lines of code to the script section of each file.
middleware: 'auth'
Now, our application would check if the user trying to access these routes has an auth.loggedIn value of true. It’ll redirect them to the login page using our redirect option in our auth config file — if you’re not logged in and you try to visit either /my-report or report-incident, you would be redirected to /login. If you go to /report-incidents, this is what you should see.
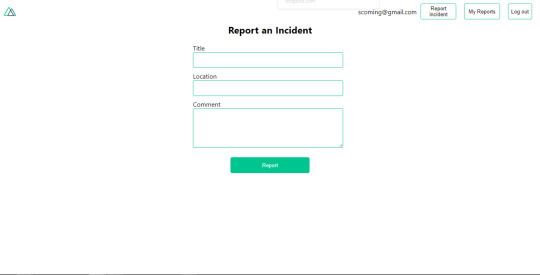
Report incident page. (Large preview)
This page is for adding incidents but that right now the form does not send incident to our server because we are not making the call to the server when the user attempts to submit the form. To solve this, we will add a reportIncident method which will be called when the user clicks on Report. We’ll have this in the script section of the component. This method will send the form data to the server. Update your report-incident.vue file with the following:
<template> <section class="report"> <h1 class="report__heading">Report an Incident</h1> <form class="report__form"> <div class="input__container"> <label for="title" class="input__label">Title</label> <input type="text" name="title" id="title" v-model="incident.title" class="input__field" required /> </div> <div class="input__container"> <label for="location" class="input__label">Location</label> <input type="text" name="location" id="location" v-model="incident.location" required class="input__field" /> </div> <div class="input__container"> <label for="comment" class="input__label">Comment</label> <textarea name="comment" id="comment" v-model="incident.comment" class="input__area" cols="30" rows="10" required ></textarea> </div> <input type="submit" value="Report" class="input__button" @click.prevent="reportIncident" /> <p class="loading__indicator" v-if="loading">Please wait....</p> </form> </section> </template> <script> export default { name: "report-incident", middleware: "auth", data() { return { loading: false, incident: { type: "red-flag", title: "", location: "", comment: "" } }; }, methods: { async reportIncident() { let data = this.incident; let formData = new FormData(); formData.append("title", data.title); formData.append("type", data.type); formData.append("location", data.location); formData.append("comment", data.comment); this.loading = true; try { let res = await this.$store.dispatch("reportIncident", formData); this.$notify({ group: "success", title: "Success", text: "Incident reported successfully!" }); this.loading = false; this.$router.push("/my-reports"); } catch (error) { this.loading = false; this.$notify({ group: "error", title: "Error!", text: error.response ? error.response.data.error : "Sorry an error occured, check your internet" }); } } } }; </script> <style> </style>
Here, we have a form with input fields for title, location, and comment with two-way data binding using v-model. We also have a submit button with a click event. In the script section, we have a reportIncident method that collects all the information provided in the form and is sent to our server using FormData because the API is designed to also accept images and videos. This formData is attached to a Vuex action using the dispatch method, if the request is successful, you get redirected to /my-reports with a notification informing you that this request was successful otherwise, you would be notified of an error with the error message. At this point, we don’t have reportIncident action in our store yet so in your browser console, you would see an error if you try to click submit on this page.

Vuex error message. (Large preview)
To fix this, add the reportIncident action your index.js file.
export const actions = { // ... async reportIncident({}, data) { let res = await this.$axios.post('/incident/create', data) return res; } }
Here, we have a reportIncident function that takes in an empty context object and the data we’re sending from our form. This data is then attached to a post request that creates an incident and returns back to our report-incident.vue file. At this point, you should be able to add a report using the form after which you would be redirected to /my-reports page.
My reports page empty. (Large preview)
This page should display a list of incidents created by the user but right now it only shows what we see above, let’s go ahead to fix that. We’re going to be using the fetch method we learned about to get this list. Update your my-reports.vue file with the following:
<script> import incidentCard from "@/components/incidentCard.vue"; export default { middleware: "auth", name: "my-reports", data() { return { incidents: [] }; }, components: { incidentCard }, async fetch() { let { data } = await this.$axios.get("/user/incidents"); this.incidents = data.data; } }; </script>
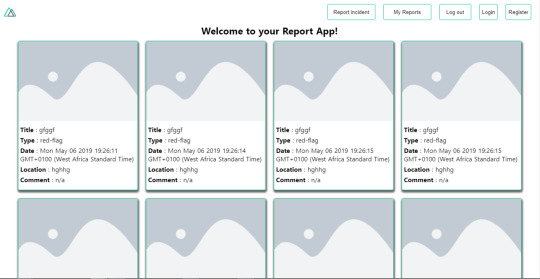
Here, we use fetch method to get user-specific incidents and assign the response to our incidents array. If you refresh your page after adding an incident, you should see something like this.
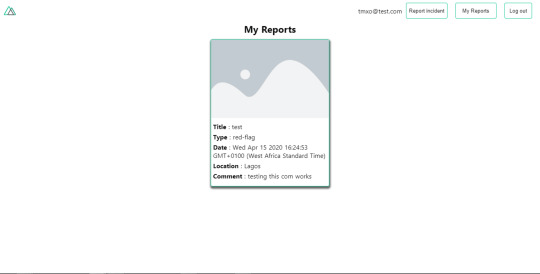
My Reports page with a report. (Large preview)
At this point, we would notice a difference in how fetch method and asyncData loads our data.
Conclusion
So far, we have learned about the Axios module and all of its features. We have also learned more about asyncData, and how we can fetch both of them together despite their differences. We’ve also learned how to perform authentication in our application using the auth module and how to use the auth middleware to protect our routes. Here are some useful resources that talk more about all we’ve covered.
Getting started with meta tags in Nuxjs.
Using the dotenv module in Nuxt.
Using Fetch in your Nuxt app.
Getting started with asyncData.
0 notes
Text
Performance Best Practices: How to Run and Monitor Express.js in Production
What is the most important feature an Express.js application can have? Maybe using sockets for real-time chats or GraphQL instead of REST APIs? Come on, tell me. What’s the most amazing, sexy, and hyped feature you have in your Express.js application?
Want to guess what mine is? Optimal performance with minimal downtime. If your users can't use your application, what's the point of fancy features?
In the past four years, I've learned that performant Express.js applications need to do four things well:
Ensure minimal downtime
Have predictable resource usage
Scale effectively based on load
Increase developer productivity by minimizing time spent on troubleshooting and debugging
In the past, I've talked a lot about how to improve Node.js performance and related key metrics you have to monitor. There are several bad practices in Node.js you should avoid, such as blocking the thread and creating memory leaks, but also how to boost the performance of your application with the cluster module, PM2, Nginx and Redis.
The first step is to go back to basics and build up knowledge about the tool you are using. In our case the tool is JavaScript. Lastly, I'll cover how to add structured logging and using metrics to pinpoint performance issues in Express.js applications like memory leaks.
In a previous article, I explained how to monitor Node.js applications with five different open-source tools. They may not have full-blown features like the Sematext Express.js monitoring integration, Datadog, or New Relic, but keep in mind they’re open-source products and can hold their own just fine.
In this article, I want to cover my experience from the last four years, mainly the best practices you should stick to, but also the bad things you should throw out right away. After reading this article you'll learn what you need to do to make sure you have a performant Express.js application with minimal downtime.
In short, you'll learn about:
My goal for you is to use this to embrace Express.js best practices and a DevOps mindset. You want to have the best possible performance with minimal downtime and ensure high developer productivity. The goal is to solve issues quickly if they occur and trust me, they always do.
Let's go back to basics, and talk a bit about Express.js.
How to Structure Express.js Applications
Having an intuitive file structure will play a huge role in making your life easier. You will have an easier time adding new features as well as refactoring technical debt.
The approach I stick to looks like this:
src/ config/ - configuration files controllers/ - routes with provider functions as callback functions providers/ - business logic for controller routes services/ - common business logic used in the provider functions models/ - database models routes.js - load all routes db.js - load all models app.js - load all of the above test/ unit/ - unit tests integration/ - integration tests server.js - load the app.js file and listen on a port (cluster.js) - load the app.js file and create a cluster that listens on a port test.js - main test file that will run all test cases under the test/ directory
With this setup you can limit the file size to around 100 lines, making code reviews and troubleshooting much less of a nightmare. Have you ever had to review a pull request where every file has more than 500 lines of code? Guess what, it's not fun.
There's a little thing I like to call separation of concerns. You don't want to create clusterfucks of logic in a single file. Separate concerns into their dedicated files. That way you can limit the context switching that happens when reading a single file. It's also very useful when merging to master often because it's much less prone to cause merge conflicts.
To enforce rules like this across your team you can also set up a linter to tell you when you go over a set limit of lines in a file, as well as if a single line is above 100 characters long. One of my favorite settings, by the way.
How to Improve Express.js Performance and Reliability
Express.js has a few well-known best practices you should adhere to. Below are a few I think are the most important.
Set NODE_ENV=production
Here's a quick hint to improve performance. Would you believe that only by setting the NODE_ENV environment variable to production will make your Express.js application three times faster!
In the terminal you can set it with:
export NODE_ENV=production
Or, when running your server.js file you can add like this:
NODE_ENV=production node server.js
Enable Gzip Compression
Moving on, another important setting is to enable Gzip compression. First, install the compression npm package:
npm i compression
Then add this snippet below to your code:
const compression = require('compression') const express = require('express') const app = express() app.use(compression())
If you're using a reverse proxy with Nginx, you can enable it at that level instead. That's covered in the Enabling Gzip Compression with Nginx section a bit further down.
Always Use Asynchronous Functions
The last thing you want to do is to block the thread of execution. Never use synchronous functions! Like, seriously, don't. I mean it.
What you should do instead is use Promises or Async/Await functions. If you by any chance only have access to sync functions you can easily wrap them in an Async function that will execute it outside of the main thread.
(async () => { const foo = () => { ...some sync code return val } async const asyncWrapper = (syncFun) => { const val = syncFun() return val } // the value will be returned outside of the main thread of execution const val = await asyncWrapper(foo) })()
If you really can't avoid using a synchronous function then you can run them on a separate thread. To avoid blocking the main thread and bogging down your CPU you can create child processes or forks to handle CPU intensive tasks.
An example would be that you have a web server that handles incoming requests. To avoid blocking this thread, you can spawn a child process to handle a CPU intensive task. Pretty cool. I explained this in more detail here.
Make Sure To Do Logging Correctly
To unify logs across your Express.js application, instead of using console.log(), you should use a logging agent to structure and collect logs in a central location.
You can use any SaaS log management tool as the central location, like Sematext, Logz.io, Datadog, and many more. Think of it like a bucket where you keep logs so you can search and filter them later, but also get alerted about error logs and exceptions.
I'm part of the integrations team here at Sematext, building open-source agents for Node.js. I put together this tiny open-source Express.js agent to collect logs. It can also collect metrics, but about that a bit further down. The agent is based on Winston and Morgan. It tracks API request traffic with a middleware. This will give you per-route logs and data right away, which is crucial to track performance.
Note: Express.js middleware functions are functions that have access to the request object (req), the response object (res), and the next middleware function in the application’s request-response cycle. The next middleware function is commonly denoted by a variable named next. - from Using middleware, expressjs.com
Here's how to add the logger and the middleware:
const { stLogger, stHttpLoggerMiddleware } = require('sematext-agent-express') // At the top of your routes add the stHttpLoggerMiddleware to send API logs to Sematext const express = require('express') const app = express() app.use(stHttpLoggerMiddleware) // Use the stLogger to send all types of logs directly to Sematext app.get('/api', (req, res, next) => { stLogger.info('An info log.') stLogger.debug('A debug log.') stLogger.warn('A warning log.') stLogger.error('An error log.') res.status(200).send('Hello World.') })
Prior to requiring this agent you need to configure Sematext tokens as environment variables. In the dotenv section below, you will read more about configuring environment variables.
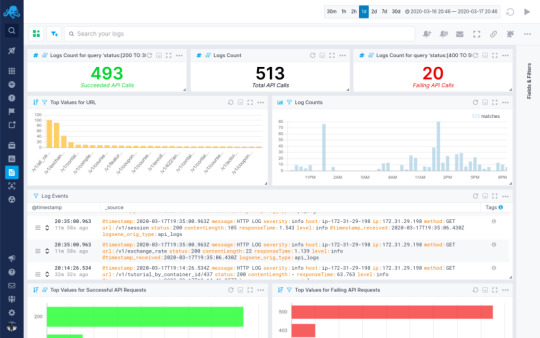
Here's a quick preview of what you can get.
Handle Errors and Exceptions Properly
When using Async/Await in your code, it's a best practice to rely on try-catch statements to handle errors and exceptions, while also using the unified Express logger to send the error log to a central location so you can use it to troubleshoot the issue with a stack trace.
async function foo() { try { const baz = await bar() return baz } catch (err) { stLogger.error('Function \'bar\' threw an exception.', err); } }
It's also a best practice to configure a catch-all error middleware at the bottom of your routes.js file.
function errorHandler(err, req, res, next) { stLogger.error('Catch-All error handler.', err) res.status(err.status || 500).send(err.message) } router.use(errorHandler) module.exports = router
This will catch any error that gets thrown in your controllers. Another last step you can do is to add listeners on the process itself.
process.on('uncaughtException', (err) => { stLogger.error('Uncaught exception', err) throw err }) process.on('unhandledRejection', (err) => { stLogger.error('unhandled rejection', err) })
With these tiny snippets you'll cover all the needed precautions for handling Express errors and log collection. You now have a solid base where you don't have to worry about losing track of errors and logs. From here you can set up alerts in the Sematext Logs UI and get notified through Slack or E-mail, which is configured by default. Don't let your customers tell you your application is broken, know before they do.
Watch Out For Memory Leaks
You can't catch errors before they happen. Some issues don't have root causes in exceptions breaking your application. They are silent and like memory leaks, they creep up on you when you least expect it. I explained how to avoid memory leaks in one of my previous tutorials. What it all boils down to is to preempt any possibility of getting memory leaks.
Noticing memory leaks is easier than you might think. If your process memory keeps growing steadily, while not periodically being reduced by garbage collection, you most likely have a memory leak. Ideally, you’d want to focus on preventing memory leaks rather than troubleshooting and debugging them. If you come across a memory leak in your application, it’s horribly difficult to track down the root cause.
This is why you need to look into metrics about process and heap memory.
Adding a metrics collector to your Express.js application, that will gather and store all key metrics in a central location where you can later slice and dice the data to get to the root cause of when a memory leak happened, and most importantly, why it happened.
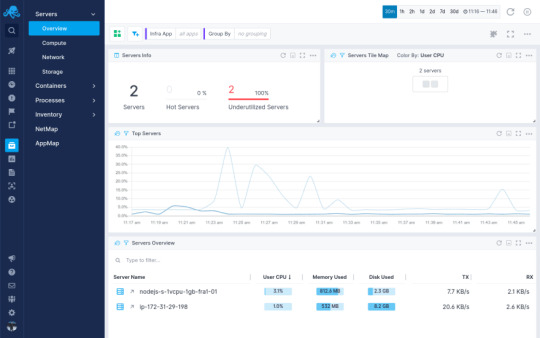
By importing a monitoring agent from the Sematext Agent Express module I mentioned above, you can enable the metric collector to store and visualize all the data in the Sematext Monitoring UI.
Here's the kicker, it's only one line of code. Add this snippet in your app.js file.
const { stMonitor, stLogger, stHttpLoggerMiddleware } = require('sematext-agent-express') stMonitor.start() // run the .start method on the stMonitor // At the top of your routes add the stHttpLoggerMiddleware to send API logs to Sematext const express = require('express') const app = express() app.use(stHttpLoggerMiddleware) ...
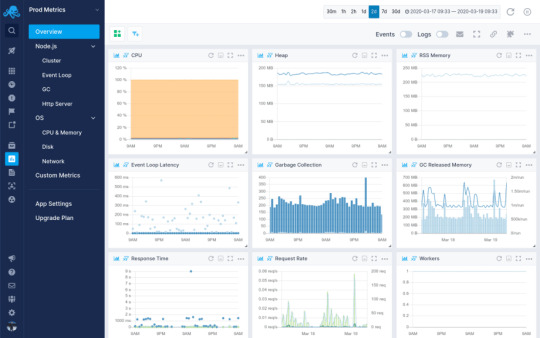
With this you'll get access to several dashboards giving you key insight into everything going on with your Express.js application. You can filter and group the data to visualize processes, memory, CPU usage and HTTP requests and responses. But, what you should do right away is configure alerts to notify you when the process memory starts growing steadily without any increase in the request rate.
Moving on from Express.js-specific hints and best practices, let's talk a bit about JavaScript and how to use the language itself in a more optimized and solid way.
How to Set Up Your JavaScript Environment
JavaScript is neither object-oriented or functional. Rather, it's a bit of both. I'm quite biased towards using as many functional paradigms in my code as possible. However, one surpasses all others. Using pure functions.
Pure Functions
As the name suggests, pure functions are functions that do not mutate the outer state. They take parameters, do something with them, and return a value.
Every single time you run them they will behave the same and return a value. This concept of throwing away state mutations and only relying on pure functions is something that has simplified my life to an enormous extent.
Instead of using var or let only use const, and rely on pure functions to create new objects instead of mutating existing objects. This ties into using higher-order functions in JavaScript, like .map(), .reduce(), .filter(), and many more.
How to practice writing functional code? Throw out every variable declaration except for const. Now try writing a controller.
Object Parameters
JavaScript is a weakly typed language, and it can show its ugly head when dealing with function arguments. A function call can be passed one, none, or as many parameters as you want, even though the function declaration has a fixed number of arguments defined. What's even worse is that the order of the parameters are fixed and there is no way to enforce their names so you know what is getting passed along.
It's absolute lunacy! All of it, freaking crazy! Why is there no way to enforce this? But, you can solve it somewhat by using objects as function parameters.
const foo = ({ param1, param2, param3 }) => { if (!(param1 && param2 && param3)) { throw Error('Invalid parameters in function: foo.') } const sum = param1 + param2 + param3 return sum } foo({ param1: 5, param2: 345, param3: 98 }) foo({ param2: 45, param3: 57, param1: 81 }) // <== the same
All of these function calls will work identically. You can enforce the names of the parameters and you're not bound by order, making it much easier to manage.
Freaking write tests, seriously!
Do you know what's the best way to document your code, keep track of features and dependencies, increase community awareness, gain contributors, increase performance, increase developer productivity, have a nicer life, attract investors, raise a seed round, make millions selling your startup!?.... wait that got out of hand.
Yes, you guessed it, writing tests is the answer.
Let's get back on track. Write tests based on the features you want to build. Then write the feature. You will have a clear picture of what you want to build. During this process you will automatically start thinking about all the edge cases you would usually never consider.
Trust me, TDD works.
How to get started? Use something simple like Mocha and Chai. Mocha is a testing framework, while Chai is an assertion library.
Install the npm packages with:
npm i mocha chai
Let's test the foo function from above. In your main test.js file add this snippet of code:
const chai = require('chai') const expect = chai.expect const foo = require('./src/foo') describe('foo', function () { it('should be a function', function () { expect(foo).to.be.a('function') }) it('should take one parameter', function () { expect( foo.bind(null, { param1: 5, param2: 345, param3: 98 })) .to.not.throw(Error) }) it('should throw error if the parameter is missing', function () { expect(foo.bind(null, {})).to.throw(Error) }) it('should throw error if the parameter does not have 3 values', function () { expect(foo.bind(null, { param1: 4, param2: 1 })).to.throw(Error) }) it('should return the sum of three values', function () { expect(foo({ param1: 1, param2: 2, param3: 3 })).to.equal(6) }) })
Add this to your scripts section in the package.json:
"scripts": { "test": "mocha" }
Now you can run the tests by running a single command in your terminal:
npm test
The output will be:
> [email protected] test /path/to/your/expressjs/project > mocha foo ✓ should be a function ✓ should take one parameter ✓ should throw error if the parameter is missing ✓ should throw error if the parameter does not have 3 values ✓ should return the sum of three values 5 passing (6ms)
Writing tests gives you a feeling of clarity. And it feels freaking awesome! I feel better already.
With this out of my system I'm ready for DevOps topics. Let's move on to some automation and configuration.
Apart from the things you can do in the code, like you saw above, some things need to be configured in your environment and server setup. Starting from the basics, you need an easy way to manage environment variables, you also need to make sure your Express.js application restarts automatically in case it crashes.
You also want to configure a reverse proxy and load balancer to expose your application, cache requests, and load balance traffic across multiple worker processes. The most important step in maintaining high performance is to add a metrics collector so you can visualize data across time and troubleshoot issues whenever they occur.
Managing Environment Variables in Node.js with dotenv
Dotenv is an npm module that lets you load environment variables easily into any Node.js application by using a file.
In the root of your project create a .env file. Here you'll add any environment variables you need.
NODE_ENV=production DEBUG=false LOGS_TOKEN=xxx-yyy-zzz MONITORING_TOKEN=xxx-yyy-zzz INFRA_TOKEN=xxx-yyy-zzz ...
Loading this file is super simple. In your app.js file require dotenv at the top before anything else.
// dotenv at the top require('dotenv').config() // require any agents const { stLogger, stHttpLoggerMiddleware } = require('sematext-agent-express') // require express and instantiate the app const express = require('express') const app = express() app.use(stHttpLoggerMiddleware) ...
Dotenv will load a file named .env by default. If you want to have multiple dotenv files, here's how you can configure them.
Make Sure the Application Restarts Automatically With Systemd or PM2
JavaScript is a scripting language, obviously, the name says so. What does this mean? When you start your server.js file by running node server.js it will run the script as a process. However, if it fails, the process exits and there's nothing telling it to restart.
Here's where using Systemd or PM2 comes into play. Either one works fine, but the Node.js maintainers urge us to use Systemd.
Ensure Application Restarts with Systemd
In short, Systemd is part of the building blocks of Linux operating systems. It runs and manages system processes. What you want is to run your Node.js process as a system service so it can recover from crashes.
Here's how you do it. On your VM or server, create a new file under /lib/systemd/system/ called app.service.
# /lib/systemd/system/fooapp.service [Unit] Description=Node.js as a system service. Documentation=https://example.com After=network.target [Service] Type=simple User=ubuntu ExecStart=/usr/bin/node /path/to/your/express/project/server.js Restart=on-failure [Install] WantedBy=multi-user.target
The two important lines in this file are ExecStart and Restart. The ExecStart says that the /usr/bin/node binary will start your server.js file. Make sure to add an absolute path to your server.js file. The Restart=on-failure makes sure to restart the application if it crashes. Exactly what you're looking for.
Once you save the fooapp.service file, reload your daemon and start the script.
systemctl daemon-reload systemctl start fooapp systemctl enable fooapp systemctl status fooapp
The status command will show you the application is running as a system service. The enable command makes sure it starts on boot. That was easier than you thought, am I right?
Ensure Application Restarts with PM2
PM2 has been around for a few years. They utilize a custom-built script that manages and runs your server.js file. It is simpler to set up, but comes with the overhead of having another Node.js process that acts as a Master process, like a manager, for your Express.js application processes.
First you need to install PM2:
npm i -g pm2
Then you start your application by running this command in the root directory of your Express.js project:
pm2 start server.js -i max
The -i max flag will make sure to start the application in cluster-mode, spawning as many workers as there are CPU cores on the server.
Mentioning cluster-mode is the perfect segue into the next section about load balancing and reverse proxies and caching.
Enable Load Balancing and Reverse Proxies
Load balancing can be done with both the Node.js cluster module or with Nginx. I'll show you my preferred setup, which is also what the peeps over at Node.js think is the right way to go.
Load Balancing with the Cluster Module
The built-in cluster module in Node.js lets you spawn worker processes that will serve your application. It's based on the child_process implementation and, luckily for us, is very easy to set up if you have a basic Express.js application.
You only really need to add one more file. Create a file called cluster.js and paste this snippet of code into it:
const cluster = require('cluster') const numCPUs = require('os').cpus().length const app = require('./src/app') const port = process.env.PORT || 3000 const masterProcess = () => Array.from(Array(numCPUs)).map(cluster.fork) const childProcess = () => app.listen(port) if (cluster.isMaster) { masterProcess() } else { childProcess() } cluster.on('exit', () => cluster.fork())
Let's break down what's happening here. When you start the cluster.js file with node cluster.js the cluster module will detect that it is running as a master process. In that case it invokes the masterProcess() function. The masterProcess() function counts how many CPU cores the server has and invokes the cluster.fork() function that many times. Once the cluster.fork() function is invoked the cluster module will detect it is running as a child process and invoke the childProcess() function, which then tells the Express.js server to .listen() on a port. All these processes are running on the same port. It's possible due to something called an IPC connection. Read more about that here.
The cluster.on('exit') event listener will restart a worker process if it fails.
With this setup you can now edit the ExecStart field in the fooapp.service Systemd service file to run the cluster.js file instead.
Replace:
ExecStart=/usr/bin/node /path/to/your/express/project/server.js
With:
ExecStart=/usr/bin/node /path/to/your/express/project/cluster.js
Reload the Systemd daemon and restart the fooapp.service:
systemctl daemon-reload systemctl restart fooapp
There you have it. You've added load balancing to your Express.js application. Now it will scale across all the CPUs on your server.
However, this will only work for a single-server setup. If you want to have multiple servers, you need Nginx.
Adding a Reverse Proxy with Nginx
One of the primal laws of running Node.js applications is to never expose them on port 80 or 443. You should always use a reverse proxy to direct traffic to your application. Nginx is the most common tool you use with Node.js to achieve this. It's a web server that can act as both a reverse proxy and load balancer.
Installing Nginx is rather straightforward, for Ubuntu it would look like this:
apt update apt install nginx
Make sure to check the Nginx installation instructions if you're using another operating system.
Nginx should start right away, but just in case make sure to check:
systemctl status nginx [Output] nginx.service - A high performance web server and a reverse proxy server Loaded: loaded (/lib/systemd/system/nginx.service; enabled; vendor preset: enabled) Active: active (running) since Fri 2018-04-20 16:08:19 UTC; 3 days ago Docs: man:nginx(8) Main PID: 2369 (nginx) Tasks: 2 (limit: 1153) CGroup: /system.slice/nginx.service ├─2369 nginx: master process /usr/sbin/nginx -g daemon on; master_process on; └─2380 nginx: worker process
If it is not started, go ahead and run this command to start it.
systemctl start nginx
Once you have Nginx running, you need to edit the configuration to enable a reverse proxy. You can find the Nginx configuration file in the /etc/nginx/ directory. The main configuration file is called nginx.conf, while there are additional snippets in the etc/nginx/sites-available/ directory. The default server configuration is found here and is named default.
To just enable a reverse proxy, open up the default configuration file and edit it so it looks like this:
server { listen 80; location / { proxy_pass http://localhost:3000; # change the port if needed } }
Save the file and restart the Nginx service.
systemctl restart nginx
This configuration will route all traffic hitting port 80 to your Express.js application.
Load Balancing with Nginx
If you want to take it a step further, and enable load balancing, here's how to do it.
Now, edit the main nginx.conf file:
http { upstream fooapp { server localhost:3000; server domain2; server domain3; ... } ... }
Adding this upstream section will create a server group that will load balance traffic across all the servers you specify.
You also need to edit the default configuration file to point the reverse proxy to this upstream.
server { listen 80; location / { proxy_pass http://fooapp; } }
Save the files and restart the Nginx service once again.
systemctl restart nginx
Enabling Caching with Nginx
Caching is important to reduce response times for API endpoints, and resources that don't change very often.
Once again edit the nginx.conf file, and add this line:
http { proxy_cache_path /data/nginx/cache levels=1:2 keys_zone=STATIC:10m inactive=24h max_size=1g; ... }
Open up the default configuration file again. Add these lines of code as well:
server { listen 80; location / { proxy_pass http://fooapp; proxy_set_header Host $host; proxy_buffering on; proxy_cache STATIC; proxy_cache_valid 200 1d; proxy_cache_use_stale error timeout invalid_header updating http_500 http_502 http_503 http_504; } }
Save both files and restart the Nginx service once again.
Enabling Gzip Compression with Nginx
To improve performance even more, go ahead and enable Gzip. In the server block of your Nginx configuration file add these lines:
server { gzip on; gzip_types text/plain application/xml; gzip_proxied no-cache no-store private expired auth; gzip_min_length 1000; ... }
If you want to check out more configuration options about Gzip compression in Nginx, check this out.
Enabling Caching with Redis
Redis in an in-memory data store, which is often used as a cache.
Installing it on Ubuntu is rather simple:
apt update apt install redis-server
This will download and install Redis and its dependencies. There is one important configuration change to make in the Redis configuration file that was generated during the installation.
Open up the /etc/redis/redis.conf file. You have to change one line from:
supervised no
To:
supervised systemd
That’s the only change you need to make to the Redis configuration file at this point, so save and close it when you are finished. Then, restart the Redis service to reflect the changes you made to the configuration file:
systemctl restart redis systemctl status redis [Output] ● redis-server.service - Advanced key-value store Loaded: loaded (/lib/systemd/system/redis-server.service; enabled; vendor preset: enabled) Active: active (running) since Wed 2018-06-27 18:48:52 UTC; 12s ago Docs: http://redis.io/documentation, man:redis-server(1) Process: 2421 ExecStop=/bin/kill -s TERM $MAINPID (code=exited, status=0/SUCCESS) Process: 2424 ExecStart=/usr/bin/redis-server /etc/redis/redis.conf (code=exited, status=0/SUCCESS) Main PID: 2445 (redis-server) Tasks: 4 (limit: 4704) CGroup: /system.slice/redis-server.service └─2445 /usr/bin/redis-server 127.0.0.1:6379
Next you install the redis npm module to access Redis from your application.
npm i redis
Now you can require it in your application and start caching request responses. Let me show you an example:
const express = require('express') const app = express() const redis = require('redis') const redisClient = redis.createClient(6379) async function getSomethingFromDatabase (req, res, next) { try { const { id } = req.params; const data = await database.query() // Set data to Redis redisClient.setex(id, 3600, JSON.stringify(data)) res.status(200).send(data) } catch (err) { console.error(err) res.status(500) } } function cache (req, res, next) { const { id } = req.params redisClient.get(id, (err, data) => { if (err) { return res.status(500).send(err) } // If data exists return the cached value if (data != null) { return res.status(200).send(data) } // If data does not exist, proceed to the getSomethingFromDatabase function next() }) } app.get('/data/:id', cache, getSomethingFromDatabase) app.listen(3000, () => console.log(`Server running on Port ${port}`))
This piece of code will cache the response from the database as a JSON string in the Redis cache for 3600 seconds. You can change this based on your own needs.
With this, you've configured key settings to improve performance. But, you've also introduced additional possible points of failure. What if Nginx crashes or Redis overloads your disk space? How do you troubleshoot that?
Enable VM/Server-Wide Monitoring and Logging
Ideally, you'd configure an Infrastructure Agent on your VM or server to gather metrics and logs and send them to a central location. That way you can keep track of all infrastructure metrics like CPU, memory, disk usage, processes, etc.
This way you can keep an eye on your whole infrastructure, including CPU, memory and disk usage, as well as all the separate processes while running your application in cluster-mode.
But, we do need to know what's going on with Nginx first. You can configure the stub_status to show Nginx metrics, but that doesn't really give you any actionable insight. But, you can install an Nginx Integration and get insight into Nginx metrics alongside your Express.js Integration in Sematext Cloud.
Why is monitoring Nginx important? Nginx is the entry point to your application. If it fails, your whole application fails. Your Node.js instance can be fine, but Nginx stops responding and your website goes down. You'll have no clue it's down because the Express.js application is still running without any issues.
You have to keep an eye on all the points of failure in your system. That's why having proper alerting in place is so crucial. If you want to learn more about alerting you can read this.
Same goes for Redis. To keep an eye on it, check out ways to monitor Redis, here or here.
That wraps up the DevOps tools and best practices you should stick to. What a ride that was! If you want to delve deeper into learning about DevOps and tooling, check out this guide my co-worker wrote.
Wrapping Up
It took me the better part of four years to start using proper tooling and adhering to best practices. In the end, I just want to point out the most important part of your application is to be available and performant. Otherwise, you won't see any users stick around. If they can't use your application, what's the point?
The idea behind this article was to cover best practices you should stick to, but also the bad practices to stay away from.
You've learned many new things in this Express.js tutorial. From optimizing Express.js itself, creating an intuitive project structure and optimizing for performance to learning about JavaScript best practices and test-driven development. You've also learned about error handling, logging and monitoring.
After all this, you can say with certainty that you've had an introduction to DevOps culture. What does that mean? Well, making sure to write reliable and performant software with test coverage, while maintaining the best possible developer productivity. That's how we as engineers continue loving our job. Otherwise, it's all mayhem.
Hope you all enjoyed reading this as much as I enjoyed writing it. If you liked it, feel free to hit the share button so more people will see this tutorial. Until next time, be curious and have fun.
via freeCodeCamp.org https://ift.tt/2y98uzT
0 notes
Photo

10 Must-have VS Code Extensions for JavaScript Developers
In this article, I’ll focus on a list of must-have VS Code extensions for JavaScript developers.
Visual Studio Code (VS Code) is undoubtedly the most popular, lightweight code editor today. It does borrow heavily from other popular code editors, mostly Sublime Text and Atom. However, its success mainly comes from its ability to provide better performance and stability. In addition, it also provides much-needed features like IntelliSense, which were only available in full-sized IDEs like Eclipse or Visual Studio 2017.
The power of VS Code no doubt comes from the marketplace. Thanks to the wonderful open-source community, the editor is now capable of supporting almost every programming language, framework and development technology. Support for a library or framework comes in various ways, which mainly includes snippets, syntax highlighting, Emmet and IntelliSense features for that specific technology.
VS Code Extensions by Category
For this article, I’ll focus on VS Code extensions specifically targeting JavaScript developers. Currently, there are many VS Code extensions that fit this criterion, which of course means I won’t be able to mention all of them. Instead, I’ll highlight VS Code extensions that have gained popularity and those that are indispensable for JavaScript developers. For simplicity, I’ll group them into ten specific categories.
Snippet Extensions
When you first install VS Code, it comes with a several built-in snippets for JavaScript and Typescript. Snippets help you write repetitive code quickly. However, you may find these may not be enough. You can easily create your own, or you can simply install an extension that includes a bunch of new useful snippets. A quick tip if you want snippets to show on top of suggestions is to use this configuration:
{ "editor.snippetSuggestions": "top" }
Here are some of the most popular snippet extensions for JavaScript developers. However, I would recommend you install just one for simplicity’s sake.
JavaScript (ES6) code snippets, by Charalampos Karypidis. This is currently the most popular javaScript snippet extension with over 3+ million installs to date. This extension provides ES6 syntax for JavaScript, TypeScript, HTML, React and Vue. All snippets include a final semicolon.
JavaScript (ES6) code snippets in StandardJS style, by James Vickery. This is basically a fork of the above extension for those who prefer StandardJS style convention—that is, the snippets don’t have semicolons.
JavaScript standardjs styled snippets, by capaj. Another StandardJS Styled snippets but this one is more popular with over 72k installs. Originally forked from Atom StandardJS snippets. Contains a huge collection of handy snippets and supports JavaScript, TypeScript and React.
JavaScript Snippets, by Nathan Chapman. A collection of JavaScript snippets with about 33k+ installs to date. This snippet extension supports Node.js, BDD Testing frameworks such as Mocha and Jasmine.
Atom JavaScript Snippet, by Saran Tanpituckpong. With about 26k+ installs to date, the snippets in this extension were ported from atom/language-javascript. JavaScript snippets ported from the atom/language-javascript extension.
Syntax Highlighting Extensions
The latest version of VS Code supports better syntax colorization and is now more in line with the standards set in Atom grammar. Hence, extensions such as JavaScript Atom Grammar are no longer needed.
However, we still have a few syntax highlighting extensions that are quite useful when it comes to certain types of projects and file extensions. Here’s a few:
Babel JavaScript, by Michael McDermott. With over 550k+ installs to date, this extension provides syntax highlighting for ES201x JavaScript, React, FlowType and GraphQL code.
DotENV, by 833,737. With over 833k installs to date, this extension supports syntax highlighting for environment settings — that is, .env files.
Bracket Pair Colorizer 2, by CoenraadS. With 730k+ installs, this extension highlights matching brackets with different colors, helping you identify which bracket belongs to which block.
Linter Extensions
Have you have ever gotten into a debate with your teammates over tabs vs spaces or semicolons vs no semicolons? You’ll realize that people have strong opinions about which coding style to use. Nevertheless, everyone on the same team needs to use the same coding style regardless of their opinion.
However, it’s quite common for programmers to forget which coding styling they agreed to work with. To enforce the rules, we need to use linters that compare your code with the rules you’ve established. You define your rules by picking a popular coding style such as Standard, Google, and Airbnb. You can use them as is or use a configuration file to customize the rules. VS Code doesn’t have a built-in JavaScript linter, so you’ll need to install an extension.
Here are the extensions we have available:
ESLint, by Dirk Baeumer. With over 8 million installs, this is the most popular extension providing support for the ESLint library. In order for the extension to work, your project will need ESLint packages and plugins installed. You’ll also need to specify an .eslintrc, which will specify the rules the extension will use to lint your code .
JSHint, by Dirk Baeumer. With 1.2M+ installs, this extension supports linting with the JSHint library. A .jshintrc configuration file is required for the extension to lint your code.
StandardJS – JavaScript Standard Style, by Sam Chen. This extension (259k+ installs) simply integrates JavaScript Standard Style into VS Code. You’ll need to install standard or semiStandard as a dev dependency in your project. No configuration file is required. You’ll need to disable VS Code’s built-in validator for this extension to work.
JSLint, by Andrew Hyndman. This extension provides linting with the JSLint library. You’ll need to install jslint locally or globally for the extension to work. It has 109k+ installs to date.
If you’d like an overview of available linters and their pros and cons, check out our comparison of JavaScript linting tools.
Node Package Management Extensions
Every JavaScript project needs to at least one npm package, unless you’re someone who likes doing things the hard way. Here are a few VS Code extensions that will help you work with managing and working with npm packages more easily.
npm, by egamma. With over 2.3M+ installs, this extension uses package.json to validate installed packages. If anything is missing or versions are mismatched, the extension will provide you with clickable options to fix the issue. In addition, you can also run npm scripts defined in package.json right inside the editor.
–npm IntelliSense, by Christian Kohler. With 1.9M+ installs, this extension provides autocompleting npm modules in import statements.

Path IntelliSense, by Christian Kohler. With 2.7M+ installs, this extension autocompletes filenames. It also works inside HTML and CSS files.
Node exec, by Miramac. With 168k+ installs, this extension allows you to execute the current file or your selected code with Node.js by pressing F8 on your keyboard. You can also cancel a running process by pressing F9.
View Node Package by Dominik Kundel. With 55k+ installs, this extension allows you to quickly view a Node package source and documentation while you’re working with your code.
Node Readme, by bengreenier. With 52k+ installs, this extension allows you to quickly open an npm package documentation right inside the VS Code editor as a separate tab.
Search node_modules, by Jason Nutter. By default, the node_modules folder is excluded from VS Code’s built-in search. With over 470k installs, this extension allows you to quickly navigate and open files in node_modules by traversing the folder tree.

Source: vscode-search-node-modules
Import Cost by Wix. This displays how much disk space a package is using when you import it. The extension has 562K+ installs.

Source: import-cost
Formatting Extensions
More often than not, we sometimes write code that’s out of alignment with the rest of the code. To fix this, we need to go back and fix the indentation in each line. In addition, we need to ensure braces and tags are properly formatted in a readable format. This process can quickly get tedious.
Luckily, we have extensions that can do the work for us. Please note extensions such as Prettier and Beautify can’t both be active simultaneously.
Prettier Code Formatter, by Esben Petersen. This is the most popular extension that supports formatting of JavaScript, TypeScript and CSS using Prettier. It has over 5.7 million installs to date. It’s recommended you install prettier locally as a dev dependency.
Beautify, by HookyQR. A jsBeautifier extension that supports JavaScript, JSON, CSS and HTML. It can be customized via a .jsbeautifyrc file. It’s now the second most popular formatter, with 4.4 million installs to date.
JS Refactor, by Chris Stead. This provides a number of utilities and actions for refactoring JavaScript code, such as extracting variables/methods, converting existing code to use arrow functions or template literals, and exporting functions. It has 140k+ installs to date.
JavaScript Booster, by Stephan Burguchev. This is an amazing code refactoring tool. It features several coding actions such as converting var to const or let, removing redundant else statements, and merging declaration and initialization. Largely inspired by WebStorm, it has 74k+ installs to date.

Source: vscode-javascript-booster
Continue reading 10 Must-have VS Code Extensions for JavaScript Developers on SitePoint.
by Michael Wanyoike via SitePoint https://ift.tt/2VvpsSb
0 notes
Link
Lightning Web Components is our open source UI framework to build enterprise-scale apps that run on Salesforce, Heroku, Google Cloud Platform, or anywhere else. When running these apps on these different platforms, you can choose your own backend stack and data source, or you may want surface data from Salesforce in them. In this blog post, we will explore some options and considerations when using Salesforce as the data source. Authentication Salesforce provides a comprehensive set of REST and SOAP APIs that can be used to access its data and services from a client or server. The first step before accessing the APIs, is to establish a session with Salesforce. You can either use a username and password, or any of the OAuth flows listed here. Depending on your use case, these flows can be executed by client-side or server-side JavaScript. You can either build this logic from scratch or use external libraries like JSforce. Here are some considerations when deciding on an Authentication Flow for your app. Client Side Authentication You can use the OAuth User-Agent Flow to execute the handshake process using client side JavaScript alone. It involves a simple redirection to the /oauth2/authorize endpoint and takes in the Consumer Key of a Connected App as a parameter. Once the authorization is successful, the access token is encoded in the redirection URL. When you run client-side JavaScript, all the code is executed on the user’s device, so sensitive data like passwords and client secrets are accessible and exploitable. For this reason, this flow doesn’t use the client secret. However, the access token is encoded into the redirection URL which is exposed to the user and other apps on the device. Hence, care must be taken to remove callbacks from browser history. You can call window.location.replace(); to remove the callback from the browser’s history. It is best to use this type of Auth flow when building Lightning Web Components for desktop or mobile apps that have an embedded browser. Once you have the access token, you can pass it in the header of any HTTP requests to access Salesforce APIs. Building and sending a request from client-side JavaScript poses a risk, because the access token becomes available to the client and can be exploited. Therefore, sensitive business logic involving access tokens, usernames and passwords must never be written in client side JavaScript, because they are inadvertently exposed. To increase security and provide a better level of abstraction between your custom application and the APIs, you should use a middleware like Express, MuleSoft or any other ESB of your choice. Server Side Authentication You can use the Web server flow or the JWT Bearer flow to execute the handshake process using server side JavaScript like Node JS or any other stack of your choice. In case of Lightning Web Components, the create-lwc-app tool provides an option to create and use an Express server as a backend. You can choose an OAuth flow that suits your requirements. For instance, you can use the JWT Bearer flow when you want to use a single integration user to access data on behalf of all users. Use cases include showing read-only data (e.g. product catalog) to unauthenticated users. The web-server flow on the other hand can be used for per-user authorization. Use cases include websites where data relevant to the logged in user is shown (e.g. cart, order history etc.). You can also refer to this Trailhead Module that talks in detail about the use cases for different OAuth flows. When running authentication flows on a server, it is expected that the server protects and securely stores all the secrets. In the case of Web Server flow, the client secret that prevents a spoofing server must be stored securely. In the case of JWT Bearer flow, an X509 Certificate that corresponds to the private key of the app must be created and stored in a keystore. These secrets and certificate aliases also have to be configurable (generally using Environment Variables) and should never be hardcoded into your codebase. This also allows you to change them without rebuilding the app and to deploy instances of your app in different environments with ease. When developing locally, for example with Node.js, these are stored in a .env file, which can then be accessed in your code by using libraries like dotenv, saving you the trouble of setting them manually every time. You should exclude sensitive configuration files like .env from version control by referencing them in specific files like .gitignore for git. Data Residency Securing access to Salesforce data doesn’t stop with authentication. Data must be stored and transmitted securely as well. Data on the Salesforce Platform is secured with its core security capabilities like Sharing Model, Object and Field Level Security and optionally Salesforce Shield for encryption and high compliance. Using Salesforce APIs allows you real time access to data without making a copy of it. The data returned by the API is bound by the permissions of the user accessing the API. Depending on your use case, you might want to replicate Salesforce data into a local/managed database. Since you can deploy Lightning Web Components Open Source (LWC OSS) apps on any platform, there are different options that each platform provides for data storage and replication. For example, Heroku Connect is an add-on by Heroku that provides a data synchronization service between Salesforce and Heroku Postgres databases. Add-Ons/Connectors like these are built to securely store tokens, and establish a session with Salesforce when needed. It is important to remember that once data is replicated locally, it is not bound by the same Sharing Model that is present in Salesforce. It is therefore necessary to implement your own access control mechanism. Also, never write the logic that queries for data or filters data based on access controls on the client side, because it can be easily tampered with. In the screenshot below, an if condition is being used by the component to only show the data relevant to the logged in user. This statement can be easily removed using browser tools which would then give the logged in user access to all the data that is being returned by the server. As a best practice, you should always use a middleware to abstract sensitive logic from the client-side and make sure that the middleware returns only the data that’s relevant to the user and nothing more. Summary In this blog post, you’ve learned about different approaches to authenticate to Salesforce from an app built with LWC OSS and what factors determine the approach you take. You’ve seen drawbacks of accessing data from the client side, and how a server can help you secure your implementation. You’ve also seen how the responsibility of data security varies with choice of data residency. However, it is also important to note that this blog post doesn’t exhaustively list all of the options available for secure Salesforce data access, but instead provides general indication patterns and principles that are used. Now it’s time to get hands-on! Below are a few resources to help you get started. Sample Code Lightning Web Components OSS foundation and documentation Trailhead Project: Access Salesforce Data with Lightning Web Components Open Source Trailhead Module: Connected App Basics About the Author Aditya Naag Topalli is a 13x Certified Senior Developer Evangelist at Salesforce. He focuses on Lightning Web Components, Einstein Platform Services, and integrations. He writes technical content and speaks frequently at webinars and conferences around the world. Follow him on Twitter @adityanaag.
0 notes
Text
Production Ready with Node.js Training

Hello there, and Happy 2020!
At RisingStack, besides working on consulting and outsourced development projects, we're actively training engineering teams as well, ranging in size from 5 to 25 ppl at a time.
You might already know that we have 2-days-long training agendas for
Node.js
React
Kubernetes
Microservices
These training opportunities are regularly popping up in major European cities, and are also available for companies who'd like to train their engineers on-site, wherever that may be.
In December we prepared a new, 5-days-long training agenda for engineering teams who'd like to dive deep into React and Node, but have little to none experience with these technologies.
Below you can read the full training agenda for the Node training, and you can also check out the 5-days-long React Training Agenda in another blogpost.
In case you have any questions about our training agendas, or if you'd like to invite us, reach out to me at [email protected], or use the contact form on our training page.
I'll get back to you within 24 hrs.
This Node.js training is for developers who:
Want to learn how to bootstrap and design scalable software solutions.
Want to create and develop production ready Node.js applications.
Want to create complex and maintainable web APIs.
The goal of the training is to
teach JavaScript and Node.js fundamentals.
teach how to bootstrap and design scalable software solutions with Node.
teach how to create complex and maintainable web APIs.
teach modern application development best-practices & methods.
teach relevant production-ready techniques like testing, debugging, logging and monitoring with the most efficient tools.
Prerequisites
No previous JavaScript knowledge is required - we will cover everything you need to get started.
Basic programming knowledge is needed, but any experience with PHP, .NET or Java is sufficient.
Other info
This training schedule is delivered throughout 5 days.
The training relies heavily on hands-on exercises. During the training, we're building a social networking site.
Full Node.js Training Agenda
Modern JavaScript Basics
Node.js Basics
Setting Up a Project
The npm module system
API Design
Networking
Database Handling
Queues and Workers
Authentication
Testing
Getting ready for production
Debugging
Performance tuning Node.js applications
Memory profiling Node.js applications
1. Modern JavaScript Basics
The training starts with learning the main concepts of modern JavaScript and ES features.
JavaScript runtimes
Async programming basics
The advantage of promises and async-await over callbacks
Understanding functions, context and binding in JavaScript
Arrow functions and their relation to this
ES6 and beyond
2. Node.js Basics
You will learn the basics of Node.js and when to use it. We will cover async programming patterns, events, streams, and the Node.js process model for concurrent programming. We will also cover the most important Node.js modules.
The strange way Node.js handles streams, and why they are important
Understanding the most important built-in modules:
http
fs
events
child_process
cluster
3. Setting Up a Project
We’ll layout the standard project used in Node.js projects, and the role of index.js files discuss the role of environmental variables and how to manage them with dotenv. We’ll also discuss the 12-factor app principles to make sure everyone is on the same page regarding modern web development best practices.
12-factor app: commandments of modern web development
Handling configuration with environment variables in Node.js
Standard project structure
The power and caveats of using index.js files
4. The npm module system
We will cover how to use npm and npm scripts and how to set up a basic project. We’ll also take a look at the npm registry and the module system’s relation to how the require function works, and what to expect from .mjs modules.
Understanding npm:
cli
scripts
package.json
The difference between common.js and mjs modules
The difference between import statements and the require function
5. API Design
You will learn how the main differences between the most used routing libraries: express, koa, fastify, and the built-in http module. Using the most relevant for the group, we’ll also learn how to design an API skeleton, which can be filled with logic later.
API design
Too many choices, why and how to choose between built-in http, express, koa, and restify
Creating an API skeleton with the most relevant package
6. Networking
You will learn how to fetch data from other APIs using the built-in http module and the most used library simply called “request” through the OpenStreetMap project.
Using external APIs: our first real-life asynchronous use-case
Using built-in http and the industry-standard request package
7. Database Handling
You will learn how to set up and connect to an SQL database or MongoDB. After that, we will design our model abstractions on top of the database and connect them with our API. We’ll also discuss the pitfalls of the most commonly used JavaScript ORM called sequelize, and the features of the most common query builder: knex.
Handling data models in Node.js for SQL and / or MongoDB
Using the most common modules for SQL: sequelize and knex
Using the most common modules for MongoDB: the mongo driver and mongoose
8. Queues and Workers
We will create a worker process and learn how to connect it to the API with messaging queues. After that, we will learn how to create jobs and how to schedule them.
Handling long-running tasks in Node.js: worker processes
Interfacing with messaging queues
The many ways and pitfalls of writing scheduled jobs
9. Authentication
You will learn how to create and manage sessions with Redis and how to use JWT tokens.
Session handling: understanding Passport.js
Using Redis for session storage
Getting rid of external DBs: using JWT tokens in Node.js
10. Testing
We will cover unit testing and mocking with mocha, chai, and sinon and compare it to jest. After that, we will write end-to-end tests.
Understanding the two most common test frameworks: mocha and jest
Writing proper assertions and expectations with chai and jest
Unit testing: the art of mocking with sinon and jest
End to end testing
Reporters: compliance with enterprise standard tooling
11. Getting ready for production
Writing the business logic consists of the majority of a Node developer’s tasks, but debugging applications that are not prepared properly for production eat up most of their time. To evade these problems, we’ll learn the necessary best practices regarding logging, caching, application lifecycle, and health checking in Node.js apps.
Logging with pino and winston
Caching in Redis
Handling application lifecycle and graceful shutdowns
Health checking best practices
12. Debugging
While console.log-s might be enough in many cases, knowing how to use the inspector is a necessary skill for all Node.js developers. We also might need to debug applications in a staging environment, so we’ll learn how to attach debugger sessions to remote processes.
The difference between the debugger and inspector
Using the inspector locally
Debugging on staging: attaching remote sessions
13. Performance tuning Node.js applications
Our job is still not over when the application is out in production. While premature optimization is the root of all evil, measurement-based optimization tuning is necessary in many cases to reduce costs or ensure the stability of our application.
CPU profiling and how to read them
Common overlooked optimization opportunities
Premature optimizations and how to avoid them
14. Memory profiling Node.js applications
Hunting memory leaks can be elusive. Heapdumps tend to be too cryptic to understand easily. To give a better understanding on how to analyze memory usage, we’ll cover some actual case studies. We’ll also learn how to use the current swiss army management of performance and memory usage analyzation: Node clinic.
Memory heap dump analysis
Swiss army knife of performance and memory analysis: Node clinic
Solving real-life memory leak issues from previous projects
Production Ready with Node.js Training published first on https://koresolpage.tumblr.com/
0 notes
Text
Create A Bookmarking Application With FaunaDB, Netlify And 11ty
Create A Bookmarking Application With FaunaDB, Netlify And 11ty
Bryan Robinson
2019-10-24T13:30:59+02:002019-10-24T13:03:40+00:00
The JAMstack (JavaScript, APIs and Markup) revolution is in full swing. Static sites are secure, fast, reliable and fun to work on. At the heart of the JAMstack are static site generators (SSGs) that store your data as flat files: Markdown, YAML, JSON, HTML, and so on. Sometimes, managing data this way can be overly complicated. Sometimes, we still need a database.
With that in mind, Netlify — a static site host and FaunaDB — a serverless cloud database — collaborated to make combining both systems easier.
Why A Bookmarking Site?
The JAMstack is great for many professional uses, but one of my favorite aspects of this set of technology is its low barrier to entry for personal tools and projects.
There are plenty of good products on the market for most applications I could come up with, but none would be exactly set up for me. None would give me full control over my content. None would come without a cost (monetary or informational).
With that in mind, we can create our own mini-services using JAMstack methods. In this case, we’ll be creating a site to store and publish any interesting articles I come across in my daily technology reading.
I spend a lot of time reading articles that have been shared on Twitter. When I like one, I hit the “heart” icon. Then, within a few days, it’s nearly impossible to find with the influx of new favorites. I want to build something as close to the ease of the “heart,” but that I own and control.
How are we going to do that? I’m glad you asked.
Interested in getting the code? You can grab it on Github or just deploy straight to Netlify from that repository! Take a look at the finished product here.
Our Technologies
Hosting And Serverless Functions: Netlify
For hosting and serverless functions, we’ll be utilizing Netlify. As an added bonus, with the new collaboration mentioned above, Netlify’s CLI — “Netlify Dev” — will automatically connect to FaunaDB and store our API keys as environment variables.
Database: FaunaDB
FaunaDB is a “serverless” NoSQL database. We’ll be using it to store our bookmarks data.
Static Site Generator: 11ty
I’m a big believer in HTML. Because of this, the tutorial won’t be using front-end JavaScript to render our bookmarks. Instead, we’ll utilize 11ty as a static site generator. 11ty has built-in data functionality that makes fetching data from an API as easy as writing a couple of short JavaScript functions.
iOS Shortcuts
We’ll need an easy way to post data to our database. In this case, we’ll use iOS’s Shortcuts app. This could be converted to an Android or desktop JavaScript bookmarklet, as well.
Setting Up FaunaDB Via Netlify Dev
Whether you have already signed up for FaunaDB or you need to create a new account, the easiest way to set up a link between FaunaDB and Netlify is via Netlify’s CLI: Netlify Dev. You can find full instructions from FaunaDB here or follow along below.
If you don’t already have this installed, you can run the following command in Terminal:
npm install netlify-cli -g
From within your project directory, run through the following commands:
netlify init // This will connect your project to a Netlify project netlify addons:create fauna // This will install the FaunaDB "addon" netlify addons:auth fauna // This command will run you through connecting your account or setting up an account
Once this is all connected, you can run netlify dev in your project. This will run any build scripts we set up, but also connect to the Netlify and FaunaDB services and grab any necessary environment variables. Handy!
Creating Our First Data
From here, we’ll log into FaunaDB and create our first data set.
We’ll start by creating a new Database called “bookmarks.” Inside a Database, we have Collections, Documents and Indexes.
A Collection is a categorized group of data. Each piece of data takes the form of a Document. A Document is a “single, changeable record within a FaunaDB database,” according to Fauna’s documentation. You can think of Collections as a traditional database table and a Document as a row.
For our application, we need one Collection, which we’ll call “links.” Each document within the “links” Collection will be a simple JSON object with three properties. To start, we’ll add a new Document that we’ll use to build our first data fetch.
{ "url": "https://css-irl.info/debugging-css-grid-part-2-what-the-fraction/", "pageTitle": "CSS { In Real Life } | Debugging CSS Grid – Part 2: What the Fr(action)?", "description": "CSS In Real Life is a blog covering CSS topics and useful snippets on the web’s most beautiful language. Published by Michelle Barker, front end developer at Ordoo and CSS superfan." }
This creates the basis for the information we’ll need to pull from our bookmarks as well as provides us with our first set of data to pull into our template.
If you’re like me, you want to see the fruits of your labor right away. Let’s get something on the page!
Installing 11ty And Pulling Data Into A Template
Since we want the bookmarks to be rendered in HTML and not fetched by the browser, we’ll need something to do the rendering. There are many great ways of doing it, but for ease and power, I love using the 11ty static site generator.
Since 11ty is a JavaScript static site generator, we can install it via NPM.
npm install --save @11ty/eleventy
From that installation, we can run eleventy or eleventy --serve in our project to get up and running.
Netlify Dev will often detect 11ty as a requirement and run the command for us. To have this work - and make sure we’re ready to deploy, we can also create “serve” and “build” commands in our package.json.
"scripts": { "build": "npx eleventy", "serve": "npx eleventy --serve" }
11ty’s Data Files
Most static site generators have an idea of a “data file” built-in. Usually, these files will be JSON or YAML files that allow you to add extra information to your site.
In 11ty, you can use JSON data files or JavaScript data files. By utilizing a JavaScript file, we can actually make our API calls and return the data directly into a template.
The file will be a JavaScript module. So in order to have anything work, we need to export either our data or a function. In our case, we’ll export a function.
module.exports = async function() { const data = mapBookmarks(await getBookmarks()); return data.reverse() }
Let’s break that down. We have two functions doing our main work here: mapBookmarks() and getBookmarks().
The getBookmarks() function will go fetch our data from our FaunaDB database and mapBookmarks() will take an array of bookmarks and restructure it to work better for our template.
Let’s dig deeper into getBookmarks().
getBookmarks()
First, we’ll need to install and initialize an instance of the FaunaDB JavaScript driver.
npm install --save faunadb
Now that we’ve installed it, let’s add it to the top of our data file. This code is straight from Fauna’s docs.
// Requires the Fauna module and sets up the query module, which we can use to create custom queries. const faunadb = require('faunadb'), q = faunadb.query; // Once required, we need a new instance with our secret var adminClient = new faunadb.Client({ secret: process.env.FAUNADB_SERVER_SECRET });
After that, we can create our function. We’ll start by building our first query using built-in methods on the driver. This first bit of code will return the database references we can use to get full data for all of our bookmarked links. We use the Paginate method, as a helper to manage cursor state should we decide to paginate the data before handing it to 11ty. In our case, we’ll just return all the references.
In this example, I’m assuming you installed and connected FaunaDB via the Netlify Dev CLI. Using this process, you get local environment variables of the FaunaDB secrets. If you didn’t install it this way or aren’t running netlify dev in your project, you’ll need a package like dotenv to create the environment variables. You’ll also need to add your environment variables to your Netlify site configuration to make deploys work later.
adminClient.query(q.Paginate( q.Match( // Match the reference below q.Ref("indexes/all_links") // Reference to match, in this case, our all_links index ) )) .then( response => { ... })
This code will return an array of all of our links in reference form. We can now build a query list to send to our database.
adminClient.query(...) .then((response) => { const linkRefs = response.data; // Get just the references for the links from the response const getAllLinksDataQuery = linkRefs.map((ref) => { return q.Get(ref) // Return a Get query based on the reference passed in }) return adminClient.query(getAllLinksDataQuery).then(ret => { return ret // Return an array of all the links with full data }) }).catch(...)
From here, we just need to clean up the data returned. That’s where mapBookmarks() comes in!
mapBookmarks()
In this function, we deal with two aspects of the data.
First, we get a free dateTime in FaunaDB. For any data created, there’s a timestamp (ts) property. It’s not formatted in a way that makes Liquid’s default date filter happy, so let’s fix that.
function mapBookmarks(data) { return data.map(bookmark => { const dateTime = new Date(bookmark.ts / 1000); ... }) }
With that out of the way, we can build a new object for our data. In this case, it will have a time property, and we’ll use the Spread operator to destructure our data object to make them all live at one level.
function mapBookmarks(data) { return data.map(bookmark => { const dateTime = new Date(bookmark.ts / 1000); return { time: dateTime, ...bookmark.data } }) }
Here’s our data before our function:
{ ref: Ref(Collection("links"), "244778237839802888"), ts: 1569697568650000, data: { url: 'https://sample.com', pageTitle: 'Sample title', description: 'An escaped description goes here' } }
Here’s our data after our function:
{ time: 1569697568650, url: 'https://sample.com', pageTitle: 'Sample title' description: 'An escaped description goes here' }
Now, we’ve got well-formatted data that’s ready for our template!
Let’s write a simple template. We’ll loop through our bookmarks and validate that each has a pageTitle and a url so we don’t look silly.
<div class="bookmarks"> </div>
We’re now ingesting and displaying data from FaunaDB. Let’s take a moment and think about how nice it is that this renders out pure HTML and there’s no need to fetch data on the client side!
But that’s not really enough to make this a useful app for us. Let’s figure out a better way than adding a bookmark in the FaunaDB console.
Enter Netlify Functions
Netlify’s Functions add-on is one of the easier ways to deploy AWS lambda functions. Since there’s no configuration step, it’s perfect for DIY projects where you just want to write the code.
This function will live at a URL in your project that looks like this: https://myproject.com/.netlify/functions/bookmarks assuming the file we create in our functions folder is bookmarks.js.
Basic Flow
Pass a URL as a query parameter to our function URL.
Use the function to load the URL and scrape the page’s title and description if available.
Format the details for FaunaDB.
Push the details to our FaunaDB Collection.
Rebuild the site.
Requirements
We’ve got a few packages we’ll need as we build this out. We’ll use the netlify-lambda CLI to build our functions locally. request-promise is the package we’ll use for making requests. Cheerio.js is the package we’ll use to scrape specific items from our requested page (think jQuery for Node). And finally, we’ll need FaunaDb (which should already be installed.
npm install --save netlify-lambda request-promise cheerio
Once that’s installed, let’s configure our project to build and serve the functions locally.
We’ll modify our “build” and “serve” scripts in our package.json to look like this:
"scripts": { "build": "npx netlify-lambda build lambda --config ./webpack.functions.js && npx eleventy", "serve": "npx netlify-lambda build lambda --config ./webpack.functions.js && npx eleventy --serve" }
Warning: There’s an error with Fauna’s NodeJS driver when compiling with Webpack, which Netlify’s Functions use to build. To get around this, we need to define a configuration file for Webpack. You can save the following code to a new — or existing — webpack.config.js.
const webpack = require('webpack'); module.exports = { plugins: [ new webpack.DefinePlugin({ "global.GENTLY": false }) ] };
Once this file exists, when we use the netlify-lambda command, we’ll need to tell it to run from this configuration. This is why our “serve” and “build scripts use the --config value for that command.
Function Housekeeping
In order to keep our main Function file as clean as possible, we’ll create our functions in a separate bookmarks directory and import them into our main Function file.
import { getDetails, saveBookmark } from "./bookmarks/create";
getDetails(url)
The getDetails() function will take a URL, passed in from our exported handler. From there, we’ll reach out to the site at that URL and grab relevant parts of the page to store as data for our bookmark.
We start by requiring the NPM packages we need:
const rp = require('request-promise'); const cheerio = require('cheerio');
Then, we’ll use the request-promise module to return an HTML string for the requested page and pass that into cheerio to give us a very jQuery-esque interface.
const getDetails = async function(url) { const data = rp(url).then(function(htmlString) { const $ = cheerio.load(htmlString); ... }
From here, we need to get the page title and a meta description. To do that, we’ll use selectors like you would in jQuery.
Note: In this code, we use 'head > title' as the selector to get the title of the page. If you don’t specify this, you may end up getting <title> tags inside of all SVGs on the page, which is less than ideal.
const getDetails = async function(url) { const data = rp(url).then(function(htmlString) { const $ = cheerio.load(htmlString); const title = $('head > title').text(); // Get the text inside the tag const description = $('meta[name="description"]').attr('content'); // Get the text of the content attribute // Return out the data in the structure we expect return { pageTitle: title, description: description }; }); return data //return to our main function }
With data in hand, it’s time to send our bookmark off to our Collection in FaunaDB!
saveBookmark(details)
For our save function, we’ll want to pass the details we acquired from getDetails as well as the URL as a singular object. The Spread operator strikes again!
const savedResponse = await saveBookmark({url, ...details});
In our create.js file, we also need to require and setup our FaunaDB driver. This should look very familiar from our 11ty data file.
const faunadb = require('faunadb'), q = faunadb.query; const adminClient = new faunadb.Client({ secret: process.env.FAUNADB_SERVER_SECRET });
Once we’ve got that out of the way, we can code.
First, we need to format our details into a data structure that Fauna is expecting for our query. Fauna expects an object with a data property containing the data we wish to store.
const saveBookmark = async function(details) { const data = { data: details }; ... }
Then we’ll open a new query to add to our Collection. In this case, we’ll use our query helper and use the Create method. Create() takes two arguments. First is the Collection in which we want to store our data and the second is the data itself.
After we save, we return either success or failure to our handler.
const saveBookmark = async function(details) { const data = { data: details }; return adminClient.query(q.Create(q.Collection("links"), data)) .then((response) => { /* Success! return the response with statusCode 200 */ return { statusCode: 200, body: JSON.stringify(response) } }).catch((error) => { /* Error! return the error with statusCode 400 */ return { statusCode: 400, body: JSON.stringify(error) } }) }
Let’s take a look at the full Function file.
import { getDetails, saveBookmark } from "./bookmarks/create"; import { rebuildSite } from "./utilities/rebuild"; // For rebuilding the site (more on that in a minute) exports.handler = async function(event, context) { try { const url = event.queryStringParameters.url; // Grab the URL const details = await getDetails(url); // Get the details of the page const savedResponse = await saveBookmark({url, ...details}); //Save the URL and the details to Fauna if (savedResponse.statusCode === 200) { // If successful, return success and trigger a Netlify build await rebuildSite(); return { statusCode: 200, body: savedResponse.body } } else { return savedResponse //or else return the error } } catch (err) { return { statusCode: 500, body: `Error: ${err}` }; } };
rebuildSite()
The discerning eye will notice that we have one more function imported into our handler: rebuildSite(). This function will use Netlify’s Deploy Hook functionality to rebuild our site from the new data every time we submit a new — successful — bookmark save.
In your site’s settings in Netlify, you can access your Build & Deploy settings and create a new “Build Hook.” Hooks have a name that appears in the Deploy section and an option for a non-master branch to deploy if you so wish. In our case, we’ll name it “new_link” and deploy our master branch.
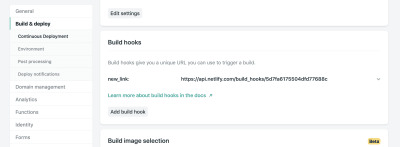
A visual reference for the Netlify Admin’s build hook setup (Large preview)
From there, we just need to send a POST request to the URL provided.
We need a way of making requests and since we’ve already installed request-promise, we’ll continue to use that package by requiring it at the top of our file.
const rp = require('request-promise'); const rebuildSite = async function() { var options = { method: 'POST', uri: 'https://api.netlify.com/build_hooks/5d7fa6175504dfd43377688c', body: {}, json: true }; const returned = await rp(options).then(function(res) { console.log('Successfully hit webhook', res); }).catch(function(err) { console.log('Error:', err); }); return returned }
A demo of the Netlify Function setup and the iOS Shortcut setup combined
Setting Up An iOS Shortcut
So, we have a database, a way to display data and a function to add data, but we’re still not very user-friendly.
Netlify provides URLs for our Lambda functions, but they’re not fun to type into a mobile device. We’d also have to pass a URL as a query parameter into it. That’s a LOT of effort. How can we make this as little effort as possible?
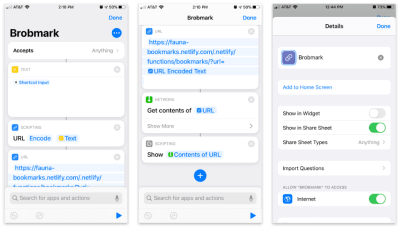
A visual reference for the setup for our Shortcut functionality (Large preview)
Apple’s Shortcuts app allows the building of custom items to go into your share sheet. Inside these shortcuts, we can send various types of requests of data collected in the share process.
Here’s the step-by-step Shortcut:
Accept any items and store that item in a “text” block.
Pass that text into a “Scripting” block to URL encode (just in case).
Pass that string into a URL block with our Netlify Function’s URL and a query parameter of url.
From “Network” use a “Get contents” block to POST to JSON to our URL.
Optional: From “Scripting” “Show” the contents of the last step (to confirm the data we’re sending).
To access this from the sharing menu, we open up the settings for this Shortcut and toggle on the “Show in Share Sheet” option.
As of iOS13, these share “Actions” are able to be favorited and moved to a high position in the dialog.
We now have a working “app” for sharing bookmarks across multiple platforms!
Go The Extra Mile!
If you’re inspired to try this yourself, there are a lot of other possibilities to add functionality. The joy of the DIY web is that you can make these sorts of applications work for you. Here are a few ideas:
Use a faux “API key” for quick authentication, so other users don’t post to your site (mine uses an API key, so don’t try to post to it!).
Add tag functionality to organize bookmarks.
Add an RSS feed for your site so that others can subscribe.
Send out a weekly roundup email programmatically for links that you’ve added.
Really, the sky is the limit, so start experimenting!

(dm, yk)
0 notes
Photo

Nuxt.jsとServerlessでdotenvを共有する http://bit.ly/2sgCX8z
Nuxt.jsとServerlessとで同じ.env ファイルを共有できるようにしてみました。
Nuxt.jsのプロジェクトは下記をベースにしています。
jeehyukwon/nuxt-serverless: Nuxt.js Serverless SSR Starter on AWS (Lambda + API Gateway + S3) with Serverless Framework https://github.com/jeehyukwon/nuxt-serverless
前提
AWSアカウントがある
serverlessがインストール・設定済み
node.js、npm(、yarn)がインストール済み
環境構築
���りあえず.env が共有できるよねーってことが確認できたら良いので、上記リポジトリをシンプルにしたものをベースにします。
kai-kou/nuxt-serverless at feature/no-use-s3 https://github.com/kai-kou/nuxt-serverless/tree/feature/no-use-s3
ベースにするリポジトリに関しては下記に利用方法をまとめています。
Nuxt.js(v2.2.0)+TypeScriptなアプリをAWS Lambda+αにデプロイしてみた(S3なし版) https://cloudpack.media/44910
今回のソースはGithubにアップしていますので、よろしければご参考ください。 https://github.com/kai-kou/nuxt-serverless/tree/feature/use-dotenv
> mkdir 任意のディレクトリ > cd 任意のディレクトリ > git clone https://github.com/kai-kou/nuxt-serverless.git > cd nuxt-serverless > git checkout feature/no-use-s3 > npm install
Nuxt.jsのプラグインを追加する
Nuxt.jsで.env から環境変数を読み込むことができるプラグインを利用させてもらいます。
nuxt-community/dotenv-module: Loads your .env file into your application context https://github.com/nuxt-community/dotenv-module
> npm install --save @nuxtjs/dotenv
.env ファイルを作成しておきます。
> touch .env
.env
HOGE=hoge
uxt.config.js に設定を追加します。
nuxt.config.js_一部抜粋
const express = require('express') const cookieParser = require('cookie-parser') require('dotenv').config() module.exports = { (略) modules: [ '@nuxtjs/dotenv', ], env: { HOGE: process.env.HOGE, }, }
vue ファイルで環境変数が利用できることを確認するのに、index.vue で を利用するようにします。 template内で としてもエラーになるのでご注意ください。
src/pages/index.vue
<template> <div class="page-index"> <h1>Nuxt Serverless Template </h1> <p></p> <nuxt-link to="/typescript">typescript</nuxt-link> <nuxt-link to="/nuxt">nuxt</nuxt-link> </div> </template> <script lang="ts"> import { Component, Vue } from 'nuxt-property-decorator' import { State } from 'vuex-class' @Component export default class PageIndex extends Vue { private get hoge(): string { return process.env.HOGE; } /** * You can fetch data from remote server with 'asyncData()' method */ private async asyncData() { return { message: 'Say Hello to Node.js 8.10 in AWS Lambda and Nuxt 2.0', } } /** * overide tags in <head> with 'head()' method */ private head() { return { title: 'Hello, Nuxt Serverless Template', } } @State((state) => state.version) private version: string } </script> <style lang="scss"> .page-index { h1 { color: #087f5b; } } </style>
実行して確認してみます。
> npm run dev > open http://localhost:3000/dev/

はい。hoge と表示されました。
Serverlessのプラグインを追加する
続いて、Serverlessでも.env が利用できるようにします。こちらもプラグインがありましたので、それを利用させてもらいます。
colynb/serverless-dotenv-plugin: Preload Environment Variables with Dotenv into Serverless https://github.com/colynb/serverless-dotenv-plugin#readme
> npm install --save-dev serverless-dotenv-plugin
serverless.yml で.env から環境変数を読み込めるようにします。環境変数は${env:HOGE} とすることでアクセスできるようになります。
serverless.yml_一部抜粋
service: nuxt-serverless # 1. Edit whole service name provider: name: aws runtime: nodejs8.10 stage: ${opt:stage, 'dev'} region: ap-northeast-1 # 2. Edit AWS region name environment: NODE_ENV: production HOGE: ${env:HOGE} (略) plugins: - serverless-offline - serverless-apigw-binary - serverless-dotenv-plugin
デプロイは割愛します。
ポイント
.env.{env} ファイルを取り扱うのにひと手間かかる
serverless-dotenv-pluginはenvironmentから.env.development や.env.production などのファイルを自動で探してくれるのですが、@nuxtjs/dotenvの方は、nuxt.config.js で指定する必要があります。
nuxt.config.js_一部抜粋
modules: [ ['@nuxtjs/dotenv', { filename: '.env.development' }], ]
.env ファイルはコミットしないようにする
.gitnoreに追加してからコミットしましょう。.env の代わりに.env.example などサンプルとなるファイルをリポジトリに含めておけばどんな環境変数を利用するのかわかりやすくなります。
参考
nuxt-community/dotenv-module: Loads your .env file into your application context https://github.com/nuxt-community/dotenv-module
colynb/serverless-dotenv-plugin: Preload Environment Variables with Dotenv into Serverless https://github.com/colynb/serverless-dotenv-plugin#readme
Nuxt.js で dotenv を活用する – chatbox.blog https://chatboxinc.wordpress.com/2018/03/26/nuxt_js_with_dotenv/
API: env プロパティ – Nuxt.js https://ja.nuxtjs.org/api/configuration-env/
元記事はこちら
「Nuxt.jsとServerlessでdotenvを共有する」
January 09, 2019 at 04:00PM
0 notes
Text
Getting Started With Axios In Nuxt
About The Author
Front-end developer based in Lagos, Nigeria. He enjoys converting designs into code and building things for the web. More about Timi …
In this tutorial, we will learn how to make a request in our NUXt.js applications using the Axios module. We will also learn how to use the ayncData and fetch methods to fetch data on the server-side using Axios and the differences between the two methods. Finally, we will learn how to add authentication to our application using the Auth module.
NUXt.js provides an Axios module for easy integration with your application. Axios is a promise-based HTTP client that works in the browser and Node.js environment or, in simpler terms, it is a tool for making requests (e.g API calls) in client-side applications and Node.js environment.
In this tutorial, we’re going to learn how to use the Axios module and how to make a request on the server-side using asyncData and fetch. These two methods make a request on the server-side but they have some differences which we’re also going to cover. Finally, we’ll learn how to perform authentication and secure pages/routes using the auth module and auth middleware.
This article requires basic knowledge of NUXtjs and Vuejs as we’ll be building on top of that. For those without experience with Vuejs, I recommend you start from their official documentation and the Nuxt official page before continuing with this article.
What Is The Nuxt.js Axios Module?
According to the official Documentation,
“It is a Secure and easy Axios integration with NUXt.js.”
Here are some of its features:
Automatically set base URL for client-side & server-side.
Proxy request headers in SSR (Useful for auth).
Fetch Style requests.
Integrated with NUXt.js Progressbar while making requests.
To use the axios module in your application, you will have to first install it by using either npm or yarn.
YARN
yarn add @nUXtjs/axios
NPM
npm install @nUXtjs/axios
Add it into your nUXt.config.js file:
modules: [ '@nUXtjs/axios', ], axios: { // extra config e.g // BaseURL: 'https://link-to-API' }
The modules array accepts a list of NUXt.js modules such as dotenv, auth and in this case, Axios. What we’ve done is to inform our application that we would be using the Axios module, which we reference using @nUXtjs/axios. This is then followed by the axios property which is an object of configurations like the baseURL for both client-side and server-side.
Now, you can access Axios from anywhere in your application by calling this.$axios.method or this.$axios.$method. Where method can be get, post, or delete.
Making Your First Request Using Axios
For this tutorial, I’ve put together a simple application on Github. The repository contains two folders, start and finish, the start folder contains all you need to get right into the tutorial. The finish folder contains a completed version of what we would be building.
After cloning the repo and opening the start folder, we would need to install all our packages in the package.json file so open your terminal and run the following command:
npm install
Once that is done, we can start our app using the npm run dev command. This is what you should see when you go to localhost:3000.
Our application’s landing page. (Large preview)
The next thing we have to do is to create a .env file in the root folder of our application and add our API URL to it. For this tutorial, we’ll be using a sample API built to collect reports from users.
API_URL=https://ireporter-endpoint.herokuapp.com/api/v2/
This way, we do not have to hard code our API into our app which is useful for working with two APIs (development and production).
The next step would be to open our nUXt.config.js file and add the environmental variable to our axios config that we added above.
/* ** Axios module configuration */ axios: { // See https://github.com/nUXt-community/axios-module#options baseURL: process.env.API_URL, },
Here, we tell NUXt.js to use this baseURL for both our client-side and server-side requests whenever we use this Axios module.
Now, to fetch a list of reports, let us open the index.vue file and add the following method to the script section.
async getIncidents() { let res = await this.$store.dispatch("getIncidents"); this.incidents = res.data.data.incidents;}
What we have done is to create an async function that we call getIncidents() and we can tell what it does from the name — it fetches a list of incidents using the Vuex store action method this.$store.dispatch. We assign the response from this action to our incidents property so we can be able to make use of it in the component.
We want to call the getIncidents() method whenever the component mounts. We can do that using the mounted hook.
mounted() { this.getIncidents() }
mounted() is a lifecycle hook that gets called when the component mounts. That will cause the call to the API to happen when the component mounts. Now, let us go into our index.js file in our store and create this action where we’ll be making our Axios request from.
export const actions = { async getIncidents() { let res = await this.$axios.get('/incidents') return res; }}
Here, we created the action called getIncidents which is an async function, then we await a response from the server and return this response. The response from this action is sent back to our getIncidents() method in our index.vue file.
If we refresh our application, we should now be able to see a long list of incidents rendered on the page.
List of incidents on landing page. (Large preview)
We have made our first request using Axios but we won’t stop there, we are going to be trying out asyncData and fetch to see the differences between them and using Axios.
AsyncData
AsyncData fetches data on the server-side and it’s called before loading the page component. It does not have access to this because it is called before your page component data is created. this is only available after the created hook has been called so NUXt.js automatically merges the returned data into the component’s data.
Using asyncData is good for SEO Company because it fetches your site’s content on the server-side and also helps in loading content faster. Note that asyncData method can only be used in the pages folder of your application as it would not work in the components folder. This is because asyncData hook gets called before your component is created.
Image from NUXt blog. (Large preview)
Let us add asyncData to our index.vue file and observe how fast our incidents data loads. Add the following code after our components property and let us get rid of our mounted hook.
async asyncData({ $axios }) { let { data } = await $axios.get("/incidents"); return { incidents: data.data.incidents }; }, // mounted() { // this.getIncidents(); // },
Here, the asyncData method accepts a property from the context $axios. We use this property to fetch the list of incidents and the value is then returned. This value is automatically injected into our component. Now, you can notice how fast your content loads if you refresh the page and at no time is there no incident to render.
Fetch
The Fetch method is also used to make requests on the server-side. It is called after the created hook in the life cycle which means it has access to the component’s data. Unlike the asyncData method, the fetch method can be used in all .vue files and be used with the Vuex store. This means that if you have the following in your data function.
data() { return { incidents: [], id: 5, gender: 'male' };}
You can easily modify id or gender by calling this.id or this.gender.
Using Axios As A Plugin
During the process of development with Axios, you might find that you need extra configuration like creating instances and interceptors for your request so your application can work as intended and thankfully, we can do that by extending our Axios into a plugin.
To extend axios, you have to create a plugin (e.g. axios.js) in your plugins folder.
export default function ({ $axios, store, redirect}) { $axios.onError(error => { if (error.response && error.response.status === 500) { redirect('/login') } }) $axios.interceptors.response.use( response => { if (response.status === 200) { if (response.request.responseURL && response.request.responseURL.includes('login')) { store.dispatch("setUser", response); } } return response } )}
This is an example of a plugin I wrote for a NUXt application. Here, your function takes in a context object of $axios, store and redirect which we would use in configuring the plugin. The first thing we do is to listen for an error with a status of 500 using $axios.onError and redirect the user to the login page.
We also have an interceptor that intercepts every request response we make in our application checks if the status of the response we get is 200. If that is true we proceed and check that there is a response.request.responseURL and if it includes login. If this checks out to be true, we then send this response using our store’s dispatch method where it then mutated in our state.
Add this plugin to your nUXt.config.js file:
plugins: [ '~/plugins/axios' ]
After doing this, your Axios plugin would intercept any request you make and check if you have defined a special case for it.
Introduction To The Auth Module
The auth module is used for performing authentication for your NUXt application and can be accessed from anywhere in your application using $this.auth. It is also available in fetch, asyncData, middleware and NUXtInitServer from the context object as $auth.
The context provides additional objects/params from NUXt to Vue components and is available in special nUXt lifecycle areas like those mentioned above.
To use the auth module in your application, you would have to install it using yarn or npm.
YARN
yarn add @nUXtjs/auth
NPM
npm install @nUXtjs/auth
Add it to your nUXt.config.js file.
modules: [ '@nUXtjs/auth'],auth: { // Options}
The auth property accepts a list of properties such as strategies and redirect. Here, strategies accepts your preferred authentication method which can be:
local For username/email and password-based flow.
Facebook For using Facebook accounts as a means of authentication.
Github For authenticating users with Github accounts.
Google For authenticating users with Google accounts.
Auth0
Laravel Passport
The redirect property accepts an object of links for:
login Users would be redirected to this link if login is required.
logout Users would be redirected here if after logout current route is protected.
home Users would be redirected here after login.
Now, let us add the following to our nUXt.config.js file.
/* ** Auth module configuration */auth: { redirect: { login: '/login', logout: '/', home: '/my-reports' }, strategies: { local: { endpoints: { login: { url: "/user/login", method: "post", propertyName: "data.token", }, logout: false, user: false, }, tokenType: '', tokenName: 'x-auth', autoFetchUser: false }, },}
Please note that the auth method works best when there is a user endpoint provided in the option above.
Inside the auth config object, we have a redirect option in which we set our login route to /login, logout route to / and home route to /my-reports which would all behave as expected. We also have a tokenType property which represents the Authorization type in the header of our Axios request. It is set to Bearer by default and can be changed to work with your API.
For our API, there is no token type and this is why we’re going to leave it as an empty string. The tokenName represents the Authorization name (or the header property you want to attach your token to) inside your header in your Axios request.
By default, it is set to Authorization but for our API, the Authorization name is x-auth. The autoFetchUser property is used to enable user fetch object using the user endpoint property after login. It is true by default but our API does not have a user endpoint so we have set that to false.
For this tutorial, we would be using the local strategy. In our strategies, we have the local option with endpoints for login, user and logout but in our case, we would only use the *login* option because our demo API does not have a *logout* endpoint and our user object is being returned when *login* is successful.
Note: The auth module does not have a register endpoint option so that means we’re going to register the traditional way and redirect the user to the login page where we will perform the authentication using this.$auth.loginWith. This is the method used in authenticating your users. It accepts a ‘strategy’ (e.g local) as a first argument and then an object to perform this authentication with. Take a look at the following example.
let data { email: '[email protected]', password: '123456'}this.$auth.loginWith('local', { data })
Using The Auth Module
Now that we have configured our auth module, we can proceed to our registration page. If you visit the /register page, you should see a registration form.
Register page. (Large preview)
Let us make this form functional by adding the following code:
methods: { async registerUser() { this.loading = true; let data = this.register; try { await this.$axios.post("/user/create", data); this.$router.push("/login"); this.loading = false; this.$notify({ group: "success", title: "Success!", text: "Account created successfully" }); } catch (error) { this.loading = false; this.$notify({ group: "error", title: "Error!", text: error.response ? error.response.data.error : "Sorry an error occured, check your internet" }); } }}
Here, we have an async function called registerUser which is tied to a click event in our template and makes an Axios request wrapped in a try/catch block to an endpoint /user/create. This redirects to the /login page and notifies the user of a successful registration. We also have a catch block that alerts the user of any error if the request is not successful.
If the registration is successful, you would be redirected to the login page.
Login page with notification component. (Large preview)
Here, we’re going to make use of auth authentication method this.$auth.loginWith('local', loginData) after which we would use the this.$auth.setUser(userObj) to set the user in our auth instance.
To get the login page working, let’s add the following code to our login.vue file.
methods: { async logIn() { let data = this.login; this.loading = true; try { let res = await this.$auth.loginWith("local", { data }); this.loading = false; let user = res.data.data.user; this.$auth.setUser(user); this.$notify({ group: "success", title: "Success!", text: "Welcome!" }); } catch (error) { this.loading = false; this.$notify({ group: "error", title: "Error!", text: error.response ? error.response.data.error : "Sorry an error occured, check your internet" }); } }}
We created an async function called logIn using the auth method this.$auth.loginWith('local, loginData). If this login attempt is successful, we then assign the user data to our auth instance using this.$auth.setUser(userInfo) and redirect the user to the /my-report page.
You can now get user data using this.$auth.user or with Vuex using this.$store.state.auth.user but that’s not all. The auth instance contains some other properties which you can see if you log in or check your state using your Vue dev tools.
If you log this.$store.state.auth to the console, you’ll see this:
{ "auth": { "user": { "id": "d7a5efdf-0c29-48aa-9255-be818301d602", "email": "[email protected]", "lastName": "Xo", "firstName": "Tm", "othernames": null, "isAdmin": false, "phoneNumber": null, "username": null }, "loggedIn": true, "strategy": "local", "busy": false }}
The auth instance contains a loggedIn property that is useful in switching between authenticated links in the nav/header section of your application. It also contains a strategy method that states the type of strategy the instance is running (e.g local).
Now, we will make use of this loggedIn property to arrange our nav links. Update your navBar component to the following:
<template> <header class="header"> <div class="logo"> <nUXt-link to="/"> <Logo /> </nUXt-link> </div> <nav class="nav"> <div class="nav__user" v-if="auth.loggedIn"> <p></p> <button class="nav__link nav__link--long"> <nUXt-link to="/report-incident">Report incident</nUXt-link> </button> <button class="nav__link nav__link--long"> <nUXt-link to="/my-reports">My Reports</nUXt-link> </button> <button class="nav__link" @click.prevent="logOut">Log out</button> </div> <button class="nav__link" v-if="!auth.loggedIn"> <nUXt-link to="/login">Login</nUXt-link> </button> <button class="nav__link" v-if="!auth.loggedIn"> <nUXt-link to="/register">Register</nUXt-link> </button> </nav> </header></template><script>import { mapState } from "vuex";import Logo from "@/components/Logo";export default { name: "nav-bar", data() { return {}; }, computed: { ...mapState(["auth"]) }, methods: { logOut() { this.$store.dispatch("logOut"); this.$router.push("/login"); } }, components: { Logo }};</script><style></style>
In our template section, we have several links to different parts of the application in which we are now using auth.loggedIn to display the appropriate links depending on the authentication status. We have a logout button that has a click event with a logOut() function attached to it. We also display the user’s email gotten from the auth property which is accessed from our Vuex store using the mapState method which maps our state auth to the computed property of the nav component. We also have a logout method that calls our Vuex action logOut and redirects the user to the login page.
Now, let us go ahead and update our store to have a logOut action.
export const actions = { // .... logOut() { this.$auth.logout(); }}
The logOut action calls the auth logout method which clears user data, deletes tokens from localStorage and sets loggedIn to false.
Routes like /my-reports and report-incident should not be visible to guests but at this point in our app, that is not the case. NUXt does not have a navigation guard that can protect your routes, but it has is the auth middleware. It gives you the freedom to create your own middleware so you can configure it to work the way you want.
It can be set in two ways:
Per route.
Globally for the whole app in your nUXt.config.js file.
router: { middleware: ['auth']}
This auth middleware works with your auth instance so you do not need to create an auth.js file in your middleware folder.
Let us now add this middleware to our my-reports.vue and report-incident.vue files. Add the following lines of code to the script section of each file.
middleware: 'auth'
Now, our application would check if the user trying to access these routes has an auth.loggedIn value of true. It’ll redirect them to the login page using our redirect option in our auth config file — if you’re not logged in and you try to visit either /my-report or report-incident, you would be redirected to /login.
If you go to /report-incidents, this is what you should see.
Report incident page. (Large preview)
This page is for adding incidents but that right now the form does not send incident to our server because we are not making the call to the server when the user attempts to submit the form. To solve this, we will add a reportIncident method which will be called when the user clicks on Report. We’ll have this in the script section of the component. This method will send the form data to the server. Update your report-incident.vue file with the following:
<template> <section class="report"> <h1 class="report__heading">Report an Incident</h1> <form class="report__form"> <div class="input__container"> <label for="title" class="input__label">Title</label> <input type="text" name="title" id="title" v-model="incident.title" class="input__field" required /> </div> <div class="input__container"> <label for="location" class="input__label">Location</label> <input type="text" name="location" id="location" v-model="incident.location" required class="input__field" /> </div> <div class="input__container"> <label for="comment" class="input__label">Comment</label> <textarea name="comment" id="comment" v-model="incident.comment" class="input__area" cols="30" rows="10" required ></textarea> </div> <input type="submit" value="Report" class="input__button" @click.prevent="reportIncident" /> <p class="loading__indicator" v-if="loading">Please wait....</p> </form> </section></template><script>export default { name: "report-incident", middleware: "auth", data() { return { loading: false, incident: { type: "red-flag", title: "", location: "", comment: "" } }; }, methods: { async reportIncident() { let data = this.incident; let formData = new FormData(); formData.append("title", data.title); formData.append("type", data.type); formData.append("location", data.location); formData.append("comment", data.comment); this.loading = true; try { let res = await this.$store.dispatch("reportIncident", formData); this.$notify({ group: "success", title: "Success", text: "Incident reported successfully!" }); this.loading = false; this.$router.push("/my-reports"); } catch (error) { this.loading = false; this.$notify({ group: "error", title: "Error!", text: error.response ? error.response.data.error : "Sorry an error occured, check your internet" }); } } }};</script><style></style>
Here, we have a form with input fields for title, location, and comment with two-way data binding using v-model. We also have a submit button with a click event. In the script section, we have a reportIncident method that collects all the information provided in the form and is sent to our server using FormData because the API is designed to also accept images and videos.
This formData is attached to a Vuex action using the dispatch method, if the request is successful, you get redirected to /my-reports with a notification informing you that this request was successful otherwise, you would be notified of an error with the error message.
At this point, we don’t have reportIncident action in our store yet so in your browser console, you would see an error if you try to click submit on this page.
Vuex error message. (Large preview)
To fix this, add the reportIncident action your index.js file.
export const actions = { // ... async reportIncident({}, data) { let res = await this.$axios.post('/incident/create', data) return res; }}
Here, we have a reportIncident function that takes in an empty context object and the data we’re sending from our form. This data is then attached to a post request that creates an incident and returns back to our report-incident.vue file.
At this point, you should be able to add a report using the form after which you would be redirected to /my-reports page.
My reports page empty. (Large preview)
This page should display a list of incidents created by the user but right now it only shows what we see above, let’s go ahead to fix that.
We’re going to be using the fetch method we learned about to get this list. Update your my-reports.vue file with the following:
<script>import incidentCard from "@/components/incidentCard.vue";export default { middleware: "auth", name: "my-reports", data() { return { incidents: [] }; }, components: { incidentCard }, async fetch() { let { data } = await this.$axios.get("/user/incidents"); this.incidents = data.data; }};</script>
Here, we use fetch method to get user-specific incidents and assign the response to our incidents array.
If you refresh your page after adding an incident, you should see something like this.
My Reports page with a report. (Large preview)
At this point, we would notice a difference in how fetch method and asyncData loads our data.
Conclusion
So far, we have learned about the Axios module and all of its features. We have also learned more about asyncData, and how we can fetch both of them together despite their differences. We’ve also learned how to perform authentication in our application using the auth module and how to use the auth middleware to protect our routes. Here are some useful resources that talk more about all we’ve covered.
Resources
“Auth Module,” NUXtJS.org
“Axios Module: Introduction,” NUXtJS.org
FormData, MDN web docs
“API: The asyncData Method,” NUXtJS.org
“The Vue Instance: Lifecycle Diagram,” VueJS.org
“Understanding How fetch Works In Nuxt 2.12,” NUXtJS.org
(ks, ra, yk, il)
Website Design & SEO Delray Beach by DBL07.co
Delray Beach SEO
Via http://www.scpie.org/getting-started-with-axios-in-nuxt/
source https://scpie.weebly.com/blog/getting-started-with-axios-in-nuxt
0 notes
Text
Getting Started With Axios In Nuxt
About The Author
Front-end developer based in Lagos, Nigeria. He enjoys converting designs into code and building things for the web. More about Timi …
In this tutorial, we will learn how to make a request in our NUXt.js applications using the Axios module. We will also learn how to use the ayncData and fetch methods to fetch data on the server-side using Axios and the differences between the two methods. Finally, we will learn how to add authentication to our application using the Auth module.
NUXt.js provides an Axios module for easy integration with your application. Axios is a promise-based HTTP client that works in the browser and Node.js environment or, in simpler terms, it is a tool for making requests (e.g API calls) in client-side applications and Node.js environment.
In this tutorial, we’re going to learn how to use the Axios module and how to make a request on the server-side using asyncData and fetch. These two methods make a request on the server-side but they have some differences which we’re also going to cover. Finally, we’ll learn how to perform authentication and secure pages/routes using the auth module and auth middleware.
This article requires basic knowledge of NUXtjs and Vuejs as we’ll be building on top of that. For those without experience with Vuejs, I recommend you start from their official documentation and the Nuxt official page before continuing with this article.
What Is The Nuxt.js Axios Module?
According to the official Documentation,
“It is a Secure and easy Axios integration with NUXt.js.”
Here are some of its features:
Automatically set base URL for client-side & server-side.
Proxy request headers in SSR (Useful for auth).
Fetch Style requests.
Integrated with NUXt.js Progressbar while making requests.
To use the axios module in your application, you will have to first install it by using either npm or yarn.
YARN
yarn add @nUXtjs/axios
NPM
npm install @nUXtjs/axios
Add it into your nUXt.config.js file:
modules: [ '@nUXtjs/axios', ], axios: { // extra config e.g // BaseURL: 'https://link-to-API' }
The modules array accepts a list of NUXt.js modules such as dotenv, auth and in this case, Axios. What we’ve done is to inform our application that we would be using the Axios module, which we reference using @nUXtjs/axios. This is then followed by the axios property which is an object of configurations like the baseURL for both client-side and server-side.
Now, you can access Axios from anywhere in your application by calling this.$axios.method or this.$axios.$method. Where method can be get, post, or delete.
Making Your First Request Using Axios
For this tutorial, I’ve put together a simple application on Github. The repository contains two folders, start and finish, the start folder contains all you need to get right into the tutorial. The finish folder contains a completed version of what we would be building.
After cloning the repo and opening the start folder, we would need to install all our packages in the package.json file so open your terminal and run the following command:
npm install
Once that is done, we can start our app using the npm run dev command. This is what you should see when you go to localhost:3000.
Our application’s landing page. (Large preview)
The next thing we have to do is to create a .env file in the root folder of our application and add our API URL to it. For this tutorial, we’ll be using a sample API built to collect reports from users.
API_URL=https://ireporter-endpoint.herokuapp.com/api/v2/
This way, we do not have to hard code our API into our app which is useful for working with two APIs (development and production).
The next step would be to open our nUXt.config.js file and add the environmental variable to our axios config that we added above.
/* ** Axios module configuration */ axios: { // See https://github.com/nUXt-community/axios-module#options baseURL: process.env.API_URL, },
Here, we tell NUXt.js to use this baseURL for both our client-side and server-side requests whenever we use this Axios module.
Now, to fetch a list of reports, let us open the index.vue file and add the following method to the script section.
async getIncidents() { let res = await this.$store.dispatch("getIncidents"); this.incidents = res.data.data.incidents; }
What we have done is to create an async function that we call getIncidents() and we can tell what it does from the name — it fetches a list of incidents using the Vuex store action method this.$store.dispatch. We assign the response from this action to our incidents property so we can be able to make use of it in the component.
We want to call the getIncidents() method whenever the component mounts. We can do that using the mounted hook.
mounted() { this.getIncidents() }
mounted() is a lifecycle hook that gets called when the component mounts. That will cause the call to the API to happen when the component mounts. Now, let us go into our index.js file in our store and create this action where we’ll be making our Axios request from.
export const actions = { async getIncidents() { let res = await this.$axios.get('/incidents') return res; } }
Here, we created the action called getIncidents which is an async function, then we await a response from the server and return this response. The response from this action is sent back to our getIncidents() method in our index.vue file.
If we refresh our application, we should now be able to see a long list of incidents rendered on the page.
List of incidents on landing page. (Large preview)
We have made our first request using Axios but we won’t stop there, we are going to be trying out asyncData and fetch to see the differences between them and using Axios.
AsyncData
AsyncData fetches data on the server-side and it’s called before loading the page component. It does not have access to this because it is called before your page component data is created. this is only available after the created hook has been called so NUXt.js automatically merges the returned data into the component’s data.
Using asyncData is good for SEO Company because it fetches your site’s content on the server-side and also helps in loading content faster. Note that asyncData method can only be used in the pages folder of your application as it would not work in the components folder. This is because asyncData hook gets called before your component is created.
Image from NUXt blog. (Large preview)
Let us add asyncData to our index.vue file and observe how fast our incidents data loads. Add the following code after our components property and let us get rid of our mounted hook.
async asyncData({ $axios }) { let { data } = await $axios.get("/incidents"); return { incidents: data.data.incidents }; }, // mounted() { // this.getIncidents(); // },
Here, the asyncData method accepts a property from the context $axios. We use this property to fetch the list of incidents and the value is then returned. This value is automatically injected into our component. Now, you can notice how fast your content loads if you refresh the page and at no time is there no incident to render.
Fetch
The Fetch method is also used to make requests on the server-side. It is called after the created hook in the life cycle which means it has access to the component’s data. Unlike the asyncData method, the fetch method can be used in all .vue files and be used with the Vuex store. This means that if you have the following in your data function.
data() { return { incidents: [], id: 5, gender: 'male' }; }
You can easily modify id or gender by calling this.id or this.gender.
Using Axios As A Plugin
During the process of development with Axios, you might find that you need extra configuration like creating instances and interceptors for your request so your application can work as intended and thankfully, we can do that by extending our Axios into a plugin.
To extend axios, you have to create a plugin (e.g. axios.js) in your plugins folder.
export default function ({ $axios, store, redirect }) { $axios.onError(error => { if (error.response && error.response.status === 500) { redirect('/login') } }) $axios.interceptors.response.use( response => { if (response.status === 200) { if (response.request.responseURL && response.request.responseURL.includes('login')) { store.dispatch("setUser", response); } } return response } ) }
This is an example of a plugin I wrote for a NUXt application. Here, your function takes in a context object of $axios, store and redirect which we would use in configuring the plugin. The first thing we do is to listen for an error with a status of 500 using $axios.onError and redirect the user to the login page.
We also have an interceptor that intercepts every request response we make in our application checks if the status of the response we get is 200. If that is true we proceed and check that there is a response.request.responseURL and if it includes login. If this checks out to be true, we then send this response using our store’s dispatch method where it then mutated in our state.
Add this plugin to your nUXt.config.js file:
plugins: [ '~/plugins/axios' ]
After doing this, your Axios plugin would intercept any request you make and check if you have defined a special case for it.
Introduction To The Auth Module
The auth module is used for performing authentication for your NUXt application and can be accessed from anywhere in your application using $this.auth. It is also available in fetch, asyncData, middleware and NUXtInitServer from the context object as $auth.
The context provides additional objects/params from NUXt to Vue components and is available in special nUXt lifecycle areas like those mentioned above.
To use the auth module in your application, you would have to install it using yarn or npm.
YARN
yarn add @nUXtjs/auth
NPM
npm install @nUXtjs/auth
Add it to your nUXt.config.js file.
modules: [ '@nUXtjs/auth' ], auth: { // Options }
The auth property accepts a list of properties such as strategies and redirect. Here, strategies accepts your preferred authentication method which can be:
local For username/email and password-based flow.
Facebook For using Facebook accounts as a means of authentication.
Github For authenticating users with Github accounts.
Google For authenticating users with Google accounts.
Auth0
Laravel Passport
The redirect property accepts an object of links for:
login Users would be redirected to this link if login is required.
logout Users would be redirected here if after logout current route is protected.
home Users would be redirected here after login.
Now, let us add the following to our nUXt.config.js file.
/* ** Auth module configuration */ auth: { redirect: { login: '/login', logout: '/', home: '/my-reports' }, strategies: { local: { endpoints: { login: { url: "/user/login", method: "post", propertyName: "data.token", }, logout: false, user: false, }, tokenType: '', tokenName: 'x-auth', autoFetchUser: false }, }, }
Please note that the auth method works best when there is a user endpoint provided in the option above.
Inside the auth config object, we have a redirect option in which we set our login route to /login, logout route to / and home route to /my-reports which would all behave as expected. We also have a tokenType property which represents the Authorization type in the header of our Axios request. It is set to Bearer by default and can be changed to work with your API.
For our API, there is no token type and this is why we’re going to leave it as an empty string. The tokenName represents the Authorization name (or the header property you want to attach your token to) inside your header in your Axios request.
By default, it is set to Authorization but for our API, the Authorization name is x-auth. The autoFetchUser property is used to enable user fetch object using the user endpoint property after login. It is true by default but our API does not have a user endpoint so we have set that to false.
For this tutorial, we would be using the local strategy. In our strategies, we have the local option with endpoints for login, user and logout but in our case, we would only use the *login* option because our demo API does not have a *logout* endpoint and our user object is being returned when *login* is successful.
Note: The auth module does not have a register endpoint option so that means we’re going to register the traditional way and redirect the user to the login page where we will perform the authentication using this.$auth.loginWith. This is the method used in authenticating your users. It accepts a ‘strategy’ (e.g local) as a first argument and then an object to perform this authentication with. Take a look at the following example.
let data { email: '[email protected]', password: '123456' } this.$auth.loginWith('local', { data })
Using The Auth Module
Now that we have configured our auth module, we can proceed to our registration page. If you visit the /register page, you should see a registration form.
Register page. (Large preview)
Let us make this form functional by adding the following code:
methods: { async registerUser() { this.loading = true; let data = this.register; try { await this.$axios.post("/user/create", data); this.$router.push("/login"); this.loading = false; this.$notify({ group: "success", title: "Success!", text: "Account created successfully" }); } catch (error) { this.loading = false; this.$notify({ group: "error", title: "Error!", text: error.response ? error.response.data.error : "Sorry an error occured, check your internet" }); } } }
Here, we have an async function called registerUser which is tied to a click event in our template and makes an Axios request wrapped in a try/catch block to an endpoint /user/create. This redirects to the /login page and notifies the user of a successful registration. We also have a catch block that alerts the user of any error if the request is not successful.
If the registration is successful, you would be redirected to the login page.
Login page with notification component. (Large preview)
Here, we’re going to make use of auth authentication method this.$auth.loginWith('local', loginData) after which we would use the this.$auth.setUser(userObj) to set the user in our auth instance.
To get the login page working, let’s add the following code to our login.vue file.
methods: { async logIn() { let data = this.login; this.loading = true; try { let res = await this.$auth.loginWith("local", { data }); this.loading = false; let user = res.data.data.user; this.$auth.setUser(user); this.$notify({ group: "success", title: "Success!", text: "Welcome!" }); } catch (error) { this.loading = false; this.$notify({ group: "error", title: "Error!", text: error.response ? error.response.data.error : "Sorry an error occured, check your internet" }); } } }
We created an async function called logIn using the auth method this.$auth.loginWith('local, loginData). If this login attempt is successful, we then assign the user data to our auth instance using this.$auth.setUser(userInfo) and redirect the user to the /my-report page.
You can now get user data using this.$auth.user or with Vuex using this.$store.state.auth.user but that’s not all. The auth instance contains some other properties which you can see if you log in or check your state using your Vue dev tools.
If you log this.$store.state.auth to the console, you’ll see this:
{ "auth": { "user": { "id": "d7a5efdf-0c29-48aa-9255-be818301d602", "email": "[email protected]", "lastName": "Xo", "firstName": "Tm", "othernames": null, "isAdmin": false, "phoneNumber": null, "username": null }, "loggedIn": true, "strategy": "local", "busy": false } }
The auth instance contains a loggedIn property that is useful in switching between authenticated links in the nav/header section of your application. It also contains a strategy method that states the type of strategy the instance is running (e.g local).
Now, we will make use of this loggedIn property to arrange our nav links. Update your navBar component to the following:
<template> <header class="header"> <div class="logo"> <nUXt-link to="/"> <Logo /> </nUXt-link> </div> <nav class="nav"> <div class="nav__user" v-if="auth.loggedIn"> <p></p> <button class="nav__link nav__link--long"> <nUXt-link to="/report-incident">Report incident</nUXt-link> </button> <button class="nav__link nav__link--long"> <nUXt-link to="/my-reports">My Reports</nUXt-link> </button> <button class="nav__link" @click.prevent="logOut">Log out</button> </div> <button class="nav__link" v-if="!auth.loggedIn"> <nUXt-link to="/login">Login</nUXt-link> </button> <button class="nav__link" v-if="!auth.loggedIn"> <nUXt-link to="/register">Register</nUXt-link> </button> </nav> </header> </template> <script> import { mapState } from "vuex"; import Logo from "@/components/Logo"; export default { name: "nav-bar", data() { return {}; }, computed: { ...mapState(["auth"]) }, methods: { logOut() { this.$store.dispatch("logOut"); this.$router.push("/login"); } }, components: { Logo } }; </script> <style></style>
In our template section, we have several links to different parts of the application in which we are now using auth.loggedIn to display the appropriate links depending on the authentication status. We have a logout button that has a click event with a logOut() function attached to it. We also display the user’s email gotten from the auth property which is accessed from our Vuex store using the mapState method which maps our state auth to the computed property of the nav component. We also have a logout method that calls our Vuex action logOut and redirects the user to the login page.
Now, let us go ahead and update our store to have a logOut action.
export const actions = { // .... logOut() { this.$auth.logout(); } }
The logOut action calls the auth logout method which clears user data, deletes tokens from localStorage and sets loggedIn to false.
Routes like /my-reports and report-incident should not be visible to guests but at this point in our app, that is not the case. NUXt does not have a navigation guard that can protect your routes, but it has is the auth middleware. It gives you the freedom to create your own middleware so you can configure it to work the way you want.
It can be set in two ways:
Per route.
Globally for the whole app in your nUXt.config.js file.
router: { middleware: ['auth'] }
This auth middleware works with your auth instance so you do not need to create an auth.js file in your middleware folder.
Let us now add this middleware to our my-reports.vue and report-incident.vue files. Add the following lines of code to the script section of each file.
middleware: 'auth'
Now, our application would check if the user trying to access these routes has an auth.loggedIn value of true. It’ll redirect them to the login page using our redirect option in our auth config file — if you’re not logged in and you try to visit either /my-report or report-incident, you would be redirected to /login.
If you go to /report-incidents, this is what you should see.
Report incident page. (Large preview)
This page is for adding incidents but that right now the form does not send incident to our server because we are not making the call to the server when the user attempts to submit the form. To solve this, we will add a reportIncident method which will be called when the user clicks on Report. We’ll have this in the script section of the component. This method will send the form data to the server. Update your report-incident.vue file with the following:
<template> <section class="report"> <h1 class="report__heading">Report an Incident</h1> <form class="report__form"> <div class="input__container"> <label for="title" class="input__label">Title</label> <input type="text" name="title" id="title" v-model="incident.title" class="input__field" required /> </div> <div class="input__container"> <label for="location" class="input__label">Location</label> <input type="text" name="location" id="location" v-model="incident.location" required class="input__field" /> </div> <div class="input__container"> <label for="comment" class="input__label">Comment</label> <textarea name="comment" id="comment" v-model="incident.comment" class="input__area" cols="30" rows="10" required ></textarea> </div> <input type="submit" value="Report" class="input__button" @click.prevent="reportIncident" /> <p class="loading__indicator" v-if="loading">Please wait....</p> </form> </section> </template> <script> export default { name: "report-incident", middleware: "auth", data() { return { loading: false, incident: { type: "red-flag", title: "", location: "", comment: "" } }; }, methods: { async reportIncident() { let data = this.incident; let formData = new FormData(); formData.append("title", data.title); formData.append("type", data.type); formData.append("location", data.location); formData.append("comment", data.comment); this.loading = true; try { let res = await this.$store.dispatch("reportIncident", formData); this.$notify({ group: "success", title: "Success", text: "Incident reported successfully!" }); this.loading = false; this.$router.push("/my-reports"); } catch (error) { this.loading = false; this.$notify({ group: "error", title: "Error!", text: error.response ? error.response.data.error : "Sorry an error occured, check your internet" }); } } } }; </script> <style> </style>
Here, we have a form with input fields for title, location, and comment with two-way data binding using v-model. We also have a submit button with a click event. In the script section, we have a reportIncident method that collects all the information provided in the form and is sent to our server using FormData because the API is designed to also accept images and videos.
This formData is attached to a Vuex action using the dispatch method, if the request is successful, you get redirected to /my-reports with a notification informing you that this request was successful otherwise, you would be notified of an error with the error message.
At this point, we don’t have reportIncident action in our store yet so in your browser console, you would see an error if you try to click submit on this page.
Vuex error message. (Large preview)
To fix this, add the reportIncident action your index.js file.
export const actions = { // ... async reportIncident({}, data) { let res = await this.$axios.post('/incident/create', data) return res; } }
Here, we have a reportIncident function that takes in an empty context object and the data we’re sending from our form. This data is then attached to a post request that creates an incident and returns back to our report-incident.vue file.
At this point, you should be able to add a report using the form after which you would be redirected to /my-reports page.
My reports page empty. (Large preview)
This page should display a list of incidents created by the user but right now it only shows what we see above, let’s go ahead to fix that.
We’re going to be using the fetch method we learned about to get this list. Update your my-reports.vue file with the following:
<script> import incidentCard from "@/components/incidentCard.vue"; export default { middleware: "auth", name: "my-reports", data() { return { incidents: [] }; }, components: { incidentCard }, async fetch() { let { data } = await this.$axios.get("/user/incidents"); this.incidents = data.data; } }; </script>
Here, we use fetch method to get user-specific incidents and assign the response to our incidents array.
If you refresh your page after adding an incident, you should see something like this.
My Reports page with a report. (Large preview)
At this point, we would notice a difference in how fetch method and asyncData loads our data.
Conclusion
So far, we have learned about the Axios module and all of its features. We have also learned more about asyncData, and how we can fetch both of them together despite their differences. We’ve also learned how to perform authentication in our application using the auth module and how to use the auth middleware to protect our routes. Here are some useful resources that talk more about all we’ve covered.
Resources
“Auth Module,” NUXtJS.org
“Axios Module: Introduction,” NUXtJS.org
FormData, MDN web docs
“API: The asyncData Method,” NUXtJS.org
“The Vue Instance: Lifecycle Diagram,” VueJS.org
“Understanding How fetch Works In Nuxt 2.12,” NUXtJS.org
(ks, ra, yk, il)
Website Design & SEO Delray Beach by DBL07.co
Delray Beach SEO
source http://www.scpie.org/getting-started-with-axios-in-nuxt/ source https://scpie.tumblr.com/post/619262397140664320
0 notes
Text
Getting Started With Axios In Nuxt
About The Author
Front-end developer based in Lagos, Nigeria. He enjoys converting designs into code and building things for the web. More about Timi …
In this tutorial, we will learn how to make a request in our NUXt.js applications using the Axios module. We will also learn how to use the ayncData and fetch methods to fetch data on the server-side using Axios and the differences between the two methods. Finally, we will learn how to add authentication to our application using the Auth module.
NUXt.js provides an Axios module for easy integration with your application. Axios is a promise-based HTTP client that works in the browser and Node.js environment or, in simpler terms, it is a tool for making requests (e.g API calls) in client-side applications and Node.js environment.
In this tutorial, we’re going to learn how to use the Axios module and how to make a request on the server-side using asyncData and fetch. These two methods make a request on the server-side but they have some differences which we’re also going to cover. Finally, we’ll learn how to perform authentication and secure pages/routes using the auth module and auth middleware.
This article requires basic knowledge of NUXtjs and Vuejs as we’ll be building on top of that. For those without experience with Vuejs, I recommend you start from their official documentation and the Nuxt official page before continuing with this article.
What Is The Nuxt.js Axios Module?
According to the official Documentation,
“It is a Secure and easy Axios integration with NUXt.js.”
Here are some of its features:
Automatically set base URL for client-side & server-side.
Proxy request headers in SSR (Useful for auth).
Fetch Style requests.
Integrated with NUXt.js Progressbar while making requests.
To use the axios module in your application, you will have to first install it by using either npm or yarn.
YARN
yarn add @nUXtjs/axios
NPM
npm install @nUXtjs/axios
Add it into your nUXt.config.js file:
modules: [ '@nUXtjs/axios', ], axios: { // extra config e.g // BaseURL: 'https://link-to-API' }
The modules array accepts a list of NUXt.js modules such as dotenv, auth and in this case, Axios. What we’ve done is to inform our application that we would be using the Axios module, which we reference using @nUXtjs/axios. This is then followed by the axios property which is an object of configurations like the baseURL for both client-side and server-side.
Now, you can access Axios from anywhere in your application by calling this.$axios.method or this.$axios.$method. Where method can be get, post, or delete.
Making Your First Request Using Axios
For this tutorial, I’ve put together a simple application on Github. The repository contains two folders, start and finish, the start folder contains all you need to get right into the tutorial. The finish folder contains a completed version of what we would be building.
After cloning the repo and opening the start folder, we would need to install all our packages in the package.json file so open your terminal and run the following command:
npm install
Once that is done, we can start our app using the npm run dev command. This is what you should see when you go to localhost:3000.
Our application’s landing page. (Large preview)
The next thing we have to do is to create a .env file in the root folder of our application and add our API URL to it. For this tutorial, we’ll be using a sample API built to collect reports from users.
API_URL=https://ireporter-endpoint.herokuapp.com/api/v2/
This way, we do not have to hard code our API into our app which is useful for working with two APIs (development and production).
The next step would be to open our nUXt.config.js file and add the environmental variable to our axios config that we added above.
/* ** Axios module configuration */ axios: { // See https://github.com/nUXt-community/axios-module#options baseURL: process.env.API_URL, },
Here, we tell NUXt.js to use this baseURL for both our client-side and server-side requests whenever we use this Axios module.
Now, to fetch a list of reports, let us open the index.vue file and add the following method to the script section.
async getIncidents() { let res = await this.$store.dispatch("getIncidents"); this.incidents = res.data.data.incidents; }
What we have done is to create an async function that we call getIncidents() and we can tell what it does from the name — it fetches a list of incidents using the Vuex store action method this.$store.dispatch. We assign the response from this action to our incidents property so we can be able to make use of it in the component.
We want to call the getIncidents() method whenever the component mounts. We can do that using the mounted hook.
mounted() { this.getIncidents() }
mounted() is a lifecycle hook that gets called when the component mounts. That will cause the call to the API to happen when the component mounts. Now, let us go into our index.js file in our store and create this action where we’ll be making our Axios request from.
export const actions = { async getIncidents() { let res = await this.$axios.get('/incidents') return res; } }
Here, we created the action called getIncidents which is an async function, then we await a response from the server and return this response. The response from this action is sent back to our getIncidents() method in our index.vue file.
If we refresh our application, we should now be able to see a long list of incidents rendered on the page.
List of incidents on landing page. (Large preview)
We have made our first request using Axios but we won’t stop there, we are going to be trying out asyncData and fetch to see the differences between them and using Axios.
AsyncData
AsyncData fetches data on the server-side and it’s called before loading the page component. It does not have access to this because it is called before your page component data is created. this is only available after the created hook has been called so NUXt.js automatically merges the returned data into the component’s data.
Using asyncData is good for SEO Company because it fetches your site’s content on the server-side and also helps in loading content faster. Note that asyncData method can only be used in the pages folder of your application as it would not work in the components folder. This is because asyncData hook gets called before your component is created.
Image from NUXt blog. (Large preview)
Let us add asyncData to our index.vue file and observe how fast our incidents data loads. Add the following code after our components property and let us get rid of our mounted hook.
async asyncData({ $axios }) { let { data } = await $axios.get("/incidents"); return { incidents: data.data.incidents }; }, // mounted() { // this.getIncidents(); // },
Here, the asyncData method accepts a property from the context $axios. We use this property to fetch the list of incidents and the value is then returned. This value is automatically injected into our component. Now, you can notice how fast your content loads if you refresh the page and at no time is there no incident to render.
Fetch
The Fetch method is also used to make requests on the server-side. It is called after the created hook in the life cycle which means it has access to the component’s data. Unlike the asyncData method, the fetch method can be used in all .vue files and be used with the Vuex store. This means that if you have the following in your data function.
data() { return { incidents: [], id: 5, gender: 'male' }; }
You can easily modify id or gender by calling this.id or this.gender.
Using Axios As A Plugin
During the process of development with Axios, you might find that you need extra configuration like creating instances and interceptors for your request so your application can work as intended and thankfully, we can do that by extending our Axios into a plugin.
To extend axios, you have to create a plugin (e.g. axios.js) in your plugins folder.
export default function ({ $axios, store, redirect }) { $axios.onError(error => { if (error.response && error.response.status === 500) { redirect('/login') } }) $axios.interceptors.response.use( response => { if (response.status === 200) { if (response.request.responseURL && response.request.responseURL.includes('login')) { store.dispatch("setUser", response); } } return response } ) }
This is an example of a plugin I wrote for a NUXt application. Here, your function takes in a context object of $axios, store and redirect which we would use in configuring the plugin. The first thing we do is to listen for an error with a status of 500 using $axios.onError and redirect the user to the login page.
We also have an interceptor that intercepts every request response we make in our application checks if the status of the response we get is 200. If that is true we proceed and check that there is a response.request.responseURL and if it includes login. If this checks out to be true, we then send this response using our store’s dispatch method where it then mutated in our state.
Add this plugin to your nUXt.config.js file:
plugins: [ '~/plugins/axios' ]
After doing this, your Axios plugin would intercept any request you make and check if you have defined a special case for it.
Introduction To The Auth Module
The auth module is used for performing authentication for your NUXt application and can be accessed from anywhere in your application using $this.auth. It is also available in fetch, asyncData, middleware and NUXtInitServer from the context object as $auth.
The context provides additional objects/params from NUXt to Vue components and is available in special nUXt lifecycle areas like those mentioned above.
To use the auth module in your application, you would have to install it using yarn or npm.
YARN
yarn add @nUXtjs/auth
NPM
npm install @nUXtjs/auth
Add it to your nUXt.config.js file.
modules: [ '@nUXtjs/auth' ], auth: { // Options }
The auth property accepts a list of properties such as strategies and redirect. Here, strategies accepts your preferred authentication method which can be:
local For username/email and password-based flow.
Facebook For using Facebook accounts as a means of authentication.
Github For authenticating users with Github accounts.
Google For authenticating users with Google accounts.
Auth0
Laravel Passport
The redirect property accepts an object of links for:
login Users would be redirected to this link if login is required.
logout Users would be redirected here if after logout current route is protected.
home Users would be redirected here after login.
Now, let us add the following to our nUXt.config.js file.
/* ** Auth module configuration */ auth: { redirect: { login: '/login', logout: '/', home: '/my-reports' }, strategies: { local: { endpoints: { login: { url: "/user/login", method: "post", propertyName: "data.token", }, logout: false, user: false, }, tokenType: '', tokenName: 'x-auth', autoFetchUser: false }, }, }
Please note that the auth method works best when there is a user endpoint provided in the option above.
Inside the auth config object, we have a redirect option in which we set our login route to /login, logout route to / and home route to /my-reports which would all behave as expected. We also have a tokenType property which represents the Authorization type in the header of our Axios request. It is set to Bearer by default and can be changed to work with your API.
For our API, there is no token type and this is why we’re going to leave it as an empty string. The tokenName represents the Authorization name (or the header property you want to attach your token to) inside your header in your Axios request.
By default, it is set to Authorization but for our API, the Authorization name is x-auth. The autoFetchUser property is used to enable user fetch object using the user endpoint property after login. It is true by default but our API does not have a user endpoint so we have set that to false.
For this tutorial, we would be using the local strategy. In our strategies, we have the local option with endpoints for login, user and logout but in our case, we would only use the *login* option because our demo API does not have a *logout* endpoint and our user object is being returned when *login* is successful.
Note: The auth module does not have a register endpoint option so that means we’re going to register the traditional way and redirect the user to the login page where we will perform the authentication using this.$auth.loginWith. This is the method used in authenticating your users. It accepts a ‘strategy’ (e.g local) as a first argument and then an object to perform this authentication with. Take a look at the following example.
let data { email: '[email protected]', password: '123456' } this.$auth.loginWith('local', { data })
Using The Auth Module
Now that we have configured our auth module, we can proceed to our registration page. If you visit the /register page, you should see a registration form.
Register page. (Large preview)
Let us make this form functional by adding the following code:
methods: { async registerUser() { this.loading = true; let data = this.register; try { await this.$axios.post("/user/create", data); this.$router.push("/login"); this.loading = false; this.$notify({ group: "success", title: "Success!", text: "Account created successfully" }); } catch (error) { this.loading = false; this.$notify({ group: "error", title: "Error!", text: error.response ? error.response.data.error : "Sorry an error occured, check your internet" }); } } }
Here, we have an async function called registerUser which is tied to a click event in our template and makes an Axios request wrapped in a try/catch block to an endpoint /user/create. This redirects to the /login page and notifies the user of a successful registration. We also have a catch block that alerts the user of any error if the request is not successful.
If the registration is successful, you would be redirected to the login page.
Login page with notification component. (Large preview)
Here, we’re going to make use of auth authentication method this.$auth.loginWith('local', loginData) after which we would use the this.$auth.setUser(userObj) to set the user in our auth instance.
To get the login page working, let’s add the following code to our login.vue file.
methods: { async logIn() { let data = this.login; this.loading = true; try { let res = await this.$auth.loginWith("local", { data }); this.loading = false; let user = res.data.data.user; this.$auth.setUser(user); this.$notify({ group: "success", title: "Success!", text: "Welcome!" }); } catch (error) { this.loading = false; this.$notify({ group: "error", title: "Error!", text: error.response ? error.response.data.error : "Sorry an error occured, check your internet" }); } } }
We created an async function called logIn using the auth method this.$auth.loginWith('local, loginData). If this login attempt is successful, we then assign the user data to our auth instance using this.$auth.setUser(userInfo) and redirect the user to the /my-report page.
You can now get user data using this.$auth.user or with Vuex using this.$store.state.auth.user but that’s not all. The auth instance contains some other properties which you can see if you log in or check your state using your Vue dev tools.
If you log this.$store.state.auth to the console, you’ll see this:
{ "auth": { "user": { "id": "d7a5efdf-0c29-48aa-9255-be818301d602", "email": "[email protected]", "lastName": "Xo", "firstName": "Tm", "othernames": null, "isAdmin": false, "phoneNumber": null, "username": null }, "loggedIn": true, "strategy": "local", "busy": false } }
The auth instance contains a loggedIn property that is useful in switching between authenticated links in the nav/header section of your application. It also contains a strategy method that states the type of strategy the instance is running (e.g local).
Now, we will make use of this loggedIn property to arrange our nav links. Update your navBar component to the following:
<template> <header class="header"> <div class="logo"> <nUXt-link to="/"> <Logo /> </nUXt-link> </div> <nav class="nav"> <div class="nav__user" v-if="auth.loggedIn"> <p></p> <button class="nav__link nav__link--long"> <nUXt-link to="/report-incident">Report incident</nUXt-link> </button> <button class="nav__link nav__link--long"> <nUXt-link to="/my-reports">My Reports</nUXt-link> </button> <button class="nav__link" @click.prevent="logOut">Log out</button> </div> <button class="nav__link" v-if="!auth.loggedIn"> <nUXt-link to="/login">Login</nUXt-link> </button> <button class="nav__link" v-if="!auth.loggedIn"> <nUXt-link to="/register">Register</nUXt-link> </button> </nav> </header> </template> <script> import { mapState } from "vuex"; import Logo from "@/components/Logo"; export default { name: "nav-bar", data() { return {}; }, computed: { ...mapState(["auth"]) }, methods: { logOut() { this.$store.dispatch("logOut"); this.$router.push("/login"); } }, components: { Logo } }; </script> <style></style>
In our template section, we have several links to different parts of the application in which we are now using auth.loggedIn to display the appropriate links depending on the authentication status. We have a logout button that has a click event with a logOut() function attached to it. We also display the user’s email gotten from the auth property which is accessed from our Vuex store using the mapState method which maps our state auth to the computed property of the nav component. We also have a logout method that calls our Vuex action logOut and redirects the user to the login page.
Now, let us go ahead and update our store to have a logOut action.
export const actions = { // .... logOut() { this.$auth.logout(); } }
The logOut action calls the auth logout method which clears user data, deletes tokens from localStorage and sets loggedIn to false.
Routes like /my-reports and report-incident should not be visible to guests but at this point in our app, that is not the case. NUXt does not have a navigation guard that can protect your routes, but it has is the auth middleware. It gives you the freedom to create your own middleware so you can configure it to work the way you want.
It can be set in two ways:
Per route.
Globally for the whole app in your nUXt.config.js file.
router: { middleware: ['auth'] }
This auth middleware works with your auth instance so you do not need to create an auth.js file in your middleware folder.
Let us now add this middleware to our my-reports.vue and report-incident.vue files. Add the following lines of code to the script section of each file.
middleware: 'auth'
Now, our application would check if the user trying to access these routes has an auth.loggedIn value of true. It’ll redirect them to the login page using our redirect option in our auth config file — if you’re not logged in and you try to visit either /my-report or report-incident, you would be redirected to /login.
If you go to /report-incidents, this is what you should see.
Report incident page. (Large preview)
This page is for adding incidents but that right now the form does not send incident to our server because we are not making the call to the server when the user attempts to submit the form. To solve this, we will add a reportIncident method which will be called when the user clicks on Report. We’ll have this in the script section of the component. This method will send the form data to the server. Update your report-incident.vue file with the following:
<template> <section class="report"> <h1 class="report__heading">Report an Incident</h1> <form class="report__form"> <div class="input__container"> <label for="title" class="input__label">Title</label> <input type="text" name="title" id="title" v-model="incident.title" class="input__field" required /> </div> <div class="input__container"> <label for="location" class="input__label">Location</label> <input type="text" name="location" id="location" v-model="incident.location" required class="input__field" /> </div> <div class="input__container"> <label for="comment" class="input__label">Comment</label> <textarea name="comment" id="comment" v-model="incident.comment" class="input__area" cols="30" rows="10" required ></textarea> </div> <input type="submit" value="Report" class="input__button" @click.prevent="reportIncident" /> <p class="loading__indicator" v-if="loading">Please wait....</p> </form> </section> </template> <script> export default { name: "report-incident", middleware: "auth", data() { return { loading: false, incident: { type: "red-flag", title: "", location: "", comment: "" } }; }, methods: { async reportIncident() { let data = this.incident; let formData = new FormData(); formData.append("title", data.title); formData.append("type", data.type); formData.append("location", data.location); formData.append("comment", data.comment); this.loading = true; try { let res = await this.$store.dispatch("reportIncident", formData); this.$notify({ group: "success", title: "Success", text: "Incident reported successfully!" }); this.loading = false; this.$router.push("/my-reports"); } catch (error) { this.loading = false; this.$notify({ group: "error", title: "Error!", text: error.response ? error.response.data.error : "Sorry an error occured, check your internet" }); } } } }; </script> <style> </style>
Here, we have a form with input fields for title, location, and comment with two-way data binding using v-model. We also have a submit button with a click event. In the script section, we have a reportIncident method that collects all the information provided in the form and is sent to our server using FormData because the API is designed to also accept images and videos.
This formData is attached to a Vuex action using the dispatch method, if the request is successful, you get redirected to /my-reports with a notification informing you that this request was successful otherwise, you would be notified of an error with the error message.
At this point, we don’t have reportIncident action in our store yet so in your browser console, you would see an error if you try to click submit on this page.
Vuex error message. (Large preview)
To fix this, add the reportIncident action your index.js file.
export const actions = { // ... async reportIncident({}, data) { let res = await this.$axios.post('/incident/create', data) return res; } }
Here, we have a reportIncident function that takes in an empty context object and the data we’re sending from our form. This data is then attached to a post request that creates an incident and returns back to our report-incident.vue file.
At this point, you should be able to add a report using the form after which you would be redirected to /my-reports page.
My reports page empty. (Large preview)
This page should display a list of incidents created by the user but right now it only shows what we see above, let’s go ahead to fix that.
We’re going to be using the fetch method we learned about to get this list. Update your my-reports.vue file with the following:
<script> import incidentCard from "@/components/incidentCard.vue"; export default { middleware: "auth", name: "my-reports", data() { return { incidents: [] }; }, components: { incidentCard }, async fetch() { let { data } = await this.$axios.get("/user/incidents"); this.incidents = data.data; } }; </script>
Here, we use fetch method to get user-specific incidents and assign the response to our incidents array.
If you refresh your page after adding an incident, you should see something like this.
My Reports page with a report. (Large preview)
At this point, we would notice a difference in how fetch method and asyncData loads our data.
Conclusion
So far, we have learned about the Axios module and all of its features. We have also learned more about asyncData, and how we can fetch both of them together despite their differences. We’ve also learned how to perform authentication in our application using the auth module and how to use the auth middleware to protect our routes. Here are some useful resources that talk more about all we’ve covered.
Resources
“Auth Module,” NUXtJS.org
“Axios Module: Introduction,” NUXtJS.org
FormData, MDN web docs
“API: The asyncData Method,” NUXtJS.org
“The Vue Instance: Lifecycle Diagram,” VueJS.org
“Understanding How fetch Works In Nuxt 2.12,” NUXtJS.org
(ks, ra, yk, il)
Website Design & SEO Delray Beach by DBL07.co
Delray Beach SEO
source http://www.scpie.org/getting-started-with-axios-in-nuxt/
0 notes
Text
Getting Started With Axios In Nuxt
About The Author
Front-end developer based in Lagos, Nigeria. He enjoys converting designs into code and building things for the web. More about Timi …
In this tutorial, we will learn how to make a request in our NUXt.js applications using the Axios module. We will also learn how to use the ayncData and fetch methods to fetch data on the server-side using Axios and the differences between the two methods. Finally, we will learn how to add authentication to our application using the Auth module.
NUXt.js provides an Axios module for easy integration with your application. Axios is a promise-based HTTP client that works in the browser and Node.js environment or, in simpler terms, it is a tool for making requests (e.g API calls) in client-side applications and Node.js environment.
In this tutorial, we’re going to learn how to use the Axios module and how to make a request on the server-side using asyncData and fetch. These two methods make a request on the server-side but they have some differences which we’re also going to cover. Finally, we’ll learn how to perform authentication and secure pages/routes using the auth module and auth middleware.
This article requires basic knowledge of NUXtjs and Vuejs as we’ll be building on top of that. For those without experience with Vuejs, I recommend you start from their official documentation and the Nuxt official page before continuing with this article.
What Is The Nuxt.js Axios Module?
According to the official Documentation,
“It is a Secure and easy Axios integration with NUXt.js.”
Here are some of its features:
Automatically set base URL for client-side & server-side.
Proxy request headers in SSR (Useful for auth).
Fetch Style requests.
Integrated with NUXt.js Progressbar while making requests.
To use the axios module in your application, you will have to first install it by using either npm or yarn.
YARN
yarn add @nUXtjs/axios
NPM
npm install @nUXtjs/axios
Add it into your nUXt.config.js file:
modules: [ '@nUXtjs/axios', ], axios: { // extra config e.g // BaseURL: 'https://link-to-API' }
The modules array accepts a list of NUXt.js modules such as dotenv, auth and in this case, Axios. What we’ve done is to inform our application that we would be using the Axios module, which we reference using @nUXtjs/axios. This is then followed by the axios property which is an object of configurations like the baseURL for both client-side and server-side.
Now, you can access Axios from anywhere in your application by calling this.$axios.method or this.$axios.$method. Where method can be get, post, or delete.
Making Your First Request Using Axios
For this tutorial, I’ve put together a simple application on Github. The repository contains two folders, start and finish, the start folder contains all you need to get right into the tutorial. The finish folder contains a completed version of what we would be building.
After cloning the repo and opening the start folder, we would need to install all our packages in the package.json file so open your terminal and run the following command:
npm install
Once that is done, we can start our app using the npm run dev command. This is what you should see when you go to localhost:3000.
Our application’s landing page. (Large preview)
The next thing we have to do is to create a .env file in the root folder of our application and add our API URL to it. For this tutorial, we’ll be using a sample API built to collect reports from users.
API_URL=https://ireporter-endpoint.herokuapp.com/api/v2/
This way, we do not have to hard code our API into our app which is useful for working with two APIs (development and production).
The next step would be to open our nUXt.config.js file and add the environmental variable to our axios config that we added above.
/* ** Axios module configuration */ axios: { // See https://github.com/nUXt-community/axios-module#options baseURL: process.env.API_URL, },
Here, we tell NUXt.js to use this baseURL for both our client-side and server-side requests whenever we use this Axios module.
Now, to fetch a list of reports, let us open the index.vue file and add the following method to the script section.
async getIncidents() { let res = await this.$store.dispatch("getIncidents"); this.incidents = res.data.data.incidents; }
What we have done is to create an async function that we call getIncidents() and we can tell what it does from the name — it fetches a list of incidents using the Vuex store action method this.$store.dispatch. We assign the response from this action to our incidents property so we can be able to make use of it in the component.
We want to call the getIncidents() method whenever the component mounts. We can do that using the mounted hook.
mounted() { this.getIncidents() }
mounted() is a lifecycle hook that gets called when the component mounts. That will cause the call to the API to happen when the component mounts. Now, let us go into our index.js file in our store and create this action where we’ll be making our Axios request from.
export const actions = { async getIncidents() { let res = await this.$axios.get('/incidents') return res; } }
Here, we created the action called getIncidents which is an async function, then we await a response from the server and return this response. The response from this action is sent back to our getIncidents() method in our index.vue file.
If we refresh our application, we should now be able to see a long list of incidents rendered on the page.
List of incidents on landing page. (Large preview)
We have made our first request using Axios but we won’t stop there, we are going to be trying out asyncData and fetch to see the differences between them and using Axios.
AsyncData
AsyncData fetches data on the server-side and it’s called before loading the page component. It does not have access to this because it is called before your page component data is created. this is only available after the created hook has been called so NUXt.js automatically merges the returned data into the component’s data.
Using asyncData is good for SEO Company because it fetches your site’s content on the server-side and also helps in loading content faster. Note that asyncData method can only be used in the pages folder of your application as it would not work in the components folder. This is because asyncData hook gets called before your component is created.
Image from NUXt blog. (Large preview)
Let us add asyncData to our index.vue file and observe how fast our incidents data loads. Add the following code after our components property and let us get rid of our mounted hook.
async asyncData({ $axios }) { let { data } = await $axios.get("/incidents"); return { incidents: data.data.incidents }; }, // mounted() { // this.getIncidents(); // },
Here, the asyncData method accepts a property from the context $axios. We use this property to fetch the list of incidents and the value is then returned. This value is automatically injected into our component. Now, you can notice how fast your content loads if you refresh the page and at no time is there no incident to render.
Fetch
The Fetch method is also used to make requests on the server-side. It is called after the created hook in the life cycle which means it has access to the component’s data. Unlike the asyncData method, the fetch method can be used in all .vue files and be used with the Vuex store. This means that if you have the following in your data function.
data() { return { incidents: [], id: 5, gender: 'male' }; }
You can easily modify id or gender by calling this.id or this.gender.
Using Axios As A Plugin
During the process of development with Axios, you might find that you need extra configuration like creating instances and interceptors for your request so your application can work as intended and thankfully, we can do that by extending our Axios into a plugin.
To extend axios, you have to create a plugin (e.g. axios.js) in your plugins folder.
export default function ({ $axios, store, redirect }) { $axios.onError(error => { if (error.response && error.response.status === 500) { redirect('/login') } }) $axios.interceptors.response.use( response => { if (response.status === 200) { if (response.request.responseURL && response.request.responseURL.includes('login')) { store.dispatch("setUser", response); } } return response } ) }
This is an example of a plugin I wrote for a NUXt application. Here, your function takes in a context object of $axios, store and redirect which we would use in configuring the plugin. The first thing we do is to listen for an error with a status of 500 using $axios.onError and redirect the user to the login page.
We also have an interceptor that intercepts every request response we make in our application checks if the status of the response we get is 200. If that is true we proceed and check that there is a response.request.responseURL and if it includes login. If this checks out to be true, we then send this response using our store’s dispatch method where it then mutated in our state.
Add this plugin to your nUXt.config.js file:
plugins: [ '~/plugins/axios' ]
After doing this, your Axios plugin would intercept any request you make and check if you have defined a special case for it.
Introduction To The Auth Module
The auth module is used for performing authentication for your NUXt application and can be accessed from anywhere in your application using $this.auth. It is also available in fetch, asyncData, middleware and NUXtInitServer from the context object as $auth.
The context provides additional objects/params from NUXt to Vue components and is available in special nUXt lifecycle areas like those mentioned above.
To use the auth module in your application, you would have to install it using yarn or npm.
YARN
yarn add @nUXtjs/auth
NPM
npm install @nUXtjs/auth
Add it to your nUXt.config.js file.
modules: [ '@nUXtjs/auth' ], auth: { // Options }
The auth property accepts a list of properties such as strategies and redirect. Here, strategies accepts your preferred authentication method which can be:
local For username/email and password-based flow.
Facebook For using Facebook accounts as a means of authentication.
Github For authenticating users with Github accounts.
Google For authenticating users with Google accounts.
Auth0
Laravel Passport
The redirect property accepts an object of links for:
login Users would be redirected to this link if login is required.
logout Users would be redirected here if after logout current route is protected.
home Users would be redirected here after login.
Now, let us add the following to our nUXt.config.js file.
/* ** Auth module configuration */ auth: { redirect: { login: '/login', logout: '/', home: '/my-reports' }, strategies: { local: { endpoints: { login: { url: "/user/login", method: "post", propertyName: "data.token", }, logout: false, user: false, }, tokenType: '', tokenName: 'x-auth', autoFetchUser: false }, }, }
Please note that the auth method works best when there is a user endpoint provided in the option above.
Inside the auth config object, we have a redirect option in which we set our login route to /login, logout route to / and home route to /my-reports which would all behave as expected. We also have a tokenType property which represents the Authorization type in the header of our Axios request. It is set to Bearer by default and can be changed to work with your API.
For our API, there is no token type and this is why we’re going to leave it as an empty string. The tokenName represents the Authorization name (or the header property you want to attach your token to) inside your header in your Axios request.
By default, it is set to Authorization but for our API, the Authorization name is x-auth. The autoFetchUser property is used to enable user fetch object using the user endpoint property after login. It is true by default but our API does not have a user endpoint so we have set that to false.
For this tutorial, we would be using the local strategy. In our strategies, we have the local option with endpoints for login, user and logout but in our case, we would only use the *login* option because our demo API does not have a *logout* endpoint and our user object is being returned when *login* is successful.
Note: The auth module does not have a register endpoint option so that means we’re going to register the traditional way and redirect the user to the login page where we will perform the authentication using this.$auth.loginWith. This is the method used in authenticating your users. It accepts a ‘strategy’ (e.g local) as a first argument and then an object to perform this authentication with. Take a look at the following example.
let data { email: '[email protected]', password: '123456' } this.$auth.loginWith('local', { data })
Using The Auth Module
Now that we have configured our auth module, we can proceed to our registration page. If you visit the /register page, you should see a registration form.
Register page. (Large preview)
Let us make this form functional by adding the following code:
methods: { async registerUser() { this.loading = true; let data = this.register; try { await this.$axios.post("/user/create", data); this.$router.push("/login"); this.loading = false; this.$notify({ group: "success", title: "Success!", text: "Account created successfully" }); } catch (error) { this.loading = false; this.$notify({ group: "error", title: "Error!", text: error.response ? error.response.data.error : "Sorry an error occured, check your internet" }); } } }
Here, we have an async function called registerUser which is tied to a click event in our template and makes an Axios request wrapped in a try/catch block to an endpoint /user/create. This redirects to the /login page and notifies the user of a successful registration. We also have a catch block that alerts the user of any error if the request is not successful.
If the registration is successful, you would be redirected to the login page.
Login page with notification component. (Large preview)
Here, we’re going to make use of auth authentication method this.$auth.loginWith('local', loginData) after which we would use the this.$auth.setUser(userObj) to set the user in our auth instance.
To get the login page working, let’s add the following code to our login.vue file.
methods: { async logIn() { let data = this.login; this.loading = true; try { let res = await this.$auth.loginWith("local", { data }); this.loading = false; let user = res.data.data.user; this.$auth.setUser(user); this.$notify({ group: "success", title: "Success!", text: "Welcome!" }); } catch (error) { this.loading = false; this.$notify({ group: "error", title: "Error!", text: error.response ? error.response.data.error : "Sorry an error occured, check your internet" }); } } }
We created an async function called logIn using the auth method this.$auth.loginWith('local, loginData). If this login attempt is successful, we then assign the user data to our auth instance using this.$auth.setUser(userInfo) and redirect the user to the /my-report page.
You can now get user data using this.$auth.user or with Vuex using this.$store.state.auth.user but that’s not all. The auth instance contains some other properties which you can see if you log in or check your state using your Vue dev tools.
If you log this.$store.state.auth to the console, you’ll see this:
{ "auth": { "user": { "id": "d7a5efdf-0c29-48aa-9255-be818301d602", "email": "[email protected]", "lastName": "Xo", "firstName": "Tm", "othernames": null, "isAdmin": false, "phoneNumber": null, "username": null }, "loggedIn": true, "strategy": "local", "busy": false } }
The auth instance contains a loggedIn property that is useful in switching between authenticated links in the nav/header section of your application. It also contains a strategy method that states the type of strategy the instance is running (e.g local).
Now, we will make use of this loggedIn property to arrange our nav links. Update your navBar component to the following:
<template> <header class="header"> <div class="logo"> <nUXt-link to="/"> <Logo /> </nUXt-link> </div> <nav class="nav"> <div class="nav__user" v-if="auth.loggedIn"> <p></p> <button class="nav__link nav__link--long"> <nUXt-link to="/report-incident">Report incident</nUXt-link> </button> <button class="nav__link nav__link--long"> <nUXt-link to="/my-reports">My Reports</nUXt-link> </button> <button class="nav__link" @click.prevent="logOut">Log out</button> </div> <button class="nav__link" v-if="!auth.loggedIn"> <nUXt-link to="/login">Login</nUXt-link> </button> <button class="nav__link" v-if="!auth.loggedIn"> <nUXt-link to="/register">Register</nUXt-link> </button> </nav> </header> </template> <script> import { mapState } from "vuex"; import Logo from "@/components/Logo"; export default { name: "nav-bar", data() { return {}; }, computed: { ...mapState(["auth"]) }, methods: { logOut() { this.$store.dispatch("logOut"); this.$router.push("/login"); } }, components: { Logo } }; </script> <style></style>
In our template section, we have several links to different parts of the application in which we are now using auth.loggedIn to display the appropriate links depending on the authentication status. We have a logout button that has a click event with a logOut() function attached to it. We also display the user’s email gotten from the auth property which is accessed from our Vuex store using the mapState method which maps our state auth to the computed property of the nav component. We also have a logout method that calls our Vuex action logOut and redirects the user to the login page.
Now, let us go ahead and update our store to have a logOut action.
export const actions = { // .... logOut() { this.$auth.logout(); } }
The logOut action calls the auth logout method which clears user data, deletes tokens from localStorage and sets loggedIn to false.
Routes like /my-reports and report-incident should not be visible to guests but at this point in our app, that is not the case. NUXt does not have a navigation guard that can protect your routes, but it has is the auth middleware. It gives you the freedom to create your own middleware so you can configure it to work the way you want.
It can be set in two ways:
Per route.
Globally for the whole app in your nUXt.config.js file.
router: { middleware: ['auth'] }
This auth middleware works with your auth instance so you do not need to create an auth.js file in your middleware folder.
Let us now add this middleware to our my-reports.vue and report-incident.vue files. Add the following lines of code to the script section of each file.
middleware: 'auth'
Now, our application would check if the user trying to access these routes has an auth.loggedIn value of true. It’ll redirect them to the login page using our redirect option in our auth config file — if you’re not logged in and you try to visit either /my-report or report-incident, you would be redirected to /login.
If you go to /report-incidents, this is what you should see.
Report incident page. (Large preview)
This page is for adding incidents but that right now the form does not send incident to our server because we are not making the call to the server when the user attempts to submit the form. To solve this, we will add a reportIncident method which will be called when the user clicks on Report. We’ll have this in the script section of the component. This method will send the form data to the server. Update your report-incident.vue file with the following:
<template> <section class="report"> <h1 class="report__heading">Report an Incident</h1> <form class="report__form"> <div class="input__container"> <label for="title" class="input__label">Title</label> <input type="text" name="title" id="title" v-model="incident.title" class="input__field" required /> </div> <div class="input__container"> <label for="location" class="input__label">Location</label> <input type="text" name="location" id="location" v-model="incident.location" required class="input__field" /> </div> <div class="input__container"> <label for="comment" class="input__label">Comment</label> <textarea name="comment" id="comment" v-model="incident.comment" class="input__area" cols="30" rows="10" required ></textarea> </div> <input type="submit" value="Report" class="input__button" @click.prevent="reportIncident" /> <p class="loading__indicator" v-if="loading">Please wait....</p> </form> </section> </template> <script> export default { name: "report-incident", middleware: "auth", data() { return { loading: false, incident: { type: "red-flag", title: "", location: "", comment: "" } }; }, methods: { async reportIncident() { let data = this.incident; let formData = new FormData(); formData.append("title", data.title); formData.append("type", data.type); formData.append("location", data.location); formData.append("comment", data.comment); this.loading = true; try { let res = await this.$store.dispatch("reportIncident", formData); this.$notify({ group: "success", title: "Success", text: "Incident reported successfully!" }); this.loading = false; this.$router.push("/my-reports"); } catch (error) { this.loading = false; this.$notify({ group: "error", title: "Error!", text: error.response ? error.response.data.error : "Sorry an error occured, check your internet" }); } } } }; </script> <style> </style>
Here, we have a form with input fields for title, location, and comment with two-way data binding using v-model. We also have a submit button with a click event. In the script section, we have a reportIncident method that collects all the information provided in the form and is sent to our server using FormData because the API is designed to also accept images and videos.
This formData is attached to a Vuex action using the dispatch method, if the request is successful, you get redirected to /my-reports with a notification informing you that this request was successful otherwise, you would be notified of an error with the error message.
At this point, we don’t have reportIncident action in our store yet so in your browser console, you would see an error if you try to click submit on this page.
Vuex error message. (Large preview)
To fix this, add the reportIncident action your index.js file.
export const actions = { // ... async reportIncident({}, data) { let res = await this.$axios.post('/incident/create', data) return res; } }
Here, we have a reportIncident function that takes in an empty context object and the data we’re sending from our form. This data is then attached to a post request that creates an incident and returns back to our report-incident.vue file.
At this point, you should be able to add a report using the form after which you would be redirected to /my-reports page.
My reports page empty. (Large preview)
This page should display a list of incidents created by the user but right now it only shows what we see above, let’s go ahead to fix that.
We’re going to be using the fetch method we learned about to get this list. Update your my-reports.vue file with the following:
<script> import incidentCard from "@/components/incidentCard.vue"; export default { middleware: "auth", name: "my-reports", data() { return { incidents: [] }; }, components: { incidentCard }, async fetch() { let { data } = await this.$axios.get("/user/incidents"); this.incidents = data.data; } }; </script>
Here, we use fetch method to get user-specific incidents and assign the response to our incidents array.
If you refresh your page after adding an incident, you should see something like this.
My Reports page with a report. (Large preview)
At this point, we would notice a difference in how fetch method and asyncData loads our data.
Conclusion
So far, we have learned about the Axios module and all of its features. We have also learned more about asyncData, and how we can fetch both of them together despite their differences. We’ve also learned how to perform authentication in our application using the auth module and how to use the auth middleware to protect our routes. Here are some useful resources that talk more about all we’ve covered.
Resources
“Auth Module,” NUXtJS.org
“Axios Module: Introduction,” NUXtJS.org
FormData, MDN web docs
“API: The asyncData Method,” NUXtJS.org
“The Vue Instance: Lifecycle Diagram,” VueJS.org
“Understanding How fetch Works In Nuxt 2.12,” NUXtJS.org
(ks, ra, yk, il)
Website Design & SEO Delray Beach by DBL07.co
Delray Beach SEO
source http://www.scpie.org/getting-started-with-axios-in-nuxt/ source https://scpie1.blogspot.com/2020/05/getting-started-with-axios-in-nuxt.html
0 notes