#dotenv tutorial
Explore tagged Tumblr posts
Visit Tumblr Blog
Explore Tumblr blogs with no restrictions, modern design and the best experience.
Last Seen Tumblr Blogs


Fun Fact
Women make up for the other 50% of Tumblr’s audience.
Text
Access Environment Variable in Nodejs JavaScript Application | Reading ENV Variable Example
Full Video Link https://youtu.be/dxrNopL1sbQ Hello friends, new #video on #reading #accessing #environmentvariables in #nodejs #projeect #application #tutorial #examples is published on #codeonedigest #youtube channel. @java #java #aws #a
In this video, we will read the environment variable in nodejs javascript project. We will learn what “dotenv” module in nodejs javascript. How to use “dotenv” package in our nodejs javascript project. ** Important Nodejs Javascript Packages or Modules ** Dotenv – DotEnv is a lightweight npm package that automatically loads environment variables from a .env file into the process.env object. To…

View On WordPress
#dotenv#dotenv example#dotenv in node js#dotenv module#dotenv module in node js#dotenv module not found#dotenv nodejs#dotenv package#dotenv package install#dotenv package nodejs#dotenv package.json#dotenv tutorial#dotenv tutorial nodejs#environment variable#environment variables#javascript environment variable#linux environment variables#node js javascript#node js javascript tutorial#nodejs#python environment variables#set environment variables
0 notes
Text
How to Build Microservices with Node.js
Divide into independent chunks to build the entire application.
Introduction
In the last blog, we learned about Microservice Architecture and Why Build Microservices with Node.js. If you haven’t explored or read much about Microservice Architecture then I would recommend visiting our last blog, to have basic theoretical knowledge. The blog deals with What, Why, and When with Microservices. We will cover the remaining question ‘How’ in this tutorial.
You are exactly right! In this tutorial, we will learn how to build a basic demo application for illustrating Microservices with Node.js. The tutorial will consist of basic and simple steps that you can follow with us and start building your own demo app.
Without further ado, let’s get started with our application.
Microservices with Node.js Example
In this demo application, we will build microservices with NodeJS which will connect to an external API.
The app will have three services: Book, Customer, and Order services. Each of the services will have individual servers running on different ports. These services will communicate with each other through REST APIs. We all know that if it wasn’t microservices architecture we would have only one server running. But, in microservices architecture the scenario is different.
So, this was about what we are building in this tutorial, let’s get started with the coding part.
Initial Set-Up
Make sure you have Node.js installed. Visit Nodejs.org to download the latest Node version, if your system doesn’t have Node.js.
Run npm init in the project root folder. This will create a package.json file that will create certain questions about the package, if you are not sure how to respond you can use the default.
We will use four packages, Express, mongoose, axios, and dotenv which can be installed as follows:
$ npm install express mongoose axios dotenv --save
Project Structure
Refer to the below image for the project structure. The structure can vary from person to person.

Read more: Creating Database Connection
0 notes
Link
Nuxt.js provides an Axios module for easy integration with your application. Axios is a promise-based HTTP client that works in the browser and Node.js environment or, in simpler terms, it is a tool for making requests (e.g API calls) in client-side applications and Node.js environment. In this tutorial, we’re going to learn how to use the Axios module and how to make a request on the server-side using asyncData and fetch. These two methods make a request on the server-side but they have some differences which we’re also going to cover. Finally, we’ll learn how to perform authentication and secure pages/routes using the auth module and auth middleware. This article requires basic knowledge of Nuxtjs and Vuejs as we’ll be building on top of that. For those without experience with Vuejs, I recommend you start from their official documentation and the Nuxt official page before continuing with this article.
What Is The Nuxt.js Axios Module?
According to the official Documentation,
“It is a Secure and easy Axios integration with Nuxt.js.”
Here are some of its features:
Automatically set base URL for client-side & server-side.
Proxy request headers in SSR (Useful for auth).
Fetch Style requests.
Integrated with Nuxt.js Progressbar while making requests.
To use the axios module in your application, you will have to first install it by using either npm or yarn. YARN
yarn add @nuxtjs/axios
NPM
npm install @nuxtjs/axios
Add it into your nuxt.config.js file:
modules: [ '@nuxtjs/axios', ], axios: { // extra config e.g // BaseURL: 'https://link-to-API' }
The modules array accepts a list of Nuxt.js modules such as dotenv, auth and in this case, Axios. What we’ve done is to inform our application that we would be using the Axios module, which we reference using @nuxtjs/axios. This is then followed by the axios property which is an object of configurations like the baseURL for both client-side and server-side. Now, you can access Axios from anywhere in your application by calling this.$axios.method or this.$axios.$method. Where method can be get, post, or delete.
Making Your First Request Using Axios
For this tutorial, I’ve put together a simple application on Github. The repository contains two folders, start and finish, the start folder contains all you need to get right into the tutorial. The finish folder contains a completed version of what we would be building. After cloning the repo and opening the start folder, we would need to install all our packages in the package.json file so open your terminal and run the following command:
npm install
Once that is done, we can start our app using the npm run dev command. This is what you should see when you go to localhost:3000.
Our application’s landing page. (Large preview)
The next thing we have to do is to create a .env file in the root folder of our application and add our API URL to it. For this tutorial, we’ll be using a sample API built to collect reports from users.
API_URL=https://ireporter-endpoint.herokuapp.com/api/v2/
This way, we do not have to hard code our API into our app which is useful for working with two APIs (development and production). The next step would be to open our nuxt.config.js file and add the environmental variable to our axios config that we added above.
/* ** Axios module configuration */ axios: { // See https://github.com/nuxt-community/axios-module#options baseURL: process.env.API_URL, },
Here, we tell Nuxt.js to use this baseURL for both our client-side and server-side requests whenever we use this Axios module. Now, to fetch a list of reports, let us open the index.vue file and add the following method to the script section.
async getIncidents() { let res = await this.$store.dispatch("getIncidents"); this.incidents = res.data.data.incidents; }
What we have done is to create an async function that we call getIncidents() and we can tell what it does from the name — it fetches a list of incidents using the Vuex store action method this.$store.dispatch. We assign the response from this action to our incidents property so we can be able to make use of it in the component. We want to call the getIncidents() method whenever the component mounts. We can do that using the mounted hook.
mounted() { this.getIncidents() }
mounted() is a lifecycle hook that gets called when the component mounts. That will cause the call to the API to happen when the component mounts. Now, let us go into our index.js file in our store and create this action where we’ll be making our Axios request from.
export const actions = { async getIncidents() { let res = await this.$axios.get('/incidents') return res; } }
Here, we created the action called getIncidents which is an async function, then we await a response from the server and return this response. The response from this action is sent back to our getIncidents() method in our index.vue file. If we refresh our application, we should now be able to see a long list of incidents rendered on the page.
List of incidents on landing page. (Large preview)
We have made our first request using Axios but we won’t stop there, we are going to be trying out asyncData and fetch to see the differences between them and using Axios.
AsyncData
AsyncData fetches data on the server-side and it’s called before loading the page component. It does not have access to this because it is called before your page component data is created. this is only available after the created hook has been called so Nuxt.js automatically merges the returned data into the component’s data. Using asyncData is good for SEO because it fetches your site’s content on the server-side and also helps in loading content faster. Note that asyncData method can only be used in the pages folder of your application as it would not work in the components folder. This is because asyncData hook gets called before your component is created.
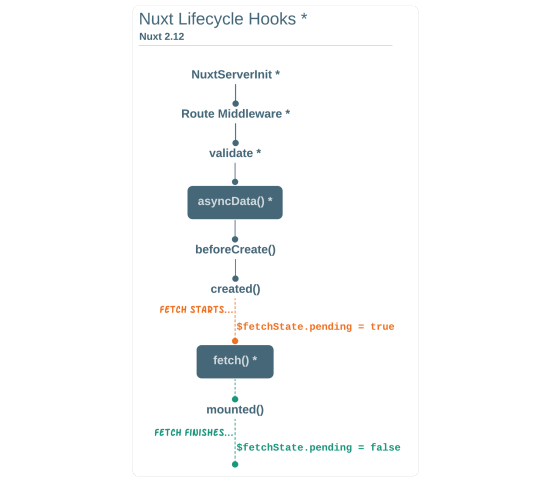
Image from Nuxt blog. (Large preview)
Let us add asyncData to our index.vue file and observe how fast our incidents data loads. Add the following code after our components property and let us get rid of our mounted hook.
async asyncData({ $axios }) { let { data } = await $axios.get("/incidents"); return { incidents: data.data.incidents }; }, // mounted() { // this.getIncidents(); // },
Here, the asyncData method accepts a property from the context $axios. We use this property to fetch the list of incidents and the value is then returned. This value is automatically injected into our component. Now, you can notice how fast your content loads if you refresh the page and at no time is there no incident to render.
Fetch
The Fetch method is also used to make requests on the server-side. It is called after the created hook in the life cycle which means it has access to the component’s data. Unlike the asyncData method, the fetch method can be used in all .vue files and be used with the Vuex store. This means that if you have the following in your data function.
data() { return { incidents: [], id: 5, gender: 'male' }; }
You can easily modify id or gender by calling this.id or this.gender.
Using Axios As A Plugin
During the process of development with Axios, you might find that you need extra configuration like creating instances and interceptors for your request so your application can work as intended and thankfully, we can do that by extending our Axios into a plugin. To extend axios, you have to create a plugin (e.g. axios.js) in your plugins folder.
export default function ({ $axios, store, redirect }) { $axios.onError(error => { if (error.response && error.response.status === 500) { redirect('/login') } }) $axios.interceptors.response.use( response => { if (response.status === 200) { if (response.request.responseURL && response.request.responseURL.includes('login')) { store.dispatch("setUser", response); } } return response } ) }
This is an example of a plugin I wrote for a Nuxt application. Here, your function takes in a context object of $axios, store and redirect which we would use in configuring the plugin. The first thing we do is to listen for an error with a status of 500 using $axios.onError and redirect the user to the login page. We also have an interceptor that intercepts every request response we make in our application checks if the status of the response we get is 200. If that is true we proceed and check that there is a response.request.responseURL and if it includes login. If this checks out to be true, we then send this response using our store’s dispatch method where it then mutated in our state. Add this plugin to your nuxt.config.js file:
plugins: [ '~/plugins/axios' ]
After doing this, your Axios plugin would intercept any request you make and check if you have defined a special case for it.
Introduction To The Auth Module
The auth module is used for performing authentication for your Nuxt application and can be accessed from anywhere in your application using $this.auth. It is also available in fetch, asyncData, middleware and NuxtInitServer from the context object as $auth. The context provides additional objects/params from Nuxt to Vue components and is available in special nuxt lifecycle areas like those mentioned above. To use the auth module in your application, you would have to install it using yarn or npm. YARN
yarn add @nuxtjs/auth
NPM
npm install @nuxtjs/auth
Add it to your nuxt.config.js file.
modules: [ '@nuxtjs/auth' ], auth: { // Options }
The auth property accepts a list of properties such as strategies and redirect. Here, strategies accepts your preferred authentication method which can be:
local For username/email and password-based flow.
facebook For using Facebook accounts as a means of authentication.
Github For authenticating users with Github accounts.
Google For authenticating users with Google accounts.
Auth0
Laravel Passport
The redirect property accepts an object of links for:
login Users would be redirected to this link if login is required.
logout Users would be redirected here if after logout current route is protected.
home Users would be redirected here after login.
Now, let us add the following to our nuxt.config.js file.
/* ** Auth module configuration */ auth: { redirect: { login: '/login', logout: '/', home: '/my-reports' }, strategies: { local: { endpoints: { login: { url: "/user/login", method: "post", propertyName: "data.token", }, logout: false, user: false, }, tokenType: '', tokenName: 'x-auth', autoFetchUser: false }, }, }
Please note that the auth method works best when there is a user endpoint provided in the option above. Inside the auth config object, we have a redirect option in which we set our login route to /login, logout route to / and home route to /my-reports which would all behave as expected. We also have a tokenType property which represents the Authorization type in the header of our Axios request. It is set to Bearer by default and can be changed to work with your API. For our API, there is no token type and this is why we’re going to leave it as an empty string. The tokenName represents the Authorization name (or the header property you want to attach your token to) inside your header in your Axios request. By default, it is set to Authorization but for our API, the Authorization name is x-auth. The autoFetchUser property is used to enable user fetch object using the user endpoint property after login. It is true by default but our API does not have a user endpoint so we have set that to false. For this tutorial, we would be using the local strategy. In our strategies, we have the local option with endpoints for login, user and logout but in our case, we would only use the *login* option because our demo API does not have a *logout* endpoint and our user object is being returned when *login* is successful. Note: The auth module does not have a register endpoint option so that means we’re going to register the traditional way and redirect the user to the login page where we will perform the authentication using this.$auth.loginWith. This is the method used in authenticating your users. It accepts a ‘strategy’ (e.g local) as a first argument and then an object to perform this authentication with. Take a look at the following example.
let data { email: '[email protected]', password: '123456' } this.$auth.loginWith('local', { data })
Using The Auth Module
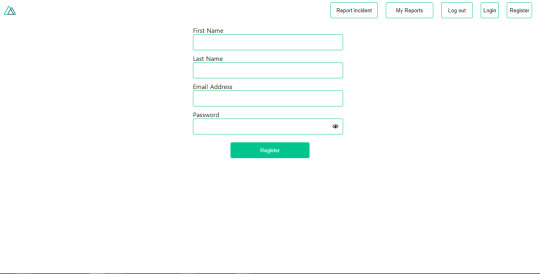
Now that we have configured our auth module, we can proceed to our registration page. If you visit the /register page, you should see a registration form.
Register page. (Large preview)
Let us make this form functional by adding the following code:
methods: { async registerUser() { this.loading = true; let data = this.register; try { await this.$axios.post("/user/create", data); this.$router.push("/login"); this.loading = false; this.$notify({ group: "success", title: "Success!", text: "Account created successfully" }); } catch (error) { this.loading = false; this.$notify({ group: "error", title: "Error!", text: error.response ? error.response.data.error : "Sorry an error occured, check your internet" }); } } }
Here, we have an async function called registerUser which is tied to a click event in our template and makes an Axios request wrapped in a try/catch block to an endpoint /user/create. This redirects to the /login page and notifies the user of a successful registration. We also have a catch block that alerts the user of any error if the request is not successful. If the registration is successful, you would be redirected to the login page.
Login page with notification component. (Large preview)
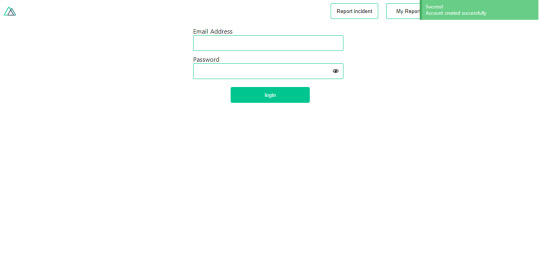
Here, we’re going to make use of auth authentication method this.$auth.loginWith('local', loginData) after which we would use the this.$auth.setUser(userObj) to set the user in our auth instance. To get the login page working, let’s add the following code to our login.vue file.
methods: { async logIn() { let data = this.login; this.loading = true; try { let res = await this.$auth.loginWith("local", { data }); this.loading = false; let user = res.data.data.user; this.$auth.setUser(user); this.$notify({ group: "success", title: "Success!", text: "Welcome!" }); } catch (error) { this.loading = false; this.$notify({ group: "error", title: "Error!", text: error.response ? error.response.data.error : "Sorry an error occured, check your internet" }); } } }
We created an async function called logIn using the auth method this.$auth.loginWith('local, loginData). If this login attempt is successful, we then assign the user data to our auth instance using this.$auth.setUser(userInfo) and redirect the user to the /my-report page. You can now get user data using this.$auth.user or with Vuex using this.$store.state.auth.user but that’s not all. The auth instance contains some other properties which you can see if you log in or check your state using your Vue dev tools. If you log this.$store.state.auth to the console, you’ll see this:
{ "auth": { "user": { "id": "d7a5efdf-0c29-48aa-9255-be818301d602", "email": "[email protected]", "lastName": "Xo", "firstName": "Tm", "othernames": null, "isAdmin": false, "phoneNumber": null, "username": null }, "loggedIn": true, "strategy": "local", "busy": false } }
The auth instance contains a loggedIn property that is useful in switching between authenticated links in the nav/header section of your application. It also contains a strategy method that states the type of strategy the instance is running (e.g local). Now, we will make use of this loggedIn property to arrange our nav links. Update your navBar component to the following:
<template> <header class="header"> <div class="logo"> <nuxt-link to="/"> <Logo /> </nuxt-link> </div> <nav class="nav"> <div class="nav__user" v-if="auth.loggedIn"> <p></p> <button class="nav__link nav__link--long"> <nuxt-link to="/report-incident">Report incident</nuxt-link> </button> <button class="nav__link nav__link--long"> <nuxt-link to="/my-reports">My Reports</nuxt-link> </button> <button class="nav__link" @click.prevent="logOut">Log out</button> </div> <button class="nav__link" v-if="!auth.loggedIn"> <nuxt-link to="/login">Login</nuxt-link> </button> <button class="nav__link" v-if="!auth.loggedIn"> <nuxt-link to="/register">Register</nuxt-link> </button> </nav> </header> </template> <script> import { mapState } from "vuex"; import Logo from "@/components/Logo"; export default { name: "nav-bar", data() { return {}; }, computed: { ...mapState(["auth"]) }, methods: { logOut() { this.$store.dispatch("logOut"); this.$router.push("/login"); } }, components: { Logo } }; </script> <style></style>
In our template section, we have several links to different parts of the application in which we are now using auth.loggedIn to display the appropriate links depending on the authentication status. We have a logout button that has a click event with a logOut() function attached to it. We also display the user’s email gotten from the auth property which is accessed from our Vuex store using the mapState method which maps our state auth to the computed property of the nav component. We also have a logout method that calls our Vuex action logOut and redirects the user to the login page. Now, let us go ahead and update our store to have a logOut action.
export const actions = { // .... logOut() { this.$auth.logout(); } }
The logOut action calls the auth logout method which clears user data, deletes tokens from localStorage and sets loggedIn to false. Routes like /my-reports and report-incident should not be visible to guests but at this point in our app, that is not the case. Nuxt does not have a navigation guard that can protect your routes, but it has is the auth middleware. It gives you the freedom to create your own middleware so you can configure it to work the way you want. It can be set in two ways:
Per route.
Globally for the whole app in your nuxt.config.js file.
router: { middleware: ['auth'] }
This auth middleware works with your auth instance so you do not need to create an auth.js file in your middleware folder. Let us now add this middleware to our my-reports.vue and report-incident.vue files. Add the following lines of code to the script section of each file.
middleware: 'auth'
Now, our application would check if the user trying to access these routes has an auth.loggedIn value of true. It’ll redirect them to the login page using our redirect option in our auth config file — if you’re not logged in and you try to visit either /my-report or report-incident, you would be redirected to /login. If you go to /report-incidents, this is what you should see.
Report incident page. (Large preview)
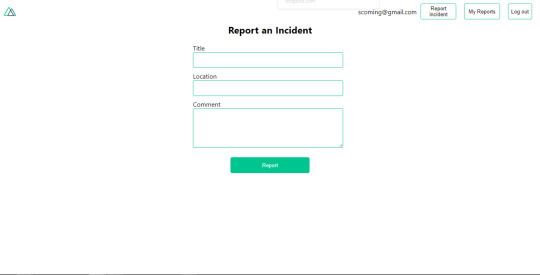
This page is for adding incidents but that right now the form does not send incident to our server because we are not making the call to the server when the user attempts to submit the form. To solve this, we will add a reportIncident method which will be called when the user clicks on Report. We’ll have this in the script section of the component. This method will send the form data to the server. Update your report-incident.vue file with the following:
<template> <section class="report"> <h1 class="report__heading">Report an Incident</h1> <form class="report__form"> <div class="input__container"> <label for="title" class="input__label">Title</label> <input type="text" name="title" id="title" v-model="incident.title" class="input__field" required /> </div> <div class="input__container"> <label for="location" class="input__label">Location</label> <input type="text" name="location" id="location" v-model="incident.location" required class="input__field" /> </div> <div class="input__container"> <label for="comment" class="input__label">Comment</label> <textarea name="comment" id="comment" v-model="incident.comment" class="input__area" cols="30" rows="10" required ></textarea> </div> <input type="submit" value="Report" class="input__button" @click.prevent="reportIncident" /> <p class="loading__indicator" v-if="loading">Please wait....</p> </form> </section> </template> <script> export default { name: "report-incident", middleware: "auth", data() { return { loading: false, incident: { type: "red-flag", title: "", location: "", comment: "" } }; }, methods: { async reportIncident() { let data = this.incident; let formData = new FormData(); formData.append("title", data.title); formData.append("type", data.type); formData.append("location", data.location); formData.append("comment", data.comment); this.loading = true; try { let res = await this.$store.dispatch("reportIncident", formData); this.$notify({ group: "success", title: "Success", text: "Incident reported successfully!" }); this.loading = false; this.$router.push("/my-reports"); } catch (error) { this.loading = false; this.$notify({ group: "error", title: "Error!", text: error.response ? error.response.data.error : "Sorry an error occured, check your internet" }); } } } }; </script> <style> </style>
Here, we have a form with input fields for title, location, and comment with two-way data binding using v-model. We also have a submit button with a click event. In the script section, we have a reportIncident method that collects all the information provided in the form and is sent to our server using FormData because the API is designed to also accept images and videos. This formData is attached to a Vuex action using the dispatch method, if the request is successful, you get redirected to /my-reports with a notification informing you that this request was successful otherwise, you would be notified of an error with the error message. At this point, we don’t have reportIncident action in our store yet so in your browser console, you would see an error if you try to click submit on this page.

Vuex error message. (Large preview)
To fix this, add the reportIncident action your index.js file.
export const actions = { // ... async reportIncident({}, data) { let res = await this.$axios.post('/incident/create', data) return res; } }
Here, we have a reportIncident function that takes in an empty context object and the data we’re sending from our form. This data is then attached to a post request that creates an incident and returns back to our report-incident.vue file. At this point, you should be able to add a report using the form after which you would be redirected to /my-reports page.
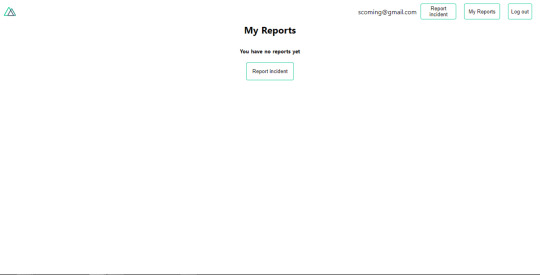
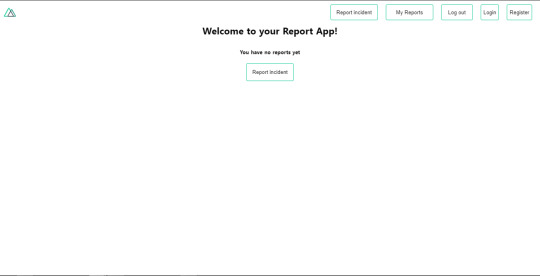
My reports page empty. (Large preview)
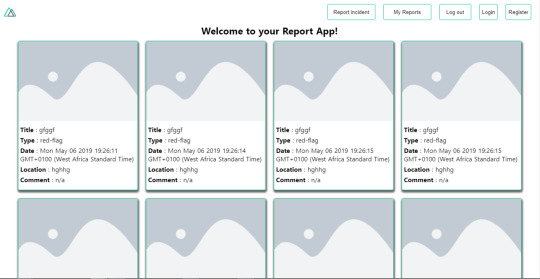
This page should display a list of incidents created by the user but right now it only shows what we see above, let’s go ahead to fix that. We’re going to be using the fetch method we learned about to get this list. Update your my-reports.vue file with the following:
<script> import incidentCard from "@/components/incidentCard.vue"; export default { middleware: "auth", name: "my-reports", data() { return { incidents: [] }; }, components: { incidentCard }, async fetch() { let { data } = await this.$axios.get("/user/incidents"); this.incidents = data.data; } }; </script>
Here, we use fetch method to get user-specific incidents and assign the response to our incidents array. If you refresh your page after adding an incident, you should see something like this.
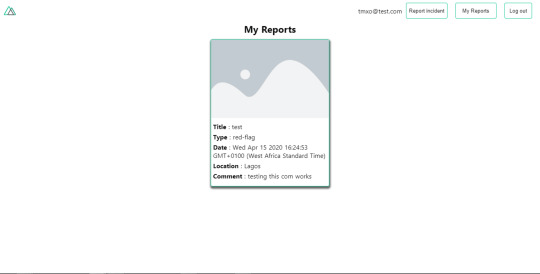
My Reports page with a report. (Large preview)
At this point, we would notice a difference in how fetch method and asyncData loads our data.
Conclusion
So far, we have learned about the Axios module and all of its features. We have also learned more about asyncData, and how we can fetch both of them together despite their differences. We’ve also learned how to perform authentication in our application using the auth module and how to use the auth middleware to protect our routes. Here are some useful resources that talk more about all we’ve covered.
Getting started with meta tags in Nuxjs.
Using the dotenv module in Nuxt.
Using Fetch in your Nuxt app.
Getting started with asyncData.
0 notes
Text
Performance Best Practices: How to Run and Monitor Express.js in Production
What is the most important feature an Express.js application can have? Maybe using sockets for real-time chats or GraphQL instead of REST APIs? Come on, tell me. What’s the most amazing, sexy, and hyped feature you have in your Express.js application?
Want to guess what mine is? Optimal performance with minimal downtime. If your users can't use your application, what's the point of fancy features?
In the past four years, I've learned that performant Express.js applications need to do four things well:
Ensure minimal downtime
Have predictable resource usage
Scale effectively based on load
Increase developer productivity by minimizing time spent on troubleshooting and debugging
In the past, I've talked a lot about how to improve Node.js performance and related key metrics you have to monitor. There are several bad practices in Node.js you should avoid, such as blocking the thread and creating memory leaks, but also how to boost the performance of your application with the cluster module, PM2, Nginx and Redis.
The first step is to go back to basics and build up knowledge about the tool you are using. In our case the tool is JavaScript. Lastly, I'll cover how to add structured logging and using metrics to pinpoint performance issues in Express.js applications like memory leaks.
In a previous article, I explained how to monitor Node.js applications with five different open-source tools. They may not have full-blown features like the Sematext Express.js monitoring integration, Datadog, or New Relic, but keep in mind they’re open-source products and can hold their own just fine.
In this article, I want to cover my experience from the last four years, mainly the best practices you should stick to, but also the bad things you should throw out right away. After reading this article you'll learn what you need to do to make sure you have a performant Express.js application with minimal downtime.
In short, you'll learn about:
My goal for you is to use this to embrace Express.js best practices and a DevOps mindset. You want to have the best possible performance with minimal downtime and ensure high developer productivity. The goal is to solve issues quickly if they occur and trust me, they always do.
Let's go back to basics, and talk a bit about Express.js.
How to Structure Express.js Applications
Having an intuitive file structure will play a huge role in making your life easier. You will have an easier time adding new features as well as refactoring technical debt.
The approach I stick to looks like this:
src/ config/ - configuration files controllers/ - routes with provider functions as callback functions providers/ - business logic for controller routes services/ - common business logic used in the provider functions models/ - database models routes.js - load all routes db.js - load all models app.js - load all of the above test/ unit/ - unit tests integration/ - integration tests server.js - load the app.js file and listen on a port (cluster.js) - load the app.js file and create a cluster that listens on a port test.js - main test file that will run all test cases under the test/ directory
With this setup you can limit the file size to around 100 lines, making code reviews and troubleshooting much less of a nightmare. Have you ever had to review a pull request where every file has more than 500 lines of code? Guess what, it's not fun.
There's a little thing I like to call separation of concerns. You don't want to create clusterfucks of logic in a single file. Separate concerns into their dedicated files. That way you can limit the context switching that happens when reading a single file. It's also very useful when merging to master often because it's much less prone to cause merge conflicts.
To enforce rules like this across your team you can also set up a linter to tell you when you go over a set limit of lines in a file, as well as if a single line is above 100 characters long. One of my favorite settings, by the way.
How to Improve Express.js Performance and Reliability
Express.js has a few well-known best practices you should adhere to. Below are a few I think are the most important.
Set NODE_ENV=production
Here's a quick hint to improve performance. Would you believe that only by setting the NODE_ENV environment variable to production will make your Express.js application three times faster!
In the terminal you can set it with:
export NODE_ENV=production
Or, when running your server.js file you can add like this:
NODE_ENV=production node server.js
Enable Gzip Compression
Moving on, another important setting is to enable Gzip compression. First, install the compression npm package:
npm i compression
Then add this snippet below to your code:
const compression = require('compression') const express = require('express') const app = express() app.use(compression())
If you're using a reverse proxy with Nginx, you can enable it at that level instead. That's covered in the Enabling Gzip Compression with Nginx section a bit further down.
Always Use Asynchronous Functions
The last thing you want to do is to block the thread of execution. Never use synchronous functions! Like, seriously, don't. I mean it.
What you should do instead is use Promises or Async/Await functions. If you by any chance only have access to sync functions you can easily wrap them in an Async function that will execute it outside of the main thread.
(async () => { const foo = () => { ...some sync code return val } async const asyncWrapper = (syncFun) => { const val = syncFun() return val } // the value will be returned outside of the main thread of execution const val = await asyncWrapper(foo) })()
If you really can't avoid using a synchronous function then you can run them on a separate thread. To avoid blocking the main thread and bogging down your CPU you can create child processes or forks to handle CPU intensive tasks.
An example would be that you have a web server that handles incoming requests. To avoid blocking this thread, you can spawn a child process to handle a CPU intensive task. Pretty cool. I explained this in more detail here.
Make Sure To Do Logging Correctly
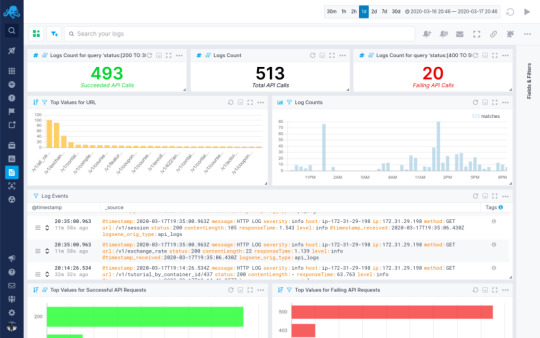
To unify logs across your Express.js application, instead of using console.log(), you should use a logging agent to structure and collect logs in a central location.
You can use any SaaS log management tool as the central location, like Sematext, Logz.io, Datadog, and many more. Think of it like a bucket where you keep logs so you can search and filter them later, but also get alerted about error logs and exceptions.
I'm part of the integrations team here at Sematext, building open-source agents for Node.js. I put together this tiny open-source Express.js agent to collect logs. It can also collect metrics, but about that a bit further down. The agent is based on Winston and Morgan. It tracks API request traffic with a middleware. This will give you per-route logs and data right away, which is crucial to track performance.
Note: Express.js middleware functions are functions that have access to the request object (req), the response object (res), and the next middleware function in the application’s request-response cycle. The next middleware function is commonly denoted by a variable named next. - from Using middleware, expressjs.com
Here's how to add the logger and the middleware:
const { stLogger, stHttpLoggerMiddleware } = require('sematext-agent-express') // At the top of your routes add the stHttpLoggerMiddleware to send API logs to Sematext const express = require('express') const app = express() app.use(stHttpLoggerMiddleware) // Use the stLogger to send all types of logs directly to Sematext app.get('/api', (req, res, next) => { stLogger.info('An info log.') stLogger.debug('A debug log.') stLogger.warn('A warning log.') stLogger.error('An error log.') res.status(200).send('Hello World.') })
Prior to requiring this agent you need to configure Sematext tokens as environment variables. In the dotenv section below, you will read more about configuring environment variables.
Here's a quick preview of what you can get.
Handle Errors and Exceptions Properly
When using Async/Await in your code, it's a best practice to rely on try-catch statements to handle errors and exceptions, while also using the unified Express logger to send the error log to a central location so you can use it to troubleshoot the issue with a stack trace.
async function foo() { try { const baz = await bar() return baz } catch (err) { stLogger.error('Function \'bar\' threw an exception.', err); } }
It's also a best practice to configure a catch-all error middleware at the bottom of your routes.js file.
function errorHandler(err, req, res, next) { stLogger.error('Catch-All error handler.', err) res.status(err.status || 500).send(err.message) } router.use(errorHandler) module.exports = router
This will catch any error that gets thrown in your controllers. Another last step you can do is to add listeners on the process itself.
process.on('uncaughtException', (err) => { stLogger.error('Uncaught exception', err) throw err }) process.on('unhandledRejection', (err) => { stLogger.error('unhandled rejection', err) })
With these tiny snippets you'll cover all the needed precautions for handling Express errors and log collection. You now have a solid base where you don't have to worry about losing track of errors and logs. From here you can set up alerts in the Sematext Logs UI and get notified through Slack or E-mail, which is configured by default. Don't let your customers tell you your application is broken, know before they do.
Watch Out For Memory Leaks
You can't catch errors before they happen. Some issues don't have root causes in exceptions breaking your application. They are silent and like memory leaks, they creep up on you when you least expect it. I explained how to avoid memory leaks in one of my previous tutorials. What it all boils down to is to preempt any possibility of getting memory leaks.
Noticing memory leaks is easier than you might think. If your process memory keeps growing steadily, while not periodically being reduced by garbage collection, you most likely have a memory leak. Ideally, you’d want to focus on preventing memory leaks rather than troubleshooting and debugging them. If you come across a memory leak in your application, it’s horribly difficult to track down the root cause.
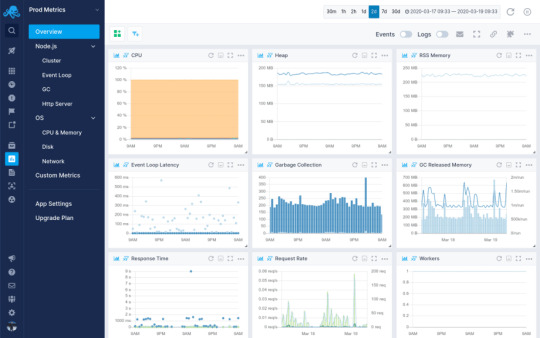
This is why you need to look into metrics about process and heap memory.
Adding a metrics collector to your Express.js application, that will gather and store all key metrics in a central location where you can later slice and dice the data to get to the root cause of when a memory leak happened, and most importantly, why it happened.
By importing a monitoring agent from the Sematext Agent Express module I mentioned above, you can enable the metric collector to store and visualize all the data in the Sematext Monitoring UI.
Here's the kicker, it's only one line of code. Add this snippet in your app.js file.
const { stMonitor, stLogger, stHttpLoggerMiddleware } = require('sematext-agent-express') stMonitor.start() // run the .start method on the stMonitor // At the top of your routes add the stHttpLoggerMiddleware to send API logs to Sematext const express = require('express') const app = express() app.use(stHttpLoggerMiddleware) ...
With this you'll get access to several dashboards giving you key insight into everything going on with your Express.js application. You can filter and group the data to visualize processes, memory, CPU usage and HTTP requests and responses. But, what you should do right away is configure alerts to notify you when the process memory starts growing steadily without any increase in the request rate.
Moving on from Express.js-specific hints and best practices, let's talk a bit about JavaScript and how to use the language itself in a more optimized and solid way.
How to Set Up Your JavaScript Environment
JavaScript is neither object-oriented or functional. Rather, it's a bit of both. I'm quite biased towards using as many functional paradigms in my code as possible. However, one surpasses all others. Using pure functions.
Pure Functions
As the name suggests, pure functions are functions that do not mutate the outer state. They take parameters, do something with them, and return a value.
Every single time you run them they will behave the same and return a value. This concept of throwing away state mutations and only relying on pure functions is something that has simplified my life to an enormous extent.
Instead of using var or let only use const, and rely on pure functions to create new objects instead of mutating existing objects. This ties into using higher-order functions in JavaScript, like .map(), .reduce(), .filter(), and many more.
How to practice writing functional code? Throw out every variable declaration except for const. Now try writing a controller.
Object Parameters
JavaScript is a weakly typed language, and it can show its ugly head when dealing with function arguments. A function call can be passed one, none, or as many parameters as you want, even though the function declaration has a fixed number of arguments defined. What's even worse is that the order of the parameters are fixed and there is no way to enforce their names so you know what is getting passed along.
It's absolute lunacy! All of it, freaking crazy! Why is there no way to enforce this? But, you can solve it somewhat by using objects as function parameters.
const foo = ({ param1, param2, param3 }) => { if (!(param1 && param2 && param3)) { throw Error('Invalid parameters in function: foo.') } const sum = param1 + param2 + param3 return sum } foo({ param1: 5, param2: 345, param3: 98 }) foo({ param2: 45, param3: 57, param1: 81 }) // <== the same
All of these function calls will work identically. You can enforce the names of the parameters and you're not bound by order, making it much easier to manage.
Freaking write tests, seriously!
Do you know what's the best way to document your code, keep track of features and dependencies, increase community awareness, gain contributors, increase performance, increase developer productivity, have a nicer life, attract investors, raise a seed round, make millions selling your startup!?.... wait that got out of hand.
Yes, you guessed it, writing tests is the answer.
Let's get back on track. Write tests based on the features you want to build. Then write the feature. You will have a clear picture of what you want to build. During this process you will automatically start thinking about all the edge cases you would usually never consider.
Trust me, TDD works.
How to get started? Use something simple like Mocha and Chai. Mocha is a testing framework, while Chai is an assertion library.
Install the npm packages with:
npm i mocha chai
Let's test the foo function from above. In your main test.js file add this snippet of code:
const chai = require('chai') const expect = chai.expect const foo = require('./src/foo') describe('foo', function () { it('should be a function', function () { expect(foo).to.be.a('function') }) it('should take one parameter', function () { expect( foo.bind(null, { param1: 5, param2: 345, param3: 98 })) .to.not.throw(Error) }) it('should throw error if the parameter is missing', function () { expect(foo.bind(null, {})).to.throw(Error) }) it('should throw error if the parameter does not have 3 values', function () { expect(foo.bind(null, { param1: 4, param2: 1 })).to.throw(Error) }) it('should return the sum of three values', function () { expect(foo({ param1: 1, param2: 2, param3: 3 })).to.equal(6) }) })
Add this to your scripts section in the package.json:
"scripts": { "test": "mocha" }
Now you can run the tests by running a single command in your terminal:
npm test
The output will be:
> [email protected] test /path/to/your/expressjs/project > mocha foo ✓ should be a function ✓ should take one parameter ✓ should throw error if the parameter is missing ✓ should throw error if the parameter does not have 3 values ✓ should return the sum of three values 5 passing (6ms)
Writing tests gives you a feeling of clarity. And it feels freaking awesome! I feel better already.
With this out of my system I'm ready for DevOps topics. Let's move on to some automation and configuration.
Apart from the things you can do in the code, like you saw above, some things need to be configured in your environment and server setup. Starting from the basics, you need an easy way to manage environment variables, you also need to make sure your Express.js application restarts automatically in case it crashes.
You also want to configure a reverse proxy and load balancer to expose your application, cache requests, and load balance traffic across multiple worker processes. The most important step in maintaining high performance is to add a metrics collector so you can visualize data across time and troubleshoot issues whenever they occur.
Managing Environment Variables in Node.js with dotenv
Dotenv is an npm module that lets you load environment variables easily into any Node.js application by using a file.
In the root of your project create a .env file. Here you'll add any environment variables you need.
NODE_ENV=production DEBUG=false LOGS_TOKEN=xxx-yyy-zzz MONITORING_TOKEN=xxx-yyy-zzz INFRA_TOKEN=xxx-yyy-zzz ...
Loading this file is super simple. In your app.js file require dotenv at the top before anything else.
// dotenv at the top require('dotenv').config() // require any agents const { stLogger, stHttpLoggerMiddleware } = require('sematext-agent-express') // require express and instantiate the app const express = require('express') const app = express() app.use(stHttpLoggerMiddleware) ...
Dotenv will load a file named .env by default. If you want to have multiple dotenv files, here's how you can configure them.
Make Sure the Application Restarts Automatically With Systemd or PM2
JavaScript is a scripting language, obviously, the name says so. What does this mean? When you start your server.js file by running node server.js it will run the script as a process. However, if it fails, the process exits and there's nothing telling it to restart.
Here's where using Systemd or PM2 comes into play. Either one works fine, but the Node.js maintainers urge us to use Systemd.
Ensure Application Restarts with Systemd
In short, Systemd is part of the building blocks of Linux operating systems. It runs and manages system processes. What you want is to run your Node.js process as a system service so it can recover from crashes.
Here's how you do it. On your VM or server, create a new file under /lib/systemd/system/ called app.service.
# /lib/systemd/system/fooapp.service [Unit] Description=Node.js as a system service. Documentation=https://example.com After=network.target [Service] Type=simple User=ubuntu ExecStart=/usr/bin/node /path/to/your/express/project/server.js Restart=on-failure [Install] WantedBy=multi-user.target
The two important lines in this file are ExecStart and Restart. The ExecStart says that the /usr/bin/node binary will start your server.js file. Make sure to add an absolute path to your server.js file. The Restart=on-failure makes sure to restart the application if it crashes. Exactly what you're looking for.
Once you save the fooapp.service file, reload your daemon and start the script.
systemctl daemon-reload systemctl start fooapp systemctl enable fooapp systemctl status fooapp
The status command will show you the application is running as a system service. The enable command makes sure it starts on boot. That was easier than you thought, am I right?
Ensure Application Restarts with PM2
PM2 has been around for a few years. They utilize a custom-built script that manages and runs your server.js file. It is simpler to set up, but comes with the overhead of having another Node.js process that acts as a Master process, like a manager, for your Express.js application processes.
First you need to install PM2:
npm i -g pm2
Then you start your application by running this command in the root directory of your Express.js project:
pm2 start server.js -i max
The -i max flag will make sure to start the application in cluster-mode, spawning as many workers as there are CPU cores on the server.
Mentioning cluster-mode is the perfect segue into the next section about load balancing and reverse proxies and caching.
Enable Load Balancing and Reverse Proxies
Load balancing can be done with both the Node.js cluster module or with Nginx. I'll show you my preferred setup, which is also what the peeps over at Node.js think is the right way to go.
Load Balancing with the Cluster Module
The built-in cluster module in Node.js lets you spawn worker processes that will serve your application. It's based on the child_process implementation and, luckily for us, is very easy to set up if you have a basic Express.js application.
You only really need to add one more file. Create a file called cluster.js and paste this snippet of code into it:
const cluster = require('cluster') const numCPUs = require('os').cpus().length const app = require('./src/app') const port = process.env.PORT || 3000 const masterProcess = () => Array.from(Array(numCPUs)).map(cluster.fork) const childProcess = () => app.listen(port) if (cluster.isMaster) { masterProcess() } else { childProcess() } cluster.on('exit', () => cluster.fork())
Let's break down what's happening here. When you start the cluster.js file with node cluster.js the cluster module will detect that it is running as a master process. In that case it invokes the masterProcess() function. The masterProcess() function counts how many CPU cores the server has and invokes the cluster.fork() function that many times. Once the cluster.fork() function is invoked the cluster module will detect it is running as a child process and invoke the childProcess() function, which then tells the Express.js server to .listen() on a port. All these processes are running on the same port. It's possible due to something called an IPC connection. Read more about that here.
The cluster.on('exit') event listener will restart a worker process if it fails.
With this setup you can now edit the ExecStart field in the fooapp.service Systemd service file to run the cluster.js file instead.
Replace:
ExecStart=/usr/bin/node /path/to/your/express/project/server.js
With:
ExecStart=/usr/bin/node /path/to/your/express/project/cluster.js
Reload the Systemd daemon and restart the fooapp.service:
systemctl daemon-reload systemctl restart fooapp
There you have it. You've added load balancing to your Express.js application. Now it will scale across all the CPUs on your server.
However, this will only work for a single-server setup. If you want to have multiple servers, you need Nginx.
Adding a Reverse Proxy with Nginx
One of the primal laws of running Node.js applications is to never expose them on port 80 or 443. You should always use a reverse proxy to direct traffic to your application. Nginx is the most common tool you use with Node.js to achieve this. It's a web server that can act as both a reverse proxy and load balancer.
Installing Nginx is rather straightforward, for Ubuntu it would look like this:
apt update apt install nginx
Make sure to check the Nginx installation instructions if you're using another operating system.
Nginx should start right away, but just in case make sure to check:
systemctl status nginx [Output] nginx.service - A high performance web server and a reverse proxy server Loaded: loaded (/lib/systemd/system/nginx.service; enabled; vendor preset: enabled) Active: active (running) since Fri 2018-04-20 16:08:19 UTC; 3 days ago Docs: man:nginx(8) Main PID: 2369 (nginx) Tasks: 2 (limit: 1153) CGroup: /system.slice/nginx.service ├─2369 nginx: master process /usr/sbin/nginx -g daemon on; master_process on; └─2380 nginx: worker process
If it is not started, go ahead and run this command to start it.
systemctl start nginx
Once you have Nginx running, you need to edit the configuration to enable a reverse proxy. You can find the Nginx configuration file in the /etc/nginx/ directory. The main configuration file is called nginx.conf, while there are additional snippets in the etc/nginx/sites-available/ directory. The default server configuration is found here and is named default.
To just enable a reverse proxy, open up the default configuration file and edit it so it looks like this:
server { listen 80; location / { proxy_pass http://localhost:3000; # change the port if needed } }
Save the file and restart the Nginx service.
systemctl restart nginx
This configuration will route all traffic hitting port 80 to your Express.js application.
Load Balancing with Nginx
If you want to take it a step further, and enable load balancing, here's how to do it.
Now, edit the main nginx.conf file:
http { upstream fooapp { server localhost:3000; server domain2; server domain3; ... } ... }
Adding this upstream section will create a server group that will load balance traffic across all the servers you specify.
You also need to edit the default configuration file to point the reverse proxy to this upstream.
server { listen 80; location / { proxy_pass http://fooapp; } }
Save the files and restart the Nginx service once again.
systemctl restart nginx
Enabling Caching with Nginx
Caching is important to reduce response times for API endpoints, and resources that don't change very often.
Once again edit the nginx.conf file, and add this line:
http { proxy_cache_path /data/nginx/cache levels=1:2 keys_zone=STATIC:10m inactive=24h max_size=1g; ... }
Open up the default configuration file again. Add these lines of code as well:
server { listen 80; location / { proxy_pass http://fooapp; proxy_set_header Host $host; proxy_buffering on; proxy_cache STATIC; proxy_cache_valid 200 1d; proxy_cache_use_stale error timeout invalid_header updating http_500 http_502 http_503 http_504; } }
Save both files and restart the Nginx service once again.
Enabling Gzip Compression with Nginx
To improve performance even more, go ahead and enable Gzip. In the server block of your Nginx configuration file add these lines:
server { gzip on; gzip_types text/plain application/xml; gzip_proxied no-cache no-store private expired auth; gzip_min_length 1000; ... }
If you want to check out more configuration options about Gzip compression in Nginx, check this out.
Enabling Caching with Redis
Redis in an in-memory data store, which is often used as a cache.
Installing it on Ubuntu is rather simple:
apt update apt install redis-server
This will download and install Redis and its dependencies. There is one important configuration change to make in the Redis configuration file that was generated during the installation.
Open up the /etc/redis/redis.conf file. You have to change one line from:
supervised no
To:
supervised systemd
That’s the only change you need to make to the Redis configuration file at this point, so save and close it when you are finished. Then, restart the Redis service to reflect the changes you made to the configuration file:
systemctl restart redis systemctl status redis [Output] ● redis-server.service - Advanced key-value store Loaded: loaded (/lib/systemd/system/redis-server.service; enabled; vendor preset: enabled) Active: active (running) since Wed 2018-06-27 18:48:52 UTC; 12s ago Docs: http://redis.io/documentation, man:redis-server(1) Process: 2421 ExecStop=/bin/kill -s TERM $MAINPID (code=exited, status=0/SUCCESS) Process: 2424 ExecStart=/usr/bin/redis-server /etc/redis/redis.conf (code=exited, status=0/SUCCESS) Main PID: 2445 (redis-server) Tasks: 4 (limit: 4704) CGroup: /system.slice/redis-server.service └─2445 /usr/bin/redis-server 127.0.0.1:6379
Next you install the redis npm module to access Redis from your application.
npm i redis
Now you can require it in your application and start caching request responses. Let me show you an example:
const express = require('express') const app = express() const redis = require('redis') const redisClient = redis.createClient(6379) async function getSomethingFromDatabase (req, res, next) { try { const { id } = req.params; const data = await database.query() // Set data to Redis redisClient.setex(id, 3600, JSON.stringify(data)) res.status(200).send(data) } catch (err) { console.error(err) res.status(500) } } function cache (req, res, next) { const { id } = req.params redisClient.get(id, (err, data) => { if (err) { return res.status(500).send(err) } // If data exists return the cached value if (data != null) { return res.status(200).send(data) } // If data does not exist, proceed to the getSomethingFromDatabase function next() }) } app.get('/data/:id', cache, getSomethingFromDatabase) app.listen(3000, () => console.log(`Server running on Port ${port}`))
This piece of code will cache the response from the database as a JSON string in the Redis cache for 3600 seconds. You can change this based on your own needs.
With this, you've configured key settings to improve performance. But, you've also introduced additional possible points of failure. What if Nginx crashes or Redis overloads your disk space? How do you troubleshoot that?
Enable VM/Server-Wide Monitoring and Logging
Ideally, you'd configure an Infrastructure Agent on your VM or server to gather metrics and logs and send them to a central location. That way you can keep track of all infrastructure metrics like CPU, memory, disk usage, processes, etc.
This way you can keep an eye on your whole infrastructure, including CPU, memory and disk usage, as well as all the separate processes while running your application in cluster-mode.
But, we do need to know what's going on with Nginx first. You can configure the stub_status to show Nginx metrics, but that doesn't really give you any actionable insight. But, you can install an Nginx Integration and get insight into Nginx metrics alongside your Express.js Integration in Sematext Cloud.
Why is monitoring Nginx important? Nginx is the entry point to your application. If it fails, your whole application fails. Your Node.js instance can be fine, but Nginx stops responding and your website goes down. You'll have no clue it's down because the Express.js application is still running without any issues.
You have to keep an eye on all the points of failure in your system. That's why having proper alerting in place is so crucial. If you want to learn more about alerting you can read this.
Same goes for Redis. To keep an eye on it, check out ways to monitor Redis, here or here.
That wraps up the DevOps tools and best practices you should stick to. What a ride that was! If you want to delve deeper into learning about DevOps and tooling, check out this guide my co-worker wrote.
Wrapping Up
It took me the better part of four years to start using proper tooling and adhering to best practices. In the end, I just want to point out the most important part of your application is to be available and performant. Otherwise, you won't see any users stick around. If they can't use your application, what's the point?
The idea behind this article was to cover best practices you should stick to, but also the bad practices to stay away from.
You've learned many new things in this Express.js tutorial. From optimizing Express.js itself, creating an intuitive project structure and optimizing for performance to learning about JavaScript best practices and test-driven development. You've also learned about error handling, logging and monitoring.
After all this, you can say with certainty that you've had an introduction to DevOps culture. What does that mean? Well, making sure to write reliable and performant software with test coverage, while maintaining the best possible developer productivity. That's how we as engineers continue loving our job. Otherwise, it's all mayhem.
Hope you all enjoyed reading this as much as I enjoyed writing it. If you liked it, feel free to hit the share button so more people will see this tutorial. Until next time, be curious and have fun.
via freeCodeCamp.org https://ift.tt/2y98uzT
0 notes
Photo

Chrome releases paused, a practical overview of CSS Houdini, and more...
#433 — March 25, 2020
Read on the Web
Frontend Focus
A Practical Overview of CSS Houdini — A detailed look at each part of Houdini, a group of APIs that give developers direct access to the CSS Object Model, including current browser support (quickly improving) and how its features can be used today using progressive enhancement.
Adrian Bece
Safari Now Blocking Third-Party Cookies By Default, Plus Expires Local Storage After 7 Days.. — Safari’s Intelligent Tracking Prevention (ITP) has been in beta for a few months, and is now live in both the iOS and macOS builds. It introduces significant privacy changes, including cross-site cookies now being blocked by default. There is also a '7 day cap on all script-writeable storage' (including Indexed DB, localStorage and sessionStorage) which Aral Balkan suggests “effectively kills offline web apps”.
John Wilander (WebKit)
New Course: State Management in Pure React, v2 — The root of most performance and maintainability issues in large React apps is often how you manage your state. This course focuses on pure React APIs such as hooks, context, useReducer, and custom hooks.
Frontend Masters sponsor
Embracing Modern Image Formats: Leveraging WebP in HTML and React — A thorough look at how using next-gen image formats along with the <picture> element can reduce image sizes dramatically.
Josh W Comeau
▶ The Complete AEA DC 2019 Now Online — Usually videos from ‘An Event Apart’ sessions get released gradually, but due to current circumstances they’ve opted to release them all in one go. There’s some good stuff here including excellent talks from Jen Simmons, Sara Soueidan, Aaron Gustafson and others.
An Event Apart
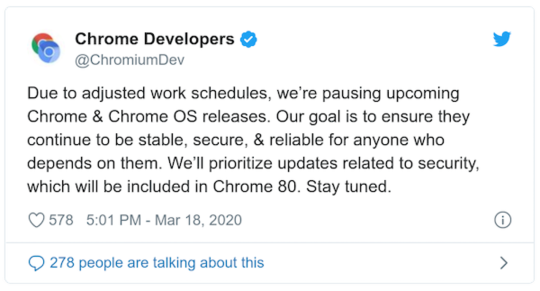
Chrome Releases Paused: There'll Be No Final Chrome 82 — The stable release of Chrome 81 was due to arrive last week, but this version remains in beta for the forseeable future as things are now on hiatus due to the current global crisis. Canary releases will continue shipping as planned.
Chrome Developers on Twitter
💻 Jobs
Find a Dev Job Through Vettery — Vettery is completely free for job seekers. Make a profile, name your salary, and connect with hiring managers from top employers.
Vettery
UX/Frontend Engineer @ Siteline — Join the founding engineering team at Siteline and help us revolutionize the payments process for construction.
Siteline
ℹ️ Interested in running a job listing in Frontend Focus? There's more info here.
📙 News, Tutorials & Opinion
Flexbox and Absolute Positioning — Looks at what happens when you absolutely position a flex item and talks about a related bug in Firefox’s developer tools.
Chen Hui Jing
How Do You Make Video Accessible? — Lots of good reminders here on video accessibility, covering captions, subtitles, audio descriptions, transcripts, and more.
Suzanne Scacca
CSS Can Influence Screenreaders — Runs through a few examples of how your CSS can significantly change what some screen readers announce.
Ben Myers
Maintaining Performance — Dave discusses how shaving 33s off page load time (by fixing how fonts are loaded) helped him recognize some larger lessons about performance over the long haul.
Dave Rupert
31 Days of #MarchMediaMadness. New Cloudinary Challenges, Win Daily
Cloudinary sponsor
Customize Media Notifications and Playback Controls with The Media Session API — A look at how to customize media notifications and respond to media related events, such as seeking or track changing with the Media Session API.
François Beaufort
How to Create an Extruded Hover Effect with Box Shadows — Now this may have some performance implications, but the end result is a neat effect. The article refers to the effect as an “accordion”, but not in the UI sense.
Sarah L. Fossheim
How to Use the URL API with Vanilla JavaScript — A simple look at a lesser-known Web API, which lets you grab various bits including the hash, hostname, pathname, protocol, etc.
Chris Ferdinandi
Playing With Particles Using the Web Animations API
Louis Hoebregts
How to use the currentColor value in CSS
JS Craft
Indicating Scroll Position on a Page With CSS
Preethi Sam
🗓 Upcoming Events
StayAtHomeConf, March 29 — Online — An online conference streamed on YouTube. Has a few talks which may be of interest to a frontend crowd, including one on accessibility.
PerfMatters, March 31 - April 1 — Online — A web performance conference, which has now moved to be a virtual event, with a focus on frontend web performance with talks by internationally renowned performance developers.
FrontCon, April 1-3 August 12 - 14 — Riga, Latvia — This event has been postponed until August due to the Coronavirus outbreak.
You Gotta Love Frontend Conference, May 14-15 August 27-28 — Vilnius, Lithuania — Described as having "big names with irresistible talks and a whole lot of fun". This event has been postponed, and will now take place in late August.
📌 If you're hosting, or know of any, upcoming online events that our readers should know about then just hit reply with a few details so we can share them in a future issue.
🔧 Code, Tools and Resources

tabler-icons: A Set of Over 300 Free High-Quality SVG Icons — Here's a nice collection of practical icons. MIT-licensed.
Tabler
Buttono: A Flexible Sass Mixin for Creating BEM-Style Buttons — Buttons have a consistent look across modern browers and include focus styles for accessibility.
Hasan Aydoğdu
CSS2JS: Convert CSS to a JavaScript Object — Got CSS and need it in JavaScript object format for JSX or some CSS-in-JS library? This may help.
dotenv
Uppload: A 'Better' JavaScript Image Uploader — Open source, highly customizable with 30+ plugins and can be used with any file uploading backend.
El Niño
Web Font of the Week
Ostrich Sans
Although not new, this remains a popular typeface. Ostrich Sans is a modern sans-serif font featuring long stems (or necks if you will). It's available in a variety of styles and weights — I particularly like the Black and Heavy variants. Here's the related GitHub repo.

by via Frontend Focus https://ift.tt/2vPubEb
0 notes
Text
Create A Bookmarking Application With FaunaDB, Netlify And 11ty
Create A Bookmarking Application With FaunaDB, Netlify And 11ty
Bryan Robinson
2019-10-24T13:30:59+02:002019-10-24T13:03:40+00:00
The JAMstack (JavaScript, APIs and Markup) revolution is in full swing. Static sites are secure, fast, reliable and fun to work on. At the heart of the JAMstack are static site generators (SSGs) that store your data as flat files: Markdown, YAML, JSON, HTML, and so on. Sometimes, managing data this way can be overly complicated. Sometimes, we still need a database.
With that in mind, Netlify — a static site host and FaunaDB — a serverless cloud database — collaborated to make combining both systems easier.
Why A Bookmarking Site?
The JAMstack is great for many professional uses, but one of my favorite aspects of this set of technology is its low barrier to entry for personal tools and projects.
There are plenty of good products on the market for most applications I could come up with, but none would be exactly set up for me. None would give me full control over my content. None would come without a cost (monetary or informational).
With that in mind, we can create our own mini-services using JAMstack methods. In this case, we’ll be creating a site to store and publish any interesting articles I come across in my daily technology reading.
I spend a lot of time reading articles that have been shared on Twitter. When I like one, I hit the “heart” icon. Then, within a few days, it’s nearly impossible to find with the influx of new favorites. I want to build something as close to the ease of the “heart,” but that I own and control.
How are we going to do that? I’m glad you asked.
Interested in getting the code? You can grab it on Github or just deploy straight to Netlify from that repository! Take a look at the finished product here.
Our Technologies
Hosting And Serverless Functions: Netlify
For hosting and serverless functions, we’ll be utilizing Netlify. As an added bonus, with the new collaboration mentioned above, Netlify’s CLI — “Netlify Dev” — will automatically connect to FaunaDB and store our API keys as environment variables.
Database: FaunaDB
FaunaDB is a “serverless” NoSQL database. We’ll be using it to store our bookmarks data.
Static Site Generator: 11ty
I’m a big believer in HTML. Because of this, the tutorial won’t be using front-end JavaScript to render our bookmarks. Instead, we’ll utilize 11ty as a static site generator. 11ty has built-in data functionality that makes fetching data from an API as easy as writing a couple of short JavaScript functions.
iOS Shortcuts
We’ll need an easy way to post data to our database. In this case, we’ll use iOS’s Shortcuts app. This could be converted to an Android or desktop JavaScript bookmarklet, as well.
Setting Up FaunaDB Via Netlify Dev
Whether you have already signed up for FaunaDB or you need to create a new account, the easiest way to set up a link between FaunaDB and Netlify is via Netlify’s CLI: Netlify Dev. You can find full instructions from FaunaDB here or follow along below.
If you don’t already have this installed, you can run the following command in Terminal:
npm install netlify-cli -g
From within your project directory, run through the following commands:
netlify init // This will connect your project to a Netlify project netlify addons:create fauna // This will install the FaunaDB "addon" netlify addons:auth fauna // This command will run you through connecting your account or setting up an account
Once this is all connected, you can run netlify dev in your project. This will run any build scripts we set up, but also connect to the Netlify and FaunaDB services and grab any necessary environment variables. Handy!
Creating Our First Data
From here, we’ll log into FaunaDB and create our first data set.
We’ll start by creating a new Database called “bookmarks.” Inside a Database, we have Collections, Documents and Indexes.
A Collection is a categorized group of data. Each piece of data takes the form of a Document. A Document is a “single, changeable record within a FaunaDB database,” according to Fauna’s documentation. You can think of Collections as a traditional database table and a Document as a row.
For our application, we need one Collection, which we’ll call “links.” Each document within the “links” Collection will be a simple JSON object with three properties. To start, we’ll add a new Document that we’ll use to build our first data fetch.
{ "url": "https://css-irl.info/debugging-css-grid-part-2-what-the-fraction/", "pageTitle": "CSS { In Real Life } | Debugging CSS Grid – Part 2: What the Fr(action)?", "description": "CSS In Real Life is a blog covering CSS topics and useful snippets on the web’s most beautiful language. Published by Michelle Barker, front end developer at Ordoo and CSS superfan." }
This creates the basis for the information we’ll need to pull from our bookmarks as well as provides us with our first set of data to pull into our template.
If you’re like me, you want to see the fruits of your labor right away. Let’s get something on the page!
Installing 11ty And Pulling Data Into A Template
Since we want the bookmarks to be rendered in HTML and not fetched by the browser, we’ll need something to do the rendering. There are many great ways of doing it, but for ease and power, I love using the 11ty static site generator.
Since 11ty is a JavaScript static site generator, we can install it via NPM.
npm install --save @11ty/eleventy
From that installation, we can run eleventy or eleventy --serve in our project to get up and running.
Netlify Dev will often detect 11ty as a requirement and run the command for us. To have this work - and make sure we’re ready to deploy, we can also create “serve” and “build” commands in our package.json.
"scripts": { "build": "npx eleventy", "serve": "npx eleventy --serve" }
11ty’s Data Files
Most static site generators have an idea of a “data file” built-in. Usually, these files will be JSON or YAML files that allow you to add extra information to your site.
In 11ty, you can use JSON data files or JavaScript data files. By utilizing a JavaScript file, we can actually make our API calls and return the data directly into a template.
The file will be a JavaScript module. So in order to have anything work, we need to export either our data or a function. In our case, we’ll export a function.
module.exports = async function() { const data = mapBookmarks(await getBookmarks()); return data.reverse() }
Let’s break that down. We have two functions doing our main work here: mapBookmarks() and getBookmarks().
The getBookmarks() function will go fetch our data from our FaunaDB database and mapBookmarks() will take an array of bookmarks and restructure it to work better for our template.
Let’s dig deeper into getBookmarks().
getBookmarks()
First, we’ll need to install and initialize an instance of the FaunaDB JavaScript driver.
npm install --save faunadb
Now that we’ve installed it, let’s add it to the top of our data file. This code is straight from Fauna’s docs.
// Requires the Fauna module and sets up the query module, which we can use to create custom queries. const faunadb = require('faunadb'), q = faunadb.query; // Once required, we need a new instance with our secret var adminClient = new faunadb.Client({ secret: process.env.FAUNADB_SERVER_SECRET });
After that, we can create our function. We’ll start by building our first query using built-in methods on the driver. This first bit of code will return the database references we can use to get full data for all of our bookmarked links. We use the Paginate method, as a helper to manage cursor state should we decide to paginate the data before handing it to 11ty. In our case, we’ll just return all the references.
In this example, I’m assuming you installed and connected FaunaDB via the Netlify Dev CLI. Using this process, you get local environment variables of the FaunaDB secrets. If you didn’t install it this way or aren’t running netlify dev in your project, you’ll need a package like dotenv to create the environment variables. You’ll also need to add your environment variables to your Netlify site configuration to make deploys work later.
adminClient.query(q.Paginate( q.Match( // Match the reference below q.Ref("indexes/all_links") // Reference to match, in this case, our all_links index ) )) .then( response => { ... })
This code will return an array of all of our links in reference form. We can now build a query list to send to our database.
adminClient.query(...) .then((response) => { const linkRefs = response.data; // Get just the references for the links from the response const getAllLinksDataQuery = linkRefs.map((ref) => { return q.Get(ref) // Return a Get query based on the reference passed in }) return adminClient.query(getAllLinksDataQuery).then(ret => { return ret // Return an array of all the links with full data }) }).catch(...)
From here, we just need to clean up the data returned. That’s where mapBookmarks() comes in!
mapBookmarks()
In this function, we deal with two aspects of the data.
First, we get a free dateTime in FaunaDB. For any data created, there’s a timestamp (ts) property. It’s not formatted in a way that makes Liquid’s default date filter happy, so let’s fix that.
function mapBookmarks(data) { return data.map(bookmark => { const dateTime = new Date(bookmark.ts / 1000); ... }) }
With that out of the way, we can build a new object for our data. In this case, it will have a time property, and we’ll use the Spread operator to destructure our data object to make them all live at one level.
function mapBookmarks(data) { return data.map(bookmark => { const dateTime = new Date(bookmark.ts / 1000); return { time: dateTime, ...bookmark.data } }) }
Here’s our data before our function:
{ ref: Ref(Collection("links"), "244778237839802888"), ts: 1569697568650000, data: { url: 'https://sample.com', pageTitle: 'Sample title', description: 'An escaped description goes here' } }
Here’s our data after our function:
{ time: 1569697568650, url: 'https://sample.com', pageTitle: 'Sample title' description: 'An escaped description goes here' }
Now, we’ve got well-formatted data that’s ready for our template!
Let’s write a simple template. We’ll loop through our bookmarks and validate that each has a pageTitle and a url so we don’t look silly.
<div class="bookmarks"> </div>
We’re now ingesting and displaying data from FaunaDB. Let’s take a moment and think about how nice it is that this renders out pure HTML and there’s no need to fetch data on the client side!
But that’s not really enough to make this a useful app for us. Let’s figure out a better way than adding a bookmark in the FaunaDB console.
Enter Netlify Functions
Netlify’s Functions add-on is one of the easier ways to deploy AWS lambda functions. Since there’s no configuration step, it’s perfect for DIY projects where you just want to write the code.
This function will live at a URL in your project that looks like this: https://myproject.com/.netlify/functions/bookmarks assuming the file we create in our functions folder is bookmarks.js.
Basic Flow
Pass a URL as a query parameter to our function URL.
Use the function to load the URL and scrape the page’s title and description if available.
Format the details for FaunaDB.
Push the details to our FaunaDB Collection.
Rebuild the site.
Requirements
We’ve got a few packages we’ll need as we build this out. We’ll use the netlify-lambda CLI to build our functions locally. request-promise is the package we’ll use for making requests. Cheerio.js is the package we’ll use to scrape specific items from our requested page (think jQuery for Node). And finally, we’ll need FaunaDb (which should already be installed.
npm install --save netlify-lambda request-promise cheerio
Once that’s installed, let’s configure our project to build and serve the functions locally.
We’ll modify our “build” and “serve” scripts in our package.json to look like this:
"scripts": { "build": "npx netlify-lambda build lambda --config ./webpack.functions.js && npx eleventy", "serve": "npx netlify-lambda build lambda --config ./webpack.functions.js && npx eleventy --serve" }
Warning: There’s an error with Fauna’s NodeJS driver when compiling with Webpack, which Netlify’s Functions use to build. To get around this, we need to define a configuration file for Webpack. You can save the following code to a new — or existing — webpack.config.js.
const webpack = require('webpack'); module.exports = { plugins: [ new webpack.DefinePlugin({ "global.GENTLY": false }) ] };
Once this file exists, when we use the netlify-lambda command, we’ll need to tell it to run from this configuration. This is why our “serve” and “build scripts use the --config value for that command.
Function Housekeeping
In order to keep our main Function file as clean as possible, we’ll create our functions in a separate bookmarks directory and import them into our main Function file.
import { getDetails, saveBookmark } from "./bookmarks/create";
getDetails(url)
The getDetails() function will take a URL, passed in from our exported handler. From there, we’ll reach out to the site at that URL and grab relevant parts of the page to store as data for our bookmark.
We start by requiring the NPM packages we need:
const rp = require('request-promise'); const cheerio = require('cheerio');
Then, we’ll use the request-promise module to return an HTML string for the requested page and pass that into cheerio to give us a very jQuery-esque interface.
const getDetails = async function(url) { const data = rp(url).then(function(htmlString) { const $ = cheerio.load(htmlString); ... }
From here, we need to get the page title and a meta description. To do that, we’ll use selectors like you would in jQuery.
Note: In this code, we use 'head > title' as the selector to get the title of the page. If you don’t specify this, you may end up getting <title> tags inside of all SVGs on the page, which is less than ideal.
const getDetails = async function(url) { const data = rp(url).then(function(htmlString) { const $ = cheerio.load(htmlString); const title = $('head > title').text(); // Get the text inside the tag const description = $('meta[name="description"]').attr('content'); // Get the text of the content attribute // Return out the data in the structure we expect return { pageTitle: title, description: description }; }); return data //return to our main function }
With data in hand, it’s time to send our bookmark off to our Collection in FaunaDB!
saveBookmark(details)
For our save function, we’ll want to pass the details we acquired from getDetails as well as the URL as a singular object. The Spread operator strikes again!
const savedResponse = await saveBookmark({url, ...details});
In our create.js file, we also need to require and setup our FaunaDB driver. This should look very familiar from our 11ty data file.
const faunadb = require('faunadb'), q = faunadb.query; const adminClient = new faunadb.Client({ secret: process.env.FAUNADB_SERVER_SECRET });
Once we’ve got that out of the way, we can code.
First, we need to format our details into a data structure that Fauna is expecting for our query. Fauna expects an object with a data property containing the data we wish to store.
const saveBookmark = async function(details) { const data = { data: details }; ... }
Then we’ll open a new query to add to our Collection. In this case, we’ll use our query helper and use the Create method. Create() takes two arguments. First is the Collection in which we want to store our data and the second is the data itself.
After we save, we return either success or failure to our handler.
const saveBookmark = async function(details) { const data = { data: details }; return adminClient.query(q.Create(q.Collection("links"), data)) .then((response) => { /* Success! return the response with statusCode 200 */ return { statusCode: 200, body: JSON.stringify(response) } }).catch((error) => { /* Error! return the error with statusCode 400 */ return { statusCode: 400, body: JSON.stringify(error) } }) }
Let’s take a look at the full Function file.
import { getDetails, saveBookmark } from "./bookmarks/create"; import { rebuildSite } from "./utilities/rebuild"; // For rebuilding the site (more on that in a minute) exports.handler = async function(event, context) { try { const url = event.queryStringParameters.url; // Grab the URL const details = await getDetails(url); // Get the details of the page const savedResponse = await saveBookmark({url, ...details}); //Save the URL and the details to Fauna if (savedResponse.statusCode === 200) { // If successful, return success and trigger a Netlify build await rebuildSite(); return { statusCode: 200, body: savedResponse.body } } else { return savedResponse //or else return the error } } catch (err) { return { statusCode: 500, body: `Error: ${err}` }; } };
rebuildSite()
The discerning eye will notice that we have one more function imported into our handler: rebuildSite(). This function will use Netlify’s Deploy Hook functionality to rebuild our site from the new data every time we submit a new — successful — bookmark save.
In your site’s settings in Netlify, you can access your Build & Deploy settings and create a new “Build Hook.” Hooks have a name that appears in the Deploy section and an option for a non-master branch to deploy if you so wish. In our case, we’ll name it “new_link” and deploy our master branch.
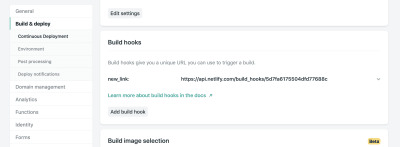
A visual reference for the Netlify Admin’s build hook setup (Large preview)
From there, we just need to send a POST request to the URL provided.
We need a way of making requests and since we’ve already installed request-promise, we’ll continue to use that package by requiring it at the top of our file.
const rp = require('request-promise'); const rebuildSite = async function() { var options = { method: 'POST', uri: 'https://api.netlify.com/build_hooks/5d7fa6175504dfd43377688c', body: {}, json: true }; const returned = await rp(options).then(function(res) { console.log('Successfully hit webhook', res); }).catch(function(err) { console.log('Error:', err); }); return returned }
A demo of the Netlify Function setup and the iOS Shortcut setup combined
Setting Up An iOS Shortcut
So, we have a database, a way to display data and a function to add data, but we’re still not very user-friendly.
Netlify provides URLs for our Lambda functions, but they’re not fun to type into a mobile device. We’d also have to pass a URL as a query parameter into it. That’s a LOT of effort. How can we make this as little effort as possible?
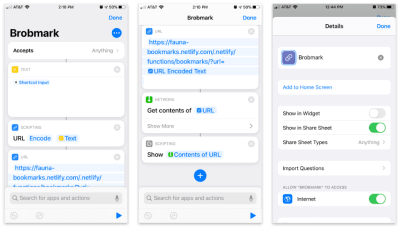
A visual reference for the setup for our Shortcut functionality (Large preview)
Apple’s Shortcuts app allows the building of custom items to go into your share sheet. Inside these shortcuts, we can send various types of requests of data collected in the share process.
Here’s the step-by-step Shortcut:
Accept any items and store that item in a “text” block.
Pass that text into a “Scripting” block to URL encode (just in case).
Pass that string into a URL block with our Netlify Function’s URL and a query parameter of url.
From “Network” use a “Get contents” block to POST to JSON to our URL.
Optional: From “Scripting” “Show” the contents of the last step (to confirm the data we’re sending).
To access this from the sharing menu, we open up the settings for this Shortcut and toggle on the “Show in Share Sheet” option.
As of iOS13, these share “Actions” are able to be favorited and moved to a high position in the dialog.
We now have a working “app” for sharing bookmarks across multiple platforms!
Go The Extra Mile!
If you’re inspired to try this yourself, there are a lot of other possibilities to add functionality. The joy of the DIY web is that you can make these sorts of applications work for you. Here are a few ideas:
Use a faux “API key” for quick authentication, so other users don’t post to your site (mine uses an API key, so don’t try to post to it!).
Add tag functionality to organize bookmarks.
Add an RSS feed for your site so that others can subscribe.
Send out a weekly roundup email programmatically for links that you’ve added.
Really, the sky is the limit, so start experimenting!

(dm, yk)
0 notes
Video
youtube
Reading Environment Variable in Nodejs JavaScript Application Using dote... Full Video Link https://youtu.be/dxrNopL1sbQHello friends, new #video on #reading #accessing #environmentvariables in #nodejs #projeect #application #tutorial #examples is published on #codeonedigest #youtube channel. @java #java #aws #awscloud @awscloud @AWSCloudIndia #salesforce #Cloud #CloudComputing @YouTube #youtube #azure #msazure #codeonedigest @codeonedigest #environmentvariables #nodejs #dotenv #setenvironmentvariables #linuxenvironmentvariables #pythonenvironmentvariables #dotenvnodejs #dotenvinnodejs #dotenvtutorial #dotenvtutorialnodejs #dotenvexample #dotenvmodule #dotenvmoduleinnodejs #dotenvmodulenotfound #dotenvpackage #dotenvpackagenodejs #dotenvpackage.json #dotenvpackageinstall #nodejsjavascript #environmentvariable #nodejsjavascripttutorial #javascriptenvironmentvariable #javascript
#youtube#nodejs#javascript#envrionment variable#nodejs tutorial#javascript tutorial#dotenv#dotenv tutorial
1 note
·
View note
Text
Laravel 5.8 Tutorial From Scratch - e07 - SQLite Database - Laravel
Laravel 5.8 Tutorial From Scratch – e07 – SQLite Database – Laravel
Laravel 5.8 Tutorial From Scratch – e07 – SQLite Database – Laravel
[ad_1]
Let’s get the basics of working with a database in Laravel by setting up an SQLite database from scratch. Let’s also create a migration and a model for our customers.
For the best experience, follow along in our interactive school at https://www.coderstape.com
Resources Course Source Code https://github.com/coderstape/larav…
View On WordPress
#database configuration laravel#dotenv#laravel#laravel 5#laravel 5.8#laravel 5.8 install#laravel 5.8 new feature#laravel 5.8 what&039;s new#laravel connect db#laravel database#laravel database configuration#laravel database settings#laravel db settings#laravel for beginners#laravel from scratch#laravel from the ground up#laravel mysql json#laravel preview#laravel tutorial#php carbon immutable#php framework#php framework 2019#php what&039;s new 2019
0 notes
Text
Getting Started With Axios In Nuxt
About The Author
Front-end developer based in Lagos, Nigeria. He enjoys converting designs into code and building things for the web. More about Timi …
In this tutorial, we will learn how to make a request in our NUXt.js applications using the Axios module. We will also learn how to use the ayncData and fetch methods to fetch data on the server-side using Axios and the differences between the two methods. Finally, we will learn how to add authentication to our application using the Auth module.
NUXt.js provides an Axios module for easy integration with your application. Axios is a promise-based HTTP client that works in the browser and Node.js environment or, in simpler terms, it is a tool for making requests (e.g API calls) in client-side applications and Node.js environment.
In this tutorial, we’re going to learn how to use the Axios module and how to make a request on the server-side using asyncData and fetch. These two methods make a request on the server-side but they have some differences which we’re also going to cover. Finally, we’ll learn how to perform authentication and secure pages/routes using the auth module and auth middleware.
This article requires basic knowledge of NUXtjs and Vuejs as we’ll be building on top of that. For those without experience with Vuejs, I recommend you start from their official documentation and the Nuxt official page before continuing with this article.
What Is The Nuxt.js Axios Module?
According to the official Documentation,
“It is a Secure and easy Axios integration with NUXt.js.”
Here are some of its features:
Automatically set base URL for client-side & server-side.
Proxy request headers in SSR (Useful for auth).
Fetch Style requests.
Integrated with NUXt.js Progressbar while making requests.
To use the axios module in your application, you will have to first install it by using either npm or yarn.
YARN
yarn add @nUXtjs/axios
NPM
npm install @nUXtjs/axios
Add it into your nUXt.config.js file:
modules: [ '@nUXtjs/axios', ], axios: { // extra config e.g // BaseURL: 'https://link-to-API' }
The modules array accepts a list of NUXt.js modules such as dotenv, auth and in this case, Axios. What we’ve done is to inform our application that we would be using the Axios module, which we reference using @nUXtjs/axios. This is then followed by the axios property which is an object of configurations like the baseURL for both client-side and server-side.
Now, you can access Axios from anywhere in your application by calling this.$axios.method or this.$axios.$method. Where method can be get, post, or delete.
Making Your First Request Using Axios
For this tutorial, I’ve put together a simple application on Github. The repository contains two folders, start and finish, the start folder contains all you need to get right into the tutorial. The finish folder contains a completed version of what we would be building.
After cloning the repo and opening the start folder, we would need to install all our packages in the package.json file so open your terminal and run the following command:
npm install
Once that is done, we can start our app using the npm run dev command. This is what you should see when you go to localhost:3000.
Our application’s landing page. (Large preview)
The next thing we have to do is to create a .env file in the root folder of our application and add our API URL to it. For this tutorial, we’ll be using a sample API built to collect reports from users.
API_URL=https://ireporter-endpoint.herokuapp.com/api/v2/
This way, we do not have to hard code our API into our app which is useful for working with two APIs (development and production).
The next step would be to open our nUXt.config.js file and add the environmental variable to our axios config that we added above.
/* ** Axios module configuration */ axios: { // See https://github.com/nUXt-community/axios-module#options baseURL: process.env.API_URL, },
Here, we tell NUXt.js to use this baseURL for both our client-side and server-side requests whenever we use this Axios module.
Now, to fetch a list of reports, let us open the index.vue file and add the following method to the script section.
async getIncidents() { let res = await this.$store.dispatch("getIncidents"); this.incidents = res.data.data.incidents;}
What we have done is to create an async function that we call getIncidents() and we can tell what it does from the name — it fetches a list of incidents using the Vuex store action method this.$store.dispatch. We assign the response from this action to our incidents property so we can be able to make use of it in the component.
We want to call the getIncidents() method whenever the component mounts. We can do that using the mounted hook.
mounted() { this.getIncidents() }
mounted() is a lifecycle hook that gets called when the component mounts. That will cause the call to the API to happen when the component mounts. Now, let us go into our index.js file in our store and create this action where we’ll be making our Axios request from.
export const actions = { async getIncidents() { let res = await this.$axios.get('/incidents') return res; }}
Here, we created the action called getIncidents which is an async function, then we await a response from the server and return this response. The response from this action is sent back to our getIncidents() method in our index.vue file.
If we refresh our application, we should now be able to see a long list of incidents rendered on the page.
List of incidents on landing page. (Large preview)
We have made our first request using Axios but we won’t stop there, we are going to be trying out asyncData and fetch to see the differences between them and using Axios.
AsyncData
AsyncData fetches data on the server-side and it’s called before loading the page component. It does not have access to this because it is called before your page component data is created. this is only available after the created hook has been called so NUXt.js automatically merges the returned data into the component’s data.
Using asyncData is good for SEO Company because it fetches your site’s content on the server-side and also helps in loading content faster. Note that asyncData method can only be used in the pages folder of your application as it would not work in the components folder. This is because asyncData hook gets called before your component is created.
Image from NUXt blog. (Large preview)
Let us add asyncData to our index.vue file and observe how fast our incidents data loads. Add the following code after our components property and let us get rid of our mounted hook.
async asyncData({ $axios }) { let { data } = await $axios.get("/incidents"); return { incidents: data.data.incidents }; }, // mounted() { // this.getIncidents(); // },
Here, the asyncData method accepts a property from the context $axios. We use this property to fetch the list of incidents and the value is then returned. This value is automatically injected into our component. Now, you can notice how fast your content loads if you refresh the page and at no time is there no incident to render.
Fetch
The Fetch method is also used to make requests on the server-side. It is called after the created hook in the life cycle which means it has access to the component’s data. Unlike the asyncData method, the fetch method can be used in all .vue files and be used with the Vuex store. This means that if you have the following in your data function.
data() { return { incidents: [], id: 5, gender: 'male' };}
You can easily modify id or gender by calling this.id or this.gender.
Using Axios As A Plugin
During the process of development with Axios, you might find that you need extra configuration like creating instances and interceptors for your request so your application can work as intended and thankfully, we can do that by extending our Axios into a plugin.
To extend axios, you have to create a plugin (e.g. axios.js) in your plugins folder.
export default function ({ $axios, store, redirect}) { $axios.onError(error => { if (error.response && error.response.status === 500) { redirect('/login') } }) $axios.interceptors.response.use( response => { if (response.status === 200) { if (response.request.responseURL && response.request.responseURL.includes('login')) { store.dispatch("setUser", response); } } return response } )}
This is an example of a plugin I wrote for a NUXt application. Here, your function takes in a context object of $axios, store and redirect which we would use in configuring the plugin. The first thing we do is to listen for an error with a status of 500 using $axios.onError and redirect the user to the login page.
We also have an interceptor that intercepts every request response we make in our application checks if the status of the response we get is 200. If that is true we proceed and check that there is a response.request.responseURL and if it includes login. If this checks out to be true, we then send this response using our store’s dispatch method where it then mutated in our state.
Add this plugin to your nUXt.config.js file:
plugins: [ '~/plugins/axios' ]
After doing this, your Axios plugin would intercept any request you make and check if you have defined a special case for it.
Introduction To The Auth Module
The auth module is used for performing authentication for your NUXt application and can be accessed from anywhere in your application using $this.auth. It is also available in fetch, asyncData, middleware and NUXtInitServer from the context object as $auth.
The context provides additional objects/params from NUXt to Vue components and is available in special nUXt lifecycle areas like those mentioned above.
To use the auth module in your application, you would have to install it using yarn or npm.
YARN
yarn add @nUXtjs/auth
NPM
npm install @nUXtjs/auth
Add it to your nUXt.config.js file.
modules: [ '@nUXtjs/auth'],auth: { // Options}
The auth property accepts a list of properties such as strategies and redirect. Here, strategies accepts your preferred authentication method which can be:
local For username/email and password-based flow.
Facebook For using Facebook accounts as a means of authentication.
Github For authenticating users with Github accounts.
Google For authenticating users with Google accounts.
Auth0
Laravel Passport
The redirect property accepts an object of links for:
login Users would be redirected to this link if login is required.
logout Users would be redirected here if after logout current route is protected.
home Users would be redirected here after login.
Now, let us add the following to our nUXt.config.js file.
/* ** Auth module configuration */auth: { redirect: { login: '/login', logout: '/', home: '/my-reports' }, strategies: { local: { endpoints: { login: { url: "/user/login", method: "post", propertyName: "data.token", }, logout: false, user: false, }, tokenType: '', tokenName: 'x-auth', autoFetchUser: false }, },}
Please note that the auth method works best when there is a user endpoint provided in the option above.
Inside the auth config object, we have a redirect option in which we set our login route to /login, logout route to / and home route to /my-reports which would all behave as expected. We also have a tokenType property which represents the Authorization type in the header of our Axios request. It is set to Bearer by default and can be changed to work with your API.
For our API, there is no token type and this is why we’re going to leave it as an empty string. The tokenName represents the Authorization name (or the header property you want to attach your token to) inside your header in your Axios request.
By default, it is set to Authorization but for our API, the Authorization name is x-auth. The autoFetchUser property is used to enable user fetch object using the user endpoint property after login. It is true by default but our API does not have a user endpoint so we have set that to false.
For this tutorial, we would be using the local strategy. In our strategies, we have the local option with endpoints for login, user and logout but in our case, we would only use the *login* option because our demo API does not have a *logout* endpoint and our user object is being returned when *login* is successful.
Note: The auth module does not have a register endpoint option so that means we’re going to register the traditional way and redirect the user to the login page where we will perform the authentication using this.$auth.loginWith. This is the method used in authenticating your users. It accepts a ‘strategy’ (e.g local) as a first argument and then an object to perform this authentication with. Take a look at the following example.
let data { email: '[email protected]', password: '123456'}this.$auth.loginWith('local', { data })
Using The Auth Module
Now that we have configured our auth module, we can proceed to our registration page. If you visit the /register page, you should see a registration form.
Register page. (Large preview)
Let us make this form functional by adding the following code:
methods: { async registerUser() { this.loading = true; let data = this.register; try { await this.$axios.post("/user/create", data); this.$router.push("/login"); this.loading = false; this.$notify({ group: "success", title: "Success!", text: "Account created successfully" }); } catch (error) { this.loading = false; this.$notify({ group: "error", title: "Error!", text: error.response ? error.response.data.error : "Sorry an error occured, check your internet" }); } }}
Here, we have an async function called registerUser which is tied to a click event in our template and makes an Axios request wrapped in a try/catch block to an endpoint /user/create. This redirects to the /login page and notifies the user of a successful registration. We also have a catch block that alerts the user of any error if the request is not successful.
If the registration is successful, you would be redirected to the login page.
Login page with notification component. (Large preview)
Here, we’re going to make use of auth authentication method this.$auth.loginWith('local', loginData) after which we would use the this.$auth.setUser(userObj) to set the user in our auth instance.
To get the login page working, let’s add the following code to our login.vue file.
methods: { async logIn() { let data = this.login; this.loading = true; try { let res = await this.$auth.loginWith("local", { data }); this.loading = false; let user = res.data.data.user; this.$auth.setUser(user); this.$notify({ group: "success", title: "Success!", text: "Welcome!" }); } catch (error) { this.loading = false; this.$notify({ group: "error", title: "Error!", text: error.response ? error.response.data.error : "Sorry an error occured, check your internet" }); } }}
We created an async function called logIn using the auth method this.$auth.loginWith('local, loginData). If this login attempt is successful, we then assign the user data to our auth instance using this.$auth.setUser(userInfo) and redirect the user to the /my-report page.
You can now get user data using this.$auth.user or with Vuex using this.$store.state.auth.user but that’s not all. The auth instance contains some other properties which you can see if you log in or check your state using your Vue dev tools.
If you log this.$store.state.auth to the console, you’ll see this:
{ "auth": { "user": { "id": "d7a5efdf-0c29-48aa-9255-be818301d602", "email": "[email protected]", "lastName": "Xo", "firstName": "Tm", "othernames": null, "isAdmin": false, "phoneNumber": null, "username": null }, "loggedIn": true, "strategy": "local", "busy": false }}
The auth instance contains a loggedIn property that is useful in switching between authenticated links in the nav/header section of your application. It also contains a strategy method that states the type of strategy the instance is running (e.g local).
Now, we will make use of this loggedIn property to arrange our nav links. Update your navBar component to the following:
<template> <header class="header"> <div class="logo"> <nUXt-link to="/"> <Logo /> </nUXt-link> </div> <nav class="nav"> <div class="nav__user" v-if="auth.loggedIn"> <p></p> <button class="nav__link nav__link--long"> <nUXt-link to="/report-incident">Report incident</nUXt-link> </button> <button class="nav__link nav__link--long"> <nUXt-link to="/my-reports">My Reports</nUXt-link> </button> <button class="nav__link" @click.prevent="logOut">Log out</button> </div> <button class="nav__link" v-if="!auth.loggedIn"> <nUXt-link to="/login">Login</nUXt-link> </button> <button class="nav__link" v-if="!auth.loggedIn"> <nUXt-link to="/register">Register</nUXt-link> </button> </nav> </header></template><script>import { mapState } from "vuex";import Logo from "@/components/Logo";export default { name: "nav-bar", data() { return {}; }, computed: { ...mapState(["auth"]) }, methods: { logOut() { this.$store.dispatch("logOut"); this.$router.push("/login"); } }, components: { Logo }};</script><style></style>
In our template section, we have several links to different parts of the application in which we are now using auth.loggedIn to display the appropriate links depending on the authentication status. We have a logout button that has a click event with a logOut() function attached to it. We also display the user’s email gotten from the auth property which is accessed from our Vuex store using the mapState method which maps our state auth to the computed property of the nav component. We also have a logout method that calls our Vuex action logOut and redirects the user to the login page.
Now, let us go ahead and update our store to have a logOut action.
export const actions = { // .... logOut() { this.$auth.logout(); }}
The logOut action calls the auth logout method which clears user data, deletes tokens from localStorage and sets loggedIn to false.
Routes like /my-reports and report-incident should not be visible to guests but at this point in our app, that is not the case. NUXt does not have a navigation guard that can protect your routes, but it has is the auth middleware. It gives you the freedom to create your own middleware so you can configure it to work the way you want.
It can be set in two ways:
Per route.
Globally for the whole app in your nUXt.config.js file.
router: { middleware: ['auth']}
This auth middleware works with your auth instance so you do not need to create an auth.js file in your middleware folder.
Let us now add this middleware to our my-reports.vue and report-incident.vue files. Add the following lines of code to the script section of each file.
middleware: 'auth'
Now, our application would check if the user trying to access these routes has an auth.loggedIn value of true. It’ll redirect them to the login page using our redirect option in our auth config file — if you’re not logged in and you try to visit either /my-report or report-incident, you would be redirected to /login.
If you go to /report-incidents, this is what you should see.
Report incident page. (Large preview)
This page is for adding incidents but that right now the form does not send incident to our server because we are not making the call to the server when the user attempts to submit the form. To solve this, we will add a reportIncident method which will be called when the user clicks on Report. We’ll have this in the script section of the component. This method will send the form data to the server. Update your report-incident.vue file with the following:
<template> <section class="report"> <h1 class="report__heading">Report an Incident</h1> <form class="report__form"> <div class="input__container"> <label for="title" class="input__label">Title</label> <input type="text" name="title" id="title" v-model="incident.title" class="input__field" required /> </div> <div class="input__container"> <label for="location" class="input__label">Location</label> <input type="text" name="location" id="location" v-model="incident.location" required class="input__field" /> </div> <div class="input__container"> <label for="comment" class="input__label">Comment</label> <textarea name="comment" id="comment" v-model="incident.comment" class="input__area" cols="30" rows="10" required ></textarea> </div> <input type="submit" value="Report" class="input__button" @click.prevent="reportIncident" /> <p class="loading__indicator" v-if="loading">Please wait....</p> </form> </section></template><script>export default { name: "report-incident", middleware: "auth", data() { return { loading: false, incident: { type: "red-flag", title: "", location: "", comment: "" } }; }, methods: { async reportIncident() { let data = this.incident; let formData = new FormData(); formData.append("title", data.title); formData.append("type", data.type); formData.append("location", data.location); formData.append("comment", data.comment); this.loading = true; try { let res = await this.$store.dispatch("reportIncident", formData); this.$notify({ group: "success", title: "Success", text: "Incident reported successfully!" }); this.loading = false; this.$router.push("/my-reports"); } catch (error) { this.loading = false; this.$notify({ group: "error", title: "Error!", text: error.response ? error.response.data.error : "Sorry an error occured, check your internet" }); } } }};</script><style></style>
Here, we have a form with input fields for title, location, and comment with two-way data binding using v-model. We also have a submit button with a click event. In the script section, we have a reportIncident method that collects all the information provided in the form and is sent to our server using FormData because the API is designed to also accept images and videos.
This formData is attached to a Vuex action using the dispatch method, if the request is successful, you get redirected to /my-reports with a notification informing you that this request was successful otherwise, you would be notified of an error with the error message.
At this point, we don’t have reportIncident action in our store yet so in your browser console, you would see an error if you try to click submit on this page.
Vuex error message. (Large preview)
To fix this, add the reportIncident action your index.js file.
export const actions = { // ... async reportIncident({}, data) { let res = await this.$axios.post('/incident/create', data) return res; }}
Here, we have a reportIncident function that takes in an empty context object and the data we’re sending from our form. This data is then attached to a post request that creates an incident and returns back to our report-incident.vue file.
At this point, you should be able to add a report using the form after which you would be redirected to /my-reports page.
My reports page empty. (Large preview)
This page should display a list of incidents created by the user but right now it only shows what we see above, let’s go ahead to fix that.
We’re going to be using the fetch method we learned about to get this list. Update your my-reports.vue file with the following:
<script>import incidentCard from "@/components/incidentCard.vue";export default { middleware: "auth", name: "my-reports", data() { return { incidents: [] }; }, components: { incidentCard }, async fetch() { let { data } = await this.$axios.get("/user/incidents"); this.incidents = data.data; }};</script>
Here, we use fetch method to get user-specific incidents and assign the response to our incidents array.
If you refresh your page after adding an incident, you should see something like this.
My Reports page with a report. (Large preview)
At this point, we would notice a difference in how fetch method and asyncData loads our data.
Conclusion
So far, we have learned about the Axios module and all of its features. We have also learned more about asyncData, and how we can fetch both of them together despite their differences. We’ve also learned how to perform authentication in our application using the auth module and how to use the auth middleware to protect our routes. Here are some useful resources that talk more about all we’ve covered.
Resources
“Auth Module,” NUXtJS.org
“Axios Module: Introduction,” NUXtJS.org
FormData, MDN web docs
“API: The asyncData Method,” NUXtJS.org
“The Vue Instance: Lifecycle Diagram,” VueJS.org
“Understanding How fetch Works In Nuxt 2.12,” NUXtJS.org
(ks, ra, yk, il)
Website Design & SEO Delray Beach by DBL07.co
Delray Beach SEO
Via http://www.scpie.org/getting-started-with-axios-in-nuxt/
source https://scpie.weebly.com/blog/getting-started-with-axios-in-nuxt
0 notes
Text
Going Jamstack with React, Serverless, and Airtable
The best way to learn is to build. Let’s learn about this hot new buzzword, Jamstack, by building a site with React, Netlify (Serverless) Functions, and Airtable. One of the ingredients of Jamstack is static hosting, but that doesn’t mean everything on the site has to be static. In fact, we’re going to build an app with full-on CRUD capability, just like a tutorial for any web technology with more traditional server-side access might.
youtube
Why these technologies, you ask?
You might already know this, but the “JAM” in Jamstack stands for JavaScript, APIs, and Markup. These technologies individually are not new, so the Jamstack is really just a new and creative way to combine them. You can read more about it over at the Jamstack site.
One of the most important benefits of Jamstack is ease of deployment and hosting, which heavily influence the technologies we are using. By incorporating Netlify Functions (for backend CRUD operations with Airtable), we will be able to deploy our full-stack application to Netlify. The simplicity of this process is the beauty of the Jamstack.
As far as the database, I chose Airtable because I wanted something that was easy to get started with. I also didn’t want to get bogged down in technical database details, so Airtable fits perfectly. Here’s a few of the benefits of Airtable:
You don’t have to deploy or host a database yourself
It comes with an Excel-like GUI for viewing and editing data
There’s a nice JavaScript SDK
What we’re building
For context going forward, we are going to build an app where you can use to track online courses that you want to take. Personally, I take lots of online courses, and sometimes it’s hard to keep up with the ones in my backlog. This app will let track those courses, similar to a Netflix queue.

Source Code
One of the reasons I take lots of online courses is because I make courses. In fact, I have a new one available where you can learn how to build secure and production-ready Jamstack applications using React and Netlify (Serverless) Functions. We’ll cover authentication, data storage in Airtable, Styled Components, Continuous Integration with Netlify, and more! Check it out →
Airtable setup
Let me start by clarifying that Airtable calls their databases “bases.” So, to get started with Airtable, we’ll need to do a couple of things.
Sign up for a free account
Create a new “base”
Define a new table for storing courses
Next, let’s create a new database. We’ll log into Airtable, click on “Add a Base” and choose the “Start From Scratch” option. I named my new base “JAMstack Demos” so that I can use it for different projects in the future.

Next, let’s click on the base to open it.

You’ll notice that this looks very similar to an Excel or Google Sheets document. This is really nice for being able tower with data right inside of the dashboard. There are few columns already created, but we add our own. Here are the columns we need and their types:
name (single line text)
link (single line text)
tags (multiple select)
purchased (checkbox)
We should add a few tags to the tags column while we’re at it. I added “node,” “react,” “jamstack,” and “javascript” as a start. Feel free to add any tags that make sense for the types of classes you might be interested in.
I also added a few rows of data in the name column based on my favorite online courses:
Build 20 React Apps
Advanced React Security Patterns
React and Serverless
The last thing to do is rename the table itself. It’s called “Table 1” by default. I renamed it to “courses” instead.
Locating Airtable credentials
Before we get into writing code, there are a couple of pieces of information we need to get from Airtable. The first is your API Key. The easiest way to get this is to go your account page and look in the “Overview” section.
Next, we need the ID of the base we just created. I would recommend heading to the Airtable API page because you’ll see a list of your bases. Click on the base you just created, and you should see the base ID listed. The documentation for the Airtable API is really handy and has more detailed instructions for find the ID of a base.
Lastly, we need the table’s name. Again, I named mine “courses” but use whatever you named yours if it’s different.
Project setup
To help speed things along, I’ve created a starter project for us in the main repository. You’ll need to do a few things to follow along from here:
Fork the repository by clicking the fork button
Clone the new repository locally
Check out the starter branch with git checkout starter
There are lots of files already there. The majority of the files come from a standard create-react-app application with a few exceptions. There is also a functions directory which will host all of our serverless functions. Lastly, there’s a netlify.toml configuration file that tells Netlify where our serverless functions live. Also in this config is a redirect that simplifies the path we use to call our functions. More on this soon.
The last piece of the setup is to incorporate environment variables that we can use in our serverless functions. To do this install the dotenv package.
npm install dotenv
Then, create a .env file in the root of the repository with the following. Make sure to use your own API key, base ID, and table name that you found earlier.
AIRTABLE_API_KEY=<YOUR_API_KEY> AIRTABLE_BASE_ID=<YOUR_BASE_ID> AIRTABLE_TABLE_NAME=<YOUR_TABLE_NAME>
Now let’s write some code!
Setting up serverless functions
To create serverless functions with Netlify, we need to create a JavaScript file inside of our /functions directory. There are already some files included in this starter directory. Let’s look in the courses.js file first.
const formattedReturn = require('./formattedReturn'); const getCourses = require('./getCourses'); const createCourse = require('./createCourse'); const deleteCourse = require('./deleteCourse'); const updateCourse = require('./updateCourse'); exports.handler = async (event) => { return formattedReturn(200, 'Hello World'); };
The core part of a serverless function is the exports.handler function. This is where we handle the incoming request and respond to it. In this case, we are accepting an event parameter which we will use in just a moment.
We are returning a call inside the handler to the formattedReturn function, which makes it a bit simpler to return a status and body data. Here’s what that function looks like for reference.
module.exports = (statusCode, body) => { return { statusCode, body: JSON.stringify(body), }; };
Notice also that we are importing several helper functions to handle the interaction with Airtable. We can decide which one of these to call based on the HTTP method of the incoming request.
HTTP GET → getCourses
HTTP POST → createCourse
HTTP PUT → updateCourse
HTTP DELETE → deleteCourse
Let’s update this function to call the appropriate helper function based on the HTTP method in the event parameter. If the request doesn’t match one of the methods we are expecting, we can return a 405 status code (method not allowed).
exports.handler = async (event) => { if (event.httpMethod === 'GET') { return await getCourses(event); } else if (event.httpMethod === 'POST') { return await createCourse(event); } else if (event.httpMethod === 'PUT') { return await updateCourse(event); } else if (event.httpMethod === 'DELETE') { return await deleteCourse(event); } else { return formattedReturn(405, {}); } };
Updating the Airtable configuration file
Since we are going to be interacting with Airtable in each of the different helper files, let’s configure it once and reuse it. Open the airtable.js file.
In this file, we want to get a reference to the courses table we created earlier. To do that, we create a reference to our Airtable base using the API key and the base ID. Then, we use the base to get a reference to the table and export it.
require('dotenv').config(); var Airtable = require('airtable'); var base = new Airtable({ apiKey: process.env.AIRTABLE_API_KEY }).base( process.env.AIRTABLE_BASE_ID ); const table = base(process.env.AIRTABLE_TABLE_NAME); module.exports = { table };
Getting courses
With the Airtable config in place, we can now open up the getCourses.js file and retrieve courses from our table by calling table.select().firstPage(). The Airtable API uses pagination so, in this case, we are specifying that we want the first page of records (which is 20 records by default).
const courses = await table.select().firstPage(); return formattedReturn(200, courses);
Just like with any async/await call, we need to handle errors. Let’s surround this snippet with a try/catch.
try { const courses = await table.select().firstPage(); return formattedReturn(200, courses); } catch (err) { console.error(err); return formattedReturn(500, {}); }
Airtable returns back a lot of extra information in its records. I prefer to simplify these records with only the record ID and the values for each of the table columns we created above. These values are found in the fields property. To do this, I used the an Array map to format the data the way I want.
const { table } = require('./airtable'); const formattedReturn = require('./formattedReturn'); module.exports = async (event) => { try { const courses = await table.select().firstPage(); const formattedCourses = courses.map((course) => ({ id: course.id, ...course.fields, })); return formattedReturn(200, formattedCourses); } catch (err) { console.error(err); return formattedReturn(500, {}); } };
How do we test this out? Well, the netlify-cli provides us a netlify dev command to run our serverless functions (and our front-end) locally. First, install the CLI:
npm install -g netlify-cli
Then, run the netlify dev command inside of the directory.
This beautiful command does a few things for us:
Runs the serverless functions
Runs a web server for your site
Creates a proxy for front end and serverless functions to talk to each other on Port 8888.
Let’s open up the following URL to see if this works:
We are able to use /api/* for our API because of the redirect configuration in the netlify.toml file.
If successful, we should see our data displayed in the browser.

Creating courses
Let’s add the functionality to create a course by opening up the createCourse.js file. We need to grab the properties from the incoming POST body and use them to create a new record by calling table.create().
The incoming event.body comes in a regular string which means we need to parse it to get a JavaScript object.
const fields = JSON.parse(event.body);
Then, we use those fields to create a new course. Notice that the create() function accepts an array which allows us to create multiple records at once.
const createdCourse = await table.create([{ fields }]);
Then, we can return the createdCourse:
return formattedReturn(200, createdCourse);
And, of course, we should wrap things with a try/catch:
const { table } = require('./airtable'); const formattedReturn = require('./formattedReturn'); module.exports = async (event) => { const fields = JSON.parse(event.body); try { const createdCourse = await table.create([{ fields }]); return formattedReturn(200, createdCourse); } catch (err) { console.error(err); return formattedReturn(500, {}); } };
Since we can’t perform a POST, PUT, or DELETE directly in the browser web address (like we did for the GET), we need to use a separate tool for testing our endpoints from now on. I prefer Postman, but I’ve heard good things about Insomnia as well.
Inside of Postman, I need the following configuration.
url: localhost:8888/api/courses
method: POST
body: JSON object with name, link, and tags
After running the request, we should see the new course record is returned.

We can also check the Airtable GUI to see the new record.

Tip: Copy and paste the ID from the new record to use in the next two functions.
Updating courses
Now, let’s turn to updating an existing course. From the incoming request body, we need the id of the record as well as the other field values.
We can specifically grab the id value using object destructuring, like so:
const {id} = JSON.parse(event.body);
Then, we can use the spread operator to grab the rest of the values and assign it to a variable called fields:
const {id, ...fields} = JSON.parse(event.body);
From there, we call the update() function which takes an array of objects (each with an id and fields property) to be updated:
const updatedCourse = await table.update([{id, fields}]);
Here’s the full file with all that together:
const { table } = require('./airtable'); const formattedReturn = require('./formattedReturn'); module.exports = async (event) => { const { id, ...fields } = JSON.parse(event.body); try { const updatedCourse = await table.update([{ id, fields }]); return formattedReturn(200, updatedCourse); } catch (err) { console.error(err); return formattedReturn(500, {}); } };
To test this out, we’ll turn back to Postman for the PUT request:
url: localhost:8888/api/courses
method: PUT
body: JSON object with id (the id from the course we just created) and the fields we want to update (name, link, and tags)
I decided to append “Updated!!!” to the name of a course once it’s been updated.

We can also see the change in the Airtable GUI.
Deleting courses
Lastly, we need to add delete functionality. Open the deleteCourse.js file. We will need to get the id from the request body and use it to call the destroy() function.
const { id } = JSON.parse(event.body); const deletedCourse = await table.destroy(id);
The final file looks like this:
const { table } = require('./airtable'); const formattedReturn = require('./formattedReturn'); module.exports = async (event) => { const { id } = JSON.parse(event.body); try { const deletedCourse = await table.destroy(id); return formattedReturn(200, deletedCourse); } catch (err) { console.error(err); return formattedReturn(500, {}); } };
Here’s the configuration for the Delete request in Postman.
url: localhost:8888/api/courses
method: PUT
body: JSON object with an id (the same id from the course we just updated)

And, of course, we can double-check that the record was removed by looking at the Airtable GUI.
Displaying a list of courses in React
Whew, we have built our entire back end! Now, let’s move on to the front end. The majority of the code is already written. We just need to write the parts that interact with our serverless functions. Let’s start by displaying a list of courses.
Open the App.js file and find the loadCourses function. Inside, we need to make a call to our serverless function to retrieve the list of courses. For this app, we are going to make an HTTP request using fetch, which is built right in.
Thanks to the netlify dev command, we can make our request using a relative path to the endpoint. The beautiful thing is that this means we don’t need to make any changes after deploying our application!
const res = await fetch('/api/courses'); const courses = await res.json();
Then, store the list of courses in the courses state variable.
setCourses(courses)
Put it all together and wrap it with a try/catch:
const loadCourses = async () => { try { const res = await fetch('/api/courses'); const courses = await res.json(); setCourses(courses); } catch (error) { console.error(error); } };
Open up localhost:8888 in the browser and we should our list of courses.

Adding courses in React
Now that we have the ability to view our courses, we need the functionality to create new courses. Open up the CourseForm.js file and look for the submitCourse function. Here, we’ll need to make a POST request to the API and send the inputs from the form in the body.
The JavaScript Fetch API makes GET requests by default, so to send a POST, we need to pass a configuration object with the request. This options object will have these two properties.
method → POST
body → a stringified version of the input data
await fetch('/api/courses', { method: 'POST', body: JSON.stringify({ name, link, tags, }), });
Then, surround the call with try/catch and the entire function looks like this:
const submitCourse = async (e) => { e.preventDefault(); try { await fetch('/api/courses', { method: 'POST', body: JSON.stringify({ name, link, tags, }), }); resetForm(); courseAdded(); } catch (err) { console.error(err); } };
Test this out in the browser. Fill in the form and submit it.

After submitting the form, the form should be reset, and the list of courses should update with the newly added course.
Updating purchased courses in React
The list of courses is split into two different sections: one with courses that have been purchased and one with courses that haven’t been purchased. We can add the functionality to mark a course “purchased” so it appears in the right section. To do this, we’ll send a PUT request to the API.
Open the Course.js file and look for the markCoursePurchased function. In here, we’ll make the PUT request and include both the id of the course as well as the properties of the course with the purchased property set to true. We can do this by passing in all of the properties of the course with the spread operator and then overriding the purchased property to be true.
const markCoursePurchased = async () => { try { await fetch('/api/courses', { method: 'PUT', body: JSON.stringify({ ...course, purchased: true }), }); refreshCourses(); } catch (err) { console.error(err); } };
To test this out, click the button to mark one of the courses as purchased and the list of courses should update to display the course in the purchased section.

Deleting courses in React
And, following with our CRUD model, we will add the ability to delete courses. To do this, locate the deleteCourse function in the Course.js file we just edited. We will need to make a DELETE request to the API and pass along the id of the course we want to delete.
const deleteCourse = async () => { try { await fetch('/api/courses', { method: 'DELETE', body: JSON.stringify({ id: course.id }), }); refreshCourses(); } catch (err) { console.error(err); } };
To test this out, click the “Delete” button next to the course and the course should disappear from the list. We can also verify it is gone completely by checking the Airtable dashboard.
Deploying to Netlify
Now, that we have all of the CRUD functionality we need on the front and back end, it’s time to deploy this thing to Netlify. Hopefully, you’re as excited as I am about now easy this is. Just make sure everything is pushed up to GitHub before we move into deployment.
If you don’t have a Netlify, account, you’ll need to create one (like Airtable, it’s free). Then, in the dashboard, click the “New site from Git” option. Select GitHub, authenticate it, then select the project repo.

Next, we need to tell Netlify which branch to deploy from. We have two options here.
Use the starter branch that we’ve been working in
Choose the master branch with the final version of the code
For now, I would choose the starter branch to ensure that the code works. Then, we need to choose a command that builds the app and the publish directory that serves it.
Build command: npm run build
Publish directory: build
Netlify recently shipped an update that treats React warnings as errors during the build proces. which may cause the build to fail. I have updated the build command to CI = npm run build to account for this.

Lastly, click on the “Show Advanced” button, and add the environment variables. These should be exactly as they were in the local .env that we created.
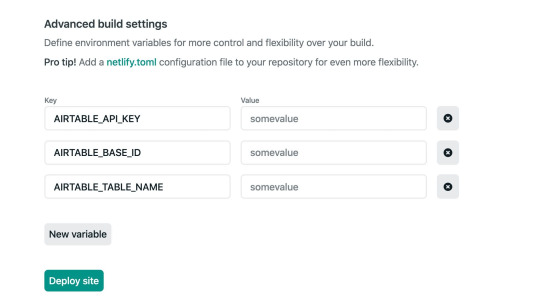
The site should automatically start building.

We can click on the “Deploys” tab in Netlify tab and track the build progress, although it does go pretty fast. When it is complete, our shiny new app is deployed for the world can see!

Welcome to the Jamstack!
The Jamstack is a fun new place to be. I love it because it makes building and hosting fully-functional, full-stack applications like this pretty trivial. I love that Jamstack makes us mighty, all-powerful front-end developers!
I hope you see the same power and ease with the combination of technology we used here. Again, Jamstack doesn’t require that we use Airtable, React or Netlify, but we can, and they’re all freely available and easy to set up. Check out Chris’ serverless site for a whole slew of other services, resources, and ideas for working in the Jamstack. And feel free to drop questions and feedback in the comments here!
The post Going Jamstack with React, Serverless, and Airtable appeared first on CSS-Tricks.
You can support CSS-Tricks by being an MVP Supporter.
Going Jamstack with React, Serverless, and Airtable published first on https://deskbysnafu.tumblr.com/
0 notes
Text
Getting Started With Axios In Nuxt
About The Author
Front-end developer based in Lagos, Nigeria. He enjoys converting designs into code and building things for the web. More about Timi …
In this tutorial, we will learn how to make a request in our NUXt.js applications using the Axios module. We will also learn how to use the ayncData and fetch methods to fetch data on the server-side using Axios and the differences between the two methods. Finally, we will learn how to add authentication to our application using the Auth module.
NUXt.js provides an Axios module for easy integration with your application. Axios is a promise-based HTTP client that works in the browser and Node.js environment or, in simpler terms, it is a tool for making requests (e.g API calls) in client-side applications and Node.js environment.
In this tutorial, we’re going to learn how to use the Axios module and how to make a request on the server-side using asyncData and fetch. These two methods make a request on the server-side but they have some differences which we’re also going to cover. Finally, we’ll learn how to perform authentication and secure pages/routes using the auth module and auth middleware.
This article requires basic knowledge of NUXtjs and Vuejs as we’ll be building on top of that. For those without experience with Vuejs, I recommend you start from their official documentation and the Nuxt official page before continuing with this article.
What Is The Nuxt.js Axios Module?
According to the official Documentation,
“It is a Secure and easy Axios integration with NUXt.js.”
Here are some of its features:
Automatically set base URL for client-side & server-side.
Proxy request headers in SSR (Useful for auth).
Fetch Style requests.
Integrated with NUXt.js Progressbar while making requests.
To use the axios module in your application, you will have to first install it by using either npm or yarn.
YARN
yarn add @nUXtjs/axios
NPM
npm install @nUXtjs/axios
Add it into your nUXt.config.js file:
modules: [ '@nUXtjs/axios', ], axios: { // extra config e.g // BaseURL: 'https://link-to-API' }
The modules array accepts a list of NUXt.js modules such as dotenv, auth and in this case, Axios. What we’ve done is to inform our application that we would be using the Axios module, which we reference using @nUXtjs/axios. This is then followed by the axios property which is an object of configurations like the baseURL for both client-side and server-side.
Now, you can access Axios from anywhere in your application by calling this.$axios.method or this.$axios.$method. Where method can be get, post, or delete.
Making Your First Request Using Axios
For this tutorial, I’ve put together a simple application on Github. The repository contains two folders, start and finish, the start folder contains all you need to get right into the tutorial. The finish folder contains a completed version of what we would be building.
After cloning the repo and opening the start folder, we would need to install all our packages in the package.json file so open your terminal and run the following command:
npm install
Once that is done, we can start our app using the npm run dev command. This is what you should see when you go to localhost:3000.
Our application’s landing page. (Large preview)
The next thing we have to do is to create a .env file in the root folder of our application and add our API URL to it. For this tutorial, we’ll be using a sample API built to collect reports from users.
API_URL=https://ireporter-endpoint.herokuapp.com/api/v2/
This way, we do not have to hard code our API into our app which is useful for working with two APIs (development and production).
The next step would be to open our nUXt.config.js file and add the environmental variable to our axios config that we added above.
/* ** Axios module configuration */ axios: { // See https://github.com/nUXt-community/axios-module#options baseURL: process.env.API_URL, },
Here, we tell NUXt.js to use this baseURL for both our client-side and server-side requests whenever we use this Axios module.
Now, to fetch a list of reports, let us open the index.vue file and add the following method to the script section.
async getIncidents() { let res = await this.$store.dispatch("getIncidents"); this.incidents = res.data.data.incidents; }
What we have done is to create an async function that we call getIncidents() and we can tell what it does from the name — it fetches a list of incidents using the Vuex store action method this.$store.dispatch. We assign the response from this action to our incidents property so we can be able to make use of it in the component.
We want to call the getIncidents() method whenever the component mounts. We can do that using the mounted hook.
mounted() { this.getIncidents() }
mounted() is a lifecycle hook that gets called when the component mounts. That will cause the call to the API to happen when the component mounts. Now, let us go into our index.js file in our store and create this action where we’ll be making our Axios request from.
export const actions = { async getIncidents() { let res = await this.$axios.get('/incidents') return res; } }
Here, we created the action called getIncidents which is an async function, then we await a response from the server and return this response. The response from this action is sent back to our getIncidents() method in our index.vue file.
If we refresh our application, we should now be able to see a long list of incidents rendered on the page.
List of incidents on landing page. (Large preview)
We have made our first request using Axios but we won’t stop there, we are going to be trying out asyncData and fetch to see the differences between them and using Axios.
AsyncData
AsyncData fetches data on the server-side and it’s called before loading the page component. It does not have access to this because it is called before your page component data is created. this is only available after the created hook has been called so NUXt.js automatically merges the returned data into the component’s data.
Using asyncData is good for SEO Company because it fetches your site’s content on the server-side and also helps in loading content faster. Note that asyncData method can only be used in the pages folder of your application as it would not work in the components folder. This is because asyncData hook gets called before your component is created.
Image from NUXt blog. (Large preview)
Let us add asyncData to our index.vue file and observe how fast our incidents data loads. Add the following code after our components property and let us get rid of our mounted hook.
async asyncData({ $axios }) { let { data } = await $axios.get("/incidents"); return { incidents: data.data.incidents }; }, // mounted() { // this.getIncidents(); // },
Here, the asyncData method accepts a property from the context $axios. We use this property to fetch the list of incidents and the value is then returned. This value is automatically injected into our component. Now, you can notice how fast your content loads if you refresh the page and at no time is there no incident to render.
Fetch
The Fetch method is also used to make requests on the server-side. It is called after the created hook in the life cycle which means it has access to the component’s data. Unlike the asyncData method, the fetch method can be used in all .vue files and be used with the Vuex store. This means that if you have the following in your data function.
data() { return { incidents: [], id: 5, gender: 'male' }; }
You can easily modify id or gender by calling this.id or this.gender.
Using Axios As A Plugin
During the process of development with Axios, you might find that you need extra configuration like creating instances and interceptors for your request so your application can work as intended and thankfully, we can do that by extending our Axios into a plugin.
To extend axios, you have to create a plugin (e.g. axios.js) in your plugins folder.
export default function ({ $axios, store, redirect }) { $axios.onError(error => { if (error.response && error.response.status === 500) { redirect('/login') } }) $axios.interceptors.response.use( response => { if (response.status === 200) { if (response.request.responseURL && response.request.responseURL.includes('login')) { store.dispatch("setUser", response); } } return response } ) }
This is an example of a plugin I wrote for a NUXt application. Here, your function takes in a context object of $axios, store and redirect which we would use in configuring the plugin. The first thing we do is to listen for an error with a status of 500 using $axios.onError and redirect the user to the login page.
We also have an interceptor that intercepts every request response we make in our application checks if the status of the response we get is 200. If that is true we proceed and check that there is a response.request.responseURL and if it includes login. If this checks out to be true, we then send this response using our store’s dispatch method where it then mutated in our state.
Add this plugin to your nUXt.config.js file:
plugins: [ '~/plugins/axios' ]
After doing this, your Axios plugin would intercept any request you make and check if you have defined a special case for it.
Introduction To The Auth Module
The auth module is used for performing authentication for your NUXt application and can be accessed from anywhere in your application using $this.auth. It is also available in fetch, asyncData, middleware and NUXtInitServer from the context object as $auth.
The context provides additional objects/params from NUXt to Vue components and is available in special nUXt lifecycle areas like those mentioned above.
To use the auth module in your application, you would have to install it using yarn or npm.
YARN
yarn add @nUXtjs/auth
NPM
npm install @nUXtjs/auth
Add it to your nUXt.config.js file.
modules: [ '@nUXtjs/auth' ], auth: { // Options }
The auth property accepts a list of properties such as strategies and redirect. Here, strategies accepts your preferred authentication method which can be:
local For username/email and password-based flow.
Facebook For using Facebook accounts as a means of authentication.
Github For authenticating users with Github accounts.
Google For authenticating users with Google accounts.
Auth0
Laravel Passport
The redirect property accepts an object of links for:
login Users would be redirected to this link if login is required.
logout Users would be redirected here if after logout current route is protected.
home Users would be redirected here after login.
Now, let us add the following to our nUXt.config.js file.
/* ** Auth module configuration */ auth: { redirect: { login: '/login', logout: '/', home: '/my-reports' }, strategies: { local: { endpoints: { login: { url: "/user/login", method: "post", propertyName: "data.token", }, logout: false, user: false, }, tokenType: '', tokenName: 'x-auth', autoFetchUser: false }, }, }
Please note that the auth method works best when there is a user endpoint provided in the option above.
Inside the auth config object, we have a redirect option in which we set our login route to /login, logout route to / and home route to /my-reports which would all behave as expected. We also have a tokenType property which represents the Authorization type in the header of our Axios request. It is set to Bearer by default and can be changed to work with your API.
For our API, there is no token type and this is why we’re going to leave it as an empty string. The tokenName represents the Authorization name (or the header property you want to attach your token to) inside your header in your Axios request.
By default, it is set to Authorization but for our API, the Authorization name is x-auth. The autoFetchUser property is used to enable user fetch object using the user endpoint property after login. It is true by default but our API does not have a user endpoint so we have set that to false.
For this tutorial, we would be using the local strategy. In our strategies, we have the local option with endpoints for login, user and logout but in our case, we would only use the *login* option because our demo API does not have a *logout* endpoint and our user object is being returned when *login* is successful.
Note: The auth module does not have a register endpoint option so that means we’re going to register the traditional way and redirect the user to the login page where we will perform the authentication using this.$auth.loginWith. This is the method used in authenticating your users. It accepts a ‘strategy’ (e.g local) as a first argument and then an object to perform this authentication with. Take a look at the following example.
let data { email: '[email protected]', password: '123456' } this.$auth.loginWith('local', { data })
Using The Auth Module
Now that we have configured our auth module, we can proceed to our registration page. If you visit the /register page, you should see a registration form.
Register page. (Large preview)
Let us make this form functional by adding the following code:
methods: { async registerUser() { this.loading = true; let data = this.register; try { await this.$axios.post("/user/create", data); this.$router.push("/login"); this.loading = false; this.$notify({ group: "success", title: "Success!", text: "Account created successfully" }); } catch (error) { this.loading = false; this.$notify({ group: "error", title: "Error!", text: error.response ? error.response.data.error : "Sorry an error occured, check your internet" }); } } }
Here, we have an async function called registerUser which is tied to a click event in our template and makes an Axios request wrapped in a try/catch block to an endpoint /user/create. This redirects to the /login page and notifies the user of a successful registration. We also have a catch block that alerts the user of any error if the request is not successful.
If the registration is successful, you would be redirected to the login page.
Login page with notification component. (Large preview)
Here, we’re going to make use of auth authentication method this.$auth.loginWith('local', loginData) after which we would use the this.$auth.setUser(userObj) to set the user in our auth instance.
To get the login page working, let’s add the following code to our login.vue file.
methods: { async logIn() { let data = this.login; this.loading = true; try { let res = await this.$auth.loginWith("local", { data }); this.loading = false; let user = res.data.data.user; this.$auth.setUser(user); this.$notify({ group: "success", title: "Success!", text: "Welcome!" }); } catch (error) { this.loading = false; this.$notify({ group: "error", title: "Error!", text: error.response ? error.response.data.error : "Sorry an error occured, check your internet" }); } } }
We created an async function called logIn using the auth method this.$auth.loginWith('local, loginData). If this login attempt is successful, we then assign the user data to our auth instance using this.$auth.setUser(userInfo) and redirect the user to the /my-report page.
You can now get user data using this.$auth.user or with Vuex using this.$store.state.auth.user but that’s not all. The auth instance contains some other properties which you can see if you log in or check your state using your Vue dev tools.
If you log this.$store.state.auth to the console, you’ll see this:
{ "auth": { "user": { "id": "d7a5efdf-0c29-48aa-9255-be818301d602", "email": "[email protected]", "lastName": "Xo", "firstName": "Tm", "othernames": null, "isAdmin": false, "phoneNumber": null, "username": null }, "loggedIn": true, "strategy": "local", "busy": false } }
The auth instance contains a loggedIn property that is useful in switching between authenticated links in the nav/header section of your application. It also contains a strategy method that states the type of strategy the instance is running (e.g local).
Now, we will make use of this loggedIn property to arrange our nav links. Update your navBar component to the following:
<template> <header class="header"> <div class="logo"> <nUXt-link to="/"> <Logo /> </nUXt-link> </div> <nav class="nav"> <div class="nav__user" v-if="auth.loggedIn"> <p></p> <button class="nav__link nav__link--long"> <nUXt-link to="/report-incident">Report incident</nUXt-link> </button> <button class="nav__link nav__link--long"> <nUXt-link to="/my-reports">My Reports</nUXt-link> </button> <button class="nav__link" @click.prevent="logOut">Log out</button> </div> <button class="nav__link" v-if="!auth.loggedIn"> <nUXt-link to="/login">Login</nUXt-link> </button> <button class="nav__link" v-if="!auth.loggedIn"> <nUXt-link to="/register">Register</nUXt-link> </button> </nav> </header> </template> <script> import { mapState } from "vuex"; import Logo from "@/components/Logo"; export default { name: "nav-bar", data() { return {}; }, computed: { ...mapState(["auth"]) }, methods: { logOut() { this.$store.dispatch("logOut"); this.$router.push("/login"); } }, components: { Logo } }; </script> <style></style>
In our template section, we have several links to different parts of the application in which we are now using auth.loggedIn to display the appropriate links depending on the authentication status. We have a logout button that has a click event with a logOut() function attached to it. We also display the user’s email gotten from the auth property which is accessed from our Vuex store using the mapState method which maps our state auth to the computed property of the nav component. We also have a logout method that calls our Vuex action logOut and redirects the user to the login page.
Now, let us go ahead and update our store to have a logOut action.
export const actions = { // .... logOut() { this.$auth.logout(); } }
The logOut action calls the auth logout method which clears user data, deletes tokens from localStorage and sets loggedIn to false.
Routes like /my-reports and report-incident should not be visible to guests but at this point in our app, that is not the case. NUXt does not have a navigation guard that can protect your routes, but it has is the auth middleware. It gives you the freedom to create your own middleware so you can configure it to work the way you want.
It can be set in two ways:
Per route.
Globally for the whole app in your nUXt.config.js file.
router: { middleware: ['auth'] }
This auth middleware works with your auth instance so you do not need to create an auth.js file in your middleware folder.
Let us now add this middleware to our my-reports.vue and report-incident.vue files. Add the following lines of code to the script section of each file.
middleware: 'auth'
Now, our application would check if the user trying to access these routes has an auth.loggedIn value of true. It’ll redirect them to the login page using our redirect option in our auth config file — if you’re not logged in and you try to visit either /my-report or report-incident, you would be redirected to /login.
If you go to /report-incidents, this is what you should see.
Report incident page. (Large preview)
This page is for adding incidents but that right now the form does not send incident to our server because we are not making the call to the server when the user attempts to submit the form. To solve this, we will add a reportIncident method which will be called when the user clicks on Report. We’ll have this in the script section of the component. This method will send the form data to the server. Update your report-incident.vue file with the following:
<template> <section class="report"> <h1 class="report__heading">Report an Incident</h1> <form class="report__form"> <div class="input__container"> <label for="title" class="input__label">Title</label> <input type="text" name="title" id="title" v-model="incident.title" class="input__field" required /> </div> <div class="input__container"> <label for="location" class="input__label">Location</label> <input type="text" name="location" id="location" v-model="incident.location" required class="input__field" /> </div> <div class="input__container"> <label for="comment" class="input__label">Comment</label> <textarea name="comment" id="comment" v-model="incident.comment" class="input__area" cols="30" rows="10" required ></textarea> </div> <input type="submit" value="Report" class="input__button" @click.prevent="reportIncident" /> <p class="loading__indicator" v-if="loading">Please wait....</p> </form> </section> </template> <script> export default { name: "report-incident", middleware: "auth", data() { return { loading: false, incident: { type: "red-flag", title: "", location: "", comment: "" } }; }, methods: { async reportIncident() { let data = this.incident; let formData = new FormData(); formData.append("title", data.title); formData.append("type", data.type); formData.append("location", data.location); formData.append("comment", data.comment); this.loading = true; try { let res = await this.$store.dispatch("reportIncident", formData); this.$notify({ group: "success", title: "Success", text: "Incident reported successfully!" }); this.loading = false; this.$router.push("/my-reports"); } catch (error) { this.loading = false; this.$notify({ group: "error", title: "Error!", text: error.response ? error.response.data.error : "Sorry an error occured, check your internet" }); } } } }; </script> <style> </style>
Here, we have a form with input fields for title, location, and comment with two-way data binding using v-model. We also have a submit button with a click event. In the script section, we have a reportIncident method that collects all the information provided in the form and is sent to our server using FormData because the API is designed to also accept images and videos.
This formData is attached to a Vuex action using the dispatch method, if the request is successful, you get redirected to /my-reports with a notification informing you that this request was successful otherwise, you would be notified of an error with the error message.
At this point, we don’t have reportIncident action in our store yet so in your browser console, you would see an error if you try to click submit on this page.
Vuex error message. (Large preview)
To fix this, add the reportIncident action your index.js file.
export const actions = { // ... async reportIncident({}, data) { let res = await this.$axios.post('/incident/create', data) return res; } }
Here, we have a reportIncident function that takes in an empty context object and the data we’re sending from our form. This data is then attached to a post request that creates an incident and returns back to our report-incident.vue file.
At this point, you should be able to add a report using the form after which you would be redirected to /my-reports page.
My reports page empty. (Large preview)
This page should display a list of incidents created by the user but right now it only shows what we see above, let’s go ahead to fix that.
We’re going to be using the fetch method we learned about to get this list. Update your my-reports.vue file with the following:
<script> import incidentCard from "@/components/incidentCard.vue"; export default { middleware: "auth", name: "my-reports", data() { return { incidents: [] }; }, components: { incidentCard }, async fetch() { let { data } = await this.$axios.get("/user/incidents"); this.incidents = data.data; } }; </script>
Here, we use fetch method to get user-specific incidents and assign the response to our incidents array.
If you refresh your page after adding an incident, you should see something like this.
My Reports page with a report. (Large preview)
At this point, we would notice a difference in how fetch method and asyncData loads our data.
Conclusion
So far, we have learned about the Axios module and all of its features. We have also learned more about asyncData, and how we can fetch both of them together despite their differences. We’ve also learned how to perform authentication in our application using the auth module and how to use the auth middleware to protect our routes. Here are some useful resources that talk more about all we’ve covered.
Resources
“Auth Module,” NUXtJS.org
“Axios Module: Introduction,” NUXtJS.org
FormData, MDN web docs
“API: The asyncData Method,” NUXtJS.org
“The Vue Instance: Lifecycle Diagram,” VueJS.org
“Understanding How fetch Works In Nuxt 2.12,” NUXtJS.org
(ks, ra, yk, il)
Website Design & SEO Delray Beach by DBL07.co
Delray Beach SEO
source http://www.scpie.org/getting-started-with-axios-in-nuxt/ source https://scpie.tumblr.com/post/619262397140664320
0 notes
Text
Getting Started With Axios In Nuxt
About The Author
Front-end developer based in Lagos, Nigeria. He enjoys converting designs into code and building things for the web. More about Timi …
In this tutorial, we will learn how to make a request in our NUXt.js applications using the Axios module. We will also learn how to use the ayncData and fetch methods to fetch data on the server-side using Axios and the differences between the two methods. Finally, we will learn how to add authentication to our application using the Auth module.
NUXt.js provides an Axios module for easy integration with your application. Axios is a promise-based HTTP client that works in the browser and Node.js environment or, in simpler terms, it is a tool for making requests (e.g API calls) in client-side applications and Node.js environment.
In this tutorial, we’re going to learn how to use the Axios module and how to make a request on the server-side using asyncData and fetch. These two methods make a request on the server-side but they have some differences which we’re also going to cover. Finally, we’ll learn how to perform authentication and secure pages/routes using the auth module and auth middleware.
This article requires basic knowledge of NUXtjs and Vuejs as we’ll be building on top of that. For those without experience with Vuejs, I recommend you start from their official documentation and the Nuxt official page before continuing with this article.
What Is The Nuxt.js Axios Module?
According to the official Documentation,
“It is a Secure and easy Axios integration with NUXt.js.”
Here are some of its features:
Automatically set base URL for client-side & server-side.
Proxy request headers in SSR (Useful for auth).
Fetch Style requests.
Integrated with NUXt.js Progressbar while making requests.
To use the axios module in your application, you will have to first install it by using either npm or yarn.
YARN
yarn add @nUXtjs/axios
NPM
npm install @nUXtjs/axios
Add it into your nUXt.config.js file:
modules: [ '@nUXtjs/axios', ], axios: { // extra config e.g // BaseURL: 'https://link-to-API' }
The modules array accepts a list of NUXt.js modules such as dotenv, auth and in this case, Axios. What we’ve done is to inform our application that we would be using the Axios module, which we reference using @nUXtjs/axios. This is then followed by the axios property which is an object of configurations like the baseURL for both client-side and server-side.
Now, you can access Axios from anywhere in your application by calling this.$axios.method or this.$axios.$method. Where method can be get, post, or delete.
Making Your First Request Using Axios
For this tutorial, I’ve put together a simple application on Github. The repository contains two folders, start and finish, the start folder contains all you need to get right into the tutorial. The finish folder contains a completed version of what we would be building.
After cloning the repo and opening the start folder, we would need to install all our packages in the package.json file so open your terminal and run the following command:
npm install
Once that is done, we can start our app using the npm run dev command. This is what you should see when you go to localhost:3000.
Our application’s landing page. (Large preview)
The next thing we have to do is to create a .env file in the root folder of our application and add our API URL to it. For this tutorial, we’ll be using a sample API built to collect reports from users.
API_URL=https://ireporter-endpoint.herokuapp.com/api/v2/
This way, we do not have to hard code our API into our app which is useful for working with two APIs (development and production).
The next step would be to open our nUXt.config.js file and add the environmental variable to our axios config that we added above.
/* ** Axios module configuration */ axios: { // See https://github.com/nUXt-community/axios-module#options baseURL: process.env.API_URL, },
Here, we tell NUXt.js to use this baseURL for both our client-side and server-side requests whenever we use this Axios module.
Now, to fetch a list of reports, let us open the index.vue file and add the following method to the script section.
async getIncidents() { let res = await this.$store.dispatch("getIncidents"); this.incidents = res.data.data.incidents; }
What we have done is to create an async function that we call getIncidents() and we can tell what it does from the name — it fetches a list of incidents using the Vuex store action method this.$store.dispatch. We assign the response from this action to our incidents property so we can be able to make use of it in the component.
We want to call the getIncidents() method whenever the component mounts. We can do that using the mounted hook.
mounted() { this.getIncidents() }
mounted() is a lifecycle hook that gets called when the component mounts. That will cause the call to the API to happen when the component mounts. Now, let us go into our index.js file in our store and create this action where we’ll be making our Axios request from.
export const actions = { async getIncidents() { let res = await this.$axios.get('/incidents') return res; } }
Here, we created the action called getIncidents which is an async function, then we await a response from the server and return this response. The response from this action is sent back to our getIncidents() method in our index.vue file.
If we refresh our application, we should now be able to see a long list of incidents rendered on the page.
List of incidents on landing page. (Large preview)
We have made our first request using Axios but we won’t stop there, we are going to be trying out asyncData and fetch to see the differences between them and using Axios.
AsyncData
AsyncData fetches data on the server-side and it’s called before loading the page component. It does not have access to this because it is called before your page component data is created. this is only available after the created hook has been called so NUXt.js automatically merges the returned data into the component’s data.
Using asyncData is good for SEO Company because it fetches your site’s content on the server-side and also helps in loading content faster. Note that asyncData method can only be used in the pages folder of your application as it would not work in the components folder. This is because asyncData hook gets called before your component is created.
Image from NUXt blog. (Large preview)
Let us add asyncData to our index.vue file and observe how fast our incidents data loads. Add the following code after our components property and let us get rid of our mounted hook.
async asyncData({ $axios }) { let { data } = await $axios.get("/incidents"); return { incidents: data.data.incidents }; }, // mounted() { // this.getIncidents(); // },
Here, the asyncData method accepts a property from the context $axios. We use this property to fetch the list of incidents and the value is then returned. This value is automatically injected into our component. Now, you can notice how fast your content loads if you refresh the page and at no time is there no incident to render.
Fetch
The Fetch method is also used to make requests on the server-side. It is called after the created hook in the life cycle which means it has access to the component’s data. Unlike the asyncData method, the fetch method can be used in all .vue files and be used with the Vuex store. This means that if you have the following in your data function.
data() { return { incidents: [], id: 5, gender: 'male' }; }
You can easily modify id or gender by calling this.id or this.gender.
Using Axios As A Plugin
During the process of development with Axios, you might find that you need extra configuration like creating instances and interceptors for your request so your application can work as intended and thankfully, we can do that by extending our Axios into a plugin.
To extend axios, you have to create a plugin (e.g. axios.js) in your plugins folder.
export default function ({ $axios, store, redirect }) { $axios.onError(error => { if (error.response && error.response.status === 500) { redirect('/login') } }) $axios.interceptors.response.use( response => { if (response.status === 200) { if (response.request.responseURL && response.request.responseURL.includes('login')) { store.dispatch("setUser", response); } } return response } ) }
This is an example of a plugin I wrote for a NUXt application. Here, your function takes in a context object of $axios, store and redirect which we would use in configuring the plugin. The first thing we do is to listen for an error with a status of 500 using $axios.onError and redirect the user to the login page.
We also have an interceptor that intercepts every request response we make in our application checks if the status of the response we get is 200. If that is true we proceed and check that there is a response.request.responseURL and if it includes login. If this checks out to be true, we then send this response using our store’s dispatch method where it then mutated in our state.
Add this plugin to your nUXt.config.js file:
plugins: [ '~/plugins/axios' ]
After doing this, your Axios plugin would intercept any request you make and check if you have defined a special case for it.
Introduction To The Auth Module
The auth module is used for performing authentication for your NUXt application and can be accessed from anywhere in your application using $this.auth. It is also available in fetch, asyncData, middleware and NUXtInitServer from the context object as $auth.
The context provides additional objects/params from NUXt to Vue components and is available in special nUXt lifecycle areas like those mentioned above.
To use the auth module in your application, you would have to install it using yarn or npm.
YARN
yarn add @nUXtjs/auth
NPM
npm install @nUXtjs/auth
Add it to your nUXt.config.js file.
modules: [ '@nUXtjs/auth' ], auth: { // Options }
The auth property accepts a list of properties such as strategies and redirect. Here, strategies accepts your preferred authentication method which can be:
local For username/email and password-based flow.
Facebook For using Facebook accounts as a means of authentication.
Github For authenticating users with Github accounts.
Google For authenticating users with Google accounts.
Auth0
Laravel Passport
The redirect property accepts an object of links for:
login Users would be redirected to this link if login is required.
logout Users would be redirected here if after logout current route is protected.
home Users would be redirected here after login.
Now, let us add the following to our nUXt.config.js file.
/* ** Auth module configuration */ auth: { redirect: { login: '/login', logout: '/', home: '/my-reports' }, strategies: { local: { endpoints: { login: { url: "/user/login", method: "post", propertyName: "data.token", }, logout: false, user: false, }, tokenType: '', tokenName: 'x-auth', autoFetchUser: false }, }, }
Please note that the auth method works best when there is a user endpoint provided in the option above.
Inside the auth config object, we have a redirect option in which we set our login route to /login, logout route to / and home route to /my-reports which would all behave as expected. We also have a tokenType property which represents the Authorization type in the header of our Axios request. It is set to Bearer by default and can be changed to work with your API.
For our API, there is no token type and this is why we’re going to leave it as an empty string. The tokenName represents the Authorization name (or the header property you want to attach your token to) inside your header in your Axios request.
By default, it is set to Authorization but for our API, the Authorization name is x-auth. The autoFetchUser property is used to enable user fetch object using the user endpoint property after login. It is true by default but our API does not have a user endpoint so we have set that to false.
For this tutorial, we would be using the local strategy. In our strategies, we have the local option with endpoints for login, user and logout but in our case, we would only use the *login* option because our demo API does not have a *logout* endpoint and our user object is being returned when *login* is successful.
Note: The auth module does not have a register endpoint option so that means we’re going to register the traditional way and redirect the user to the login page where we will perform the authentication using this.$auth.loginWith. This is the method used in authenticating your users. It accepts a ‘strategy’ (e.g local) as a first argument and then an object to perform this authentication with. Take a look at the following example.
let data { email: '[email protected]', password: '123456' } this.$auth.loginWith('local', { data })
Using The Auth Module
Now that we have configured our auth module, we can proceed to our registration page. If you visit the /register page, you should see a registration form.
Register page. (Large preview)
Let us make this form functional by adding the following code:
methods: { async registerUser() { this.loading = true; let data = this.register; try { await this.$axios.post("/user/create", data); this.$router.push("/login"); this.loading = false; this.$notify({ group: "success", title: "Success!", text: "Account created successfully" }); } catch (error) { this.loading = false; this.$notify({ group: "error", title: "Error!", text: error.response ? error.response.data.error : "Sorry an error occured, check your internet" }); } } }
Here, we have an async function called registerUser which is tied to a click event in our template and makes an Axios request wrapped in a try/catch block to an endpoint /user/create. This redirects to the /login page and notifies the user of a successful registration. We also have a catch block that alerts the user of any error if the request is not successful.
If the registration is successful, you would be redirected to the login page.
Login page with notification component. (Large preview)
Here, we’re going to make use of auth authentication method this.$auth.loginWith('local', loginData) after which we would use the this.$auth.setUser(userObj) to set the user in our auth instance.
To get the login page working, let’s add the following code to our login.vue file.
methods: { async logIn() { let data = this.login; this.loading = true; try { let res = await this.$auth.loginWith("local", { data }); this.loading = false; let user = res.data.data.user; this.$auth.setUser(user); this.$notify({ group: "success", title: "Success!", text: "Welcome!" }); } catch (error) { this.loading = false; this.$notify({ group: "error", title: "Error!", text: error.response ? error.response.data.error : "Sorry an error occured, check your internet" }); } } }
We created an async function called logIn using the auth method this.$auth.loginWith('local, loginData). If this login attempt is successful, we then assign the user data to our auth instance using this.$auth.setUser(userInfo) and redirect the user to the /my-report page.
You can now get user data using this.$auth.user or with Vuex using this.$store.state.auth.user but that’s not all. The auth instance contains some other properties which you can see if you log in or check your state using your Vue dev tools.
If you log this.$store.state.auth to the console, you’ll see this:
{ "auth": { "user": { "id": "d7a5efdf-0c29-48aa-9255-be818301d602", "email": "[email protected]", "lastName": "Xo", "firstName": "Tm", "othernames": null, "isAdmin": false, "phoneNumber": null, "username": null }, "loggedIn": true, "strategy": "local", "busy": false } }
The auth instance contains a loggedIn property that is useful in switching between authenticated links in the nav/header section of your application. It also contains a strategy method that states the type of strategy the instance is running (e.g local).
Now, we will make use of this loggedIn property to arrange our nav links. Update your navBar component to the following:
<template> <header class="header"> <div class="logo"> <nUXt-link to="/"> <Logo /> </nUXt-link> </div> <nav class="nav"> <div class="nav__user" v-if="auth.loggedIn"> <p></p> <button class="nav__link nav__link--long"> <nUXt-link to="/report-incident">Report incident</nUXt-link> </button> <button class="nav__link nav__link--long"> <nUXt-link to="/my-reports">My Reports</nUXt-link> </button> <button class="nav__link" @click.prevent="logOut">Log out</button> </div> <button class="nav__link" v-if="!auth.loggedIn"> <nUXt-link to="/login">Login</nUXt-link> </button> <button class="nav__link" v-if="!auth.loggedIn"> <nUXt-link to="/register">Register</nUXt-link> </button> </nav> </header> </template> <script> import { mapState } from "vuex"; import Logo from "@/components/Logo"; export default { name: "nav-bar", data() { return {}; }, computed: { ...mapState(["auth"]) }, methods: { logOut() { this.$store.dispatch("logOut"); this.$router.push("/login"); } }, components: { Logo } }; </script> <style></style>
In our template section, we have several links to different parts of the application in which we are now using auth.loggedIn to display the appropriate links depending on the authentication status. We have a logout button that has a click event with a logOut() function attached to it. We also display the user’s email gotten from the auth property which is accessed from our Vuex store using the mapState method which maps our state auth to the computed property of the nav component. We also have a logout method that calls our Vuex action logOut and redirects the user to the login page.
Now, let us go ahead and update our store to have a logOut action.
export const actions = { // .... logOut() { this.$auth.logout(); } }
The logOut action calls the auth logout method which clears user data, deletes tokens from localStorage and sets loggedIn to false.
Routes like /my-reports and report-incident should not be visible to guests but at this point in our app, that is not the case. NUXt does not have a navigation guard that can protect your routes, but it has is the auth middleware. It gives you the freedom to create your own middleware so you can configure it to work the way you want.
It can be set in two ways:
Per route.
Globally for the whole app in your nUXt.config.js file.
router: { middleware: ['auth'] }
This auth middleware works with your auth instance so you do not need to create an auth.js file in your middleware folder.
Let us now add this middleware to our my-reports.vue and report-incident.vue files. Add the following lines of code to the script section of each file.
middleware: 'auth'
Now, our application would check if the user trying to access these routes has an auth.loggedIn value of true. It’ll redirect them to the login page using our redirect option in our auth config file — if you’re not logged in and you try to visit either /my-report or report-incident, you would be redirected to /login.
If you go to /report-incidents, this is what you should see.
Report incident page. (Large preview)
This page is for adding incidents but that right now the form does not send incident to our server because we are not making the call to the server when the user attempts to submit the form. To solve this, we will add a reportIncident method which will be called when the user clicks on Report. We’ll have this in the script section of the component. This method will send the form data to the server. Update your report-incident.vue file with the following:
<template> <section class="report"> <h1 class="report__heading">Report an Incident</h1> <form class="report__form"> <div class="input__container"> <label for="title" class="input__label">Title</label> <input type="text" name="title" id="title" v-model="incident.title" class="input__field" required /> </div> <div class="input__container"> <label for="location" class="input__label">Location</label> <input type="text" name="location" id="location" v-model="incident.location" required class="input__field" /> </div> <div class="input__container"> <label for="comment" class="input__label">Comment</label> <textarea name="comment" id="comment" v-model="incident.comment" class="input__area" cols="30" rows="10" required ></textarea> </div> <input type="submit" value="Report" class="input__button" @click.prevent="reportIncident" /> <p class="loading__indicator" v-if="loading">Please wait....</p> </form> </section> </template> <script> export default { name: "report-incident", middleware: "auth", data() { return { loading: false, incident: { type: "red-flag", title: "", location: "", comment: "" } }; }, methods: { async reportIncident() { let data = this.incident; let formData = new FormData(); formData.append("title", data.title); formData.append("type", data.type); formData.append("location", data.location); formData.append("comment", data.comment); this.loading = true; try { let res = await this.$store.dispatch("reportIncident", formData); this.$notify({ group: "success", title: "Success", text: "Incident reported successfully!" }); this.loading = false; this.$router.push("/my-reports"); } catch (error) { this.loading = false; this.$notify({ group: "error", title: "Error!", text: error.response ? error.response.data.error : "Sorry an error occured, check your internet" }); } } } }; </script> <style> </style>
Here, we have a form with input fields for title, location, and comment with two-way data binding using v-model. We also have a submit button with a click event. In the script section, we have a reportIncident method that collects all the information provided in the form and is sent to our server using FormData because the API is designed to also accept images and videos.
This formData is attached to a Vuex action using the dispatch method, if the request is successful, you get redirected to /my-reports with a notification informing you that this request was successful otherwise, you would be notified of an error with the error message.
At this point, we don’t have reportIncident action in our store yet so in your browser console, you would see an error if you try to click submit on this page.
Vuex error message. (Large preview)
To fix this, add the reportIncident action your index.js file.
export const actions = { // ... async reportIncident({}, data) { let res = await this.$axios.post('/incident/create', data) return res; } }
Here, we have a reportIncident function that takes in an empty context object and the data we’re sending from our form. This data is then attached to a post request that creates an incident and returns back to our report-incident.vue file.
At this point, you should be able to add a report using the form after which you would be redirected to /my-reports page.
My reports page empty. (Large preview)
This page should display a list of incidents created by the user but right now it only shows what we see above, let’s go ahead to fix that.
We’re going to be using the fetch method we learned about to get this list. Update your my-reports.vue file with the following:
<script> import incidentCard from "@/components/incidentCard.vue"; export default { middleware: "auth", name: "my-reports", data() { return { incidents: [] }; }, components: { incidentCard }, async fetch() { let { data } = await this.$axios.get("/user/incidents"); this.incidents = data.data; } }; </script>
Here, we use fetch method to get user-specific incidents and assign the response to our incidents array.
If you refresh your page after adding an incident, you should see something like this.
My Reports page with a report. (Large preview)
At this point, we would notice a difference in how fetch method and asyncData loads our data.
Conclusion
So far, we have learned about the Axios module and all of its features. We have also learned more about asyncData, and how we can fetch both of them together despite their differences. We’ve also learned how to perform authentication in our application using the auth module and how to use the auth middleware to protect our routes. Here are some useful resources that talk more about all we’ve covered.
Resources
“Auth Module,” NUXtJS.org
“Axios Module: Introduction,” NUXtJS.org
FormData, MDN web docs
“API: The asyncData Method,” NUXtJS.org
“The Vue Instance: Lifecycle Diagram,” VueJS.org
“Understanding How fetch Works In Nuxt 2.12,” NUXtJS.org
(ks, ra, yk, il)
Website Design & SEO Delray Beach by DBL07.co
Delray Beach SEO
source http://www.scpie.org/getting-started-with-axios-in-nuxt/
0 notes
Text
Let’s Build a JAMstack E-Commerce Store with Netlify Functions
A lot of people are confused about what JAMstack is. The acronym stands for JavaScript, APIs, and Markup, but truly, JAMstack doesn’t have to include all three. What defines JAMstack is that it’s served without web servers. If you consider the history of computing, this type of abstraction isn’t unnatural; rather it’s the inevitable progression this industry has been moving towards.
So, if JAMstack tends to be static by definition, it can’t have dynamic functionality, server-side events, or use a JavaScript framework, right? Thankfully, not so. In this tutorial, we’ll set up a JAMstack e-commerce app and add some serverless functionality with Netlify Functions (which abstract AWS Lambda, and are super dope in my opinion).
I'll show more directly how the Nuxt/Vue part was set up in a follow-up post, but for now we're going to focus on the Stripe serverless function. I'll show you how I set this one up, and we'll even talk about how to connect to other static site generators such as Gatsby.
This site and repo should get you started if you’d like to set something like this up yourself:
Demo Site
GitHub Repo
Scaffold our app
The very first step is to set up our app. This one is built with Nuxt to create a Vue app, but you can replace these commands with your tech stack of choice:
yarn create nuxt-app hub create git add -A git commit -m “initial commit” git push -u origin master
I am using yarn, hub (which allows me to create repos from the command line) and Nuxt. You may need to install these tools locally or globally before proceeding.
With these few commands, following the prompts, we can set up an entirely new Nuxt project as well as the repo.
If we log into Netlify and authenticate, it will ask us to pick a repo:
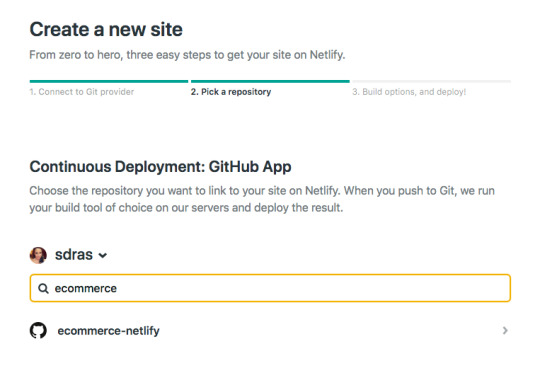
I'll use yarn generate to create the project. With that, I can add in the site settings for Nuxt in the dist directory and hit feploy! That's all it takes to set up CI/CD and deploy the site! Now every time I push to the master branch, not only will I deploy, but I'll be given a unique link for that particular deploy as well. So awesome.
A basic serverless function with Netlify
So here's the exciting part, because the setup for this kind of functionality is so quick! If you’re unfamiliar with Serverless, you can think of it like the same JavaScript functions you know and love, but executed on the server. Serverless functions are event-driven logic and their pricing is extremely low (not just on Netlify, but industry-wide) and scales with your usage. And yes, we have to add the qualifier here: serverless still uses servers, but babysitting them is no longer your job. Let’s get started.
Our very basic function looks like this. I stored mine in a folder named functions, and just called it index.js. You can truly call the folder and function what you want.
// functions/index.js exports.handler = async (event, context) => { return { statusCode: 200, body: JSON.stringify({ message: "Hi there Tacos", event }) } }
We’ll also need to create a netlify.toml file at the root of the project and let it know which directory to find the function in, which in this case, is "functions."
// netlify.toml [build] functions = "functions"
If we push to master and go into the dashboard, you can see it pick up the function!

If you look at the endpoint listed above it’s stored here: https://ecommerce-netlify.netlify.com/.netlify/functions/index
Really, for any site you give it, the URL will follow this pattern: https:/<yoursiteurlhere>/.netlify/functions/<functionname>
When we hit that endpoint, it provides us with the message we passed in, as well as all the event data we logged as well:

I love how few steps that is! This small bit of code gives us infinite power and capabilities for rich, dynamic functionality on our sites.
Hook up Stripe
Pairing with Stripe is extremely fun because it's easy to use, sophisticated, has great docs, and works well with serverless functions. I have other tutorials where I used Stripe because I enjoy using their service so much.
Here’s a bird’s eye view of the app we’ll be building:

First we’ll go to the Stripe dashboard and get our keys. For anyone totally scandalized right now, it's OK, these are testing keys. You can use them, too, but you’ll learn more if you set them up on your own. (It’s two clicks and I promise it’s not hard to follow along from here.)
We’ll install a package called dotenv which will help us store our key and test it locally. Then, we’ll store our Stripe secret key to a Stripe variable. (You can call it anything, but here I’ve called it STRIPE_SECRET_KEY, and that’s pretty much industry standard.)
yarn add dotenv
require("dotenv").config() const stripe = require("stripe")(process.env.STRIPE_SECRET_KEY)
In the Netlify dashboard, we’ll go to "Build & deploy," then "Environment" to add in Environment variables, where the STRIPE_SECRET_KEY is key, and the value will be the key that starts with sk.
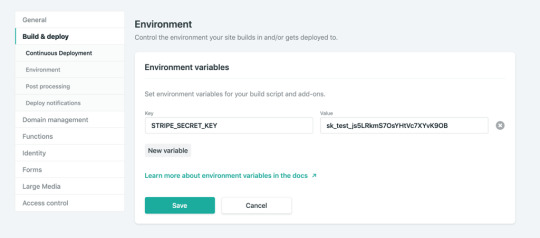
We’ll also add in some headers so we don’t run into CORS issues. We’ll use these headers throughout the function we’re going to build.
const headers = { "Access-Control-Allow-Origin": "*", "Access-Control-Allow-Headers": "Content-Type" }
So, now we’ll create the functionality for talking to Stripe. We’ll make sure we’ll handle the cases that it’s not the HTTP method we’re expecting, and also that we’re getting the information we expect.
You can already see here, what data we’re going to be needing to send to stripe by what we check for. We’ll need the token, the total amount, and an idempotency key.
If you're unfamiliar with idempotency keys, they are unique values that are generated by a client and sent to an API along with a request in case the connection is disrupted. If the server receives a call that it realizes is a duplicate, it ignores the request and responds with a successful status code. Oh, and it's an impossible word to pronounce.
exports.handler = async (event, context) => { if (!event.body || event.httpMethod !== "POST") { return { statusCode: 400, headers, body: JSON.stringify({ status: "invalid http method" }) } } const data = JSON.parse(event.body) if (!data.stripeToken || !data.stripeAmt || !data.stripeIdempotency) { console.error("Required information is missing.") return { statusCode: 400, headers, body: JSON.stringify({ status: "missing information" }) } }
Now, we’ll kick off the Stripe payment processing! We’ll create a Stripe customer using the email and token, do a little logging, and then create the Stripe charge. We’ll specify the currency, amount, email, customer ID, and give a description while we're at it. Finally, we’ll provide the idempotency key (pronounced eye-dem-po-ten-see), and log that it was successful.
(While it's not shown here, we’ll also do some error handling.)
// stripe payment processing begins here try { await stripe.customers .create({ email: data.stripeEmail, source: data.stripeToken }) .then(customer => { console.log( `starting the charges, amt: ${data.stripeAmt}, email: ${data.stripeEmail}` ) return stripe.charges .create( { currency: "usd", amount: data.stripeAmt, receipt_email: data.stripeEmail, customer: customer.id, description: "Sample Charge" }, { idempotency_key: data.stripeIdempotency } ) .then(result => { console.log(`Charge created: ${result}`) }) })
Hook it up to Nuxt

If we look back at our application, you can see we have pages and components that live inside the pages. The Vuex store is like the brain of our application. It will hold the state of the app, and that's what will communicate with Stripe. However, we still need to communicate with our user via the client. We'll collect the credit card data in a component called AppCard.vue that will live on the cart page.
First, we'll install a package called vue-stripe-elements-plus, that gives us some Stripe form elements that allow us to collect credit card data, and even sets us up with a pay method that allows us to create tokens for stripe payment processing. We'll also add a library called uuid that will allow us to generate unique keys, which we'll use for the idempotency key.
yarn add vue-stripe-elements-plus uuid
The default setup they give us to work with vue-stripe-elements-plus looks like this:
<template> <div id='app'> <h1>Please give us your payment details:</h1> <card class='stripe-card' :class='{ complete }' stripe='pk_test_XXXXXXXXXXXXXXXXXXXXXXXX' :options='stripeOptions' @change='complete = $event.complete' /> <button class='pay-with-stripe' @click='pay' :disabled='!complete'>Pay with credit card</button> </div> </template>
<script> import { stripeKey, stripeOptions } from './stripeConfig.json' import { Card, createToken } from 'vue-stripe-elements-plus' export default { data () { return { complete: false, stripeOptions: { // see https://stripe.com/docs/stripe.js#element-options for details } } }, components: { Card }, methods: { pay () { // createToken returns a Promise which resolves in a result object with // either a token or an error key. // See https://stripe.com/docs/api#tokens for the token object. // See https://stripe.com/docs/api#errors for the error object. // More general https://stripe.com/docs/stripe.js#stripe-create-token. createToken().then(data => console.log(data.token)) } } } </script>
So here's what we're going to do. We're going to update the form to store the customer email, and update the pay method to send that and the token or error key to the Vuex store. We'll dispatch an action to do so.
data() { return { ... stripeEmail: "" }; }, methods: { pay() { createToken().then(data => { const stripeData = { data, stripeEmail: this.stripeEmail }; this.$store.dispatch("postStripeFunction", stripeData); }); }, ...
That postStripeFunction action we dispatched looks like this:
// Vuex store export const actions = { async postStripeFunction({ getters, commit }, payload) { commit("updateCartUI", "loading") try { await axios .post( "https://ecommerce-netlify.netlify.com/.netlify/functions/index", { stripeEmail: payload.stripeEmail, stripeAmt: Math.floor(getters.cartTotal * 100), //it expects the price in cents stripeToken: "tok_visa", //testing token, later we would use payload.data.token stripeIdempotency: uuidv1() //we use this library to create a unique id }, { headers: { "Content-Type": "application/json" } } ) .then(res => { if (res.status === 200) { commit("updateCartUI", "success") setTimeout(() => commit("clearCart"), 3000) …
We're going to update the UI state to loading while we're processing. Then we'll use axios to post to our function endpoint (the URL you saw earlier in the post when we set up our function). We'll send over the email, the amt, the token and the unique key that we built the function to expect.
Then if it was successful, we'll update the UI state to reflect that.
One last note I'll give is that I store the UI state in a string, rather than a boolean. I usually start it with something like "idle" and, in this case, I'll also have "loading," "success," and "failure." I don't use boolean states because I've rarely encountered a situation where UI state only has two states. When you work with booleans for this purpose, you tend to need to break it out into more and more states, and checking for all of them can get increasingly complicated.
As it stands, I can reflect changes in the UI on the cart page with legible conditionals, like this:
<section v-if="cartUIStatus === 'idle'"> <app-cart-display /> </section> <section v-else-if="cartUIStatus === 'loading'" class="loader"> <app-loader /> </section> <section v-else-if="cartUIStatus === 'success'" class="success"> <h2>Success!</h2> <p>Thank you for your purchase. You'll be receiving your items in 4 business days.</p> <p>Forgot something?</p> <button class="pay-with-stripe"> <nuxt-link exact to="/">Back to Home</nuxt-link> </button> </section> <section v-else-if="cartUIStatus === 'failure'"> <p>Oops, something went wrong. Redirecting you to your cart to try again.</p> </section>
And there you have it! We’re all set up and running to accept payments with stripe on a Nuxt, Vue site with a Netlify function, and it wasn’t even that complicated to set up!
Gatsby Applications
We used Nuxt in this instance but if you wanted to set up the same kind of functionality with something that uses React such as Gatsby, there's a plugin for that. (Everything is plugin in Gatsby. ☺️)
You would install it with this command:
yarn add gatsby-plugin-netlify-functions
...and add the plugin to your application like this:
plugins: [ { resolve: `gatsby-plugin-netlify-functions`, options: { functionsSrc: `${__dirname}/src/functions`, functionsOutput: `${__dirname}/functions`, }, }, ]
The serverless function used in this demo is straight up JavaScript, so it's also portable to React applications. There's a plugin to add the Stripe script to your Gatsby app (again, everything is a plugin). Fair warning: this adds the script to every page on the site. To collect the credit card information on the client, you would use React Stripe Elements, which is similar to the Vue one we used above.
Just make sure that you're collecting from the client and passing all the information the function is expecting:
The user email
The total amount, in cents
The token
The idempotency key
Demo Site
GitHub Repo
With such a low barrier to entry, you can see how you can make really dynamic experiences with JAMstack applications. It's amazing how much you can accomplish without any maintenance costs from servers. Stripe and Netlify Functions make setting up payment processing in a static application such a smooth developer experience!
The post Let’s Build a JAMstack E-Commerce Store with Netlify Functions appeared first on CSS-Tricks.
via CSS-Tricks https://ift.tt/2z8RO8E
0 notes
Photo

How to Build and Structure a Node.js MVC Application
In a non-trivial application, the architecture is as important as the quality of the code itself. We can have well-written pieces of code, but if we don’t have good organization, we’ll have a hard time as the complexity increases. There’s no need to wait until the project is half-way done to start thinking about the architecture; the best time is before starting, using our goals as beacons for our choices.
Node.js doesn’t have a de facto framework with strong opinions on architecture and code organization in the same way that Ruby has the Rails framework, for example. As such, it can be difficult to get started with building full web applications with Node.
In this tutorial, we’re going to build the basic functionality of a note-taking app using the MVC architecture. To accomplish this, we’re going to employ the Hapi.js framework for Node.js and SQLite as a database, using Sequelize.js, plus other small utilities, to speed up our development. We’re going to build the views using Pug, the templating language.
What is MVC?
Model-View-Controller (or MVC) is probably one of the most popular architectures for applications. As with a lot of other cool things in computer history, the MVC model was conceived at PARC for the Smalltalk language as a solution to the problem of organizing applications with graphical user interfaces. It was created for desktop applications, but since then, the idea has been adapted to other mediums including the Web.
We can describe the MVC architecture in simple terms:
Model: the part of our application that will deal with the database or any data-related functionality.
View: everything the user will see — basically, the pages that we’re going to send to the client.
Controller: the logic of our site, and the glue between models and views. Here we call our models to get the data, then we put that data on our views to be sent to the users.
Our application will allow us to create, view, edit and delete plain-text notes. It won’t have other functionality, but because we’ll have a solid architecture already defined we won’t have a lot of trouble adding things later.
This tutorial assumes you have a recent version of Node installed on your machine. If this isn’t the case, please consult our tutorial on getting up and running with Node.
You can check out the final application in the accompanying GitHub repository, so you get a general overview of the application structure.
Laying out the Foundation
The first step when building any Node.js application is to create a package.json file, which is going to contain all of our dependencies and scripts. Instead of creating this file manually, npm can do the job for us using the init command:
mkdir notes-board cd notes-board npm init -y
After the process is complete, we’ll have a package.json file ready to use.
Note: if you’re not familiar with these commands, checkout our Beginner’s Guide to npm.
We’re going to proceed to install Hapi.js — the framework of choice for this tutorial. It provides a good balance between simplicity, stability and features that will work well for our use case (although there are other options that would also work just fine).
npm install @hapi/[email protected]
This command will download Hapi.js and add it to our package.json file as a dependency.
Note: We’ve specified v18.4.0 of Hapi.js, as it’s compatible with Node versions 8, 10, and 12. If you’re using Node 12, you can opt to install the latest version (Hapi v19.1.0).
Now we can create our entry file — the web server that will start everything. Go ahead and create a server.js file in your application directory and add the following code to it:
"use strict"; const Hapi = require("@hapi/hapi"); const Settings = require("./settings"); const init = async () => { const server = new Hapi.Server({ port: Settings.port }); server.route({ method: "GET", path: "/", handler: (request, h) => { return "Hello, world!"; } }); await server.start(); console.log(`Server running at: ${server.info.uri}`); }; process.on("unhandledRejection", err => { console.log(err); process.exit(1); }); init();
This is going to be the foundation of our application.
First, we indicate that we’re going to use strict mode, which is a common practice when using the Hapi.js framework.
Next, we include our dependencies and instantiate a new server object where we set the connection port to 3000 (the port can be any number above 1023 and below 65535).
Our first route for our server will work as a test to see if everything is working, so a “Hello, world!” message is enough for us. In each route, we have to define the HTTP method and path (URL) that it will respond to, and a handler, which is a function that will process the HTTP request. The handler function can take two arguments: request and h. The first one contains information about the HTTP call, and the second will provide us with methods to handle our response to that call.
Finally, we start our server with the server.start() method.
Storing Our Settings
It’s good practice to store our configuration variables in a dedicated file. This file exports a JSON object containing our data, where each key is assigned from an environment variable — but without forgetting a fallback value.
In this file, we can also have different settings depending on our environment (such as development or production). For example, we can have an in-memory instance of SQLite for development purposes, but a real SQLite database file on production.
Selecting the settings depending on the current environment is quite simple. Since we also have an env variable in our file which will contain either development or production, we can do something like the following to get the database settings:
const dbSettings = Settings[Settings.env].db;
So dbSettings will contain the setting of an in-memory database when the env variable is development, or will contain the path of a database file when the env variable is production.
Also, we can add support for a .env file, where we can store our environment variables locally for development purposes. This is accomplished using a package like dotenv for Node.js, which will read a .env file from the root of our project and automatically add the found values to the environment.
Note: if you decide to also use a .env file, make sure you install the package with npm install dotenv and add it to .gitignore so you don’t publish any sensitive information.
Our settings.js file will look like this:
// This will load our .env file and add the values to process.env, // IMPORTANT: Omit this line if you don't want to use this functionality require("dotenv").config({ silent: true }); module.exports = { port: process.env.PORT || 3000, env: process.env.NODE_ENV || "development", // Environment-dependent settings development: { db: { dialect: "sqlite", storage: ":memory:" } }, production: { db: { dialect: "sqlite", storage: "db/database.sqlite" } } };
Now we can start our application by executing the following command and navigating to http://localhost:3000 in our web browser:
node server.js
Note: this project was tested on Node v12.15.0. If you get any errors, ensure you have an updated installation.
Defining the Routes
The definition of routes gives us an overview of the functionality supported by our application. To create our additional routes, we just have to replicate the structure of the route that we already have in our server.js file, changing the content of each one.
Let’s start by creating a new directory called lib in our project. Here we’re going to include all the JS components.
Inside lib, let’s create a routes.js file and add the following content:
"use strict"; const Path = require("path"); module.exports = [ // we’re going to define our routes here ];
In this file, we’ll export an array of objects that contain each route of our application. To define the first route, add the following object to the array:
{ method: "GET", path: "/", handler: (request, h) => { return "All the notes will appear here"; }, config: { description: "Gets all the notes available" } },
Our first route is for the home page (/), and since it will only return information, we assign it a GET method. For now, it will only give us the message “All the notes will appear here”, which we’re going to change later for a controller function. The description field in the config section is only for documentation purposes.
Then, we create the four routes for our notes under the /note/ path. Since we’re building a CRUD application, we’ll need one route for each action with the corresponding HTTP methods.
Add the following definitions next to the previous route:
{ method: "POST", path: "/note", handler: (request, h) => { return "New note"; }, config: { description: "Adds a new note" } }, { method: "GET", path: "/note/{slug}", handler: (request, h) => { return "This is a note"; }, config: { description: "Gets the content of a note" } }, { method: "PUT", path: "/note/{slug}", handler: (request, h) => { return "Edit a note"; }, config: { description: "Updates the selected note" } }, { method: "GET", path: "/note/{slug}/delete", handler: (request, h) => { return "This note no longer exists"; }, config: { description: "Deletes the selected note" } }
We’ve done the same as in the previous route definition, but this time we’ve changed the method to match the action we want to execute.
The only exception is the delete route. In this case, we’re going to define it with the GET method rather than DELETE and add an extra /delete in the path. This way, we can call the delete action just by visiting the corresponding URL.
Note: if you plan to implement a strict REST interface, then you would have to use the DELETE method and remove the /delete part of the path.
We can name parameters in the path by surrounding the word in curly braces. Since we’re going to identify notes by a slug, we add {slug} to each path, with the exception of the POST route; we don’t need it there because we’re not going to interact with a specific note, but to create one.
You can read more about Hapi.js routes on the official documentation.
Now, we have to add our new routes to the server.js file. Let’s import the routes file at the top of the file:
const Routes = require("./lib/routes");
Then let’s replace our current test route with the following:
server.route(Routes);
The post How to Build and Structure a Node.js MVC Application appeared first on SitePoint.
by James Kolce via SitePoint https://ift.tt/398Hi0R
0 notes
Text
Getting Started With Axios In Nuxt
About The Author
Front-end developer based in Lagos, Nigeria. He enjoys converting designs into code and building things for the web. More about Timi …
In this tutorial, we will learn how to make a request in our NUXt.js applications using the Axios module. We will also learn how to use the ayncData and fetch methods to fetch data on the server-side using Axios and the differences between the two methods. Finally, we will learn how to add authentication to our application using the Auth module.
NUXt.js provides an Axios module for easy integration with your application. Axios is a promise-based HTTP client that works in the browser and Node.js environment or, in simpler terms, it is a tool for making requests (e.g API calls) in client-side applications and Node.js environment.
In this tutorial, we’re going to learn how to use the Axios module and how to make a request on the server-side using asyncData and fetch. These two methods make a request on the server-side but they have some differences which we’re also going to cover. Finally, we’ll learn how to perform authentication and secure pages/routes using the auth module and auth middleware.
This article requires basic knowledge of NUXtjs and Vuejs as we’ll be building on top of that. For those without experience with Vuejs, I recommend you start from their official documentation and the Nuxt official page before continuing with this article.
What Is The Nuxt.js Axios Module?
According to the official Documentation,
“It is a Secure and easy Axios integration with NUXt.js.”
Here are some of its features:
Automatically set base URL for client-side & server-side.
Proxy request headers in SSR (Useful for auth).
Fetch Style requests.
Integrated with NUXt.js Progressbar while making requests.
To use the axios module in your application, you will have to first install it by using either npm or yarn.
YARN
yarn add @nUXtjs/axios
NPM
npm install @nUXtjs/axios
Add it into your nUXt.config.js file:
modules: [ '@nUXtjs/axios', ], axios: { // extra config e.g // BaseURL: 'https://link-to-API' }
The modules array accepts a list of NUXt.js modules such as dotenv, auth and in this case, Axios. What we’ve done is to inform our application that we would be using the Axios module, which we reference using @nUXtjs/axios. This is then followed by the axios property which is an object of configurations like the baseURL for both client-side and server-side.
Now, you can access Axios from anywhere in your application by calling this.$axios.method or this.$axios.$method. Where method can be get, post, or delete.
Making Your First Request Using Axios
For this tutorial, I’ve put together a simple application on Github. The repository contains two folders, start and finish, the start folder contains all you need to get right into the tutorial. The finish folder contains a completed version of what we would be building.
After cloning the repo and opening the start folder, we would need to install all our packages in the package.json file so open your terminal and run the following command:
npm install
Once that is done, we can start our app using the npm run dev command. This is what you should see when you go to localhost:3000.
Our application’s landing page. (Large preview)
The next thing we have to do is to create a .env file in the root folder of our application and add our API URL to it. For this tutorial, we’ll be using a sample API built to collect reports from users.
API_URL=https://ireporter-endpoint.herokuapp.com/api/v2/
This way, we do not have to hard code our API into our app which is useful for working with two APIs (development and production).
The next step would be to open our nUXt.config.js file and add the environmental variable to our axios config that we added above.
/* ** Axios module configuration */ axios: { // See https://github.com/nUXt-community/axios-module#options baseURL: process.env.API_URL, },
Here, we tell NUXt.js to use this baseURL for both our client-side and server-side requests whenever we use this Axios module.
Now, to fetch a list of reports, let us open the index.vue file and add the following method to the script section.
async getIncidents() { let res = await this.$store.dispatch("getIncidents"); this.incidents = res.data.data.incidents; }
What we have done is to create an async function that we call getIncidents() and we can tell what it does from the name — it fetches a list of incidents using the Vuex store action method this.$store.dispatch. We assign the response from this action to our incidents property so we can be able to make use of it in the component.
We want to call the getIncidents() method whenever the component mounts. We can do that using the mounted hook.
mounted() { this.getIncidents() }
mounted() is a lifecycle hook that gets called when the component mounts. That will cause the call to the API to happen when the component mounts. Now, let us go into our index.js file in our store and create this action where we’ll be making our Axios request from.
export const actions = { async getIncidents() { let res = await this.$axios.get('/incidents') return res; } }
Here, we created the action called getIncidents which is an async function, then we await a response from the server and return this response. The response from this action is sent back to our getIncidents() method in our index.vue file.
If we refresh our application, we should now be able to see a long list of incidents rendered on the page.
List of incidents on landing page. (Large preview)
We have made our first request using Axios but we won’t stop there, we are going to be trying out asyncData and fetch to see the differences between them and using Axios.
AsyncData
AsyncData fetches data on the server-side and it’s called before loading the page component. It does not have access to this because it is called before your page component data is created. this is only available after the created hook has been called so NUXt.js automatically merges the returned data into the component’s data.
Using asyncData is good for SEO Company because it fetches your site’s content on the server-side and also helps in loading content faster. Note that asyncData method can only be used in the pages folder of your application as it would not work in the components folder. This is because asyncData hook gets called before your component is created.
Image from NUXt blog. (Large preview)
Let us add asyncData to our index.vue file and observe how fast our incidents data loads. Add the following code after our components property and let us get rid of our mounted hook.
async asyncData({ $axios }) { let { data } = await $axios.get("/incidents"); return { incidents: data.data.incidents }; }, // mounted() { // this.getIncidents(); // },
Here, the asyncData method accepts a property from the context $axios. We use this property to fetch the list of incidents and the value is then returned. This value is automatically injected into our component. Now, you can notice how fast your content loads if you refresh the page and at no time is there no incident to render.
Fetch
The Fetch method is also used to make requests on the server-side. It is called after the created hook in the life cycle which means it has access to the component’s data. Unlike the asyncData method, the fetch method can be used in all .vue files and be used with the Vuex store. This means that if you have the following in your data function.
data() { return { incidents: [], id: 5, gender: 'male' }; }
You can easily modify id or gender by calling this.id or this.gender.
Using Axios As A Plugin
During the process of development with Axios, you might find that you need extra configuration like creating instances and interceptors for your request so your application can work as intended and thankfully, we can do that by extending our Axios into a plugin.
To extend axios, you have to create a plugin (e.g. axios.js) in your plugins folder.
export default function ({ $axios, store, redirect }) { $axios.onError(error => { if (error.response && error.response.status === 500) { redirect('/login') } }) $axios.interceptors.response.use( response => { if (response.status === 200) { if (response.request.responseURL && response.request.responseURL.includes('login')) { store.dispatch("setUser", response); } } return response } ) }
This is an example of a plugin I wrote for a NUXt application. Here, your function takes in a context object of $axios, store and redirect which we would use in configuring the plugin. The first thing we do is to listen for an error with a status of 500 using $axios.onError and redirect the user to the login page.
We also have an interceptor that intercepts every request response we make in our application checks if the status of the response we get is 200. If that is true we proceed and check that there is a response.request.responseURL and if it includes login. If this checks out to be true, we then send this response using our store’s dispatch method where it then mutated in our state.
Add this plugin to your nUXt.config.js file:
plugins: [ '~/plugins/axios' ]
After doing this, your Axios plugin would intercept any request you make and check if you have defined a special case for it.
Introduction To The Auth Module
The auth module is used for performing authentication for your NUXt application and can be accessed from anywhere in your application using $this.auth. It is also available in fetch, asyncData, middleware and NUXtInitServer from the context object as $auth.
The context provides additional objects/params from NUXt to Vue components and is available in special nUXt lifecycle areas like those mentioned above.
To use the auth module in your application, you would have to install it using yarn or npm.
YARN
yarn add @nUXtjs/auth
NPM
npm install @nUXtjs/auth
Add it to your nUXt.config.js file.
modules: [ '@nUXtjs/auth' ], auth: { // Options }
The auth property accepts a list of properties such as strategies and redirect. Here, strategies accepts your preferred authentication method which can be:
local For username/email and password-based flow.
Facebook For using Facebook accounts as a means of authentication.
Github For authenticating users with Github accounts.
Google For authenticating users with Google accounts.
Auth0
Laravel Passport
The redirect property accepts an object of links for:
login Users would be redirected to this link if login is required.
logout Users would be redirected here if after logout current route is protected.
home Users would be redirected here after login.
Now, let us add the following to our nUXt.config.js file.
/* ** Auth module configuration */ auth: { redirect: { login: '/login', logout: '/', home: '/my-reports' }, strategies: { local: { endpoints: { login: { url: "/user/login", method: "post", propertyName: "data.token", }, logout: false, user: false, }, tokenType: '', tokenName: 'x-auth', autoFetchUser: false }, }, }
Please note that the auth method works best when there is a user endpoint provided in the option above.
Inside the auth config object, we have a redirect option in which we set our login route to /login, logout route to / and home route to /my-reports which would all behave as expected. We also have a tokenType property which represents the Authorization type in the header of our Axios request. It is set to Bearer by default and can be changed to work with your API.
For our API, there is no token type and this is why we’re going to leave it as an empty string. The tokenName represents the Authorization name (or the header property you want to attach your token to) inside your header in your Axios request.
By default, it is set to Authorization but for our API, the Authorization name is x-auth. The autoFetchUser property is used to enable user fetch object using the user endpoint property after login. It is true by default but our API does not have a user endpoint so we have set that to false.
For this tutorial, we would be using the local strategy. In our strategies, we have the local option with endpoints for login, user and logout but in our case, we would only use the *login* option because our demo API does not have a *logout* endpoint and our user object is being returned when *login* is successful.
Note: The auth module does not have a register endpoint option so that means we’re going to register the traditional way and redirect the user to the login page where we will perform the authentication using this.$auth.loginWith. This is the method used in authenticating your users. It accepts a ‘strategy’ (e.g local) as a first argument and then an object to perform this authentication with. Take a look at the following example.
let data { email: '[email protected]', password: '123456' } this.$auth.loginWith('local', { data })
Using The Auth Module
Now that we have configured our auth module, we can proceed to our registration page. If you visit the /register page, you should see a registration form.
Register page. (Large preview)
Let us make this form functional by adding the following code:
methods: { async registerUser() { this.loading = true; let data = this.register; try { await this.$axios.post("/user/create", data); this.$router.push("/login"); this.loading = false; this.$notify({ group: "success", title: "Success!", text: "Account created successfully" }); } catch (error) { this.loading = false; this.$notify({ group: "error", title: "Error!", text: error.response ? error.response.data.error : "Sorry an error occured, check your internet" }); } } }
Here, we have an async function called registerUser which is tied to a click event in our template and makes an Axios request wrapped in a try/catch block to an endpoint /user/create. This redirects to the /login page and notifies the user of a successful registration. We also have a catch block that alerts the user of any error if the request is not successful.
If the registration is successful, you would be redirected to the login page.
Login page with notification component. (Large preview)
Here, we’re going to make use of auth authentication method this.$auth.loginWith('local', loginData) after which we would use the this.$auth.setUser(userObj) to set the user in our auth instance.
To get the login page working, let’s add the following code to our login.vue file.
methods: { async logIn() { let data = this.login; this.loading = true; try { let res = await this.$auth.loginWith("local", { data }); this.loading = false; let user = res.data.data.user; this.$auth.setUser(user); this.$notify({ group: "success", title: "Success!", text: "Welcome!" }); } catch (error) { this.loading = false; this.$notify({ group: "error", title: "Error!", text: error.response ? error.response.data.error : "Sorry an error occured, check your internet" }); } } }
We created an async function called logIn using the auth method this.$auth.loginWith('local, loginData). If this login attempt is successful, we then assign the user data to our auth instance using this.$auth.setUser(userInfo) and redirect the user to the /my-report page.
You can now get user data using this.$auth.user or with Vuex using this.$store.state.auth.user but that’s not all. The auth instance contains some other properties which you can see if you log in or check your state using your Vue dev tools.
If you log this.$store.state.auth to the console, you’ll see this:
{ "auth": { "user": { "id": "d7a5efdf-0c29-48aa-9255-be818301d602", "email": "[email protected]", "lastName": "Xo", "firstName": "Tm", "othernames": null, "isAdmin": false, "phoneNumber": null, "username": null }, "loggedIn": true, "strategy": "local", "busy": false } }
The auth instance contains a loggedIn property that is useful in switching between authenticated links in the nav/header section of your application. It also contains a strategy method that states the type of strategy the instance is running (e.g local).
Now, we will make use of this loggedIn property to arrange our nav links. Update your navBar component to the following:
<template> <header class="header"> <div class="logo"> <nUXt-link to="/"> <Logo /> </nUXt-link> </div> <nav class="nav"> <div class="nav__user" v-if="auth.loggedIn"> <p></p> <button class="nav__link nav__link--long"> <nUXt-link to="/report-incident">Report incident</nUXt-link> </button> <button class="nav__link nav__link--long"> <nUXt-link to="/my-reports">My Reports</nUXt-link> </button> <button class="nav__link" @click.prevent="logOut">Log out</button> </div> <button class="nav__link" v-if="!auth.loggedIn"> <nUXt-link to="/login">Login</nUXt-link> </button> <button class="nav__link" v-if="!auth.loggedIn"> <nUXt-link to="/register">Register</nUXt-link> </button> </nav> </header> </template> <script> import { mapState } from "vuex"; import Logo from "@/components/Logo"; export default { name: "nav-bar", data() { return {}; }, computed: { ...mapState(["auth"]) }, methods: { logOut() { this.$store.dispatch("logOut"); this.$router.push("/login"); } }, components: { Logo } }; </script> <style></style>
In our template section, we have several links to different parts of the application in which we are now using auth.loggedIn to display the appropriate links depending on the authentication status. We have a logout button that has a click event with a logOut() function attached to it. We also display the user’s email gotten from the auth property which is accessed from our Vuex store using the mapState method which maps our state auth to the computed property of the nav component. We also have a logout method that calls our Vuex action logOut and redirects the user to the login page.
Now, let us go ahead and update our store to have a logOut action.
export const actions = { // .... logOut() { this.$auth.logout(); } }
The logOut action calls the auth logout method which clears user data, deletes tokens from localStorage and sets loggedIn to false.
Routes like /my-reports and report-incident should not be visible to guests but at this point in our app, that is not the case. NUXt does not have a navigation guard that can protect your routes, but it has is the auth middleware. It gives you the freedom to create your own middleware so you can configure it to work the way you want.
It can be set in two ways:
Per route.
Globally for the whole app in your nUXt.config.js file.
router: { middleware: ['auth'] }
This auth middleware works with your auth instance so you do not need to create an auth.js file in your middleware folder.
Let us now add this middleware to our my-reports.vue and report-incident.vue files. Add the following lines of code to the script section of each file.
middleware: 'auth'
Now, our application would check if the user trying to access these routes has an auth.loggedIn value of true. It’ll redirect them to the login page using our redirect option in our auth config file — if you’re not logged in and you try to visit either /my-report or report-incident, you would be redirected to /login.
If you go to /report-incidents, this is what you should see.
Report incident page. (Large preview)
This page is for adding incidents but that right now the form does not send incident to our server because we are not making the call to the server when the user attempts to submit the form. To solve this, we will add a reportIncident method which will be called when the user clicks on Report. We’ll have this in the script section of the component. This method will send the form data to the server. Update your report-incident.vue file with the following:
<template> <section class="report"> <h1 class="report__heading">Report an Incident</h1> <form class="report__form"> <div class="input__container"> <label for="title" class="input__label">Title</label> <input type="text" name="title" id="title" v-model="incident.title" class="input__field" required /> </div> <div class="input__container"> <label for="location" class="input__label">Location</label> <input type="text" name="location" id="location" v-model="incident.location" required class="input__field" /> </div> <div class="input__container"> <label for="comment" class="input__label">Comment</label> <textarea name="comment" id="comment" v-model="incident.comment" class="input__area" cols="30" rows="10" required ></textarea> </div> <input type="submit" value="Report" class="input__button" @click.prevent="reportIncident" /> <p class="loading__indicator" v-if="loading">Please wait....</p> </form> </section> </template> <script> export default { name: "report-incident", middleware: "auth", data() { return { loading: false, incident: { type: "red-flag", title: "", location: "", comment: "" } }; }, methods: { async reportIncident() { let data = this.incident; let formData = new FormData(); formData.append("title", data.title); formData.append("type", data.type); formData.append("location", data.location); formData.append("comment", data.comment); this.loading = true; try { let res = await this.$store.dispatch("reportIncident", formData); this.$notify({ group: "success", title: "Success", text: "Incident reported successfully!" }); this.loading = false; this.$router.push("/my-reports"); } catch (error) { this.loading = false; this.$notify({ group: "error", title: "Error!", text: error.response ? error.response.data.error : "Sorry an error occured, check your internet" }); } } } }; </script> <style> </style>
Here, we have a form with input fields for title, location, and comment with two-way data binding using v-model. We also have a submit button with a click event. In the script section, we have a reportIncident method that collects all the information provided in the form and is sent to our server using FormData because the API is designed to also accept images and videos.
This formData is attached to a Vuex action using the dispatch method, if the request is successful, you get redirected to /my-reports with a notification informing you that this request was successful otherwise, you would be notified of an error with the error message.
At this point, we don’t have reportIncident action in our store yet so in your browser console, you would see an error if you try to click submit on this page.
Vuex error message. (Large preview)
To fix this, add the reportIncident action your index.js file.
export const actions = { // ... async reportIncident({}, data) { let res = await this.$axios.post('/incident/create', data) return res; } }
Here, we have a reportIncident function that takes in an empty context object and the data we’re sending from our form. This data is then attached to a post request that creates an incident and returns back to our report-incident.vue file.
At this point, you should be able to add a report using the form after which you would be redirected to /my-reports page.
My reports page empty. (Large preview)
This page should display a list of incidents created by the user but right now it only shows what we see above, let’s go ahead to fix that.
We’re going to be using the fetch method we learned about to get this list. Update your my-reports.vue file with the following:
<script> import incidentCard from "@/components/incidentCard.vue"; export default { middleware: "auth", name: "my-reports", data() { return { incidents: [] }; }, components: { incidentCard }, async fetch() { let { data } = await this.$axios.get("/user/incidents"); this.incidents = data.data; } }; </script>
Here, we use fetch method to get user-specific incidents and assign the response to our incidents array.
If you refresh your page after adding an incident, you should see something like this.
My Reports page with a report. (Large preview)
At this point, we would notice a difference in how fetch method and asyncData loads our data.
Conclusion
So far, we have learned about the Axios module and all of its features. We have also learned more about asyncData, and how we can fetch both of them together despite their differences. We’ve also learned how to perform authentication in our application using the auth module and how to use the auth middleware to protect our routes. Here are some useful resources that talk more about all we’ve covered.
Resources
“Auth Module,” NUXtJS.org
“Axios Module: Introduction,” NUXtJS.org
FormData, MDN web docs
“API: The asyncData Method,” NUXtJS.org
“The Vue Instance: Lifecycle Diagram,” VueJS.org
“Understanding How fetch Works In Nuxt 2.12,” NUXtJS.org
(ks, ra, yk, il)
Website Design & SEO Delray Beach by DBL07.co
Delray Beach SEO
source http://www.scpie.org/getting-started-with-axios-in-nuxt/ source https://scpie1.blogspot.com/2020/05/getting-started-with-axios-in-nuxt.html
0 notes