#javascript environment variable
Explore tagged Tumblr posts
Visit Tumblr Blog
Explore Tumblr blogs with no restrictions, modern design and the best experience.
Last Seen Tumblr Blogs


Fun Fact
28.6 is the average number of monthly visits per US mobile user.
Text
Access Environment Variable in Nodejs JavaScript Application | Reading ENV Variable Example
Full Video Link https://youtu.be/dxrNopL1sbQ Hello friends, new #video on #reading #accessing #environmentvariables in #nodejs #projeect #application #tutorial #examples is published on #codeonedigest #youtube channel. @java #java #aws #a
In this video, we will read the environment variable in nodejs javascript project. We will learn what “dotenv” module in nodejs javascript. How to use “dotenv” package in our nodejs javascript project. ** Important Nodejs Javascript Packages or Modules ** Dotenv – DotEnv is a lightweight npm package that automatically loads environment variables from a .env file into the process.env object. To…

View On WordPress
#dotenv#dotenv example#dotenv in node js#dotenv module#dotenv module in node js#dotenv module not found#dotenv nodejs#dotenv package#dotenv package install#dotenv package nodejs#dotenv package.json#dotenv tutorial#dotenv tutorial nodejs#environment variable#environment variables#javascript environment variable#linux environment variables#node js javascript#node js javascript tutorial#nodejs#python environment variables#set environment variables
0 notes
Text
Convert HTML to Image: A Step-by-Step Guide ✨

Do you want to turn some HTML code you've made that's on your website and have a way to convert it into an image for you to save?
Well, look no further! I too wanted to do the same thing but funny enough, there weren't any straightforward tutorials out there that could show you how! After hours of searching, I finally discovered the solution~!
This is an old tutorial I made 🐼

💛 Set your environment
Before we dive into the conversion process, I'll assume you already have your HTML code ready. What you want to learn is how to turn it into an image file. You should have a good grasp of HTML and JavaScript. For this tutorial, we'll use the following HTML code example:

We won't include the CSS code, as it doesn't affect this tutorial. The JavaScript file (script.js) at the bottom of the body element is where we'll add the functionality for the conversion.
Your page should resemble the following:

As you can see, the "Click me" button will handle the conversion. We aim to convert everything within the div.info-div into an image.
💛 Using the html2canvas JavaScript Library
The html2canvas library allows you to take screenshots of webpages and target specific elements on a screen. Here are the steps to include the library in your project:
The steps to put the library in your project:
Visit the html2canvas website for more information.
Copy the CDN link from here

and include it in a script tag in your project's head tag in the HTML file:

That's it for including the library on the HTML side. Now, let's move on to the JavaScript code.
💛 JavaScript Functionality
Here's the JavaScript code to handle the conversion:

In this code, I want to turn the whole div.info-div into an image, I put it into a variable in const div = document.querySelector(".info-div");.
I also put the button into a variable in const button = document.querySelector("button");
I added a click event listener to the button so when the user clicks the button, it will follow the code inside of the event listener!
You can find similar code like this in the documentation of the html2canvas library:

What is happening here is:
We add the div (or what the element we want to take an image of) into the html2canvas([element]).then((canvas)
Added the image file type url to a variable = const imageDataURL = canvas.toDataURL("image/png"); - You can replace the png to other image file types such as jpg, jpeg etc
Created an anchor/link tag, added the href attribute to imageDataURL
The download attribute is where we will give the default name to the image file, I added "dog.png"
Perform the click() function to the anchor tag so it starts to download the image we created
And that's it!
💛 The End
And that's it! You've successfully learned how to turn your HTML into an image. It's a great way to save and share your web content in a unique format.

If you have any questions or need further clarification, please comfortable to ask. Enjoy converting your HTML into images! 💖🐼
#my resources#coding#codeblr#programming#progblr#studying#studyblr#programmer#html#html css#javascript#neocities#coding tips#html5 tutorial#html tutorial
156 notes
·
View notes
Text
Learn how to code the object pool pattern by pre-allocating memory and reusing objects. Which can greatly improve performance when reusing short lived objects like bullets and particles.
This tutorial will show you how to create and manage a pool of bullet objects. For example, this is useful in shooter and bullet hell games which have thousands of bullets on the screen.
The tutorial is written in the Java programming language, and uses the free Processing graphics library and integrated development environment.
The object pool pattern can be especially useful with programming languages which use automatic garbage collection like Java, C#, JavaScript, Python, etc.
Since automatic garbage collection can stall your program and reduce your frame rates. The object pool pattern gives you more control over when the garbage collector comes to reclaim the memory.
The downside of the object pool pattern is that it complicates the life cycle of the object. Meaning you need to reset the variables of the object before you can reuse it. Since its variables are unlikely to match the defaults after repeated use.
There are a few ways to implement the object pool pattern, this tutorial will show you one method.
Walkthrough and full code example on the blog:
#gamedev#indiedev#tutorial#processing#programming#java#software#software design#software development#game development#coding#design patterns
19 notes
·
View notes
Text

Boost Shopify Revenue with A/B Testing
Boost your Shopify revenue with A/B testing experiments and data-driven insights to increase conversions and optimize your store.
Source: https://cro.media/insights/ab-tests/boost-shopify-revenue-ab-testing/
A/B testing is a powerful tool to increase your Shopify store's revenue by helping you make data-driven decisions. By running native A/B testing experiments on your Shopify store, you can optimize your customer experience and turn more visitors into paying customers. With easy-to-use features, you can start testing without any hassle.
Effortless Tracking with Instant A/B Testing
With Instant A/B Testing, there's no need for a JavaScript pixel to get started. The visual editor allows you to create and manage tests easily within minutes. This seamless setup ensures that you can test different variations of your Shopify store with zero technical headaches.
Smooth Experiment Operation
Run your A/B tests without worrying about disrupting your users' experience. The app is designed to serve experiments to the right audience and prevents redirects, making sure that your customers experience no interruptions while browsing your store.
Full Control Over Your Tests
Create separate URLs for each test to ensure a flawless and clean testing environment. By running your tests on individual pages, you can isolate variables and measure the success of each experiment with higher accuracy.
Easy Traffic Split
You have complete control over how much traffic goes to each version of your test. Define the percentage of traffic directed to each variant (A and B), allowing you to balance the experiment and gather precise insights.
Precision Insights Across the Funnel
Gain in-depth analytics with a full funnel view of your A/B tests. Track key metrics such as add-to-cart rates, checkout progression, and completed transactions to measure the true impact of your experiments on revenue.
Why Use Instant A/B Testing for Shopify?
Instant A/B Testing offers a 100% free solution to run experiments on your Shopify store, and no credit card is required to get started. This allows you to experiment with various store elements at zero cost while gathering valuable data that can drive better conversions.
Frequently Asked Questions
Do I need to subscribe to any service? No, Instant A/B Testing is completely free, with no subscription required.
How does it integrate with other apps? Instant A/B Testing works well with Instant Page Builder. You can easily create variants of your pages, publish them to your Shopify store, and test which version converts better.
Does A/B Testing affect my SEO? Since experiments run on separate URLs, there’s minimal risk to SEO performance. The app ensures that crawlers do not get redirected and uses Shopify Webpixel for tracking, keeping everything optimized for search engines.
Can I track custom redirects or use existing URLs? Yes, you can use both custom redirects and existing URLs for your A/B tests.
Do I need to enable app embeds? Yes, enabling app embeds is the only step needed to get started with A/B testing.
Start Your A/B Testing Today
Increase your Shopify store's revenue and conversion rates by running native A/B testing experiments. Take advantage of this free Shopify app to optimize your store with precision and ease. For businesses looking to optimize not just their A/B testing but their entire digital presence, consider exploring additional services like Shopify SEO Audit, Shopify CRO Audit, or Custom Shopify Development. These expert services can elevate your online store's performance even further.
If you're looking for more comprehensive solutions for Shopify, Shopify Services offers a range of professional services to boost your store's functionality and success.
2 notes
·
View notes
Text
JavaScript Frameworks
Step 1) Polyfill
Most JS frameworks started from a need to create polyfills. A Polyfill is a js script that add features to JavaScript that you expect to be standard across all web browsers. Before the modern era; browsers lacked standardization for many different features between HTML/JS/and CSS (and still do a bit if you're on the bleeding edge of the W3 standards)
Polyfill was how you ensured certain functions were available AND worked the same between browsers.
JQuery is an early Polyfill tool with a lot of extra features added that makes JS quicker and easier to type, and is still in use in most every website to date. This is the core standard of frameworks these days, but many are unhappy with it due to performance reasons AND because plain JS has incorporated many features that were once unique to JQuery.
JQuery still edges out, because of the very small amount of typing used to write a JQuery app vs plain JS; which saves on time and bandwidth for small-scale applications.
Many other frameworks even use JQuery as a base library.
Step 2) Encapsulated DOM
Storing data on an element Node starts becoming an issue when you're dealing with multiple elements simultaneously, and need to store data as close as possible to the DOMNode you just grabbed from your HTML, and probably don't want to have to search for it again.
Encapsulation allows you to store your data in an object right next to your element so they're not so far apart.
HTML added the "data-attributes" feature, but that's more of "loading off the hard drive instead of the Memory" situation, where it's convenient, but slow if you need to do it multiple times.
Encapsulation also allows for promise style coding, and functional coding. I forgot the exact terminology used,but it's where your scripting is designed around calling many different functions back-to-back instead of manipulating variables and doing loops manually.
Step 3) Optimization
Many frameworks do a lot of heavy lifting when it comes to caching frequently used DOM calls, among other data tools, DOM traversal, and provides standardization for commonly used programming patterns so that you don't have to learn a new one Everytime you join a new project. (you will still have to learn a new one if you join a new project.)
These optimizations are to reduce reflowing/redrawing the page, and to reduce the plain JS calls that are performance reductive. A lot of these optimatizations done, however, I would suspect should just be built into the core JS engine.
(Yes I know it's vanilla JS, I don't know why plain is synonymous with Vanilla, but it feels weird to use vanilla instead of plain.)
Step 4) Custom Element and component development
This was a tool to put XML tags or custom HTML tags on Page that used specific rules to create controls that weren't inherent to the HTML standard. It also helped linked multiple input and other data components together so that the data is centrally located and easy to send from page to page or page to server.
Step 5) Back-end development
This actually started with frameworks like PHP, ASP, JSP, and eventually resulted in Node.JS. these were ways to dynamically generate a webpage on the server in order to host it to the user. (I have not seen a truly dynamic webpage to this day, however, and I suspect a lot of the optimization work is actually being lost simply by programmers being over reliant on frameworks doing the work for them. I have made this mistake. That's how I know.)
The backend then becomes disjointed from front-end development because of the multitude of different languages, hence Node.JS. which creates a way to do server-side scripting in the same JavaScript that front-end developers were more familiar with.
React.JS and Angular 2.0 are more of back end frameworks used to generate dynamic web-page without relying on the User environment to perform secure transactions.
Step 6) use "Framework" as a catch-all while meaning none of these;
Polyfill isn't really needed as much anymore unless your target demographic is an impoverished nation using hack-ware and windows 95 PCs. (And even then, they could possible install Linux which can use modern lightweight browsers...)
Encapsulation is still needed, as well as libraries that perform commonly used calculations and tasks, I would argue that libraries aren't going anywhere. I would also argue that some frameworks are just bloat ware.
One Framework I was researching ( I won't name names here) was simply a remapping of commands from a Canvas Context to an encapsulated element, and nothing more. There was literally more comments than code. And by more comments, I mean several pages of documentation per 3 lines of code.
Custom Components go hand in hand with encapsulation, but I suspect that there's a bit more than is necessary with these pieces of frameworks, especially on the front end. Tho... If it saves a lot of repetition, who am I to complain?
Back-end development is where things get hairy, everything communicates through HTTP and on the front end the AJAX interface. On the back end? There's two ways data is given, either through a non-html returning web call, *or* through functions that do a lot of heavy lifting for you already.
Which obfuscates how the data is used.
But I haven't really found a bad use of either method. But again; I suspect many things about performance impacts that I can't prove. Specifically because the tools in use are already widely accepted and used.
But since I'm a lightweight reductionist when it comes to coding. (Except when I'm not because use-cases exist) I can't help but think most every framework work, both front-end and Back-end suffers from a lot of bloat.
And that bloat makes it hard to select which framework would be the match for the project you're working on. And because of that; you could find yourself at the tail end of a development cycle realizing; You're going to have to maintain this as is, in the exact wrong solution that does not fit the scope of the project in anyway.
Well. That's what junior developers are for anyway...
2 notes
·
View notes
Text
GitHub Repositories Hit by Password-Stealing Commits Disguised as Dependabot Contributions
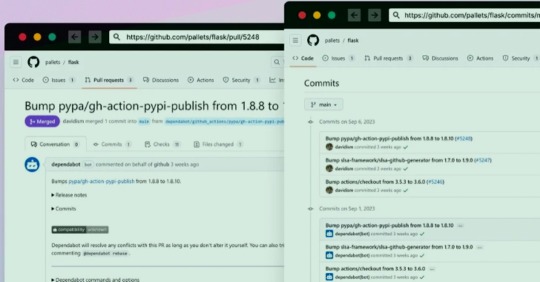
A new deceptive campaign has been observed hijacking GitHub accounts and committing malicious code disguised as Dependabot contributions with an aim to steal passwords from developers.
"The malicious code exfiltrates the GitHub project's defined secrets to a malicious C2 server and modify any existing javascript files in the attacked project with a web-form password-stealer malware code effecting any end-user submitting its password in a web form," Checkmarx said in a technical report
The malware is also designed to capture GitHub secrets and variables to a remote server by means of a GitHub Action.
The software supply chain security firm said it observed the atypical commits to hundreds of public and private GitHub repositories between July 8 and 11, 2023.
It has emerged that the victims had their GitHub personal access tokens stolen and used by the threat actors to make falsified code commits to users' repositories by posing as Dependabot.
Dependabot is designed to alert users of security vulnerabilities in a project's dependencies by automatically generating pull requests to keep them up-to-date.

"The attackers accessed the accounts using compromised PATs (Personal Access Token) -- most likely exfiltrated silently from the victim's development environment," the company said. Most compromised users are located in Indonesia.
However, the exact method by which this theft may have taken place is currently unclear, although it's suspected that it may have involved a rogue package inadvertently installed by the developers.
This is evidenced by a new data exfiltration campaign targeting both npm and PyPI that uses as many as 39 counterfeit packages to gather sensitive machine information and transmit the details to a remote server.
The development highlights the continued attempts on part of threat actors to poison open-source ecosystems and facilitate supply chain compromises.
3 notes
·
View notes
Text
JavaScript 17 🧬 closure
New Post has been published on https://tuts.kandz.me/javascript-17-%f0%9f%a7%ac-closure/
JavaScript 17 🧬 closure

youtube
a - closure intro closure is a function that retains access to its lexical scope, even when the function is executed outside of that scope. This means that a closure can "remember" and access variables from the environment in which it was created... even after that environment has finished executing. Key Concepts: 1. Lexical Scope: Lexical scope refers to the way variables are scoped according to their location in the code, rather than when they are called. A function's lexical environment is determined by where it was defined, not where it was executed. 2. Execution Context: The execution context is the environment in which JavaScript code executes. It includes the variable and function declarations that are currently accessible. 3. Closure Creation: *When a function is created inside another function, the inner function retains access to the variables of the outer function's scope. Common Misconceptions: Closures Capture Values, Not References → When a closure captures a variable, it captures the value of that variable at the time the closure was created. Changes to the original variable after the closure is created do not affect the closure. In conclusion they enable encapsulation, data hiding, and state management, making them an essential tool for any JavaScript developer. b - closure examples 1. Function Definition → createCounter is defined with a local variable count initialized to 0. Inside createCounter, another function (an anonymous function) is defined and returned. 2. Closure Creation → When createCounter is called, it returns the inner function. This inner function retains access to the count variable from its lexical scope (createCounter). 3. Usage of Closure: The returned inner function (closure) is stored in the counter variable. Each time counter() is called, it increments and logs the count variable. Use Cases for Closures: Encapsulation and Data Hiding → You can use closures to create private variables that cannot be accessed from outside the function. Factory Functions: Closures are often used to create factory functions, which generate objects with specific behavior. Maintaining State Across Asynchronous Operations: Closures can help maintain state in asynchronous operations by retaining access to variables.
0 notes
Text
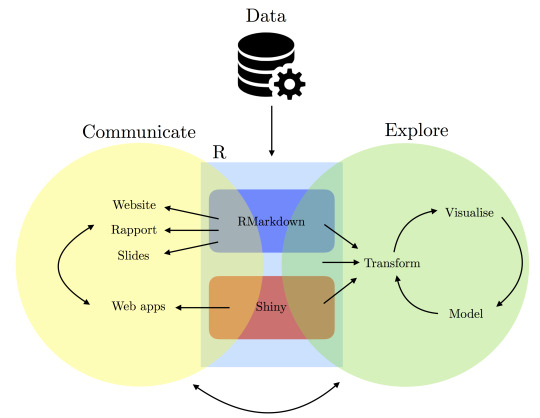
Building Dashboards & Applications with R: Shiny in the Real World
In today's data-driven world, the ability to transform raw data into actionable insights is crucial for businesses, academics, and policymakers. Shiny, an R package, is at the forefront of this transformation, enabling users to build interactive web applications with ease. This blog explores what Shiny is, how it works, and its applications in the real world.
What is Shiny and How It Works
Shiny is an open-source R package that allows users to create interactive web applications directly from R, a language and environment for statistical computing. By combining the power of R with the interactivity of web development, Shiny enables users to build applications that can host complex data visualizations, perform real-time calculations, and provide an engaging user experience.
Shiny applications are composed of two main components: the UI (User Interface) and the Server. The UI defines the layout and appearance of the application, while the Server handles the application's functionality and logic. Users can utilize HTML, CSS, and JavaScript to enhance their applications, making Shiny a versatile tool for data scientists and developers alike.
How Shiny Work
Creating Interactive Apps for Data-Driven Decisions
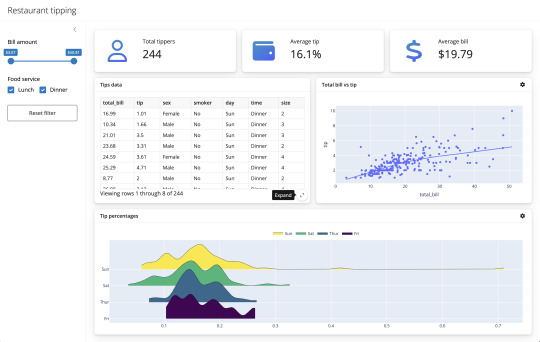
The true power of Shiny lies in its ability to create interactive applications tailored to data-driven decision-making. By enabling users to manipulate data through dynamic inputs such as sliders, dropdowns, and text fields, Shiny apps allow for real-time analysis and visualization, encouraging informed decision-making.
For instance, a company could use a Shiny app to visualize sales data, allowing managers to adjust variables like time frames and product categories to identify trends. Similarly, academics can harness Shiny to create tools for exploring complex datasets, facilitating greater understanding and discovery in research.
Embedding Dashboards in Business or Academic Projects
One of Shiny’s significant advantages is its ability to embed dashboards in various projects, providing a seamless way to share insights. Whether in a business context, where dashboards can be embedded into company intranets, or in academia, where they can be incorporated into online courses and research papers, Shiny applications offer versatile integration options.
By sharing Shiny dashboards, stakeholders can access up-to-date information, enabling collaboration and fostering a data-driven culture. Furthermore, the open-source nature of Shiny encourages customization and the development of bespoke solutions tailored to specific organizational needs.
Business Dashboard
Real-World Hook: Shiny Dashboards in Action
Shiny dashboards have found applications across numerous fields, including healthcare, policy analytics, and business reporting.
Healthcare: Hospitals utilize Shiny dashboards to monitor patient data in real-time, helping medical professionals make informed decisions quickly. For instance, dashboards can track patient vitals, medication schedules, and bed occupancy rates, optimizing hospital operations and improving patient outcomes.
Policy Analytics: Policymakers use Shiny to analyze data related to social issues, enabling them to model the potential impact of different policy decisions. By visualizing data effectively, policymakers can communicate findings to stakeholders and the public, facilitating transparency and informed decision-making.
Business Reporting: Companies implement Shiny dashboards to report on key performance indicators (KPIs), allowing executives to drill down into data for in-depth analysis. These dashboards can be customized to reflect organizational goals, providing a clear picture of business performance.
Shiny Dashboards
FAQs
What makes Shiny different from other dashboard tools?
Shiny stands out due to its integration with R, offering robust statistical and graphical capabilities. Its open-source nature and flexibility make it ideal for customization.
How difficult is it to learn Shiny?
For those familiar with R, learning Shiny is straightforward. Its intuitive structure and extensive documentation make it accessible to a wide range of users.
Can Shiny applications be deployed on mobile devices?
Yes, Shiny applications are web-based and can be accessed on any device with a web browser, including smartphones and tablets.
What industries benefit the most from Shiny dashboards?
While Shiny is versatile and applicable across many industries, it is particularly beneficial in healthcare, finance, academia, and government sectors.
Is it possible to integrate Shiny with other technologies?
Absolutely, Shiny can be integrated with other technologies such as databases, APIs, and JavaScript libraries, enhancing its functionality and reach.
In conclusion, Shiny offers a powerful platform for building interactive dashboards and applications, driving data-driven decision-making across various industries. Its real-world applications demonstrate the transformative potential of data visualization and exploration, making it an essential tool for the modern information age.
Home
instagram
youtube
#ShinyApps#InteractiveDashboards#RWebApps#DataTools#BIWithR#RealTimeData#RForBusiness#AppDevelopmentWithR#DashboardDesign#SunshineDigitalServices#Instagram#Youtube
0 notes
Text
WordPress Training Course in Dehgam
WordPress Training Course syllabus in Dehgam Gandhinagar ( Dahegam )
A brief overview of how WordPress works
• An introduction to how a web server works with WordPress • The WordPress file system • Creating basic things like posts, pages, and users, and changing settings • Permalinks, and how they work with the rewrite module on both Apache and Nginx • How a dashboard page request loads • How a front-end page request loads
The programming languages of WordPress
• HTML • Introduction to Accessibility • CSS • JavaScript • PHP • MySQL
WordPress development fundamentals
• Setting up a local development environment • Action Hooks and Filter Hooks • The WordPress database • WordPress coding standards • Enabling the debug.log
An introduction to developing WordPress themes
• Classic themes vs block themes • Theme requirements • Templates and template parts • The WordPress Template Hierarchy • Classic themes – Template tags and conditional tags • Block themes – patterns • Block themes – theme.json • Enqueuing CSS and JavaScript • Custom functions
An introduction to developing WordPress plugins
• Plugin requirements • Creating custom post types and taxonomies • Using post meta • Enqueuing CSS and JavaScript • Introduction to developing plugins securely • Preventing common vulnerabilities
An introduction to Internationalization
• The commonly used Internationalization Functions • An overview of the Internationalization
An introduction to Roles and Capabilities
• How to create/modify/remove roles and capabilities • How to check user capabilities • Custom content types and capabilities
An introduction to Common WordPress APIs
• Responsive Images • Dashboard widgets • Database • Filesystem • Global Variables • Metadata • Options • HTTP Requests • Rewrite • Settings • Shortcode • Transients
An introduction to the WordPress REST API
• Using the WordPress REST API • Interacting with the WordPress REST API • The WordPress REST API under the hood • an overview of how the REST API works, detail about design decisions • Interacting with the WordPress REST API • Extending the WordPress REST API • custom fields, authentication • modifying responses • creating custom routes and endpoints
An introduction to developing WordPress blocks
• An introduction to React • Using JSX vs vanilla JavaScript • Setting up the block development requirements • Building your first simple block • Converting a Shortcode into a Block • Styling your WordPress Blocks • Using Block Attributes to Enable User Editing
An introduction to WordPress multisite
• Setting up a Multisite network • Managing a Multisite network • Advanced Multisite Management • Building plugins and themes that support multisite (WIP) • The differences between developing for multisite vs single site (WIP)
Debugging in WordPress
• Enabling the built-in WordPress debugging options (WIP) • Examining the state of your PHP code using error_log and print_ror vardump (WIP) • Examining the state of your JavaScript code using the console object
0 notes
Text
Web Development Training Program
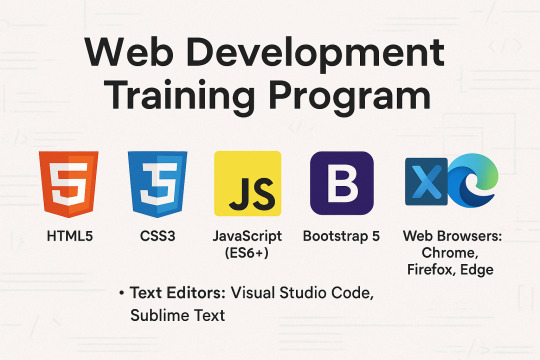
Master the Core Front-End Technologies: HTML, CSS, JavaScript, and BootstrapThis course provides a complete introduction to front-end web development, enabling you to build responsive, interactive, and professional websites from scratch. By mastering these technologies, you'll be equipped with the foundational skills needed for a career in web development.Tools & Technologies Covered:HTML5 CSS3 JavaScript (ES6+) Bootstrap 5 Text Editors: Visual Studio Code, Sublime Text Web Browsers: Chrome, Firefox, Edge Understand how websites are structured and styled using HTML and CSS. Create interactive, dynamic web pages using JavaScript. Build responsive, mobile-first web designs using Bootstrap. Overview of the Web Development Process Understanding Client-Side and Server-Side Development Setting Up the Development Environment (Text Editors, Browsers) Structure of an HTML Document Basic HTML ElementsHeadings, Paragraphs, Lists, Links Images and Media ElementsAdding Images, Audio, and Video Forms and Input ElementsText Fields, Buttons, Dropdowns, and Checkboxes Semantic HTML5 Tags (header, nav, section, article, footer) CSS Syntax: Selectors, Properties, and Values Styling Text and ElementsFonts, Colors, Backgrounds, Borders The Box Model (Margins, Padding, Borders, Content) Layout and PositioningStatic, Relative, Absolute, Fixed, and Sticky Responsive Design with Media Queries Advanced Features: Animations, Transitions, Gradients Introduction to JavaScript Variables and Data Types (var, let, const) Operators and Control Flow (if-else, loops) Functions and EventsWriting and Calling Functions Handling Click, Mouse, and Keyboard Events Arrays and Objects Manipulating the DOMSelecting and Updating HTML Elements Adding Dynamic Behavior to Web Pages Setting Up Bootstrap (CDN or Local) Understanding the Grid SystemRows, Columns, Breakpoints for Responsive Layouts Using Bootstrap ComponentsNavigation Bars, Modals, Buttons, Cards, Forms Styling with UtilitiesColors, Spacing, Typography Advanced FeaturesCreating Hero Sections and Interactive Forms Customizing Bootstrap with Custom CSS and Sass Combining All Technologies to Create Web Pages Styling and Adding Interactivity to Content Building Responsive and Dynamic Multi-Page Websites Developing a Full-Stack Web ApplicationResponsive Landing Page with Navigation Interactive Elements (Forms, Buttons, Modals) Using JavaScript for Dynamic Content and Validations Styling the Project with Bootstrap Components Hands-On Practice: Build multiple projects throughout the course. Real-World Application: Work on a capstone project to create a complete website. Certification: Earn a Web Development certificate upon successful completion. Aspiring web developers and designers. Students looking to start a career in front-end development. Professionals seeking to build personal or business websites. Read the full article
0 notes
Text
Tensorflow.js tf.keep() Function

Tensorflow.js is an open-source library that is developed by Google for running machine learning models as well as deep learning neural networks in the browser or node environment. The .keep() function is used to hold a tensor input that is formed within a tf.tidy() method from being spontaneously discarded. Syntax: tf.keep(result) Parameters: result: It is the stated tensor input which is to be held from being discarded. Return Value: It returns tf.Tensor object. Example 1: Javascript // Importing the tensorflow.js library import * as tf from "@tensorflow/tfjs" // Declaring a variable let res1; // Calling tidy […]
0 notes
Text
Best Java Courses in Kochi – Kickstart Your Software Development Career
In today’s tech-driven world, Java stands tall as one of the most popular programming languages for software development, making it an ideal choice for aspiring developers. Its versatility, scalability, and extensive application in web and enterprise environments have kept it relevant for over 25 years. If you’re looking to build a rewarding career in software development, enrolling in one of the Best Java Courses in Kochi can be your ideal starting point.
Why Learn Java?
Java is everywhere — from mobile apps and enterprise platforms to banking systems and SaaS products. Its “write once, run anywhere” (WORA) philosophy allows developers to build software that can operate across platforms, making it highly valuable in the job market.
Here are a few reasons why learning Java is a smart move:
✅ High Demand: Java developers are always sought after due to its widespread use across industries.
✅ Strong Community Support: An extensive global developer community provides valuable resources, open libraries, and frameworks.
✅ Excellent Salary Prospects: Skilled Java developers can command lucrative salaries and benefit from long-term career stability.
✅ Versatility: From mobile and desktop applications to big data and AI, Java can be used for a multitude of projects.
Why Choose Kochi for Your Java Training?
Kochi is quickly gaining recognition as an emerging IT hub in Kerala, with numerous multinational companies and startups setting up shop in the city. This has created a strong demand for skilled Java developers, making it an ideal location to pursue Java training.
The best Java courses in Kochi focus on providing a well-rounded learning experience, combining theoretical knowledge, hands-on programming, and real-world project experience. By choosing a reputable institute in Kochi, students can:
✅ Learn from experienced trainers with extensive industry knowledge. ✅ Get access to a modern curriculum aligned with the latest Java technologies and frameworks. ✅ Participate in live projects that build practical coding experience. ✅ Receive placement support to land their first job as a Java developer.
What to Expect from a Java Course in Kochi?
Quality Java courses cover a range of essential topics and tools, ensuring that students gain a strong foundation and advanced understanding of the language. Here’s an overview of what you can expect:
Java Basics and OOP Concepts
Understanding variables, data types, and operators
Introduction to Object-Oriented Programming (OOP) principles
Advanced Java Programming
Exception handling and file I/O
Threads, collections, and generics
Java Frameworks and Libraries
Introduction to popular frameworks like Spring, Spring Boot, and Hibernate
Building RESTful APIs and working with databases
Full Stack Development
Introduction to front-end technologies like HTML, CSS, and JavaScript
Building complete applications with Java as the backend
Project Development and Testing
Developing, deploying, and testing Java applications
Exposure to version control platforms like Git and GitHub
Why Techmindz is the Best Choice for Java Training in Kochi
With numerous training institutes in Kochi, selecting the right one can be challenging. At Techmindz, we stand out as a premier Java training institute, offering:
✅ Industry-Relevant Curriculum: Our courses are designed by seasoned Java developers, making sure you learn the latest tools and best practices. ✅ Hands-On Training: We emphasize practical programming exercises, coding labs, and live projects that mirror real-world scenarios. ✅ Personalized Mentorship: Get one-on-one guidance from trainers who have worked on enterprise-level Java projects. ✅ Modern Infrastructure: Learn in a state-of-the-art environment with access to online and offline training options. ✅ Placement Support: Our dedicated placement team connects students with top employers, making the transition from learning to working seamless.
Future Scope of Java Development in Kochi
Kochi is at the center of Kerala’s growing tech revolution, making it an ideal location for starting your Java development journey. Skilled Java developers can pursue careers in a variety of fields such as:
Software Development for multinational firms and startups
App Development for mobile platforms
Big Data and AI Projects using Java frameworks
Banking and Financial Services, which rely heavily on Java-based platforms
With numerous career paths available, mastering Java gives you the edge you need to stand out in this competitive market.
Conclusion: Start Your Java Journey Today!
Learning Java is an investment in your future — one that can open the door to countless opportunities in the world of software development. By choosing one of the Best Java Courses in Kochi, like those offered by Techmindz, you can gain the knowledge, practical experience, and industry connections needed to launch a successful and rewarding career.
With the right training and dedication, you can transform from a novice programmer into a confident Java developer, making your mark in Kochi’s thriving tech scene and beyond. Don’t wait — kickstart your software development career with Java today!
https://www.techmindz.com/java-programming-course-kochi-infopark/
0 notes
Text
Empowering Careers with Online Coding Courses
The Rise of Coding Education
The digital age has transformed coding into a cornerstone of opportunity, unlocking pathways to dynamic careers in technology. Across the United States, individuals from all walks of life are turning to online education to master in-demand skills. Full Stack Development Online Courses have gained immense popularity, offering comprehensive training in both front-end and back-end technologies. These programs empower aspiring developers to create fully functional web applications, making them highly valuable in today’s tech-driven job market.
The appeal of online coding education lies in its flexibility and accessibility. Whether you’re a student in Virginia, a professional seeking a career change, or a lifelong learner, these courses provide a structured yet adaptable path to proficiency. The tech industry’s rapid growth has elevated coding from a niche skill to a universal asset, enabling individuals to innovate and contribute to the digital landscape. From urban hubs to small towns, the opportunity to learn coding online is reshaping futures.
The Scope of Full Stack Development
Full stack development encompasses the art of building both the user-facing and server-side components of a website or application. Full Stack Development Online Courses teach a wide array of skills, from designing responsive interfaces with HTML, CSS, and JavaScript to managing databases and servers with tools like Node.js and SQL. This holistic approach ensures learners understand the entire development process, from crafting visually appealing front-ends to building secure, efficient back-ends.
These courses are designed for flexibility, catering to both beginners and those with some coding experience. They often include hands-on projects, such as building a portfolio website or an e-commerce platform, allowing learners to apply their skills in real-world scenarios. With interactive lessons, video tutorials, and community forums, online platforms create engaging environments that foster growth. For aspiring developers, mastering full stack development opens doors to roles like web developer, software engineer, or tech entrepreneur.
Starting with Java in Virginia
For those new to coding, starting with a foundational language like Java is a smart choice. A java course for beginners in Virginia provides an accessible entry point, teaching the basics of programming through one of the most widely used languages in the world. Java’s versatility makes it ideal for building applications, from mobile apps to enterprise systems, and its clear syntax is beginner-friendly, helping learners grasp core concepts like variables, loops, and object-oriented programming.
In Virginia, where tech hubs like Arlington and Richmond are thriving, demand for skilled programmers is on the rise. Online Java courses tailored for beginners offer Virginians the chance to learn at their own pace, with modules covering topics like data structures, algorithms, and debugging. These courses often include practical exercises, such as creating simple programs or games, to build confidence and competence. For residents seeking to enter the tech industry, a Java foundation can lead to opportunities in local startups or global corporations.
Benefits of Online Learning
Online coding courses have revolutionized education by removing barriers like location and rigid schedules. Full Stack Development Online Courses provide a comprehensive curriculum accessible from anywhere, allowing learners to study while balancing work or family commitments. Interactive platforms offer video lectures, coding challenges, and real-time feedback, ensuring an engaging learning experience. Many programs also provide certificates upon completion, enhancing resumes and signaling expertise to employers.
Similarly, a java course for beginners in Virginia leverages online tools to create a supportive learning environment. Features like live coding sessions, discussion forums, and one-on-one mentorship help demystify complex concepts. The self-paced nature of these courses allows learners to revisit lessons, ensuring they fully grasp each topic before moving forward. This flexibility is particularly valuable in Virginia, where professionals in tech-heavy regions can upskill without disrupting their busy lives.
Building a Tech Career
Learning to code is a gateway to a rewarding career, and online courses make this journey accessible to all. Full stack development equips individuals with the skills to handle diverse projects, from designing user interfaces to managing server infrastructure. This versatility makes full stack developers highly sought-after, with opportunities in industries like finance, healthcare, and e-commerce. In Virginia, where the tech sector is expanding, these skills are especially valuable, offering pathways to roles with competitive salaries.
A java course for beginners in Virginia lays the groundwork for further specialization. Java’s widespread use in enterprise applications and Android development ensures its relevance, making it a strategic starting point. Beginners who master Java can transition to advanced topics like full stack development or explore related fields like data science. With Virginia’s proximity to Washington, D.C., and its growing tech ecosystem, these skills can lead to local opportunities or remote roles with global impact.
Shaping the Future Through Code
The journey to mastering coding is both challenging and rewarding, offering a chance to create, innovate, and solve real-world problems. Full Stack Development Online Courses provide a comprehensive path to becoming a versatile developer, while a java course for beginners in Virginia offers an accessible entry into the world of programming. Together, these educational opportunities empower individuals to build skills that are both timeless and cutting-edge.
As technology continues to shape the future, coding education is a powerful tool for personal and professional growth. Whether you’re in Virginia or beyond, online courses make it possible to transform aspirations into reality, one line of code at a time. By embracing these opportunities, learners can not only launch fulfilling careers but also contribute to a world where technology drives progress and connection.
0 notes
Text
Learn Everything with a MERN Full Stack Course – The Future of Web Development

The internet is evolving, and so is the demand for talented developers who can build fast, interactive, and scalable applications. If you're someone looking to make a successful career in web development, then learning the mern stack is a smart choice. A mern full stack course is your complete guide to mastering both the frontend and backend aspects of modern web applications.
In this blog, we’ll cover what the MERN stack is, what you learn in a MERN full stack course, and why it is one of the best investments you can make for your career today.
What is the MERN Stack?
MERN stands for:
MongoDB – A flexible NoSQL database that stores data in JSON-like format.
Express.js – A web application framework for Node.js, used to build backend services and APIs.
React.js – A powerful frontend JavaScript library developed by Facebook for building user interfaces.
Node.js – A JavaScript runtime that allows developers to run JavaScript on the server side.
These four technologies together form a powerful tech stack that allows you to build everything from single-page websites to complex enterprise-level applications.
Why Take a MERN Full Stack Course?
In a world full of frameworks and languages, the MERN stack offers a unified development experience because everything is built on JavaScript. Here’s why a MERN Full Stack Course is valuable:
1. All-in-One Learning Package
A MERN full stack course teaches both frontend and backend development, which means you won’t need to take separate courses for different parts of web development.
You’ll learn:
React for building interactive UI components
Node and Express for server-side programming
MongoDB for managing the database
2. High Salary Packages
Full stack developers with MERN expertise are highly paid in both startups and MNCs. According to market research, the average salary of a MERN stack developer in India ranges between ₹6 LPA to ₹15 LPA, depending on experience.
3. Multiple Career Opportunities
After completing a MERN full stack course, you can work in various roles such as:
Full Stack Developer
Frontend Developer (React)
Backend Developer (Node & Express)
JavaScript Developer
Freelance Web Developer
What’s Included in a MERN Full Stack Course?
A professional MERN course will cover all major tools, concepts, and real-world projects. Here's a breakdown of typical modules:
Frontend Development:
HTML5, CSS3, Bootstrap
JavaScript & ES6+
React.js with Hooks, State, Props, and Routing
Redux for state management
Backend Development:
Node.js fundamentals
Express.js for server creation
RESTful APIs and middleware
JWT Authentication and security
Database Management:
MongoDB queries and models
Mongoose ORM
Data validation and schema design
DevOps & Deployment:
Using Git and GitHub
Deploying on Heroku, Vercel, or Netlify
Environment variables and production-ready builds
Capstone Projects:
E-commerce Website
Job Portal
Chat App
Blog CMS
These projects help students understand real-world workflows and strengthen their portfolios.
Who Should Join a MERN Full Stack Course?
This course is suitable for:
College students looking for skill development
Job seekers who want to start a tech career
Working professionals who wish to switch careers
Freelancers who want to offer web development services
Entrepreneurs who want to build their own web apps
Certificate and Placement Support
Many institutes offering mern full stack courses provide completion certificates and placement assistance. This not only adds value to your resume but also helps you get your first job faster.
Some courses also include an internship program, giving you industry exposure and hands-on experience with live projects.
Final Words
The demand for MERN stack developers is growing every year, and companies are constantly hiring professionals who understand how to build full-stack applications. A mern full stack courses is the perfect way to gain these skills in a structured and effective manner.
Whether you want to get a job, work as a freelancer, or build your own startup – the MERN stack will empower you to do it all.
0 notes
Text
Top 10 Challenges in Automation Testing and Their Solutions (with Genqe.ai)

Automation testing is a cornerstone of modern software development. It enables rapid feedback, improved accuracy, and faster release cycles. However, implementing automation isn’t without its hurdles. From script maintenance to tool compatibility and scaling, QA teams encounter various obstacles that can slow down progress and inflate costs.
In this article, we explore the top 10 challenges in automation testing, their real-world implications, and how to solve them effectively — especially using intelligent platforms like Genqe.ai, which leverages generative AI to streamline and simplify automation.
Challenge 1: High Initial Investment and Tool Selection
The Problem: Automation testing often requires upfront investment in tools, infrastructure, and training. Choosing the wrong tool can lead to wasted resources and stalled progress.
The Solution: Start with a clear understanding of your application environment, technology stack, and team capabilities. Opt for tools that support cross-platform testing and integrate well with your CI/CD pipeline. With Genqe.ai, teams eliminate the need for complex scripting tools. It allows test creation in plain English, reducing the learning curve and upfront tool complexity.
Challenge 2: Difficulty in Identifying What to Automate
The Problem: Automating every test case is impractical and costly. Teams struggle to identify high-priority test cases that should be automated first.
The Solution: Use a risk-based approach. Automate high-frequency and high-risk functionalities such as login flows, payment systems, and API integrations. Genqe.ai assists with test case prioritization by analyzing application logic and suggesting critical paths that yield maximum coverage with minimal effort.
Challenge 3: Frequent UI Changes Break Tests
The Problem: UI-driven automation is fragile. Even minor UI changes — like button renaming or layout shifts — can cause test scripts to fail.
The Solution: Implement a test automation platform that supports self-healing mechanisms to adapt to UI changes. Genqe.ai automatically updates test scripts using AI-driven pattern recognition. When it detects a UI change, it intelligently adjusts the locator or flow, keeping the test valid without manual intervention.
Challenge 4: Script Maintenance Overhead
The Problem: As applications evolve, maintaining scripts becomes a full-time job. QA teams are often stuck updating old scripts instead of writing new ones.
The Solution: Adopt modular, reusable components for test scripts and avoid hard-coded values. Genqe.ai simplifies this through smart script generation and maintenance. It detects outdated flows and suggests optimizations or updates based on new application behavior — cutting maintenance time drastically.
Challenge 5: Test Data Management
The Problem: Reliable test data is essential for consistent results. However, managing, generating, and maintaining test data for different environments is complex.
The Solution: Use automated data generation tools or integrate your automation platform with data provisioning systems. Genqe.ai supports dynamic data handling, allowing users to define variables in plain language and enabling the tool to fetch or generate relevant test data for different scenarios.
Challenge 6: Lack of Skilled Resources
The Problem: Not every QA team has deep technical expertise. Traditional tools often require knowledge of scripting languages like Java, Python, or JavaScript.
The Solution: Choose no-code or low-code platforms that empower testers without requiring programming knowledge. With Genqe.ai, test cases can be created using natural language prompts. Even non-technical team members can contribute to automation, significantly expanding team capacity.
Challenge 7: Integration with CI/CD Pipelines
The Problem: Automation tools that operate in isolation are less effective. If they don’t integrate with Jenkins, GitLab, Azure DevOps, or other CI/CD tools, automation becomes a bottleneck.
The Solution: Select automation solutions that support API-based or native integrations with DevOps pipelines. Genqe.ai is designed with CI/CD integration in mind, offering plug-and-play compatibility with popular tools. It enables continuous testing as part of your deployment pipeline, ensuring timely feedback for every code change.
Challenge 8: Limited Test Coverage
The Problem: Teams often automate only UI or functional tests, leaving out performance, security, or edge-case testing. This leads to false confidence and missed bugs.
The Solution: Adopt a layered testing strategy that includes unit, integration, performance, and end-to-end testing. Genqe.ai expands testing scope with AI-driven suggestions that cover not just the happy paths but also edge cases and rare failure scenarios. It ensures your coverage is holistic, not just superficial.
Challenge 9: Cross-Browser and Cross-Device Testing
The Problem: With the explosion of devices, browsers, and screen sizes, ensuring consistent behavior across environments is daunting.
The Solution: Use cloud-based platforms or automation tools that allow test execution across multiple devices and configurations. Genqe.ai supports cross-platform automation. You can write a single test in natural language and execute it across different devices and browsers, ensuring uniform performance without duplicating test efforts.
Challenge 10: Inadequate Reporting and Debugging
The Problem: When tests fail, poor reporting makes it hard to trace the issue. Debugging becomes time-consuming and frustrating.
The Solution: Look for tools that offer detailed logs, visual reports, and actionable feedback. Genqe.ai excels in this area by providing AI-generated insights, visual step-by-step breakdowns, and natural language explanations of what went wrong. This accelerates root cause analysis and helps teams respond quickly to issues.
Why Choose Genqe.ai for Automation Testing
Genqe.ai is purpose-built for the future of software testing. Here’s how it addresses key challenges:
No-Code, Plain English Test Creation — No more scripting headaches.
Self-Healing Tests — Resilience against UI changes.
Smart Maintenance and Optimization — AI auto-fixes broken flows.
Deep CI/CD Integration — Automate testing in your pipeline with ease.
Multi-Platform Support — Desktop, mobile, legacy systems, and even AI models.
Actionable Reporting — Understand failures at a glance with AI-driven insights.
Genqe.ai goes beyond automation. It’s a testing companion that understands your app, evolves with it, and helps your team deliver high-quality releases faster and more efficiently.
Conclusion
Automation testing holds immense promise, but only when its challenges are properly addressed. From test maintenance and tool selection to test data and CI/CD integration, each hurdle demands smart solutions. Tools like Genqe.ai are revolutionizing how testing is approached — making it simpler, faster, and more reliable.
0 notes
Text
Start Coding Today: Learn React JS for Beginners

Start Coding Today: Learn React JS for Beginners”—will give you a solid foundation and guide you step by step toward becoming a confident React developer.
React JS, developed by Facebook, is an open-source JavaScript library used to build user interfaces, especially for single-page applications (SPAs). Unlike traditional JavaScript or jQuery, React follows a component-based architecture, making the code easier to manage, scale, and debug. With React, you can break complex UIs into small, reusable pieces called components.
Why Learn React JS?
Before diving into the how-to, let’s understand why learning React JS is a smart choice for beginners:
High Demand: React developers are in high demand in tech companies worldwide.
Easy to Learn: If you know basic HTML, CSS, and JavaScript, you can quickly get started with React.
Reusable Components: Build and reuse UI blocks easily across your project.
Strong Community Support: Tons of tutorials, open-source tools, and documentation are available.
Backed by Facebook: React is regularly updated and widely used in real-world applications (Facebook, Instagram, Netflix, Airbnb).
Prerequisites Before You Start
React is based on JavaScript, so a beginner should have:
Basic knowledge of HTML and CSS
Familiarity with JavaScript fundamentals such as variables, functions, arrays, and objects
Understanding of ES6+ features like let, const, arrow functions, destructuring, and modules
Don’t worry if you’re not perfect at JavaScript yet. You can still start learning React and improve your skills as you go.
Setting Up the React Development Environment
There are a few ways to set up your React project, but the easiest way for beginners is using Create React App, a boilerplate provided by the React team.
Step 1: Install Node.js and npm
Download and install Node.js from https://nodejs.org. npm (Node Package Manager) comes bundled with it.
Step 2: Install Create React App
Open your terminal or command prompt and run:
create-react-app my-first-react-app
This command creates a new folder with all the necessary files and dependencies.
Step 3: Start the Development Server
Navigate to your app folder:
my-first-react-app
Then start the app:
Your first React application will launch in your browser at http://localhost:3000.
Understanding the Basics of React
Now that you have your environment set up, let’s understand key React concepts:
1. Components
React apps are made up of components. Each component is a JavaScript function or class that returns HTML (JSX).
function Welcome() { return <h1>Hello, React Beginner!</h1>; }
2. JSX (JavaScript XML)
JSX lets you write HTML inside JavaScript. It’s not mandatory, but it makes code easier to write and understand.
const element = <h1>Hello, World!</h1>;
3. Props
Props (short for properties) allow you to pass data from one component to another.
function Welcome(props) { return <h1>Hello, {props.name}</h1>; }
4. State
State lets you track and manage data within a component.
import React, { useState } from 'react'; function Counter() { const [count, setCount] = useState(0); return ( <div> <p>You clicked {count} times.</p> <button onClick={() => setCount(count + 1)}>Click me</button> </div> ); }
Building Your First React App
Let’s create a simple React app — a counter.
Open the App.js file.
Replace the existing code with the following:
import React, { useState } from 'react'; function App() { const [count, setCount] = useState(0); return ( <div style={{ textAlign: 'center', marginTop: '50px' }}> <h1>Simple Counter App</h1> <p>You clicked {count} times</p> <button onClick={() => setCount(count + 1)}>Click Me</button> </div> ); } export default App;
Save the file, and see your app live on the browser.
Congratulations—you’ve just built your first interactive React app!
Where to Go Next?
After mastering the basics, explore the following:
React Router: For navigation between pages
useEffect Hook: For side effects like API calls
Forms and Input Handling
API Integration using fetch or axios
Styling (CSS Modules, Styled Components, Tailwind CSS)
Context API or Redux for state management
Deploying your app on platforms like Netlify or Vercel
Practice Projects for Beginners
Here are some simple projects to strengthen your skills:
Todo App
Weather App using an API
Digital Clock
Calculator
Random Quote Generator
These will help you apply the concepts you've learned and build your portfolio.
Final Thoughts
This “Start Coding Today: Learn React JS for Beginners” guide is your entry point into the world of modern web development. React is beginner-friendly yet powerful enough to build complex applications. With practice, patience, and curiosity, you'll move from writing your first “Hello, World!” to deploying full-featured web apps.
Remember, the best way to learn is by doing. Start small, build projects, read documentation, and keep experimenting. The world of React is vast and exciting—start coding today, and you’ll be amazed by what you can create!
0 notes