#pet tutorial
Explore tagged Tumblr posts
Visit Tumblr Blog
Explore Tumblr blogs with no restrictions, modern design and the best experience.
Last Seen Tumblr Blogs


Fun Fact
Tumblr has 4 main sources of revenue.
Text
Video Tutorial Here:
youtube
Custom Fur Accessory Tutorial
I have been meaning to put this together for a loooonnnng time, but as there is still a lot of information about the process that is undiscovered, I held off. I didn't have the energy to deep dive and solve those mysteries either, so I just kept delaying and delaying. The circle of procrastination in progress!
It's long overdue though, and even though the mysteries still remain, I am sure there are others eager for even the partial scoop of knowledge I've managed to glean. And also thanks @angelapleasant for helping re-motivate me! I appreciate the patience as I worked through to remember all the steps.
This assumes you already know the main basics of making a mesh and using SimPE, so I won't go over every excruciating detail for this. I personally will be using a cat mesh for this tutorial, but the method is the same for dogs as well (they just have way more meshes/resources).
Tools: SimPE, a mesh editor such as MilkShape, and a photoeditor. I also put together some Custom Pet Genetics Resources, which includes everything pet related I've ever utilized when making pet cc. Everything is separated by cats or dogs, and then sorted even further. For this tutorial, I will be making a cat item, so the resources I'm using will be from there. If you're making an item for dogs, just follow the same steps but using the dog equivalent of each resource instead. I tried to make it organized, but it's probably still messy.
Step 1 - Slaved Vs Recolorable: There are two types of Fur Accessories: slaved and recolorable. I will only go over the process for slaved furcards, but the process for recolorable is pretty much the same except at one part.
• Slaved are my personal favorite fur accessories; they grab their color from that of the pet’s coat color. They don’t require any recolors, just one simple package and they’re all done. The only downside is that they don't have their own textures. Examples of slaved furcards are the furry belly fluff on cats and dogs.
• Recolorable is by far the most tedious of all versions, as it requires an additional recolor of the accessory to be made for every single fur color, and any fur colors that don’t have a recolor made for them will default to white. Do yourself a favor and avoid recolorable accessory furs at all costs. Examples of recolorable furcards are dog beards, dog eyebrows, and poodle fluff.
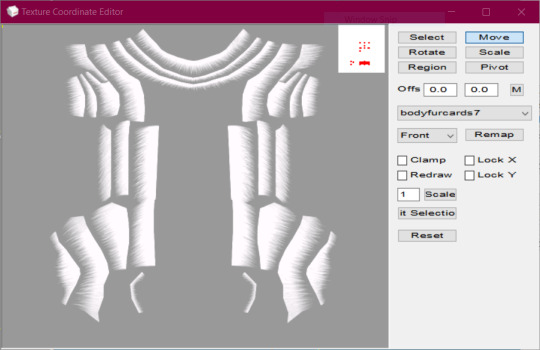
Step 2 - Make the Mesh: Open MilkShape and import "bodyfurcards.5gd" from the zMeshResources folder.* There's 5 groups, don't delete any, just make your mesh on one of the group layers already available. I, personally, put my meshes on the bodyfurcards7 group.

After you've made your mesh, map the textures to "fubodyaccflowingfurcardREMAKE.png" in the zMaterialDefinitions folder. This is from my AccFurCardsTextureOct2018.package, which is a default replacement of Maxis' original body furcard texture. It adds a square in the corner (for the dog equivalent, it adds a teeny tiny rectangle near where the eye texture normally is).
Once you're satisfied with the mapping, then make sure all the comments and joints are correct, and export. As a fair warning, pet weights are super weird, so your mesh might wind up with some strange issues such as morphing or floating.
*There is also a facefurcards version, but my attempts to use that one for custom fur accessories have been unsuccessful. I included it if anyone else wanted to try their hand at it.
Step 3 - Make the Mesh Package: In the zMeshResource folder find the BodyFlowingFurCardsMesh package. Open it in SimPE, Fix Integrity, then Save As under a new name. Then replace the GMDC with your exported Milkshape mesh, and save. Or don't, if you prefer a different way of mesh making. The TRULY important part is the Shape (shpe) file. Click it and make sure it has the correct number of parts in Plugin view. BodyFlowing (Cat) for example has 5 groups, so it should look like this:

Make sure the new mesh is in your Downloads folder, if you haven't already put it there.
Step 4 - Make An Accessory: Open up Bodyshop and make a brand new accessory. To make it easier on yourself, I would suggest choosing an accessory that has only 1 or 2 ages or genders. One age group if you are making a mesh for only adult cats, two if it will be for cats and kittens, etc. That way you won't need to delete unneeded overlays and other resources from the package.
Other than the number of ages, don't worry about anything else. Immediately import the accessory project into Bodyshop, and then close the program.
Step 5 - Clean Out Unneeded Textures: Inside your SavedSims folder should be the new accessory package you just made. Open it, and delete all the Material Definitions (TXMT) and Texture Images (TXTR). The only exception would be if you're making Recolorable Fur Accessories, then skip this step instead and skip step 6 as well. For the Recolorables' case, here is where you would import your recolor. Remember, each fur coat color will require their own recolors of your mesh, which means you will need to make a new accessory in bodyshop for every single fur color.
Step 6 - Link To Furcard Material Definition: Click on the 3IDR resources and let them load. Pick 3IDR, if it has a Resource Node and a Shape listed in the plugin view, perfect. Find the first available material definition line, and change it to the appropriate File type - SubType/Class ID - Group - Instance and delete any material definition lines underneath it.
0x49596978 - 0x08CCE154 - 0x1C0532FA - 0xFF7FC524
It's the same for both cats and dogs for some reason. I also included the "FUBodyAccFlowingFurcards.5tm.xml" in the MaterialDefinitions folder, if you prefer the package method. Repeat for additional 3IDR that have material definitions, ignore 3IDR that don't.
Step 7 - Link Accessory Package to Mesh: If you already know how to link, feel free to jump ahead. While still on the the 3IDRs, pick one that has a Resource Node and a Shape listed in the plugin view. Memorize the chosen 3IDR's instance. I picked the one with an instance of 0x00000801, which is usually the instance for adult female accessories. Click on Tools>PJSE>Body Mesh Tool>Linking Stage. Then select the mesh you made in step 3. Click on any other resource available, then save.
Step 8 - Edit Overlay XML: Click on the XMOL with the same instance as the 3IDR from step 7. As a reminder, I picked the adult female instance of 0x00000801 for this tutorial. Find the family string value, and copy it with ctrl+c and make sure you put it somewhere you won't lose it.
From there, right-click the XMOL and select "replace", then select the "XMOLReference.xmol.xmol" in the main folder. Paste the family value you copied earlier into the new XMOL, then save.
Click on the XMOL again and change the values of any lines necessary. For the Species line use 8 (cats), 2 (big dogs), 4 (little dogs), or 6 (big & little dogs, AKA puppies). For the Gender line use 3 (unisex). For the Age line use 18 (adults & elders), or 20 (kittens/puppies). The Parts line should be 8 or 2 (use 2 for meshes that need to morph and move with the pet's body/face, like the face fur cards). The Category line should be 7, but if they aren't then fix them. Delete the Outfit and Priority line, if they haven't been already. Override0subset needs to say bodyfurcards.
Step 9 - Choose A SubtypexBin: The most frustrating part about pet cc is that they have big limitations. For example, pets can only wear one "collar", and only a small number of custom fur accessories are allowed to be worn at once. You can have as many fur accessories as you want in the game, but if any two fur accessories share the same subtype and bin combo, then they can’t be used together at the same time. Pets can have a total of 10 fur accessories without conflict, but once you exceed 10 eventually some will have to use the same SubtypeXBin combo and thus be unusable together.
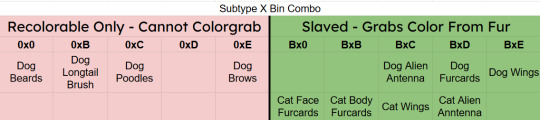
In the XMOL, change the Subtype line to B, if you're making a Slaved Fur Accessory*. If you're making a Recolorable one instead, use 0 as your subtype. Then change your Bin to either 0, B, C, D, or E. Now save.
Depending on your project, I might even suggest you choose a slot already filled instead of a free slot. For example, if you are making a wing accessory then choose BxC (BxE for dogs), or a head accessory that would look terrible with antenna then choose BxD (BxC for dogs), etc.
*There is a way to trick the game into allowing slaved fur accessories to use the 0 subtype. It involves loading the game with the fur accessory as a normal B subtype first, and then changing the subtype after. The game will then use the "old" version of the accessory, but with the subtype permissions of the "new" version.
Step 10 - Repeat Steps 6-9 For Additional Ages/Species: As it says, if you plan on making versions for kittens/big dogs/little dogs/puppies/etc. Have all of them share the same family, so that way they are all connected and can be passed down to offspring.
At the end, each XMOL should roughly resemble this, but with whatever their appropriate values are:

Don't forget to make sure the override0resourcekeyidx is correct for whatever line the material definition is in the 3IDR! ("4" means the 5th line, etc. The first line is number "0", so count the lines then minus 1.)
Step 11 - Delete Cache/Thumbnails/Registry: To quote @angelapleasant who worded it perfectly, pet cc is sticky. The game frequently gets stuck on old versions, and has to be forcibly updated. This stickiness is exactly yeah the subtype loophole mentioned earlier exists, but it can be very frustrating when testing new cc. In your game folder delete the Accessory.cache, Group.cache, cigen.package, ContentRegistry, and Thumbnails folder. Make sure AccFurCardsTextureOct2018.package is in your Downloads folder. Then load up the game, and check out your custom fur accessory.

If it all worked out, congrats! For Dogs if you mapped onto the tiny rectangle, then slaved fur accessory will appear gold with Maxis fur colors but custom colors will work just fine. Recolorable dog accessories on the other hand will require my MaxisAccFurDogFix to work.
I think that's everything, and good luck! Feel free to ask questions or reach out, I'll do my best to help. And if you do wind up making something, please let me know; I love seeing what people create!
102 notes
·
View notes
Text


A knight and friends.
#art#digital art#original character#character design#2d animation#animation#oc#animated gif#cartoon#tutorial#art tutorial#animation tutorial#how to#knight#medieval#steed#horse#bird#pet#quest#adventure#dnd#d&d#fantasy#king arthur#arthurian#derp#derpy#equestrian#armor
638 notes
·
View notes
Text

too busy to draw today so here is a picture of my lovely cat penny everyone say hi penny
#she is absorbing the nature#cat#hi penny#my cat#cats of tumblr#aww the scrunkly#double tap now if you'd skrunkly the when#HELP ME why is this my post w the most notes#i love her#little baby#inktober#cute cats#catposting#catblr#tortie#kitty#tortoiseshell cat#penny the cat#kitty cat#kittyposting#cute#cute animals#pets#pet#RAAAAGGGHH#if ur reading this u should watch next to normal slime tutorial on youtube its the best musical ever made
949 notes
·
View notes
Text

made this for oomf but you can have it too. a little breakdown of my process with bird wings if anyone finds it useful
#art#art tutorial#im suuuuure there's a million out there but idc#also the things in red are pet peeves of MINE idgaf if you wanna draw like that i just think it looks bad imho#ME PERSONALLY. DONT LET ME STOP YOU#and on the little articulation bend cross sea bird wings would be the exception there the joint bend IS very noticeable and sharp#as well as hummingbird wings since those twist the humerus close to the body#rather than flapping from the shoulder
829 notes
·
View notes
Text
Trending Funny Cat
#cat#cat attack#cats of tumblr#cat animals#cat_amazing#cats#cat lover#cat cute#cute cat#pets and animals#kitty cat#kitties#kitty#cat baby#cat burger tutorial#cat dog#cat girl#Cat_Funny#animals of tumblr#animals funny#animal lover#Cat Rabbit#Cat_Rat#meow
85 notes
·
View notes
Text
@atlaslovesedm


I had to
#peppino just doesn't care anymore#he'll just let fakey mess with him as much as he wants#not like he has any other choice#fakey is just so proud shshdjahskdnnak#pizza tower#pt#pt art#pizzahead#peppino#fake peppino#pizza tower art#art#fakey tutorials: how to take care of your pet human#< upcoming comic lol#workin on it#hope u guys like it#pizzaposting#radaverse
277 notes
·
View notes
Text
Drawing i did of me and my pal @misahaze!
#groovy tunes!#duke also helped make it of course#he contributed judgemental side eye's and lots of tummy pets#he loves getting his belly petted. its crazy!#myart#misa made me a 30 min tutorial on csp‚ i owe her my life‚ shes an icon
20 notes
·
View notes
Text
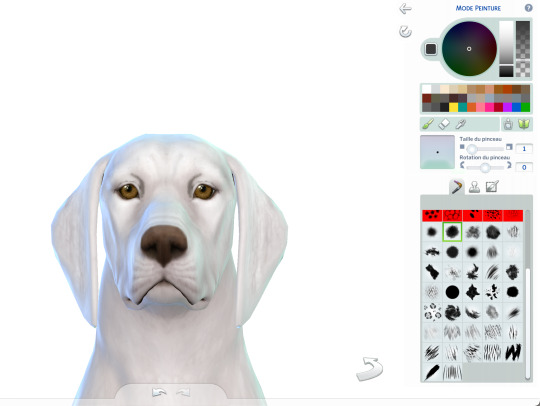
Some tricks to paint your animals in CAS
I won't make a tutorial because I wouldn't know where to start and honestly, it's mostly through practice that you'll improve yourself at painting. But here are a few tricks that might help you. 1. Enter the cheat code "cas. clockspeed 2" to almost pause the time in CAS. When the animal is breathing too fast it really makes it more difficult to paint details. 2. When you want to paint small details on your pet's face, click on "edit details", then double click anywhere else to exit the details painting mode without zooming out. You'll have a closer look of what you're doing. 3. Be aware that you can have a much darker black paint by pulling down the slider lower than it is set.

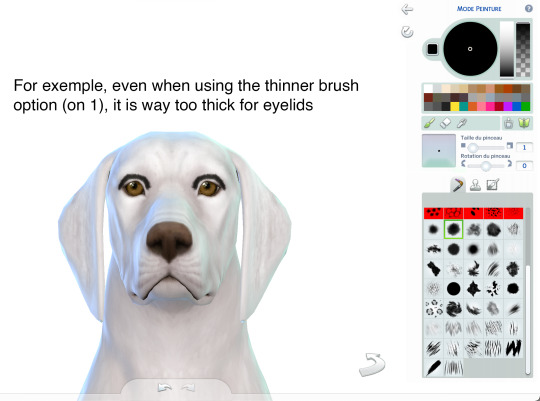
4. Use pictures as references. Can sound silly, but it isn't just for inspiration, it will really help you to see better where you are supposed to paint the lights. Aaand they are really important since they will give much more landforms, and therefore, realism to your animals. 5. Paint the eyelids and the nose of your pets. Trust me, they will look much more expressive and realistic. 6. You can paint thinner traits with a simple technique. First, you make the trait you want using the colour you want, usually darker than your pet's colour.
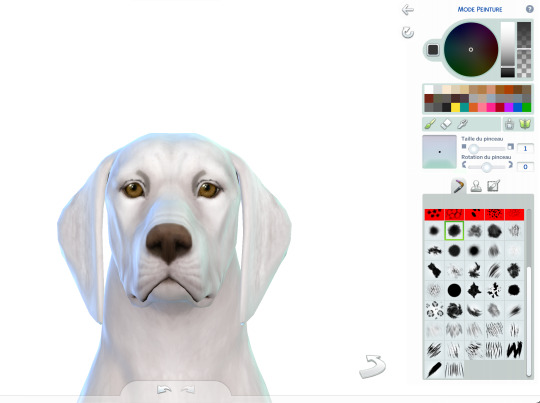
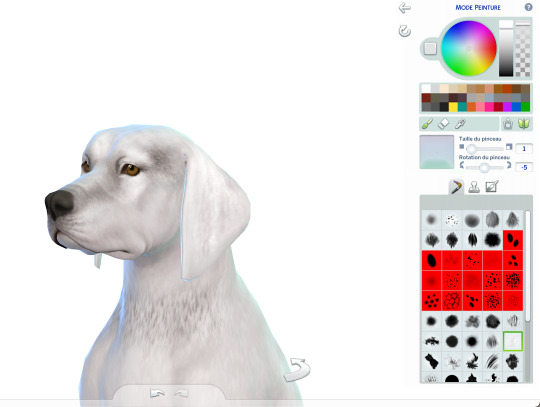
Once you've done your trait the way you want it, select the pet's base colour (white in this exemple) and draw an other trait just next to the first one. It has to be very close to erase some of it but not all.

Same here:
7. Make a hairy effect using the fur brushes. Use different ones, set them to to smallest option on the face and more or less bigger on the body, depending on the hair length. Also, you can start with a dark colour and draw lighter above. Pay attention of the orientation of your brushes; respect the hair's direction. 8. Don't hesitate to mess around with different colours and opacity. 9. Use fur brushes with a darker colour to give some shadows and landforms to your animals.
That's it, I'll update this post if I can think of anything else. I hope some of you will find it useful. Have fun ! ᵔᴥᵔ
#sims 4#ts4#s4#sims 4 pets#sims 4 cc finds#sims 4 cats and dogs#sims 4 dog#sims 4 tutorial#sims 4 tricks#sims 4 painting tricks#sims 4 help#sims 4 realistic pets
310 notes
·
View notes
Text
small little intro and I give a tutorial on how to bark for anyone that needs it :3
fun fact! The constricting your throat does when you hiccup is a great way to bark! Why? Oh because I’ve accidentally barked so many times by hiccuping mid-sentence.
It’s also a thing of habit. If you practice it enough times, it comes without even thinking about it.
Most ways of writing animal noises don’t get things all that accurate, yeah the cat goes “meow” - we understand, but usually it’s always more gutteral and focuses on certain words or letters more than text could explain (well, maybe with languages which have accents on letters could get it right but they still write animal noises like words).
A bark would more likely be an “ARV!” Or “arf!” Than a ‘bark’, have you ever heard a dog casually say bark? No, but you have heard “uip, awf, wuv/wuf, haf,” etc. like I said, these don’t translate through text easily. but where I’m going with this is that often times you need not to focus on what you expect an animal to sound like but rather the sounds that make up it. Although, for me atleast, it comes more automatically. But if you’re learning you can always just experiment by combining different sounds you can make until you get something animalistic!
or, best of all, simply look at recordings and mimic the creature.
Personally, I’d say a good way to learn how to make a realistic bark is first what sort of bark your going for and your vocal range, which you could just try make the highest noise you can and lowest noise you can, a growl, a whimper, and something resembling a bark, listen through or just make mental notes, and go from that.
Then, practice expelling air sharply through your lungs, it’s what helps make that “aaRF!” effect, rather than just seeming like you’re saying the word. Best of all is to use the letter “A” and combine it with an F/V/R noise as they’re the most canine sounding and seem rough, if you’re going for something gentler or sweet then U/O/W may be your friend! Some combinations you can try which are pretty much the basics are, as mentioned prior, “arv/arf”, “wuf”, “Arhf” (to make it more breathy), “Rkuf” gives it a trill, if you get what I mean.., “Eip/yip/eup” to make a small dog yap.
if you need, I could supply you with how I pronounce those specific sounds. Can’t say I’m the best at them but I have done them since I was about five so I know what I’m tapping about.
I also suggest learning to roll your R-s as it’s a great way to be able to growl/purr! Also no clue how to explain it but.. if you know how to make a whine/high pitch sound, kudos to you! It’s something apparently not all can do and is pretty much just how well you can control your vocal chords. Silly stuff, ain’t it?
Some won’t be able to just immediately know how to make certain noises and that’s okay! Keep trying and I’m sure you’ll do great :) oh, and good luck!!
#Went off on a little tangent here oh wow#therianthropy#dog therian#wolf therian#caninekin#therian vocals#Advice#tutorial#tips#how to#puppy#pet regression
30 notes
·
View notes
Note
Hello!! Not a request, which I hope is okay, but I was hoping I could ask: What do you use (as in like programs/apps) to make things like your mood-boards or outfit boards? And if possible, do you have any tips for making some myself? I've made a couple before but I always seem to struggle with thinking of objects and stuff to put on them. Thank you in advance, and I hope you have a wonderful day!! :-]
Of course you can ask!! <3
I use Ibis Paint X (freely available for android and iOS) and have been for multiple years. It's actually a drawing up but it's GREAT for editing too!! It takes a bit getting used to but once you get the hang of all the controls it's super easy I promise :D
Please always let me know if (any of) you have more questions, I'll be super happy to follow up!! <3
Outfit Board Tips:
- Stick to a specific theme (i.e. The Zoo)
- I like to start with the outfit (I'm a big fan of shorts if it wasn't obvious), you can also use it for color guidance!
- I usually like to include at least one outfit, one food item and one plushie
- I think it's also important to keep the age group you want to make the board for in mind, it helps with searching for toys
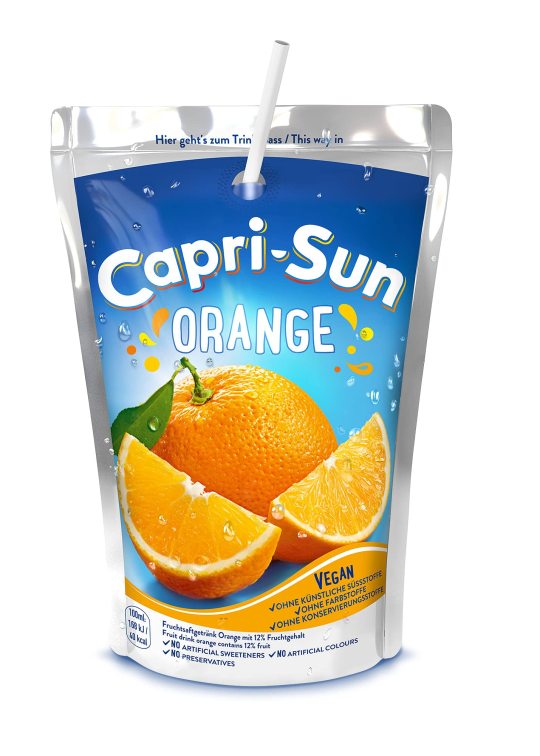
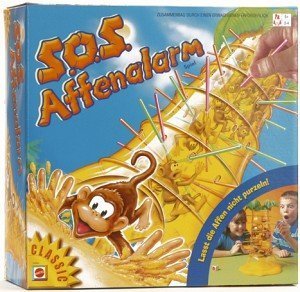
- As for choosing the items, I usually think of me and my childhood and what I want(ed) to play with myself! You can often find specific toys/food items with a google image search (i.e. i searched for Zoo Cookies, Capri Sun Orange, Monkey Board Game)

- In my opinion, a big part of making something look nice is composition. I usually work with three sizes of images: big, middle and small. I try to only put two big elements (one being the outfit) and put them farthest apart from each other. I place middle images randomly and fill in the spaces with the small images (which are usually "clutter" like legos, shells, gummies etc. all the same thing but different colors/shapes)
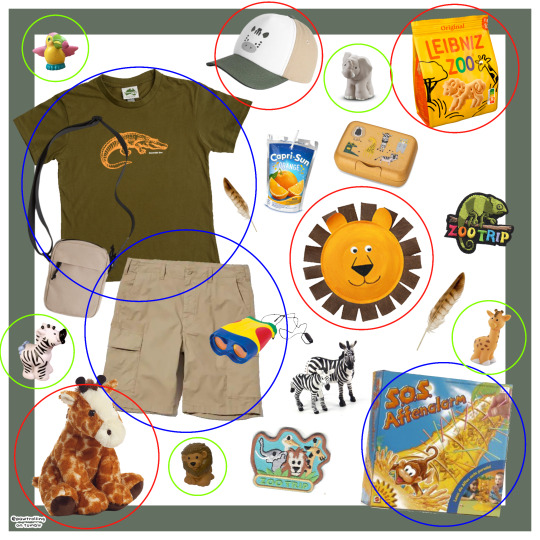
- As for where to find pngs, I usually use Pinterest, Google and Tumblr (#agerepngs) and I make my own pngs with background remover websites such as remove.bg or pixian.ai BUT you can also make them yourself with Ibis Paint X or PicsArt!
- And lastly, I like to do fun little swirls & patterns around the object to fill the empty spaces even more
Okay I hope this wasn't too elaborate lol thank you so much for your ask, I really hope it helps you a bit!! Good luck, I'd love to see some of your stuff if you wanna tag me or send it to me :D <3 oh & final product of the example mood board I used can be found here 🐘🐒🐊

#sfw age regression#age regression#age regressor#kid regression#sfw agere#agere blog#agere community#inner child#sfw#agere moodboard#agere outfit#outfit board#sfw agedre community#sfw age dreaming#sfw agedre#sfw age dreamer#sfw pet regression#sfw pet dreaming#sfw petre#pet regression#Ibis Paint X#Tips#Tutorials#Editing Tutorials#my stuff#asks
39 notes
·
View notes
Text

He’s THE Smashing Pumpkins listener fr
My OC Dan based on this LPS Great Dane🎞️🍺🌊
This is honestly like the first digital art of mine that I actually like
#lpscommunity#lps#lps art#littlest pet shop#art#digital art#lps fanart#lps popular#digital artist#speedpaint#procreate#procreate tutorial#art tutorial
21 notes
·
View notes
Text
must say again that mgs3 ocelot is so so compelling to me. in my head he's the perfect little prodigy boy who has his position as a major at just 20 yrs old thru a combination of nepotism and real skill, real gifted kid who's excelled at everything he's ever tried, triple agent fooling absolutely everyone, trying out combat techniques he's only read or heard about in the field bc he knows he'll just Get it right away, and it's like partially true that he's very good but he's not That good, there's people pulling strings behind the scenes to get him there, but he doesn't see them and thinks he got this all by himself. and i need to put this smarmy little man in my mouth and shake him like a dog with a toy.
#i like him sooooooo bad i like him so much#kitten ocelot inspires this cuteness aggression in me to such an intense degree#literally said i need to bake him into a pie the other day. And i do.#my fucking googyyyyy....#like and then he runs into big boss and that's his first ever real challenge and he Loses. and i foam at the mouth#the way he repeats 'pretty good' and then like genuinely swoons. fuck offfffff#ooo did you get a compliment you little teacher's pet are you hooked on the serotonin of getting a pat on the heas#*head#do you respect this man bc he defeated you but you're also blindingly furious at him for it and also a lil bit got a little puppydog crush#i'm gonna explode. i haven't even finished the tutorial on mgs2 yet and i can't wait to start 3.#for Him.#witness me
81 notes
·
View notes
Text

Get a Detailed Tutorial To Wet Felt Your Own Cat Cave: 👉 https://buff.ly/3HXzqmD 😻
21 notes
·
View notes
Text
yall would the Internet eat me alive/neg if I bought a peach riot figure and used it as a base to make an anthro lps custom
#like Im not a collector idk what discourse they engage in#kinda tempted to do it regardless bc like it would fuck so hard??#the proportions the artstyle the outfits??? come onn#and obvsly Im diving in blind into costumization like an idiot#Ive watched enough tutorials this should be easy right??#famous last words#lps#littlest pet shop#lps anthro#lps custom#peach riot#pop mart#guys watch this im gonna get canceled#(?)#dl#yap#iswe.txt
2 notes
·
View notes
Text
#cat#cats#cats of tumblr#cat lover#cat attack#cat_amazing#cat animals#cute cat#cat cute#pets and animals#pets animals#cute animals#animal lover#animals#cat burger tutorial#cat funny#Meow#kitties#kitty#kitty cat#trending cat#trending funny#trending#amazing video#Pets#Cat Dog#Cat Rat#Cat Rabbit
68 notes
·
View notes
Text
Pikmin 4 could be improved by. Some of the dialogue being cut down as good as it is because in the early game it really messes with the pacing which is silly for a game like pikmin where the gameplay gimmick Is your pacing
#over-tutorialising is unfortunately a huge pet peeve for me w modern nintendo games#for one thing good tutorials dont have to be overdrawn#but i think games like pikmin would hugely benefit from a ‘first time player’ vs ‘replay’ mode#where they dont tell u the gameplay features every 5 mins. perhaps
2 notes
·
View notes