#esp32 arduino
Explore tagged Tumblr posts
Visit Tumblr Blog
Explore Tumblr blogs with no restrictions, modern design and the best experience.
Last Seen Tumblr Blogs


Fun Fact
Average visit duration of Tumblr.com is 10 mins and 25 secs.
Text
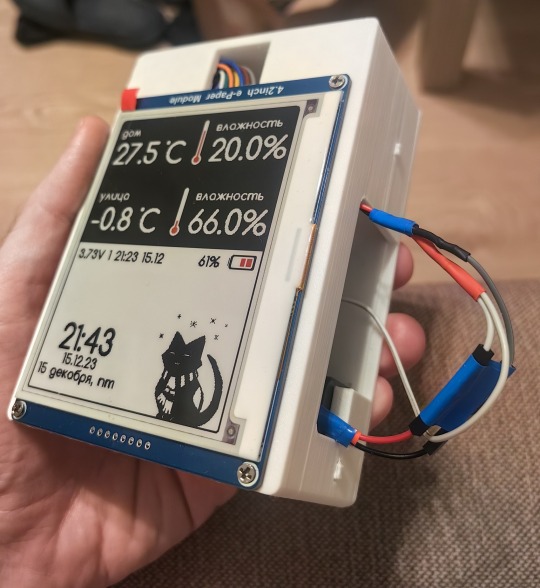
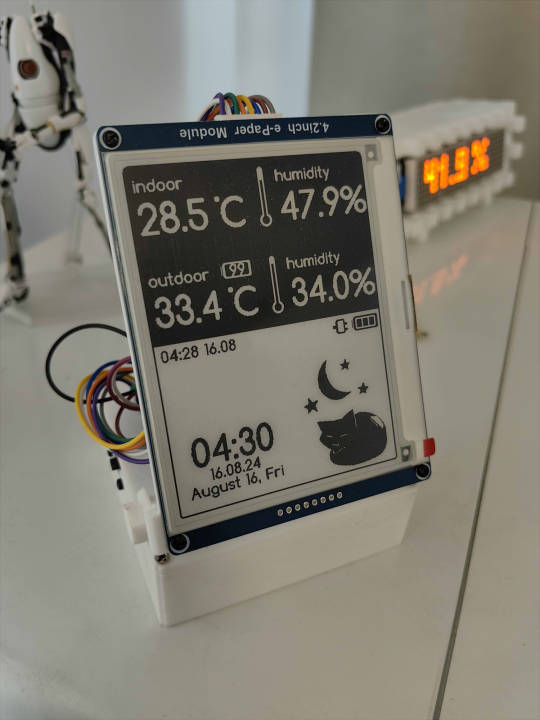

Released my open source weather station firmware, works with E-INK 4.2' \ 1.5' displays; compatible with ESP8266 \ ESP32 Default kitty icon is depends on time \ temperature; Upload custom interfaces is also available via web panel; Optional °F \ °C, English Source code : https://github.com/NC22/Volna42BW Documentation : https://volna42.com
628 notes
·
View notes
Text
I made an output agnostic logging framework for embedded devices that would work on anything as it's written only with standard C++ libs. In theory I could use it for linux or pis, lol. I made it because I kept having to write new handlers for serial, mqtt, uart, then having to like wire them all together without creating dependency loops or other issues - especially because I often work on meshes or online embedded devices that require multiple outputs. Now you just write your handler, tell it what tags to watch, and it'll log according to tag and log level. So you could write a serial debugging log handler when you're first making it. Then when you're done, disable it, and it'll stop outputting - but then later assign the serial debugging log tag to your MQTT handler and get all your debugging serial lines output to MQTT - then just disable it again when you're done. There's still some polish I need to put into it, it has some jank, some bugs, but it's working and neat. it's kind of neat.
39 notes
·
View notes
Text
TLV320DAC3100 first bops 🔊🎶💃🕺
OK, after many hours spent with Claude on writing a driver for the TLV320DAC3100 (https://www.digikey.com/en/products/detail/texas-instruments/TLV320DAC3100IRHBR/2260591), we finally have it configured using our driver, and playing an MP3 stream on this ESP32. This I2S DAC has a particularly complex PLL and audio-routing system, so it's not one where you can just pipe in I2S data and have it magically play. One nice thing we got working on is the MCLK, which is generated from the BCLK, so it'll work great with anything from an Arduino-compatible to a single-board computer like Raspberry Pi. We're hoping to get the headphone detection working next so that we can turn off the amp when the headphone is plugged in. Also, it should be able to control the volume from the headset buttons. Also, we want to get the internal beep generator going so we can make tones separate from the audio stream for UI notifications.
#tlv320dac3100#dac#esp32#i2s#audioengineering#opensource#mp3streaming#embeddedhardware#hardwarehacking#arduino#raspberrypi#microcontrollers#firmware#coding#electronics#headphones#pll#audioprocessing#dsp#mclk#bclk#headphonemod#techinnovation#audiophile#sounddesign#makercommunity#opensourcehardware#iot#embeddeddev#beepgenerator
36 notes
·
View notes
Text
First time messing with e-paper, of course it's gonna be some Hola Mundo thingy lol
11 notes
·
View notes
Text
need a bit of advice on something rather new to me... i have been DYING to get into some semblance of diy electronics/robotics, specifically regarding the idea of building a flipper zero knockoff with a raspberry pi/esp32/arduino. or a hack rf one ripoff, etc. u get it? i wanna make a lil handheld pwnagotchi pet style device for rolljam rf shit, something that can copy and paste and send and receive rf signals, but homemade by my self....
please if anyone has experience, resources, ideas, anything at all= hit me up right now immediately asap today please.... i am so passionate and ready to do this please help me make device go beepboop
#flipper zero#hack rf one#raspberry pi#esp32#arduino#diy electronics#diy#diy hacking#car hacking#hacking hardware#hacking#help#hacking help#hacking question#need advice#diy projects#diy craft#diy punk#upcycle#homebrew
14 notes
·
View notes
Text
Protogen Chess
youtube
#furry#fursuit#fursuit friday#protogen#chess#esp32#arduino#furry community#furry fandom#furries#Youtube
14 notes
·
View notes
Text
Local idiot orders Arduino clone without the pins attached, solders them himself, kills the only 5V pin on the board. (all 4 0V pins seem to still work)
6 notes
·
View notes
Text
Essential Electronic Items for IoT and Electronics Enthusiasts
Are you diving into the world of Internet of Things (IoT) and electronics? Whether you are a seasoned engineer or simply beginning out, having a stable list of essential components is key to bringing your initiatives to existence. Here’s a curated list of electronic objects that each maker and tech enthusiast ought to have of their toolkit:
1. Microcontrollers
Arduino Uno: Great for novices and versatile for diverse projects.
Raspberry Pi: Ideal for more complex duties and going for walks complete operating structures.
ESP8266/ESP32: Perfect for wireless communication and IoT projects.
2. Sensors
DHT22: For temperature and humidity readings.
PIR Sensor: Useful for movement detection.
Ultrasonic Distance Sensor: Measures distances with high accuracy.
3. Actuators
Servo Motors: For unique manage in robotics and mechanical structures.
Stepper Motors: Ideal for applications requiring particular movement.
Solenoids: Good for growing mechanical actions and locks.
4. Displays
LCD Display: Useful for showing records and debugging.
OLED Display: Compact and clean for exact photographs and texts.
5. Connectivity Modules
Bluetooth Module (HC-05/HC-06): For short-range wi-fi communication.
Wi-Fi Module (ESP8266): Connects gadgets to the internet.
GSM Module: Enables verbal exchange over mobile networks.
6. Power Supplies
Battery Packs: Various types for transportable electricity.
Voltage Regulators: Ensure solid voltage ranges in your circuits.
Power Banks: Handy for charging and powering devices on the move.
7. Prototyping Tools
Breadboards: Essential for prototyping with out soldering.
Jumper Wires: For making connections on breadboards.
Soldering Kit: For everlasting connections and circuit meeting.
eight. Additional Components
Resistors, Capacitors, and Diodes: Fundamental for circuit design and stability.
Transistors: Key for switching and amplification tasks.
Connectors and Switches: For interfacing and controlling circuits.
By preserving these objects handy, you'll be nicely-prepared to address a huge range of IoT and electronics projects. Whether you're constructing smart domestic devices, wearable tech, or computerized structures, having the right additives can make all the difference.
#IoT#Electronics#Arduino#RaspberryPi#ESP32#Sensors#Actuators#Displays#ConnectivityModules#PowerSupplies#Prototyping#Tech#DIY#Makers#Engineering#ElectronicComponents#TechProjects
2 notes
·
View notes
Text
13. April 2024
Die smarte Jalousie
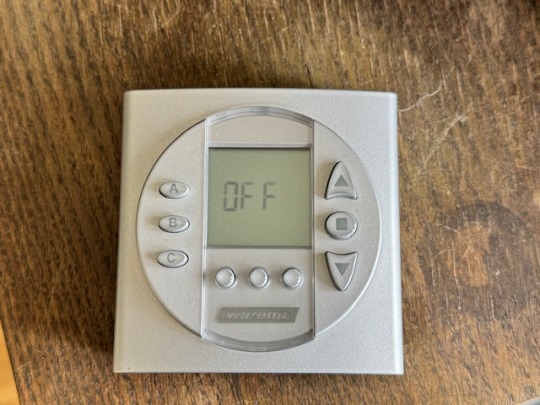
Wir haben eine elektrische Jalousie. Die hält im Sommer die Sonnenwärme draußen und im Winter hat man etwas Sichtschutz und so. Dazu gibt es eine Fernbedienung. Damit ist es leicht, die Jalousie rauf- und runterfahren zu lassen. Weil wir vor ein paar Jahren, als die ganze Technik installiert wurde, auch etwas automatische Steuerung haben wollten, gab es seinerzeit auch eine Schaltuhr dazu.
Ich behaupte, dass ich mich eigentlich nicht besonders dumm anstelle, wenn es darum geht, so eine Schaltuhr zu programmieren. Aber dieses Gerät ist eine einzige Katastrophe. Bis heute ist es mir nicht gelungen, die so zu programmieren, dass die Jalousie dann herauf- und hinunterfährt, wenn sie soll. Zwar meistens, aber nicht zufriedenstellend. Wenn sie einmal funktionierte: Bloß nicht mehr anrühren, bis der Übergang von Sommer zu Winter und umgekehrt Maßnahmen verlangten. Das ist der Übeltäter, hier inzwischen inaktiv:
Zwischenzeitlich übernimmt Apple Homekit einige Funktionen in unserem Haus, z. B. die Steuerung der Warmwasserpumpe. Und da dachte ich, dass ich die Jalousie dort auch andocken könnte. Geht ja auch mit Funk und so. Aber leider ist es etwas undurchschaubar, was man nun für Gerätschaften braucht. Der Hersteller scheint nicht nur bei seinen Bedienungsanleitungen zur Verwirrung zu neigen. Ich bin mir also nicht sicher, ob die Steuerung überhaupt mit Apple Homekit gehen würde.
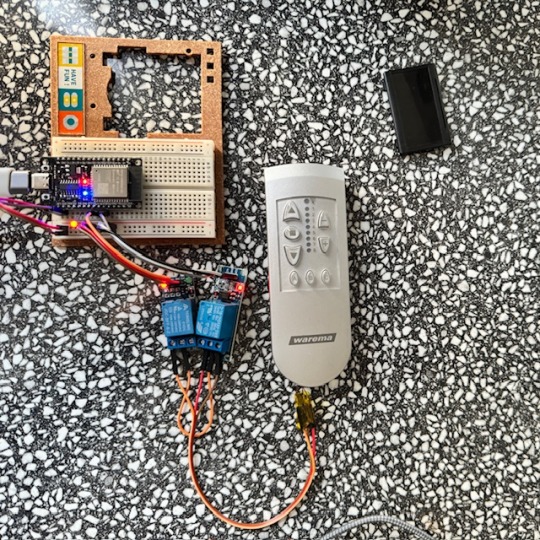
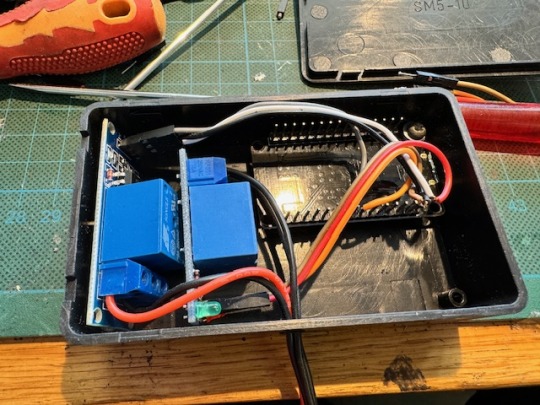
Also suche ich im Internet nach anderen Lösungen. Ein bisschen kann ich mit Arduinos umgehen, und so finde ich eine Lösung, wie man ein ESP32-Board mit Apple Homekit verheiraten kann. Meine Idee: Ich schalte mit dem ESP32 ein paar Optokoppler oder Relais, die so tun, als ob sie die Knöpfe an der Fernbedienung meiner Jalousie drücken. Dafür muss ich allerdings erst mal ziemlich filigrane Drähtchen an den richtigen Stellen der Platine anlöte. Diese Kontakte sind mit den Tastern auf der Platine verbunden.

Die Kupferlackdrähte enden dann an zwei Relais am ESP32-Board. Ich stecke das erst mal alles auf einer Steckplatine zusammen. Es funktioniert. Gegen Optokoppler entscheide ich mich, weil vermutlich die zu schaltende Spannung zu gering ist.
Meistens jedenfalls. Denn immer wieder verliert das ESP32-Board die Verbindung zum Homekit-Netzwerk. Auch hier ergoogle ich mir eine Lösung. Die besteht offenbar darin, dem WiFi-Router einen festen Kanal zuzuweisen. Ich hoffe, dass damit auch dasselbe Problem mit anderen Geräten passé ist, die sich ebenfalls immer mal wieder aus dem Verbund verabschieden.
Damit das alles besser nutzbar wird, kommt in die Fernbedienung der Jalousie eine Anschlussbuchse und das ESP32-Board mit den Relais in eine kleine Box, aus der das passende Verbindungskabel herausguckt.
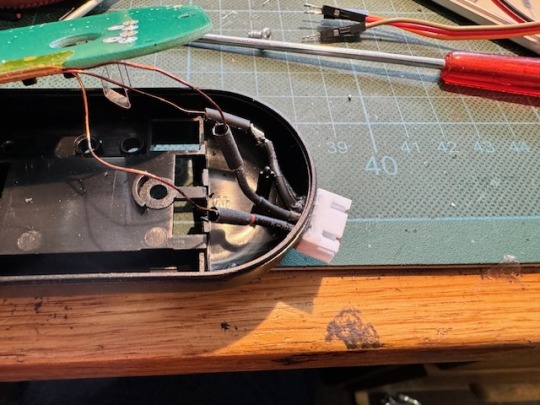
Auf den Platinen der Relais befanden sich noch LEDs. Die habe ich aus Stromspargründen entfernt. Man sieht davon ja eh nichts.
Man kann nun die Knöpfe der alte Fernbedienung nach wie vor manuell bedienen, aber die Jalousien auch von der Home-App aus ereignis- oder zeitgesteuert herauf- und hinunter fahren lassen.

(Markus Winninghoff)
5 notes
·
View notes
Text
Cyberjacket update. Managed to get the interrupts working, meaning that I have functional buttons even with effects. I can now add as many effects as I have buttons, which is to say: a fucking lot.
#cyberpunk#cyberpunk aesthetic#personal project#cyberjacket#ledstrips#microcontrollers#arduino#esp32#electronics#arduino_language#rgb
5 notes
·
View notes
Text
2 notes
·
View notes
Text
USB-BLE MIDIインターフェイスを作る② - iOSのBLE MIDI接続設定を調べる
USB-BLE MIDIインターフェイスを作る際に気になる遅延とiOSの接続設定の話です。
前回のお話:
無線MIDI接続を利用する際に気になってしまうのが反応の鈍さではないでしょうか。鍵盤を押してから音が鳴るまでに一瞬でも間があったり、ジャストなタイミングで弾いているはずなのになぜか音がずれる、的なことがあると致命的です。
BLEの技術的な話
Bluetooth LE(BLE)では、親機(セントラル)と子機(ペリフェラル)という概念があり、たとえばiOS機器とBLE MIDI機器を接続する場合はiOS側がセントラル、BLE MIDI機器がペリフェラルになります。BLEが特徴的なのは、セントラルが出した信号に対しペリフェラルが応答する形でデータを送信するという形態です。つまり、セントラルが信号を出さない限り、ペリフェラルからデータを送ることができないのです。通常セントラルは一定間隔でペリフェラルに対し信号を送信しますが、この間隔(Connection interval、Interval)はセントラル側に決定権があります。ペリフェラル側からも、「こういう間隔で信号を送って欲しい」という要望をセントラル側に送信することはできますが、その要望通りのIntervalを利用するかどうかはセントラル側が決定します。
ちなみに、BLEでの接続パラメータはIntervalに加えて「Connection slave latency(Latency)」と「Connestion supervision timeout(Timeout)」というものもあります。セントラルが信号を送信した際に、ペリフェラルはその信号を無視することもできるのですが、Latencyはこの無視できる回数の最大数を指定するパラメータです。また、Timeoutは接続が失われたと判断する時間を指定するパラメータで、通信を行えずにここで指定した時間が経過すると、通信の切断を行います。
これらのパラメータとして指定できる値は規格で決まっており、Intervalは規格上は最短7.5ミリ秒、最長4秒、1.25ミリ秒の倍数、と決まっています。また、Latencyは0以上500以下(かつTimeout/Intervalより小さい値)、Timeoutは最短100ミリ秒、最長32秒、10ミリ秒の倍数です。また、Intervalの値をリクエストする際には最小値(Min)と最大値(Max)を指定する形になっています(つまり、ペリフェラル側がセントラル側にパラメータ設定をリクエストする際はInterval Max、Interval Min、Latency、Timeoutの4つのパラメータを指定する)。
BLEでは7.5ミリ秒より短い間隔での通信は行えないため、規格上は少なくとも7.5ミリ秒の遅延が発生する可能性があります。さらに、iOSではBLEに関する独自の制約があります。これによると、Interval Minは15ミリ秒以上(かつ15ミリ秒の倍数)、Interval MaxはInterval Max+15ミリ秒以上(ただし15ミリ秒は許容)などとなっています(詳しくはAppleのドキュメントを参照)。ということで、iOSデバイスと通信する場合、どう頑張っても最長15ミリ秒の遅延が発生することになります。
実際の接続パラメータを調べてみる
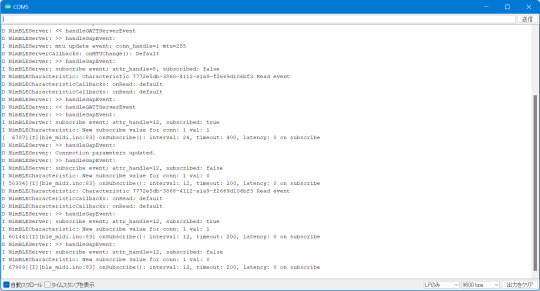
さて、ここまではあくまで仕様上の話で、実際にiOSでBLE MIDI接続を利用する場合に、どういった接続パラメータが利用されるかは公表されていないようです。ということで、iOSデバイスとBLE MIDIデバイスを実際に接続して接続パラメータを調べたり、接続パラメータ変更リクエストが受け入れられるかをチェックしてみました。
基本的なコードは前回記事で使ったものと同じですが、ここで使用しているArduino BLE-MIDI Transportには、BLEの接続パラメータ変更機能がありません。ということで、Arduino BLE-MIDI Transportのコードをコピペして、接続時やデータを受け取った際に処理を追加できるように改造した「BLEMIDI_ESP32_NimBLE_Custom」というclassを作成しました(本来は継承したclassを作るべきなのでしょうが、コードが煩雑になりそうだったのでコピペで作成)。
このクラスはテンプレート引数でBLEServerCallbacksクラスの派生クラスとBLECharacteristicCallbacksクラスの派生クラスを指定するようになっており、接続時や各種イベント発生時にこのクラスで実装したコールバックメソッドが呼ばれる仕組みです。
メインのコード(ble_midi.ino)では(テスト目的なので)USB MIDI関連のコードをコメントアウトし、代わりにシリアル通信でBLE関連のイベント発生時に接続パラメータを送信するように実装しています。これは、EPS32 Arduinoで用意されているlog_i()の関数を使っています。この関数を実行すると、USBシリアル通信経由で指定した値がログとして送信されます(この機能を利用する場合、Arduinoの設定でUSB Modeを「Hardware CDC and JTAG」に、「Core Debug Level」を「Info」以上に設定する必要があります)。
ちなみに、NimBLE-Arduinoはデフォルトでログ用のコードが実装されており、「Core Debug Level」の値に応じてUSBシリアルでデバッグ情報を送信してくれます。便利!
テスト結果
まず、接続パラメータの変更リクエストを送信しないケースでは、接続時の接続パラメータはIntervalが30ミリ秒(1.25ミリ秒×24)、Timeoutが720ミリ秒(10ミリ秒×72)、Latencyが0となっていました(Intervalの単位は1.25ミリ秒、Timeoutの単位は10ミリ秒なので、取得した値にそれぞれ1.25、10を掛けた値が実際の時間になります)。
[ 13624][I][ble_midi.ino:49] onConnect(): interval: 24, timeout: 72, latency: 0 on startup
その後、こちらからは接続パラメータの変更要求を出していないにも関わらず、接続パラメータの変更が行われました。変更後の値はIntervalが15ミリ秒(1.25ミリ秒×12)、Timeoutが2秒(10ミリ秒×200)、Latencyが0となっていました
D NimBLEServer: >> handleGapEvent: D NimBLEServer: Connection parameters updated. D NimBLEServer: >> handleGapEvent: I NimBLEServer: subscribe event; attr_handle=12, subscribed: false I NimBLECharacteristic: New subscribe value for conn: 1 val: 0 [ 20477][I][ble_midi.ino:83] onSubscribe(): interval: 12, timeout: 200, latency: 0 on subscribe
これはあくまで想像なのですが、BLE MIDIはリアルタイム性が求められるため、iOS側でBLE MIDIデバイスに対してはデフォルトでこの値を利用するように決められているのではないかと思います。
また、接続時に接続パラメータの変更リクエストを送信した場合についても同様に確認してみました(コード上でコメントアウトしている「pServer->updateConnParams(desc->conn_handle, 15, 15, 0, 400);」の部分が変更リクエストを送信するメソッド)。
まず、iOSのドキュメントで定められている接続パラメータに則った値で接続パラメータの変更リクエストを送信した場合ですが、この場合はそこで指定された値に接続パラメータがセットされました。たとえば「Interval Min=12, Interval Max=12, Timeout=400, latency=0」でリクエストした場合、次のような値に設定されています。
[ 23490][I][ble_midi.ino:80] onSubscribe(): interval: 12, timeout: 400, latency: 0 on subscribe
「Interval Min=48, Interval Max=72, Timeout=400, latency=0」のように、15ミリ秒より大きい値を指定した場合は、Interval Maxで指定した値が設定されました。
[ 17025][I][ble_midi.ino:81] onSubscribe(): interval: 72, timeout: 400, latency: 0 on subscribe
また、iOSのドキュメントで定められている接続パラメータに適合しない「Interval Min=6, Interval Max=8, Timeout=400, latency=0」という値を指定した際は、指定したIntervalには設定されず、代わりにIntervalとして24が使われました。
[ 27836][I][ble_midi.ino:80] onSubscribe(): interval: 24, timeout: 400, latency: 0 on subscribe
接続直後のIntervalの値が24(1.25×24ミリ秒=30ミリ秒)なので、これがiOSのデフォルト値で、適切でないIntervalが指定されるとこの値が使用されるように見えます。
結論
ということで、少なくともiOSでBLE MIDI機器を利用する場合、特に機器が接続パラメータの変更をリクエストしなくとも、15ミリ秒間隔で通信するように設定されるということが分かりました。つまり、前回テストした際もiOSでの最短Intervalである15ミリ秒間隔で通信が行われていたわけで、そこで発生した遅延は少なくとも接続設定変更では解決できないように思われます。
4 notes
·
View notes
Text
My worker firmware works! It flashed itself over, now just to add some roll back, security, and validation features. But effectively this means I never have to plug in another ESP32 to send them firmware. I can just tell them to post to MQTT from the worker firmware for logging and post the firmware binary to my local file server. This makes my life so much easier while building out this mesh of meshes multi-protocol com lib. Hell yeahhh
#trans#queer#transgender#tech#esp32#maker#computer#programming#c++#arduino#embedded software#firmware
7 notes
·
View notes
Text

Trying to design a great WLED board 🌈🦄🦃
While waiting for the turkey to finish brining, we're designing a board for using WLED - and we want to make like the bestest board in the whole world.
Our resident mermaid, firepixie
, makes a lot of projects with WLED, and she loves it! So, how can we make something that will be powerful but not too bulky? Here are some things we're thinking about as the design starts to congeal like cranberry sauce:
Power via USB Type C PD with a slide switch that selects between 5, 12, and 20V (24V pixels can usually run fine at 20V) OR via a 2.1mm DC jack. With ideal diodes, it's good for up to 5A from either.
ESP32-Mini module with built-in or optional wFL antenna port. The classic '32 has broad support, even if we'd prefer the 'S2 or 'S3.
There are three output signal terminal block sets, with power and ground for each. They'll be level-shifted to 5V.
Built in I2S microphone (we're still pondering this one).
Stemma QT I2C port to connect external sensors/OLEDs/etc.; separate analog/digital input JST port.
1.3"x1.75" / 33mm x 45mm size with mounting holes.
Anything we're missing, anything that's extraneous?
#electronics#wled#makerspace#esp32#usbtypec#diyprojects#arduino#adafruit#ledlights#hardwaredesign#microcontroller#iot#esp32mini#stemmaqt#circuithacks#ledart#makersgonnamake#powerdesign#tinytech#firepixie
22 notes
·
View notes
Text
Big news!

My homebrew gps rally computer thing is starting to take shape!
Bad news!
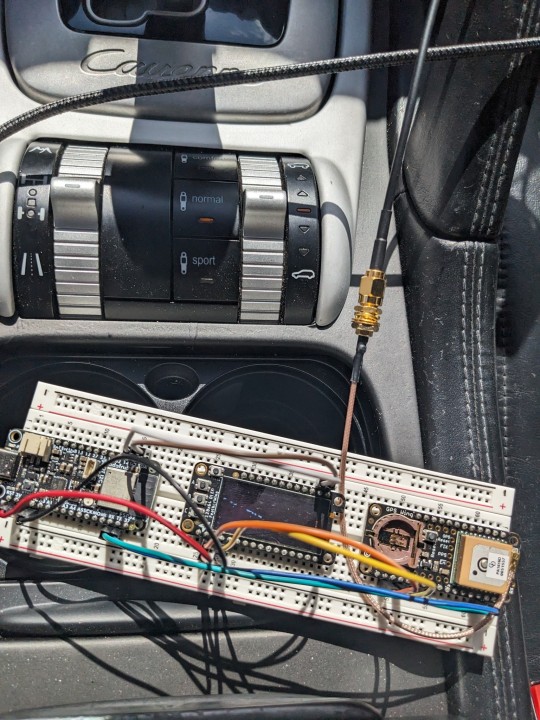
It looks like an IED
2 notes
·
View notes