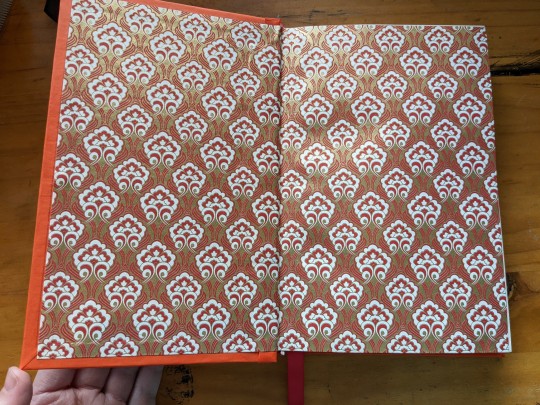
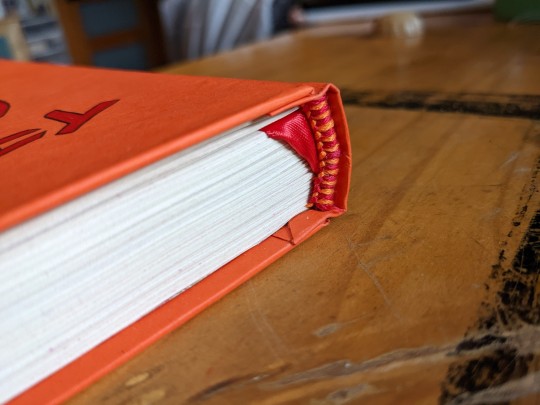
#ficbind tutorial
Explore tagged Tumblr posts
Visit Tumblr Blog
Explore Tumblr blogs with no restrictions, modern design and the best experience.
Last Seen Tumblr Blogs


Fun Fact
28.6 is the average number of monthly visits per US mobile user.
Video
youtube
@omfgreylo Show how to print, fold, and make holes for #fanficbookbinding
#youtube#omfgreylo#fanficbookbinding#fanfic bookbinding#ficbinding#fan art#book binding#bookbinding#diy bookbinding#tutorial#ficbind tutorial
61 notes
·
View notes
Text
Typesetting in One Click: Microsoft Word Macros 101!
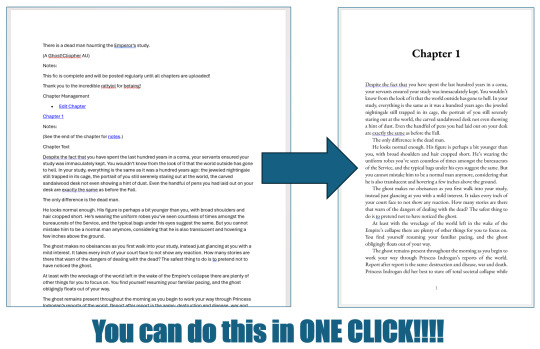
For @renegadepublishing's Binderary month, I gave a talk about how you can use Microsoft Word Macros to automate the typesetting process!! This talk was aimed for beginners, and covered how to install and use the Blak Books Bindery Macros (which can typeset an Ao3 fanfic in a single click!), how to customize Macros, some very basic VBA syntax, how to understand VBA documentation, use debugging tools, and more! If you're a total beginner to bookbinding, using Macros is one of the easiest ways to get started typesetting! You can watch the recording of the talk here. And the slides for the talk can be viewed here! Hope this is helpful, and happy binding! 😊
#bookbinding#typesetting#fanbinding#binderary2025#fanfic binding#ficbinding#bookbinding tutorial#rosa binds#rosa macros#renegade bookbinding guild
67 notes
·
View notes
Text
✨How to make inlays with a Silhouette Cameo 4✨
I finally slapped together a tutorial on my process for making inlays with my Silhouette Cameo 4! For higher quality you can visit my Instagram.
This is of course not applicable to all designs; if you have a design that goes across the spine and back cover, you will likely want to forego the transfer tape and attach your design to a piece of paper instead.
It should be noted that I am an amateur, and this is simply the method that works best for me personally.
Happy binding!
78 notes
·
View notes
Note
hi there, just discovered your blog, binged scrolled and consumed all your posts. <3 [ sorry, i don't want to sound weird ] I have a question if you would be so kind to answer? I saw your WIP of Dear Your Holiness, and I am wondering how are you doing your speech-text bubbles? How do you make it look like texts? Is it a software? I am trying to typeset Did you miss me? - Fantismal&Krethes, and let me tell you, that is 80% text-bubbles. And I don't think what i've got going on now is very efficient. Right now i am editing the .css and .html directly in Calibre.
hi! I'm glad you like this blog, nothing weird about it, sorry about the messy house actually and be my guest!!
I really love your ask cause text bubbles are really a pain in the ass and I love babble about my typessets. So I warn you, this answer may be a bit longer than expected.
The short is: Existing 200k ways to do chat text on writer and more 200k to do on typessets.
Editing the .css and .html directly is my first time seeing it, but I guess it works very well too, just maybe too much time consuming. In general, the most common is pre-setting a paragraph on the software you use to design your project. Most of the softwares for writers can do this. So you can select the dialog, click a button and voilá all your dialogs will look the same and your typesset will be really beautiful really fast.
Affinity and Adobe InDesign I know better, but I know Word does this too, just don't know how. Find one to learn and have joy :)))
My personal response is more like: How do you want your project to look?
So I think the most important thing to me here is not where to do it, or how to do it fast, but how to do exactly what we want it and what we can do to make this happen. And here lives my lack of sanity.
It really depends on the project. I have done some fic with chats and none of them I did exactly the same way. But for my Dear Your Holiness project, I want this look of a mobile chat but without remembering any social media chat we know and I want make it fancy

So I try to emulate some things we see on these social media chats and with a bit of compulsory search I discover some things really helpful.
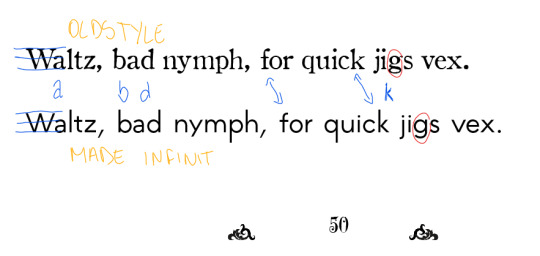
First of all, the typography choice
I'm a little biased here, I love typography. But it is exactly because of this that I notice that chat typography is simple. They need we read fast but without notice, so we don't have serifs, that remember us of academic texts, and the contrast are really light
I had this other typesser of Wish You Are Here by @afieryfox, and she uses Discord and Twitter to set her fic, in this case I choose the exact fonts that each platform uses to set my typesset (and setting a paragraph for each site). But in the main text I use some simple serifed font, to help the reading.
Main Text: Cambria
Discord: Whitney
Twitter/X : Helvetica Neue

The same to DYH, I chose a serif font with some fancy look to the body and a saint serif font to the text, but I chose one with some alike things to do not look too drastic.
I chose to set the main text in OldStyle because it has this vintage look., and the chats on Made infinit (this one I ask permission for personal use). They pretty similar except for the g, so i think work very well

The second was the contrast.


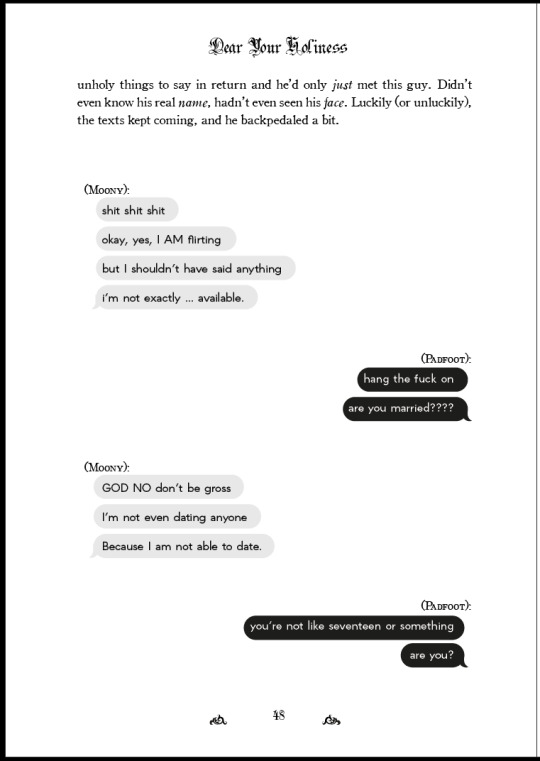
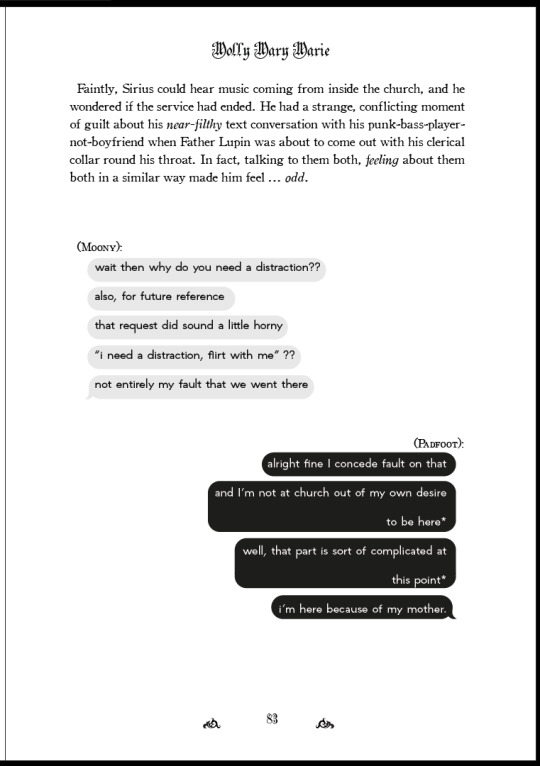
We had this constant that is the color of the chats, where who sends the text is the most eye-catching bubble, and the right one. So I just set this with the pov one being our dramatic bubble. In this case, our Padfoot
And the last thing, our guides and spaces!!
We are not on a mobile, so we have pretty much space and this is a problem, because chat texts are compacts and a book… not exactly. So what i did was divide the space I had to rearrange our text so we can feel like the space was purposeful
I divide my workspace in 3, and each side of the chat could only transpose ⅔. then they has their own section and don’t steal the friend's space.
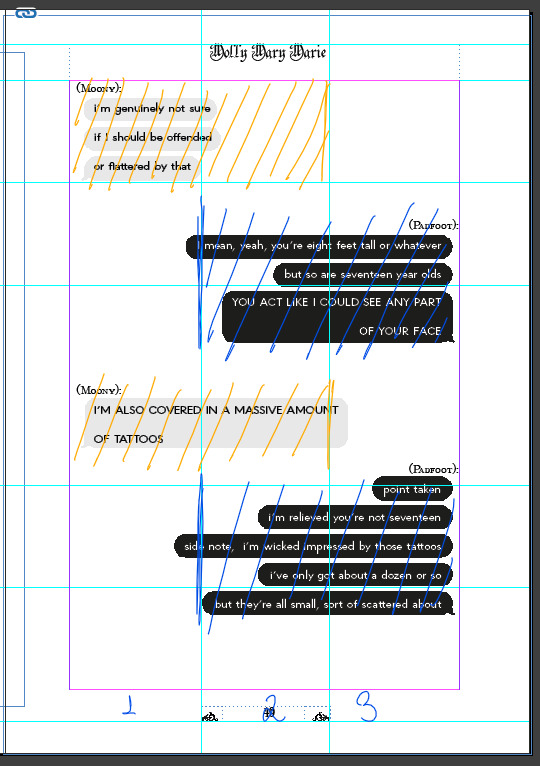
this is not extremely strict, the text can transpass the line till I feel like is acceptable. So, if the text is too long and insist on cross the guide, i can shift then and make these big balloons

Other guides I like:

the space between the start of the text end the start of the bubble
the space between bubbles
the center of the text on inside de bubble
the last bubble with the call tail (idk how call this)
So
How I did my Dear Your Holiness chat bubbles?
I did all the typesset first.
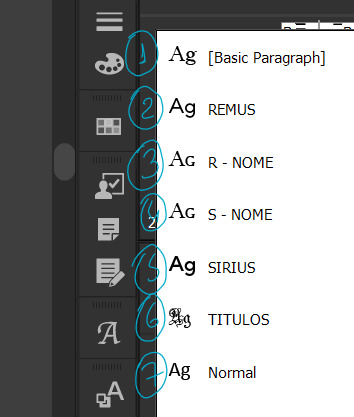
I use Adobe Indesign to do my typessets, so I set up all the text blocks, with all the typos to set my pre-sert paragraphs. All my paragraphs are pre-settings cause I like my life easy when I can have it, cause the rest of the process is really time-consuming.

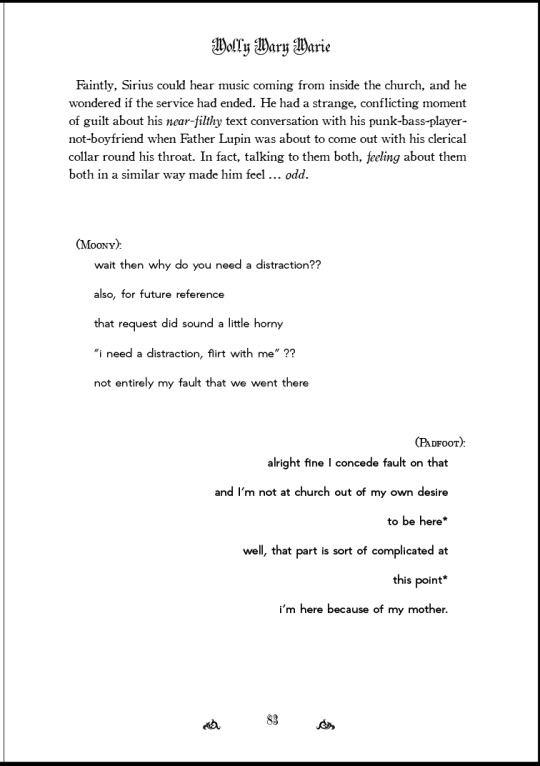
So set all the pre-set paragraphs and the dialogues exactly the way I want it. Till look something like this

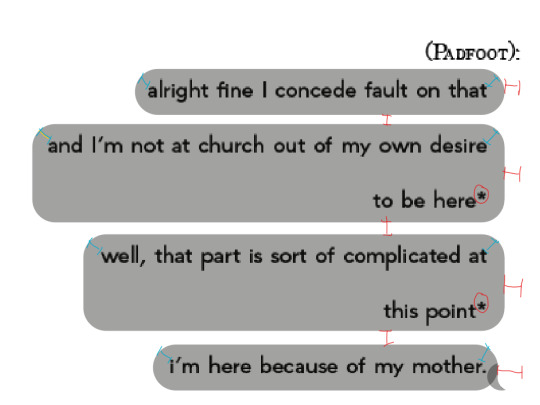
So I take a simple print from the naked page and go to Adobe Illustrator, were I put the the cute little outfit (the bubble)
There I have a board setting on my page size to use the correct scale on the bubbles, I just scale the print on the board and fit the bubbles on the dialogues.


The bubbles are actually little rectangles with rounded corners. We can easily do the call tail (still don't know how call this thing) just push one off the corners staring, but I really wanted this sexy toothpaste curve, so I make this little shape and overlapped my bubble.

To put the bubbles over the print, i set the opacity on 80% or less just to confirm the guides and the * I left to mark the ones that will be big balloons. So I correct the opacity, remove the print and save as a pdf

the pdf I put above my text, and change the color of Sirius’s chat, because we can’t read black on black and voíla, -1 page to do.

Now all we need is repeat till end all dialogues bubbles left in the fic.
After some time this became a really mechanical thing, so listen to something in that maintime that the time flies. So yes, a pain in the ass as i said, but look how pretty they turn!!!!

yeah, I think that's it
I hope I've answered
3 notes
·
View notes
Text
Want to learn how to save a fic? Bind it!
Listen to your elders
So last week I posted abut the importance of downloading your fic. And then three days later AO3 went down for 24 hours. No one was more weirded out by this than I was. But while y’all were acting like the library at Alexandria was on fire I was reading my download fic and editing chapter eight of Buck, Rogers, and the 21st Century. And also thinking about what I could do to be helpful when the crisis was actually over.
So first off, I’m going to repeat that if you��re going to bookmark a fic, you really need to also download the fic and back it up in a safe place. I just do it automatically now and it’s a good habit to get into.
But let’s talk about some other scenarios. Last October I lost power for over a week after hurricane Ian. Apart from not having internet or A/C I did find plenty to do, I collect books so I had plenty to read, but maybe, unlike me, your favorite comfort reads aren’t sitting on a bookshelf. So let’s do something about that, shall we?
In olden times many long years ago around 1995 we printed off a lot of fic. It was mostly SOP to print a fic you planned to reread and stick it in a three ring binder. And that’s totally valid today too, but you can also make a very nice paperback with a minimum amount of skill and materials.
Let’s start with the download; Go to Ao3 and select your fic, we’ll be working with one of mine. This method works best with one shots, long fic tends to need a more complicated approach. Get yourself an HTML download

Open up the HTML download and select all then copy paste into any word processor. Set the page to landscape and two columns, then change the font to something you find easy to read, this is your book, no judgement. This is all you have to do for layout but I like to play a little bit. I move all the meta, summary, notes to the end and pick out a fun font for the title:
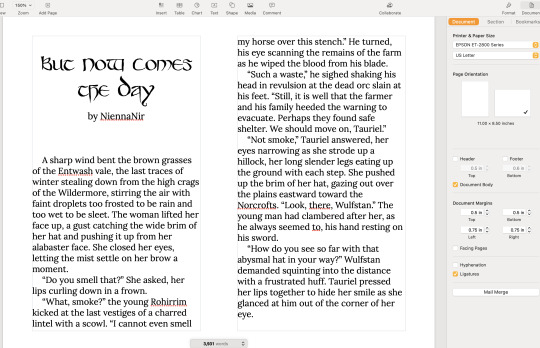
No time like the present to do a quick proofread. Congratulations, you’ve just created your first typeset. On to the fun part.
Now you’re going to need some materials: 8.5x11in paper ruler one sheet of 12x12 medium card stock (60-80lb) scissors pencil pen or fine tip marker sheet of wax paper white glue two binder clips 2 heavy books or 1 brick butter knife
You’ll also need a printer, if you’re in the US there is almost a 100% chance your local library has a printer you can use if you don’t have your own. None of these materials are expensive and you can literally use cheap copy paper and Elmers glue.
Print your text block, one page per side. Fold the first page in half so that the blank side is inside and the printed side out:
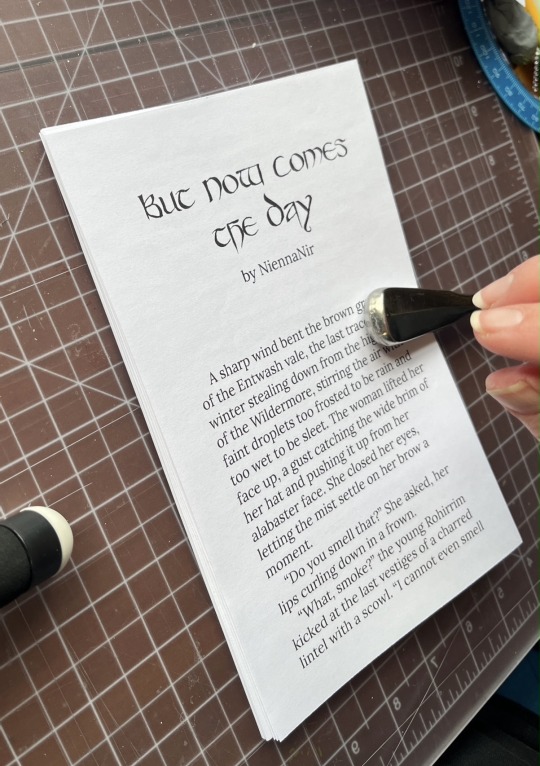
use the butter knife to crease the edge. Repeat on all the sheets. When you’ve finished, stack them up with the raw edge on the left and the folded edge on the right. I used standard copy paper, because you’re only printing on one side there’s no bleed to worry about. Take the text block and line everything up. Use the binder clips to hold the raw edge in place.
Wrap the text block in the wax paper so that the raw edge and binder clips are facing out. I’m going to use my home built book press but you don’t need one, a brick or a couple of books or anything else heavy will work fine.
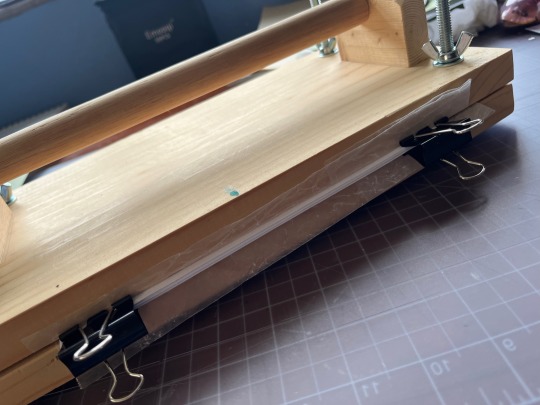
Once the text block is anchored down, take off he binder clips and get out the glue.
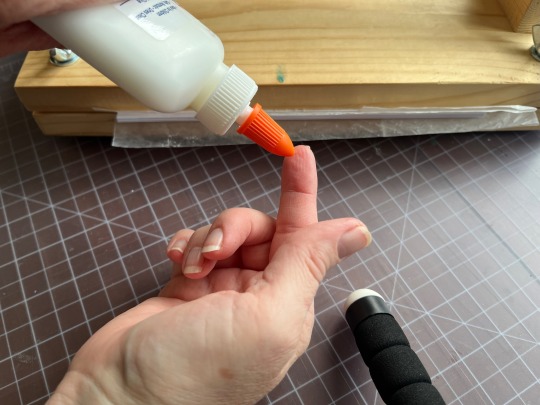
You can use a brush but you don’t need one, smear some glue on that raw edge.
Go make a margarita, watch The Mandalorian, call your mother. Don’t come back for at least an hour
In an hour smear some more glue on there and shift your brick forward so that the whole book is covered. This keeps the paper from warping. While glue part 2 is drying we’ll do the cover. Get out your 12x12 cardstock
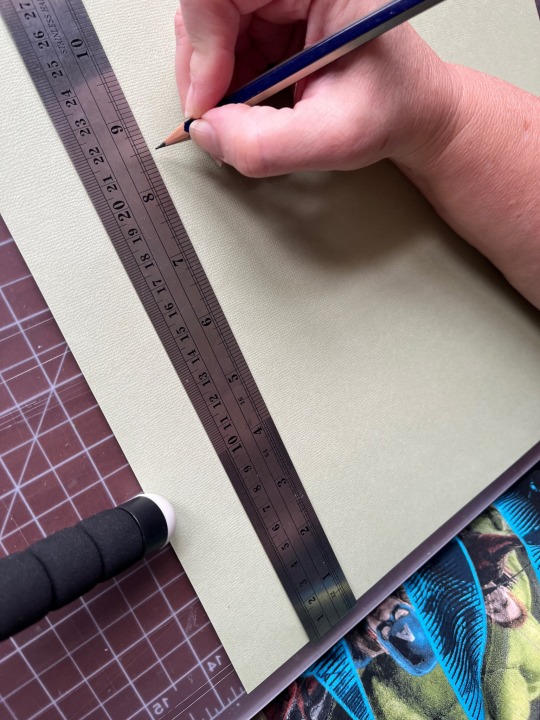
Mark the cardstock off at 8.5 inches and cut it. Measure in 5.5 inches from the left and put in a score line with the butter knife (the back edge not the sharp edge)
Carefully fold the score line, this is your front cover. You have some options for the cover title, you can use a cutting machine like a cricut if you have one, you can print out a title on the computer and use carbon paper to transfer the text to the cardstock. I was in a mood so I just freehanded that beoch. Pencil first then in pen.
Take your text block out from under your brick. Line it up against the score mark and mark the second score on the other side of the spine
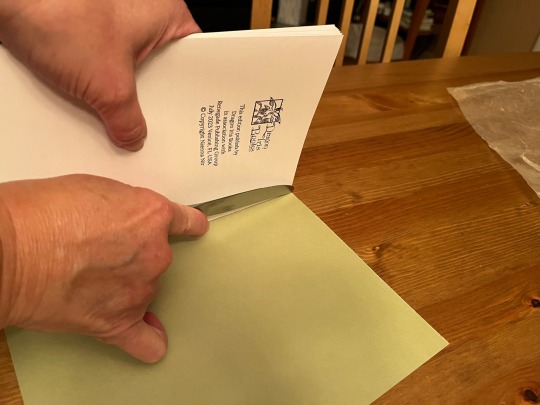
Fold the score and glue the textblock into the cover at the spine. Once the glue dries up mark the back cover with the pencil and then trim the back cover to fit with your scissors.
Voila:
I’m going to put this baby on the shelf next to the Silmarillion.
The whole process, not counting drying time, took less than an hour.
If you want to make a book of a longer fic, I recommend Renegade Publishing, they have a ton of resources for fan-binders.
#fanbinding#ficbinding#pamphlet binding#bookbinding#diy bookbinding#diy#tutorials#fanbook#fanbind#fantastic ficbinders and where to find them#ficbook#fic books#fic book#fic binders#fic binding#fan book#fan binders
22K notes
·
View notes
Text
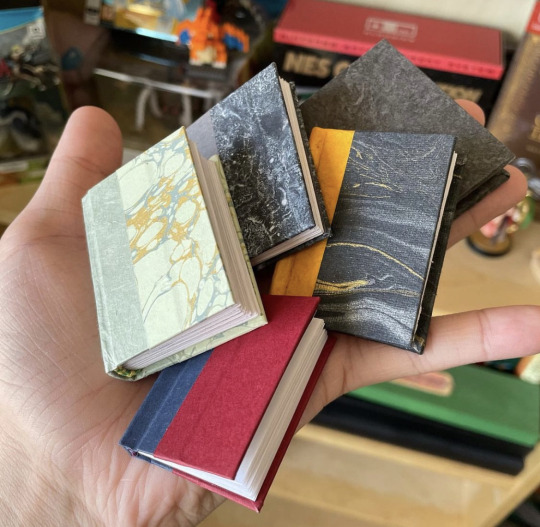
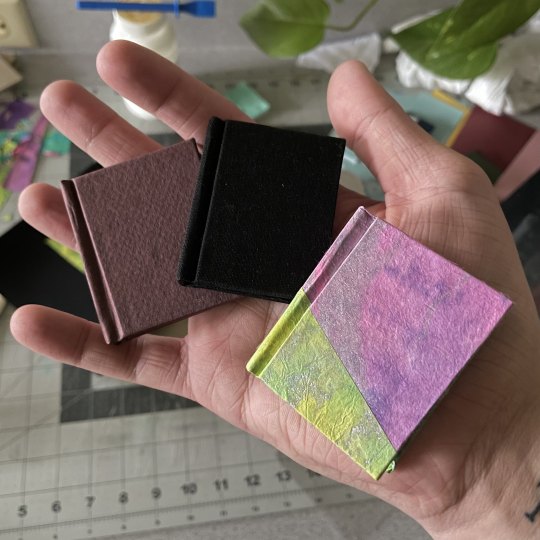
Tiny Book? Tiny Book. Pt1.
Idk yall I just felt like writing a little how-to of how-I-do my tiny A9 books! So if you've ever been interested, I hope this will be helpful. This will be neither a beginner typesetting nor beginner bookbinding tutorial; as I go through my process I will only be showing my process and providing a few tips, assuming you already have the basics understood. We can worry about the rougher technical skills in another post.
Also keep in mind that this guide includes images of fic I've bound, and you're zooming into these fics at your own discretion. I am not responsible if you read something yucky. I know you have a lot of options out there but thank you for flying No-Name Publishing.
Tiny books part 2; Tiny books part 3

Just like with regular ficbinding, there are layers, and they are:
1 - Typesetting and Imposing 2 - Printing 3 - Cutting, Folding, and Sewing 4 - Gluing, Rounding/Backing, Endbands 5 - Building the Case and casing in 6 - BOOK
In this part we will be focusing on steps 1 and 2. Please feel free to skip to the area you're interested in most.
1 - Typesetting and Imposing
Okay, so this area has some nuances that you don't have to consider so closely with typesetting for more traditionally sized books. To me, these tiny books are not about readability, they are about novelty. As such, I do not prioritize readability. Instead, I try to achieve something that is closer to scale. That said, neither do I want these illegible. But we'll begin from the top.
You want to make a tiny book, but you're wondering, what would be an appropriate word count for a tiny book? Tiny books are the perfect medium for the ficlettes, the shorties, the one-shots. They are also perfect for the mid-sized, 10-15-20k fics, in my opinion. Here we can see,

On the left we have a fic that is exactly 12,771 words, typeset on a 1.5" x 2" (37 × 52 mm) document, with .3" margins, 6pt Garamond font, and 5pt line spacing. This book is only approaching 1/2" (13mm) wide, and only took 5 sheets of Letter paper to print. On the right we have a fic that is exactly 1,939 words, typeset to the same specifications. This book is only 4-5mm wide, and took only 1 sheet of Letter paper.
In my opinion this format of book begins getting unruly around the 300-page mark. However, making any combination of margins, fonts size, and line spacing will yield different page results for different word counts. For example:
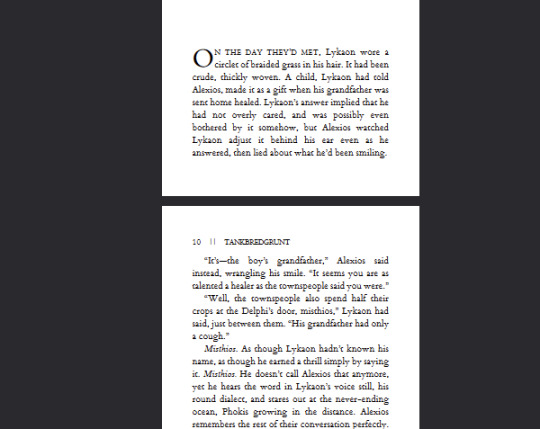
Like the above, in each of these examples I typeset in Garamond font @ 6pt size and 5pt line spacing. Typesetting on an A9 page, this is about as small as I felt comfortable sizing my font while still being legible. But notice the rivers between the words--the rivers of white space bisecting the lines, due to the Justified alignment battling the admittedly tiny work surface. At this scale, with the font at this size and alignment, those will be unavoidable. Over time I began disliking this in my own work, so I pursued a different method, which was typesetting on a quarter letter page (4.25" x 5.5" / 108mm x 140mm), and allowing my imposer to scale the PDF down.
Have you ever seen anything sexier. THIS looks like a tiny book. Little to no rivers, still legible (hand-wobble), and preserves the novelty feel that I desire from a tiny book. This method of scaling down (specifically from quarter letter to A9) does change the final shape of the book, from A9 to A9-ish in this case. Specifically, from 1.5"X2" (37 × 52 mm) to 1.625"X2" (41.3mmX52mm). You're achieving something closer to a square shape, which is delightful to hold. All this to say, you have some freedom with word count, with font size, with page size. I've done as many pages as 376 and as few as 17. The fantastic thing about tiny books--their structure will not be load-bearing, meaning--the only thing stopping you are your tastes.
Quickly, some more examples of features in a regularly sized typeset and their tiny counterpart after the imposer has scaled them down. First, scaling half-letter down to A9, a little-over 4X shrinkage:
And from B6 to B9, smaller by 3x:

You notice the compression of every element, and too how entirely unparcable the text in the first example is, sometimes not horrible, sometimes very. Make your decisions dependent on your tastes!
You have decided on the fic you'd like to bind into a tiny book. I will be using my own fic as the typesetting example, and I will be using Word 365 for PC. I'm sure many of my pointers during this process might not apply 1-to-1 if you are using a different word processing software, but hopefully you can adapt the concepts to your program of your choosing.
Kay, next you will do your typesetting. Since this is not a typesetting guide I'm trusting that you have your preferred methods, but I will go through my key steps for setting up a tiny typeset:
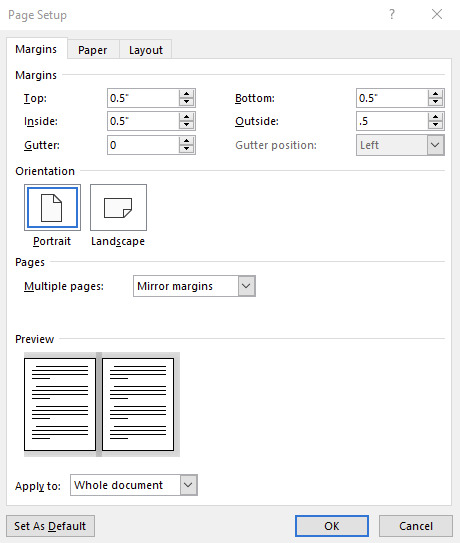
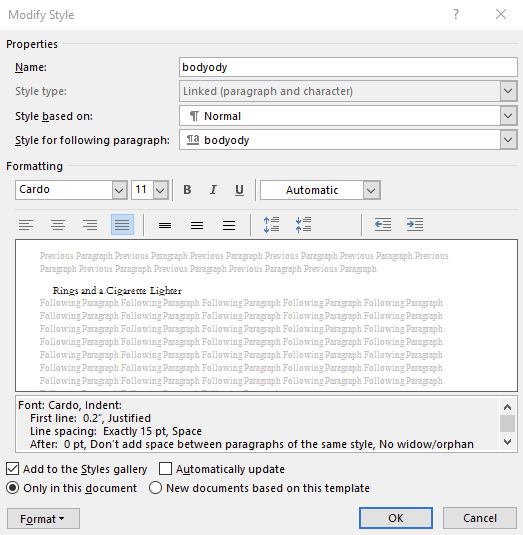
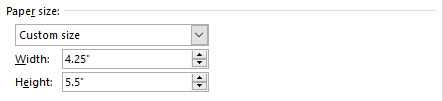
First, for every typeset I delete each default Style, create mine own, and dictate the document size. For this example I will be doing my preferred quarter letter method, setting the custom page size to 4.25" wide and 5.5" tall, and .5" page margins all around (except Gutter; leave 0"). On the Multiple pages dropdown I will select Mirror margins (however, as all my margins are the same size, this is redundant, though may not be the case for you). My body text style will be Cardo font @ 11pt size and Exactly 15pt line spacing, with a .2" first line indent and Justified alignment.
You can use whatever body font you like, I only encourage you to do many many test prints to refine your preferences. Your favorite font for half-letter books might not translate to tiny books. After ~30 tiny books I've found I like Cardo at this size and spacing. And if you're using A-paper sizes, consider doing quarter A4 instead of quarter letter, which is technically A6--4.1"X5.8", or 105mmX148mm. Follow your heart~~nyah 🐱♥
Now I will go to my fic and download the HTML file. I hugely prefer copying from the HTML file rather than the browser itself. It kind of standardizes any goofy formatting that might try to make its way over otherwise, while still preserving the italics and bolds, etc, and makes for an easier editing process. It was important I made my body Style in Word first, so that once I paste the text into my document that Style is automatically applied in one fell swoop (if not, you can change that in your Word settings. Advanced -> Cut, copy and paste -> Merge Formatting. It is a huge time saver.)
Now you've gone through your typesetting process, you have a liddle quarter letter Word document that you're happy with. Gets real close to you. Listen to me--listen, you're going to Export as PDF. Not Save As PDF. Not Print to PDF. Export. It's in--listen--it's in File, then Export, then Create PDF/XPS. You need to Export. Especially if you selected Bookfold instead of Mirror margins in your page settings because we need an unimposed PDF in order for this to work right and exporting to PDF is going to solve 99% of your pdf formatting woes with Word. Okay, I love you 👨❤️💋👨
Now, your EXPORTED pdf should look something like mine. Straight, unimposed.
Now what we're going to do is take this PDF back to my penthouse and freak it. Go to this link for the Renegade Bindery-created and -curated imposition tool. This has been will be is such an incredible FREE asset to you, maintained by a crew of intelligent, skilled Renegade Bindery members who understand the importance of community and accessibility. If you find someone hiding this link behind a paywall of any kind it is not with the creators' permission, so shame on them.
Anyway I will be assuming that you know what imposing your document means. If you've never used this site before, it's very straight forward, and here are my settings for making Tiny Books.
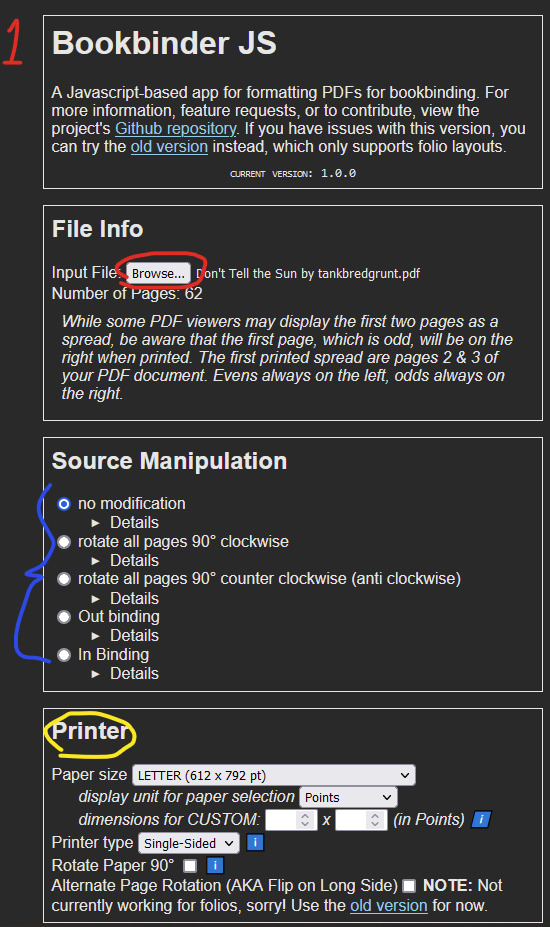
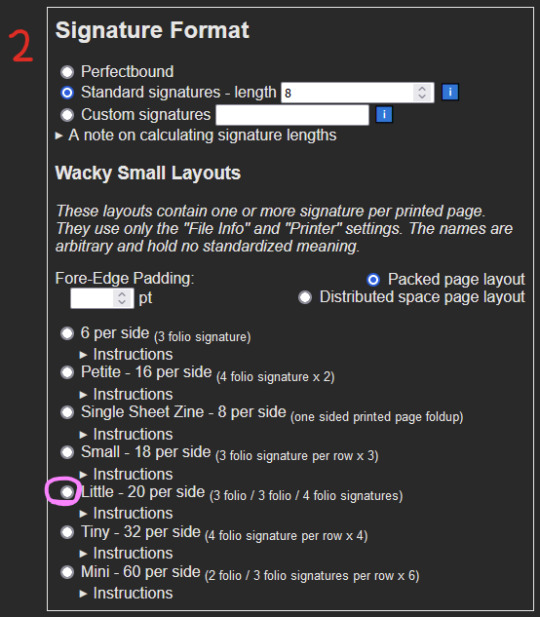
1 - Upload your unimposed exported pdf. 2 - ignore 3 - Select the paper size you will be printing on. This is not the FINAL size of the book, this is what paper you are printing on. These instructions are for Letter sized paper. Don't change any of the other settings right now, I will explain more about the Single-sided vs Duplex option in a bit. 4 - Skip aaalllll the way down to Signature Format. Under Wacky Small Layouts, click on the bubble next to Little. You'll notice there are a lot of options here. I encourage you to play with these settings later on as well, there are so many things you can make with this tool.
Once that's done, scroll down to the very bottom. You'll see the Signature Info area, telling you the results of your imposition. In the case of using the Little option we've selected, 1 sheet of our paper will make 40 book pages. 3-signature-sets of 3/3/4 folio configuration. That's a lot of pages per page.
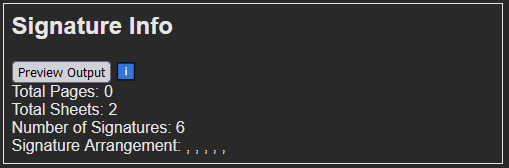
Anyway for our document today it will cost us 2 sheets of Letter paper, and will make 6 signatures. Math says that's 80 pages. Now, you may be concerned because your typeset PDF is not formatted in a number equally divisible by 40. And why would it be. The imposer is doing that math for you in the background, organizing your pages regardless. In my case, my finished typeset is 62 pages, which means that from my second page, I will only be using my 3 folio segments, and discarding the 4 folio segment. This will make more sense later. Click the Generate button, and save the zipped folder wherever you want. Don't change the name of it.
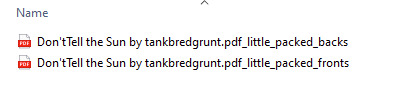
Unzip that baby, and inside you'll notice 2 files--(filename).pdf_little_packed_backs, and .pdf_little_packed_fronts. Appropriately named as one file contains one side of the sheet that will be printed, and the other file the other side.
And when you open them up, they will look like:
2 - Printing
We are manually duplexing this bad boy, because working at this scale amplifies and compounds every millimeter of difference. Manual duplexing will keep printer skew to a minimum, as the printer will not have to perform gymnastics in order to print on the reverse side of your page. Here are some examples:

Two auto-duplexing examples of skew, one horizontal and one vertical, dependent on which direction my paper was loaded into the feeder. There is significant skew. Not a horrible issue on full-sized books but these will matter much more on our tiny books, the key issue being that we do not have much to work with in the margins department. Trimming 5-6-7mm of margins of your half-letter sized textblocks might not be much of an issue; however, here, in order to remove all the trim lines during the cutting process, you will be significantly impacting the margins of your tiny textblock.
Now here is an example of the skew from manual duplexing:
MUCH subtler. Your skew with manual duplexing will range from this--less than .5mm--to no skew at all, and you will have to cut off far less of each page to remove the trim lines, maintaining the consistency of appearance of your tiny, beautiful pages. This is why during step 3 of the imposing process we selected Single-sided (which is MANUAL duplexing), and not Duplex (which is AUTO duplexing) appropriately. This will result in you either getting two files for manual duplexing, or one auto duplexing file.
Your next consideration when it comes to printing your liddle book will be whether you want to use an inkjet printer or a laser printer. I've until recently only had a laser printer available to me. I can say after about 6 or 7 little books on an inkjet printer that I prefer the laser printing on tiny books. Here is an example of why:

On the left you have a tiny book printed from an inkjet printer printed on the highest quality setting, and on the right is a tiny book printed from a laser printer. These were both printed at the same scaling, same font size, same line spacing, everything. The inkjet printer, printing at this scale, introduces pretty glaring feathering on the letters, whereas the laser printer is crisp as can be. I've said before that to me tiny books are more for novelty rather than readability, however I do still want to make out the word I'm looking at, you know what I mean? For this reason I prefer printing my tiny books from a laser printer. Use what you got though, you'll get a tiny book regardless. Make sure you're flipping on the short edge with these tiny books too, and double check to make sure your page numbers line up. And when you're done you got...
BOOK(-adjacent).
Continue on to part duex.
245 notes
·
View notes
Note
Can you recommend any full-scope resources for getting in to bookbinding, especially rebinding books and the different methods of stitching signatures/folios? I've had a really hard time finding comprehensive resources that kind of have all the information collected in one easy to read/watch place, but I really want to start binding my own books! Any resources for supply shops (I'm not in the USA so online might have to do) would be great too!
Ty 🩷
Full-scope in one place is unfortunately not exactly a thing in this hobby, given the very wide range of techniques & training styles. This is why I've found it helpful to be part of a community (even one that is mostly amatuers). @renegadeguild (the discord especially, but here is the website resource page too) is a great group of people that are always finding new tutorials, books, techniques, & material shops to share with each other - or creating them outright when none seem to exist. The discord hosts the bulk of the resources & is open to anyone 18+. Renegade also has regional servers you can join from the main, including outside the US (there are Renegade Europe, Australia, & Asia servers - I'm one of the Renegade Asia mods), which collect more region specific shops, online listings, & classes.
For traditional bookbinding (case bindings & some in-boards styles, plus explanations of adhesives & other basics), I recommend DAS Bookbinding. He has a lot of videos and focuses on technique. I recommend going through his videos by playlist, but he also has a guide to his video listings in his bio description on YouTube. This playlist talks about different sewing styles. Of the people putting out tutorials I would say he is the most comprehensive.
For exposed sewing styles, I'd recommend Bittermelon Bindery, who has a book called Handmade Books At Home that covers several different sewing styles.
r/bookbinding on reddit has a long list of links under the description's "see more."
There are of course other people out there, but there are also whole books on just endband styles or marbling, so to avoid sending you all over the place...
For rebinding, I probably have less useful information for you, as it's not something I do often, but here's a few notes. "Rebinding" in the colloquial sense currently refers to either of two different things: 1) taking a glued together paperback & recovering it to make it a prettier hardcover, or 2) completely taking apart a book (usually one that was sewn; if not sewn, gluing individual pages to "stubs" which are then sewn together), sewing the pages back together ("rebinding"), often with increased structural support, and either restoring the original cover or creating a new one.
#1 is debatable on whether it increases the longevity of the book (mostly because of paper quality & the glue binding), but it's nice for renovating your shelves. DAS also has a few videos on this type of rebinding, plus another here by Nik the Booksmith that I referenced the one time I've done this. Keep in mind they are using different techniques from each other, so you may need to do a little parsing between what different steps they are using. What a lot of people do too is use the square back bradel cover and act like the paperback is just a regular textblock, which does work for type #1 rebinding.
Type #2 rebinding requires some care in removing the glue & taking apart the original binding, because you want it off but not so much you damage the paper below. I have very little experience with this type of rebinding, but it results in a book that will last longer if you do it right. If you aren't concerned with keeping any of the original cover, once you've got the signatures clean & separated it seems pretty similar to starting from scratch.
I know there are a bunch of other rebinding resources out there, I just generally don't know what they are, so my knowledge is a bit lacking here! My ficbinding to-do list is too long for many rebinds to make it into the mix, lol.
Happy binding & best of luck in your future efforts!
44 notes
·
View notes
Text
Ficbinding - A5 Heft Teil 1
Ich binde meine Fics gerne als einfaches A5 Heft. Das bietet sich für die meisten, kürzeren Sachen gut an und ist leicht umzusetzen und das meiste Werkzeug und Material dafür hat man (wahrscheinlich) schon zu Hause.
Im ersten Teil zeige ich meine Herangehensweise aus einer Fic ein druckbares Dokument zu erstellen über die Broschüren-Funktion von Word. Fragt mich bitte nicht, wie das mit anderen Office-Anwendungen funktioniert.
Im zweiten Teil binde ich die Seiten und das Cover mit einer einfachen Fadenheftung.
Damit der Post nicht zu lang wird alles weitere unter dem Lies mehr.
Wir brauchen:
eine Fanfic, die wir binden wollen
Microsoft Word
etwas Geduld
einen Drucker

Wir starten mit unserer Fic. Ich empfehle dringend nochmal Korrektur zu lesen ;)

Im Reiter Layout den Pfeil zum Menü "Seite Einrichten" anklicken und das Menü öffnen. Darüber stellen wir die Broschüren-Funktion ein.

Dieses Menü öffnet sich.
unter "Seiten" Mehrere Seiten: Buch auswählen. Dadurch sollte sich das Vorschau-Icon zu dem kleinen Buch ändern. Seiten pro Broschüre auf "alles" belassen.
Seitenränder einrichten. Ich stelle alle auf 2 cm. Damit hab ich bisher gute Erfahrungen gemacht.
Querformat stellt sich von alleine ein. So lassen.
Über OK zurück zur Fic.
Die Broschüren-Funktion sorgt dafür, dass später im Druck die Seiten in der richtigen Reihefolge gedruckt werden. Ihr müsst also nicht darüber nachdenken, welche Seite wo im Dokument ist, sondern bearbeitet es einfach nach aufsteigender Seitenzahl weiter.

Das Dokument sollte jetzt ungefähr so aussehen.
Jetzt folgt der gestalterische Part.
Ihr seht die leere zweite Seite? Bücher beginnen immer auf einer ungeraden Seite (also 1, 3, 5 etc.), also solltet ihr eine leere Seite zwischen Titel und Beginn einfügen.
Wenn ihr ein Inhaltsverzeichnis oder ein vorangestelltes Gedicht/Bild/Zitat habt, würde ich das auch auf eine ungerade Seite schieben.
In diesem Schritt suche ich die Schriftart(en) aus, lege die Schriftgröße fest (meistens 10 oder 11) und schiebe Absätze an die richtige Stelle (s. Hurenkind und Schusterjunge) und formatiere im Blocksatz.
Außerdem füge ich Bilder und Überschriften ein. Hier sieht man das noch etwas besser:

Das ist teilweise etwas Gefummel, aber da vertraue ich auf eure Word und Google-Skills.
An dem Punkt könnt ihr natürlich eurer Kreativität freien Lauf lassen. Unterschiedliche Farben und Schriftarten für jeden Charakter? Initialen für den Kapitelanfang? Eigene Zeichnungen? Go for it!
Außerdem füge ich Seitenzahlen nach diesem Tutorial ein und formatiere sie der Gestaltung entsprechend. Auch das ist immer etwas fummelig, aber nur Geduld.
Falls ich noch etwas einkleben oder reinzeichnen will, lasse ich dementsprechend Platz auf den Seiten.
Idealerweise hat das Dokument am Ende eine gerade Anzahl Seiten. Eigentlich sollte das beim Druck keine Probleme bereiten, ich hab aber schon anderes erlebt und achte seitdem darauf.

Zum Druck:
Ich drucke auf 90gr Papier, 100 gr ist noch besser. Normales 80gr Druckerpapier finde ich immer ein bisschen arg dünn, geht natürlich auch!
Es wird beidseitig gedruckt und im Broschüren-Modus ist immer nur das gesamte Dokument druckbar, deswegen kopiere ich mir manchmal kleinere Passagen von 4 Seiten raus, um zB Schriftgröße oÄ zu kontrollieren.
Wenn ich Bilder in der Datei habe oder das Heft verschenken will, stelle ich die Druckqualität noch auf maximal. Für mich selbst brauche ich das nicht.
Jeder Drucker ist anders.
Unserer kann automatisch drehen und ich weiß, dass das Blatt über die kurze Seite gewendet werden muss, damit der Text nicht bei jeder zweiten Seite auf dem Kopf steht.
das ist trial und error und am besten probiert ihr das mit einer markierten Seite aus und schreibt es euch irgendwo auf ;)
Dann drucken und hoffen, dass alles passt und wie es mit dem Stapel Papier weiter geht, erfahrt ihr nach der nächsten Maus im nächsten Teil.
Lasst mich wissen, ob etwas unklar ist oder bei euch gar nicht funktioniert!
34 notes
·
View notes
Note
sorry i couldn't find out how to ask on your other blog.
that book binding you posted is gorgeous btw !!
I noticed that in one of the photos you included the disclaimer that you also edited it. I just had a question about how you formatted the text.
one of my biggest gripes with AO3 is text formatting (i often feel like i'm reading a legal document vs a novel/story) . Did you change how it is formatted on AO3 compared to printed?
I feel like i'm in the 0.5% that hate AO3 formatting but i thought i might as well ask in case you have any tips for that. >,>
(also how do you decide on the page size, do you just choose a standard size for all your projects? or do you vary it depending on what you are binding?)
thanks so much for taking the time to answer and for sharing your projects :) !!!!!!!!!!!
hey anon! I have asks turned off for the sideblog, but happy to answer here. Thanks very much!
I'm taking this opportunity to info-dump and link a lot of resources. I think they're useful for people new to either typesetting or bookbinding, but not all are directly related to your queries. That said, hope this is of use!
one of my biggest gripes with AO3 is text formatting (i often feel like i'm reading a legal document vs a novel/story) . Did you change how it is formatted on AO3 compared to printed?
I do a fair bit of editing when I'm binding a fic; typesetting is often the longest part of the process. Your mileage will vary depending on your experience with using word processor software, particularly the paragraph style and page style settings. Another factor is how simple/complicated you want your typeset to look. Replicating a published novel in format is difficult but learnable for a complete beginner.
I'm not equipped to give a full tutorial on how to typeset, but I'll point you towards some useful resources for ficbinding then talk about my own process.
ArmouredSuperHeavy has a tutorial on how to make Ao3's HTML downloads into a printable book in Microsoft Word. I use LibreOffice Writer myself, so this adaptation of the same tutorial is what I follow. Both are very helpful to reference as you're learning the typesetting ropes.
Personally, I don't mess around with HTML. I find it easiest to start by doing a Ctrl+A copy of the Entire Work fic view on Ao3 then pasting that into my word processor. This video tutorial by Beautifully Bound runs through how to do this in Microsoft Word using an AO3 fic as an example, including the associated steps needed to make the fic look novel-like. This is probably the best tutorial to address your gripe with AO3 formatting. Other than that, I'd recommend looking into videos or tutorials about typesetting novels for print. Same idea, and you may get more hits than searching for fanbind/ficbind typesetting tutorials.
More under the cut! Once I start yapping, it's hard to shut me up 🤷♀️
As a point of comparison, here's one of my fics on Ao3 and the corresponding typeset side by side:


Beautifully Bound explains this in far better detail than I will, but off the top of my head, the steps involved:
making a new document and setting the default page size to whatever size I want the book's pages to be (A5 or A6 usually). You can also set the margins at this point, taking account of your printer settings.
CTRL+A and copying the entire work's text on AO3 then pasting it into the document.
removing all hyperlinks and AO3 frontmatter, things like the author tags, summary, notes, etc as well as any website text that got copied over alongside the fic.
(optional) running a spell check and ensuring grammar usage is consistent. For me that's substituting em dashes for hyphens between clauses, enforcing curly double quotation marks for dialogue, etc. LibreOffice Writer automates a lot of this with customisable settings, via Tools -> Auto-Correct. Here's also where to make sure character names are all spelled right, convert the text to or from US to UK English, etc.
picking out fonts for the body text, headers, page numbers, etc. This is where you'll want to use paragraph style settings. Page style settings also comes in clutch if, for example, you'd like different headers on alternating pages. I like having the author on the right, the fic title on the left.
setting the body text first line indent to whatever makes sense visually). This in particular helps make the fic feel more like a novel. You can also play around with line spacing and space between paragraphs at this stage. For this A6 typeset, I had a 0.75cm first line indent, 1.15 line spacing, and 0.15 spacing between paragraphs.
(optional) formatting the first line of the work to use small capitals and to add a drop caps to the first letter of the first word. Again, this is a convention in publishing which add a novel-like feeling to a printed fanwork.
Inserting page numbers, adding images, coming up with how I wanted the "copyright" page to look—optional for the most part, but these are details that make a fic appear more like a novel.
For multi-chapter works, there's extra work in formatting chapter titles as headings so that they're referenced correctly in the automatic table of contents word processors can generate.
Once you have a typeset you're happy with, and if you're considering printing and binding it as a book, then you'll need to look into how to create and print signatures. Personally, this is something I had to actually try (and mess up a bunch of times) before I got to grips with it. Understanding how both your printer and your PDF reader work, particularly printer margins and booklet print settings, is key.
I won't go into as much detail on this, but if it's something you have an interest in, I'd recommend starting with DAS Bookbinding's tutorial. DAS has tutorials for everything bookbinding related so when in doubt, check his channel! Plenty of other YouTubers also have good videos on making signatures.
This resource is extremely useful once you've got your head around how to print signatures manually, so here's a link for anyone in that space: GitHub Bookbinding Imposer. Essentially, this does the signature creation for you, removing the need for booklet print settings in your PDF reader.
also how do you decide on the page size, do you just choose a standard size for all your projects? or do you vary it depending on what you are binding?
I have access to both A4 and A5 sized paper and my printer can handle printing on either size. In bookbinding, normally two pages are printed per side of the paper (which are then folded in half as part of a signature). That is, when I print on A4 paper, it's to make an A5 sized book. Printing on A5 paper will yield an A6 sized book.
Before I begin typesetting, I'll usually know what paper I plan to use, so the typeset will be one size down from the paper. So far, I've made softcover pamphlets at A6 size and casebound books in A5. No real method of choice for me, it's whatever I feel most suits the project.
---
If you made it this far anon, thanks for reading! Here's links to a few general resources if bookbinding is something you'd like to explore more:
DAS Bookbinding (YouTube, bookbinding in all forms)
Sea Lemon DIY (YouTube, bookbinding and other crafts)
bitter melon bindery (YouTube, bookbinding, particularly beginner friendly!)
Jess Less (YouTube, demonstrations of fanbinding and re-binding existing novels)
Papercraft Panda (blog, lots of detailed tutorial on bookbinding)
Renegade Bookbinding Guild (collective and website, loads of fanbinding-specific resources from their members and they have a helpful Discord).
21 notes
·
View notes
Note
I would love a list of resources on getting started on ficbinding, if you have any? Or recommended tips, or tags to follow? Just anything, really. Obsessed with this.
I started with this video. It teaches you the basics like sewing (the sewing stitch is still the one I use now, despite having learned others since), printing and gluing. You can pretty much do this project with materials and tools you already have.
This video will introduce you to better tools and materials, but I don't believe this is quite accessible to beginners, it's borderline professional. But it's full of good tips!
Sea Lemon's channel, especially her bookbinding playlist. They're recommended very often in bookbinding circles and I've watched one or two tutorials by her for specific stuff and I found them good. So this might be a goldmine for a beginner.
I mostly learned bookbinding from this book, that I still use from A to Z when I make a book. It was expensive when I bought it, but it's invaluable to me.
I have found great advice on r/bookbinding in the past.
And that's it. I'm in that phase where I get better with every book even though all I'm doing is following the same instructions.
I follow the "bookbinding" and "ficbinding" tags here on tumblr, but so far I haven't seen tutorials, I just like seeing the beautiful projects. It's customary to put a list of the materials used in these posts however, so you might learn about materials that way.
Now for general tips, or what I wish I'd've known sooner!
Don't try to trim a text block by hand, or accept that it will look rough. If you insist, you have a big chance of hurting yourself. Wear gloves. Use a safety cutter. I can't stress this enough
Do it on the cheap when you start. I literally bound my first fics with cardboard from amazon boxes. That way you'll learn the techniques and gestures without ruining good materials
Once you've found the right ones, screenshot or note down your printer settings for the love of everything that breathes
That's all I have right now. Thank you for asking, I hope it helps, and good luck!
56 notes
·
View notes
Note
how do you format text? i saw your dbh ficbind & am obsessed—i’ve been using google docs for the last year because i was scared to learn anything else but it’s really getting to the point where i NEED to stop
Hi! Affinity Publisher is my go-to. I found it to be a one-time financial and setup investment: I dropped 50 bucks and then spent a horrible week configuring a million tiny fiddly settings on a master document. In the years since I've just duplicated that one doc whenever I need to start a new typeset.
Highly recommend doing the same (and @renegadepublishing has a great Affinity Publisher setup tutorial to walk you through every step). Plus, if you're Adobe-trained you'll find it to be a similar experience.
Let me know if I can help more!
9 notes
·
View notes
Video
youtube
I really have to try this.
#youtube#book edges#teleport books#gilged edges#foil edge#diy#tutorial#diy bookbinding#ficbind tutorial
2 notes
·
View notes
Text
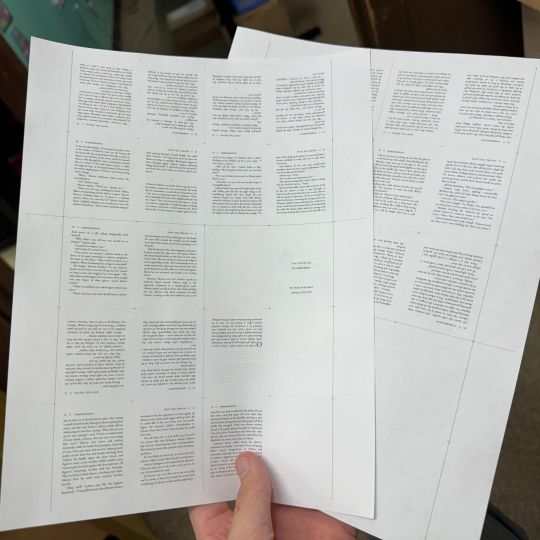
I figured out how to format The Howl Inside for ficbinding! Thanks everyone for your suggestions for tutorials!
Does anyone want the pdf for printing? Idk where to host it but I made the chapters all pretty and I am very proud!
4 notes
·
View notes
Text
✨How to foil a book cover with a Silhouette Cameo 4✨
I've noticed some people in my tags expressing interest in the foiling process, so I'm uploading this foiling tutorial from my Instagram.
While I'm still a beginner myself, I'm more than happy to share resources with anyone interested in pursuing book binding as a hobby.
Happy binding!
#book binding#fanbinding#fanfic binding#ficbinding#fic binding#tutorial#my binds#haxkattpress#If I'm being honest this is also for me because I forget what I do every. single. time.
180 notes
·
View notes
Note
HI ITS ME!!!💝
I’m so glad more people are going to bind ACoFD, you deserve it!!! Also I’m cracking up at your tags imaging the bugs bunny meme “OUR beloved 💝 anon” 😂😂
As for the other anon, I’m definitely okay sharing the typeset once it’s done! I’ll probably have revealed myself by then lol so i can send it I downloaded some fonts though so you might need to have them too for it to load properly😅 (unless pdf works? Idk🤷🏼♀️) disclaimer though i am Very New to ficbinding (I’m currently making my very first/ a practice one to learn everything via trial and a lot of error even following tutorials lol)
I hope you feel better soon LB! 💝 Get lots of rest and relaxation😌
LMAO that was the exact meme that I had in mind when I wrote that tag 😂😂

I have no idea how fic binding works, so I am sadly no help at all here, but I am so very honored that you are both interested in binding my fic 🥺 And I hope everything goes well with your practice bind!!
And no pressure if you don't feel comfortable revealing yourself, there might be ways to share it anonymously! Though if you ever do feel comfortable revealing yourself, I would love to be your friend!!
#I say as if you aren't already my friend#My most BELOVED friend#**our most beloved friend 😌#and thank you for the well wishes!! I hope I feel better soon too 🤒#💝anon
3 notes
·
View notes
Text
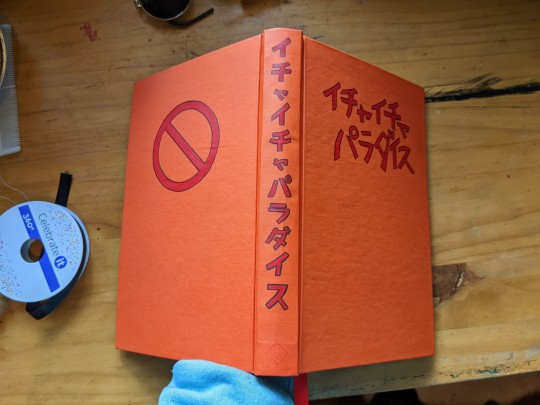
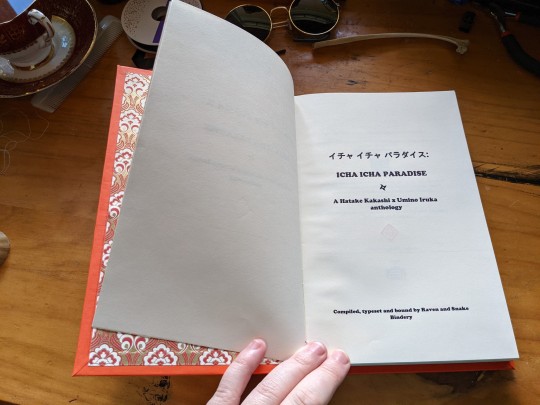
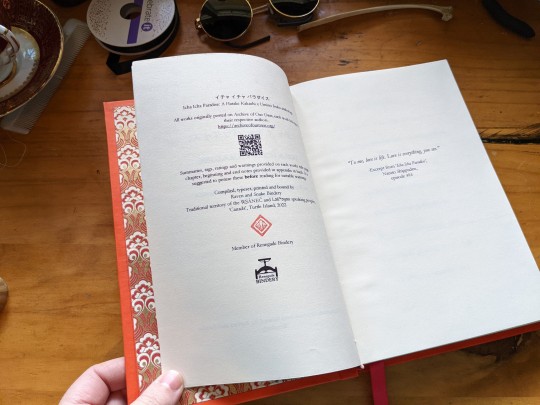

A tongue-in-cheek Kakashi x Iruka anthology modelled after icha icha paradise. I kept reading about Kakashi's love of erotica (and icha icha), while reading, well, erotic kakairu fanfiction. As a result I kept going 'same hat' (although I'm probably not going to be in public reading it. It's not subtle, although it'd be fun to see who would recognize it?) and then had this idea as a result. I've always loved subtle breaks in the third wall and self-containing/perpetuating systems, so this really tickled me. I may or may not be planning to do the entire icha icha series as kakairu anthologies and most definitely have not started on icha icha violence, idk what ur talking about.
Edit: click to see the Icha Icha series master post.
Icha Icha Paradise Anthology Fanfiction list:
A Heat-seeking Cuddle Octopus (4k, G)
It wasn't that Iruka wasn't willing to share a tent with his squad leader. It's just that he wished that Kakashi wasn't such a cuddle-octopus in his sleep.
Responsible, forever, for what you have tamed (4k, M)
Kakashi gets hit with a Jutsu and becomes feral.
Always Only One Night (6k, M)
Iruka has a one-night stand with a man whose face he has never seen before. Only it's not just one night, and there is something about the man that seems familiar, if he could just figure out what.
The Heart that Hungers (7k, T)
With Naruto away training life for Umino Iruka had gotten quiet, but that quiet had been broken up periodically by the kindness of Hatake Kakashi, who discreetly delivered him letters from their mutual student whenever he got the chance. Which was great, amazingly thoughtful even, but the problem lay within the fact that it made Iruka's heart starved for more. For Kakashi. And so he kept a polite distance, didn't let on to feelings he had no right to have for someone as incredible as Hatake Kakashi. But the universe had a way of setting things right, of pushing people like Iruka, who deserved more than they gave themselves credit for.
Enter Senju Tsunade, Godaime Hokage of Konohagakure, and resident overly-stressed medical professional who could not take another second of Kakashi being a reckless idiot. She assigns the most caring man she knows to care for the most infuriating man, official mission scroll and everything, and calls it a day. And while Iruka takes the assignment (though whether it was willingly is up for debate) he can't help but wonder if he can survive a week in the company of the man his heart hungers for.
Fine Point of a Blade (9k, E)
Iruka’s body froze as terror gripped his heart. With claws. He watched a gloved hand deftly pluck the blade out of the air, bringing it up to a porcelain mask painted with red, waved lines. ANBU.
A strange meeting with an ANBU in his childhood leads Iruka down a life-changing path.
Willful Concealment (13k, E)
“Are you planning to keep my hair tie?” Iruka asked suddenly, a hint of amusement in his voice.
“I’m holding it prisoner for crimes against the citizens of Konoha.”
“What are the charges?”
Kakashi smiled, twirling the band around his forefinger like a kunai. “Perjury and willful concealment.”
Iruka huffed and shook his head, lips thinning in a way that made Kakashi think he was holding back a grin. “You know, if I’d realized you had such a thing for long hair, I would have started wearing mine down years ago.”
Kakashi’s thumb caught the hair band, halting its revolution.
“Years?”
(Or, in which Iruka asks for a single night, and gets a whole lot more.)
Worst Mission Ever (21k, T)
“Iruka, how would you feel about taking on a solo mission for me?” Sandaime asked.
Thrown by the change of topic, Iruka blinked at him.
“What do you want me to do?” he asked.
“Befriend Hound.”
A Stupid Favour (33k, Not rated- I'd say M or E tho)
"Iruka-sensei! Do you have a moment?"
"Yes? Tsunade-sama?" Iruka's voice came, drawing closer with every syllable.
"Someone has a stupid favor to ask you."
Shifting cloth and more clicking of shoes said Tsunade had come back into the room, followed by another person, whom Kakashi assumed was Iruka.
"The brat either needs to stay in the hospital or to have a babysitter for two days," Tsunade said bluntly.
OR, in which Kakashi is blind and sans chakra for two days but is desperate to find a way to leave the hospital until his sight and chakra can be restored.
#rose serpent press#rose serpent bindery#fanbinding#ficbinding#fanfiction#fanfics#kakashi x iruka fanfic#kakashi x iruka#kakashi hatake#kakashi#umino iruka#hatake kakashi/umino iruka#iruka sensei#renegade bindery#icha icha#icha icha paradise#fanfiction recommendation#kakashi x iruka fanfiction#fanfic rec#third fic to have been bound by me! how fun#also the FUCK how do you do hide long post thingies help#ok thank you person who made that beautiful and short tutorial mwah#bookbinding
229 notes
·
View notes