#fixing the mess uv created
Text
RED ROBIN REDESIGN RAHHGGGG 🗣🗣🔊🔊🔊📢📢📢
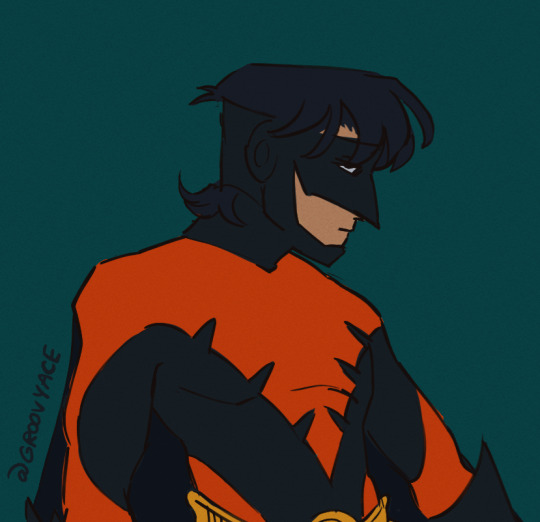
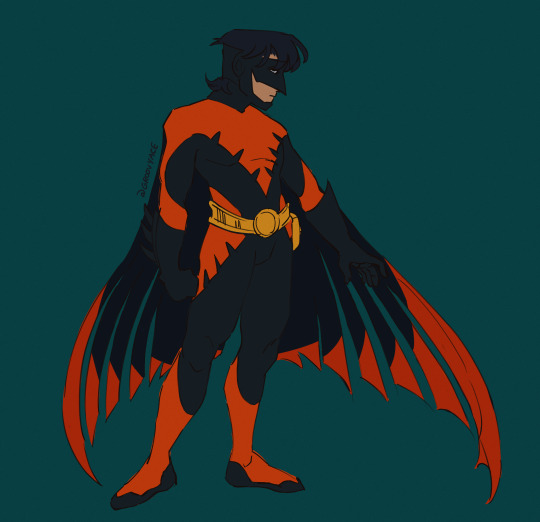
I took elements from his different suits plus added some extra flair. My favourite being the addition of climbing shoes.
#tim drake#red robin#dc#dc comics#so sorry to everyone im abt to blind with these bright ass colours#shield tes yeux#eyestrain#robin#i was surprised to hear yall liked the bird cape#idk why i thought it was hated#its such a good concept just#do better dc#DC HIRE ME CHALLENGE#this is my portfolio#fixing the mess uv created#thefridge
1K notes
·
View notes
Text


Above: before-and-after pictures of this process. Thank you to @cloudywithachanceofsims, @silverthornestudfarm, and @blueridgeequines for giving me permission to use their coats as examples!
CK's Guide to Fixing Pixelated Horse Coats
As we all know, every time you paint a horse (or any pet or werewolf, really) in Create-a-Pet, it inevitably gets pixelated. This is due to the TS4 engine's compression of Sims textures, which it does to theoretically save on file space and load time. The more you paint on your horse (and the more you save it over and over again), the greater the artifact damage becomes, until you're left with a pixelated mess.
Luckily, I've figured out a way to fix it. Yay!
This method uses a program called chaiNNER, which is an incredibly versatile node-based graphics UI that (among many other things) uses AI models to upscale and process images. After a month and a half of experimenting on multiple different types of coats with about a dozen different models, I've identified two AI models that work best at repairing the artifacting damage done by TS4: RealESRGAN_x2plus and 2xAniscale. I extract the painted coats from the tray files using Cmar's Coat Converter, process them using chaiNNER, use Photoshop to make any touch ups (softening hard edges, fixing seams, adding in the appropriate hoof texture), and then create a new hoof swatch to put the newly fixed coat back into the game.
Fair warning: chaiNNER is a bit of a hefty program that requires significant RAM and VRAM to run. If you have a beefy gaming computer, you should have no issues running this (as long as no other major programs - games, graphics programs, etc. - are running as well). If you've got a lower end computer, though, your computer might not be able to handle it and this method might not be for you. Make sure to read all the documentation on chaiNNer's github before proceeding.
Before we begin, we're going to need to gather some resources. We will need:
A graphics program. I use Photoshop, but GIMP or any other program that can work in layers will work too.
chaiNNER
AI Models; these are the ones I use are RealESRGAN_x2plus and 2xAniscale
Cmar's Coat Converter to extract the coat textures from your tray files
Tray Importer (Optionally) to isolate your household tray files and save you the trouble of searching the Tray Folder
The TS4 Horse UV as a helpful guide to make sure all our textures are lined up properly
Sims 4 Studio to create your new package.
I recommend using S4S to export hoof swatch textures from the game or from existing hoof swatch cc. Some popular hoof swatch CC include @walnuthillfarm's Striped Hooves and @pure-winter-cc's Glorious Striped Hooves
This tutorial assumes you are familiar with the basics in how to use Sims 4 Studio, such as how to clone a base-game item & how to import and export textures, and the basic functions of your graphics program, such as adding multiple different image files together as layers. I'll try to keep my explanations as straight-forward as possible.
STEP ONE: Extract the Coats
Install Cmar's Coat Converter and run it. Cmar's Coat Converter works by looking through your tray files for specific texture files (ie. The coats of cats, dogs, horses, and werewolves) and converting them to png files. You can go through the households of your Tray folder one by one, but I typically just use Tray Importer to separate the household containing the horses I want to fix.
Save the extracted coats in a project folder. These are your OG coats.
STEP TWO: Extract the hoof textures
Open up S4S. To extract the hoof swatches from the base game, create a new package by clicking CAS -> New Package, filter everything by species (ie. Horse) and then part type (Hoof color). Highlight all the basegame swatches and then save your new package.
Open up that package and then extract the texture for each swatch. Save them in your project folder (In a 'basegame hooves' folder to keep things organized).
To extract the textures from Hoof Swatch CC files, simply open them up in S4S and repeat the above.
STEP THREE: Download the AI Models
Right as it says on the tin. These are the models I use currently & some notes about them:
RealESRGAN_x2plus - this model is THE workhorse. It repairs artifact damaging with minimal loss to texture quality and results in a very smooth coat. It may sometimes darken the texture a little bit, but it's not noticeable in-game. That being said, it has a harder time with finer details such as spots, individual ticking for roans, dapples etc. I run this one first on all the coats because it usually does the job.
These models are trained to find and repair any incidence of artifacting/jpeg damage and approximate what the image is supposed to look like. The reason RealESRGAN_x2plus has an especially hard time with spots/dapples/tiny repetitive details etc. because it registers those areas as particularly damaged and works extra hard to smooth it out… which can sometimes result in a bit of an iffy coat repair. When things don't turn out the way I want, I turn to...
2xAniscale - I use this model for any appaloosas, roans, sabinos etc. that have very fine detail and came out mangled by RealESRGAN_2xPlus. It's also good for light-duty repairing (in cases where people have only 'saved' the coat once, as opposed to working on it on and off). While not strong enough on its own to tackle the more heavily damaged coats, it still does a decent job while keeping the fine details intact.
Go make a folder somewhere and name it 'AI Models' or something similar, and drop these guys in there.
STEP FOUR: Setting up chaiNNER
Obviously, go ahead and download chaiNNER, and then (through chaiNNER itself) download & install the dependencies. You really only need PyTorch for this, so if you'd like, you can skip NCNN, ONNX, and Stable Diffusion.
At first glance, chaiNNER is a bit overwhelming. It is unlike any other graphics ui I've seen before, but the basic premise is pretty straightforward: you 'chain' together specific functions ('nodes') in order to get your result.
We're going to start by setting up a chain for single coat conversions.
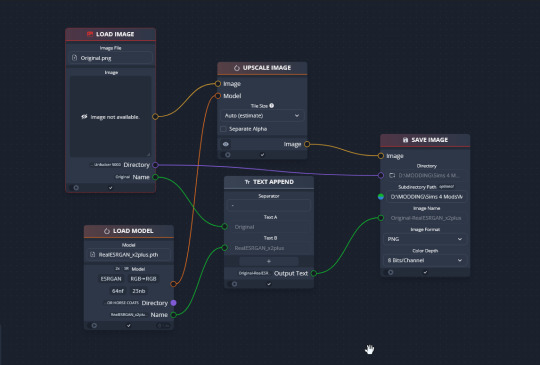
Drag & drop these nodes into your workspace:
Load Image
Save Image
Upscale Image
Load Model (From the PyTorch tab only!)
Text append
Next, connect the nodes just as I have connected them in the image.
Load Image, obviously, loads your image. We then tell the program we want to upscale that image by linking to the Upscale Image node. Upscaling can't happen without a model, so we then want to link Upscale Image with Load Model.
Text Append takes the original name of the image and combines it with the model name. This is super helpful, because if you're playing with many models at a time, you need to tell your result images apart. Link the output text to the Save Image Model.
Finally, Save Image obviously saves the image. We link the directory from Load Image to save it in the same place as the OG image, or, optionally, add in a file path link to another folder (in my case, I load images from a folder called 'Unprocessed' and save them into a folder called 'Processed'. Link the image from Upscale Image to Save Image to complete this chain.
Go in and select your image, model, and save locations.
Ta dah! You made your first chain.
To create an Iterator to batch process coats, we follow the same general idea, only we use 'Load Images'.
STEP FIVE: Run chaiNNER
Go ahead and run chaiNNER. Repeat using 2xAniscale if your spotty/dappled coat comes out funky.
Optionally, you can also add 'Resize' between 'Upscale' and 'Save Image' so the output texture is the same size as the OG. I like keeping mine big, as it makes it easier to fix any fine details in Photoshop.
STEP SIX: Combine in Photoshop
Go ahead and open up the horse UV, your coat texture & hoof swatches in Photoshop. This is a fairly straightforward process: layer the hooves overtop the texture, and then hide all hoof layers except the one you want. Make sure everything is lined up properly using the horse UV.
This is also where you would go in and fix any sharp, jagged edges you might spot. I often notice jagged edges on white face markings. Since the head is often one of the worst areas for artifacting, the AI models don't really have much to work with, resulting in jagged edges as they try to extrapolate what had been there 'before'. Either paint over it or use blur to smooth it out.
I personally would also remove any stray color that isn't the horse texture (body + ears). It won't hurt to leave it there, but I personally like things neat and tidy. Use the horse UV as a guide.
I also add in any little details using extracted stencils & layer masks.
Save your new coat as a png. Optionally, downsize it by 50% back to the original size. I don't do this because I'm very forgetful, but this would definitely help in keeping your package size smaller.
STEP SEVEN (Optional): Make a thumbnail
I make thumbnails for all the coats I do because it makes it much easier to identify them under the Hoof Swatch category. TS4 thumbnails are 144 x 148. You can label it with your horse's name, or stick a headshot in there etc. whatever works for you that will help it stand out from the other hoof swatches.
STEP EIGHT: Put it all Together
Finally, we've come to the end.
Using S4S, create a new package cloned from a hoof swatch. Import your new coat into 'Texture', and your thumbnail into 'Thumbnail'. Make sure you import the thumbnail for both Male and Female!
Check to make sure there aren't major seams, and that your texture is properly projected onto the S4S horse model. If there are seams, go back to check that your texture is lined up properly with the Horse UV. If there are minor seams (legs, chest, underbelly etc.) you can carefully paint (using the same color as on either side of the seam) just beyond the UV mesh boundaries to close the seam.
Then, go into Categories, scroll down, and uncheck Random. This will prevent random townie horses from wearing the coat.
Save your package.
Congratulations! You're done!
#ts4 tutorial#ts4 resource#ts4 guide#Ts4 horse cc#ts4 equestrian cc#sims 4 horse cc#sims 4 equestrian cc#ts4 equestrian#sims 4 equestrian#ts4 horses#sims 4 horses#ts4 horse ranch#sims 4 horse ranch#sims horses
50 notes
·
View notes
Text

Morph Madness!
Fixing Exploding Morphs
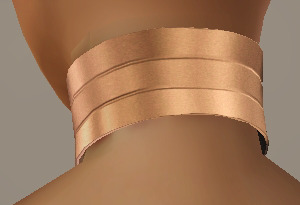
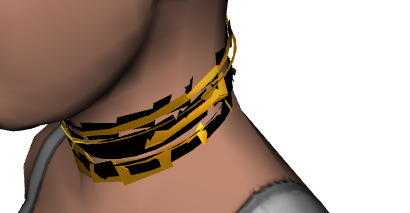
Marik's Egyptian Choker is currently in production. It is the first accessory I've made that involves assignment to more than one bone and morphs for fat, fit and thin states. So there is a learning curve, and it is during that learning curve that interesting and unexpected things can happen.
As with my other content, I'm making the choker fit sims of all ages and genders--that's 8 different bodies.
Adding fat, fit and thin morphs multiples this number to 27 different bodies.
I'm also making 3 levels of detail for each of these. The number comes to 81 different bodies, 81 different bodies for which I need to tightly fit a cylinder around the neck and avoid clipping.
That's a lot of work. I can see why most custom content creators stick with one age, gender and detail level. At least, they did in the past. Our tools are getting better day by day, and that may partly be because of creative, ambitious and somewhat obsessive people like me.
There are usually multiple ways to solve the same problem. Some ways are faster than others. This I've learned from working in Blender3D. You can navigate to a button with your mouse or hit the keyboard shortcut. You can use proportional editing to fiddle around with a mesh or you can use a combination of modifiers.
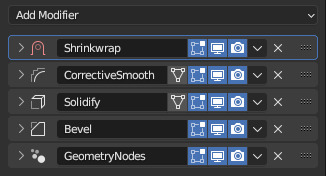
If I am going to be creating 81 chokers, I don't want to be fiddling around on each one of them for an hour. I need something automated, repeatable and non-destructive so I can make adjustments later without having to start over from the beginning. I need to work smart rather than just work hard.
This is where modifiers and geometry nodes come in. After you develop a stack to work with one body, the same process pretty much works for the others as well. That is how it became easier for me to model each of the 81 chokers from scratch rather than to use proportional editing to fit a copy from one body to the next.
But I was about to confront an explosive problem…
Anyone who has worked with morphs before probably knows where this story is headed. There is a good reason to copy the base mesh and then use proportional editing to refit it to the fat, fit and thin bodies. That reason has to do with vertex index numbers.
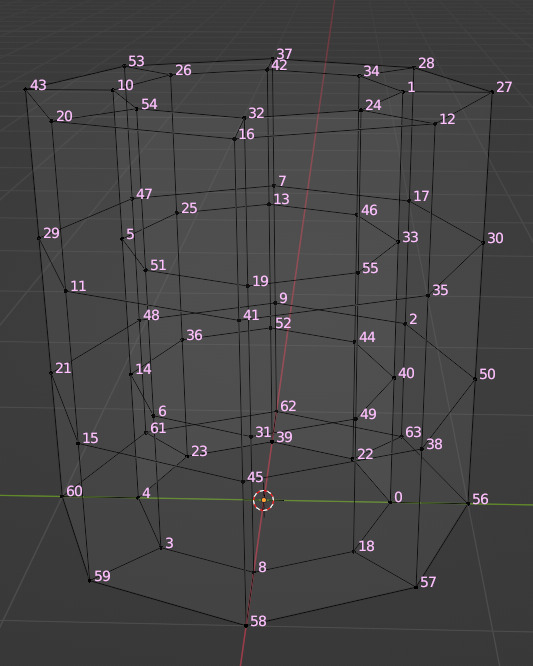
You see, every vertex in your mesh has a number assigned to it so that the computer can keep track of it. Normally, the order of these numbers doesn't really matter much. I had never even thought about them before I loaded my base mesh and morphs into TSRW, touched those sliders to drag between morph states, and watched my mesh disintegrate into a mess of jagged, black fangs.
A morph is made up of directions for each vertex in a mesh on where to go if the sim is fat or thin or fit. The vertex index number determines which vertex gets which set of directions. If the vertices of your base mesh are numbered differently than the vertices of your morph, the wrong directions are sent to the vertices, and they end up going everywhere but the right places.
It is morph madness!
When a base mesh is copied and then the vertices are just nudged around with proportional editing, the numbering remains the same. When you make each morph from scratch, the numbering varies widely.
How, then, could I get each one of those 81 meshes to be numbered in exactly the same way?
Their structures and UV maps were the same, but their size and proportions varied a lot from body to body. Furthermore, I'd used the Edge Split modifier to sharpen edges, which results in disconnected geometry and double vertices.
Sorting the elements with native functions did not yield uniform results because of the varying proportions.
The Blender Add-On by bartoszstyperek called Copy Verts Ids presented a possible solution, but it was bewildered by the disconnected geometry and gave unpredictable results.
Fix your SHAPE KEYS! - Blender 2.8 tutorial by Danny Mac 3D
I had an idea of how I wanted the vertices to be numbered, ascending along one edge ring at a time, but short of selecting one vertex at a time and sending it to the end of the stack with the native Sort Elements > Selected function, there was no way to do this.
Of course, selecting 27,216 vertices one-at-a-time was even more unacceptable to me than the idea of fiddling with 81 meshes in proportional editing mode.
So… I decided to learn how to script an Add-On for Blender and create the tool I needed myself.
A week and 447 polished lines of code later, I had this satisfying button to press that would fix my problem.

Here are the index numbers before and after pressing that wonderful button.
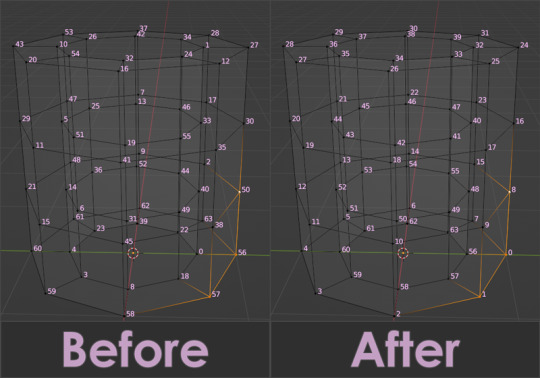
My morphs are not exploding anymore, and I am so happy I didn't give up on this project or give myself carpal tunnel syndrome with hours of fiddling.
Marik's Egyptian Choker is coming along nicely now. I haven't avoided fiddling entirely, but now it only involves resizing to fix clipping issues during animation.
Unfortunately, I'll have to push the release date to next month, but now, I have developed my first Blender Add-On and maybe, after a bit more testing, it could be as useful to other creators in the community as its been to me.
See more of my work: Check out my archive.
Join me on my journey: Follow me on tumblr.
Support my creative life: Buy me a coffee on KoFi.
#exploding#morph#mesh#sims 3#cc#custom content#tutorial#C:O#SallyCompaq122#mod the sims#cc creator#art process#blender#3d#add on#shape keys#sort#vertex#index#blendercommunity
68 notes
·
View notes
Photo


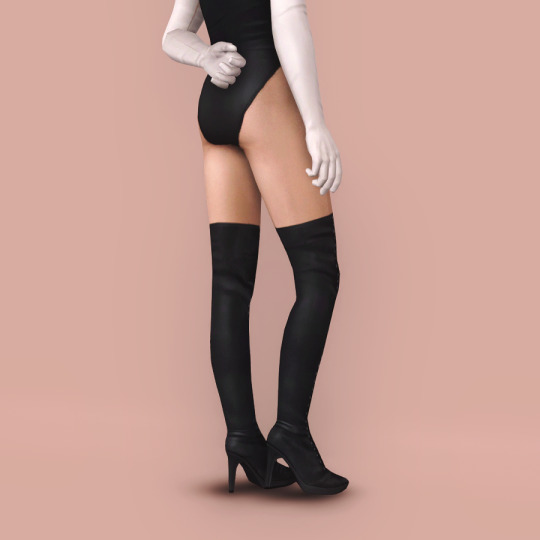

testing some lingerie i made!
gloves - i made 4 pairs of accessory gloves enabled for all genders and dani is modeling one pair of them. i basically just separated the textures from some EA clothes. these long ones came from a gown for ladies, so the texture doesn’t transfer perfectly on to the male UV map. honestly idk if i want to go back and fix/realign the seams for male sims, because it’s not that noticeable anyways.
swimsuit - i converted one of the base game female swimsuits and edited the cut of the swimsuit to look more flattering on the male frame. there is an unrealistically small amount of coverage on the bottom but i didn’t want to mess with the textures too much, or lose the new silhouette i created. eh, it is what it is. also, the textures on the shoulder straps look wonky due to my torso default replacement, but it is smooth on the default EA nude top. this version is categorized as a bottom but i might make it into a full body outfit or an accessory so that it could be worn with other pants or skirts.
thigh high boots - these were originally converted from F to M by omegastarr82 on modthesims. i edited the mesh to make the heel higher and the proportions nicer, and made the actual thigh high texture visible on the legs.
i went with boring black and white because i just wanted to get some quick testing shots done. the swimsuit and the boots both have a matte version and a shiny version since they’re supposed to look like latex and leather.
how sexy are these?! heavy pin-up/fetish vibes. i love how they came out. 🖤
112 notes
·
View notes
Text


Assignment: Color Your Game
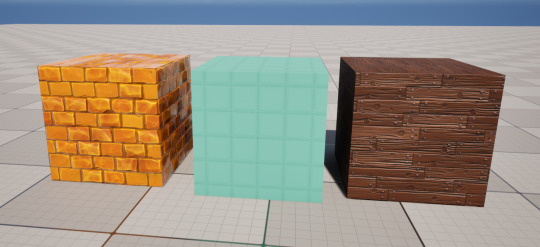
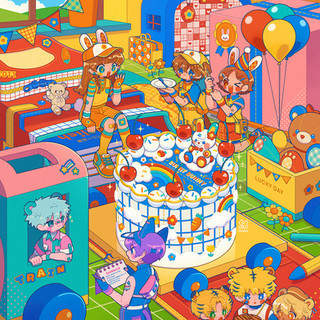
This was probably the biggest assignment thus far, but I gave it my best shot! First order of business, new project statement: I intend to create a music-based puzzle game with a fun and stylized feel inspired by "kid-core" and 90s aesthetics.
Upon going through my material from my look-book, I definitely still want to keep the playful and colorful style I was aiming for in the beginning, but I've narrowed down my main aesthetic inspirations to 2 key sources - Itousa (a Japanese artist/illustrator) and Rudo Company (an animation studio based in Buenos Aires). I've used some of their work (pictured above) to help me create a color palette for my project. It's not yet set in stone, but I think it's a great set of colors to start with.
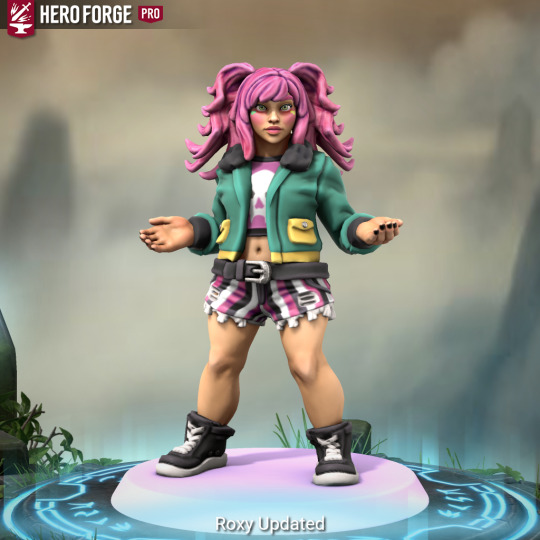
I also revisited Roxy's character design (or lack there of) and came up with a more concrete idea of what I want her to look like. This involved a lot of noodling around on Hero Forge, a website that, while technically meant for creating D&D miniatures, I find immensely helpful for designing characters. Seriously I cannot say enough great things about Hero Forge, go check it out if you haven't already. ANYWAY, after playing around on Hero Forge for a bit, I settled on a general design that I felt pretty happy with! I then drew her in my sketchbook, tweaking a few things here and there as I went. Drawing is definitely not my strong suit, so it was a little frustrating, but I'm pretty happy with it! Everything is still subject to change, but now I have something to work off of.
Finally, I did some texturing in my game. I wanted things to look really stylized and cute, but as stated previously, 2D art isn't really my forte. So I tried to find some free stylized textures online and adjust them accordingly. The three main materials I was looking for were bricks, wooden planks, and something quilted. I found bricks super fast, so I added them into my game and changed the tint so that they were a brighter, more golden yellow. Next was the wood, which took a bit longer, but overall didn't cause me much grief. The biggest issue was that the texture I downloaded had both a normal map AND a height map, so I struggled a bit trying to make it look right. Lastly, and unfortunately most importantly, was the quilt texture. THIS texture gave me HELL. Every quilted texture I found was either too photo-realistic or had no dimension whatsoever, and I swear I looked for hours. I finally found the PERFECT texture on ArtStation, like I was ready to whip out my wallet and pay just about anything for it, only to find that the artist wasn't selling it anywhere. This is why I have decided that I will be teaching myself how to make custom stylized PBR textures. I settled on this very flat quilted square texture I found online for now, but JUST YOU WAIT TIL I GET MY HANDS ON SUBSTANCE DESIGNER
(also, adding materials to my game made me realized just how messed up my UVs were in terms of scale, so I'm definitely gonna need to go back and fix that lol)
1 note
·
View note
Text
Benefits of Buying an Auto-Retractable Water Hose Reel
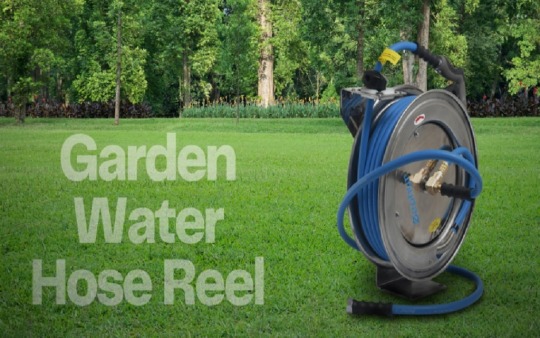
Gardening is certainly a blissful hobby, but sometimes the challenges it poses overwhelm the joy. Many people are familiar with this pain point of maintaining a hose, which is prone to tripping and twisting.
One just doesn’t need the headache of coiling manually. Fortunately, the Auto retractable water hose reel provides you with a solution to this issue. This unique tool has been developed to help you overcome such hurdles and make your gardening experience different, and better.
In this article, we’ll explore the various advantages of Auto-retractable hose reels for water investment. Find out how this simple addition will make your gardening more interesting without wasting your time and energy.
Ease of Use and Convenience
Gardening, as an activity, is supposed to be a restful pastime, but sometimes the difficulties of handling a garden hose can make it seem like a drudgery. Therefore, that’s exactly when you’d require the need of a Auto-retractable water hose reel in order to turn your gardening exercise into a breeze.
They’re beautiful because they can be automatically retracted without having to hand-coil after use. Simultaneously, the hose can even be neatly rolled again into the housing with one tug.
Say goodbye to those days when you had to untangle knots and kinks. It is amazing because it minimizes fatigue caused due to hose management making it an ideal option for gardeners irrespective of their experience.
Space Efficient and Organizing
The right organization of your garden will completely change the way you do gardening, making your work efficient, effective, and beautiful. Using non-retractable hoses can lead to untidiness and mess all over the storage room, as well as difficulty in locating and utilizing these hoses.
One elegant way of solving this problem is through an Auto-retractable hose reel. They can also comfortably be fixed in the wall to create enough space for your garden by eliminating the clutter on the floor. Coiling the hose neatly inside the reel’s housing will provide extra space for other gardening tools and equipment.
Apart from making your garden look more beautiful, this organization makes your garden safer by eliminating unnecessary obstructions or things that might cause accidents and thus ensure safety. Although it may seem like one very minor change, utilizing an auto-retractable water hose reel for your garden will dramatically affect its usefulness and look.
Protection and Extended Hose Life
Sunlight, harsh climates, and continued stress due to usage can actually cause your garden hoses to break down. A retractable reel acts as a shield against UV rays and can prevent your hose from degrading over time.
Besides, it minimizes erosion as well as tear thereby also helping you in extending the shelf life of it. Retractable hose reels even protect as well as preserve your hose from being replaced which is an expense and make sure that it always stays in proper condition to cater to your gardening needs.
Reduced Maintenance
Gardeners are usually required to do recurring activities on their job, but it doesn’t mean that winding up your hose should be one of them. Maintenance becomes a norm when you use non-retractable hoses as they’re continuously exposed to certain elements, and also undergo manual winding, which in turn leads to wear and tear.
This means more time and energy spent on maintenance. On the contrary, the retractable ones make your gardening more straightforward as they require minimal upkeep. Less wear and tear will result in less maintenance requirements for the hoses compared to the previous case.
The advantage of utilizing a water hose reel that’s retractive is that it provides automatic hose management and has a comparatively lower maintenance burden compared with traditional garden hoses.
Adjustable Length and Water Conservation
What is more, retractable hose reels are flexible. The reels are ideal in that they let one pick a specific length of hose used per gardening activity hence cutting down on water wastage.
They also ensure that you use water responsibly by ensuring that each drop delivered is essential only for the garden and that water is scarce in some areas.
Using a retractable water hose reel in gardening allows you to get it right by taking care of your garden while conserving nature.
Safety and Tripping Hazard Prevention
A garden can be very calm, and then a hose lying loose and entangled in your feet turns it into a threatening zone. Apart from being inconvenient, tripping accidents can be dangerous. Falls and other injuries due to non-retractable hoses may be common, but they often go unnoticed.
One method of solving the problem is the use of retractable water hose reels whose hoses are automatically retracted into their housing system upon use. Worry no more about stepping over or tripping over an errant hose and make your garden a safe place for you and your family.
Lastly, apart from avoiding accidents caused by tripping, a retractable garden hose reel enhances the general safety of the outdoor region as it prevents any obstacles that may cause congestion. However, this is a very straightforward but effective means of ensuring that your garden remains a place of relaxation and not a hub of accidents and frustration.
Mobility and Flexibility
A lot of times gardening also entails changing the location of the garden or switching taps to access different parts of the garden oasis you have established. Hoses that are not retractable can be messy to handle and may affect your freedom of movement making the operation even harder.
The flexible nature of the retractable garden hose reels is designed for convenience and lets you move the hose with ease. You can place these reels anywhere in the garden and you will be able to get all the corners watered without any difficulty.
You could connect to various faucets and move the hose when your garden undergoes changes in order to adapt. This increases the mobility that makes your gardening operations effective and interesting while at the same time, it allows movement to different areas without restriction at any time.
Accessories and Add-Ons
Moreover, most retractable hose reels are equipped with several useful attachments. Examples of these include adjustable nozzles, spray guns, and hose connectors. The add-ons empower you with flow controls that enable customization in line with your garden needs. These accessories make the reel more versatile and efficient whether you are caring for delicate plants or doing cleaning.
Final Words
The retractable water hose reel is a game-changer in gardening. It simplifies hose management, enhances garden aesthetics, and promotes safety while conserving water. By choosing a retractable hose reel, you’re not just simplifying your gardening routine; you’re transforming it into a more efficient and enjoyable experience. If you’re ready for the change, get in touch with Zephyr Watering right away.
Source Link[lifestylefun.net]
0 notes
Text
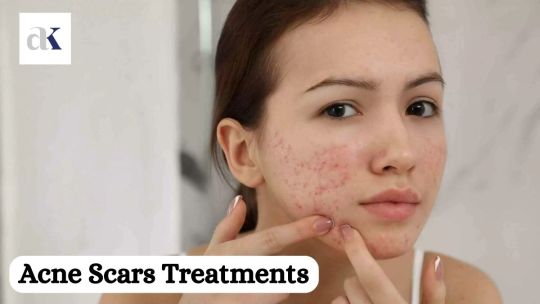
Unveiling the Truth About Acne Scars: Causes, Types, and Effective Treatments
Introduction
Acne is a ubiquitous skin condition that affects countless individuals, often extending beyond their teenage years. Beyond the physical discomfort and emotional distress it causes, acne often leaves a lasting reminder – scars in its wake. In this comprehensive guide, Dr. Atul Kathed one of the best Skin Specialist in Indore will delve deeply into the realm of acne scars, investigating their root causes, diverse types, and the most efficient treatment options at your disposal. Our objective is to provide you with the insights and remedies required to restore your confidence and attain the clear, unblemished skin you aspire to have.
Understanding Acne Scars
The Root of the Problem: Acne
To really get why acne scars happen, you need to know the ABCs of acne. Acne starts when tiny hair follicles get all clogged up with a mix of oil, dead skin cells, and bacteria. This leads to things like pimples, blackheads, and whiteheads. And if you don’t handle these properly, they can turn into scars
Why Do Acne Scars Form?
Not all acne cases end with scars, but when they do, it’s usually because the skin is trying to fix the damage caused by really bad acne spots. This fixing process can sometimes mess up the natural collagen production in your body, which can then create scars..
Types of Acne Scars
Ice Pick Scars
Ice pick scars are characterized by deep, narrow pits that resemble small, jagged holes on the skin’s surface. Their depth and irregular shape make them particularly challenging to treat, often necessitating professional intervention.
Boxcar Scars
These scars have a wider, more defined shape with well-demarcated edges. They frequently resemble the scars left behind by chickenpox and can be particularly difficult to conceal.
Rolling Scars
Rolling scars are identifiable by their undulating, wave-like appearance on the skin’s surface. These scars result from damage beneath the skin’s surface, affecting its texture.
Hypertrophic and Keloid Scars
Hypertrophic and keloid scars manifest as raised, firm, and sometimes itchy scars. They often occur when the body produces an excess of collagen during the healing process, resulting in more prominent scars.
Post-Inflammatory Hyperpigmentation (PIH)
While not technically scars, PIH can mar the skin’s surface with dark, discoloured marks after an acne lesion has healed. These marks typically fade over time but can be distressing.
Prevention and Early Intervention
Maintaining a Healthy Skincare Routine
Preventing the formation of acne scars begins with a consistent skincare regimen. This should include daily cleansing, moisturizing, and the application of sunscreen to protect the skin from harmful UV rays.
Avoiding Picking and Squeezing
Resist the urge to pick or squeeze acne lesions, as this can significantly increase the risk of scarring. Despite the temptation, it is essential to exercise restraint.
Effective Treatments for Acne Scars by Dr. Atul Kathed the Skin Specialist in Indore
Dermaroller – This is a special instrument, with microneedles, which is used to fill up superficial as well as deep acne scars. The procedure will even out the skin texture through collagen stimulation.
Dermastamp – This is an instrument, which has five small micro needles in it to treat localized depressed scars.
Laser – Laser-fractional resurfacing is a new technique where microscopic thermal wounds within the selected target area are created producing tiny dots, or grid-like treated areas on the skin), leaving the other zones within it perfectly intact. This causes fractional damage through the heat created in the skin. This allows the skin to heal much faster with minimal discomfort and less downtime as the healthy untreated tissue surrounding the treated zones helps to fill in the damaged area with new cells. Recovery occurs in 5-7 days.
There are different types of fractionated lasers:
Pixel (2940nm) – This is a fractionated ablative resurfacing Erbium Yag laser. This laser is very effective in treating superficial and deep scars.
Fraxel(1550nm)/Starlux Palomar Laser (1540nm) – These are non-ablative resurfacing lasers with Erbium glass which are effective in treating both superficial and deep scars
Light Systems – IPL acts by heating the dermis and stimulating new collagen formation. It is useful for treating red post-acne scars.
Chemical Peels – 70% Glycolic Acid peels can be done to treat hyper-pigmented, red and shallow scars. TCA peeling can be done for hyper-pigmented and deep-pitted scars. Spot TCA peeling is a very good technique for isolated ice pick scars.
Microdermabrasion – A fine stream of aluminium oxide crystals is used to exfoliate the skin’s upper layers. The intensity of exfoliation can be varied to suit an individual’s skin type from light exfoliation to deeper resurfacing. This procedure stimulates collagen production and renews skin elasticity; thereby, enhancing the skin tone and resilience. This treatment is useful for treating superficial acne scars.
Fillers – these can be used to raise sunken scars to the level of surrounding skin. Hyaluronic acid is a very safe injectable material that is used to restore structure and volume to the skin. It is a good and safe option. The effects are usually temporary lasting 6- 12 months.
Autologous fat transfer – Autologous fat transfer, is a procedure in which an individual’s own body fat is removed from the abdominal area, emulsified and put in the areas of volume loss e.g. sunken or emaciated areas of the face.
Radiosurgery – In this procedure, radio waves are used in ablative mode, to ablate the unwanted layers of the skin and flatten out the edges of scars and to promote collagen remodelling thereby filling up deep irregular scars.
Steroid injections – Intralesional Steroid Injections like Triamcinolone Acetonide 10mg-40mg may be used for raised keloidal and hypertrophic scars. These injections help to soften thick stubborn fibrous tissue.
Subcision – This involves subcutaneous sectioning of dermal adhesions with a sharp needle thereby lifting the scars. This technique is useful for very deep-pitted scars. ice pick scars, boxcar scars and rolled scars
The Importance of Professional Consultation
While some over-the-counter treatments may prove effective for mild acne scars, it is essential to consult a dermatologist or skincare professional like Dr. Atul Kathed as he is one of the finest Skin Specialist in Indore. Their expertise allows for personalized advice and treatment recommendations tailored to your specific skin type and scar type.
Embracing Confidence
Acne scars can really affect how you feel about yourself. But it’s essential to know that these scars don’t define who you are. With the correct treatment and proper care, you can reduce their visibility and feel confident in your skin again.
Consult Dr. Atul Kathed the best Skin Specialist in Indore
Conclusion
Acne scars, often seen as enduring symbols of one’s skin challenges, do not have to be a lifelong weight. Grasping the roots, varieties, and array of treatments for acne scars is the primary stride toward attaining smoother, unblemished skin. With the commitment to a diligent skincare regimen and the wisdom to seek expert counsel when required, you can embark on a voyage toward renewed self-assurance and a more transparent complexion. Consult Dr. Atul Kathed the best Skin Specialist in Indore for radiant, unmarked, glowing and natural skin.
#Best Dermatologist in Indore#Acne Scars#Aesthetics Skin clinic#Best Dermatology in Indore#Best Skin Doctor in Indore#Skin Specialist in Indore#Dermatology in Indore
0 notes
Text
How does the accumulation of DNA damage and the impairment of repair mechanisms impact the risk of cancer development and the aging process in our cells?
Hey there, let's dive into a super interesting topic - DNA and how it's connected to aging and cancer. I'm going to break it down for you in a casual, easy-to-understand way.
The DNA Damage Culprits
First things first, let's chat about what messes with our DNA:
1. Oxidative Stress: The Sneaky Culprit
Believe it or not, even something as vital as oxygen can mess with our DNA. It creates reactive oxygen species (ROS) during everyday cell activities, causing mutations and breaks. It's like tiny troublemakers inside our cells!
2. Environmental Factors: The External Troublemakers
Our DNA can also take a hit from external factors like UV rays, radiation, and chemicals. These guys are like the neighborhood bullies messing with our genetic code.
3. Replication Errors: Copy-Paste Gone Wrong
When our cells copy our DNA during division, they sometimes make errors, like typos in a book. These mistakes pile up over time, causing our genetic material to slowly crumble.
Discover all the benefits of feeling young again: >>>Try this today<;<<
When DNA Repair Takes a Vacation
In a perfect world, our cells have a repair team that fixes DNA damage. But sometimes, they go on vacation, and that's when the problems start:
1. Nucleotide Excision Repair (NER) Goofs
NER is like sunscreen for our DNA, protecting it from UV damage. But when it's not doing its job, the risk of skin aging and cancer goes up because of UV-induced mutations.
2. Base Excision Repair (BER) Slip-Ups
BER is supposed to fix small DNA lesions. When it fails, those tiny issues become big problems, leading to different types of cancer.
3. Double-Strand Break Repair Blunders
Double-strand breaks are like big roadblocks in our DNA. When the repair team doesn't handle them properly, it can lead to genetic instability, a red flag for many cancers.
Aging: The Slow Unraveling
As DNA damage adds up, it's like wear and tear on our bodies. One sign is telomeres shortening, which acts as the biological clock for our cells. More DNA damage means shorter telomeres, and that speeds up aging.
The DNA Damage-Cancer Connection
Now, here's where it gets really interesting. DNA damage and cancer are like old friends who don't get along. Let's see how they're connected:
1. Kicking Off Cancer
Accumulated DNA damage can turn healthy cells into cancerous ones. Mutations, especially in oncogenes and tumor suppressor genes, mess with cell regulation, leading to uncontrolled cell growth.
2. Pushing and Prodding: DNA Damage and Cancer Progression
More DNA damage means a juicier plot. Ongoing DNA damage pushes cancer to become more aggressive and resistant to our body's defenses.
3. Battling Treatment Resistance
Cancer cells with lousy DNA repair systems can also become tricky. They become resistant to treatments like chemotherapy and radiation, making the fight against cancer even tougher.
Wrapping It Up
In the grand story of biology, DNA damage and impaired repair systems play central roles in the drama of aging and cancer. Understanding these connections is vital as we search for ways to prevent and treat these life-changing conditions. With every new discovery in our DNA, we move a step closer to a healthier, brighter future.
Discover all the benefits of feeling young again: >>>Try this today<;<<
0 notes
Text
Bird Netting Benefits

Bird netting is a highly effective and humane bird control solution that offers several benefits. Here are some of the key advantages of using bird netting:
Prevents Bird Entry: Bird netting creates a physical barrier that prevents birds from entering and roosting in specific areas, such as buildings, gardens, warehouses, and agricultural fields.
Humane Bird Control: Bird netting is a humane method of bird control. It does not harm birds but simply deters them from accessing protected areas, reducing the risk of harm to the birds and the need for lethal control methods.
Versatile: Bird netting is versatile and can be used in various settings and locations. It can be customized to fit specific areas, making it suitable for both residential and commercial properties.
Long-Lasting: High-quality bird netting is durable and long-lasting. It can withstand exposure to weather conditions, UV rays, and other environmental factors, making it a cost-effective solution over time.
Protection from Damage: Bird netting helps protect structures and property from bird-related damage. Birds can cause structural damage, clog drains with nesting materials, and create unsightly messes with their droppings—all of which can be costly to repair.
Crop Protection: In agriculture, bird netting is used to protect crops from birds that can consume or damage fruits, vegetables, and grains. This helps farmers increase crop yields and reduce losses.
Improved Hygiene: By preventing birds from roosting in or around buildings, bird netting helps improve hygiene and reduces the spread of diseases and parasites carried by birds.
Preservation of Aesthetics: Bird netting is often designed to be discreet and nearly invisible, allowing it to blend with the surroundings without detracting from the aesthetics of a property.
Reduced Cleanup and Maintenance: Bird droppings can be difficult and costly to clean up. Bird netting reduces the need for frequent cleaning and maintenance of affected areas.
Environmentally Friendly: Bird netting is an environmentally friendly solution that does not involve the use of chemicals or lethal methods, making it suitable for eco-conscious individuals and businesses.
Compliance with Regulations: In some areas, there may be regulations and health codes related to bird control. Bird netting can help businesses and property owners comply with these regulations.
Customizable: Bird netting can be tailored to fit specific areas and bird species. Different mesh sizes are available to deter various types of birds effectively.
Year-Round Protection: Bird netting provides year-round protection against bird-related issues, ensuring continuous benefits regardless of the season.
Non-Harmful to Beneficial Birds: Bird netting primarily targets pest birds, leaving beneficial and native bird species unaffected.
Reduces Noise and Disturbance: By keeping birds away from areas where they can create noise and disturbances, bird netting helps maintain a quieter and more peaceful environment.
Overall, bird netting is a comprehensive and sustainable solution for addressing bird-related problems in various settings. Its versatility, long-term effectiveness, and human nature make it a preferred choice for many property owners and businesses.
Deepthi Enterprise offers the best service across Chennai, they have a well trained team of installation professionals, who can Customize and fix safety nets perfectly as per your requirement. For more details, please visit https://deepthisafetynetschennai.com/
#balcony safety nets in chennai#pigeon net for balcony chennai#safety nets chennai#pigeon safety nets chennai#anti bird nets chennai#balcony nets chennai#balcony safety net chennai#safety net chennai#bird net for balcony chennai
0 notes
Text
Bird Netting Benefits
Bird netting is a highly effective and humane bird control solution that offers several benefits. Here are some of the key advantages of using bird netting:
Prevents Bird Entry: Bird netting creates a physical barrier that prevents birds from entering and roosting in specific areas, such as buildings, gardens, warehouses, and agricultural fields.
Humane Bird Control: Bird netting is a humane method of bird control. It does not harm birds but simply deters them from accessing protected areas, reducing the risk of harm to the birds and the need for lethal control methods.
Versatile: Bird netting is versatile and can be used in various settings and locations. It can be customized to fit specific areas, making it suitable for both residential and commercial properties.
Long-Lasting: High-quality bird netting is durable and long-lasting. It can withstand exposure to weather conditions, UV rays, and other environmental factors, making it a cost-effective solution over time.
Protection from Damage: Bird netting helps protect structures and property from bird-related damage. Birds can cause structural damage, clog drains with nesting materials, and create unsightly messes with their droppings—all of which can be costly to repair.
Crop Protection: In agriculture, bird netting is used to protect crops from birds that can consume or damage fruits, vegetables, and grains. This helps farmers increase crop yields and reduce losses.
Improved Hygiene: By preventing birds from roosting in or around buildings, bird netting helps improve hygiene and reduces the spread of diseases and parasites carried by birds.
Preservation of Aesthetics: Bird netting is often designed to be discreet and nearly invisible, allowing it to blend with the surroundings without detracting from the aesthetics of a property.
Reduced Cleanup and Maintenance: Bird droppings can be difficult and costly to clean up. Bird netting reduces the need for frequent cleaning and maintenance of affected areas.
Environmentally Friendly: Bird netting is an environmentally friendly solution that does not involve the use of chemicals or lethal methods, making it suitable for eco-conscious individuals and businesses.
Compliance with Regulations: In some areas, there may be regulations and health codes related to bird control. Bird netting can help businesses and property owners comply with these regulations.
Customizable: Bird netting can be tailored to fit specific areas and bird species. Different mesh sizes are available to deter various types of birds effectively.
Year-Round Protection: Bird netting provides year-round protection against bird-related issues, ensuring continuous benefits regardless of the season.
Non-Harmful to Beneficial Birds: Bird netting primarily targets pest birds, leaving beneficial and native bird species unaffected.
Reduces Noise and Disturbance: By keeping birds away from areas where they can create noise and disturbances, bird netting helps maintain a quieter and more peaceful environment.
Overall, bird netting is a comprehensive and sustainable solution for addressing bird-related problems in various settings. Its versatility, long-term effectiveness, and human nature make it a preferred choice for many property owners and businesses.
Deepthi Enterprise offers the best service across Chennai, they have a well trained team of installation professionals, who can Customize and fix safety nets perfectly as per your requirement. For more details, please visit https://deepthisafetynetschennai.com/
#balcony safety nets in chennai#pigeon net for balcony chennai#safety nets chennai#pigeon safety nets chennai#anti bird nets chennai#balcony nets chennai#balcony safety net chennai#safety net chennai#bird net for balcony chennai
0 notes
Text
Opt for Premium Quality Timber Flooring in Melbourne from Well Established Suppliers
Manufacturers providing Timber flooring in Melbourne have a long history of bringing warmth and relaxation to households and businesses because of their amazing nature. For your home or place of business, these hardwood floors can design and install premium hardwood flooring. To raise the value of your house, pick from a variety of attractive flooring options.

Long-lasting carpet tiles can also be used as Laminate flooring in Melbourne. Your property will be fashionable and contemporary if you choose wood flooring in Melbourne. It is a great way to add class to the look and feel of your home or place of business.
What are the Perks of Installing Laminate Flooring Solutions?
Due to its affordability, laminate flooring is the most well known. Compared to natural timber, which can be rather pricey depending on how exotic the tree is, laminate flooring is far more economical because it is primarily created from composite wood that is compressed together at high temperatures. The laminate floorboards' top layer will withstand heavy foot traffic, boisterous children, and pet claws. Additionally, UV resistance makes it less probable for the colour of the floors to fade over time.
Will Floor Cleaning and Polishing Aid in Flooring Restoration?
Your wood flooring will last longer if you use these Melbourne hardwood floor sanding and polishing services. They may fix any scratches, re-smooth the ground, and give the flooring a gorgeous gloss.
Since they are concerned about our customers' security, they make sure that these items are both safe and environmentally friendly. You can therefore just let your kids engage on the carpet without worrying that they will become sick.
Additionally, these companies wipe up after themselves, leaving your floors spotless and ready for use. Professional services are delivered without making a big mess or harming your home. This implies that over time, you not only pay inexpensive prices but also receive excellent value for your money.
Source
0 notes
Text
What You Need To Know About Vehicle Home Window Tinting

Tinting your window is a fantastic method to reduce your automobile's energy bill and decrease your carbon impact. However, there are some points to consider prior to deciding to tint your automobile's windows. First, there are the price factors to consider. The film itself is affordable, however it is very important to bear in mind that home window tinting needs professional setup, not a do it yourself work. Executing the process on your own is unwise because you'll take the chance of making mistakes that need to be fixed as well as may result in an untidy mess.
Home top tint in durham also assists shield your eyes from UV rays as well as prevent eye stress. There are various kinds of window films available. You can select a clear movie, a colored movie, or a mix of these. The most typical alternative is colored movie, which is the most cost-effective and long lasting, as well as it provides your vehicle a colored appearance. Nevertheless, dyed film will not provide the very best UV defense or warmth resistance, as well as the tint may wind up decolorizing with time. Carbon film is one more option and also is additionally an excellent option for blocking UV rays. If you choose to do the job on your own, remember to check the service warranty of your window tinting movie. Some producers supply lifetime guarantees, while others only supply a year's worth of defense. Likewise, make certain to ask your home window color buy certain post-purchase constraints. For more details on window tinting, check here!
Generally, window tints require that you not roll down your home windows for a day approximately to ensure the adhesive has completely cured. An additional benefit of window tinting is that it will prevent your cars and truck's home windows from barging in a mishap. Tinted glass likewise makes it challenging for thieves to enter your auto. The tint also provides privacy to the vehicle driver by avoiding prying eyes from seeing what's within. The tinting will certainly make your cars and truck look even more elegant, and you'll have less to stress over while driving. Colored windows can likewise shield you from harmful UV rays. The sun's ultraviolet rays can create damage to your skin, which can trigger premature aging and skin cancer cells. Even conventional vehicle windows can be tinted to safeguard you from sunlight damage. Home window colors likewise secure the inside of your cars and truck from fading. If you probably want to get more enlightened on this topic, then click on this related post: https://en.wikipedia.org/wiki/Window_film.
Film tinting is the most basic and most cost-effective technique. It involves applying a slim film to the window glass and also comes in a selection of colors. Some automobile experts say that movie tinting avoids glass from shattering throughout a crash. However, this safety and security benefit only lasts for a few months. The film is likewise susceptible to peeling as well as fracturing. Home window colors can be used manually or by a professional. A professional home window tint installer can measure the windows as well as reduce the color to fit them. While the procedure is quick, it can take even more time if accessibility to the window is hard or the room is as well tiny to fit the movie perfectly.
1 note
·
View note
Text
Retractable Clothesline

Indoor Clothes Line
BASIX contains the option of installing a typical space clothes drying line in multi unit developments. See also the Building Code of Australia provisions for minimum indoor clothesline size or laundry facility measurement in multi-unit residences. As a housewife, it is rather troublesome to handle each and everything that fits into everyone’s necessities. A main concern was of garments drying as I am staying in the flat and the duty creates an enormous mess. Then I brought my Ecodry Clothesline and it's so easily transported elsewhere as it's so gentle in weight. It is also very robust and holds an in depth weight of clothes.
Covered wire core that may store moist clothes Sunlight and weather-resistant good for every day ... Offers excessive power and durability with permanent colors Easy to scrub, long-wearing, and can be used inside or exterior the house Ideal for individual objects of ... Is excellent for interior and exterior purposes, including as a replacement line for the rotary ... The UV stabilised plastic coating with a flexible wire core can retailer moist clothes ... Air drying clothes isn't just power and cost-efficient, however is nice for the longevity of your clothes too! Find one of the best garments drying rack with Howards' range of indoor and outdoor clothes airers, garments horses and wall mounted drying racks from finest manufacturers like Artweger and Leifheit.
Ceiling Mounted Clothes Line
Renters don’t worry, only 5 screw holes to put in, straightforward to patch-up when you take your rack and move-on. Hand-crafted in long-lasting plantation hardwood, with through joins, steel fixings, sturdy crusing cord and low friction crusing pulleys. Leave clothesline hassles exterior — no dashing to beat the rain or dusk. Your washing dries gently out of the way in which and you retrieve it when it suits. We use ours all year spherical just for that comfort. Instahanger Clothes Airer Create an immediate drying space with the wonderful new Instahanger just released in Australia!
Also the pulley MUST be fitted into the sloping ceiling at an angle to the slope so the pulley is installed vertical to the floor, just as they would be if the ceiling was a flat ceiling. Keep updated with the most recent product information, house living inspiration and events. At Australian Made Clotheslines, we believe you've the power to alter this. A thought-about laundry should assist us to include intention into our environment whilst performing multiple features and maximising space. Below are some concepts that will help you obtain this in your own house.
Indoor Wall Mounted Clothes Line
Check out each product to seek out out its color choices. The hook on the receiving end for wall to wall or submit to wall configurations should even be fixed in a stud. Usually no again board is required in this case as just one stud is required. This only applies if your retractable configeration is a "wall to wall" or a "wall to publish".
Tier A-Frame Airer has a 31m of line area, allowing to dry more clothes directly. With anti slip protecting toes to maintain the clothesline from collapsing, it's good for accommodating small ... Folding Clothesline Post Mount Heavy Duty Steel Cements into ground Folding Clothesline Post Mount Heavy Duty Steel Cements into floor Heavy Duty Galvanised & Powder Coated Steel. Compatible with Hills Single & Double Midnight Sky folding body. Enables folding frame to be put in ...
Wall Mounted Clothes Line
Just observe the steps below and you may be properly in your approach to making a great decision. Or call us throughout working hours and we are in a position to advocate one. We’re proud to be the largest supplier & installer of Australian made clotheslines within the country. Here you’ll find precisely what you need, plus assist our nice nation's economic system, small companies and families along the way in which. Excellent, actually pleased with this clothesline which was custom made for our actual wants. When your clothesline is delivered, contact your allotted installer and quote your order quantity.
Our installation group are notified overnight about your upcoming set up and will start scheduling you in for a rough day and time in your set up. Made to Order Clotheslines (Air Dry - Made to Order) will take longer to be delivered as these are particularly manufactured to swimsuit your requirements. Please think about this when placing your order. Estimated lead times are on the product pages, additionally it's essential to note the Air Dry - Made to Order product can't be returned.
https://retractableclothesline653.blogspot.com/2022/08/retractable-clothesline.html
Pull out clothes line
Pull out clothes line
Pull out clothes line
Indoor clothes lines
Indoor clothes line
Ceiling mounted clothes line
Indoor clothes lines
https://affordablevideodevelopmentpa.blogspot.com/2022/08/affordable-video-development-pa.html
https://cheap-website-deveopment.tumblr.com/
https://cheap-website-deveopment.tumblr.com/rss
https://affordablevideodevelopmentpa.blogspot.com/
https://affordable2ddevelopmentpa.blogspot.com/
1 note
·
View note
Text
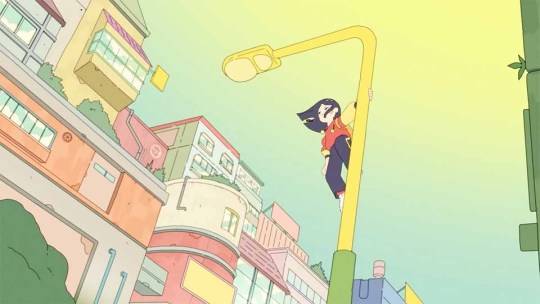
GCDS x Bratz (Yasmin)
Hi! it’s 4am
My GCDS x Bratz Yasmin came and I was way too excited not to rip her out and style her a little lol
If you’re not aware, Bratz did a collaboration with Italian streetwear brand GCDS that includes clothing, accessories and a set of two dolls, along with an incredibly immersive promo campaign unlike any I’ve seen for Bratz since, like, Forever Diamondz honestly- cars emblazoned with the Bratz artwork, an animated billboard, pop up shops in Europe, a gorgeous photo shoot and even a set of massive hand sculpted Bratz mannequins along with custom OOAK celebrity dolls sent as PR and drag queens recreating the doll’s looks to promote the launch - like, this is a CAMPAIGN.

I was truly not expecting much from this launch when the listings leaked early this year, especially because Bratz’ branding has been a huge mess since 2019 and MGA seemed to care very little about the brand beyond Spencer’s merchandise and nostalgia pandering (and also because the 2018 was so frustratingly terrible- see my very impolite review here), but this line absolutely delivered for me in every way possible, both as a doll launch and especially as a Bratz launch. I don’t know who handled this collection at MGA but every aspect is infused with the essence of what made Bratz great and I feel so rewarded after waiting SO LONG for them to actually get something right. The 2001 repros definitely impressed as well but not to this degree (and we won’t talk about the tragic RA repros- though they are allegedly fixing them for the next batch so that’s nice!)
I’m not going to do a full review but my friend posted one here and you can find more information about the launch from my other friend’s website Lookinbratz lol
My basic summed up thoughts are as follows:
-Clothing is amazing quality with unique designs, based on actual GCDS clothing pieces- the shoe and accessory sculpts are also entirely new, which is something we haven’t seen for non-2015 bratz since 2013!!! Very exciting!!
-The doll herself is absolutely stunning; a brand new screening based on some of the older Bratz screenings (very similar to Secret Date with some changes in shadow and iris design), gorgeous, thick, shiny nylon hair. It’s actually surreal for me to be handling a modern Bratz doll with a screening that feels so much like the originals but with modern makeup and eyebrows. They do have UV-printed eyes, but this is largely not noticeable on the dolls themselves so I’m not bothered by it.
-The box is GORGEOUS, incredibly well executed presentation. The box is so heavy and luxurious, the artwork is gorgeous and it feels so incredibly fresh while staying true to the Bratz DNA. The bottom portion turns into a large stand base, which can also be taken apart and made into a smaller rectangular base.
-Quality control is excellent- I have yet to see any Yasmin dolls with flaws that I would consider unacceptable for a collector or playline doll (though Sasha’s QC seems to be worse, especially for her lipstick and hairline)
And with that, here’s my Yasmin (well, one of them-I got two so I’d have an NIB one to display)
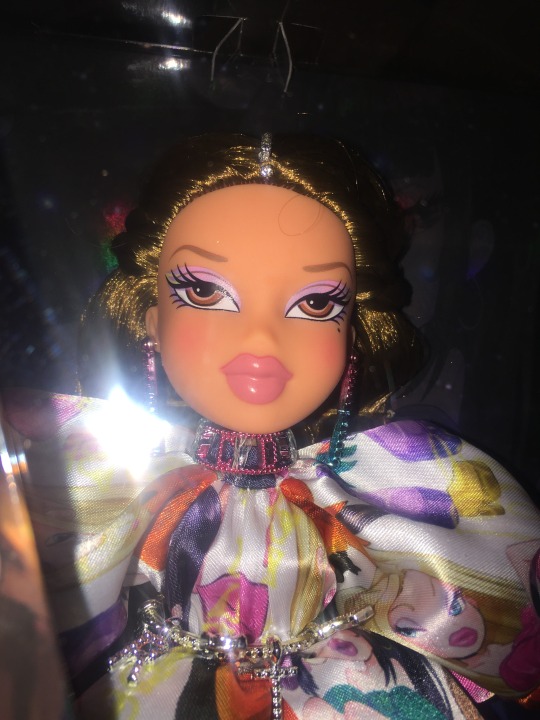
Surprisingly I didn’t wash her hair right away (which I tend to do with every doll) because she is so beautiful that I actually wanted to enjoy her without making any changes from the jump.
Her hair is LONG. Like, past her ankles long, and it’s basically uncut. So while I love a doll with super long hair, once I did wash her I decided to cut an entirely new set of layers in her hair to make it look less bottom-heavy.
She’s sitting like this right now until I dress her up again:

LOOK AT HER
I only have a few small qualms with this launch:
-They come on the 2018 body ( a hybrid of the 2001 torso, 2007 Movie Starz articulated arms and 2013 hands) which I truly dislike; the 2001 torso was outdated for it’s time and it’s incredibly archaic now, and I wish MGA would invest the time and money into either creating a new body sculpt for Bratz, or utilizing their older/better body sculpts- specifically the Sisterz Kiani body, which is proportionally very similar to the 2001 body with a more aesthetically pleasing torso and modern hip articulation.
-Yasmin’s skintone is not only different from her original skintone, but also from the 2001 repro and the (orange) 2018 doll; I actually think GCDS has a much nicer skintone than the previous versions (it has a little more pink to it) but it does mean that I can’t put her on a new body, which sucks lol. This is kind of a nitpick so I’m not really that bothered by it.
-I do think it would have been nice to include a second outfit, given that both Yasmin and Sasha come with very few pieces; however the pieces they do come with are very nice and made with quality materials, so I’m not super upset about it.
Otherwise, this is my favorite Bratz launch in over a decade and I really hope they keep doing stuff like this for them. Considering how successful this launch has been (they sold out everywhere on launch day), I really hope MGA can take this as a sign that Bratz requires this level of effort to be good and that adult doll collectors should be their primary target audience going forward.
Hopefully my GCDS Sasha dolls and Holiday Felicia will be just as stunning as Yasmin when they arrive!
21 notes
·
View notes
Note
I'd been trying my hand on using the model extractor as well with the bosses from 3, and I just gotta ask--have you ever encountered a problem where you exported the models and imported them to blender with the uv mapping all wrong? spike looks like a garbled mess texture wise when I tried applying the uv map on blender
i have had some texture issues with a handful of models ripped with SME, but spike seems to rip fine for me!

my issue with textures usually happens when the texture image for some reason rips looking like this:

if this is your issue, i found a long-winded work around using spyro edit to get a working copy of the object textures and manually cobbling the texture image back together in a photo editor by copying the order seen in the SME viewport x_x
but for me spike’s textures ripped ok:

if your texture image ripped okay, what might be your problem is some of his faces are UV’d+textured, BUT the rest of of his faces use a different material that is vertex color only (doesn’t need the texture image plugged in). so there are two separate materials needed to shade him. sometimes when a model has separate materials that have different shading parameters, they rip and then import to blender as two separate mesh objects packed into the same fbx/dae file. you can see this if you import the model and click on a part of the mesh, you should see only some polys highlight. what you’ve selected will have a unique material from the other object(s)

so add a shader to those polys, select the other polys and create a duplicate of the first material, and unplug the image texture image from the other shader. to break it down..
have a textured material applied on one of the objects here (don’t forget alpha clipping in material settings on the right, to make the texture around the eyes appear transparent). most of his body uses this textured material:

when you’re done, click the unshaded polys, and go ahead and add that same material to the other object too and then make a copy of the material like so (see it’ll look funky for a second):

fix the new material by removing the image texture in the shader editor:
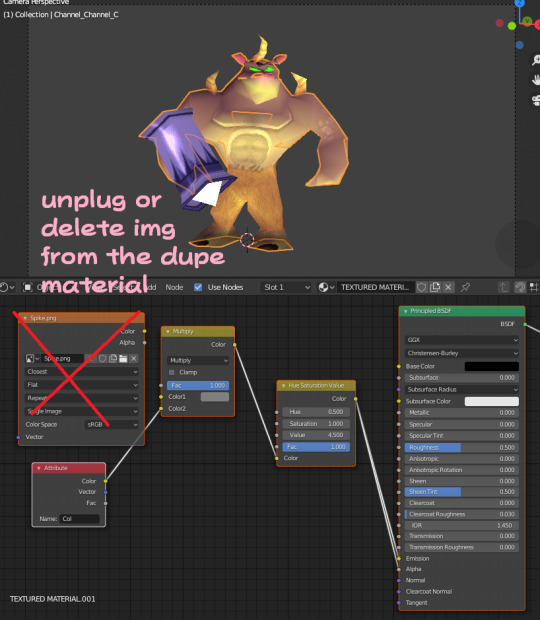
the color on Color1 in the Multiply mixRGB node should be made grey at .5 value like i have above, to blend the two material types seamlessly!
good luck!
23 notes
·
View notes
Note
How long does it usually take you to make a piece of cc? Your custom content is absolutely amazing by the way! It all looks so wonderful!
It honestly depends on the piece and my mood. Sometimes I can make and knock a hair out in 1-2 hours. Other times I can spend 8+ hours on something and still need to make a ton of little fixes. I’m working on a hair right now and I’ve probably fiddled in photoshop to match textures more than I’ve been in blender. I would say the longest I’ve worked on a hair would be my Naomi hair. I was learning how to make a specular map from scratch, it was a huge UV mapping mess for me, and I was still learning how to make actions in PS to create textures for me. On the same scale, Paris and Elli were also very hard to make. I just remember the braided texture/mesh on top of Naomi was a nightmare.
57 notes
·
View notes
Last Seen Blogs

lizx0x0x0
miss you most

nanatto
Carpe Diem

fritslit
Untitled
pixelatedshimmer
Pixelated Shimmer

cath-zhiluo
ド派手に行くぜ!!!