#free alternative apps
Explore tagged Tumblr posts
Visit Tumblr Blog
Explore Tumblr blogs with no restrictions, modern design and the best experience.
Last Seen Tumblr Blogs


Fun Fact
In 2020, 27% of US Tumblr users had an annual household income of over $100,000.
Text

:] hehehe
#buds musings#art wip#hilda fanart#soldier poet king#animation#animating using blender cause i didn't find a better alternative...#feel free to discuss and argue in the notes on which app i should use for this uvu <3
25 notes
·
View notes
Note
i just ended my duolingo streak back in march at 2102 days because of the ai!!! i just couldn’t do it anymore but it was also one of my things i needed to do. it’s been so nice and freeing not doing it anymore honestly.
aghhh yeah i really should delete it! it's pretty much useless and i'm only beholden to the Streak because i'm insane :')
#congrats anon for being free of that green dick of a bird! he popped up just a second before i answered this ask :')#i think i'll let my streak die at 1919 days. and uninstall the app and shit.#where will i hear terrible french now? (i was learning for jean hashtag jeremycore)#i was looking into alternatives but the main reason i used duolingo at all is it's FREE#i'm a poor motherfucker i do not have $20 to spend on a language app#(i literally saw one where someone in the reviews said that was the monthly cost and almost shit my britches wtf)#anyway though. maybe i'll check out some language textbook from libby or smth! do it the real jeremy way :) lol#it would probably work better anyway#wtf does duolingo think i need to say my cat's husband eats spiders. in french? like girl what???#anyway! ty anon#anon#answered
7 notes
·
View notes
Text
Evernote to Notion Tutorial!
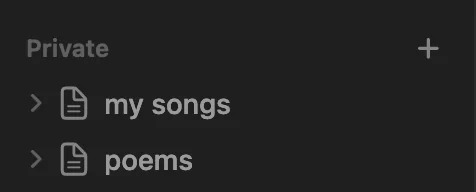
As an avid Notion user whose first love was Evernote, I was also very upset at the sudden high charge and limit of Evernote to 50 free notes... I already had 565 notes in there, and was a fan of the simplistic yet useful mechanism for taking notes with a click, organizing them in notebooks, and being able to use tags, archived files, etc.
So I have taken it upon myself to recreate the mechanism as closely as possible.
This is my final result: easy to make into your own!

Template link, though I suggest looking over this tutorial most of all:)
I also have to say, I love how it is relatively great for the mobile option as well! Especially with my gallery views and button for new notes.


**I recommend using a computer/laptop for this!
Step 1: Importing all your notes
- Instructions directly quoted from the Notion website:
You can import all of your Evernote data into Notion in one go, and retain its organization.
From the import window, choose Evernote
Sign into your Evernote account.
Authorize Evernote to connect to Notion.
Once your Evernote account is linked, check the boxes next to the notebooks you'd like to move and click Import
Your Evernote notebooks will appear as pages in Notion's sidebar. Inside, you'll find your notes as items in a list database.
Each note can be dragged and dropped anywhere else within Notion
Step 2: Move notebooks into ONE database
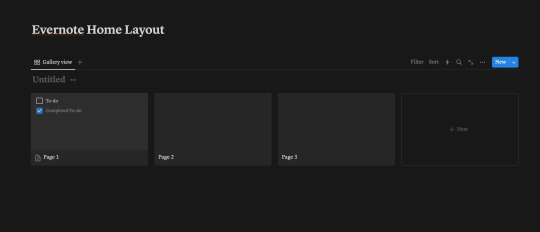
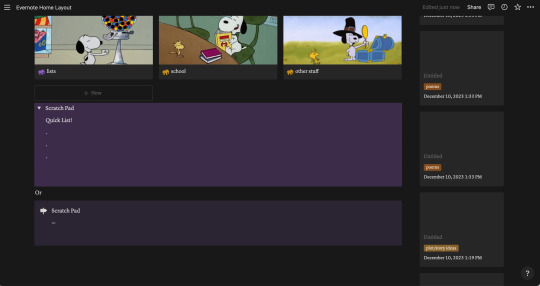
Let all your notebooks load correctly -- I personally checked the amount of notes each notebook had to match the ones in Evernote. The notebooks will go into the Notion pages on the sidebar like the picture, and each page will automatically add the notes into a NEW DATABASE table, which tells the amount of notes at the bottom.
Create a new blank page: this will be your EVERNOTE HOME layout
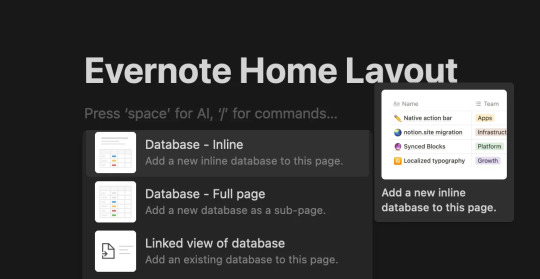
Inside this page, create a New Database (preferably in Table form)

This will be the MAIN DATABASE
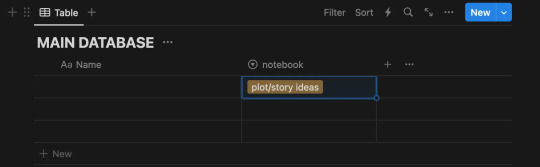
In this database, click ...
Then click + Add a new property and click Select.
I named the property "notebook". Then include in the options all the different notebooks you had in Evernote! Here is my specific example:

4. Add ALL the notes to the new database
Each "notebook" is automatically a separate database, we don't want that!
With tedious work, copy all the notes from the first notebook into the new database
Go into the first "notebook" (on the sidebar, just imported from Evernote) and press CTRL-A or Command-A to select all the notes. Then copy them with CTRL-V or Command-V.
Then go into your EVERNOTE HOME LAYOUT
Paste the notes into your MAIN DATABASE
Make sure the notes are inside the database, they will be part of the MAIN DATABASE table!
WARNING!!! BEFORE PASTING THE OTHER NOTEBOOKS' NOTES:
After pasting the First Notebook notes on the MAIN DATABASE, put the correct notebook property in each one!
I could not find a better way to do this than selecting a Single Note > Click on the "Notebook" property > Select the preferred notebook ("plot/story ideas") > click away > click back on the square until it is selected (the whole square turns blue) > then copy it (CTRL-C or Command-C) > then select the rest of the notes in that property column (like in picture 3) - and pasting the property to all of them at once.

(select property + CTRL-C or Command-C)
(select the rest of the notes - for ease, click on one, then press SHIFT and arrow down!)
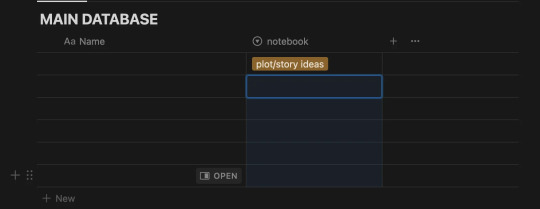
(Paste the property to the rest of the notes all at once)

-- Thank you @ myself for complicating a very simple procedure --
Continuing:
5. Next - copy and paste the notes of each note book into the MAIN DATABASE, each time making sure you add the "notebook" property as said in Step 4.
For ease: I found it helpful to sort the notes (... > Sort > Updated > Descending)
When this is done, you should have all your notes into a single database (MAIN DATABASE), organized by notebooks.
Make the Evernote Home Layout - 2 options
*If you're new to Notion, you will slowly get the hang of databases, don't worry. I am making this as detailed as possible:)
Option 1: Use my free template!
Please let me know if you have any problems accessing it.
Option 2: Follow my instructions and make your layout your own
You can follow my steps as I create my preferred layout, and change things around (magic of notion) to make this into your own.
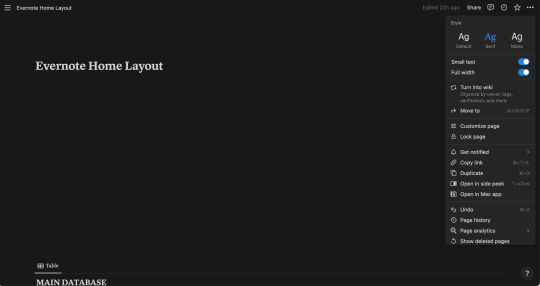
I prefer to make my page Full Width, Small text, and change the font (upper right corner: ...)
With the space bar I give some space to the whole ordeal.
Now, what exactly am I saving from a normal Evernote Home Page?
Recent notes
Scratch pad
(Would be so very easy to get a pinned note, and recently captured as well, though I don't do this in this tutorial)

Notebooks Gallery Tutorial
Press anywhere on the page > Click + > Scroll and Click on Gallery View > Click New Database
It should look like this
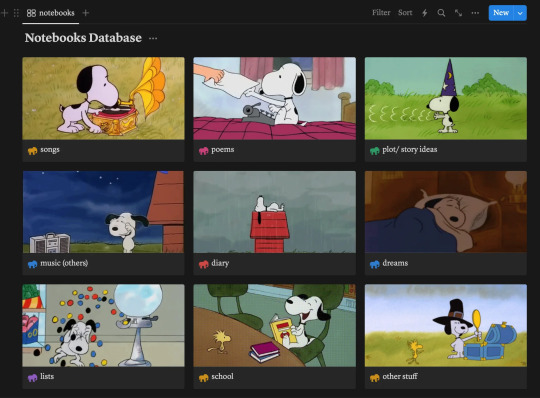
This here is a new database that we will call "Notebooks Database"
Each page shown there can be each notebook, and if you don't wish to show it in Gallery view, and instead have a simple list, you can!
For that Press ... > Layout > List
I will continue showing how to make the Gallery View like my own layout however:)

You can customize each page by clicking on it, changing the name (to each notebook you have), adding a cover and icon, however you wish.
Notion Tip: Instead of having to download images, you can Copy Image Link to almost any GIF of image on Google, Pinterest, etc, and then pasting the link!

Make sure you select "Page Cover" to be shown for your Notebooks Database Gallery View!
... > Layout > Gallery > Card Preview > Page Cover
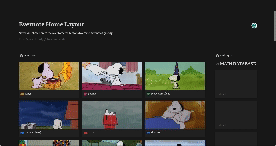
My final result:
Notion Tip: To hide the name of "Notebooks Database", click the three dots ... next to it and click Hide Database Title
2. Recent Notes Gallery Tutorial:
To explain how to add the RECENT notes view I will make a video:
This is exactly what I do:
Make space after the title > Move a Block next to another Block to create 2 columns > Drag the Notebooks Database Gallery to Column 1
In column 2: Add a New Gallery View > Choose Main Database > Add whatever Properties you would like shown > Sort > By Created Time/ Updated Time (depending on preference)

For this one, make sure you put "Page Content" to be shown
... > Layout > Gallery > Card Preview > Page Content

3. New Note Shortcut Button Tutorial
To add a button so you can quickly add a new note like in Evernote, do the following (shown in the video below)
Click anywhere > + > Button > Add page > (Add page to) "MAIN DATABASE" > (Delete the name property) > + Add another step > Open Page > Select Page > New Page Added
Explore all the other features of this new button!
4. Finally, customize each Notebook Page:
Click on each Notebook page > Add a Gallery/List/Table view > Filter > Choose selected notebook tag > Sort > Updated time > Descendant
(video/gif tutorial shows how i personalized mine, I still have more stuff I want to add but those are the basics!)
BONUS: Add a Scratch Pad
Click anywhere > + > Add a Toggle List > ::: > Customize color
OR
Click anywhere > + > Add Callout > Customize color and Icon
Thank you for following this tutorial and I hope it was helpful and less daunting for new Notion users after the Evernote downfall:) Please send any questions, feel free to add your own ways to make things easier and other tips and hacks you may have!
#evernote#notion#evernote alternative#notion tutorial#notion template#notion free template#notion dashboard#organization#notes app#productivity#productive#notes#time management
82 notes
·
View notes
Text
Got a new word count tracking site that I'm gonna use for my next writing challenge that I'm going to start November 1st! The site is TrackBear (https://trackbear.app/) and so far I'm into it.
You can create multiple projects:

You can create goals and set the goals to update with either all projects, specific projects you select to count towards your goal, or progress updates that are tagged using a specific tag that would count towards your project:
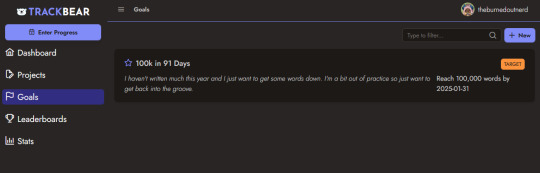
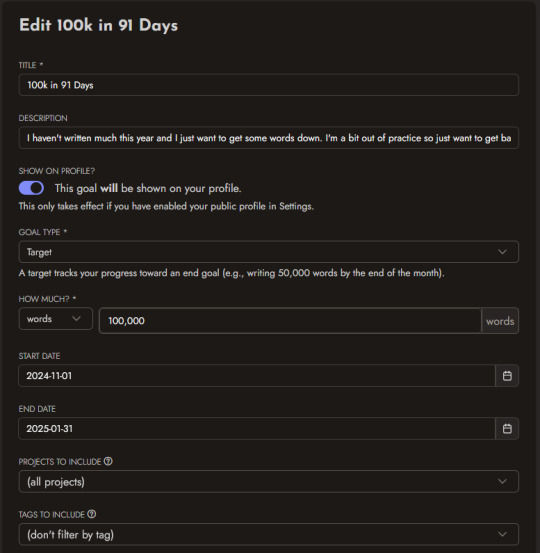
I haven't tested the other stuff yet because I just created this account and am only going to start putting it to work tomorrow, but it just came out of beta so I'm sure someone else has opinions. The leader board page has a button where it looks like you can invite people to your challenges.
A friend tossed this my way as a replacement for NaNoWriMo, and I'm here for it.
Wish me luck, homies.
Mutuals Taglist
@saphoblin @thelordgrey @sarahlizziewrites @rickie-the-storyteller
#new tech#nanowrimo alternative#trackbear#trackbear app#new apps#word count tracking#writing project tracking#free stuff#writing resources#a burnedoutnerd production#this was more effort than I've put into this site in years
16 notes
·
View notes
Text

finally learning some useful phrases
#ro speaks#side note—anyone have any suggestions for alternative free language learning apps?#duo is shifting to ai and im not here for that#duolingo
5 notes
·
View notes
Note
okay so now that tumblr maybe exploding for Actual real this time do you have like a discord or something? I like talking to you! Mutual I talk to the most tbh
I'm on Discord under the same username (Jeiseny), but aside from that and AO3 (also same username) I'm really not anywhere. And I barely use Discord too, I haven't opened it for what, 9ish? months in a row before I really needed to, so I think it's fair to say I'm very much unreachable outside of Tumbrl. I also don't like DMs too much and I never join group chats/communities/servers/etc so your chances of contacting me elsewhere are pretty slim I won't lie. If tumbrl goes down, I'm going down too lol
#jay rambles.txt#jay gets asks.txt#I have a burner account on twitter I used to write to tumbrl support and it's a miserable time#but I don't use it#I think you're better off straight up writing to my email than getting me to talk on discord#discord freaks me out for some reason. neophobia or something#the thing is I've been enjoying pjsk for 2 years off internet and other media the same way for longer#I'm perfectly content to going back to that. if I don't have a comfortable place to yap and then I just won't#I'm getting this public in case some people are wondering about it too#discord just fundamentally doesn't operate the same as tumbrl so I see no point in maintaining it#I just have it for Gaming in case I need it#by all means feel free to message me on there just be aware I'm like. still side-eyeing that app#I've seen some alternative options for tumbrl and none of them seem appealing I won't lie
2 notes
·
View notes
Note
if it's okay, would you mind sharing your art process? your style is SO gorgeous dude. keep it up spardacest nation!!!
Thank you so much anon, and of course! I kinda posted about it on twitter a while ago, but for anyone not also on there, here's a paraphrasing of what I said there! (under a cut bc it's gonna get a bit long)
(speedpaint video from procreate mostly bc like I also said in that post, it's one of the few pieces I've done entirely on procreate and thus entirely recorded kdfjhdk I usually don't do the sketching + painting parts on there but every now and then I get lazy and want to get it all done quick in one program lol! It's not as good as it would look if I were using krita to render (which is what I normally use) but it gets the idea across decently of what it is that I do)
The short version of my process is: sketch, clean up sketch for lineart, then flat colors, then paint over the flats (i make the flats my shadows and paint on the light), then a multiply layer for skin details (like lips, eyebags, etc), then an overlay layer for skin transparency details (red over the ears/nose/fingertips etc), then i do hair over the lineart, then a multiply layer with the contact shadows in a light beige/grey/neutral tone on top of everything else, and then i unify layers, paint over the details, and color correct the HELL out of it The longer version is: SO, first of all, I will say, my entire process for a finished/fully redered piece is pretty scattered and uses a lot of different apps, because after many years of trying out different drawing apps I found that I just worked better when I could incorporate the parts I liked best from each individual one rather than having to adapt to another app entirely! In total, what I use is: autodesk sketchbook and procreate for the first half I do on my ipad, then krita and photoshop on my computer when I'm actually rendering (but any photo editing app instead of ps will do, I'm just used to photoshop bc that's what I learned as my first drawing app WAAAY back in the day lol), and then meitu on my phone for color filters (also any phone editing app with filters in it will do), AND also optional just for references: blender and daz3d on computer + magicposer on my phone The actual step by step of what I do: First of all, if I want to do a detailed, well rendered piece I will start by getting my references ready. That means either just grabbing a screenshot from the game if it's like, a simple portrait, or a photo reference, taking a picture of myself in the right pose/lighting, and if it's something more complex I will recreate the scene in Daz3D to simulate a realistic lighting, OR even just blender (i have the game models for the dmc characters downloaded, so I can just pop them in, pose them and change the lighting to get a realistic idea of what shadows their faces will cast in that specific angle/lighting.) Note: references are pretty essential to me, and there's nothing to be ashamed about for using them! Personally I don't struggle a lot with the drawing/sketching part of art, but my tiny little pea brain cannot fathom how to make an object 3D in my mind, and how to visualize shadows realistically... thus the reliance on 3D programs to do that for me, and then all I have to do is draw what I'm seeing lol. My art improved significantly ever since I started making 3D refs so I could get /exactly/ what I needed - there's still a lot of leeway you need to learn though, because as realistic as the lighting will be in a rendering program, you'll never really get a fully natural looking image, as far as stuff like the body stretching/squishing/pulling when it's in movement, facial expressions, folds in clothing/fabric, etc... so really it's more a guide than something meant to be followed 1:1.
Then, once I'm confident I know exactly what I'm gonna draw/have the idea in my head, I start sketching it in sketchbook. Not really getting very in depth, just blocking out rough shapes - I like sketchbook and to be on my ipad for that because it feels very reminiscent of traditional sketching on paper to me, which while I'm not super confident on my traditional art abilities, I do get the most natural/fluid/non-stiff figures out that way. Then when I think I have the general idea ready, I export the sketch layer as a png and import it into procreate - which is where I kinda start picking at the sketch and polishing it like i'm carving it out haha. Lots of liquify tool, flipping the canvas to check if it's even, blending out some of the lineart to help out with the rendering later, and then polishing up what was once the sketch into serviceable lineart. I usually reimport it back into sketchbook at this stage - while I like procreate for drawing I don't love the brushes I can use for lineart there, and so I usually only draw the "base" naked figure in there - when I'm in sketchbook I use a hard pencil to refine the details, then on a separate layer add all the things "on top" like hair, clothing, etc - usually I can get it pretty easily in one go, and once I'm satisfied I erase the naked body under the clothes and unify the lineart layers. Then I will just do the flats with a hard brush, turning the lineart layer into an overlay layer and coloring things in with the shadow colors. At this point, I export the file as a psd and import it on my computer - I give it a once over in photoshop first to see if there needs to be any adjusting (like whether any layer that has an effect needs to have a different effect, if all the colors look right since the ipad screen isn't the most faithful, if i wanna change the background color, etc), and once I think it's ready enough, I open it up in krita, where I do the actual bulk of the painting/rendering (as to why specifically krita: it's because I've gotten very comfortable with the brush/painting brush dynamics there and cannot seem to get as good results anywhere else, it's just the goldilocks spot of a brush for me haha.) If anyone's curious, here's the brushes I usually use for painting:
The one in the middle is my go to painting brush, left one for tinier/more refined details, right one for blending out soft shadows (though I learned the hard way to not overuse it, or it will look like I went ham with an airbrush tool lol). (I don't change any of the settings on these brushes, so if you wanna try out the exact ones I use! Just fresh off how they come out the app haha) I paint on the lights on top of the shadows, and just focus on that for the time being - once I'm done with the basic painting, I'll make a separate multiply layer for details like lip color, eye waterlines, makeup if there is any, eyebags, etc, and then adjust the opacity until it feels right - then I'll make an overlay layer with skin translucency details (like, when you hold your hands in front of a light and see the tips of your fingers become bright orange - many parts of your body are always a bit translucent to the blood underneath, specifically parts where the skin is thin like noses, cheeks, joints, knuckles, etc, and I found it makes the character look a lot more alive to add that subtle coloring in) - then usually I do hair on a separate layer on top of the lineart (because that way I can add small flyaways, more details, etc, and just use the lineart as a guide) After that, I'll usually make a multiply layer on top of everything where I'll add contact shadows in a neutral color (usually pretty pale, it'll be darker anyway since it's multiply), and once I feel like I've rendered everything out properly, I save the psd and re-open it on photoshop.
In photoshop, I'll mess around with the layers a little bit more (changing hue/saturation, opacity, etc), fuck around with the background to make it look pleasing, and once I'm happy with it, I'll unify the layers and start color correcting - usually by duplicating the unified layer and messing with the curve/hsl of the image and then changing the opacity of that edited layer until it's as strong or muted as I want it to be - then I also edit the RGB curves individually and adjust the opacity of that also (because I just really like how it ends up looking if I give a bit of a red/warm tint to the shadows lol), and at that point often I will reimport the finished image into procreate for some finalizing touches! Like, blending out shadows that came out too harshly, painting over anything that came out not the way I wanted it, redefining the lineart if it got messy during painting, and adding any extra small detail that might have gotten lost like catchlights, hair shines, hair flyaways, tears, etc. I also do one last round of flipping the canvas and liquify if needed! At this point, I export the finished image both to my computer and my phone - on my phone I open it up on the photo editing app, and add a bunch of different color filters - I don't hesitate from going completely balls to the walls here, and just kinda applying as many filters as will make an image look pleasing to my eye. Once I think it looks good, I'll export the edited image to my computer - and then open both the version without filters and the one with them on photoshop, and use the filtered version as an opacity layer, and adjust it until it doesn't look as crazy anymore lol. One last step I recently started incorporating was also changing the image to grayscale after I'm done, and doing one last round of curves in greyscale to make sure the values look right, and nothing is getting too lost because the values are too similar (because i know i get a bit swept up in getting repulsed by harsh contrasting lighting and can end up washing out all of rendering if I don't check myself kjdfgk) AND that's it! Yes it's a pretty long and chaotic process, but it's coming from years of trial and error and realizing I can just let myself fo whatever makes me happier with the results, and I don't have to stay constrained to one program if I don't like every tool it has to offer/don't have to accept the final image fresh off the painting app as the "finished" image with no adjustments allowed after, lol. I don't find it takes a lot more time than if I didn't do it this way, but YMMV. Hope this was helpful and sorry for taking so long to explain! I just wanted to give a thorough explanation dfhdkhkx
#asks#sorry i know its a bit chaos hfdgd#but i hope its helpful anon! thanks for asking#also for anyone wondering#no i am not paying for ps lmao#fuck adobe#it is always morally correct to pirate adobe products people#if you have an alternative photo editing app you like best youre welcome to use it#but if youre too used to photoshop. everything is free on the internet if you know where to look#i also wouldnt recommend meitu bc it feels like a pretty sketchy app all things considered#im just too lazy to care to change my go to app but i would look for a different phone app#p sure theres billions that let you add funky color filters instead#actually i think you could use photoshop camera raw filters for that too#its just way too intensive of a process for my tiny potato computer and it feels a lot faster + seamless on phone
14 notes
·
View notes
Text
i have spent a substantial part of this day trying to find an alternative to google calendar that works for me and fits the specific requirements i have (web or desktop app that syncs with usable android app, free, caldav support, task integration, colour coding possible and probably some other things) and after a few hours, several installed programs and disappointments i have to conclude that there is no good alternative. and i guess i'm going back to using google calendar now
#one of the apps i tried was quite nice#but it's a super expensive monthly subscription#the free alternatives all had missing features#ugh#m
3 notes
·
View notes
Text
🦋☠️🦋☠️New Social media Incoming! ☠️🦋☠️🦋
So as you can probably tell from the title, I recently found a new site where I can share my Hades stories. It is called Kyodo, and it is a lot like Amino, but they actually fix the issues there. I was able to get a Hades group going so fans such as myself can share our passions and love for the game. The site is completely free on the app store and is rated teen, but the game has a similar rating. It would be amazing if people begin to join, it would be another way to keep the Fandom alive. Everyone is welcome, of course. And it is a judgment free zone. I look forward to seeing you there and eager to see how this Fandom can continue to grow and evolve!
#hades 2#hades game#hades fanart#thanatos hades#hades supergiant#Kyodo app#fanfiction#au#oc#alternate universe#thanatos#zagreus#please join#a judgment free zone#everyone is welcome#Friendly moderator
3 notes
·
View notes
Text
.
#i found a free app called delightful that is very simple and lets u put in 3 things that ur grateful for each day i used to have a physical#gratitude journal i bought in 2020 and used it inconsistently but recently finished it so i found a free alternative yesterday#and today it is warm outside i sat outside in direct sunlight w my cup of iced coffee it was a lovely time#and then i came inside made food and then after i did my office hours w my prof and now im on tumblr to chat about my life in the tumblr#tags bc thats my fav past time
5 notes
·
View notes
Text
just for the record I've never paid for spotify and I don't want to start now (just because this could've been inferred from what I'm about to say), but my usual way of using the app is currently unavailable to me for whatever reason and not having access to an ad free mode of music listening while using my phone is killinggg me. Because my newest attempt at fixing it has also failed and I have no other current plans I just have to go and look up a new solution again
#btw the attachment to spotify is out of convenience because of my library and playlists and having an app for podcasts at the same time#but if this persists enough im gonna have to find a more permanent alternative#also as IF the ads are the only reason not to use a normal free spotify account#anyway ive been dying badly and all for the crime of being a music enjoyer
4 notes
·
View notes
Text
i think its kinda funny that ibis paint is regarded as the Broke Artist App or whatever (as opposed to more mainstream programs like csp or procreate) because its free and because of how popular it is with phone + finger artists while im jusg sitting here having used ibis for a cool eight years on purpose.
like i have an ipad and an apple pencil and all theyre very nice and i absolutely could move to a more powerful program i have the resources to do so but my change averse brain has decided they like it here a lot and im not leaving
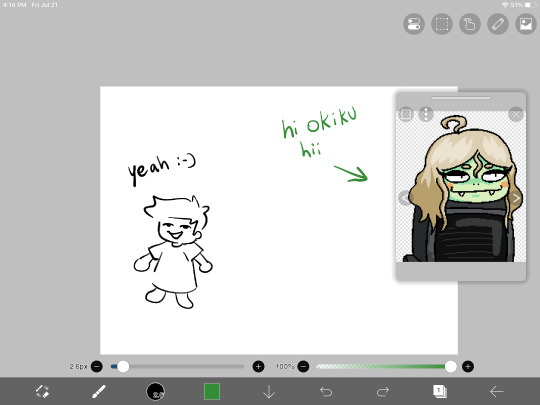
#not talking smack on phone and finger artists btw. some of my mutuals use their fingers and their art goes crazy i respect that so much#even when i did use my phone (most of 14 crush was done on a phone!) i still had to use a cheap rubber stylus hahaha#anyway maybe ill try procreate someday but also i hate learning new programs and i like ibis's brushes too much#fingers crossed that they add fully custom brushes someday though#like id love to be one of those artists that makes really cool art with ridiculous shapes and nobody even knows until they tell you#younger artists might not know this but modern ibis is STACKED compared to how it was in 2015#like i remember when clipping layers were first implemented. and they sucked. like they didnt fully go over the lower layer#so it just left a gross tiny outline around the shape#and there wasnt any border or text tools either#and there was a hard cap on layer count depending on your device's storage and the canvas size#modifying brushes wasnt even a thing HAHAHAHAH you just used what you had#anyway okiku reference window unrelated shes just there for something else im working on<3#bri talks#for the record all this is to say i think the smack talk towards ibis is pretty unwarranted#like yeah maybe its not as powerful as a lot of these fancy paid apps but i honestly think its insanely good for being a free program#i think getting rid of the ads costs more now than it did when i paid to get rid of them but i mean#free with ads is still a lot more than csp's ever gonna give you!!!!#(psst. secret from me to you! you wont get any ads if you disable the app's data usage and turn off wifi when you use it)#(alternatively just use airplane mode but you can still get texts and stuff the first way)
21 notes
·
View notes
Text
Behold, my type in men

#my type is data data data and two overeager potentially neurodivergent ensigns#that sounds about right#star trek shitposting#the app is called faraday btw#it is a local private and free alternative to#character.ai#novel.ai#if you want to chat with bots but also do not want to give away your data and money#i recommend it#faraday.dev
18 notes
·
View notes
Text
im totally fine and chill and healed from my trauma with men and definitely didn't almost just have a panic attack in the library because a male acquaintance asked me out on a date
#my next tattoo should just be DYKE across my forehead to stop this from happening#alternatively i should just get a girlfriend#but the ace4ace dating scene is fucking microscopic#it's like: find the only other ace lesbian on the apps#(she lives 100 miles away)#DM for a few weeks#realise you have nothing in common#ghost each other#there was a nice dyke at my regular ace meetup a while ago who asked me out but then ghosted me when i texted asking when she was free 😭
5 notes
·
View notes
Text
making notes on the demographic profile the advertising algorithms have crafted for me, and i appear to be an entire suburban family all by myself
#podcast app thinks i'm a dad. music app thinks i'm a gay millenial. streaming apps think i'm a mother as well as my own infant children#did they determine whether raspberry pi is still spyware. have they figured out an alternative pihole#i should look into that. when i have free time.
6 notes
·
View notes
Text
so I normally do all my writing in docs but I kinda felt like getting a dedicated writing app so I can have a dedicated space for all my works instead of scattered among work and school stuff
however if I could have predicted the sheer ordeal of finding something decent I would have just cut my losses lmao
I think I'm on my 4th?? 5th?? app that i'm checking?? guys I think I might just settle for it at this point 💀 or else I'm crawling back to the devil I know (google docs)
#cake notes#I hear a lot about scrivner but I went through the list of free alternatives and none of them worked for me >(#so then I tried the app store and of course the best lookin free app is a paid app in disguise#gaaaaaaaahhhhhhhh
2 notes
·
View notes