#graphql resolvers explained
Explore tagged Tumblr posts
Visit Tumblr Blog
Explore Tumblr blogs with no restrictions, modern design and the best experience.
Last Seen Tumblr Blogs


Fun Fact
Tumblr Inc. is using 66 technologies for its website.
Text
GraphQL Resolver Explained with Examples for API Developers
Full Video Link - https://youtube.com/shorts/PlntZ5ekq0U Hi, a new #video on #graphql #resolver published on #codeonedigest #youtube channel. @java @awscloud @AWSCloudIndia @YouTube #youtube @codeonedigest #graphql #graphqlresolver #codeo
Resolver is a collection of functions that generate response for a GraphQL query. Actually, resolver acts as a GraphQL query handler. Every resolver function in a GraphQL schema accepts four positional arguments. Root – The object that contains the result returned from the resolver on the parent field. args – An object with the arguments passed into the field in the query. context – This is…

View On WordPress
#graphql#graphql api project#graphql example tutorial#graphql resolver arguments#graphql resolver async#graphql resolver best practices#graphql resolver chain#graphql resolver example#graphql resolver example java#graphql resolver field#graphql resolver functions#graphql resolver interface#graphql resolver java#graphql resolver mutation#graphql resolvers#graphql resolvers explained#graphql resolvers tutorial#graphql tutorial#what is graphql
0 notes
Text
Top Full-Stack Developer Interview Questions You Should Know

Frontend Interview Questions
What is the difference between inline, block, and inline-block elements in CSS?
How does the virtual DOM work in frameworks like React?
Can you explain the concept of responsive design? How would you implement it?
Backend Interview Questions
What are RESTful APIs, and how do they differ from GraphQL APIs?
How would you optimize database queries in SQL?
Can you explain middleware in Express.js?
General Full-Stack Questions
What is the role of CORS in web development, and how do you handle it?
How would you implement authentication in a full-stack application?
What’s the difference between monolithic and microservices architecture?
Bonus: Behavioral Questions
Describe a challenging bug you encountered and how you resolved it.
How do you manage your time when working on multiple projects simultaneously?
Looking for More Questions?
For a more comprehensive list of questions, including in-depth examples and answers, check out my Full-Stack Developer Interview Guide. It’s a resource packed with actionable insights to help you ace your next interview.
1 note
·
View note
Text
How to Implement GraphQL Resolvers for Scalability
First, for the Introduction, I should explain what GraphQL resolvers are and why they are important for scalability. I also need to outline what the readers will learn, the prerequisites, and the tools they’ll need. I’ll mention Apollo Server, Node.js, npm, and maybe some optional tools like GraphQL Playground. I should include links to these tools so readers can easily access them. Moving on to…
0 notes
Text
REST API vs GraphQL API: Choosing an API Which You Need
REST API vs. GraphQL APIs: A Developer Showdown
APIs power modern online services by connecting software components and transferring data across the internet. API technologies like SOAP, REST, and GraphQL facilitate software development by integrating third-party data and services. APIs allow firms to securely communicate data and provide services to workers, business partners, and users.
Recent disputes have focused on REST (representational state transfer) and GraphQL, despite the various APIs. Both have several advantages and are used in networking projects worldwide. Data traffic management differs greatly between them. IBM compare REST and GraphQL APIs and explain how corporations may optimise their networks.
Explain REST and GraphQL APIs Comparing REST and GraphQL APIs requires knowledge of each.
REST The early 2000s-developed REST architecture paradigm for networked hypermedia applications uses a stateless, client/server, cacheable communication protocol. RESTful APIs drive REST designs.
REST APIs address resources using URIs. REST APIs use endpoints to execute CRUD (“create,” “read,” “update,” and “delete”) network resource activities. They shape and size client resources based on a media type or MIME type. Most formats are JSON and XML (occasionally HTML or plain text).
The server handles client requests for resources and returns all related data. HTTP response codes include “200 OK” for successful REST queries and “404 Not Found” for missing resources.
GraphQL In 2012, Facebook created GraphQL, a query language and API runtime that became open source in 2015.
API schema published in GraphQL schema definition language defines GraphQL. Each schema lists data types and associations the user may query or alter. The resolver backs each schema field. The resolver converts GraphQL queries, modifications, and subscriptions into data and fetches it from databases, cloud services, and other sources. Resolvers specify data formats and let the system combine data from several sources.
Instead of utilising several endpoints to acquire data and conduct network operations like REST, GraphQL exposes data models by using a single endpoint for all GraphQL queries. Using resource attributes and resource references, the API gets the client all the data they need from a single query to the GraphQL server.
GraphQL and REST APIs are resource-based data exchanges that employ HTTP methods like PUT and GET to limit client actions. However, important contrasts explain why GraphQL has grown and why RESTful systems have endured.
REST API vs GraphQL API GraphQL APIs are typically considered an enhancement over RESTful settings due to their ability to promote front-end-back-end team cooperation. An organization’s API journey should continue with GraphQL, which solves REST difficulties.
REST was the norm for API designs, and many developers and architects still use RESTful settings to manage IT networks. Understanding the differences is crucial to any IT management plan.
REST and GraphQL APIs handle differently:
Data retrieval REST uses many endpoints and stateless interactions to handle each API request as a new query, so clients obtain all resource data. Over-fetching occurs when a client only wants a portion of the data. To make up for under-fetching, a RESTful system frequently requires clients query each resource individually if they need data from numerous resources. Single-endpoint GraphQL APIs eliminate over- and under-fetching by providing clients with an accurate, full data response in one round trip from a single request.
Versioning Teams must version APIs to adjust data structures and avoid end-user errors and service outages in a REST architecture. Developers must establish a new endpoint for every update, producing several API versions and complicating maintenance. GraphQL eliminates versioning since clients may express data needs via queries. Clients without need for new server fields are unaffected. Clients may request deprecated fields until queries are updated.
Error handling HTTP status codes indicate request success or failure in REST APIs. Each status code has a purpose. A successful HTTP request returns 200, whereas a client error returns 400 and a server error returns 500.
This status reporting method sounds simpler, however HTTP status codes are typically more valuable to online users than APIs, particularly for mistakes. REST does not specify errors, therefore API failures may display as transport problems or not at all with the status code. This may compel staff to study status documentation to understand faults and how infrastructure communicates failures.
Because HTTP status codes don’t transmit problems (excluding transport faults), GraphQL APIs return 200 OK for every request. The system sends faults in the response body with the data, so clients must interpret it to determine whether the request was successful.
However, GraphQL specifies errors, making API problems easier to identify from transport failures. The response body’s “errors” item describes errors, making GraphQL APIs easier to develop upon.
REST lacks built-in functionality for real-time data changes. Long-polling and server-sent events are required for real-time functionality, which might complicate a programme.
Subscriptions provide real-time changes in GraphQL. Subscriptions enable the server to notify clients when events occur by maintaining a continuous connection.
Environment and tools Developers have several tools, libraries, and frameworks in the REST environment. Teams must browse several endpoints and learn each API’s norms and practices while using REST APIs.
GraphQL APIs are young, but the ecosystem has evolved greatly since their inception, with several server and client development tools and modules. GraphiQL and GraphQL Playground are powerful in-browser IDEs for discovering and testing GraphQL APIs. GraphQL also supports code generation, simplifying client-side development.
Caching REST APIs use eTags and last-modified headers to cache API requests. While effective, some caching solutions are difficult to implement and may not be suited for all use situations.
Dynamic queries make GraphQL APIs harder to cache. Persisted queries, response caching, and server-side caching may alleviate these issues and simplify GraphQL caching.
When to utilise GraphQL and REST APIs REST and GraphQL APIs are distinct tools for various goals, not better.
For public-facing e-commerce sites like Shopify and GitHub, REST is easy to deploy and provides a simple, cacheable communication protocol with strict access constraints. Due to under- and over-fetching issues, REST APIs are ideal for:
Businesses with simpler data profiles and smaller applications Businesses without complicated data queries Businesses where most customers utilise data and processes similarly GraphQL APIs increase system efficiency and developer ease-of-use by providing flexible, fast data fetching. This makes GraphQL ideal for APIs in complicated setups with quickly changing front-end needs. This includes:
Business with limited bandwidth wants to restrict calls and answers Companies who seek to aggregate data at one endpoint Businesses with diverse client requirements Though they employ distinct methods, GraphQL and REST APIs may improve network scalability and server speed.
Control your API environment using IBM API Connect Whether you use REST or GraphQL APIs or a mix of both your business can benefit from a wide range of applications, including JavaScript implementations and integration with microservices and serverless architectures. Use both API types to optimise your IT infrastructure with IBM API Connect.
IBM API Connect lets you establish, manage, protect, socialise, and monetise APIs and encourage digital transformation in data centres and clouds. This lets organisations and consumers power digital applications and innovate in real time.
API Connect helps organisations stay ahead in API management, which will be crucial in a computing ecosystem that will get bigger, more complicated, and more competitive.
Read more on Govindhtech.com
0 notes
Text
What exactly is GraphQL?
GraphQL is a new API standard was invented and developed by Facebook. GraphQL is intended to improve the responsiveness, adaptability, and developer friendliness of APIs. It was created to optimize RESTful API calls and offers a more flexible, robust, and efficient alternative to REST. It is an open-source server-side technology that is now maintained by a large global community of companies and individuals. It is also an execution engine that acts as a data query language, allowing you to fetch and update data declaratively. GraphQL makes it possible to transfer data from the server to the client. It allows programmers to specify the types of requests they want to make.
GraphQL servers are available in a variety of languages, including Java, Python, C#, PHP, and others. As a result, it is compatible with any programming language and framework.
For a better understanding, the client-server architecture of GraphQL is depicted above
No JSON is used to write the GraphQL query. A GraphQL query is transmitted as a string to the server then when a client sends a 'POST' request to do so.
The query string is received by the server and extracted. The server then processes and verifies the GraphQL query in accordance with the graph data model and GraphQL syntax (GraphQL schema).
The GraphQL API server receives the data requested by the client by making calls to a database or other services, much like the other API servers do.
The data is then taken by the server and returned to the client as a JSON object.
Here are some major GraphQL characteristics:
Declarative query language, not imperative, is offered.
It is hierarchical and focused on the product.
GraphQL has excellent type checking. It denotes that inquiries are carried out inside the framework of a specific system.
GraphQL queries are encoded in the client rather than the server.
It has all the attributes of the OSI model's application layer.
GraphQL has three essential parts:
Query
Resolver
Schema
1. Query: The client machine application submitted the Query as an API request. It can point to arrays and support augments. To read or fetch values, use a query. There are two key components to a query:
a) Field: A field merely signifies that we are requesting a specific piece of information from the server. The field in a graphQL query is demonstrated in the example below. query { employee { empId ename } } "data": { "employee”: [ { "empId": 1, "ename": "Ashok" }, { "id": "2", "firstName": "Fred" } …] } }
In the above In the GraphQL example above, we query the server for the employee field along with its subfields, empId and ename. The data we requested is returned by the GraphQL server.
b) Arguments: As URL segments and query parameters, we can only pass a single set of arguments in REST. A typical REST call to obtain a specific profile will resemble the following: GET /api'employee?id=2 Content-Type: application JSON { "empId": 3, "ename": "Peter." }
2. Resolver: Resolvers give instructions on how to translate GraphQL operations into data. They define resolver routines that convert the query to data.
It shows the server the location and method for fetching data for a certain field. Additionally, the resolver distinguishes between API and database schema. The separated information aids in the modification of the database-generated material.
3. Schema: The heart of GraphQL implementation is a schema. It explains the features that the clients connected to it can use.
The benefits of using GraphQL in an application are summarized below.
It is more precise, accurate, and efficient.
GraphQL queries are simple and easy to understand.
Because it uses a simple query, GraphQL is best suited for microservices and complex systems.
It makes it easier to work with large databases.
Data can be retrieved with a single API call.
GraphQL does not have over-fetching or under-fetching issues.
GraphQL can be used to discover the schema in the appropriate format.
GraphQL provides extensive and powerful developer tools for query testing and documentation.
GraphQL automatically updates documentation in response to API changes.
GraphQL fields are used in multiple queries that can be shared and reused at a higher component level.
You have control over which functions are exposed and how they operate.
It is suitable for rapid application prototyping.
GraphQL can be used in all types of mobile and web applications across industries, verticals, and categories that require data from multiple sources, real-time data updates, and offline capabilities. Here is some application that benefits greatly from GraphQL development:
It offers Relay as well as other client frameworks.
GraphQL assists you in improving the performance of your mobile app.
It can reduce the problem of over fetching to reduce server-side cloud service and client-side network usage.
It can be used when the client application needs to specify which fields in a long query format are required.
GraphQL can be fully utilized when adding functionality to an existing or old API.
It is used to simplify complicated APIs.
The mix-and-match façade pattern, which is popular in object-oriented programming.
When you need to combine data from multiple sources into a single API.
GraphQL can be used as an abstraction on an existing API to specify response structure based on user requirements.
In this blog, I’ve attempted to explain the significance of GraphQL it is a new technology that allows developers to create scalable APIs that are not constrained by the limitations of REST APIs. It allows developers to use an API to easily describe, define, and request specific data. Please let us know what you think of GraphQL. Do you have any further questions? Please do not hesitate to contact us. We will gladly assist you.
0 notes
Text
Elite Node.JS Development Trends In 2022 To Check Out
With 2022 approaching, everyone in the software development industry is looking forward to the new trends that may prevail in the industry.

With the beginning of the COVID-19 pandemic, one of the most trending industries that witness profits is the e-commerce industry. With this, a lot of businesses switched to online business models.
When software development is growing so fast, picking the right framework is one of the crucial aspects which can be challenging too.
Developers across the world are predicting the Node.js development trends in 2022. Well, this blog will help you learn about the top trends in Node.js to be witnessed in 2022.
About Node.js
Well, Node.js can be best explained as a tool or JavaScript runtime environment developed on Chrome’s V8 JS engine. It is often mistaken for a programming language. It utilizes asynchronous, event-based, non-blocking input or output model. Node.js runs on a single-threaded event loop.
Why Node.js is so popular?
Talking about the popularity of Node.js, it has increased rapidly because of the flexibility it offers. It is one of the lightweight tools having a vast library of JavaScript modules. This vast library simplifies the entire development process. Node.js is an open-source tool ideal for mobile and web application development. Some other benefits that make it so popular are
Offers robustness for modern applications
Has a great community support
Offers increased performance for the real-time apps
Cuts down the time to launch apps
Easy to learn
Cuts down Loading Time
Offers high extensibility to cater to custom requirements
Applications Where Node.js Can Be Used
Streaming apps
Real-time web apps
Chat programs
Messaging apps
API
Virtual emulators
Social media apps
Collaboration tools
Multiplayer games
Best Node.js Frameworks
Meteor.js
Express.js
Hapi.js
Sails.js
NestJS
Notable Trends In Node.js To Check Out In 2022
1. MERN Stack
It is cementing its place in the development process because of the benefits it offers. With the entire code written using JavaScript, it eradicates the context switching option.
Earlier it was difficult for developers to switch from one framework to another. It was because of the tech stack having multiple programming languages to deal with.
2. GraphQL
It helps developers to create API calls with schemas, queries, and resolvers established on particular data needs.
Endpoints designed as per the view in the app utilizing REST API can result in obstruction when some changes in the frontend are required for the application.
3. Real-Time Apps
When it comes to Node.js development, real-time apps for online tasks form the main phase of the entire process. Real-apps offer higher user engagement due to incredible features and performance. The apps comprise interactive features like social media integrations, chats, stock exchange, ad servers, etc. Interestingly, Node.js caters to all these needs in the system.
Also, real-time apps offer a strong backend development for the apps apart from incredible features to improve user experience. Some of the primary Node.js applications built with real-time features are :
Video conferencing apps
Online gaming apps
Instant messaging apps
Online gaming apps
E-commerce transaction apps
VOIP (Voice Over Internet Protocol) App
Document sharing apps
Most businesses prefer highly scalable apps and this has increased the demand for real-time apps. Hence, the businesses hire app developers with knowledge of Node.js to boost their profitability.
4. Microservices
Well, if you are planning to develop enterprise-level projects, make sure you utilize Microservices. They promote server outlook.
Microservices come with multiple benefits in terms of debugging and performance. Node.js helps make the use of microservices much easier for projects.
Yet another benefit associated with microservices is its proficiency to facilitate serverless models which enable building large projects flawlessly. So, this trend in Node.js development has increased its popularity for future-ready applications. It is due to the productivity, reusability, and independent development offered by Node.js.
6. IoT

All IoT (Internet of Things) app development is supported by Node.JS as it offers real-time power and a data-oriented outlook. So, for IoT-based apps, Node.js is the first choice. Also, Node.js allows you to integrate microservices to manage features related to geo-distributed systems live.
Node.js – A Perfect Option To Build Scalable, Fast, and Convenient Apps
Certainly, Node.js helps app developers build flexible apps in less time. When the world is moving fast we need to do multitask and Node.js helps the developers do so. One of the latest Node.js development trends is its ability to help developers manage multiple tasks simultaneously without compromising on quality.
Most mobile or web app development services prefer Node.js as it allows the developers to modify the apps to connect to a wider audience base. Also, app developers can bring in changes to the apps as and when needed with Node.js without the need to change the entire app framework. So, this indicates that Node.js is one of the best choices for app development.
| Read here in-depth blog: Web Application Development Services
| Contact us: +1 (832) 251 7311
| Email us: [email protected]
#web application development#web app development#web app development services#website design and development services#web app development company#node js web application#custom web application development
0 notes
Text
July 26, 2018
News and Links
Protocol (with an assist from the Ethereum Research team)
Shasper chain, v2.1
Prysmatic’s biweekly update on transitioning to Eth 2.0 with separate Go codebase
VDFs are not Proof of Work by Danny Ryan. Verifiable Delay Functions have some properties - requiring significant computation to calculate but relatively little computation to verify - that is suitable for strengthening RANDAO-based RNG. That sounds like proof of work, but Danny explains the difference between VDFs and PoW.
STARKs, Part 3: Into the Weeds by Vitalik Buterin: In Vitalik’s STARKs series part 3, he introduced how to actually implement a STARK with vivid explication.
Latest Casper standup call
VB: Epoch-less Casper FFG liveness/safety argument
Why Shasper makes more sense than the previous FFG, then sharding roadmap
LearnPlasma is really coming together as a Plasma education resource
A Plasma Cash primer from Simon de la Rouviere
Jinglan Wang: what is Plasma? Plasma Cash?
Raiden is live on Ropsten testnet and open to testing
Stuff for developers
Benchmarking between Mythril, Manticore and Oyente from ConsenSys Diligence
What FoMo3d’s real exit scam might look like, but you can hedge with Augur?
Péter Szilágyi: How to PWN FoMo3D, a beginners guide
Pipeline - video explaining PoC of visual IDE of already deployed functions
Airswap tutorial on building with their API server
Adding ENS into your dapp tutorial
Tutorial to using Parity’s Secret Store multi-party key generation
IDEO on dealing with gas in UX
ethereum-to-graphql: autogenerate the schema and resolver
EthQL alpha from PegaSys and Infura
Aragon Package Manager - upgradeability for Aragon orgs
Zeppelin: Exploring upgradeability governance in ZeppelinOS with a Gnosis MultiSig
Apache Camel connector for Ethereum enterprise using web3j
The new Infura dashboard - existing access tokens need to migrate to v3 authentication keys and endpoints
Release
Trinity v0.1.0-alpha.12, better syncing and performance. Also has a new website.
web3j v3.5
web3.js 0.20.7 and web3.js 1.0.0-beta.35. breaking change on http provider
EthereumJS VM v2.4.0 (and their monthly recap)
Live on mainnet
iExec went live on mainnet to test rendering. 80% of jobs completed.
Melonport is live on mainnet with somewhat constrained Paros release
Gnosis DutchX contracts are live on mainnet in advance of their 100k competition to build on them
Ecosystem
The new Gnosis Safe miltisig is live on Rinkeby
Parity’s Thibaut Sardan: what is a light client and why should you care?
Someone managed to briefly cause a kerfuffle with a 1337 Javascript popup in Etherscan using their Disqus comments.
Nathan Sexer: State of stablecoins
Metamask’s retrospective on getting removed from the Chrome store this week. Also how they’ll support more networks
A reader friendly version of 100+ Eth dev interviews from EthPrize
Governance and Standards
EIP1227 (remove difficulty bomb, revert to 5 ETH block reward) vs EIP1234 (delay difficulty bomb, reduce to 2 ETH block reward) vs EIP1240 (remove difficulty bomb, leave at 3 ETH block reward). Results in Afri’s poll mirror what I hear in the community.
ERC1257: proof of payment standard
ERC1238: non-transferrable token badges
ERC1261: membership verification token
Add bottom-up composables to ERC998
ERC1263: NFT index
Project Updates
As planned, Augur burned the escape hatch, so the code is now decentralized.
Messari buys OnchainFX, lays out content strategy
Status now displays at full resolution on tablets, and no more Mixpanel
Maker to vote on increasing the Dai stability fee to 2.5%
Interviews, Podcasts, Videos, Talks
Dappcon videos are coming in
Andy Tudhope talks about EthPrize’s dev interviews on Smartest Contract
CoinTelegraph with some good print interviews: Jutta Steiner and Joe Lubin
FunFair’s Jez San podcast interview
Open Source Web3 Design call
Jay Rush talking The Dao and how Quickblocks grew out of that from Gitcoin’s weekly stream
Dan Boneh on the Bitcoin Podcast
Ethan Buchman talks testnets on Zero Knowledge
Dan Finlay on MetaMask and Mustekala on Smartest Contract
Maker’s Rune Christensen print interview where he says they are developing their own language for better security
Martin Becze on Epicenter
Tokens
You now need Santiment tokens to access some of their market and data feeds.
Text tutorial of how to claim your (free) Livepeer tokens.
Incentivizing new users of TCRs through gamification
Mike Maples: Slow money crypto
General
Zilliqa releases its Scilla language “with formalization of its semantics and its embedding into Coq.” Also of interest, Etheremon is planning to have gameplay on Zilliqa but will use Ethereum as its store of value.
First Polkadot parachain deployed in PoC2
Raul Jordan with an intro to hashing algos
NYTimes on art and blockchain
Péter Szilágyi: TOR from within GO. I imagine many who read it will immediately start using the Brave browser’s private tabs with TOR
Ethereum coming to Google Cloud
John Backus with his lessons learned from p2p file sharing
Dates of Note
Upcoming dates of note:
August 7 - Start of two month distributed hackathon from Giveth, Aragon, Swarm City and Chainshot
August 10-12 - EthIndia hackathon (Bangalore)
August 10-12 - ENS workshop and hackathon (London)
August 22 - Maker DAO ‘Foundation Proposal’ vote
August 24-26 - Loom hackathon (Oslo, Norway)
September 6 - Security unconference (Berlin)
September 7-9 - EthBerlin hackathon
September 7-9 - WyoHackathon (Wyoming)
September 8 - Ethereum Industry Summit (Hong Kong)
Oct 5-7 - TruffleCon in Portland
Oct 5-7 - EthSanFrancisco hackathon
Oct 11 - Crypto Economics Security Conf (Berkeley)
Oct 22-24 - Web3Summit (Berlin)
Oct 26-28 - Status hackathon (Prague)
Oct 29 - Decentralized Insurance D1Conf (Prague)
Oct 30 - Nov 2 - Devcon4 (Prague)
Dec 7-9 - dGov distributed governance conf (Athens)
December - EthSingapore hackathon
If you appreciate this newsletter, thank ConsenSys
This newsletter is made possible by ConsenSys, which is perpetually hiring if you’re interested.

Editorial control is 100% me. If you're unhappy with editorial decisions, feel free to tweet at me.
Shameless self-promotion
Link: http://www.weekinethereum.com/post/176336020338/july-26-2018
Most of what I link to I tweet first: @evan_van_ness
Did someone forward this email to you? Sign up to receive the weekly email (box in the top blue header)
1 note
·
View note
Text
Amazon DynamoDB session videos from AWS re:Invent 2020
This blog post includes links to the videos from the keynotes and Amazon DynamoDB sessions presented during AWS re:Invent 2020. This year’s conference was free and completely virtual, and featured 11 sessions about DynamoDB: eight at the advanced level and three at the expert level. To give you some idea of where to start, Rick Houlihan’s two-part “DynamoDB advanced design patterns” and Alex DeBrie’s two-part “Data modeling with DynamoDB” are popular year-round on YouTube. You also can bookmark this YouTube playlist that includes all these videos. The keynotes AWS re:Invent 2020 Keynote with Andy Jassy AWS CEO Andy Jassy shares his insights and the latest news about AWS customers, products, and services. AWS re:Invent 2019 Keynote with Werner Vogels AWS VP and CTO Dr. Werner Vogels shares his insights about solving today’s hardest technology problems, building resilient architectures, and the future of software development. The DynamoDB sessions Level 300 – Advanced Data modeling with DynamoDB – Part 1 (Alex DeBrie, DAT305-PT1) DynamoDB is popular because of its flexible billing model and ability to scale without performance degradation. It’s a common database choice in serverless and high-scale applications. But modeling your data with DynamoDB requires a different approach than modeling in traditional relational databases. Alex DeBrie is an AWS Data Hero, recognized for his work with DynamoDB, and author of The DynamoDB Book, a comprehensive guide to data modeling. In Part 1 of this two-part session, see how modeling with DynamoDB is different than modeling with a traditional relational database, and learn some foundational elements of data modeling with DynamoDB. Data modeling with DynamoDB – Part 2 (Alex DeBrie, DAT305-PT2) In the second part of this two-part session, learn more-advanced guiding principles from AWS Data Hero Alex DeBrie, including strategies for handling complex, highly relational data models that don’t slow down as your application scales. Deliver business impact with feature-packed DynamoDB (Pete Naylor, DAT316) DynamoDB offers an enterprise-ready database that helps you protect your time, your data, and your budget. In this session, review key features that help drive the most business impact, such as multi-Region, multi-primary replication with global tables, on-demand capacity mode for spiky workloads, and backup and restore, including point-in-time recovery that backs up your table data automatically for the preceding 35 days. Dropbox cuts costs with cold metadata store using DynamoDB and Amazon S3 (Anuj Dewangan and Jonathan Lee, DAT313) Dropbox was experiencing a capacity crunch in its on-premises MySQL metadata store, requiring it to migrate or delete several terabytes of metadata to avoid doubling storage costs. The company rapidly prototyped and migrated cold metadata to a new storage system built by using DynamoDB and Amazon S3—currently storing 300 TB of data and growing. This storage system leverages the scale and flexibility of DynamoDB and the cost savings of Amazon S3. The session’s first half focuses on an architectural review of the durability, availability, and scale of DynamoDB. Dropbox then explains the architecture and scaling mechanisms for its metadata storage system on AWS. DynamoDB: Untold stories of databases in a serverless world (Angela Timofte, COM305) Trustpilot has adopted a serverless mindset. Over the years, the company improved its software architecture by building serverless applications, which includes the important decision of choosing the right database. Today, DynamoDB is Trustpilot’s first choice when building new applications, but this wasn’t always the case. In this session, Trustpilot’s Angela Timofte discusses what the company learned working with DynamoDB in a serverless architecture, misconceptions the team had, and mistakes they made. Angela also provides examples of how to model your data in DynamoDB so that you can unlock its full potential. Finally, hear some of Trustpilot’s favorite tips learned throughout their database and serverless journey. How Disney+ scales globally on Amazon DynamoDB (Attilio Giue, DAT304) Disney+, one of the largest global online video streaming platforms, was launched in November 2019 as the home of Disney, Pixar, Marvel, Star Wars, and National Geographic. Disney+ delivers its extensive library of digital content directly to the homes of more than 60.5 million subscribers, and DynamoDB is one of the technologies that supports this global footprint. The Content Discovery team behind Disney+ uses DynamoDB global tables to scale and deliver popular features such as Continue Watching, Watchlist, and Personalized Recommendations. Hear from Disney+ about its use cases and learnings from using DynamoDB to meet customers’ needs at scale. Model and access application data more efficiently with AWS Amplify (Stephen Johnson, FWM301) The right data access pattern can significantly improve application performance to delight your end users. AWS Amplify helps front-end web and mobile developers use the power of GraphQL to model app data for faster production apps, with offline capabilities and Amplify DataStore, that can scale across platforms. In this session, learn how to create advanced data access patterns with the Amplify GraphQL transform library, powered by AWS AppSync and DynamoDB. Unify access to siloed data with AWS AppSync GraphQL resolvers (Nader Dabit, FWM304) Querying data across multiple sources can be complex and time consuming. AWS AppSync provides a rich set of GraphQL resolver mapping templates and utilities that make it easy to query, update, and subscribe to data changes in services such as DynamoDB, Amazon Aurora, or Amazon Elasticsearch Service, and any other data sources via AWS Lambda or Amazon API Gateway. This session provides an overview of these capabilities and shows how you can easily modify, extend, and test these proven templates. Level 400 – Expert DynamoDB advanced design patterns – Part 1 (Rick Houlihan, DAT402-PT1) Every year, AWS Principal Technologist Rick Houlihan leads this technical session dedicated to advanced users of DynamoDB. He explains design patterns and data models that are based on a collection of implementations and best practices used by a variety of customers to deliver highly scalable solutions for a range of business problems. In this first part of a two-part series, Rick discusses and demonstrates important concepts including partition sharding and index overloading, scalable graph processing, and managing distributed locks. DynamoDB advanced design patterns – Part 2 (Rick Houlihan, DAT402-PT2) In this second part of a two-part series, AWS Principal Technologist Rick Houlihan reviews more common design patterns for DynamoDB, a highly scalable NoSQL database. Rick demonstrates how to optimize shard keys to ensure even workload distribution, dives into global secondary index replication lag, and shows how to support operational analytics with DynamoDB Streams and AWS Lambda. Rick also shows how AWS AppSync can be used to stand up GraphQL APIs, and he demonstrates the performance benefits of single-table design. How Stitch Fix is delivering personalized experiences (Madhu Nunna and Ujjwal Sarin, RET401) How can organizations deliver dynamic personalized customer interactions? Hear how the platform engineering team at Stitch Fix is transforming customer interactions by delivering a highly concurrent and scalable solution for real-time product recommendations. Come away with an understanding of the architectural requirements for leveraging DynamoDB to optimize near-real-time machine learning workloads to deliver the right user experience. About the author Craig Liebendorfer is a senior technical editor at Amazon Web Services. He also runs the @DynamoDB Twitter handle. https://aws.amazon.com/blogs/database/amazon-dynamodb-session-videos-from-aws-reinvent-2020/
0 notes
Text
Rendering the WordPress philosophy in GraphQL
WordPress is a CMS that’s coded in PHP. But, even though PHP is the foundation, WordPress also holds a philosophy where user needs are prioritized over developer convenience. That philosophy establishes an implicit contract between the developers building WordPress themes and plugins, and the user managing a WordPress site.
GraphQL is an interface that retrieves data from—and can submit data to—the server. A GraphQL server can have its own opinionatedness in how it implements the GraphQL spec, as to prioritize some certain behavior over another.
Can the WordPress philosophy that depends on server-side architecture co-exist with a JavaScript-based query language that passes data via an API?
Let’s pick that question apart, and explain how the GraphQL API WordPress plugin I authored establishes a bridge between the two architectures.
You may be aware of WPGraphQL. The plugin GraphQL API for WordPress (or “GraphQL API” from now on) is a different GraphQL server for WordPress, with different features.
Reconciling the WordPress philosophy within the GraphQL service
This table contains the expected behavior of a WordPress application or plugin, and how it can be interpreted by a GraphQL service running on WordPress:
CategoryWordPress app expected behaviorInterpretation for GraphQL service running on WordPressAccessing dataDemocratizing publishing: Any user (irrespective of having technical skills or not) must be able to use the softwareDemocratizing data access and publishing: Any user (irrespective of having technical skills or not) must be able to visualize and modify the GraphQL schema, and execute a GraphQL queryExtensibilityThe application must be extensible through pluginsThe GraphQL schema must be extensible through pluginsDynamic behaviorThe behavior of the application can be modified through hooksThe results from resolving a query can be modified through directivesLocalizationThe application must be localized, to be used by people from any region, speaking any languageThe GraphQL schema must be localized, to be used by people from any region, speaking any languageUser interfacesInstalling and operating functionality must be done through a user interface, resorting to code as little as possibleAdding new entities (types, fields, directives) to the GraphQL schema, configuring them, executing queries, and defining permissions to access the service must be done through a user interface, resorting to code as little as possibleAccess controlAccess to functionalities can be granted through user roles and permissionsAccess to the GraphQL schema can be granted through user roles and permissionsPreventing conflictsDevelopers do not know in advance who will use their plugins, or what configuration/environment those sites will run, meaning the plugin must be prepared for conflicts (such as having two plugins define the SMTP service), and attempt to prevent them, as much as possibleDevelopers do not know in advance who will access and modify the GraphQL schema, or what configuration/environment those sites will run, meaning the plugin must be prepared for conflicts (such as having two plugins with the same name for a type in the GraphQL schema), and attempt to prevent them, as much as possible
Let’s see how the GraphQL API carries out these ideas.
Accessing data
Similar to REST, a GraphQL service must be coded through PHP functions. Who will do this, and how?
Altering the GraphQL schema through code
The GraphQL schema includes types, fields and directives. These are dealt with through resolvers, which are pieces of PHP code. Who should create these resolvers?
The best strategy is for the GraphQL API to already satisfy the basic GraphQL schema with all known entities in WordPress (including posts, users, comments, categories, and tags), and make it simple to introduce new resolvers, for instance for Custom Post Types (CPTs).
This is how the user entity is already provided by the plugin. The User type is provided through this code:
class UserTypeResolver extends AbstractTypeResolver { public function getTypeName(): string { return 'User'; } public function getSchemaTypeDescription(): ?string { return __('Representation of a user', 'users'); } public function getID(object $user) { return $user->ID; } public function getTypeDataLoaderClass(): string { return UserTypeDataLoader::class; } }
The type resolver does not directly load the objects from the database, but instead delegates this task to a TypeDataLoader object (in the example above, from UserTypeDataLoader. This decoupling is to follow the SOLID principles, providing different entities to tackle different responsibilities, as to make the code maintainable, extensible and understandable.
Adding username, email and url fields to the User type is done via a FieldResolver object:
class UserFieldResolver extends AbstractDBDataFieldResolver { public static function getClassesToAttachTo(): array { return [ UserTypeResolver::class, ]; } public static function getFieldNamesToResolve(): array { return [ 'username', 'email', 'url', ]; } public function getSchemaFieldDescription( TypeResolverInterface $typeResolver, string $fieldName ): ?string { $descriptions = [ 'username' => __("User's username handle", "graphql-api"), 'email' => __("User's email", "graphql-api"), 'url' => __("URL of the user's profile in the website", "graphql-api"), ]; return $descriptions[$fieldName]; } public function getSchemaFieldType( TypeResolverInterface $typeResolver, string $fieldName ): ?string { $types = [ 'username' => SchemaDefinition::TYPE_STRING, 'email' => SchemaDefinition::TYPE_EMAIL, 'url' => SchemaDefinition::TYPE_URL, ]; return $types[$fieldName]; } public function resolveValue( TypeResolverInterface $typeResolver, object $user, string $fieldName, array $fieldArgs = [] ) { switch ($fieldName) { case 'username': return $user->user_login; case 'email': return $user->user_email; case 'url': return get_author_posts_url($user->ID); } return null; } }
As it can be observed, the definition of a field for the GraphQL schema, and its resolution, has been split into a multitude of functions:
getSchemaFieldDescription
getSchemaFieldType
resolveValue
Other functions include:
getSchemaFieldArgs: to declare the field arguments (including their name, description, type, and if they are mandatory or not)
isSchemaFieldResponseNonNullable: to indicate if a field is non-nullable
getImplementedInterfaceClasses: to define the resolvers for interfaces implemented by the fields
resolveFieldTypeResolverClass: to define the type resolver when the field is a connection
resolveFieldMutationResolverClass: to define the resolver when the field executes mutations
This code is more legible than if all functionality is satisfied through a single function, or through a configuration array, thus making it easier to implement and maintain the resolvers.
Retrieving plugin or custom CPT data
What happens when a plugin has not integrated its data to the GraphQL schema by creating new type and field resolvers? Could the user then query data from this plugin through GraphQL? For instance, let’s say that WooCommerce has a CPT for products, but it does not introduce the corresponding Product type to the GraphQL schema. Is it possible to retrieve the product data?
Concerning CPT entities, their data can be fetched via type GenericCustomPost, which acts as a kind of wildcard, to encompass any custom post type installed in the site. The records are retrieved by querying Root.genericCustomPosts(customPostTypes: [cpt1, cpt2, ...]) (in this notation for fields, Root is the type, and genericCustomPosts is the field).
Then, to fetch the product data, corresponding to CPT with name "wc_product", we execute this query:
{ genericCustomPosts(customPostTypes: "[wc_product]") { id title url date } }
However, all the available fields are only those ones present in every CPT entity: title, url, date, etc. If the CPT for a product has data for price, a corresponding field price is not available. wc_product refers to a CPT created by the WooCommerce plugin, so for that, either the WooCommerce or the website’s developers will have to implement the Product type, and define its own custom fields.
CPTs are often used to manage private data, which must not be exposed through the API. For this reason, the GraphQL API initially only exposes the Page type, and requires defining which other CPTs can have their data publicly queried:

Transitioning from REST to GraphQL via persisted queries
While GraphQL is provided as a plugin, WordPress has built-in support for REST, through the WP REST API. In some circumstances, developers working with the WP REST API may find it problematic to transition to GraphQL. For instance, consider these differences:
A REST endpoint has its own URL, and can be queried via GET, while GraphQL, normally operates through a single endpoint, queried via POST only
The REST endpoint can be cached on the server-side (when queried via GET), while the GraphQL endpoint normally cannot
As a consequence, REST provides better out-of-the-box support for caching, making the application more performant and reducing the load on the server. GraphQL, instead, places more emphasis in caching on the client-side, as supported by the Apollo client.
After switching from REST to GraphQL, will the developer need to re-architect the application on the client-side, introducing the Apollo client just to introduce a layer of caching? That would be regrettable.
The “persisted queries” feature provides a solution for this situation. Persisted queries combine REST and GraphQL together, allowing us to:
create queries using GraphQL, and
publish the queries on their own URL, similar to REST endpoints.
The persisted query endpoint has the same behavior as a REST endpoint: it can be accessed via GET, and it can be cached server-side. But it was created using the GraphQL syntax, and the exposed data has no under/over fetching.
vimeo
Extensibility
The architecture of the GraphQL API will define how easy it is to add our own extensions.
Decoupling type and field resolvers
The GraphQL API uses the Publish-subscribe pattern to have fields be “subscribed” to types.
Reappraising the field resolver from earlier on:
class UserFieldResolver extends AbstractDBDataFieldResolver { public static function getClassesToAttachTo(): array { return [UserTypeResolver::class]; } public static function getFieldNamesToResolve(): array { return [ 'username', 'email', 'url', ]; } }
The User type does not know in advance which fields it will satisfy, but these (username, email and url) are instead injected to the type by the field resolver.
This way, the GraphQL schema becomes easily extensible. By simply adding a field resolver, any plugin can add new fields to an existing type (such as WooCommerce adding a field for User.shippingAddress), or override how a field is resolved (such as redefining User.url to return the user’s website instead).
Code-first approach
Plugins must be able to extend the GraphQL schema. For instance, they could make available a new Product type, add an additional coauthors field on the Post type, provide a @sendEmail directive, or anything else.
To achieve this, the GraphQL API follows a code-first approach, in which the schema is generated from PHP code, on runtime.
The alternative approach, called SDL-first (Schema Definition Language), requires the schema be provided in advance, for instance, through some .gql file.
The main difference between these two approaches is that, in the code-first approach, the GraphQL schema is dynamic, adaptable to different users or applications. This suits WordPress, where a single site could power several applications (such as website and mobile app) and be customized for different clients. The GraphQL API makes this behavior explicit through the “custom endpoints” feature, which enables to create different endpoints, with access to different GraphQL schemas, for different users or applications.
To avoid performance hits, the schema is made static by caching it to disk or memory, and it is re-generated whenever a new plugin extending the schema is installed, or when the admin updates the settings.
Support for novel features
Another benefit of using the code-first approach is that it enables us to provide brand-new features that can be opted into, before these are supported by the GraphQL spec.
For instance, nested mutations have been requested for the spec but not yet approved. The GraphQL API complies with the spec, using types QueryRoot and MutationRoot to deal with queries and mutations respectively, as exposed in the standard schema. However, by enabling the opt-in “nested mutations” feature, the schema is transformed, and both queries and mutations will instead be handled by a single Root type, providing support for nested mutations.
Let’s see this novel feature in action. In this query, we first query the post through Root.post, then execute mutation Post.addComment on it and obtain the created comment object, and finally execute mutation Comment.reply on it and query some of its data (uncomment the first mutation to log the user in, as to be allowed to add comments):
# mutation { # loginUser( # usernameOrEmail:"test", # password:"pass" # ) { # id # name # } # } mutation { post(id:1459) { id title addComment(comment:"That's really beautiful!") { id date content author { id name } reply(comment:"Yes, it is!") { id date content } } } }
Dynamic behavior
WordPress uses hooks (filters and actions) to modify behavior. Hooks are simple pieces of code that can override a value, or enable to execute a custom action, whenever triggered.
Is there an equivalent in GraphQL?
Directives to override functionality
Searching for a similar mechanism for GraphQL, I‘ve come to the conclusion that directives could be considered the equivalent to WordPress hooks to some extent: like a filter hook, a directive is a function that modifies the value of a field, thus augmenting some other functionality. For instance, let’s say we retrieve a list of post titles with this query:
query { posts { title } }
…which produces this response:
{ "data": { "posts": [ { "title": "Scheduled by Leo" }, { "title": "COPE with WordPress: Post demo containing plenty of blocks" }, { "title": "A lovely tango, not with leo" }, { "title": "Hello world!" }, ] } }
These results are in English. How can we translate them to Spanish? With a directive @translate applied on field title (implemented through this directive resolver), which gets the value of the field as an input, calls the Google Translate API to translate it, and has its result override the original input, as in this query:
query { posts { title @translate(from:"en", to"es") } }
…which produces this response:
{ "data": { "posts": [ { "title": "Programado por Leo" }, { "title": "COPE con WordPress: publica una demostración que contiene muchos bloques" }, { "title": "Un tango lindo, no con leo" }, { "title": "¡Hola Mundo!" } ] } }
Please notice how directives are unconcerned with who the input is. In this case, it was a Post.title field, but it could’ve been Post.excerpt, Comment.content, or any other field of type String. Then, resolving fields and overriding their value is cleanly decoupled, and directives are always reusable.
Directives to connect to third parties
As WordPress keeps steadily becoming the OS of the web (currently powering 39% of all sites, more than any other software), it also progressively increases its interactions with external services (think of Stripe for payments, Slack for notifications, AWS S3 for hosting assets, and others).
As we‘ve seen above, directives can be used to override the response of a field. But where does the new value come from? It could come from some local function, but it could perfectly well also originate from some external service (as for directive @translate we’ve seen earlier on, which retrieves the new value from the Google Translate API).
For this reason, GraphQL API has decided to make it easy for directives to communicate with external APIs, enabling those services to transform the data from the WordPress site when executing a query, such as for:
translation,
image compression,
sourcing through a CDN, and
sending emails, SMS and Slack notifications.
As a matter of fact, GraphQL API has decided to make directives as powerful as possible, by making them low-level components in the server’s architecture, even having the query resolution itself be based on a directive pipeline. This grants directives the power to perform authorizations, validations, and modification of the response, among others.
Localization
GraphQL servers using the SDL-first approach find it difficult to localize the information in the schema (the corresponding issue for the spec was created more than four years ago, and still has no resolution).
Using the code-first approach, though, the GraphQL API can localize the descriptions in a straightforward manner, through the __('some text', 'domain') PHP function, and the localized strings will be retrieved from a POT file corresponding to the region and language selected in the WordPress admin.
For instance, as we saw earlier on, this code localizes the field descriptions:
class UserFieldResolver extends AbstractDBDataFieldResolver { public function getSchemaFieldDescription( TypeResolverInterface $typeResolver, string $fieldName ): ?string { $descriptions = [ 'username' => __("User's username handle", "graphql-api"), 'email' => __("User's email", "graphql-api"), 'url' => __("URL of the user's profile in the website", "graphql-api"), ]; return $descriptions[$fieldName]; } }
User interfaces
The GraphQL ecosystem is filled with open source tools to interact with the service, including many provide the same user-friendly experience expected in WordPress.
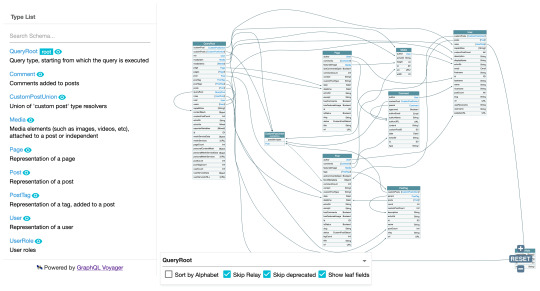
Visualizing the GraphQL schema is done with GraphQL Voyager:

This can prove particularly useful when creating our own CPTs, and checking out how and from where they can be accessed, and what data is exposed for them:

Executing the query against the GraphQL endpoint is done with GraphiQL:

However, this tool is not simple enough for everyone, since the user must have knowledge of the GraphQL query syntax. So, in addition, the GraphiQL Explorer is installed on top of it, as to compose the GraphQL query by clicking on fields:

Access control
WordPress provides different user roles (admin, editor, author, contributor and subscriber) to manage user permissions, and users can be logged-in the wp-admin (eg: the staff), logged-in the public-facing site (eg: clients), or not logged-in or have an account (any visitor). The GraphQL API must account for these, allowing to grant granular access to different users.
Granting access to the tools
The GraphQL API allows to configure who has access to the GraphiQL and Voyager clients to visualize the schema and execute queries against it:
Only the admin?
The staff?
The clients?
Openly accessible to everyone?
For security reasons, the plugin, by default, only provides access to the admin, and does not openly expose the service on the Internet.
In the images from the previous section, the GraphiQL and Voyager clients are available in the wp-admin, available to the admin user only. The admin user can grant access to users with other roles (editor, author, contributor) through the settings:

As to grant access to our clients, or anyone on the open Internet, we don’t want to give them access to the WordPress admin. Then, the settings enable to expose the tools under a new, public-facing URL (such as mywebsite.com/graphiql and mywebsite.com/graphql-interactive). Exposing these public URLs is an opt-in choice, explicitly set by the admin.

Granting access to the GraphQL schema
The WP REST API does not make it easy to customize who has access to some endpoint or field within an endpoint, since no user interface is provided and it must be accomplished through code.
The GraphQL API, instead, makes use of the metadata already available in the GraphQL schema to enable configuration of the service through a user interface (powered by the WordPress editor). As a result, non-technical users can also manage their APIs without touching a line of code.
Managing access control to the different fields (and directives) from the schema is accomplished by clicking on them and selecting, from a dropdown, which users (like those logged in or with specific capabilities) can access them.

Preventing conflicts
Namespacing helps avoid conflicts whenever two plugins use the same name for their types. For instance, if both WooCommerce and Easy Digital Downloads implement a type named Product, it would become ambiguous to execute a query to fetch products. Then, namespacing would transform the type names to WooCommerceProduct and EDDProduct, resolving the conflict.
The likelihood of such conflict arising, though, is not very high. So the best strategy is to have it disabled by default (as to keep the schema as simple as possible), and enable it only if needed.
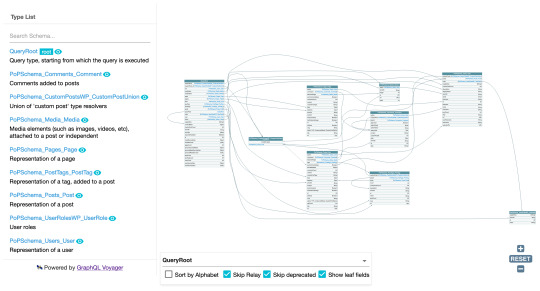
If enabled, the GraphQL server automatically namespaces types using the corresponding PHP package name (for which all packages follow the PHP Standard Recommendation PSR-4). For instance, for this regular GraphQL schema:
…with namespacing enabled, Post becomes PoPSchema_Posts_Post, Comment becomes PoPSchema_Comments_Comment, and so on.
That’s all, folks
Both WordPress and GraphQL are captivating topics on their own, so I find the integration of WordPress and GraphQL greatly endearing. Having been at it for a few years now, I can say that designing the optimal way to have an old CMS manage content, and a new interface access it, is a challenge worth pursuing.
I could continue describing how the WordPress philosophy can influence the implementation of a GraphQL service running on WordPress, talking about it even for several hours, using plenty of material that I have not included in this write-up. But I need to stop… So I’ll stop now.
I hope this article has managed to provide a good overview of the whys and hows for satisfying the WordPress philosophy in GraphQL, as done by plugin GraphQL API for WordPress.
The post Rendering the WordPress philosophy in GraphQL appeared first on CSS-Tricks.
You can support CSS-Tricks by being an MVP Supporter.
Rendering the WordPress philosophy in GraphQL published first on https://deskbysnafu.tumblr.com/
0 notes
Link
One of the most important things which is also often neglected by developers - the performance. One of the key focus area for the 1.0 release was making it blazingly fast ⚡
TypeGraphQL is basically an abstraction layer built on top of the reference GraphQL implementation for JavaScript - graphql-js. To measure the overhead of the abstraction, a few demo examples were made to compare it against the "bare metal" - using raw graphql-js library.
It turned out that in the most demanding cases like returning an array of 25 000 nested objects, the old version 0.17 was even about 5 times slower!
library execution time TypeGraphQL v0.17 1253.28 ms graphql-js 265.52 ms
After profiling the code and finding all the root causes (like always using async execution path), the overhead was reduced from 500% to just 17% in v1.0.0! By using simpleResolvers it can be reduced even further, up to 13%:
execution time graphql-js 265.52 ms TypeGraphQL v1.0 310.36 ms with "simpleResolvers" 299.61 ms with a global middleware 1267.82 ms
Such small overhead is much easier to accept than the initial 500%! More info about how to enable the performance optimizations in the more complex cases can be found in the docs ����.
Schema isolation
This is another feature that is not visible from the first sight but gives new possibilities like splitting the schema to public and private ones 👀
In 0.17.x and before, the schema was built from all the metadata collected by evaluating the TypeGraphQL decorators. The drawback of this approach was the schema leaks - every subsequent calls of buildSchema was returning the same schema which was combined from all the types and resolvers that could be find in the metadata storage.
In TypeGraphQL 1.0 it's no longer true! The schemas are now isolated which means that the buildSchema call takes theresolvers array from options and emit only the queries, mutation and types that are related to those resolvers.
const firstSchema = await buildSchema({ resolvers: [FirstResolver], }); const secondSchema = await buildSchema({ resolvers: [SecondResolver], });
So just by modifying the resolvers option we can have different sets of operations exposed in the GraphQL schemas! Proper isolation also makes serverless development easier as it allows to get rid of the "Schema must contain uniquely named types" errors and others.
Directives and extensions
This two new features are two complementary ways to put some metadata about the schema items.
GraphQL directives though the syntax might remind the TS decorators, as "a directive is an identifier preceded by a @ character", but in fact, they are a purely Schema Definition Language feature. Apart from the metadata capabilities, they can also modify the schema and e.g. generate the connection type for pagination purposes. Basically, the looks like this:
type Query { foobar: String! @auth(requires: USER) }
To apply them, we just need to put the @Directive decorator above and supply the string argument, e.g.:
@Resolver() class FooBarResolver { @Directive("@auth(requires: USER)") @Query() foobar(): string { return "foobar"; } }
However, on the other side we have the GraphQL extensions which are the JS way to achieve the same goal. It's the recommended way of putting the metadata about the types when applying some custom logic.
To declare the extensions for type or selected field, we need to use @Extensionsdecorator, e.g.:
@ObjectType() class Foo { @Extensions({ roles: [Role.User] }) @Field() bar: string; }
We can then read that metadata in the resolvers or middlewares, just by exploring the GraphQLResolveInfo object, e.g.:
export const ExtensionsMiddleware: MiddlewareFn = async ({ info }, next) => { const { extensions } = info.parentType.getFields()[info.fieldName]; console.log(extensions?.roles); // log the metadata return next(); };
More info about directives and extensions features can be found in docs 📖
Resolvers and arguments for interface fields
The last thing that was preventing TypeGraphQL from being fully GraphQL compliant thus blocking the 1.0 release - an ability to provide interface fields resolvers implementations and declare its arguments.
Basically, we can define resolvers for the interface fields using the same syntax we would use in case of the @ObjectType, e.g.:
@InterfaceType() abstract class IPerson { @Field() avatar(@Arg("size") size: number): string { return `http://i.pravatar.cc/${size}`; } }
...with only a few exceptions for cases like abstract methods and inheritance, which you can read about in the docs.
More descriptive errors messages
One of the most irritating issues for newcomers were the laconic error messages that haven't provided enough info to easily find the mistakes in the code.
Messages like "Cannot determine GraphQL input type for users" or even the a generic "Generating schema error" were clearly not helpful enough while searching for the place where the flaws were located.
Now, when the error occurs, it is broadly explained, why it happened and what could we do to fix that, e.g.:
Unable to infer GraphQL type from TypeScript reflection system. You need to provide explicit type for argument named 'filter' of 'getUsers' of 'UserResolver' class.
or:
Some errors occurred while generating GraphQL schema: Interface field 'IUser.accountBalance' expects type 'String!' but 'Student.accountBalance' is of type 'Float'
That should allow developers to safe tons of time and really speed up the development 🏎
Transforming nested inputs and arrays
In the previous releases, an instance of the input type class was created only on the first level of inputs nesting. So, in cases like this:
@InputType() class SampleInput { @Field() sampleStringField: string; @Field() nestedField: SomeNestedInput; } @Resolver() class SampleResolver { @Query() sampleQuery(@Arg("input") input: SampleInput): boolean { return input.nestedField instanceof SomeNestedInput; } }
the nestedField property of input was just a plain Object, not an instance of the SomeNestedInput class. That behavior was producing some unwanted issues, including limited support for inputs and args validation.
Since 1.0 release, it's no longer an issue and all the nested args and inputs are properly transformed to the corresponding input type classes instances, even including deeply nested arrays
0 notes
Text
GraphQL Client Side & Server-Side Components Explained with Examples for API Developers
Full Video Link - https://youtube.com/shorts/nezkbeJlAIk Hi, a new #video on #graphql #mutation published on #codeonedigest #youtube channel. @java @awscloud @AWSCloudIndia @YouTube #youtube @codeonedigest #graphql #graphqlresolver #graphqltutorial
Let’s understand the GraphQL components and the way they communicate with each other. The entire application components can be categories in to server side and client-side components. Server-side Components – GraphQL server forms the core component on the server side and allows to parse the queries coming from GraphQL client applications. Apollo Server is most commonly used implementation of…

View On WordPress
#graphql#graphql api#graphql apollo server express#graphql apollo server tutorial#graphql client#graphql client apollo#graphql client java#graphql client react#graphql client side#graphql client spring boot#graphql client tutorial#graphql example#graphql explained#graphql java client example#graphql schema and resolver#graphql server and client#graphql server apollo#graphql server components#graphql server tutorial#graphql tutorial
0 notes
Text
Understanding Client-Side GraphQl With Apollo-Client In React Apps
About The Author
Blessing Krofegha is a Software Engineer Based in Lagos Nigeria, with a burning desire to contribute to making the web awesome for all, by writing and building … More about Blessing …
Ever tried interacting with a GraphQL server in a client-side application and felt like giving up even before getting anywhere? Ever declined an invitation to join a code base that requires working with GraphQL API because you had no idea? Ever felt like the only front-end engineer who hasn’t learned how to consume GraphQL APIs? If you answered yes to any of these questions, then this tutorial is for you. We’ll be taking a closer look at a few basics of GraphQL and Apollo Client, as well as how to work with both of them. By the end, we’ll have built a pet shop app that uses Apollo Client. Then, you can go on to build your next project.
According to State of JavaScript 2019, 38.7% of developers would like to use GraphQL, while 50.8% of developers would like to learn GraphQL.
Being a query language, GraphQL simplifies the workflow of building a client application. It removes the complexity of managing API endpoints in client-side apps because it exposes a single HTTP endpoint to fetch the required data. Hence, it eliminates overfetching and underfetching of data, as in the case of REST.
But GraphQL is just a query language. In order to use it easily, we need a platform that does the heavy lifting for us. One such platform is Apollo.
The Apollo platform is an implementation of GraphQL that transfers data between the cloud (the server) to the UI of your app. When you use Apollo Client, all of the logic for retrieving data, tracking, loading, and updating the UI is encapsulated by the useQuery hook (as in the case of React). Hence, data fetching is declarative. It also has zero-configuration caching. Just by setting up Apollo Client in your app, you get an intelligent cache out of the box, with no additional configuration required.
Apollo Client is also interoperable with other frameworks, such as Angular, Vue.js, and React.
Note: This tutorial will benefit those who have worked with RESTful or other forms of APIs in the past on the client-side and want to see whether GraphQL is worth taking a shot at. This means you should have worked with an API before; only then will you be able to understand how beneficial GraphQL could be to you. While we will be covering a few basics of GraphQL and Apollo Client, a good knowledge of JavaScript and React Hooks will come in handy.
GraphQL Basics
This article isn’t a complete introduction to GraphQL, but we will define a few conventions before continuing.
What Is GraphQL?
GraphQL is a specification that describes a declarative query language that your clients can use to ask an API for the exact data they want. This is achieved by creating a strong type schema for your API, with ultimate flexibility. It also ensures that the API resolves data and that client queries are validated against a schema. This definition means that GraphQL contains some specifications that make it a declarative query language, with an API that is statically typed (built around Typescript) and making it possible for the client to leverage those type systems to ask the API for the exact data it wants.
So, if we created some types with some fields in them, then, from the client-side, we could say, “Give us this data with these exact fields”. Then the API will respond with that exact shape, just as if we were using a type system in a strongly typed language. You can learn more in my Typescript article.
Let’s look at some conventions of GraphQl that will help us as we continue.
The Basics
Operations In GraphQL, every action performed is called an operation. There are a few operations, namely:
Query This operation is concerned with fetching data from the server. You could also call it a read-only fetch.
Mutation This operation involves creating, updating, and deleting data from a server. It is popularly called a CUD (create, update, and delete) operation.
Subscriptions This operation in GraphQL involves sending data from a server to its clients when specific events take place. They are usually implemented with WebSockets.
In this article, we will be dealing only with query and mutation operations.
Operation names There are unique names for your client-side query and mutation operations.
Variables and arguments Operations can define arguments, very much like a function in most programming languages. Those variables can then be passed to query or mutation calls inside the operation as arguments. Variables are expected to be given at runtime during the execution of an operation from your client.
Aliasing This is a convention in client-side GraphQL that involves renaming verbose or vague field names with simple and readable field names for the UI. Aliasing is necessary in use cases where you don’t want to have conflicting field names.
GraphQL basic conventions. (Large preview)
What Is Client-Side GraphQL?
When a front-end engineer builds UI components using any framework, like Vue.js or (in our case) React, those components are modeled and designed from a certain pattern on the client to suit the data that will be fetched from the server.
One of the most common problems with RESTful APIs is overfetching and underfetching. This happens because the only way for a client to download data is by hitting endpoints that return fixed data structures. Overfetching in this context means that a client downloads more information than is required by the app.
In GraphQL, on the other hand, you’d simply send a single query to the GraphQL server that includes the required data. The server would then respond with a JSON object of the exact data you’ve requested — hence, no overfetching. Sebastian Eschweiler explains the differences between RESTful APIs and GraphQL.
Client-side GraphQL is a client-side infrastructure that interfaces with data from a GraphQL server to perform the following functions:
It manages data by sending queries and mutating data without you having to construct HTTP requests all by yourself. You can spend less time plumbing data and more time building the actual application.
It manages the complexity of a cache for you. So, you can store and retrieve the data fetched from the server, without any third-party interference, and easily avoid refetching duplicate resources. Thus, it identifies when two resources are the same, which is great for a complex app.
It keeps your UI consistent with Optimistic UI, a convention that simulates the results of a mutation (i.e. the created data) and updates the UI even before receiving a response from the server. Once the response is received from the server, the optimistic result is thrown away and replaced with the actual result.
For further information about client-side GraphQL, spare an hour with the cocreator of GraphQL and other cool folks on GraphQL Radio.
What Is Apollo Client?
Apollo Client is an interoperable, ultra-flexible, community-driven GraphQL client for JavaScript and native platforms. Its impressive features include a robust state-management tool (Apollo Link), a zero-config caching system, a declarative approach to fetching data, easy-to-implement pagination, and the Optimistic UI for your client-side application.
Apollo Client stores not only the state from the data fetched from the server, but also the state that it has created locally on your client; hence, it manages state for both API data and local data.
It’s also important to note that you can use Apollo Client alongside other state-management tools, like RedUX, without conflict. Plus, it’s possible to migrate your state management from, say, Redux to Apollo Client (which is beyond the scope of this article). Ultimately, the main purpose of Apollo Client is to enable engineers to query data in an API seamlessly.
Features of Apollo Client
Apollo Client has won over so many engineers and companies because of its extremely helpful features that make building modern robust applications a breeze. The following features come baked in:
Caching Apollo Client supports caching on the fly.
Optimistic UI Apollo Client has cool support for the Optimistic UI. It involves temporarily displaying the final state of an operation (mutation) while the operation is in progress. Once the operation is complete, the real data replaces the optimistic data.
Pagination Apollo Client has built-in functionality that makes it quite easy to implement pagination in your application. It takes care of most of the technical headaches of fetching a list of data, either in patches or at once, using the fetchMore function, which comes with the useQuery hook.
In this article, we will look at a selection of these features.
Enough of the theory. Tighten your seat belt and grab a cup of coffee to go with your pancakes, as we get our hands dirty.
Building Our Web App
This project is inspired by Scott Moss.
We will be building a simple pet shop web app, whose features include:
fetching our pets from the server-side;
creating a pet (which involves creating the name, type of pet, and image);
using the Optimistic UI;
using pagination to segment our data.
To begin, clone the repository, ensuring that the starter branch is what you’ve cloned.
Getting Started
Install the Apollo Client Developer Tools extension for Chrome.
Using the command-line interface (CLI), navigate to the directory of the cloned repository, and run the command to get all dependencies: npm install.
Run the command npm run app to start the app.
While still in the root folder, run the command npm run server. This will start our back-end server for us, which we’ll use as we proceed.
The app should open up in a configured port. Mine is http://localhost:1234/; yours is probably something else.
If everything worked well, your app should look like this:
Cloned starter branch UI. (Large preview)
You’ll notice that we’ve got no pets to display. That’s because we haven’t created such functionality yet.
If you’ve installed Apollo Client Developer Tools correctly, open up the developer tools and click on the tray icon. You’ll see “Apollo” and something like this:
Apollo Client Developer Tools. (Large preview)
Like the RedUX and React developer tools, we will be using Apollo Client Developer Tools to write and test our queries and mutations. The extension comes with the GraphQL Playground.
Fetching Pets
Let’s add the functionality that fetches pets. Move over to client/src/client.js. We’ll be writing Apollo Client, linking it to an API, exporting it as a default client, and writing a new query.
Copy the following code and paste it in client.js:
import { ApolloClient } from 'apollo-client' import { InMemoryCache } from 'apollo-cache-inmemory' import { HttpLink } from 'apollo-link-http' const link = new HttpLink({ uri: 'https://localhost:4000/' }) const cache = new InMemoryCache() const client = new ApolloClient({ link, cache }) export default client
Here’s an explanation of what is happening above:
ApolloClient This will be the function that wraps our app and, thus, interfaces with the HTTP, caches the data, and updates the UI.
InMemoryCache This is the normalized data store in Apollo Client that helps with manipulating the cache in our application.
HttpLink This is a standard network interface for modifying the control flow of GraphQL requests and fetching GraphQL results. It acts as middleware, fetching results from the GraphQL server each time the link is fired. Plus, it’s a good substitute for other options, like Axios and window.fetch.
We declare a link variable that is assigned to an instance of HttpLink. It takes a uri property and a value to our server, which is https://localhost:4000/.
Next is a cache variable that holds the new instance of InMemoryCache.
The client variable also takes an instance of ApolloClient and wraps the link and cache.
Lastly, we export the client so that we can use it across the application.
Before we get to see this in action, we’ve got to make sure that our entire app is exposed to Apollo and that our app can receive data fetched from the server and that it can mutate that data.
To achieve this, let’s head over to client/src/index.js:
import React from 'react' import ReactDOM from 'react-dom' import { BrowserRouter } from 'react-router-dom' import { ApolloProvider } from '@apollo/react-hooks' import App from './components/App' import client from './client' import './index.css' const Root = () => ( <BrowserRouter> <ApolloProvider client={client}> <App /> </ApolloProvider> </BrowserRouter> ); ReactDOM.render(<Root />, document.getElementById('app')) if (module.hot) { module.hot.accept() }
As you’ll notice in the highlighted code, we’ve wrapped the App component in ApolloProvider and passed the client as a prop to the client. ApolloProvider is similar to React’s Context.Provider. It wraps your React app and places the client in context, which allows you to access it from anywhere in your component tree.
To fetch our pets from the server, we need to write queries that request the exact fields that we want. Head over to client/src/pages/Pets.js, and copy and paste the following code into it:
import React, {useState} from 'react' import gql from 'graphql-tag' import { useQuery, useMutation } from '@apollo/react-hooks' import PetsList from '../components/PetsList' import NewPetModal from '../components/NewPetModal' import Loader from '../components/Loader' const GET_PETS = gql` query getPets { pets { id name type img } } `; export default function Pets () { const [modal, setModal] = useState(false) const { loading, error, data } = useQuery(GET_PETS); if (loading) return <Loader />; if (error) return <p>An error occured!</p>; const onSubmit = input => { setModal(false) } if (modal) { return <NewPetModal onSubmit={onSubmit} onCancel={() => setModal(false)} /> } return ( <div className="page pets-page"> <section> <div className="row betwee-xs middle-xs"> <div className="col-xs-10"> <h1>Pets</h1> </div> <div className="col-xs-2"> <button onClick={() => setModal(true)}>new pet</button> </div> </div> </section> <section> <PetsList pets={data.pets}/> </section> </div> ) }
With a few bits of code, we are able to fetch the pets from the server.
What Is gql?
It’s important to note that operations in GraphQL are generally JSON objects written with graphql-tag and with backticks.
gql tags are JavaScript template literal tags that parse GraphQL query strings into the GraphQL AST (abstract syntax tree).
Query operations In order to fetch our pets from the server, we need to perform a query operation.
Because we’re making a query operation, we needed to specify the type of operation before naming it.
The name of our query is GET_PETS. It’s a naming convention of GraphQL to use camelCase for field names.
The name of our fields is pets. Hence, we specify the exact fields that we need from the server (id, name, type, img).
useQuery is a React hook that is the basis for executing queries in an Apollo application. To perform a query operation in our React component, we call the useQuery hook, which was initially imported from @apollo/react-hooks. Next, we pass it a GraphQL query string, which is GET_PETS in our case.
When our component renders, useQuery returns an object response from Apollo Client that contains loading, error, and data properties. Thus, they are destructured, so that we can use them to render the UI.
useQuery is awesome. We don’t have to include async-await. It’s already taken care of in the background. Pretty cool, isn’t it?
loading This property helps us handle the loading state of the application. In our case, we return a Loader component while our application loads. By default, loading is false.
error Just in case, we use this property to handle any error that might occur.
data This contains our actual data from the server.
Lastly, in our PetsList component, we pass the pets props, with data.pets as an object value.
At this point, we have successfully queried our server.
To start our application, let’s run the following command:
Start the client app. Run the command npm run app in your CLI.
Start the server. Run the command npm run server in another CLI.
VScode CLI partitioned to start both the client and the server. (Large preview)
If all went well, you should see this:
Pets queried from the server.
Mutating Data
Mutating data or creating data in Apollo Client is almost the same as querying data, with very slight changes.
Still in client/src/pages/Pets.js, let’s copy and paste the highlighted code:
.... const GET_PETS = gql` query getPets { pets { id name type img } } `; const NEW_PETS = gql` mutation CreateAPet($newPet: NewPetInput!) { addPet(input: $newPet) { id name type img } } `; const Pets = () => { const [modal, setModal] = useState(false) const { loading, error, data } = useQuery(GET_PETS); const [createPet, newPet] = useMutation(NEW_PETS); const onSubmit = input => { setModal(false) createPet({ variables: { newPet: input } }); } if (loading || newPet.loading) return <Loader />; if (error || newPet.error) return <p>An error occured</p>; if (modal) { return <NewPetModal onSubmit={onSubmit} onCancel={() => setModal(false)} /> } return ( <div className="page pets-page"> <section> <div className="row betwee-xs middle-xs"> <div className="col-xs-10"> <h1>Pets</h1> </div> <div className="col-xs-2"> <button onClick={() => setModal(true)}>new pet</button> </div> </div> </section> <section> <PetsList pets={data.pets}/> </section> </div> ) } export default Pets
To create a mutation, we would take the following steps.
1. mutation
To create, update, or delete, we need to perform the mutation operation. The mutation operation has a CreateAPet name, with one argument. This argument has a $newPet variable, with a type of NewPetInput. The ! means that the operation is required; thus, GraphQL won’t execute the operation unless we pass a newPet variable whose type is NewPetInput.
2. addPet
The addPet function, which is inside the mutation operation, takes an argument of input and is set to our $newPet variable. The field sets specified in our addPet function must be equal to the field sets in our query. The field sets in our operation are:
id
name
type
img
3. useMutation
The useMutation React hook is the primary API for executing mutations in an Apollo application. When we need to mutate data, we call useMutation in a React component and pass it a GraphQL string (in our case, NEW_PETS).
When our component renders useMutation, it returns a tuple (that is, an ordered set of data constituting a record) in an array that includes:
a mutate function that we can call at any time to execute the mutation;
an object with fields that represent the current status of the mutation’s execution.
The useMutation hook is passed a GraphQL mutation string (which is NEW_PETS in our case). We destructured the tuple, which is the function (createPet) that will mutate the data and the object field (newPets).
4. createPet
In our onSubmit function, shortly after the setModal state, we defined our createPet. This function takes a variable with an object property of a value set to { newPet: input }. The input represents the various input fields in our form (such as name, type, etc.).
With that done, the outcome should look like this:
Mutation without instant update.
If you observe the GIF closely, you’ll notice that our created pet doesn’t show up instantly, only when the page is refreshed. However, it has been updated on the server.
The big question is, why doesn’t our pet update instantly? Let’s find out in the next section.
Caching In Apollo Client
The reason our app doesn’t update automatically is that our newly created data doesn’t match the cache data in Apollo Client. So, there is a conflict as to what exactly it needs to be updated from the cache.
Simply put, if we perform a mutation that updates or deletes multiple entries (a node), then we are responsible for updating any queries referencing that node, so that it modifies our cached data to match the modifications that a mutation makes to our back-end data.
Keeping Cache In Sync
There are a few ways to keep our cache in sync each time we perform a mutation operation.
The first is by refetching matching queries after a mutation, using the refetchQueries object property (the simplest way).
Note: If we were to use this method, it would take an object property in our createPet function called refetchQueries, and it would contain an array of objects with a value of the query: refetchQueries: [{ query: GET_PETS }].
Because our focus in this section isn’t just to update our created pets in the UI, but to manipulate the cache, we won’t be using this method.
The second approach is to use the update function. In Apollo Client, there’s an update helper function that helps modify the cache data, so that it syncs with the modifications that a mutation makes to our back-end data. Using this function, we can read and write to the cache.
Updating The Cache
Copy the following highlighted code, and paste it in client/src/pages/Pets.js:
...... const Pets = () => { const [modal, setModal] = useState(false) const { loading, error, data } = useQuery(GET_PETS); const [createPet, newPet] = useMutation(NEW_PETS, { update(cache, { data: { addPet } }) { const data = cache.readQuery({ query: GET_PETS }); cache.writeQuery({ query: GET_PETS, data: { pets: [addPet, ...data.pets] }, }); }, } ); .....
The update function receives two arguments:
The first argument is the cache from Apollo Client.
The second is the exact mutation response from the server. We destructure the data property and set it to our mutation (addPet).
Next, to update the function, we need to check for what query needs to be updated (in our case, the GET_PETS query) and read the cache.
Secondly, we need to write to the query that was read, so that it knows we’re about to update it. We do so by passing an object that contains a query object property, with the value set to our query operation (GET_PETS), and a data property whose value is a pet object and that has an array of the addPet mutation and a copy of the pet’s data.
If you followed these steps carefully, you should see your pets update automatically as you create them. Let’s take a look at the changes:
Pets updates instantly.
Optimistic UI
A lot of people are big fans of loaders and spinners. There’s nothing wrong with using a loader; there are perfect use cases where a loader is the best option. I’ve written about loaders versus spinners and their best use cases.
Loaders and spinners indeed play an important role in UI and UX design, but the arrival of Optimistic UI has stolen the spotlight.
What Is Optimistic UI?
Optimistic UI is a convention that simulates the results of a mutation (created data) and updates the UI before receiving a response from the server. Once the response is received from the server, the optimistic result is thrown away and replaced with the actual result.
In the end, an optimistic UI is nothing more than a way to manage perceived performance and avoid loading states.
Apollo Client has a very interesting way of integrating the Optimistic UI. It gives us a simple hook that allows us to write to the local cache after mutation. Let’s see how it works!
Step 1
Head over to client/src/client.js, and add only the highlighted code.
import { ApolloClient } from 'apollo-client' import { InMemoryCache } from 'apollo-cache-inmemory' import { HttpLink } from 'apollo-link-http' import { setContext } from 'apollo-link-context' import { ApolloLink } from 'apollo-link' const http = new HttpLink({ uri: "http://localhost:4000/" }); const delay = setContext( request => new Promise((success, fail) => { setTimeout(() => { success() }, 800) }) ) const link = ApolloLink.from([ delay, http ]) const cache = new InMemoryCache() const client = new ApolloClient({ link, cache }) export default client
The first step involves the following:
We import setContext from apollo-link-context. The setContext function takes a callback function and returns a promise whose setTimeout is set to 800ms, in order to create a delay when a mutation operation is performed.
The ApolloLink.from method ensures that the network activity that represents the link (our API) from HTTP is delayed.
Step 2
The next step is using the Optimistic UI hook. Slide back to client/src/pages/Pets.js, and add only the highlighted code below.
..... const Pets = () => { const [modal, setModal] = useState(false) const { loading, error, data } = useQuery(GET_PETS); const [createPet, newPet] = useMutation(NEW_PETS, { update(cache, { data: { addPet } }) { const data = cache.readQuery({ query: GET_PETS }); cache.writeQuery({ query: GET_PETS, data: { pets: [addPet, ...data.pets] }, }); }, } ); const onSubmit = input => { setModal(false) createPet({ variables: { newPet: input }, optimisticResponse: { __typename: 'Mutation', addPet: { __typename: 'Pet', id: Math.floor(Math.random() * 10000 + ''), name: input.name, type: input.type, img: 'https://via.placeholder.com/200' } } }); } .....
The optimisticResponse object is used if we want the UI to update immediately when we create a pet, instead of waiting for the server response.
The code snippets above include the following:
__typename is injected by Apollo into the query to fetch the type of the queried entities. Those types are used by Apollo Client to build the id property (which is a symbol) for caching purposes in apollo-cache. So, __typename is a valid property of the query response.
The mutation is set as the __typename of optimisticResponse.
Just as earlier defined, our mutation’s name is addPet, and the __typename is Pet.
Next are the fields of our mutation that we want the optimistic response to update:
id Because we don’t know what the ID from the server will be, we made one up using Math.floor.
name This value is set to input.name.
type The type’s value is input.type.
img Now, because our server generates images for us, we used a placeholder to mimic our image from the server.
This was indeed a long ride. If you got to the end, don’t hesitate to take a break from your chair with your cup of coffee.
Let’s take a look at our outcome. The supporting repository for this project is on GitHub. Clone and experiment with it.
Final result of our app.
Conclusion
The amazing features of Apollo Client, such as the Optimistic UI and pagination, make building client-side apps a reality.
While Apollo Client works very well with other frameworks, such as Vue.js and Angular, React developers have Apollo Client Hooks, and so they can’t help but enjoy building a great app.
In this article, we’ve only scratched the surface. Mastering Apollo Client demands constant practice. So, go ahead and clone the repository, add pagination, and play around with the other features it offers.
Please do share your feedback and experience in the comments section below. We can also discuss your progress on Twitter. Cheers!
References
(ks, ra, al, yk, il)
Website Design & SEO Delray Beach by DBL07.co
Delray Beach SEO
source http://www.scpie.org/understanding-client-side-graphql-with-apollo-client-in-react-apps/ source https://scpie.tumblr.com/post/625015311855419392
0 notes
Text
Understanding Client-Side GraphQl With Apollo-Client In React Apps
About The Author
Blessing Krofegha is a Software Engineer Based in Lagos Nigeria, with a burning desire to contribute to making the web awesome for all, by writing and building … More about Blessing …
Ever tried interacting with a GraphQL server in a client-side application and felt like giving up even before getting anywhere? Ever declined an invitation to join a code base that requires working with GraphQL API because you had no idea? Ever felt like the only front-end engineer who hasn’t learned how to consume GraphQL APIs? If you answered yes to any of these questions, then this tutorial is for you. We’ll be taking a closer look at a few basics of GraphQL and Apollo Client, as well as how to work with both of them. By the end, we’ll have built a pet shop app that uses Apollo Client. Then, you can go on to build your next project.
According to State of JavaScript 2019, 38.7% of developers would like to use GraphQL, while 50.8% of developers would like to learn GraphQL.
Being a query language, GraphQL simplifies the workflow of building a client application. It removes the complexity of managing API endpoints in client-side apps because it exposes a single HTTP endpoint to fetch the required data. Hence, it eliminates overfetching and underfetching of data, as in the case of REST.
But GraphQL is just a query language. In order to use it easily, we need a platform that does the heavy lifting for us. One such platform is Apollo.
The Apollo platform is an implementation of GraphQL that transfers data between the cloud (the server) to the UI of your app. When you use Apollo Client, all of the logic for retrieving data, tracking, loading, and updating the UI is encapsulated by the useQuery hook (as in the case of React). Hence, data fetching is declarative. It also has zero-configuration caching. Just by setting up Apollo Client in your app, you get an intelligent cache out of the box, with no additional configuration required.
Apollo Client is also interoperable with other frameworks, such as Angular, Vue.js, and React.
Note: This tutorial will benefit those who have worked with RESTful or other forms of APIs in the past on the client-side and want to see whether GraphQL is worth taking a shot at. This means you should have worked with an API before; only then will you be able to understand how beneficial GraphQL could be to you. While we will be covering a few basics of GraphQL and Apollo Client, a good knowledge of JavaScript and React Hooks will come in handy.
GraphQL Basics
This article isn’t a complete introduction to GraphQL, but we will define a few conventions before continuing.
What Is GraphQL?
GraphQL is a specification that describes a declarative query language that your clients can use to ask an API for the exact data they want. This is achieved by creating a strong type schema for your API, with ultimate flexibility. It also ensures that the API resolves data and that client queries are validated against a schema. This definition means that GraphQL contains some specifications that make it a declarative query language, with an API that is statically typed (built around Typescript) and making it possible for the client to leverage those type systems to ask the API for the exact data it wants.
So, if we created some types with some fields in them, then, from the client-side, we could say, “Give us this data with these exact fields”. Then the API will respond with that exact shape, just as if we were using a type system in a strongly typed language. You can learn more in my Typescript article.
Let’s look at some conventions of GraphQl that will help us as we continue.
The Basics
Operations In GraphQL, every action performed is called an operation. There are a few operations, namely:
Query This operation is concerned with fetching data from the server. You could also call it a read-only fetch.
Mutation This operation involves creating, updating, and deleting data from a server. It is popularly called a CUD (create, update, and delete) operation.
Subscriptions This operation in GraphQL involves sending data from a server to its clients when specific events take place. They are usually implemented with WebSockets.
In this article, we will be dealing only with query and mutation operations.
Operation names There are unique names for your client-side query and mutation operations.
Variables and arguments Operations can define arguments, very much like a function in most programming languages. Those variables can then be passed to query or mutation calls inside the operation as arguments. Variables are expected to be given at runtime during the execution of an operation from your client.
Aliasing This is a convention in client-side GraphQL that involves renaming verbose or vague field names with simple and readable field names for the UI. Aliasing is necessary in use cases where you don’t want to have conflicting field names.
GraphQL basic conventions. (Large preview)
What Is Client-Side GraphQL?
When a front-end engineer builds UI components using any framework, like Vue.js or (in our case) React, those components are modeled and designed from a certain pattern on the client to suit the data that will be fetched from the server.
One of the most common problems with RESTful APIs is overfetching and underfetching. This happens because the only way for a client to download data is by hitting endpoints that return fixed data structures. Overfetching in this context means that a client downloads more information than is required by the app.
In GraphQL, on the other hand, you’d simply send a single query to the GraphQL server that includes the required data. The server would then respond with a JSON object of the exact data you’ve requested — hence, no overfetching. Sebastian Eschweiler explains the differences between RESTful APIs and GraphQL.
Client-side GraphQL is a client-side infrastructure that interfaces with data from a GraphQL server to perform the following functions:
It manages data by sending queries and mutating data without you having to construct HTTP requests all by yourself. You can spend less time plumbing data and more time building the actual application.
It manages the complexity of a cache for you. So, you can store and retrieve the data fetched from the server, without any third-party interference, and easily avoid refetching duplicate resources. Thus, it identifies when two resources are the same, which is great for a complex app.
It keeps your UI consistent with Optimistic UI, a convention that simulates the results of a mutation (i.e. the created data) and updates the UI even before receiving a response from the server. Once the response is received from the server, the optimistic result is thrown away and replaced with the actual result.
For further information about client-side GraphQL, spare an hour with the cocreator of GraphQL and other cool folks on GraphQL Radio.
What Is Apollo Client?
Apollo Client is an interoperable, ultra-flexible, community-driven GraphQL client for JavaScript and native platforms. Its impressive features include a robust state-management tool (Apollo Link), a zero-config caching system, a declarative approach to fetching data, easy-to-implement pagination, and the Optimistic UI for your client-side application.
Apollo Client stores not only the state from the data fetched from the server, but also the state that it has created locally on your client; hence, it manages state for both API data and local data.
It’s also important to note that you can use Apollo Client alongside other state-management tools, like RedUX, without conflict. Plus, it’s possible to migrate your state management from, say, Redux to Apollo Client (which is beyond the scope of this article). Ultimately, the main purpose of Apollo Client is to enable engineers to query data in an API seamlessly.
Features of Apollo Client
Apollo Client has won over so many engineers and companies because of its extremely helpful features that make building modern robust applications a breeze. The following features come baked in:
Caching Apollo Client supports caching on the fly.
Optimistic UI Apollo Client has cool support for the Optimistic UI. It involves temporarily displaying the final state of an operation (mutation) while the operation is in progress. Once the operation is complete, the real data replaces the optimistic data.
Pagination Apollo Client has built-in functionality that makes it quite easy to implement pagination in your application. It takes care of most of the technical headaches of fetching a list of data, either in patches or at once, using the fetchMore function, which comes with the useQuery hook.
In this article, we will look at a selection of these features.
Enough of the theory. Tighten your seat belt and grab a cup of coffee to go with your pancakes, as we get our hands dirty.
Building Our Web App
This project is inspired by Scott Moss.
We will be building a simple pet shop web app, whose features include:
fetching our pets from the server-side;
creating a pet (which involves creating the name, type of pet, and image);
using the Optimistic UI;
using pagination to segment our data.
To begin, clone the repository, ensuring that the starter branch is what you’ve cloned.
Getting Started
Install the Apollo Client Developer Tools extension for Chrome.
Using the command-line interface (CLI), navigate to the directory of the cloned repository, and run the command to get all dependencies: npm install.
Run the command npm run app to start the app.
While still in the root folder, run the command npm run server. This will start our back-end server for us, which we’ll use as we proceed.
The app should open up in a configured port. Mine is http://localhost:1234/; yours is probably something else.
If everything worked well, your app should look like this:
Cloned starter branch UI. (Large preview)
You’ll notice that we’ve got no pets to display. That’s because we haven’t created such functionality yet.
If you’ve installed Apollo Client Developer Tools correctly, open up the developer tools and click on the tray icon. You’ll see “Apollo” and something like this:
Apollo Client Developer Tools. (Large preview)
Like the RedUX and React developer tools, we will be using Apollo Client Developer Tools to write and test our queries and mutations. The extension comes with the GraphQL Playground.
Fetching Pets
Let’s add the functionality that fetches pets. Move over to client/src/client.js. We’ll be writing Apollo Client, linking it to an API, exporting it as a default client, and writing a new query.
Copy the following code and paste it in client.js:
import { ApolloClient } from 'apollo-client' import { InMemoryCache } from 'apollo-cache-inmemory' import { HttpLink } from 'apollo-link-http' const link = new HttpLink({ uri: 'https://localhost:4000/' }) const cache = new InMemoryCache() const client = new ApolloClient({ link, cache }) export default client
Here’s an explanation of what is happening above:
ApolloClient This will be the function that wraps our app and, thus, interfaces with the HTTP, caches the data, and updates the UI.
InMemoryCache This is the normalized data store in Apollo Client that helps with manipulating the cache in our application.
HttpLink This is a standard network interface for modifying the control flow of GraphQL requests and fetching GraphQL results. It acts as middleware, fetching results from the GraphQL server each time the link is fired. Plus, it’s a good substitute for other options, like Axios and window.fetch.
We declare a link variable that is assigned to an instance of HttpLink. It takes a uri property and a value to our server, which is https://localhost:4000/.
Next is a cache variable that holds the new instance of InMemoryCache.
The client variable also takes an instance of ApolloClient and wraps the link and cache.
Lastly, we export the client so that we can use it across the application.
Before we get to see this in action, we’ve got to make sure that our entire app is exposed to Apollo and that our app can receive data fetched from the server and that it can mutate that data.
To achieve this, let’s head over to client/src/index.js:
import React from 'react' import ReactDOM from 'react-dom' import { BrowserRouter } from 'react-router-dom' import { ApolloProvider } from '@apollo/react-hooks' import App from './components/App' import client from './client' import './index.css' const Root = () => ( <BrowserRouter> <ApolloProvider client={client}> <App /> </ApolloProvider> </BrowserRouter> ); ReactDOM.render(<Root />, document.getElementById('app')) if (module.hot) { module.hot.accept() }
As you’ll notice in the highlighted code, we’ve wrapped the App component in ApolloProvider and passed the client as a prop to the client. ApolloProvider is similar to React’s Context.Provider. It wraps your React app and places the client in context, which allows you to access it from anywhere in your component tree.
To fetch our pets from the server, we need to write queries that request the exact fields that we want. Head over to client/src/pages/Pets.js, and copy and paste the following code into it:
import React, {useState} from 'react' import gql from 'graphql-tag' import { useQuery, useMutation } from '@apollo/react-hooks' import PetsList from '../components/PetsList' import NewPetModal from '../components/NewPetModal' import Loader from '../components/Loader' const GET_PETS = gql` query getPets { pets { id name type img } } `; export default function Pets () { const [modal, setModal] = useState(false) const { loading, error, data } = useQuery(GET_PETS); if (loading) return <Loader />; if (error) return <p>An error occured!</p>; const onSubmit = input => { setModal(false) } if (modal) { return <NewPetModal onSubmit={onSubmit} onCancel={() => setModal(false)} /> } return ( <div className="page pets-page"> <section> <div className="row betwee-xs middle-xs"> <div className="col-xs-10"> <h1>Pets</h1> </div> <div className="col-xs-2"> <button onClick={() => setModal(true)}>new pet</button> </div> </div> </section> <section> <PetsList pets={data.pets}/> </section> </div> ) }
With a few bits of code, we are able to fetch the pets from the server.
What Is gql?
It’s important to note that operations in GraphQL are generally JSON objects written with graphql-tag and with backticks.
gql tags are JavaScript template literal tags that parse GraphQL query strings into the GraphQL AST (abstract syntax tree).
Query operations In order to fetch our pets from the server, we need to perform a query operation.
Because we’re making a query operation, we needed to specify the type of operation before naming it.
The name of our query is GET_PETS. It’s a naming convention of GraphQL to use camelCase for field names.
The name of our fields is pets. Hence, we specify the exact fields that we need from the server (id, name, type, img).
useQuery is a React hook that is the basis for executing queries in an Apollo application. To perform a query operation in our React component, we call the useQuery hook, which was initially imported from @apollo/react-hooks. Next, we pass it a GraphQL query string, which is GET_PETS in our case.
When our component renders, useQuery returns an object response from Apollo Client that contains loading, error, and data properties. Thus, they are destructured, so that we can use them to render the UI.
useQuery is awesome. We don’t have to include async-await. It’s already taken care of in the background. Pretty cool, isn’t it?
loading This property helps us handle the loading state of the application. In our case, we return a Loader component while our application loads. By default, loading is false.
error Just in case, we use this property to handle any error that might occur.
data This contains our actual data from the server.
Lastly, in our PetsList component, we pass the pets props, with data.pets as an object value.
At this point, we have successfully queried our server.
To start our application, let’s run the following command:
Start the client app. Run the command npm run app in your CLI.
Start the server. Run the command npm run server in another CLI.
VScode CLI partitioned to start both the client and the server. (Large preview)
If all went well, you should see this:
Pets queried from the server.
Mutating Data
Mutating data or creating data in Apollo Client is almost the same as querying data, with very slight changes.
Still in client/src/pages/Pets.js, let’s copy and paste the highlighted code:
.... const GET_PETS = gql` query getPets { pets { id name type img } } `; const NEW_PETS = gql` mutation CreateAPet($newPet: NewPetInput!) { addPet(input: $newPet) { id name type img } } `; const Pets = () => { const [modal, setModal] = useState(false) const { loading, error, data } = useQuery(GET_PETS); const [createPet, newPet] = useMutation(NEW_PETS); const onSubmit = input => { setModal(false) createPet({ variables: { newPet: input } }); } if (loading || newPet.loading) return <Loader />; if (error || newPet.error) return <p>An error occured</p>; if (modal) { return <NewPetModal onSubmit={onSubmit} onCancel={() => setModal(false)} /> } return ( <div className="page pets-page"> <section> <div className="row betwee-xs middle-xs"> <div className="col-xs-10"> <h1>Pets</h1> </div> <div className="col-xs-2"> <button onClick={() => setModal(true)}>new pet</button> </div> </div> </section> <section> <PetsList pets={data.pets}/> </section> </div> ) } export default Pets
To create a mutation, we would take the following steps.
1. mutation
To create, update, or delete, we need to perform the mutation operation. The mutation operation has a CreateAPet name, with one argument. This argument has a $newPet variable, with a type of NewPetInput. The ! means that the operation is required; thus, GraphQL won’t execute the operation unless we pass a newPet variable whose type is NewPetInput.
2. addPet
The addPet function, which is inside the mutation operation, takes an argument of input and is set to our $newPet variable. The field sets specified in our addPet function must be equal to the field sets in our query. The field sets in our operation are:
id
name
type
img
3. useMutation
The useMutation React hook is the primary API for executing mutations in an Apollo application. When we need to mutate data, we call useMutation in a React component and pass it a GraphQL string (in our case, NEW_PETS).
When our component renders useMutation, it returns a tuple (that is, an ordered set of data constituting a record) in an array that includes:
a mutate function that we can call at any time to execute the mutation;
an object with fields that represent the current status of the mutation’s execution.
The useMutation hook is passed a GraphQL mutation string (which is NEW_PETS in our case). We destructured the tuple, which is the function (createPet) that will mutate the data and the object field (newPets).
4. createPet
In our onSubmit function, shortly after the setModal state, we defined our createPet. This function takes a variable with an object property of a value set to { newPet: input }. The input represents the various input fields in our form (such as name, type, etc.).
With that done, the outcome should look like this:
Mutation without instant update.
If you observe the GIF closely, you’ll notice that our created pet doesn’t show up instantly, only when the page is refreshed. However, it has been updated on the server.
The big question is, why doesn’t our pet update instantly? Let’s find out in the next section.
Caching In Apollo Client
The reason our app doesn’t update automatically is that our newly created data doesn’t match the cache data in Apollo Client. So, there is a conflict as to what exactly it needs to be updated from the cache.
Simply put, if we perform a mutation that updates or deletes multiple entries (a node), then we are responsible for updating any queries referencing that node, so that it modifies our cached data to match the modifications that a mutation makes to our back-end data.
Keeping Cache In Sync
There are a few ways to keep our cache in sync each time we perform a mutation operation.
The first is by refetching matching queries after a mutation, using the refetchQueries object property (the simplest way).
Note: If we were to use this method, it would take an object property in our createPet function called refetchQueries, and it would contain an array of objects with a value of the query: refetchQueries: [{ query: GET_PETS }].
Because our focus in this section isn’t just to update our created pets in the UI, but to manipulate the cache, we won’t be using this method.
The second approach is to use the update function. In Apollo Client, there’s an update helper function that helps modify the cache data, so that it syncs with the modifications that a mutation makes to our back-end data. Using this function, we can read and write to the cache.
Updating The Cache
Copy the following highlighted code, and paste it in client/src/pages/Pets.js:
...... const Pets = () => { const [modal, setModal] = useState(false) const { loading, error, data } = useQuery(GET_PETS); const [createPet, newPet] = useMutation(NEW_PETS, { update(cache, { data: { addPet } }) { const data = cache.readQuery({ query: GET_PETS }); cache.writeQuery({ query: GET_PETS, data: { pets: [addPet, ...data.pets] }, }); }, } ); .....
The update function receives two arguments:
The first argument is the cache from Apollo Client.
The second is the exact mutation response from the server. We destructure the data property and set it to our mutation (addPet).
Next, to update the function, we need to check for what query needs to be updated (in our case, the GET_PETS query) and read the cache.
Secondly, we need to write to the query that was read, so that it knows we’re about to update it. We do so by passing an object that contains a query object property, with the value set to our query operation (GET_PETS), and a data property whose value is a pet object and that has an array of the addPet mutation and a copy of the pet’s data.
If you followed these steps carefully, you should see your pets update automatically as you create them. Let’s take a look at the changes:
Pets updates instantly.
Optimistic UI
A lot of people are big fans of loaders and spinners. There’s nothing wrong with using a loader; there are perfect use cases where a loader is the best option. I’ve written about loaders versus spinners and their best use cases.
Loaders and spinners indeed play an important role in UI and UX design, but the arrival of Optimistic UI has stolen the spotlight.
What Is Optimistic UI?
Optimistic UI is a convention that simulates the results of a mutation (created data) and updates the UI before receiving a response from the server. Once the response is received from the server, the optimistic result is thrown away and replaced with the actual result.
In the end, an optimistic UI is nothing more than a way to manage perceived performance and avoid loading states.
Apollo Client has a very interesting way of integrating the Optimistic UI. It gives us a simple hook that allows us to write to the local cache after mutation. Let’s see how it works!
Step 1
Head over to client/src/client.js, and add only the highlighted code.
import { ApolloClient } from 'apollo-client' import { InMemoryCache } from 'apollo-cache-inmemory' import { HttpLink } from 'apollo-link-http' import { setContext } from 'apollo-link-context' import { ApolloLink } from 'apollo-link' const http = new HttpLink({ uri: "http://localhost:4000/" }); const delay = setContext( request => new Promise((success, fail) => { setTimeout(() => { success() }, 800) }) ) const link = ApolloLink.from([ delay, http ]) const cache = new InMemoryCache() const client = new ApolloClient({ link, cache }) export default client
The first step involves the following:
We import setContext from apollo-link-context. The setContext function takes a callback function and returns a promise whose setTimeout is set to 800ms, in order to create a delay when a mutation operation is performed.
The ApolloLink.from method ensures that the network activity that represents the link (our API) from HTTP is delayed.
Step 2
The next step is using the Optimistic UI hook. Slide back to client/src/pages/Pets.js, and add only the highlighted code below.
..... const Pets = () => { const [modal, setModal] = useState(false) const { loading, error, data } = useQuery(GET_PETS); const [createPet, newPet] = useMutation(NEW_PETS, { update(cache, { data: { addPet } }) { const data = cache.readQuery({ query: GET_PETS }); cache.writeQuery({ query: GET_PETS, data: { pets: [addPet, ...data.pets] }, }); }, } ); const onSubmit = input => { setModal(false) createPet({ variables: { newPet: input }, optimisticResponse: { __typename: 'Mutation', addPet: { __typename: 'Pet', id: Math.floor(Math.random() * 10000 + ''), name: input.name, type: input.type, img: 'https://via.placeholder.com/200' } } }); } .....
The optimisticResponse object is used if we want the UI to update immediately when we create a pet, instead of waiting for the server response.
The code snippets above include the following:
__typename is injected by Apollo into the query to fetch the type of the queried entities. Those types are used by Apollo Client to build the id property (which is a symbol) for caching purposes in apollo-cache. So, __typename is a valid property of the query response.
The mutation is set as the __typename of optimisticResponse.
Just as earlier defined, our mutation’s name is addPet, and the __typename is Pet.
Next are the fields of our mutation that we want the optimistic response to update:
id Because we don’t know what the ID from the server will be, we made one up using Math.floor.
name This value is set to input.name.
type The type’s value is input.type.
img Now, because our server generates images for us, we used a placeholder to mimic our image from the server.
This was indeed a long ride. If you got to the end, don’t hesitate to take a break from your chair with your cup of coffee.
Let’s take a look at our outcome. The supporting repository for this project is on GitHub. Clone and experiment with it.
Final result of our app.
Conclusion
The amazing features of Apollo Client, such as the Optimistic UI and pagination, make building client-side apps a reality.
While Apollo Client works very well with other frameworks, such as Vue.js and Angular, React developers have Apollo Client Hooks, and so they can’t help but enjoy building a great app.
In this article, we’ve only scratched the surface. Mastering Apollo Client demands constant practice. So, go ahead and clone the repository, add pagination, and play around with the other features it offers.
Please do share your feedback and experience in the comments section below. We can also discuss your progress on Twitter. Cheers!
References
(ks, ra, al, yk, il)
Website Design & SEO Delray Beach by DBL07.co
Delray Beach SEO
source http://www.scpie.org/understanding-client-side-graphql-with-apollo-client-in-react-apps/
0 notes
Text
Understanding Client-Side GraphQl With Apollo-Client In React Apps
About The Author
Blessing Krofegha is a Software Engineer Based in Lagos Nigeria, with a burning desire to contribute to making the web awesome for all, by writing and building … More about Blessing …
Ever tried interacting with a GraphQL server in a client-side application and felt like giving up even before getting anywhere? Ever declined an invitation to join a code base that requires working with GraphQL API because you had no idea? Ever felt like the only front-end engineer who hasn’t learned how to consume GraphQL APIs? If you answered yes to any of these questions, then this tutorial is for you. We’ll be taking a closer look at a few basics of GraphQL and Apollo Client, as well as how to work with both of them. By the end, we’ll have built a pet shop app that uses Apollo Client. Then, you can go on to build your next project.
According to State of JavaScript 2019, 38.7% of developers would like to use GraphQL, while 50.8% of developers would like to learn GraphQL.
Being a query language, GraphQL simplifies the workflow of building a client application. It removes the complexity of managing API endpoints in client-side apps because it exposes a single HTTP endpoint to fetch the required data. Hence, it eliminates overfetching and underfetching of data, as in the case of REST.
But GraphQL is just a query language. In order to use it easily, we need a platform that does the heavy lifting for us. One such platform is Apollo.
The Apollo platform is an implementation of GraphQL that transfers data between the cloud (the server) to the UI of your app. When you use Apollo Client, all of the logic for retrieving data, tracking, loading, and updating the UI is encapsulated by the useQuery hook (as in the case of React). Hence, data fetching is declarative. It also has zero-configuration caching. Just by setting up Apollo Client in your app, you get an intelligent cache out of the box, with no additional configuration required.
Apollo Client is also interoperable with other frameworks, such as Angular, Vue.js, and React.
Note: This tutorial will benefit those who have worked with RESTful or other forms of APIs in the past on the client-side and want to see whether GraphQL is worth taking a shot at. This means you should have worked with an API before; only then will you be able to understand how beneficial GraphQL could be to you. While we will be covering a few basics of GraphQL and Apollo Client, a good knowledge of JavaScript and React Hooks will come in handy.
GraphQL Basics
This article isn’t a complete introduction to GraphQL, but we will define a few conventions before continuing.
What Is GraphQL?
GraphQL is a specification that describes a declarative query language that your clients can use to ask an API for the exact data they want. This is achieved by creating a strong type schema for your API, with ultimate flexibility. It also ensures that the API resolves data and that client queries are validated against a schema. This definition means that GraphQL contains some specifications that make it a declarative query language, with an API that is statically typed (built around Typescript) and making it possible for the client to leverage those type systems to ask the API for the exact data it wants.
So, if we created some types with some fields in them, then, from the client-side, we could say, “Give us this data with these exact fields”. Then the API will respond with that exact shape, just as if we were using a type system in a strongly typed language. You can learn more in my Typescript article.
Let’s look at some conventions of GraphQl that will help us as we continue.
The Basics
Operations In GraphQL, every action performed is called an operation. There are a few operations, namely:
Query This operation is concerned with fetching data from the server. You could also call it a read-only fetch.
Mutation This operation involves creating, updating, and deleting data from a server. It is popularly called a CUD (create, update, and delete) operation.
Subscriptions This operation in GraphQL involves sending data from a server to its clients when specific events take place. They are usually implemented with WebSockets.
In this article, we will be dealing only with query and mutation operations.
Operation names There are unique names for your client-side query and mutation operations.
Variables and arguments Operations can define arguments, very much like a function in most programming languages. Those variables can then be passed to query or mutation calls inside the operation as arguments. Variables are expected to be given at runtime during the execution of an operation from your client.
Aliasing This is a convention in client-side GraphQL that involves renaming verbose or vague field names with simple and readable field names for the UI. Aliasing is necessary in use cases where you don’t want to have conflicting field names.
GraphQL basic conventions. (Large preview)
What Is Client-Side GraphQL?
When a front-end engineer builds UI components using any framework, like Vue.js or (in our case) React, those components are modeled and designed from a certain pattern on the client to suit the data that will be fetched from the server.
One of the most common problems with RESTful APIs is overfetching and underfetching. This happens because the only way for a client to download data is by hitting endpoints that return fixed data structures. Overfetching in this context means that a client downloads more information than is required by the app.
In GraphQL, on the other hand, you’d simply send a single query to the GraphQL server that includes the required data. The server would then respond with a JSON object of the exact data you’ve requested — hence, no overfetching. Sebastian Eschweiler explains the differences between RESTful APIs and GraphQL.
Client-side GraphQL is a client-side infrastructure that interfaces with data from a GraphQL server to perform the following functions:
It manages data by sending queries and mutating data without you having to construct HTTP requests all by yourself. You can spend less time plumbing data and more time building the actual application.
It manages the complexity of a cache for you. So, you can store and retrieve the data fetched from the server, without any third-party interference, and easily avoid refetching duplicate resources. Thus, it identifies when two resources are the same, which is great for a complex app.
It keeps your UI consistent with Optimistic UI, a convention that simulates the results of a mutation (i.e. the created data) and updates the UI even before receiving a response from the server. Once the response is received from the server, the optimistic result is thrown away and replaced with the actual result.
For further information about client-side GraphQL, spare an hour with the cocreator of GraphQL and other cool folks on GraphQL Radio.
What Is Apollo Client?
Apollo Client is an interoperable, ultra-flexible, community-driven GraphQL client for JavaScript and native platforms. Its impressive features include a robust state-management tool (Apollo Link), a zero-config caching system, a declarative approach to fetching data, easy-to-implement pagination, and the Optimistic UI for your client-side application.
Apollo Client stores not only the state from the data fetched from the server, but also the state that it has created locally on your client; hence, it manages state for both API data and local data.
It’s also important to note that you can use Apollo Client alongside other state-management tools, like RedUX, without conflict. Plus, it’s possible to migrate your state management from, say, Redux to Apollo Client (which is beyond the scope of this article). Ultimately, the main purpose of Apollo Client is to enable engineers to query data in an API seamlessly.
Features of Apollo Client
Apollo Client has won over so many engineers and companies because of its extremely helpful features that make building modern robust applications a breeze. The following features come baked in:
Caching Apollo Client supports caching on the fly.
Optimistic UI Apollo Client has cool support for the Optimistic UI. It involves temporarily displaying the final state of an operation (mutation) while the operation is in progress. Once the operation is complete, the real data replaces the optimistic data.
Pagination Apollo Client has built-in functionality that makes it quite easy to implement pagination in your application. It takes care of most of the technical headaches of fetching a list of data, either in patches or at once, using the fetchMore function, which comes with the useQuery hook.
In this article, we will look at a selection of these features.
Enough of the theory. Tighten your seat belt and grab a cup of coffee to go with your pancakes, as we get our hands dirty.
Building Our Web App
This project is inspired by Scott Moss.
We will be building a simple pet shop web app, whose features include:
fetching our pets from the server-side;
creating a pet (which involves creating the name, type of pet, and image);
using the Optimistic UI;
using pagination to segment our data.
To begin, clone the repository, ensuring that the starter branch is what you’ve cloned.
Getting Started
Install the Apollo Client Developer Tools extension for Chrome.
Using the command-line interface (CLI), navigate to the directory of the cloned repository, and run the command to get all dependencies: npm install.
Run the command npm run app to start the app.
While still in the root folder, run the command npm run server. This will start our back-end server for us, which we’ll use as we proceed.
The app should open up in a configured port. Mine is http://localhost:1234/; yours is probably something else.
If everything worked well, your app should look like this:
Cloned starter branch UI. (Large preview)
You’ll notice that we’ve got no pets to display. That’s because we haven’t created such functionality yet.
If you’ve installed Apollo Client Developer Tools correctly, open up the developer tools and click on the tray icon. You’ll see “Apollo” and something like this:
Apollo Client Developer Tools. (Large preview)
Like the RedUX and React developer tools, we will be using Apollo Client Developer Tools to write and test our queries and mutations. The extension comes with the GraphQL Playground.
Fetching Pets
Let’s add the functionality that fetches pets. Move over to client/src/client.js. We’ll be writing Apollo Client, linking it to an API, exporting it as a default client, and writing a new query.
Copy the following code and paste it in client.js:
import { ApolloClient } from 'apollo-client' import { InMemoryCache } from 'apollo-cache-inmemory' import { HttpLink } from 'apollo-link-http' const link = new HttpLink({ uri: 'https://localhost:4000/' }) const cache = new InMemoryCache() const client = new ApolloClient({ link, cache }) export default client
Here’s an explanation of what is happening above:
ApolloClient This will be the function that wraps our app and, thus, interfaces with the HTTP, caches the data, and updates the UI.
InMemoryCache This is the normalized data store in Apollo Client that helps with manipulating the cache in our application.
HttpLink This is a standard network interface for modifying the control flow of GraphQL requests and fetching GraphQL results. It acts as middleware, fetching results from the GraphQL server each time the link is fired. Plus, it’s a good substitute for other options, like Axios and window.fetch.
We declare a link variable that is assigned to an instance of HttpLink. It takes a uri property and a value to our server, which is https://localhost:4000/.
Next is a cache variable that holds the new instance of InMemoryCache.
The client variable also takes an instance of ApolloClient and wraps the link and cache.
Lastly, we export the client so that we can use it across the application.
Before we get to see this in action, we’ve got to make sure that our entire app is exposed to Apollo and that our app can receive data fetched from the server and that it can mutate that data.
To achieve this, let’s head over to client/src/index.js:
import React from 'react' import ReactDOM from 'react-dom' import { BrowserRouter } from 'react-router-dom' import { ApolloProvider } from '@apollo/react-hooks' import App from './components/App' import client from './client' import './index.css' const Root = () => ( <BrowserRouter> <ApolloProvider client={client}> <App /> </ApolloProvider> </BrowserRouter> ); ReactDOM.render(<Root />, document.getElementById('app')) if (module.hot) { module.hot.accept() }
As you’ll notice in the highlighted code, we’ve wrapped the App component in ApolloProvider and passed the client as a prop to the client. ApolloProvider is similar to React’s Context.Provider. It wraps your React app and places the client in context, which allows you to access it from anywhere in your component tree.
To fetch our pets from the server, we need to write queries that request the exact fields that we want. Head over to client/src/pages/Pets.js, and copy and paste the following code into it:
import React, {useState} from 'react' import gql from 'graphql-tag' import { useQuery, useMutation } from '@apollo/react-hooks' import PetsList from '../components/PetsList' import NewPetModal from '../components/NewPetModal' import Loader from '../components/Loader' const GET_PETS = gql` query getPets { pets { id name type img } } `; export default function Pets () { const [modal, setModal] = useState(false) const { loading, error, data } = useQuery(GET_PETS); if (loading) return <Loader />; if (error) return <p>An error occured!</p>; const onSubmit = input => { setModal(false) } if (modal) { return <NewPetModal onSubmit={onSubmit} onCancel={() => setModal(false)} /> } return ( <div className="page pets-page"> <section> <div className="row betwee-xs middle-xs"> <div className="col-xs-10"> <h1>Pets</h1> </div> <div className="col-xs-2"> <button onClick={() => setModal(true)}>new pet</button> </div> </div> </section> <section> <PetsList pets={data.pets}/> </section> </div> ) }
With a few bits of code, we are able to fetch the pets from the server.
What Is gql?
It’s important to note that operations in GraphQL are generally JSON objects written with graphql-tag and with backticks.
gql tags are JavaScript template literal tags that parse GraphQL query strings into the GraphQL AST (abstract syntax tree).
Query operations In order to fetch our pets from the server, we need to perform a query operation.
Because we’re making a query operation, we needed to specify the type of operation before naming it.
The name of our query is GET_PETS. It’s a naming convention of GraphQL to use camelCase for field names.
The name of our fields is pets. Hence, we specify the exact fields that we need from the server (id, name, type, img).
useQuery is a React hook that is the basis for executing queries in an Apollo application. To perform a query operation in our React component, we call the useQuery hook, which was initially imported from @apollo/react-hooks. Next, we pass it a GraphQL query string, which is GET_PETS in our case.
When our component renders, useQuery returns an object response from Apollo Client that contains loading, error, and data properties. Thus, they are destructured, so that we can use them to render the UI.
useQuery is awesome. We don’t have to include async-await. It’s already taken care of in the background. Pretty cool, isn’t it?
loading This property helps us handle the loading state of the application. In our case, we return a Loader component while our application loads. By default, loading is false.
error Just in case, we use this property to handle any error that might occur.
data This contains our actual data from the server.
Lastly, in our PetsList component, we pass the pets props, with data.pets as an object value.
At this point, we have successfully queried our server.
To start our application, let’s run the following command:
Start the client app. Run the command npm run app in your CLI.
Start the server. Run the command npm run server in another CLI.
VScode CLI partitioned to start both the client and the server. (Large preview)
If all went well, you should see this:
Pets queried from the server.
Mutating Data
Mutating data or creating data in Apollo Client is almost the same as querying data, with very slight changes.
Still in client/src/pages/Pets.js, let’s copy and paste the highlighted code:
.... const GET_PETS = gql` query getPets { pets { id name type img } } `; const NEW_PETS = gql` mutation CreateAPet($newPet: NewPetInput!) { addPet(input: $newPet) { id name type img } } `; const Pets = () => { const [modal, setModal] = useState(false) const { loading, error, data } = useQuery(GET_PETS); const [createPet, newPet] = useMutation(NEW_PETS); const onSubmit = input => { setModal(false) createPet({ variables: { newPet: input } }); } if (loading || newPet.loading) return <Loader />; if (error || newPet.error) return <p>An error occured</p>; if (modal) { return <NewPetModal onSubmit={onSubmit} onCancel={() => setModal(false)} /> } return ( <div className="page pets-page"> <section> <div className="row betwee-xs middle-xs"> <div className="col-xs-10"> <h1>Pets</h1> </div> <div className="col-xs-2"> <button onClick={() => setModal(true)}>new pet</button> </div> </div> </section> <section> <PetsList pets={data.pets}/> </section> </div> ) } export default Pets
To create a mutation, we would take the following steps.
1. mutation
To create, update, or delete, we need to perform the mutation operation. The mutation operation has a CreateAPet name, with one argument. This argument has a $newPet variable, with a type of NewPetInput. The ! means that the operation is required; thus, GraphQL won’t execute the operation unless we pass a newPet variable whose type is NewPetInput.
2. addPet
The addPet function, which is inside the mutation operation, takes an argument of input and is set to our $newPet variable. The field sets specified in our addPet function must be equal to the field sets in our query. The field sets in our operation are:
id
name
type
img
3. useMutation
The useMutation React hook is the primary API for executing mutations in an Apollo application. When we need to mutate data, we call useMutation in a React component and pass it a GraphQL string (in our case, NEW_PETS).
When our component renders useMutation, it returns a tuple (that is, an ordered set of data constituting a record) in an array that includes:
a mutate function that we can call at any time to execute the mutation;
an object with fields that represent the current status of the mutation’s execution.
The useMutation hook is passed a GraphQL mutation string (which is NEW_PETS in our case). We destructured the tuple, which is the function (createPet) that will mutate the data and the object field (newPets).
4. createPet
In our onSubmit function, shortly after the setModal state, we defined our createPet. This function takes a variable with an object property of a value set to { newPet: input }. The input represents the various input fields in our form (such as name, type, etc.).
With that done, the outcome should look like this:
Mutation without instant update.
If you observe the GIF closely, you’ll notice that our created pet doesn’t show up instantly, only when the page is refreshed. However, it has been updated on the server.
The big question is, why doesn’t our pet update instantly? Let’s find out in the next section.
Caching In Apollo Client
The reason our app doesn’t update automatically is that our newly created data doesn’t match the cache data in Apollo Client. So, there is a conflict as to what exactly it needs to be updated from the cache.
Simply put, if we perform a mutation that updates or deletes multiple entries (a node), then we are responsible for updating any queries referencing that node, so that it modifies our cached data to match the modifications that a mutation makes to our back-end data.
Keeping Cache In Sync
There are a few ways to keep our cache in sync each time we perform a mutation operation.
The first is by refetching matching queries after a mutation, using the refetchQueries object property (the simplest way).
Note: If we were to use this method, it would take an object property in our createPet function called refetchQueries, and it would contain an array of objects with a value of the query: refetchQueries: [{ query: GET_PETS }].
Because our focus in this section isn’t just to update our created pets in the UI, but to manipulate the cache, we won’t be using this method.
The second approach is to use the update function. In Apollo Client, there’s an update helper function that helps modify the cache data, so that it syncs with the modifications that a mutation makes to our back-end data. Using this function, we can read and write to the cache.
Updating The Cache
Copy the following highlighted code, and paste it in client/src/pages/Pets.js:
...... const Pets = () => { const [modal, setModal] = useState(false) const { loading, error, data } = useQuery(GET_PETS); const [createPet, newPet] = useMutation(NEW_PETS, { update(cache, { data: { addPet } }) { const data = cache.readQuery({ query: GET_PETS }); cache.writeQuery({ query: GET_PETS, data: { pets: [addPet, ...data.pets] }, }); }, } ); .....
The update function receives two arguments:
The first argument is the cache from Apollo Client.
The second is the exact mutation response from the server. We destructure the data property and set it to our mutation (addPet).
Next, to update the function, we need to check for what query needs to be updated (in our case, the GET_PETS query) and read the cache.
Secondly, we need to write to the query that was read, so that it knows we’re about to update it. We do so by passing an object that contains a query object property, with the value set to our query operation (GET_PETS), and a data property whose value is a pet object and that has an array of the addPet mutation and a copy of the pet’s data.
If you followed these steps carefully, you should see your pets update automatically as you create them. Let’s take a look at the changes:
Pets updates instantly.
Optimistic UI
A lot of people are big fans of loaders and spinners. There’s nothing wrong with using a loader; there are perfect use cases where a loader is the best option. I’ve written about loaders versus spinners and their best use cases.
Loaders and spinners indeed play an important role in UI and UX design, but the arrival of Optimistic UI has stolen the spotlight.
What Is Optimistic UI?
Optimistic UI is a convention that simulates the results of a mutation (created data) and updates the UI before receiving a response from the server. Once the response is received from the server, the optimistic result is thrown away and replaced with the actual result.
In the end, an optimistic UI is nothing more than a way to manage perceived performance and avoid loading states.
Apollo Client has a very interesting way of integrating the Optimistic UI. It gives us a simple hook that allows us to write to the local cache after mutation. Let’s see how it works!
Step 1
Head over to client/src/client.js, and add only the highlighted code.
import { ApolloClient } from 'apollo-client' import { InMemoryCache } from 'apollo-cache-inmemory' import { HttpLink } from 'apollo-link-http' import { setContext } from 'apollo-link-context' import { ApolloLink } from 'apollo-link' const http = new HttpLink({ uri: "http://localhost:4000/" }); const delay = setContext( request => new Promise((success, fail) => { setTimeout(() => { success() }, 800) }) ) const link = ApolloLink.from([ delay, http ]) const cache = new InMemoryCache() const client = new ApolloClient({ link, cache }) export default client
The first step involves the following:
We import setContext from apollo-link-context. The setContext function takes a callback function and returns a promise whose setTimeout is set to 800ms, in order to create a delay when a mutation operation is performed.
The ApolloLink.from method ensures that the network activity that represents the link (our API) from HTTP is delayed.
Step 2
The next step is using the Optimistic UI hook. Slide back to client/src/pages/Pets.js, and add only the highlighted code below.
..... const Pets = () => { const [modal, setModal] = useState(false) const { loading, error, data } = useQuery(GET_PETS); const [createPet, newPet] = useMutation(NEW_PETS, { update(cache, { data: { addPet } }) { const data = cache.readQuery({ query: GET_PETS }); cache.writeQuery({ query: GET_PETS, data: { pets: [addPet, ...data.pets] }, }); }, } ); const onSubmit = input => { setModal(false) createPet({ variables: { newPet: input }, optimisticResponse: { __typename: 'Mutation', addPet: { __typename: 'Pet', id: Math.floor(Math.random() * 10000 + ''), name: input.name, type: input.type, img: 'https://via.placeholder.com/200' } } }); } .....
The optimisticResponse object is used if we want the UI to update immediately when we create a pet, instead of waiting for the server response.
The code snippets above include the following:
__typename is injected by Apollo into the query to fetch the type of the queried entities. Those types are used by Apollo Client to build the id property (which is a symbol) for caching purposes in apollo-cache. So, __typename is a valid property of the query response.
The mutation is set as the __typename of optimisticResponse.
Just as earlier defined, our mutation’s name is addPet, and the __typename is Pet.
Next are the fields of our mutation that we want the optimistic response to update:
id Because we don’t know what the ID from the server will be, we made one up using Math.floor.
name This value is set to input.name.
type The type’s value is input.type.
img Now, because our server generates images for us, we used a placeholder to mimic our image from the server.
This was indeed a long ride. If you got to the end, don’t hesitate to take a break from your chair with your cup of coffee.
Let’s take a look at our outcome. The supporting repository for this project is on GitHub. Clone and experiment with it.
Final result of our app.
Conclusion
The amazing features of Apollo Client, such as the Optimistic UI and pagination, make building client-side apps a reality.
While Apollo Client works very well with other frameworks, such as Vue.js and Angular, React developers have Apollo Client Hooks, and so they can’t help but enjoy building a great app.
In this article, we’ve only scratched the surface. Mastering Apollo Client demands constant practice. So, go ahead and clone the repository, add pagination, and play around with the other features it offers.
Please do share your feedback and experience in the comments section below. We can also discuss your progress on Twitter. Cheers!
References
(ks, ra, al, yk, il)
Website Design & SEO Delray Beach by DBL07.co
Delray Beach SEO
source http://www.scpie.org/understanding-client-side-graphql-with-apollo-client-in-react-apps/ source https://scpie1.blogspot.com/2020/07/understanding-client-side-graphql-with.html
0 notes
Link
Spring & Hibernate for Beginners (includes Spring Boot)
Spring & Hibernate for Beginners (includes Spring Boot)
Spring 5: Learn Spring 5 Core, AOP, Spring MVC, Spring Security, Spring REST, Spring Boot 2, Thymeleaf, JPA & Hibernate
What you'll learn
Spring & Hibernate for Beginners (includes Spring Boot)
Develop a REAL-TIME project with Spring MVC, Spring REST, Spring Boot and Hibernate CRUD ... all from SCRATCH
You will TYPE IN EVERY LINE of code with me in the videos. I EXPLAIN every line of code to help you learn!
LEARN key Spring 5 features: Core, Annotations, Java Config, AOP, Spring MVC, Hibernate and Maven
I am a RESPONSIVE INSTRUCTOR ... post your questions and I will RESPOND in 24 hours.
POPULAR VIDEOS for Spring Boot 2, Spring Security, Spring REST, Spring Data JPA, Spring Data REST and Thymeleaf
Join an ACTIVE COMMUNITY of 110,000+ students that are already enrolled! Over 33,000+ Reviews - 5 STARS
Students have LANDED NEW JOBS with the skills from this course. Spring and Hibernate developers are in HIGH-DEMAND!
You can DOWNLOAD all videos, source code, and PDFs. Perfect for o
Requirements
Basic Java knowledge is required
Basic HTML knowledge is helpful
Description
SPRING BOOT SECTION NOW INCLUDES OVER 6.5 HOURS OF NEW VIDEOS
#1 BESTSELLING SPRING-HIBERNATE COURSE ON UDEMY - OVER 35,000 REVIEWS - 5 STARS! ⭐️⭐️⭐️⭐️⭐️
---
THIS COURSE COVERS SPRING 5
LEARN these HOT TOPICS in Spring 5:
Spring Framework 5
Spring Core
Spring Annotations
Spring Java Configuration (all Java, no XML)
Spring AOP
Spring MVC
Hibernate CRUD
JPA CRUD
Spring Security
Spring REST
Maven
SPRING BOOT
Spring Boot Starters
Spring Boot and Hibernate
Spring Boot and Spring Data JPA
Spring Boot and Spring Data REST
Spring Boot, Thymeleaf and Spring MVC
REAL-TIME PROJECTS
Spring MVC and Hibernate CRUD real-time project
Spring Security (with password encryption in the database)
Spring REST (with full database CRUD real-time project)
Spring Boot REST (with full database CRUD real-time project)
Spring Boot with JPA and Spring Data JPA (with full database CRUD real-time project)
Spring Boot with Spring Data REST (with full database CRUD real-time project)
Spring Boot with Thymeleaf (with full database CRUD real-time project)
---
[COURSE UPDATES]:
Added Spring Boot and Thymeleaf videos ... 12 videos, 2.5 hours of new content
Added Spring Boot videos ... 34 videos, 4 hours of new content
Added Spring Security Role-based Registration lecture
Added ADVANCED Spring REST videos ... 40 videos, 3 hours of new content
Added Spring REST videos ... 18 videos, 1.5 hours of new content
Added Spring Security User Registration Lecture
Added Spring Security JDBC videos ... 16 new videos, 1 hour of new content
Added more Spring Security videos ... 52 videos, 3.5 hours of new content
Updated course to SPRING 5, Tomcat 9 and Eclipse Oxygen
Added Spring Security videos ... 16 new videos, 1 hour of new content
New Advanced Hibernate videos ... 57 new videos, 4 hours of new content
---
This course covers the LATEST VERSIONS of Spring 5 and Hibernate 5! The course also includes Spring Boot and Spring Data JPA
Build a complete Spring MVC + Hibernate CRUD web app ... all from scratch! (real-time project)
You will learn about: Spring Core, AOP, Spring MVC, Spring Security, Spring REST, Spring Boot, Spring Data JPA, Spring Data REST, Thymeleaf and Hibernate ... all connected to a MySQL database
---
By the end of this course, you will create all of the source code for a complete Spring MVC - Hibernate CRUD real-time project.
You will also develop Spring REST APIs for a full CRUD REST API real-time project.
You will type in every line of code with me in the videos ... all from scratch.
I explain every line of code that we create. So this isn't a copy/paste exercise, you will have a full understanding of the code.
---
I am a RESPONSIVE INSTRUCTOR .... post your questions and I will RESPOND in 24 hours.
---
Join 118,000+ students that are already enrolled!
Over 35,000+ Reviews! (the most reviews for any Spring-Hibernate course on Udemy, more than DOUBLE the nearest competitor)
---
Sample of the reviews:
★★★★★
I worked in some company, so I can say that this course is 100% industry oriented. The best course for learning Spring Framework. Getting replies within 24 hours. - Premang
★★★★★
Chad Darby has done a superb job organizing this course and has made Spring Framework, MVC, AOP, Hibernate, Security easy to learn and use. I have a bs and ms in CS, have been developing software for 25 years, and have taken many courses over the years at the different companies I've been at and Chad is easily the best instructor I've had.
He's extremely well-organized and knowledgeable and lays out this course in a step-by-step approach to fully cover the material and make it easy to learn. I highly recommend this course and Chad as an instructor.
I'm adding to my review following Chad's recent updates to his course to cover Spring Boot, JPA, etc. After finishing the course originally, I found another Spring Boot class, and after working on this other class, I appreciate more what Chad has done here. He's made Spring Boot for CRUD applications with Thymeleaf very easy to follow and learn. I've taken half a dozen other software courses, and while other instructors might be good, Chad is the gold standard here. I can't recommend him highly enough. - Dave Zeltserman
★★★★★
This is the best tutorial I've seen so far for Spring/Hibernate, each step is well explained and the tutorial videos are made to a high standard. I highly recommend this course! - Rob
★★★★★
Hats off to you Chad, the best Spring fundamentals course I have done on Udemy thus far. You never disappoint. - More body Modise
★★★★★
Chad is an excellent natural teacher. His course is well organized. He makes difficult concepts very easy to understand. - Julie Hodgson
---
Live Coding - I code all of the real-time projects from scratch
All source code is available for download
Responsive Instructor - All questions answered within 24 hours
---
PDFs of all lectures are available for download
Closed-Captions / Subtitles available for English and other languages (new!)
Professional video and audio recordings (check the free previews)
---
This course includes mini-courses on Maven, Spring Security, Spring REST and Spring Boot. These mini-courses are designed to help you quickly get started with Maven, Spring Security, Spring REST and Spring Boot.
Mini-Courses
Maven mini-course includes 16 videos (1 hour of video)
Spring Security mini-course includes 68 videos (5 hours of video)
Spring REST mini-course includes 55 videos (4.5 hours of video)
Spring Boot mini-course includes 39 videos (6.5 hours of video)
This is all included in this existing course. :)
---
What Is Spring?
Spring is an enterprise Java framework. It was designed to simplify Java EE development and make developers more productive. Spring makes use of Inversion of Control and Dependency Injection to promote good software coding practices and speed up development time.
This course covers Spring Core, Annotations, All Java Spring Configuration, Spring AOP, Spring MVC, Spring Security, Spring REST, Spring Boot and Spring Data JPA.
What Is Hibernate?
Hibernate is an Object-to-Relational-Mapping (ORM) framework. It simplifies database access for Java applications. By using the framework, you can easily store and retrieve Java objects by setting up some simple configuration mappings.
This course covers basic Hibernate CRUD. Also, advanced Hibernate mappings are covered for one-to-one, one-to-many and many-to-many.
ALSO DOWNLOAD: NodeJS - The Complete Guide (incl. MVC, REST APIs, GraphQL)
Benefits of Taking This Spring and Hibernate Course
Knowing Spring and Hibernate can get you a job or improve the one you have. It's a skill that will put you more in demand in the enterprise Java industry, and make your software life easier, that's why it's so popular.
Nearly every job posting asks for skills in Spring and Hibernate!
This course will help you quickly get up to speed with Spring and Hibernate. I will demystify the technology and help you understand the essential concepts to build a real Spring and Hibernate application from scratch.
You, Will, Learn How To
Spring Core
Build a complete Spring MVC and Hibernate CRUD Project ... all from scratch
Set up your Spring and Hibernate development environment with Tomcat and Eclipse
Wire beans together in the Spring container using Inversion of Control
Configure the Spring container for Dependency Injection
Define Spring Beans using the @Component annotation
Perform auto-scanning of Spring beans to minimize configuration
Automatically wire beans together using @Autowired annotation
Apply all Java configuration to Spring Beans (no XML)
Spring MVC
Set up your Spring MVC environment with configs and directories
Create controllers using @Controller annotation
Read HTML form data using @RequestParam
Leverage Spring MVC model to transport data between controller and view page
Define Request Mappings for GET and POST requests
Minimize coding with Spring MVC Form data binding
Apply Spring MVC form validation on user input
Create custom Spring MVC form validation rules
Hibernate
Perform object/relational mapping with Hibernate
Leverage the Hibernate API to develop CRUD apps
Develop queries using the Hibernate Query Language (HQL)
Apply advanced Hibernate mappings: one-to-one, one-to-many and many-to-many
Create a real-time project using Spring and Hibernate together in a Real-Time Project
Spring AOP
Apply Aspect-Oriented-Programming AOP for cross-cutting concerns
Examine AOP use-cases and how AOP can resolve code-tangling
Create AOP pointcut expressions to match on method invocations
Leverage AOP annotations: @Before, @After, @AfterReturning, @AfterThrowing, @Around
Create a real-time project using AOP and Spring MVC together in a Real-Time Project
Spring Security
Secure your web application with Spring Security
Set up your Maven pom.xml file with compatible Spring Security dependencies
Configure Spring Security with all Java configuration (no XML)
Create custom Spring Security login pages with Bootstrap CSS
Add logout support using default features of Spring Security
Leverage Spring Security support for Cross-Site Request Forgery (CSRF)
Define users and roles for authentication
Display user login info and role using Spring Security tags
Restrict access to URLs based on user role
Hide and Display content based on user role
Add JDBC authentication, store user accounts and passwords in the database
Store encrypted passwords in the database using bcrypt
Register new users and encrypt passwords using Java code
Create a Spring Security Real-Time Project using authorization, authentication and database encryption
Spring REST Web Services - Spring REST APIs
Overview of REST Web Services - REST APIs
Investigating Spring REST support
Sending JSON data over HTTP
JSON Data Binding with the Jackson project
Converting JSON data to Java POJO with Jackson
Processing nested JSON objects and JSON arrays
Developing a Spring REST API
Setting up a Spring REST project with Maven
Creating the Spring REST Controller using @RestController
Running the Spring REST Controller with Eclipse and Tomcat
Testing Spring REST Web Services with Postman
Parameterize REST API endpoints using @PathVariable
Add Spring REST exception handling with @ExceptionHandler
Integrate global REST exception handling with @ControllerAdvice
Leverage ResponseEntity for fine-grained control of Spring REST HTTP response
Build REST API to execute CRUD actions on the Database with Hibernate
Create a Real-Time Project using REST API with full database CRUD
Spring Boot
What is the Spring Boot?
Creating a Project with Spring Boot Initializr
Develop a REST API Controller with Spring Boot
Explore the Spring Boot Project Structure
Leverage Spring Boot Starters - A Curated List of Dependencies
Inherit Defaults with Spring Boot Starter Parents
Automatically Restart with Spring Boot Dev Tools
Add DevOps functionality with Spring Boot Actuator Endpoints
Secure Spring Boot Actuator Endpoints
Run Spring Boot apps from the Command-Line
Use the Spring Boot Maven Plugin to package and run Spring Boot apps
Inject custom application properties into a Spring Boot REST Controller
Spring Boot REST API CRUD
Develop a REST API Controller with Spring Boot with full CRUD support
Configure Spring Boot Data Source for MySQL Database
Create DAO implementations using JPA Entity Manager
Apply Best Practices by integrating a Service Layer
Expose REST API endpoints in Controller code (GET, POST, PUT and DELETE)
Access the REST API using Postman
Add support for Standard JPA API
Learn the benefits of the JPA API in Spring Boot applications
Spring Boot and Spring Data JPA
Minimize boilerplate code with Spring Data JPA and the JpaRepository
Refactor existing REST API to integrate with Spring Data JPA
Leverage new features of the Java Optional pattern with JpaRepository
Test the Spring Data JPA repository with Postman
Spring Boot and Spring Data REST
Accelerate your development process with Spring Data REST
Leverage Spring Data REST to eliminate custom code for controllers and service
Automatically expose REST endpoints for your JPA Repositories
Customize REST base path endpoints
Apply pagination and sorting to REST API endpoints
Configure default page sizes for REST APIs
Investigate HATEOAS compliant REST responses
Test Spring Data REST with Postman
Spring Boot and Thymeleaf
Develop view templates with Thymeleaf in Spring Boot projects
Compare the functionality of Thymeleaf to JSP
Examine the auto-configuration of Thymeleaf in Spring Boot projects
Create a Spring Boot project with Thymeleaf using the Spring Initializer website
Develop a Spring MVC Controller and a Thymeleaf template
Leverage Thymeleaf expressions to access data from the Spring MVC Model
Apply CSS stylesheets to your Thymeleaf templates
Spring Boot, Thymeleaf and Database CRUD
Develop a real-time project with Thymeleaf and Spring Boot with full database CRUD support
Integrate the @Repository to execute CRUD actions on the Database with Spring Data JPA
Apply best practices with the @Service layer design pattern
Create a @Controller to handle web browser requests
Develop Thymeleaf templates to render database results
Beautify your Thymeleaf templates with Bootstrap CSS
Maven
Simplify your build process with Maven
Create Maven POM files and add dependencies
Search Central Maven repository for Dependency Coordinates
Run Maven builds from the Eclipse IDE
Use Maven during the development of Real-Time Projects for Spring MVC, Spring Security, Spring REST, Spring Boot and Hibernate.
ALSO DOWNLOAD: Learning Python for Data Analysis and Visualization
Compared to other Spring/Hibernate courses
This course is fully up to date and covers the latest versions of Spring 5 and Hibernate 5. The course also includes new content on Spring Boot, Spring Data JPA, Spring Data REST and Thymeleaf.
Beware of other Udemy Spring/Hibernate courses. Most of them are outdated and use old versions of Spring and Hibernate. Don’t waste your time or money on learning outdated technology.
Also, I create all of the code from scratch in this course. Beware of other courses, those instructors simply copy/paste from their GitHub repo or they use pre-written code. Their approach is not ideal for real-time learning.
Take my course where I show you how to create all of the code from scratch. You can type the code along with me in the videos, which is the best way to learn.
I am a very responsive instructor and I am available to answer your questions and help you work through any problems.
Finally, all source code is provided with the course along with setup instructions.
Student Reviews Prove This Course's Worth
Those who have reviewed the course have pointed out that the instruction is clear and easy to follow, as well as thorough and highly informative.
Many students had also taken other Spring and Hibernate courses in the past, only to find that this Spring and Hibernate course was their favorite. They enjoyed the structure of the content and the high-quality audio/video.
Sample of the Student Reviews:
★★★★★
I worked in some company, so I can say that this course is 100% industry oriented. The best course for learning Spring Framework. Getting replies within 24 hours. - Premang
★★★★★
Chad Darby has done a superb job organizing this course and has made Spring Framework, MVC, AOP, Hibernate, Security easy to learn and use. I have a bs and ms in CS, have been developing software for 25 years, and have taken many courses over the years at the different companies I've been at and Chad is easily the best instructor I've had.
He's extremely well-organized and knowledgeable and lays out this course in a step-by-step approach to fully cover the material and make it easy to learn. I highly recommend this course and Chad as an instructor.
I'm adding to my review following Chad's recent updates to his course to cover Spring Boot, JPA, etc. After finishing the course originally, I found another Spring Boot class, and after working on this other class, I appreciate more what Chad has done here. He's made Spring Boot for CRUD applications with Thymeleaf very easy to follow and learn. I've taken half a dozen other software courses, and while other instructors might be good, Chad is the gold standard here. I can't recommend him highly enough. - Dave Zeltserman
★★★★★
This is the best tutorial I've seen so far for Spring/Hibernate, each step is well explained and the tutorial videos are made to a high standard. I highly recommend this course! - Rob
★★★★★
Hats off to you Chad, the best Spring fundamentals course I have done on Udemy thus far. You never disappoint. - More body Modise
★★★★★
Chad is an excellent natural teacher. His course is well organized. He makes difficult concepts very easy to understand. - Julie Hodgson
Quality Material
You will receive a quality course, with solid technical material and excellent audio and video production. This is my fifth course at Udemy.
My first four courses on Udemy were:
Eclipse IDE for Beginners
Java Database Connection (JDBC)
JavaServer Faces (JSF) for Beginners
JSP and Servlets for Beginners
These courses have received rave 5-star reviews and over 220,000 students have taken the courses. Also, these courses are the most popular courses in their respective categories.
Similar thing for this Spring course, it is ranked as #1 best seller for Spring courses.
I also have an active YouTube channel where I post regular videos. In the past year, I’ve created over 300 video tutorials (public and private). My YouTube channel has over 4.5 million views and 33k subscribers. So I understand what works and what doesn’t work for creating video tutorials.
No-Risk – Money-Back Guarantee
Finally, there is no risk. You can preview 25% of the course for free. Once you purchase the course, if for some reason you are not happy with the course, Udemy offers a 30-day money-back guarantee.
So you have nothing to lose, sign up for this course and learn how to build Spring and Hibernate Real-Time Projects from scratch!
Target Audience
Java Developers with basic Java experience
Who this course is for:
The course is appropriate for all Java developers: beginners to advanced
Spring & Hibernate for Beginners (includes Spring Boot)
Created by Chad Darby
Last updated 1/2020
English
English, French [Auto-generated]
Size: 16.00 GB
DOWNLOAD COURSE
Content From: https://ift.tt/2Xfd5dX
0 notes
Photo

Redux, sparse arrays, and learning React from basic code examples
#393 — July 6, 2018
Read on the Web
JavaScript Weekly

Illustration by Beebee
What is Redux: A Designer's Guide — A really neat high-level approach to explaining Redux and what it offers beyond state management.
Linton Ye
An Adventure in Sparse Arrays — A quick prod around the idea of ‘sparse’ arrays, how they work in JavaScript, and a few concepts to keep in mind.
Remy Sharp
Optimization Auditing: A Deep Dive into Chrome's Dev Console — Ahmed Bouchefra offers an in-depth exploration of the features of the Chrome DevTools for measuring performance and debugging your web apps.
SitePoint
Build and Deploy Serverless Functions Entirely in JavaScript — Pulumi.io provides a programming model for the cloud. Spend less time on YAML, and more time on JavaScript, because after all… Code is the best Config. Pulumi supports any service on any cloud - from serverless to Kubernetes to storage.
Pulumi sponsor
Reduce JavaScript Payloads with Tree Shaking — Knowing where to begin optimizing your app’s JavaScript can be daunting — tree shaking might be a good place to start.
Jeremy Wagner
Building Mobile Apps with Capacitor and Vue.js — Learn how to use Capacitor and cutting-edge web technologies such as Vue.js and Ionic 4 web components to build cross-platform mobile apps for Android and iOS.
Ahmed Bouchefra
React From Zero: A Simple Code-Based React Tutorial — An interesting approach based entirely upon simple, annotated code, with no articles to read. It’s nice to see React’s features demonstrated so cleanly. Also in Chinese and Portuguese.
Kay Plößer
💻 Jobs
React/Full Stack Developer (Remote or Southern CA) — Join our small team building apps and services for customers in over 50 countries worldwide. We learn. We build. We deliver.
Geist Interactive
JavaScript Developer at X-Team (Remote) — We help our developers keep learning and growing every day. Unleash your potential. Work from anywhere. Join X-Team.
x-team
Find A Job Through Vettery — Vettery matches top tech talent with fast-growing companies. Create your profile to get started.
Vettery
📘 Tutorials and Opinions
ES2017 Object and String Extensions — Covering Object.entries, Object.values, Object.getOwnPropertyDescriptors, String.padStart and String.padEnd.
Zsolt Nagy
Recreating Python's Slice Syntax in JS Using ES6 Proxies
Evan Sangaline
Build a Netflix Style Video Delivery Infrastructure — Play adaptive video at the same quality and speed as Netflix and Youtube. Encoding, Player and Analytics - JavaScript API client.
Bitmovin sponsor
Get Better Type Checking in JavaScript with the 'Maybe' Type
Gilad Shoham
Understanding Redux: The World’s Easiest Guide to Beginning Redux — Long, but starts from a very simple level.
Ohans Emmanuel
How Angular Resolves Dynamic Components — What happens under the hood when you use Angular’s resolveComponentFactory?
Chidume Nnamdi
WebRTC and the Mechanics of Peer-to-Peer Networking
Alexander Zlatkov
Deriving the Y Combinator in JavaScript — Well written, but quite a theoretical exercise.
Nathan Leung
OpenID Connect + Node = Simple, Secure Website — Learn all about data storage, middlewares, routing, & generating views as you build a secure blog with Express.js.
Okta sponsor
Keep Your Promises in TypeScript using async/await
Gilad Shoham
Ask HN: What You Wish You'd Known Before Getting Into JavaScript? — A lot of very different answers here.
Hacker News
Why GraphQL: Advantages, Disadvantages and Alternatives
Robin Wieruch
🔧 Code and Tools

Rete.js: A Framework for Visual Programming — Create a node-based editor in the browser and apply logic. Check out these demos on CodePen.
Vitaliy Stoliarov
Microstates.js: Composable State Primitives for JavaScript — Declaratively compose application state from atomic state machines.
Taras Mankovski and Charles Lowell
Real-Time Error Monitoring, Alerting, and Analytics for JavaScript 🚀
ROLLBAR sponsor
Singlie: Singly Circular and Linear Linked Lists for ES6
Klaus Sinani
Formik: Working with Forms in React Made Easier — Handles validation, errors, submission, and getting values in and out. It’s now a year old, too.
Jared Palmer
Axax: Async Iterator Extensions for JavaScript
Jamie McCrindle
Rogue: Quick, Zero Config Server Side Rendering for React
Alid Castano
😄 Peter's “They're Not JavaScript But You Might Like 'Em” Bonus Links
Visual Studio Code June 2018 Update Released — The most commonly used editor by JavaScript developers gains the ability to lay out multiple editors in the same window in a grid-like manner.
Microsoft
Layoutit: A CSS Grid Layout Interface Builder — A quick online way to put together a CSS grid layout and get the code needed.
Leniolabs
Robot Odyssey Online — An amazingly playable Apple II game from 1984 ported to the Web. You have to program a group of robots to help you escape a sewer. One of the earliest programming-related games, it remains a serious challenge and will suck your time away.
Micah Elizabeth Scott
by via JavaScript Weekly https://ift.tt/2tXRGa0
0 notes