#heat shrink connector
Text
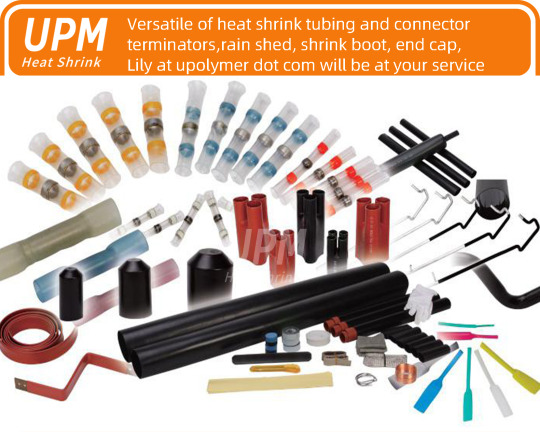
UPM heat shrink tubing, Versatility Insulation Protection Identification Connectivity
#shrink tubing#heat shrink#shrink terminator#shrink sleeve#upm heat shrink specialist#heat shrink connector#stress control tube#thin wall heat shrink#shrink breakout boot#shrink end cap#flame retardant#automotive wire harness
1 note
·
View note
Text
Tracked down a starter connector for my neighbor today, and it occurred to me this might be a useful thing to tell people about.
If an electrical connector on your car breaks, lots of shops won't have access to the parts to rebuild or replace just the connector. I've had parts stores have no listings for any wiring bits, and dealerships for some brands quote me a whole harness (usually over a grand just for the part) for a broken connector.
Wreckers, on the other hand, don't usually care about whole harnesses, because they're too hard to take out in one piece.
So if you need a connector replaced, see if you can find a wrecking yard who's willing to cut out the one you need with a few inches of wire attached for you. Usually they're only charging you for the time it takes to go get it, since they don't usually save them.
Bonus points if you know a thing or two about cars and know what you're looking for, because usually wreckers I've worked with just send me out with an apprentice to cut it out myself. That way I get exactly what I'm looking for and they don't have to look for it.
Anyway, this is maybe the one thing that has saved me the most money as a mechanic. Hopefully somebody here gets some mileage out of it.
#car advice#mechanic things#mechanical advice#automotive#cars#honestly if you can fix a cord on an appliance you can replace an automotive wiring connector#just use heat shrink crimp connectors (or solder and shrink tube if you're fancy)#and match up the colors#easy
10 notes
·
View notes
Text
Get Better Connections with Yamuna Densons Copper Braids
We are one of the leading manufacturers and suppliers of copper braid. If you are looking for the best Copper Braid Manufacturers and Suppliers in India, So you have come to the right location. Please visit Yamuna Denson. Yamuna Denson Copper braid construction varies depending on the desired flexibility and application. A copper braid can be made with different wire diameters, with a smaller diameter resulting in greater flexibility. The degree of flexibility offered by various weaves, such as flat, round, and rope braids, can be selected by the particular needs of the application.
To know more information about our products, you can directly contact us at (91) 11 - 47025670.
#connector front & rear#cold shrink cable joints & terminations#conductor cover#heat shrinkable end caps#medium voltage cable jointing kit#low voltage cable jointing kit#bus bar connector#cable repair sleeve#shrinkable anti tracking#copper braid#Cable Repair Sleeve#Bus Bar Connector
0 notes
Text
How to Make: Electronic Wings for Cosplay

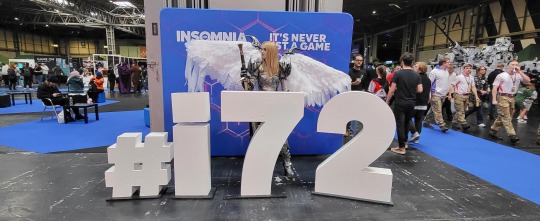
Hello Everyone! It's been a while since I last uploaded a written tutorial on here and since I just finished and wore my Dame Aylin cosplay this last weekend it seemed appropriate to jump back in with a tutorial on one of the costume pieces!
Her wings were the star of the show this weekend and I know a lot of people were curious about how I made them! A huge source of knowledge and inspiration behind these wings was this video by Axceleration, I made a few changes to the frame shape and electrical circuitry for mine but her tutorial was a huge stepping stone to give me the confidence to tackle them myself!
Health and Safety:
When working with Sintraboard (as well as other thermoplastics) it is incredibly important you wear a respirator as well as goggles when heating, moulding and cutting it. The fumes this plastic will give off when heated up are no joke! Make sure you're in a well-ventilated space!
Basic tool safety knowledge is also really important! wearing gloves when using power tools can be more dangerous in most situations, so always be aware of where your hands are vs where the tools are. Always cut away from yourself and take things slowly, don't panic.
Electrical safety! You're working with live wires and circuitry! make sure your hands are dry, you aren't touching the bare wires at any point when they are connected to a power source, and if you choose to solder anything, make sure you're wearing heat-proof gloves and a mask in a ventilated space!
Tools
Wire stripper
Screwdriver and wrench
Dremel - I recommend the Dremel 3000 rotary tool personally! Some essential Dremel bits you'll need for this include, a sanding bit, drill bit (smaller or same size as your screws/bolts), and a small/narrow cutting bit. These will usually come with the Dremel!
Heat Gun (A hairdryer will not get hot enough to heat the Sintraboard!!)
Pipe cutter (alternatively you can use a hacksaw for this!)
Hacksaw
Ruler
Scissors (for cutting fabric straps)
Materials
Heat shrink Tubing
2 core electrical wire
switch (you want a three position, six pin switch, like this one, even better if it has the Screws on the pins! otherwise you'll need a soldering kits to solder the wires to the pins.
2x 8AA 12v Battery Holders
2x 12v Linear Actuators (Mine had a stroke length of 100mm)
21.5mm PVC Pipes (I got 2x 3m Lengths)
2x 21.5mm PVC Pipe straight couplers
6mm 8"x12" Sintraboard
Nuts/Bolts/Screws (I used M5 bolts for the base & Actuator connectors and M6 screws to attach the hinges to the pipes! You'll need Washers for every Nut & Bolt!)
Hinges (I used 2.5cm wide hinges that were skinny but long so they would just about fit along the PVC pipe! 3" gate hinges would work!)
50 metre Polythene Jiffy foam roll (in retrospect this was ALOT of foam, you could definitely get away with maybe a 20-30 metre roll! I now have a load leftover XD)
16 AA Batteries (I used 16 and had enough for the whole day with them on, I think They'd probably be enough for another half a day-full day too! but have spares just in case!)
Webbing strap ( I went for grey to match my base suit colour!)
Buckle - as wide as the webbing strap you use!
3 metres of white cotton fabric (or whatever colour wings youre going for!)
Optional
Zipties (for cleaning up the wires)
Lets Go!
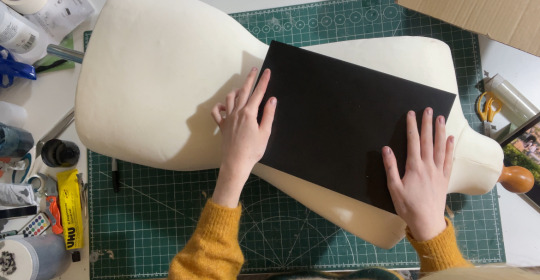
Sintraboard is this wonderfully stable thermoplastic that is relatively easy to cut into (with the right tools) and when heated allows you to mould its shape! I started by using a mannequin and heating the Sintraboard with a heat gun for a few minutes to make it pliable, I recommend using gloves for this part as the materials gets VERY HOT! Press the board into the shape of the mannequin's back, taking note of the edges especially! you want this board to sit as comfortably to your body shape as possible as it makes a huge difference to how long you can wearing the wings for in this backplate is comfy!
Once shaped, I placed it against my back to make sure it was a good fit, heating again and making any alterations I needed (again don't place bright hot plastic to your bare skin! wear protective clothes and wait till its slightly cooler to do this, with the help of a friend!). I then took a hacksaw and rounded the corners, before sanding the edges with my Dremel! Try to avoid cutting off loads, just enough to make things less likely to snag.
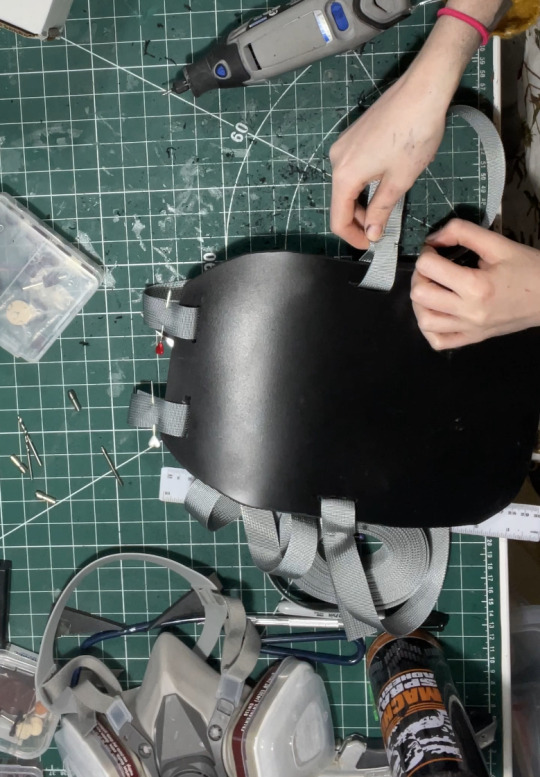
3. I then cut in four holes, wide enough to feed my webbing strap through, two at the top and one on either side below where my arms would sit! I measured the webbing strap by firstly feeding them through the top holes and pinning them, and then bring the strap over my should to everything sits where it should and seeing where the strap hits the side hole and cutting the length there! you'll also want a strap that attaches across the chest, meeting in the centre with a buckle!
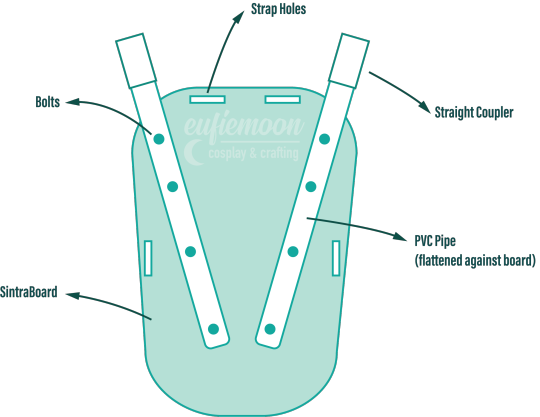
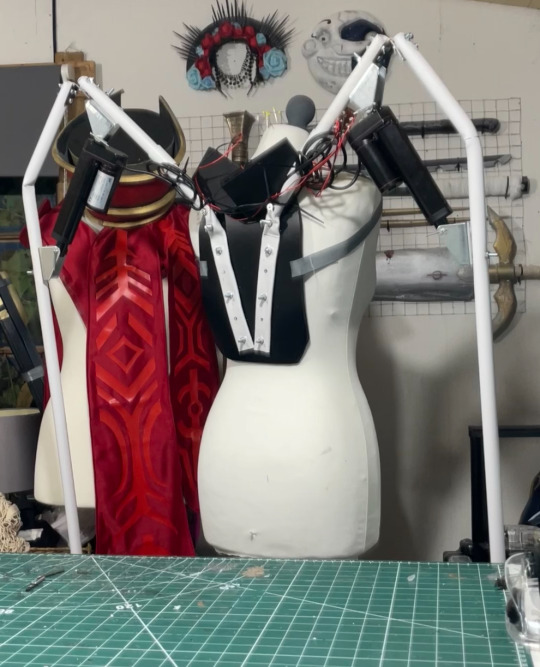
4. After sewing the straps closed I was able to move onto the PVC pipe structure! This may change slightly depending on the finished shape you want but I needed the PVC pipes to come out from inside a breastplate so had a particularly angle as well as character references to work with! I began by heating the pipe over my heat gun and flattening a portion of it under a heavy object so it would sit much more flush against the backboard and sit better underneath my breastplate before moving onto securing the first portion of the structure to the backplate. This mainly involved lots of try-ons and measuring to make sure the angles were correct and symmetrical and was quite fiddly but well-worth the effort! I'll include a diagram of the general shape I went with below:
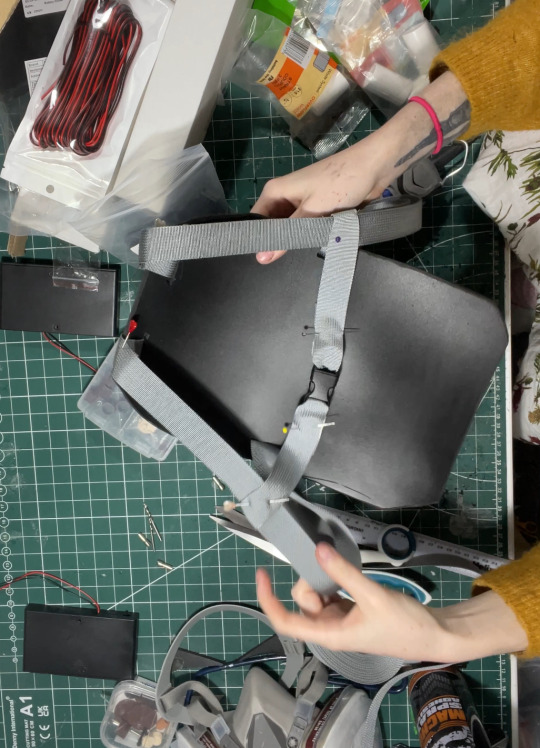
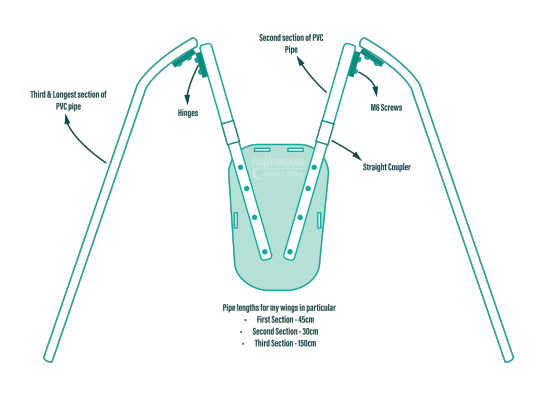
5. I wanted my wings to be relatively modular for ease of travel so I needed to make sure certain portions of them could come away from other parts easily, so I popped a straight coupler on the top of the pipes that were attach to the breastplate, this also meant I could slot the breastplate over these shorter pipes and wear everything correctly! Then these second pipes slot on and at the other end they are attached via hinges to the longest portion of the pipe 'skeleton', Diagram below:
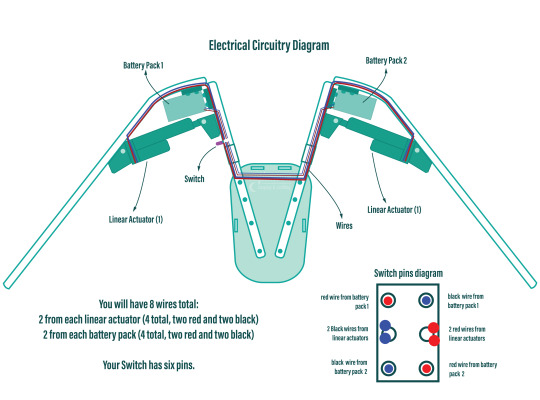
6. Now that the skeleton was put together, it's time for the electrical stuff! It's a good idea to figure out where your circuit is going to lay on the skeleton - consider if you want the battery packs mounted the the backplate or, like me, put them inside the actual wings in removeable pockets for easy access and removal for battery changes. all your wires will go through the switch so deciding where you want to place that is very important! Mine was placed just over my shoulder on the front side, mounted to the PVC pipe with a metal cover I drilled a hole into to slip the switch through and then drill through the pipe.
I've included another diagram below that explains all the electrical circuitry, including which wires go on which pins on the switch!
Important to note: The linear actuators need to be placed and bolted into the PVC pipes at *exactly* the same angle on each side, any slight deviation will lead to the wings going up wonkily! So take your time and make as many adjustments as necessary.
7. You can extend your wires by adding on the electrical wire, just match the colours, and put heat shrink tubing over the connections to hide the live wires! I ended up zip-tying the wires into organised bundles once the wings were done to help keep everything safe from snags.
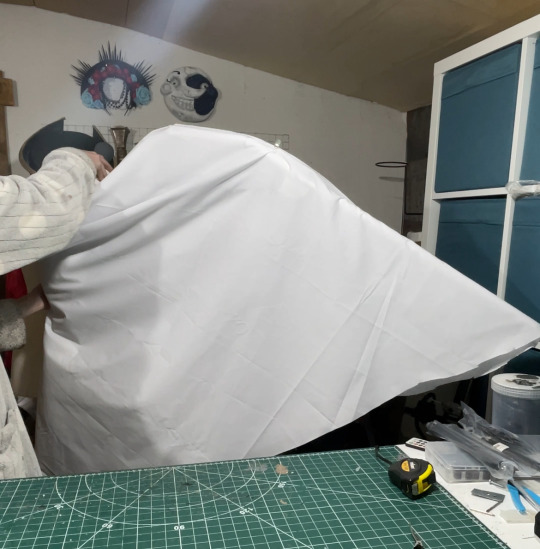
8. Now its time for the Wings themselves! I drafted my base pattern by just draping the white cotton fabric I had over the wing when it was fully extended. I then pinned the wings to the shape I wanted them to be along the bottom before cutting along the pins. I ran the fabric through my sewing machine to close the bottom edge, leaving a gap wide enough by the wing base so I could slip the wing on and off, closing it with velcro. I also added little fabric pockets inside of these to hold my battery packs, which also connected via velcro for easy removal!
9. Now that I had a wing base I was able to begin making feathers! I cut out a total of 800 feathers out of polythene jiffy roll for these wings, in 6 different styles and using real life bird wings to dictate the shapes I used and where I placed them. I ended up hot gluing every individual feather onto the white fabric base, going row by row until every side was covered, the wing covers themselves are super light because of the foam feathers and they shine light through them in a really magical way!
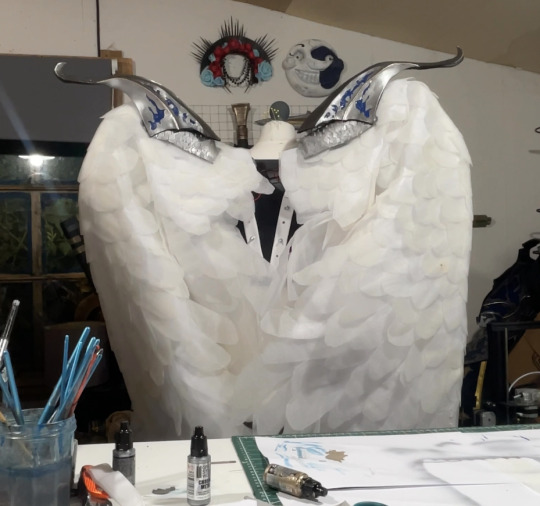
Optional: I also ended up going over these feathers with my airbrush and some super light beige paint to help darken the shadows, this is entirely optional and may change depending on the wings you're looking to make!
When in neutral position and in extended position the wings looks like this:

Mine had a wingspan of about 7ft total when fully extended but when in neutral position they were fairly close to my own proportions! mainly staying behind me and weren't much of a problem in a packed con hall!

Photo by: Helloimfran (on Instagram and Twitter)
I hope this tutorial helped and if there are any questions about anything in specific don't hesitate to reach out at [email protected] or on my instagram or twitter (@eufiemoon)
Happy Crafting!

#cosplay#cosplayer#cosplaying#baldurs gate iii#baldur’s gate 3#baldurs gate 3#bg3#dame aylin#aylin x isobel#bg3 aylin#cosplay tutorial#Wings#fantasy#tutorial#cosplay help#cosplay tips
143 notes
·
View notes
Text
Upgrade your lighting with our LED 2835 Strip 120LEDs/m—a versatile and energy-efficient solution that offers exceptional brightness and durability. Designed for both indoor and outdoor use, this IP67 waterproof rope lighting is suitable for various applications, from outdoor decoration, false ceiling lights, architectural and decorative lighting to emergency pathway illumination. These lights work on AC 220V so can be directly plugged in without a driver, It comes with connector attached to the rope. It can also be cut every 1m and powered using unique lead free connector plug.
Note: The open and end part of the lights need to be concealed using a tape, heat shrink or silicone glue as it runs on high voltage 220v can cause issue or shock if PCB is touched directly.
2 notes
·
View notes
Text
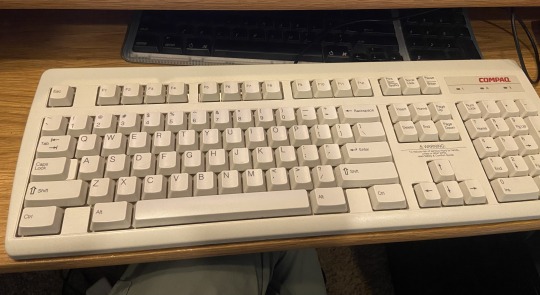
1997 Compaq RT235BT Pinout and Blind Cable Replacement
I recently picked up this Compaq PS/2 keyboard from my E-waste job in excellent condition. We rarely save keyboards and separate the cords and send them downstream for processing and that was the case with this one. Luckily I found a cut keyboard-less cord from a Wyse KB-9933 to splice on.
The first thing I did was strip the wires and found that the two keyboards used entirely different color codes. Because I had the Wyse PS/2 connector, I could get the pinout, but I found myself in a unique situation with the Compaq without its connector.
I first identified the positive wire by seeing which wire was absolutely needed to power the LEDs and called it a night, worried I fried the chip and would have to go through 25+ combinations.

EIGHTY ONE COMBINATIONS LETS GO
The next day I identified the ground wire by looking at where the negative side of the capacitors on the PCB terminated. I found an article with photos of the PCB on the Kazakh tech blog WASP.kz so I didn’t have to do further disassembly.

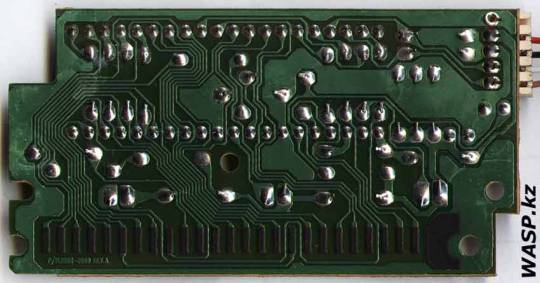
Source: WASP.kz
I had a 50-50 shot on the clock and data wires which I just decided to match by color brightness, and paired yellow and white and brown and green. I also found out that PS/2 peripherals were not intended to be hot swappable so I had to restart my computer to boot it.
It worked! Now I was on my way to a 90’s beige setup I may eventually get around to completing. I then soldered the wires with my very rusty soldering skills, and plugged it in again and it somehow still worked!
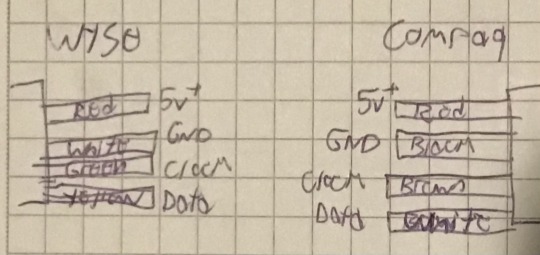
The final pinout.
I may revisit this project in the future now that I have another cut PS2 cable of similar vintage and heat shrink solder connectors.
2 notes
·
View notes
Photo

Part 2! Image 7: Slide your conduit and your shrink tube on -before- you start soldering. Or you'll feel like a fool in about 10 minutes. Use the smallest shrink tube that will fit. Image 8: Find the smallest connector that will slide onto your wire. Get the copper all the way through the metal solder ring. Overlap for a nice snug connection. Connect same color wires. Image 9: Might as well do them all at once. You may need the assistance of an extra pair of hands or maybe some clamps to hold everything in place while wielding the heat gun. Image 10: Heat gun will be applied pretty close to the target. This is no hair dryer. It will get very hot, so be careful about flammable, meltable, or injurable things too close to the plume of heat. You'll also need something heat-proof to set the heat gun on when you're done. I usually use a brick or metal baking pan. Image 11: Start on low heat. The shrink tube will shrink first. Then the color bands melt and act as a glue and also waterproofing seal. Image 12: Now we hit the high heat. Get in there and really blast it until you see a bit of shiny melted solder come from the ring and spread across the copper surfaces. You don't have to melt the entire ring. Turn the heat gun off, and set it somewhere safe. Wait for the wire to cool down. Then give it a tug. If it can't resist a bit of tugging, it isn't a good enough seal. The worst case scenario is simply cutting any failed bits off, stripping some more wire, and starting again. Images 13 and 14: Slide your shrink tube cover and hit it with some low heat. It doesn't take much. Once everything has cooled down you're done! And if this all seems overwhelming, any repair shop for appliances or computers can probably do this for you, but I have no idea how much they charge. #diy #repair #bunny #rabbit #spicyhay #chewedcord https://www.instagram.com/p/Cm2XSW1u8M2/?igshid=NGJjMDIxMWI=
3 notes
·
View notes
Text
Enhancing Electrical Connectivity with Electrical Lugs: A Comprehensive Overview
Electrical lugs are essential components in electrical systems used for connecting cables or wires to electrical equipment, devices, or other cables. These lugs play a crucial role in ensuring secure and reliable electrical connections, enabling efficient power transmission and distribution in various applications. This article delves into the functionality, types, applications, advantages, and installation methods of electrical lugs, highlighting their significance in modern electrical systems.
Functionality of Electrical Lugs:
Electrical lugs, also known as cable lugs or wire lugs, serve as interface connectors between cables or wires and electrical equipment. These lugs are typically made of conductive materials such as copper or aluminum and are designed to provide a secure and stable connection that facilitates the flow of electrical current. Electrical lugs come in various shapes and sizes to accommodate different wire gauges and types, ensuring compatibility with a wide range of electrical applications.
Types of Electrical Lugs:
Copper Lugs: Copper lugs are widely used for their excellent conductivity and corrosion resistance, making them ideal for applications requiring high electrical performance.
Aluminum Lugs: Aluminum lugs are lightweight and cost-effective alternatives to copper lugs, suitable for applications where weight and cost considerations are important.
Mechanical Lugs: Mechanical lugs feature a screw or compression mechanism for securing wires, offering a reliable and reusable connection that can withstand mechanical stress.
Solder Lugs: Solder lugs require soldering to create a permanent connection between the lug and the wire, providing a secure and low-resistance electrical joint.
Applications of Electrical Lugs:
Power Distribution Networks: Electrical lugs are commonly used in power distribution networks to connect cables to transformers, switchgear, and distribution panels, ensuring efficient power transmission.
Renewable Energy Systems: In solar power installations and wind turbines, electrical lugs are utilized to connect solar panels, inverters, and battery banks, facilitating the flow of renewable energy.
Industrial Equipment: Electrical lugs are essential in industrial machinery and equipment, providing secure connections for motors, control systems, and electrical enclosures.
Automotive Industry: In automotive applications, electrical lugs are used to connect electrical components, batteries, and wiring harnesses, ensuring reliable performance in vehicles.
Advantages of Electrical Lugs:
Reliable Connectivity: Electrical lugs offer a secure and stable connection between cables and electrical equipment, minimizing the risk of electrical faults and interruptions in power transmission.
Versatility: With a wide range of types and sizes available, electrical lugs are versatile components that can be used in various electrical applications, providing flexibility and adaptability.
Corrosion Resistance: Copper and aluminum lugs are resistant to corrosion, ensuring long-term performance and durability in diverse environmental conditions.
Ease of Installation: Electrical lugs are designed for easy installation, reducing downtime and labor costs associated with connecting cables to electrical equipment.
Installation Methods for Electrical Lugs:
Cable Preparation: Ensure that the cables are stripped, cleaned, and prepared properly before attaching the lugs.
Crimp or Compression: Use crimping tools or compression devices to secure the lug onto the cable, ensuring a tight and reliable connection.
Insulation: Insulate the connection using heat shrink tubing or insulating tape to protect against electrical hazards and ensure safety.
Testing: After installation, conduct testing to verify the integrity of the connection and ensure proper electrical conductivity.
Significance of Electrical Lugs in Electrical Systems:
Electrical lugs play a critical role in ensuring efficient power transmission, reliable connectivity, and safe operation of electrical systems. By providing secure connections between cables and electrical equipment, these components help minimize power losses, reduce downtime, and prevent electrical faults, thereby enhancing the overall performance and reliability of electrical networks.
In conclusion, electrical lugs are indispensable components in the electrical industry, offering secure connectivity, versatility, and ease of installation in various applications. With their importance in facilitating efficient power transmission and safe operation of electrical systems, electrical lugs continue to be essential components in modern power distribution networks, industrial equipment, renewable energy systems, and automotive applications. As the demand for robust and reliable electrical connections grows, the role of electrical lugs in ensuring secure and stable connections remains paramount in maintaining the integrity and efficiency of electrical networks.
0 notes
Text
Electrical Components Manufacturers in India: Bhagyadeep Cables Leading the Industry
The electrical industry is a cornerstone of modern infrastructure, playing a pivotal role in powering homes, industries, and technologies worldwide. Within this industry, electrical components such as cables, connectors, wires, harnesses, and accessories are essential for the safe and efficient transmission of electricity and signals. As one of the leading electrical components manufacturers in India, Bhagyadeep Cables stands out for its commitment to quality, innovation, and customer satisfaction. With a diverse range of products that cater to various sectors, Bhagyadeep Cables is a trusted partner for clients seeking reliable electrical solutions.

The Importance of Quality Electrical Components
Electrical components are the backbone of any electrical system, ensuring the safe and efficient flow of electricity. High-quality components are crucial for several reasons:
Safety and Reliability: Reliable electrical components prevent short circuits, overheating, and electrical fires, ensuring safety in residential, commercial, and industrial settings.
Efficient Power Distribution: Quality cables, wires, and connectors reduce energy loss and ensure efficient power distribution, which is critical in both large-scale industrial applications and everyday household use.
Durability and Longevity: High-grade materials and robust manufacturing processes ensure that electrical components can withstand harsh environments, temperature fluctuations, and mechanical stress, leading to a longer lifespan and reduced maintenance costs.
Compliance with Standards: Quality electrical components adhere to national and international standards, such as ISI, ISO, CE, RoHS, and UL, ensuring they meet stringent safety and performance criteria.
Bhagyadeep Cables: A Leading Manufacturer of Electrical Components in India
Bhagyadeep Cables is renowned for its comprehensive range of high-quality electrical components that cater to diverse industries and applications. Here’s an overview of the key electrical components offered by Bhagyadeep Cables:
Power Cables and Wires: Bhagyadeep Cables manufactures a wide range of power cables and wires, including low, medium, and high-voltage cables, designed for safe and efficient power transmission. These cables are used in various applications, from residential wiring to complex industrial setups, ensuring robust performance and safety.
Control Cables: Control cables are used to transmit control signals in automation and industrial equipment. Bhagyadeep Cables offers highly flexible and durable control cables designed to operate in harsh environments, ensuring reliable signal transmission without interference.
Hook-Up Wires: These are essential for internal wiring of electrical and electronic devices. Bhagyadeep Cables provides a variety of hook-up wires that offer excellent insulation, flexibility, and resistance to heat, moisture, and chemicals.
Heat Shrink Sleeves: Bhagyadeep Cables is also a prominent manufacturer of heat shrink sleeves, which provide insulation, protection, and sealing for wires, cables, and connectors. These sleeves are available in different types, such as single wall, dual wall, adhesive-lined, and flame-retardant varieties.
Wire Harness Assemblies: The company excels in producing custom wire harness assemblies that provide organized, reliable connections for complex electrical systems in the automotive, industrial, aerospace, and consumer electronics sectors.
Instrumentation Cables: Bhagyadeep Cables offers high-quality instrumentation cables designed for accurate data transmission in instrumentation and control applications. These cables are engineered to withstand electrical noise, electromagnetic interference (EMI), and physical stress.
Custom Electrical Components: In addition to standard products, Bhagyadeep Cables provides tailored solutions to meet specific customer requirements, including custom lengths, connectors, insulation types, and packaging.
Why Choose Bhagyadeep Cables for Electrical Components?
Bhagyadeep Cables has earned its reputation as a leading manufacturer of electrical components in India by consistently delivering high-quality, innovative, and reliable solutions. Here’s why Bhagyadeep Cables is the preferred choice for many clients:
Unmatched Quality Assurance: All products from Bhagyadeep Cables undergo rigorous quality checks and adhere to national and international standards. The company’s state-of-the-art manufacturing facilities ensure precision and consistency in every product.
Advanced Manufacturing Capabilities: Bhagyadeep Cables leverages advanced technologies and automated machinery to manufacture electrical components that meet the highest standards of safety, performance, and durability.
Innovation and Customization: With a strong focus on innovation, Bhagyadeep Cables continuously develops new products and custom solutions to meet the evolving needs of various industries. The company offers flexible customization options for clients who need specialized components tailored to their unique applications.
Expert Technical Support: Bhagyadeep Cables is backed by a team of skilled professionals who possess deep expertise in electrical components. The team provides valuable insights, technical support, and guidance to help clients select the right products for their applications.
Sustainable Practices: Committed to sustainability and environmental responsibility, Bhagyadeep Cables ensures that its products are RoHS compliant and that its manufacturing processes are eco-friendly.
Reliable Supply Chain and Delivery: The company’s efficient supply chain management ensures on-time delivery of products, regardless of order size or complexity. This reliability has made Bhagyadeep Cables a trusted partner for clients across the globe.
Applications of Bhagyadeep Cables’ Electrical Components
Bhagyadeep Cables’ extensive range of electrical components is used across various sectors, such as:
Automotive Industry: For wiring harnesses, battery cables, and control systems in cars, trucks, and electric vehicles (EVs).
Industrial Automation: In control panels, industrial robots, machinery, and automation systems for efficient and reliable operations.
Telecommunications: For fiber optic cables, coaxial cables, and network cabling in telecommunication infrastructure.
Construction and Infrastructure: In residential, commercial, and industrial buildings for safe and efficient power distribution.
Renewable Energy: For solar power systems, wind turbines, and other renewable energy applications that require robust and durable electrical components.
Consumer Electronics: In devices such as televisions, computers, home appliances, and mobile devices for internal wiring and component connections.
Conclusion
As one of the premier electrical components manufacturers in India, Bhagyadeep Cables is committed to delivering top-quality, reliable, and innovative solutions for a wide range of industries. With a focus on quality, customization, sustainability, and customer satisfaction, Bhagyadeep Cables is your trusted partner for all electrical component needs. Whether you need power cables, control cables, wire harness assemblies, or custom solutions, Bhagyadeep Cables has the expertise and experience to meet your requirements. Choose Bhagyadeep Cables for superior electrical components that stand the test of time and performance.
0 notes
Text

Heat shrink puzzles,would you find which are the thin wall heat shrink tubing, and which are the heat shrink connector. Is there cold shrink here?
#shrink tubing#upm heat shrink specialist#cable protection#heat shrink#shrink sleeve#heat shrink connector#shrink terminator#expandable braided sleeve#shrink end cap#cold shrink tube#high shrink ratio 6:1#bus bar insulation#fiber optic splice#solder sleeve#thin wall tube#electronic wire insulation
0 notes
Text
Understanding Dual 2/0GA-1/0GA Reducers: A Comprehensive Guide
In the realm of electrical and power distribution systems, ensuring efficient and safe connections is paramount. One critical component that facilitates such connections is the wire reducer. Specifically, the Dual 2/0GA-1/0GA reducer plays a vital role in various heavy-duty applications. This article delves into the specifics of these reducers, exploring their functionality, applications, benefits, and considerations for use.
What is a Dual 2/0GA-1/0GA Reducer?
A Dual 2/0GA-1/0GA reducer is an electrical connector designed to join or transition between cables of different gauges—specifically from dual 2/0 gauge wires to a single 1/0 gauge wire or vice versa. The "GA" stands for American Wire Gauge (AWG), a standard measurement system for the diameter of electrical conductors. In this context:
2/0 Gauge (also known as 00 AWG): Refers to a thicker wire capable of carrying higher current loads.
1/0 Gauge (also known as 0 AWG): Slightly smaller in diameter compared to 2/0 gauge, suitable for slightly lower current capacities.
These reducers are essential in scenarios where there is a need to adapt or consolidate multiple heavy-duty conductors into a single pathway, ensuring continuity and reliability in power transmission.
Key Features and Design
Material Composition
Dual 2/0GA-1/0GA reducers are typically constructed from high-conductivity materials such as:
Copper: Known for its excellent electrical conductivity and durability. Copper reducers often feature a tin plating to resist corrosion.
Aluminum: Offers a lightweight and cost-effective alternative, though with slightly lower conductivity compared to copper. Aluminum reducers are also often coated to prevent oxidation.
The choice of material depends on the specific application requirements, environmental conditions, and budget considerations.
Construction and Design Aspects
Dual Entry Points: The design includes two entry points accommodating 2/0 gauge wires, allowing for the consolidation or branching of circuits.
Single Exit Point: The exit point accommodates a 1/0 gauge wire, facilitating a seamless transition in conductor size.
Secure Fastening Mechanisms: Equipped with set screws or compression fittings to ensure a tight and secure connection, minimizing resistance and preventing accidental disconnections.
Insulation and Protection: Some reducers come with insulating covers or are designed to be used with heat shrink tubing to provide additional protection against environmental factors and electrical shorts.
Applications of Dual 2/0GA-1/0GA Reducers
These reducers find widespread use across various industries and applications, including:
Automotive and Marine Industries
High-Performance Audio Systems: In vehicles and boats where powerful audio setups require robust wiring configurations, these reducers help manage and distribute power efficiently.
Battery Connections: Facilitating connections between multiple batteries or between batteries and heavy-duty equipment like winches and inverters.
Engine and Electrical Systems: Ensuring reliable connections within complex electrical systems that demand varying current capacities.
Industrial and Commercial Electrical Systems
Power Distribution Panels: Assisting in organizing and connecting multiple power feeds into centralized panels or sub-panels.
Heavy Machinery Wiring: Providing secure connections for machinery that requires substantial power input, ensuring minimal voltage drop and heat generation.
Renewable Energy Installations: In solar and wind power setups where consolidating power from multiple sources is necessary.
Construction and Infrastructure
Building Electrical Systems: Used in large-scale electrical installations within commercial buildings, hospitals, and data centers where robust and reliable power distribution is critical.
Emergency Power Systems: Facilitating connections in backup power systems, including generators and uninterruptible power supplies (UPS).
Benefits of Using Dual 2/0GA-1/0GA Reducers
Enhanced Electrical Efficiency
By providing a secure and low-resistance connection between conductors of different sizes, these reducers help maintain optimal electrical performance, reducing energy losses and preventing overheating.
Flexibility and Versatility
They offer flexibility in designing and modifying electrical systems, allowing for easy upgrades and expansions by accommodating different wire sizes and configurations.
Improved Safety
Proper use of these reducers ensures compliance with electrical standards and codes, reducing the risk of electrical faults, fires, and equipment damage.
Ease of Installation
Designed for straightforward installation, they save time and labor costs. Clear labeling and standardized sizes make selection and usage convenient for electricians and installers.
Considerations for Selecting and Using Reducers
Compatibility
Ensure that the reducer is compatible with the conductor materials being used (e.g., copper-to-copper connections). Mixing different metals can lead to galvanic corrosion over time.
Current Carrying Capacity
Select reducers that can handle the maximum expected current load to prevent overheating and ensure longevity.
Environmental Conditions
Consider the operating environment:
Corrosive Environments: Opt for reducers with appropriate coatings or made from corrosion-resistant materials.
Temperature Extremes: Ensure the materials and insulation can withstand the temperature ranges they will be exposed to.
Compliance with Standards
Choose products that meet relevant electrical codes and standards, such as UL (Underwriters Laboratories) listings, to ensure safety and reliability.
Installation Practices
Proper Tightening: Follow manufacturer specifications for torque settings on set screws to ensure secure connections without damaging the conductors.
Insulation: Use appropriate insulation methods to protect against electrical shorts and environmental damage.
Regular Inspection: Implement routine checks to identify and rectify any signs of wear, corrosion, or loosening.
Dual 2/0GA-1/0GA reducers are indispensable components in modern electrical systems, offering efficient and reliable solutions for connecting conductors of varying sizes. Their robust design and versatility make them suitable for a wide array of applications across different industries. By understanding their features, applications, and proper usage considerations, professionals can ensure optimal performance and safety in their electrical installations. Whether in automotive, industrial, or construction settings, these reducers play a critical role in maintaining the integrity and efficiency of power distribution networks.
0 notes
Text
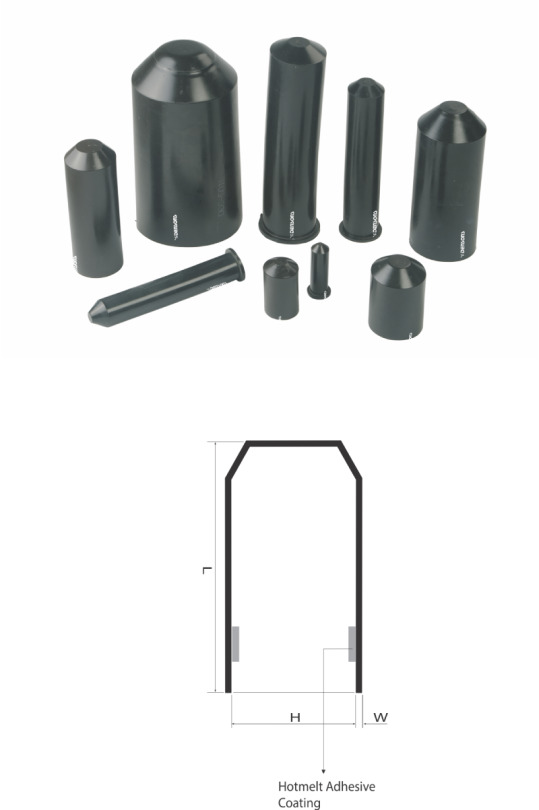
Protect Your Equipment with Yamuna Denson's Heat Shrinkable End Caps
Yamuna Denson Heat Shrinkable End Caps provide optimum waterproofing and environmental protection for underwater, underground, and outdoor applications. Our heat-shrink end caps are highly resistant to moisture, fungus, and weathering. We also offer electrical end caps with pre-coat sealants. The heat-shrink end caps are available in several sizes to accommodate varying cable diameters due to their large range-taking ability.
Contact Us Today.
#connector front & rear#cold shrink cable joints & terminations#conductor cover#heat shrinkable end caps#medium voltage cable jointing kit#low voltage cable jointing kit#bus bar connector#cable repair sleeve#shrinkable anti tracking#copper braid
0 notes
Text
DIY Welding Cable Connector Repair: Tips and Tricks

Welding cable connectors are essential components in any welding setup. They facilitate the safe and efficient transfer of electrical current from the welding machine to the welding gun. However, over time, welding cable connectors can become damaged or worn, leading to poor performance and even safety hazards.
In this blog post, we will provide you with some helpful tips and tricks for repairing welding cable connectors yourself.
Common Welding Cable Connector Problems
Before attempting any repairs, it is important to identify the specific problem with your welding cable connector. Some common issues include:
Loose or corroded terminals: This can cause poor electrical contact and lead to inconsistent welding.
Damaged insulation: Damaged insulation can expose the electrical conductors to moisture and other contaminants, increasing the risk of electrical shock or short circuits.
Broken or worn cables: If the cables themselves are damaged, they may need to be replaced entirely.
DIY Welding Cable Connector Repair Tips
Safety First: Always disconnect the power to your welding machine before attempting any repairs. Wear appropriate safety gear, including gloves and eye protection.
Inspect for Damage: Carefully inspect the welding cable connector for any signs of damage, such as loose terminals, corroded contacts, or damaged insulation.
Clean the Terminals: If the terminals are dirty or corroded, use a wire brush or sandpaper to clean them thoroughly.
Tighten Loose Terminals: If the terminals are loose, use a wrench or pliers to tighten them securely.
Repair Damaged Insulation: If the insulation is damaged, you can attempt to repair it with electrical tape or heat shrink tubing. However, if the damage is extensive, it may be necessary to replace the entire connector.
Replace Worn Cables: If the cables themselves are worn or frayed, they will need to be replaced. You can either replace the entire cable assembly or splice in a new section of cable.
When to Seek Professional Help
While many welding cable connector repairs can be performed at home, there are some situations where it is best to seek professional help. If you are unsure about how to repair your connector, or if the damage is extensive, it is best to consult with a qualified electrician or welding technician.
Welding Cable Connectors from IQS Engineering Solutions
If you are in need of high-quality welding cable connectors, look no further than IQS Engineering Solutions. As a leading manufacturer of non-ferrous forgings and castings, IQS Engineering offers a wide range of welding cable connectors that are designed to meet the most demanding standards.
Conclusion
By following the tips and tricks outlined in this blog post, you can safely and effectively repair your welding cable connectors. Remember to always prioritize safety and to seek professional help if you are unsure about how to proceed.
0 notes
Text
10 Effective Tips for Working with Bare Copper Conductors
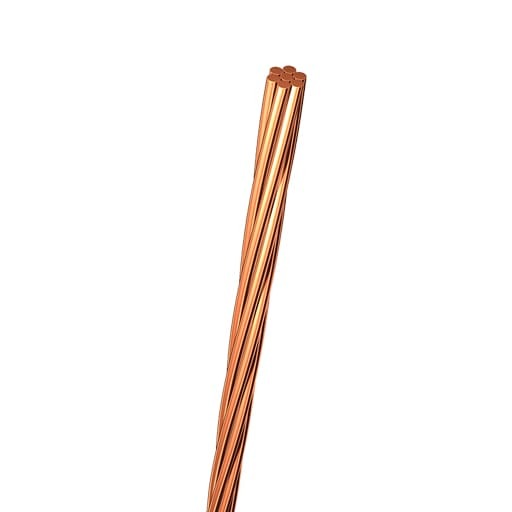
Introduction
Bare copper conductors are fundamental components in various electrical applications, prized for their excellent conductivity and corrosion resistance. However, working with these conductors requires careful attention to detail and adherence to safety protocols.
This article provides ten effective tips to help you work safely and efficiently with bare copper conductors.
Use the Right Tools: Always use high-quality, specialized tools like wire strippers, crimping tools, and heat shrink tubing to ensure safe and secure connections.
Prioritize Safety: Wear appropriate protective gear such as insulated gloves, safety goggles, and rubber-soled shoes. Use nonmetallic ladders to prevent accidents.
Proper Stripping and Cutting: Use a sharp wire stripper to avoid damaging the copper strands, which could affect conductivity and safety.
Ensure Secure Connections: Crimp or twist wires properly to prevent loose connections, which can cause electrical resistance and hazards.
Insulate Properly: Use electrical tape or heat shrink tubing to insulate bare copper conductors, preventing accidental contact with other conductive materials.
Avoid Excessive Bending: Handle conductors carefully to avoid twisting or bending, which can weaken or break them.
Use Appropriate Connectors: Ensure connectors are specifically designed for bare wire connections to maintain a secure and reliable setup.
Prevent Corrosion: Protect conductors from moisture and harsh environments by using suitable insulation or protective coatings.
Grounding: Follow proper grounding techniques to ensure electrical safety in the building or equipment.
Regular Inspections: Periodically check for signs of damage, wear, or corrosion and address any issues promptly to maintain the integrity of the electrical system.
Conclusion
Handling bare copper conductors with care is crucial for ensuring both safety and efficiency in electrical systems. By following these ten tips, you can enhance the longevity and performance of your conductors, ultimately contributing to a more reliable and effective electrical infrastructure. Whether you are a seasoned professional or a newcomer to electrical work, these guidelines will help you manage bare copper conductors with confidence and precision.
#bare copper conductor#tips to work with bare copper conductor#conductor manufacturer in india#dynamic cables ltd
0 notes
Text
Cable Accessories Supplier -royal projects
Royal Projects is a premier supplier of cable accessories, offering a diverse range of high-quality products. Their inventory includes cable lugs, connectors, glands, ties, heat shrink tubing, and markers. Known for durability and reliability, these accessories ensure safe and efficient electrical installations across various industries. Royal Projects' commitment to quality makes them a trusted choice for all cable accessory needs.
#Cable Accessories Suppliers#Cable Accessories Suppliers in Ahmedabad#Cable Accessories Suppliers in Gujarat#Cable Accessories Wholesalers#Cable Accessories Wholesalers in Ahmedabad#Cable Accessories Wholesalers in Gujarat
0 notes
Text
Heat Shrink Tubing /sleeve/connector/terminator,braided sleeve Manufacturer/factory/workshop/Supplier
0 notes
Last Seen Blogs

mallner
studiomarkallner

blackkoi
Melancholic Creature

zhinandvatu
zhinandvatu

miktekonus-blog
Mikte Konus Sesli Sohbet Sesli Chat kamerali Sohbe

killersandy
The Prince of the Moonlight Stone