#high end skin retouching action
Text
skin retouching and photo masking service
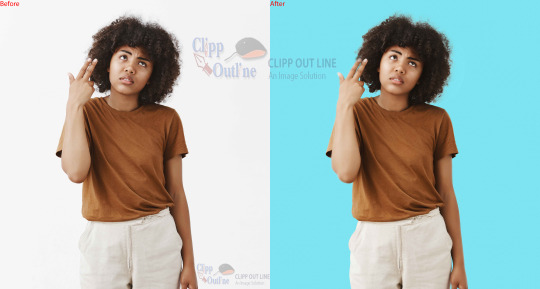
Welcome to Merchynt's world of creativity, where every image is transformed into a masterpiece! 🎨 Our skin retouching and Photo Masking Service are designed to elevate your photographs to new heights of perfection. Whether you're a photographer looking to enhance your portfolio, a business in need of stunning visuals, or simply someone who appreciates impeccable image refinement, Merchynt is here to exceed your expectations. ✨
Our Photo maskings is not just about editing; it's about crafting enchanting visuals that captivate and inspire. With our meticulous attention to detail and commitment to excellence, we ensure that every image tells a story of beauty and sophistication. 💫
Join the ranks of satisfied clients who have experienced the Merchynt difference. Discover the transformative power of our services and unlock the full potential of your images. 🌟 Trust in Merchynt for unparalleled quality, reliability, and creativity. Let us turn your vision into reality!
#photography#professional editing#skin smoothing#affinity photo high end retouching#high end skin retouching action#skin retouching and color grading in photoshop#pixelmator pro skin retouching#face retouching in photoshop cc plugins#one click skin retouching free photoshop action#affinity photo face retouch#capture one skin smoothing#capture one portrait retouching#capture one pro skin retouching#capture one skin retouching#capture one face retouching#masking photo editing lightroom#skin smoothing plugin photoshop#skin retouching camera raw#skin retouching capture one
0 notes
Text
Pampering Day
Type: Advertisement (Headcanons)
Cast: Miya Atsumu | Miya Osamu | Suna Rintarou | Kita Shinsuke
Storyline: All about how they take care of themselves. What's the impact of your existence when it comes to them pampering themselves? What they do with their pocket money?
Genre: Highschool Romance, Slice of Life
— Miya Atsumu —
This man surprisingly cares so much about his physical appearance, even though he doesn't care less about girls or boys who fawn over him.
When he buy skincare, he do it for himself. When he buy all of those hair products, he use it for himself. He wanted to look perfect because it makes him feel good. Even though he is already perfect.
You always love to feel his hair tickling your cheek when he hugs you from behind, it's so soft and somewhat fluffy. And he knows how much you like it, hence the reason why he moves his head affectionately like a golden retriever sometimes.
He buys everything monthly, and since he is in a relationship with you, he always takes you to the mall and ends up having a date.
At the end of the date, there will be maybe around three or four shopping bag at least. Yes, all belong to him. Either it's for new stuff that a clerk promote, or stuff that becomes his must to buy.
Once the two of you are home, no matter how tired it is, he always excuses himself first to the bathroom. He had this headband that he wears before cleaning up, customised one with "Top Japan Setter" written on the side.
It takes him like maybe around fifteen minutes, humming happily while he cleanse his face as he thinks about what will he do with you until the moon replace the sun. He always has this giddy smile, something that shown when he think of you, and some cool volleyball thingy.
He is surprisingly easy to be "scammed", just some word about how magical the product could be for his skin and hair, he is hooked. If he has more money, he will buy two or three of them at once.
Sometimes a week after that, he will whine. He will complain on your ear about how the product is not like how it promised. And as a good lover you are, you will calm him down, recommending him what he should do with the failed product.
He is so grateful to have you, because you are always willing to listen. And even though somedays his hair will smell different because of it, you never complain and the two of you will just cuddle like what you always do.
"Thank you, I may not saying that a lot of times and I can be such a douchebag. But I mean it, thank you, for dealing with all of my shit." "It's nothing, Atsumu..." "No, it's everything."
— Miya Osamu —
Haha, haha. This man doesn't care shit.
He loves to buried his head at the crook of your neck when the two of you have some movie night or something.
His hair is harsh. It may look soft when everyone sees it, but the look can be deceiving. Once it makes contact with your skin, sometimes you grimace from how spiky it feels.
Yet once again you never complain, don't have the heart to do it as he nom on some snacks with eyes focusing on the screen.
Every new month where he gets the money from his parents, he always call you and brings you to every new restaurant or places that he already takes note inside his head.
His pocket money will be gone in a day, usually half of the money will go to his stomach (and yours since he always wants to be the one who pays for the food).
One day you see his original hair starts to grow, so you tell him that you want to be the one who retouches his hair. He hum and just nod at this, believing in you 100%
The next day, you come in full equipment. His favourite colour, the bleaching—and a bottle of olaplex that make you broke (but then again it feels like a self-indulgence for you since it can help his hair to be a lot softer)
When you are done with his hair, he touches his hair, playing with it as his eyes fill with wonder. He looks so excited, asking you things about how can you make it feels like his hair never bleached and dyeed.
You tell him things about how destructive the bleaching for his hair. His hair is black for god sake and it needed at least three times of bleaching so the silver hair colour can penetrate inside his hair.
You give him a special shampoo and conditioner, adding some hair mask to his routine, some hair vitamin to give more strength.
He is so happy to know that and goes to the bathroom to save all of the stuff that you give him. But he pouts all of a sudden, realising that it must hurt you every time he cuddles up on your neck.
You are currently playing with your phone on the couch when he hugs you from behind, whispering on your ear about how much he loves you, saying thank you and compliment your action.
The two of you are so hooked for each other, and he promises you some onigiri every now and then to thank you for just being his lover.
"I can't believe you never complain about it." "Well, why should I? It's not that hurt. Uncomfy yes, but not hurt." "Dear God, what did I do to deserve you."
— Suna Rintarou —
He buys things so easily and his room literally fills with lots of high-end products.
At the outside, it may look like he doesn't care about his physical appearance that much. But oh boy there are reasons why his skin is like it made of glass.
He is a crazy money spender. When the two of you having an impromptu date, every stuff or products that catch his eyes, all of a sudden it will be wrapped with the luxurious package and fall on his hand.
Suna doesn't even think about either he will use the product or not. As long as he thinks it's good, no matter if he already has some at home, he will buy it—for stock purpose he say.
At the first and second date, you just go along with whatever that he wants to buy. After all his parents give him the money, and it's his freedom to choose what he wants to do with said cash.
But when you go to his house and use his bathroom, you found out there are like fifteen to twenty products that are expired there. And ny that fact, you snap.
He is sleepy after the date with you, begging for you to be his pillow. A smile grazed his face when you are out from the bathroom, now wearing his sweatshirt and boxer—doesn't even notice the discontented look that you throw at his direction.
Patting the side of his bed, he wants you to lay there with him. You know well that he is much more relaxed when he had his arms around your torso. So you wait until maybe a few minutes before you share what bothering your mind.
He had his arms topple on top of you, with his head resting on your chest. He always feels safe and sound, to hear your heartbeat. But somehow, he can feel how your body is a little bit tense than usual.
You are surprised when he suddenly asks about what is bothering your mind. You are a little bit hesitant at first since you know too well that he waste that stuff possibly by accident, but then again it's for his own good.
With your fingers gracing his soft hair (that when you think of it is a lot softer than yours), he listens to every syllable that comes out from your lips. He nods here and there. And when you are done, you are only answered with silence.
At first, you think that you mess up, that you become annoying and it's not your place to pry his life. But then he lifts his head to look at you, a gentle expression appears on his face.
"I think I need to keep you in my life." "Aye, what with the sudden confession?" "You keep me grounded, and I really need someone who look upon me with no other intention except for my own wellbeing."
— Kita Shinsuke —
Kita spends all of his pocket money with the perfect count. He knows well what he needs to do with the money even long before he gets it.
He set everything part by part. This amount for stationary, that amount for hand sanitizer, another amount for some skincare and hair routine that you tell him.
Last but not least though, of course some other amount to take you out on a date and to buy some stuff that his grandma has been eyeing and wants.
Before he's in a relationship with you, he just buys the basic stuff that is just right from his eyes. Like facial foam, sunscreen, deodorant—clean, simple, enough.
But ever since he dates you, he is sometimes a little bit nervous. You are the first relationship, the first time he actually falls in love with someone.
From everyone on the volleyball team, he is highly aware that he is considered as someone that is not stand out, someone—that some bitchy ass students said; not attractive.
So he recounts everything, asking Atsumu and Suna who he knows always pack a lot of things (skincare, perfume, haircare that always make them having the most stuff) when they have some camps or tournament.
Sunarin being your closest friend of yours from out of all of them, inform you about how his captain seems to lose in thought. And some other time after that, he even sees that the stoic man playing some advertisement video for some 10 step skincare routine.
So one day, you decided to confront your boyfriend. The two of you just walk side by side in silence, enjoying the calm breeze with the sun starting to set on the horizon.
You flicker your eyes back and forth between Kita and the road ahead. He glances towards you too, realising your look with his usual expression plaster on his face.
You jolt when he suddenly interlace his hand with yours, thumb caressing the back of your hand as if reassuring you that you can say anything to him. So you parted your lips, telling him about yours and Suna's.
He is silent for a moment before suddenly letting out a sigh. He tells you about his insecurity, about how he feels like he should take care of himself more than he used to.
It pains you to know that he has been having this poisonous thought inside his head. You let him talk and explain everything, and you wait for him to calm down first before you tell him what you want him to hear.
You tell him how he is through your eyes, how perfect he is that you will never trade the affection that he ever gives to you with anything. You say it all with a soft and genuine look.
You heard from Sunarin how your boyfriend cried when he received the captain's jersey, and now, you can see tears prickle at the corner of his eyes.
"It's just, I never been in a relationship before, and I don't ever want to see you leave." "I would never, I promise I would never." "I believe in you. Thank you."
✧・゚: *✧・゚:* ༶• ┈┈ ⛧ ┈ ♛ ♛ ┈ ⛧ ┈┈ •༶ *:・゚✧*:・゚✧
Tagged Lovelies:
@muffins-puffins @vlovers-world @blacckdiamondposts @atsunflower @miyatsunami @iwaixiumi @hihiq @the-fandom-ness @quirksandbreaths @murasakibaraa @verbluehte @simp4tsukkii @ladyalicevii @evermorehaikyuu @clowninfortodoroki @koutaroulovebot @fitriiaw @mistypoison @aquariarose @greenleaf-fantasy @t-amajiki @kuraomi @haikyuuwithadashofart @starbybokuto @shiningstar-byulxx @nerdyphantomlady @raequii @akasuns @sunaschupet @macaronnv @spicyfoodboi
#haikyuu#haikyuu headcanons#haikyuu x reader#kita shinsuke fluff#kita shinsuke imagine#kita shinsuke x reader#kita shinsuke#miya atsumu imagine#miya atsumu x reader#atsumu miya#miya atsumu#miya osamu imagine#haikyuu miya osamu#miya osamu x reader#osamu miya#rintarou suna#suna rintarou imagine#suna rintarou x reader#suna rintarou
301 notes
·
View notes
Text
5 Skin Retouching Actions | Photoshop Actions Free Download
Here in this post, you’ll get premium High End Retouching Photoshop Action absolutely free without any cost. It is the most useful action for photographers and photo editors. It allows you to do high-end retouching of all types of images.
1 note
·
View note
Text
Workflow
Photography workflow is the sequence of steps and actions you take to get from taking your photograph, editing the photograph, working them up to a result you consider finished, then sharing them with the world. Editing your photos can be like baking a cake, making an airfix model or assembling flat pack furniture. You start with raw ingredients, or loose parts, then you use an ordered sequence of steps to put everything together. With good photography workflow, the end result is a perfectly crafted image, that is securely stored for future use.
Stage 1. Capture
Whatever the end result you have inside your head, you should always strive to take the best image that you possibly can, and in most cases, try to finish the photo as much as possible in-camera. Regardless of camera, wether it be digital or film, you should always be working to master your camera techniques, composition, exposure, light, lens and what you see.
Stage 2. Import
Digital Camera - Copying files from removable media i.e Secure Digital card, Compact Flash and its new iteration XQD, onto more permanent storage can also be called downloading, ingesting, transferring, etc, but the end result is the same. to copy all of your images from your cameras memory card, then save them to a new folder on you computer, then back up everything right away.
Film Camera - Develop your film, then take the negatives and import them onto the computer by scanning, using either a flatbed or a dedicated negative scanner. Save all of your exposures into a new folder on at least one hard drive, then back up everything right away.
You should always have your images saved on at least three separate media sources:
Your master working drive (computer).
A current backup of the master drive (external hard drive).
A complete historical archive, stored in a separate physical location from your master and working backups (i.e server, NAS or cloud).
Stage 3. Organise
After your photos are copied onto your working drive (and backed up!), sort through the pictures to separate your best or favourite images from the rest. The best way to do this is with ratings (e.g. stars). Keep all the photos from a single shoot together in one folder and use the ratings to annotate your selections. During this stage you should also apply and enhance the metadata associated with your files, i.e keywords, copyright and contact information are just a few of the many types of information which can be embed within a digital image.
Stage 4. Develop
instead of using the darkroom to edit or develop images or exposures, in digital photography we use Lightroom to process and make each image look as good as it can be. Developing is the term most often used by Lightroom users, to enhance, adjust, post-process, and simply edit are common terms to describe this stage, which itself is can be broken down in several steps.
Develop steps
Crop and straighten - Changes the composition, cropping can be the most significant change you can make to a photograph.
Adjust exposure and tones - The tonal range of an image refers to the various levels of brightness, from pure white to solid black. Tone is independent from colour and simply setting the white and black points can have a huge impact on an images overall appearance. Contrast, which is the variation between light and dark tones, determines how much impact (or punch) a picture has. Naturally, some pictures will look best as low contrast and vice versa. White balance is the process of removing unrealistic color casts, so that objects which appear white in person are rendered white in your photo. After setting the white balance, consider making other colour adjustments, such as saturation and vibrance, which will affect how pure and vivid the colours appear, or just convert your image to black-and-white.
Apply local adjustments - These are edits you make only to small areas of the picture. Examples are to dodge and burn (lightening and darkening) and selective colour adjustments.
Apply noise adjustment - Noise appears in digital images captured at high ISO, in the dark, or ones that are significantly underexposed and can be recognised as soft coloured blobs or grainy speckles. By varying the amounts of noise reduction, most images can be improved
Apply sharpening - Sharpening is all about contrast. The more contrast along the edges equals more sharpness.
Retouch - Many pictures contain elements that you want to remove. In some cases, these are artefacts — undesirable results of digital processing or camera characteristics i.e noise, chromatic aberration, fringing and sensor dust spots. Other issues were retouching is necessary can be, there’s something ugly in the frame, blemishes on skin or to whiten teeth.
Stage 5. Output
After you have edited your photos to a level you’re happy with, think about reproducing them, this can be as a high quality printed reproduction i.e photo book, fine art prints, etc, or for sharing online, this require you to follow specific parameters for exporting your image or files from your editing software to either your printer or to file to give or email to the company or individual you use to produce your prints.
3 notes
·
View notes
Video
youtube
1 click High End Skin Retouching plugin Action Free Download SAAD BBC ST...
0 notes
Text
Photo Retouching in Photoshop – High End Professional Skin Retouching
We often consider photo retouching as the villain in terms of photo editing. That’s because, it sometimes may show the face of your image too cakey or artificial. It’s like a chief problem graphic designers face occasionally.
For that reason, it is important to have high end retouching. And if you feel crucial about the matter, how to do so, what’s the procedure, how is the concept, then don’t panic. I am here for you with a grasp of comprehension about it.
Image Retouching proficiently
When you start a procedure of photo retouching, make sure you have the updated version of Photoshop. It can help you to edit your intended image in an error free way. I prefer the Photoshop CS6 which is an edible option to work with.
It is sure that I will explain about the aspects of photo retouching each and every part of your image. But before that, I am going to show you a step-by-step procedure on how you can actually retouch your photo.
Some basic need-to-know steps whenever you go for retouching any image:
Step 1:
Be ready with your Adobe Photoshop CS6 when you task it for the first time. This is because you can have your first trial at ease. After you go there, you will see an option of open file on the left bar. Select the image you want to retouch and open it there.
Note: If you don’t have the Photoshop CS6 version, then you may use the Photoshop CC or Photoshop CS4. But make sure you have an updated version.
Step 2:
Now go to the toolbar on the right side and make a copy of the layer. You can take initiative in your work, once you select the copy. Then select the particular area, where you want to do the retouching.
How to select the area? For that, you have to use the pen tools, located on the left side. By this way, you can select the path area.
Step 3:
After it, you are to use the option ‘Mask’. You will see it on the top of the bar of your window. Click on the mask selection, a box will appear there. Now, use and adjust the mask that will be good for your photo.
Actions and Techniques
When it comes to retouching an image, it includes beautiful and natural sculpting. In that situation, high end retouching gives that privilege. Such editions not only done for a single part of an image, like- face, body, hair, etc. You must consider the whole phenomenon of retouching on the viewed image.
Here I have specified some retouching substitutes shown as alternatives. If you consume these basic retouching ideas, you can go for hard retouching affirmatively.
Skin Photo Retouching :
Skin retouching in Photoshop carries a significant part, because it is what catches the eye of every observer. Here, what the designer firstly does is, remove the blemishes, tone out the skin, give authentic texture to the delicate skins.
The tool that is required for such retouching is the Brush Tool. With the help of it, you can paint any part or hide it. For example, if there are any blemishes over skin, you can paint those with it’s actual skin color. And don’t worry about it’s extra effects. The tool ensures a natural look as you are using a high end retouching.
Hair Image Retouching :
Like the retouching skin, retouching hair also accumulates it’s specific tool by which you can retouch the hair of your image simply. Make sure you are prepared with the Clone Stamp Tool, because it helps to fix any kind of hair disturbances.
With this tool, you can paint any kind of excess flying hair and add a mask to that part. Then do some unnecessary paintings over those hair which are shuffled nicely. Now you can refine your task with the pen pressure and have a check lastly. Your hair retouching process has been done successfully.
Highlight Image Retouching :
Sometimes we don’t consider retouching highlights as a major work. But you must know that it plays a great role when it comes to revealing a natural look to your image. Especially toning up is done efficiently with this kind of retouch.
To do this task, at first open your image, then click on adjustments, and from there choose highlights. Now, you are to move the amount slider to adjust the lighting. Or what you can do is, give the highlight value on the percentage box. If you want to make more additional adjustments, then you can do that by clicking on Show more and get better options to control.
Headshot Photo Retouching :
When we do headshot retouching, we have to consider several accumulations. Such as- eyes, skin softening, eye bag removals, removing hotspots, sharpening the image, dodge, burn, hair spray removal, etc. The tools that are required for such retouching e.g. Brush Tool, Layer Mask Tool, Clone Stamp Tool.
You can use the Brush Tool to erase the outer parts, and give the iris of your eyes darker texture by lowering the exposure. Again, the Clone Stamp Tool helps to tone up the skin required for headshot. Then you can sharpen up the image and remove hotspot following a processed way.
Final Verdict
Till now, you must have understood how important photo retouching is, especially when you work as a professional designer. Why the high end retouching is demandable because it assures to make your image real and natural.
If you want to retouch your image with perfect combination, then I will suggest you to go for the high end ones. But also keep in mind that you follow the proper ways or methods. My article will help you for sure on that term.
0 notes
Text
Production Journal - GQ
060320
The final presentation of my photographs for this project should be appropriate for a men’s lifestyle magazine. GQ is a publication that would print an editorial shoot of this nature and I shall use it as a case study. The magazine’s focus is fashion, style, culture, fitness, music, travel, sports and technology for a male market. An article by photographer Matt Martin is the basis for my project and I will consider the requirements of print and digital platforms.
Gentlemen's Quarterly (GQ), formerly Apparel Arts, started as a men’s fashion magazine for wholesale buyers and retailers. It was launched in 1931 in the US for a limited run; however, its popularity promoted the advent of Esquire Magazine and other publications that built upon its success. Apparel Arts was rebranded as Gentleman’s Quarterly in 1958. The acronym GQ followed in 1967. It was later acquired by Condé Nast, who added articles beyond fashion. Various editors have influenced the reader base over the years - Nonnie Moore as fashion editor dressed up the pages to make the content approachable yet aspirational then Jim Nelson attracted younger and more casual readers. Finally, the term ‘metrosexuality’ was coined in response to the lifestyle that GQ promoted - ownership of an impulse to shop for high fashion. It is thought to trace back to a Mark Simpson piece for The Independent via his book Male Impersonators (1994), ‘The promotion of metrosexuality was left to the men's style press, magazines such as The Face, GQ, Esquire, Arena and FHM, the new media which took off in the Eighties and is still growing. They filled their magazines with images of narcissistic young men sporting fashionable clothes and accessories. And they persuaded other young men to study them with a mixture of envy and desire.’ (Condé Nast, 2020)
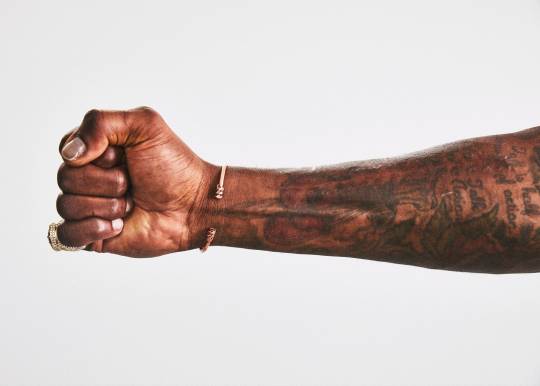
Matt Martin is a New York-based photo editor and photographer. At GQ Magazine he has held the positions of senior visuals editor and visuals editor from 2015 to 2019. As a former e-commerce and product photographer, there is characteristic precision to his style - colours are true to life with lighting that elevates the subject to appear pristine. In an editorial shoot with boxer Deontay Wilder, Martin worked as part of team involving a stylist, cinematographer and video editor. As a showman and undisputed champion in his weight class, Wilder has many visual traits that are the subject of tropes - a gold studded mask, crown, jewellery and boxing gloves. The styling of the shoot reflects his passion for luxury and he wears Bottega Veneta, Dolce & Gabbana and Versace. In the video footage, the sitter is playful yet physical. Poses are clearly those of a boxer as he flaunts his form. The lighting is low-key with a background that falls into darkness. A soft key light, absent fill light and carefully placed back light emphasise the broadness of his shoulders and angular musculature. Metallic-based textiles and a black skin tone complement these creative choices. Cropping is bold in the video footage and high key still images. There are some full length and profile shots; however, cropping at the chin to frame his golden chain and presenting a lone tattooed fist are signifiers that are all unmistakably Wilder. (GQ, 2019)
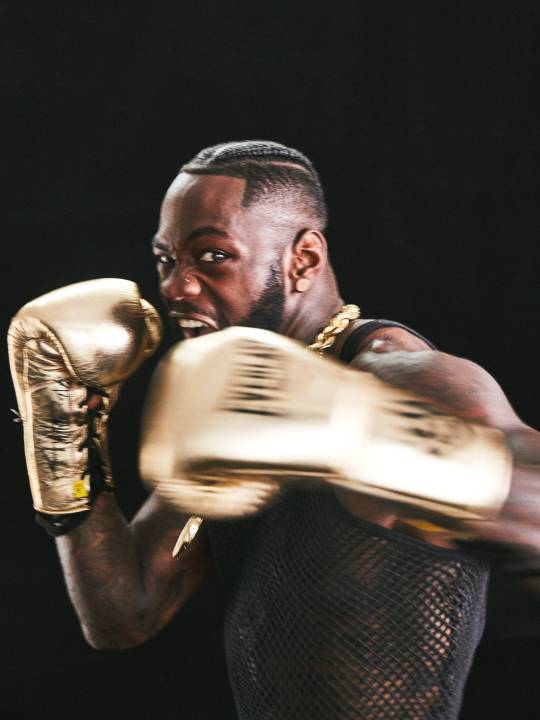
Matt Martin, Deontay Wilder, 2019
Summary
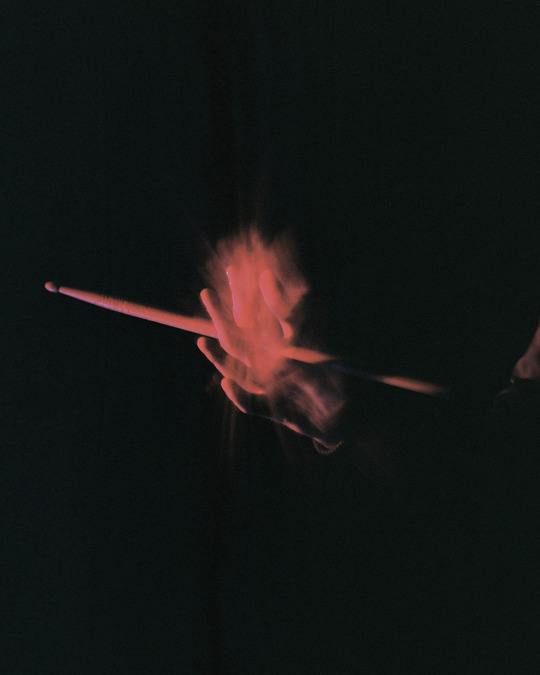
The list of photographers and cinematographers that I have blogged about for this project is extensive - Smith, Andrew, Refn, Sigel, Norwood and Kander. Martin is being added for his clean-cut editorial approach. The opening sequence of my series will aim to recreate his low-key Deontay Wilder lighting that I have described. It champions the look that GQ has come to represent. Back lighting exaggerates the masculinity of a subject because angular features become more pronounced. Reflective textiles in this shoot were successful and Ben’s red jacket should create a similar outcome. Acting in combination with the lighting, a sense of the luxury will be inferred. The innovative cropping is effective for Wilder as he has characteristics specific to him as a boxing personality. Ben and I shall search for framing that defines him. Furthermore, there needs to be some dominant statement expressed with his drumsticks.
Production Notes
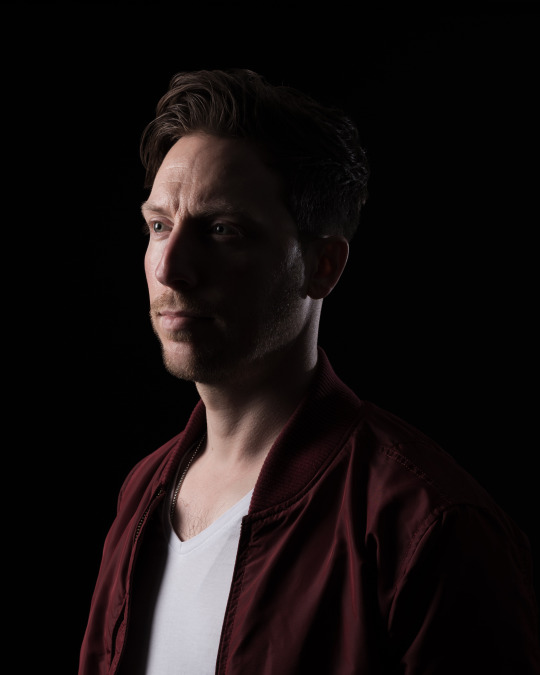
I have worked as a portrait photographer for the past eight years. Studio Photo Gallery is my preference of studio space. It is compact and well equipped for photographers on a budget. The owner provides Elinchrom heads with a variety of modifiers. Ben arrived with his clothing, drumsticks and hair product to prepare for the shoot. I set up the lighting as shown in the diagram. It refashions Martin’s design almost directly. There was a head with a soft box camera left and black polyboards either side of it. This prevented flare into the lens and flagged light from the background. A head with a snoot was placed camera right at an angle. Again like Martin, a hard back light enhanced Ben’s masculine characteristics. Finally, the black paper background was a few metres behind him. This imposed several stops difference between the subject and background, ensuring a pure black aesthetic.
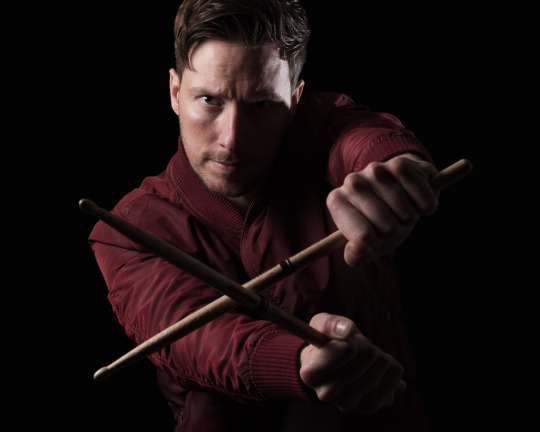
My professional studio settings are f8.0, 1/125s and 100 ISO. I feel that this gives me the optimal performance of my lens and camera - Nikon D750 and 50mm lens. It is natural for me to work with people and empower them to present their personality. Ben had several ideas for poses. We started casually with his arms by his side and at an angle to me. There are variations between him looking at the camera and away. The way that he held the drumsticks came from him. Making a cross was aggressive and purposeful. We felt that worked well. Reaching with a single stick straight into the lens was another successful composition. I rejected poses that seemed forced, although I did not communicate this at the time. My final images have been retouched on Photoshop. His hair was reshaped and trimmed to remove any fly aways. His skin is free of most blemishes; however, I left some to maintain a rugged appearance. Otherwise there is relatively little post-production and the look I was attempting was captured as practical effects.
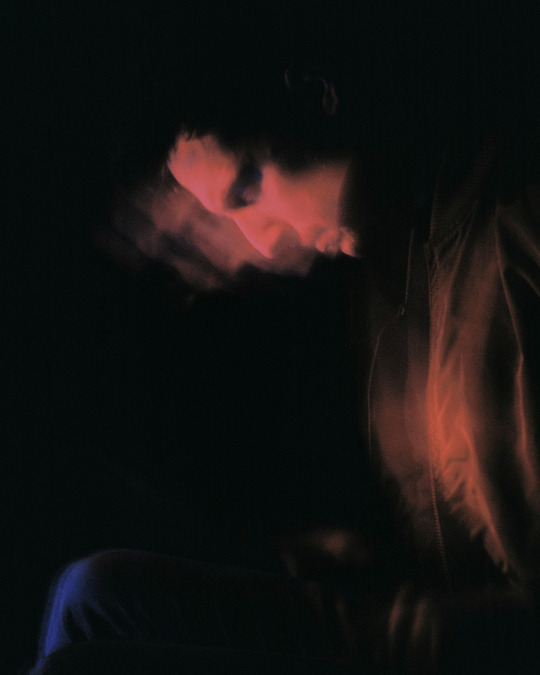
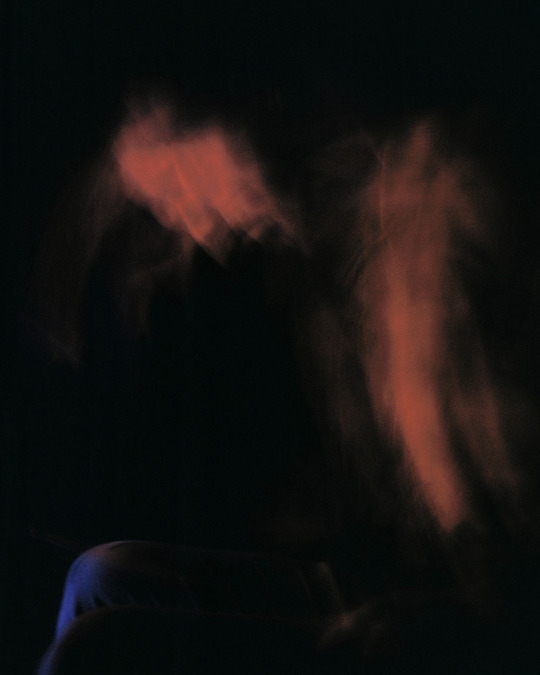
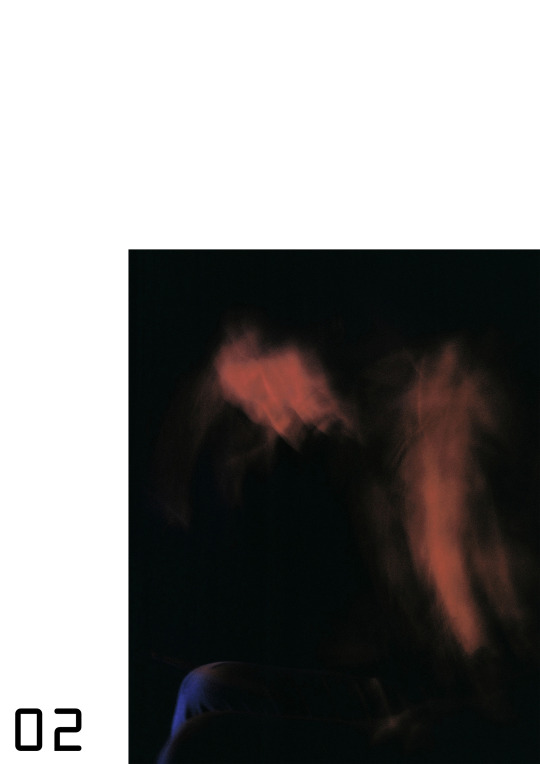
In a second phase of the shoot, I began to take more risks and to work outside of my comfort zone. I mounted my Nikon D750 and 50mm lens on a tripod and attempted long exposure motion blur. After many test shots the most efficacious combination was f8.0, 4s and ISO 200. If the shutter speed was too long then forms clumped together. If it was too short then there was no trace of a blur. Since my Mamiya 645 with 80mm lens is analogue, I had to wait until the film was processed to see if I was successful. The Kodak Professional Ektar 100 that I loaded performed admirably. It was pushed a stop to 200 ISO to reproduce the digital test shots. My lighting design was comparably simple. The head with a snoot was switched off and the head with a softbox had a range of gels taped to it. It was used as a constant light with the flash unit off and the modelling light switched on. Finally, a domestic table lamp with an open bulb was positioned under it. This had a contrasting gel taped to it. Red and blue was my preferred choice of gels. When it came to the movement, I asked Ben to be seated and to drum on his thighs to give the impression that there was a drum kit present. Music was played loudly and it was interesting to watch the movements that he would make. In the end, we selected several heavy metal tracks for him to drum to. Head banging added an extra dimensionality to the action. This definitively condensed the spirit of his music into a selective range of shots. It was Ben who suggested spinning the sticks in his hands and cropping him out. With practice he could hold still for 2s and then spin for the remaining 2s on the same exposure. This is how the solid outline of his hand was created with cyclical distortion appearing to emanate from it.
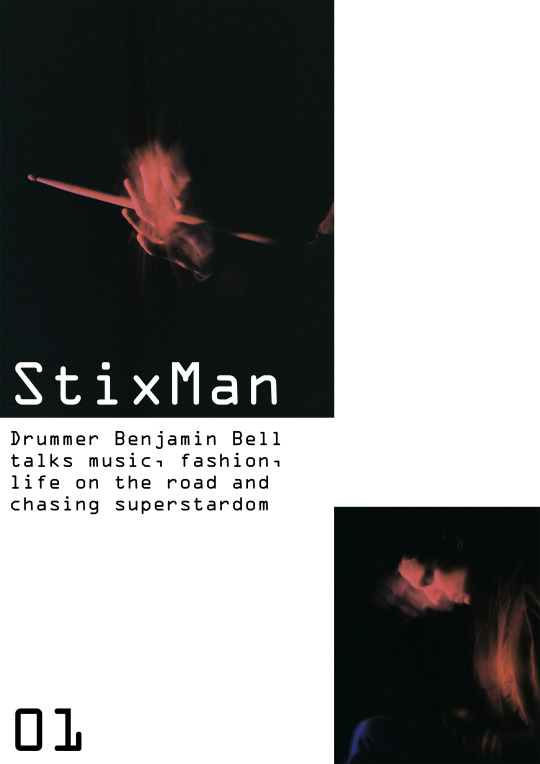
Using Photoshop, I pulled the saturation and vibrancy down on scans of these negatives. The grain gives the images a warmer and more vintage feel than a digital alternative. There was some clone tool used to remove excess blur, otherwise I felt it was necessary to preserve their rawness. A mock up magazine spread was created in the same vein as GQ. I kept the graphic design motifs minimal and made suggestions for where text could potentially appear. Each photograph is a different size to be indicative of the frenzied nature of drumming - back and forth, round and round. Ben is identified as a hand with a drumstick and two blurred profile images. I selected these latter shots because they were still identifiable as him amongst the chaotic blurriness.
Bibliography
Condé Nast (2020). GQ. Condé Nast. Available from
www.condenast.co.uk/gq
[Accessed 10/04/2020]
Martin, M. (2020). Deontay Wilder Always Prefers the Knockout. GQ. Available from
www.gq.com/story/deontay-wilder-tunnel-style-profile
[Accessed 10/04/2020]
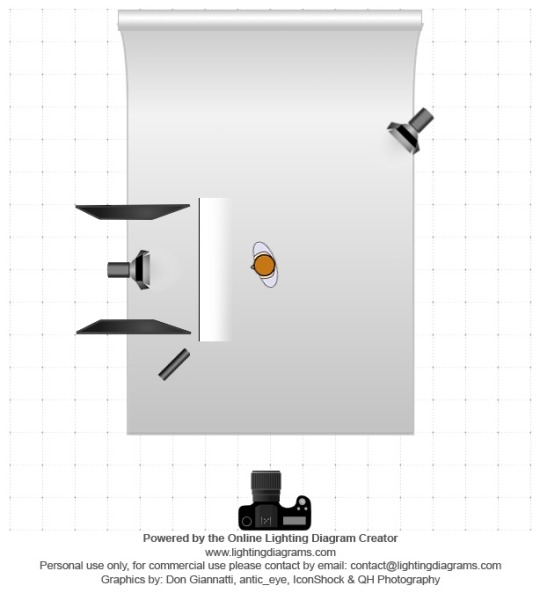
Lighting Diagram
Digital Shoot, f/8, 1/125s, ISO 100
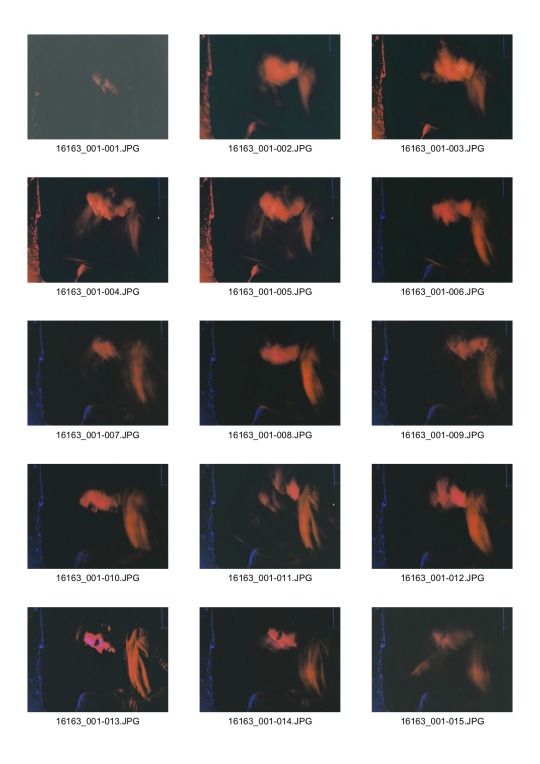
Contact Sheet 01

Contact Sheet 02
Analogue Shoot, f/8, 4s, ISO 200
Mock Up
0 notes
Text
Photo retouching services
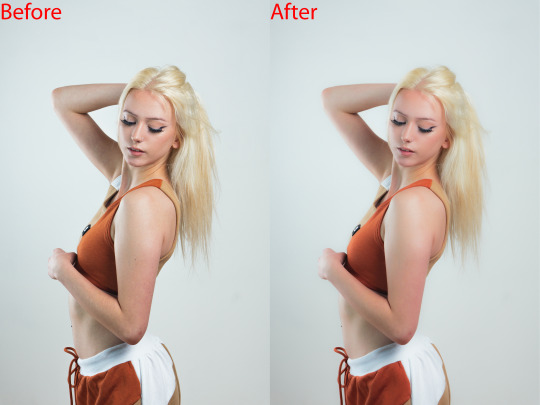
Photo retouching services are offered by many companies and freelancers, and they involve editing digital images to improve their appearance or fix any flaws. These services can range from basic adjustments like color correction and exposure balancing to more advanced techniques such as removing blemishes, reshaping the body, or even adding or removing objects from the image.
That's correct! Photo retouching services encompass a wide range of editing techniques to enhance the visual appeal of digital images. These services are commonly used in various industries, including fashion, advertising, e-commerce, and photography.
Basic adjustments typically involve correcting exposure, color balance, contrast, and sharpness to improve the overall appearance of the image. More advanced techniques may include skin retouching to remove blemishes, wrinkles, or scars, as well as body reshaping to slim or enhance body contours.
Other advanced retouching services may include background removal, adding or removing objects or people from the image, and composite image creation. These services are often used to create visually stunning images for advertising, marketing campaigns, or personal projects.
It's important to note that photo retouching services should be done with care and attention to detail to maintain the integrity of the original image while enhancing its visual appeal.
#affinity photo high end retouching#skin smoothing capture one#skin retouching and color grading in photoshop#pixelmator pro skin retouching#face retouching in photoshop cc plugins#one click skin retouching free photoshop action#affinity photo face retouch#capture one skin smoothing#capture one portrait retouching#capture one pro skin retouching#capture one skin retouching#capture one face retouching#masking photo editing lightroom#masking in adobe camera raw#skin smoothing plugin photoshop#skin retouching camera raw#skin retouching capture one#skin retouching and photo masking service
0 notes
Photo

High-End Skin Retouching Photoshop-Skin Smoothing without Losing Texture-Free Photoshop Action http://ehelpdesk.tk/wp-content/uploads/2020/02/logo-header.png [ad_1] High-End Skin Retouching Photosh... #adobelightroom #adobepremiere #advancedretouching #affinityphoto #airbrushskin #airbrushing #blemishes #blendmode #colorgrading #digitalphotography #dslr #fashionphotography #filmmaking #finalcutpro #frequencyseparation #glamor #headshot #high-endretouching #imageediting #iphonephotography #learnphotoshop #makeup #nightphotography #photography #photoshop #photoshopforbeginners #photoshopretouching #photoshoptutorial #portraitphotograhy #portraitphotography #portraitretouching #retouch #retouchphotoshop #retouchskin #skin #skinretouching #skinretouchingfrequencyseparation #skinsculpting #skinsmoothing #skinsoftening #skintexture #smoothskinphotoshop #videoediting #videoproduction #videography #wrinkle
0 notes
Text
Easily Smooth and Soften Skin In Photoshop | High-End Retouching Techniques [FREE Action Included]
New Post has been published on https://hititem.kr/easily-smooth-and-soften-skin-in-photoshop-high-end-retouching-techniques-free-action-included/
Easily Smooth and Soften Skin In Photoshop | High-End Retouching Techniques [FREE Action Included]

Hi welcome again to the photoshoptrainingchannel.Com i’m mrs. Ramirez on this video i will exhibit you the way to delicate epidermis in Photoshop you’re going to gain knowledge of two strong epidermis softening approaches both of these tactics are non-harmful which means that that you’ll be able to be competent to come back back and make changes to your edits at any time however most importantly these approaches depart the skin texture intact so that you can offer you a wonderful tender skin with out it looking too soft or too fake the primary process will take knowledge of a brand new characteristic of Photoshop CC if you’re in an older version of Photoshop then do not worry the 2nd system will work with Photoshop cs6 it does require just a few extra steps however it offers you total manage over your photo and your skin softening effect it makes sure that you simply stick around into the very end of the tutorial in view that i’ll be sharing with you a free Photoshop retouching action this action will enable you to use the 2nd method with just one single click with the intention to start smoothing skin proper away k let’s get began that is the portrait that we’re going to work with once more this primary illustration is for the contemporary variation of Photoshop Photoshop CC if you are working on an older variation then which you could speedy ahead to the 2nd technique and you can follow together with that so with this residue chosen i’m without difficulty going to press ctrl J command J on the Mac to copy the layer this step just isn’t fairly integral however it’ll help me exhibit you a earlier than and after when we’re done now earlier than you soft the dermis of any portrait what you have got to do is eliminate significant blemishes that the skin smoothing manner would possibly not do away with in the event you zoom into your portrait you may see some greater distractions she truely does not have too many probably this one right here maybe this blemish there it is now not a lot however we’ll cast off it now that way matters are so much less complicated once we apply the dermis smoothing method so what you wish to have to do is create a brand new layer to work and under strucked capability we’re gonna make all our adjustments in this layer i am gonna rename it and i will call it Spot treatment considering that i’m going to use the Spot treatment Brush device with that layer selected go into the Spot cure Brush device found within the tools bar make certain that sample all layers is selected and earlier than we simply begin working with it I wish to show you one factor i will use a right bracket key on the keyboard to make the brush bigger you will discover the preview there that suggests you how giant your brush is when you do not see that that is on the grounds that the caps lock secret’s enabled so if you happen to see a crosser like that one just tap on the caps lock key to disable it and the comb preview comes again so what I need to show you is how most folks work with this tool most humans simply work with this device with the ordinary surroundings become aware of that the mode is about to average and that simply means that Photoshop samples pixels relying on the place you paint and probably that that is a really just right job sadly in the event you zoom in you’ll be able to notice that mostly it destroys the feel of the dermis and that’s because we’re focusing on all pixels and ordinarily we do not want to do that we wish to goal unique pixels so i’m going to undo these changes and what you need to do is select your Spot remedy Brush software then in the mode decide upon either darken or lighten the mode that you simply decide upon is determined by the blemish or distraction that you’re looking to put off if the distraction is starker than the epidermis tone pick lighten if the distraction it can be brighter than the epidermis tone pick darken so let me show you ways this works i’m going to click on lighten and i’m just going to disposing of some of these distractions and observe that as I do this i am now not destroying the highlights of the picture i’m just eliminating the darker pixels so i am taking away the darker blemishes and preserving the intense areas to be able to permit me to maintain the epidermis texture so i will double click on on the hand instrument to suit the image to display and i will simply take away one of the most darker blemishes within the snapshot quite swiftly right here she honestly does not have too many i am simply displaying you simply in the event that your image has larger blemishes that the skin smoothing manner won’t eliminate so i am simply putting off a few of these blemishes and that is the earlier than and the after rather quickly we had been capable to wash up her face i’m gonna zoom into the corner over her mouth and there’s a white spot there that I need to do away with however watch what happens with that same process if I make my brush slightly smaller with the left bracket key and faucet it will now not do away with that distraction seeing that it’s brighter than the skintone so i do not need to lighten it alternatively I want to darken it so i’m going to prefer darken and i’m going to simply eliminate that blemish and realize how I didn’t have an effect on the shadows within the darker pixels only the brighter pixels and that’s why I propose using modes due to the fact that you will eliminate handiest the pixels that you are concentrating on and i will be able to switch in between them i will be able to go back in to lighten and just might be dispose of a few of these spots however this is fairly no longer fundamental the epidermis smoothing manner will eliminate these spots i will double click on on the hand device again to fit the snapshot to display and you can find the earlier than in the after so when you eliminate the greater blemishes out of your image what you must do is decide upon your Spot healing layer maintain shift and opt for your portrait layer and correct click and choose convert to shrewd object with a purpose to location the two layers into a shrewd object a shrewd object is a container they are able to hold a number of layers and that you could observe changes distortions and filters non-destructively which means that that you may at all times come again and edit them at any time so with this sediment chosen i go to go into filter camera uncooked filter and the digital camera raw filter enables you to regulate the tonality colour in small print of a photograph and that is what we’re gonna use to create lovely tender dermis we’ll use one of the vital manufacturer new sliders in Photoshop CC the feel slider which will also be found in the general panel right above the D haze and readability sliders i’m going to zoom in so that you could see how it works the feel slider allows you to increase texture or decrease texture so detect that when I cut back the texture it smooths out the skin I might now not wish to go the entire technique to the left might be at about negative seventy five and if that’s still not gentle ample for you that you could alter the readability you deliver the readability back down to the poor values it would also smooth out the skin I commonly do not wish to go too a long way with the clarity and if you wish to be taught more in regards to the texture and the hay sliders then i’ve a video on adjusting texture and Photoshop I give an explanation for in a lot of detail what these sliders accomplish that I particularly endorse staring at that video i will place a hyperlink down under within the description however anyway while you set your texture down you could want to go into the element tab and just add a bit bit of sharpening just so that you simply get a few of that skin texture back also here is a trick for you in case you maintain alt alternative on the Mac and click on that protecting slider detect how the snapshot turns white that signifies that the entire picture is being affected by that sharpening outcomes if I drag to the proper best the areas in white might be affected so perhaps which you can regulate that accordingly depending to your portrait in this case it particularly will not be gonna make a colossal difference so i’ll go away it at zero but that tip may be relatively quite valuable for different forms of graphics so once you will have set your sharpening that you could just press ok and Photoshop applies that outcomes but it applies it to the complete picture and we don’t want that we only want to observe to exact parts of the photo so what we’re gonna do is click on on the layer masks for the intelligent filter and we will then press ctrl I command I on the Mac to invert or you could click on the invert button in the properties panel to invert the masks discover now how the masks is wholly black that implies that the whole lot is hidden with a mask black hides white exhibits in the exceptional stages of gray give you one of a kind phases of transparency so what i am gonna do now is with the comb software i will ensure that my foreground colour is about to white which it’s and i am just gonna paint in the areas the place I want to follow the epidermis smoothing results so no longer every or just within the areas that require a little bit little bit of smoothing and so one can rapidly soft out her dermis we are going to be competent to see various detail and all that is non-destructive we are able to edit it so if I make a mistake i can just paint with black and cast off the effect from that field switch back to white and i’m switching between white and black via clicking on this arrow you might additionally press the X key on the keyboard or swap backward and forward and simply paint with white in the areas the place you wish to have the effect i will zoom in simply exhibit you one more thing you would additionally use a mode with the digicam raw filter much like we use with the Spot therapy Brush software and if you wish to use a mode that you would be able to double click on this icon here which brings up this window this window is rather a lot like the fade command it permits you to carry down the opacity of the filter and it also makes it possible for you to change the mixing mode for you to alternate the blending mode to lighten and become aware of how so much brighter the highlights get so if you want to preserve the customary highlights exchange the blending mode to lighten i’m gonna maintain it at usual given that I think it appears higher in my case and opacity at a hundred works I just desired to give you that alternative if your portrait requires it i’m going to press adequate and we’re again to where I used to be before what i’m gonna do now could be with no trouble double click on on the hand tool and click on on this eye icon so as to see that before and the after much a lot better also due to the fact all this is non-harmful you can continually double click on the camera raw filter label and make additional adjustments that you can are available and alter how so much texture we’re gonna have how a lot sharpening you are going to use press adequate when you are achieved and Photoshop applies these new adjustments to your file as soon as again earlier than and after and as you’ll find it is a very strong procedure for smoothing skin in Photoshop I highly advocate that you use it what i am gonna do now is show you learn how to do something similar in an older version of Photoshop it’s gonna require just a few more steps and i will furnish an motion you can quite simply run and follow the effect your pix to save you a little bit little bit of time first i’ll exhibit you ways the technique works after which i will exhibit you where that you may down load the free motion the first step is to prefer the portrait layer proper click on and select convert to clever object and i’m going to press ctrl J on windows command J on the Mac to replicate that layer one time and i will do this once more to replicate it a 2nd time so now i have three intelligent objects it’s foremost to note that while you replica a clever object they continue to be linked to the customary so in case you change the contents of 1 it’ll trade the contents of all and that’s gonna be fairly fundamental later on in the tutorial for now i’m going to situation these sensible Objects into a gaggle so i will pick them both with the aid of maintaining shift and urgent manage G on home windows command G on the Mac and i’m going to expand the team so that i will be able to see the contents and i’m going to work with the bottom photo first and even though i don’t ought to i’m going to disable this layer as a way to be certain that i’m best working with this primary to placate and what i am gonna do is i’ll apply a filter i’m going to practice the blur filter so i’m going to identify this sediment blur then go into the filter menu and prefer blur Gaussian blur and that is going to blur my photograph and what you want to do is simply blur it as much as a point where you lose all details so in this case we will take it as much as maybe 6 pixels and we’re shedding all of the detail within the photograph and what the blur filter does is cast off excessive frequency information if you don’t know what frequency is or what it approach then investigate out that video I referenced prior within the tutorial the one about bettering textures in that video i am going into first-rate detail about what frequency is the way it works and what you are able to do with it so watch that video i’m inserting a hyperlink proper below in the description but anyway simply know that Gaussian blur gets rid of element high frequency expertise 6 pixels i’m going to press ok i’m gonna allow now the 2d layer and with this sediment we will follow another filter and we will use the high-go filter high-pass is the opposite of blur it removes the low frequency expertise so it most effective maintains the small print and texture of a layer so i’m gonna go into filter different excessive move and i will enter precisely the equal price 6 pixels and i’ll press ok then i will alternate the mixing mode of this deposit to blender with the layer beneath and i’m going to pick linear mild after which convey the opacity all the way down to 50% and that almost gives us the same picture that we began with i’ll permit the portrait layer and if I disable the attention icon for team you’ll discover that it can be very nearly the identical photograph is fairly special and that is seeing that we use the filters to separate every frequency and put it in its own layer then we use the blending mode to combine the frequencies and give us the common snapshot back so now we have now the feel on one layer and the colours and one other layer and we will alter each and every layer independently to melt the dermis and the intent that I went through that lengthy rationalization is so that you understood what those filters did at the back of the scenes now that you already know what these filters are doing we’re gonna change the settings so that we will get smoother dermis and reduce the depth of the epidermis texture and we will start with the blur filter within the blur layer as a way to click on the Gaussian blur label and perhaps broaden this to about 8 pixels so we get a so much much smoother transition of her dermis tones and i will double click on high-move and lower it so it reduces down to 3 pixels and press good enough and that is the nice thing about working with shrewd Objects that you could perpetually come again and make changes later so these settings on work i will consistently modify them so with the team selected i am just gonna double click on the name to rename it and i’ll call it skin softening and i will create a layer masks but i’ll preserve alt as I click on the layer masks icon which is choice on the Mac to create a black masks which hides the whole thing in that group and i will be able to quite simply paint with white on that masks to disclose the effect like so so become aware of how i am simply revealing that epidermis softening influence on these areas that is very similar to what we did in the prior illustration and i’m going rather quickly right here but obviously take your time for your snapshot and i’ll click on on the eye icon with the intention to see that before within the after and you often have already noticed one factor that I did not do my Spot remedy Brush software adjustment and that is why i have a blemish here and one of the most blemishes on her nostril so do not forget this can be a clever object we will at all times come again and edit it so if I double-click on the wise object it’s going to open up in a new tab and i will be able to do the equal system create a brand new layer decide on the Spot treatment Brush software make certain that lightin is my mode and i can simply paint away some of these better blemishes that you just see here her nose and on other areas of her dermis the white on her mouth so I converted it to the darken mode on the spot healing Brush instrument i’m going to rapidly dispose of these white dots then i will close a clever object reserve it and those changes are utilized to the photograph do not forget these wise objects are linked so the updates will happen on all occasions of those duplicated smart objects and that is the fine thing about working with smart objects which you can constantly come back and edit your adjustments that manner you get the exceptional tender dermis as feasible once more these changes are all subjective do what works great to your photograph however by and large speaking you do not need to push the outcome too a ways however that’s as much as you to make a decision what I want to do now could be show you the free motion that I recounted previous within the tutorial this motion will support you create all these layers and folder just with one single click on so examine out the hyperlink down below within the description so where to down load the file when you download your file into your pc deliver it into Photoshop and the way in which that you’d do that is by going into the moves panel that you may click on this icon or go into the window menu in actions and click on on the flyout menu and decide on load movements and cargo that etienne file onto your computer and also you must see a dermis softening action you understand you must do is hit the play icon the action will run Photoshop will ask you ways much blur you want to add so I feel I added six pixels to start with in this video so press adequate then the motion will ask you how much excessive move you wish to have so as to add i’ll go to 2 in this case press good enough and you’ll be able to have instructional materials on what to do next paint with white using the brush instrument on the corporations layer mask to reveal the softening result and that you can examine out extra of my tutorials on my internet site p.C.Viscom and this is who i’m i’m going to press stop and i can proceed working with the brush software i can paint with white on the team’s layer masks to disclose the dermis smoothing result when you broaden the staff you will see the layers on the action created and you will see a further layer that i did not show within the tutorial this blur at its layer makes it possible for you to locally excellent-tune the blur in other words which you can blur small parts of the picture without affecting the leisure of the snapshot let me exhibit you how it works decide upon the lasso software in the choices bar add feather the feather determines how smooth the brink of the choice can be I don’t want the sharp determination so i’m going to use a feather of 10 pixels then make a selection around the part of the face that you wish to edit i will choose her forehead then go into filter blur Gaussian blur and increase the blur unless you may have a delicate soft area without blotches of color and press ok then i will press control D on home windows command D on the Mac to deselect i will fall down the moves panel and disable the blur edits layer to exhibit you the before and the after you will see how so much smoother the dermis appears on this field in a real project i might ought to go and high-quality-tune one of the edges of course but I suppose that you just get the concept how this works and incidentally let me be aware of within the comments beneath what you believe about these techniques should you like them then click on on that like button now additionally if you are manufacturer new to the Photoshop coaching Channel then remember to click on that subscribe and notification buttons that approach you are notified whenever I submit a new tutorial and you don’t miss any new Photoshop hints and tricks also if you happen to loved this video then do not forget to determine out my tutorial on creating skin texture from scratch is one among my 90 2nd Photoshop pointers i’m going to location a hyperlink to that video correct beneath within the description thank you so much for watching and i will speak to you again in the subsequent Photoshop tutorial
0 notes
Text
Easily Smooth and Soften Skin In Photoshop | High-End Retouching Techniques [FREE Action Included]
New Post has been published on https://hititem.kr/easily-smooth-and-soften-skin-in-photoshop-high-end-retouching-techniques-free-action-included/
Easily Smooth and Soften Skin In Photoshop | High-End Retouching Techniques [FREE Action Included]
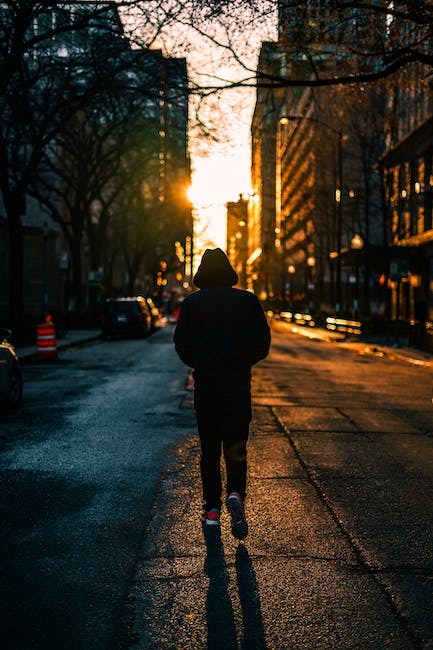
Hi welcome again to the photoshoptrainingchannel.Com i’m mrs. Ramirez on this video i will exhibit you the way to delicate epidermis in Photoshop you’re going to gain knowledge of two strong epidermis softening approaches both of these tactics are non-harmful which means that that you’ll be able to be competent to come back back and make changes to your edits at any time however most importantly these approaches depart the skin texture intact so that you can offer you a wonderful tender skin with out it looking too soft or too fake the primary process will take knowledge of a brand new characteristic of Photoshop CC if you’re in an older version of Photoshop then do not worry the 2nd system will work with Photoshop cs6 it does require just a few extra steps however it offers you total manage over your photo and your skin softening effect it makes sure that you simply stick around into the very end of the tutorial in view that i’ll be sharing with you a free Photoshop retouching action this action will enable you to use the 2nd method with just one single click with the intention to start smoothing skin proper away k let’s get began that is the portrait that we’re going to work with once more this primary illustration is for the contemporary variation of Photoshop Photoshop CC if you are working on an older variation then which you could speedy ahead to the 2nd technique and you can follow together with that so with this residue chosen i’m without difficulty going to press ctrl J command J on the Mac to copy the layer this step just isn’t fairly integral however it’ll help me exhibit you a earlier than and after when we’re done now earlier than you soft the dermis of any portrait what you have got to do is eliminate significant blemishes that the skin smoothing manner would possibly not do away with in the event you zoom into your portrait you may see some greater distractions she truely does not have too many probably this one right here maybe this blemish there it is now not a lot however we’ll cast off it now that way matters are so much less complicated once we apply the dermis smoothing method so what you wish to have to do is create a brand new layer to work and under strucked capability we’re gonna make all our adjustments in this layer i am gonna rename it and i will call it Spot treatment considering that i’m going to use the Spot treatment Brush device with that layer selected go into the Spot cure Brush device found within the tools bar make certain that sample all layers is selected and earlier than we simply begin working with it I wish to show you one factor i will use a right bracket key on the keyboard to make the brush bigger you will discover the preview there that suggests you how giant your brush is when you do not see that that is on the grounds that the caps lock secret’s enabled so if you happen to see a crosser like that one just tap on the caps lock key to disable it and the comb preview comes again so what I need to show you is how most folks work with this tool most humans simply work with this device with the ordinary surroundings become aware of that the mode is about to average and that simply means that Photoshop samples pixels relying on the place you paint and probably that that is a really just right job sadly in the event you zoom in you’ll be able to notice that mostly it destroys the feel of the dermis and that’s because we’re focusing on all pixels and ordinarily we do not want to do that we wish to goal unique pixels so i’m going to undo these changes and what you need to do is select your Spot remedy Brush software then in the mode decide upon either darken or lighten the mode that you simply decide upon is determined by the blemish or distraction that you’re looking to put off if the distraction is starker than the epidermis tone pick lighten if the distraction it can be brighter than the epidermis tone pick darken so let me show you ways this works i’m going to click on lighten and i’m just going to disposing of some of these distractions and observe that as I do this i am now not destroying the highlights of the picture i’m just eliminating the darker pixels so i am taking away the darker blemishes and preserving the intense areas to be able to permit me to maintain the epidermis texture so i will double click on on the hand instrument to suit the image to display and i will simply take away one of the most darker blemishes within the snapshot quite swiftly right here she honestly does not have too many i am simply displaying you simply in the event that your image has larger blemishes that the skin smoothing manner won’t eliminate so i am simply putting off a few of these blemishes and that is the earlier than and the after rather quickly we had been capable to wash up her face i’m gonna zoom into the corner over her mouth and there’s a white spot there that I need to do away with however watch what happens with that same process if I make my brush slightly smaller with the left bracket key and faucet it will now not do away with that distraction seeing that it’s brighter than the skintone so i do not need to lighten it alternatively I want to darken it so i’m going to prefer darken and i’m going to simply eliminate that blemish and realize how I didn’t have an effect on the shadows within the darker pixels only the brighter pixels and that’s why I propose using modes due to the fact that you will eliminate handiest the pixels that you are concentrating on and i will be able to switch in between them i will be able to go back in to lighten and just might be dispose of a few of these spots however this is fairly no longer fundamental the epidermis smoothing manner will eliminate these spots i will double click on on the hand device again to fit the snapshot to display and you can find the earlier than in the after so when you eliminate the greater blemishes out of your image what you must do is decide upon your Spot healing layer maintain shift and opt for your portrait layer and correct click and choose convert to shrewd object with a purpose to location the two layers into a shrewd object a shrewd object is a container they are able to hold a number of layers and that you could observe changes distortions and filters non-destructively which means that that you may at all times come again and edit them at any time so with this sediment chosen i go to go into filter camera uncooked filter and the digital camera raw filter enables you to regulate the tonality colour in small print of a photograph and that is what we’re gonna use to create lovely tender dermis we’ll use one of the vital manufacturer new sliders in Photoshop CC the feel slider which will also be found in the general panel right above the D haze and readability sliders i’m going to zoom in so that you could see how it works the feel slider allows you to increase texture or decrease texture so detect that when I cut back the texture it smooths out the skin I might now not wish to go the entire technique to the left might be at about negative seventy five and if that’s still not gentle ample for you that you could alter the readability you deliver the readability back down to the poor values it would also smooth out the skin I commonly do not wish to go too a long way with the clarity and if you wish to be taught more in regards to the texture and the hay sliders then i’ve a video on adjusting texture and Photoshop I give an explanation for in a lot of detail what these sliders accomplish that I particularly endorse staring at that video i will place a hyperlink down under within the description however anyway while you set your texture down you could want to go into the element tab and just add a bit bit of sharpening just so that you simply get a few of that skin texture back also here is a trick for you in case you maintain alt alternative on the Mac and click on that protecting slider detect how the snapshot turns white that signifies that the entire picture is being affected by that sharpening outcomes if I drag to the proper best the areas in white might be affected so perhaps which you can regulate that accordingly depending to your portrait in this case it particularly will not be gonna make a colossal difference so i’ll go away it at zero but that tip may be relatively quite valuable for different forms of graphics so once you will have set your sharpening that you could just press ok and Photoshop applies that outcomes but it applies it to the complete picture and we don’t want that we only want to observe to exact parts of the photo so what we’re gonna do is click on on the layer masks for the intelligent filter and we will then press ctrl I command I on the Mac to invert or you could click on the invert button in the properties panel to invert the masks discover now how the masks is wholly black that implies that the whole lot is hidden with a mask black hides white exhibits in the exceptional stages of gray give you one of a kind phases of transparency so what i am gonna do now is with the comb software i will ensure that my foreground colour is about to white which it’s and i am just gonna paint in the areas the place I want to follow the epidermis smoothing results so no longer every or just within the areas that require a little bit little bit of smoothing and so one can rapidly soft out her dermis we are going to be competent to see various detail and all that is non-destructive we are able to edit it so if I make a mistake i can just paint with black and cast off the effect from that field switch back to white and i’m switching between white and black via clicking on this arrow you might additionally press the X key on the keyboard or swap backward and forward and simply paint with white in the areas the place you wish to have the effect i will zoom in simply exhibit you one more thing you would additionally use a mode with the digicam raw filter much like we use with the Spot therapy Brush software and if you wish to use a mode that you would be able to double click on this icon here which brings up this window this window is rather a lot like the fade command it permits you to carry down the opacity of the filter and it also makes it possible for you to change the mixing mode for you to alternate the blending mode to lighten and become aware of how so much brighter the highlights get so if you want to preserve the customary highlights exchange the blending mode to lighten i’m gonna maintain it at usual given that I think it appears higher in my case and opacity at a hundred works I just desired to give you that alternative if your portrait requires it i’m going to press adequate and we’re again to where I used to be before what i’m gonna do now could be with no trouble double click on on the hand tool and click on on this eye icon so as to see that before and the after much a lot better also due to the fact all this is non-harmful you can continually double click on the camera raw filter label and make additional adjustments that you can are available and alter how so much texture we’re gonna have how a lot sharpening you are going to use press adequate when you are achieved and Photoshop applies these new adjustments to your file as soon as again earlier than and after and as you’ll find it is a very strong procedure for smoothing skin in Photoshop I highly advocate that you use it what i am gonna do now is show you learn how to do something similar in an older version of Photoshop it’s gonna require just a few more steps and i will furnish an motion you can quite simply run and follow the effect your pix to save you a little bit little bit of time first i’ll exhibit you ways the technique works after which i will exhibit you where that you may down load the free motion the first step is to prefer the portrait layer proper click on and select convert to clever object and i’m going to press ctrl J on windows command J on the Mac to replicate that layer one time and i will do this once more to replicate it a 2nd time so now i have three intelligent objects it’s foremost to note that while you replica a clever object they continue to be linked to the customary so in case you change the contents of 1 it’ll trade the contents of all and that’s gonna be fairly fundamental later on in the tutorial for now i’m going to situation these sensible Objects into a gaggle so i will pick them both with the aid of maintaining shift and urgent manage G on home windows command G on the Mac and i’m going to expand the team so that i will be able to see the contents and i’m going to work with the bottom photo first and even though i don’t ought to i’m going to disable this layer as a way to be certain that i’m best working with this primary to placate and what i am gonna do is i’ll apply a filter i’m going to practice the blur filter so i’m going to identify this sediment blur then go into the filter menu and prefer blur Gaussian blur and that is going to blur my photograph and what you want to do is simply blur it as much as a point where you lose all details so in this case we will take it as much as maybe 6 pixels and we’re shedding all of the detail within the photograph and what the blur filter does is cast off excessive frequency information if you don’t know what frequency is or what it approach then investigate out that video I referenced prior within the tutorial the one about bettering textures in that video i am going into first-rate detail about what frequency is the way it works and what you are able to do with it so watch that video i’m inserting a hyperlink proper below in the description but anyway simply know that Gaussian blur gets rid of element high frequency expertise 6 pixels i’m going to press ok i’m gonna allow now the 2d layer and with this sediment we will follow another filter and we will use the high-go filter high-pass is the opposite of blur it removes the low frequency expertise so it most effective maintains the small print and texture of a layer so i’m gonna go into filter different excessive move and i will enter precisely the equal price 6 pixels and i’ll press ok then i will alternate the mixing mode of this deposit to blender with the layer beneath and i’m going to pick linear mild after which convey the opacity all the way down to 50% and that almost gives us the same picture that we began with i’ll permit the portrait layer and if I disable the attention icon for team you’ll discover that it can be very nearly the identical photograph is fairly special and that is seeing that we use the filters to separate every frequency and put it in its own layer then we use the blending mode to combine the frequencies and give us the common snapshot back so now we have now the feel on one layer and the colours and one other layer and we will alter each and every layer independently to melt the dermis and the intent that I went through that lengthy rationalization is so that you understood what those filters did at the back of the scenes now that you already know what these filters are doing we’re gonna change the settings so that we will get smoother dermis and reduce the depth of the epidermis texture and we will start with the blur filter within the blur layer as a way to click on the Gaussian blur label and perhaps broaden this to about 8 pixels so we get a so much much smoother transition of her dermis tones and i will double click on high-move and lower it so it reduces down to 3 pixels and press good enough and that is the nice thing about working with shrewd Objects that you could perpetually come again and make changes later so these settings on work i will consistently modify them so with the team selected i am just gonna double click on the name to rename it and i’ll call it skin softening and i will create a layer masks but i’ll preserve alt as I click on the layer masks icon which is choice on the Mac to create a black masks which hides the whole thing in that group and i will be able to quite simply paint with white on that masks to disclose the effect like so so become aware of how i am simply revealing that epidermis softening influence on these areas that is very similar to what we did in the prior illustration and i’m going rather quickly right here but obviously take your time for your snapshot and i’ll click on on the eye icon with the intention to see that before within the after and you often have already noticed one factor that I did not do my Spot remedy Brush software adjustment and that is why i have a blemish here and one of the most blemishes on her nostril so do not forget this can be a clever object we will at all times come again and edit it so if I double-click on the wise object it’s going to open up in a new tab and i will be able to do the equal system create a brand new layer decide on the Spot treatment Brush software make certain that lightin is my mode and i can simply paint away some of these better blemishes that you just see here her nose and on other areas of her dermis the white on her mouth so I converted it to the darken mode on the spot healing Brush instrument i’m going to rapidly dispose of these white dots then i will close a clever object reserve it and those changes are utilized to the photograph do not forget these wise objects are linked so the updates will happen on all occasions of those duplicated smart objects and that is the fine thing about working with smart objects which you can constantly come back and edit your adjustments that manner you get the exceptional tender dermis as feasible once more these changes are all subjective do what works great to your photograph however by and large speaking you do not need to push the outcome too a ways however that’s as much as you to make a decision what I want to do now could be show you the free motion that I recounted previous within the tutorial this motion will support you create all these layers and folder just with one single click on so examine out the hyperlink down below within the description so where to down load the file when you download your file into your pc deliver it into Photoshop and the way in which that you’d do that is by going into the moves panel that you may click on this icon or go into the window menu in actions and click on on the flyout menu and decide on load movements and cargo that etienne file onto your computer and also you must see a dermis softening action you understand you must do is hit the play icon the action will run Photoshop will ask you ways much blur you want to add so I feel I added six pixels to start with in this video so press adequate then the motion will ask you how much excessive move you wish to have so as to add i’ll go to 2 in this case press good enough and you’ll be able to have instructional materials on what to do next paint with white using the brush instrument on the corporations layer mask to reveal the softening result and that you can examine out extra of my tutorials on my internet site p.C.Viscom and this is who i’m i’m going to press stop and i can proceed working with the brush software i can paint with white on the team’s layer masks to disclose the dermis smoothing result when you broaden the staff you will see the layers on the action created and you will see a further layer that i did not show within the tutorial this blur at its layer makes it possible for you to locally excellent-tune the blur in other words which you can blur small parts of the picture without affecting the leisure of the snapshot let me exhibit you how it works decide upon the lasso software in the choices bar add feather the feather determines how smooth the brink of the choice can be I don’t want the sharp determination so i’m going to use a feather of 10 pixels then make a selection around the part of the face that you wish to edit i will choose her forehead then go into filter blur Gaussian blur and increase the blur unless you may have a delicate soft area without blotches of color and press ok then i will press control D on home windows command D on the Mac to deselect i will fall down the moves panel and disable the blur edits layer to exhibit you the before and the after you will see how so much smoother the dermis appears on this field in a real project i might ought to go and high-quality-tune one of the edges of course but I suppose that you just get the concept how this works and incidentally let me be aware of within the comments beneath what you believe about these techniques should you like them then click on on that like button now additionally if you are manufacturer new to the Photoshop coaching Channel then remember to click on that subscribe and notification buttons that approach you are notified whenever I submit a new tutorial and you don’t miss any new Photoshop hints and tricks also if you happen to loved this video then do not forget to determine out my tutorial on creating skin texture from scratch is one among my 90 2nd Photoshop pointers i’m going to location a hyperlink to that video correct beneath within the description thank you so much for watching and i will speak to you again in the subsequent Photoshop tutorial
0 notes
Link
High-End Photoshop Beauty Retouching Mastery Techniques ##elearning ##realdiscount #Beauty #HighEnd #Mastery #Photoshop #Retouching #Techniques High-End Photoshop Beauty Retouching Mastery Techniques Learn Non-Destructive Professional Beauty Retouching Tools and Techniques in Photoshop Do you want to know how you can get more higher paying clients? Well then you're in the right place. I'm Sheldon Evans, a professional photographer and retoucher who has been in the industry for over 11 years. I know how difficult it can be to find high quality photography education online and that's why I have decided to create this course. A lot of photographers jump into the working field without fully learning how to retouch their images.This results in photographers missing out on higher paying clients simply because their work does not meet the standard of the professional industry. By improving your retouching skills, not only can you save money by not having to hire a retoucher and give up some of your creative process to someone else, but you can also then retouch for other photographers and earn extra income. There are a few things you should know about retouching, it's not about making the image look fake and smooth. We need to learn how to retouch non-destructively so that we preserve the quality of the image. In this course you will learn: How to non-destructively retouch images How to clean up skin while preserving the texture How to enhance the eyes and lips How to do frequency separation and dodge & burn How to professionally color grade your images How to perfect image sharpening for social media You will get over 35 video lessons, hours of content and high resolution RAW files to practice on!As a FREE BONUS you will get photoshop actions to speed up your workflow! In the course nothing is left to chance, we cover each step of the retouching process to ensure that you have a thorough understanding of every aspect by the end. If you're passionate about photography then you'll love this course and become a world class retoucher by the end. Let's get your work on the cover of magazines! Enroll now and I'll see you inside the course!- Sheldon #photoshop #retouching #face #beauty #tools #techniques Who this course is for: This course is for everyone interested in Photoshop and particularly retouching! If you've never opened Photoshop before or if you're a professional, there will be something for you to learn in this course. 👉 Activate Udemy Coupon 👈 Free Tutorials Udemy Review Real Discount Udemy Free Courses Udemy Coupon Udemy Francais Coupon Udemy gratuit Coursera and Edx ELearningFree Course Free Online Training Udemy Udemy Free Coupons Udemy Free Discount Coupons Udemy Online Course Udemy Online Training 100% FREE Udemy Discount Coupons https://www.couponudemy.com/blog/high-end-photoshop-beauty-retouching-mastery-techniques/
0 notes
Text
Photo Retouching in Photoshop – High End Professional Skin Retouching
We often consider photo retouching as the villain in terms of photo editing. That’s because, it sometimes may show the face of your image too cakey or artificial. It’s like a chief problem graphic designers face occasionally.
For that reason, it is important to have high end retouching. And if you feel crucial about the matter, how to do so, what’s the procedure, how is the concept, then don’t panic. I am here for you with a grasp of comprehension about it.
Image Retouching proficiently
When you start a procedure of photo retouching, make sure you have the updated version of Photoshop. It can help you to edit your intended image in an error free way. I prefer the Photoshop CS6 which is an edible option to work with.
It is sure that I will explain about the aspects of photo retouching each and every part of your image. But before that, I am going to show you a step-by-step procedure on how you can actually retouch your photo.
Some basic need-to-know steps whenever you go for retouching any image:
Step 1:
Be ready with your Adobe Photoshop CS6 when you task it for the first time. This is because you can have your first trial at ease. After you go there, you will see an option of open file on the left bar. Select the image you want to retouch and open it there.
Note: If you don’t have the Photoshop CS6 version, then you may use the Photoshop CC or Photoshop CS4. But make sure you have an updated version.
Step 2:
Now go to the toolbar on the right side and make a copy of the layer. You can take initiative in your work, once you select the copy. Then select the particular area, where you want to do the retouching.
How to select the area? For that, you have to use the pen tools, located on the left side. By this way, you can select the path area.
Step 3:
After it, you are to use the option ‘Mask’. You will see it on the top of the bar of your window. Click on the mask selection, a box will appear there. Now, use and adjust the mask that will be good for your photo.
Actions and Techniques
When it comes to retouching an image, it includes beautiful and natural sculpting. In that situation, high end retouching gives that privilege. Such editions not only done for a single part of an image, like- face, body, hair, etc. You must consider the whole phenomenon of retouching on the viewed image.
Here I have specified some retouching substitutes shown as alternatives. If you consume these basic retouching ideas, you can go for hard retouching affirmatively.
Skin Photo Retouching :
Skin retouching in Photoshop carries a significant part, because it is what catches the eye of every observer. Here, what the designer firstly does is, remove the blemishes, tone out the skin, give authentic texture to the delicate skins.
The tool that is required for such retouching is the Brush Tool. With the help of it, you can paint any part or hide it. For example, if there are any blemishes over skin, you can paint those with it’s actual skin color. And don’t worry about it’s extra effects. The tool ensures a natural look as you are using a high end retouching.
Hair Image Retouching :
Like the retouching skin, retouching hair also accumulates it’s specific tool by which you can retouch the hair of your image simply. Make sure you are prepared with the Clone Stamp Tool, because it helps to fix any kind of hair disturbances.
With this tool, you can paint any kind of excess flying hair and add a mask to that part. Then do some unnecessary paintings over those hair which are shuffled nicely. Now you can refine your task with the pen pressure and have a check lastly. Your hair retouching process has been done successfully.
Highlight Image Retouching :
Sometimes we don’t consider retouching highlights as a major work. But you must know that it plays a great role when it comes to revealing a natural look to your image. Especially toning up is done efficiently with this kind of retouch.
To do this task, at first open your image, then click on adjustments, and from there choose highlights. Now, you are to move the amount slider to adjust the lighting. Or what you can do is, give the highlight value on the percentage box. If you want to make more additional adjustments, then you can do that by clicking on Show more and get better options to control.
Headshot Photo Retouching :
When we do headshot retouching, we have to consider several accumulations. Such as- eyes, skin softening, eye bag removals, removing hotspots, sharpening the image, dodge, burn, hair spray removal, etc. The tools that are required for such retouching e.g. Brush Tool, Layer Mask Tool, Clone Stamp Tool.
You can use the Brush Tool to erase the outer parts, and give the iris of your eyes darker texture by lowering the exposure. Again, the Clone Stamp Tool helps to tone up the skin required for headshot. Then you can sharpen up the image and remove hotspot following a processed way.
Final Verdict
Till now, you must have understood how important photo retouching is, especially when you work as a professional designer. Why the high end retouching is demandable because it assures to make your image real and natural.
If you want to retouch your image with perfect combination, then I will suggest you to go for the high end ones. But also keep in mind that you follow the proper ways or methods. My article will help you for sure on that term.
0 notes
Video
youtube
2 Action Free Dark Skin Retouching Tutorial High-End Retouching Saad bbc...
0 notes
Photo

High-End Skin Retouching with Action in Easy Way in Photoshop in Urdu Hindi http://ehelpdesk.tk/wp-content/uploads/2020/02/logo-header.png [ad_1] download png or background : htt... #adobelightroom #adobephotoshopfacefinishing #adobepremiere #advancedskinretouching #affinityphoto #colorgrading #digitalphotography #dslr #easilysmoothandsoftenskininaphotowithphotoshop #facefinishing #facesmothinps #filmmaking #finalcutpro #frequencyseparationphotoshopsteps #hajinewton #high-endskinretouchingu0026sculptinginphotoshop #howtoquicklysmoothskinandremoveblemishesu0026scars #imageediting #iphonephotography #newtonclicks #nightphotography #photography #photoshop #photoshopretouching #photoshopskinfilterfree #portraitphotography #simpleskinsmoothing #starttofinishhigh-endskinretouching #themostimportantskinretouchingtrickinphotoshop #videoediting #videoproduction #videography
0 notes
Last Seen Blogs


