#skin smoothing plugin photoshop
Text
Photo retouching services
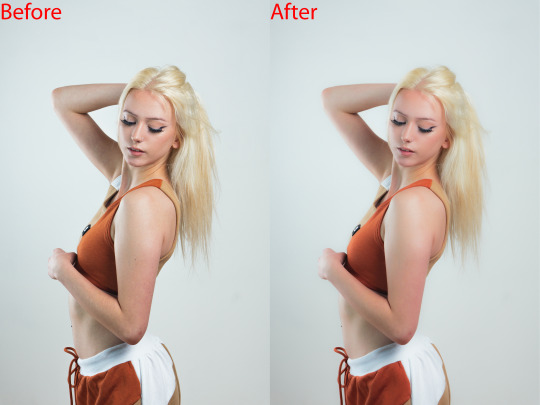
Photo retouching services are offered by many companies and freelancers, and they involve editing digital images to improve their appearance or fix any flaws. These services can range from basic adjustments like color correction and exposure balancing to more advanced techniques such as removing blemishes, reshaping the body, or even adding or removing objects from the image.
That's correct! Photo retouching services encompass a wide range of editing techniques to enhance the visual appeal of digital images. These services are commonly used in various industries, including fashion, advertising, e-commerce, and photography.
Basic adjustments typically involve correcting exposure, color balance, contrast, and sharpness to improve the overall appearance of the image. More advanced techniques may include skin retouching to remove blemishes, wrinkles, or scars, as well as body reshaping to slim or enhance body contours.
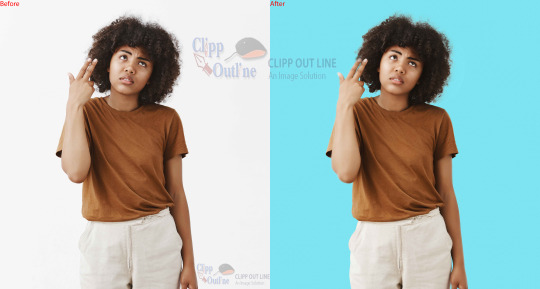
Other advanced retouching services may include background removal, adding or removing objects or people from the image, and composite image creation. These services are often used to create visually stunning images for advertising, marketing campaigns, or personal projects.
It's important to note that photo retouching services should be done with care and attention to detail to maintain the integrity of the original image while enhancing its visual appeal.
#affinity photo high end retouching#skin smoothing capture one#skin retouching and color grading in photoshop#pixelmator pro skin retouching#face retouching in photoshop cc plugins#one click skin retouching free photoshop action#affinity photo face retouch#capture one skin smoothing#capture one portrait retouching#capture one pro skin retouching#capture one skin retouching#capture one face retouching#masking photo editing lightroom#masking in adobe camera raw#skin smoothing plugin photoshop#skin retouching camera raw#skin retouching capture one#skin retouching and photo masking service
0 notes
Text
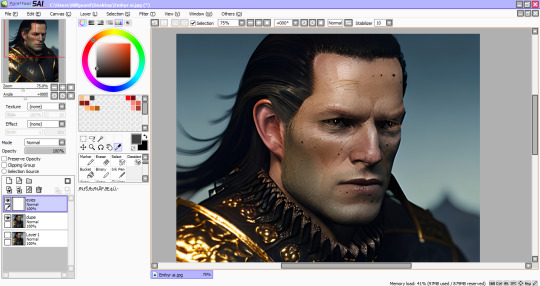
How to repair eyes generated by AI with Photoshop and PainTool SAI
....the tygerlyla way (complicated and tedious) 😅😅😅😅😅
Ai art is astounding! Still, it can't compare to the hard work and beauty of art created by the artist, not to mention the time, sweat, tears, and -maybe some- blood. And Ai art also requires human touch and patience- training the program to come up with the character you want it to replicate... and then it generates those weird eyes, misshapen hands, and speckles that have no right to be there.
So here are my procedures... Be warned: the post is lengthy!
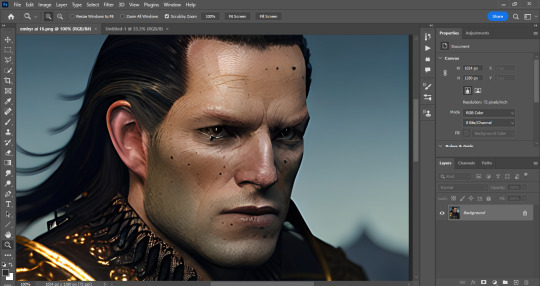
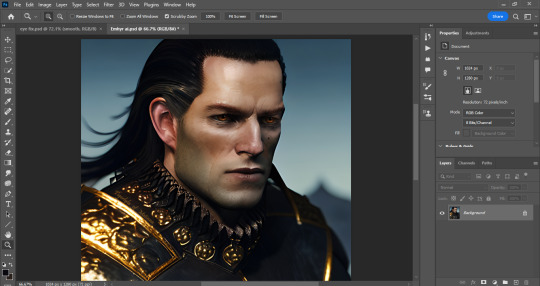
Choose the image and open with photoshop. Brace yourself for the task of fixing that (gorgeous) face.
Fortunately the eye on the left has the correct shape, so lasso that baby, copy paste, and flip it. Then use the perspective warp and fit it to the other side.
Erase the stuff you don't need until the other eye is a close match and looks better size wise. Flatten the image and create a new save.
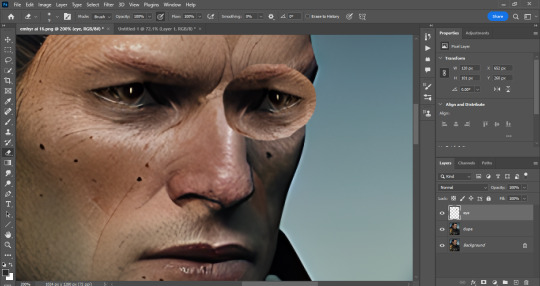
Now boot the new save with the new eye on PainTool SAI. This is where I do my main repairs.
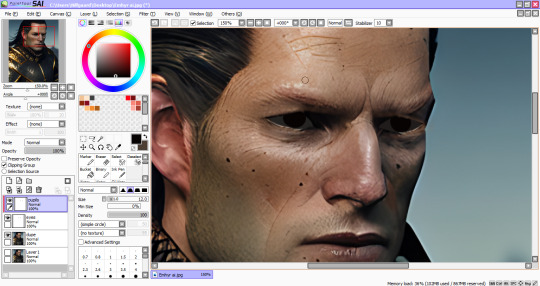
Create layers for the sclera, iris and pupils. Then start painting over the weird eyes with dark flats first.
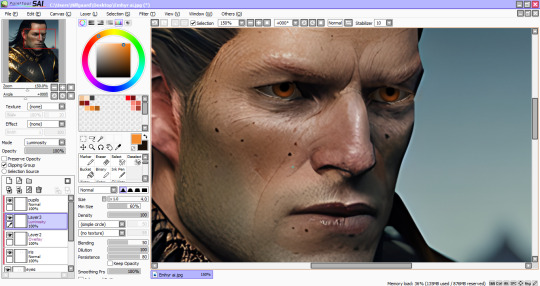
For his warm amber peepers, clip a new layer, change the layer mode to Overlay and airbrush the orange at low density (flow)- about 30-40, and do a crescent shape brush strokes on the pupils. Blur the ends and repeat. Then clip another layer (Luminosity or Linear Dodge on PS) use a yellow orange color and create a lighter crescent.
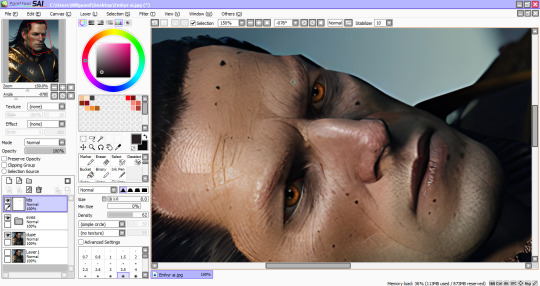
I actually work with my canvas at this angle, easier for me to add details. Create another layer for fixing around the eyes. Eye dropper tool helps matching the colors of the fixed eyes and the ai image. Lots of blurring and shadows going on here. Once satisfied with the repairs, save the image and return to PS.
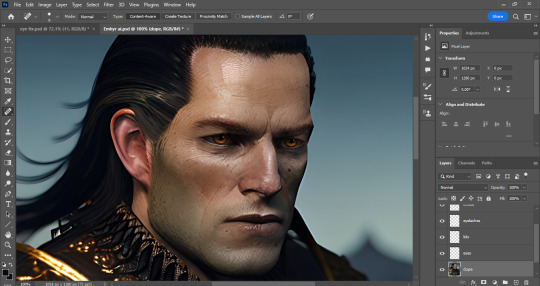
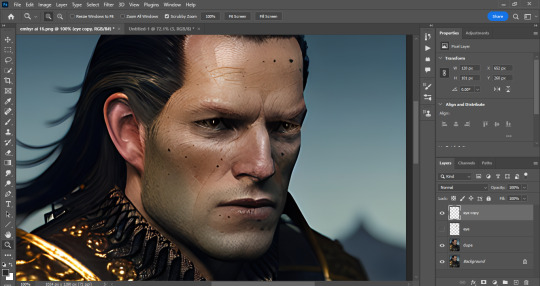
Now we fix the rest of him with a healing brush or spot brush tool, and zap those excessive moles. I also use a body hairbrush to create those thick eyebrows (after making em, change the layer to soft light to blend with the image's colors)
And this is where I use all available photo enhancement tricks at my disposal (skin smoothing plugins, 3LUTS, Liquify, etc.)
And it's done!

Thank you for making this far! Hope this helps fellow artist dabbling in ai programs.
#emhyr var emreis#ai art#stable diffusion#wip#witcher 3#photo edit#photoshop#paintool sai#artist on tumblr#art tutorial#art help#art tips#photoshop tutorial#paintool sai tutorial
36 notes
·
View notes
Text
How to smooth skin in Photoshop with free neural filter
Adobe Photoshop Tutorial video shows how we can smooth skin and smooth face by using Free Download Photoshop Filter. In this tutorial, we will go through how to make skin smooth using a plugin, Neural Filters. We can go to Neural Filters to download this filter for free. Then, we can apply skin smoothing filter into photo that has pores on face with few clicks. Steps are easy to follow for…
0 notes
Text
AI Photo Enhancers: Transforming Your Images with Artificial Intelligence
In the age of digital photography, capturing moments has become easier than ever. However, not all photos turn out perfect. Whether it’s low resolution, poor lighting, or other imperfections, we often wish we could enhance our images. That’s where AI photo enhancers come into play. These powerful tools leverage artificial intelligence to improve and transform your photos. Let’s explore some of the best AI photo enhancers available in 2024:
Remini: If you’re looking for an all-in-one solution, Remini is a top choice. It offers many AI-powered features, including upscaling low-res images, restoring old and blurry photos, denoising grainy images, and color correction. Remini can even beautify portraits and generate different versions of yourself. While the free version has ads, the paid plan provides a more robust experience.
Clipdrop by Stability.ai: Clipdrop is a fantastic web service that enhances photos using AI. It’s free to use and offers features like object and text removal, image upscaling, relighting, and background replacement. The “Uncrop” tool lets you expand images, and the new “Reimagine XL” feature creates multiple versions of an image.
Lensa: Lensa focuses on portrait enhancement. It automatically detects faces and applies adjustments like skin smoothing, eye brightening, and teeth whitening. It’s a mobile app and offers free and premium features.
PhotoApp: PhotoApp combines AI with manual editing tools. It provides features like automatic color correction, noise reduction, and sharpening, and you can fine-tune the adjustments to your liking.
Fotor: Fotor offers a user-friendly interface and various AI enhancements. It includes features like one-tap retouching, filters, and effects. While the free version is robust, the premium version unlocks additional tools.
Let’s Enhance: As the name suggests, Let’s Enhance specializes in upscaling images. It uses AI algorithms to increase resolution without losing quality. You can enhance old photos or enlarge small images with impressive results.
Adobe Photoshop: While not exclusively an AI tool, Photoshop integrates AI features. Its “Enhance Details” function improves image sharpness and detail. Photoshop remains a powerful choice for professional photo editing1.
Topaz Photo AI: Topaz offers various AI-powered plugins, including Sharpen AI, DeNoise AI, and Gigapixel AI. These tools excel in sharpening, denoising, and upscaling images1.
And now, let’s dive into the specifics of the FotoTweak app:

FotoTweak: AI Face Swap and Photo Enhancer
AI Art Generator: Craft unique and captivating art in seconds with FotoTweak’s AI generator. Type in your text or upload a photo to start generating AI art.
Photo AI enhancer
AI Filters: Add a whimsical touch to your photos with neon, pop art, and anime styles.
AI Headshot Generator: Reinvent your selfies with professional, fancy, or casual styles.
Turn Photos into Art: Transform images into various artistic styles like anime and pixel art.
AI Tattoo Generator: Design unique tattoos effortlessly.
Anime and Cartoon Yourself: Become an anime or cartoon character with specialized styles.
AI Face Swap Magic & AI Avatar Maker: Revolutionize your photos with advanced AI Face Swap technology.
Restore Old or Damaged Photos: Revitalize cherished memories by fixing wrinkles, scratches, and imperfections.
AI Photo Enhancer: Unblur photos, sharpen, and enhance photo quality.
Colorize Black and White Photos: Bring old black-and-white photos to life with color.
Remove Objects: Easily modify images with AI-powered editing tools.
In summary, AI photo enhancers empower us to transform ordinary photos into extraordinary ones. Whether a casual photographer or a professional, these tools can elevate your images and make memories unforgettable. Try them out and see the magic unfold!
0 notes
Text
Mastering Retouching: Essential Tips and Techniques of Photoshop
Are you trying to improve your Photoshop retouching skills? Whether you're a beginner or an experienced expert, mastering retouching techniques is critical for producing amazing effects in your images. In this lesson, we'll go over some essential Photoshop retouching skills and techniques.
Understanding the basics
Before getting into advanced retouching techniques, it's critical to learn the fundamentals of Photoshop. Familiarize yourself with the different tools and features available, including as layers, masks, adjustment layers, and blend modes. Having a solid foundation will help you understand more advanced retouching techniques later on.
Perfecting Skin Retouching.
Skin retouching is one of the most used photo editing techniques. Whether you're photographing portraits or fashion, having smooth, natural-looking skin is vital. Learn how to utilize the Healing Brush, Clone Stamp, and Frequency Separation to eliminate blemishes, wrinkles, and defects while retaining skin texture.
Mastering Color Correction
Color accuracy has a huge impact on the appearance of your images. Learn how to use Photoshop's Color Balance, Hue/Saturation, and Curves adjustments to correct color casts, increase vibrancy, and create a uniform color palette throughout your photographs. Understanding color theory can allow you to make more educated decisions when altering color in your photographs.
Enhancing Details and Sharpness
To make your images genuinely shine out, you must enhance details and sharpen key features. High Pass sharpening and Sharpening Masks enable you to sharpen certain regions of your image, such as the eyes, hair, or textures. By highlighting details, you can produce photographs that are sharp, clear, and visually appealing.
Using Advanced Tools and Plugins
In addition to Photoshop's built-in tools, there are a number of third-party plugins and extensions available to improve your retouching workflow. Explore plugins such as Nik Collection, PortraitPro, and Alien Skin Exposure to have access to extra tools and effects that will elevate your retouching to the next level.
Developing an Efficient Workflow
When editing several photographs or working under a tight deadline, efficiency is essential. Create a streamlined workflow by organizing layers and groups, using keyboard shortcuts, and generating custom actions and presets. By simplifying your workflow, you may save time and concentrate on the creative parts of retouching.
Conclusion
Mastering Photoshop retouching involves effort, practice, and ongoing learning. Understanding the fundamentals, refining skin retouching, mastering color correction, enhancing details, leveraging advanced tools and plugins, and building an efficient workflow will allow you to elevate your retouching skills and produce breathtaking, professional-quality photographs.
Whether you're a photographer, graphic designer, or digital artist, mastering retouching in Photoshop opens up new creative possibilities and helps you to bring your ideas to life like never before.
#image editing services#outsource image clipping path#image retouching#image background removal company#product image editing services#photo retouching service#image background removal services#image editing company india#image editing#image background removal service providers#image clipping path services
0 notes
Text
Topaz clean setting fur

Topaz clean setting fur how to#
Topaz clean setting fur serial key#
Topaz clean setting fur movie#
X64 2014 Install Register Notes = - Install #39 - When prompt for a directory folder to install.
Topaz clean setting fur serial key#
Topaz Labs Clarity Serial Key Replacement. Topaz K - Topaz Labs Plug-In Bundle X86.X64 Install. Topaz Labs Plug-In Bundle Free serial keys for topaz labs. Topaz Clean is a versatile plugin for Photoshop that can clean up unwanted details from digital photos, as well as to refine textures and stylize edges. 7:30 pm on JV3NOM 0 0 LATEST VERSION Topaz Detail 3.2.0 Pro One of the main problems with HDR-type post-processing is that you can easily end up with glowing halos around your subject matter. Serial numbers for topaz clean 3.1.0 serial key: NETGATE Registry Cleaner v6.0.805 SERIAL KEYS ONLY. Topaz Denoise 5.0 serial number maker: Topaz Detail 2.0.0 serials key: Topaz Photoshop Plugins keygen: Topaz Adjust 4.0.2 keygen: Topaz Photoshop Bundle 2010 serial number maker: Topaz Adjust Hdr key code generator: Topaz Vivacity 1.31 serial: Adobe Photoshop Plugins - Topaz Detail 1.0.1 patch: Adobe Photoshop Plugins - Topaz Adjust 3.0.9. Free topaz clean plugin 3.1.0 download Windows. Topaz DeJPEG v4 Serial Topaz DeJPEG gives you the ability to improve the quality of your JPEG images. Topaz Clean v3 Serial: Powerful detail smoothing and edge stylization plug-in that simplifies advanced techniques typically used for creating smooth, flawless skin and curly, vectorized effects. Link For Win: TOPAZ 17 Plugin For Win Full Crack Show More. Topaz Clean 3.1.0 Lam min anh Topaz DeNoise 6.0.1 Khu nhieu hat cho anh Topaz InFocus 1.0.0 Giam anh mo khi chup bi rung tay Topaz DeJPEG 4.0.2 Nang mau, khu nhieu cho anh JPEG. Kesinlikle Guvenli Virus yok, kullandm FAV COM WATCH yapn lutfen Rar#39 n icinde Lisans sifreleri bulunmaktadr. ABREME 10 LIKAZOS RIKOZLINK DE MEGA Topaz Clean 3.1.0 Keygen #BEST# - Wakelet.Įvet Arkadaslar Topaz Clean 3 ile karsnzdaym. Topaz Video Enhance AI Crack Registration Key Latest Version Download.
Topaz clean setting fur movie#
Additionally, It is a powerful software that permits you to enhance your videos quality at low resolutions and capture each aspect of your assigned movie at the most astonishing possible rate. Topaz Video Enhance AI Keygen is Easy to Use and also has a fantastic interface.
Topaz clean setting fur how to#
To run a plug-in, simply select the plug-in that you would like to use, and click Run button.Download Topaz Clean 3.0.2 Installer Serial Number Download Size: 30.76 MB DOWNLOAD How to Install and Activate Topaz Clean 3.0.2 Extract the file using 7z, download 7z hereEnter Password: 1WGy4mSIIU6KKEG Quit Photoshop if its opened Run topazclean. These are the products we are referring to: Topaz Adjust 5. Topaz Labs Classic Plugin software does not collect any personally identifiable information whatsoever. Topaz Clean 3.1.0 keygen on raumenburres - Trello. Tutorial Merubah foto Menjadi Kartun Dengan Plugin Topaz Clean 3 Di.Sam Broadcaster 2013 Serial Key - browneco.System Requirements For Topaz Labs Programs.Topaz K - Topaz Labs Plug-In Bundle X86.X64 Install.Free topaz clean plugin 3.1.0 download Windows.Topaz Clean 3.1.0 Keygen #BEST# - Wakelet.Topaz Clean 3.1.0 keygen on raumenburres - Trello.
1 note
·
View note
Text
Topaz clean setting fur

TOPAZ CLEAN SETTING FUR SKIN
Topaz Clean really inspired me to be more creative with my photo processing, and I actually really like how some of these turned out. But if you want to loosen up and play with your images a little, you might really strike gold. If realism is your thing, you're probably not going to love Topaz Clean. I snapped this shot of a beautiful classic truck, and Clean really smoothed it nicely.
TOPAZ CLEAN SETTING FUR SKIN
Topaz Clean gave it new life with something of a comic book effect.Ĭlean is great for smoothing textures: water, sky, and skin are all surfaces the plugin excels at. I always enjoyed the subject of this image of a reef shark swimming beneath a dive boat-it's very Jaws-but technically, the photo is lacking. With Topaz Clean, I gave it a little bit of a watercolor effect.īack to flowers: a dreamy orchid image gets even dreamier with the help of Topaz Clean. The mantis shrimp is another sea creature that already looks like a cartoon in real life. How about some kelp! The original image had a vector-drawn look to it already. It's subtle, but you can see the difference around the eye, nose, and throat. I masked the effect to process just the iguana's head. This image of an iguana has quite a bit of texture to it. That was fun, but let's be a little more subtle this time. I also see a real opportunity to use Topaz Clean to remove backscatter. The look of this one came out a little over-the-top, but kind of fun nevertheless. I wanted to pick something that was already pretty cartoon-y, and what's more so than a Sarcastic Fringehead? Clean smoothed over just the right amount of detail, giving the flower a little bit of a softer look.įeeling emboldened by my previous two experiments, I decided to go bigger on my next one. Then I moved on to this image of a hibiscus flower. Check out how Topaz Clean totally smoothed out the image, like it just got a fresh coat of paint. The first photo I chose to process with the plugin was this image of an historic building in Curaçao. Shown below are the "Before" pics mouse over each to see the processing I applied using Topaz Clean. It would be good for retouching skin in portraits while keeping detail in hair and eyelashes, for example.īut I rarely shoot portraits, so how can Topaz Clean help me? I plugged a variety of images into Topaz Clean to find out. The result is a flatter, crisper, more vector-like image. Topaz Clean works on your photos to smooth textures while enhancing edges at the same time. Photoshop CS, Photoshop CC, Photoshop Elements.Like the rest of the Topaz suite, Clean works with quite a few common graphics-processing applications: But if you want to do something different, and spice up your photos with a cool, cartoony, vector-art-type effect, you should click over and pick it up right now. It's not going to be one of your workhorse apps that becomes an essential part of your workflow, like Topaz Detail is. You're not going to be using Topaz Clean on all of your photos. And rules are all fine and good, 99.9% of the time.īut sometimes, just sometimes, a girl just wants to have a little fun with her photos. There are lots of rules out there about how photography should look.
0 notes
Text
skin retouching and photo masking service
Welcome to Merchynt's world of creativity, where every image is transformed into a masterpiece! 🎨 Our skin retouching and Photo Masking Service are designed to elevate your photographs to new heights of perfection. Whether you're a photographer looking to enhance your portfolio, a business in need of stunning visuals, or simply someone who appreciates impeccable image refinement, Merchynt is here to exceed your expectations. ✨
Our Photo maskings is not just about editing; it's about crafting enchanting visuals that captivate and inspire. With our meticulous attention to detail and commitment to excellence, we ensure that every image tells a story of beauty and sophistication. 💫
Join the ranks of satisfied clients who have experienced the Merchynt difference. Discover the transformative power of our services and unlock the full potential of your images. 🌟 Trust in Merchynt for unparalleled quality, reliability, and creativity. Let us turn your vision into reality!
#photography#professional editing#skin smoothing#affinity photo high end retouching#high end skin retouching action#skin retouching and color grading in photoshop#pixelmator pro skin retouching#face retouching in photoshop cc plugins#one click skin retouching free photoshop action#affinity photo face retouch#capture one skin smoothing#capture one portrait retouching#capture one pro skin retouching#capture one skin retouching#capture one face retouching#masking photo editing lightroom#skin smoothing plugin photoshop#skin retouching camera raw#skin retouching capture one
0 notes
Note
Hi
I'm curious about your young Emhyr. How did you do it? Is it a mod in nexus? If it is, is there a link? Or it's all done in photoshop with filters and stuff? It looks so smooth without looking plastic! Thanks in advance.
Thanks for asking :)
It's not a mod: I can't use em (PS4). I de-age Emhyr photos using both photoshop and PainTool Sai, which can be a lengthy process.

There are filters/plugins available free to download for photoshop and I use some of them to smoothen the skin, then boot the PSD file on PainTool SAI to manually brush dark eyebrows and thicken eyelashes. But before doing all these, I start by using the spot healing brush, patch, and clone stamp to minimize or completely erase most of the age spots and wrinkles (that deep smile line on his cheek was quite the task). Then apply the finishing touches with manually brushing his brows and eyelashes and cap it off with actions/luts/filters in low opacity so that his facial pores are still visible.
If anyone is interested, I could post a tutorial. It will be lengthy, but it works for me and hopefully for you too :).
15 notes
·
View notes
Text
Genarts sapphire openfx

Windows Windows An OpenCL 1.Sapphire is the essential visual effects suite for Premiere Pro editors working in the broadcast, advertising, film, and online content creation industries. Your files have been successfully processed. Academic Discount Student discounts are available to full-time students and academic staff. Upgrade your bundle license to the Nitrate features now and start using the Premiere plugin - other platforms coming soon! Get access to all of our plugins with the Bundle License, perfect if you work across more than one editing software when in post. Instantly create the look of film on your next digital video using our FilmConvert plugin for Final Cut Pro. History of ChangesĬreate the look of film on your next stunning photograph using our Photoshop Plugin. Licenses purchased with an academic discount are not intended for commercial use and may not be purchased primarily for commercial use. The person purchasing the license must be a student or faculty member.Īcademic licenses are provide for educational use. If you wish to use a non-academic email address for your purchase, you can upload a snapshot of a current student ID with a visible expiry date. Common academic email addresses ending with. To receive a discount, please fill out the form below with your school email address and details of your academic status or enrolment. Student discounts are available to full-time students and academic staff. Generate 3D lens flares and sweeps.Īdd sparkle with glitters, glares, and glints.Sale prices as shown below.
Boris Continuum Unit: Lights Add stage lights, spotlights, and volumetrics. Apply digital makeup and more.Ĭhromakey Studio - your one-stop shop. Instantly fix flickering footage, reduce noise, and remove damaged pixels. Add film damage, soft glows, and film grain. Pull rack focus, create lens blurs, and more. Create professional Transform your footage into slick graphic novel or comic looks. Highlights Highlights include: New! Title Studio adds new presets and new 3D render options including depth-of-field. Navigate around the visible scene lighting using the built-in 3D camera system or use the host native 3D camera in Adobe After Includes a modern fully-customizable EPS files.Ĭross-host license. Highlights Features Optical Flow based image stabilization Boris Continuum Stage Light This filter uses the multiple integrated spot or point light sources, or an infinite number of host native lights in Adobe After Effects to generate cool smokey stage light stylized volumetric lighting effects. Say goodbye to setting and keyframing user-defined tracking points unlike many other image stabilization tools - an added bonus when point tracking data is unreliable. The Continuum Optical Stabilizer plug-in smooths camera motion or completely locks it down depending on your needs. You can also use a clip in the timeline as Boris Continuum Optical Stabilizer Quickly and easily stabilize shaky video. It is an age old photographic technique, which uses blurred masks and compositing tricks to bring Depending upon the selected settings, a blur or a smear is applied to the pixels that move from one frame to the next. Highlights Unsharp masking is the traditional method of enhancing image detail in a source clip. Maximize the value of your Boris FX purchase with the Upgrade Continuum is available as a Complete Collection or as individual Continuum Akin to digital make-up, the BCC Beauty Studio filter was designed to automate the process of eliminating wrinkles, pores and other undesirable blemishes from the skin-tones in Magic Sharp goes above and beyond any other image sharpening filter available today. One collection that fits every project need. Highlights Noise is a serious problem The powerful, timesaving plugins streamline post workflows with seventeen creative effect, titling, and quick fix plug-in categories. Neat Video is available as a plug-in for many popular video editing applications such as Adobe Premiere and Final Cut Pro. Please turn on javascript and reload the page. Toolfarm requires javascript to be turned on.
0 notes
Text
Topaz clean 3.1.0

#Topaz clean 3.1.0 full version#
#Topaz clean 3.1.0 license key#
#Topaz clean 3.1.0 serial number#
Desaturates the edges of your mask to help with color contamination and bleeding.
This can be a great tool for fur, whiskers, or wispy hair.
Revives the color of your foreground in weaker or more transparent areas.
Shifts the mask edge in either direction.
Comes in handy if you want to add more sharpness to a rocky landscape, or perhaps soften the edges for a portrait.
Mask AI incorporates machine learning for a more accurate mask with less refining required!.
But when nature gives you a less than perfect sky or an undesirable background, Mask AI’s background replacement lets you take back control of your work. You’ve planned and executed with military precision to get the shot. Topaz Mask AI 1.1.0 Overview Topaz Clean Filterīeing a great photographer requires a lot of techniques and tools at your disposal. Users of Topaz Clean gave it a rating of 3 out of 5. Topaz Clean runs on the following operating systems: Windows. Saat menginstall pada pilihan Install Topaz PS Bundle to:, silahkan anda ganti directory atau lokasi peng-installan ke folder plugin photoshop anda. Topaz Clean is a powerful detail smoothing and edge stylization plug-in that simplifies advanced techniques typically used for creating smooth, flawless skin and curly, vectorized effects - allowing you to quickly and easily reduce or remove the depth of detail within images, while maintaining im. Silahkan anda install file setup.exe-nya (azcompletesetup.exe).
#Topaz clean 3.1.0 serial number#
The most prevalent version is 3.1.0, which is used by 50% of all installations. Extract terlebih dahulu Photoshop Plugins Bundle x86/圆4 Full Serial Number yang sudah anda download. It was initially added to our database on. The latest version of Topaz Clean is 3.2, released on.While Topaz tools generally require better hardware than alternatives, you can trust that you’ll get the highest-quality results currently possible. The mission of Topaz Labs is to apply cutting-edge technology (lately machine learning) to common post-processing problems like noise reduction, sharpening, enlargement, and more.Topaz Clean 3.3 (latest) Topaz Clean 3.2.0 Topaz Clean 3.0.2. Review Comments Questions & Answers Update program info. Fine tune the smoothness, edges, and texture of your photos. These infections might corrupt your computer installation or breach your privacy.Īrtistic keygen or key generator might contain a trojan horse opening a backdoor on your computer.Topaz Clean 3.1.0.
#Topaz clean 3.1.0 full version#
While you are searching and browsing these illegal sites which distribute a so called keygen, key generator, pirate key, serial number, warez full version or crack forĪrtistic. Your computer will be at risk getting infected with spyware, adware, viruses, worms, trojan horses, dialers, etc Including Rapidshare, MegaUpload, YouSendIt, Letitbit, DropSend, MediaMax, HellShare, HotFile, FileServe, LeapFile, MyOtherDrive or MediaFire, Download links are directly from our mirrors or publisher's website,Īrtistic torrent files or shared files from free file sharing and free upload services,
#Topaz clean 3.1.0 license key#
Using warez version, crack, warez passwords, patches, serial numbers, registration codes, key generator, pirate key, keymaker or keygen forĪrtistic license key is illegal. Top 4 Download periodically updates software information of artistic full versions from the publishers,īut some information may be slightly out-of-date.
0 notes
Text
Affinity photo download mac

Affinity photo download mac for mac#
Affinity photo download mac pdf#
Affinity photo download mac update#
Affinity photo download mac skin#
Affinity photo download mac full#
Affinity photo download mac pdf#
Flag PDFs for PDF passthrough to ensure perfect representation of original PDF when exporting, without the need to have embedded fonts installed.Isolate, edit and duplicate spare channels with a simple click.Save and import XMP files, batch files to tag images and edit metadata.Customise saveable presets, including studio presets for the UI layout.Save documents as template files to re-use time and time again.Drag and drop layers from one document to another.Record and play macros for ultimate productivity.Undo history can be saved with the document so you can always undo your changes.Edit live filters, adjustments, effects, blend modes and masks non-destructively.
Affinity photo download mac full#
Full support for unlimited layers, layer groups, adjustment layers, filter layers and masks.
Affinity photo download mac update#
Windows hardware (GPU) acceleration (for users running Windows 10 (April 2020 update or later) with a Direct3D feature level 12.0 capable card).
Work with all standard formats like PNG, TIFF, JPG, GIF, SVG, EPS, EXR, HDR and PDF.
RGB, CMYK, Greyscale, PANTONE© and LAB colour spaces.
Open, edit and save Photoshop® PSD files.
Massive image support (100+ Megapixels).
With a huge toolset specifically engineered for creative and photography professionals, it has everything you need to edit and retouch images, create full-blown, multi-layered compositions or beautiful raster paintings, and so much more. It does not store any personal data.Faster, smoother and more powerful than ever, Affinity Photo continues to push the boundaries of professional photo editing software. The cookie is set by the GDPR Cookie Consent plugin and is used to store whether or not user has consented to the use of cookies. The cookie is used to store the user consent for the cookies in the category "Performance". This cookie is set by GDPR Cookie Consent plugin. The cookie is used to store the user consent for the cookies in the category "Other. The cookies is used to store the user consent for the cookies in the category "Necessary". The cookie is set by GDPR cookie consent to record the user consent for the cookies in the category "Functional". The cookie is used to store the user consent for the cookies in the category "Analytics". These cookies ensure basic functionalities and security features of the website, anonymously. Necessary cookies are absolutely essential for the website to function properly. It is a complete offline standalone setup of Affinity Photo 1.6.6 Mac with the direct download link. System Requirements for Affinity Photo 1.9 for MacĬlick on the button given below to download Affinity Photo 1.6.6 Mac DMG standalone setup free.
Affinity photo download mac for mac#
Technical Details for Affinity Photo 1.9 for Mac
Edit live filters, adjustments, effects, blend modes.
Affinity photo download mac skin#
Smooth and retouch skin with built-in frequency separation.New dodge burn, clone, patch, blemish and red eye tools.Got latest effects for jaw-dropping image editing.You can also Download Affinity Designer 1.6 for Mac Free. In short, for professional image editing Affinity Photo, 1.6.6 Mac is a must-have tool and we highly recommend it. Its advanced lens corrections help editors in chromatic aberration, defringe, vignette and best-in-class noise reduction. Furthermore, editors can recover detail thought to be lost by editing in an unbounded linear color space. In the dedicated pre-processing workspace, digital artists can adjust exposure, blackpoint, clarity, vibrance, white balance, shadows, highlights and much more. In image correctness and processing, it facilities with the dedicated pre-processing workspace. The comprehensive vector drawing and text editing tools allow professional image editor to bring their thoughts on the digital screens in more attractive and colorful ways. With the unique set of image editing tools, now Mac users can edit live filters, adjustments, effects, blend modes and masks non-destructively. It enables graphic ninjas to resize layers without any loss of quality and lock, hide, duplicate and merge layers easily with just a few clicks. Now it has full support for unlimited layers, layer groups, adjustment layers, filter layers, and masks. There are bulk of amazing tools and effects available in this bundle that help digital artists to take their creativity to the next level. Graphic designers, Professional image editors, and photographers can sharp their digital photography skills with this awesome image editor. Affinity Photo 1.9 for Mac ReviewĪffinity Photo 1.6.6 is an amazing image editing software for Mac users. The Affinity Photo 1.6.6 is a professional photo editing software for the Mac that offers sophisticated tools for enhancing, editing and retouching the images. Download Affinity Photo 1.9 for Mac DMG standalone setup free.
0 notes
Text
Making Normal Channels in GIMP (with njob)
Hello everyone! I was explaining how to do this in the Sims of History discord server and realized how much of this process I learned through trial and error. There isn’t really a good step-by-step tutorial about how to do this in GIMP, only in Photoshop (at least no text-based tutorials). While I use both Photoshop and GIMP for various things, I prefer to make my normal channels in GIMP. This tutorial will walk you through the process and hopefully demystify normal channels in GIMP.
Normal channels (bump maps) add additional depth beyond your mesh, which is useful for things like folds, painted on pockets, and buttons.
This tutorial is particularly for how to make Create-a-Sim items, not objects, but a lot of steps should be transferable.
You will need (all free programs):
GIMP
njob
Sims4Studio and/or CAS Tools

First, open your diffuse texture in GIMP. I often try to use the light/base texture rather than one I have colored already, but if you have already colored it and didn’t save a base, don’t worry, it doesn’t make much of a difference. Don’t use an image which has a pattern applied to it, as that will create a bump on the pattern and appear like applique or something along those lines (unless that is your goal).
I recommend doing this step after you have tested your diffuse texture image and mesh (if applicable) in the game. If you have any last minute changes to either of these, you will probably need to re-do your normal from scratch.
If your image is in layers for recoloring, or not, choose to flatten the image. Transparency isn’t helpful in making normal channels, so get rid of it so you won’t have to worry about it later.
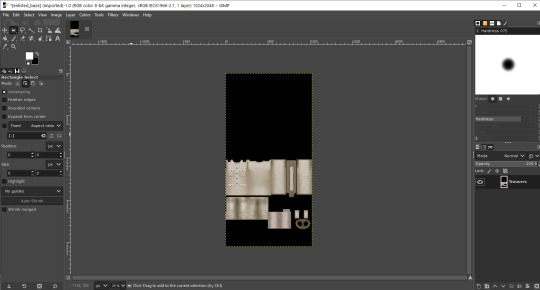
Once you have flattened it, the background usually turns either black or white. It doesn’t really matter which one, it won’t make much of a difference in njob.
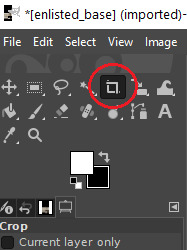
Now, select the crop tool. You can see the current dimensions of the image in the “aspect ratio” box. For a CAS items, the original will be 1024:2048, which is 1 x 2. We will need to crop the image into a 1 x 1, or perfect square.
To have your normal channel as high quality as possible, you should use 1024:1024. This will work for clothing items like full body outfits, tops, bottoms, gloves, socks, and tights (basically anything mapped in this bottom portion of the UV map). For all of these items, you must use a square and cannot crop it to be smaller. For shoes, this means a very large blank area.
For accessory items like jewelry and hats, the cropping is different. For instance, a hat would be 512:256. If you are unsure of the dimensions to use, export the normal channel on the maxis item and copy its dimensions. The following instructions will assume you are making a clothing item and not an accessory item.
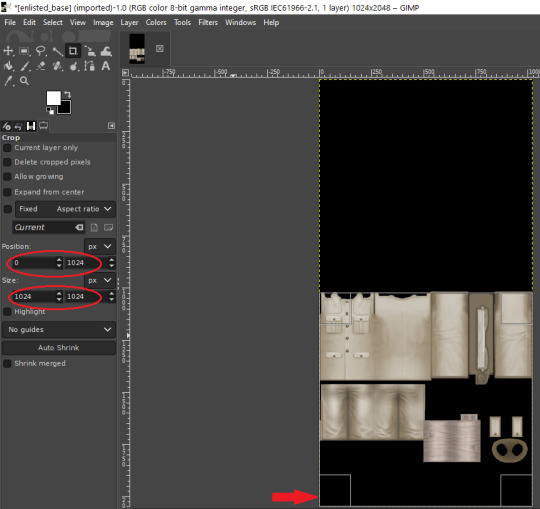
Click anywhere on the image while you have the crop tool active, then adjust your dimensions in the box to the left. You can manually type it in or drag the box and follow the size in the box as you drag.
The box should be perfectly aligned with the bottom and have no space below. If you have space below, just drag it as far to the bottom as you can. GIMP will stop you from dragging it outside of your current dimensions. If a little is sticking out at the top, that is okay. Nothing can be mapped outside of the 1024:1024 dimensions, so it is probably just bleed over or space filler that you are cropping off.
Press “Enter” on your keyboard to complete the crop.

Optional Step: If you desire, you may want to decrease the brightness and increase the contrast on your image so there will be more for njob to pick up. If you already have a lot of contrast, you may not need to do this.
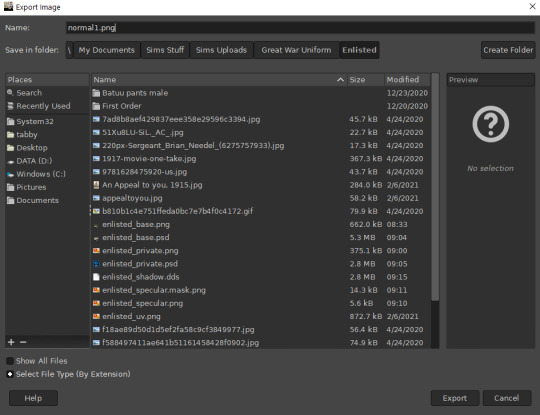
Next, export your image as a PNG or BMP. Be sure to not overwrite your original diffuse texture.
You can now close GIMP, though you will need to open it again later.
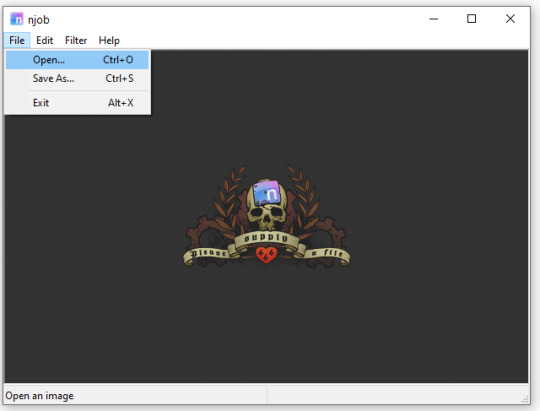
Open njob, then your saved, cropped image.
Maximize your screen so you can see what you’re doing.

Go to Filter > Diffusemap > Heightmap and select that option.
The screen will pause to load for a bit before opening up a new box.

Your image will convert to black and white and may look a bit strange. The first step is to change your “Course Detail” setting to the lowest (or close to the lowest) setting and your “Fine Detail” to the highest setting. I generally play around with the “Mid Detail” and “Scale” until I get what I want. Try to have what you want to be visible stand out, while folds should be soft and fuzzy but still somewhat distinguishable.
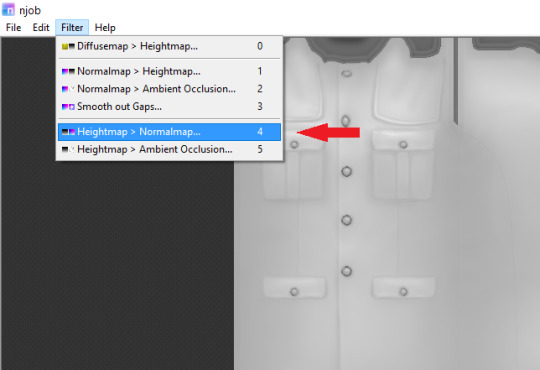
Once you have what you need, click OK and go to Filter > Heightmap > Normalmap

There are two settings, “Scale” and “Blur Radius.” Neither of them have “ideal” settings, so you will need to adjust as you need. “Scale” controls the depth of the contrast and “Blur Radius” impacts the softness of the image. If your edges are too harsh, your normal map may look odd in game.
You will probably also have lines in areas in no texture. This is normal, and I will go over how to remove those later.
Once you are satisfied with how things look, save the image as a bitmap.
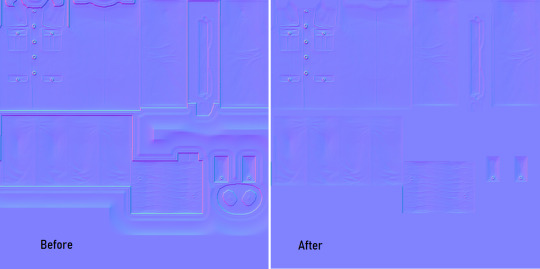
Now, open your bitmap image in GIMP. It is time to clean up the image and get rid of the artifacts. Unfortunately, unlike a specular, a normal map doesn’t have a mask to prevent bleed over onto skin or other textures. The unused areas need to be a midrange, solid grey. It is easier to edit at this step before you create your transparency.
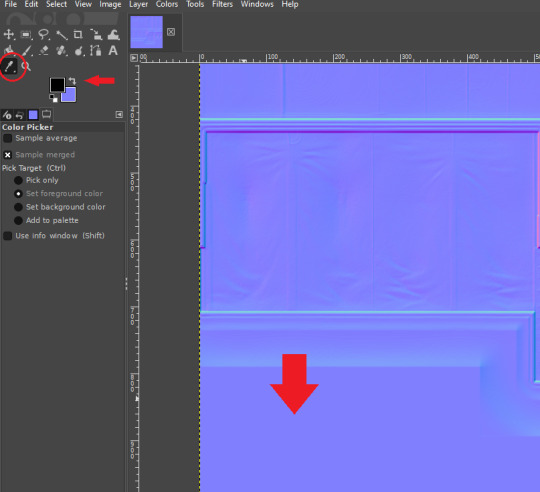
Select a midrange blue color from one of the blank areas with your color selector and make it your background color by using the arrow button between the foreground and background colors.
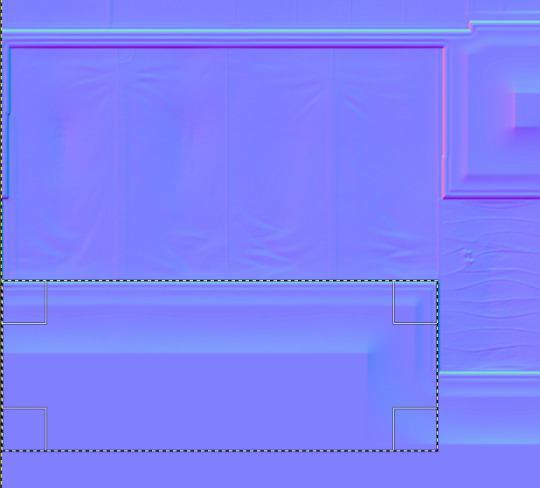
Select the areas that should be blank and delete them, which will replace the lines with a solid blue color. This would be areas around the neck, wrists and ankles, and also places like the filler beneath skirts and tops that doesn’t need texturing. Be sure to select the odd lines around the image, which are usually a bright teal or hot pink color. Those can be very visible.
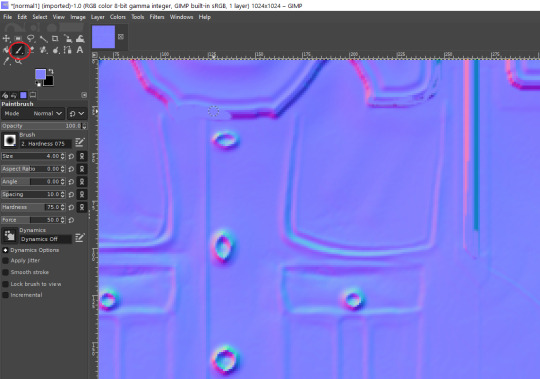
Sometimes, you may need to take your paintbrush and clean up the artifacts if they are in curved or very small areas. If anything looks too sharp, you can also use the smudge brush to smooth it out (very lightly). But don’t move anything around too much.
Once you have cleaned up your image, export it again as a bitmap. This is just so you can go back to it if you make a mistake later or need to modify it. Usually I save it as a new image, but you can overwrite the old one if you are feeling confident.
I have to point out that sometimes you can get away with not cleaning the artifacts from your image. But I have had too many issues with it in the past to skip this step.
Now it is time to make the normal map. Finally!

In the layers area, right click on your single layer and add an alpha channel to it. There is also a small button at the bottom you can use to add an alpha channel. You will need this transparency for the next step.
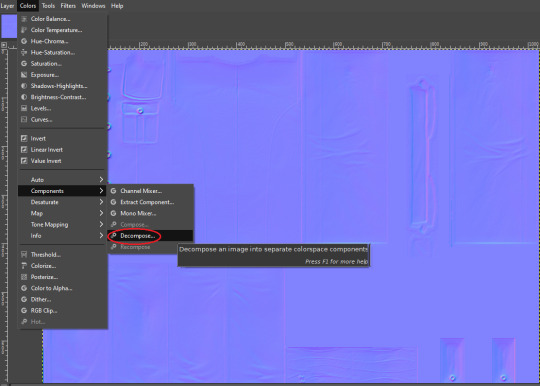
Next, go to Colors > Components > Decompose.

A small box will open up. Change your color model from RGB to RGBA to enable the alpha channel as a separate channel (layer).

Now, a new image will open that is your bitmap but greyscale. You will see four layers on the side called red, green, blue and alpha.
Select the red layer and click CTRL + A on your keyboard to select the entire layer. Then, click CTRL + C to copy the layer. (If you don’t have a keyboard, you can do “Select all” and “Copy” but this takes longer).
Now, go to your layer named alpha and press CTRL + V (paste) and CTRL + H (to anchor the layer). Now, you have replaced the alpha channel with the red channel.
Next, go to the green layer and select and copy it. Paste and anchor it into the red and blue layers, just as you did before with the red layer and alpha layer.

Your image won’t look too much different right now, it will just look like the green alpha channel rather than the visible red alpha channel when you opened it. Go back to the top bar and choose Colors > Components > Recompose. This will alter your original image, so the one you have open in layers will stay open. Go back up to the top and select the original image to go back to it, or close your layered image.

Now, your image should have changed from mostly blue to a transparent, mid-range gray with only a few elements visible. This is how it is supposed to look. If you don’t have transparency or it looks very different, then you probably messed up somewhere. Generally, I find it easier to go back to the original cleaned up bitmap (that you saved for future use) and start from scratch rather than trying to figure out where I messed up. That is usually faster.
Next, export your single-layer image as a PNG or DDS file (your preference). You will need a DDS plugin to save DDS files.
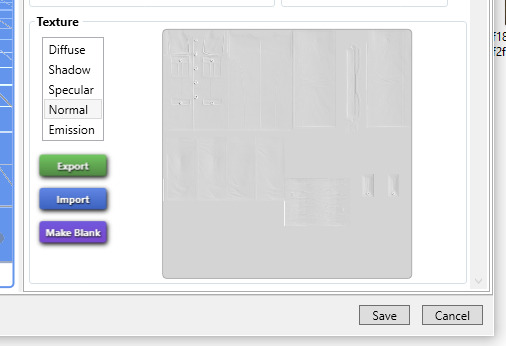
Open your item in Sims4Studio and import your new image file in the normal texture category. You will see a small preview in the box, which will probably show more details than you were able to see in GIMP. If it looks correct, save it and go to check it in game or in CASTools (which has a feature for previewing bumpmaps that can help you check for alignment problems). CASTools can be particularly useful if your computer doesn’t open the Sims quickly and you want to preview multiple bumpmaps. The only issue with CASTools is that it doesn’t really look much like it will look in game.
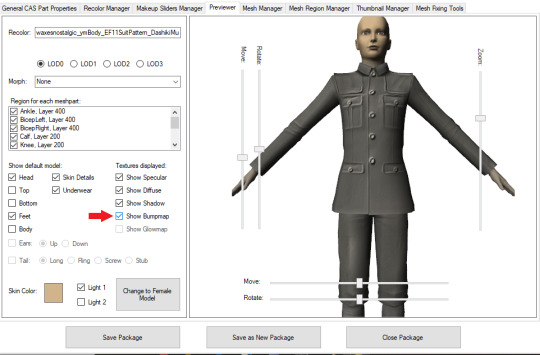
In CASTools. You have to select to see the bumpmap in the Previewer tab.
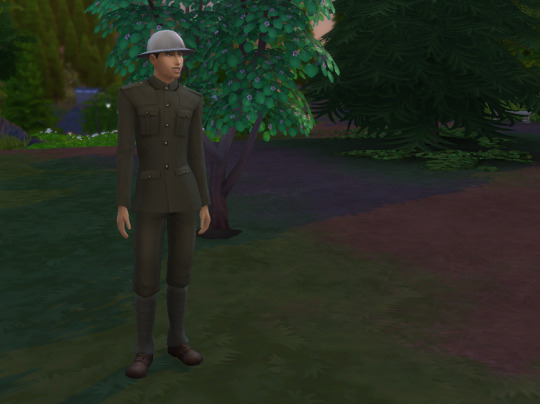
In game.
As I have only been making normal channels for a few months now, it’s possible I have missed some things, so if you know an easier or better way let me know and I can update the tutorial. I hope this is useful to you!
93 notes
·
View notes
Note
making gifs isn't that hard actually, if you have a working computer/laptop, and you have a working technique (there are like 3-5 common ways to make gifs) (it depends on what you do, like kpop gifs, movie gifs, general edits etc., what's your pc memory, and how fast your pc is) but the main bs is not photoshop itself, but topaz
basically, topaz is a plugin for photoshop that allows you finishing touches for works — those kpop gifs, where gifs are quality lower than mariana's trench but gifs still look 720p and skin looks smooth af? that's cause of topaz plugins (a bish to use)
i have never mastered topaz and i'm quite afraid i never will, photoshop sharpen and blur is enough for me
ahhh gotcha gotcha. yeah when i’ve tried to make gifs before it wasn’t stuff like that it was more with my own art not like, trying to turn video into gifs. so the problems usually came in just file sizes because of the drawings details n stuff.
also my poor little macbook air is just always dying because i run after effects and photoshop and illustrator stuff on here all the time. my computer hates me and it should.
but if im ever trying to do those kinds of gifs for something i shall keep that in mind, the only plugin i’ve really used for photoshop was one at school for making fonts in my typography class a year or so ago, forget what it was called now though
2 notes
·
View notes
Last Seen Blogs

gleo33
Oleg Golovin

cannibalromance
le cannibale mélancolique

asakodigitalblog
ASAKO DIGITAL BLOG

lovingdetectivecherryblossom
Untitled

sexypreera
😍Only Entertainment ❤😍