#masking photo editing lightroom
Text
Photo retouching services
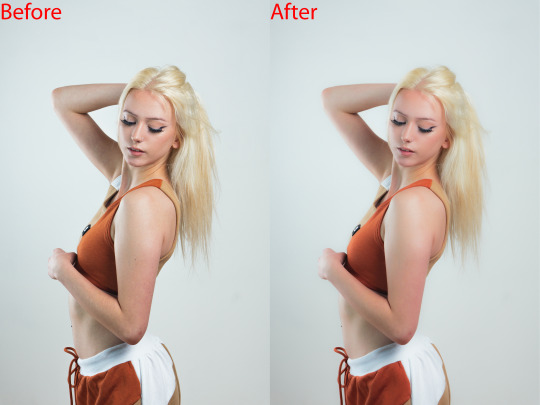
Photo retouching services are offered by many companies and freelancers, and they involve editing digital images to improve their appearance or fix any flaws. These services can range from basic adjustments like color correction and exposure balancing to more advanced techniques such as removing blemishes, reshaping the body, or even adding or removing objects from the image.
That's correct! Photo retouching services encompass a wide range of editing techniques to enhance the visual appeal of digital images. These services are commonly used in various industries, including fashion, advertising, e-commerce, and photography.
Basic adjustments typically involve correcting exposure, color balance, contrast, and sharpness to improve the overall appearance of the image. More advanced techniques may include skin retouching to remove blemishes, wrinkles, or scars, as well as body reshaping to slim or enhance body contours.
Other advanced retouching services may include background removal, adding or removing objects or people from the image, and composite image creation. These services are often used to create visually stunning images for advertising, marketing campaigns, or personal projects.
It's important to note that photo retouching services should be done with care and attention to detail to maintain the integrity of the original image while enhancing its visual appeal.
#affinity photo high end retouching#skin smoothing capture one#skin retouching and color grading in photoshop#pixelmator pro skin retouching#face retouching in photoshop cc plugins#one click skin retouching free photoshop action#affinity photo face retouch#capture one skin smoothing#capture one portrait retouching#capture one pro skin retouching#capture one skin retouching#capture one face retouching#masking photo editing lightroom#masking in adobe camera raw#skin smoothing plugin photoshop#skin retouching camera raw#skin retouching capture one#skin retouching and photo masking service
0 notes
Text
Ethereal
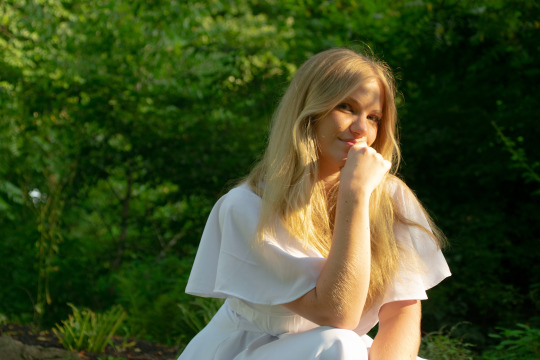
Grace, our Student Spotlight blogger, is majoring in Graphic Design and minoring in Photography. This summer she's building her photo portfolio with ethereal summer photoshoots highlighting friends in beautiful settings. #MarywoodArt #Photography
Hello everyone! This past week in my town, the weather has been beautiful. Mid-70s °F every day and sunny! I chose to take advantage of this weather and do a photo shoot I had wanted to do for a while. This summer, I’m trying to work on my photography portfolio, hoping to start to charge for shoots next summer (senior shoots, graduation photos, etc.)
I had this idea for a very light and airy,…
View On WordPress
#Art#Bucks County#Doylestown PA#editing#ethereal photoshoot#Fonthill Castle#inspiration#layer masks#lightroom#Marywood Art#Marywood Art Department#Marywood University#Marywood University Art Department#model#photo editing#Photography#Photoshop#portfolio#Portraits#Where Creativity Works
0 notes
Note
Why reblog machine-generated art?
When I was ten years old I took a photography class where we developed black and white photos by projecting light on papers bathed in chemicals. If we wanted to change something in the image, we had to go through a gradual, arduous process called dodging and burning.
When I was fifteen years old I used photoshop for the first time, and I remember clicking on the clone tool or the blur tool and feeling like I was cheating.
When I was twenty eight I got my first smartphone. The phone could edit photos. A few taps with my thumb were enough to apply filters and change contrast and even spot correct. I was holding in my hand something more powerful than the huge light machines I'd first used to edit images.
When I was thirty six, just a few weeks ago, I took a photo class that used Lightroom Classic and again, it felt like cheating. It made me really understand how much the color profiles of popular web images I'd been seeing for years had been pumped and tweaked and layered with local edits to make something that, to my eyes, didn't much resemble photography. To me, photography is light on paper. It's what you capture in the lens. It's not automatic skin smoothing and a local filter to boost the sky. This reminded me a lot more of the photomanipulations my friend used to make on deviantart; layered things with unnatural colors that put wings on buildings or turned an eye into a swimming pool. It didn't remake the images to that extent, obviously, but it tipped into the uncanny valley. More real than real, more saturated more sharp and more present than the actual world my lens saw. And that was before I found the AI assisted filters and the tool that would identify the whole sky for you, picking pieces of it out from between leaves.
You know, it's funny, when people talk about artists who might lose their jobs to AI they don't talk about the people who have already had to move on from their photo editing work because of technology. You used to be able to get paid for basic photo manipulation, you know? If you were quick with a lasso or skilled with masks you could get a pretty decent chunk of change by pulling subjects out of backgrounds for family holiday cards or isolating the pies on the menu for a mom and pop. Not a lot, but enough to help. But, of course, you can just do that on your phone now. There's no need to pay a human for it, even if they might do a better job or be more considerate toward the aesthetic of an image.
And they certainly don't talk about all the development labs that went away, or the way that you could have trained to be a studio photographer if you wanted to take good photos of your family to hang on the walls and that digital photography allowed in a parade of amateurs who can make dozens of iterations of the same bad photo until they hit on a good one by sheer volume and luck; if you want to be a good photographer everyone can do that why didn't you train for it and spend a long time taking photos on film and being okay with bad photography don't you know that digital photography drove thousands of people out of their jobs.
My dad told me that he plays with AI the other day. He hosts a movie podcast and he puts up thumbnails for the downloads. In the past, he'd just take a screengrab from the film. Now he tells the Bing AI to make him little vignettes. A cowboy running away from a rhino, a dragon arm-wrestling a teddy bear. That kind of thing. Usually based on a joke that was made on the show, or about the subject of the film and an interest of the guest.
People talk about "well AI art doesn't allow people to create things, people were already able to create things, if they wanted to create things they should learn to create things." Not everyone wants to make good art that's creative. Even fewer people want to put the effort into making bad art for something that they aren't passionate about. Some people want filler to go on the cover of their youtube video. My dad isn't going to learn to draw, and as the person who he used to ask to photoshop him as Ant-Man because he certainly couldn't pay anyone for that kind of thing, I think this is a great use case for AI art. This senior citizen isn't going to start cartooning and at two recordings a week with a one-day editing turnaround he doesn't even really have the time for something like a Fiverr commission. This is a great use of AI art, actually.
I also know an artist who is going Hog Fucking Wild creating AI art of their blorbos. They're genuinely an incredibly talented artist who happens to want to see their niche interest represented visually without having to draw it all themself. They're posting the funny and good results to a small circle of mutuals on socials with clear information about the source of the images; they aren't trying to sell any of the images, they're basically using them as inserts for custom memes. Who is harmed by this person saying "i would like to see my blorbo lasciviously eating an ice cream cone in the is this a pigeon meme"?
The way I use machine-generated art, as an artist, is to proof things. Can I get an explosion to look like this. What would a wall of dead computer monitors look like. Would a ballerina leaping over the grand canyon look cool? Sometimes I use AI art to generate copyright free objects that I can snip for a collage. A lot of the time I use it to generate ideas. I start naming random things and seeing what it shows me and I start getting inspired. I can ask CrAIon for pose reference, I can ask it to show me the interior of spaces from a specific angle.
I profoundly dislike the antipathy that tumblr has for AI art. I understand if people don't want their art used in training pools. I understand if people don't want AI trained on their art to mimic their style. You should absolutely use those tools that poison datasets if you don't want your art included in AI training. I think that's an incredibly appropriate action to take as an artist who doesn't want AI learning from your work.
However I'm pretty fucking aggressively opposed to copyright and most of the "solid" arguments against AI art come down to "the AIs viewed and learned from people's copyrighted artwork and therefore AI is theft rather than fair use" and that's a losing argument for me. In. Like. A lot of ways. Primarily because it is saying that not only is copying someone's art theft, it is saying that looking at and learning from someone's art can be defined as theft rather than fair use.
Also because it's just patently untrue.
But that doesn't really answer your question. Why reblog machine-generated art? Because I liked that piece of art.
It was made by a machine that had looked at billions of images - some copyrighted, some not, some new, some old, some interesting, many boring - and guided by a human and I liked it. It was pretty. It communicated something to me. I looked at an image a machine made - an artificial picture, a total construct, something with no intrinsic meaning - and I felt a sense of quiet and loss and nostalgia. I looked at a collection of automatically arranged pixels and tasted salt and smelled the humidity in the air.
I liked it.
I don't think that all AI art is ugly. I don't think that AI art is all soulless (i actually think that 'having soul' is a bizarre descriptor for art and that lacking soul is an equally bizarre criticism). I don't think that AI art is bad for artists. I think the problem that people have with AI art is capitalism and I don't think that's a problem that can really be laid at the feet of people curating an aesthetic AI art blog on tumblr.
Machine learning isn't the fucking problem the problem is massive corporations have been trying hard not to pay artists for as long as massive corporations have existed (isn't that a b-plot in the shape of water? the neighbor who draws ads gets pushed out of his job by product photography? did you know that as recently as ten years ago NewEgg had in-house photographers who would take pictures of the products so users wouldn't have to rely on the manufacturer photos? I want you to guess what killed that job and I'll give you a hint: it wasn't AI)
Am I putting a human out of a job because I reblogged an AI-generated "photo" of curtains waving in the pale green waters of an imaginary beach? Who would have taken this photo of a place that doesn't exist? Who would have painted this hypersurrealistic image? What meaning would it have had if they had painted it or would it have just been for the aesthetic? Would someone have paid for it or would it be like so many of the things that artists on this site have spent dozens of hours on only to get no attention or value for their work?
My worst ratio of hours to notes is an 8-page hand-drawn detailed ink comic about getting assaulted at a concert and the complicated feelings that evoked that took me weeks of daily drawing after work with something like 54 notes after 8 years; should I be offended if something generated from a prompt has more notes than me? What does that actually get the blogger? Clout? I believe someone said that popularity on tumblr gets you one thing and that is yelled at.
What do you get out of this? Are you helping artists right now? You're helping me, and I'm an artist. I've wanted to unload this opinion for a while because I'm sick of the argument that all Real Artists think AI is bullshit. I'm a Real Artist. I've been paid for Real Art. I've been commissioned as an artist.
And I find a hell of a lot of AI art a lot more interesting than I find human-generated corporate art or Thomas Kincaid (but then, I repeat myself).
There are plenty of people who don't like AI art and don't want to interact with it. I am not one of those people. I thought the gay sex cats were funny and looked good and that shitposting is the ideal use of a machine image generation: to make uncopyrightable images to laugh at.
I think that tumblr has decided to take a principled stand against something that most people making the argument don't understand. I think tumblr's loathing for AI has, generally speaking, thrown weight behind a bunch of ideas that I think are going to be incredibly harmful *to artists specifically* in the long run.
Anyway. If you hate AI art and you don't want to interact with people who interact with it, block me.
5K notes
·
View notes
Text
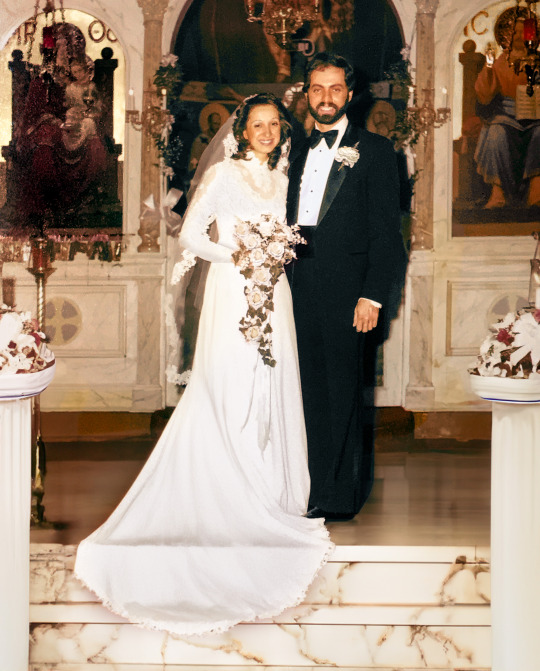
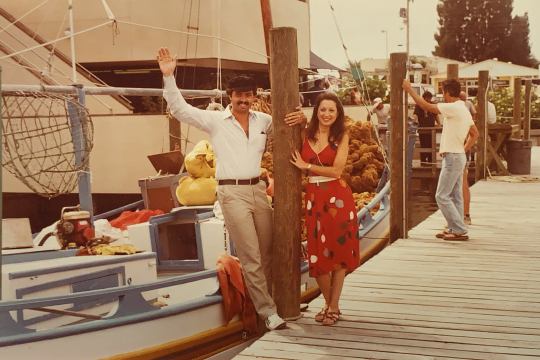
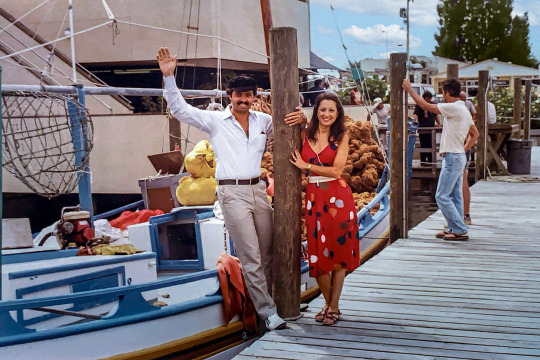
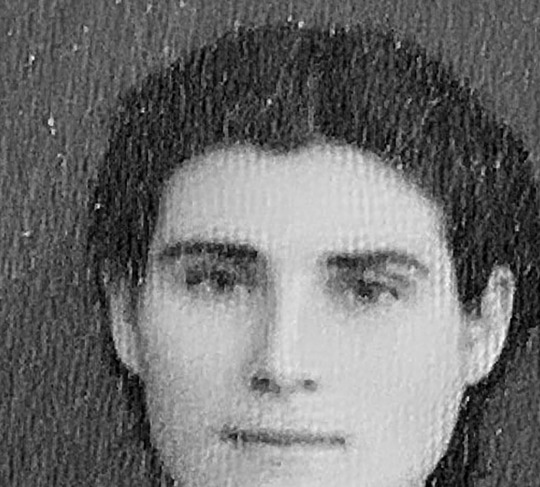
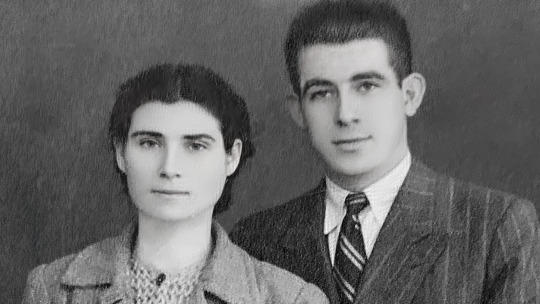
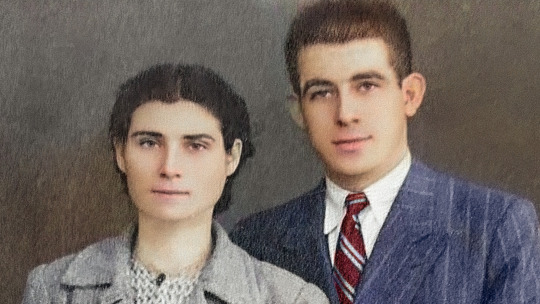
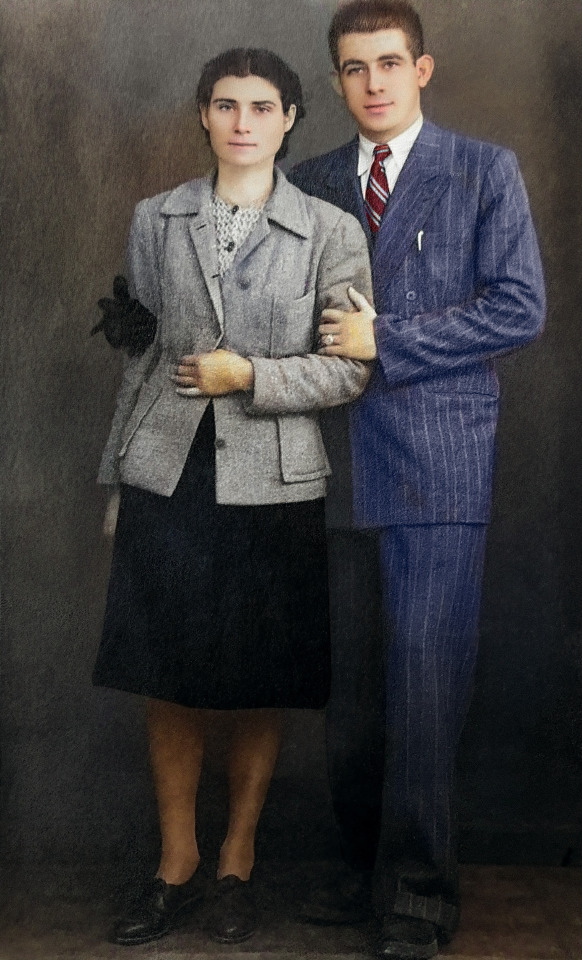
Photo Restoration Project - Part 1
A long time ago, Katrina sent me some old photos of her family I could restore. Her parents have been helping me from afar for years and I really wanted to do something nice for them. Unfortunately my dad got much worse and I pretty much forgot about this project for quite some time.
But then I decided to visit Katrina in Orlando and we discussed having dinner with her parents and I remembered these photos. So I thought I would fix them up so I could present them as a gift in person.
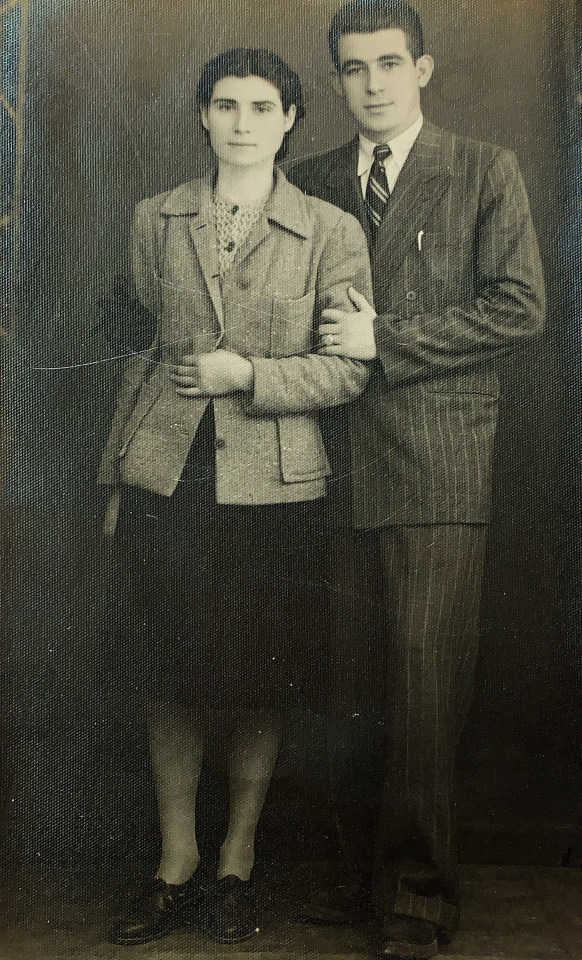
The first and most important photo was from her parents wedding.
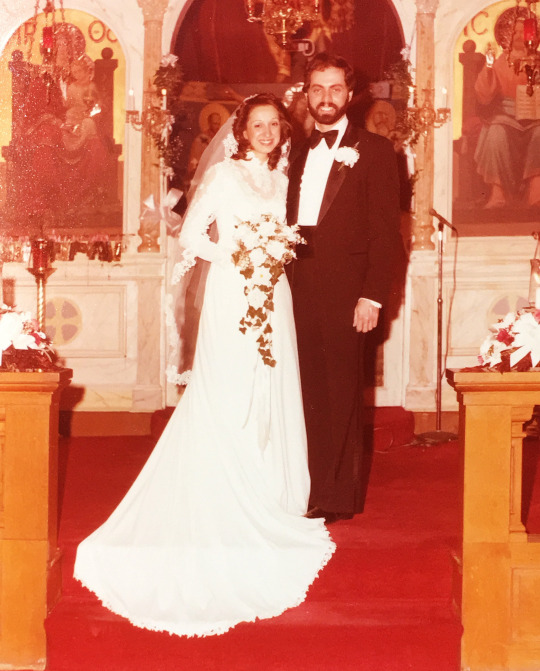
Old photo prints can fade over time due to UV light exposure. From what I understand, different colors fade at different rates and red/orange tones tend to be the least susceptible to this fading. Thankfully all of the color information is still there, it's just that the darks are not as dark and the lights are not as light. The dynamic range got squeezed like an accordion. However, if you do a levels adjustment on the red, blue, and green channels individually, you can unsqueeze the accordion and balance everything back to the way it was.
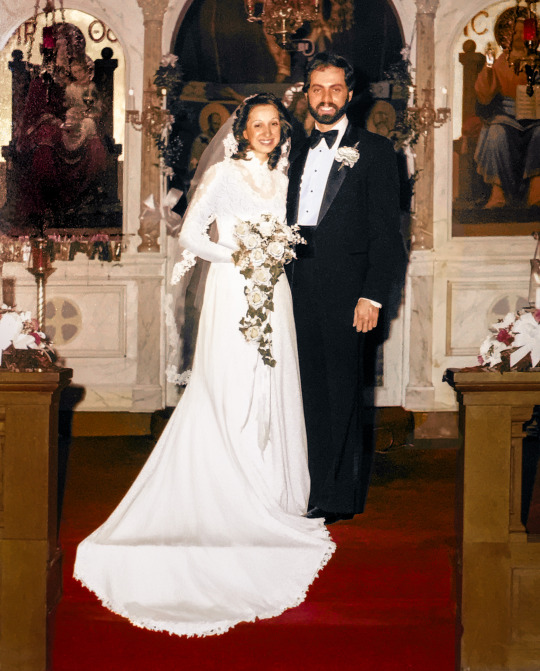
But you can't always save everything and there may be other damage that needs fixing. If something becomes pure white, there is no way to restore that detail. Thankfully I was able to use the new generative fill feature to bring back detail in the dress, the flowers, and the tuxedo shirt.
And because I hate front facing flash and how it makes colors look ugly and sterile, I may have also added a marble floor and pillars.
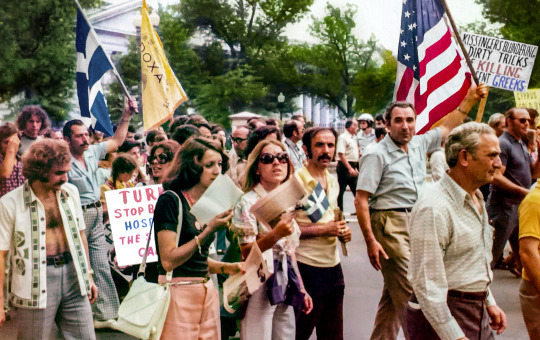
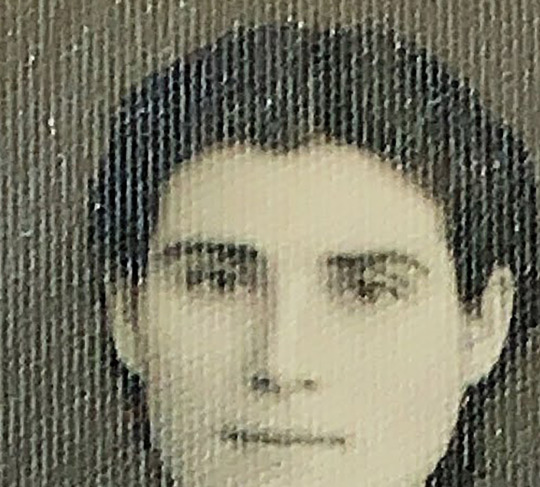
Next up was a photo of Anastasia, Katrina's mom, protesting Henry Kissinger on behalf of her home country of Greece. This suffered from the same color fading issues.
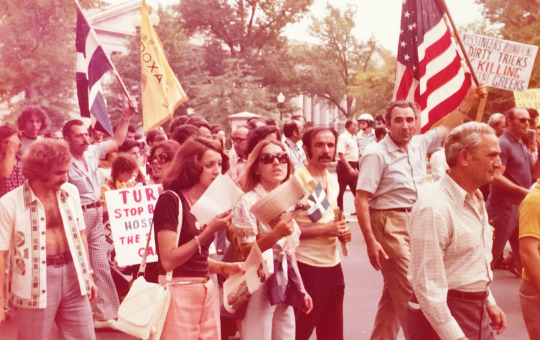
What made this one a little more tricky was an uneven fading. The left side had to be adjusted independently and the top was even more faded. I had to isolate the trees to bring back their color. And the protest signs were difficult to read, so I enhanced those as well.
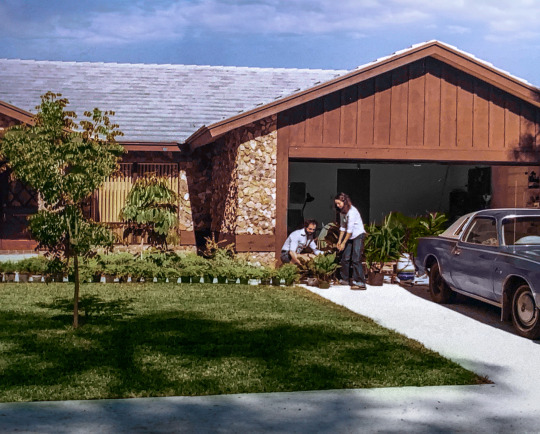
Next we have this lovely photo of Anastasia tending to some house plants.
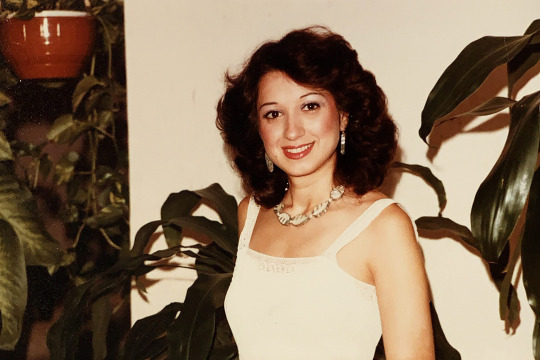
This photo was actually in decent shape. It lost a little contrast, had a little bit of fading, and her top retained almost no detail I could recover. Recovering accurate skin tones is probably one of the most important skills I learned when restoring these photos. I wanted to keep that filmic look of the era while avoiding making people look jaundiced or pale. Lightroom's new masking feature that let's you isolate every aspect of the people it detects in a photo. This made fixing skin tones much easier. I could isolate just her face or her lips or her hair or her eyes and make precise individual adjustments. This process could have taken a great deal longer without this feature. But, I brought back proper contrast and color, added a little bit of detail to her top with gen fill, and hopefully got fairly accurate skin tones as well.

Next up, forward facing flash strikes again in a photo of Mike and Anastasia during Christmas.
Film did not do well in low light. If it was indoors and nighttime, you pretty much had no choice but to use flash. But a flash is a very small, bright light source and this causes a very unflattering result on humans. Today we have much more powerful flashes with rotating heads. We can bounce the light into the ceiling or off a wall and increase the size of the light source to get a more flattering result.
In this photo I wasn't able to do much, so I just balanced the skin tones and brought out some hidden detail and called it a day. It's still a lovely memory and thankfully film has such character that it negates a lot of the unflattering aspects of direct flash.
Next up is some cuteness...
A big priority when editing photos is to make sure the subjects are the star of the photo. And in this one their faces were a bit obscured in shadow. There was also a lot of haze in the background hiding the beautiful vista. Not to mention when I cleared that haze, there was this super faint hint of something in the sky. I can't tell if it was a rainbow, but I decided to believe it was a rainbow. The only thing that I am still struggling with, and this seems to be common with a lot of old photos, is green. Getting a good, saturated, natural green to look right has been very difficult. Everything I try ends up looking toxic or fake. The only thing that ends up looking right with the rest of the photo is more of a yellow-y brown. It's something I'll have to work on as I learn, but as long as the overall photo looks balanced and natural, I'm okay with not perfectly nailing the greens.
Up next we have a lovely scene on a Greek dock...
As far as editing goes, this was pretty basic. I just undid the fading, adjusted the skin tones, replaced the blown-out sky, and made the colors pop. But I think this is actually one of my favorite before and after shots. I just love how such a simple fix brought this scene to life.
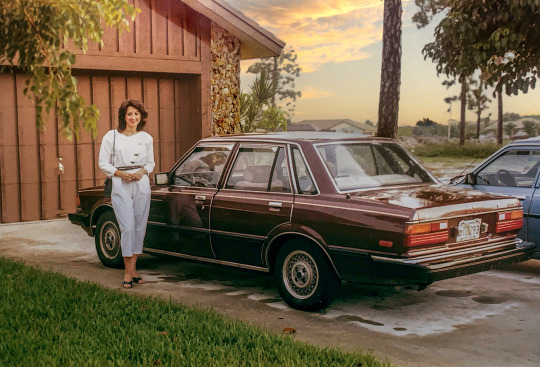
A new car is a big deal and Anastasia looks so proud here...
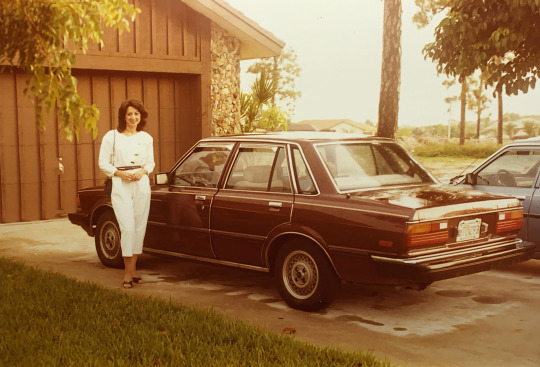
This image has another common issue in addition to the typical fading of colors. It has a yellowish orange color cast. This could have been an issue with the film used or the development process or a chemical reaction on the print. A color cast is a lot like looking through colored glasses. It's like a translucent color material was put on top of the image. This can be a little trickier to deal with, but if you know your color theory, you might already know the solution. Blue is the opposite of yellow/orange on the color wheel, so if you introduce blue to the image it should balance out. Also, add a sky if it was missing.
Next up we have a landscaping project...
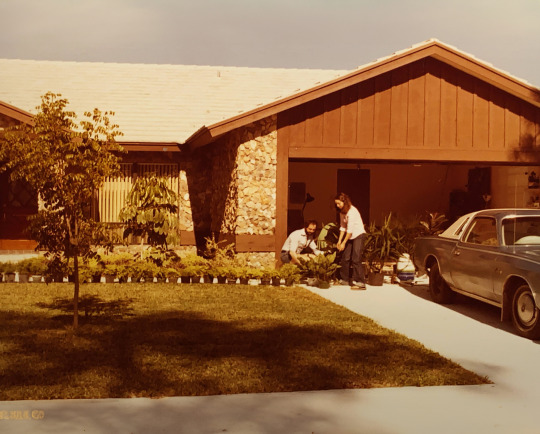
This one wasn't too tricky, but there was one interesting issue I had to address. All light has a color temperature. Daylight has a temperature of around 5500K. But the inside of the garage was being lit by reflected light and so that light took on the color temperature of the things it was bouncing off of. So I had to mask out the people and the car and address the color temperature inside the garage to make everything look balanced. Also, the green fought me hard on this one. And with the theme of this picture being plants, I felt I really needed to find a tone that worked. I think I finally got there, but I spent way too much time in the color picker doing trial and error of green tones. Also, new sky.
With this next one I actually did a pretty thorough explanation of how I edited it. But this was probably my favorite puzzle to solve from this collection of photos.
I'll do the abridged explanation...
The physical photograph was printed on a paper with a very heavy texture. And when it was scanned, the light from the scanner bounced off that texture and created a pattern of unwanted highlights.

I was worried this was impossible to fix and I almost gave up on this photo. But after one final Google search I discovered something called "Fast Fourier Transform." It's a mathematical formula that can be used to detect patterns. And the image editing software Affinity Photo, just so happens to have a filter called FFT denoise that helps you remove unwanted patterns from scanned photos.
And thanks to that filter, I was able to remove a substantial amount of that pattern...
Then I did my standard clean up techniques...
Oh, and I decided to try learning how to colorize.
Photoshop has a new set of experimental filters and a colorization tool is one of them. It is not great yet, but it is a great starting place. Instead of having to hand paint every single thing in the photo, Photoshop gave me a base to work with and I could take it from there with traditional techniques.
That's all I have the energy for today, but there are a bunch of cool restorations to talk about. Hopefully you all find this interesting. It was such a great gift to give to Katrina's parents. And spending that time with them and making them happy felt like I was with my own parents again. So we all got a gift in that wonderful evening.
Part 2 coming as soon as I have the energy!
452 notes
·
View notes
Text
Let's talk photo editing!
How I took this photo to this photo:


First step is cropping. III is blurry and the mic stand & the Espera are distracting, so we'll crop them out. One of the biggest tips I’ve ever received as a concert photographer is to never be afraid of cropping!


Next, we edit. For this picture, I want to darken the background, add saturation to Vess's mask to make it pop, and generally increase the contrast while making the photo crisp and clear.
Overall edits: Exposure -0.49; Contrast +13; Highlights -1; Shadows +29; Whites +6; Blacks -15; Texture +16; Clarity +1; Sharpening +89.
I personally don't like to keep background tech in the photos if I can help it, so I use a combination of Lightroom and Photoshop to patch/clone/fill/heal (and/or paint over) the lights, IV's mic stand, and white lines on the stage:
Now that Vess looks like he's in some mysterious bathypelagic ocean depth, I need to add some interest back to the background. I love dust overlays, so here I add one of my favorites and play with the blend modes - for this one I used Pin Light.

It adds a weird texture to his mask and cloak, so I select Vess and copy him onto a new layer above the overlay.
And that's it! You can see the final photo posted here in all its glory.
#hecetasphoto#concert photography#editing#photoshop#photoshop process#editing process#metal photography#sleep token#vessel#vessel sleep token
66 notes
·
View notes
Text
Dont pirate photoshop! use:
program that everyone hates because it's awful, barely has half the features of photoshop, doesnt even have adjustment layers or good layer masking and shit but everyone still recommends for some reason (GIMP)
program that's really good, but is more focused towards digital art rather than photo editing, not what im looking for (Krita)
program thats trying to be illustrator, and not photoshop (Inkscape)
program thats trying to be lightroom, and not photoshop (Darktable, Shotwell, RawTherapee)
online editors that do the job pretty well but you have to use it in a browser and they show you ads and half the keyboard shortcuts don't work and some of them require subscriptions to export (Photopea, Pixlr)
Until someone makes a FOSS photoshop clone thats actually good im pirating photoshop
29 notes
·
View notes
Text


Blog - Changing Meaning
Shot on Canon R10 and 70-200 f/2.8 under natural lighting
All of my photos were edited for other blogs but I had a few extras for this one. I used masking in lightroom as well as exposure, highlights, shadows, and tone curves to accentuate the colors desired and make the subjects stand out.
3 notes
·
View notes
Note
Hey. Totally not returning a favor or anything this is definitely for no reason at all yep mhm. Do you want to tell me about photo editing.
Photo editing means a LOT to me because most people don’t realize how much really goes into it. Call me crazy, but I WILL be in my local mall staring at every advertisement poster I come across figuring out the editing techniques used. Are the highlights too high? What about the whites? Have the shadows been raised to provide more detail to the darker parts of the image? Does the subject pop out from the background the way they’re supposed to? Could a masking layer help this in any way? Unfortunately, this is not a words thing, this is a visual thing.
You did not ask for photo editing advice, but I will serve it to you anyway.
A lot of these terms and advices are all referenced from my experiences with Adobe Lightroom, since that is the main program I use.
Highlights + Whites– The most basic things I first learned when it came to photo editing was to always lower the whites and highlights in a photo. By lowering the brightest points in the photo, you get a more professional feel, as all the colors are in closer relation to eachother. And in fact! In movies, there are no parts of any shot that are complete, pure white. They are always dimmed. They are always a dimmer off-white, because that’s how you achieve that cinematic feel to a movie. The same goes for photos! This was just a good rule of thumb for a while me, until recently when I figured out that it really does add a level of professionalism to the entire photo.
Shadows– RAISE THEM! Reasonably, of course. But we want all the information we can get in a photo. It’s really shocking how BIG of a difference it starts making when you have more information in the darker parts of an image, how much it really brings the photo together.
Blacks– For more professional, contrasty photos, I usually leave this alone. But if you want to achieve a more film-like look, raise them slightly! Just keep in mind that the higher you raise them, the more flat your image may end up looking (If you play around with it, you’ll see what I’m getting at with that).
Masking– One of my favorite tools so far that I’ve discovered. Again, this mostly pertains for Adobe Lightroom. I use this for a large percentage of my photos. One thing that’s super super important is making sure your subjects stand out from their background. I don’t own a light reflector, so one of the ways I do this is by creating a subject mask (often for portraits), and in that mask, turning the subject’s shadows up, lighting them properly. Of course, an actual light reflector would absolutely work better for lighting the subject rather than a digitally processed way, but if you’re lucky with lighting outdoors, you shouldn’t be able to tell that it’s done in post. In some really strong cases, I’ll create a background mask to turn the exposure down on what is NOT the subject, so we can assure that that is still what our main focus is.
Saturation + vibrancy– I rarely ever touch these settings. They tend to adjust all the colors in an image, when my main point of editing is to bring out certain colors, and not other. Hell YES I want my subject’s shirt brought out against the blues of the sky. I also want some of the sky brought out! But not entirely. These settings will bring out the color of the shirt plus the blues of the sky, plus the reds in the subject’s skin that make them look like they really need some medical attention. I never really touch these settings. They do too much for what I want .
Curves– I’ve heard this described as “the most powerful tool” you can use in photo editing, but it took me an embarrassingly long amount of time to get the hang of how to use curves properly. What I learned is that the curves chart is always divided into three sections: the shadows, midtones, and highlights. And there are four charts, one for gamma (general brightness), red/greens, green/purples, and blue/yellows. Curves are FANTASTIC for when there is an overarching single color in a photo. Is your photo too blue because you were shooting in the morning shadows? Adjust the curves chart (probably around the center, or the midtones area for general color-correction coverage) towards the yellows. Because of color theory, they obviously counteract eachother. If it’s mostly the shadows that look a little too blue, you can adjust the curves chart in the shadows portion to bring the shadows back to matching the rest of the image. I did not master the curves charts by fiddling around with them myself, I had to be shown how to use them, but they sure have benefited me for the better
Are you a beginner without the money for fancy programs like Lightroom? I got you. Lightroom Mobile IS INFACT FREE! But that’s not what I started off with. I did a lot of my editing on mobile for the longest time. I used Snapseed, a free mobile app for photo editing. The organization is… questionable. It really takes a lot of time to learn how to get around the app, and learn what all the options do. But like I said, organization of things within that app? Questionable. But even then I got compliments from professional photographers on my photos taken and edited with nothing but my phone. Crazy to me 2 years later, but. Anyways! Snapseed does give you more options for specific editing styles than Lightroom does, so there’s that!
Thank you again for the ask, photo editing is something that brings me so much joy every time I have the opportunity to do it <3
3 notes
·
View notes
Text

Morvran Voorhis (AI)
Morvran, shirtless and sexy.
Created in stable diffusion by @alphagravy using one of my screenshot edits. My edits in PS includes overlaying it with the original photo, masking, and application of lightroom filters.
#morvran voorhis#nilfgaard#witcher 3#ai generated#stable diffusion#the witcher 3#witcher 3 wild hunt#photoshop
19 notes
·
View notes
Photo

Reworked
Superheroes & civilians III: California State Fair. Sacramento, 07-27-13. (Reworked 01-14-23.)
After all these years, even though I took this one with my D50, I still love the moment I captured and the composition, the subject matter. The colors, mostly primary. So while looking over some old photo posts, I figured I would edit this one again, this time using the latest Camera Raw (same as in Lightroom) masking tools.
Gotta say, I LOVE the new detailed masking options that make Photoshop totally unnecessary, at least for me. For this photo, I created separate people masks for each one of the men in the photo and brushed out the baby’s face that seemed to be growing out of Iron Man’s left shoulder. Captain America I made sharper and more saturated, Iron Man I left alone except for some decreased exposure on his face, and the man on the left I reduced exposure, sharpness, and saturation a little.I also subdued the exposure and saturation (and sharpness) of the background and did some other minimal brush tweaks as well as some healing and cloning.
I LOVE doing such post adjustments. Feels in some ways like I am drawing and/or painting on my photos.
21 notes
·
View notes
Text
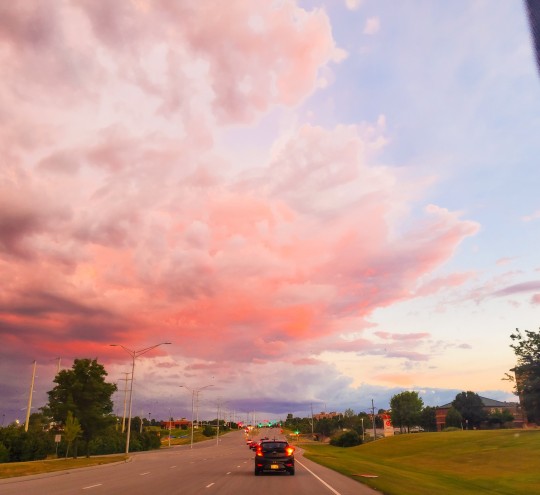
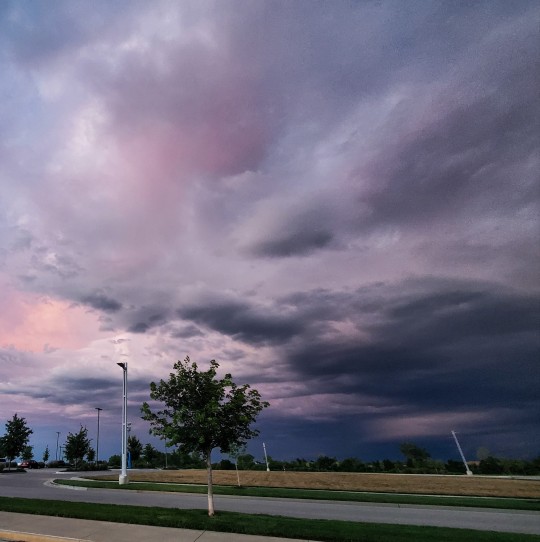
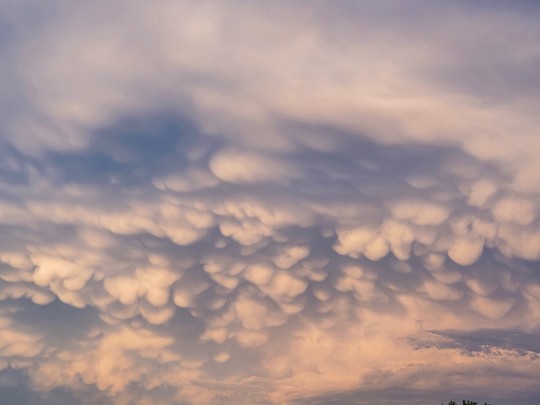
Some weather from today!!!
1-2 were taken about 10 minutes apart as the storm moved in, I think the difference in color and contrast of the cloud mass is a cool example of how how quickly the light scattering level changes as the sun sets.
These had very minor contrast edits done in Adobe Lightroom because cameras never do the sky justice. Both photos had the same preset copy-pasted as to not mask the natural transition or color. 😉👍
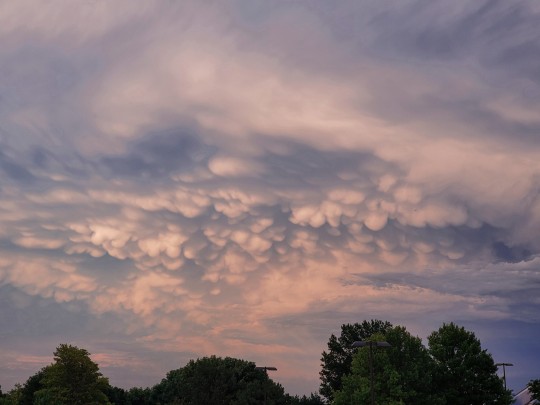
As for 3-4, I saw these mammatus clouds forming and hit the gas drove a reasonable speed to the nearest parking garage because I knew they wouldn't last long. I had never seen these in real life before so I was laughing like an idiot from the time I noticed them until they dissipated.
Most clouds form due to the conditions caused by air rising but mammatus clouds form around severe weather events with sinking air. There is a misconception that these pockets continue falling downward until a tornado forms but that isn't the case because these bubbles have little/no rotational energy.
#⛈️#clouds#nephology#meteorology#storm chasing#I ONLY CRIED A LITTLE BIT THE COLORS WERE SO COOL AND THE LIGHTNING WAS AMAZING AND AND AND AND#big autism moment for me#i hope i am not only a tumblr user to you but also an educated and practicing meteorologist#DONT TAKE PHOTOS OF CLOUDS AND DRIVE ALWAYS FOLLOW ROAD RULES#science service stewardship ö7#meteor gala
6 notes
·
View notes
Text
skin retouching and photo masking service
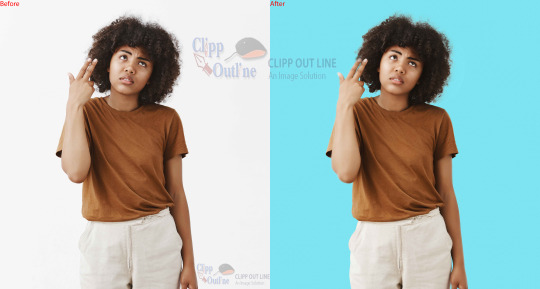
Welcome to Merchynt's world of creativity, where every image is transformed into a masterpiece! 🎨 Our skin retouching and Photo Masking Service are designed to elevate your photographs to new heights of perfection. Whether you're a photographer looking to enhance your portfolio, a business in need of stunning visuals, or simply someone who appreciates impeccable image refinement, Merchynt is here to exceed your expectations. ✨
Our Photo maskings is not just about editing; it's about crafting enchanting visuals that captivate and inspire. With our meticulous attention to detail and commitment to excellence, we ensure that every image tells a story of beauty and sophistication. 💫
Join the ranks of satisfied clients who have experienced the Merchynt difference. Discover the transformative power of our services and unlock the full potential of your images. 🌟 Trust in Merchynt for unparalleled quality, reliability, and creativity. Let us turn your vision into reality!
#photography#professional editing#skin smoothing#affinity photo high end retouching#high end skin retouching action#skin retouching and color grading in photoshop#pixelmator pro skin retouching#face retouching in photoshop cc plugins#one click skin retouching free photoshop action#affinity photo face retouch#capture one skin smoothing#capture one portrait retouching#capture one pro skin retouching#capture one skin retouching#capture one face retouching#masking photo editing lightroom#skin smoothing plugin photoshop#skin retouching camera raw#skin retouching capture one
0 notes
Photo

Final work by: Alex Hernandez,
In these works, I am documenting the social scene. In specific, a particular DJ in Miami, a special group of friends, and certain moments I find in the events. Originally, I wanted to capture the lack of intimacy seen at these events and at the same time evoke emotion via these images by focusing on the intimacy between the camera and the subjects. As I continued to photograph the events, I realized I want to tell a story, that story Is the party; the calm before the storm, the moments during the storm, an overview of the storm as a whole, and the aftermath. Although the focus is no longer tied around the subject of “Intimacy” there is still intimacy between my subjects and I whilst documenting those specific moments.
I wanted to show the moments before the event, whilst arriving, and all the odd scenes one might witness like an individual in crutches, or another bent over tying their shoes. These scenes are calm, and foreshadow the upcoming photographs through the use of clothes and looming figures. Afterward, capture the chaos and the energy that ensues during “the storm”, the frenzy-like crowd packed together like sardines, the lust-filled interactions amongst the crowd, the eye of the storm (the DJ), the peak of the story. Finally, I captured the moments after all the damage has been done, and the residual energy carries the individual throughout the night. As a whole, the story told is one of the life of energy in the social aspects of humans and their interaction with one another and my camera's ability to document these scenes.
Process: The tools I used to create these images are: Digital Camera, Bridge, Photoshop, and Light Room. After I made my selection via Bridge, I opened each photograph in photoshop and proceeded to edit them as regular photos, assigned an SRGB profile, worked the white balance and color balance, cropping, masking, adjusting, etc… Then transferred the photo to lightroom to apply a “vintage” style preset of mine and then exported as PNG or JPEG. Uploaded to Instagram.
I took inspiration from Larry Fink’s Social Graces to create these works and if I had time to push my concept further, I would attempt to recreate more scenes like his, and learn to shoot better compositionally shot photographs such as Larry Fink's. I might even see if I can find a juxtaposition in the social scene I currently photograph in an attempt to document it such as Fink did.
Blaze
2 notes
·
View notes
Text
the most minorly annoying thing about this photo class is that the professor required us to put our first and last names in the metadata and i'm too lazy to figure out how to strip that out in lightroom so i need to go through and edit all the good shit properly before I can share the high res versions.
Also hello i learned to take photos in a journalism context and I am old man yells at cloud about lightroom. Clarity? DEHAZE? AI SELECTING THE SKY?
Back in my day we didn't have smart masks we had to do a magnetic lasso with a 10px feather and it always covered the wrong shit at least part of the time and that's why you take snapshots to correct after the fact and now you've just got a robot to tell you where the sky is? What's the world coming to!? (But actually seriously for real, "select the sky" is a great example of how machine image recognition trained on large public facing image sets is/can be a really useful tool for artists and is not just a fucking plagiarism machine and ALSO a good example of the democratization that people love to deride when talking about AI "everybody already could draw, AI isn't doing anything special" - yeah, well everybody could also spend an hour meticulously clicking around the edge of the subject to remove the background but it was a pain in the ass wasn't it? are you telling me you don't want a mask that you can use to fill with content aware hatching? Are you telling me you don't want a stippling brush that will correct distribution when multiple passes are applied?)
380 notes
·
View notes
Note
Heyy! Love your acc!! Any editing tips/programs/filters you recommend? :)
hi!!! thank you so much! yeah I use adobe Lightroom for the base of my photos then I use picsart pro for the filters an extra masks and stuff! ( normal picsart is good too!)
1 note
·
View note
Text
The Best Software and Techniques for Stunning Photos by Mohit Bansal Chandigarh
The Best Software and Techniques for Stunning Photos by Mohit Bansa Chandigarh, unlocks the secrets to transforming your raw images into visual masterpieces. Mohit Bansal, known for his keen eye and expertise, offers a comprehensive guide to the most effective photo editing tools and techniques available today.
The journey to perfecting your photos begins with selecting the right software. Mohit Bansal Chandigarh recommends Adobe Lightroom and Photoshop as top choices for both beginners and advanced users. Lightroom is ideal for organizing and making global adjustments, such as exposure and color balance, while Photoshop excels in detailed edits and creative enhancements. For those seeking budget-friendly alternatives, Bansal also highlights programs like Capture One and GIMP, which offer robust features at lower costs.
Once you've chosen your software, Mohit Bansal Chandigarh emphasizes the importance of understanding fundamental editing techniques. He advises focusing on three core areas: color correction, sharpness enhancement, and noise reduction. Adjusting white balance and vibrance can bring out the true essence of your subject, while sharpening details ensures clarity and precision. Noise reduction tools help eliminate unwanted graininess, especially in low-light shots, ensuring your images look polished and professional.
Mohit Bansal Chandigarh also stresses the value of non-destructive editing, allowing you to experiment and refine your photos without permanently altering the original file. By mastering layers and masks in Photoshop or using Lightroom's adjustment brushes, you can make precise edits and preserve the integrity of your images.
With these tips and techniques, Mohit Bansal equips photographers with the tools to elevate their editing skills and achieve stunning results. Whether you're polishing your latest shoot or revisiting past projects, his advice offers a pathway to creating visually captivating photographs that truly stand out.

0 notes
Last Seen Blogs

jupiterjazzcat
iroiro diary

grenzlinie17
Grenzlinie
grenzlinie17
Grenzlinie

lovesanmotion
i'm feeling nice, i'm feeling good

rizqaas-blog
assalamu'alaikum☺