#skin retouching and color grading in photoshop
Text
Photo retouching services
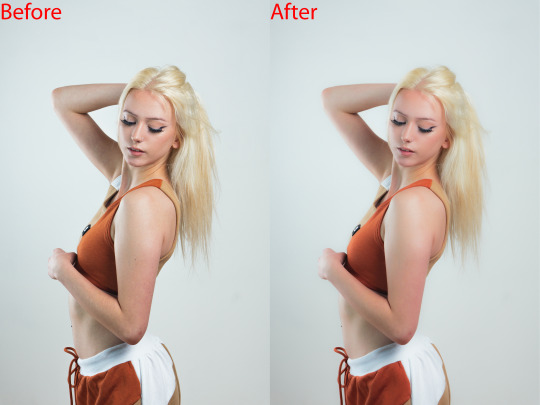
Photo retouching services are offered by many companies and freelancers, and they involve editing digital images to improve their appearance or fix any flaws. These services can range from basic adjustments like color correction and exposure balancing to more advanced techniques such as removing blemishes, reshaping the body, or even adding or removing objects from the image.
That's correct! Photo retouching services encompass a wide range of editing techniques to enhance the visual appeal of digital images. These services are commonly used in various industries, including fashion, advertising, e-commerce, and photography.
Basic adjustments typically involve correcting exposure, color balance, contrast, and sharpness to improve the overall appearance of the image. More advanced techniques may include skin retouching to remove blemishes, wrinkles, or scars, as well as body reshaping to slim or enhance body contours.
Other advanced retouching services may include background removal, adding or removing objects or people from the image, and composite image creation. These services are often used to create visually stunning images for advertising, marketing campaigns, or personal projects.
It's important to note that photo retouching services should be done with care and attention to detail to maintain the integrity of the original image while enhancing its visual appeal.
#affinity photo high end retouching#skin smoothing capture one#skin retouching and color grading in photoshop#pixelmator pro skin retouching#face retouching in photoshop cc plugins#one click skin retouching free photoshop action#affinity photo face retouch#capture one skin smoothing#capture one portrait retouching#capture one pro skin retouching#capture one skin retouching#capture one face retouching#masking photo editing lightroom#masking in adobe camera raw#skin smoothing plugin photoshop#skin retouching camera raw#skin retouching capture one#skin retouching and photo masking service
0 notes
Note
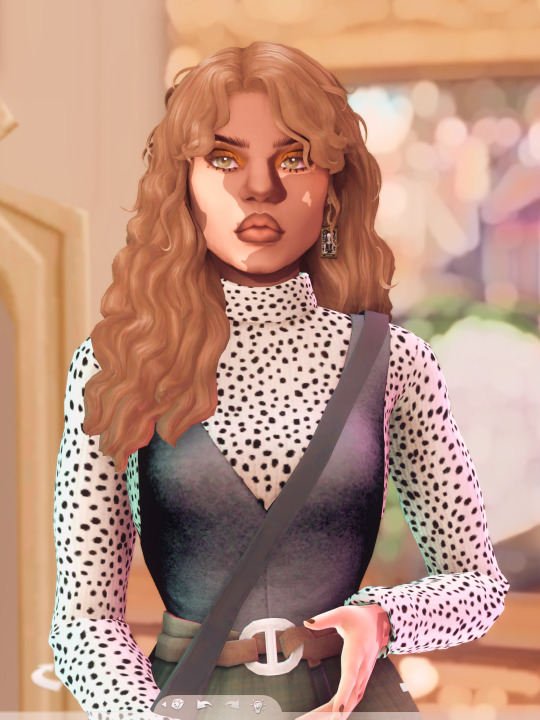
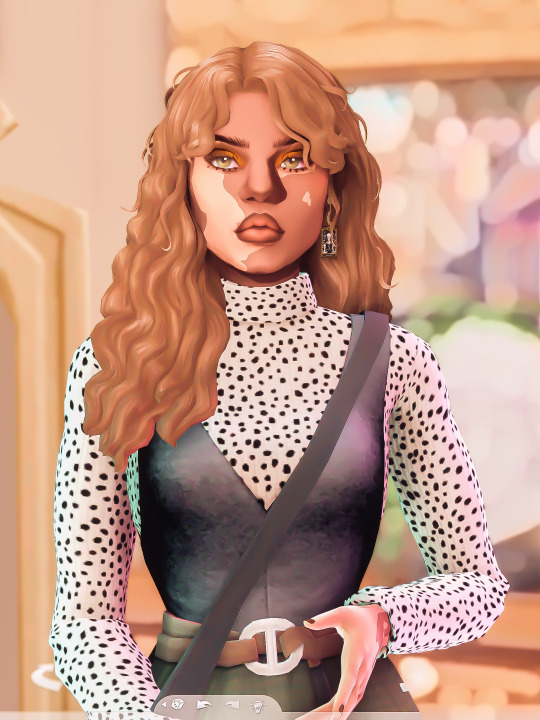
Hii! I'm absolutely in love of how good your screenshots are, both in game and in cas, I was wondering is it possible you could make a little tutorial on how you do it? Idk why mine always look like blurry or something idk it's very uninspiring
hi @simsinfinitylt. thank you so much 🥺! and please do not feel discouraged. it really is all trial and error, i promise. it definitely took me a minute myself to find what worked best for me. this is my current editing system:

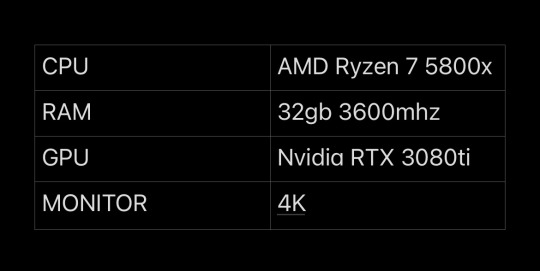
chapter 1: a pc for me
the most important thing is to have a good computer that can play the game on max settings. make sure all your settings are maxed out, with laptop mode and edge smoothing off. i also play the game in 4k resolution (3840 x 2160), the max for my monitor (but it might be different for you).
additionally, i use the graphics overhaul overrider by simp4sims, the 'ultimate quality' preset.
graphic overhaul: graphics rules setters
here are my pc specs...
chapter 2: maybe she's born with it. maybe... it's reshade
reshade honestly does most of the work as well as the world lighting mods by @softerhaze. i hope to be able to find time to make my own preset one day, but for now, i use the daisies reshade by @breezytrait. here are my lighting and visual mods...
reshade: daisies (i tweaked the preset a bit, mostly increasing the mxao here)
world lighting mods: twinkle toes, shadows for days
light replacements: no glow v2, out of the dark, inner glow
cloud replacement: studio ghibli clouds
chapter 3: say click. take a pic
i take all of my screenshots in tab mode. i find that it's best to go into tab mode further away than you want the picture, then slowly move the camera forward with the arrow keys to frame the screenshot. this is especially great for really up close photos of sims faces.
i capture all my screenshots with the built in reshade capture function and use the no drift camera mod to keep the tab camera steady
tab mode mods: no drift
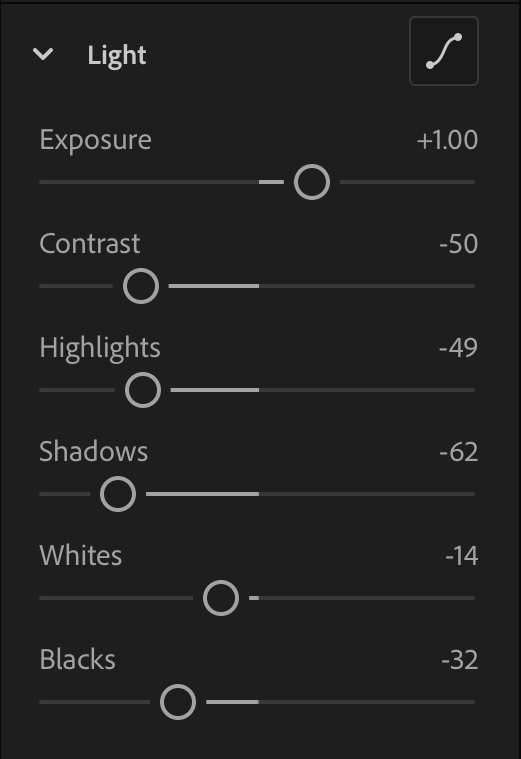
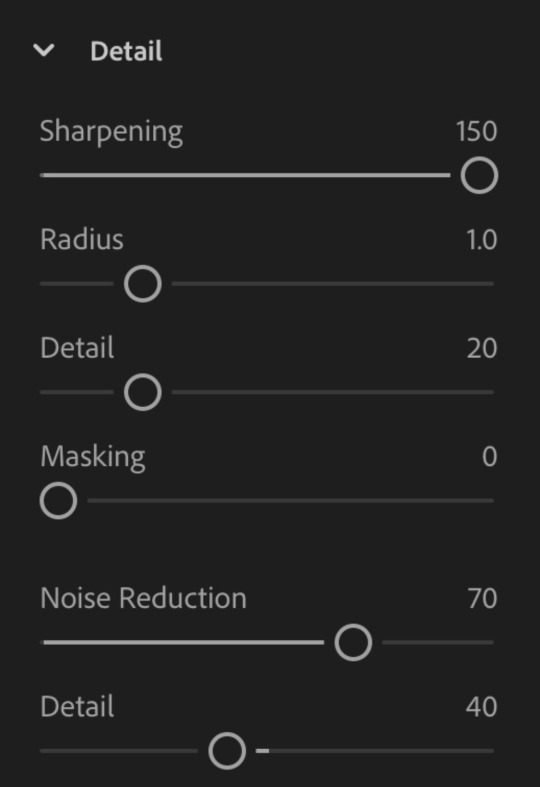
chapter 4: call me by your lightroom
now that the screenshots are taken, off to lightroom they go. i honestly don't do much editing in lightroom in terms of color grading. i mainly focus on the details and lights sections. here are my settings...

here are examples, before and after, of what the edits look like on top of the reshade


these are the same settings i use for all my photos. with the exception of the 'contrast' slider which I sometimes bring up for sims with darker skin tones. and the 'shadows' slider i sometimes bring down for night photos.
chapter 5: shout out to picsart. gotta be one of my favorite genders
from lightroom, i'll then import the photos into picarts to finish them off with light leaks and dust particles (as needed). i use the 'detail' brush under 'retouch' to color in sims and objects in the foreground (rocks, plants, bottles, etc.) to make them pop even more.
i also use this app to blur things that the reshade dof couldn't get to. here are some finished examples before and after.


chapter 6: the sons of picsart
for overlay graphics and texts, i use photoshop and phonto. for the psds, i'll import them into photoshop first to make edits then send them off to picsart to add them to my image. i'll use phonto to add texts and sometimes doodles
here are links to some of my favorite psds and other useful resources
photoshop psds: moodlets, promotions, holiday, ui mockups
other resources: sims 4 icons, text message
chapter 7: she doesn't even go here
for cas photos, since there is no tab mode, i just take screenshots as is, with the reshade dof from my preset on to blur out most of the background.
i use the cas lighting by @breezytrait to brighten the cas room up.
cas lighting: hard side light
then edit them in lightroom with he same edits as in-game photos (see chapter 4).
chapter 8: the bell doesn't dismiss you, i do
and that is how i typically edit my photos. i hope this helps inspire you for your future content... and was extensive enough. but of course if you have anymore questions feel free to leave them down below. my inbox is always open and i'm happy to help 😊.
155 notes
·
View notes
Text
Mastering the Art of Image Editing: Unveiling the Secrets to Stunning Visuals
In the dynamic and visually-driven digital landscape, image editing has become an indispensable tool for individuals and businesses alike. From social media influencers curating eye-catching feeds to businesses enhancing product images for e-commerce, the demand for high-quality, visually appealing content is at an all-time high. In this comprehensive guide, we delve into the world of image editing, exploring its significance, popular techniques, and the tools that empower creators to transform ordinary visuals into extraordinary masterpieces.
The Significance of Image Editing:
Images are powerful communicators, capable of conveying emotions, telling stories, and leaving a lasting impression. Image editing serves as the catalyst that elevates visuals to new heights, making them more engaging and effective. Whether you're a professional photographer, a social media enthusiast, or a business owner, the ability to enhance and optimize your images is a game-changer in today's competitive digital landscape.
Key Techniques in Image Editing:
Color Correction and Grading:
One of the fundamental aspects of image editing is adjusting and enhancing colors. Color correction ensures accurate reproduction of hues, while color grading allows for creative manipulation, setting the tone and mood of the image. Professionals use tools like Adobe Lightroom or Photoshop to fine-tune colors and achieve a visually cohesive look.
Retouching and Enhancement:
Perfecting portraits or product images involves retouching and enhancing details. Removing blemishes, smoothing skin tones, and refining textures are common techniques employed to achieve a polished and professional look. Advanced tools such as frequency separation help achieve nuanced results without sacrificing realism.
Cropping and Composition:
The right composition can transform an ordinary image into a captivating one. Image editing tools provide the flexibility to crop, resize, and reframe images to improve their overall composition. Attention to composition is crucial for creating visually pleasing and balanced visuals.
HDR Imaging:
High Dynamic Range (HDR) imaging is a technique that combines multiple exposures of a scene to capture a broader range of light and detail. This is particularly useful in landscape photography, architectural shots, and any scenario with varying light conditions. HDR enhances the overall tonal range and details in an image.
Adding Filters and Effects:
Filters and effects are powerful tools for infusing creativity into images. From vintage looks to modern aesthetics, a plethora of filters and effects are available to cater to diverse preferences. These can be applied to evoke specific emotions or align with a brand's visual identity.
Tools of the Trade:
Adobe Creative Cloud:
Adobe's suite of creative tools, including Photoshop and Lightroom, remains the industry standard for professional image editing. With a wide range of features and capabilities, these tools offer unparalleled flexibility and control.
GIMP (GNU Image Manipulation Program):
GIMP is a free, open-source alternative to proprietary image editing software. Despite being free, GIMP provides a comprehensive set of tools for tasks ranging from photo retouching to graphic design.
Canva:
Canva is a user-friendly online platform that caters to both beginners and professionals. It offers a range of templates and tools for easy image editing, making it accessible to those without extensive design experience.
Snapseed:
For mobile users, Snapseed is a powerful and intuitive photo editing app. Developed by Google, Snapseed provides a wide array of editing tools and filters, making it a favorite among smartphone photographers.
Conclusion:
In the digital age, where visuals reign supreme, mastering the art of image editing is a valuable skill. Whether you're a seasoned photographer or a social media enthusiast, understanding the significance of image editing and familiarizing yourself with the essential techniques and tools will undoubtedly elevate the quality of your visuals. So, embark on this creative journey, experiment with different editing styles, and witness the transformative power of image editing in making your visuals truly stand out in the digital realm.
2 notes
·
View notes
Text
photo editing
Photo editing has become an essential part of modern photography. In today's digital age, editing has allowed photographers to take their images to the next level by enhancing their visual appeal and aesthetic. With the advancement of technology, photo editing has become more accessible and user-friendly than ever before, with a wide range of software and tools available to help you achieve your desired result.
In this blog, we will discuss the basics of photo editing and provide some tips and tricks to help you improve your editing skills.
Firstly, it's important to understand that photo editing is not about altering the reality of the image but enhancing the visual appeal. The goal is to make the image look better, more captivating, and aesthetically pleasing while still maintaining the authenticity of the original photograph. This means that you should avoid over-editing your images, as it can make them look unnatural and unappealing.
The first step in photo editing is selecting the right software or tool. Some popular options include Adobe Photoshop, Lightroom, GIMP, and Canva. These programs offer a wide range of features, from basic adjustments such as brightness and contrast to advanced techniques like color grading and retouching. It's important to choose a tool that suits your needs and experience level.
Once you have selected your editing software, the next step is to import your images and make basic adjustments. These include adjusting the brightness, contrast, and saturation levels, which can dramatically improve the overall look of your image. You can also crop your images to remove any unwanted elements or to emphasize the main subject.
Another useful tool in photo editing is the use of filters. Filters can add a unique look to your images and can help you achieve a specific mood or tone. However, it's important to use filters sparingly and avoid using them as a crutch. Overusing filters can make your images look generic and unoriginal.
One of the most popular advanced techniques in photo editing is retouching. This involves removing blemishes, smoothing out skin, and correcting any imperfections in the image. However, it's important to be subtle when retouching, as overdoing it can make the image look unnatural and fake.
Color grading is another advanced technique that can make your images stand out. Color grading involves adjusting the color and tone of your image to achieve a specific look or mood. This can be done by adjusting the hue, saturation, and brightness levels of specific colors in the image.
Finally, it's important to save your edited images in the right format. JPEG is the most common format used for web and social media images, while PNG is better suited for images with transparent backgrounds. TIFF is the preferred format for print images, as it preserves the highest quality and resolution.
In conclusion, photo editing is a powerful tool that can enhance the visual appeal of your images and help you achieve your desired result. Whether you're a professional photographer or a hobbyist, learning the basics of photo editing can help take your images to the next level. Remember to keep it simple, avoid over-editing, and be subtle with your techniques. With practice and patience, you'll be able to create stunning images that will capture the attention of your audience.
Do you want edit any type of photo contact me : https://www.fiverr.com/share/V80BKB
2 notes
·
View notes
Video
youtube
Natural Color Grading and skin retouch |Photoshop Tutorial | Vidu Art
0 notes
Text
Advanced Photoshop Techniques: Elevate Your Design Skills
Introduction
Once you've mastered the basics of Photoshop, diving into advanced techniques can significantly enhance your creative projects and workflow. These advanced skills will allow you to push the boundaries of your creativity, creating professional-grade designs that stand out. In this guide, we'll explore a variety of advanced Photoshop techniques to help you elevate your work.
1. Mastering Layer Styles and Blending Modes
Understanding and utilizing advanced layer styles and blending modes can create stunning effects and bring your designs to the next level. Layer styles like Bevel & Emboss, Drop Shadow, and Gradient Overlay can add depth and dimension to your designs. Experiment with blending modes such as Multiply, Screen, Overlay, and Soft Light to blend layers creatively and achieve unique visual effects.
2. Advanced Masking Techniques
Mastering advanced masking techniques allows for precise control over image adjustments and compositions. Using layer masks, you can seamlessly blend multiple images or selectively apply adjustments to specific areas. Refine Edge and Select and Mask tools help create intricate selections for complex subjects like hair or transparent objects, ensuring smooth and realistic composites.
3. Non-Destructive Editing with Smart Objects
Smart Objects offer a powerful way to apply transformations and filters non-destructively, preserving the quality of your original images. Convert layers to Smart Objects before resizing, warping, or applying filters. This way, you can make changes without degrading the image quality, and you can always revert to the original state if needed.
4. Creative Use of Filters and Effects
Applying creative filters and effects can transform your images and add unique artistic touches. Use the Liquify filter for surreal distortions, the Oil Paint filter for a painterly look, or the Tilt-Shift filter for miniaturization effects. Combine multiple filters and effects to develop your own signature style, and use the Filter Gallery to preview combinations.
5. Advanced Retouching and Healing Techniques
Advanced retouching and healing techniques can help you achieve professional-quality results in portrait and product photography. The Healing Brush and Clone Stamp tools are excellent for removing blemishes, imperfections, and unwanted elements. Frequency Separation is a technique that separates texture and color, allowing for precise and natural-looking skin retouching.
6. Using Actions and Scripts to Automate Workflow
Automating repetitive tasks with actions and scripts can streamline your workflow and save valuable time. Photoshop Actions record a sequence of steps that you can apply to multiple images with a single click. Scripts, written in JavaScript, offer even more advanced automation possibilities, such as batch processing and complex adjustments.
7. Creating Complex Selections with Channels
Channels provide a powerful method for creating complex selections, especially when dealing with intricate details like hair or fur. By isolating the color information in different channels, you can create precise masks. Use the Alpha channel to store and refine selections, combining them with layer masks for detailed compositing work.
8. Advanced Typography and Text Effects
Elevate your text designs with advanced typography techniques and text effects that stand out. Use Layer Styles to add shadows, glows, and textures to your text. Explore the capabilities of the 3D Text tool to create dynamic and realistic text effects. Combine text with clipping masks and layer blending modes for creative and impactful typography.
9. 3D Effects and Compositing
Explore the world of 3D in Photoshop to create immersive effects and complex composites. Use the 3D workspace to build, texture, and light 3D objects. Integrate 3D elements with 2D images to create realistic scenes. Experiment with depth maps, extrusions, and 3D layers to add an extra dimension to your designs.
10. Leveraging the Power of Camera Raw
The Camera Raw filter offers advanced tools for photo editing, providing greater control over exposure, color, and detail. Use Camera Raw to make global adjustments, such as correcting white balance, enhancing contrast, and sharpening details. The local adjustment tools, like Graduated Filter and Adjustment Brush, allow for precise, targeted edits to specific areas of your image.
Conclusion
By incorporating these advanced Photoshop techniques into your skill set, you can push the boundaries of your creativity and produce professional-grade designs. Mastering layer styles, blending modes, and advanced masking techniques will refine your compositing skills, while non-destructive editing and automation will streamline your workflow. Embrace the power of Photoshop's advanced features, and watch your design capabilities soar.
#photoshop#onlineducation#hrishionlinebuddhi#onlinelearing#career#course#graphic design#Photoshop#graphic design tutorials#Photoshop tutorials#learn graphic design online#best graphic design software#free Photoshop course#graphic design courses#advanced Photoshop techniques#graphic design certification online#Photoshop for beginners#graphic design inspiration#Photoshop tips and tricks#online graphic design degree#how to use Photoshop#graphic design portfolio examples#free graphic design resources#graphic design trends 2024#Photoshop editing techniques#graphic design jobs
0 notes
Text
The Best Tools for Professional-Grade Photo Retouching

Introduction
Professional-grade photo retouching requires the right set of tools to achieve stunning results. Whether you're retouching portraits, landscapes, or product photos, using the best software and tools can make a significant difference in the quality of your work. This blog post will explore the best tools available for professional-grade photo retouching, helping you choose the right ones for your needs.
Adobe Photoshop
Overview
Adobe Photoshop is the gold standard in photo retouching, used by professionals worldwide. Its vast array of tools and features make it the go-to choice for detailed and precise retouching.
Key Features
Healing Brush and Clone Stamp: For removing blemishes and imperfections.
Liquify Tool: For reshaping and adjusting elements within a photo.
Adjustment Layers: For non-destructive color correction and exposure adjustments.
Advanced Layer Masks: For precise control over edits.
Pros and Cons
Pros: Extensive features, industry-standard, excellent support and tutorials.
Cons: Steep learning curve, subscription-based pricing.
Adobe Lightroom
Overview
Adobe Lightroom is perfect for photographers who need both powerful editing tools and robust photo management features. It excels in batch processing and non-destructive editing.
Key Features
Global and Local Adjustments: For fine-tuning exposure, color, and detail.
Presets: For quick, consistent edits across multiple photos.
Photo Organization: With tagging, rating, and collections.
Integration with Photoshop: Seamless workflow between the two programs.
Pros and Cons
Pros: Easy to use, excellent for batch processing, integrates well with Photoshop.
Cons: Subscription-based pricing, fewer retouching tools compared to Photoshop.
Affinity Photo
Overview
Affinity Photo is a powerful and affordable alternative to Photoshop, offering many of the same advanced features without a subscription model.
Key Features
Inpainting Brush Tool: For removing blemishes and objects.
Frequency Separation: For professional skin retouching.
Advanced Layer Support: Including non-destructive adjustments.
HDR Merging and Panorama Stitching: For creating stunning composite images.
Pros and Cons
Pros: One-time purchase, powerful features, supports PSD files.
Cons: Smaller community, fewer tutorials compared to Adobe products.
Capture One
Overview
Capture One is renowned for its superior color grading and tethered shooting capabilities, making it a favorite among professional photographers.
Key Features
Advanced Color Editor: For precise color adjustments.
High-Quality RAW Processing: For maximum image quality.
Tethered Shooting: For real-time edits during photoshoots.
Layer-Based Editing: For non-destructive adjustments.
Pros and Cons
Pros: Superior color grading, excellent RAW processing, powerful tethered shooting.
Cons: Expensive, steep learning curve.
GIMP
Overview
GIMP (GNU Image Manipulation Program) is a free, open-source photo editing software that offers a range of powerful tools, making it a great option for budget-conscious photographers.
Key Features
Clone and Heal Tools: For removing imperfections.
Customizable Interface: To fit your workflow.
Layer Support: For non-destructive editing.
Extensive Plugin Support: For added functionality.
Pros and Cons
Pros: Free, powerful features, customizable.
Cons: Less polished interface, steeper learning curve.
Conclusion
Choosing the right tools for professional-grade photo retouching is essential for achieving high-quality results. Adobe Photoshop and Lightroom remain industry standards due to their extensive features and integration. Affinity Photo offers a cost-effective alternative with powerful capabilities. Capture One stands out for its color grading and tethered shooting. GIMP provides a robust free option for those on a budget. By selecting the tools that best fit your needs and workflow, you can elevate your photo retouching to a professional level.
0 notes
Text
Portrait Retouching Tips and Tricks: Enhance Your Images Like a Pro

Portrait retouching is an essential skill for photographers and digital artists looking to elevate their work. Whether you're refining headshots for a professional portfolio or enhancing family portraits, mastering these techniques can make a significant difference. In this article, we’ll cover top tips and tricks for effective portrait retouching.
Understanding the Basics of Portrait Retouching
Portrait retouching is a part of image editing. Before diving into advanced techniques, it’s important to understand the fundamentals of portrait retouching. The primary goal is to enhance the subject’s natural features while maintaining a realistic look. Here are the basics to keep in mind:
Skin Smoothing: Smooth out blemishes and uneven skin tones without removing natural texture.
Color Correction: Adjust the colors to achieve a balanced and flattering look.
Detail Enhancement: Sharpen eyes, hair, and other key features to make the portrait pop.
Essential Tools for Portrait Retouching
Using the right tools is crucial for effective retouching. Most professional retouchers rely on Adobe Photoshop, but there are other options like Lightroom and GIMP. Key tools within these software include:
Healing Brush Tool: Perfect for removing blemishes and imperfections.
Clone Stamp Tool: Useful for replicating skin texture and fixing larger areas.
Dodge and Burn: Essential for enhancing highlights and shadows to add depth to the portrait.
Step-by-Step Portrait Retouching Process
1. Initial Adjustments
Start with basic adjustments to set the stage for detailed retouching:
Exposure and Contrast: Ensure the image has balanced exposure and contrast.
White Balance: Correct the white balance to avoid unnatural skin tones.
Cropping and Framing: Crop the image to focus on the subject and improve composition.
2. Skin Retouching
Achieving smooth, natural-looking skin is often the primary focus of portrait retouching:
Frequency Separation: This technique separates the texture and color layers, allowing for detailed skin smoothing without losing texture.
Healing and Cloning: Use the healing brush and clone stamp tools to remove blemishes, wrinkles, and other imperfections.
Skin Tone Adjustments: Use selective color correction to even out skin tones and reduce redness.
3. Enhancing Features
Pay special attention to the subject’s eyes, hair, and other defining features:
Eyes: Sharpen the eyes and enhance the catchlights to make them stand out. You can also whiten the sclera (whites of the eyes) slightly for a brighter look.
Teeth: Use a whitening tool or adjustment layer to brighten the teeth, but be careful not to overdo it.
Hair: Enhance hair by increasing its shine and adding volume. Use the dodge and burn tools to create depth and highlights.
4. Color Grading
Color grading can dramatically change the mood and feel of a portrait:
Hue and Saturation: Adjust the overall hue and saturation to complement the skin tones and background.
Split Toning: Add subtle color tones to the shadows and highlights to create a cohesive look.
5. Final Touches
Before finalizing your retouching, make sure to review the image for any inconsistencies:
Sharpening: Apply a final sharpening pass to enhance details.
Noise Reduction: Reduce any noise that may have been introduced during retouching.
Overall Check: Zoom out and check the image as a whole to ensure everything looks natural and cohesive.
Common Mistakes to Avoid
Even seasoned retouchers can fall into common pitfalls. Here are some mistakes to watch out for:
Over-Retouching: Avoid making the subject look plastic or unrealistic by over-smoothing the skin.
Ignoring Proportions: Be mindful of the subject’s natural proportions and avoid excessive reshaping.
Inconsistent Lighting: Ensure that the retouching matches the original lighting conditions to maintain realism.
Conclusion
Photo retouching is a blend of art and science, requiring both technical skills and a keen eye for detail. By mastering the tools and techniques outlined in this guide, you can enhance your portraits while preserving the subject’s natural beauty. Practice regularly, and don't be afraid to experiment with new methods to find your unique style.
For more in-depth tutorials and resources on portrait retouching, consider exploring online courses and professional workshops to continue honing your skills. Happy retouching!
#PortraitRetouching#PhotoEditingTips#DigitalArtistry#RetouchingTechniques#PhotoshopSkills#PhotographyTips#SkinRetouching#ColorGrading#PhotoEnhancement#CreativeEditing
1 note
·
View note
Text
skin retouching and photo masking service
Welcome to Merchynt's world of creativity, where every image is transformed into a masterpiece! 🎨 Our skin retouching and Photo Masking Service are designed to elevate your photographs to new heights of perfection. Whether you're a photographer looking to enhance your portfolio, a business in need of stunning visuals, or simply someone who appreciates impeccable image refinement, Merchynt is here to exceed your expectations. ✨
Our Photo maskings is not just about editing; it's about crafting enchanting visuals that captivate and inspire. With our meticulous attention to detail and commitment to excellence, we ensure that every image tells a story of beauty and sophistication. 💫
Join the ranks of satisfied clients who have experienced the Merchynt difference. Discover the transformative power of our services and unlock the full potential of your images. 🌟 Trust in Merchynt for unparalleled quality, reliability, and creativity. Let us turn your vision into reality!
#photography#professional editing#skin smoothing#affinity photo high end retouching#high end skin retouching action#skin retouching and color grading in photoshop#pixelmator pro skin retouching#face retouching in photoshop cc plugins#one click skin retouching free photoshop action#affinity photo face retouch#capture one skin smoothing#capture one portrait retouching#capture one pro skin retouching#capture one skin retouching#capture one face retouching#masking photo editing lightroom#skin smoothing plugin photoshop#skin retouching camera raw#skin retouching capture one
0 notes
Text
The Art and Science of Fashion Photography Retouching
Fashion photography retouching is a crucial aspect of the fashion industry, seamlessly blending art and science to produce visually captivating images. It involves enhancing photographs to perfection, creating an idealized representation of models, clothing, and accessories. The goal is to maintain a balance between realism and idealization, ensuring that the images are both appealing and believable.
Understanding Fashion Photography Retouching
Fashion photography retouching is more than just superficial enhancement. It encompasses various techniques aimed at improving the overall quality of an image. These techniques include color correction, skin smoothing, blemish removal, background enhancement, and even reshaping certain elements to achieve the desired look. The process is meticulous, requiring a keen eye for detail and a profound understanding of both photography and digital editing tools.
Tools of the Trade
Professional retouchers primarily use advanced software like Adobe Photoshop and Lightroom. These tools offer a wide range of functions that cater to every aspect of photo retouching. Photoshop, for instance, provides powerful capabilities for precise adjustments, allowing retouchers to manipulate images at the pixel level. Lightroom, on the other hand, is excellent for handling large batches of photos, making initial corrections, and setting the overall tone of the images.
Key Techniques in Fashion Photography Retouching
Skin Retouching: One of the most critical aspects of fashion photography retouching is skin enhancement. This involves smoothing the skin, removing blemishes, and evening out skin tones. However, it's crucial to retain the natural texture of the skin to avoid an overly airbrushed or artificial look. Techniques like frequency separation and dodge and burn are commonly used to achieve this balance.
Color Correction and Grading: Color plays a significant role in the mood and style of a fashion photograph. Retouchers adjust the colors to ensure that they are vibrant and true to life. This can involve correcting white balance, enhancing the colors of the garments, and applying color grading to create a cohesive look across a series of images.

Lighting Adjustments: Proper lighting is essential in photography, but sometimes even the best lighting setups need enhancement in post-production. Retouchers adjust the brightness, contrast, and shadows to highlight the model and the clothing effectively. This step ensures that the images are visually striking and professionally polished.
Background and Element Enhancement: The background of a fashion photograph should complement the subject without drawing attention away from it. Retouchers might blur backgrounds slightly, adjust their colors, or remove distracting elements to maintain focus on the model and the fashion being showcased.
Reshaping and Sculpting: Sometimes, minor adjustments to the model's shape or the fit of the clothing are necessary. This can involve subtle reshaping of body parts or the adjustment of clothing to fit perfectly. It's important to do this tastefully and realistically, Ecommerce fashion photography retouching ensuring that the final image remains true to the model’s actual appearance.
Ethical Considerations
While retouching is a standard practice in fashion photography, it's important to approach it ethically. Over-retouching can lead to unrealistic body standards and perpetuate unhealthy beauty ideals. Ethical retouching involves enhancing the image while maintaining the authenticity of the subject. The fashion industry is gradually shifting towards a more natural and inclusive representation, where diversity and realness are celebrated.
0 notes
Text

Hi there,
Greetings from our service These are the services listed below that we offer in this.
Types of Retouching/Editing we provide:
Beauty
Fashion
Editorial
Portrait
Headshot
Lifestyle, Sport, product
Maternity& New born etc
My Workflow or Service:
High-end natural skin retouching with micro/macro dodge&Burn
Skin ,hairs, cloths and background cleaning
Frequnecy Separation
Makeup correction/adding
Body reshaping/recomposing
color correction& color grading
Photoshop, Lightroom, and Capture One Pro are the programs we utilize for retouching. Our skilled team can handle all of your work and provide excellent results quickly. To learn more about our unique offer for photographers, click here. Send now.
#photoretouching#photoshop#photography#photoediting#retouching#retouch#backgroundremoval#imageediting#clippingpath#portrait#photorestoration#photoretouch#photoshopediting#retoucher#whitebackground#colorcorrection#productphotography#backgroundremove#photo#beautyretouching#editing#fashion#portraitphotography#removebackground#background#graphicdesign#photographer#beautyretouch#backgroundremoveservice#retouchingservices
1 note
·
View note
Link
Manny Ortiz Portrait Retouching Tutorial DOWNLOAD What you will learn Produce smooth skin textures and remove blemishes using Frequency Separation Blending skin tones and improving skin discoloration Sculpt your images using my Dodge and Burn techniques In- depth color grading using Adobe Lightroom My personal workflow with Lightroom and Photoshop. All of my secrets revealed! Here is what you get 8 retouching videos 8 raw files (so you can follow along as I edit) Frequency Separation + dodge & burn Photoshop actions Social Media resizing tutorial (With free Photoshop action) 1.5 hours of video footage Filmic Preset Pack V1 (MUST HAVE PHOTOSHOP & LIGHTROOM FOR THIS COURSE) *****BONUS: FREE COPY OF MY BRAND NEW LIGHTROOM PRESET PACK CALLED THE WALMART DRAKE PRESETS WILL BE INCLUDED ($25 VALUE) OFFER EXPIRES 8/26/19 My personal technique to skin retouching using Frequency Separation! Smoothen skin like a PRO! I will provide a FREE Frequency Separation Photoshop action! Dodge and Burn professionally using my approach to achieve a dynamic POP! This is such an important technique to learn. I provide a free D&B Photoshop action Color grading with ease using my workflow in Lightroom Learn how I retouch portraits with uneven lighting and blending skin color Easily get rid of those blotchy areas on skin From start to finish. No secrets! You will see my entire retouching process! yep, all of it! My process is easy to learn and perfect for beginners or anyone who doesn't have much experience retouching portraits I love golden hour portraits but sometimes, a raw image doesn’t do it justice I will show you how I get these dreamy golden hour tones! FREE COPY OF MY BRAND NEW LIGHTROOM PRESETS ARE INCLUDED Offer expires on 8/26/19 P.S These are the best ones I’ve made!
0 notes
Text

Face color variant retouching typically involves adjusting the skin tones and colors in a portrait to achieve a desired look. This process is often used in professional photography or digital image editing to enhance the appearance of the subject. Here are some general steps you can follow for face color variant retouching:
Open the Image:
Use a photo editing software like Adobe Photoshop, GIMP, or any other tool that supports detailed image editing.
Duplicate the Layer:
Duplicate the background layer to have a copy to compare changes and for non-destructive editing.
Selective Color Adjustment:
Use selective color adjustments to target specific colors in the image, including those in the skin tones. Adjust the levels of reds, yellows, and magentas to achieve the desired skin tone. This can be done through adjustment layers or direct adjustments, depending on the software you're using.
Hue/Saturation Adjustment:
Fine-tune the overall color balance using the Hue/Saturation adjustment. This allows you to adjust the hue, saturation, and lightness of specific color ranges.
Curves Adjustment:
Use curves to adjust the overall contrast and color balance. This can help bring out or subdue certain tones in the image.
Dodge and Burn:
Use dodge and burn tools to lighten or darken specific areas of the face. This can help emphasize highlights and shadows, giving the face more dimension.
Frequency Separation:
Apply frequency separation to separate the texture and color information in the image. This allows for more targeted retouching of skin tones without affecting the overall texture.
Color Correction Brushes:
Use brushes with low opacity to selectively paint over areas that need color correction. This can be useful for areas with uneven skin tones.
Skin Smoothing (Optional):
If necessary, apply skin smoothing techniques. Be cautious not to overdo it, as excessive smoothing can make the image look unnatural.
Final Adjustments:
Make final adjustments as needed, such as sharpening, overall color grading, and any other enhancements.
Compare with Original:
Regularly compare your edited image with the original to ensure that you are achieving the desired result.
Remember to work non-destructively by using adjustment layers or keeping a copy of the original image. Additionally, it's important to maintain a natural look and avoid over-manipulating the image. The goal is often to enhance the subject's appearance rather than create an unrealistic or artificial look.
#retouching#design#editing#photoshop#reaction image#image clipping service#clippingpathservice#jewelry
0 notes
Text
Mastering Digital Retouching: Key Techniques for Stunning Photos

Introduction
In the world of photography, digital retouching has become an essential skill for creating stunning images. Whether you're a professional photographer or an enthusiastic hobbyist, mastering digital retouching can elevate your photos to new heights. This blog post will explore key techniques for digital retouching, providing you with the knowledge and tools to enhance your images effectively.
Understanding Digital Retouching
Digital retouching involves using photo editing software to enhance and manipulate images. This can include correcting flaws, adjusting colors, enhancing details, and more. The goal is to create a polished, professional-looking photo while maintaining a natural appearance.
Key Techniques for Digital Retouching
1. Blemish Removal
One of the most common retouching tasks is removing blemishes and imperfections. Tools like the Healing Brush, Spot Healing Brush, and Clone Stamp in Adobe Photoshop are invaluable for this task. They allow you to seamlessly remove spots, acne, and other imperfections, creating smooth, flawless skin.
2. Skin Smoothing
While it's important to remove blemishes, over-smoothing can make skin look unnatural. Use techniques like frequency separation, which allows you to separate texture from color, to achieve smooth skin without losing detail. Tools like the Mixer Brush can also help blend skin tones subtly.
3. Color Correction
Color correction is crucial for achieving a balanced, natural look. Use adjustment layers for levels, curves, and color balance to correct any color casts and ensure the skin tones are accurate. White balance adjustments can also help achieve the correct color temperature.
4. Enhancing Eyes
Eyes are a focal point in portraits, and enhancing them can make a significant impact. Use tools like the Dodge and Burn to brighten the whites of the eyes and add depth to the irises. Sharpening the eyes slightly can also make them stand out more.
5. Hair Retouching
Hair retouching involves removing stray hairs, adding volume, and sometimes even changing the hair color. Use the Clone Stamp or Healing Brush to remove stray hairs. For adding volume, use the Liquify filter subtly to shape the hair. Adjusting the hue and saturation can help with color changes.
Tools for Digital Retouching
Adobe Photoshop: The industry standard for photo retouching with a wide array of tools.
Adobe Lightroom: Excellent for color correction and overall enhancements.
Affinity Photo: A powerful alternative to Photoshop with robust retouching capabilities.
Capture One: Known for its superior color grading and tethered shooting features.
Tips for Effective Retouching
Work Non-Destructively: Use layers and masks to make edits without altering the original image.
Zoom In and Out: Regularly zoom in to work on details and zoom out to see the overall effect.
Use Soft Brushes: Soft-edged brushes create smoother transitions and more natural edits.
Take Breaks: Stepping away from your work and coming back with fresh eyes can help you spot areas that need improvement.
Conclusion
Mastering digital retouching is a valuable skill that can significantly enhance your photography. By understanding and applying key techniques, such as blemish removal, skin smoothing, color correction, eye enhancement, and hair retouching, you can create stunning, professional-quality photos. With practice and the right tools, you'll be able to transform your images and bring your creative vision to life.
0 notes
Text
Mastering Photo Retouching: Your Guide to Professional Results
Photo retouching is a powerful art that can elevate your images to a professional standard. Whether you're a photographer looking to enhance your portfolio, a model seeking flawless pictures, or anyone interested in perfecting their photos, mastering the art of photo retouching is essential. In this comprehensive guide, we'll delve into the fundamental principles of professional photo retouching, the tools and techniques involved, and how to achieve stunning results. We'll also discuss the significance of professional photo retouching services like Clipping World and offer insights on how to enhance your skills by listening to Photo retouching podcasts.
Grasping the Essentials
Before delving into advanced photo retouching techniques, it's essential to understand the core principles of professional photo retouching. These principles will help you achieve a natural, polished look:
a. Skin Retouching: Eradicate imperfections, blemishes, and wrinkles while retaining skin texture and tone.
b. Color Enhancement: Adjust exposure, contrast, and color balance to attain vibrant and harmonious images.
c. Background Refinement: Ensure that the background complements the subject without distracting from it.
d. Detail Enhancement: Accentuate key details like eyes or hair to draw the viewer's attention.
Equipping Yourself with the Right Tools
To retouch photos like a professional, you need access to the right tools and software. Adobe Photoshop and Lightroom are popular choices among professional photo retouchers due to their extensive feature sets. When working on an image, use tools such as the clone stamp, healing brush, and adjustment layers to enhance your photographs.
Non-Destructive Editing
A hallmark of professional photo retouching is non-destructive editing. This method involves making edits on separate layers to preserve the original image. Non-destructive editing allows you to make adjustments or undo changes without compromising image quality. Utilize tools like adjustment layers, layer masks, and smart objects in Photoshop to facilitate this approach.
Skin Retouching Techniques
Achieving flawless skin is often a top priority in professional photo retouching. Effective skin retouching techniques include:
a. Frequency Separation: Split the image into two layers, one for texture and one for color, enabling precise adjustments to each.
b. Dodging and Burning: Use dodge and burn tools to selectively lighten and darken areas, resulting in a smoother skin tone.
c. Healing and Cloning: Eliminate imperfections using the healing brush and clone stamp while preserving skin texture.
Color Correction and Enhancement
Correcting and enhancing color can significantly transform an image. Techniques include:
a. Curves and Levels: Adjust the image's contrast and tonal range with curves and levels.
b. Color Grading: Employ color grading techniques to establish a specific mood or style.
c. White Balance: Rectify any color cast by fine-tuning the white balance.
Background Enhancement
The background of an image plays a pivotal role in its overall appeal. To enhance the background:
a. Background Blurring: Employ depth-of-field adjustments to create an appealing bokeh effect.
b. Composite Images: Substitute the background with a more suitable one to enhance the overall composition.
c. De-clutter: Eliminate distractions and unnecessary elements from the background.
Detail Enhancement
Accentuating specific details can significantly boost an image's impact. Techniques include:
a. Sharpening: Utilize sharpening tools to bring out fine details such as hair or texture.
b. Eye Enhancement: Emphasize the eyes with techniques like brightening, enhancing catchlights, and adjusting color.
Continuous Practice and Improvement
Becoming a professional photo retoucher requires continuous practice and experience. Work on a variety of images and consistently refine your skills. Study the work of experienced retouchers and photographers to gain inspiration and insights.
Photo Retouching Services
Achieving professional-level retouching can sometimes be time-consuming. In such cases, professional photo retouching services like Clipping World can provide expertise in retouching, helping you achieve the polished, flawless appearance you desire for your photos.
Conclusion
Mastering photo retouching is a blend of technical knowledge, artistic intuition, and dedication to practice. By grasping the fundamentals, using the right tools, and embracing non-destructive editing, you can bring your images to life, transforming them into truly exceptional visuals. Whether you're an aspiring photographer or an individual seeking to enhance personal photos, photo retouching is a valuable skill that can turn your images into professional works of art. Additionally, listening to relevant podcasts can further enhance your skills and knowledge in the world of photo retouching.
#professional photo editing services#professional photo retouching#professional photo retouching service#Retouching guide#Photo#Photography
1 note
·
View note
Text
Photo editing service
A photo editing service is a professional service that specializes in enhancing and modifying photographs to improve their overall quality, appearance, and appeal. These services offer a wide range of editing techniques and tools to address various aspects of a photo, such as color correction, exposure adjustment, removal of imperfections or blemishes, retouching, cropping, resizing, and much more. Photo editing services typically employ skilled editors who are proficient in using advanced software like Adobe Photoshop or Lightroom to achieve desired results. By utilizing these services, individuals and businesses can transform their ordinary photos into visually stunning and captivating images, suitable for various purposes like online marketing, social media, printing, personal use, and professional portfolios.
- Professional photo retouching

Professional photo retouching is the process of enhancing and improving the appearance of a photograph. It can involve various techniques, such as adjusting brightness and contrast, removing blemishes or wrinkles, smoothing skin, correcting colors, removing or adding elements, and more.
To get professional photo retouching done, you have a few options:
1. DIY using photo-editing software: If you have basic editing skills and access to software like Adobe Photoshop or Lightroom, you can retouch your photos yourself.
2. Hiring a freelance retoucher: There are many freelance retouchers available online who specialize in photo retouching. Platforms like Upwork, Fiverr, and Freelancer allow you to hire retouchers based on their skill level and portfolio. Make sure to communicate your requirements and provide reference photos for clear instructions.
3. Working with a professional retouching service: Several companies and agencies specialize in professional photo retouching. They often have a team of retouchers with different specializations and offer a range of services. You can search online for reputable retouching services and compare their prices and portfolios before making a decision.
When choosing a method, consider your skill level, time constraints, and the level of retouching you require. It's important to communicate your expectations clearly and provide any specific instructions or reference images to achieve the desired results.
- Color correction and enhancement

Color correction and enhancement is the process of adjusting and improving the colors in an image or video. It is commonly used in photography, graphic design, and video production to ensure accurate and visually appealing colors.
There are several techniques and tools available for color correction and enhancement, depending on the software you are using. Here are some common methods:
1. White Balance Adjustment: This involves adjusting the colors in an image to remove any unwanted color casts. It provides a neutral color balance and ensures that whites appear true white.
2. Exposure Adjustment: This helps to correct the brightness and contrast levels in an image or video. It allows you to brighten or darken specific areas to achieve the desired look.
3. Saturation and Vibrancy Adjustment: These adjustments control the intensity and richness of colors in an image or video. Increasing saturation can make colors more vibrant, while decreasing it can create a more muted effect.
4. Selective Color Correction: This technique allows you to adjust the individual colors in an image or video. It can be used to enhance or correct specific colors, such as making blues more vibrant or reducing the intensity of reds.
5. Curves and Levels Adjustment: These tools provide granular control over the tonal range and color balance of an image or video. They allow you to adjust shadows, highlights, and midtones to fine-tune the overall look.
6. Color Grading: This is a more advanced technique used in video production to create a specific mood or look. It involves adjusting the color tones and creating a consistent color scheme throughout a video.
When it comes to color correction and enhancement, it's important to work with the original files and make non-destructive edits whenever possible. This allows you to easily revert back to the original if needed.
Different software applications offer these color correction and enhancement tools, such as Adobe Photoshop, Lightroom, DaVinci Resolve, and Final Cut Pro, among others. It's important to familiarize yourself with the specific tools and processes within your preferred software to achieve the desired results.
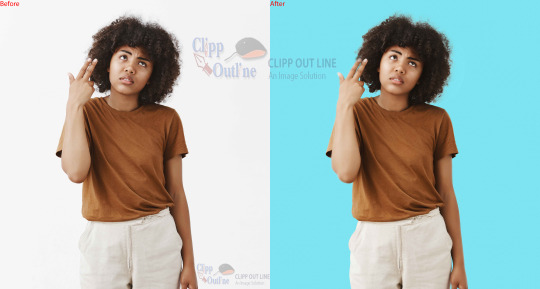
- Background removal and replacement

Background removal and replacement refers to the process of isolating the main subject in an image or video and removing the existing background. This allows for the replacement of the original background with a new one, creating a different visual context or enhancing the overall aesthetic of the image or video.
There are various techniques and tools available for background removal and replacement. Some popular methods include:
1. Manual selection: Using selection tools in photo editing software, such as Photoshop, the user manually selects the subject and removes the background. This method requires precision and can be time-consuming, especially for complex images.
2. Background eraser tool: Many image editing software provide a background eraser tool that automatically removes background pixels based on similar color or tone. This tool requires fine-tuning to ensure accurate removal.
3. Masking: With masking, the user can create a layer mask to reveal or hide certain parts of an image. By painting over the areas to be removed or kept, the background can be effectively separated from the subject.
4. Deep learning-based methods: Recent advancements in AI and machine learning have introduced automated background removal techniques. These methods utilize deep learning algorithms to analyze and extract the main subject from an image or video. Tools like Adobe Sensei, Remove.bg, and Unscreen utilize these techniques to offer quick and accurate background removal.
Once the background is removed, the user can replace it with a new background of their choice. This can be done by either manually adding a new background or using pre-existing background templates or stock images. Some advanced software even allows for the seamless integration of the main subject with the new background, ensuring a realistic and visually pleasing result.
It's important to note that the effectiveness of background removal and replacement techniques depends on factors such as image complexity, subject extraction accuracy, and the user's skill level. Experimenting with different methods and tools will help achieve the desired outcome.
- Image resizing and cropping
When it comes to image resizing and cropping, there are several methods you can employ depending on your requirements and the tools at your disposal. Here are a few common approaches:
1. Image Editing Software: This is the most versatile and commonly used method. Software like Adobe Photoshop, GIMP, or Pixlr allows you to easily resize and crop images. These tools provide precise control over dimensions, resolution, aspect ratio, and cropping. You can choose to resize by percentage, specific dimensions, or even maintain the original aspect ratio while resizing. Cropping allows you to select a specific portion of an image and remove the rest.
2. Online Image Editors: If you don't have access to dedicated image editing software, you can use online image editing tools such as Canva, Fotor, or Pixlr. These web-based tools offer resizing and cropping features similar to dedicated software. You can upload your image, specify the desired dimensions, and then either crop or resize accordingly.
3. Command Line Tools: If you prefer using the command line or need to automate the process, you can use command line tools like ImageMagick. ImageMagick is a powerful tool that provides various command line options for image manipulation, including resizing and cropping. You can find detailed documentation and examples on the ImageMagick website.
4. Programming Libraries: If you are familiar with programming, you can utilize libraries such as OpenCV (for C++/Python), PIL/Pillow (for Python), or GD (for PHP) to perform image resizing and cropping programmatically. These libraries provide APIs and functions that allow you to manipulate images, including resizing and cropping.
Remember to always work on a copy of your original image to preserve the original and avoid losing any important data. Additionally, be mindful of the aspect ratio to prevent distortion when resizing and choose the appropriate cropping ratio to maintain the desired composition.
- Beauty and skin retouching

Beauty and skin retouching is a technique used in photo editing to enhance the appearance of a person's skin and overall beauty. There are various software applications and tools available that can be used for this purpose.
When retouching skin, the goal is to achieve a natural and subtle enhancement while maintaining the person's original features. Here are some common techniques used in beauty and skin retouching:
1. Blemish Removal: This involves removing any acne, spots, or other imperfections on the skin. Clone stamp or healing brush tools can be used to carefully remove blemishes without affecting the surrounding areas.
2. Skin Smoothing: To create a smooth and flawless look, techniques like frequency separation can be used. This involves separating the texture and color of the skin and then using a blur or smoothing effect on the texture while preserving the color information.
3. Skin Tone and Color Correction: Adjusting the skin tone and color can help achieve a more even and vibrant look. Tools like curves or color balance can be used to correct any color imbalances or discolorations.
4. Reducing Wrinkles and Fine Lines: Techniques such as dodge and burn can be used to selectively lighten or darken areas, helping to reduce the appearance of wrinkles and fine lines.
5. Enhancing Features: Beauty retouching may involve enhancing features such as eyes, lips, and hair. Techniques like dodge and burn can be used to enhance highlights and shadows, adding depth and dimension.
It's important to approach beauty and skin retouching with care and avoid excessive edits that result in an unnatural or unrealistic appearance. It's also essential to respect the person's individuality and ensure their consent when retouching their photos.
- Object and people removal
Removing objects and people from images is a common task in image editing and graphic design.
1. Content-Aware Fill: Many photo editing software, such as Adobe Photoshop, offer a Content-Aware Fill feature. This tool analyzes the surrounding areas of the object or person you want to remove and fills in the space with similar textures and colors, creating a seamless result.
2. Cloning/Healing Brush: Another common method is to use cloning or healing brushes. These tools allow you to sample pixels from one area of the image and paint over the object or person you want to remove. This technique requires careful attention to detail to ensure a natural-looking result.
3. Layer Masking: If you are working with layers in your image editing software, you can use layer masking techniques to remove objects or people. By creating a layer mask and painting black on the mask where you want to hide the object or person, you can effectively remove them.
When using any of these methods, it's important to have good editing skills and pay attention to the details to achieve a convincing result.
- Photo restoration and repair
Photo restoration and repair is the process of restoring and repairing old, damaged, or faded photographs to their original condition or improving their overall appearance. Here are some steps and techniques commonly used in photo restoration and repair:
1. Assess the damage: Begin by analyzing the condition of the photograph, identifying any cracks, tears, stains, color fading, or other damage. This evaluation helps determine the best approach for restoration.
2. Digitize the photo: If the photo exists in physical form, it's important to create a digital copy. This can be done by scanning the image using a high-resolution scanner or by taking a high-quality photograph of the original using a digital camera.
3. Clean the image: Remove any physical dirt, dust, or debris from the scanned or photographed image using software tools like Photoshop. Be careful not to damage the original photo during this process.
4. Fix cracks and tears: Use specific tools in photo editing software to repair any cracks or tears in the image. The clone stamp or healing brush tool can be used to copy and replace damaged parts of the photo with adjacent undamaged areas.
5. Restore color and contrast: Adjust the color balance, exposure, and contrast levels in the image to enhance its overall appearance. This can help revitalize faded colors and improve the image's clarity.
6. Remove stains and spots: Utilize the spot healing brush or patch tool in software like Photoshop to remove stains, spots, or scratches. These tools can be effective in seamlessly blending and repairing damaged areas.
7. Reconstruct missing parts: In cases where important elements of the image are missing, such as facial features, backgrounds, or objects, digital reconstruction techniques can be employed to recreate and restore those parts.
8. Preserve the original look: While restoration aims to improve the photo's appearance, it's crucial to maintain its original characteristics and avoid over-editing. Retain the original essence of the photograph while making necessary repairs.
9. Print and display: Once the restoration is complete, the photo can be printed on high-quality archival paper to ensure its longevity. Consider framing or storing it in an acid-free sleeve or album to protect it from further damage.
It's worth noting that photo restoration and repair can be a complex and time-consuming process, particularly for severely damaged photographs. In such cases, it may be best to consult a professional photo restoration service or specialist who has the expertise and specialized equipment to handle more challenging restoration projects.
- Adding or removing objects or text
To add or remove objects or text in a photo, you can use photo editing software such as Adobe Photoshop or GIMP (a free and open-source alternative).
1. Open the photo in the photo editing software.
2. To add an object or text:
a. Use the selection tools (e.g., the lasso tool or the pen tool) to outline the area where you want to add the object or text.
b. Create a new layer to add the object or text on.
c. Use the appropriate tool (e.g., the brush tool or the text tool) to place the object or text on the new layer.
d. Adjust the position, size, color, and other properties as needed.
3. To remove an object or text:
a. Use the selection tools to outline the object or text you want to remove.
b. Use the appropriate tool (e.g., the eraser tool or the content-aware fill tool) to remove the selected area.
c. Clean up any remaining artifacts or inconsistencies by using tools such as the clone stamp or the healing brush.
4. Once you are satisfied with the changes, save the edited photo.
It's also important to respect copyright and intellectual property rights when editing photos. Always make sure you have the necessary permissions to make changes to someone else's work.
- Photo manipulation and compositing
Photo manipulation and compositing refer to the process of altering and combining multiple images to create artistic or realistic visuals. It involves techniques such as retouching, color correction, blending, removing or adding elements, and adjusting overall composition to achieve a desired result.
Image editing software like Adobe Photoshop, GIMP, or Affinity Photo are commonly used for photo manipulation and compositing tasks. These software tools provide a wide range of features and tools that enable users to edit, enhance, and manipulate images with precision.
In photo manipulation, creative effects can be applied to images to create surreal or imaginative results. This can involve adding or removing objects, changing backgrounds, adjusting lighting and colors, and manipulating shapes and perspectives. The goal is to transform an image into something different from its original form.
Compositing, on the other hand, involves merging multiple images seamlessly to create a new composition. This technique is often used in areas like advertising, film, and digital art. Compositing allows for the creation of scenes that are challenging or impossible to capture in a single photograph.
Overall, photo manipulation and compositing are powerful techniques used by photographers, designers, and artists to create visually stunning and impactful images by manipulating and combining multiple photographic elements.
- Special effects and filters
Special effects and filters are commonly used in various forms of media, such as movies, photography, and social media platforms, to enhance visual aesthetics and create unique visual experiences. Here are some common types and applications of special effects and filters:
1. Visual Effects (VFX): Visual effects involve the use of computer-generated imagery (CGI) to create realistic or fantastical elements that are not feasible or safe to capture during filming. VFX can be used to create explosions, monsters, environments, and other imaginative elements.
2. Filters in Photography: Filters are often used in photography to alter the appearance of an image. They can enhance or change colors, add artistic effects, adjust brightness and contrast, or simulate vintage looks. Common types of filters include polarizing filters, color filters, and neutral density filters.
3. Augmented Reality (AR) Filters: AR filters are popular in social media apps like Instagram and Snapchat. These filters use augmented reality technology to overlay virtual elements onto real-time camera feed, allowing users to add effects, masks, animations, and interactive elements to their photos and videos.
4. Video Filters: Video filters are used to modify the colors, tones, and overall look of a video footage. They can help set the mood, create a specific atmosphere, or give a vintage or retro aesthetic to the video. Video editing software often provides a range of built-in filters that can be applied to achieve various visual effects.
5. Green Screen Effects: Green screen or chroma key effects are widely used in video production. In this technique, the subject is filmed in front of a green or blue screen, and during editing, the green or blue background is replaced with a different image or video. This allows for the integration of the subject into different environments or scenarios.
It's important to note that creating high-quality special effects and using filters often requires specialized software like Adobe after Effects, Photoshop, or dedicated video editing tools. Additionally, professional expertise and experience are usually needed to achieve desired results.
0 notes
Last Seen Blogs

deathbyfanfictioning
Fandom Love

learning-made-easy
Kids books

pusto-ili-temno
тамгдетемноипусто
hezraela
trying my best

maofru
.You.stupid.fucking.whore.