#masking in adobe camera raw
Explore tagged Tumblr posts
Visit Tumblr Blog
Explore Tumblr blogs with no restrictions, modern design and the best experience.
Last Seen Tumblr Blogs


Fun Fact
The most popular pages on Tumblr are about Minecraft, GIFs, and David J. Peterson.
Text
Photo retouching services
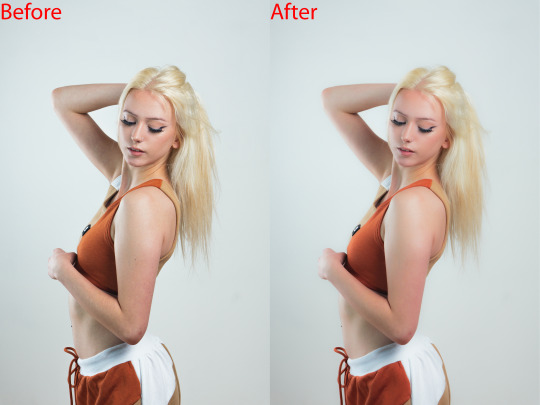
Photo retouching services are offered by many companies and freelancers, and they involve editing digital images to improve their appearance or fix any flaws. These services can range from basic adjustments like color correction and exposure balancing to more advanced techniques such as removing blemishes, reshaping the body, or even adding or removing objects from the image. That's correct! Photo retouching services encompass a wide range of editing techniques to enhance the visual appeal of digital images. These services are commonly used in various industries, including fashion, advertising, e-commerce, and photography. Basic adjustments typically involve correcting exposure, color balance, contrast, and sharpness to improve the overall appearance of the image. More advanced techniques may include skin retouching to remove blemishes, wrinkles, or scars, as well as body reshaping to slim or enhance body contours. Other advanced retouching services may include background removal, adding or removing objects or people from the image, and composite image creation. These services are often used to create visually stunning images for advertising, marketing campaigns, or personal projects. It's important to note that photo retouching services should be done with care and attention to detail to maintain the integrity of the original image while enhancing its visual appeal.
#affinity photo high end retouching#skin smoothing capture one#skin retouching and color grading in photoshop#pixelmator pro skin retouching#face retouching in photoshop cc plugins#one click skin retouching free photoshop action#affinity photo face retouch#capture one skin smoothing#capture one portrait retouching#capture one pro skin retouching#capture one skin retouching#capture one face retouching#masking photo editing lightroom#masking in adobe camera raw#skin smoothing plugin photoshop#skin retouching camera raw#skin retouching capture one#skin retouching and photo masking service
1 note
·
View note
Text
"I have seen three pictures of the man".
Picture_01
The boy stood still, staring at the camera, his gaze fixed, unyielding. A absent smirk, just the stark, unadorned plane of his face. It was a face that already knew the weight of scrutiny, the silent judgment that settled like dust. No empathy, but a rigid mask, the skin stretched taut over the bones, revealing nothing.
"What a dreadful child!", a silent testament to the cruelty of first impressions. "What a hideous little boy! A monkey! That's why he looks so miserable and nobody wishes to play with him.". Parents would quietly whisper to each other upon seeing him arriving at the playground, shamelessly blessing God for having not so ugly sons.
Even in childhood, the contours of our features are being etched into a narrative not of our making. A single, unyielding look, and the world begins to define us: dreadful, wizened, hideous. Labels whispered and solidified, a prison built of glances. How swiftly the gaze of society could strip innocence, how easily a child could become a stigma, a grotesque caricature, simply for the way he appears, and becomes no longer human.
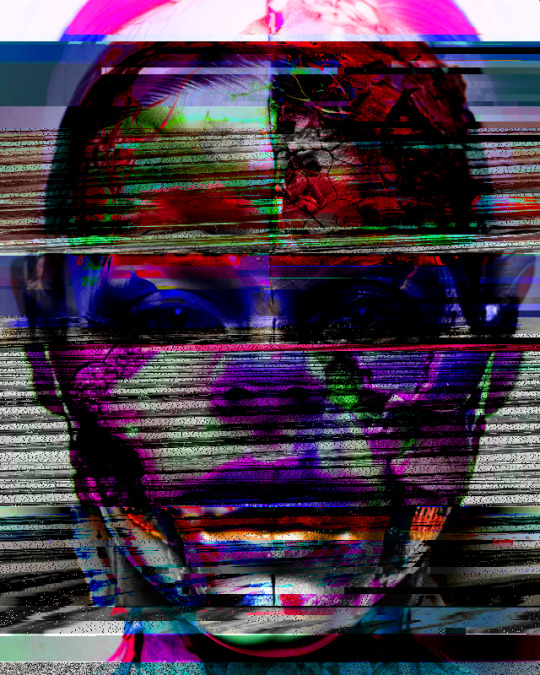
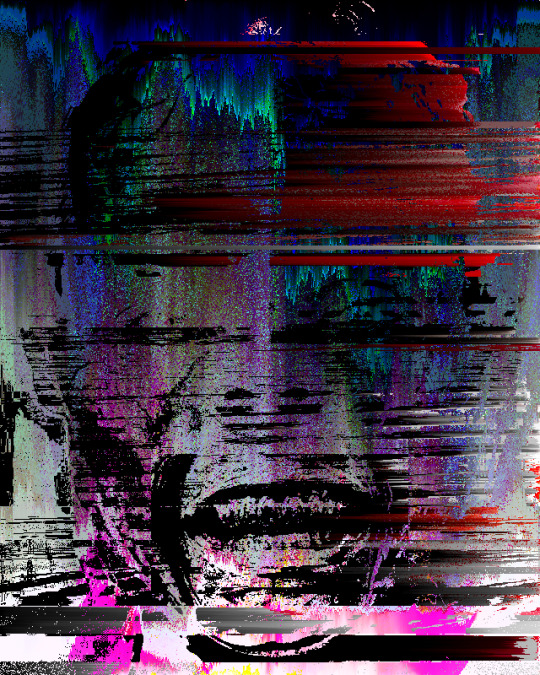
#GlitchArt + #AIportrait + Text inspired by a paragraph from No Longer Human by #OsamuDazai.

Childhood and Body Shaming.
Society's judgmental and pitiful gaze.
Physical appearance and discrimination.
Art inspiration and creative process.
Experimental Art and New Media.
Body Horror and Body Positivity.
How was the video made?
Initial AI Image Generation and Glitching:
Eight AI-generated portraits were compiled into a PDF (JPG compression).
The PDF's raw data was manipulated using a text editor (Notepad++) by replacing hexadecimal characters, creating initial glitches.
The glitched PDF was viewed in SumatraPDF.
Each glitched image was copied and pasted into a single Photoshop file as separate layers (PSD).
The PSD file's raw data was again manipulated in Notepad++, further glitching the image layers.
The glitched layers were then adjusted in Photoshop using Hue and Saturation adjustments.
All layers were blended into a final PNG image.
Image Sorting and Animation:
The PNG image was processed using the "UltimateSort" script by GenerateMe, creating a series of sorted frames.
A selection of these frames was exported.
The frames were compiled into an animated GIF.
The GIF was encoded into an MP4 video.
The GIF's raw data was databended in Note++
The glitched GIF was played in IrfanView and screen recorded via ShareX.
The two MP4 video files that were made from the GIF were edited together in Adobe Premiere.
Video Glitching and Audio Integration:
The edited video track was exported as an MP4.
The MP4 was converted to an AVI file using the ASV1 codec.
The AVI video's raw data was imported into Audacity as a RAW file, glitched, and saved.
The glitched AVI was converted back into an MP4 video using FFmpeg.
The glitched video was imported into Adobe Premiere.
Audio was added: a Mubert-generated musical track and a voiceover.
The voiceover was created using TTSMaker, based on text generated by Gemini 2.0, which drew inspiration from a paragraph in No Longer Human.
#digital art#new media art#artificial intelligence#glitch art#glitch#art#artists on tumblr#databending#dark art#macabre#dark aesthetic#dark artwork#glitchart#glitch aesthetic#glitchartistscollective#glitch artists collective
15 notes
·
View notes
Text
The padawans found out about it first, as padawans are wont to do. Getting into trouble without realizing the full extent of it, stumbling right into something so much larger than they could understand. In any other scenario it would have been fodder for their masters to tease their apprentices over and -later- rib one another with. But not with something like this.
Jedi, as a whole, didn’t tend to concern themselves with things such as the holonet. When there was a crisis somewhere out in the galaxy, they were typically brought into the know before even the news outlets were told, their response being what led the rest of the Republic forward.
There were of course those who would tune in to certain channels to watch their favorite soap operas, or catch up on the goings on in the parts of the galaxy outside of the Jedi’s jurisdiction, but it was really the younger generation who had any sort of presence on the ‘net.
So really, it shouldn’t have come as any surprise when a crowd of junior padawans and older initiates had gone running in search of Master Nu during their recreational time in the archives (or the several dozen senior padawans with their own personal access to the holonet who’d screamed across their quarters for their masters to come and see).
It did not take long for the news to reach the Council members, who immediately called an impromptu session to watch and review. There were many angry holocalls sent out inquiring why the Jedi hadn’t been informed of this development sooner, mostly by Adi Gallia. There were also many headaches developed, also by Adi Gallia who both dealt and received.
Mace Windu also had one such headache, brought on by watching the recording for the fifth time- or was it the sixth now?
The image was grainy, implying poor equipment, but the shot held remarkably steady throughout which spoke to some level of familiarity with filming. The grandiose excess of a Hutt residence decorated the space, covering over hard packed adobe walls and tiled floors covered in a thin layer of sand. It was apparent that this was no Nal Hutta, but the exile planet of Tatooine. This was the domain of Jabba Desilijic Tiure and- to a lesser extent- Gardulla Besadii the Elder.
Or it used to be.
The holo paned slowly over the large interior of the palace, lingering on the forms of a number of sentients, many of them scantily dressed, some of them no more than children, all of them with heavy collars around their necks. Some looked healthy, deceptively so, but there are others- thin with protruding bones, or open gaping wounds leaking out bodily fluids, and those missing whole limbs. The first few minutes were nothing but the camera moving through the inside of the palace, taking in the misery and the horror, from up in the audience hall all the way down to slave quarters deep below the palace.
There were other figures too- those dressed in dark desert weave and wearing a wide collection of masks over their faces. Some of them had what looked suspiciously like lightsaber hilts hanging from their belts.
They worked to remove the chains from the slaves while a voice spoke over the recording in Huttese. Mace wasn’t much familiar with the language, only understood a handful of words spoken. They were still working on getting the poor audio translated, but from what they were able to gather it was a rallying cry for other enslaved worlds to fight back.
The holo lingered a long moment on an opened metal collar, dried blood and bits of flesh stuck to the inside where it had rubbed skin raw. Then it cut suddenly, the screen black for a fraction of a second before suddenly illuminated with the blinding light of two suns.
The new perspective showed a town center of some sort, huge crowds of people gathered in streets and on the roofs of buildings, the camera panning down to capture the thousands of faces looking up toward the platform.
A slave auction block, they found out later.
The camera turned from the crowd to instead film the group standing atop the platform. There were more figures in black and brown, but unlike when they were within the palace, these had brightly colored cloth thrown over the rest of their attire, ponchos and scarves and wraps. Mace assumed there was some sort of cultural significance to it, but he didn’t know enough about the planet’s people to know for certain.
These, too, wore metal masks.
Beneath the desert suns it was easier to make out that most were fashioned into abstract animal faces, with fangs and horns and sweeping pieces that might have been feathers. All of them carried metal cylinders at their hips.
In the middle of the platform, surrounded by more masked guards with lit sabers in hand- colors a wash of oranges and yellows and greens and even one that looked pink- was Jabba the Hutt. Large gashes and lesions covered the expanse of his body, a heavy chain wrapped several times around his neck. It didn’t seem to be connected to anything- seemingly more of a humiliation rather than something to keep the Hutt confined.
The lightsabers pointed at him likely did well enough a job of that.
Standing between Jabba and the crowd was a lone figure in all black. If they were sweltering in the heat, they gave no indication of it, their long layers and heavy helmet seemingly inconsequential. It was a tall figure, humanoid and seemingly male in stature- though that was hard to tell beneath the dark clothing that seemed almost a parody of Jedi robes. The helmet they wore was dog-like, or at least that of a canine skull, with jaws that looked less like jaws and more like a muzzle. There was something altogether disquieting about the figure.
Tilting its head like a curious predator, the figure turned to look the camera lens dead on. It didn’t feel like someone looking into a camera, but like something looking straight through and into the view beyond.
Each time Mace had watched the recording, that single look managed to make hair prickle up on the back of his neck. An animal response.
The figure in black spoke in Basic, addressing the holo’s audience and not the crowd actually present. The voice that came out was distorted through a vocoder into something that was more hard and mechanical than organic, it was still distinctly male, and distinctly authoritative. The rest of the video would prove that this was likely the leader of the whole affair, but even in the opening minutes, it was easy to tell here stood the catalyst for all that would crumble down after.
“You say that slavery is illegal in your Republic,” the voice growled from behind the melted teeth of the dog’s jaw. “And you say that Tatooine is part of your Republic. Then what is this we stand on? What is it that the Hutt empire has made its fortunes off of? What your own halls hide and Senators pedal behind closed doors. Look at what you have turned your blind eyes away from.”
With a gloved hand, he reached to his belt and unclipped a black and gray hilt. “We will not let you look away.” He then turned to the crowd and raised the saber hilt high over his head, calling out something in a language that sounded nothing like Huttese. The crowd thundered back in unison.
The saber lit with a wash of red as violent as a wildfire.
Lowering his arm slowly, the man turned to finally face Jabba, his blade hungry and crackling at his side. He spoke again- softer this time- but still loud enough for the gathered populace to hear. Huttese again, Mace was pretty certain, something about punishment- or maybe it was justice.
For a split second on Jabba’s face there was a look of pure unfiltered terror- the sudden fear in falling with the knowledge that the ground was coming and coming up fast.
Then that hungry blade slid easily into thick Hutt skin that couldn’t be cut by any other means, sinking into the hilt, fat bubbling and cooking with the heat of it.
Jabba made a noise that Mace never, ever wanted to hear again.
The man dragged the blade down- slowly- guts spilling out from where the Hutt was being unzipped like a field-dressed carcass, still wriggling. Jabba moved a lot less than someone being methodically disemboweled should, but that might have something to do with the dog-skulled man’s left hand being raised up like an open claw. Like he was pinning the crime lord in place with sheer will or- more concerningly- with the Force.
That obsidian black mask seemed to give a jackal grin as the red blade was pulled from the Hutt’s body and Jabba Desilijic Tiure was unceremoniously dropped to slowly die on the same platform where thousands of people had been bought and sold.
Stepping away from the smoking body, the Sith- for what else could this monster be but a Sith?- flicked his blade to the side as if trying to rid it of gore. A useless endeavor for a plasma blade, but there was something almost poignant about the move.
He stood facing the screaming, cheering crowd, but his head was tilted sideways just slight enough to look back at the camera from the inky black socket of the dog’s eye.
“You’ve spent long enough ignoring us. I suggest you start paying attention now.”
The feed cut to black.
#my writing#fic: groundwater#fic excerpt#ignore any spelling mistakes it's 2:30 am and i have not edited any of this
111 notes
·
View notes
Text
Far From Home

Coccothrinax miraguama, a Cuban endemic palm, waving happily in the wind in the Gardens by the Bay here. Photo credit: Eleanor Chua.
The halos around the palm leaves were the result of pulling back the highlight slider drastically in Adobe Camera Raw. This was probably the best that could be expected from its masking algorithm I guess.
#photographers on tumblr#canon eos rp#canon photography#Coccothrinax miraguama#flora fauna#flora photography#palm photos#photography tips#tamron 16-300mm#tree pics
19 notes
·
View notes
Text
Technical Challenges and Solutions in Professional Photography
Photography is an art form that demands creativity and technical skill in equal measure. As a professional photographer, navigating the technical challenges that arise during a shoot is part of the journey. These challenges can disrupt your workflow, but with experience and preparation, they can be effectively managed.
One common technical issue is poor lighting conditions. Natural light isn't always available, and artificial lighting can cast harsh shadows or unwanted color tones. To tackle this, investing in high-quality lighting equipment like softboxes, reflectors, and portable LED lights can make a world of difference. Additionally, understanding how to adjust your camera's ISO, aperture, and shutter speed allows you to adapt to changing light conditions quickly.
Another challenge is achieving accurate color balance. Colors can appear different on various screens and prints, leading to discrepancies between what you see and what your client receives. To maintain consistency, calibrating your monitor regularly and shooting in RAW format are essential. RAW files retain maximum data, giving you greater flexibility in post-processing to correct colors without losing quality.
Technical malfunctions also happen—memory card failures, dead batteries, or unexpected equipment damage. The solution? Always carry backups. Extra batteries, memory cards, and even a secondary camera body can save a shoot from disaster. Additionally, regular maintenance and firmware updates for your equipment help minimize the risk of technical issues.
Finally, mastering post-processing software is crucial. Programs like Adobe Lightroom and Photoshop are powerful tools, but they require learning. Taking the time to understand these applications ensures that your editing enhances your work rather than masking flaws.
Every technical challenge has a solution. With preparation, knowledge, and adaptability, you can overcome these obstacles and create stunning work that captures your artistic vision.
2 notes
·
View notes
Video
Arched building that once contained a street altar Pompeii Walk by Mary Harrsch Via Flickr: These screen captures from the Pompeii Walking Tour 2020 video is courtesy of the POMPEII ARCHAEOLOGICAL PARK and ProWalk Tours. Note to educators: ProWalk Tours as producer of the original video footage has agreed to allow my derivative still images to be licensed with Creative Commons Attribution Sharealike so they can be freely used for teaching and research publications. Technical notes: I have used Topaz Sharpen AI to remove the slight motion blur in screen captures as well as Adobe Camera Raw to adjust clarity, texture, highlights, shadows, and occasionally haze and white balance. I increased dynamic contrast and added a subtle vignette with On1 Photo Raw Effects and removed distracting visitors and some barriers, as well as replaced empty skies with Photoshop and its Sky Replacement feature, changing the blend mode from Screen to Multiply to avoid excessive editing of the mask layer. You can explore the Pompeii Walk video yourself here - no special hardware is required : www.youtube.com/watch?v=sUYJ8LbF1YsT
5 notes
·
View notes
Text
Enhancing Image Quality with Photoshop
Enhancing Images With Photoshop: Common Queries Answered
1. How to enhance images in Photoshop?
To enhance images in Photoshop, use the following steps: 1. Open the image. 2. Adjust brightness/contrast via Image > Adjustments. 3. Use the Levels or Curves tools for total adjustments. 4. Apply sharpening filters (Filter > Sharpen). 5. Use the Vibrance or Hue/Saturation adjustments for color enhancement. 6. Crop or straighten as needed. 7. Save your edited image.
2. How to enhance photo quality?
To enhance photo quality, use photo editing software to adjust brightness, contrast, and saturation. Apply sharpening filters to improve clarity, and use noise reduction tools to minimize graininess. Crop to improve composition and remove distractions. For higher resolution, consider using interpolation techniques. Additionally, shooting in good lighting conditions and using a higher-quality camera can significantly improve photo quality.
3. Can Photoshop auto enhance photos?
Yes, Photoshop has an "Auto" feature under the "Image" menu that can automatically enhance photos by adjusting levels, contrast, and colors. Additionally, Adobe offers a feature called "Camera Raw," which includes an "Auto" button for quick adjustments. While these features can improve images, results may vary, and manual editing is often preferred for more control.
4. How do you enhance a blurry picture in Photoshop?
To enhance a blurry picture in Photoshop, use the "Filter" menu and select "Sharpen" followed by "Shake Reduction" for overall improvement. You can also apply "Unsharp Mask" or "Smart Sharpen" for more control. Adjust the sliders to achieve the desired sharpness. Always work on a duplicate layer to preserve the original image. Save your work afterward.
5. What's new in Photoshop 2024?
Photoshop 2024 introduces AI-powered features like Generative Fill and enhanced object selection, improving creative workflows. The new “Quick Actions” panel simplifies tasks such as background removal and skin smoothing. Additional improvements include a streamlined interface, better performance, and enhanced collaboration tools for easier sharing and feedback. The update also offers expanded support for new file formats and plugins.

Visit: VS Website See: VS Portfolio
0 notes
Text
How To Enhance Your Photos Without Losing Quality
In today's digital age, photography plays a vital role in personal and professional life. Whether you're a social media enthusiast, a blogger, or a business owner, having high-quality images is essential. However, enhancing photos without losing quality can be a challenge, especially if you don’t use the right techniques and tools.
In this article, we will explore the best ways to enhance your photos while preserving their original quality. From choosing the right software to understanding key adjustments like brightness, contrast, and sharpening, you’ll learn how to optimize your images professionally.

Understanding Image Quality and Resolution
Before enhancing your photos, it's crucial to understand the factors that determine image quality:
Resolution: The number of pixels in an image, typically measured in pixels per inch (PPI) or dots per inch (DPI). Higher resolution means better clarity and detail.
File Format: Different formats (JPEG, PNG, TIFF, RAW) affect image quality and editing flexibility. RAW files retain the most detail, while JPEGs may lose quality over time due to compression.
Compression: Excessive compression can reduce file size but also degrade quality by removing important details.
Choosing the Right Photo Editing Software
To enhance images without compromising quality, selecting the right software is key. Here are some of the best tools available:
1. Adobe Photoshop
Industry-standard for professional editing
Offers non-destructive editing techniques (adjustment layers, smart objects)
Advanced features like content-aware fill, frequency separation, and high-pass sharpening
2. Adobe Lightroom
Best for batch editing and color correction
Preserves original quality using non-destructive adjustments
Powerful tools like tone curves, HSL sliders, and masking
3. GIMP (GNU Image Manipulation Program)
Free and open-source alternative to Photoshop
Supports layers, masks, and high-quality editing techniques
4. Luminar Neo
AI-powered editing with automatic enhancements
Intuitive interface for beginners
5. Capture One
Popular among professional photographers
Superior RAW processing and color grading options
Essential Techniques to Enhance Photos Without Losing Quality
Once you have the right software, follow these best practices to enhance your images effectively.
1. Work with RAW Files
RAW images store all data captured by your camera sensor, allowing you to edit without quality loss. Unlike JPEGs, RAW files do not undergo compression, preserving more detail and color information.
2. Use Non-Destructive Editing
Non-destructive editing allows you to make changes without permanently altering the original image. Methods include:
Using adjustment layers in Photoshop
Editing in Lightroom without exporting multiple times
Creating copies or smart objects before applying edits
3. Adjust Brightness and Contrast
Proper brightness and contrast adjustments improve an image’s overall look. In Lightroom and Photoshop, use:
Curves: Adjust shadows, midtones, and highlights precisely.
Levels: Balance the black, gray, and white points to optimize exposure.
4. Enhance Colors with HSL Adjustments
HSL (Hue, Saturation, and Luminance) sliders let you tweak individual colors without affecting the entire image. This technique helps:
Make skies more vibrant without oversaturating the whole picture.
Improve skin tones naturally in portrait photography.
5. Sharpen the Image Without Adding Noise
Sharpening enhances details, but excessive sharpening can introduce noise. Best sharpening techniques:
High Pass Filter in Photoshop: Apply a subtle sharpening effect without degrading the image.
Unsharp Mask: Adds contrast along edges to increase perceived sharpness.
Smart Sharpen: Reduces artifacts while enhancing details.
6. Reduce Noise While Maintaining Detail
Noise reduction is essential for low-light images. To reduce noise without losing quality:
Use Lightroom’s Noise Reduction Tool to minimize luminance and color noise.
In Photoshop, use the Camera Raw Filter to fine-tune noise reduction.
Avoid excessive noise removal, as it can make images look blurry.
7. Use AI Tools for Automatic Enhancement
AI-powered tools like Luminar Neo, Topaz Gigapixel AI, and Adobe’s Enhance feature automatically improve image quality while preserving details. AI-based upscaling can also enlarge images without introducing pixelation.
8. Correct Lens Distortion and Perspective
Wide-angle lenses and perspective shifts can cause distortions. Correct them using:
Lens Correction Tool in Lightroom: Fixes distortion and chromatic aberrations.
Transform Tool in Photoshop: Adjusts perspective and straightens lines.
9. Retouching and Removing Unwanted Elements
To clean up distractions while keeping quality intact:
Use Content-Aware Fill in Photoshop to remove unwanted objects seamlessly.
The Clone Stamp Tool can manually replace specific areas.
Healing Brush Tool smoothens skin and textures without affecting clarity.
Consider using photo editing and retouching services for complex edits that require professional expertise.
10. Export Images Properly
After editing, export settings play a significant role in maintaining quality:
Use TIFF for lossless compression and archiving.
Export JPEG with 100% quality for web use while maintaining clarity.
Adjust DPI to 300 for high-quality prints.
Enable sRGB color profile for web display compatibility.
Final Thoughts
Enhancing photos while maintaining their original quality is a skill that requires the right tools and techniques. By working with RAW files, applying non-destructive edits, and using sharpening and noise reduction carefully, you can produce stunning, high-quality images.
Whether you’re a beginner or a professional photographer, following these best practices will ensure that your photos look their best without any loss of detail. Invest time in learning advanced editing tools and techniques, and you’ll be able to create visually striking images without sacrificing quality.
By mastering these techniques, you’ll enhance your photography skills and produce high-quality visuals suitable for any platform or purpose.
1 note
·
View note
Text
Adobe Photography Course: A Comprehensive Learning Path for Pixel-Perfect Photography
Introduction
Photography is an art that combines creativity with technical expertise. In the digital age, software plays a crucial role in enhancing and perfecting images. Adobe, a leader in creative software, offers various photography courses designed to help both beginners and professionals master the art of image editing. The Adobe Photography Course is an excellent way to enhance your skills, especially when working with pixel-based photography.
What is Pixel Photography?
Pixel photography refers to digital photography where images are composed of tiny square-shaped units called pixels. The quality and sharpness of an image depend on the resolution and number of pixels. High-resolution photography requires sophisticated editing tools to enhance details, adjust colors, and refine imperfections—this is where Adobe’s software, such as Adobe Photoshop and Lightroom, plays a significant role.
Overview of Adobe’s Photography Course
Adobe offers various online courses through platforms like Adobe Creative Cloud, Adobe Learn, and Adobe Digital Learning Services. These courses cover essential topics in digital photography, including:
Basic Photography Concepts – Understanding exposure, lighting, composition, and camera settings.
Adobe Photoshop – Mastering layers, masks, retouching, and advanced photo manipulations.
Adobe Lightroom – Organizing, color grading, and enhancing images efficiently.
RAW Editing – Working with high-resolution images for professional-quality results.
Creative Techniques – Adding artistic effects, removing unwanted elements, and creating composites.
Why Choose Adobe’s Photography Course?
Industry-Standard Software – Adobe Photoshop and Lightroom are widely used by professionals.
Hands-On Learning – Practical exercises help apply techniques in real-world projects.
Flexible Learning – Online access allows learners to study at their own pace.
Certification – Completing an Adobe-certified course can enhance career opportunities.
Conclusion
If you are passionate about pixel-perfect photography, mastering Adobe tools through an Adobe Photography Course is a smart investment. Whether you're a beginner looking to learn the basics or a professional aiming to refine your skills, Adobe provides comprehensive training to take your photography to the next level.
Would you like help finding a specific Adobe course or recommendations for learning platforms? Let me know how I can assist!
0 notes
Text
Photo Editing
Introduction to Photo Editing
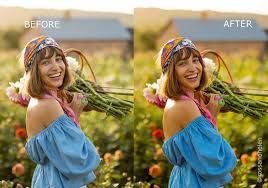
Photo editing has become an essential part of modern photography, enabling photographers and hobbyists to enhance their images and bring out the best in their shots. Whether you're a professional photographer, a social media influencer, or just someone who enjoys taking pictures, understanding the fundamentals of photo editing can dramatically improve the quality of your photos. This comprehensive guide will explore various aspects of photo editing from basic adjustments to advanced techniques, providing you with the knowledge to create stunning images.
The Importance of Photo Editing
In the digital age, capturing a great photo is only half the battle. Even the best cameras can produce images that need a little tweaking to reach their full potential. Factors like lighting, color balance, and composition often require post-processing to ensure that the image looks as vibrant and professional as possible.
Enhance Colors and Lighting: Adjust brightness, contrast, and saturation to make your photos more visually appealing.
Correct Imperfections: Remove blemishes, correct red-eye, and fix other flaws that detract from the image.
Alter Composition: Crop, straighten, and reframe images to improve their composition.
Create Artistic Effects: Apply filters, overlays, and textures to give your photos a unique, creative look.
Before diving into specific editing techniques, it's essential to understand the tools at your disposal. Various photo editing software options range from beginner-friendly apps to professional-grade programs.
Popular Photo Editing Software
Adobe Photoshop:
Overview: The industry standard for photo editing, offering a vast array of tools for everything from basic adjustments to complex image manipulation.
Key Features: Layers, masks, advanced retouching tools, and support for plugins.
Best For: Professionals and serious hobbyists who need advanced features and flexibility.
Adobe Lightroom:
Overview: A powerful tool designed for organizing and editing large collections of photos.
Key Features: Non-destructive editing, presets, and robust organizational tools.
Best For: Photographers who need to manage and process large numbers of images.
GIMP (GNU Image Manipulation Program):
Overview: A free, open-source alternative to Photoshop.
Key Features: Comprehensive tools for editing and manipulating images, supports layers and plugins.
Best For: Users who need advanced editing features without the cost.
Affinity Photo:
Overview: A budget-friendly alternative to Photoshop, offering many of the same features.
Key Features: High-end photo editing tools, RAW editing, and a user-friendly interface.
Best For: Photographers who want professional-level tools at an affordable price.
Canva:
Overview: A user-friendly online platform for basic photo editing and graphic design.
Key Features: Drag-and-drop interface, templates, and basic editing tools.
Best For: Beginners and casual users looking for quick edits and design work.
Basic Photo Editing Techniques
Once you've chosen your editing software, it's time to start enhancing your photos. Here are some basic techniques that form the foundation of photo editing.
Cropping and Straightening:
Purpose: Improve composition by removing unnecessary elements and straightening horizons.
How-To: Use the crop tool to trim the edges of your photo. Many tools also offer a grid overlay to help you straighten the image by aligning key elements with the grid lines.
Adjusting Exposure:
Purpose: Correct the overall brightness of your image.
How-To: Use the exposure slider to increase or decrease the brightness. Be careful not to overexpose (too bright) or underexpose (too dark) your image.
Contrast and Brightness:
Purpose: Enhance the difference between the light and dark areas of your photo, making it more dynamic.
How-To: Adjust the contrast slider to increase or decrease the difference between shadows and highlights. Use the brightness slider to fine-tune the overall lightness of the image.
Color Correction:
Purpose: Ensure that the colors in your photo are accurate and appealing.
How-To: Use the white balance tool to correct any color cast (e.g., too warm or too cool). Adjust saturation and vibrance to enhance colors without oversaturating them.
Sharpening:
Purpose: Enhance the clarity of your image by making edges appear more defined.
How-To: Apply the sharpening tool carefully to avoid creating a grainy or unnatural look. Focus on areas that need more definition, like eyes in a portrait or the edges of objects in landscapes.
Noise Reduction:
Purpose: Minimize graininess or “noise,” particularly in low-light photos.
How-To: Use the noise reduction slider to smooth out the grain, but be careful not to overdo it, as it can lead to a loss of detail.
Advanced Photo Editing Techniques
Once you've mastered the basics, you can explore more advanced techniques to take your photo editing to the next level.
1. Layering and Masking:
Purpose: Allows you to make non-destructive edits, combine multiple images, and apply adjustments selectively.
How-To: Use layers to separate different elements of your photo (e.g., background, subject) and apply masks to control where adjustments are applied. This technique is powerful for compositing images or making complex adjustments.
2. Dodging and Burning:
Purpose: Enhance or darken specific areas of your photo to add depth and focus.
How-To: The dodge tool lightens areas of your photo, while the burn tool darkens them. Use these tools selectively to draw attention to key parts of your image or to create a more balanced exposure.
3. Cloning and Healing:
Purpose: Remove unwanted elements or imperfections from your photo.
How-To: The clone stamp tool allows you to copy pixels from one part of your image to another, effectively “erasing” unwanted objects. The healing brush works similarly but blends the copied area with the surrounding pixels for a more natural look.
4. Advanced Color Grading:
Purpose: Apply a specific mood or aesthetic to your photo through color adjustments.
How-To: Use curves, selective color, or split toning to fine-tune the colors in your image. This technique is often used in cinematic photography to create a specific atmosphere.
5. Working with RAW Files:
Purpose: RAW files contain more data than JPEGs, giving you greater flexibility in editing.
How-To: Open RAW files in a program like Adobe Lightroom or Photoshop. From there, you can adjust exposure, white balance, and other settings with minimal loss of quality. RAW editing is essential for professional photographers who need the highest quality results.
Creative Photo Editing
Beyond enhancing and correcting photos, editing can also be used creatively to produce artistic images. This involves thinking outside the box and using various tools and techniques to transform your photos in unique ways.
1. Applying Filters and Presets:
Purpose: Quickly change the look and feel of your photo.
How-To: Many editing programs come with built-in filters and presets. These are pre-defined adjustments that can dramatically alter the appearance of your image. You can also create your own presets for a consistent style across multiple photos.
2. Adding Textures and Overlays:
Purpose: Enhance your photos with additional visual elements.
How-To: Apply textures (like grunge, paper, or fabric) as an overlay to add depth and interest to your photo. You can also use light leaks, lens flares, or bokeh effects to create a specific mood.
3. Photo Manipulation:
Purpose: Combine multiple images or elements to create a surreal or fantasy composition.
How-To: Use techniques like compositing, where you blend multiple images, or digital painting, where you paint directly onto your photo. This requires a good understanding of layers, masking, and perspective to achieve a believable result.
4. Black and White Conversion:
Purpose: Create timeless, classic images by converting color photos to black and white.
How-To: Use the black and white adjustment layer or desaturation tool to remove color from your image. You can then adjust the contrast and apply filters to enhance the tonal range and bring out details.
Tips for Effective Photo Editing
Work Non-Destructively:
Always use layers, masks, and adjustment layers to ensure that your original image remains untouched. This allows you to experiment and make changes without permanently altering your photo.
Use Shortcuts:
Familiarize yourself with keyboard shortcuts in your editing software. This will speed up your workflow and make the editing process more efficient.
Keep It Natural:
While it's tempting to push adjustments to the extreme, subtlety is often more effective. Aim to enhance your photos without making them look overly edited.
Learn from Others:
Study the work of professional photographers and editors. Tutorials, online courses, and forums are valuable resources for learning new techniques and improving your skills.
Practice Regularly:
The more you edit, the better you'll become. Experiment with different styles and techniques to develop your unique editing style.
The Future of Photo Editing
Photo editing technology is constantly evolving, driven by advancements in software and artificial intelligence (AI). Here’s a glimpse of what the future holds:
1. AI-Powered Editing:
AI is making photo editing faster and more accessible. Tools like Adobe's Sensei and Laminar AI can automatically enhance photos, suggest edits, and even retouch portraits with a single click. As AI technology advances, we can expect more intuitive and powerful editing tools.
2. Augmented Reality (AR) in Editing:
AR is starting to influence photo editing, allowing users to visualize edits in real-time or apply effects that interact with the environment. This technology could lead to new creative possibilities and more immersive editing experiences.
3. Mobile Editing:
With the increasing power of smartphones, mobile editing apps are becoming more sophisticated. Professionals and amateurs alike are turning to mobile apps like Adobe Lightroom Mobile and Snapseed for on-the-go editing. The convenience and accessibility of mobile editing will continue to grow.
4. Collaborative Editing:
As cloud-based tools become more prevalent, collaborative editing is becoming easier. Multiple users can work on the same project simultaneously, whether they are in the same room or across the globe. This is particularly useful for professional teams and creative agencies.
The Importance of Photo Editing
In the digital age, capturing a great photo is only half the battle. Even the best cameras can produce images that need some tweaking to reach their full potential, and post-processing is often required in elements such as lighting, color balance and composition to make your images look as vibrant and professional as possible.
Enhance Colors and Lighting: Adjust brightness, contrast, and saturation to make your photos more visually appealing.
Correct Imperfections: Remove blemishes, correct red-eye, and fix other flaws that detract from the image.
Alter Composition: Crop, straighten, and reframe images to improve their composition.
Create Artistic Effects: Apply filters, overlays, and textures to give your photos a unique, creative look.
Before diving into specific editing techniques, it's important to become familiar with the tools available to you. Various photo editing software options range from beginner-friendly apps to professional-grade programs.
Popular Photo Editing Software
Adobe Photoshop:
Overview: The industry standard for photo editing, offering a vast array of tools for everything from basic adjustments to complex image manipulation.
Key Features: Layers, masks, advanced retouching tools, and support for plugins.
Best For: Professionals and serious hobbyists who need advanced features and flexibility.
Adobe Lightroom:
Summary: A powerful tool for organizing and editing large photo collections.
Key Features: Non-destructive editing, presets, and robust organizational tools.
Best For: Photographers who need to manage and process large numbers of images.
GIMP (GNU Image Manipulation Program):
Overview: A free, open-source alternative to Photoshop.
Main features: Comprehensive tools for image editing and manipulation, support for layers and plugins.
Best For: Users who need advanced editing features without the cost.
Affinity Photo:
Overview: A budget-friendly alternative to Photoshop, offering many of the same features.
Key Features: High-end photo editing tools, RAW editing, and a user-friendly interface.
Best For: Photographers who want professional-level tools at an affordable price.
Canva:
Overview: A user-friendly online platform for basic photo editing and graphic design.
Key Features: Drag-and-drop interface, templates, and basic editing tools.
Best For: Beginners and casual users looking for quick edits and design work.
Once you've chosen your editing software, you're ready to start enhancing your photos. Here are some basic techniques to help you start editing your photos.
Cropping and Straightening:
Purpose: Improve composition by removing unnecessary elements and straightening horizons.
How-To: Use the crop tool to trim the edges of your photo. Many tools also offer a grid overlay to help you straighten the image by aligning key elements with the grid lines.
Adjusting Exposure:
Purpose: Correct the overall brightness of your image.
How-To: Use the exposure slider to increase or decrease the brightness. Be careful not to overexpose (too bright) or underexpose (too dark) your images.
Contrast and Brightness:
Purpose: Enhance the difference between the light and dark areas of your photo, making it more dynamic.
How-To: Adjust the contrast slider to increase or decrease the difference between shadows and highlights. Use the Brightness slider to optimize the overall brightness of your image.
Color Correction:
Purpose: Ensure that the colors in your photo are accurate and appealing.
How-To: Use the white balance tool to correct any color cast (e.g., too warm or too cool). Adjust saturation and vibrance to enhance colors without oversaturating them.
Sharpening:
Purpose: Enhance the clarity of your image by making edges appear more defined.
How-To: Apply the sharpening tool carefully to avoid creating a grainy or unnatural look. Focus on areas that need more definition, such as eyes in a portrait or the edges of objects in a landscape.
Noise Reduction:
Purpose: Minimize graininess or “noise,” particularly in low-light photos.
How to: Use the Noise Reduction slider to smooth out grain, but be careful not to overdo it as this can result in loss of detail.
Advanced Photo Editing Techniques
Once you've mastered the basics, you can explore more advanced techniques to take your photo editing to the next level.
1. Layering and Masking:
Purpose: Allows you to make non-destructive edits, combine multiple images, and apply adjustments selectively.
How-To: Use layers to separate different elements of your photo (e.g., background, subject) and apply masks to control where adjustments are applied. This technique is great for compositing images or making complex adjustments.
2. Dodging and Burning:
Purpose: Enhance or darken specific areas of your photo to add depth and focus.
How-To: The dodge tool lightens areas of your photo, while the burn tool darkens them. Use these tools selectively to draw attention to key parts of your image or to create a more balanced exposure.
3. Cloning and Healing:
Purpose: Remove unwanted elements or imperfections from your photo.
How-To: The clone stamp tool allows you to copy pixels from one part of your image to another, effectively “erasing” unwanted objects. The healing brush works similarly but blends the copied area with the surrounding pixels for a more natural look.
4. Advanced Color Grading:
Purpose: Apply a specific mood or aesthetic to your photo through color adjustments.
How-To: Use curves, selective color, or split toning to fine-tune the colors in your image. This technique is often used in film photography to create a particular atmosphere.
5. Working with RAW Files:
Purpose: RAW files contain more data than JPEGs, giving you greater flexibility in editing.
How-To: Open RAW files in a program like Adobe Lightroom or Photoshop. From there, you can adjust exposure, white balance and other settings with minimal loss of quality. RAW editing is essential for professional photographers looking for the highest quality results.
Creative Photo Editing
Beyond enhancing and correcting photos, editing can also be used creatively to produce artistic images. It's all about thinking outside the box and using different tools and techniques to transform your photos in a unique way.
1. Applying Filters and Presets:
Purpose: Quickly change the look and feel of your photo.
How-To: Many editing programs come with built-in filters and presets. These are predefined adjustments that can drastically change the look of your image. You can also create your own presets to create a consistent style across multiple photos.
2. Adding Textures and Overlays:
Purpose: Enhance your photos with additional visual elements.
How-To: Apply textures (like grunge, paper, or fabric) as an overlay to add depth and interest to your photo. You can also use light leaks, lens flares, or bokeh effects to create a specific mood.
3. Photo Manipulation:
Purpose: Combine multiple images or elements to create a surreal or fantasy composition.
How-To: Use techniques like compositing, where you blend multiple images, or digital painting, where you paint directly onto your photo. This requires a good understanding of layers, masking, and perspective to achieve a believable result.
4. Black and White Conversion:
Purpose: Create timeless, classic images by converting color photos to black and white.
How-To: Use the black and white adjustment layer or desaturation tool to remove color from your image. You can then adjust the contrast and apply filters to enhance the tonal range and bring out details.
Conclusion
Image editing is an essential skill in today's visually driven world. Whether you want to fix small mistakes or create stunning visual art, image editing tools and techniques offer endless possibilities. By understanding the basics and exploring advanced techniques, you can turn your photos into something truly stunning. Remember, image editing is both a science and an art. It requires technical knowledge, creativity and practice. With the right tools and the willingness to keep learning, you can master photo editing and realize your creative vision. Whether you're enhancing snapshots for social media or creating a professional portfolio, photo editing is key to making your images stand out in a crowded digital environment. Photo editing has become an essential part of modern photography, allowing photographers and amateurs alike to enhance their images and get the most out of them. Whether you're a professional photographer, a social media influencer, or simply someone who enjoys photography, understanding the basics of photo editing can greatly improve the quality of your photos. This comprehensive guide will explain the various aspects of photo editing, from basic adjustments to advanced techniques, giving you the knowledge to create amazing images.
#PhotoEditing#PhotoEditor#PhotoRetouching#CreativeEditing#EditMyPic#PhotoManipulation#EditingTips#PhotographyEditing#BeforeAndAfter#EditLikeAPro#EditingSoftware#Retouching#DigitalArt#CreativeRetouch#PhotoshopSkills
0 notes
Link
0 notes
Text
Photo Editor Tips: Enhancing Detail and Texture

Introduction
Enhancing detail and texture in your photos can significantly elevate their quality and impact. Whether you're working with landscapes, portraits, or macro shots, bringing out the details can make your images more captivating. This blog post will provide tips and techniques for using a photo editor to enhance detail and texture, helping you create stunning, high-quality photos.
Understanding Detail and Texture
Detail refers to the fine elements in a photo, such as sharpness and clarity, while texture refers to the surface quality and feel of the subjects within the photo. Enhancing these aspects can make your images more lifelike and engaging.
Tips for Enhancing Detail
1. Sharpening
Sharpening enhances the fine details in your photo, making them appear crisper and more defined. Use sharpening tools in your photo editor to achieve this effect.
Unsharp Mask: A popular sharpening tool that allows you to control the amount, radius, and threshold of sharpening.
High Pass Filter: Apply the High Pass filter and blend mode to enhance edges without increasing noise.
2. Clarity and Structure
Increasing clarity and structure can enhance mid-tone contrasts, bringing out details in textures and patterns.
Clarity Slider: Available in software like Lightroom and Capture One, the clarity slider enhances mid-tone contrasts.
Structure Tool: Found in tools like Nik Collection, the structure tool enhances the overall detail and texture.
Tips for Enhancing Texture
1. Dodge and Burn
Dodging (lightening) and burning (darkening) specific areas can enhance texture and detail, creating depth and dimension in your photos.
Dodge and Burn Tools: Use these tools in Photoshop or Lightroom to selectively lighten or darken areas.
Frequency Separation: Separate the high and low frequencies to work on texture independently from color and tone.
2. Contrast Adjustments
Adjusting contrast can enhance the appearance of texture by increasing the difference between light and dark areas.
Curves Adjustment: Use curves to fine-tune contrast and bring out textures.
Contrast Slider: Increase contrast to make textures more pronounced.
Tools for Enhancing Detail and Texture
1. Adobe Photoshop
Camera Raw Filter: Offers powerful tools for enhancing detail and texture.
Layer Masks: Use layer masks to apply enhancements selectively.
2. Adobe Lightroom
Detail Panel: Contains sharpening and noise reduction tools.
Clarity Slider: Enhances mid-tone contrasts for better texture.
3. Capture One
Clarity and Structure: Provides advanced tools for enhancing detail and texture.
Luma Curve: Adjusts brightness and contrast without affecting color.
Tips for Effective Enhancement
Work Non-Destructively: Use layers and masks to make reversible edits.
Zoom In and Out: Regularly zoom in to work on details and zoom out to see the overall effect.
Avoid Overdoing It: Over-enhancing detail and texture can make your photo look unnatural. Aim for a balanced, realistic look.
Use Light and Shadow: Enhancing the interplay of light and shadow can add depth and dimension to textures.
Conclusion
Enhancing detail and texture is crucial for creating high-quality, impactful photos. By using sharpening tools, clarity adjustments, dodge and burn techniques, and contrast adjustments, you can bring out the best in your images. Whether you're using Adobe Photoshop, Lightroom, Capture One, or another photo editor, these tips will help you achieve stunning results that captivate viewers and highlight the intricate details and textures of your subjects.
0 notes
Text


FInal Image 01
In the upcoming blog post, I will provide an in-depth explanation of each of the 8 final images. This will include the meaning behind each photo, the background story, the intended message, the shooting process, and the post-editing techniques.
My goal is to depict the protagonist's inner state through these dreamlike images. In photo 01, I aim to convey the vitality and positive energy of nature, which offers a relaxing atmosphere and serves as the beginning of the dream. In this series, light is used as a visual symbol of emotional energy, guiding viewers to understand the context and state of the subjects in each image.
In my own life, whenever I experience negative emotions or feel overwhelmed by multiple challenges, I find solace in walking through two nearby parks. Being in nature helps reduce my stress and clears my mind. I wanted to capture this scene to introduce the healing power of nature, suggesting that those facing life's struggles might find relief by visiting local parks or finding their own ways to relax and relieve stress.
Shooting Process: For this shoot, I used a tripod, a 24-70mm lens, and two light sticks. The camera settings were 30s exposure time, f/8 aperture, and ISO 100. I had two friends assist me. I set the camera on the tripod and focused on the central tree. Once the composition was ready, my friends positioned themselves near the closest trees (left and right). After pressing the shutter, they used the light sticks to illuminate specific points on the trees for one second before moving to another spot, continuing this process for the entire exposure. We repeated this for each tree, ensuring more detailed lighting for the trees closest to the camera and single exposures for trees further away to avoid overlap.
The entire shooting process took about 30 minutes.
Post-Editing: I started by marking the photos in Adobe Bridge, then used Photoshop for stacking to reduce noise. The stacked image served as the base layer. I imported all the photos into Photoshop and used layer masks to paint the illuminated parts onto the base layer. This process was repeated for each tree until all were illuminated. Afterward, I grouped all the layers, duplicated the group, and merged it into a single image. Finally, I adjusted the brightness and color in Camera Raw to complete the final image.
0 notes
Text
[ad_1] Very similar to the entry of iGaming platforms just like the On line casino Vulkan Vegas revolutionized the playing realm, placing a digicam inside a telephone is one concept that considerably modified the entire idea of pictures. In the identical means on line casino websites the place everybody can play slots on-line Canada began giving land-based playing homes a run for his or her cash, the camera-making business has confronted hefty competitors as extra folks started buying smartphones as an alternative of conventional cameras. Photographers discovered palm-sized smartphones extra handy than massive and heavy cameras, because of digicam telephones. Though smartphones’ captured photos had decision hiccups on the very starting in comparison with DSLRs, it wasn’t a lot of a problem in a while, because of steady upgrades like modifying instruments and particular processors. Smartphone cameras can now seize greater decision photographs that may be edited utilizing modern instruments in design apps to offer a picture you’re really after. The enjoyable a part of all that is that you simply don’t must be an expert photographer to expertly use the design pictures apps to create a visible masterpiece you possibly can admire. So, how is smartphone pictures unlocking customers’ creative facet? What are the perfect instruments utilizing which you'll be able to edit your photographs? What made mobile-based pictures an fulfilling playground for anybody with a inventive thoughts? Let's discover solutions to all these questions! Progressive Design Purposes in Cell Pictures Typically, the captured picture comes out the way in which you visualize it. In different instances, the picture has some blemishes that, as soon as corrected, will give it an elevated look. Cell apps are designed to assist edit such photos on the go. You’d be shocked to understand how a lot you possibly can edit utilizing cell design purposes. They allow superior capabilities like tone changes, masking, blemish fixing, overlays, HSL color correction, and gradients. The best apps you possibly can obtain in your smartphone to edit your pics as we speak embody: Adobe Lightroom Cell Its digicam function permits photographers or informal snapshooters to shoot raw-format photos on iOS and Android units. The app’s free model additionally permits filters and different instruments. With a paid subscription, Adobe Lightroom customers can get pleasure from cloud storage, superior modifying instruments, and results like therapeutic, masking, and preset options. Apple Photographs This helps you make inventive edits on iOS units. Stay photographs can have lengthy publicity and bounce results. When you have an iPhone, the app offers you extra modifying prospects, like altering the white stability and lifting shadows. It’s slick, and also you’ll get all the color changes you would ever ask for. One other good thing about utilizing Apple Photographs in cell pictures is that it excels at organizing your photographs and utilizing the system’s AI assistant that will help you discover distinctive objects and particular folks. Afterlight Afterlight is an iOS cell app wealthy in primary modifying options like cropping, distinction, publicity, saturation, and so forth. Whereas these options can be found within the free model, upgrading Afterlight to the paid account gives higher perks, corresponding to making certain no stone is left unturned in pictures creativity. The perks embody: Superior filters for HSL (hues, saturation, and lightness); Movie and VHS look filters; Tone curve modifying; Materials and textual content overlays; Sharpness and gradients. Snapseed The Snapseed app is among the many very unique innovators in Google’s portfolio. Its sturdy photo-improving instruments haven’t seen many upgraded options, however that shouldn’t be a priority, as the present ones are adequate. Snapseed permits modifying uncooked digicam DNG and JPG information with instruments like HDR, sharpness, therapeutic brush, and perspective.
The app is free for all Android and iOS customers—an enormous plus, proper? Polish Polish is an Android and iOS freemium app that options Photoshop-like instruments. It allows masking and AI-powered artwork transfers. The free model is nice, however you possibly can improve to the professional version for a greater modifying course of with out the distraction adverts, which has cropping options at its finest stage. VSCO VSCO is the place professional photographers excel with filters. It has normal correction and modifying capabilities you’d look forward to finding in different cell picture design instruments. The app helps uncooked digicam information and supplies superior modifying instruments like HSL and split-tone modifying. Higher nonetheless, authorized VSCO individuals can focus on posts and contribute concepts on bettering current options. Different Picks for You So, if inventive pictures is your factor and you want modifying photos on the go, you must contemplate having numerous modern purposes mentioned above in your system. Certainly, these six apps are just some of the best-rated professional cell pictures instruments, however beginner photographers can nonetheless unlock their modifying artistry with different apps like: TouchRetouch; Polarr; Google Photographs; PicsArt. Unlock the Potential of Inventive Cell-Primarily based Pictures! Smartphone producers are making strides in telephone digicam high quality, narrowing the hole between DSLRs and smartphones. Furthermore, by the perfect purposes the place you possibly can edit each picture, the pics taken by your cell system can now rival the management that DSLRs provide. Cell phone builders are constantly innovating telephone cameras with greater megapixel decision and improved movement blur. Mix that with the modern instruments featured in high picture modifying apps, and also you’ll agree that the way forward for cell pictures is vivid. [ad_2] Supply hyperlink
0 notes
Text
Week 2 - DSLR: Taking Charge Workshop
Notes:
RAW vs JPEG
RAW is a term used to describe unprocessed data that the camera captures. – Larger, can shoot in 16-bit mode.
JPEGs are converted to 8-bit mode, use unsharpen mask, and set contrast and saturation; different cameras will do these differently. – Smaller, compressed file
RAW holds more information and is easier to edit. Larger dynamic range. Holds all camera settings.
More pixels have more colour information.
Each pixel has a value that describes how bright they are.
Camera Raw for Photoshop CS to convert.
Aperture priority, priorities aperture etc.
Manual gives you more control.
High dynamic range – HDR – which is the detail in the shadows and the highlights.
Adobe Bridge – Advance file browsing software
Proof sheet in Lightroom
Shoot in RAW!!!
Default your camera stores as JPEG, can be heavily compressed without losing details.
^
Do not contain all colour detail, hard for post production.
Raw files store all colour details your camera captures.
Raw can allow you to recover from overexposed highlights. Recover detail and save and image.
Reflecting:
I was able to learn some new knowledge about using the DSLR camera. Such as Raw vs Jpeg, why you could use each one. Changing the ISO, aperture and shutter settings. The correct way to hold a camera and change a lens. I felt like I gained some confidence and knowledge that I can bring to taking photos this week. I also learnt how to make a contact sheet in both Adobe Bridge and Lightroom, something I wish I'd known last week.
0 notes
Text
Trying the New Lightroom Masking
Trying the New Lightroom Masking
Make a Donation As always, as I poured my morning coffee I glanced down the valley toward the Sangre de Cristo Range to see what kind of a day I would encounter. The range was cloud capped and amazing looking in the alpenglow as the sun rose in the east. The cold front is taking forever to arrive but I could see the clouds on the mountains might be of interest on this day, along with my two…

View On WordPress
#ACR masking#Adobe#adobe photoshop#camera raw#landscape photography#Lightroom#masking#masking techniques#mountains#new masking tools#Sangre de Cristo Mountains#sensor cleaning#sensor cleaning tips#techniques#tips#turorial#weather#weather photography
2 notes
·
View notes