#hiking resources
Text
Beginner Hiking Guide Part Three:
What to Wear Hiking
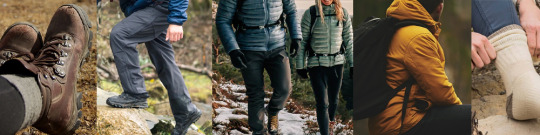
Adequate and appropriate attire while hiking can make a big difference in your mobility, comfort, and even survival. Don’t worry about fashion -- nobody on the trail cares if you look good, and feeling good is far more important. Plus, you don’t want to wear anything that you don’t mind getting dirty, since you’re going to get sweaty and potentially dusty, muddy, etc. Focus on functional clothing for the activity you’re engaging in!
Comfort & Flexibility
You’re going to be moving a lot, so make sure you’re wearing clothes that you can move in! You’ll want clothes that fit comfortably and are sturdy enough that they won’t tear like tissue paper if you take a tumble, but that are stretchy and flexible enough that you don’t feel limited in your movements. Avoid anything that’s going to pinch or chafe.
If you don’t have hiking-specific clothes -- which, if you’re just getting started, you probably don’t -- don’t worry! Odds are there’s something in your closet that will work fine. A lot of non-cotton athleticwear is perfectly good for hiking -- I’ve used my gym leggings and workout shirt on the trail. The key is finding something that uses the right fabrics:
Fabrics
Good: Synthetic fabrics like polyester or nylon, as well as merino wool, are great for hiking. These fabrics are good at wicking moisture away from your body -- a key quality in base layers, or any fabric that touches your skin. You’re going to work up a sweat, so you want fabrics that will wick that sweat away and allow it to evaporate, rather than trapping it against your skin so you get clammy and chilled. Anything described as “quick dry” is going to be a good option. For socks, I always opt for wool.
Bad: Cotton of any kind, including denim. Cotton is like a sponge and will absorb moisture and stay wet. You know how when you do laundry, your jeans are often still damp after the rest of your clothes have dried? Jeans will also hold on to moisture from sweat or from wet trail conditions, chilling you on a long hike; a lot of hypothermia cases in backcountry are attributed to cotton clothing. So unless you’re doing a very short, easy hike in optimal weather conditions, avoid cottons.
Dress for the Conditions
I wrote in a previous segment about the importance of knowing the forecast for your hike; make sure you dress appropriately for the hike you’re undertaking, in the conditions you’re undertaking it in!
Hot weather: Wear light-weight moisture-wicking clothes that won’t trap sweat against your body and that will let you keep cool. If you have longer hair, bring something to tie it up/back to keep sweaty hair out of your face.
Sunny weather: If it’s sunny and you’re going to be out in direct light, consider a lightweight outer layer to protect yourself from the sun. A hat with a wide brim is also a good option, and definitely bring sunglasses!
Wet weather: If it looks like there might be rain, make sure you have clothing on that will dry quickly, and a rain shell/rain jacket -- something lightweight and breathable. Also consider packing an extra pair of socks (because nothing is worse than hiking in wet socks) and an extra warm dry layer since you’re more likely to get chilled when you’re wet.
Cold weather: Layer up! Make sure you are dressed warmly, and pack one more layer than you think you’re going to need. My dad always says, “If you wore all your layers, you didn’t pack enough layers.” (more on layers below). Also be sure to have a hat that fully covers your ears, a scarf or buff or other means of keeping your face and neck warm, gloves/mittens, and warm wool socks.
While you will probably be pretty warm from exertion while you’re hiking, you’ll find yourself cooling down quickly when you stop for breaks-- or if you have to stop due to an injury or other problem. Always pack for the coldest you might get. (On a longer, more remote hike, this should include ‘how cold I’ll get if I get lost and spend the night outside.’)
How to Layer for Warmth:
Underwear: Synthetic, moisture-wicking, and comfortable. If you have breasts, make sure you have adequate support. I’m a fan of high-impact sports bras and long boxer briefs to avoid chafing/riding up.
Base Layer: Wear a top in a moisture-wicking fabric (pretty much any synthetic workout shirt will do!); if it’s mild enough you don’t need multiple bottom layers, opt for quick-dry pants or athletic leggings and you’re probably good there. If it’s cold, consider wearing non-cotton leggings or long underwear as an insulating layer under a pair of pants -- if you’re like me and slip and fall on your ass a lot, your cold wet butt will thank you.
Mid Layer: This is your insulating layer that traps in heat. In warm or mild temperatures, sticking a light jacket or hoodie in your pack for if you need it is fine, but if temps are dipping colder, bulk up your mid layer(s). I usually wear a fleece jacket and then an insulated puff jacket over it when I hike in winter. You may also consider warmer pants (I have fleece-lined joggers for when it’s REALLY cold).
Outer Layer: If base layers keep away the moisture from your skin, and mid layers trap in heat, your outer layer is preventing heat loss and moisture from everything else. Windbreakers and rain shells can keep high winds from biting through your other layers and stealing away body heat, and keep rain from soaking you through and similarly putting you at risk for hypothermia.
Will you need all these layers on a hike? Probably not! In the middle of summer at low elevations, I hike in base layers and throw a rain shell in my pack and I’m pretty much good. But in winter, I’ve had up to 5 layers. So it will depend on the conditions.
Also, be ready to take off and add layers throughout your hike. I usually shed a layer within the first half mile of a hike as I get warmed up, but will often put layers back on when I reach summit, or am taking a snack break. Dropping layers when necessary will prevent you from sweating too much (soaking your clothes and dehydrating you).
Footwear:
Perhaps the most important item in your hiking ensemble is your footwear. Proper shoes can make or break a hike. Or a leg, for that matter.
Hiking boots are thusly named because, well, they’re good for hiking. You want footwear that:
is sturdy
has good grip/traction
keeps you comfortable by cushioning, supporting, and protecting your foot.
Good: Hiking boots. Trail/hiking shoes. Hiking sandals, weather permitting. Maybe sneakers, on a really flat and easy trail, though I don’t recommend them for more rugged trails.
Bad: Basically everything else. Ballet flats, flip flops, crocs, converse, etc. Anything that pinches or hurts your feet after a while. Any brand new shoes you’ve never worn or broken in.
Now admittedly, a good pair of hiking boots can be expensive. But if you’re going to invest in anything to get started while hiking, I beg you to invest in a comfortable pair of hiking boots/shoes. And practice walking in them and breaking them in before you hit the trail -- you will often find that the experience of walking uphill in a particular pair of shoes feels very different from walking in them on flat terrain.
Additional clothing notes:
Long pants vs. Shorts. I personally always hike in long pants, though I see plenty of people hiking in shorts in summer. I recommend researching trail conditions, the local ecology, and knowing your own heat tolerance. Long pants might not let you cool off like shorts, but they do protect your legs from sun exposure, ticks and other insect bites, and scratches and scrapes from brambles or rocks.
Socks. I highly recommend wool socks for hiking, year-round. Also, make sure that your socks fit well; loose, baggy socks are more likely to slip around in your shoe and cause blisters, along with socks that are shorter than the ankle of your shoe.
Jewelry. In addition to jewelry potentially catching and tangling on things, there’s the risk of it getting lost and being near impossible to find. I recommend you don’t wear or bring anything overly precious to you while hiking. That includes clothes you really really love, because you will get gross.
Binders. If you wear a binder, consider not wearing it while hiking, or wear a binder a size up from your usual. You will know your body and limitations best, but as a matter of safety you don't want your breathing restricted or to risk overheating, and it is widely recommended not to bind while engaging in strenuous activity.
In Summary:
Dress comfortably for activity
Avoid cotton ([Edna Mode voice: NO JEANS!]) and stick to synthetics that will wick away moisture and dry fast
Factor in weather and trail conditions into your clothing choices
Layers are your friend (and pack a spare layer just in case)
Get yourself some decent hiking shoes that won’t fall apart, slip and skid, or leave your feet blistered and hurting
Don't worry about looking stylish; just stay safe, comfortable, and have fun!
<< Previous Part: Preparations - Knowledge is Power
Next Part: What to Bring Hiking >>
91 notes
·
View notes
Text
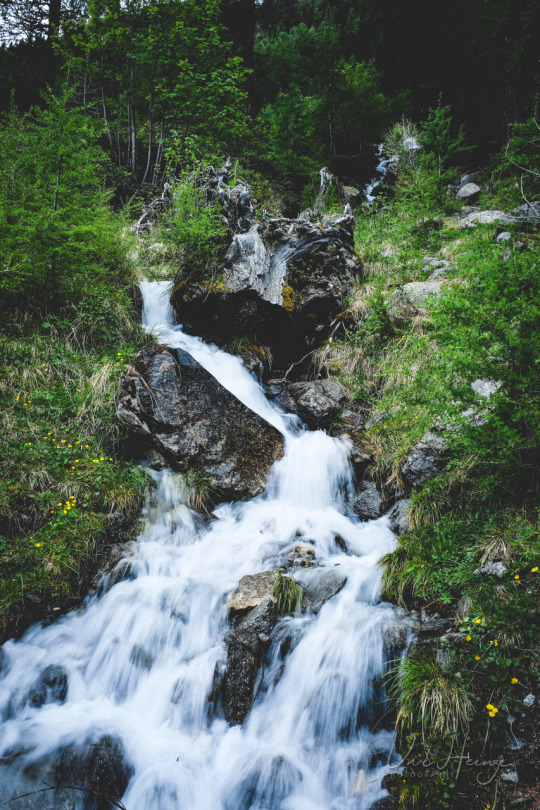
. . . | uwhe-arts
#watercourse#photographers on tumblr#uwhe-arts#original photographers#nature#original creators#explore#vertical#photography#resource#spring water#travel#hiking#wanderlust#planet earth#curators on tumblr
455 notes
·
View notes
Text
764 notes
·
View notes
Text
webby would have LOVED mystery flesh pit national park
#my funky guys#shed be sooo fascinated w it#shed be pissed about the comercialisation of it n shit BUT. at the same time if she could take a hike in there?#she would. 100%. and shed be having a blast tge whole time#like. shed have a love hate relationship w the whole national park thing and how irresponsible the whole situation was#bc it WAS shitty and sketchy as hell#but on the other hand she just really really loves the idea of being able to walk around the insides of a colossal beast#so shed be like 'ofc nobody should be allowed to fuck around in there like that wtf dude thats so dangerous and irresponsible#.except for me. they should let ME fuck around!!! fuck the corporation and tourists i would treat her right!!!!!!#*I* would be careful and wouldnt exploit the resources and keep distance from the fauna unlike SOME PEOPLE'#ok well. i mean weblums exist so i suppose she COULD walk around the insides of a giant organism#but still the mystery flesh pit has that certain allure. a vibe. weblums are cool as hell but theyre not an eldritch underground horror#weblums are cool space whales but the mystery flesh pit is .well the mystery flesh pit. cant rlly compete w that#anyway. the pit may be a deatrap but not for her. shed survive. shes special like that the giant lobsters wouldnt eat HER#also webby would be very much on the pits side. its not ITS fault people are stupid?? its just chilling!!! its not evil!!!!!!#'ohh but those arthropods are scary!!! WELL. theyre WILD ANIMALS DIPSHIT ofc theyre hostile. and plus theyre cool as hell'
15 notes
·
View notes
Text
The field backpack I’ve used my entire CRM career is finally dying, and I’m having trouble finding something similar to replace it.
Anyone have any recommendations for good day packs? Preferably something sturdy enough it can handle having a screen attached to it while hiking and made from material that wont get easily sliced open by trowels or other sharp gear in it.
3 notes
·
View notes
Text
This is really great! Accessible hiking trails!
(Also if anyone knows a way to link a non-subscriber version I would greatly appreciate it!)
12 notes
·
View notes
Text
mentally planning out the most elaborate and amazing date/romantic vacation ideas before remembering that no one has ever wanted you even as a last resort: priceless
#not trek#personal log#early morning thoughts#insomnia#yucky head cold sore throat it's been 3 days since i could talk out loud!#boooooooooooooooo hiss#somebody call the waambulance plz#forever alone#forever single#frustrating paradox#i feel like i would be a phenomenal romantic partner if only relationships didn't involve jealousy anxiety paranoia ptsd insecurity etc#or like. communication#or the other person ever having to actually Look At or Be Near me#i think maybe my head is a balloon 👀🎈#ooooooooooo lol like in those old sudafed ads where the little cartoon people are spaced out and their brains float away 🎈🎈🎈#idk wtf this is but maybe my painkillers are finally kicking in again yayyy#edit w/ slightly more sentience: srsly like local apple orchard shenanigans. grand canyon/other natl park exploring. carnivals hikes idk#stuff that would all end up costing far more money than i have and probably more than anybody else has either#i would treat them so good if i had all the money/resources and any of those charming personality or physical traits i dream about having#i would be impossible to resist if only i—*sigh* 😮💨 you're right‚ just fuck it all 😮💨😮💨😮💨
68 notes
·
View notes
Note
sorry about the post, but I do have a question, do any of city or surrounding factions have tanks or armored cars?
Nah, it wasn't you, dude. I just spent way too long in fan groups fighting with bros doing bad faith arguments so The Lore discourse gets my fight or flight going. Sorry if my response was bitchy.
For ground vehicles, in Pentagram city in districts where the Overlords bother with infrastructure, the roads are passable enough that carts/rickshaws/etc. are common for people getting around. Bicycles are amusingly popular in Cannibal Town, which has properly paved walkways, and would probably have a trolley if it were big enough that you couldn't easily travel on foot.
Vox loves showing off, and the Vees want to encourage as many people into their territory as possible, so they do have a monorail/tram that goes around their district, and he bugs his neighbors to let him build lines through their districts as well. The roads and sidewalks in their district are absolutely shit though and you could lose a Brahmin in some of those potholes.
Thinking about it, Zeezi would absolutely have some sort of Mad Max truck with big treads for offroading, just for the fun of it. Not practical or central to her operations, but seeing a restored semi in neon paint and deatchclaw skulls loaded up with Raiders screaming towards you would ruin anyone's day.
The Army of the Righteous, true to their Enclave-esque role, do have some tanks and land vehicles, which mostly go between their bases. The Wasteland's terrain can make it really inefficient to use them as a main source of transportation, and vertibirds are their preferred mode of transportation for Exterminations.
So in my AU, there are functioning land vehicles, but they're not really as common as pre-war because few roadways are restored, and more infrastructure, especially in the city, is focused on foot traffic.
#vault 666#answers#as always with Fallout the answer as to why they haven't totally bounced back to prewar tech is always 'people' instead of resources#but also imagine a cannibal in a hiked up skirt cruising along ringing a cheery little bike bell#adorable yet deadly
2 notes
·
View notes
Text
In case anyone would like to know how I'm doing mentally, I did my first leisurely five-miler in a while (it's finally warm enough/nice enough out) just around campus/the area around it, completely zoned out somehow during the first mile of it, and managed to zone out completely again by the end and walked myself "home" to the apartment I lived in during grad school.
I need a hug.
#still a little too muddy to be doing any real hiking (for me) yet#just making due with other good resources for now#but wtf#funny#personal#30 and THRIVING
3 notes
·
View notes
Text
Playing minecraft means I now have a minesona and I am thinking about him.
#she likes the cold. she hates polar bears. she regularly has to hike thousands of blocks to acquire basic resources.#she’s clumsy. she doesn’t know what she’s doing. she’s constantly nauseous.#she’s too lazy to make food and kills herself instead of eating. she dies constantly anyway. she’s broke as fuck.#she’s trying her best <3#magpie chirping
4 notes
·
View notes
Text
Beginner Hiking Guide Part Two:
Preparations - Knowledge is Power

1. Know what trail you’re taking
You may have decided “I’m going to climb Mount Moosilauke!” -- but there are several different trails up Mount Moosilauke, of varying length and steepness. Are you planning on doing the Beaver Brook Trail or the Gorge Brook Trail? Will you be doing an out-and-back up and down the same trail, or doing a loop where you descend down a different trail to the same trailhead departure point?
Make a plan using the resources from Part One, know the names of the trails if there are interconnecting ones you plan to take, and keep track of blaze colors if you are in an area that uses colored trail blazes. (Blazes are rectangles of paint or other markers on trees and rocks put up by trail maintainers to indicate where the trail is, and which trail you are on)
2. Trailhead location and access
Once you know what trail you’re taking, you’ll want to figure out the location of the trailhead. Some trailheads can be very crowded, so you may want to show up early for parking, or be aware you may need to park a distance away. Also, some backcountry trailheads are on seasonal roads that may be closed during certain times or day or times of year, meaning you may wind up hiking an extra mile or two along a dirt road just to get to the trail.
3. Trail length & elevation gain
How long is the route you’re taking? And what is the elevation gain? (Note: listed elevation for the hike typically refers to the highest point on the hike’s distance from sea level. Elevation gain specifically refers to the gain in elevation from the beginning of the hike to its highest point, since you often aren’t starting at sea level.) Keep in mind that the greater the elevation gain relative to the length of the hike, the steeper the trail will be and the more challenging the hike.
4. How difficult is the trail?
Trail difficulty is hard to gauge precisely, since what is difficult is always going to be relative. Something that might be an easy trail by one person’s judgment may be extremely challenging to another. But there are some factors we can look at for what’s likely to make a trail more or less difficult to hike:
Steepness - determined by elevation gain / length. TrailsNH has a useful “hiking difficulty calculator" to help you get an idea of the overall grade of the trail based on these criteria: https://trailsnh.com/tools/hiking-difficulty.php
Terrain - is the ground flat gravel or full of rocks and tree roots? Does the trail description reference ‘scrambles’, ie, rocky areas where you will need to use your hands as well as your feet to climb up?
Trail Conditions - did it rain heavily yesterday, leaving the trail a slippery, muddy mess? Have there been landslides in the area? Did it snow at elevation?
Looking at the elevation gain and distance can help you determine steepness. Pictures of the trail and reviews may help you get an idea of the terrain. And there may be online hiking communities in your area that report on local trail conditions. (If you hike in the New England area, I recommend https://www.newenglandtrailconditions.com/ ). AllTrails also has a comment section where people sometimes leave useful trail reports with the date, so you can check to see if someone hiked it recently.
5. What is your expected hike duration?
Average human walking pace is about 3 miles an hour. But walking pace and hiking pace can be very different, depending on the trail difficulty -- you may find yourself hiking between 3mph and 1mph. A challenging trail will force you to move slower and more carefully, and you’ll probably want to take breaks -- both to catch your breath, and to enjoy the view!
There are a few different formulae out there for predicting hiking time. “Naismith's Rule” is 19.5 minutes per mile, plus 30 minutes for every 1000 feet of elevation gain, but this really only makes sense if you’re on a trail that has very smooth terrain. “Book time”, which is a bit better suited to rocky terrain like you’ll get on more backcountry trails, states “30 minutes per mile + 30 minutes per 1000 feet of elevation gain.” (Personally, in the White Mountains, I make it 45 minutes per 1000 feet of elevation). TrailsNH has a slightly more involved calculator that factors in overall pace, terrain, and the weight of your pack: https://trailsnh.com/tools/hiking-time-calculator.php . (Note that none of these factor in "snacking time", which is an egregious oversight in my opinion.)
If you’re new to hiking, always err on the side of giving yourself more time than you expect to need, until you get to know your own pace! And be sure to give yourself extra time to enjoy the wilderness without stress.
6. What’s the forecast?
Always look up the weather before you hike! Hikers are far more likely to die of exposure than of bear attacks or whatever else you may think is a threat in backcountry. Pay attention to temperature (extreme heat and extreme cold are both dangerous), humidity (humid days will have you sweating more, so you will need more water), wind speed + wind chill (especially if you’re hiking in exposed areas -- wind is a killer above treeline), and precipitation (you’re at greater risk of hypothermia, even in mild temperatures, if you’re wet). The weather conditions will impact the trail conditions, impact your own physical tolerance, and dictate what you need to bring if you do go hiking, or whether you should even be hiking at all.
There may be different weather concerns depending on where you’re hiking. If you’re hiking in the mountains, you’ll want to make sure you know what the weather is at summit, not just at the base of a trail. It may be 80ºF down in the valley, but below freezing at the top of the mountain. On the other hand, if you’re hiking at low elevation, especially if you’re hiking in a canyon, you’ll want to pay close attention to flash flood warnings.
Useful forecasting tools:
https://forecast.weather.gov/ - NOAA weather forecast, offers detailed hourly weather forecasts
https://www.mountain-forecast.com/ - provides forecasts for mountain summits (including windchill, wind speed, and wind direction)
Knowledge + SAFETY
Before you leave for your hike:
Plan your departure time. Know when sunset is, how long you project your hike to take, and how long it will take to get to the trailhead. Give yourself an ample buffer in case you underestimated your hike duration, and working backwards, plan to leave early enough that you will be done with your hike and back to your car well before the sun goes down so you aren’t stuck blundering through treacherous terrain in the dark (more on this in the next part where we talk about gear!).
Check the weather forecast once again the night before, AND the morning of! Weather can be volatile. If conditions change and become unfavorable, don’t be afraid to reschedule your hike. You cannot outrun mother nature. Numerous people -- including seasoned hikers -- have died in the White Mountains (where I hike) from failing to adequately check the forecasts and getting trapped in deadly weather. There’s no shame in bailing out at the last minute if conditions are just plain bad.
Notify someone reliable in your life of:
Where you are hiking
What trail(s)/route you are taking
How long you expect to take
When to worry and call for help if they haven’t heard from you or can’t get hold of you
Stick to the plan you’ve communicated once you start your hike! If you are injured or lost and don’t have the ability to call for help (dead phone battery, no service, etc.), you will want someone who will recognize that you’re overdue and can call for the authorities to tell them where to look. The sooner someone knows you’re missing, the sooner Search & Rescue teams can be deployed to help you.
<< Previous part: Find Where You Want to Hike
Next part: What to Wear Hiking >>
#Beginner hiking guide#hiking resources#hiking preparation#hiking safety#ongoing series I will be getting to a lot more topics don't worry#lena hikes
58 notes
·
View notes
Text
Golf Courses ARE Being Converted
The Solarpunk "fantasy" that so many of us tout as a dream vision, converting golf courses into ecological wonderlands, is being implemented across the USA according to this NYT article!
The article covers courses in Michigan, Pennsylvania, California, Colorado, and New York that are being bought and turned into habitat and hiking trails.

The article goes more into detail about how sand traps are being turned into sand boxes for kids, endangered local species are being planted, rocks for owl habitat are being installed, and that as these courses become wilder, they are creating more areas for biodiversity to thrive.
Most of the courses in transition are being bought by Local Land Trusts. Apparently the supply of golf courses in the USA is way over the demand, and many have been shut down since the early 2000s. While many are bought up and paved over, land Trusts have been able to buy several and turn them into what the communities want: public areas for people and wildlife. It does make a point to say that not every hold course location lends itself well to habitat for animals (but that doesn't mean it wouldn't make great housing!)
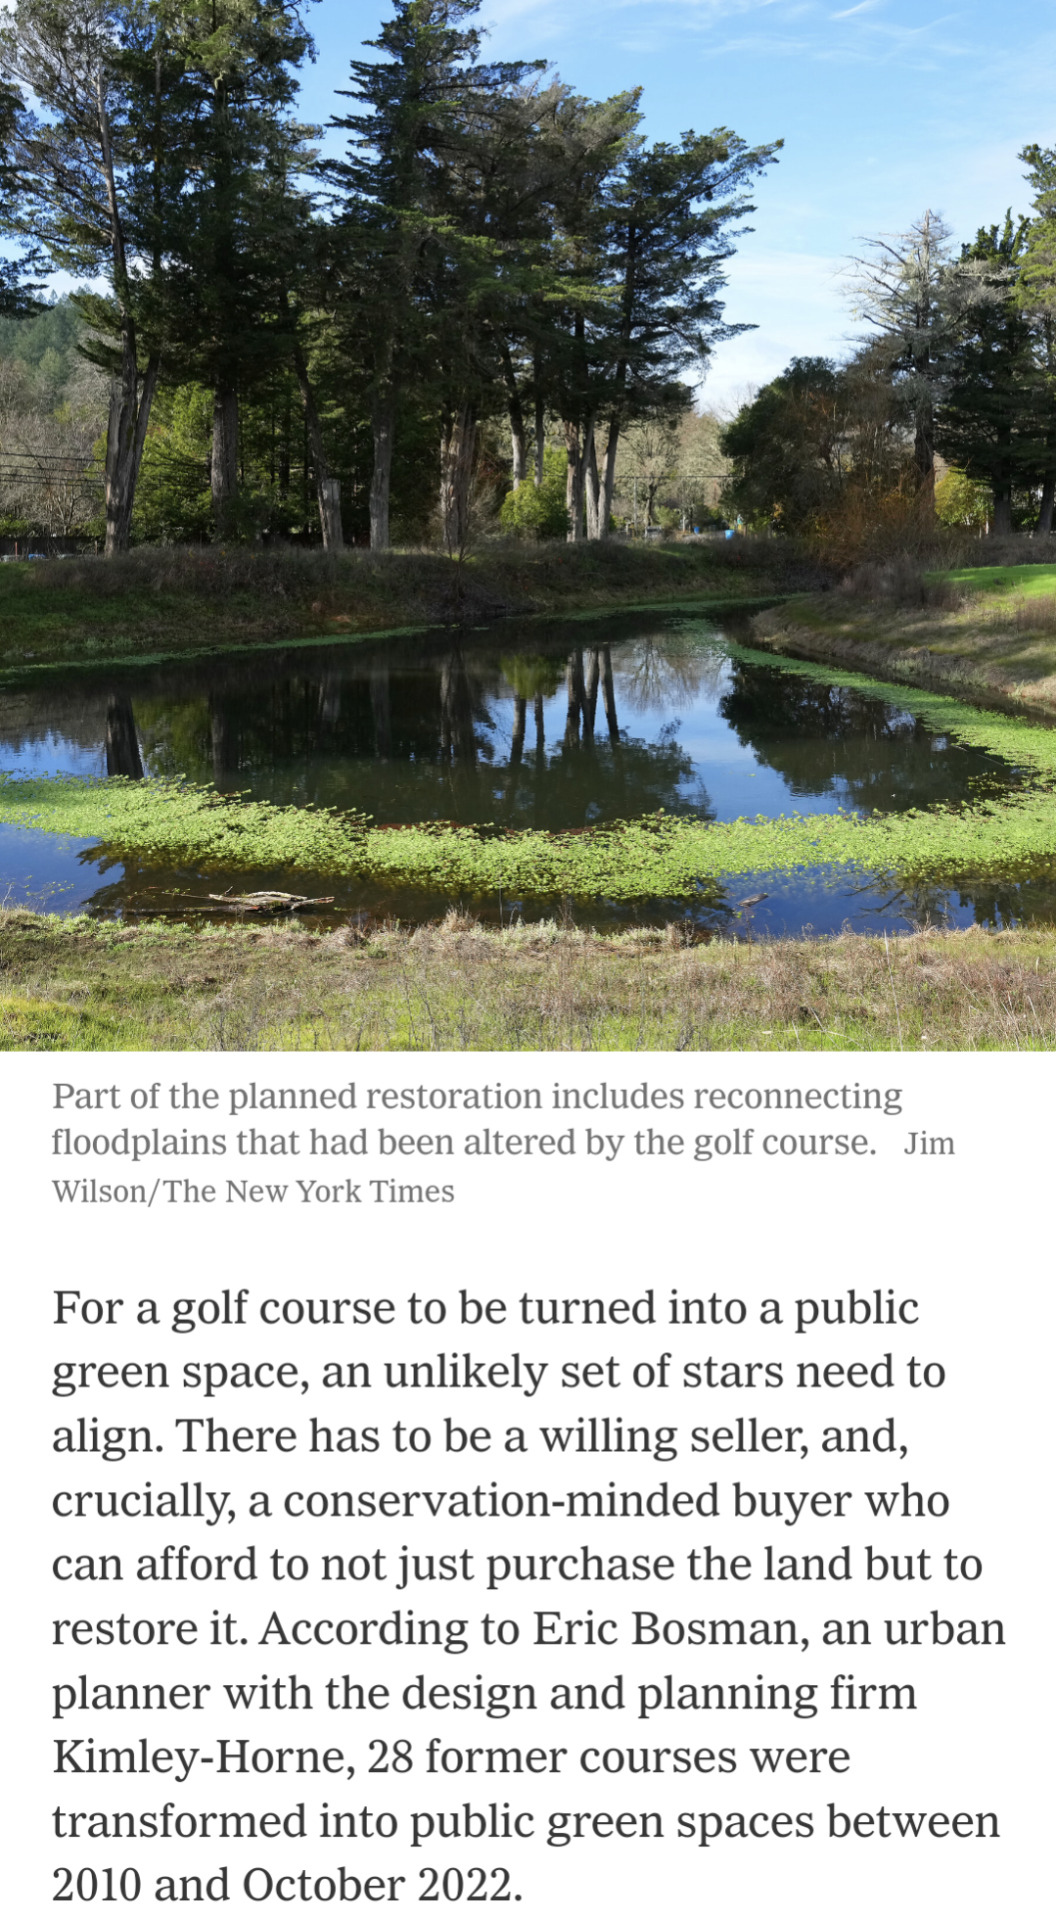
So lets be excited by the fact that people we don't even know about are working on the solutions we love to see! Turning a private space that needs thousands of gallons of water and fertilizer into an ecologically oriented public space is the future I want to see! I can say when I used to work in water conservation, we were getting a lot of clients that were golf courses that were interested in cutting their resource input, and they ended up planting a lot of natives! So even the golf courses that still operate could be making an effort.
So what I'd encourage you to do is see if there's any land or community trusts in your area, and see if you can get involved! Maybe even look into how to start one in your community! Through land trusts it's not always golf course conversions, but community gardens, solar fields, disaster adaptation, or low cost housing! (Here's a link to the first locator I found, but that doesn't mean if something isn't on here it doesn't exist in your area, do some digging!)
#solarpunk#sustainability#climate change#gardening#activism#hope#climate justice#news#new york times#golf courses#habitat#conservation
16K notes
·
View notes
Text
outdoor bingo cards!


Image description. Four images with a leaf green background, coloured line art pink California rose with red hips and hazel leaf sticker in bottom right with where to get a copy, a red chop in bottom right, and poster's handle in bottom left in black serif font. Each image has a screenshot of a different black on white lineart bingo card. of 24 lineart tiles.
I will admit right now that I think going someplace and playing bingo is pretty boring. But hand me a bingo sheet, a pencil, and tell me to go for a walk and I will speedwalk my way to blackout bingo. I think it's pretty important and pretty fun to be able to identify the plants and animals around you, with an emphasis on what's edible and what's poisonous - I have my priorities. So I made my kids these bingo sheets, and want to share with you!
Then I thought, why waste a perfectly good piece of line art? So I made 8 pages of four tile colouring pages, with the 32 most interesting to colour tiles from the bingo cards.
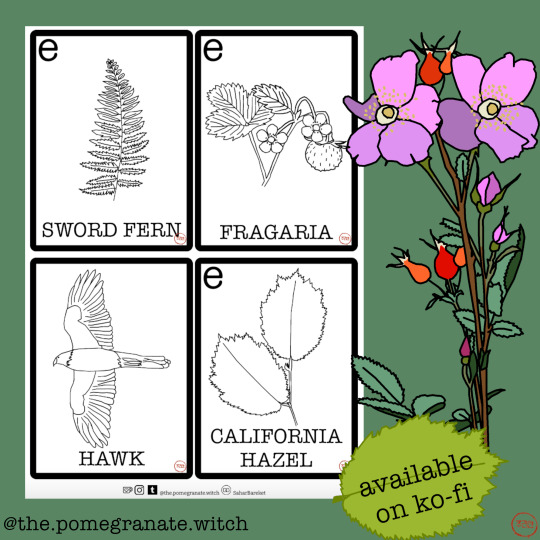

Image description. Two images with a leaf green background, coloured line art pink California rose with red hips and hazel leaf sticker in bottom right with where to get a copy, a chop in bottom right, and poster's handle in bottom left in black serif font. Each slide has a screenshot of a different black on white lineart four-tile colouring page. The first page shows a sword fern, Fragaria, hawk, and California hazel on the first page. The second colouring page has a California poppy, a California rose, California white sage, and a seed eating bird, which is a sparrow.
We've been having a lot of fun with these - well, the preschooler is, the toddler is more interested in finding a good stick and mishroom hunting still (good sticks are important!). Grab yourself a copy too - it's a 10-page pdf with 4 different bingo cards and 32 colouring tiles, print yourself on 8.5x11 paper. While this was designed for the California woods, it can be enjoyed in much of the wooded United States West Coast areas.
#bingo#outdoor#outdoors#outdoor bingo#hiking#hiking bingo#get outside#teaching resources#california#redwoods#foraging#coloring#digital art#queer#queer art#queer jewish art#queer jew#thefifthacre
1 note
·
View note
Text
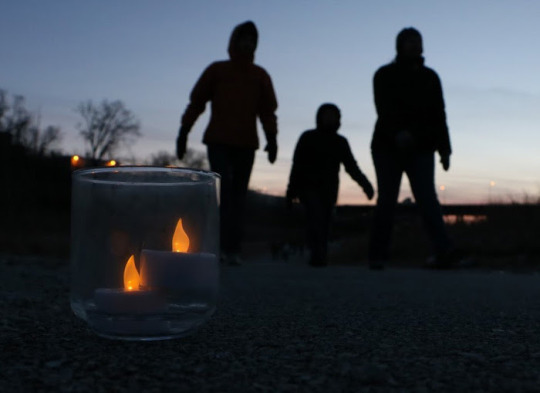
DNR to offer candlelight hikes
Most properties will require a 2024 Wisconsin state park admission fee and/or a state trail pass unless otherwise noted.
MADISON – The Wisconsin Department of Natural Resources invites the public to celebrate the outdoors this winter at any of the several candlelight events happening across Wisconsin. These events kick off on Jan. 6 and are scheduled at various locations through March.
“Winter candlelight events are some of the most popular activities at Wisconsin state parks, forests and trails,” said Steve…
View On WordPress
#candlelight hikes#cross-country skiing#hiking#snowshoeing#Wisconsin Department of Natural Resources#Wisconsin DNR
0 notes
Text
I went hiking again today with the Appalachian group! It wasn’t a bad hike at all besides I had a Zoomba class after it which by time I did all that then got home I was DEAD.
After the hike we went to Bucees,it was my first time going! I even got a selfie with the mascot!! I was so so happy.
Besides that the hike slapped, it was deadly feeling going up like DEAD. And it was pretty chilly, but once we got to the top it was so worth it! We hung out up there for a bit, saw some puppies and eventually headed back down. Which was almost completely downhill, but 10/10 it was hilarious. Couldn’t even stop laughing my whole way down, even though it was kinda moist so not falling became a task.
Zoomba afterwards went well, it wasn’t the best but it was still great and I had fun. I liked my last cardio workout I done, that one was really fun and so was the instructor. I definitely will be signing up for more here soon. Honestly I’ll probably do that tonight.
I feel like I always struggle to make these longer so I end up making them way to long which I mean is okay, I’m not mad. But anyway it is almost midnight and I definitely should probably end this here soon!
But yeah, It wasn’t a bad week VERY busy as always but what’s new. Still pissed at myself for failing my Geology midterm but we don’t talk about that.
Anyway, I love ya’ll and I’m so very proud of y’all!!!💜🫶🏻
#hiking#i love you#university of kentucky#college blog#lexington#spotify#studying#introduction#sewing#resources#wool
1 note
·
View note
Text
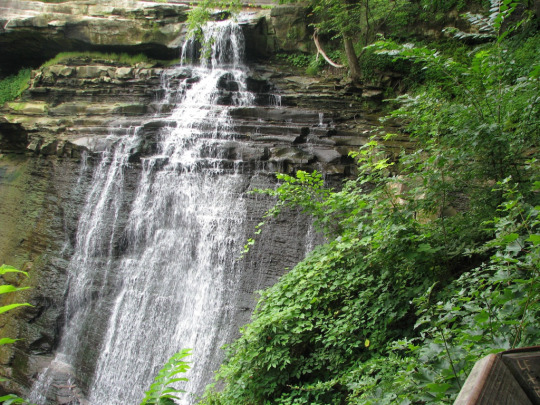
Hiking Guide to Cuyahoga Valley National Park: Discover Ohio's Hidden Gem
Embark on a journey through Ohio’s untamed wilderness at Cuyahoga Valley National Park. This expansive park, a true hidden gem, offers lush trails for beginners and seasoned hikers alike. You’ll traverse rolling hills, scenic farmlands, and serene waterways, all teeming with diverse flora and fauna. Whether you’re seeking solitude, a family adventure, or a fitness challenge, our comprehensive…
View On WordPress
#best hikes in Ohio#Cuyahoga Valley hikes#Cuyahoga Valley National Park#hiking experiences#hiking guide#Hiking Project#hiking trails#National Park Ohio#nature exploration#Ohio Department of Natural Resources#Ohio hiking#Outdoor Adventures#trail maps#travel Ohio#visitor information
0 notes
Last Seen Blogs

honeybewrites
HoneyBe

hexedrosel-arts
Rose-laced drawings

in-the-bookish-dark
In The Bookish Dark

sibirliss
Senza titolo

tsuutarr
Girl failure with silly thoughts