#how to access localhost from internet
Explore tagged Tumblr posts
Visit Tumblr Blog
Explore Tumblr blogs with no restrictions, modern design and the best experience.
Last Seen Tumblr Blogs


Fun Fact
In 2020, 44% of users from Denmark used Tumblr daily.
Text
When you want to record a HTTP conversation you can use a MITM (Man In The Middle) Proxy. I was trying to record a replay a HTTP request for one of my projects and stumbled across the MITMProxy project. The tools is really powerful however documentation is not detailed so after some research on web I realized that I need to try on my own. It took me a day to figure out, I hope to be able to save your time by this article. This tutorial is focused mainly for beginners like me. I have created a simple tutorial to run a proxy on your local machine that can record and replay HTTP request on a HTTP server. I have taken tomcat manager app as the example. This can also be treated as a sample MITM attack demonstration since I am recording the tomcat manager login session and then able to replay it to get execute more requests as tomcat manager account without client initiating any requests. What Is Man In The Middle (MITM) Attack Man in the middle attack is a type of communication hacking attack where an attacker can modify the information between client and server. For example just imagine you are logged into your bank account and want to transfer money from your account to a friends account. If a hacker having access to communication channel suing MITM attack is able to modify the information in your transfer request and change the friends account number to someone else. This way you may not realize that the money was transferred to someone else. What is mitmproxy Project This is a command line utility that can intercept the traffic flows and record it to be replayed later. For more details visit project website - mitmproxy project How A Man In The Middle (MITM) Attack Is Performed MITM attack requires an attacker to have control over the communication channel. A common scenario could be a internet cafe that has all the traffic going through a proxy. A proxy server can see the traffic between client and server and may modify it. In case when a hacker has control of the proxy, it can be really easy for them to intercept a non encrypted traffic and see all the information. This is main reason why HTTP is not considered secure since it sends data in plain text and any proxy in between can see the plain text traffic. How To Avoid Man In The Middle (MITM) Attack ? MITM attack can be easily avoided (or at least made very difficult to perform) by using HTTPS connection between client and server. How To Simulate A Man In The Middle (MITM) Attack Using MITM Proxy Below are the steps to perform a MITM attack using MITM proxy tool. Real MITM attack may involve much more complex steps, however we have avoided it to keep the tutorial simple. Running A Reverse Proxy To Record Tomcat Requests Below command should run a reverse proxy on port 8081 and record any request sent to port 8081 mitmdump -w tomcat-mgr-login.dump -d --keepserving --anticache -p 8081 -R http://localhost:8080 & Understanding The Options In This Command -w This option tells the tool to record and write into a file called “tomcat-mgr-login.dump" -d This option will enable tool to show more details —keepserving This option will keep the mitmdump reverse proxy running. Otherwise your proxy will stop after one request. --anticache This option will ensure to avoid any web server level caching. -p Tells the port at which the reverse proxy needs to listen to client request. -R This option tells mitmdump tool to run in Reverse proxy mode. The host:port details are used to forward traffic from the port specified in -p option. & This is a unix way to run process in background, not specific to this tool. Start Tomcat Server Start tomcat on your machine, make sure its running on port 8080 You can check it by going to browser on this url http://localhost:8080 Configure Tomcat Manager Password Go to tomcat_home/conf/tomcat-users.xml and un comment these lines. Make sure the change the roles value to manager-gui for tomcat user. Lets Start Recording Now point your browser to localhost:8081
Make sure to use the proxy port 8081, not tomcat default port. This is the main trick that enables proxy to be able to record. Visit the tomcat manger app. Login to tomcat manager app. The mitmdump should record it in the tomcat.dump file Sample Output 127.0.0.1 GET http://localhost:8080/ Host: localhost:8081 Accept: text/html,application/xhtml+xml,application/xml;q=0.9,*/*;q=0.8 Accept-Language: en-us Connection: keep-alive Accept-Encoding: gzip, deflate User-Agent: Mozilla/5.0 (Macintosh; Intel Mac OS X 10_10_3) AppleWebKit/600.6.3 (KHTML, like Gecko) Version/8.0.6 Safari/600.6.3
0 notes
Text
In today’s digital world, networks are the foundation upon which almost all technology is built. A network, at its core, is a system that allows multiple computers, devices, or servers to communicate with each other, sharing data, resources, and applications. Whether it’s the internet or a small home network, the principles behind their functionality remain similar.
What is a Network?
A network consists of two or more connected computers, allowing them to share data. These connections can be established through various mediums, including cables, wireless signals, and even satellite links. Networks are categorized into different types depending on their scale:
Local Area Network (LAN): This type connects computers in a small, localized area such as a home, office, or school. It enables devices to share resources like printers and files.
Wide Area Network (WAN): A WAN covers a larger geographic area, often connecting multiple LANs. The internet is the largest example of a WAN.
Personal Area Network (PAN): PANs are the smallest networks, often used for personal devices such as smartphones, laptops, and tablets.
How Networks Work
For devices to communicate in a network, protocols define the rules of interaction. One of the most important protocols in networking is the Transmission Control Protocol/Internet Protocol (TCP/IP), which governs how data is sent and received.
Data sent over a network is broken into small packets. Each packet contains information about its destination, allowing it to travel through different routes to reach the target device. Once all the packets reach their destination, they are reassembled to form the original message or file.
Importance of Networks
Networks are vital for almost every aspect of modern life. They enable collaboration through file sharing, allow access to vast stores of information via the internet, and power applications like video conferencing and online gaming. In business, networks support everything from email communications to large-scale cloud services, ensuring smooth operations and enhanced productivity.
Network Security
With the growing reliance on networks, security has become a primary concern. Protecting networks from cyber threats such as malware, ransomware, and hacking attempts is crucial. Implementing firewalls, using secure protocols (like HTTPS), and regularly updating systems are some methods to ensure network security.
Conclusion:
One key aspect of network testing and development is the concept of localhost, represented by the IP address 127.0.0.1. This special IP address is reserved for a computer to communicate with itself, often used by developers to run and test applications locally before deploying them to a live network. Ports, such as 62893, are used to establish specific pathways through which data can travel within the localhost environment. Thus, 127.0.0.1:62893 represents a local testing environment, critical for ensuring that networked applications run smoothly before they go live.
0 notes
Text
127.0.0.1:62893: Understanding the Meaning and How to Fix It?

127.0.0.1:62893 is a unique IP address referencing the machine from which you are operating. Working on your computer, have you ever come across the mysterious code 127.0.0.1:62893? Though it seems complicated, knowing its components will be beneficial! The error message "Disconnected from the target VM, address: 127.0.0.1:62893" often shows up on the screen throughout the development process. IPv4 and IPv6 are the two varieties of IP addresses. While IPv6 addresses are 128-bit values written in hexadecimal (e.g., 2001:0b8:85a3:0000:0000:8a2e:0370:7334), IPv4 addresses are 32-bit numbers generally expressed in dotted decimal form (e.g., 192.168.1.1). However, port numbers are used on a device to name particular operations or services. They separate traffic for distinct uses so that several services may run on a single IP address. For HTTP, for instance, online traffic usually uses port 80; for HTTPS, port 443; for SMTP, port 25. This blog post will dissect what 127.0.0.1:62893 represents, how it operates, and how to correct a typical issue. Value In Knowing Network Fundamentals Anyone in IT, networking, or software development needs a strong foundation in network principles. Knowing IP addresses and port numbers enhances security network resource protection, performance optimization, and diagnosis of connectivity problems. Furthermore, it enables experts to set and debug systems properly, guaranteeing seamless connection between devices and services. Summary Of The Subject: 127.0.0.1:62893 An IP address and a port number combine in the address 127.0.0.1:62893. 127.0.0.1 is the loopback address—a special-purpose IP address a host uses to interact with itself. Combined with a port number, it allows local machine testing and development free from system exposure to outside networks. We will examine the details 127.0.0.1:62893 in this blog, including its relevance, typical problems, and recommended methods for diagnosing and maximizing its use. Whether your job is network administrator, developer, or IT enthusiast, knowing this IP can help you to control and fix local network configurations. What Is 127.0.0.1? ( Loopback Address) The most often used loopback address in IPv4 is 127.0.0.1. Reserved for a host to send messages to herself, loopback addresses are a spectrum of IP addresses (127.0.0.0 to 127.255.255). It's a local testing method for network applications without transmitting traffic across the real network. Using 127.0.0.1 causes network traffic to return to the same machine. Because it lets you replicate network environments without impacting other devices, this is very helpful for development, testing, and troubleshooting needs. For instance, if you run a web server on your local computer, you can access it by 127.0.0.1 to guarantee it's operating as it should without letting the internet know. What 127.0.0.1:62893 Can Do for You? There are various benefits to address 127.0.0.1:62893. It gives developers a safe space free from public view by letting them test and troubleshoot programs within. Learning about networking concepts, including TCP/IP systems and client-server communication, benefits one. Early identification and reduction of any security risks depends on local-host traffic monitoring. Debugging helps to identify problems connected to networks, enhancing the stability and performance of applications. Working in a controlled environment, localhost avoids issues with other programs. How to Use 127.0.0.1:62893 The address works as follows in a basic sense: Your device runs an application trying to interact with another process. It wants to interact with a service on the same system, so it uses "localhost," (127.0.0.1). The port number (62893) informs the operating system which service or application should handle incoming traffic. For example, a development tool might utilize this address to interface with a local server for debugging needs. Safety Concerns Although port 62893 and the loopback address are usually safe, there are a few factors to consider: Make sure that your firewall settings allow communication across port 62893 if needed. Blocking this port could stop some programs from operating as they should. If you are unfamiliar with the application or service, be cautious of any software trying to interact with this port. Malicious programs could use this port for illegal correspondence. Now and then, make sure no illegal programs are using any other suspicious port or port 62893 on your machine. Please Note: Even though localhost is designed chiefly for local use, the concepts you gain from experimenting can be used in general networking scenarios. You should now be able to interpret and utilize 127.0.0.1:62893 with ease. The Step-by-Step Troubleshooting Guide STEP 1: Verify whether the service is currently running. Check that the service meant to be listening on 127.0.0.1:62893 is running. Open Command Prompt and run: cmd netstat -an | find "62893". Mac or Linux: Run bash from an open terminal using lsof -i:62893. This command will list the process utilizing port 62893 and indicate whether any service is listening on that port. If no service turns up, start the application or service and try again. STEP 2: Look for port conflicts. Verify no other service makes use of port 62893. If you discover another service, you can stop it or switch the port used for your application. STEP 3: Confirm Firewall Guidelines On particular ports, firewalls can restrict access To be sure port 62893 is permitted, review your firewall settings. Firewall from Windows: Advanced Security Open Windows Defender Firewall Review Inbound and Outbound Rules to find rules blocking Port 62893. Firewall from Apple: Under Security & Privacy, under Firewall Settings in System Preferences STEP 4: Review application settings. To guarantee your program is configured correctly to access 127.0.0.1 and port 62893 Review the configuration files or settings of it. STEP 5: Restart network services Restarts of network services occasionally help to fix underlying problems. Windows: cmd netsh winsock reset Restart the network service using the bash sudo system Linux/Mac. STEP 6: Update or reinstall network drivers Issues can arise from corrupt or antiquated network drivers. Make sure your drivers either reinstall them if needed or are current. Conclusion The combination of a local IP address and a port number utilized by a specific service on your computer is represented as 127.0.0.1:62893, more than simply a string of digits. It is essential for anyone working in web development, networking, or information technology to grasp the significance of port numbers, IP addresses, and local hosts. It is crucial to know how to use localhost and the loopback address 127.0.0.1 while troubleshooting network issues, whether you are a developer testing your latest online application or an IT specialist. If you know what these statistics mean and how to manipulate them, you can keep your local services safe and running efficiently. FAQs Can my browser make an HTTP local request if I am not connected to a network? Indeed, your computer communicates with itself without any network! This is so because your computer connects to a default address—127.0.0.1—which is not particular to any network when it lacks an internet connection. How do IPv6 addresses differ from localhost addresses? Acting as the host entry for any data for a given computer, localhost is the basic IPv4 address stated numerically as 127.0.0.1 together with port 62893. Conversely, IPv6 addresses are a numerical series 127.0.0.1-based internet protocol in the v6 sequence. This is a loopback address, unlike IPv4 addresses, which would not allocate many addresses. Can I block a website using a local host address? If yes, in what manner? Certainly. Just follow a few guidelines as described here: Open Notepad under Administrator; utilize the User Account Control prompt Click File, then Open. View the host file open. Enter 127.0.0.1 in the address bar, then Save and Restart your machine. Read the full article
0 notes
Text
MQTT Protocol and Security in Flutter Application
Introduction: MQTT (Message Queuing Telemetry Transport) is a lightweight publish/subscribe messaging protocol that is ideal for Internet of Things (IoT) applications. It is designed to be lightweight and efficient, making it ideal for devices with limited resources. MQTT is also secure, supporting both username/password authentication and TLS/SSL encryption.

Flutter is a cross-platform mobile development framework that allows you to create native apps for Android, iOS, web, and desktop from a single codebase. Flutter is also known for its performance and its ability to create beautiful, fluid user interfaces.
In this blog post, we will discuss how to use MQTT in a Flutter application. We will also cover the security implications of using MQTT and how to secure your Flutter application.
Using MQTT in Flutter
The Flutter MQTT client library provides a simple way to connect to an MQTT broker and publish and subscribe to topics. The library is easy to use and can be integrated into your Flutter application with just a few lines of code.
To use the Flutter MQTT client library, you first need to install it. You can do this by running the following command in your Flutter project:
flutter pub add mqtt_
Once the library is installed, you can create a new MQTT client object and connect to the broker. The following code shows how to do this:
import ‘package:mqtt_client/mqtt_client.dart’;
void main() {
// Create an MQTT client object.
final client = MqttClient(‘mqtt://localhost:1883’);
// Connect the client to the broker.
client.connect();
// Subscribe to a topic.
client.subscribe(‘topic’);
// Publish a message.
client.publish(‘topic’, ‘Hello, world!’);
}
This code will connect to the MQTT broker at mqtt://localhost:1883 and subscribe to the topic hello. It will then publish a message with the value world to the topic hello.
Securing MQTT in Flutter
The mqtt_client package also provides a number of other features, such as:
Handling messages that are published to a topic.
Disconnecting from the broker.
Reconnecting to the broker if the connection is lost.
Security in MQTT
The MQTT protocol is a secure protocol by default. However, there are a number of security best practices that should be followed to further secure the communication between the client and the broker.
One of the most important security best practices is to use a secure connection between the client and the broker. This can be done by using Transport Layer Security (TLS) or Secure Sockets Layer (SSL).
Another important security best practice is to use strong passwords for the client and the broker. The passwords should be at least 12 characters long and should contain a mix of uppercase and lowercase letters, numbers, and symbols.
Finally, it is important to keep the MQTT client and broker software up to date. This will ensure that they are protected from known security vulnerabilities.
Here are some additional security considerations for MQTT in Flutter applications:
Use strong passwords and keep them secret.
Use TLS to encrypt all data that is sent over the network.
Restrict access to the MQTT broker to authorized users.
Monitor the MQTT traffic for signs of malicious activity.
Conclusion
MQTT is a powerful and versatile protocol that can be used to create a variety of IoT applications. Flutter is a modern and efficient cross-platform development framework that can be used to create beautiful and user-friendly apps. By combining MQTT and Flutter, you can create powerful and secure IoT applications that can run on any device.
I hope this blog post has given you a better understanding of how to use MQTT in a Flutter application. If you have any questions, please feel free to leave a comment below. If you would like any help with regards to web application development, please get in touch with us today!
#Data Engineering & User Experience Design Thinking data engineering services#services digital engineering#digital engineering services#services digital operations#engineering services database
0 notes
Text
(2020/05/19) Why is This Website Port Scanning me
[nullsweep.com][1]
[1]: <https://nullsweep.com/why-is-this-website-port-scanning-me/>
# Why is This Website Port Scanning me
Charlie Belmer
6-7 minutes
* * *
Recently, I was tipped off about certain sites performing localhost port scans against visitors, presumably as part of a user fingerprinting and tracking or bot detection. This didn't sit well with me, so I went about investigating the practice, and it seems many sites are port scanning visitors for dubious reasons.
## A Brief Port Scanning Primer
Port Scanning is an adversarial technique frequently used by penetration testers and hackers to scan internet facing machines and determine what applications or services are listening on the network, usually so that specific attacks can be carried out. It's common for security software to detect active port scans and flag it as potential abuse.
Most home routers don't have any open ports, so scanning an internet users IP address is unlikely to return any meaningful data. However, many users run software on their computer that listens on ports for various reasons \- online gaming, media sharing, and remote connections are just a few things that consumers might install on a home PC.
A Port scan can give a website information about what software you are running. Many ports have a well defined set of services that use them, so a list of open ports gives a pretty good view of running applications. For instance, Steam (a gaming store and platform) is known to run on port 27036, so a scanner seeing that port open could have reasonable confidence that the user also had steam open while visiting the web site.
## Watching Ebay Port Scan My Computer
In the past I have worked on security products that specifically worried about port scanning from employee web browsers. Attack frameworks like [BeEF][2] include port scanning features, which can be used to compromise user machines or other network devices. So, I wanted to be able to alert on any port scanning on machines as a potential compromise, and a site scanning localhost might trip those alerts.
[2]: <https://beefproject.com/>
On the other hand, it's [been reported][3] on a few times in the past as banks sometimes port scan visitors, and I have heard Threat Matrix offers this as a customer malware detection check.
[3]: <https://www.theregister.co.uk/2018/08/07/halifax_bank_ports_scans/>
I was given the example of ebay as a site that includes port scanning, but when I initially navigated there I didn't see any suspicious behavior. I thought they might use some heuristics to determine who to scan, so tried a few different browsers and spoofed settings, without any luck.
I thought it might be because I run Linux, so I created a new Windows VM and sure enough, I saw the port scan occurring in the browser tools from the ebay home page:
![][4]Ebay port scan
[4]: https://nullsweep.com/content/images/2020/05/ebay_port_scan.png
Looking at the list of ports they are scanning, they are looking for VNC services being run on the host, which is the same thing that was reported for bank sites. I marked out the ports and what they are known for (with a few blanks for ones I am unfamiliar with):
* 5900: VNC * 5901: VNC port 2 * 5902: VNC port 3 * 5903: VNC port 4 * 5279: * 3389: Windows remote desktop / RDP * 5931: Ammy Admin remote desktop * 5939: * 5944: * 5950: WinVNC * 6039: X window system * 6040: X window system * 63333: TrippLite power alert UPS * 7070: RealAudio
VNC is sometimes run as part of bot nets or viruses as a way to remotely log into a users computer. There are several malware services that leverage VNC for these purposes. However it is also a valid tool used by administrators for remote access to machines, or by some end user support software, so the presence of VNC is a poor indicator of malware.
Furthermore, when I installed and ran a VNC server, I didn't detect any difference in site behavior - so why is it looking for it?
## How Port Scanning with WebSockets Works
WebSockets are intended to allow a site to create bi-directional communication like traditional network sockets. This allows sites to periodically send information to a client browser without user interaction or front end polling, which is a win for usability.
When a web socket is configured, it specifies a destination host and port, which do not have to be the same domain that the script is served from. To do a port scan, the script only has to specify a private IP address (like localhost) and the port it wishes to scan.
WebSockets only speak HTTP though, so unless the host and port being scanned are a web socket server, the connection won't succeed. In order to get around this, we can use connection timing to determine whether the port is open or not. Ports that are open take longer in the browser, because there is a TLS negotiation step.
You also might get different error messages. If you have python installed, try running the following to create a local web server running on port 8080: [code] python3 -m http.server 8080
[/code]
Now, open your browser developer console (usually options -> Web Developer -> Console) and type some JavaScript in directly. Here is what I see when I do it in chrome: [code] > var s = new WebSocket("ws://127.0.0.1:8080") < undefined VM1131:1 WebSocket connection to 'ws://127.0.0.1:8080/' failed: Error during WebSocket handshake: Unexpected response code: 200 (anonymous) @ VM1131:1 >var s = new WebSocket("ws://127.0.0.1:8081") <undefined VM1168:1 WebSocket connection to 'ws://127.0.0.1:8081/' failed: Error in connection establishment: net::ERR_CONNECTION_REFUSED
[/code]
Between error message introspection and timing attacks, a site can have a pretty good idea of whether a given port is open.
## Port Scanning is Malicious
Whether the port scan is used as part of an infection or part of e-commerce or bank "security checks", it is clearly malicious behavior and may fall on the wrong side of the law.
If you observe this behavior, I encourage you to complain to the institution performing the scans, and install extensions that attempt to block this kind of phenomenon in your browser, generally by preventing these types of scripts from loading in the first place.
3 notes
·
View notes
Text
How To Make Your Own Website and Monetize it?

By following up with me in less than twenty-four hours, you will be ready to launch a Website that will undoubtedly earn you thousands of dollars every month! How to generate the money? Well, the website that we make will be offering SAAS service.
What is a SAAS service?
A SAAS (Software As A Service) service is essentially an online software or service that you pay to use.
For example, Mailchimp.com, which is a SAAS service, provides email marketing services that you pay for.

A SAAS service is anything you pay for to get an online service.
Now you can be the owner of a SAAS service, you will have your own Website, and people will subscribe to your service and pay you monthly recurring payments.
Let’s say you have 100 customers who use your SAAS service, and your service costs about $10 a month; you’d make $1000 per month!
All you have to do is sit at home and watch your passive income develop on your computer screen. It’s a fantastic and easy way to earn money.
How to get a SAAS service?

“How can I get my own SAAS service or software?” you might be wondering. The good news is that you don’t have to create one, learn to program, or even employ a programmer to do so.
You can simply buy it Online for $40–$60. You can buy software from a website called codecanyon
You can simply visit the website, click on the php scripts and search for SAAS and choose what kind of SAAS service that you preferred.
There are several types of SAAS applications available for purchase. Discount networks, accounting and billing software, email marketing systems, and employee management software are only a few examples. Take your time browsing the services and choose the one you like best, the one that fits you and you feel that you can be successful with.
Hosting Your Service
After you’ve created your SAAS service, the next move is to host it and make it public. To host it online, you’ll need a domain name and a server.
Now it is sounds hard since you don’t have any technical background in this term. Don’t worry, it is actually a simple and easy steps.
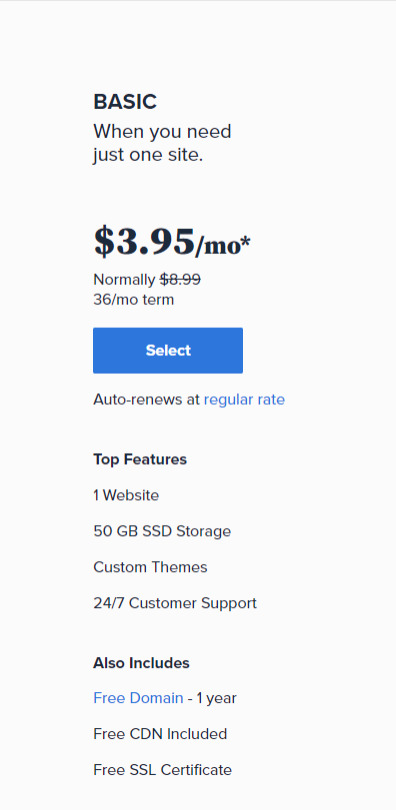
First you need a VPS server, you can visit and buy a cheap one from Bluehost. its only $3,95 permonth with and they give you free domain for 1 year! Check the price below. Buy the “LAMP” administration.
So What is VPS server? We do what we call “online hosting” when we want to publish a PHP page, script, or some other web application. This basically means uploading the files and database to a public server so that it can be accessed over the internet. On simple word, the place where you put the file is from VPS server.
In this tutorial we will used the shared server from Bluehost. Shared server only means that your server will be host with others website.
Now everything is ready, the only things that matter is how to install it. Let get to it.
Getting Started
After having your own server and domain on Bluehost, you need to connect them. Your VPS Server can be accessed now your Bluehost profile, but of course, we don’t want to access our website though an IP! we want to use our domain name. So simply, we are going to map the domain name to our VPS IP, so then we access the VPS and the WordPress website through both the domain and the IP.
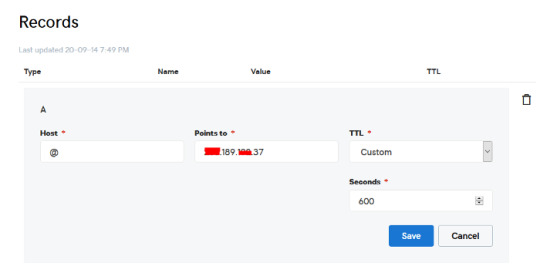
Configure your DNS Records
Simply open DNS management zone in your Domain Provider and edit the main A record.
Than we need to create MySQL database for the application. So Let’s Create one. Connect to your VPS server using any SSH client like putty. and Let’s start!
Just open Putty and enter the Server IP or Name, and Press Open. It will ask you to login, just enter “root” as the user, then enter your password which is sent to you by email.
Note: while typing the password, putty will now show it for security reasons, but It’s there, just type it!
What’s nice, is that we have MySQL installed already as part of the LAMP Stack, but we need to create a database and a user for out application.
Note: Every MySQL statement must end in a semi-colon (;)
To get started, log into the MySQL root (administrative) account by issuing this command:
mysql -u root -p
You will be prompted for the root password, just write or paste it and press Enter.
First, create a separate database that your PHP application will use. You can call this whatever you want, but we will be using TestDb in this guide to keep it simple. Create the database by running this command:
CREATE DATABASE TestDb DEFAULT CHARACTER SET utf8 COLLATE utf8_unicode_ci;
Next, we are going to create a separate MySQL user account that we will use exclusively to operate on our new database. Creating one-function databases and accounts is a good idea from a management and security standpoint. We will use the name DbUser in this guide. Feel free to change this if you’d like.
We are going to create this account, set a password, and grant access to the database we created. We can do this by typing the following command. Remember to choose a strong password here for your database user:
CREATE USER 'DbUser'@'localhost' IDENTIFIED BY 'enter_a_custom_password_here';GRANT ALL ON TestDb.* TO 'DbUser'@'localhost';
You now have a database and user account, each made specifically for Your PHP application. We need to flush the privileges so that the current instance of MySQL knows about the recent changes we’ve made:
FLUSH PRIVILEGES;
Exit from it by typing :
EXIT;
Upload The Script Files To The Server.
To upload the files, you need an application called WinSCP.
It is a free tool and you can download it from here.
Connect to Your VPS Server using WinSCP, and Update the PHP Files to the server to this path: “/var/www/html”
In most cases, the files would be zipped, so we need to extract them.
Again to Putty SSH CLient and Let’s install the unzip utility using the following command:
sudo apt-get install unzip
Clear putty screen to make in clean using the following command:
clear
Change directory to /var/www/html using the following command:
cd /var/www/html
Unzip the “.zip” file using the following command:
unzip YOURFILENAME*.zip
*Note: the file name may be different in your case, so replace YOURFILENAME with your file name.
Now, Move the latest folder content to the upper directory so it can be accessed directly -> use WinSCP Just copy all the files inside “YOURFILENAME” folder and paste them directly in html folder.
Configure Apache to Publish PHP Website
Well Done, Now your files are uploaded and placed in the html folder, we just need to configure apache so we can our Publish PHP Website and access our script using our domain name. To do so, open WinSCP again and navigate to this directory: /etc/apache2/sites-available/
Now, create a new empty file and name it “yourdomain.conf” . You can replace “Scriptname” with any name you want
Open yourdomain.conf Then copy and paste the content below into the file and save.
<VirtualHost *:80> ServerAdmin admin@YOUDOMAINNAME DocumentRoot /var/www/html ServerName YOUDOMAINNAME ServerAlias YOUDOMAINNAME <Directory /var/www/html/> Options +FollowSymlinks AllowOverride All Require all granted </Directory> ErrorLog ${APACHE_LOG_DIR}/error.log CustomLog ${APACHE_LOG_DIR}/access.log combined </VirtualHost>
Replace with your own domain, in my case its “YOURDOMAINNAME”
Enable your script configuration in apache and restart the service.
Now simply, run the following commands to finish the setup:
sudo a2ensite yourdomain.conf sudo a2enmod rewrite sudo systemctl restart apache2.service
ALMOST DONE!
Connect to MySQL Database.
Open your web browser now and navigate to your server name.
Continue the setup by entering the database info and your admin login information. In our example, the database name is TestDb and the user is DBUser with the password set.
That simple!
Setup cronjobs.What are cronjobs?
cron is a Linux utility which schedules a command or script on your server to run automatically at a specified time and date. A cron job is the scheduled task itself. Cron jobs can be very useful to automate repetitive tasks.
For example, you can set a cron job to delete temporary files every week to conserve your disk space. Some PHP web applicaitons, may require you to set up a cron job to perform certain functions.
Setup cronjobs.
To setup cronjobs, you need to add all required jobs to the server. This depends on your script, so if you bought a script from code canyon, the script owner should provide the cronjobs.
To do this, open WinSCP and got to /etc Open crontab file using the editor And paste all the jobs from your script to this folder. (cronjobs are listed in the app documentation)
Make sure each job is on a line and an empty line in the end.
Secure with a Free SSL.
SSL certificates are used within web servers to encrypt the traffic between the server and client, providing extra security for users accessing your application. Let’s Encrypt provides an easy way to obtain and install trusted certificates for free.
Connect to your Server using Putty SSH client. and Let’s Start!
Install the Let’s Encrypt Client
Let’s Encrypt certificates are fetched via client software running on your server. The official client is called Certbot.
First, add the repository to install Certbot:
sudo add-apt-repository ppa:certbot/certbot
You’ll need to press ENTER to accept.
Then, Update the package list to pick up the new repository’s package information:
sudo apt-get update
Install Certbot’s Apache package:
sudo apt install python-certbot-apache
Certbot is now ready to be used.
Set Up the SSL Certificate
Generating the SSL certificate for Apache using Certbot is quite straightforward. The client will automatically obtain and install a new SSL certificate that is valid for the domains provided as parameters.
Simply run the following command: (change the domain)
sudo certbot --apache -d YOUR_DOMAIN_NAME
You will be asked to provide an email address for lost key recovery and notices, and you will be able to choose between enabling both http and https access or forcing all requests to redirect to https. It is usually safest to require https, unless you have a specific need for unencrypted http traffic.
That’s it!
Test your website now and it should be SSL encrypted.
This tutorial I used are originated and made by Hasan By H-educate, you can check his link Here : https://h-educate.com/ or check his youtube on H-educate.
Other tips to make money online, check here : https://ricky-kartiyanta.medium.com/
Cheers!!
#website#saas solutions#saas#monetize#passive income#business#workfromanywhere#easy money#gettingrichfromhome
2 notes
·
View notes
Text
Adobe Master Collection Cs5 Download Mac

The ultimate and comprehensive suite edition of Adobe CS5.5 Master Collection has been leaked earlier, and now apparently, all suite editions and individual software products from Adobe CS5.5 has been available on the Internet through BitTorrent network, leaked by WZorNet. However, do note that not all software is updated to CS version 5.5, as. Adobe hasn’t officially published Adobe Creative Suite 5.5 (CS5.5) for public download yet, but the setup installers of Adobe CS5.5 trial versions have been put up on the official download servers for ESD (Electronic Software Distribution). Adobe CS5.5 is a significant mid-cycle product release that delivers essential innovation across Flash, HTML5, video, mobile app for smartphone or tablet.
Caution: Downloading and using any leaked builds or any hacked/cracked version of any software is not only illegal and a crime punishable by law, but also pose great security risks and should be avoided. The information posted here is for news purposes only and any illegal links posted in comments will be deleted.
Do you ever get this error message?
If you use a key generated serial without using this hosts file technique, It will not work permanent and gives you the error above again and again… Remember Serials may be different but hosts file editing is same required for one time only so make it now and use all Adobe cs4 and cs5 products with a key generated serial number…

Adobe CS5 Hosts File Editing
Windows / Windows 7 / Windows XP
Step 1: Under windows 7 go to this path “C:WindowsSystem32driversetc” there you can see some files. We just need to work with hosts file. First we will copy this file and paste to somewhere else as a backup so if anything goes wrong we can replace that with our edited one.
Step 2: Now click on your start button search for Notepad, right-click and select Run as Administrator. This should launch notepad with all possible privileges. Now open the hosts file from the directory path: “C:WindowsSystem32driversetc” if no file displayed, you have to display All Files by typing (*) in the box. It will show you all files of this directory. Now you can open hosts file from there. (remember the above path won’t show any file if you try it without star number: (*) You have to use it to see the All Files)
Step 3: Now the file is front of you check the last line which is “# ::1 localhost” and paste the below lines right after it.
MAC / OS X
Editing the hosts file Editing the hosts file in Mac OS X – Leopard, is a pretty easy task, especially if you are familiar with the terminal.

Step 1: – Open the Terminal.app Either by start typing Terminal on the Spotlight, or by going into Applications -> Utilities -> Terminal.
Step 2: – Open the hosts file Open the hosts by typing on the Terminal that you have just opened:
Type your user password when prompted.
Step 3: Edit the Hosts File The hosts file contains some comments (lines starting with the # symbol), as well as some default hostname mappings (e.g. 127.0.0.1 – localhost). Simply append your new mappings underneath the default ones. Or edit one of the default values if you know what you are doing! You can navigate the file using the arrow keys.
Step 4 – Save the hosts fileWhen done editing the hosts file, press control-o to save the file. Press enter on the filename prompt, and control-x to exit the editor. Step 5 – Flush the DNS cache On Leopard you can issue a simple Terminal command to flush the DNS cache, and have your host file changes to take immediate effect:
HOSTS FILE ENTRIES
Enter the following entries in the HOSTS file:
Sample Results From Member Downloads
Adobe Cs5 Master Collection free. download full Version Mac
Download NameDate AddedSpeedAdobe Cs5 Master Collection Mac Ita HDTV06-Nov-20202,260 KB/sAdobe Cs5 Master Collection Mac Ita 202006-Nov-20202,651 KB/sAdobe Cs5 Master Collection Mac Ita Crack05-Nov-20202,961 KB/sAdobe Cs5 Master Collection Mac Ita Unlock Code03-Nov-20202,232 KB/sAdobe.Cs5.Master.Collection.Mac.Ita_01.Nov.2020.rar01-Nov-20202,072 KB/sAdobe Cs5 Master Collection Mac Ita (2020) Retail29-Oct-20202,697 KB/s
Showing 6 download results of 6 for Adobe Cs5 Master Collection Mac Ita
Welcome To DownloadKeeper.com
DownloadKeeper.com provides 24/7 fast download access to the most recent releases. We currently have 417,381 direct downloads including categories such as: software, movies, games, tv, adult movies, music, ebooks, apps and much more. Our members download database is updated on a daily basis. Take advantage of our limited time offer and gain access to unlimited downloads for FREE! That's how much we trust our unbeatable service. This special offer gives you full member access to our downloads. Take the DownloadKeeper.com tour today for more information and further details!
Adobe Cs5 Master Collection Mac Ita Information
Adobe Cs5 Master Collection Mac Ita was added to DownloadKeeper this week and last updated on 05-Nov-2020. New downloads are added to the member section daily and we now have 417,381 downloads for our members, including: TV, Movies, Software, Games, Music and More. It's best if you avoid using common keywords when searching for Adobe Cs5 Master Collection Mac Ita. Words like: crack, serial, keygen, free, full, version, hacked, torrent, cracked, mp4, etc. Simplifying your search will return more results from the database.

Copy & Paste Links
The word 'crack' in warez context means the action of removing the copy protection from commercial software. A crack is a program, set of instructions or patch used to remove copy protection from a piece of software or to unlock features from a demo or time-limited trial. There are also crack groups who work together in order to crack software, games, etc. If you search for 'adobe cs5 master collection mac ita crack', you will often see the word crack amongst the results, which implies it is the full version of the product.
Popular Download Searches
Adobe Cs5 Master Collection Mac Ita | Adobe Cs5 Master Collection Mac Ita Crack | Super 8 2011 DVDrip Xvid Nedivx | Free Pcmav | Schock Labyrinth 2009 German | Copytodvd 4.0.0.35rc | Dead Rising 2 2010multi2repack By R G. Shift | Cubic Clarity After Effects Project | Wiso 2009 | Free Conpus Procoder | Chave De Validao Do Xp | Mr Ray 73 Mk2 Dll | Soundcells Thor Source 2 Refill 1 Cd | Free Craagle | Quick Slide Show V2.32 By Foff | Rizzoli And Isles S03E08 720p HDTV X264 | Mathe Perfekt 3 | Mon Shines 1.2.2 | Agilent Empro V2009.02 Null | Dreamweaver 6 Franais |
Adobe Cs5 Master Collection Free Download With Crack For Mac
[ Home | Signup | Take A Tour | FAQ | Testimonials | Support | Terms & Conditions | Legal & Content Removal ] Design and Layout © 2020 DownloadKeeper. All rights reserved.
1 note
·
View note
Text
127.0.0.1:49342 Localhost IP Address Explained: The Ultimate Guide

127.0.0.1 is the typical loopback IP address; accessing this IP connects you to your system, not the Internet. There are a lot of complicated words and terms used in computers. Each one is important and makes a difference. Not every user, nevertheless, is aware of them. One of the typical terms usually shown on a computer screen when working on some programs is 127.0.0.1:49342. Most people are unaware of it, so it seems to be the leading cause of problems. We must first have a fundamental knowledge of IP addresses, sometimes known as internet protocol, to solve this problem. Knowing how it operates will help us to fix this mistake effectively. Below, we have clarified what an IP address is and why it is significant. Keep sliding down the post underneath to find further specifics regarding this 127.0.0.1:49342. What is 127.0.0.1? The loopback address, 127.0.0.1, is a special-purpose IPv4 address. It creates an IP link to the same machine or computer the end-user is running. This lets the computer interact with itself since any network demand issued to 127.0.0.1 is replayed back. Debugging network programs and testing depend on this loopback mechanism. Port 49342: Its Importance In networking, a port is a logical endpoint that designates a particular process or service. Port numbers run from 0 to 65535 and have different uses. Specifically, Port 49342 is private or dynamic. Often used for bespoke or temporary needs, the IANA does not reserve these ports (49152–65535), Internet Assessed Numbers Authority. Benefits of 127.0.0.1:49342 Employing this specific IP address has several benefits, including: Testing and Development: connection and may test apps without compromising the network or any other system. Making sure the traffic stays within your local machine—that is, the computer—allows no outside access, mitigating possible security hazards. Because communication between the same machine is far faster than any external network, this Loopback address lets the machine operate far faster. It lessens the demand for extra resources, including a network, which improves test performance. Developers can rapidly and effortlessly test modifications and identify environmental problems free from constant network assistance. Applications can operate concurrently on the same machine without issues using the address and several ports, including the 49342. Setting Up The Address These guidelines will help you to arrange the 127.0.0.1:49342 address following: Install any program on your computer, such as Ngnix, Apache, or IIS. This program will enable your machine to serve local web content. Open the configurable options on the selected program and arrange the server to port 49342. Ensure the program has permission to read from and write to the required folders you will have to create where your web will be kept. Restart your program to implement the fresh settings you just changed; next, open a browser and visit your site or application using the address "127.0.0.1:49342" to verify and guarantee everything is operating as intended. You set up the address this way; if necessary, utilize virtualization tools like VirtualBox or Docker to build and oversee virtual environments. Common Problems: Troubleshooting Should you run across any difficulties, Use these troubleshooting guides to correct the IP address setup: Ensure the server settings are mistakes-free, and verify that port 49342 is free. Confirm that the server can access necessary files and that the firewall lets port 49342. Comfin if you did not miss anything and are utilizing the "127.0.0.1:49342". Changes Not Applicable: Researt following your adjustments and search logs for any error notes. Should the pages not be located, confirm whether the files are in the correct location and whether the names exactly match.404 Error Ensure you have enough CPU and memory, and check any logs for fault specifics. The Key Function of Port 49342 Network Resources and Uses Dynamic port 49342 is not linked to any one service or protocol. This adaptability makes it the perfect alternative for system managers and developers needing a port for temporary or custom services. Using a dynamic port such as 49342 helps developers avoid problems with well-known ports set aside for conventional services (e.g., HTTP on port 80 and HTTPS on port 443). Testing and Correcting Problems Debugging and testing constitute one of the main applications of 127.0.0.1:49342. Testing a network application in a controlled environment is crucial when designing one. Developers can replicate network communication without compromising other network activity by tying the application to 127.0.0.1:49342. Before putting the program into use in a production setting, this approach guarantees accurate operation, helps to spot problems, and maximizes performance. Processing Localhost Operations First, you must start setting or installing any currently used server or program on your computer, such as Nlinux, Apache, or IIS. You can run your applications on localhost once the program is effectively implemented. Moreover, you must develop server software coupled with port 49342 to arrange communication between services and apps. This will cause the gadget to start picking up the incoming connections. Furthermore, you may also implement the necessary changes in the service's configuration file. Establish the field paths afterward and get your server access to the right. To complete the assignment, you must build the correct folders to save your site and apps. Visit your website at 127.0.0.1:49342 to confirm your server setup next-wise. It should all be in order, and your computer should show your website or application running without problems. Finally, you could want to build and oversee virtualized machines using the Docker or Virtual Box tools. Conclusion You have it right now! Although, at first look, 127.0.0.1:49342 seems mysterious, it is a valuable tool for developers and anybody wishing to play about with their computer's network. Understanding its elements and possible applications will help you to maximize it while considering security. FAQs While talking about networking, how crucial is crypto code 127.0.0.1:49342? Although we are talking about networking, local communication depends on this crypto code; therefore, it is essential to address this issue. It lets programs on one device interact safely without outside network connections. In what ways might port 49342 enhance communication? Port 49342 improves device inter-app contact. It fixing technological problems. Tools for debugging can also be helpful if issues continue even after port change. For testing and development, is 127.0.0.1:49342 safe? It is indeed safe for testing and development. It offers correct security mechanisms to stop illegal access. Read the full article
0 notes
Text
Webdav Server Windows 10

Windows 10 Connect To Webdav
Webdav Server Windows 10 Einrichten
WebDAV on Windows 10 How to access MyFiles off-campus using WebDAV on a Windows 10 PC From the Start Menu go to File Explorer and select This PC on the left hand pane. How to create a WebDAV server on Windows and connect it to ONLYOFFICE Community Server v.10.0 Community Server changelog. Open in new window. Version 10.0.4. Release date:. General portal changes. The Mono version used is updated to 6.0. To create a WebDAV server.
WebDAV is an FTP-like protocol you can use to remotely access or share your files over the Internet. In contrast to FTP, though, WebDAV works better through firewalls and can be password-protected and encrypted. In our latest server tutorial we'll share how to set up the WebDAV server that's included with Windows.
First, you must install the Internet Information Services (IIS) and WebDAV publishing features of Windows. In Windows 7, click Start, type 'Windows features,' and then click enter. In Windows 8, go to the Start screen, type 'Windows features,' select 'Settings' on the right, and then select the shortcut that appears.
Make sure you select at least the following:
Internet Information Services
IIS Management Console
WebDAV Publishing
Windows Authentication

Next, to enable the WebDAV publishing you must open the IIS Manager. In Windows 7, click Start, type 'IIS,' and open the shortcut that appears. In Windows 8, go to the Start screen, type 'IIS,' and then select the shortcut that appears.
To configure the authentication, select the 'Default Web Site' and double-click the 'Authentication' icon. The list of authentication types displayed will depend upon which ones you installed earlier, but I'd suggest disabling 'Anonymous' and enabling 'Windows Authentication' if you will only be using IIS for WebDAV.
Next, select the 'Default Web Site' site again and double-click the 'WebDAV Authoring Rules' and then click 'Enable' on the right. Now click 'Add Authoring Rule' on the right to configure the permissions and make your desired selections.
To test if IIS and the web server are running, open a web browser and type 'localhost' and hit Enter.
If you enabled Windows Authentication, you'll be prompted for a username and password, so enter your Windows account name and password here. If you have issues signing in, make sure you're using the correct account name — open the Computer Management console to check the local users list to confirm.
Once you've authenticated, you should next see the default webpage of IIS if you haven't already deleted or replaced it.
To test the WebDAV server in action, open a command prompt and type: net use * http://localhost. This should map a network drive to your WebDAV folder, showing just the files from your IIS web server directory.
If you want to offer access to other places you can add some virtual directories by right-clicking the Default Web Site and choosing 'Add New Virtual Directory.'
In order for you or others to access the WebDAV server share via the Internet, you must configure your firewall to open port 80 for unencrypted access and/or 443 for encrypted access, as well as configure your router to forward these ports to the Windows PC. Once properly configured, to access the WebDAV share via the Internet you'd use either your Internet IP address or a domain or host name if you have one configured.
While your WebDAV password is encrypted when using Windows Authentication, the rest of your session is sent in the clear if you choose to use normal HTTP via port 80. But you can also encrypt the entire session by enabling SSL encryption in IIS and using the HTTPS address when configuring/accessing the WebDAV share.
If you'd like to be able to see a listing of your files in a web browser, turn on Directory Browsing in IIS. Select the Default Web Site, double-click 'Directory Browsing,' and then click 'Enable' on the right.
Windows 10 Connect To Webdav
Eric Geier is a freelance tech writer — keep up with his writings on Facebook. He's also the founder of NoWiresSecurity, a cloud-based Wi-Fi security service, and On Spot Techs, an on-site computer services company.
Webdav Server Windows 10 Einrichten
Follow ServerWatch on Twitterandon Facebook
1 note
·
View note
Text
How to Set Up a Local Server on Mac for Beginners #NotADeveloper #WordPress
Let’s start by inserting a disclaimer, I am not a developer or coder in any way. I am not “tech savvy” or futuristic. I can work a computer enough to get online and manage my daily tasks or watch youtube videos. Oh ,and of course email. But l wanted to learn more about what Landon and Cliff do, to enter their world and understand their nerd talk. So they walked me through setting up a local server running WordPress on my mac laptop, and I took notes. Stay tuned for more blogs to come, including setting up divi builder (the fun stuff)! It was difficult to understand at some points, and others straight up made no sense, but alas! We made it through and I am here to share that experience. Sharing it with the hope that someone out there like me, can find this useful and motivating. Or the rest of you smarties find it amusing!
First things first, download WordPress. This is a commonly used CMS or content management system where you can login in to your site and make changes etc.

Once you download WordPress, you will want to move the file into your Sites Folder in Finder. (You can check for the download on your desktop or in Finder under downloads.) This is located in the Home folder. ( the one with the little house next to it.) If this folder does not yet exist, just right click and create a new one.

Once you add the WordPress download (drag and drop the folder here), you can rename if you’d like. Here in my test run, I named it “HairByKelseyAnn”. This can keep you more organized if you want to create multiple sites. (This will be talked about in another blog post to come. For now, let’s just stick with one!)

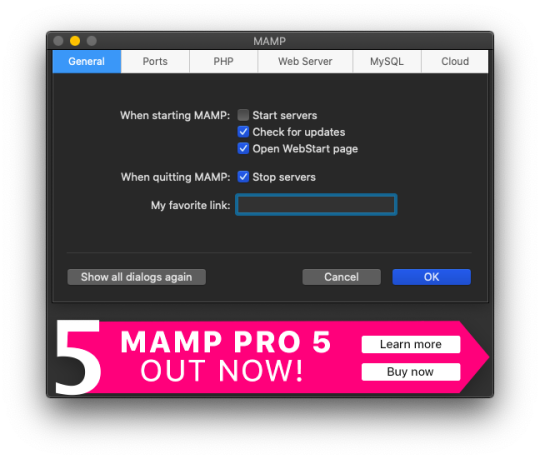
Next, download MAMP (”Stands for "Mac OS X, Apache, MySQL, and PHP." MAMP is a variation of the LAMP software package that can be installed on Mac OS X. It can be used to run a live web server from a Mac, but is most commonly used for web development and local testing purposes” Description from techterms.com) In this case, we are using it for testing purposes. You can download MAMP (I downloaded MAMP instead of MAMP pro because it’s free) Once you have that downloaded, open it up . If you are having trouble finding it, or any applications, hit command key (⌘) and the space bar at the same time. This will pull up a search bar so you can just type in MAMP and hit enter.

Once you have MAMP open, there are two ways to get to your preferences. You can either select MAMP in the top bar of your computer (next to the apple in the top left corner) or you can hit command key (⌘) and comma(,) at the same time. You will get a drop down like in the image below.
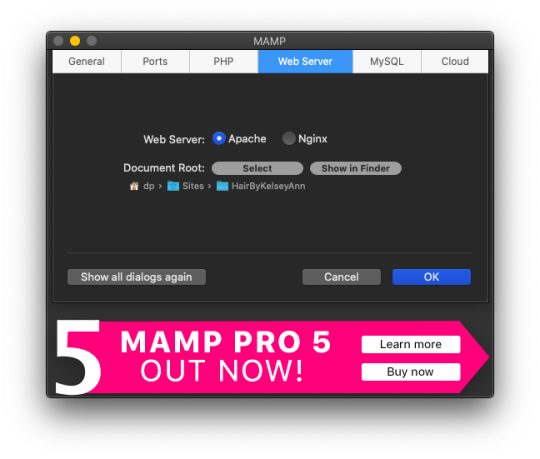
Select the Web Server tab, and this is where you make your document root to the folder you created. (Hit select and add the folder you created from your WordPress download.) This is basically creating a starting point for your localhost server so it knows what files to work from.
After you have your document root folder linked, click ok and it will bring you back to the “home screen”. At this point, you can click Start Servers.

Open a new tab or window, and go to- http://localhost:8888/phpMyAdmin From here you will click the database tab and create new. I chose to name my new DB the same name as the other folders I created. (This is where you create a custom database that WordPress will use. This is highly advanced and you should not find yourself here, beyond initial creation. )

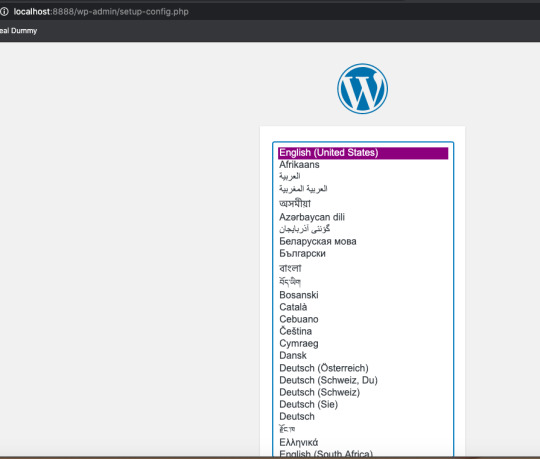
After you have created your DB (DataBase), go to http://localhost:8888/ and follow through the WordPress setup. This is where you are setting up the foundation for your site.
Once you get to this screen (see below) your DataBase Name should be the same as the DB name you previously created a local host file for. Username and Password set to “root” This is a general password for WordPress to login. This is not your personal account or information. Submit this, and on the next screen, click Run the Installation.

The next page will ask you for your Site name and username/ password. This is your personal information. Do Not Share! There is a checkbox asking if you want to discourage search engines ( Google, Yahoo, Bing, etc) from finding your site. You want to check this box because you are only trying to build your website on your computer (For now!). Launching your website to “go live” is separate documentation. This is for building your “rough draft” so you make sure your site is perfect before you let the world see it. After you submit this, you should have this screen.

At this point, you have set up a local server (YAY!) and created the skeleton of a WordPress website, on your computer. From here you can see my next blog post on how to customize and what your different sidebar tabs can do.
Setting up a local host on your computer gives you the ability to work on your website without being connected to the internet. The link below is how you can visualize your saved changes. (Refresh the page to see new changes made)
http://localhost:8888/
Below is the link to your WordPress dashboard. This is where you can start to mess around with themes and layouts. You can end here, or you can download the divi theme builder to really customize your site. Divi builder makes it easier to see the layout and customize as you’re looking at your site.
http://localhost:8888/wp-admin/index.php
Be sure to have your server turned on in MAMP to access your site!
I hope that you enjoyed this article and found it useful! Ideal Dummy is all about sharing knowledge and educating people on how to manage their websites. Or just computer knowledge in general! This is a tech savvy era, and we are here to help! So from one beginner to another, you can do it!
For more information, check out our website.
Written and Documented By: Kelsey Ann
#idealdummy#wordpress#computer#localhost#serversetup#localserver#software development#phpmyadmin#MAMP#macintosh#mac#database#website build#education#computer education#developers & startups#beginner#technology#kansascity
1 note
·
View note
Text
Download Freedom APK Latest v2.0.9 (Official Website) – 2019
There is no doubt that you can do a hell lot of interesting stuff by rooting your Android device from overclocking the processor to cracking games and apps. Now, if you have rooted your Android phone and want to do some crazy stuff like cracking games or free In-App purchases, then it’s time to install the Latest Freedom Apk on your phone. Do you play games like Subway Surfers or Temple run? Well, the chances are that you want to buy all the things available in the game, but due to lack of coins, you cannot do that.

CHECK OUT: [WORKING] How To Install Freedom App For PC – Freedom APK Latest Version
Also, you don’t want to spend any money on buying things in a game so what to do? Well, it’s time to try Freedom app and do absolutely *Free* In-App purchases. There are more than 2 Million apps and games available to download right now but have you ever wondered how the developers make money from them? You might think of ads. No! Most of the apps and games have In-App Purchases meaning you have to spend some real cash to enjoy all the features of that particular app or game.
download freedom app
Freedom App lets you make free In-App purchases, and the only requirement is that your phone needs to be rooted which is not a big thing as everyone knows how to root a phone. Now, since this app lets you do cracking or patching kinda stuff, it is pretty obvious that this app is not available to download from the official Google Play Store. But, we are here to help you out. We are providing the latest Freedom App to download, and there are no surveys or whatsoever. Just click on the download button, and that’s it. The apk file will start downloading.
So, time to say No to those annoying ads or surveys. We know that these surveys suck as they waste your precious time and also, sometimes there is no file and you are only making money for that website owner.
WHAT ARE THE FEATURES OF FREEDOM APK? Freedom Apk Features
As mentioned above, Freedom App lets you do the amazing thing from your rooted device so you should know about all the things that you can do with it. Here are the amazing features of Freedom App –
Want to get free gems or coins? Try Freedom and there you have them. Freedom lets you bypass the In-App Purchases, and so, it will let you make free purchases of things in the game. You don’t need to buy the full version of any app. Just use Freedom, and you are all set to go. The app is regularly updated by the developers so that it is compatible with every new app or game. Also, we regularly update the download link so that you get the latest apk file. Want to remove ads from any app or game? Download Freedom Apk Directly. The App uses many mods and patches to exploit apps and games. Aren’t the features offered by the Latest Freedom App amazing? Well, what is more, surprising that the fact that this app is available to download Free.
App Name Freedom Main Purpose Free In-App-Purchases Latest Version 2.0.6+ Last Updated On 20 April, 2017 APK Size 1.7MB Minimum Android Version Required Android 2.3+ Root Required Yes Downloads 5,00,000+ Quick Infographics freedom-apk-infographdsfsdic CAN I INSTALL FREEDOM APK ON MY PHONE? Now, for every App, there are some minimum requirements. So, here are the requirements for the Freedom app –
Android 2.3 Gingerbread or Above – For the Freedom App to work on your smartphone, it is necessary that you should have atleast Android 2.3 Gingerbread running on your phone. If you are running on any android version below it, this app won’t work. It is hard that it fails to work on Nougat so better if you try it on Lollipop or marshmallow or earlier versions. 512MB RAM or Above – RAM is one of the main things that are considered when we run any app. The more the RAM, the better the performance (But this doesn’t mean we will add 8GB RAM to phones). To run the Freedom APpp on your phone, make sure that you have atleast 512MP RAM and above. Your Phone should be ROOTED, or this app won’t work – A rooted phone allows you to do things that you cannot even imagine doing with the non-rooted phone. Freedom App is a root app so it will require Root. Make sure your phone is rooted before trying this app. At least 100MB free space should be there in your phone – RAM is not the only thing that is the reason for a better performance. There should be some minimum space also so that an app runs without any hassle. So, to run the Freedom APK without any hassle, make sure you have at least 100MB free space on your phone. PERMISSIONS THAT ARE REQUIRED Well, this is something that you surely need to read. If you are one of the thsoe guys who are concerned about the privacy of their phone, then it is better to check the permissions that are required by Freedom App for Android. Here are the permissions –
INTERNET ACCESS – Ok, this is pretty simple one. Freedom APK can work without the internet too but sometimes, when it needs the internet, you have to provide access to it MODIFY SYSTEM SETTINGS – Since freedom apk works only on rooted phones and we know why, it is necessary to keep in mind that this app can modify the system settings in order to make it easy to do free In-App Purchases. KILL BACKGROUND TASKS – Might sound weird but this app requires permission to kill the background tasks. GET ACCOUNTS – It can access the accounts you have on your phone. WRITE EXTERNAL STORAGE – The Freedom app can write external storage. REBOOT DEVICE – Sometimes, it asks for the user to reboot the phone so to reboot the phone from inside the app itself, you have to provide it the permission. INSTALL, FORCE STOP PACKAGES – If you are installing something, this app can force stop that or install any package. HOW TO INSTALL & DOWNLOAD FREEDOM APK ON YOUR ANDROID DEVICE (LATEST VERSION) | FREEDOM APK DOWNLOAD Download Freedom Apk for Android
Now, since you are aware of what Freedom app for android does and what should be the minimum specifications of your phone to install this app, let us talk about how to install the Latest Freedom App on your Android phone. The installation steps are damn easy, and you don’t need to do any extra stuff. Just make some little changes in your Android phone’s settings, and that’s it. You can then easily install the application. So, are you ready to get free gems, coins and everything from your favourite game or app without spending any real cash? Well, let’s see how to install the app –
First of all, go to the Settings of your phone and then go to Security. There, the first thing you need to do is to turn on ‘Unknown Sources’ option. No, there won’t be any virus or something like that in the app that we are providing. You have to turn this option on only because you are installing an app from outside of the Play Store. Now, once you are done with this, download Freedom Apk file from the Download button given below. As mentioned above, there are no surveys or ads, and this is the direct download link to the file. Download Freedom APK
Assuming that you have downloaded the file, next thing you need to do is to head to that file and install it as you do for the other apps. In a few seconds, the Freedom app will be there on your Android device, and you are all set to do some crazy stuff. HOW TO MAKE FREE IN-APP PURCHASES WITH THE FREEDOM APP | FREEDOM APK DOWNLOAD
Now, since you have the Freedom app installed on your phone, you must be figuring out how to use it and make free In-App purchases. Well, here are the steps –
1. First of all, open the Freedom App by tapping on its icon.
Freedom APK Free In-App Purchases Freedom APK Free In-App Purchases 2. Then, a popup will be shown to you that will ask you to grant Root permissions. This is very important steps so don’t try to skip it. Just grant the root permissions and the app’s interface will open.
3. You will see all the installed apps that you have on your phone at the moment.
4. Select any app or game from which you want to make free In-App purchases and then click on the app name and wait for a few seconds.
5. Once that app launches, just go to the store of that app or game from where you can buy coins or gems. just click on Buy Now button and you will see that the payment will be done for free.
FIX PLAY STORE NO CONNECTION ERROR
Wasn’t that super easy? Well, many users say that they get the ‘No Connection’ error in the Play Store when they try to make in-App Purchase to here is what you need to do –
Download a file explorer that let you edit the system files. We will recommend Es File Explorer as it is the best in this task. Now, go to the Root Directory of your Phone and there will be a folder named ‘System’. Open it and then open the folder ‘etc’. There, you will find Hosts file. You need to edit that file and add the code below to it – 127.0.0.1 localhost
Save the file. Once done, go to Settings > Apps > Google Play Store and then Clear the Cache and Clear the Data as well.
Lastly, just reboot your phone and the error will be no more. Download Freedom APK
SOME GENERAL FAQ Now, this is an obvious thing that if you are downloading an app that is not there even on the Play Store, then there are some questions that arise in your mind. For Example, you might get a file infected with virus etc. So, here are some of the questions that we will answer. You Can ask more via the comments section as we will always help you.
DOES THIS APP WORK FOR NON-ROOTED DEVICES? Sadly, no! This app requires a rooted Android device and rooting your phone isn’t a tough task actually. There are a ton of guides on how to root android online that you can follow. So, a rooted phone is one of the requirements for this app.
ARE THERE ALTERNATIVES TO THE FREEDOM APK? Of course there are. Some of these include apps like Lucky Patcher, Game Killer, XModgames, Gamer Hacker and much more.
IS THIS APP HARMFUL FOR MY PHONE? Now, there are two answers for this – Yes and No. This app is surely harmful if you download it from an untrusted source as they might give you a file infected with dangerous malware or virus. But no, this is not harmful if you are downloading it from a trusted source like our site which provides the file directly from the developers.
IS THIS APP FREE OF COST? Yes, freedom app lets you make free in-app purchases and it is completely free of cost. There are no In-App Purchases in the app itself.
CONCLUSION Well, that was all about the Freedom App & How to Download Freedom Apk ( Freedom APK Download), its requirements, how to install it and how to make Free In-App purchases. We also covered how to fix the annoying Play Store error. If you are still finding difficulties, then just refer to the video that we have attached below. Make sure to let us know if you face any problems while using the app in the comments section. We will try to fix that if we can. And yes, everything has its cons so this app might have some bugs. We will be updating the post regularly with the latest app file so stay tuned.
VIDEO CREDITS – THE ANDROID GUY
Here in the video below, it is thoroughly showed how you can make Unlimited Free In-App Purchases by using the Freedom App for Android. Make sure that you like this video and subscribe to the channel as this guy makes some amazing stuff. Also, don’t forget to share this on social networks. This will help us. Have a Good Day.
1 note
·
View note
Text
How to Setup Port Forwarding using Localhost.run
How to Setup Port Forwarding using Localhost.run #portforward #port #howto #hacking #emailspoofing #hackthebox
[sc name=”ad_1″]
Port forwarding or port mapping is an application of network address translation that redirects a communication request from one address and port number combination to another while the packets are traversing a network gateway, such as a router or firewall.
SSH port forwarding is a mechanism in SSH for tunneling application ports from the client machine to the server machine, or…
View On WordPress
#email spoofing#hack the box#how to#how to access localhost from internet#how to port forward#how to setup port forwarding in linux#Information Security#kali linux#localhost.run custom domain#ngrok alternative#pentesttools#port forward#port forward without router access#port forward without vpn#Port Forwarding#port forwarding tutorial#port forwarding without router#remote port forwarding#Serveo#serveo port forwarding#ssh port forwarding#ssh tunneling
0 notes
Text
Bandit
Level 13 → Level 14
The password for the next level is stored in /etc/bandit_pass/bandit14 and can only be read by user bandit14. For this level, you don’t get the next password, but you get a private SSH key that can be used to log into the next level. Note:localhost is a hostname that refers to the machine you are working on

connect the ssh server using sshkey will lead me to next level
Level 14 → Level 15
The password for the next level can be retrieved by submitting the password of the current level to port 30000 on localhost.

Telnet can help you to establish TCP/IP connection between you and the server
Level 15 → Level 16
The password for the next level can be retrieved by submitting the password of the current level to port 30001 on localhost using SSL encryption.
Helpful note: Getting “HEARTBEATING” and “Read R BLOCK”? Use -ign_eof and read the “CONNECTED COMMANDS” section in the manpage. Next to ‘R’ and ‘Q’, the ‘B’ command also works in this version of that command…
openssl will help you connect the server using SSL protocol
Level 16 → Level 17
The credentials for the next level can be retrieved by submitting the password of the current level to a port on localhost in the range 31000 to 32000. First find out which of these ports have a server listening on them. Then find out which of those speak SSL and which don’t. There is only 1 server that will give the next credentials, the others will simply send back to you whatever you send to it.
nmap can help you find out the open ports and their services on the internet, we can see we have found two open ports, and let’s try to connect the first one:


It only offers echo service, let’s try the second port:

This time it gives out the ssh key, we save it and then go to the next level
Level 17 → Level 18
There are 2 files in the homedirectory: passwords.old and passwords.new. The password for the next level is in passwords.new and is the only line that has been changed between passwords.old and passwords.newNOTE: if you have solved this level and see ‘Byebye!’ when trying to log into bandit18, this is related to the next level, bandit19

diff can show the differences between the textfiles
Level 18→ Level 19
The password for the next level is stored in a file readme in the homedirectory. Unfortunately, someone has modified .bashrc to log you out when you log in with SSH.

Though I can’t log in properly, I still can visit the file directly and get the password for the next level
Level 19 → Level 20
To gain access to the next level, you should use the setuid binary in the homedirectory. Execute it without arguments to find out how to use it. The password for this level can be found in the usual place (/etc/bandit_pass), after you have used the setuid binary.
This program basically fakes you like another user, and you just use it to cat the password to the terminal directly
Level 20 → Level 21
There is a setuid binary in the homedirectory that does the following: it makes a connection to localhost on the port you specify as a commandline argument. It then reads a line of text from the connection and compares it to the password in the previous level (bandit20). If the password is correct, it will transmit the password for the next level (bandit21).
NOTE: Try connecting to your own network daemon to see if it works as you think

What you need to do is basically setting up a client and server, where nc here is actually a client sending the message, and the binary setuid here act as a server to listen to a specific code and return the password.
Level 21 → Level 22
A program is running automatically at regular intervals from cron, the time-based job scheduler. Look in /etc/cron.d/ for the configuration and see what command is being executed.

What you need to do is actually investigating what do the shells do, then you find that the shells are exporting the password to a file somewhere.
Level 22 → Level 23
A program is running automatically at regular intervals from cron, the time-based job scheduler. Look in /etc/cron.d/ for the configuration and see what command is being executed.
NOTE: Looking at shell scripts written by other people is a very useful skill. The script for this level is intentionally made easy to read. If you are having problems understanding what it does, try executing it to see the debug information it prints.
Find the shell first, an then just run it:

After running it, the password is generated.
Level 23 → Level 24
A program is running automatically at regular intervals from cron, the time-based job scheduler. Look in /etc/cron.d/ for the configuration and see what command is being executed.
NOTE: This level requires you to create your own first shell-script. This is a very big step and you should be proud of yourself when you beat this level!
NOTE 2: Keep in mind that your shell script is removed once executed, so you may want to keep a copy around…
The cron does not seem to run the sh automatically... I’ve waited for a long time and nothing happened, so I skipped this level
Level 24 → Level 25
A daemon is listening on port 30002 and will give you the password for bandit25 if given the password for bandit24 and a secret numeric 4-digit pincode. There is no way to retrieve the pincode except by going through all of the 10000 combinations, called brute-forcing.

Let’s make a new directory, and create a shell script
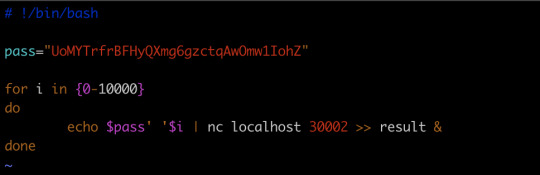
and run the script, we will get the key
Level 25 → Level 26→Level 27(actually)
Logging in to bandit26 from bandit25 should be fairly easy… The shell for user bandit26 is not /bin/bash, but something else. Find out what it is, how it works and how to break out of it.
Honestly, this one I did not find out the solution myself, I stuck at this level for a long time, and finally, I went to google for the solution, the solution is AMAZING! The solution is so creative that I actually shocked, I will go through the solution for you:

When you tried to login, you find the connection is closed immediately. Then I tried to find some information about the shell it this level uses, then I found this:

So basically, the shell will close immediately after it showed all the text...how the hell can you connect to the level 26 and get the password of level 27???
And this is also where I stuck...
And the solution is....
The shell does close immediately after showing all the text, but... what if you can find a way to slow down the procedure of showing all the text?? And yeah!
with “more”, you can actually realize this by simply resizing your terminal to a very small size, and now you can let the text show page by page...and as long as your text has not been fully shown on the screen, you still have the connection, and you could enter the edit mode, which is vim, and in the vim, you know you can open other files, and boom, you have the password!
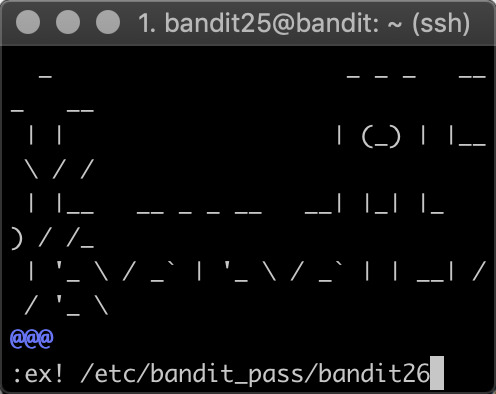
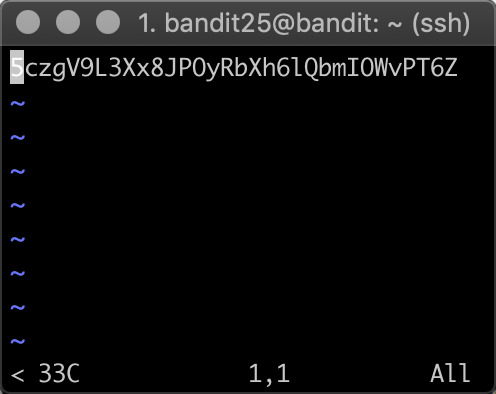
2 notes
·
View notes
Text
What to Know About NC Redirector Opera?
We've put up a comprehensive guide to NC Redirector Opera, so sit back and enjoy the ride. Thanks to the development of the NC Redirector Opera, Opera has now become the first browser to have the power of redirecting material away from the Opera browser.

About NC Redirector Opera
nc redirector opera com provides cutting-edge technology with the most impressive features. With the opera browser, you can go to your web destination faster while using less data. Offline file sharing is also possible with the browser. The Opera browser recently received these enhancements.
You'll need to update to the newest version to obtain access to the nc redirector opera com file sharing, which allows you to exchange things including videos, audio, images, documents, and apps without asking for or requiring an active internet connection. File transfers in Opera, according to NDTV, create a secure private network that provides a continuous connection between the devices being shared.
When you're on a slow connection, the app maximizes performance and data savings with a seamless experience. However, if the high resolution is enabled, data usage may be excessive; however, this can be disabled to display a lower resolution.
To use this portion of the nc redirector opera com, go to the settings page and choose either low or medium image resolution, depending on your needs. Meanwhile, if you're using an Android device, you may enable Extreme mode, which allows you to conserve a lot of data while maintaining a continuous connection at a faster and better speed.
Apart from making it easier for users to browse the internet faster and with less data usage, the nc redirector opera com also provides access to services such as news covering politics, finance, business, education, sport, entertainment, and more.
The browser has gathered content from thousands of publishers, which means you won't have to go through multiple taps to find what you're looking for because the relevant news and information will appear as soon as you open your Opera browser. Similarly, the section option can be used to finetune or personalize nc redirector opera com to match your needs.
The opera contains country-specific content, so you may switch between nations to locate fascinating articles for that region, regardless of where you are.
On Windows, how to block NC Redirector Opera.com?
Using the website address nc.redirector.opera.com or the site IP address, you can block NC redirector opera com on your Windows 8/10 computer.
As an administrator, log in to your Windows computer.
To get to C: WindowsSystem32driversetc, go to C: WindowsSystem32driversetc.
Double-click "Host" and select "Notepad" to open it.
Fill in the blanks at the bottom of the notepad:
https://nc.redirector.opera.com 127.0.0.1 localhost::1 localhost 127.0.0.1 https://nc.redirector.opera.com
Close the "Host" window and apply the changes.
Done
To validate that the NC redirector Opera has been disabled, reboot your Windows machine and go to the NC redirector opera com site at nc.redirector.opera.com.
On Mac, how to block NC Redirector Opera.com?
Due to the operating system, the steps above cannot be used to block websites on a computer. Therefore, we will consider how to block any website on your Mac computer, including the nc.redirector.opera.com on your macOS in this section.
Unlock and sign in to your Mac computer with an administrative right.
Navigate to Applications/Utilities/Terminal
Type “Sudo nano /etc/hosts” and click on the “Enter” button.
The “file/etc/hosts will open in a new file editor.
Type the command below
127.0.0.1 https://nc.redirector.opera.com
Enter “sudo dscacheutil -flushcache” without the quotes and click on the “Enter” button or restart the computer.
This will add the NC redirector Opera com to the list of blocked websites on your Mac computer. And you can repeat this process for all websites that you want to block on the PC.
On Android, how to block NC Redirector Opera.com?
A third-party program is required to restrict a website on an Android phone. And in this post, we'll show you how to use an app to block websites on Android phones, as well as how to use the app to block nc.redirector.opera.com.
ES File Explorer is a free program that you may download and install.
On your Android phone, open "File Explorer."
Tap on Local > Device > system > etc. from the menu option in the top left corner.
Open a fine called "Hosts" and select Text from the pop-up menu.
From the information that appeared, select ES Editor Note.
To block the NC redirector opera com site, create a new line at the bottom and type the following command.
127.0.0.1 https://nc.redirector.opera.com
Restart your Android phone after saving the modifications.
On Android phones, the NC redirector.opera.com site will no longer be available.
On iPhone/iPad, how to block NC Redirector Opera.com?
It's simple to block any website on your iPhone or iPad using Apple's parental control tool.
Go to the settings on your iPhone or iPad.
Select "General >> Restrictions" from the drop-down menu.
To enable the restriction function, click the "Enable" restriction and enter the desired code.
Click "Website" at the bottom of the page.
To add more websites to be restricted on the iPhone, go to "Add website."
Save the modifications by typing "https://nc.redirector.opera.com".
Done.
Anytime you try to access the NC redirector opera website, a message stating that the website has been blocked on your device will appear.
That is, you can regulate what others view on their iPhones and iPads, which is especially useful when you want to shield your children from inappropriate content and prevent them from accessing adult websites.
Wrapping Up!
You can ban NC redirector Opera.com on your Windows, Mac, Android, and iPhone/iPad devices using these steps. If you're having trouble with the NC redirector opera com bug, please leave a comment below.
Source: https://tomtysononeclick.blogspot.com/2022/10/what-to-know-about-nc-redirector-opera.html
0 notes
Text
Setup ssh proxy on iphone

Setup ssh proxy on iphone android#
Setup ssh proxy on iphone code#
Then I tried to access via localhost:9998 and localhost:9999.įor Netflix, I have a Http Status 404 : the requested resource is not available.įor Google, I have a Http Status 404 : the requested URL was not found on this server. Since my basic needs are Google and Netflix, I used Termius and configured the port forwarding as followed : Second idea: : I tried port forwarding with this tutorial And if that's so, how could I make it work? You simply have to create a Proxy Auto-Config (PAC) file, insert the function below in it (replace the x's with your IP and the y's with the port you used after the -D in your SSH command), and save it to a web. If you have not set your proxy using HD-ConfigHttpProxy, skip to the next step. In this case I used 3389as I’m trying to reach my Windows Desktop at home using remote desktop services. Then enter the local port you would like to forward to. Then scroll to the bottom below the terminal settings where it says Tunnels and enter.
Setup ssh proxy on iphone android#
But after using this tool the most Android apps, including Google Play Store, are still unable to connect to the internet. First enter the host and your log in credentials for the SSH server. What's strange is that I can still access non-censored website (like Apple), but I can't access censored-one (Facebook, Twitter) I would have thought that configuring the Http Proxy to Auto would affect the whole Web Browser.Īnyway, I wonder if that's because I need an authentication to access my host. Most people think you can't connect to a SOCKS proxy from an iPhone/iPod Touch without jailbreaking it but the truth is you can. BlueStacks comes with a command line tool named HD-ConfigHttpProxy.exe which allows users to set a HTTP proxy in BlueStacks. Then I configured the iOS device (Proxy Http -> Auto -> URL.) but it didn't work. The lights in the LAN port should also soon start blinking. You should see the red (power) and green (activity) LEDs on the Pi light up.
Setup ssh proxy on iphone code#
When I checked the URL of the file with Mobile Safari, it displayed the code written above, so I guess it can access it. Run an Ethernet cable from an available port on your router through to the Ethernet port on your Raspberry Pi 3. I put the file proxy.pac in my linux host via scp command. My Pac file is : function FindProxyForURL(url, host) Ssh -ND 9999 I configured my socks proxy, and everything worked fine.įirst idea: I tried to follow this tutorial I have a linux host in France that I could use for the SSH tunnel (let's call it my Mac Book Pro, I typed the command line I am currently in China and I would like to bypass the censorship.
1 note
·
View note
Text
Ubuntu install tigervnc server

#UBUNTU INSTALL TIGERVNC SERVER HOW TO#
#UBUNTU INSTALL TIGERVNC SERVER INSTALL#
#UBUNTU INSTALL TIGERVNC SERVER SOFTWARE#
The VNC server allows you to connect from the desktop as well as in the server.
#UBUNTU INSTALL TIGERVNC SERVER INSTALL#
Next, run apt command to install and configure the TigerVNC server. As long as the SSH port has been opened, you shouldn’t have to configure anything else (e.g. The procedure to install and configure TigerVNC on Ubuntu Linux can be described via:Login to the remote Ubuntu server via SSH:Install and configure the desktop environment, including Gnome or XFCE4. Remmina is convenient because it handles the SSH tunnel.
#UBUNTU INSTALL TIGERVNC SERVER SOFTWARE#
Enter the SSH settings under the SSH Tunnel tab. VNC is open-source client-server software that allows you to see the screen of the server computer and control it on one or more client computers no matter what. COMPUTERNAME.local:1, :1 corresponds to the display number above). Enter the VNC connection settings under the basic tab (e.g. If using Ubuntu 20.04 as the client machine, Remmina (a VNC client) is installed by default. Sudo systemctl enable systemctl start systemctl status Connect Using Remmina VNC Client Login to remote Ubuntu server using ssh command Install the desktop environment such as Gnome or XFCE4 using apt command Install and configure the TigerVNC. sudo mkdir /etc/vncĮxecStart=/usr/bin/vncserver -fg -depth 24 -geometry 1920x1200 -localhost no :%i This will create the typical Ubuntu desktop. & xrdb $HOME/.Xresources chmod 755 xstartupĬreate /etc/vnc/xstartup, edit the file, make executable. The fix comes from this post.Ĭreate ~/.vnc/xstartup, edit the file, make executable cd ~/.vnc Instructions found in other tutorials might work if you manually start the VNC server, but you will get a black screen if starting it as a service with GNOME (although it works with XFCE4). We want to run the VNC server as a system service (starts at boot), using GNOME (i.e. Vncserver -kill :1 Configure the VNC Server Test the installation by starting and then killing the server. TigerVNC supports virtual displays, is an active successor to TIghtVNC, and is easy to install from the Ubuntu repositories sudo apt install tigervnc-standalone-server Others can support virtual (remote) displays that are truly headless. controlling the visible logged-in desktop). Some VNC servers only support local VNC sessions (i.e. It was easy to set up a local VNC session, but going headless without a dummy adapter AND with the GNOME desktop was a challenge. no monitor plugged in) for Ubuntu 20.04 using GNOME was harder than anticipated. Install the OpenSSH server on the remote Ubuntu server that you want to access. Those who want to access their remote system securely over ssh, they can follow the given steps. Update apt database with apt-get using the following command.Creating a headless virtual VNC session (i.e. Enter the IP address along with port 5901 of the remote Ubuntu system where the VNC server is running. Install tigervnc-standalone-server Using apt-get In the following sections we will describe each method. There are three ways to install tigervnc-standalone-server on Ubuntu 20.04. This viewer may also be on a computer running other operating Note: This server does not need a display. The server generates a display that can be viewed with a vncviewer. This package provides a standalone VNC server to which clients can connect. Internet and from a wide variety of machine architectures. Not only on the machine where it is running, but from anywhere on the It is, in essence, a remoteĭisplay system which allows you to view a computing `desktop’ environment VNC stands for Virtual Network Computing.
#UBUNTU INSTALL TIGERVNC SERVER HOW TO#
In this tutorial we learn how to install tigervnc-standalone-server on Ubuntu 20.04. tigervnc-standalone-server is Standalone virtual network computing server Introduction
1 note
·
View note