#how to change pc name in windows 11
Explore tagged Tumblr posts
Visit Tumblr Blog
Explore Tumblr blogs with no restrictions, modern design and the best experience.
Last Seen Tumblr Blogs


Fun Fact
The Tumblr office adopted Tommy, an 11-year-old Pomeranian.
Text
youtube
Learn how to easily change your account name on Windows 10 with this step-by-step tutorial. Follow these simple instructions to update your account name in just a few minutes! Step 1: Open Settings. ... Step 2: Click on Accounts. ... Step 3: Click on Your Info. ... Step 4: Click on Manage my Microsoft Account. ... Step 5: Sign in to your Microsoft account. ... Step 6: Click on Edit Name. ... Step 7: Enter a new name and click Save.
#how to change pc name in windows 11#how to change pc name in windows 10#how to change username in computer#how to change pc account name in windows 11#tutorial#checkoutpages#techreview#facebook#Youtube
0 notes
Note
What is the appeal of vintage computers to you? Is it the vintage video games or is it the programs? If so, what kind of programs do you like to run on them?
Fair warning, we're talking about a subject I've been passionate about for most of my life, so this will take a minute. The answer ties into how I discovered the hobby, so we'll start with a few highlights:
I played old video games starting when I was 9 or 10.
I became fascinated with older icons buried within Windows.
Tried to play my first video game (War Eagles) again at age 11, learned about the hardware and software requirements being way different than anything I had available (a Pentium III-era Celeron running Windows ME)
I was given a Commodore 1541 by a family friend at age ~12.
Watched a documentary about the history of computers that filled in the gaps between vague mentions of ENIAC and punch cards, and DOS/Windows machines (age 13).
Read through OLD-COMPUTERS.COM for the entire summer immediately after that.
Got my first Commodore 64 at age 14.
I mostly fell into the hobby because I wanted to play old video games, but ended up not finding a ton of stuff that I really wanted to play. Instead, the process of using the machines, trying the operating system, appreciating the aesthetic, the functional design choices of the user experience became the greater experience. Oh, and fixing them.
Then I started installing operating systems on some DOS machines, or playing with odd peripherals, and customizing hardware to my needs. Oh, and programming! Mostly in BASIC on 8-bit hardware, but tinkering with what each computer could do is just so fascinating to me. I'm in control, and there isn't much of anything between what I write and the hardware carrying it out (especially on pre-Windows machines)! No obfuscation layers, run-times, .dlls, etc. Regardless of the system, BASIC is always a first choice for me. Nova, Ohio Scientific, Commodore, etc. I usually try to see what I can do with the available BASIC dialect and hardware. I also tend to find a game or two to try, especially modern homebrew Commodore games because that community is always creating something new. PC stuff I focus more on pre-made software of the era.
Just to name a few examples from a variety of systems: Tetris, terminal emulators, Command & Conquer titles, screen savers, War Eagles, Continuum, video capture software, Atomic Bomberman, demos, LEGO Island, Bejeweled clones, Commander Keen 1-3, lunar lander, Galaxian, sinewave displays, 2048, Pacman, mandelbrot sets, war dialers, paint -- I could keep going.
Changing gears, I find it funny how often elders outside of the vintage computing community would talk about the era I'm interested in (60s-early 90s). [spoken with Mr. Regular's old man voice]: "Well, computers used to be big as a room! And we used punch cards, and COBOL!" I didn't know what any of that meant, and when pressed for technical detail they couldn't tell you anything substantial. Nobody conveyed any specifics beyond "that's what we used!"
I noticed that gaps remained in how that history was presented to me, even when university-level computer science and history professors were engaged on the subject. I had to go find it on my own. History is written by the victors, yeah? When was the last time a mainstream documentary or period piece focused on someone other than an Apple or Microsoft employee? Well, in this case, you can sidestep all that and see it for yourself if you know where to look.
Experiencing the history first hand to really convey how computers got from point A to B all the way down to Z is enlightening. What's cool is that unlike so many other fields of history, it's near enough in time that we can engage with people who were there, or better yet, made it happen! Why do you think I like going to vintage computer festivals?
We can see the missteps, the dead-ends, the clunkiness, the forgotten gems and lost paradigms, hopefully with context of why it happened. For the things we can't find more information on, when or documentation and perspectives are limited, sometimes we have to resort to digital archeology, and reverse engineering practices to save data, fix machines, and learn how they work. The greater arc of computer history fascinates me, and I intend to learn about it by fixing and using the computers that exemplify it best, and sharing that passion with others who might enjoy it.
275 notes
·
View notes
Text
Alright. I'm making this post because I was unpleasantly surprised to find Microsoft had forcibly downloaded an """"ai assistant"""" onto my computer (called Copilot), and because finding a site that actually told me how to kill it for good -- in clear, truly step-by-step terms -- was way harder than it needed to be.
Preface: this is only relevant if you're running Windows 11.
Here is your target:

If you see this logo on your taskbar -- or... have Edge installed on Windows 11 -- you've got Copilot. You can't delete it on its own, Microsoft has integrated it into the OS as best they can. The most you can do is disable it (instructions for which are at the very end of this post).
So... to REALLY get rid of it you need to uninstall Microsoft Edge, because it's a part of/reliant on Edge. A lot of bells and whistles of Windows are also reliant on Edge, like widgets, but I never use those. I use my PC almost exclusively for gaming, and I don't want this slimy "ai" shit on my computer. I use Firefox anyway. Edge can go die as far as I'm concerned.
Here's the actual steps, copy-pasted from a website that took me way too long to find. It also really makes my browser chug for some reason, which is why I'm copy-pasting the whole thing. If you still want to look at the site itself, put it in reader view as fast as you can (link to site).
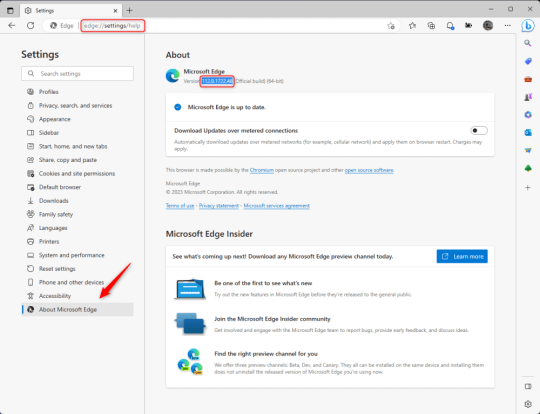
1.) Open Microsoft Edge, type "edge://settings/help" in the address bar, and then press Enter.
2.) Click "About Microsoft Edge" at the bottom of the left-hand pane. Copy the version number at the top of the screen, under Microsoft Edge.
3.) Press Windows Key + S to open Windows Search.
4.) Type "Command Prompt", right-click the result, and then select "Run as Administrator".
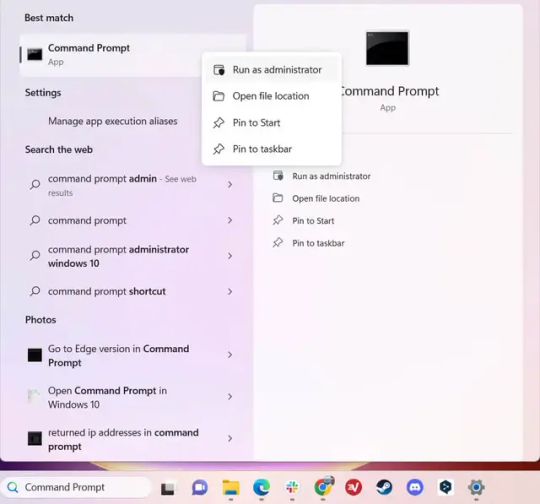
5.) The User Account Control (UAC) prompt will appear. Click "Yes".
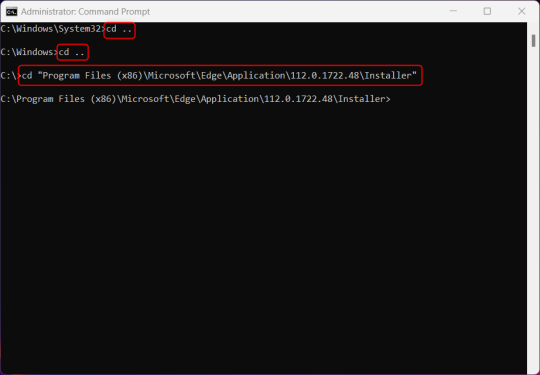
6.) Navigate to Edge’s “Installer” directory by using the cd command. Depending on which directory your Command Prompt opens in by default, you may need to use the "cd .." command to go back a level or two.
Once ready, run this command:
cd “Program Files (x86)\Microsoft\Edge\Application\Version Number\Installer”
Replace "Version Number" with your actual version number copied earlier.
7.) Next, run this command to uninstall Microsoft Edge:
setup –uninstall –force-uninstall –system-level
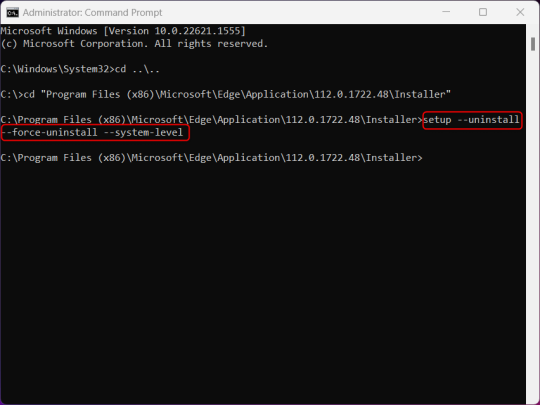
((It will look like nothing happened! Don't worry!))
8.) Restart your PC for the changes to take place.
((HOWEVER, Windows will try to reinstall it the next time your PC updates (or whenever it feels like it lol) so there's a second half to this))
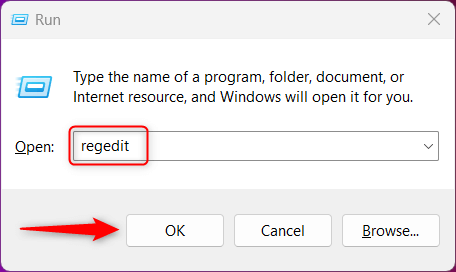
1.) Press Windows Key + R to open Run.
2.) Type "regedit" in the text box and click OK to open the Registry Editor.
3.) The User Account Control (UAC) prompt will appear. Click "Yes".
4.) In the Registry Editor, navigate to HKEY_LOCAL_MACHINES\SOFTWARE\Microsoft.
5.) Right-click the "Microsoft" folder, hover your cursor over "New", and then select "Key".
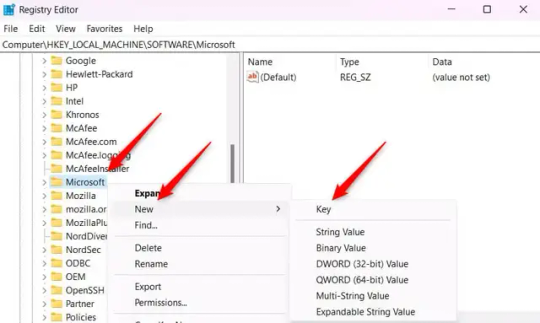
6.) Rename the new Key to "EdgeUpdate".
7.) Right-click EdgeUpdate, hover your cursor over "New", and then select "DWORD (32-bit) Value".

8.) Right-click the new value, which is currently named "New Value #1".
9.) Select "Rename" from the context menu.
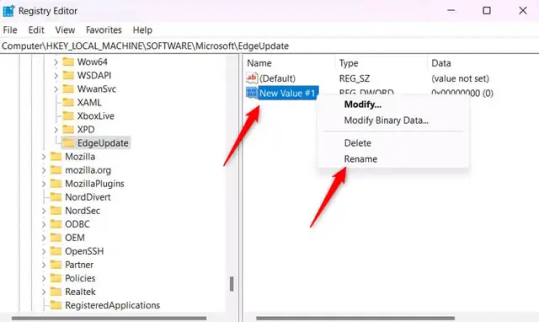
10.) Rename the value to "DoNotUpdateToEdgeWithChromium".
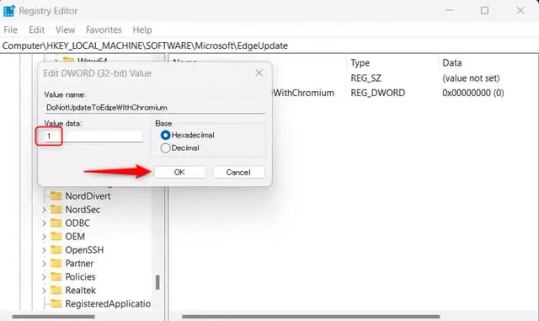
11.) Right-click the newly-named DoNotUpdateToEdgeWithChromium value and select "Modify" from the context menu.
12.) The Edit DWORD (32-bit) Value window will appear. Change the Value data to "1" and then click OK.
((You are now free. If you ever run into a really serious, unavoidable issue with your OS that's clearly a result of Edge being gone, you can redownload it like a regular app. But you should be fine.))
((And, if for some reason you want still want Edge around but just want the copilot thing gone, here's what you do:
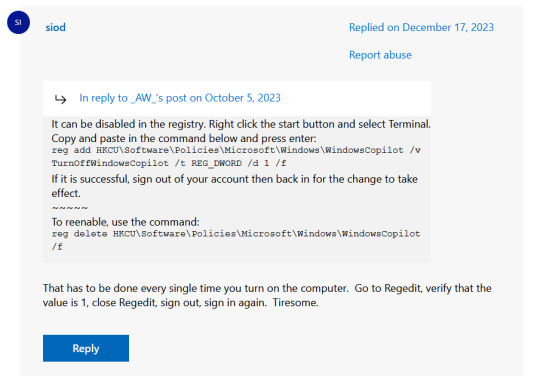
The command, for ease of copy-pasting: reg add HKCU\Software\Policies\Microsoft\Windows\WindowsCopilot /v TurnOffWindowsCopilot /t REG_DWORD /d 1 /f
You can't actually truly delete Copilot (without deleting Edge), only disable it. And as the reply says, you do have to do this every time you turn the computer on. I haven't tested that myself, but I believe it. I assume/hope that excludes just waking the computer up after it goes to sleep, but I don't know for sure.))
120 notes
·
View notes
Text
How to bypass Microsoft Account when installing Windows 11

Microsoft has confirmed that the popular “bypassnro” command, which let users to skip connecting to the Internet and signing into a Microsoft Account, is being removed, when setting up a new Windows 11 PC.
Microsoft is now requiring every Windows 11 device be set up with an internet-connected account.
Windows 11 PCs that have already been set up without a Microsoft Account will be unaffected. This change only affects the Windows 11 install and setup experience, where the OS requires an internet connection and a Microsoft Account to progress.
There are still ways to bypass these requirements, Currently, it’s also possible to manually re-add the bypassnro command to your system by typing the following into a command prompt: “reg add HKLM\SOFTWARE\Microsoft\Windows\CurrentVersion\OOBE /v BypassNRO /t REG_DWORD /d 1 /f shutdown /r /t 0”
However, there’s no guarantee Microsoft will allow this additional workaround for long. There are other workarounds as well, such as using the unattended.xml installation, but this requires a lot more work and includes creating a new Windows installation image from scratch.
Steps to Create an Unattended XML File for Local Account
1. Basic unattend.xml to Skip Microsoft Account:
Here’s a minimal XML file that configures a local administrator account and skips OOBE (Out-of-Box Experience) prompts:
<?xml version="1.0" encoding="utf-8"?> <unattend xmlns="urn:schemas-microsoft-com:unattend"> <settings pass="oobeSystem"> <component name="Microsoft-Windows-Shell-Setup" processorArchitecture="amd64" publicKeyToken="31bf3856ad364e35" language="neutral" versionScope="nonSxS" xmlns:wcm="http://schemas.microsoft.com/WMIConfig/2002/State" xmlns:xsi="http://www.w3.org/2001/XMLSchema-instance"> <OOBE> <HideEULAPage>true</HideEULAPage> <HideOEMRegistrationScreen>true</HideOEMRegistrationScreen> <HideOnlineAccountScreens>true</HideOnlineAccountScreens> <!-- Skips Microsoft account --> <HideWirelessSetupInOOBE>true</HideWirelessSetupInOOBE> <NetworkLocation>Work</NetworkLocation> <ProtectYourPC>1</ProtectYourPC> </OOBE> <UserAccounts> <LocalAccounts> <LocalAccount wcm:action="add"> <Password> <Value>YourPassword123</Value> <!-- Change this --> <PlainText>true</PlainText> <!-- Set to false if hashed --> </Password> <DisplayName>LocalAdmin</DisplayName> <Name>LocalAdmin</Name> <Group>Administrators</Group> </LocalAccount> </LocalAccounts> </UserAccounts> <AutoLogon> <Password> <Value>YourPassword123</Value> </Password> <Enabled>true</Enabled> <Username>LocalAdmin</Username> <LogonCount>999999</LogonCount> </AutoLogon> </component> </settings> </unattend>
2. Save the File
Save as autounattend.xml (for USB boot) or unattend.xml (for deployment tools).
Place it in the root of your Windows 11 installation USB or inject it into the ISO.
3. Use the File During Installation
Boot from the USB, and Windows Setup will automatically apply the settings.
No Microsoft account prompt will appear.
Get a Windows 11 Product key at keyingo.com for half price !
5 notes
·
View notes
Text
Explore the Exciting Updates in Horticular Garden-Builder

Horticular garden-builder game gets huge changes in the first major update for Linux and Windows PC. A big thanks to the creative minds at inDirection Games. Available on Steam with its 81% Very Positive reviews. If you're into Horticular, get ready for the first major update in this garden-builder. Since they are all about making this Linux title smoother and more fun, thanks to feedback from the community. Let's break down the biggest changes coming your way, starting with how you build and manage those important habitats.
Habitat Changes
A lot of Horticular players had feedback about how habitats work, so the garden-builder dev's have made some great upgrades. All due to make it easier for you to build and manage homes for all the adorable creatures in your garden. Before, habitats would move around on their own when destroyed — kind of annoying, right? Now, you'll have more control. When a habitat is destroyed, you'll be offered a new one, but this time, you get to decide where to move the creature. This gives you a lot more say over where your little critters live. Your creatures will also be more upfront about how they're feeling. If they’re unhappy with their habitat, they’ll give you a heads-up much earlier, so you have time to fix things before it becomes a bigger issue. They've also tweaked habitat borders, so it’s clearer where each creature comes from when selected. Plus, you’ll see easy to understand color indicators showing whether a habitat is uninhabited, occupied, or just plain unsuitable for a creature.
3 Awesome Mods for Horticular - a garden-builder Guide
youtube
UI Upgrades
The Horticular garden-builder interface just got bigger and better! There's now a larger default interface for Steam Deck users, making it easier to play on the go. The mod browser and tutorial pages were also reoptimized, so everything fits and works better. Another neat improvement is the new camera zoom level. The update now lets you zoom out a little more, just before reaching the map overview, making it easier to see your garden and plan where to grow or expand. And, if you like keeping track of your creatures, you’ll appreciate the new notebook setup. It’s been reworked to fit better with different screen sizes, and when you open the creature page, it’ll automatically focus on the creatures you’re tracking—pretty handy! For all the details, you can check out the full patch notes here.
What is this title all about?
In case you’re new to it, Horticular is a cozy, magical garden-builder where you're summoned by gnomes to bring a lost garden back to life. Your mission? Attract cute animals, build a beautiful environment, and use ancient magic to keep corruption at bay. Horticular launched the garden-builder on Linux, July 11, 2024, with these key features:
Story Mode: Letters from The Council (a group of garden gnomes) will help guide you as you face a mysterious enemy called The Nemesis.
Game Modes: Alongside the main story, there are multiple difficulty settings, plus a sandbox mode for more chill gameplay. You can choose between Storyless, Peaceful, or Creative play styles.
Controller Support: Full controller support means you can kick back and play on your TV or Steam Deck without a keyboard or mouse.
Twitch Integration: Streamers can involve their community like never before. Viewers can use Bits to name creatures or send in-game mail to the streamer.
Mod Support: Want more content? Horticular garden-builder has full mod support and integration with Steam Workshop. So you can easily install and share mods.
With these changes, Horticular keeps getting better and better, making it the perfect chill garden-builder for both casual players and creative gardeners alike. With this first major update it's time to get out there and start growing. Available on Steam for Linux and Windows PC. Priced at $19.99 USD / £16.75 / 19,50€.
#horticular#garden-builder#major update#linux#gaming news#indirection games#ubuntu#windows#pc#monogame#Youtube
2 notes
·
View notes
Text
How to Disable Copilot on Windows 11
Windows Copilot, Microsoft's new AI assistant, can assist you with a variety of tasks, such as answering questions, changing system settings, and creating AI images. However, if you're not a fan of Copilot or simply don't need it, you can remove its taskbar icon or disable it entirely on your Windows 11 PC. Here, we'll show you how.
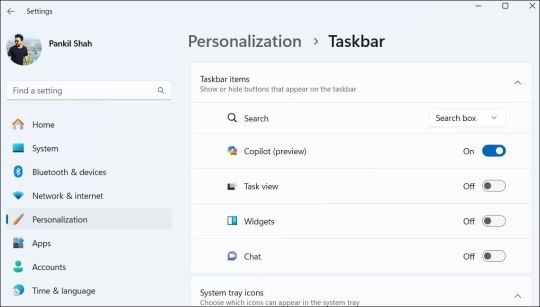
How to Remove the Copilot Icon From the Windows 11 Taskbar
By default, the Copilot icon appears in the Windows 11 taskbar. However, if you prefer not to have it there but still want to use it occasionally, it's easy to hide the Copilot icon. Simply right-click anywhere on an empty spot on your taskbar and select Taskbar settings. In the Settings window that appears, turn off the toggle next to Copilot.
This should remove the Copilot icon from the taskbar. You can still access Copilot by pressing the Win + C keyboard shortcut in Windows 11.
How to Completely Disable Copilot via Group Policy Settings
Although hiding the Copilot is quite easy, it does not turn it off completely, and you might inadvertently access it. Fortunately, you can turn off Copilot completely via the Local Group Policy Editor on PCs running the Professional, Education, or Enterprise edition of Windows 11. - Press Win + S to access the search menu. - Type gpedit.msc in the search box and select the first result that appears. - Select Yes when the User Account Control (UAC) prompt appears. - Use the left pane to navigate to User Configuration > Administrative Templates > Windows Components > Windows Copilot. - Double-click the Turn off Windows Copilot policy on your right. - Select the Enabled option. - Hit Apply followed by OK.
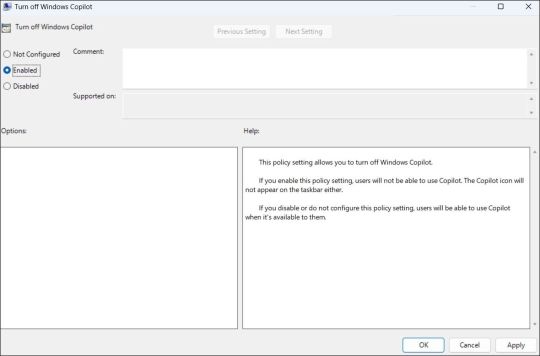
Once you complete the above steps, Copilot will be disabled on your Windows 11 PC and you won't be able to access it even with the keyboard shortcut. If you want to re-enable Copilot later, repeat the above steps and set the Turn off Windows Copilot policy to Not configured or Disabled.
How to Completely Disable Copilot by Modifying Registry Files
Another way to disable Copilot on Windows 11 involves modifying registry files. However, since editing the registry can be risky, you should follow the steps carefully. Also, be sure to back up all the registry files or create a restore point. This will allow you to restore the registry files in case something goes wrong. Once you’ve done that, here’s what you need to do to disable Copilot via the Registry Editor: - Press Win + R to open the Run dialog. - Type regedit in the text box and press Enter to open the Registry Editor. - Select Yes when the User Account Control (UAC) prompt appears. - Use the left pane to navigate to HKEY_CURRENT_USER > Software > Policies > Microsoft > Windows. - Right-click the Windows key and select New > Key. Name it WindowsCopilot. - Right-click on the WindowsCopilot DWORD, go to New, and select DWORD (32-bit) Value from the submenu. Name the DWORD TurnOffWindowsCopilot. - Double-click the TurnOffWindowsCopilot DWORD, type 1 in the text field, and click OK. - Restart your PC for the changes to take effect.
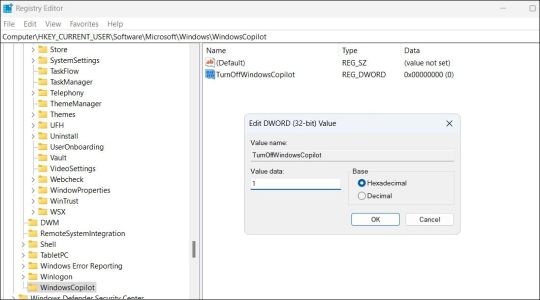
And that’s about it. Windows Copilot will be disabled on your PC. To re-enable it in the future, repeat the above steps and set the TurnOffWindowsCopilot DWORD value to 0. You can also delete the TurnOffWindowsCopilot DWORD instead.
Get Rid of Copilot on Windows 11
While Windows Copilot is a powerful tool, not everyone may want to use it. Fortunately, it’s possible to get rid of it. The above steps will help you achieve your goal, whether you want to keep Copilot out of sight or turn it off entirely. source Read the full article
3 notes
·
View notes
Text
BNHA Observations, speculations and assorted info: U.A. High School (Part 1: Infirmary)
So, in order to write my fic, I spend much time observing canon scenes, comparing the manga and the anime version, take note of details, translations and info in them as well as finding out how are some things called.
Since what I noticed/speculated/found out can be of use for other fic authors I thought to share as well.
Resources:
Chap. 7 “Costume Change?” (服着よう? Fuku Kiyō?) Chap. 11 “Bakugo's Starting Line” (スタートライン、爆豪の Start Line, Bakugō no) Chap. 21 “In Each of Our Hearts” (各々の胸に Onōno no Mune ni) Chap. 206 “Match 3 Conclusion” (第3セット決着 Daisan Set Ketchaku)
Ep. 6 “Rage, You Damn Nerd” (猛れクソナード Takere Kuso Nerd) Ep. 8 “Bakugo's Start Line” (スタートライン、爆豪の。 Sutāto Rain, Bakugō no.) Ep. 13 “In Each of Our Hearts” (各々の胸に Onōno no Mune ni) Ep. 96 “Match 3 Conclusion” (第3試合決着 Daisan Shiai Ketchaku)
OBSERVATIONS, SPECULATIONS AND ASSORTED INFO:
As all the Japanese schools U.A too has an infirmary or helath room (保健室 ‘Hoken-shitsu’), though the English version prefers to call it Nurse's office.
There aren't many pictures about in the manga and the anime, as it's a place that appears only 4 times though the story but they're enough to give us an idea of how it is.
THE ONE IN CHARGE OF THE INFIRMARY
Youthful Heroine: Recovery Girl (妙齢ヒロイン リカバリーガール Myōrei Heroine Recovery Girl), real name Shūzenji Chiyo (修善寺治与) is in charge of the U.A. infirmary.

Chapter 4 refers to her as ‘Kango kyōyu’ (看護教諭 “Nurse teacher”) where normally, in Japan, nurses in charge of the infirmary are called ‘Yōgo kyōyu’ (養護教諭 “Health Teacher”) or ‘Hoken-shitsu no sensei’ (保健室の先生 “Infirmary Teacher”) and this person provides first-aid treatment for injuries, illnesses, etc. of students and monitor their physical and mental health through medical examinations, health observations and so on. Recovery Girl is likely raised to the rank of “Nurse teacher” because she also has a nursing licence and provides much more serious nursing care to the students than just first aid help in fact during the sport festival, when Midoriya is injuried she says she did surgery on him.
Also, in Japan the person in charge of the infirmary is part of the teacher body and, in some cases, can teach to classes, though this would risk leaving the infirmary empty.
INFIRMARY SIGN
To point out the place is an infirmary, outside the door there's a sign saying so.

We don't really get to see the corridor in which the infirmary is but it likely looks like one of the many corridors in U.A. with the rooms on one side and giant windows on the opposite one. Actually, even if it's not said, this could very well be the corridor that lead to the infirmary as the view from the window seems the right one and it would make sense for the students to go visit Midoriya but as it's not clearly stated this is just my speculation.

DOOR (FROM THE INSIDE)
The door is a sliding one. In the manga there's either a glass on it or something attached to it but the same can't be said for the anime. Ironically while in the manga the door opens in one direction in the anime it opens in the opposite one. In the anime it's shown that the window on the corridor is so clear and large you've the impression the door opens on the outside.

WINDOW (FROM THE INSIDE)
The infirmary has a large window on the wall opposite to the one of the door. In the manga we can't see out of it, but in the anime treetops are visible, hinting the infirmary is placed on one of the upper floors of the school.

INSIDE
Inside there's Recovery Girl's desk with a deskchair as well as two infirmary beds and a stool for patients or visitors to sit on.


On Recovery Girl's desk there's the screen of a pc but I can't see any keyboard. Possibly it's a touchscreen. She also seems to have books on her desk.

Manga and anime seem to more or less agree on the design of the room for the left wall. Things change when we move to the right wall, as it wasn't shown in the manga early on and so the anime had no references when they drew the first series and had to make up the tiny glimpses of it we see and then decided to stick with what they made up. The result is the anime has a room with less space than the manga and a closet in it.

We can also sign a sign which I think is the one to check eyesignt, what should be an instrument to measure height and a message board.

The anime shows us there's also a clock on the wall and a speaker.

Also, the anime shows the recycle bin.

OUTSIDE
In the manga we aren't shown where the infirmary is located. The anime, showing the treetops from the windows, seems to imply it's on a upper floor. This image from which ballons of what Recovery Girl is saying come out from the last floor seems to imply that's where the infirmary is but it's likely not the case or it would be in such a high place they wouldn't be able to see the treetops. But well, this is just me, I can't say for sure.

2 notes
·
View notes
Text
And now all the search engines are being replaced by AI. I have spent twenty years trying to talk people to go to libraries and check their beliefs against records, and now we face a future without libraries and endless artificially generated idiocy.

There was an argument in the Australian Parliament when Julia Gillard was PM. She accused her opponent of being a misogynist. He pointed out it was a fact that he was not. So the next day the dictionary was edited to 'correct' it, to align with her opinion of what it should be, so she could now label him a misogynist and pretend her definition had always been true.

The trouble with manually removing AI from windows is MS can undo your changes at any time.
Completely remove Microsoft Bing Chat AI from your Windows 11 PC and sidebar.
Open the PowerShell application with administrator privileges. You can do this by searching for "PowerShell" in the Start menu, right-clicking on the result, and selecting "Run as Administrator."
In the PowerShell window, type the following command and press Enter:
Get-AppxPackage bing | Remove-AppxPackage
Wait for the command to execute. This command will uninstall any app packages related to Bing, including the Bing Chat AI. Once it completes, the Bing Chat AI should be removed from your Windows 11 PC.
To remove the Bing Chat AI integration in the Taskbar search, you can disable it using the steps below:
Open the Settings app in Windows 11. You can do this by pressing the Windows key, searching for "Settings," and selecting the "Settings" app.
Click on "Privacy & Security" in the left sidebar.
Under the "Windows permissions" section, click on "Search permissions."
In the "More settings" section, toggle off the "Show Search highlights" option. This will disable the Bing Chat AI integration in the Taskbar search.
After following these steps, the Bing Chat AI should be removed from the Taskbar search and the search home interface in Windows 11.
(This did not disable it but did disable the AI use of the search results in Windows 11 See the next step below to also disable the physical button integration.
Do both steps.)
Manual removal by component:
Page 2: Remove Bing Chat integrated into Microsoft Edge Explorer:
Disclaimer: If you are not comfortable using the registry editor, stop here. If you’re unfamiliar and willing to try anyway, the simplest way to look at this is a set of folders. Each has a parent folder; each folder can contain files. The view is like the windows explorer expanding directories with different naming conventions. It’s rather complicated but simplistic in nature.
How to remove the Bing Chat integration from Microsoft Edge Explorer on Windows, first follow the instructions provided in the first source mentioned:
((Silly AI, Step 1: Back up the registry: Select the folder HKEY_LOCAL_MACHINE\SOFTWARE\ click on the menu bar file, select export, select the destination for the backup file and name the file then save it.))
Open Registry Editor on your PC.
Navigate to the following location: HKEY_LOCAL_MACHINE\SOFTWARE\Policies\Microsoft.
If the “Edge.” Folder exists go to step 5.
Right-click inside the Microsoft folder and choose New, then Key.
Name the new Key (folder) as "Edge".
Right-click inside the Edge folder and select New, then DWORD (32-bit value).
Name the new DWORD as "HubsSidebarEnabled".
Right-click on HubsSidebarEnabled and click Modify.
Ensure the Value data is set to 0.
That's all the work in the Registry. Next, open Microsoft Edge and enter "edge://policy" in the address bar.
Click on the "Reload Policies" button, and the Bing Chat button will now disappear from the Microsoft Edge Explorer window.
These steps should help you remove the Bing Chat button from your Microsoft Edge Explorer window.
Please note that modifying the registry can have unintended consequences if not done correctly, so it's essential to be cautious and comfortable with the process. Additionally, it's always a good idea to back up your registry or create a system restore point before making any changes.
Page 3: Remove Bing from the Windows Start Bar.
If "Show Search highlights" setting was already disabled, and the Bing Chat button is still visible on your start menu bar. Here's an alternative method you can try to remove the Bing Chat button:
((Silly AI, Step 1: Back up the registry: Select the folder HKEY_CURRENT_USER\Software\ click on the menu bar file, select export, select the destination for the backup file and name the file then save it.))
Open the Registry Editor by searching for "Registry" in the Start Menu and selecting the "Registry Editor" app.
Navigate to the following location in the Registry Editor: HKEY_CURRENT_USER\Software\Policies\Microsoft\Windows\Explorer
If this folder does not exist, you can create it manually by right-clicking on the parent folder “Windows” and selecting "New" > "Key." Then, name the new key "Explorer" as instructed inside the 'HKEY_CURRENT_USER\Software\Policies\Microsoft\Windows\' directory.
Right-click on the "Explorer" folder, choose "New," and then select "DWORD (32-bit) Value" from the context menu.
Name the new DWORD value as "DisableSearchBoxSuggestions" (without quotes) and press Enter.
Double-click on the "DisableSearchBoxSuggestions" value you just created and set its value data to "1."
Click "OK" to save the changes.
Restart your computer for the changes to take effect.
After restarting, the Bing Chat button should be removed from the start menu bar. If you want to re-enable it in the future, you can return to the Registry Editor and change the value of "DisableSearchBoxSuggestions" to "0" or simply delete the DWORD value.


108K notes
·
View notes
Text
Discover Microsoft Copilot Notebook, A Productivity Booster

What Is Copilot Notebook?
An advanced tool or application called a Copilot Notebook combines AI capabilities to help users with a variety of data analysis, programming, and documentation activities. It combines the capabilities of a conventional notebook (like Jupyter Notebook) with improved AI-powered features, such context-aware help, mistake detection, and intelligent code recommendations.
Copilot Notebook Feature
The following are some essential components of a typical Copilot Notebook:
Intelligent Code Completion: This feature helps users write code more quickly by providing context-based smart code suggestions.
Debugging and Error Detection: Finds probable mistakes in the code and makes recommendations for how to repair it.
Help with Documentation: Produces and enhances documentation, facilitating user comprehension and code maintenance.
Context-Aware Help: Offers pertinent resources and information, like linked libraries or functions, based on the user’s current task.
Integration with Popular Tools: Improves workflow overall by integrating seamlessly with commonly used programming languages and tools.
These features are intended to improve efficiency and user-friendliness of the coding environment, decrease coding errors, and increase productivity.
Copilot Notebook
Five undiscovered Microsoft Copilot productivity-boosting techniques and tactics. Microsoft’s ChatGPT-enabled Copilot is accessible through any web browser, so it’s not simply confined to Windows PCs.
Microsoft made significant progress in the fight for generative AI by collaborating with OpenAI. The Redmond, Washington-based business unveiled Copilot, a brand-new service that lets customers utilize OpenAI’s state-of-the-art model on Windows 11 OS-powered PCs for free. Later on, users of Windows 10 were added to this.
Furthermore, any web browser may be used to access Microsoft’s GPT-powered Copilot, making it accessible from any Windows computer. Microsoft has also made the Copilot app available for free to iPhone and Android users.
Copilot Notepad for more extensive text prompting
If you think the text prompt input box is too small, the Copilot Notebook is the ideal fix. Users can enter more in-depth enquiries in the Notebook’s huge context pane, which supports up to 18,000 characters. This is useful, particularly when one needs to produce code for a computer program or needs a certain answer.
You will value the Copilot Notebook if you dislike the complicated-looking Copilot homepage user interface. Its user interface is straightforward, and even the AI-generated Notebook results are simple to obtain. Copilot Notebook allows you to summarise lengthy emails and messages that you receive.
Copilot artificial intelligence featured
Copilot Windows 11
Bing Chat was the previous name of Copilot (Photo courtesy of Microsoft).
Microsoft made significant progress in the fight for generative AI by collaborating with OpenAI. The Redmond, Washington-based business unveiled Copilot, a brand-new service that lets customers utilise OpenAI’s state-of-the-art model on Windows 11 OS-powered PCs for free. Later on, users of Windows 10 were added to this.
Furthermore, any web browser may be used to access Microsoft’s GPT-powered Copilot, making it accessible from any Windows computer. Microsoft has also made the Copilot app available for free to iPhone and Android users.
Here are five Copilot hidden features that you should be aware of but aren’t likely to know:
Microsoft Copilot
Image Modification Using DALL-E An output from DALL-E with prompts in three different versions. (Image from Express)
One of the most potent text-to-image generative AI models, OpenAI’s DALL.E 3, powers Microsoft Copilot’s ability to produce graphics at no cost. Selecting the Microsoft Designer option allows you to alter the created photographs in ways like deleting or replacing the backdrop, blurring the background, changing the colour tone, applying a certain filter, and more. Please be aware that Copilot will add a watermark on the photographs. One can also make lovely computer or smartphone wallpapers with the same Designer program.
Make use of the plugins’ power
Microsoft recently made Copilot able to add plugins. These plugins can aid in producing more focused outcomes. A shopaholic, for instance, can install plugins like Klarna to obtain precise price comparisons of a certain item. Microsoft has activated the search plugin by default, which facilitates the integration of AI-generated results with web search results. You can access Copilot’s AI-generated content by disabling it.
Consult the copilot
Voice and text cues are both supported by Copilot. Copilot will even automatically narrate the AI-generated result when you search with your voice. Copilot has the ability to read out the output even when you provide a text-based prompt. This makes Microsoft Copilot accessible to users who are unable to use or access a physical keyboard.
Copilot PC Wallpaper
Images can also be input or prompted by Copilot. You can pose a question about an image, like a landmark or a well-known person. In a similar vein, one can instruct Copilot to produce comparable graphics in other styles. Additionally, it has the ability to translate text between languages and extract text from images.
These are a few of the several use cases for Microsoft Copilot. To access more sophisticated generative AI models and to obtain extra capabilities, users can also subscribe to Copilot Pro.
Copilot Windows 11
Windows Copilot PC
According to Microsoft, users of the original Outlook software on Windows may already access Copilot; the Mac and mobile versions will be available shortly.
Microsoft has quickly incorporated its AI chatbot, Copilot, which is supported by OpenAI, into a number of its products. The software behemoth included Copilot to the updated Outlook app for Windows last year, although the previous version of the app was still devoid of features.
Microsoft just announced on their blog that Copilot for Windows’ classic Outlook is now accessible to users in the Current or Monthly Enterprise Channel and that it will be released gradually. The post also says that three to twelve months after the first release, Copilot for the older Outlook program on Mac and mobile devices would be available.
The AI-driven chatbot may assist with a variety of activities, such as compiling threads so users can stay up to date on everything. Additionally, Copilot allows you to retrieve additional information as needed and can display the data in bullet points. Simply click the “Summarize” button in the upper right reading pane when a message is open to utilize this function.
Like Google’s Help Me Write, the “Draft with Copilot” tool can be helpful if you are stuck and don’t know where to begin or what to write. Click the “New Email” button to begin a new draft, or select “Draft with Copilot” while replying to a message by clicking the Copilot button on the ribbon. Before sending, you can also change the message’s length and tone.
Users can also verify the tone, lucidity, and even whether the reader’s sentiment is as intended with a function called “Coaching by Copilot.” Simply click “Coaching by Copilot” after draughting a message in Outlook by pressing the Copilot button on the ribbon.
Additionally, Microsoft made it clear that all of the AI features of the new Outlook will be added to the traditional version of Outlook, but only “within a reasonable follow-up” timeframe.
Read more on Govindhtech.com
#copilot#microsoftcopilot#govindhtech#news#technews#technology#copilotnotebook#Microsoft#ai#technologytrends#technologynews#artificial intelligence
0 notes
Text
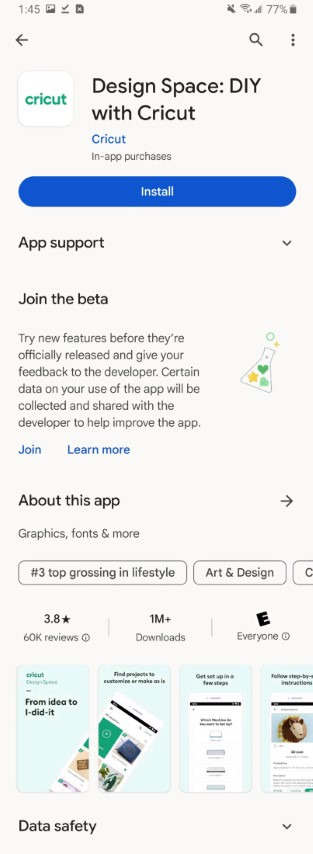
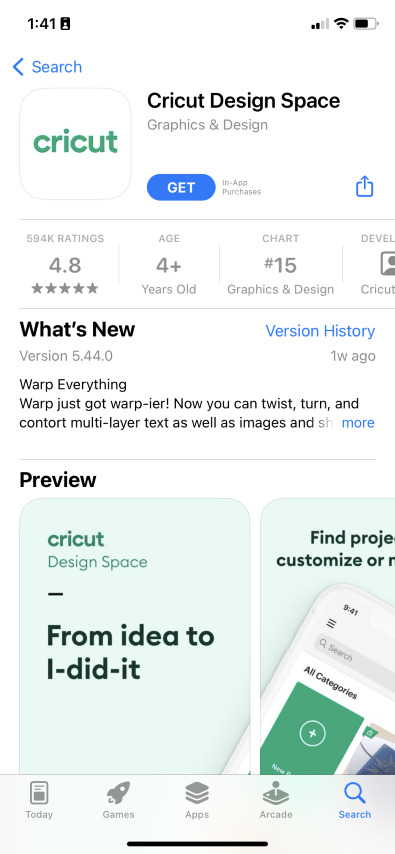
How Do I Download Cricut Design Space: All Devices Covered!
How do I download Cricut Design Space? Does that sound like you? You’re in the right place. This blog outlines the basic steps to download Cricut software on various devices, such as Windows, MacBooks, iPhones/iPad, and Android. If you have been looking for this, read this write-up until the end.
While writing this post, I was pretty sure about your needs. Beginner crafters like you who’ve just started crafting might be intimidated initially. Although Cricut is an amazing machine, its setup process can slightly confuse you. Since I have experienced it already, I know what you want. Therefore, I have written this blog to keep your needs in demand. Besides, I am covering all the compatible devices on which you can use the Cricut app.
So, shall we start? Let’s get ready with your computer or mobile device where you want to download the app.
How Do I Download Cricut Design Space on My Computer?
I got my first Cricut machine in 2018. Then, I installed the Cricut Design app for the first time on my PC. At that time, I had an HP laptop with Windows 10 and an Intel Dual Core or equivalent AMD. In addition, 4 GB RAM is the minimum needed for using Cricut software on a PC. So, ensure you meet all the basic needs to run this software on your PC.
Here are the steps to download and install the Cricut application on a PC:
Step 1: Download the Cricut Software
Start by turning on your Windows PC.
Then, plug in your Cricut machine.
After you have turned on the devices, click on the Start menu from the taskbar.
Now, type any browser’s name that you use. Here, I use Google Chrome, but you can try any other alternatives.
You have to use your internet browser’s search bar.
Next, paste this URL design.cricut.com.
Then, press the Enter button on your keyboard.
You will go to a page with a checkbox. Click on it to enable the Download button.

Once you have enabled the button, click it to download Cricut software on your PC.
When the download begins, wait for a while and let it finish.
Step 2: Install the Cricut Design Space app
When downloading is finished, you must go to the Downloads folder or file where you downloaded and saved the file.
Once you have found the downloaded file, click on it twice to open it.
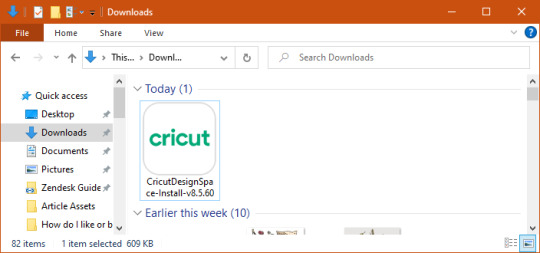
Then, you will see a pop-up that asks, “Whether you trust the application to make changes to your PC.”
Here, you need to select Yes to allow.

How Do I Download Cricut Design Space on Mac?
MacBook is an Apple computer with its own exceptional MacOS, which is more advanced than other OSs like Windows. However, you should have a MacBook with macOS 11 or later and 4 GB RAM. Besides, make sure you have free 2 GB disk space available.
Here are the steps to download and install the Cricut software on MacBook:
Step 1: Download the Cricut App
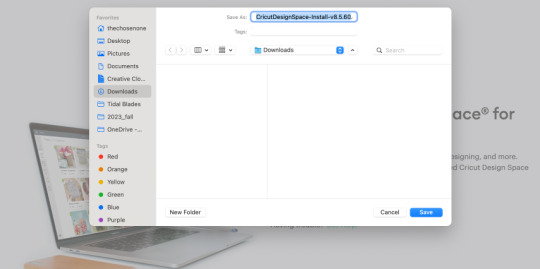
The first and second steps are the same as those for your Windows PC.
Then, paste this URL design.cricut.com into your browser’s search bar.
Next, you have to tick the checkbox to accept Cricut’s terms & conditions.
Now, you will notice that your Download button is activated.
Click on this enabled Download button and begin downloading the app.

After that, you will reach a page where you will have to select the folder to save the file that you are downloading.
Once you have selected the desired location, hit on the Save tab to start downloading.
Step 2: Install the Cricut Design Space app
When you have downloaded the Cricut software, you have to head to the Downloads folder.
Now, click on the .dmg file twice in the Downloads folder.
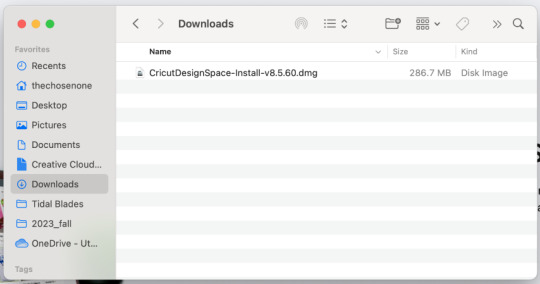
On the next window screen, drag the Design Space icon to the Applications folder icon to start installing the app.

How Do I Download Cricut Design Space on Smartphones?
Thanks to Cricut, you can now use your Cricut app on your smartphone. Yes, that’s true! Whether you use Android or iOS, you can use this software hassle-free. Make sure that if you’re an Android user, you have an Android 10.0 or higher OS. While for iOS users, they must have at least iOS 15 or later. Here’s how to download and install the app on Android/iOS:
For Android
Use any Android phone that you use. (You can check the eligible list of devices on Cricut’s official site).
In order to download the app, you must find the Google Play Store icon on your device.
Then, you should type Cricut Design Space software in the search bar.
After that, you will have to look for the apps displayed in the provided result below.
You will need to select it and click on the Install button to begin the installation.
For iOS
You have to head to the App Store on your iOS device (iPhone/iOS)
After that, you need to type Cricut Design Space in the search bar.
Now, you have to look for the app.
Then, you should select the app based on the visible results.
Click on the Get tab to install the app.
Conclusion
This blog focuses on how do I download Cricut Design Space for macOS, Windows, Android, and iOS devices. I have written the steps simply so that every beginner user can understand them hassle-free. Downloading the Cricut software is a must, as it allows you to create intricate designs smoothly and then send them to your Cricut machine for further cutting. Start your crafting journey with Cricut Design Space today!
FAQs
Question 1: Which Device is the best for Cricut Design Space?
Answer: Although the Cricut software is compatible with both computer and mobile, Windows and macOS are the most suitable options for the Cricut app. They run the Cricut app easily and offer more features than Android and iOS. In a nutshell, try Windows and macOS to use the software.
Question 2: Do I always need to use Cricut Design Space online?
Answer: Not necessarily. In order to use some features of Cricut Design Space, you have to stay connected to the internet. However, Cricut allows users to edit and make changes to their design even when they are offline. Besides, you will only need the internet when you want to download some new images, fonts, or projects.
Question 3: Can I use Cricut Design Space without a Cricut machine?
Answer: Yes, you can! Users can use the Cricut Design app without using their Cricut machine. Cricut is a simple software used to create designs where you can access thousands of images, projects, and more. Use the app without any cutting machine, and when you are done with your design, you can connect Cricut to cut.
Read more: cricut.com/setup mac
install cricut design space app
Cricut Design Space
Source: how do i download cricut design space
#how do i download cricut design space#Cricut Design Space#cricut.com/setup mac#cricut.com/setup#cricut explore air 2#cricut design space app#cricut new machine setup#download cricut software
0 notes
Text
youtube
How To Change Your User Account Name On Windows 11 | Change Account Name Windows 11 (PC Or Laptop)
#changeaccountname#windows11#changeusername#usernamechange#accountname#laptop#howto#pc#trending#fixed#Youtube
0 notes
Text
A lot of it can! I built a stupidly overpowered computer given that the game I played the most in the first month or two was Sid Meier's Alpha Centauri from 1999. Windows 11 actually does better with SMAC than Windows 10 did, it's only crashed once! I can also run Creative Suite CS2 which I OWN on this system. Photoshop from 2004 doesn't quite know what to do with multithreading but it's actually still really fast and the 64 gigs of RAM doesn't hurt. At the moment I have NMS running in the background while I have a gadzillion firefox tabs open and I could easily watch a video like this and be fine. One of the upsides of holding on to old software is that where it can take advantage of the new hardware, it really does run very well and you get actually uplift. The issue is that a lot of people lost the thread of Intel's naming scheme and haven't upgraded their computer or they bought something with stupidly little RAM (16g is probably okay but 32 g is what most gamers will be happier with and I bought a little word processing toaster of a netbook in 2020-ish or 2021 which had FOUR gigs of RAM but there was a huge tech shortage at the time and it can do what i needed it to do (run Scrivener) just fine. It cannot handle a lot of tabs open and still do, you know, the operating system. 8 gigs is Sluggish because of Windows bloat.
And yes, I have a fervent desire for two things in programming:
That programmers optimize their programs to run on a wide variety of systems with reasonable speeds
That programmers enable their programs to use things like multithreading and large amounts of available RAM *if there is excess capacity readily available* to speed necessary functions that take significant time. Like, oh, loading screens and transitions shouldn't take much time at all on my system but the cpu is sitting there at like 4% utilization while the framerate drops to 30fps on a LOADING screen because they just had to animate a gadzillion star systems through the gpu alone (looking at you NMS.)
What I mean by that is that, for example, in the gaming sector, there are a lot of companies who are like "How much eye candy can we stuff in here to meet our arbitrary (stupidly low) framerate goal" and most of the "eye candy" is stuff most observers wouldn't know or recognize from a hole in the ground. Yes, I'm talking about Starfield. I didn't understand why they'd accept a framerate of 30fps on console until I discovered they'd artificially locked both Skyrim and Fallout 4 ON THE PC to like 30 or 40 fps. And then tied the physics to framerate, completely unnecessarily (as in you can change this behavior with like two or three ini edits.) Then there's games like Baldur's Gate which was done thoughtfully and can run on a huge range of hardware. I had to return one Civilization game because they hadn't accounted for an aging fanbase and high resolution monitors and I flat out couldn't read the tiny text to play the game.
But yeah, we have this neverending leapfrogging bloat that goes on, where users try to upgrade to get things to work better and companies decide to fill in the new overhead with data mining background tasks and "user experience optimizations" that are a ridiculous rat race that in no way enhances the user experience.
Anyway, I'm not opposed to upgrades but like, do them sensibly and if you can, learn to build your own stuff so that you aren't beholden to the anticonsumer tactics most major computer system integrators (dell, etc.) use to get as much of your money as possible while giving you the least in exchange.
we should globally ban the introduction of more powerful computer hardware for 10-20 years, not as an AI safety thing (though we could frame it as that), but to force programmers to optimize their shit better
232K notes
·
View notes
Text
What is Chat with RTX?

- A powerful, NVIDIA-developed software demo showcasing generative AI technology. - Designed to let you train a large language model (LLM) on your personal documents, notes, and other data. - Leverages retrieval-augmented generation (RAG) to provide contextually relevant answers based on your specific information. - Accelerated by TensorRT-LLM and RTX power for speed and efficiency. Key Features of Chat with RTX - Local Processing: All data analysis and query responses happen directly on your RTX-powered Windows PC or workstation. This significantly increases privacy and security. - Customization: The ability to train the chatbot on your own datasets leads to highly tailored conversations and responses that reflect your knowledge and areas of interest. - Contextual Queries: Chat with RTX can scan your files and even process information from YouTube videos to answer questions based on the content you've provided. - Supported File Formats: Compatible with common formats like .txt, .pdf, .doc/docx, and .xml Image rights: Nvidia Benefits of Nvidia Chat with RTX - Enhanced Privacy: No need to upload sensitive information to the cloud. - Faster Response Times: Local processing often translates to quicker results. - Unique Personalization: You get a chatbot that aligns with your specific needs and knowledge base. Before Enjoying Nvidia LLM Generative AI Technology you need: - System Requirements: - GeForce RTX 30 or 40 series GPU with at least 8GB of VRAM - Windows 10 or 11 - Latest NVIDIA GPU drivers - 16GB+ System RAM - 100GB+ Disk Space - Download: Find the installer on the official NVIDIA website (https://www.nvidia.com/en-us/ai-on-rtx/chat-with-rtx-generative-ai/) - Add Your Data: Create a folder containing the documents, notes, etc. you wish the chatbot to learn from. Point Chat with RTX to this folder. - YouTube Integration (Optional): Add YouTube video URLs to incorporate that knowledge into your chatbot's responses. Important Note: Chat with RTX is resource-intensive. Be prepared for some setup time, and ensure your system meets the requirements for the best experience. Here's a Detailed Step-by-Step Guide on How to Install Chat with RTX: Before You Begin - Make Sure Your Hardware Meets the Pre-requisites: To ensure you have a compatible system. You'll need: - NVIDIA GeForce RTX 30 or 40 series graphics card (at least 8GB VRAM) - Windows 10 or Windows 11 operating system - Latest NVIDIA GPU drivers - 16GB+ of system RAM - 100GB+ of free disk space (the installation is large) Installation Steps - Download: - Visit the official NVIDIA Chat with RTX page: https://www.nvidia.com/en-us/ai-on-rtx/chat-with-rtx-generative-ai/ - Click the prominent "Download Now" button. The download is sizeable (~35GB), so it may take some time depending on your connection. - Extract the Files: - Locate the downloaded ZIP file. - Right-click on the ZIP file and select "Extract All..." or use a dedicated extraction tool like 7-Zip or WinRAR. - Choose an appropriate location to store the extracted files (you'll need plenty of free space). - Launch the Installer: - Navigate to the extracted folder. You should see a file named "setup.exe" or something similar. - Double-click "setup.exe" to begin the installation process. - Follow the Installer Prompts: - Agree to the license terms - Choose an installation location (it's best to leave it as the default unless you have a strong reason to change it). - The installer will likely ask you to install additional components like a base language model. Select the ones you want. - Continue through the prompts and let the installation complete. After Installation - Launch Chat with RTX: Find the Chat with RTX shortcut on your desktop or Start Menu and launch it. - Initial Setup: The first time you run Chat with RTX, it might download additional files and do some setup. Be patient, as it can take a while. Important Note: If you encounter any installation errors, double-check that your system meets the requirements and that you have the latest NVIDIA drivers. You can typically find troubleshooting tips on the NVIDIA website or forums. Read the full article
0 notes
Text
iOS Jailbreak
Are you planning to get an iOS jailbreak? You can try several jailbreak tools in public. Among those tools, you can try the most reliable option for iOS jailbreak. Here I recommended trying the HappyMod iOS jailbreak tool. You can follow the link here to directly download the HappyMod application and then you can try HappyMod iOS jailbreak.
Using multiple jailbreak tweaks you can customize the iOS. For that, you can easily try HappyMod iOS jailbreak tweaks. To get more ideas about iOS jailbreak, follow this article. It's all about jailbreak, methods, and reasons to jailbreak iOS.

What is iOS Jailbreak?
iOS jailbreak is like giving your iPhone or iPad a special key to unlock its full potential. Normally, Apple puts strict rules on these devices to keep them safe and secure. But with jailbreaking, you can break these rules and customize your device in cool ways. It's like having the freedom to download special apps, change how your device looks, and do things Apple doesn't allow. Jailbreaking is popular among people who want more control and fun with their iPhones or iPads. Just remember, while it can be exciting, it's important to be careful and follow instructions to avoid any problems!
iOS Jailbreak Apps
If you search on Google, you'll find many jailbreak apps with different names. You can choose one based on whether it works with your device and if it's reliable. Here are some of the latest ones available for everyone to use:
Palera1n Jailbreak:
This app works for certain iOS devices from iOS 15 to iOS 16.7.2. It's for developers and works on macOS and Linux, but not on Windows PCs.
Fugu15 Jailbreak:
Fugu15 works on iOS devices from version 15.0 to 15.8. It doesn't allow adding tweaks, but it's effective on devices like the iPhone XS Max, iPhone 11, iPhone 12, iPhone 12 Pro Max, and iPhone 13.
Xina15 Jailbreak:
Xina15 is made for newer iOS devices from version 15.0 to 15.8, specifically those with A12 or later chipsets.
Checkra1n Jailbreak:
Checkra1n works for devices using A5 to A11 chips, running iOS 12.0 to iOS 14.8.1, and iPadOS 13.1 to iPadOS 14.8.1. With this app, you can install Cydia on your device.
Unc0ver Jailbreak:
Unc0ver supports iOS 11 to iOS 14.3, and some newer devices up to iOS 14.8. It also works for iPadOS 13.1 to iPadOS 14.5.1. It lets you install Cydia Free on your device.
Taurine Jailbreak:
Taurine is for devices running iOS versions 14.0 to 14.3. It allows you to install the Sileo package manager on your device.
These apps give you extra features on your iPhone or iPad, but remember to choose the one that matches your device and version!
Best iOS jailbreak Option with HappyMod iOS Jailbreak
If you decide to jailbreak iOS, then there is another good try. That is, you can try the HappyMod iOS version to download multiple jailbreak tweaks. This is the safest option you can follow for an easy way to jailbreak tweaks. To get this, you can try the above app download link.
1 note
·
View note
Text
Saturday Morning Coffee
Good morning from Charlottesville, Virginia! ☕️

I’m still having a great time at work integrating React Native into an existing iOS App. I still have a lot to learn about JavaScript and TypeScript but my interest is piqued. Don’t get me wrong, I still need to learn SwiftUI and I still love doing native work, but this is worth learning because we’re seeing more clients ask for it.
Just poured my first cup. I hope you enjoy the links.
Alan Herrera • Comic Sands
The United States Forest Service responded to a video filmed by a couple that went viral for allegedly showing Bigfoot walking in broad daylight.
I really do wish Bigfoot was a real thing. The skeptic in me says “Of course this is faked.” But how do we really know?
The truth is out there.🛸

Steven Lee Myers, Stuart A. Thompson and Tiffany Hsu • The New York Times
Now rebranded as X, the site has experienced a surge in racist, antisemitic and other hateful speech. Under Mr. Musk’s watch, millions of people have been exposed to misinformation about climate change. Foreign governments and operatives — from Russia to China to Hamas — have spread divisive propaganda with little or no interference.
Face it, Space Karen isn’t the genius everyone made him out to be. He’s a self serving narcissist with too much money and strange ideas.
I��ve been saying I won’t call X, X, because it’s still Twitter. I’m wrong. Twitter is gone. Now folks are left with X.
Please, please, please, sell the Twitter name and branding. Someone could make something amazing with it. 🐦
Swift Forums
When using this feature, the developer hand-writes Objective-C headers just as they normally would for an Objective-C class, but implements their declarations in Swift by using an extension marked with the new @implementation attribute.
This is an interesting idea but I’m not sure it’s any better than what we have today when using @objc notation.
I suppose it would mean the continued existence of the vaunted header file. 😄
Dave Winer
I have basically had it with JavaScript. It is a write-only language. More so than any other language I’ve used, including some pretty old and arcane systems. I asked ChatGPT to give DALL-E instructions based on this prompt.
Even if you don’t read Dave’s piece go check out the images generated by DALL-E. They’re beautiful works of art suitable for framing. Seriously.
Steven Beschloss
Twice now President Joe Biden made the decision to visit active war zones not under U.S. military command. These trips, to Kyiv in February and to Tel Aviv this week, are without precedent in modern American history. It’s easy to take these visits in stride: It’s the President of the United States! Surely, he has quite a circle of protection. But I think it’s worth reflecting on the vigor and guts—and principle—it took to meet American allies in person to demonstrate American support, despite genuine danger.
Joe Biden has been a great President. I don’t care if he’s “too old” to hold the office. He seems to be doing a pretty damned good job of it. 🇺🇸
Paul Thurrott
Crapware. PC makers have long installed crapware and other superfluous utilities in Windows, providing users with a compromised user experience that didn’t reflect what Microsoft intended. But with Windows 11, now Microsoft installs its own collection of crapware too, in the form of sponsored apps and shortcuts in the Start menu.
Seriously Microsoft? Some of your own software includes ads? That’s pathetic.
At least Apple’s annoying notifications for services are a little better, not by much, but slightly better. 🤬

Detroit Free Press
A politically connected Detroit synagogue president was found stabbed to death Saturday morning outside her home in the city’s Lafayette Park neighborhood, east of downtown.
If you think the war in Gaza and Israel don’t affect us at home, think again.
Hate crimes in the States will most likely continue to climb because of it. 😢
Chance Miller, Ben Lovejoy, Zac Hall, and Michael Potuck • 9 to 5 Mac
Is M. Night Shyamalan running Apple? The company just announced a Monday night keynote event on the eve of Halloween. The tagline? Scary Fast. Macs are rumored, but what Apple silicon will be inside?
How long have M2 Macs been a thing? I haven’t got a clue. Is the M3 a Halloween surprise just in time for the holiday season? 🤔
Joseph Heck
Over the summer, I started working with the Automerge team to bring its Rust-language core to Swift.
Joseph is a really nice guy and I’m excited to see him working on something he’s so passionate about. I’ll be keeping an eye on his progress. 🦀
Witney Seibold • /Film
Halloween’s Original Movie Poster Has A Creepy Hidden Detail - And It Happened By Accident
It took me a while to make out what they’re talking about. Go see for yourself.
Sindre Sorhus
Buffer will never be removed, and probably never even deprecated, but at least the community can slowly move away from it. My hope is that the Node.js team will at least start discouraging the use of Buffer.
I know nothing about JavaScript but it’s always nice to see someone advocate for making code safer.
Do you use Buffer in your code? Maybe it’s time to change that? 🦬
1Password Blog
How ethical hacker Jamie Woodruff used a pizza delivery to break into a server room
This made me think of the 1992 film, Sneakers. If you haven’t seen it, go watch it. It’s a great film. 👟
I’d be horrible security for a data center. Pizza? You have pizza? Sure, come on in! 🍕
Victor Tangermann • Futurism
AI chatbots like OpenAI’s ChatGPT and Google’s Bard consume an astronomical amount of electricity and water — or, more precisely, the massive data centers that power them do.
The crypto and AI data centers really need to get their act together and start building sources of clean energy to power these monstrosities.

Andy Greenberg • WIRED
They Cracked the Code to a Locked USB Drive Worth $235 Million in Bitcoin. Then It Got Weird
This is a cool story! Again, I think of Sneakers.
I hope this means folks who forgot their passwords are able to crack their keys open and sell off their bitcoin.
Especially the poor dude who has millions in bitcoin. He’s not using this tech, currently, but I hope he’s able to finally be able to cash out. 💸
Marc Elias • Democracy Docket
Republican lawyers are back in the news and are bringing disgrace to the party and profession. Even before the indictments in Georgia, it had been widely reported that at least five, and perhaps all six, of former President Donald Trump’s co-conspirators were Republican lawyers. Now in Georgia, we add several lawyers, some familiar and some new, to the list of Trump’s co-defendants.
At least some of these knuckleheads are pleading guilty and cooperating.
I still say his Orangness will get off scot-free. He’ll delay, delay, delay. Win the Presidency. Pardon everyone he can, destroy democracy, and not leave the White House until he’s dead.
If things get super bad I hope Canada and Mexico will accept American refugees.
Dave Rogers
Sea level rise is a game of inches. It doesn’t take many inches to create miles and miles and miles of problems. And it’s going to take decades to address those problems, so we might as well get started now.
Yay, climate change! 😡
If the Orangeman doesn’t destroy the nation, climate change might.
Dave, we won’t cleanup things on the shoreline. We’ll just let Mother Nature take it and leave a giant mess. Like we do. 😔
Christopher Nichols • Atlas Obscura
One of the reasons people can never be entirely sure about what is going on at Area 51 is that it is a highly classified secret military facility. It was not until 2013 that the United States government even acknowledged the existence and name “Area 51.”
I like this take on Area 51. We don’t need aliens to create crazy technology.
I do like the thought of aliens though. 👽
Daring Fireball
This “now is not the time” argument gets trotted out by Republicans after each and every gun massacre. Right after their tweets offering “thoughts and prayers”. Bullshit. The aftermath of a massacre is the time to demand sane gun control measures.
Yep. More pressure to pass great gun legislation. It’s time for a nationwide ban on assault weapons and other protections.

0 notes
Text
Of Life and Land v1.0: Experience the Nature Simulation

Of Life and Land launches 1.0 for the nature simulation city builder game on Linux, Steam Deck, and Windows PC. Thanks to the creative magic of developer Kerzoven, the release feels more alive than ever. Which you can find on Steam with 87% Very Positive reviews. After more than a year of shaping, tweaking, and love from its passionate devs and Early Access community, Of Life and Land launches in full glory. That’s right – version 1.0 is finally here on Linux and Steam Deck, and it’s releasing with a 40% discount. If you’ve been eyeing it or waiting for the full release, now’s the time to dive into one of the most peaceful (yet surprisingly deep) strategy games out there. This isn’t just a slap on a number and ship it Of Life and Land launch. Nope. The devs at Metaroot and Kerzoven have dropped a full medieval scenario steeped in real Swiss history, and it’s awesome. Picture this: you're building up Lenzburg Castle, a mighty fortress in the Central Plateau of medieval Switzerland, while navigating a tug-of-war between empire and church. Oh, and there are ancient myths to uncover too – because what’s medieval life without a few legends to chase? What’s new in the Of Life and Land 1.0 launch?
Well, it’s not just castles and cool backdrops. You’re getting:
A fresh historical scenario centered on the Counts of Lenzburg
Castle building mechanics – it’s as epic as it sounds
Single-city challenges for those who like focused play
Revamped trade systems that add real weight to your decisions
And loads of new decorative goodies – benches, signs, flower boxes – you name it
But wait, there’s more (and yes, it’s good stuff):
Of Life and Land Full Release 2025
youtube
The game world isn’t just pretty – it’s alive. Since Early Access, they’ve added actual physical dirt and humidity simulation. Your environment changes based on how you interact with it. There’s even an entire region called Risenna, with 11 new maps built for trade-centric strategies. And for the eco-heads out there – yes, you can now watch chickens and pike (yep, the fish) influence your ecosystem. It’s not just flavor text – it’s all simulated and it matters. There’s even a schooling and retirement system for Of Life and Land launch. Your villagers grow, learn, work, and eventually slow down. It adds a beautiful, human rhythm to your settlement that most city builder simulation titles just don’t bother with.
Why you should care:
Of Life and Land isn’t trying to be flashy. It’s thoughtful, relaxing, and packed with those “just one more season” moments. It’s for players who like deep systems but also appreciate the beauty of a slow, meaningful build. And for us on Linux and Steam Deck? The game runs buttery smooth, with full support from day one – no hoops to jump through, just install and play. Priced at $14.99 USD / £12.59 / 14,70€ with the 40% discount on Steam. So if you’re looking for a simulation city builder strategy title that respects your brain and your chill – now’s the perfect time to jump in. Of Life and Land launches into 1.0, and it's one of those rare releases that truly earns your time.
#of life and land#simulation#city builder#linux#gaming news#kerzoven#ubuntu#steam deck#windows#pc#godot#Youtube
1 note
·
View note