#how to change pc name in windows 10
Explore tagged Tumblr posts
Visit Tumblr Blog
Explore Tumblr blogs with no restrictions, modern design and the best experience.
Last Seen Tumblr Blogs


Fun Fact
In 2020, 27% of US Tumblr users had an annual household income of over $100,000.
Text
youtube
Learn how to easily change your account name on Windows 10 with this step-by-step tutorial. Follow these simple instructions to update your account name in just a few minutes! Step 1: Open Settings. ... Step 2: Click on Accounts. ... Step 3: Click on Your Info. ... Step 4: Click on Manage my Microsoft Account. ... Step 5: Sign in to your Microsoft account. ... Step 6: Click on Edit Name. ... Step 7: Enter a new name and click Save.
#how to change pc name in windows 11#how to change pc name in windows 10#how to change username in computer#how to change pc account name in windows 11#tutorial#checkoutpages#techreview#facebook#Youtube
0 notes
Text
How to run The Sims 3 with DXVK & Reshade (Direct3D 9.0c)

Today I am going to show you guys how to install Reshade and use Direct3D 9.0c (D3D9) instead of Vulkan as rendering API.
This tutorial is based on @nornities and @desiree-uk's awesome guide on "How to use DXVK with The Sims 3", with the goal of increasing compatibility between DXVK and Reshade. For users not interested in using Reshade, you may skip this tutorial.
If you followed nornities and desiree-uk's guide, it is strongly recommended that you start from scratch, meaning you should uninstall DXVK AND Reshade completely. Believe me when I say this: it will save you a lot of time, frustration, and make your life so much easier.
For the purpose of this tutorial, I am on patch 1.69.47 and running EA App on Windows 10, but it should work for version 1.67.2 on Steam and discs, too. This tutorial does not cover GShade.
Before we start
Backup your files, even the entire folder (Program Files\EA Games\The Sims 3\Game\Bin) if you want to be extra safe; you will thank yourself later. If you do not wish to backup the entire folder, at least backup the following:
reshade-presets
reshade-shaders
Reshade.ini
Options.ini (Documents\Electronic Arts\The Sims 3)
Keep them somewhere secure, for your peace of mind (and sanity).

Done? Great stuff, let us begin!
Step 1:
If you installed DXVK following nornite and desiree-uk's guide, go to the bin folder and delete the following files to fully uninstall DXVK, we are starting from scratch:
d3d9.dll
TS3.dxvk-cache
dxvk.conf
TS3_d3d9.log (or TS3W_d3d9.log)
Step 2:
If you already have Reshade on your PC, uninstall it using this: https://reshade.me/downloads/ReShade_Setup_X.X.X.exe (replace X.X.X with version number)
Step 3:
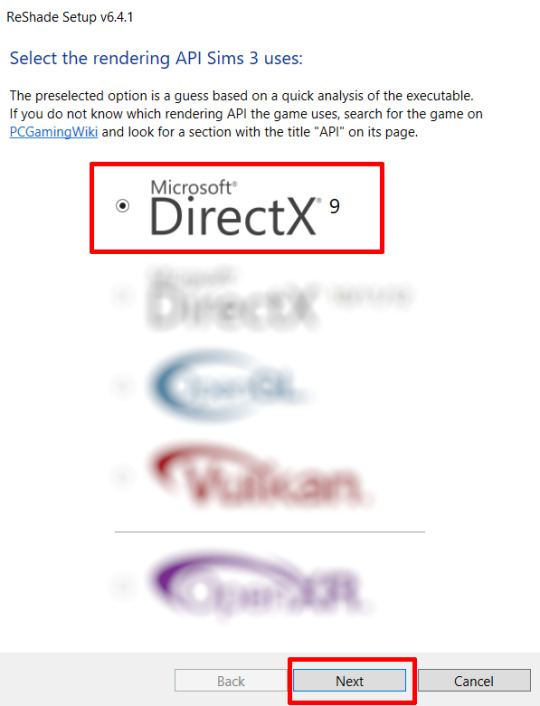
Perform a clean install of Reshade (I am using the latest version - 6.4.1 at the time of writing). Please note that you need a version no older than 4.5.0 or this method will not work. Choose DirectX9, click next.
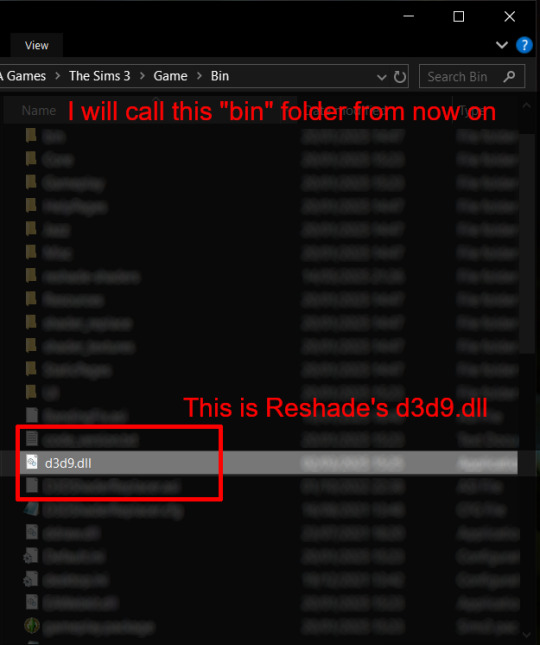
Once the installation is complete, you should see a "d3d9.dll" file inside The Sims 3's bin folder (Program Files\EA Games\The Sims 3\Game\Bin):
It may all seem familiar thus far. Indeed, this is how we installed Reshade in the past before using DXVK, but here comes the tricky part:
Step 4:
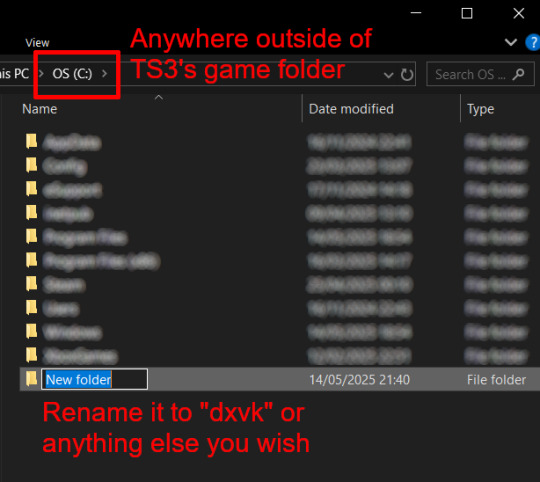
Create a new folder outside of The Sims 3's game folder (I created it on my C drive), name it "dxvk" or whatever else you like. Remember where you saved this folder, we will return to it later.
Step 5:
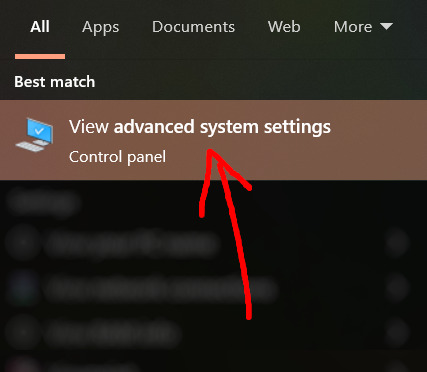
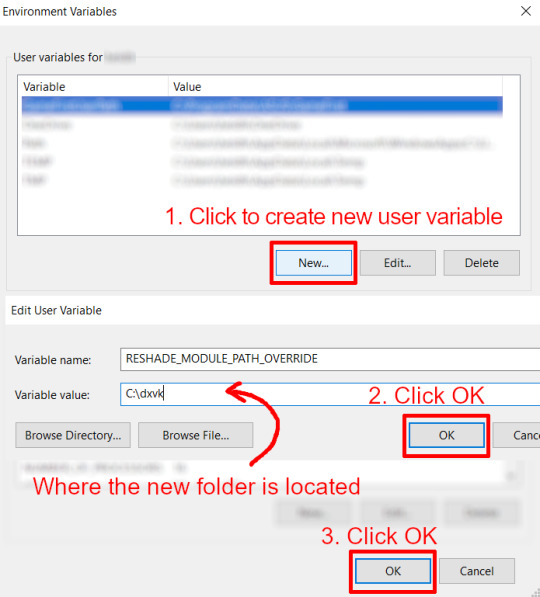
Now we need Reshade to load the next dll in order to chain Reshade with DXVK. Click on the search bar, and type in "View advanced system settings".
Click on "Environment Variables..."

Under "User variables", click "New..."
In the new pop-up window, find "Variable name:" and type in:
RESHADE_MODULE_PATH_OVERRIDE
for "Variable value:", paste in the directory that leads to the folder we created earlier. Once you are done, hit OK, and then hit OK again to save the changes made.
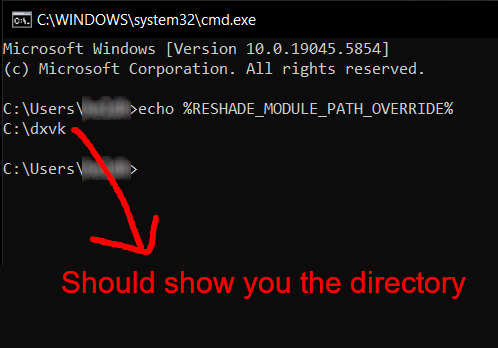
You can use Command Prompt to check if this new environment variable has been registered by entering:
echo %RESHADE_MODULE_PATH_OVERRIDE%
It should return you the folder's location. If not, make sure you have typed in the variable name correctly and confirm the folder's location.
Step 6:
Download DXVK (version 2.3.1) from here: https://github.com/doitsujin/DXVK/releases/tag/v2.3.1 and unzip "dxvk-2.3.1.tar.gz" (I use 7-Zip, but winRAR works, too). Remember to choose x32, and move only "d3d9.dll" to the folder we made earlier.
Now we have two "d3d9.dll" files, one from Reshade (lives in the bin folder), and the other from DXVK (in this new folder, outside of The Sims 3 game folder).

Step 7:
Download "dxvk.conf" here: https://github.com/doitsujin/dxvk/blob/master/dxvk.conf delete everything inside, and enter the following:
d3d9.textureMemory = 1 d3d9.presentInterval = 1 d3d9.maxFrameRate = 60 dxvk.hud = devinfo
Ctrl + S to save the document.
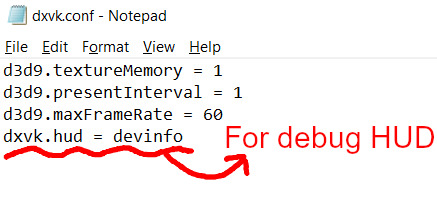
The first 3 lines are taken from @nornities and @desiree-uk's guide.
The last line is only for debugging purposes. Due to the inconvenient location occupied by the HUD (top left corner of your screen), it should be removed once the installation is successful.
Step 8:
Drag "dxvk.conf" into the bin folder, where Reshade's "d3d9.dll", "TS3.exe", and "TS3W.exe" all live.

Step 9:
Now fire up the game and check if both are showing up:

Lastly, check for “TS3.dxvk-cache” in the bin folder:
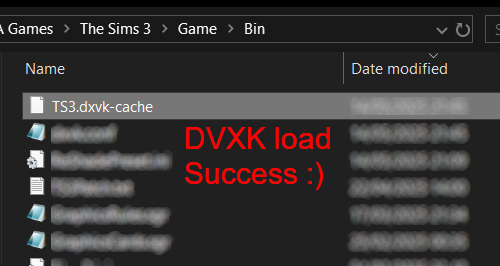
If it is there, congratulations! You have successfully installed DXVK and Reshade utilising D3D9 as API! You can now go to "dxvk.conf" and remove its last line "dxvk.hud = devinfo" and have fun! :)
Hope this tutorial isn't too confusing, the last thing I want is to over-complicate things. If you still need some help, comment down below or send me a DM/ask, I'll try and troubleshoot with you to the best of my ability.
Credits:
@nornities and @desiree-uk for their fantastic guide.
@criisolate for promulgating the usage of DXVK in TS3 community.
reddit user folieadeuxmeharder for helping me troubleshoot and informing me of this workaround.
doitsujin for creating DXVK.
crosire for creating Reshade.
142 notes
·
View notes
Note
What is the appeal of vintage computers to you? Is it the vintage video games or is it the programs? If so, what kind of programs do you like to run on them?
Fair warning, we're talking about a subject I've been passionate about for most of my life, so this will take a minute. The answer ties into how I discovered the hobby, so we'll start with a few highlights:
I played old video games starting when I was 9 or 10.
I became fascinated with older icons buried within Windows.
Tried to play my first video game (War Eagles) again at age 11, learned about the hardware and software requirements being way different than anything I had available (a Pentium III-era Celeron running Windows ME)
I was given a Commodore 1541 by a family friend at age ~12.
Watched a documentary about the history of computers that filled in the gaps between vague mentions of ENIAC and punch cards, and DOS/Windows machines (age 13).
Read through OLD-COMPUTERS.COM for the entire summer immediately after that.
Got my first Commodore 64 at age 14.
I mostly fell into the hobby because I wanted to play old video games, but ended up not finding a ton of stuff that I really wanted to play. Instead, the process of using the machines, trying the operating system, appreciating the aesthetic, the functional design choices of the user experience became the greater experience. Oh, and fixing them.
Then I started installing operating systems on some DOS machines, or playing with odd peripherals, and customizing hardware to my needs. Oh, and programming! Mostly in BASIC on 8-bit hardware, but tinkering with what each computer could do is just so fascinating to me. I'm in control, and there isn't much of anything between what I write and the hardware carrying it out (especially on pre-Windows machines)! No obfuscation layers, run-times, .dlls, etc. Regardless of the system, BASIC is always a first choice for me. Nova, Ohio Scientific, Commodore, etc. I usually try to see what I can do with the available BASIC dialect and hardware. I also tend to find a game or two to try, especially modern homebrew Commodore games because that community is always creating something new. PC stuff I focus more on pre-made software of the era.
Just to name a few examples from a variety of systems: Tetris, terminal emulators, Command & Conquer titles, screen savers, War Eagles, Continuum, video capture software, Atomic Bomberman, demos, LEGO Island, Bejeweled clones, Commander Keen 1-3, lunar lander, Galaxian, sinewave displays, 2048, Pacman, mandelbrot sets, war dialers, paint -- I could keep going.
Changing gears, I find it funny how often elders outside of the vintage computing community would talk about the era I'm interested in (60s-early 90s). [spoken with Mr. Regular's old man voice]: "Well, computers used to be big as a room! And we used punch cards, and COBOL!" I didn't know what any of that meant, and when pressed for technical detail they couldn't tell you anything substantial. Nobody conveyed any specifics beyond "that's what we used!"
I noticed that gaps remained in how that history was presented to me, even when university-level computer science and history professors were engaged on the subject. I had to go find it on my own. History is written by the victors, yeah? When was the last time a mainstream documentary or period piece focused on someone other than an Apple or Microsoft employee? Well, in this case, you can sidestep all that and see it for yourself if you know where to look.
Experiencing the history first hand to really convey how computers got from point A to B all the way down to Z is enlightening. What's cool is that unlike so many other fields of history, it's near enough in time that we can engage with people who were there, or better yet, made it happen! Why do you think I like going to vintage computer festivals?
We can see the missteps, the dead-ends, the clunkiness, the forgotten gems and lost paradigms, hopefully with context of why it happened. For the things we can't find more information on, when or documentation and perspectives are limited, sometimes we have to resort to digital archeology, and reverse engineering practices to save data, fix machines, and learn how they work. The greater arc of computer history fascinates me, and I intend to learn about it by fixing and using the computers that exemplify it best, and sharing that passion with others who might enjoy it.
275 notes
·
View notes
Text
Poe's Giffing Tutorial (From One Beginner to Another)

Hey, everyone! So, I've been thinking about this for a while, and decided to finally make it happen. This post aims to be a giffing tutorial that isn't a bunch of technical jargon that nobody except experienced giffers understands. This is for the person that I was when I first started out: someone who wants to make gifs, for free, without having to learn the entirety of a new program. As such, if you're already familiar with the basics, this probably won't be super helpful to you.
In this, I'll cover the basics of actually capturing a gif, the how-to of color correction (though without getting into the nitty-gritty detail of it), some basic text effects, and some more decorative effects like overlays and ~fancy coloring. I'll also show you the program I use to resize gifs.
I don't have a fun quip to lead us into the next part, so, uh, let's just dive in.
Tools*:
A PC capable of handling heavy processor loads (I use a mid-range gaming laptop; it's a little slow sometimes, but it works)
Whatever you're giffing (obviously...)
ScreenToGif (a free, basic screencapture program)
Photopea (a free, in-browser Photoshop dupe)
RedKetchup (a free file resizer/converter)
*Note: These are not the end-all, be-all of gifmaking. They may not even be the best tools for the job! But they're free, they work well, and they're relatively intuitive.
Step 1: Capture your gif.
I'm going to use ScreenToGif for this. The first thing I do is open the program and click Recorder, which opens the recording interface.

I click and drag (or manually input dimensions in the boxes next to the recording button in the lower right corner) to set my dimensions, and then I press record. The red "Record" button will change to a blue square that says "Stop," and a timer will appear in the upper right corner, showing how many seconds your gif is.
Generally, I'll pause the video 5-10 seconds before my desired start time, to give myself a buffer (you'll be able to delete those frames later), start the recording, and then start the video. You'll probably find a system that works for you once you do it a few times.
Once the scene that I want to capture is done, I'll click the blue "Stop" button, and the overlay will close itself. A few seconds later, depending on how long/complex/large your gif is, the program will pop up with a new window where you can edit. Here's what it looks like:
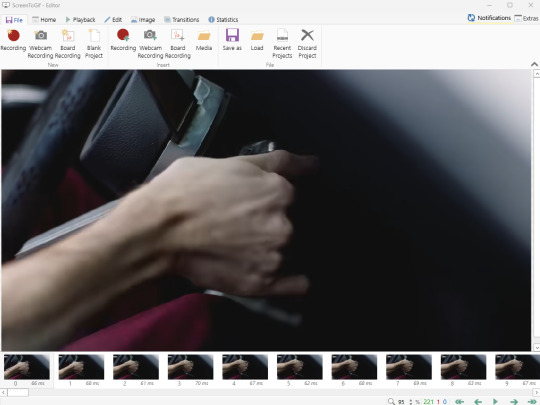
You can do a lot with ScreenToGif, but we'll be using the dead simple stuff today. Click the "Edit" tab, fourth from the left, and this will show up.

"Delete All Previous" and "Delete All Next" are our friends here. Go to the FIRST frame that you want in your gif, using either your arrow keys or just dragging the slider, and select it. Then hit "Delete All Previous." This will make that frame the first frame of your gif. Then, go to the LAST frame of your gif, and hit "Delete All Next." This makes the last frame of the scene that you want the last frame of the gif. You can also use the "Delete" option to delete frames by selecting them with your cursor if you want a more manual option.
Now you have your raw gif! Go to the "File" tab, the first one on the left, and select "Save As" from the menu. You want to make sure that it's saving as a .gif file, not an .mp4 or .apng --- you can check this up at the top. Don't worry, though, as .gif is the default, so unless you change it, you should be golden. Select whatever folder you want to put it in, name it, and save it.
You could absolutely stop here. It is by no means required to color your gifs or slow them down or any other number of things associated with giffing. But if you want to, here's how I do it.
Step 2: Edit your gif.
Head on over to Photopea. You'll see this:
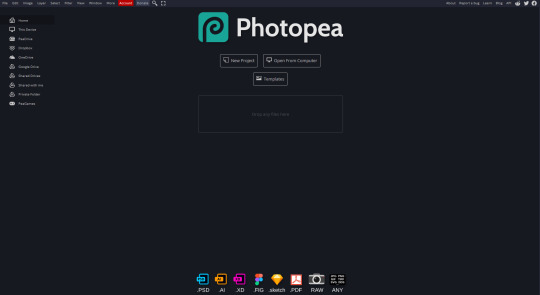
What we want is the "Open From Computer" option. Click it, and your File Explorer will show up. Navigate to whatever folder you saved your gif in and select it by double clicking or clicking once and hitting "Open."
It'll open in a new workspace that looks like this.
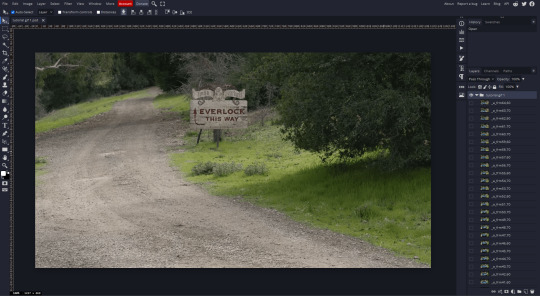
You may be saying, "Gee, Poe, that sure looks a lot like Photoshop!" Yes, it absolutely does. If you're familiar with Photoshop, you will most likely be able to find your way around Photopea just fine, and can probably go from here. But if you're not familiar with Photoshop, here's the basics.
First thing's first: gifs are frequently pretty fuzzy/blurry. Luckily, sharpening them is easy.
Select all your frames (the list on the right with all the numbered layers) by clicking one end, scrolling up/down, holding Shift, and clicking the other end. Then go up to the tabs and do Filter > Sharpen > Smart Sharpen. This will automatically sharpen each frame using a percentage; the default is, I believe, 150%, and this is usually what I use because I am fundamentally lazy.
If you don't select all your frames, only the one that you're currently on (the one highlighted in a lighter color) will get the effect applied to it. This goes for basically anything you do, so it's good to get in the habit of selecting all.
Now that it's sharpened, we can color it. Go up to the tabs again, and go to Layer > New Adjustment Layer > [whatever you want to adjust]. Most commonly in Escape the Night, you'll have to adjust brightness, because there's a lot of dark, moody scenes; Season 3 is also especially yellow/orange tinted, so you'll probably want to color correct it, too, using the Color Balance adjustment layer. This is a total guessing game based on the exact scene you're doing and my method is just selecting random things and adjusting sliders until it looks good (remember: fundamentally lazy). Honestly, I'm not an expert in coloring gifs, so I won't pretend to be — especially since people can and do write entire posts just dedicated to it. For this gif, I'm just lightening it a little.
And if this is all you want to do — no text, no effects — you're done! Go to File > Export As > GIF. It will take a few moments to load, so don't panic when your page freezes. A new window will pop up that allows you to do things like set looping, time, etc. but you can also just "Save" and you're done!
But let's say you want something fun. Maybe you'd like to overlay a quote or make it a cool color. If that's the case, continue on...
Step 3: Make your gif shine.
Three parts in this: text, fun colors, and overlays. You can combine these three to do some awesome things, and they're all very simple to do, once you know what you're doing. Think of them less like steps and more like a mix-and-match deal. You can use one, two, or all three!
So, here we go.
Option 3a: Add some text.
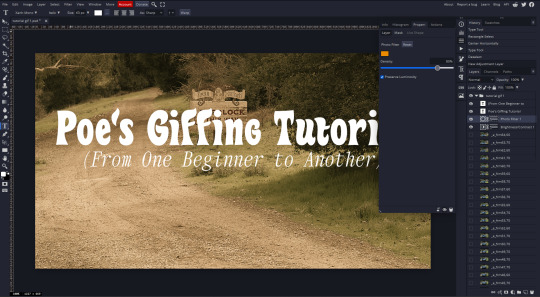
The easiest option of the three, this one works exactly like you think it does. The uppercase T symbol on the sidebar will create a new text layer where you can type something and set a font, size, and color.

I'll spare you the lecture on typography that I could give you — you can find better ones than I could make. Generally, though, you have a decorative/display font for headings and emphasis, and then a different, more generalized font for subheadings and other things. In this, the display font is Heavy Heap, which was used on the Season 3 tarot cards, and the general font is a relatively generic serif font.
(Sidenote: you can load fonts into Photopea! Just go to a font website like Dafont, download the font you want, and then open it as you would any other file by going to File > Open and selecting it from your files. You should get a message that says "Font [Your Font Name Here] Loaded," and then you'll be able to use it in your design. That's how I got Heavy Heap in there.)
You can change size and color with these, which will show up at the top when you select the text tool. Keep in mind that if you're making changes after you type something out, you will need to select (highlight) the text you want to change — it won't do it automatically.

I will admit that Photopea's text editor is not the cleanest, simplest, or nicest to use, especially at first. I came from Canva where it was much faster and easier. The downside, of course, is that Canva is highly limited with what you can do.
There are also ways to warp the text, change the blending, and do outlines, but I'll leave that for another time as to avoid making this any longer than it already is.
Option 3b: Make it a cool color.
You have a couple different ways to do this. Probably the most intuitive is to go to Layer > New Adjustment Layer > Photo Filter. Select the color box, pick the color you want using the picker or a hex code, select your desired density, and click OK. Boom, color over your gif.
It defaults to this vintage-y orange, but you can pick whatever color your heart desires.
However, I usually use a different method using Gradient Maps. This is also pretty easy; Layer > New Adjustment Layer > Gradient Map. If you leave it black and white, by the way, you get a B&W gif (you can also just select the Black and White option in the Adjustment Layer menu). Click on the gradient, select the white square on the right side of the gradient line, and then select the square down at the bottom of the window and change it to whatever color you want.

For this gif, I'm leaving it B&W.
(You can have a lot of fun with gradient maps. Play around with them!)
Option 3c: Overlay another gif on top.
Ooookay, so, this is the most advanced and tedious of effects to do (at least of the ones documented in this post), but it's worth it, I promise. For this, you'll need at least one other gif. I usually use a base gif that's relatively neutrally colored, oftentimes B&W but sometimes just faded or pastel, plus one (or more than one) colored, brighter gif. These are, of course, just guidelines — combine whatever gifs you want. The only real requirement, per se, is that they have the same amount of frames. If they don't, it'll look weird. (But if you do end up with two gifs that have different amounts of frames, you can delete the difference right in Photopea, so I don't stress about it too much.)
You also generally want to add text after this step, so if you're planning on doing this, save the text for last.
First things first: color your gifs the way you want and then save both of them. Then re-open them both in Photopea. Yes, this is annoying. I did say it was tedious.

So now I have both of them in my navbar, labeled as "tutorial base" and "tutorial overlay."
Go to your overlay gif and right-click on the gif folder. This is the top layer with a little arrow and folder icon next to the name of the gif.

Select "Duplicate Into" and then pick your base gif in the popup. In my case, it's named "tutorial base."

Now you'll click over to your base gif, and you'll see that your accent has been put on top of your base. Now you get to have fun with blending!
Right click on the overlay gif's folder again. Then, select Blending Options, which is the first menu item. It'll bring up a popup with all sorts of options for styling your layer.

The default setting is Pass Through, which is what we see here. If you want, you could just change the opacity to get your desired effect.
You could also play around with blending options such as Overlay, Color Burn, Lighten, and Screen. Every gif is different, and every gif will look different with different options, so experiment and see what looks best! You may have to go back and recolor it a few times, so I recommend just keeping the project open in your navbar for easy access.
For this gif, I think I'll go with Darker Color at 67%.
One last step, and then you're done with blending!
Go to Layer > Animation > Merge. This will merge each frame of your animation (the gifs) with each other, meaning that they'll play at the same time. If you forget this step, as I do frequently, you'll go to save your gif and find that it plays as a sequence.
Once you've merged your gifs, you can add texts, more effects, PNG overlays, whatever you want! Congrats! You did it!
Step 4: Resize your gif (if necessary).
Maybe you've made a gif, and it's beautiful, and it's amazing, and you wanna show everyone...but it's five million megabytes and you can't send or post it anywhere. Tumblr's max file size is 10 MB, while Discord's (standard) max file size is..7 MB, I think? Either way, if you try to upload something bigger than that, you'll get an error message and the familiar taste of disappointment.
Never fear, Redketchup is here!

This is Redketchup, and it's super simple.
Go to "GIF Resizer" under Animation Tools. Upload your gif, then scroll until you see the Resize GIF section. Input the percentage you'd like to reduce it by (presets are 25%, 50%, and 75% smaller, but you can set it manually, as well).
This is also the step where you can slow it down if you desire if you didn't do it in Photopea — it's in the next section down. Set the speed, if you'd like, and then go down to the bottom and hit Download.

It'll take you to a preview tab where you can check if your gif is small enough. If it is, hit Download again up in the top left, and that's that! Go share your gif with the world!
Conclusion:
Thank you for reading! I am by no means an expert gifmaker, but I want to spread the love and give other people the option to do it. I wouldn't know any of this stuff without the people who taught me, and I'll put a list of tutorials down at the bottom that I referenced when I was first learning to make gifs.
At any rate, if you use this post to make a gif, feel free tag me or send it to me so I can see! And for those of you who are on the fence about learning or starting to gif...
Do it. I double-dog dare you.
:)
References:
Blending Gifs by @the-mother-of-lions
Photopea Coloring Tutorial by @heroeddiemunson
Merging in Photopea by @bellamyblakru
And, though not a specific reference, I frequently browse @usergif for inspiration (they have tutorials there, as well, but I haven't checked them out yet).
#gifset#giffing#gif tutorial#how to gif#how to make a gif#photopea#escape the night#etn#I wrote this instead of socializing at my family's thanksgiving dinner#because that's just who I am
149 notes
·
View notes
Text
Alright. I'm making this post because I was unpleasantly surprised to find Microsoft had forcibly downloaded an """"ai assistant"""" onto my computer (called Copilot), and because finding a site that actually told me how to kill it for good -- in clear, truly step-by-step terms -- was way harder than it needed to be.
Preface: this is only relevant if you're running Windows 11.
Here is your target:

If you see this logo on your taskbar -- or... have Edge installed on Windows 11 -- you've got Copilot. You can't delete it on its own, Microsoft has integrated it into the OS as best they can. The most you can do is disable it (instructions for which are at the very end of this post).
So... to REALLY get rid of it you need to uninstall Microsoft Edge, because it's a part of/reliant on Edge. A lot of bells and whistles of Windows are also reliant on Edge, like widgets, but I never use those. I use my PC almost exclusively for gaming, and I don't want this slimy "ai" shit on my computer. I use Firefox anyway. Edge can go die as far as I'm concerned.
Here's the actual steps, copy-pasted from a website that took me way too long to find. It also really makes my browser chug for some reason, which is why I'm copy-pasting the whole thing. If you still want to look at the site itself, put it in reader view as fast as you can (link to site).
1.) Open Microsoft Edge, type "edge://settings/help" in the address bar, and then press Enter.
2.) Click "About Microsoft Edge" at the bottom of the left-hand pane. Copy the version number at the top of the screen, under Microsoft Edge.
3.) Press Windows Key + S to open Windows Search.
4.) Type "Command Prompt", right-click the result, and then select "Run as Administrator".
5.) The User Account Control (UAC) prompt will appear. Click "Yes".
6.) Navigate to Edge’s “Installer” directory by using the cd command. Depending on which directory your Command Prompt opens in by default, you may need to use the "cd .." command to go back a level or two.
Once ready, run this command:
cd “Program Files (x86)\Microsoft\Edge\Application\Version Number\Installer”
Replace "Version Number" with your actual version number copied earlier.
7.) Next, run this command to uninstall Microsoft Edge:
setup –uninstall –force-uninstall –system-level
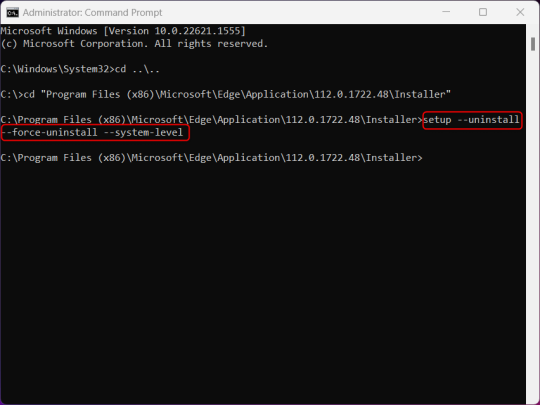
((It will look like nothing happened! Don't worry!))
8.) Restart your PC for the changes to take place.
((HOWEVER, Windows will try to reinstall it the next time your PC updates (or whenever it feels like it lol) so there's a second half to this))
1.) Press Windows Key + R to open Run.
2.) Type "regedit" in the text box and click OK to open the Registry Editor.
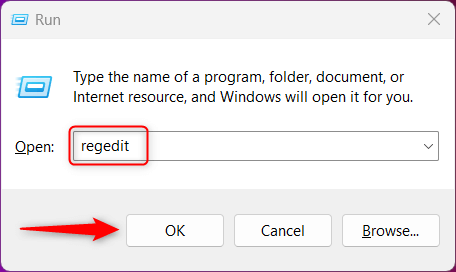
3.) The User Account Control (UAC) prompt will appear. Click "Yes".
4.) In the Registry Editor, navigate to HKEY_LOCAL_MACHINES\SOFTWARE\Microsoft.
5.) Right-click the "Microsoft" folder, hover your cursor over "New", and then select "Key".
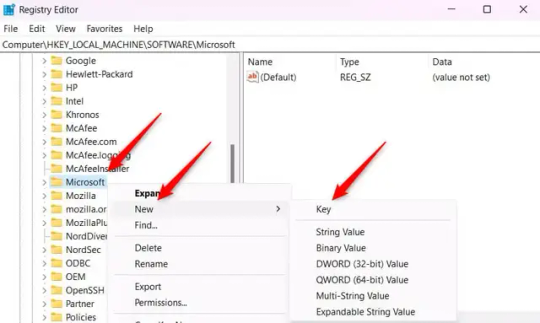
6.) Rename the new Key to "EdgeUpdate".
7.) Right-click EdgeUpdate, hover your cursor over "New", and then select "DWORD (32-bit) Value".

8.) Right-click the new value, which is currently named "New Value #1".
9.) Select "Rename" from the context menu.
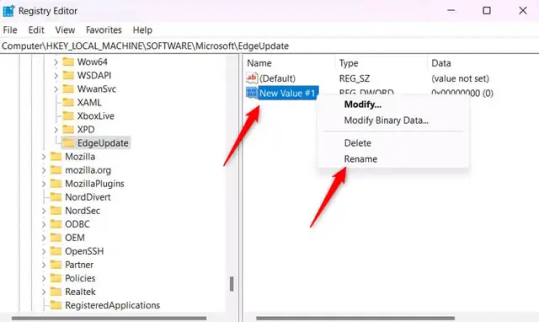
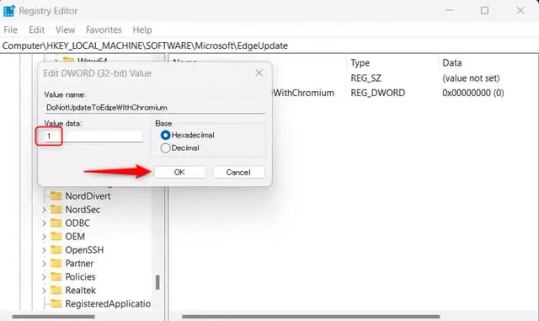
10.) Rename the value to "DoNotUpdateToEdgeWithChromium".
11.) Right-click the newly-named DoNotUpdateToEdgeWithChromium value and select "Modify" from the context menu.
12.) The Edit DWORD (32-bit) Value window will appear. Change the Value data to "1" and then click OK.
((You are now free. If you ever run into a really serious, unavoidable issue with your OS that's clearly a result of Edge being gone, you can redownload it like a regular app. But you should be fine.))
((And, if for some reason you want still want Edge around but just want the copilot thing gone, here's what you do:
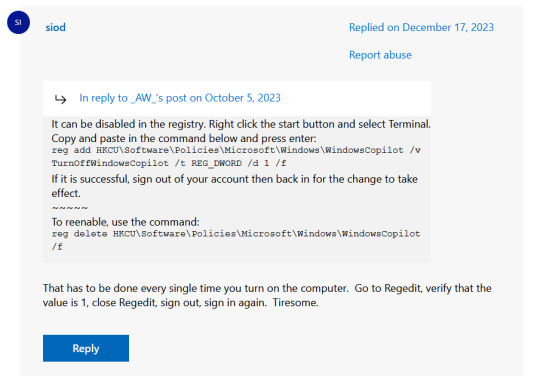
The command, for ease of copy-pasting: reg add HKCU\Software\Policies\Microsoft\Windows\WindowsCopilot /v TurnOffWindowsCopilot /t REG_DWORD /d 1 /f
You can't actually truly delete Copilot (without deleting Edge), only disable it. And as the reply says, you do have to do this every time you turn the computer on. I haven't tested that myself, but I believe it. I assume/hope that excludes just waking the computer up after it goes to sleep, but I don't know for sure.))
120 notes
·
View notes
Text
My pc is in a repair shop and I got nothing to do, so here's a list of fic ideas I'll probably never do anything with, in no particular order:
Ghost, SAS Lieutenant, needs to gather intel from a secret agent at a party. He doesn't know how the man looks, only the agreed upon signal. Cut to Soap, the secret agent, trying very hard to save Ghost from an enemy that somehow knew the signal and is now taking Ghost to a more "secure area".
Soap is a councilor at a prestigious summer camp, along with a few others. He doesn't really fit in with the rest, far too rich to relate to, so he spends most of his time taking care of a memorial for one Simon Riley, who died in the nearby lake 10 years ago. When Ghost, a local hunter, starts terrorizing the camp, Soap is somehow spared. Eventually Ghost goes on a murder spree, despite Soap's efforts to stop him, but when the other councilors tried to prank Soap, Ghost didn't really care to end their lives over it.
Ghost encounters an SAS soldier on the field, from a different squad. He soon finds out the soldier is non verbal. Which is a problem when they're in an active warzone, and he doesn't know sign language. Through a lot of pointing and miming, they somehow find a way to survive, and Ghost comes to like the company of 'Soap', as the man pointed to one when he asked for his name.
Soap is a famous actor, with a beautiful girlfriend, big movie on its way, and millions of fans across the world. His coworkers, Gaz, Price, and his bodyguard Ghost, are ones he considers close friends at this point. It all comes crashing down when he finds his girlfriend cheating on him. Not a day later, her room is trashed, threats and warnings to stay away from Soap carved into the walls. Soap and Ghost uncover the existence of a stalker, one that is slowly becoming more and more violent. All the while, Soap finds himself in his first romance movie, imagining his bodyguard in the place of his supposed love interest.
Ghost doesn't give attention to most soldiers on his base, and especially not to Soap MacTavish. The Scottish Sergeant is the most unserious, annoying bastard he ever had the misfortune of knowing. His view of him changes when they're assigned on a mission together, and Ghost witnesses just how skilled Soap really is. Over time, he finds out why Soap keeps on a mask of a bumbling idiot, and digs deeper into the strange behavior of his superiors. Namely, how they seem to almost sabotage Soap every step of the way.
Ghost and Gaz are sent on a mission in the Russian tundras, to salvage intel from an abandoned prison complex. Only, they soon find it's not abandoned at all - a single man is locked behind bars, surrounded by dozens of guards. After rescuing him, the 141 soon discovers he suffers from amnesia, and only remembers his callsign, Soap. As foreign forces continue to attempt to kidnap Soap back, and as his memory comes back, John MacTavish comes to a horrifying conclusion: he betrayed his old squad, and his capture was not accidental. His original mission? Infiltrate the 141, and bring it down.
Simon Riley, owner and butcher at his own small shop, suspiciously eyes the man that has been hanging around his shop for the last 15 minutes. He's going to kick him out if he doesn't buy anything, and he tells the man so, but the fear he recognizes in his eyes stalls him. Ghost catches a flash of a camera outside the window, and the man tells him he's actually hiding from 'them'. Ghost, built as he is, simply goes and scares them away. The man inside brightens, and introduces himself as John. From that day on, John comes back, bringing tea and breakfast at the early opening hours. Ghost finds it a little weird, but the company becomes comforting soon enough. Once, he let it slip to John that the shop isn't doing too well, and the very next day a slew of costumers arrived at his doorstep, muttering excitedly about a "Soap MacTavish". It's only when his old mates Price and Gaz come by the shop, that Ghost discovers his friend "John" is no other than the famous actor nicknamed "Soap". Simon doesn't understand the shock on Price and Gaz's face even after the name is revealed, and Soap loves him all the more for it.
#call of duty modern warfare 2#cod mw2#cod ghost#cod soap#cod gaz#cod price#john soap mactavish#simon ghost riley#kyle gaz garrick#john price#each of them has an issue of either no clear plotline or its just not exciting enough for me to write the 50k words needed to tell it#so im letting them out to be free#could almost be like writing prompts if they werent so... specific lol#im probably forgetting some ill remember later
61 notes
·
View notes
Text
Near-Mage is here to Captivate Adventure Fans

Near-Mage launches the well crafted narrative point and click adventure game for Linux, Mac, and Windows PC. All thanks to the brilliant and ever-creative team at Stuck In Attic, who keep the magic coming. Which you can find on both Steam and GOG with a discount.
Hold onto your robes — Near-Mage launches, and it’s something truly magical. From the indie minds at Stuck In Attic—yep, the folks who brought us Gibbous: A Cthulhu Adventure—comes a title that throws you headfirst into spell-slinging chaos, ancient secrets, and a gorgeously strange slice of Transylvania. If you’ve ever dreamed of studying magic in a haunted castle surrounded by myths, monsters, and moody villagers, this one’s calling your name.
Think Harry Potter in Transylvania—but without the bigotry. You’re 18. You’ve just discovered you’re a witch. You’ve left your parents behind. And you’ve landed at the Transylvanian Institute for Magick, where nothing is quite what it seems.
Near-Mage Launch Trailer
youtube
Near-Mage is a hand-painted, story-rich point and click adventure with a modern twist, now fully playable on Linux. And when I say “hand-painted,” I mean it looks like a Ghibli movie met classic Disney and then had a baby with a European comic book. The animation is pure eye candy, and it wraps around a narrative that blends dark humor, heartfelt moments, and cosmic horror in just the right doses.
But this isn’t just a pretty face. The game features:
A build-your-own-spellbook system, where your magic evolves based on how you play
A fully voiced cast with over 100 speaking characters
More than three hours of orchestral music to give your headphones something to love
Launching into a branching Near-Mage story that changes depending on your choices and how you interact with the world
Tons of customization—from hairstyles to clothes, you make your witch your own
Support for mouse or gamepad, because it’s 2025 and we deserve options
A deeply emotional, empathy-driven world, where your curiosity and kindness unlock as much as your spells do
The best part? This isn’t your typical fetch-quest-fueled adventure, inventory-juggling point and click. Near-Mage invites you to slow down, meet the locals, and get tangled in their dreams and nightmares. There’s depth here—stories within stories—and every replay might reveal something you missed the first time.
And yes, it’s available now on Steam and GOG for $17.99 USD / £15.07 / 17,55€, with a tasty 10% launch discount. So if you’re on Linux and craving a game that respects your OS and your soul, it’s time to pack your wand and head to Transylvania.
So, ready to find out what kind of witch you are?
Because Near-Mage launches, and your magical journey is just beginning.
#near-mage#narrative#point and click adventure#linux#gaming news#stuck In attic#ubuntu#mac#windows#pc#unity#Youtube
2 notes
·
View notes
Text
Custom Mouse Cursor Installation, how to on Windows 10:
There are certainly better people to explain this than me, and I'll add a link to a site for a more in depth explanation, however some people don't wanna go to external sites, and as I am the owner of this blog, I gotta explain it. Y'know, since I am making those little ani and cur files that some of you may want to use, I know one or two things, even if I'm inexperienced.
This is a long one, so everything important is under read more. :>
Explanation on what a custom mouse cursor even is: A custom mouse cursor can either be one of two data file types, on Windows at least: .ani or .cur. Basically ani files are animated cursor files, so those are what you need if you want an animated cursor, and cur are static cursor files, if you want a non animated cursor, this is the file type you need. Each ani and cur file has an assigned hot spot, these may differ depending on what cursor role it takes on, but the hotspot is embedded into the file itself. (As an example: An ani/cur file that is intended for text selection, will have a different hot spot than let's say, the normal link select cursor.) Note for the next part: My operating system is in German, and the settings names are roughly translated, I try to explain where to find the options in addition to their names. Thank you for understanding. Okay, but how do I install those little files?: You don't install them, you simply add file that you need in the mouse control panel in windows. Let me explain how to get there: You first open Windows settings, there are multiple ways to do this, but I like going to the notification side bar, and click on all settings. However if you don't have that bar, you can click on the windows icon on the windows icon, and it should be right above above your power (ON/OFF) settings. Next, you go to the devices setting that handles Bluetooth, printers and mouses. (It should be right next to System settings, and is the second option below the search bar.) There you will want to go to the mouse tab (3rd from the top) and click on the Additional Mouse Options. (It should be found in related settings, as the second option.) Now a window should have opened called Mouse Properties. To change the cursor image, you need to go to the second tab, called Pointers. Now you can begin replacing images. Be cautious of moving the ani and cur files after this point, because if you change where they are placed on your pc, you will need to set them again even if you set them as a preset /more on that later/. To change an a cursor image, simply double click the one you want to change, or use the button under "Use as Standard", to look for it on your pc. Now you simply need to search for the cursor images on your pc, and add them to each slot. I try to name my cursor files according to what they are called in the small description to the left of each mouse cursor role, so just try to follow that and it should be alright. I recommend making a new scheme, or preset after adding all the ani or cur files you want to add. You can do this by setting your preset to none before you add all of them, and / or simply pressing save as, give it a fitting name. Voila, now you can set them again without much hassle, unless you moved the files. Mouse cursor images reset when changing the cursor size, so presets are pretty useful for that, or when you have a bunch of ani and cur files you want to switch between without much trouble.
Changing mouse cursor size: Speaking of changing cursor size, if you like your mouse cursor images to be a bit bigger, so it's clearer to see, you can do that fairly easily as well, simply go to the mouse settings again, and there you will want to click on "Change Mouse & Cursor Size" (should be the first / top option in related settings.) Once at the next page, you simply need to adjust the pointer size (it should be the first slider on that page) and re apply the preset you made of the cursor files you chose. I exported the files in 24bit colour depth, so it shouldn't blur when upscaled. Feel free to experiment with what feels comfortable for you, and be sure to give it some time. A new cursor size needs some time to get adjusted to.
Additional Links:
A website that goes into more detail, and has images:
If you want to get more custom mouse cursors RW Designer's gallery tab, and cursor sub tags, also have a lot of neat ones. This should be it, if anything else needs to be added, I will reblog this post with more information.
7 notes
·
View notes
Text
47
How have you been doing? I'm doing pretty okay right now, honestly. Bad things: I miss my mom a LOT and also my dad, we fucking hate our new neighbours, we want to move within the next year so we have a lot of house fixing up to do, I have a chronic condition which will always suck at least a little. Insomnia has been insomnia-ing. Good things: I've been working out and I've lost 10 of the 30lbs I want to lose, I'm really enjoying it! It's so nice to be doing some self care and working towards being the healthiest and fittest version of myself. :) Therapy has been going well. On a day to day basis, I'm happier than I've been in the past.
Anything you're looking forward to? My boyfriend's birthday. Summer ending so my favourite time of year can begin. :D I'm already thinking about Christmas gifts.
Do you or anyone you know play the violin? Yes! An online friend.
Do you have a nice view out of the closest window? No. Neighbour's house.
What is one of your favorite breakup songs? No idea. Haven't gone through that in a long time.
Do you know anyone named Georgia or George? No.
What age did you learn how to ride a bike? Nooo idea.
Are you currently listening to music or watching TV? I'm listening to a podcast.
What is your morning routine? Wake up at 7, scroll on my phone for 15 minutes (boyfriend gets our daughter), come downstairs and make the kiddo breakfast, drink coffee while she eats. Once she's fed and we're caffeinated, we go on a morning adventure. I stay home with our daughter so my boyfriend does me a solid and usually gets her up. I super appreciate that. :)
Are you someone who gets easily agitated by hearing someone chewing? No.
What was the last text you sent? Text to my boyfriend saying kiddo & I were going into the pool.
What did you last have to eat? Leftover Subway.
What's your favorite kind of oatmeal/porridge? None.
Have you ever ate a whole pizza in one sitting? No.
What are some things you are grateful for? My boyfriend's family. My condition being mostly mild lately. My dinosaur of a PC. Being able to afford to feed our daughter the 9809334 berries per day that she eats.
What's the last thing you done while outside? Walk with the kiddo.
How often do you do laundry? Every few days.
Have you already had your birthday this year? No. It's in September.
Last thing you done before this survey? I started to exercise and then gave upppp. First weekday I've skipped since I started. I'm feeling super angry and frustrated right now.
Do you like sleeping with multiple pillows? Yes. Ever since I was pregnant, I need one for my head and one for each side of my body.
How many candles do you have in your bedroom? None.
What emojis have you used the most here recently? :)
What color is your favorite shirt? I don't have one.
Do you currently smell food cooking? No.
If you were given $1,000 to spend at one store. What's your store of choice? Old Navy.
How much sugar do you consume on a daily basis? Not much.
Do you have any ice cream in your freezer? Probably. That's my boyfriend's favourite treat.
What's the first thing that comes to mind when you hear the word "chaos"? Twitch streams.
Do you own anything that has an animated character on it? I have a toddler so yessssss.
Have you used a microwave today? We don't have one.
What's the last book you read? One of the Bridgerton ones. I think To Sir Phillip, With Love.
What's something that always makes you cringe? Not sure.
What's a word or phrase you say a lot? Not sure.
What's something that always makes you emotional? When my daughter says "I wuv you". When something big/interesting/confusing happens and I want to call my mom but I can't.
How many times have you changed clothes today? Once. PJs to day time clothes.
What's on your mind currently? I'm feeling super stressed about our neighbour situation right now. I hate that my daughter can't play in our yard without breathing in their cigarette smoke. They literally smoke from morning until night and it's sooooo freaking frustrating.
In what ways have you changed over the past year? My mom died. I've been trying really hard to take care of myself. I've changed a lot, I think.
Do you really care about others opinions of you? A little.
What's your favorite pasta? Fusili.
Do you currently see anything yellow? A toy dump truck.
What did you last try to do and failed? Exercise today lol.
Does your bathroom have a certain theme or color scheme? Blue, turquoise & white.
If you have Netflix or any streaming service.. what's your favorite shows to stream? We're watching New Girl on Disney atm.
Are you currently wearing anything red? No.
What was the last thing that caught your eye while shopping? Not sure.
What's a social media site you have no interest in? Twitter.
Have you ever tripped and fallen in a public place? For sure.
When did you last buy a dairy product? Yesterday morning.
What's the last song you sang out loud? Something by Raffi.
2 notes
·
View notes
Note
What's your biggest hyperfocus and how did you discover it?
I had to think on this for a minute because I wasn't sure if it was true anymore. If it wasn't this then it would be something like MLP or motorcycles (it was tempting to say motorcycles!).
I think it's fair to still say personal computers, though. I'm not sure about when my first contact with them was, but I know a major development was when my dad bought our first PC, an IBM AT clone. (I think I still have most of the parts for it!) I would have been like, 7-9 years old at the time and I was fascinated with it. I ended up breaking it as a kid, because I was trying to figure out what all the DOS 4.0 commands did by running them... when I got to FDISK I rendered it unbootable by pressing buttons. A friend of my father's recovered the situation (I think he used Norton Utilities to recreate the partition table).
I can name pretty much every PC that we had as a family or I had personally:
-Aforementioned IBM AT clone (8088 with a Tatung Hercules monitor, DOS 4.0) -386SX that came from who knows where (Went straight from orange Hercules to VGA colour!!! Windows 3.1) -Tandy 1000HX (long term loan from a friend) -Cyrix 586 (dogshit computer - had fake onboard cache, a common scam at the time, crashed constantly. Windows 95) -468DX4 (think I built this from scrounged parts. Win95, slower than the other PC but way more stable) -Pentium II 233 (also built from scrounged parts. First PC I overclocked, gaining 33 mHz! So fast!!! Windows 2000... but later got repurposed as a Linux-based router) -AMD Duron 800 (built with NEW parts - parents gave me a budget to built a family computer. Windows ... 98? XP? Probably changed multiple times) -AMD Athlon XP 1600 (built with NEW parts - I truly don't remember where I got the money in highschool to put it together, but it was probably every penny I had) -AMD Athlon 64 X2 4400+ (admittedly I didn't remember this offhand... but I did have the physical CPU lying around to check. bought off the shelf very cheap as old stock for my parents to use. Windows Vista. Later upgraded to an Phenom X4, also for very cheap. This PC still lives running Windows 10 today!) -Intel Core 2 Duo Q6700 (built in a cute Shuttle XPC chassis. Eventually burned out a RAM slot because apparently it wasn't rated for 2.0V DIMMs. Windows 7) -Intel Core i5-2500K (I used this computer for YEARS. Like almost a decade, while being overclocked to 4.4 gHz from nearly the first day I had it. Windows 7/10) -AMD 5800X (Currently daily driver. Windows 10)
Not mentioning laptops because the list is already long and you get the point.
I actually did attempt to have a computer related career - in the mid 2000s I went to a community college to get a programming diploma, but I dropped out halfway. There was a moment, in a class teaching the Windows GDI API, where I realized that I had no desire to do that professionally. I did learn things about SQL and OS/400 that randomly came in handy a few times in my life. I did go back and successfully get a diploma in networking/tech support but I've never worked a day in that field.
Unprofessionally though, I was "that guy" for most of my life - friend of a friend or family would have a problem with their PC, and I would show up and help them out. I never got to the point where I would attempt to like, re-cap somebody's motherboard, but I could identify blown caps (and there was a time when there was a lot of those). As the role of PCs has changed, and the hardware has gotten better, I barely ever get to do this kind of thing these days. My parent's PC gathers dust in the corner because they can do pretty much do everything they need on their tablets, which they greatly prefer.
Today though... I used to spend a lot of time reading about developments in PC hardware, architectural improvements, but it doesn't matter as much to me anymore. I couldn't tell you what the current generation of Intel desktop CPUs use for a socket without looking it up. A lot of my interest used to be gaming related, and to this day the GPU industry hasn't fully recovered from the crypto boom. Nearly all of the games I'm interested in play well on console so I just play them there. I still fiddle with what I have now and then.
It is fun to think back on various challenges/experiences with it I've had over the years (figuring out IRQ/DMA management when that was still manual, Matsushita CD-ROM interfaces, trying to exorcise the polymorphic Natas virus from my shit). Who knows, maybe I'll get to curate a PC museum of all this shit someday haha.
2 notes
·
View notes
Text
And now all the search engines are being replaced by AI. I have spent twenty years trying to talk people to go to libraries and check their beliefs against records, and now we face a future without libraries and endless artificially generated idiocy.

There was an argument in the Australian Parliament when Julia Gillard was PM. She accused her opponent of being a misogynist. He pointed out it was a fact that he was not. So the next day the dictionary was edited to 'correct' it, to align with her opinion of what it should be, so she could now label him a misogynist and pretend her definition had always been true.

The trouble with manually removing AI from windows is MS can undo your changes at any time.
Completely remove Microsoft Bing Chat AI from your Windows 11 PC and sidebar.
Open the PowerShell application with administrator privileges. You can do this by searching for "PowerShell" in the Start menu, right-clicking on the result, and selecting "Run as Administrator."
In the PowerShell window, type the following command and press Enter:
Get-AppxPackage bing | Remove-AppxPackage
Wait for the command to execute. This command will uninstall any app packages related to Bing, including the Bing Chat AI. Once it completes, the Bing Chat AI should be removed from your Windows 11 PC.
To remove the Bing Chat AI integration in the Taskbar search, you can disable it using the steps below:
Open the Settings app in Windows 11. You can do this by pressing the Windows key, searching for "Settings," and selecting the "Settings" app.
Click on "Privacy & Security" in the left sidebar.
Under the "Windows permissions" section, click on "Search permissions."
In the "More settings" section, toggle off the "Show Search highlights" option. This will disable the Bing Chat AI integration in the Taskbar search.
After following these steps, the Bing Chat AI should be removed from the Taskbar search and the search home interface in Windows 11.
(This did not disable it but did disable the AI use of the search results in Windows 11 See the next step below to also disable the physical button integration.
Do both steps.)
Manual removal by component:
Page 2: Remove Bing Chat integrated into Microsoft Edge Explorer:
Disclaimer: If you are not comfortable using the registry editor, stop here. If you’re unfamiliar and willing to try anyway, the simplest way to look at this is a set of folders. Each has a parent folder; each folder can contain files. The view is like the windows explorer expanding directories with different naming conventions. It’s rather complicated but simplistic in nature.
How to remove the Bing Chat integration from Microsoft Edge Explorer on Windows, first follow the instructions provided in the first source mentioned:
((Silly AI, Step 1: Back up the registry: Select the folder HKEY_LOCAL_MACHINE\SOFTWARE\ click on the menu bar file, select export, select the destination for the backup file and name the file then save it.))
Open Registry Editor on your PC.
Navigate to the following location: HKEY_LOCAL_MACHINE\SOFTWARE\Policies\Microsoft.
If the “Edge.” Folder exists go to step 5.
Right-click inside the Microsoft folder and choose New, then Key.
Name the new Key (folder) as "Edge".
Right-click inside the Edge folder and select New, then DWORD (32-bit value).
Name the new DWORD as "HubsSidebarEnabled".
Right-click on HubsSidebarEnabled and click Modify.
Ensure the Value data is set to 0.
That's all the work in the Registry. Next, open Microsoft Edge and enter "edge://policy" in the address bar.
Click on the "Reload Policies" button, and the Bing Chat button will now disappear from the Microsoft Edge Explorer window.
These steps should help you remove the Bing Chat button from your Microsoft Edge Explorer window.
Please note that modifying the registry can have unintended consequences if not done correctly, so it's essential to be cautious and comfortable with the process. Additionally, it's always a good idea to back up your registry or create a system restore point before making any changes.
Page 3: Remove Bing from the Windows Start Bar.
If "Show Search highlights" setting was already disabled, and the Bing Chat button is still visible on your start menu bar. Here's an alternative method you can try to remove the Bing Chat button:
((Silly AI, Step 1: Back up the registry: Select the folder HKEY_CURRENT_USER\Software\ click on the menu bar file, select export, select the destination for the backup file and name the file then save it.))
Open the Registry Editor by searching for "Registry" in the Start Menu and selecting the "Registry Editor" app.
Navigate to the following location in the Registry Editor: HKEY_CURRENT_USER\Software\Policies\Microsoft\Windows\Explorer
If this folder does not exist, you can create it manually by right-clicking on the parent folder “Windows” and selecting "New" > "Key." Then, name the new key "Explorer" as instructed inside the 'HKEY_CURRENT_USER\Software\Policies\Microsoft\Windows\' directory.
Right-click on the "Explorer" folder, choose "New," and then select "DWORD (32-bit) Value" from the context menu.
Name the new DWORD value as "DisableSearchBoxSuggestions" (without quotes) and press Enter.
Double-click on the "DisableSearchBoxSuggestions" value you just created and set its value data to "1."
Click "OK" to save the changes.
Restart your computer for the changes to take effect.
After restarting, the Bing Chat button should be removed from the start menu bar. If you want to re-enable it in the future, you can return to the Registry Editor and change the value of "DisableSearchBoxSuggestions" to "0" or simply delete the DWORD value.


108K notes
·
View notes
Text
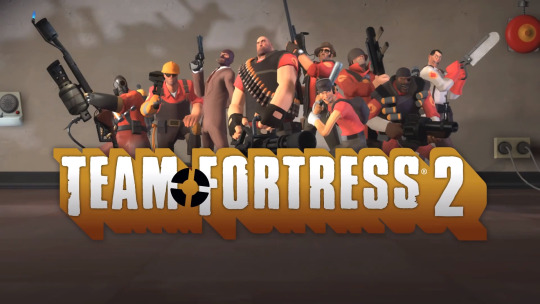
[Academic Blog #9] Dynamic Emotion: The Mercurial Narrative of a 'Team Fortress 2' Match
(Digital Media: Sources and Significance]
Few mediums can provoke a wide range of reactions and emotions within a relatively brief window of time as videogames. Due to their highly interactive nature, as the player must partake in a consistently active role to ensure successful results in-game, depending on their performance, the game will reward them back with electrifying bursts of dopamine… or a brief period of frustration and inconvenience.
Online multiplayer games relish in this back-and-forth of shifting power dynamics between winners and losers, and probably one of the of the most chaotic examples in this field, is Team Fortress 2 (or ‘TF2’ for short).
TF2 is a co-op multiplayer shooter with a multitude of game modes, with a common setup shared across most of them: there is a red team and a blue team, each boasting 12 players. Only one team can emerge victorious in the end, and there’s bound to be many hurdles thrown at each team player’s way. Snipers that can headshot your allies from a distance, spies that can instantly kill your character with a backstab (forcing you to wait 10 - 20 seconds to respawn), just to name a few of multiple setbacks.
While most videogames are reliant on the player’s individual skill or mastery of the mechanics to achieve victory, TF2 encourages consistent teamwork to ensure all 12 team players win. From healing your teammates as the Medic, rocket blasting any Scouts or Spies that are consistently KO’ing your teammates- it’s a frenetic mix of class match-ups, mechanics and constantly shifting dynamics that really drive the game’s cartoonishly chaotic nature home.
But as well that, the game highly encourages consistent communication between teammates: alerting allies about sneaking Spies, warning of Sentry guns ahead that can take down some classes’ health down in a matter of seconds, calling for the Medic when needed most- it’s a chaotic time, but one that will deliver many exhilarating experiences with an incredibly wide range of emotions that change in the snap of a finger: joy, excitement, relief, frustration, irritation, anxiety… it’s an experience like no other, truly.
RESOURCES
Team Fortress 2 (2007) Valve, PC.
WU, C. and CHANG, C. (2025) How multiplayer online games can yield positive effects on individual gamers, gaming companies, and society as a whole [Online]. Humanities & Social Sciences Communications. Available at: https://www.nature.com/articles/s41599-025-04690-6 [Accessed: June 19th, 2025].
0 notes
Text
Immerse Yourself in the Awe-Inspiring Fantasy World of Argumentum ad Culpam

Argumentum ad culpam a gothic visual novel game will test you on Linux and Windows PC. Thanks to the teams at Tagetes and TellerySpyro_GTX for their amazing work. Due to make its way onto Steam. Argumentum ad culpam transports players to a dark and mesmerizing world, like stepping into a gothic fairy tale. The backdrop? A crumbling place known as the Scarlet Fortress. Step into the most awe-inspiring castle, now forgotten by time, slowly decaying, yet full of secrets and rich histories. At the heart of the story in Argumentum ad culpam, there's a wizard named Luftschlösser who once made a pact with a powerful demon, Duke Luthedor. But here's the twist: the Duke isn't faring so well these days. So much so that three mighty transcendents are locked in a debate over Luthedor's past actions. Since their each trying to tell their version of a story to take control. Here's where you step into this gothic visual novel. You aren't just a bystander. You're the referee and the decision-maker. Depending on how you judge their arguments and pick sides, the destinies of the wizard, the Duke, and even the transcendents can change dramatically. Think of it like a mystery novel, where you get to play detective and decide how the story unfolds.
Argumentum ad culpam | Trailer
youtube
Now, you won't be throwing punches or casting spells. Instead, you'll engage in battles of wit! It's a contest of who's the sharpest, the most persuasive. Each character also has their way of arguing, and the wizard? Well, he can join the fray or even help one of the transcendents if he wishes. This unique form of combat is what makes Argumentum ad culpam stand out. Remember, the stakes are sky-high. Just like in real life, where choices have outcomes. Here too, any character, even our main wizard, might not make it through depending on your decisions. Your decisions matter so much that there are nine different possible endings in Argumentum ad culpam. Imagine reading a book where you get to decide which one you'll experience. Also, to complete the mood, as you navigate through this captivating journey, the background is adorned with over 10 live piano tracks. These aren't your typical jingles but soulful melodies that enhance the feel of this world. Curious? There's a free Demo version available for Linux. Due to give you a taste of the prologue and a sneak peek into the first of these mind battles. There are even two endings to discover right there. Argumentum ad culpam isn't just a gothic visual novel game. It's a unique blend of storytelling, strategy, and atmospheric music. Due to ensure an unforgettable journey through the hauntingly beautiful Scarlet Fortress. Give it a try, and remember, your choices shape the story. Also, make sure to Wishlist the game on Steam. Due to making its way onto Linux and Windows PC.
#argumentum ad culpam#gothic visual novel#linux#gaming news#tagetes team#telleryspyro_gtx#ubuntu#windows#pc#renpy#Youtube
3 notes
·
View notes
Text
A lot of it can! I built a stupidly overpowered computer given that the game I played the most in the first month or two was Sid Meier's Alpha Centauri from 1999. Windows 11 actually does better with SMAC than Windows 10 did, it's only crashed once! I can also run Creative Suite CS2 which I OWN on this system. Photoshop from 2004 doesn't quite know what to do with multithreading but it's actually still really fast and the 64 gigs of RAM doesn't hurt. At the moment I have NMS running in the background while I have a gadzillion firefox tabs open and I could easily watch a video like this and be fine. One of the upsides of holding on to old software is that where it can take advantage of the new hardware, it really does run very well and you get actually uplift. The issue is that a lot of people lost the thread of Intel's naming scheme and haven't upgraded their computer or they bought something with stupidly little RAM (16g is probably okay but 32 g is what most gamers will be happier with and I bought a little word processing toaster of a netbook in 2020-ish or 2021 which had FOUR gigs of RAM but there was a huge tech shortage at the time and it can do what i needed it to do (run Scrivener) just fine. It cannot handle a lot of tabs open and still do, you know, the operating system. 8 gigs is Sluggish because of Windows bloat.
And yes, I have a fervent desire for two things in programming:
That programmers optimize their programs to run on a wide variety of systems with reasonable speeds
That programmers enable their programs to use things like multithreading and large amounts of available RAM *if there is excess capacity readily available* to speed necessary functions that take significant time. Like, oh, loading screens and transitions shouldn't take much time at all on my system but the cpu is sitting there at like 4% utilization while the framerate drops to 30fps on a LOADING screen because they just had to animate a gadzillion star systems through the gpu alone (looking at you NMS.)
What I mean by that is that, for example, in the gaming sector, there are a lot of companies who are like "How much eye candy can we stuff in here to meet our arbitrary (stupidly low) framerate goal" and most of the "eye candy" is stuff most observers wouldn't know or recognize from a hole in the ground. Yes, I'm talking about Starfield. I didn't understand why they'd accept a framerate of 30fps on console until I discovered they'd artificially locked both Skyrim and Fallout 4 ON THE PC to like 30 or 40 fps. And then tied the physics to framerate, completely unnecessarily (as in you can change this behavior with like two or three ini edits.) Then there's games like Baldur's Gate which was done thoughtfully and can run on a huge range of hardware. I had to return one Civilization game because they hadn't accounted for an aging fanbase and high resolution monitors and I flat out couldn't read the tiny text to play the game.
But yeah, we have this neverending leapfrogging bloat that goes on, where users try to upgrade to get things to work better and companies decide to fill in the new overhead with data mining background tasks and "user experience optimizations" that are a ridiculous rat race that in no way enhances the user experience.
Anyway, I'm not opposed to upgrades but like, do them sensibly and if you can, learn to build your own stuff so that you aren't beholden to the anticonsumer tactics most major computer system integrators (dell, etc.) use to get as much of your money as possible while giving you the least in exchange.
we should globally ban the introduction of more powerful computer hardware for 10-20 years, not as an AI safety thing (though we could frame it as that), but to force programmers to optimize their shit better
232K notes
·
View notes
Link
0 notes
Text
Discover Microsoft Copilot Notebook, A Productivity Booster

What Is Copilot Notebook?
An advanced tool or application called a Copilot Notebook combines AI capabilities to help users with a variety of data analysis, programming, and documentation activities. It combines the capabilities of a conventional notebook (like Jupyter Notebook) with improved AI-powered features, such context-aware help, mistake detection, and intelligent code recommendations.
Copilot Notebook Feature
The following are some essential components of a typical Copilot Notebook:
Intelligent Code Completion: This feature helps users write code more quickly by providing context-based smart code suggestions.
Debugging and Error Detection: Finds probable mistakes in the code and makes recommendations for how to repair it.
Help with Documentation: Produces and enhances documentation, facilitating user comprehension and code maintenance.
Context-Aware Help: Offers pertinent resources and information, like linked libraries or functions, based on the user’s current task.
Integration with Popular Tools: Improves workflow overall by integrating seamlessly with commonly used programming languages and tools.
These features are intended to improve efficiency and user-friendliness of the coding environment, decrease coding errors, and increase productivity.
Copilot Notebook
Five undiscovered Microsoft Copilot productivity-boosting techniques and tactics. Microsoft’s ChatGPT-enabled Copilot is accessible through any web browser, so it’s not simply confined to Windows PCs.
Microsoft made significant progress in the fight for generative AI by collaborating with OpenAI. The Redmond, Washington-based business unveiled Copilot, a brand-new service that lets customers utilize OpenAI’s state-of-the-art model on Windows 11 OS-powered PCs for free. Later on, users of Windows 10 were added to this.
Furthermore, any web browser may be used to access Microsoft’s GPT-powered Copilot, making it accessible from any Windows computer. Microsoft has also made the Copilot app available for free to iPhone and Android users.
Copilot Notepad for more extensive text prompting
If you think the text prompt input box is too small, the Copilot Notebook is the ideal fix. Users can enter more in-depth enquiries in the Notebook’s huge context pane, which supports up to 18,000 characters. This is useful, particularly when one needs to produce code for a computer program or needs a certain answer.
You will value the Copilot Notebook if you dislike the complicated-looking Copilot homepage user interface. Its user interface is straightforward, and even the AI-generated Notebook results are simple to obtain. Copilot Notebook allows you to summarise lengthy emails and messages that you receive.
Copilot artificial intelligence featured
Copilot Windows 11
Bing Chat was the previous name of Copilot (Photo courtesy of Microsoft).
Microsoft made significant progress in the fight for generative AI by collaborating with OpenAI. The Redmond, Washington-based business unveiled Copilot, a brand-new service that lets customers utilise OpenAI’s state-of-the-art model on Windows 11 OS-powered PCs for free. Later on, users of Windows 10 were added to this.
Furthermore, any web browser may be used to access Microsoft’s GPT-powered Copilot, making it accessible from any Windows computer. Microsoft has also made the Copilot app available for free to iPhone and Android users.
Here are five Copilot hidden features that you should be aware of but aren’t likely to know:
Microsoft Copilot
Image Modification Using DALL-E An output from DALL-E with prompts in three different versions. (Image from Express)
One of the most potent text-to-image generative AI models, OpenAI’s DALL.E 3, powers Microsoft Copilot’s ability to produce graphics at no cost. Selecting the Microsoft Designer option allows you to alter the created photographs in ways like deleting or replacing the backdrop, blurring the background, changing the colour tone, applying a certain filter, and more. Please be aware that Copilot will add a watermark on the photographs. One can also make lovely computer or smartphone wallpapers with the same Designer program.
Make use of the plugins’ power
Microsoft recently made Copilot able to add plugins. These plugins can aid in producing more focused outcomes. A shopaholic, for instance, can install plugins like Klarna to obtain precise price comparisons of a certain item. Microsoft has activated the search plugin by default, which facilitates the integration of AI-generated results with web search results. You can access Copilot’s AI-generated content by disabling it.
Consult the copilot
Voice and text cues are both supported by Copilot. Copilot will even automatically narrate the AI-generated result when you search with your voice. Copilot has the ability to read out the output even when you provide a text-based prompt. This makes Microsoft Copilot accessible to users who are unable to use or access a physical keyboard.
Copilot PC Wallpaper
Images can also be input or prompted by Copilot. You can pose a question about an image, like a landmark or a well-known person. In a similar vein, one can instruct Copilot to produce comparable graphics in other styles. Additionally, it has the ability to translate text between languages and extract text from images.
These are a few of the several use cases for Microsoft Copilot. To access more sophisticated generative AI models and to obtain extra capabilities, users can also subscribe to Copilot Pro.
Copilot Windows 11
Windows Copilot PC
According to Microsoft, users of the original Outlook software on Windows may already access Copilot; the Mac and mobile versions will be available shortly.
Microsoft has quickly incorporated its AI chatbot, Copilot, which is supported by OpenAI, into a number of its products. The software behemoth included Copilot to the updated Outlook app for Windows last year, although the previous version of the app was still devoid of features.
Microsoft just announced on their blog that Copilot for Windows’ classic Outlook is now accessible to users in the Current or Monthly Enterprise Channel and that it will be released gradually. The post also says that three to twelve months after the first release, Copilot for the older Outlook program on Mac and mobile devices would be available.
The AI-driven chatbot may assist with a variety of activities, such as compiling threads so users can stay up to date on everything. Additionally, Copilot allows you to retrieve additional information as needed and can display the data in bullet points. Simply click the “Summarize” button in the upper right reading pane when a message is open to utilize this function.
Like Google’s Help Me Write, the “Draft with Copilot” tool can be helpful if you are stuck and don’t know where to begin or what to write. Click the “New Email” button to begin a new draft, or select “Draft with Copilot” while replying to a message by clicking the Copilot button on the ribbon. Before sending, you can also change the message’s length and tone.
Users can also verify the tone, lucidity, and even whether the reader’s sentiment is as intended with a function called “Coaching by Copilot.” Simply click “Coaching by Copilot” after draughting a message in Outlook by pressing the Copilot button on the ribbon.
Additionally, Microsoft made it clear that all of the AI features of the new Outlook will be added to the traditional version of Outlook, but only “within a reasonable follow-up” timeframe.
Read more on Govindhtech.com
#copilot#microsoftcopilot#govindhtech#news#technews#technology#copilotnotebook#Microsoft#ai#technologytrends#technologynews#artificial intelligence
0 notes