#how to delete wordpress site godaddy
Explore tagged Tumblr posts
Visit Tumblr Blog
Explore Tumblr blogs with no restrictions, modern design and the best experience.
Last Seen Tumblr Blogs


Fun Fact
12.7% of mobile users access Tumblr.
Text
How to Delete Wordpress Site
Deleting a WordPress site should be done with caution, as it permanently removes all of your site's content, settings, and data. Make sure you have a backup of any data you want to keep before proceeding. Here's a step-by-step guide on how to delete a WordPress site:
Before you begin:
Backup your site: Use a WordPress backup plugin or your hosting provider's backup feature to create a backup of your site's content and database. This is crucial in case you change your mind or need to restore your site later.
Export Content: If you want to save any posts, pages, or other content, export it using the WordPress export tool. This will create an XML file you can import into another WordPress site if needed.

#how to delete wordpress site#how to delete wordpress site and start over#how to delete wordpress site hostinger#how to delete wordpress site from cpanel#how to delete wordpress site 2022#how to delete wordpress site from localhost#how to delete wordpress site godaddy#how to delete wordpress site 2023#how to delete your wordpress site and start again#how to delete a wordpress site on bluehost
1 note
·
View note
Text
How to introduce a WordPress
https://bizbuddy.coachzippy.com/p/WPKitStartPreviously, you needed to have a serious degree in geek talk just to get a WordPress format introduced. In any case, today, as a rule, that is not true anymore.
The motivation behind this instructional exercise is to show you, the Average Joe (or Josephine), how to introduce a WordPress format that you've bought or gotten for nothing from the web.
I should specify that I'm making three presumptions here.
Suspicion #1 is that you are facilitating your own WordPress site and don't have one facilitated for you through WordPress.com (this is significant - yet don't stress. I'll tell you later the best way to have your own WordPress site that you can change without any problem!)
Presumption #2 is that your facilitating organization introduced WordPress for you (GoDaddy and Fantastico are the most widely recognized). This will naturally give your site the "authorizations" important to make refreshes and transfer your topic in WordPress.
Presumption #3 is that the format you've gotten came to you in a compress record. A compress record is basically a gathering of documents that would typically be too huge (or too enormous of an agony in the you-recognize what) to transfer at the same time.
The symbol for a compress document on your PC sort of resembles a pile of books lying on their side, the spines confronting you. They're generally a similar tone (on the PC at any rate. I don't know about a Mac): green on the base, blue in the center, purple on the top.
Try not to stress over doing anything with these documents! We will utilize them precisely the manner in which they are.
Presently for the pleasant part...
Stage 1: Log into your WordPress site (recall, this should be a site you have yourself and not one from WordPress.com). This should take you to your Dashboard (however you're most likely acquainted with this page, right?)
Stage 2: Click on the little bolt close to the Appearance module on the left-hand side of your screen. A progression of extra decisions should drop down. One of these decisions will be "Include New Themes". On the off chance that you don't see it, don't freeze. Snap on "Subjects" and take a gander at the head of the following screen. There ought to be an "Include New" button at the head of it that will permit you to include another subject.
Stage 3: Assuming you're on the page that says "Introduce Themes" at the top, click on the "Transfer" tab simply under the "Introduce Themes" type at the head of the page. Another page will come up, requesting that you find the compress document on your PC.
Stage 4: Locate the compress document on your PC, click on it, and hit the "Introduce Now" button just to one side. Presently sit idle. Let the PC do its "magic".:)
A progression of notices will mention to you what the PC is doing. Unfastening the record, and so on. Basically, its placing the substance of the document in the puts in they have a place in request with make the format work appropriately.
Be that as it may, stand by! We're not done!
After the screen reveals to you that the layout has been introduced effectively, you've still gotta do Step 5!
Stage 5: You're given 3 decisions: Preview, Activate, or Delete. You should see the format you've stacked, just to ensure it's the correct one. In the event that it looks great to you, close that screen and snap on the "Enact" tab.
Your WordPress format is presently dynamic and individuals can see the your rewards for so much hard work! How spectacular does your site look now???
In a couple of uncommon cases, there are a few situations where you'll have to introduce the format through the FTP. In any case, except if you get a mistake when you introduce the format the way I've quite recently let you know and have depleted tapping the information on your companion who realizes WordPress, I'd avoid signing into the FTP.
The ability to "break something" in there is simply excessively incredible. As far as What can tell, on the off chance that you break something and don't have the foggiest idea what you're doing (this is valid for PCs, vehicle fix, and pretty much whatever else throughout everyday life), it costs mucho dinero to get it fixed.
At long last, adhere to the 5 stages you've been given here and your site will be up, running, and look stunning instantly!
Who says you just need ONE format for your site? Why not transform it with the seasons, the special seasons, your preferred games group, or even your disposition?
TO LEARN BUILDING SITE WITH WP VISIT
https://bizbuddy.coachzippy.com/p/WPKitStart
1 note
·
View note
Note
Just out of curiousity: how do you manage the site? Do you pay for hosting services? And also is it difficult to maintain the thing? I'm thinking about a dedicated blog of my own, so I'm just wondering if it all is troublesome or not.
Honestly, I registered my domain through GoDaddy and then my friend took over the rest through WordPress. It wouldn’t look nearly as good had she not helped me! If you don’t know how to code and you’re good with it looking simplistic, I would say go for it! The only reason I made mine was so I could preserve my masterposts lol. One of them was deleted because of a copyright issue so that’s when I made the move to get all the important stuff moved over to a more permanent medium. If I wasn’t a masterpost maker, I probably wouldn’t have a website. But to each their own!
#wordpress is a decent site for it though#it got hacked a few weeks ago and thankfully my friend dealt with it LOL#honestly i wouldn't have this site without her
7 notes
·
View notes
Text
Namecheap Hosting review 2022: A Top Domain Registrar
What is Namecheap Hosting and how does it work?
In this piece, we'll examine Namecheap's hosting options for the year 2022.
To now, Namecheap hosting in 2022 has been the best low-cost hosting option available worldwide.
Initial Year of Shared Hosting for 51% Off! All the information you need to know about Namecheap Hosting's features and pricing can be found on this page.
Namecheap hosting has built up a three million-strong clientele over the course of its 18-year history.
When it comes to managed WordPress hosting, Namecheap hosting 2022 is one of the cheapest and easiest options available.
2.Is Namecheap Hosting any good?
6 Advantages of Namecheap Hosting
Reasonably quick average response time
Multiple domains are permitted.
A large amount of disk space
Email accounts that are completely free
No charge for site migration
Money-back guarantee for 30 days
Namecheap hosting 2022 is the most simple, beautiful, and low-cost option.
GoDaddy or Namecheap: which is better?
Domain administration is a breeze with Namecheap as well. There is no better value than GoDaddy because of their free backups and SSL certificates.
While GoDaddy's plans may offer more total storage space, for the vast majority of users, that space is unnecessary, making Namecheap the better choice due to their superior customer service and support.
Is Namecheap based in Russia?
Namecheap does not employ Russians. In Ukraine, they have set up their main help desk and chat service. Most of their business actually takes place in Europe.
Business like this doesn't just happen in the United States.
Is it legal to buy a domain name from Namecheap?
Namecheap guarantees their hosting services will be up and running at all times, and their servers are fast and reliable.
Quickly and easily create your own website using one of Namecheap's many site builder programs.
Is hosting available through Namecheap?
Shared hosting, WordPress hosting, and e-commerce hosting are all services that Namecheap offers its customers.
What is the difference between a Namecheap domain and a regular domain?
Founded in 2000 by current CEO Richard Kirkendall, Namecheap is an ICANN-accredited domain registrar with headquarters in Los Angeles. More than 500,000 clients are serviced, and millions of domains are administered.
Namecheap is an industry leader in both domain name registration and web hosting.
Is SSL provided by Namecheap for free?
Namecheap will instantly apply the free SSL certificate to your account if you buy hosting from them. If you refer your domain to our hosting name servers, our Namecheap SSL plugin will activate automatically.
What is the procedure for deleting my Namecheap domain?
Select Manage next to the web host your domain is associated with. Click the Cancel service button that appears next to the package. To cancel your application, fill out the cancellation form and select "I understand, please consider my request"> "Submit application."
Namecheap Hosting's Best Features in 2022
Now we'll go through the advantages of Namecheap hosting.
Cost-Effective:
Fast, secure, and high-performing hosting services are yours from Namecheap in 2022 for only $2.88 a month.
You may, for instance, get 50% off the renewal price of PositiveSSL certificates and a free certificate for the first year.
If you have found your way to Hostinger's main page. If you go with them, you can expect cheap hosting rates. It has a surprisingly affordable service package.
Namecheap hosting 2022 offered a 30 day money refund guarantee, which we took use of.
Moreover, a real domain name will be provided to you. You may make reservations at a discount and see your balance rise. If you're looking for a cheap option, Hostinger is it.
In addition, Namecheap Hosting has built a dependable and safe environment in which to host your website.
With Namecheap hosting 2022, we save time and effort.
Namecheap deserves credit for helping make this happen.
We've finally found a hosting company willing to cut our rates by 25%, and it's name cheap.
Simple and Quick Onboarding
The Onboarding Process Should Be Straightforward and Quick
Namecheap hosting in 2022 is the most convenient and stylish option. Use of it has been simplified.
Right after you sign up, you'll get a welcome email and be able to access the site right away.
Show your support for Namecheap hosting.
At 2022, support is accessible anytime, day or night.
Just a minute is all you need to feel connected.
Backup Alternatives
With NameCheap hosting in 2022, you get unrestricted access to the backup feature. The free c panel backup offered by Namecheap is superior to all others.
Reliability
Namecheap's web hosting services are lightning fast and trustworthy, with a 99.9% uptime guarantee.
Sharing hosting packages were discounted by 73%, and we received a further discount of 25% since this was our first hosting purchase with them.
Domain Registrar
The fact that Namecheap, a domain registrar, is giving us a discount of 25% on our first hosting purchase is a huge help.
What is the difference between a Namecheap private email address and a Namecheap public email address?
Namecheap's Private Email is a high-end email client that gives you more flexibility and customization options.
Many company owners like private email because it is more secure, however professional Internet email is when a cloud mail server handles both incoming and outgoing email.
Which of the NameCheap plans should I choose?
You should start out with the more affordable option, as suggested by me. If the need arises, updates may be made at a later date.
Moving up to a more costly plan? NameCheap can help with that, too. A multiplication in visitors takes more time than expected, so only invest heavily if absolutely necessary.
It's possible that your requirements are unique, in which case you should consult with a NameCheap hosting expert.
50% OFF Namecheap Hosting 2022 offers three plans: 1. Stealler 2. Stealler plus 3. Stealler enterprise SSD Plan.
Stealler (Stealler):
a monthly fee of $1.44
SSD disk space of 20 GB
3.Bandwidth that is unmetered
Make use of three websites
Control panel ePanel
Plus Stealler
Monthly payment of $2.44
SSD Disk Space with No Limits
Bandwidth that is unmetered
an unrestricted website
5.ePanel is a control panel for ePanel.
Stealler business SSD Plan :
1.4.44$ per month
50 GB of SSD storage space
bandwidth that is unmetered
an unrestricted website
5.ePanel is a control panel for ePanel.
The following hosting coupons are available from Namecheap hosting.
Here are some options:
They provided a 73% discount on shared hosting plans.
Get a 32 percent discount on VPS hosting
On 24 different websites, you can get $3.98 off.
4.com has a 4.8% market share.
5.us received 5.3.88 percent of the vote.
On.xyz, you can get a 90% discount.
7.io domains are 7.21 percent discounted.
STORE domains are 8.96% off.
Green Bar Single-domain EV SSL is now $9.50 off.
VPN Service at a Discount of 10.68%
Dedicated Servers are discounted by 11.50 percent.
Security Products are discounted by 12.54 percent.
Bonus features:
NameCheap's plans include a lot of useful features, however there are a few perks that are left out.
For instance, you may see that the time allotted for requesting a refund is really little. Only for the next 14 days can you purchase a name for the low, low price of NameCheap. Corporate rivals like as HostGator, on the other hand, provide a 45-day money-back guarantee. Similar services from other rivals, such InMotion, Web Hosting Hub, and DreamHost, provide a money-back guarantee of at least ninety days.
Some of its improvements, like the dedicated IP addresses needed for SSL certifications, might be expensive. While many companies would provide one at no cost or for a little price, NameCheap will charge you $24 yearly.
Although none of them are deal-breakers, purchasers should be aware of them nevertheless.
Namecheap hosting 2022 is offering a special deal where students can receive free domains. They provide free domains to students. There is no need for students to have a Namecheap discount code to take advantage of this offer. Therefore, one of the best domain registrars and hosting companies is Namecheap in 2021.
In 2022, the pros and cons of using Namecheap Hosting
(1) A great place to start.
As many as three websites may be hosted for as little as $2.88 per month.
Namecheap's offer is beneficial and uncommon since most of the other companies I've researched limit their basic plans to just one website.
If you're looking to host two or three somewhat large websites, I think the lowest Namecheap package is amazing value for the money.
free migrations, among other liberties
Namecheap offers a free website migration service.
Migrating your existing cPanel site to Namecheap is quick, easy, and needs minimal work on your behalf.
Simply authorize Namecheap's hosting professionals to access your existing cPanel, and they'll take care of the rest. They will operate autonomously, requiring neither your assistance nor any downtime, from start to finish. Still, even if that's the case, we're talking about a wait of no more than 15 minutes at most.
Third, a reasonable pricing structure
When it comes time to renew, Namecheap's renewal fee does not rise much, unlike many other web providers. In light of the fact that the ridiculously low prices offered by certain businesses are impossible to maintain, I find this to be a welcome change.
You may end up paying for this site for many years to come if it becomes successful. GoDaddy and HostGator, both web hosting providers, adopt the tactic of charging a cheap initial charge followed by a much higher renewal fee. Namecheap's prices are stable.
Four, free backups
With every Namecheap subscription, you get free backup storage. Only the biggest corporations do backups every day, but even once a week is fair given that backups are costless.
With so many potential uses for backups, this is particularly important for websites.
Multiple factors need regular backups, including site redesigns, broken plugins, and malicious intrusions.
5 - Outstanding Domain Name Registration Options
If you look for 2019 Namecheap reviews without specifying that you want hosting, you will get a clear idea of the registrar's quality. Absolutely, that's the case.
I can say with confidence, however, that Namecheap is excellent. As the best domain registrar, they provide the most TLD options, a user-friendly interface, and tempting deals.
Sixthly: a sweet spot for users
Namecheap has an excellent user interface. It has a minimal design yet gives a plethora of data at a glance.
Options are presented clearly, and the product itself is easy to administer. The number of upsells is minimal, and the interfaces for managing payments, domains, and hosting accounts are as straightforward as is humanly possible.
Using two-factor authentication, you can keep your Namecheap account safe and secure for the long haul.
What a great update page
No doubt Namecheap is down or undergoing maintenance at the moment.
The status page provides a wealth of information. There you'll find promotions for things like server upgrades, network monitoring, email hosting, and domain registration. I like how helpful they are, and how often they release new versions.
Eighth, Bitcoin Dealings
This has nothing to do with site hosting, but I think it's fantastic that digital services may be purchased with actual digital money.
Namecheap's disadvantages
Namecheap hosting has a few flaws. Even if there are other aspects of the product that may be improved, this usually relates to average speed and uptime.
1 Boost from SSDs:
As I was doing research for my Namecheap evaluation, I came across the phrase "SSD acceleration" for the first time. If there is no advertising coverup, then the hosting is not on SSD servers.
Because SSDs are so much quicker than traditional hard drives, this may be the reason why my Stellar Plus plan isn't functioning as effectively as it should.
Inadequate space for:
50 GB of solid-state drive (SSD) space seems to be plenty, and 20 GB on three sides is a lot.
However, many of their rivals do not put reasonable limitations on how much space an account may use so long as it does not breach the terms of service.
a dearth of data centers:
The firm not only offers colocation services in the UK, but also operates a data center in Phoenix, Arizona. The second option is more costly.
Most of the other big hosts have three or more data centers of their own.
We hope you'll be happy to know that using Namecheap for hosting in 2021 is lot easier than you would think.
The learning curve for this tool is minimal. Here, no cost themes are readily available for download and installation.
2021 Namecheap hosting is lightning fast and loads pages quickly.
Briefly said, hosting services like Namecheap's have a lot to offer modern businesses.
Because of how easy it is to use, everyone can benefit from it.
Namecheap's Core Values and Company Image
the 2021 reputation and principles of Namecheap Hostng It has already been established that Namecheap Hosting is an independently owned and run company.
In the computer industry, where a few of corporations dominate the bulk of hosting providers, this is an extremely unusual event.
On the other side, having complete autonomy and secrecy isn't always preferable.
On the other hand, it's not necessarily a bad thing for hosting companies to fall into the hands of large corporations.
Namecheap Hosting 2021 stands out from the competition because to the company's commitment to openness and the clarity with which it defines its brand principles.
They are notorious for producing enormous confusion among professionals. It's great when a business is honest about everything, including the prices and services they provide.
I like that they include hosting solutions that interest me and that their renewal fees are advertised publicly.
Performance
Namecheap's hosting 2021 customer service starts with an easily navigable information base.
It's organized into digestible chunks, and it addresses both basic questions (such "How do I renew my domain?") and more complicated concepts. Regarding more specific questions ("DNSSEC management for domains specified by custom DNS").
Most of these pieces are rather extensive and comprehensive. Namecheap 2021 hosting users have the option of posting messages in the support center and reading those sent by other users.
This is a common way to get answers to specific questions concerning the content of an article from the Namecheap team, which is subsequently made available to the public (Namecheap does not appear to remove negative comments).
Even though they don't provide phone support, Namecheap has a live chat option and a ticketing system for when you need help. We tested it with a simple question, and we got a precise answer in under 30 minutes.
Namecheap hosting 2021 outperformed the competition, but we cannot guarantee this will continue to be the case in more difficult, real-world conditions.
In spite of this, our server testing showed that this was not the case.
Uptime.com monitored our test site every five minutes during the week, and although it was always available, the average response time was a dismal 718 milliseconds (ms), with a variation of 625 ms to 1.55 ms.
Our current 10th host (DreamHost) averaged 274 ms throughout testing, with a range of 235-465 ms, whereas the bulk of the original shared hosting plans ranged between 200 and 400 ms.
And when compared to other free services, it stands out.
While this is a drawback, it's important to remember that we only look at the cheapest plans from each provider and the vast majority are far more costly than Namecheap. Hosting with Liquid Web is $19 per month, Media Temple is $16.67, and Namecheap is $1.44 per month; these prices make sense as a performance cost.
Namecheap might be a suitable option if speed isn't a priority and price is. I realize this is a drawback, however bear in mind Namecheap has the lowest prices after comparing the lowest plans from all the providers.
Hosting with Liquid Web is $19 per month, Media Temple is $16.67, and Namecheap is $1.44 per month; these prices make sense as a performance cost. Choose Namecheap if saving cash is your primary concern and the service speed meets your requirements.
That choice is still open to you.
Service to the customer:
Assistance to Clients Evaluation of customer service is challenging.
What is happening in the background is murky at best.
The same holds true for figuring out whether the firm will be helpful when you contact them.
When looking for reviews of a company online, you will find either exaggeratedly negative encounters or overly positive ones.
The problem with anecdotes is that it's impossible to tell whether what you're reading is significant or just a fluke.
Instead, customers should look for indications that the company values customer service or views it as an expense.
Does this have any bearing on whether or not the company's priority is to increase long-term, satisfied consumers or short-term profits?
Host comparisons for Namecheap in the year 2022
My experience as both a consultant and a client with several of the industry's most prominent hosting companies is extensive.
Check out how NameCheap's hosting compares below!
NameCheap vs. iPage
Web Hosting Comparison: iPage vs. NameCheap HostGator's cheap hosting comes courtesy of a sister firm called iPage.
Although Endurance International owns this company, it does not seem to be as actively invested as Endurance International was with HostGator.
IPage seems to exist primarily to provide users with free or almost free hosting in the short term.
Those on a tight budget will appreciate this, but it comes at the expense of efficiency and satisfaction for regular customers.
Namecheap is my go-to web server, despite iPage's many features.
Domain Name Service Comparison: NameCheap vs. HostGator
Web Hosting: NameCheap vs. HostGator In the hosting industry, HostGator needs no introduction.
This firm, like iPage and Bluehost, is owned by Endurance International.
HostGator, a product of Endurance International, is lauded for its optimal harmony of helpful customer service, affordable rates over the long term, and enough functionality.
Hostgator offers superior customer service, faster speeds, and less restrictions than its competitors.
But if you're just starting out with a single little site and don't anticipate a lot of traffic, NameCheap is a great option.
Large-scale website builders will find HostGator to be the most beneficial service.
Conclusion:
If you don't want a lot of space for your websites, NameCheap Hosting 2022 is a great option.
Of course, you should go elsewhere if you have more stringent needs.
In my experience, they consistently performed below the averages for speed, uptime, and customer service.
For just a little bit extra money, you can have hosting that is light years ahead of what they provide.
Visit Namecheap, on the other hand, if saving money is a top concern.
In conclusion, in my opinion, NameCheap hosting is a great option for people trying to save money on their hosting.
If you're just getting started with a small website and are more concerned with costs than storage space, then Namecheap hosting in 2020 is your best bet.
Namecheap has several useful options. You must carefully read the TACs before registering, as there may be important information hidden there.
Research everything carefully before making a decision because the money-back guarantee only lasts 30 days.
0 notes
Text
Buy a domain and attach with Blogger
When you start your work on Blogger, you are given a no cost sub domain by Blogger. On Blogspot you get AdSense approval but it will be too late for you to access your site. The sub domain calculates that if any of your clicks come from India, your domain will be in front of .in if the click comes from USA. So .usa will come in front of the site. If a visitor comes from Pakistan, then .pk will come in front of your site, but the problem is that it takes a lot of time to rank this site and it approves adsense. Also get too late.
I will show you how you can attach Godaddy High Level .com domain to your blog by removing Blogspot sub domain .blogspot I will tell you.
The first thing you need to do is visit Godaddy website. If you want to buy a domain, you must have a MasterCard or Visa card. Only then can you buy Godaddy .com domain. The top level domain will tell you how to attach it to Blogger.
Visit now Godaddy website.
Godaddy.pk
Godaddy.in
Godaddy.us
If you are from India then select .in If you are from Pakistan then select .pk If you are from USA then select .usa and register domain in the way I will tell you.

When you click on the link to Godaddy site you will be taken to Godaddy homepage. First you have to sign up to Godaddy and then you have to buy a domain.

If you want to sign up to Godaddy from your Facebook account, you can also sign up from your Facebook account. If you don't have a Facebook account, you can also sign up from your Google Account. You have to add your complete details. You have to get your Godaddy account verified. You will get it done when you buy a domain. You have to save Godaddy password properly, otherwise your domain may be compromised. In Detail you have to enter your home address, your country, your postal code and then you have to buy your domain. For this you have to have Visa card then you have to save your Visa card number, expiry date CVV code and buy land.
Your Debit card:
Back side : CVV code example 123
Front side card no example: 4245 5757 3565 5675
And front side example: expiry date 09/26

When you sign up on Godaddy, a home page will open in front of you in which you have to search for your domain name and add it to the cart. Will.
Process 9 picture 👇


I have shown you clearly in the picture that you have to buy Godaddy's .com domain where I have marked the arrow and mark the circle. You have to click on it and the next page will open in front of you. You have to complete it and buy the .com domain by entering your details.

NEXT STEP:
I will show you the complete way to attach your purchased .com domain with Blogger as I will show in the picture which has an arrow on it and a circle which will show in the picture as you clearly see your .Com domain can be attached to your blogger and your .blogspot.com can be removed from your blogger.


Setting Complete:
As I told you, you have to buy Godaddy top level .com domain and attach it to your blogger and remove your blogger's .blogspot domain if you want to increase your Godaddy .com domain authority. If so, read our article.
Another thing that can cause a 404 error on your site is if you do not complete the setting of the domain then I will tell you how you can solve it:
I'll tell you why a 404 error occurs on your site and how you can fix it. The latest trick is that before today on YouTube and on the blog very few people would have told you I will tell you there are many mistakes that you make and if a 404 error occurs on your site then I will tell you how you can solve it. I will tell you three points. Only then will you understand the trick to solve the 404 error.
Main three points:
(1) If you have been working on Blogger for a long time and you have not taken the custom domain, then you use .blogspot domain. If you publish a new post then your domain will not be open and 404 will come to your site.
(2) The second point is that this point is very important. If you understand this, you can avoid making a big mistake. If you used to work on Blogger, you have converted all the content of your blog to WordPress. Deleting all the articles and converting them to WordPress then 404 error will come to your site. Why it comes is that when your custom domain is on Blogger, all your articles are indexed by the crawler to your site. What happens is that when all your content goes to WordPress, the crawler also leaves your site and gets a 404 error on your site.
(3) Let me tell you another point which can be very detrimental to you if you miss it. If you do not have a custom domain. You can avoid only I am giving you an example like if you named the subdomain blogger.blogspot.com you changed your URL for some reason and named the URL youtube.blogspot.com then your page There will definitely be a 404 error. I'm just giving you an example of a sub domain. The sub domain never gets a 404 error. The 404 error only comes on a top-level domain. com, .net, .co comes on domains like this so I just gave you an example to explain it means if you bought a custom domain you lost that domain and you bought another domain then with you It can happen.
Solve process 404 error:
If you have missed any of these 3 points and you do not know and 404 error has occurred on your site then how can you remove it I will tell you when you visit your blogger If I add a custom site, there is one thing in it. If you miss it, your site will get 404 error. Let me tell you about this. If there is a 404 error on your site, your site's ranking will go down. And visitors to your site leave your site and go to someone else's site.
You must add this code to your domain's DNS when setting up your domain's DNS.
185.199.108.153
185.199.109.153
185.199.110.153
185.199.111.153

If you did not add this code to your DNS settings, you will get a 404 whenever you publish a new article. If an error occurs, you should index your article in Google, then 404 error will be removed from the top of your site.
3 reasons?Why Google ads don't run campaigns.
If you like our article, be sure to subscribe to our blog. Whenever I publish an informative article, you will receive a notification and let us know in the comments how you like our article.
0 notes
Text
At Last, the Secret to WORDPRESS HOSTING Is Revealed
New Post has been published on https://martechguide.com/at-last-the-secret-to-wordpress-hosting-is-revealed/
At Last, the Secret to WORDPRESS HOSTING Is Revealed

Table of Content
What Is CMS?
What CMS’s are available?
WordPress is world’s most popular CMS followed by Drupal and Wpengine are in top 3
What is WPEngine?
Why WPengine is best wordpress hosting site?
Incomparable features in wpengine
Website Performance Optimization features in WPengine
Performance of WPengine
Get your FREE 3 months Trial Offer Use code JULY3FREE to get 3 months free on annual shared plans. Valid through July 31, 2020.
I have around 9 websites are running on different shared hosting servers. Some are blog sites, educational websites and some are e-commerce website. Most of the websites are having heavy content and some only moderate content. So when I look at hosting provider, I give emphasis on overall performance of website.
I have tried many shared servers including net4india, Hostgator, Godaddy and inmotion hosting. I personally found inmotion hosting giving fantastic performance. In this post “Migrating hosting server from HostGator to inmotion hosting” of I have given detailed analysis why inmotion is the best.
But still for me to make my WordPress website faster, I had to spend a lot of money in getting many plugins and website booster application. So if you have decided to make your website only in wordpress CMS then this piece of information is very much important, which learnt after experimenting for ages.
What Is CMS?
CMS stands for content management system; a content management system is software that helps users create, manage, and modify content on a website without the need for specialized technical knowledge. So if you do not have knowledge of coding or HTML or PHP, you could still make amazing website with ease.
What CMS’s are available?

Market Share of wordpress globally


WordPress is world’s most popular CMS followed by Drupal and Wpengine are in top 3
Let’s Understand the Top3 CMS and how they are going to be useful for you to start making your website.
WordPress.org is an open source CMS available, and there are plenty of developers who developed millions of themes a, plugins, widgets which can be used to make a website. The biggest drawback is that all the plugins and themes, widgets are developed by many different independent developers and when you use them on your website it leads to conflict in the scripts and worst part is that the codes are optimized for superior performance and its performance is impacted.
Point to note: more plugins will certainly slows down your wordpress website and you might need to get it optimized by a php developer, which might cost your quite more. That’s the reason most if the website are hard coded by the php developers in wordpress CMS.
Drupal: this is one of the most powerful CMS for making a enterprise level of a website, but certainly it’s not easy for a non-technical person to work and edit the website content. It certainly requires understanding of web development and code level understanding.
Wpengine: one of the most advanced managed hosting service provider for the wordpress websites and it’s only top of the list in the paid wordpress hosting as per the builtwith.com website result.
What is WPEngine?
WP Engine is the leading WordPress hosting platform. Wpengine platform give more agility in building the website, provides cloud hosting & higher security ( Cloud hosting performance is highest compared to shared hosting). They also have integrated wordpress website optimization tools and other partner integration tools included.
Why WPengine is best wordpress hosting site?
Wpengine integrate with best-in-class technology partners. They are partnered with Google, hubspot, cloudflare, AWS, and New Relic, and optimize their technology specifically for WordPress.

Incomparable features in wpengine
StudioPress Themes
Build amazing, mobile-responsive WordPress digital experiences with 36 easy-to-use, premium themes powered by our Genesis Framework, featuring built-in SEO and security, and all included in your WP Engine plan. Explore Studio Press Themes
Auto Migration
Your move to WP Engine is as simple as a couple of clicks using our auto migration plugin. Explore auto site migration
Deploy Site
Easily move data between your cloud development environments on WP Engine.
Git and SFTP Connections
Let your development team keep using their favorite development tools to increase productivity and collaboration.
One-Click Staging
Use tools to simplify and shorten development cycles through rapid testing of changes so you’re never surprised. Creating a testing environment of a website is easy just by doing a click. Explore One Click Staging
Dev, Stage, Prod Environments
Every WP Engine site comes with three environments to help you quickly set up an efficient development workflow. Explore Environments
Automated Backups
We perform daily backups on your digital experience to give you peace of mind in case you run into any site issues.
WordPress Core Updates
We handle all major updates automatically to ensure sites stay up-to-date, and test the minor updates before recommending them.
Free CDN and SSL Certificates
WP Engine makes it easy to scale your site up with CDN and keep your transactions safe with SSL—just add them with a single click.
Multi-Site Conversion
WP Engine lets you set up and turn off multisite with just a few clicks in our User Portal.
User Permissions
Our interface makes it easy for you to ensure all users have the proper roles and access, making it easy for you to add or delete users and change permissions.
SSH Gateway
Save time by efficiently managing any number of WordPress sites through the command line.
Ownership Transfer
Provides an easy way for agencies or freelancers to transition site ownership and billing to clients post launch.
Activity Log
Gain visibility on your account, including updates and published content, and use the activity log to help provide governance.
GeoTarget
Provides location specific content for your audiences increasing engagement and transactions.
WordPress Plugins
WP Engine helps you by powering a wide variety of personalized experiences through plugins and custom functionality.Check Migration Plugin
WordPress
Publish quality content at scale with WordPress, a world-class CMS that increases creative agility through collaboration and ease of use.Check Genesis Pro- Content Creation Plugin
Website Performance Optimization features in WPengine
Amazon Web Services
As an AWS Advanced Technology Partner, we offer a range of solutions that meet the needs of customers seeking high-performance optimized for WordPress.
Global Data Centers
We have servers across the United States, Europe, the Middle East, Africa, and in the Asia-Pacific region.
Data Center Redundancy
Keep your data safe and sound with Amazon Web Services.
Uptime Protection
Stay up and running with clustered configurations in dedicated environments, fully-managed content delivery network, and proactive, multi-layered security measures.
PHP 7.4 and HTTP/2 Enabled
Get better SEO, visitor retention, and conversions with the latest updates, which can serve up to 3x more requests per second.
Proprietary EverCache®
Reduce strain on your site’s resources with our caching solution, which is capable of moving hundreds of millions of hits per day through our system.
Fully Managed Global CDN
Load content faster with our global content delivery network (CDN), which routes local requests to the nearest server.
Increased Speed
Our customers enjoy an average of 38% faster load times by switching to WP Engine.
Scalable Architecture
Manage traffic spikes–from 10,000 to 100 million users—seamlessly.
Dedicated Security Engineering Team
Leave the code reviews and security audits of all internal environments and processes to our in-house team.
Managed Core Updates & Patches
Rest easy knowing that minor updates will be pushed through automatically, while we vet major updates thoroughly before recommending them.
Multi-Factor Authentication
Complex passwords enforced on WordPress sites and the WP Engine User Portal by default. Add a layer of security to the user portal with multi-factor authentication (MFA) technology.
Traffic Encryption with SSL
Use free SSL certificates on every page thanks to Let’s Encrypt.
Threat Detection & Blocking
Let us dynamically detect and block malicious behavior with our proprietary system, making sure your site doesn’t suffer embarrassing hacks.
Disaster Recovery
In the unlikely event your site is compromised, bounce back quickly with our expert recovery help.
Performance of WPengine
Pingdom Speed Test Report: This is regarded as as the fastest wordpress hosting & Theme;

Gtmetrix performance report
Get your FREE 3 months Trial Offer Use code JULY3FREE to get 3 months free on annual shared plans. Valid through July 31, 2020.
0 notes
Text
Syncing Wordpress w/ Github
Wordpress powers over 25% of all the websites in the world! While I use Bootstrap for my personal site, I highly recommend WordPress for community and shopping sites. ACORD, the company I work for, uses Wordpress to power its massive site, which houses a forum, shop and hundreds of blog posts.
A lot of WordPress backup plugins are expensive and cumbersome when you have sites that are the size of ours. I came up with the idea of backing your site up to Github. Rather than running it via Github pages (which only works for “static” sites like Jekyll/Bootstrap), you host it on a webhost (like GoDaddy) and back up your files to Github that way.
One of the big problems that people have is that not only do you have files on your site, you also have a database, and if you want to have a complete back-up you’ll need to copy both.
In this post, I’ll discuss various methods that you can use to backup your Wordpress site to Github.
This tutorial works for any git version (GitHub, gitlab, etc)
Why would you do it?
There are a number of reasons:
It’s free
Unlimited storage!
Version control - know exactly when a file was edited, created or deleted (in other words, recovery!)
Backup - if something goes wrong, you’ll need a backup
Here’s how you do it:
Sign up for a Github account - it’s free! If you’ve already done this, proceed to the next step.

Download an FTP client. In my case, I’ll be using Filezilla, which is free and open-source! You will want to find your FTP account from your hosting provider, which normally is sent to you in an email.
Enter these details into the client. For example:
Host: ftp://yoursiteurl.com
Username: ftpusername
Password: ftppassword
Port: 21/22
If all goes to plan, it should show you the site files on the right-hand side. If this doesn’t work, check to make sure your details are correct.
After this, you’re going to want to download a Git client.

Personally, I use GitKraken, but Github Desktop (pictured above) is a good choice. Be warned, however: if your site is more than 100mb in size, Github Desktop won’t work, and you’ll need to use something like SourceTree or GitKraken. Both are free.
Create the repository for your WordPress site, if you haven’t already. After this, clone this repo to your local machine, where your site will sync to.
Go back to Filezilla, or your FTP client of choice. Drag the files from your site over to the left-hand side, where they’ll start downloading to. This will take a while if you have a site like mine.
Preferably, you’d have selected the destination for your repo clone on the left hand side. This makes it easier to commit these files via Git and then push them.
Every time you make a big change to your site, make sure you get into the habit of syncing your site to Github. My site’s been around for almost 4 years, and I don’t want to lose it. Neither should you!
There are a number of plugins available that also do this for you. A good choice is VersionPress.
0 notes
Text
Website Development
The idea of creating a website from scratch was an exciting one for me although I didn’t have a clue where to start. I knew what I would like to achieve after exploring various other sites and knowing what caught my eye and what had failed to deliver.
http://www.overthewaterproductions.co.uk
I had registered my business with HMRC back in 2018 ‘Over the Water Productions Ltd’ and had purchased both the .co.uk and .com domains via GoDaddy, this is then were it stalled. I tried a couple of times to develop the concepts and ideas through a Wordpress site but found the process complicated and in my mind restrictive. I now know it was not restrictive in nature but I was restricted in my lack of knowledge and understanding. I needed to just do it, start, play around and mess up if need be to embed my learning. I know I am someone who learns by doing so why I had tried just to read a book and look at websites to discover the answers is beyond me. Actions are what move me forward.
I logged in and clicked ‘manage your wordpress site’, I was filled with excitement.
Looking at the initial interface, all the expected options were there and my mind flooded with colours, images and fonts and layout. Little did I know that this basic interface had so much depth and extensive options to explore more creative pages.
Through looking at YouTube I discovered an informative video by Tyler Moore which gave step by step instructions of how to create a site.
youtube
It became apparent quickly that the easiest way to build my site would be to delete the plugins already installed and start from scratch using ones that were relevant for my needs.
I began by creating a professional appearance of the web address by deleting part of the address via the permalinks button and redirecting the site to only show the URL and the page its on.
The next stage and probably crucial to my vision was to change the theme of the website which would give me a foundation to build on. I chose the Astra theme as it gave the option to install plugins of complete website templates. Before I started adding pages I deleted the pre-given ones. I then imported the Astra site and chose the Elementor page builder. I then decided on the ‘outdoor adventure’ plugin as although the name did not appear relevant the layout appealed to my vision. I was drawn to the transparent header that the layout had installed.
The next stage was fairly simple in changing the name of the page by clicking on appearance-layout-header-site identity. I selected my logo and uploaded it. I added my tagline. I didn’t like how it looked visually with the tagline under the logo so I decided to opt for it only been shown in search engines and not on the site itself in the current format. I chose instead to have the tagline ‘Bridging the Gap for Creativity’ to be centrally displayed so that the audience would see it and be drawn to it once they open the home page.
Next I looked at the transparent header colour and decided that although there was many options the solid colour bar at the top detracted from what I was trying to achieve and made the site look less fluid so I opted to keep it transparent. I looked at the wording colour on the site title and chose to keep it quite neutral as I knew I wanted my images in the site to have a dark background with colourful content. My wording is white and the hover colour is grey. I felt this gave a crisp finish to this area of the site.
Once these basic steps had been completed I clicked on ‘edit with elementor’ to begin the process of adjusting the layout and adding content. Once loaded this editor gave many widgets which allowed me to add sections, headings, text and video. It is easy to use and there is an inline editor. This process also gave me the option to change the style of the typography, the text colour and the size. As I wanted the website to have serious content but a fun element I chose lettering which was more funky and not rigid. The typography I chose was ‘permanent marker’.
The next challenge for me was to edit the buttons on the page and route them so that a user would be able to access the content. I did this by accessing the content section of the button area and typing into the link box were I wanted the button to lead to. On the home page I opted for the main button in the middle of the page to link to the ‘about us’ page. I changed the text within the button in indicate this. I wanted to make the button a little smaller so did this from the ‘style’ tab and adjusted the size and also the colour of the button. In keeping with my vision of neutral colouring for the letters I opted for black wording on a grey button with the hover colour being white. The final part of this section was to click on the style areas of the editing section and chose an image as my background. Again in keeping with the theme of Music - Film - Photography I chose an image which shows music equipment imagery. I ensured that the image was smaller than 500mb so that it didn’t interfere with the functionality of the website. The image once uploaded was a little dark so I changed the settings in the background overlay section and decreased the opacity. This gave a clearer overall page with the wording standing out as planned. Lastly I accessed the advanced setting and adjusted the padding which allowed my lettering to be more central on the page.
Further down this page I added a section using the widgets in elementor and added a showreel short video with a button attached. The wording here is ‘unleash the creativity’ with a button underneath which links to the services page. The button is the same as the previous button and I ensured this by right clicking on the previously designed button and clicking copy and paste style. I also added a still photograph in the image area so this would be the default if the showreel failed to play. I adjusted the placement of the button by going into the advanced tab of the edit button area and adjusted the margin by unlinking the previous values first.
I repeated the processes discussed on the rest of the pages and created a similar structure using the widgets to create columns and buttons. I ensured continuous saving and reviewing as I went along. During the review I adjusted the size of the wording and some of the layout and pictures to accommodate the changes when viewing via a mobile phone or tablet. I did this via the edit image tab and the responsive mode. I unchecked some of the content to ensure ease of use for the consumer.
Once the pages had been created I went back in and decided to add an entrance animation to the wording that is centralised on the main picture on each page, other than the home page. From the advanced tab I chose a ‘bouncing’ animation to be active.
The contact page was my next mission to ensure that it was functional and informative. I edited the contact details with the elementor editing tab. I edited the social media icons so that they linked to the relevant sites by clicking ‘edit social icons’ and typing in the relevant link. The section of the contact form that says ‘We’re Ready, Lets Talk’ was a little more tricky to do. This involved me going back into the Wordpress dashboard and ensuring that the shortcode widget was displayed in the ‘contacts’ section. I also adjusted the ‘mail’ area within this to ensure that the ‘to’ and ‘from’ areas linked with my business email address.
Next I decided to add a new page so that I could display a Q & A section of information. I did this by going back into the dashboard and clicking on ‘pages’ and then ‘add new’. I added a title and then ‘edit with elementor’. This is an easy way to add a page as I then just needed to click on the folder tab within elementor and chose a page to edit, I then clicked insert. I added layout, changed padding and added a photograph and text content. I then went into the edit page and scrolled to transparent header and ticked enabled to ensure that this was the same as the previously developed pages. In order for this new page to be visible to the consumer I went back into the dashboard and clicked the ‘menu’ tab and clicked ‘add items’. I dragged my new page from the list and dropped it into the already defined list. As I wanted it to be a ‘sub’ page under the ‘about us’ page I dragged it to the right as an indent which then allowed it to know this was not a primary page. I adjusted the colours in ‘colours and background’ and transparent header to keep inline with the colour theme for the site.
Next I wanted to ensure the button on the transparent header displayed ‘contact’ and was linked to the already developed contact page. I did this by going on customise, layout, header, primary header and then I clicked in last item in menu and typed in ‘contact’ on the text box and then added a forward slash contact into the link section. I then went into the transparent header and ensured again that this was adjusted in keeping with the rest of the theme.
Finally for the layout I went into the menu section and clicked ‘footer bar menu’ and added custom text to inform potential clients of my details.
By far the biggest challenge for me has been the last one of adding SSL to my site. I purchased the certificate and downloaded it. I can see it in my list of SSL certificates but have yet to be able to get it to work.
My website is one that I am happy with and am proud of it. I need to keep developing it, adding pages and content to show the work I do. I need a more extensive showreel and information about jobs I’ve done with additional photography displayed. I intend to develop my social media pages to also reflect this and to market my company. I would like to develop a different logo as I’m not entirely happy with the one I have so I’m exploring my creativity through learning various aspects of the adobe creative suite.
During my preparation and research into websites of a similar genre I was determined to have a site that visually showed more depth. I don’t as yet have the showreel content to display depth to the extent of Lime Pictures or RSA films but I do have an ability to use colour to draw the eye. I liked the Lime Pictures site for the depth it showed and the colour used but felt many of the other sites were quite flat and not appealing. The odd splash of colour on neutral typography gave me options for photography and showreels that added depth with tone and colour.
0 notes
Text
Effective Ways to Speed Up Your WordPress Website
Reasons Why You Need to Work On Your Website Load Times!
Increasing your website speed is essential if you want to attract new viewers to your site. Many times, great content is not enough to keep your viewers’ attention. You need to have images, graphs, videos and a compelling reason to keep your visitor interested and engaged. If your website loads slow due to having images, graphs, screen shots or videos, they may never really see what you have to offer. So making sure your website is optimized for speed is very important to your visitors and for ranking in Google.
Wordpress Website Hosting
One of the first areas we are going to look at is your hosting. If you are hosting a large site with many images or videos, a shared hosting like GoDaddy or Hostgator is not going to cut it. You need to find premium hosting solutions to power your website. This is one of the first steps to ensure your website load times are fast. There are several hosting providers we recommend: LiquidWeb WP Engine – 2 Months Free Annual Plan WPXHosting
Rent a VPS
Renting your own Virtual Private Server will create a large difference on your site. Most serious businesses and famous bloggers opt to have their own VPS because of its speed and security. Shared hosting can create some complications on your site, especially if one of its websites is experiencing trouble. Many times, the ease of having your own VPS is worth the extra cash. We use and recommend Liquid Web and have many different options of VPS/VDS you can take advantage of.
Keep Your Pictures Optimized
Another tip to increase your website speed is to pay attention to your pictures. Pictures usually take up a lot of time to load, especially if you have not edited them properly. If your site is picture heavy, then it will definitely take longer to load especially if they are not optimized. Most people would opt to place thumbnails or smaller resolution pictures on the pages to save on space, as well as load time. You may think that optimizing your images so they will load faster will take up a lot of time on your end. It is not necessarily so. There are many programs that can help you optimize all of your pictures at once, so that they are all in the same size. That should be so much less effort for you. To make it even faster for your viewers to access your site, you may also want to try the lazy load technique, where the pictures load while the viewer is scrolling down the page. This saves a lot of loading time and it is very user friendly. This will save your viewers bandwidth, especially for viewers that do not read posts all the way through. A great plugin that works to help optimize your images is Imagify. Imagify will optimize your images with just a few clicks of a button. They provide different programs based on your data usage per month. You can also use a CDN to help with optimizing your images. A CDN is known as a content delivery network and “is a system of distributed servers (network) that deliver pages and other Web content to a user, based on the geographic locations of the user, the origin of the webpage and the content delivery server”. Seen published on http://www.webopedia.com/TERM/C/CDN.html. A good CDN is Max CDN and has very competitive pricing.
Use YouTube
Using YouTube for videos can actually keep the loading time down on your posts and pages. Placing a video directly on your site can cause some drag while people try to access your content. If you do not like using YouTube, there are other streaming services that are readily available to use online. Putting lesser loads on your server will make your site easier to access. For a more optimal user experience, remember to disable the Auto Play feature on your videos. This can be a little unsettling for your viewers and some of them may get annoyed enough to leave your page. Give a great description of the video you want them to see. If they are at work and the auto play comes on, they potentially can bounce off your website immediately. Check out our web design do’s and don’ts.
Keep Your Posts Organized
Keeping your main page neat and organized is also a good way to keep your loading speed fast enough to gain more viewers. Instead of showing the full posts on the main page, you can choose to show only the first few paragraphs. Excerpts are sneak peeks to the main content, and it is a great way to build interest too. You may also want to make sure that you only feature around 4 to 8 posts on the main page in order to reduce the load time. You can have a load more button that allows more posts to be loaded just by a click. You can also utilize pages (page 1, 2, 3 for your posts), or you can develop a good database that can make your audience get to the content that they want faster. People will definitely appreciate your site’s efficiency. A great way to keep your posts organized is utilizing a silo structure on your website.
Wordpress Settings & Plugins for Website Speed Optimization
When it comes to wordpress, it is a database website that has a lot of functionality and plugins to not only speed up your site, but also help you optimize your website. It is important to use plugins that have little drag and drain on your website and help improve your websites performance. We tried all of the following WP Caching Plugins:
W3 Total Cache
WP Super Cache
WP Fastest Cache
Zen Cache (Now Comet Cache)
WP Rocket
The clear winners for a caching plugin on our website speed were WP Rocket and WP Fastest Cache. I need to also mention we only did the paid versions of WP Rocket and WP Fastest Cache. The other caching plugins we were only using the free version. We opted to use WP Rocket for several reasons. Some of the reasons we choose to go with WP Rocket:
Cost for many websites (WP Fastest Cache charges per website installation)
Integration with Imagify was easy
Optimal setup was easy
Easy integration with Max CDN
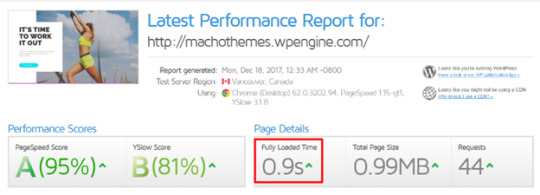
As far as website speed loading time, it was very close. WP Rocket was a slight bit faster than WP Fastest Cache. On WP Rocket we usually load between 1.2s and 1.5s with a webpage that is 3.1mb.
Make Use of Your WordPress Plugins
Try to check through the plugins on your site and find the ones that are no longer being used. Unused plugins can create a lot of drag on your WordPress site. Take a look through your list. Sometimes we can forget, and deleting the things we do not used can create seconds of difference. On the internet, that is a big difference already. You may even want to study how these plugins function. You can incorporate these without having to put the entire plugin on the site. A few codes on your functions.php can give you the same benefits a widget can offer you. You also want to keep your wordpress plugins up-to-date for efficiency and security reasons.
Pay Attention to Your WordPress Settings
There is also a way to increase the loading speed through your WordPress settings. You may have noticed pingbacks and trackbacks on your WordPress. This is something that is enabled by default so that you can get notified whenever other blogs interact with you. This is a great WordPress feature, but this can also affect loading speeds. This adds on new data to your post, which in turn makes the post heavier. Turning this feature off will let you browse through your site a little bit faster.
Do Your Maintenance Work
WordPress is based on a MySQL Database, which means that the database gets larger whenever your posts are edited or when comments are left on the site. Always remember that every time you revise your post, the last version will be automatically saved to the database. Cleaning this up will allow your page to load much faster. Spam comments must also be deleted. While it is great to have comments on your page, spam comments do nothing for you and it will only slow the page down. There are plugins on WordPress that can help you do these maintenance tasks on your site. Since plugins can create a bit of a slow down on your site, you might want to enable this only once a month. For the rest of the time, you can keep it disabled. WP Rocket takes care of the maintenance work for you as well. It will cleanup old revisions and will also delete spam comments from your database for you each week on auto pilot. Also try not to keep website page redirects to a minimum. Sometimes you have to redirect pages, posts, categories and even tags to a new URL. Each redirect added to the page, can and will slow down the page load times.
Cut Down on the Word Art, Widgets and Graphics. (If You Have To)
The first thing that you should do is to cut down on the word art. Many times, glitzy word art can slow down a page significantly, and it is not a pretty picture when it refuses to show up on screen. In some ways, word art can be unnecessary. It is fine to use it for titles, or for details that absolutely need the attention. There is no need to overdo. You can try using a neat and legible font instead and pay attention to proper spacing. Nice and simple goes a long way, and it will even make your site look fresh and professional. Remember to take down pop ups and widgets that are not of the utmost importance. Decorations can be attractive, but you will have to consider that not all viewers will appreciate that. They will always want good content, and they want it fast. Widgets and other decorations can sometimes take away the experience.
Majestic Warrior The blog post Effective Ways to Speed Up Your WordPress Website is courtesy of website - MajesticWarrior
Majestic Warrior
18631 N 19th Ave #158
Phoenix, AZ 85027
(888) 717-6864
https://goo.gl/maps/ZwEcL5EFVUr
from http://www.majesticwarrior.net/website-design/optimized/effective-ways-to-speed-up-your-wordpress-website/
2 notes
·
View notes
Photo

Is Google Adsense Dead on Tumblr?
This is my experience with Adsense and Tumblr, and what I did to get my ads running again.
History
On December 14th, 2016, I found all my Adsense ads gone from my 3 sites that ended in .tumblr.com. Ads were still up on my Tumblr unicornhatparty.com site. I was bummed because ad revenue is at its all time high after Thanksgiving to Christmas - then it plummets for the rest of the year.
What did I do? I immediately emailed both Adsense and Tumblr and got very different answers.
From the beginning of this, I suspected that Adsense was not allowed to show ads on Tumblr because Tumblr/Yahoo have been pushing their own ad network. I still don’t know what is going on because Tumblr and Yahoo never answered my questions, whereas Adsense was transparent.
Google Adsense
I had 19 conversations with Google Adsense over the next month. It boils down to Tumblr not accepting Adsense as an advertising platform. I asked what was going on in numerous ways to make sure I understood what was going on.
Responses from Adsense:
12/18/16 “ The issue is with tumblr.com so I recommend moving your sites and redirecting traffic to another domain or blog hosting service. You do not have to contact Tumblr. Our specialists are working on this issue.:
12/20/16 “ As J__ mentioned, this is part of a larger issue between AdSense and Tumblr.com and there currently isn't a timeline set for when the issue will be resolved.
What you should know is Publishers won't be able to monetize subdomains on Tumblr.com until this issue is resolved.
Publishers will not be able to appeal this decision either.
What publishers can do is host their content on Tumblr.com and use a custom domain to monetize it.”
Tumblr
I got 3 generic responses from Tumblr: it’s you, it’s your theme, it’s custom HTML that you added that’s causing this problem.
12/18/16 “Hello,You're also free to use third party ads on your blog. Before you proceed, just know that we can’t provide support for them."
12/19/16 “Hello,This is likely caused by a piece of custom HTML. Unfortunately, we don’t have the resources to provide technical support for HTML/CSS customizations. If you’d like to select a new theme though, you can browse our Theme Garden here: http://tumblr.com/themes”
Yahoo
3 emails to Yahoo’s advertising page (was transferred to Yahoo from Tumblr’s Help Page for ad info). No response from Yahoo.
FIXES
After 3 months I decided to change all my .tumblr.com blogs to .com blogs. I’m only out about $10 for each domain name and godaddy has an easy way to connect your new domain to Tumblr here. Tumblr’s help page on custom domains is here.
truebluemeandyou.tumblr.com is now truebluemeandyou.com
diychristmascrafts.tumblr.com is now truebluegifts.com
halloweencrafts.tumblr.com is now truebluehalloween.com
Also, as long as you are only changing your domain name, your posts and links should remain intact.
Things to remember:
To get started with Adsense you must have a .com domain (see above). In the past, once you got your .com site authorized you could add other not .coms to Adsense i.e. blogspot.com etc...
You have to fill out an application to be accepted to the Google Adsense program. Adsense will check out your blog and get back to you.
Read Adsense’s “violations” page very carefully. If you are banned from Adsense it is almost impossible to ever have another Adsense account.
If you love your Tumblr Blog and want to make sure it doesn’t disappear i.e. deleted by Tumblr, make a mirror blog of your blog off of Tumblr. Wordpress has a plugin that makes this really easy to do. You can see my experience when Tumblr deleted 7 of my blogs here (and how it can happen to you).
#adsense#advertising#adsense is dead on tumblr#adsense on tumblr#advertising on tumblr#adsense dead on tumblr#ads on tumblr
39 notes
·
View notes
Text
Buy a domain and attach with Blogger
When you start your work on Blogger, you are given a no cost sub domain by Blogger. On Blogspot you get AdSense approval but it will be too late for you to access your site. The sub domain calculates that if any of your clicks come from India, your domain will be in front of .in if the click comes from USA. So .usa will come in front of the site. If a visitor comes from Pakistan, then .pk will come in front of your site, but the problem is that it takes a lot of time to rank this site and it approves adsense. Also get too late.

I will show you how you can attach Godaddy High Level .com domain to your blog by removing Blogspot sub domain .blogspot I will tell you.

The first thing you need to do is visit Godaddy website. If you want to buy a domain, you must have a MasterCard or Visa card. Only then can you buy Godaddy .com domain. The top level domain will tell you how to attach it to Blogger.
Visit now Godaddy website.
Godaddy.pk
Godaddy.in
Godaddy.us
If you are from India then select .in If you are from Pakistan then select .pk If you are from USA then select .usa and register domain in the way I will tell you.

When you click on the link to Godaddy site you will be taken to Godaddy homepage. First you have to sign up to Godaddy and then you have to buy a domain.

If you want to sign up to Godaddy from your Facebook account, you can also sign up from your Facebook account. If you don't have a Facebook account, you can also sign up from your Google Account. You have to add your complete details. You have to get your Godaddy account verified. You will get it done when you buy a domain. You have to save Godaddy password properly, otherwise your domain may be compromised. In Detail you have to enter your home address, your country, your postal code and then you have to buy your domain. For this you have to have Visa card then you have to save your Visa card number, expiry date CVV code and buy land.
Your Debit card:
Back side : CVV code example 123
Front side card no example: 4245 5757 3565 5675
And front side example: expiry date 09/26

When you sign up on Godaddy, a home page will open in front of you in which you have to search for your domain name and add it to the cart. Will.
Process 9 picture 👇


I have shown you clearly in the picture that you have to buy Godaddy's .com domain where I have marked the arrow and mark the circle. You have to click on it and the next page will open in front of you. You have to complete it and buy the .com domain by entering your details.

NEXT STEP:
I will show you the complete way to attach your purchased .com domain with Blogger as I will show in the picture which has an arrow on it and a circle which will show in the picture as you clearly see your .Com domain can be attached to your blogger and your .blogspot.com can be removed from your blogger.


Setting Complete:
As I told you, you have to buy Godaddy top level .com domain and attach it to your blogger and remove your blogger's .blogspot domain if you want to increase your Godaddy .com domain authority. If so, read our article.
Another thing that can cause a 404 error on your site is if you do not complete the setting of the domain then I will tell you how you can solve it:
I'll tell you why a 404 error occurs on your site and how you can fix it. The latest trick is that before today on YouTube and on the blog very few people would have told you I will tell you there are many mistakes that you make and if a 404 error occurs on your site then I will tell you how you can solve it. I will tell you three points. Only then will you understand the trick to solve the 404 error.
Main three points:
(1) If you have been working on Blogger for a long time and you have not taken the custom domain, then you use .blogspot domain. If you publish a new post then your domain will not be open and 404 will come to your site.
(2) The second point is that this point is very important. If you understand this, you can avoid making a big mistake. If you used to work on Blogger, you have converted all the content of your blog to WordPress. Deleting all the articles and converting them to WordPress then 404 error will come to your site. Why it comes is that when your custom domain is on Blogger, all your articles are indexed by the crawler to your site. What happens is that when all your content goes to WordPress, the crawler also leaves your site and gets a 404 error on your site.
(3) Let me tell you another point which can be very detrimental to you if you miss it. If you do not have a custom domain. You can avoid only I am giving you an example like if you named the subdomain blogger.blogspot.com you changed your URL for some reason and named the URL youtube.blogspot.com then your page There will definitely be a 404 error. I'm just giving you an example of a sub domain. The sub domain never gets a 404 error. The 404 error only comes on a top-level domain. com, .net, .co comes on domains like this so I just gave you an example to explain it means if you bought a custom domain you lost that domain and you bought another domain then with you It can happen.
Solve process 404 error:
If you have missed any of these 3 points and you do not know and 404 error has occurred on your site then how can you remove it I will tell you when you visit your blogger If I add a custom site, there is one thing in it. If you miss it, your site will get 404 error. Let me tell you about this. If there is a 404 error on your site, your site's ranking will go down. And visitors to your site leave your site and go to someone else's site.
You must add this code to your domain's DNS when setting up your domain's DNS.
185.199.108.153
185.199.109.153
185.199.110.153
185.199.111.153

If you did not add this code to your DNS settings, you will get a 404 whenever you publish a new article. If an error occurs, you should index your article in Google, then 404 error will be removed from the top of your site.
If you like our article, be sure to subscribe to our blog. Whenever I publish an informative article, you will receive a notification and let us know in the comments how you like our article.
3 reasons?Why Google ads don't run campaigns
0 notes
Text
How to start a wordpress blog
This guide covers precisely tips on how to arrange a wordpress web site from scratch, because here is the issue: you are looking to begin a website to your weblog, business, portfolio, retailer, or forum - however the idea of messing with laptop code, databases, or software sounds a bit daunting. Heres my suggestion: earlier than you start a weblog, make sure you have some ideas what to write down about. This begin a weblog tutorial highlights ipage as I discover they're very low cost for full freshmen to check the water with. I am planning to launch a tutorial on how to move from free wordpress to self-hosted wordpress as nicely.
Thanks for sharing great submit jessica, it is really very useful to beginner for beginning a brand new blog. You'll title your weblog whatever you need, for instance ” or you possibly can end it withcom,,net,org, or just about any other web suffix. All it is advisable to do is join with ipage (or your chosen supplier), select your internet hosting plan and a domain title and look for the one-click wordpress install button on the admin panel. I'm actually nervous to launch the site though in order of now only I have entry to my blog. Selecting the place you wish to build weblog is just about the first thing it's important to do. I'm going to take a leap and assume you've got heard of wordpress, and this is the platform I advocate.
Should you're still a bit of confused by what a self-hosted weblog is, permit me to explain and how you can go about setting one up for yourself. I really want to start my own how to start a blog and earn money from it. And everybody I do know simply really helpful me to make use of wordpress.
I recommend you to put in wordpress by way of ipage because in case you resolve to go self-hosted instantly from - it is going to price much more. I've been setting up my blog over the last few days and written a few posts already. Earlier than we dive in although, I actually wish to speak about why it's best to construct a blog. It's by far one of many greatest blogging platforms in the world, with numerous plugins and add-ons and almost infinite ways to design and layout your weblog. As for opening a blog in the uk as long as you may have a bank card and uk handle then you may join with ipage.
I signed up with ipage, acquired my area, I can not discover a one click on set up button for wordpress on the cpanel. Worse nonetheless, you will not even have entry to the free themes offered by wordpress. So beneath, I'll define exactly what you must do to get began and arrange your own personal weblog. This guide to creating a blog has been really useful and we'll now be beginning a weblog for them. Disclosure: this information to beginning your own blog comprises some affiliate links. I was a bit overwhelmed about all the other ways in which to start out a weblog however am feeling extra confident now. Consider it as a computer exhausting-drive on the internet the place your weblog can be saved.
Most, if not all of them, should have a one-click on” wordpress set up resolution on their admin panel. The issue is that some they won't can help you monetize your weblog and they can delete your blog with none legitimate reason. One suggestion or caution with godaddy though…godaddy has a product known as wordpress internet hosting. My drawback is, I'm not really good in english that is why I am hesitating to start blogging.
1 note
·
View note
Text
WordPress security in a few easy steps
Michiel Heijmans
Michiel is a partner at Yoast and our COO. Internet veteran. His main goal with most of his articles is to kick-start your site optimization. So much to do!
If you’re working with or using WordPress, then you should always think about your site’s security. WordPress isn’t any more or less secure than any other platform, but the number of users, plugins and third party add-ons make it a common target for attackers. Don’t worry though, there are some basic steps you can take to keep your site safe (even if you’re not very tech-savvy)!
New to WordPress? Our FREE WordPress for beginners training is here to help. Find out how to set up your own site, learn the ins and outs of creating and maintaining it, and more. This training is part of our free training subscription, take a look at all our online SEO training subscriptions!
Table of contents
1. Don’t use ‘admin’ as a username
Most WordPress ‘hacks’ and attacks don’t do anything more sophisticated than try and brute-force their way into your admin area by guessing your password. That’s much easier for them to do if they don’t also have to guess your admin username! Avoiding using common words (like admin) for your usernames can make brute-force attacks much less effective.
If you’re working with an older site that already has an ‘admin’ user, it might be time to delete that account and transfer any content or access to a more secure username!
2. Use a complex password
Having a better password can make it much harder to guess or to brute-force. An easy tip to remember is CLU: Complex. Long. Unique.
But longer, unique passwords can be hard to remember, right? That’s where tools like 1Password and LastPass come into play, as they each have password generators. You type in the required length, and it generates a password for you. You save the link, save the password, and move on with your day. Depending on how secure you want the password to be, it’s sensible to set a long password (20 characters is good) and decide on things like the inclusion of less usual characters like # or *.
3. Add two-factor authentication
Even if you’re not using ‘admin’ and have a strong, randomly generated password, brute-force attacks can still be a problem. Don’t worry though, two-factor authentication can help protect your site.
The principle is that, rather than just entering your login details, you also need to confirm that you’re you by entering a one-time code from another device you own (usually through an app on your phone). That’s much harder for attackers to fake!
Two popular plugins for handling authentification in WordPress are the Google Authenticator and Rublon Plugin (which takes a slightly different approach). Just make sure that you don’t lose your backup codes, or you might find yourself locked out.
4. Employ least privileged principles
The WordPress.org team has put together a great article in the WordPress Codex regarding Roles and Capabilities. We encourage you to read it and become familiar with it because it applies to the following step.
The concept of Least Privileged is simple. Only give permissions to:
those that need it,
when they need it and
only for the time they need it.
If someone requires temporary administrator access for a configuration change, grant it, but then remove it upon completion of the task. The good news is you don’t have to do much here, other than employ best practices.
Contrary to popular belief, not every user accessing your WordPress instance needs to be categorized under the administrator role. Assign people to the appropriate roles, and you’ll greatly reduce your security risk.
5. Hide wp-config.php and .htaccess
Your wp-config.php and .htaccessfile are critical to your WordPress security. They often contain your system credentials and expose information about your site’s structure and configuration. Ensuring that attackers can’t gain access to them is vital.
Hiding these files is relatively easy to do, but doing it wrong might make your site inaccessible. Make a backup and proceed with caution. Yoast SEO Company for WordPress makes this process somewhat easier for you. Just go to “Tools > File Editor” to edit your .htaccess.
For better WordPress security, you will need to add this to your .htaccess file to protect wp-config.php:
<Files wp-config.php> order allow,deny deny from all </Files>
That will prevent the file from being accessed. Similar code can be used for your .htaccess file itself:
<Files .htaccess> order allow,deny deny from all </Files>
6. Use WordPress security keys for authentication
‘Authentication keys’ and ‘salts’ are basically a set of random variables, unique to your website, which improve the security (encryption) of information in cookies.
Your wp-config.php file has a dedicated area where you can provide your own variables (simply get a new set of keys from here and paste them in).
7. Disable file editing
If a hacker gets in, the easiest way for them to change your files would be to go to “Appearance > Editor” in WordPress. To improve your WordPress security, you could disable the editing of these files via that editor. Again, you can do this from within your wp-config.php file by adding this line of code:
define('DISALLOW_FILE_EDIT', true);
You will still be able to edit your templates via your favorite (S)FTP application. You just won’t be able to do it via WordPress itself.
8. Hide your login and limit login attempts
Brute-force attacks usually target your login form. So changing where that lives can make it harder for attackers to get in. The All in One WP Security & Firewall plugin has an option to simply change the default URL (from /wp-admin/) to something more secure.
Next to that, you can also limit the number of attempts to log in from a certain IP address. There are several WordPress plugins to help you protect your login form from IP addresses that fire a multitude of login attempts your way.
9. Be selective with XML-RPC
XML-RPC is an application program interface (API) that’s been around for a while. It’s used by a number of plugins and themes, so we caution the less technical to be mindful of how they implement this specific hardening tip.
While functional, disabling can come at a cost. This is why we don’t recommend disabling for everything, but being more selective on how and what you allow to access it. In WordPress, if you use Jetpack you’ll want to be extra careful here.
There are a number of plugins that help you be very selective in the way you implement and disable XML-RPC by default.
10. Hosting & WordPress security
Even if you’re meticulous when it comes to the security of your website, if it’s hosted by a company that isn’t just as meticulous, you may as well not have done anything at all.
If an attacker can gain access to your website hosting, they can take complete control of everything. That means it’s really important that you choose (or move to) a host that takes hosting seriously. Cheaper hosting options often don’t come with good security or backups, or might not offer support to help you clean up a hacked site.
Shared hosting (which is common on cheap packages) is often particularly risky, as attackers might be able to gain access to your site via another compromised site on the same system. That’s why we always recommend serious users to spend a little more on hosting and use a company with a great reputation for specialized WordPress hosting (for example GoDaddy or WP Engine).
11. Stay up to date
Staying up to date is an easy statement to make, but we realize how hard this can be for website owners in the day-to-day. Our websites are complex beings. They have many different things happening at any given time. And sometimes it’s difficult to apply the changes quickly. That’s why it’s not uncommon for websites to end up running out-of-date code. Both in their plugins and core software. Unfortunately, this makes them particularly vulnerable to known exploits.
It’s critical that updating your themes, software, plugins, and other components is part of an ongoing routine. Otherwise, you’re leaving the door open to attackers. If you’re a user of the Yoast SEO Company plugin, just follow these easy steps to update your Yoast SEO plugin.
12. Put more security layers in place
The best security solutions prevent attackers from ever getting anywhere near your website. That’s why we recommend that most sites run some kind of WordPress firewall plugin. These plugins look for known attackers and common attack patterns and stop them before they have a chance to compromise your site.
It’s also worth considering that many Content Delivery Systems now include firewall functionality; combining performance optimization with protection. Cloudflare, in particular, does a great job of blocking ‘bad traffic’ and even has rules and scans specifically developed to protect WordPress sites.
13. The best security plugins & themes
Most WordPress users tend to apply themes and plugins to their sites at will. We recommend being mindful of testing different themes or plugins, especially if you’re not using a test server. Most plugins and a lot of themes are free, and unless the developer has a solid business model to accompany these free giveaways, the security might not have been the highest priority during development. In other words, if a developer is maintaining a plugin just because it’s good fun, chances are he or she did not take the time to do proper security checks.
For this reason, we teamed up with Sucuri years ago to make sure every one of our plugins is checked for security before release. And we have an agreement with them for ongoing checks as well. If you are creating a free theme or plugin, you might not have the resources to add solid checks like that.
How to pick the right plugin
If you want to be taken by the hand in selecting the right WordPress security plugin for your website, please read this in-depth article Tony Perez did on the subject: Understanding the WordPress Security Plugin Ecosystem.
First, let me focus on the basics of plugin selection here. As explained above, free plugins and themes could be a possible vulnerability. When adding a plugin (or theme for that matter), always check the rating of that plugin on WordPress.org. Keep in mind that one 5-star rating won’t tell you anything, so always check the number of ratings. Depending on the niche, a plugin should be able to get multiple reviews. If more people think a plugin is awesome and take the time to rate it, you may feel more secure in using it too.
Compatibility of the plugin
There is one other thing you want to check. If a plugin hasn’t been updated for two years, WordPress will tell you that. Now, this doesn’t necessarily mean it’s a bad plugin. It could also mean there hasn’t been a need to update it, simply because the plugin still works. The ratings will help you decide if that’s the case. And have a look at the compatibility with the current WordPress version, which is also shown on the plugin page at wordpress.org. Having said that, Sucuri strongly recommends against using any plugins that haven’t been updated for that long. You should take their word for it.
Based on ratings and compatibility, you can pick your plugins thoughtfully and be mindful about your WordPress security at the same time.
Yoast recommends Sucuri
I’ve already mentioned our friends at Sucuri. Owners and managers Daniel and Tony have done a tremendous job on our plugins and have helped on several hacked websites in the past.
Sucuri is a globally recognized website security company known for its ability to clean and protect websites and bringing peace of mind to website owners, including us here at Yoast.
We teamed up with Sucuri because we take security very seriously. It’s not and never should be an afterthought. There is a variety of ways to address WordPress security, and we found that security was best addressed remotely at the edge beyond the application. What Daniel and Tony have built is a product/service that lets you get back to running your business. They are the security team we lean on when we need help the most. And they can help you out too. For instance, if you use WordPress, definitely read their WordPress guide on how to clean a hacked WordPress site.
Webinar Sucuri: how do websites get hacked?
If you’re wondering why websites get hacked and what type of attacks there are, watch Sucuri’s webinar on this subject:
youtube
Failing to take the necessary precautions for your WordPress security, and leveraging the experts can lead to malware infections, branding issues, Google blacklists and possibly have huge impacts on your SEO (something dear to our hearts). Because of this, we turn to Sucuri for our needs, as they turn to us for website optimization.
Moreover, Sucuri created an infographic on what to do when your site does get hacked:
A lot of the suggestions in this article can be dealt with by installing and configuring the free Sucuri Scanner plugin for WordPress or hiring Sucuri to handle your website’s security. At Yoast, we don’t think this is an ‘extra’, but consider it an absolute necessity. For us, security is not a DIY project, which is why we leave it to the professionals. Visit their website at sucuri.net for more information or check your site now to make sure you haven’t been infected with malware or have been blacklisted.
If you are serious about your website, you are serious about your security. Get the complete security package of Website Security Stack right here:
Get your Sucuri Website Security Stack NOW
14. Don’t forget logs & monitoring
So far, we’ve seen how to secure a WordPress site. However, since WordPress security is not an absolute (sites are always evolving by changing functionality and users) there is another aspect to WordPress security: logging and monitoring. Audit logs or activity logs are a chronological record of events and changes that happened on your website. In the audit logs you can find information on who logged into your site, installed or updated a plugin, changed the content, changed the site’s settings, and more.
Spot attacks before they happen
By keeping an audit log on your WordPress site you ensure user accountability, ease troubleshooting of technical issues, and spot attacks before or as they happen, allowing you to take evasive action to stop them. Audit logs are also used for forensics, to find out what went wrong in the unfortunate case of a successful hack. To keep an audit log on your WordPress site you need to install a plugin such as WP Security Audit Log.
There are several other things you should keep an eye on. For example, if you use Sucuri you’ll get a weekly traffic report with details on what was blocked and allowed. You can learn a lot from it, as well as from your website’s analytics and traffic patterns.
Closing thoughts on WordPress security
If you’ve come this far in this article, you will have no more excuse not to improve WordPress security for your website. Much like adding posts and pages, checking your WordPress security should be a routine for every WordPress site owner.
Also bear in mind that this isn’t the full list of things you can do to secure your website. I am aware that one should, for instance, create regular backups to keep your site secure. However, I trust this article about WordPress security gives you a practical list of things you can and should do to secure at least the first layer of defense of your website. Remember, WordPress security isn’t an absolute, and it’s up to us to make it harder for the hackers!
I would also like to thank Tony Perez for his input and several additions to this article.
Read more: 5 things to do after a hack »
WordPress for beginners series
SEO Company by DBL07.co
source http://www.scpie.org/wordpress-security-in-a-few-easy-steps/ source https://scpie.tumblr.com/post/616220589153239040
0 notes
Text
WordPress security in a few easy steps
Michiel Heijmans
Michiel is a partner at Yoast and our COO. Internet veteran. His main goal with most of his articles is to kick-start your site optimization. So much to do!
If you’re working with or using WordPress, then you should always think about your site’s security. WordPress isn’t any more or less secure than any other platform, but the number of users, plugins and third party add-ons make it a common target for attackers. Don’t worry though, there are some basic steps you can take to keep your site safe (even if you’re not very tech-savvy)!
New to WordPress? Our FREE WordPress for beginners training is here to help. Find out how to set up your own site, learn the ins and outs of creating and maintaining it, and more. This training is part of our free training subscription, take a look at all our online SEO training subscriptions!
Table of contents
1. Don’t use ‘admin’ as a username
Most WordPress ‘hacks’ and attacks don’t do anything more sophisticated than try and brute-force their way into your admin area by guessing your password. That’s much easier for them to do if they don’t also have to guess your admin username! Avoiding using common words (like admin) for your usernames can make brute-force attacks much less effective.
If you’re working with an older site that already has an ‘admin’ user, it might be time to delete that account and transfer any content or access to a more secure username!
2. Use a complex password
Having a better password can make it much harder to guess or to brute-force. An easy tip to remember is CLU: Complex. Long. Unique.
But longer, unique passwords can be hard to remember, right? That’s where tools like 1Password and LastPass come into play, as they each have password generators. You type in the required length, and it generates a password for you. You save the link, save the password, and move on with your day. Depending on how secure you want the password to be, it’s sensible to set a long password (20 characters is good) and decide on things like the inclusion of less usual characters like # or *.
3. Add two-factor authentication
Even if you’re not using ‘admin’ and have a strong, randomly generated password, brute-force attacks can still be a problem. Don’t worry though, two-factor authentication can help protect your site.
The principle is that, rather than just entering your login details, you also need to confirm that you’re you by entering a one-time code from another device you own (usually through an app on your phone). That’s much harder for attackers to fake!
Two popular plugins for handling authentification in WordPress are the Google Authenticator and Rublon Plugin (which takes a slightly different approach). Just make sure that you don’t lose your backup codes, or you might find yourself locked out.
4. Employ least privileged principles
The WordPress.org team has put together a great article in the WordPress Codex regarding Roles and Capabilities. We encourage you to read it and become familiar with it because it applies to the following step.
The concept of Least Privileged is simple. Only give permissions to:
those that need it,
when they need it and
only for the time they need it.
If someone requires temporary administrator access for a configuration change, grant it, but then remove it upon completion of the task. The good news is you don’t have to do much here, other than employ best practices.
Contrary to popular belief, not every user accessing your WordPress instance needs to be categorized under the administrator role. Assign people to the appropriate roles, and you’ll greatly reduce your security risk.
5. Hide wp-config.php and .htaccess
Your wp-config.php and .htaccessfile are critical to your WordPress security. They often contain your system credentials and expose information about your site’s structure and configuration. Ensuring that attackers can’t gain access to them is vital.
Hiding these files is relatively easy to do, but doing it wrong might make your site inaccessible. Make a backup and proceed with caution. Yoast SEO Company for WordPress makes this process somewhat easier for you. Just go to “Tools > File Editor” to edit your .htaccess.
For better WordPress security, you will need to add this to your .htaccess file to protect wp-config.php:
<Files wp-config.php> order allow,deny deny from all </Files>
That will prevent the file from being accessed. Similar code can be used for your .htaccess file itself:
<Files .htaccess> order allow,deny deny from all </Files>
6. Use WordPress security keys for authentication
‘Authentication keys’ and ‘salts’ are basically a set of random variables, unique to your website, which improve the security (encryption) of information in cookies.
Your wp-config.php file has a dedicated area where you can provide your own variables (simply get a new set of keys from here and paste them in).
7. Disable file editing
If a hacker gets in, the easiest way for them to change your files would be to go to “Appearance > Editor” in WordPress. To improve your WordPress security, you could disable the editing of these files via that editor. Again, you can do this from within your wp-config.php file by adding this line of code:
define('DISALLOW_FILE_EDIT', true);
You will still be able to edit your templates via your favorite (S)FTP application. You just won’t be able to do it via WordPress itself.
8. Hide your login and limit login attempts
Brute-force attacks usually target your login form. So changing where that lives can make it harder for attackers to get in. The All in One WP Security & Firewall plugin has an option to simply change the default URL (from /wp-admin/) to something more secure.
Next to that, you can also limit the number of attempts to log in from a certain IP address. There are several WordPress plugins to help you protect your login form from IP addresses that fire a multitude of login attempts your way.
9. Be selective with XML-RPC
XML-RPC is an application program interface (API) that’s been around for a while. It’s used by a number of plugins and themes, so we caution the less technical to be mindful of how they implement this specific hardening tip.
While functional, disabling can come at a cost. This is why we don’t recommend disabling for everything, but being more selective on how and what you allow to access it. In WordPress, if you use Jetpack you’ll want to be extra careful here.
There are a number of plugins that help you be very selective in the way you implement and disable XML-RPC by default.
10. Hosting & WordPress security
Even if you’re meticulous when it comes to the security of your website, if it’s hosted by a company that isn’t just as meticulous, you may as well not have done anything at all.
If an attacker can gain access to your website hosting, they can take complete control of everything. That means it’s really important that you choose (or move to) a host that takes hosting seriously. Cheaper hosting options often don’t come with good security or backups, or might not offer support to help you clean up a hacked site.
Shared hosting (which is common on cheap packages) is often particularly risky, as attackers might be able to gain access to your site via another compromised site on the same system. That’s why we always recommend serious users to spend a little more on hosting and use a company with a great reputation for specialized WordPress hosting (for example GoDaddy or WP Engine).
11. Stay up to date
Staying up to date is an easy statement to make, but we realize how hard this can be for website owners in the day-to-day. Our websites are complex beings. They have many different things happening at any given time. And sometimes it’s difficult to apply the changes quickly. That’s why it’s not uncommon for websites to end up running out-of-date code. Both in their plugins and core software. Unfortunately, this makes them particularly vulnerable to known exploits.
It’s critical that updating your themes, software, plugins, and other components is part of an ongoing routine. Otherwise, you’re leaving the door open to attackers. If you’re a user of the Yoast SEO Company plugin, just follow these easy steps to update your Yoast SEO plugin.
12. Put more security layers in place
The best security solutions prevent attackers from ever getting anywhere near your website. That’s why we recommend that most sites run some kind of WordPress firewall plugin. These plugins look for known attackers and common attack patterns and stop them before they have a chance to compromise your site.
It’s also worth considering that many Content Delivery Systems now include firewall functionality; combining performance optimization with protection. Cloudflare, in particular, does a great job of blocking ‘bad traffic’ and even has rules and scans specifically developed to protect WordPress sites.
13. The best security plugins & themes
Most WordPress users tend to apply themes and plugins to their sites at will. We recommend being mindful of testing different themes or plugins, especially if you’re not using a test server. Most plugins and a lot of themes are free, and unless the developer has a solid business model to accompany these free giveaways, the security might not have been the highest priority during development. In other words, if a developer is maintaining a plugin just because it’s good fun, chances are he or she did not take the time to do proper security checks.
For this reason, we teamed up with Sucuri years ago to make sure every one of our plugins is checked for security before release. And we have an agreement with them for ongoing checks as well. If you are creating a free theme or plugin, you might not have the resources to add solid checks like that.
How to pick the right plugin
If you want to be taken by the hand in selecting the right WordPress security plugin for your website, please read this in-depth article Tony Perez did on the subject: Understanding the WordPress Security Plugin Ecosystem.
First, let me focus on the basics of plugin selection here. As explained above, free plugins and themes could be a possible vulnerability. When adding a plugin (or theme for that matter), always check the rating of that plugin on WordPress.org. Keep in mind that one 5-star rating won’t tell you anything, so always check the number of ratings. Depending on the niche, a plugin should be able to get multiple reviews. If more people think a plugin is awesome and take the time to rate it, you may feel more secure in using it too.
Compatibility of the plugin
There is one other thing you want to check. If a plugin hasn’t been updated for two years, WordPress will tell you that. Now, this doesn’t necessarily mean it’s a bad plugin. It could also mean there hasn’t been a need to update it, simply because the plugin still works. The ratings will help you decide if that’s the case. And have a look at the compatibility with the current WordPress version, which is also shown on the plugin page at wordpress.org. Having said that, Sucuri strongly recommends against using any plugins that haven’t been updated for that long. You should take their word for it.
Based on ratings and compatibility, you can pick your plugins thoughtfully and be mindful about your WordPress security at the same time.
Yoast recommends Sucuri
I’ve already mentioned our friends at Sucuri. Owners and managers Daniel and Tony have done a tremendous job on our plugins and have helped on several hacked websites in the past.
Sucuri is a globally recognized website security company known for its ability to clean and protect websites and bringing peace of mind to website owners, including us here at Yoast.
We teamed up with Sucuri because we take security very seriously. It’s not and never should be an afterthought. There is a variety of ways to address WordPress security, and we found that security was best addressed remotely at the edge beyond the application. What Daniel and Tony have built is a product/service that lets you get back to running your business. They are the security team we lean on when we need help the most. And they can help you out too. For instance, if you use WordPress, definitely read their WordPress guide on how to clean a hacked WordPress site.
Webinar Sucuri: how do websites get hacked?
If you’re wondering why websites get hacked and what type of attacks there are, watch Sucuri’s webinar on this subject:
youtube
Failing to take the necessary precautions for your WordPress security, and leveraging the experts can lead to malware infections, branding issues, Google blacklists and possibly have huge impacts on your SEO (something dear to our hearts). Because of this, we turn to Sucuri for our needs, as they turn to us for website optimization.
Moreover, Sucuri created an infographic on what to do when your site does get hacked:
A lot of the suggestions in this article can be dealt with by installing and configuring the free Sucuri Scanner plugin for WordPress or hiring Sucuri to handle your website’s security. At Yoast, we don’t think this is an ‘extra’, but consider it an absolute necessity. For us, security is not a DIY project, which is why we leave it to the professionals. Visit their website at sucuri.net for more information or check your site now to make sure you haven’t been infected with malware or have been blacklisted.
If you are serious about your website, you are serious about your security. Get the complete security package of Website Security Stack right here:
Get your Sucuri Website Security Stack NOW
14. Don’t forget logs & monitoring
So far, we’ve seen how to secure a WordPress site. However, since WordPress security is not an absolute (sites are always evolving by changing functionality and users) there is another aspect to WordPress security: logging and monitoring. Audit logs or activity logs are a chronological record of events and changes that happened on your website. In the audit logs you can find information on who logged into your site, installed or updated a plugin, changed the content, changed the site’s settings, and more.
Spot attacks before they happen
By keeping an audit log on your WordPress site you ensure user accountability, ease troubleshooting of technical issues, and spot attacks before or as they happen, allowing you to take evasive action to stop them. Audit logs are also used for forensics, to find out what went wrong in the unfortunate case of a successful hack. To keep an audit log on your WordPress site you need to install a plugin such as WP Security Audit Log.
There are several other things you should keep an eye on. For example, if you use Sucuri you’ll get a weekly traffic report with details on what was blocked and allowed. You can learn a lot from it, as well as from your website’s analytics and traffic patterns.
Closing thoughts on WordPress security
If you’ve come this far in this article, you will have no more excuse not to improve WordPress security for your website. Much like adding posts and pages, checking your WordPress security should be a routine for every WordPress site owner.
Also bear in mind that this isn’t the full list of things you can do to secure your website. I am aware that one should, for instance, create regular backups to keep your site secure. However, I trust this article about WordPress security gives you a practical list of things you can and should do to secure at least the first layer of defense of your website. Remember, WordPress security isn’t an absolute, and it’s up to us to make it harder for the hackers!
I would also like to thank Tony Perez for his input and several additions to this article.
Read more: 5 things to do after a hack »
WordPress for beginners series
SEO Company by DBL07.co
source http://www.scpie.org/wordpress-security-in-a-few-easy-steps/ source https://scpie1.blogspot.com/2020/04/wordpress-security-in-few-easy-steps.html
0 notes
Text
At Last, the Secret to WORDPRESS HOSTING Is Revealed
New Post has been published on https://martechguide.com/wpengine-wordpress-hosting-benefits/
At Last, the Secret to WORDPRESS HOSTING Is Revealed
Table of Content
What Is CMS?
What CMS’s are available?
WordPress is World’s Most popular CMS
TOP 3 CMS’s to look at
What is WPEngine?
Why WPengine is best wordpress hosting site?
Incomparable features in wpengine
Website Performance Optimization features in WPengine
WPengine WordPress Hosting Speed Test report
Get your FREE 3 months Trial Offer Use code JULY3FREE to get 3 months free on annual shared plans. Valid through July 31, 2020.
Create WordPress sites and content quickly with prebuilt content blocks, sections and full page layouts using Genesis Pro!
I have 9 websites are running on different shared hosting servers. Some are blog sites, educational websites and some e-commerce website. Most of the websites are having heavy content and some only moderate content. So when I look at hosting provider, I give emphasis on overall performance of website.
I have tried many shared servers including net4india, Hostgator, Godaddy and inmotion hosting. I personally found inmotion hosting giving fantastic performance. In this post “Migrating hosting server from HostGator to inmotion hosting” I have given detailed analysis why inmotion is the best.
But still for me to make my WordPress website faster, I had to spend a lot of money in getting many plugins and website booster application. So if you have decided to make your website only in wordpress CMS then this piece of information is very much important, which I learnt after experimenting for years.
What Is CMS?
CMS stands for content management system; a content management system is software that helps users create, manage, and modify content on a website without the need for specialized technical knowledge. So if you do not have knowledge of coding or HTML or PHP, you don’t need to worry you. Using CMS like WordPress you can easily make a good looking and fully functional website easily.
What CMS’s are available?
There are many CMS’s available for people to use and make website of their choice. Some of the popular CMS’s are WordPress, Drupal, Magento, WPEngine, Prestashop, Moodle, Wix, and so On… you can find huge list of CMS’s in your Hosting Cpanel
WordPress is World’s Most popular CMS
Market Share of WordPress globally
TOP 3 CMS’s to look at
Let’s understand the Top3 CMS and how they are going to be useful for you to start making your website.
WordPress.org is an open source CMS available. There are plenty of wordpress developers who developed millions of themes, plugins, widgets which can be used to make a website. The biggest drawback is, that all the plugins ,themes and widgets are developed by many different independent developers and when you use them on your website it leads to conflict in the scripts and worst part is that the codes are not optimized for superior performance and its performance is impacted. This leads to slow loading of your website and search engines DO NOT like slow websites, which impacts your websites ranking in search engines.
Point to note: more plugins will certainly slows down your wordpress website and you might need to get it optimized by a php developer, which might cost you a lot. That’s the reason most of the website are hard coded by the php developers in wordpress.
Drupal: this is one of the most powerful CMS for making a enterprise level of a website, but certainly it’s not easy for a non-technical person to work and edit the website content. It requires understanding of web development and coding skills.
Wpengine: one of the most advanced managed hosting service provider for the wordpress websites and it’s only top of the list in the paid wordpress hosting as per the builtwith.com website result.
What is WPEngine?
WP Engine is the leading WordPress hosting platform. Wpengine platform give more agility in building the website, provides cloud hosting & higher security ( Cloud hosting performance is highest compared to shared hosting). They also have integrated wordpress website optimization tools and other partner integration tools included.
Why WPengine is best wordpress hosting site?
Wpengine integrate with best-in-class technology partners. They are partnered with Google, hubspot, cloudflare, AWS, and New Relic, and optimize their technology specifically for WordPress.
Incomparable features in wpengine
StudioPress Themes
Build amazing, mobile-responsive WordPress digital experiences with 36 easy-to-use, premium themes powered by our Genesis Framework, featuring built-in SEO and security, and all included in your WP Engine plan. Explore Studio Press Themes
Auto Migration
Your move to WP Engine is as simple as a couple of clicks using our auto migration plugin. Explore auto site migration
Deploy Site
Easily move data between your cloud development environments on WP Engine.
Git and SFTP Connections
Let your development team keep using their favorite development tools to increase productivity and collaboration.
One-Click Staging
Use tools to simplify and shorten development cycles through rapid testing of changes so you’re never surprised. Creating a testing environment of a website is easy just by doing a click. Explore One Click Staging
Dev, Stage, Prod Environments
Every WP Engine site comes with three environments to help you quickly set up an efficient development workflow. Explore Environments
Automated Backups
WPengine perform daily backups on your digital experience to give you peace of mind in case you run into any site issues.
WordPress Core Updates
WPengine handle all major updates automatically to ensure sites stay up-to-date, and test the minor updates before recommending them.
Free CDN and SSL Certificates
WP Engine makes it easy to scale your site up with CDN and keep your transactions safe with SSL—just add them with a single click.
Multi-Site Conversion
WP Engine lets you set up and turn off multisite with just a few clicks in our User Portal.
User Permissions
Our interface makes it easy for you to ensure all users have the proper roles and access, making it easy for you to add or delete users and change permissions.
SSH Gateway
Save time by efficiently managing any number of WordPress sites through the command line.
Ownership Transfer
Provides an easy way for agencies or freelancers to transition site ownership and billing to clients post launch.
Activity Log
Gain visibility on your account, including updates and published content, and use the activity log to help provide governance.
GeoTarget
Provides location specific content for your audiences increasing engagement and transactions.
WordPress Plugins
WPEngine helps you by powering a wide variety of personalized experiences through plugins and custom functionality.Check Migration Plugin
WordPress Content Creation Tool
Publish quality content at scale with WordPress, a world-class CMS that increases creative agility through collaboration and ease of use.Check Genesis Pro- Content Creation Plugin
Website Performance Optimization features in WPengine
Amazon Web Services
As an AWS Advanced Technology Partner, WPengine offer a range of solutions that meet the needs of customers seeking high-performance optimized for WordPress.
Global Data Centers
They have servers across the United States, Europe, the Middle East, Africa, and in the Asia-Pacific region.
Data Center Redundancy
Keep your data safe and sound with Amazon Web Services.
Uptime Protection
Stay up and running with clustered configurations in dedicated environments, fully-managed content delivery network, and proactive, multi-layered security measures.
PHP 7.4 and HTTP/2 Enabled
Get better SEO, visitor retention, and conversions with the latest updates, which can serve up to 3x more requests per second.
Proprietary EverCache®
Reduce strain on your site’s resources with our caching solution, which is capable of moving hundreds of millions of hits per day through our system.
Fully Managed Global CDN
Load content faster with our global content delivery network (CDN), which routes local requests to the nearest server.
Increased Speed
As per the results the websites on WPengine are having 38% faster load time.
Multi-Factor Authentication
Complex passwords enforced on WordPress sites and the WP Engine User Portal by default. Add a layer of security to the user portal with multi-factor authentication (MFA) technology.
Traffic Encryption with SSL
Use free SSL certificates on every page thanks to Let’s Encrypt.
Threat Detection & Blocking
Dynamically detect and block malicious behavior with their proprietary system, making sure your site doesn’t suffer embarrassing hacks.
Disaster Recovery
In the unlikely event site is compromised, bounce back quickly with their expert recovery help.
WPengine WordPress Hosting Speed Test report
Pingdom Speed Test Report: This is regarded as as the fastest wordpress hosting & Theme;
Gtmetrix performance report
I strongly recommend to use WPengine managed hosting. if you are looking for a professional solution to your wordpress website with great performance and top ranking in search engines.
Get your FREE 3 months Trial Offer Use code JULY3FREE to get 3 months free on annual shared plans. Valid through July 31, 2020.
0 notes
Text
WordPress security in a few easy steps
Michiel Heijmans
Michiel is a partner at Yoast and our COO. Internet veteran. His main goal with most of his articles is to kick-start your site optimization. So much to do!
If you’re working with or using WordPress, then you should always think about your site’s security. WordPress isn’t any more or less secure than any other platform, but the number of users, plugins and third party add-ons make it a common target for attackers. Don’t worry though, there are some basic steps you can take to keep your site safe (even if you’re not very tech-savvy)!
New to WordPress? Our FREE WordPress for beginners training is here to help. Find out how to set up your own site, learn the ins and outs of creating and maintaining it, and more. This training is part of our free training subscription, take a look at all our online SEO training subscriptions!
Table of contents
1. Don’t use ‘admin’ as a username
Most WordPress ‘hacks’ and attacks don’t do anything more sophisticated than try and brute-force their way into your admin area by guessing your password. That’s much easier for them to do if they don’t also have to guess your admin username! Avoiding using common words (like admin) for your usernames can make brute-force attacks much less effective.
If you’re working with an older site that already has an ‘admin’ user, it might be time to delete that account and transfer any content or access to a more secure username!
2. Use a complex password
Having a better password can make it much harder to guess or to brute-force. An easy tip to remember is CLU: Complex. Long. Unique.
But longer, unique passwords can be hard to remember, right? That’s where tools like 1Password and LastPass come into play, as they each have password generators. You type in the required length, and it generates a password for you. You save the link, save the password, and move on with your day. Depending on how secure you want the password to be, it’s sensible to set a long password (20 characters is good) and decide on things like the inclusion of less usual characters like # or *.
3. Add two-factor authentication
Even if you’re not using ‘admin’ and have a strong, randomly generated password, brute-force attacks can still be a problem. Don’t worry though, two-factor authentication can help protect your site.
The principle is that, rather than just entering your login details, you also need to confirm that you’re you by entering a one-time code from another device you own (usually through an app on your phone). That’s much harder for attackers to fake!
Two popular plugins for handling authentification in WordPress are the Google Authenticator and Rublon Plugin (which takes a slightly different approach). Just make sure that you don’t lose your backup codes, or you might find yourself locked out.
4. Employ least privileged principles
The WordPress.org team has put together a great article in the WordPress Codex regarding Roles and Capabilities. We encourage you to read it and become familiar with it because it applies to the following step.
The concept of Least Privileged is simple. Only give permissions to:
those that need it,
when they need it and
only for the time they need it.
If someone requires temporary administrator access for a configuration change, grant it, but then remove it upon completion of the task. The good news is you don’t have to do much here, other than employ best practices.
Contrary to popular belief, not every user accessing your WordPress instance needs to be categorized under the administrator role. Assign people to the appropriate roles, and you’ll greatly reduce your security risk.
5. Hide wp-config.php and .htaccess
Your wp-config.php and .htaccessfile are critical to your WordPress security. They often contain your system credentials and expose information about your site’s structure and configuration. Ensuring that attackers can’t gain access to them is vital.
Hiding these files is relatively easy to do, but doing it wrong might make your site inaccessible. Make a backup and proceed with caution. Yoast SEO Company for WordPress makes this process somewhat easier for you. Just go to “Tools > File Editor” to edit your .htaccess.
For better WordPress security, you will need to add this to your .htaccess file to protect wp-config.php:
<Files wp-config.php> order allow,deny deny from all </Files>
That will prevent the file from being accessed. Similar code can be used for your .htaccess file itself:
<Files .htaccess> order allow,deny deny from all </Files>
6. Use WordPress security keys for authentication
‘Authentication keys’ and ‘salts’ are basically a set of random variables, unique to your website, which improve the security (encryption) of information in cookies.
Your wp-config.php file has a dedicated area where you can provide your own variables (simply get a new set of keys from here and paste them in).
7. Disable file editing
If a hacker gets in, the easiest way for them to change your files would be to go to “Appearance > Editor” in WordPress. To improve your WordPress security, you could disable the editing of these files via that editor. Again, you can do this from within your wp-config.php file by adding this line of code:
define('DISALLOW_FILE_EDIT', true);
You will still be able to edit your templates via your favorite (S)FTP application. You just won’t be able to do it via WordPress itself.
8. Hide your login and limit login attempts
Brute-force attacks usually target your login form. So changing where that lives can make it harder for attackers to get in. The All in One WP Security & Firewall plugin has an option to simply change the default URL (from /wp-admin/) to something more secure.
Next to that, you can also limit the number of attempts to log in from a certain IP address. There are several WordPress plugins to help you protect your login form from IP addresses that fire a multitude of login attempts your way.
9. Be selective with XML-RPC
XML-RPC is an application program interface (API) that’s been around for a while. It’s used by a number of plugins and themes, so we caution the less technical to be mindful of how they implement this specific hardening tip.
While functional, disabling can come at a cost. This is why we don’t recommend disabling for everything, but being more selective on how and what you allow to access it. In WordPress, if you use Jetpack you’ll want to be extra careful here.
There are a number of plugins that help you be very selective in the way you implement and disable XML-RPC by default.
10. Hosting & WordPress security
Even if you’re meticulous when it comes to the security of your website, if it’s hosted by a company that isn’t just as meticulous, you may as well not have done anything at all.
If an attacker can gain access to your website hosting, they can take complete control of everything. That means it’s really important that you choose (or move to) a host that takes hosting seriously. Cheaper hosting options often don’t come with good security or backups, or might not offer support to help you clean up a hacked site.
Shared hosting (which is common on cheap packages) is often particularly risky, as attackers might be able to gain access to your site via another compromised site on the same system. That’s why we always recommend serious users to spend a little more on hosting and use a company with a great reputation for specialized WordPress hosting (for example GoDaddy or WP Engine).
11. Stay up to date
Staying up to date is an easy statement to make, but we realize how hard this can be for website owners in the day-to-day. Our websites are complex beings. They have many different things happening at any given time. And sometimes it’s difficult to apply the changes quickly. That’s why it’s not uncommon for websites to end up running out-of-date code. Both in their plugins and core software. Unfortunately, this makes them particularly vulnerable to known exploits.
It’s critical that updating your themes, software, plugins, and other components is part of an ongoing routine. Otherwise, you’re leaving the door open to attackers. If you’re a user of the Yoast SEO Company plugin, just follow these easy steps to update your Yoast SEO plugin.
12. Put more security layers in place
The best security solutions prevent attackers from ever getting anywhere near your website. That’s why we recommend that most sites run some kind of WordPress firewall plugin. These plugins look for known attackers and common attack patterns and stop them before they have a chance to compromise your site.
It’s also worth considering that many Content Delivery Systems now include firewall functionality; combining performance optimization with protection. Cloudflare, in particular, does a great job of blocking ‘bad traffic’ and even has rules and scans specifically developed to protect WordPress sites.
13. The best security plugins & themes
Most WordPress users tend to apply themes and plugins to their sites at will. We recommend being mindful of testing different themes or plugins, especially if you’re not using a test server. Most plugins and a lot of themes are free, and unless the developer has a solid business model to accompany these free giveaways, the security might not have been the highest priority during development. In other words, if a developer is maintaining a plugin just because it’s good fun, chances are he or she did not take the time to do proper security checks.
For this reason, we teamed up with Sucuri years ago to make sure every one of our plugins is checked for security before release. And we have an agreement with them for ongoing checks as well. If you are creating a free theme or plugin, you might not have the resources to add solid checks like that.
How to pick the right plugin
If you want to be taken by the hand in selecting the right WordPress security plugin for your website, please read this in-depth article Tony Perez did on the subject: Understanding the WordPress Security Plugin Ecosystem.
First, let me focus on the basics of plugin selection here. As explained above, free plugins and themes could be a possible vulnerability. When adding a plugin (or theme for that matter), always check the rating of that plugin on WordPress.org. Keep in mind that one 5-star rating won’t tell you anything, so always check the number of ratings. Depending on the niche, a plugin should be able to get multiple reviews. If more people think a plugin is awesome and take the time to rate it, you may feel more secure in using it too.
Compatibility of the plugin
There is one other thing you want to check. If a plugin hasn’t been updated for two years, WordPress will tell you that. Now, this doesn’t necessarily mean it’s a bad plugin. It could also mean there hasn’t been a need to update it, simply because the plugin still works. The ratings will help you decide if that’s the case. And have a look at the compatibility with the current WordPress version, which is also shown on the plugin page at wordpress.org. Having said that, Sucuri strongly recommends against using any plugins that haven’t been updated for that long. You should take their word for it.
Based on ratings and compatibility, you can pick your plugins thoughtfully and be mindful about your WordPress security at the same time.
Yoast recommends Sucuri
I’ve already mentioned our friends at Sucuri. Owners and managers Daniel and Tony have done a tremendous job on our plugins and have helped on several hacked websites in the past.
Sucuri is a globally recognized website security company known for its ability to clean and protect websites and bringing peace of mind to website owners, including us here at Yoast.
We teamed up with Sucuri because we take security very seriously. It’s not and never should be an afterthought. There is a variety of ways to address WordPress security, and we found that security was best addressed remotely at the edge beyond the application. What Daniel and Tony have built is a product/service that lets you get back to running your business. They are the security team we lean on when we need help the most. And they can help you out too. For instance, if you use WordPress, definitely read their WordPress guide on how to clean a hacked WordPress site.
Webinar Sucuri: how do websites get hacked?
If you’re wondering why websites get hacked and what type of attacks there are, watch Sucuri’s webinar on this subject:
youtube
Failing to take the necessary precautions for your WordPress security, and leveraging the experts can lead to malware infections, branding issues, Google blacklists and possibly have huge impacts on your SEO (something dear to our hearts). Because of this, we turn to Sucuri for our needs, as they turn to us for website optimization.
Moreover, Sucuri created an infographic on what to do when your site does get hacked:
A lot of the suggestions in this article can be dealt with by installing and configuring the free Sucuri Scanner plugin for WordPress or hiring Sucuri to handle your website’s security. At Yoast, we don’t think this is an ‘extra’, but consider it an absolute necessity. For us, security is not a DIY project, which is why we leave it to the professionals. Visit their website at sucuri.net for more information or check your site now to make sure you haven’t been infected with malware or have been blacklisted.
If you are serious about your website, you are serious about your security. Get the complete security package of Website Security Stack right here:
Get your Sucuri Website Security Stack NOW
14. Don’t forget logs & monitoring
So far, we’ve seen how to secure a WordPress site. However, since WordPress security is not an absolute (sites are always evolving by changing functionality and users) there is another aspect to WordPress security: logging and monitoring. Audit logs or activity logs are a chronological record of events and changes that happened on your website. In the audit logs you can find information on who logged into your site, installed or updated a plugin, changed the content, changed the site’s settings, and more.
Spot attacks before they happen
By keeping an audit log on your WordPress site you ensure user accountability, ease troubleshooting of technical issues, and spot attacks before or as they happen, allowing you to take evasive action to stop them. Audit logs are also used for forensics, to find out what went wrong in the unfortunate case of a successful hack. To keep an audit log on your WordPress site you need to install a plugin such as WP Security Audit Log.
There are several other things you should keep an eye on. For example, if you use Sucuri you’ll get a weekly traffic report with details on what was blocked and allowed. You can learn a lot from it, as well as from your website’s analytics and traffic patterns.
Closing thoughts on WordPress security
If you’ve come this far in this article, you will have no more excuse not to improve WordPress security for your website. Much like adding posts and pages, checking your WordPress security should be a routine for every WordPress site owner.
Also bear in mind that this isn’t the full list of things you can do to secure your website. I am aware that one should, for instance, create regular backups to keep your site secure. However, I trust this article about WordPress security gives you a practical list of things you can and should do to secure at least the first layer of defense of your website. Remember, WordPress security isn’t an absolute, and it’s up to us to make it harder for the hackers!
I would also like to thank Tony Perez for his input and several additions to this article.
Read more: 5 things to do after a hack »
WordPress for beginners series
SEO Company by DBL07.co
source http://www.scpie.org/wordpress-security-in-a-few-easy-steps/
0 notes