#how to export figma to html
Explore tagged Tumblr posts
Visit Tumblr Blog
Explore Tumblr blogs with no restrictions, modern design and the best experience.
Last Seen Tumblr Blogs


Fun Fact
Celebrities use Tumblr as well.
Text
0 notes
Note
hii!! uh starting writer here, can you pls make a tutorial of how to make the dividers? yours is so pretty!! and i kinda want to do something like that too 🫶
my dividers i use figma! i’m a ux designer so it was easy for me to use 😭
figma is free if you want to try it out but i did download a plugin to export gifs as normally figma doesn’t export .gif
you can use anything that lets you use masks!
for the gradient text dividers i use a html code creator (https://jsfiddle.net/j7vLfbw1/22/)
good luck <3
11 notes
·
View notes
Text
What is Canva Code? Canva Create 2025 Reveals a Game-Changing Innovation

At the Canva Create 2025 event, Canva broadened its platform significantly, moving beyond just graphic design into AI tools, enterprise-grade features, and — for the first time — developer-friendly functionality. One of the most talked-about additions was Canva Code, a built-in coding environment within the platform.
It allows users to not only visually design elements but also modify the code behind them using HTML, CSS, and JavaScript. This feature empowers collaboration between designers and developers, signaling a larger industry trend towards low-code and no-code accessibility.
What is Canva Code?
Canva Code is an integrated code editor that lives directly within Canva’s interface. Unlike traditional design-to-code tools, it gives users the ability to directly customize the logic, behavior, and appearance of their projects using front-end languages.
Whether you're tweaking layout styles, injecting interactive JavaScript, or connecting to third-party APIs, Canva Code offers a developer-like experience within a visual design platform. It brings together elements of Figma’s Dev Mode, Webflow’s visual-coding fusion, and a lightweight version of VS Code — all streamlined into one tool.
Building Interactive Designs Made Easy: The Power of Canva Code’s AI and No-Code Features

No-code coding: Users can build interactive experiences with Canva Code without having to start from scratch with code. Canva Code will create the required code if you only specify the needed functionality.
Interactivity: Users may incorporate interactive components into any Canva design, such as price calculators and mini-games.
Code editor: Although Canva Code streamlines the coding process, it also provides an integrated code editor that allows users to manually update the code and link it to APIs for more intricate features.
AI-powered: Canva Code makes it simpler for anybody to create interactive designs by using AI to produce code in response to user input.
Use versatility: Canva Code may be applied to a wide range of Canva forms, such as papers, presentations, social media posts, and even webpages.
What's Different About Canva Code?
Traditional platforms often allow design export as HTML/CSS, but Canva Code goes far beyond that. It offers:
Canva's live editing feature– No need to switch between platforms.
Real-time code updates – Changes to your code reflect instantly on the design canvas.
Integration with Canva AI tools – Seamless use of design intelligence across projects.
Coming soon: One-click deployment – Direct publishing of coded widgets or microsites.
This makes Canva not just a design solution, but a complete creation and development platform, bridging gaps between idea, design, and execution.
Canva Code's key attributes
With Canva Code, users can:
Access and edit auto-generated HTML/CSS directly from their design.
Write JavaScript functions to add interactivity or custom logic.
Integrate third-party APIs and backend services.
Make component-level edits with class/state logic.
All code updates are live — you can preview, test, and even embed or export your design without leaving the Canva interface.
Canva Code: Who Should Use It?
Canva Code is perfect for a wide range of hybrid users:
Designers who want control over responsiveness and interactivity.
Developers seeking a fast way to prototype ideas without spinning up separate environments.
Small teams or startups aiming to bridge design and code without complex workflows.
Educators or solopreneurs creating web-based learning tools, calculators, or games.
This platform is especially valuable to creators who want to move from concept to launch — fast and without barriers.
How AI Is Used in Canva Code

AI plays a central role in Canva Code. Here’s how:
Auto-generation of responsive layouts based on your design intent.
Intelligent code recommendations to optimize your project.
Convert designs to clean, semantic HTML for accessibility and SEO.
Natural language debugging and coding help, similar to ChatGPT's assistance.
This makes the coding experience feel intuitive, even for those who are not deeply technical, and provides real-time support for problem-solving.
How Canva Code Is Used
To get started with Canva Code:
Open Canva:Access Canva via your web browser or app and log in.
Navigate to Canva Code:Use the sidebar or search to find “Code for me” under Canva AI. This initiates the smart coding prompt interface.
Describe What You Want:Type a prompt like: “Build a quiz app for 5th graders” or “Create a price calculator with three input fields.” Add visual preferences or functionality.
Refine Through Chat:Didn’t get it right the first time? Continue prompting the AI to adjust layout, structure, or behavior.
Use or Share Your Code:Embed your new widget into existing Canva designs, export the code, or soon — publish it live with Canva’s upcoming deployment feature.
Canva Code in Action: Real-World Examples

Below are three real-life use cases demonstrating the power and flexibility of Canva Code:
Flash Card Game for 2nd Grade
Prompt: “Create a flashcard game for addition/subtraction for 2nd graders.”
Result: A colorful, responsive quiz interface powered by basic math logic.
To-Do List App
Prompt: “Design a fun UI for a daily to-do list app.”
Result: An interactive checklist with playful styling and functional state management.
Custom Price Calculator
Prompt: “Build a calculator that estimates service costs based on input values.”
Result: A live form with logic tied to service categories and pricing tiers.
These use cases showcase Canva Code's versatility — ideal for educators, freelancers, and product teams building lightweight tools without deep backend integration.
Additional Highlights of Canva Create 2025
In addition to Canva Code, the event introduced several major upgrades:
Real-Time Collaboration – Teams can now work together on the same design live, increasing workflow speed.
3D and Animation Tools – Create animated, interactive visuals with new 3D assets and motion features.
Expanded Brand Hub – Centralized asset management including fonts, logos, and templates for brand consistency.
Template Library Boost – A wider range of professional templates for presentations, social posts, and more.
Revamped Canva Video Suite – Advanced editing tools make Canva a serious contender in the video creation space.
Canva Assistant (AI) – A smart assistant offering live design advice, layout suggestions, and troubleshooting help.
Final Thoughts
Canva Code marks a transformative step in the world of collaborative creation. By blending design, development, and AI-powered assistance into a unified workflow, it democratizes the building of functional digital products. For creators who want both control and speed, whether designers dabbling in code or developers seeking visual structure, Canva Code offers a frictionless, future-ready solution.
As AI continues to reshape creative tools, Canva is leading the charge with a platform that makes building, prototyping, and launching as simple as designing a slide.
At CQLSYS Technologies, we build innovative, user-friendly mobile and web apps for startups and enterprises worldwide. Specializing in AI, Flutter, PWA, and cross-platform development, we deliver scalable, future-ready solutions across industries like transport, e-commerce, healthcare, and more. As tools like Canva Code reshape the tech landscape, we stay ahead with modern stacks and low-code options. Partner with CQLSYS for fast, creative, end-to-end digital innovation. Visit www.cqlsys.com to get started.
#mobile apps development companies#custom mobile app development company#android apps development#ai generated#canva#graphic design#no code platforms#low code app development#ai app development
0 notes
Text
Effortless Figma to Elementor Conversion for Your WordPress Needs
When it comes to building dynamic, aesthetically appealing websites for WordPress, the integration of design tools with page builders is crucial. Figma and Elementor are two powerful platforms that, when combined, can take your web design to the next level. The process of converting Figma designs into Elementor layouts might seem daunting at first, but with the right strategies and tools, the transition from Figma to Elementor can be incredibly seamless. This guide will help you understand how to effortlessly perform a figma to elementor conversion, ensuring your website looks exactly as envisioned and functions perfectly.
Understanding Figma to Elementor Conversion
Figma is a popular design tool widely used by UX/UI designers to create wireframes, prototypes, and high-fidelity mockups. Elementor, on the other hand, is a drag-and-drop page builder for WordPress that allows users to build stunning websites without needing to write a single line of code. The combination of these two tools makes designing and building a website faster and more efficient.
The key to a successful Figma to Elementor conversion lies in understanding the relationship between a static design and the dynamic elements that Elementor offers. While Figma provides an accurate visual representation of how a page should look, Elementor helps translate that design into a fully functional website. With the right workflow, converting your Figma designs into Elementor pages becomes a straightforward task.
Preparing Your Figma Design for Elementor
Before diving into the actual Figma to Elementor conversion, it’s important to ensure that your Figma design is structured in a way that is compatible with Elementor. Start by ensuring that your design is clean, organized, and broken down into sections that make sense for a web page layout. Proper use of grids, alignments, and spacing in Figma will make the conversion process smoother.
Additionally, ensure that all the images, typography, and colors used in your Figma design are clearly defined. By keeping a consistent design language, you’ll save time when transferring assets into Elementor. It’s also helpful to export Figma elements like icons, logos, and images in high-quality formats that are optimized for the web. This will ensure that the design’s integrity remains intact when using Elementor.
Tools for Effortless Figma to Elementor Conversion
There are several tools available that can significantly speed up the Figma to Elementor conversion process. For instance, there are plugins that allow you to import your Figma design directly into Elementor, reducing the manual effort of recreating each element. These tools automatically map the visual elements from Figma to their Elementor counterparts, preserving the design’s layout, typography, and other key components.
Additionally, using a Figma-to-HTML converter can also streamline the conversion. This tool generates an HTML version of your Figma design, which can then be imported into Elementor as custom HTML. Once you have the design in Elementor, you can further refine it using Elementor’s advanced styling options to ensure that it matches the original Figma design.
Steps for Converting Figma to Elementor
The process of converting Figma to Elementor involves several key steps that can be broken down into manageable tasks. First, begin by preparing your design files in Figma for export. This involves ensuring that all elements are grouped and organized in layers, so they can be easily manipulated once in Elementor.
Next, export the Figma files you need, such as images, icons, and any other assets you want to keep. These files should be saved in a web-friendly format, such as PNG or SVG, ensuring that they retain their clarity and resolution when used on your WordPress website. Now, create a new page or post in WordPress and open it with Elementor. Begin the process of building your page by replicating the design structure from Figma, using Elementor’s widgets to add elements like text, images, and buttons.
For more advanced users, Elementor allows custom CSS and HTML integration, which can be used to fine-tune the design to match Figma precisely. During this stage of the Figma to Elementor conversion, be mindful of responsiveness. Make sure your design looks great on both desktop and mobile devices by utilizing Elementor’s responsive editing features.
Customizing Your Elementor Design
Once the basic structure of your page is built, it’s time to dive into the customization options that Elementor offers. Elementor’s theme builder allows you to fine-tune the design by customizing headers, footers, and even global design settings like fonts, colors, and spacing. This gives you full control over the look and feel of your website while keeping it in line with the original Figma design.
You can also take advantage of Elementor’s advanced features, such as animations, hover effects, and dynamic content. These features enable you to add interactivity and visual appeal to your website, which might not be possible with static Figma designs alone.
Testing and Refining Your Figma to Elementor Conversion
After the Figma to Elementor conversion is complete, it’s important to thoroughly test your website for functionality and visual consistency. This includes checking how it looks on different devices and browsers to ensure that your design remains responsive and fully functional across various platforms. You may need to adjust certain elements for optimal display, especially for mobile users.
Additionally, check for any broken links, missing images, or alignment issues that might have occurred during the conversion process. Elementor’s preview mode allows you to see how your design will look once published, which is an essential step before going live with the new page.
Conclusion
The process of Figma to Elementor conversion doesn’t have to be time-consuming or complicated. With careful planning, the right tools, and an understanding of how to leverage both platforms effectively, you can easily turn your Figma designs into fully functional WordPress pages. Whether you’re a designer or developer, mastering this workflow will help streamline your web design process and ensure that your website looks exactly as envisioned.
1 note
·
View note
Text
Transforming Designs: How to Convert Figma to WordPress Effectively
In the dynamic world of web development, transforming a meticulously crafted design into a functional website is both an art and a science. Figma, a robust design tool, is increasingly becoming the go-to for web designers due to its collaborative features and versatility. However, converting Figma designs into a WordPress site can be a daunting task if you're not well-versed in the process. This blog aims to demystify the conversion process and provide a clear roadmap for developers and designers alike.

Why Choose WordPress for Your Website?
Before diving into the conversion process, it’s essential to understand why WordPress is the platform of choice for many developers. WordPress powers over 40% of all websites on the internet, thanks to its flexibility, scalability, and user-friendly interface. Custom WordPress development allows for the creation of unique, feature-rich websites that cater to specific business needs.
Benefits of Converting Figma Designs to WordPress
Visual Precision: Figma’s vector-based design system ensures that your website looks exactly as you envisioned it.
Collaboration: Figma’s collaborative tools allow designers and developers to work together seamlessly, ensuring that the final product aligns with the initial design.
Efficiency: Converting designs from Figma to WordPress can streamline the development process, saving time and reducing errors.
Step-by-Step Guide to Convert Figma to WordPress
Step 1: Prepare Your Figma Design
Organize Layers: Ensure that your Figma design is well-organized with named layers and groups. This will make the development process smoother.
Responsive Design: Check that your design is responsive, meaning it will look good on various devices and screen sizes.
Step 2: Export Assets from Figma
Images and Icons: Export all images, icons, and other graphical elements from Figma. Ensure they are in the correct formats (e.g., PNG, SVG) and resolutions.
CSS and Styles: Use Figma’s built-in tools to extract CSS styles for text, buttons, and other elements.
Step 3: Set Up Your WordPress Environment
Local Development Environment: Set up a local development environment using tools like XAMPP, WAMP, or Local by Flywheel.
Install WordPress: Download and install the latest version of WordPress on your local environment.
Step 4: Develop the WordPress Theme
HTML and CSS: Create HTML and CSS files based on your Figma design. Start with a basic HTML structure and gradually add styles.
Theme Structure: Follow the WordPress theme hierarchy to create essential files like header.php, footer.php, index.php, style.css, and functions.php.
Template Files: Use WordPress template files to define different parts of your site, such as the homepage, single posts, and pages.
Step 5: Implement Functionality
Custom Post Types: Define custom post types in functions.php if your site requires specific content types.
Advanced Custom Fields (ACF): Use the ACF plugin to create custom fields and add more flexibility to your content management.
Plugins: Install necessary plugins to add functionality like SEO, security, and performance optimization.
Step 6: Test and Optimize
Cross-Browser Testing: Ensure your site works well across different browsers and devices.
Performance Optimization: Optimize images, minify CSS and JavaScript files, and leverage caching to improve site performance.
SEO: Implement SEO best practices, including meta tags, alt texts for images, and a clean URL structure.
Common Challenges and Solutions
Responsive Design Issues: Use media queries in CSS to ensure that your site looks good on all devices.
Alignment and Spacing: Pay close attention to the spacing and alignment of elements to ensure they match your Figma design.
Complex Animations: Use CSS and JavaScript libraries like Animate.css or GSAP to recreate complex animations.
Tools and Plugins to Facilitate the Conversion
Figma to HTML Tools: Tools like Anima or Figma2HTML can automate parts of the conversion process.
WordPress Page Builders: Elementor or Beaver Builder can help you build complex layouts without extensive coding.
Theme Frameworks: Use frameworks like Genesis or Underscores to speed up theme development.
Conclusion
Converting Figma designs to WordPress involves a combination of design precision and coding expertise. By following the steps outlined above, you can ensure a smooth and efficient conversion process, resulting in a stunning, fully functional WordPress website. Whether you’re a designer looking to bring your vision to life or a developer aiming to streamline your workflow, mastering the Figma to WordPress conversion process is an invaluable skill in the realm of custom WordPress development.
0 notes
Text
How to Export Figma to HTML Code: Step-by-Step Guide
In the world of web design and development, efficiency is key. One tool that has revolutionized the design process is Figma, a cloud-based design platform that allows teams to collaborate in real-time. However, once the design phase is complete, the next step is to convert those stunning visuals into functional code. This is where knowing how to export Figma to HTML comes into play.
Understanding the Figma to HTML Process
Figma to HTML is the bridge that transforms your design files into a web-ready format. This process involves translating the visual elements, such as images, text, and layouts, into HTML code that browsers can understand and render as a website.
Step 1: Organize Your Figma Design
Before exporting to HTML, it's essential to have a well-organized Figma design. Ensure that all layers are named appropriately, and elements are grouped logically. This will make the conversion process much smoother.
Step 2: Export Assets
Start by exporting any images, icons, or other assets used in your design. Figma provides an easy-to-use export feature that allows you to select and save individual elements as PNGs, SVGs, or other common image formats. Remember to keep track of where you save these files, as you'll need to reference them later.
Step 3: Use a Figma to HTML Converter
There are several tools available online that specialize in converting Figma designs to HTML code. These converters streamline the process, saving time and ensuring accuracy. Simply upload your Figma file, and the converter will generate the corresponding HTML code.
Figma to HTML converters are equipped to handle various design elements, from basic shapes and text to more complex features like gradients and shadows. This ensures that your design is faithfully translated into code.
Step 4: Review and Adjust
Once you have the initial HTML code, it's crucial to review the output. Check for any discrepancies between the design and the generated code. This could include spacing issues, font styles, or any other visual elements that may need adjustment.
Step 5: Add Interactivity with CSS and JavaScript
While the Figma to HTML converter does an excellent job of translating the visual elements, you may need to add interactivity using CSS and JavaScript. This includes animations, transitions, and responsive design elements that enhance the user experience.
Step 6: Test Across Browsers and Devices
Before finalizing your HTML code, it's essential to test it across different browsers and devices to ensure compatibility. This step helps identify any potential issues that may arise when the website is live.
Step 7: Optimize for Performance
Optimizing your HTML code is crucial for ensuring fast load times and a seamless user experience. This involves minimizing unnecessary code, compressing images, and utilizing techniques like lazy loading to prioritize content.
Step 8: Deploy Your Website
With your HTML code ready and optimized, it's time to deploy your website to a hosting platform. Choose a reliable hosting provider that offers the resources and support you need to keep your site running smoothly.
Conclusion
Knowing how to export Figma to HTML opens up a world of possibilities for designers and developers alike. It streamlines the transition from design to code, saving time and ensuring a seamless user experience. By following these steps, you can confidently convert your Figma designs into functional, web-ready HTML code. Embrace the power of Figma to HTML conversion and elevate your web design projects to new heights.
0 notes
Text
Figma to HTML: A Simple Guide To Converting Figma To HTML

Table of contents
What is Figma to HTML Conversion?
How can converting Figma designs to HTML benefit your business?
What are Figma designs?
Key features of Figma
Steps to convert the Figma designs to HTML
Design Preparation
Design export
Converting Figma designs to HTML
Handling responsive design
Testing the HTML output
Final testing and debugging
6. FAQs 7. Conclusion
A top-notch website is necessary these days for a business to reach success and get the right results. Developing a website is a huge challenge, but it can be achieved by employing the correct strategies and technologies. You can leverage the Figma to HTML Conversion Service to get a functional website developed with designs of your choice.
A reputed and reliable Figma to HTML Conversion Service provider can deliver a world-class website. Figma has emerged as a popular choice among developers and business owners. So, if you are looking to gain in-depth knowledge of Figma to HTML Conversion, then this blog will answer all your questions.
What is Figma to HTML Conversion?
The question that must be popping into your mind is, Why convert Figma to HTML? Figma is a cloud-based design tool that offers multiple benefits and conveniences to developers. Figma to HTML Conversion refers to the process of transforming your website design that is in the Figma format into a full-fledged HTML website.
Designers and developers translate the visual components, layout, and assets from the Figma design into HTML, CSS, and JavaScript code during the Figma to HTML conversion process. According to the Figma design guidelines, this assists in rebuilding the design framework, applying styles, and adding interaction.
What are Figma designs?
Figma designs are Digital visual representations that are created using the Figma design tool. Figma offers a pool of features and capabilities that enable designers to realize their original ideas. These designs consist of website details like the font, color, layout, theme, etc. Developers can utilize a Figma design file to further develop the website.
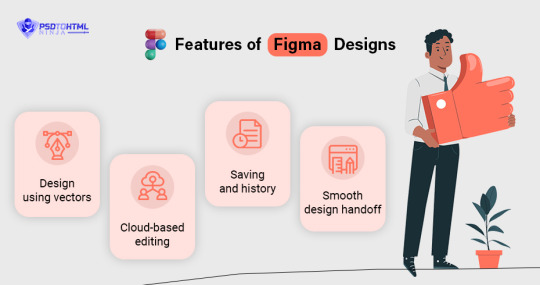
Features of Figma Designs
Figma designs come with several features that are used to process the designs, and then you can convert Figma to HTML. Below are the top features of Figma designs.
Design using vectors: The use of vector graphics in Figma enables designers to produce designs that may be scaled indefinitely without sacrificing quality. This indicates that Figma designs are easily scalable and adaptable to various screen sizes and resolutions.
Cloud-based editing: Figma is a cloud-based tool that helps designers and developers access their files from anywhere. This allows them to collaborate with their team members, so they simultaneously work on the project at hand. Figma also allows multiple team members to comment, provide feedback, and make edits in real-time, fostering effective communication and streamlining the design workflow.
Saving and history: Figma allows you to work on the designs online and save them on the cloud for timely access. You can find those saved files online at your convenience. It also has a history feature that enables you to view the design history and a detailed record of iterations.
Smooth design handoff: Providing large design files to developers may not always be convenient. But Figma ensures the process remains smooth and hassle-free. Through Figma's simplified handoff process, you can send design specifications to the developers with ease. The feature streamlines all the various conversion stages for better output and timely results.
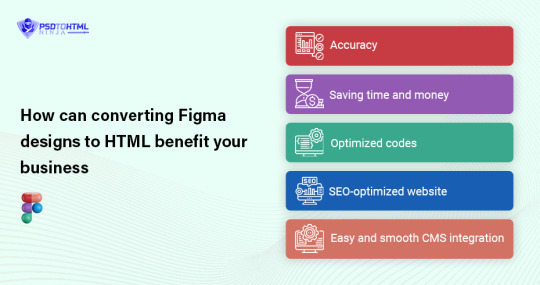
How can converting Figma designs to HTML benefit your business?
Figma to HTML Conversion is popularly adopted by many developers and companies because of the several benefits offered by this service. Below are the top advantages of converting your Figma designs to HTML.
Accuracy: Your design will be precisely translated into HTML code thanks to Figma to HTML conversion services. The conversion service is skilled at interpreting Figma designs and translating them into clear, well-structured HTML while preserving the integrity of the original design.
Saving time and money: Converting Figma designs to HTML might take some time, especially if they are intricate. You can save critical time and allocate resources to other crucial areas of your project by outsourcing this conversion procedure to a conversion service. Additionally, compared to engaging in-house developers for the conversion work, using a professional conversion service may be less expensive.
Optimized codes: Figma is used by developers across the world for its tendency to deliver optimized and pixel-perfect HTML and CSS codes used for delivering responsive and quick-loading websites. Websites developed with Figma are highly responsive and have fast loading speeds, allowing large files to load quickly with an attractive user experience.
SEO-optimized website: When converting designs, Figma to HTML conversion services follow best practises and accessibility standards. They make sure that the HTML code is written according to SEO best practices and is structured in a way that makes the website accessible to users with disabilities. This increases the website's exposure in search engine results.
Easy and smooth CMS integration: Conversion services can guarantee a seamless integration of the HTML code into your preferred platform if you're utilizing a content management system (CMS) or a particular web development framework. They are skilled in using well-known CMSs like Drupal and WordPress as well as frameworks like React, Angular, and Vue.js.
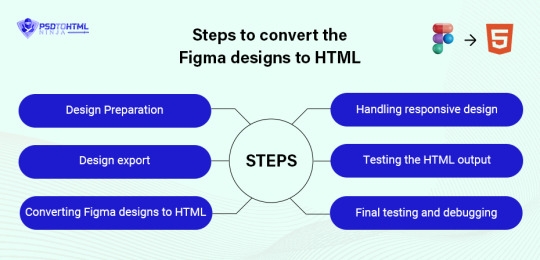
Steps to convert the Figma designs to HTML
Converting Figma to HTML requires a systematic approach for positive results and timely project completion. Here is a breakdown of how to efficiently convert your Figma designs to fully functional HTML websites.
Design Preparation: The Figma designs must be properly prepared for export before beginning the conversion procedure. You should organize and structure design files. The assets must be optimized, and the naming standards should have consistency. Streamlining the design files will make the conversion process smooth and easy.
Design export: We can move on to the next stage once you are completely satisfied with your design. In Figma, you can export the design in various formats like JPG, PNG, SVG, etc. It depends on you whether you want to export the entire design together or each component separately. The latter option makes the HTML Conversion more feasible as it reduces complications during the conversion process.
Converting Figma designs to HTML: This is the most crucial step in converting your Figma designs to HTML. The heart of the conversion process lies in translating the visual elements of the Figma designs into HTML code. This involves hand-coding or utilizing a code generator tool to convert the design components into semantic HTML markup. Developers have to be attentive and ensure every detailed requirement is met during this stage to maintain the accuracy and fidelity of the design.
Handling responsive design: You would not want your website to be slow and inaccurate. A responsive design ensures the website runs smoothly on various devices and platforms. Figma allows you to incorporate various design principles during the conversion process, like fluid layouts, media queries, etc. Your website will also have a fast loading time if you maintain a responsive design.
Testing the HTML output: It is always wise to check the HTML output before sending it to the client. There are certain things that you should look for, including visual errors, layout issues, broken codes, etc. You should also check the output across multiple devices to ensure that it is compatible with different browsers and screen sizes.
Final testing and debugging: Finally, in the last stage, it is crucial to conduct comprehensive functionality testing. This involves validating form submissions, testing interactive elements, and ensuring smooth navigation throughout the website. Debugging any issues or errors that arise during testing will help deliver a polished final product.
FAQs
How much do you charge for Figma to HTML Conversion?
We have a comprehensive and reasonable price sheet for various services. You can contact our support team to further discuss your project and get a fair price quote that suits both parties.
How much time does it take to complete the conversion process?
The actual delivery time depends on multiple factors like team size, design format and size, features required, etc. If you want a pixel-perfect Figma to HTML Conversion service, PSD-to-HTML Ninja can help.
How do you ensure data security?
Our clients well-being is of the utmost importance. We ensure data security using the best tools and techniques. We aim to protect your data and privacy from any kind of breach.
What design formats do you accept for the conversion process?
We accept designs in all formats for the conversion process. You can bring formats like PSD, Photoshop, XD, PDF, etc., and we will deliver a top-notch, responsive, and feature-loaded website with attractive and user-friendly websites.
Conclusion
The Figma-to-HTML conversion process is widely used in the industry for impressive websites. It offers great benefits that make the conversion process smooth and effective for the developers. It assists in various kinds of wireframing and prototype creation.
PSD to HTML Ninja is a renowned name for helping convert Figma to HTML with efficiency. We have years of experience in the field, and our experts are highly qualified professionals. If you are looking for a reliable and top-quality Figma to HTML conversion service, then we can be your ultimate savior. Let’s convert Figma to HTML and give your business impressive results with our cutting edge technology.
#Figma to HTML#Convert Figma to HTML#Figma to HTML Conversion#Figma to HTML css#Figma Export to HTML#Export Figma to HTML#Figma Export to Code
0 notes
Text
...
So, working on a project and one aspect of it is making a really simple scientific poster. I'm the design guy, I do the front nd design since I'm the only person who knows basic html and css, the only person who has taken art and design classes, and I do this stuff for fun so I go ahead and take charge of the poster. Plus they really just don't have the intuition for design at all, even when I or the professors give clear instructions on How To Do Things Right. We have to make tons of drafts and get feedback on them, and its kind of a dripfeed because staff would make comments on some things, neglect to comment on the other things, and make us turn in another draft based on those missed comments.
Every single fucking time my teammates would work on it, I would have to go back and fix allllllll of the margins and padding they neglected, and I would have to remake every image of a diagram into a simplified, vectorized. Every time we had to change text or images based on the feedback, I would have to go back and change those as well. Today, while I was working on this, one of my teammates was literally trying to edit the same thing at the same time (using figma and diagrams.net). I was going to lose my mind because I was just trying to fix all of the issues, like I had to do multiple times, that my teammates would neglect from the feedback, and so this was actively happening while I was trying to fix them.
I had everything in their own groups, so that it would be easy to change things out. My teammates didn't know how to work with that. Earlier teammate literally did not understand that a file cannot have two different file extensions, and sent me a rasterized image of a diagram instead of the actual editable file, because diagrams.net just lets you have an "editable (so like, able to move around the individual elements) png" saved to your google docs, exported it as a plain png and posted it in the project chat. When I couldn't open it they then tried to tell me like, well it worked for me and well it has the other extension too so it should work. It was only the filename that had the 'extension' of the proper file format. (this is the big csc senior class btw)
The fact that we went back and forth so much on that diagram to begin with was frustrating because they could've given me access to the editable file at any time, and would constantly ignore or forget feedback which meant having to fix it many, many more times, and most of those fixes were still missing the core design feedback like 'make the text size bigger' and 'eliminate unnecessary whitespace'. If anything, it would've been much better if I went through with porting it to figma instead of relying on them, but I'm over here not wanting to be a total control freak so I'm like... whatever.
So when I get access to that diagram I fix issues from all of the feedback, but at the end of our final feedback they go and try to edit at the same fucking time as I am editing, and I had been fixing the diagram all day up to that point. Then the same thing happened on the figma document, and of course they deleted my group for the section the diagram was supposed to go in, so I had to make it again, fix the margins, fix the padding, fix the sizing.
They also completely trashed my design for a page I worked on for the project itself like waay earlier in the semester, so I was like. Okay. You guys do your thing, I can put in all my junk later. I would like to avoid wasting my time as much as possible, considering how mentally ill and exhausted I already am.
oh yeah and also the examples the professors put in the powerpoint for posters had the same (margins and spacing or text inconsistencies, bad looking screenshots, that kind of thing) or worse issues (think black impact font on a busy patterned background, for fucks sake) that they kept nitpicking us for, so its kinda like. please actually showcase something that's relevant thanks.
At least it's finally(?) over.
1 note
·
View note
Photo
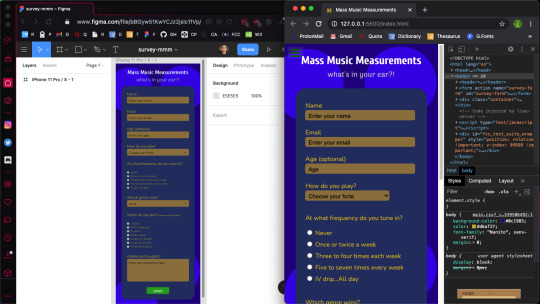
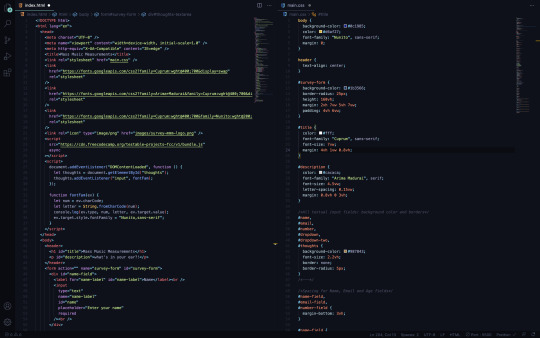
Mass Music Measurements Survey Form
A freeCodeCampChallenge
Gaining Speed
This marks my second freeCodeCamp challenge. As I mentioned in my after action report from the first FCC challenge (tribute page), it took some time to finally gain traction and fully complete that project. That was a problem with (one) unnecessary complexity of design and (two) a lack of planning (before I began to code.) It was my assumption that if I laced the project with many working parts, I would learn much, much faster; also, that by getting right to the code, I could pick up the syntax, semantics and general knack for writing (code) in less time. And wow, I was very incorrect in thinking so.
As a response to my previous poor start (with my tribute page,) this time I was better able to address some lessons which had only occurred to me when halfway through the last project. So this time, I really dialed in the importance of streamlining my initial paperwork designs, learning how to more proficiently use Figma and some of its tools, how to better approach icon design with Photoshop and vastly improve my entire workflow. This provided (not only) an easier build, but also a more efficient angle by which I was empowered to catch more lessons along the way.
In the next few paragraphs, I will detail just which specific advantages I picked up in terms of HTML5, CSS3 and JavaScript capability. In addition, I will move through some of the tactics I employed to help me finish this challenge with much more confidence than the last.
Planning Stages
When I set out to hand-write the marked goals (set down by FCC’s challenge,) I do find it tedious. The thing is, I am copying (in my own words) precisely what the challenge is demanding of me. Let me elaborate…
With every line, I am telling myself that I really do not need to do this. I mean, I can pretty easily peer over at the other browser window (when necessary) and see exactly what my marching orders are. Though albeit true, there are a couple of key differences in (one) reading from FCC and (two) writing/reading my own notes.
As I write out every expected step of my project, I can build an image immediately for how I would like my creation to take shape. This falls in line with the visual aspects and design, the color scheme, the functionality of each element and the code itself. It is a powerful method to which I will pay better respect going forward. (I already have plenty of ideas on how to implement more potent procedures — like larger drafting paper, (which will allow for a greater landscape on my pages, maybe using a tablet for notation and perhaps a few voice recordings along the way)). Now, I may be getting ahead of myself! Back to the plans..
And so writing out the objectives is terrific for lots of reasons, but moving to the drawn design itself — this may be the most crucial bit yet. Here’s the deal. When I physically drew the (expected) survey form, I may have well completed the whole project. So what does that mean?
I took so much liberty in imagining what the design should resemble. More specifically, I let my mind wander and allowed thoughts to spill out onto the legal pad before me. This (in combination with my understanding of how everything needed be expressed in code) let me structure my rough draft with such a degree that the next step made the actual coding like an exercise in copy and paste. I’ll expound…
I was drawing parts which were effectively elements of HTML. This was followed by some (more precise) markings of pseudo-code (which amounted to about all of the HTML I required to code for the whole challenge.) So, when I say the planning has proved to be useful, this would be an undestatement. This attention to planning has made it possible for me to avoid the ‘nuts and bolts’ in my code editor. Now, this advancement is massive, because the saved time and effort was a testement to why I was then able to better learn more intricate detail when coding. And now let’s get to those lessons and the code at large.
Within Earshot of Paper and Pencil
My goal is not to elaborate on the use of specific technologies, but more-so the process itself. however, I will briefly touch on Figma and Photoshop…
Using Figma helped me focus on each element and understand how they more literally fit together in the puzzle. I was able to name every piece such that it would show me what my HTML element should be in code and how each need be named. Also, I took those separate entities and grouped them such that I could postion everything exactly as I wished. My next goal with Figma will be to utilize the ‘component’ feature and truly unroll some strong functionality of the software.
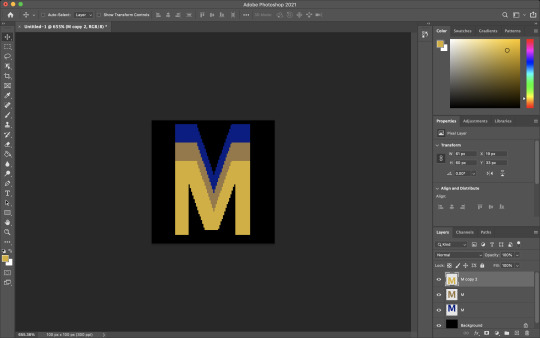
Regarding Photoshop, I made a logo for my survey and spun it into a favicon with relative ease. In an attempt to create animations and advertisements for my affiliate site, I have better come to understand Photoshop’s effectiveness. Thereby, building my icon was fairly straightforward. I simply pieced it together with a couple of layers and exported the PNG. I still want to be able to employ SVGs for this application; but until now, I haven’t perfected the craft. I will leave that for the coming FCC challenge. Onward!
Coding the Beast
The first topic to address here is quite obvious for me… SUITE TESTING.
When I began coding this project, I wrote my HTML boilerplate and immediately tied in the FCC testing script so I could begin verifying my code at every turn. I’ll elaborate…
I ran into a few issues with debugging throughout my last project; those were problems which resulted in code errors piling up on me simultaneously. And, while an error (for which you don’t know the remedy) is frustrating…several of those errors (all at once) becomes infuriating. Luckily, I ran into a great solution. Unit testing.
By instantiating the FCC test suite before I began coding the bulk of my project, I was then gifted the opportunity of verifying each of the sixteen goal posts.
In more detail, nearly no problems snuck up on me while coding the breadth of this project because I was adamant on addressing them in real time (as they appeared). What a true life-saver...
Input Text (element, attribute)
I found it repetitive and annoying at first, when the 10th goal of this challenge asked me to give both the input and label elements their own respective and corresponding ids. This was because I (very simply) did not understand the request. Along with that, I definitely didn’t understand why it was being asked (to begin with.)
That said, I now realize that the goal was to identify the label for the text field, in addition to the field itself. In understanding this distinction, I have now been able to find value in this very feature.
By giving ids to both my labels and input texts, I was then able to style each distinctly and find them with more ease (while peering though my HTML.) Now here’s real solid tip which I will not soon forget.
Don’t Pick More Than One Option!
So, I was writing the code for my radio buttons and what happened next is certainly a rookie mistake. When I navigated to my browser (in order to test the options,) I found that EVERY one of my buttons was clickable. And this, for obvious reasons, is not ideal.
This solution was super easy. All I needed to do was unify (or make each value the same for) the input-radio buttons. After I placed cloned values for each radio button, only one option could then be chosen. Success!
Nitpick the Name and Ids
This is something which should possibly be glossed over. But, when working with various input fields, I was asked to employ many names and ids for each.
While I’m not entirely certain (even now) whether there is a standard for which comes first, I have come to realize that name attributes should possibly supercede id attributes.
Using Visual Studio Code, it seems to like placing names before ids. And in a real life estimation, using name over id seems to be old-fashioned, but admirable.
More seriously, I understand in code, name will be less subjective (while more actionable) and ids will more far more particular and prone to alteration.
Dropdown
I was in a position to use dropdown boxes twice in this project. The problem I came across was that my options continued to begin with the default option as selectable. While I learned the solution quickly and with ease, I believe it should be recorded as vital.
When inserting a placeholder option in a dropdown box, in order to keep it from being a clickable entity, you have to style it as such.
I called the id of the option in my CSS sheet and set its display as none. That easy.
Pseudo Class and Element Selectors
Very little of my experience with this challenge dealt with pseudo class or pseudo element selectors. But, I will cover (in short) what I did learn (with these topics in mind.)
Using a pseudo element selector is the best (or maybe only) way to call an attribute from an HTML element and style with CSS.
This is how I was able to change the appearance of my placeholder text in each input-text.
I know pseudo class selectors are the way to alter elements (in a certain state) like ‘hover’ or ‘before’, but I haven’t used them enough to expand this monologue. That said, I’ll press on…
Attribute Selectors
In confluence with my previous words, I may have provided a misnomer to exactly what was being modified with pseudo-elements. But, I digress (and hopefully you see what I mean).
Using attribute selectors is quite different from other selectors, because you will be placing true brackets in as your selector which house your attribute, followed by an equal sign and a set of quotations (housing your value.)
Looks like this [attribute=“value”]. And that’s that!
Media Queries
While I employed media queries for this project, I have yet to fully grasp exactly how to use them (in reference to appropriation and context.) Therefore, I will not go into detail; but, only mention that I used them to alter my CTA button across pixel-widths. Also, I realized that setting a new media query works better when starting with the immediate values from your last screen size.
A Bit of JavaScript
The big task I pushed for in this project was this: change the client-side font family for a text area as the user types. And by big, I mean, it took me about as long as the rest of the whole challenge to learn this functionality with JavaScript. That said, I now understand much better how JS semantics are employed. And, that’s pretty priceless…
For this goal, I inserted a script with an event listener. First, I started with DOMContentLoaded, which allows for firing without the images or styling need be loaded.
The next bit lets my document be called by its (element) id.
Then, it states that my id will be triggered by any input (via an eventListener) and will force my later instantiated function.
The function declared will let the charCode number equal a string which will be console.log(ed) out as my target.value (of Nunito, sans-serif) with proper style.fontFamily.
Conclusion
Attempting to wrap this project up in a nice bow is difficult, as I have onboarded a great deal of information (from one simple survey page.) After completing this task, I am left with a split-brain. While I have learned so much from something, seemingly straightforward, now I am thrilled to make it to the next project and take on those new expectations.
I suppose my takeaway is that I should fine-tune my HTML and CSS understanding and seriously crack open all that is JavaScript. All which, can wait until tomorrow. Cheers!
7 notes
·
View notes
Text
youtube
In this video, we're going to show you how to use a figma plugin to create an awesome design in seconds! This figma to html tutorial will teach you how to create a simple design in figma, and then export it to html for quick and easy design changes!
If you're looking for a quick and easy way to design in figma, then this tutorial is perfect for you! With just a few clicks, you'll be able to create beautiful designs in no time at all!
Links: Figma,Plugin Link,Chrome Extension.
💬 𝗙𝗼𝗹𝗹𝗼𝘄 & 𝗖𝗵𝗮𝘁 𝘄𝗶𝘁𝗵 𝘂𝘀: 𝗜𝗻𝘀𝘁𝗮𝗴𝗿𝗮𝗺: https://www.instagram.com/verdantofficial 𝗙𝗮𝗰𝗲𝗯𝗼𝗼𝗸 Profile: https://www.facebook.com/tanvirahmedtanji 𝗙𝗮𝗰𝗲𝗯𝗼𝗼𝗸: https://www.facebook.com/verdantofficialtech 𝗧𝘄𝗶𝘁𝘁𝗲𝗿: https://twitter.com/Tanjib425
Time Stamps: 0:00 Introduction 0:10 Tip 1: Login Figma(Desktop/Browser) 0:26 Tip 2: Figma Desktop 2:17 Tip 3: Figma Browser 2:59 Tip 4: Figma Chrome Extension
htmltofigma #websitetofigma #html #design
0 notes
Text
Which is the best tool for Figma design to code?
CopyCat is the best tool to convert Figma design to code. Developers may turn their designs for mobile and web apps into developer-friendly code using the CopyCat platform. CopyCat automates the lifecycle of application development and produces readable, modular, and reusable code right away. Figma providing both web developing tools and web designer tools. So Start creating designs using CopyCat quickly and with confidence without corresponding with engineers.Trust that the product will look exactly how you imagined it to look and feel Design with real-time feedback.

0 notes
Text
Converting Figma Designs to Webflow
Some innovators choose to reclaim a tenancy website from Figma to Webflow when constructing a website. Importing acquisitions from Figma to Webflow can be questioning if you haven’t contemplated pre-setting your styles in Figma It’s better if you have a Webflow Development Agency for the same. It would reduce a lot of stress.
Regardless of the challenges, both Webflow and Figma are special layout tools, submitting innumerable advantages. With that being said, we will provide you with an overview of how to convert Figma designs to Webflow in this article so let's dive in.

New Project
Assembling a new project using Webflow is the first and foremost step. Just going to the top right corner and clicking on the blue button will get you started with your project. Figma correspondingly utilizes a comparable configuration when constructing projects, which will come in opportunely during the transformation cycle.
Style Guide
One of the preferred paths to proceed with your site is by building your global tones. So what are the global styles?
All the default components, such as titles, paragraph styles, and link impressions are featured on a website comprising transnational styles. Matter of fact, if your Figma project doesn’t comprise the global styles specified, you can prepare your style guide, you require to duplicate the base technique guide or HTML tag template furnished there. Create a new page to paste the earlier copied or cloned style guide within your project folder.
Custom Colors
Next, you must give an introduction to custom colors and proclaim them globally. If you’d be manipulating too many colors, the promising route to go about it is by putting in a color-block division.
Keep transforming its color frequently until all your swatches are created in Webflow.
Export Assets
Now that the initial phases in Webflow are comprehensive, you can commence shipping your Figma purchases. Make sure that you emphasize all components that you ought to export during the method grade. This will make exporting manageable and easy.
If you need to ship everything, you don't have to select any structures. If you need a distinct frame, select only that structure for exporting. You can use the Upload button and drag the frames directly from Webflow from the assets panel. New subfolders will be automatically presented in Webflow if your Figma scheme layers reach forwarding incisions.
Content Styling
This stage might emerge to be complicated. However, if you allocate generic phrases to your lessons and use a mixture of distinct characteristics, everything will quickly plunge to its spot. Instead of using a name, it is suggested that you develop a combo lesson.
Create Interactions
When using Figma, the prototypes are balanced, making it tough to summarize problematic interchanges to the web in Webflow. Nevertheless, you retain a choice to do these interchanges from Webflow by characterizing them on a per-class basis. You also have the alternative of building new ones, surrounding considerable components or categories.
Modify and Publish
Finally, you can propel your layout live. If you require, you can notch up your design according to the appliances on which it will be considered. Before going live, examine your design on numerous devices to assure that the industry reasoning and design flow are taken care of, regardless of the interface.
Conclusion
Figma is a great design tool for developing high-fidelity designs, but it can be problematic to reclaim those designs into regulation for somebody who is not knowledgeable about Figma. Follow the steps in this article to quickly and easily convert your Figma designs to Webflow or ask your trusted Webflow expert for the same. Need further assistance? Reach out to us, and we'll be happy to help you out!
0 notes
Text
How to Convert Your Figma Design into a Fully Functional WordPress Site
Transforming your Figma design into a fully functional WordPress site can seem daunting, but with the right approach, it's perfectly achievable. This blog post will guide you through the process of converting Figma designs into a WordPress site, highlighting essential practices in custom WordPress development and WordPress website development. Here’s how you can make your Figma to WordPress project a success.
Finalize Your Figma Design
Before you begin the conversion process, ensure that your Figma design is completely finalized. This includes refining the UI/UX details, ensuring that the layout is responsive, and organizing your assets for easier transition. Properly naming your layers, grouping related elements, and creating a style guide within Figma can greatly streamline the later stages of development.
Export Assets from Figma
Figma allows you to export your assets in various formats which are web-ready. Export all visual elements such as images, icons, and fonts. Ensure that these assets are optimized for the web to enhance your site’s performance. This includes compressing images and using web-friendly font formats.
Choose the Right WordPress Theme
Selecting an appropriate WordPress theme that matches your design is crucial. You can choose from thousands of themes or opt for a blank starter theme like Underscores or Hello Elementor. For custom WordPress development, these themes offer a clean slate to implement your design with minimal interference from pre-existing styles.
Convert Figma Designs to HTML/CSS
The next step involves turning your Figma designs into HTML and CSS. This can be done manually by a developer or through automated tools that convert designs directly into code. However, manual coding often results in cleaner and more optimized code. This stage forms the skeleton of your WordPress website development process.
Integrate with WordPress
After you have your HTML and CSS ready, integrate them with WordPress. This involves breaking down your HTML into WordPress themes' template files like header.php, footer.php, and index.php. Also, create custom page templates for unique layouts in your design. Utilize WordPress’s functions and hooks to add functionalities like navigation, widgets, and post formats.
Add WordPress Plugins
To enhance functionality, install necessary WordPress plugins. Plugins can handle forms, SEO, security, and more. Choose plugins that are well-supported and keep the number of plugins to a minimum to avoid slowing down your site.
Test Your Site
Testing is an essential step in ensuring that your WordPress site matches your Figma design in functionality and appearance. Check responsiveness across all devices, test all functionalities like form submissions and page loading, and ensure compatibility with all major browsers.
Launch and Maintain
Once testing is completed and you’re satisfied with the results, launch your website. However, launching your site is not the end. Regular maintenance is necessary to keep the site secure, functional, and up-to-date with the latest web standards and SEO practices.
Conclusion
Converting a Figma design to a WordPress site involves a detailed process that bridges creative design and technical development. By following these steps and focusing on custom WordPress development, you can ensure that your WordPress website not only looks exactly as planned in Figma but also performs excellently in the digital space.
Remember, while tools and plugins can automate many aspects of this process, the expertise and insights from experienced WordPress developers can add significant value, ensuring that your website is optimized, secure, and tailored to meet your specific needs.
0 notes
Text
Front-end development software for PSD to HTML conversion

PSD to HTML conversion works best to convert the design files into lively HTML-coded websites. Still, some individuals and designers fancy transforming their design files to websites on their own.
Thus, many professional companies provide PSD to HTML services. That being said, they need tools and software to handle the development part. Software is said to be automating the process. There is an abundance of tools and software that can help you convert the PSD file to HTML. So here are some of the usable front-end development software for PSD to HTML conversion.
Let's get started!
PSD to HTML software for Front-end Development
Sublime Text
Sublime Text is an advanced commercial source text editor for coding, markup, and prose. Also, it has a slick user interface, extraordinary features. For instance, it has built-in support for multiple programming and markup languages. You might not know, but it is an upgraded version of Notepad++, and it uses colors to differentiate the languages and codes. You can even convert between Apple and Windows smoothly than the other editors.
The highlight is that you can expand its functionality with plugins, as it features a Python API to ease the plugin's usage. You can download and evaluate the Sublime Text software as a freebie, but you have to purchase the license if you like it and want to use it continuously.
Figma
Figma is a web-based vector graphics editing, user interface (UI), and UX design application. Furthermore, it has robust features when it comes to design, prototyping, and code-generation tools. Thus, you can leverage it for all wire-framing websites, designing mobile app interfaces, prototyping designs, and more.
It is free to use, being an online UI tool. However, it has additional offline features enabled by desktop applications.
CSS Hat
The next in line in the list of Front-end development software for PSD to HTML conversion is CSS Hat.
CSS Hat converts layer styles to CSS pretty fast by providing you with the CSS code for your layer styles. It is an add-on of Photoshop that is a Photoshop plugin. When you click on a layer, CSS Hat renders the code, so you can copy it to the clipboard and paste it to get started. It also translates the PhotoShop effects like drop shadows, gradient overlays, inner shadows, inner glows, outer glows, color overlays, strokes, etc.
Avocode
Avocode is a cloud-based app and works best to develop the web, iOS, and Android apps exactly like they were designed. You can run it on all Mac, Windows, or Linux. Using this software, many developers and designers export assets and collaborate with each other. It is such a tool that assists in opening, sharing, scrutinizing, and combining the Sketch, Adobe XD, Photoshop, Illustrator, and Figma designs.
CSS3ps
CSS3Ps is a cloud-based tool and is a PhotoShop plugin. This software is similar to CSS Hat in that you can convert the design layers to CSS3. However, CSS3Ps is free to use for everyone. Like CSS Hat, it also supports the PhotoShop effects like drop shadows, gradient overlays, inner shadows, inner glows, outer glows, color overlays, strokes, and so forth.
Adobe PhotoShop
You have heard about Adobe Photoshop, primarily for graphic designing. However, you can use it for front-end designing and development.
Thankfully, Photoshop APIs and SDKs are assisting the developers at another level with modern HTML, CSS, JavaScript, etc. So they can use it to build plugins and integrations and transform the creative workflows. Besides, you can automate Adobe Photoshop using actions and scripts.
Whatever software from Front-end development software for PSD to HTML conversion you use, all are best. However, the front end should be fulfilling the code requirements. In addition, it has to be meeting the latest design standards and trends. On top of all, one should be able to identify and fix the bugs. Also, have the know-how of coding for the smooth conversion with the software. Otherwise, the software will be a burden to handle and gnarled the file or the website.
So it seems that skills are a must to ensure quality development. If you have no expertise in handling the conversion, you can find a way out by hiring the best PSD to HTML services. The design and code experts integrate the pixel-perfect front end of the website. Besides, hand-coding of the PSD file will let you have an excellently custom website.
0 notes
Text
Top 14 UX Software For UI/UX Designers
UX Software
UX Softwares is responsible for creating user-centered designs that focus on accumulating requirements. It designs and improves the usefulness and usability of products on part of the end-user.
UI UX software manufactures highly faithful prototype products that allow us to design products for existing users for usability testing. We can use it before starting projects, so it saves lots of money for stakeholders.
How can the best prototype tool be found?
We know that so many different kinds of industries work. Every industry has its target audience and always has a different preference. The software of UX design also agrees with projects. Therefore, the design process is unique for most customers.
Designers always search for the best prototyping tool by-product, choice, and other factors. It depends on the projects and guidelines of its customers. The designer selects advanced instruments most of the time according to a client niche.
UX Wireframing & Prototyping Tools Design
A lot of advanced UI UX design software is available on the market. The best way to give any project a fresh look is by using the right UX software.
We discuss some new, trendy tools that contribute to the stylish development of websites or apps. It helps the websites to look at their organic traffic and to improve it easily.
Adobe XD
Adobe XD allows vector-based user interface tools to create interface-based prototypes and mockups. The UI UX software is renowned for designers who used other products from Adobe.
It comes with a real-time partnership, which offers many UI designers a solution. Another one of the unique design platforms that connect various disciplines is Adobe XD with advanced tools for UI UX designers.
Figma
Figma was the first browser-based interface design software that makes software building for teams simpler. These tools can be used easily because uploading, downloading don’t need to worry.
It allows us to develop design systems with related UI factors that can be used by the entire team. UX software reduces the interference of visual concepts in code and allows us to be flexible and controlled.
Sketch
The sketch is a lightweight UI UX UI software for UI/UX designs based on macOS. It comes with many new features such as infinite zooming, 2x export, and styled vector forms that are suitable for different resolutions to help you achieve professional results.
The 'Export All' column is provided by Sketch to enable designers to easily export PDF, JPG, and PNG files.
MockPlus
As dynamic as any other prototype UX software, MockPlus is as accurate. This software can easily be used because it is free of code, provides a simple drag and drop option, and forms a link to interactive pages and factors.
It has 3000 UI icons and 200 components parallel to Android, iOS, and PC programs, which is an impressive UX software solution. Our teams, group projects, collaborative development, online review, and other features are available.
POP
However, in searching for a practical prototype compatible with our Android device POP POP (PROTOTYPING ON PAPER) is useful. It is a UX design software that is easily used for the development of mobile prototyping from paper to digital prototyping. There is no visual restriction in the app because we have chosen a prototype suitable for a device.
UXPin
UXPin is an absolute UX software wireframing and prototyping. They are equipped with an interface and features that help us to understand a design and create highly interactive wireframes and prototypes.
UI UX designers are able to make design decisions, test usability, count users and their clicks, and submit team results.
It has a dynamic software kit with various design elements and patterns for brilliant scratch designs. We can edit all UXPin images and modify their luminosity, sharpness, contrast, and transparency with convenience.
Proto.io
It makes prototypes very attractive that need to look and feel connected with our mobile apps. This UX design software can be used to test your prototype designs on different devices.
Proto.io has a nice feature in which we increase the application's efficiency. The program includes Dropbox synchronization, Adaptive UI libraries, UI Material Design and Offline mode, and many more features. It is an app for designers to organize fast changes and co-relate easily with other team members.
Zeplin
It is a plugin and Web application adaptable to Sketch and includes in a concerted specification sheet all the characteristics of the selected elements, explaining the handoff between the design and the developer’s teams. It is the best example of UX design software.
Zeplin is effective because it is not necessary to wait until the end of the design process to hand over the developers' contributions. It improves the entire app development process.
Axure
It is the best UI UX wireframing software for websites and applications. it is a zero-coding program.
Axure includes all documentation software needed for the design choices and layouts of documents. The standard edition or pro edition can also be selected as required.
It is the largest application developed for state-of-the-art Prototype solutions and is the best prototype feature of reactive websites and mobile apps.
JustInMind
It's incredible UX prototyping software that allows us to make prototypes for mobile apps and websites better and quicker. JustInMind has a magnificent widget library to enter HTML, video, online widgets, documents, interactive maps, and many more.
UX designers can also add UI library factors for perfectly building master pages. This tool makes it easy for designers to create websites for advanced management and to use apps to boost customers' business.
HotGloo
The powerful UX prototyping software for wireframe uses a wide variety of mobile apps that require a special user interface. The interactive feature of UI UX software design enables one app designer to work together on a single wireframing application project.
Without restricting the browser or operating system, we can work on our wiring project anytime.
Marvel
It turns raw paper sketches into attractive, tappable prototypes that allow designers to demonstrate our approaches to apps and to build up feedback from others.
It works well with.psd files, which are easy to change before you upload. In the background, Marvel maintains the changes in testing times.
It allows designers to import from Sketch, develop prototypes of app interactions, animations, transitions, and advance these prototypes with stakeholders and developers.
Invision
It includes special features like workflow, collaboration, and prototyping of UX software, which transform our static apps into fully interactive prototypes.
Prototypes contain animations, transitions, and actions for Android, iOS and responsive web apps is the most impressive feature of this program. It helps us provide the first-hand navigation experience and convert sales to proposed customers.
Slicy
The product is supplied as resources for our Website or application with reactivated Photoshop cutting and export PSD factors. Policy exports groups of layers individually, giving full freedom to operate, overlap or hide design items.
It focuses entirely on the export of services to GIF, JPG, PNG, and image formats from Photoshop PSD. We know that drag and drop a Photoshop file that exports files automatically makes exporting assets easy.
Conclusion
There is numerous UX software that helps us to create websites or applications in the best possible way. Each design agency or team of designers has its preferences.
It depends most of the time on the project type. Each project has its UX software design preferences. Our designer makes websites and apps more engaging with the latest designs.
We help you if you are new to the company or wish to redesign your website or mobile apps. Call for more information or drop a query.
0 notes
Photo

Mozilla layoffs, Rome, and some CSS comics
#453 — August 12, 2020
Web Version
Frontend Focus
☹️ Mozilla Laying Off 250 Employees — Sad news from the folks behind Firefox — they've laid off a quarter of their entire workforce, which reportedly includes both the DevTools and MDN teams. A troubling and unfavourable sign for the future of a diverse web. There’s been extensive discussion on Hacker News about this.
Mitchell Baker
Rome: Unifying The Frontend Development Toolchain — This is an ambitious in-beta project that aims to replace Babel, ESLint, Webpack, Prettier, Jest, and more, to ostensibly simplify the frontend workflow. We’re all for it if it works. Here’s the introductory blog post.
Sebastian McKenzie
The Definitive Introduction to Svelte with Rich Harris — Learn how the Svelte framework works, write svelte components, and take a tour through the entire Svelte API in this detailed video course.
Frontend Masters sponsor
Web History — Chapter 1: Birth — The first in a long-form series about the history of the web. This initial entry looks at the work Sir Tim Berners-Lee carried out to make the web a reality.
Jay Hoffman
Some More CSS Comics — Julia is back with another batch of her excellent CSS explainer comics. There’s six to go through here, covering things such as compatibility, specificity, centering, flexbox and more.
Julia Evans
Enhancing User Experience With CSS Animations — How to build CSS animations and transitions in your interfaces that are inclusive, accesible and will enhance your users’ experience.
Stéphanie Walker
⚡️ Quick bits:
A living doc of things to consider when building sites for iOS 14 users.
The New York Times is pretty good at creating clever pages that show off their journalistic work, and so it goes with this look at 'viral particles' on the New York subway.
Some app design lessons we can learn from Google.
People are doing some neat exploration of building SPAs with Rust by way of WebAssembly.
Could you build a Web 'piano' in just 1KB of code? This guy shares how he did it.
From 2017 comes the back story to how we got 'favicons' on the Web.
Do you need a custom select control? Spoiler: No.
Working with pre-rendered/static sites? You may enjoy Brian Rinaldi's JAMstacked newsletter.
💻 Jobs
Our Design Team Is Looking for a Talented UX Content Strategist — We will be creating and publishing original UX thought leadership content that ties into Activity Feeds and Chat Messaging.
Stream
React JS Developer (Remote) — 13 million people and counting plan outdoor hiking and cycling routes with our apps. If you are smart and talented React Dev, join us to inspire more people to explore more of the great outdoors.
Komoot
Find a Job Through Vettery — Use Vettery to connect with hiring managers at startups and Fortune 500 companies. It's free for job-seekers.
Vettery
➡️ Looking to share your job listing in Frontend Focus? More info here.
📙 Tutorials, Stories & Opinion
content-visibility: The New CSS Property That Boosts Your Rendering Performance — The CSS content-visibility property enables web content rendering performance benefits by skipping rendering of off-screen content. Here’s how to leverage it for faster initial load times.
Una Kravets & Vladimir Levin
Optimizing CSS for Faster Page Loads — A look at just how CSS affects page load times and what you can do to improve it.
Tomas Pustelnik
How To Configure App Color Schemes with CSS Custom Properties — A modern approach on how to set up CSS Custom Properties that respond to application colors.
Artur Basak
The Remote Access Smart Lock That Works Without Wi-Fi — Share a PIN with family, friends, guests, and employees. Grant access any time, anywhere using our algoPIN™ technology.
igloohome sponsor
Supercharging <input type=number> — The number input type provides a nice control for working with numbers on most platforms, with min and max bounds, stepping up and down, etc. But what if you want to add more power to it with custom stepping types and controls? Kilian has a go at this here.
Kilian Valkhof
Modern CSS Solutions — We linked to this a few months back, but a lot has been added since. A great series of posts examining modern CSS solutions to annoying problems.
Stephanie Eckles
Laws of UX — A collection of the key maxims that designers must consider when building user interfaces.
Jon Yablonski
Nailing the Perfect Contrast Between Light Text and a Background Image
Yaphi Berhanu
Best Practices in CSS: Organization and Naming Conventions
Daniel Sipe
CSS Mistakes We Make Whilst on Autopilot
Ahmad Shadeed
🗓 Upcoming Events:
Front-End Focus (August 17) – It's got the same name as this newsletter but it's nothing to do with us. It's from the An Event Apart team though and has some fantastic speakers lined up.
You Gotta Love Frontend (August 24-28) — This now online event will feature five talks over five days. Here's the speaker line-up.
International JavaScript Conference (September 2 - 4) — Lots of workshops, sessions and keynotes — now all online.
🔧 Code, Tools and Resources

Coolors: A Customizable and Flexible Color Scheme Generator — There are a number of tools like this one, but this one has quite a few features including palettes from photos, export in multiple formats, share palettes via URL, and lots more.
Fabrizio Bianch
Forge Icons: A Set of 300+ SVG Icons for a Variety of Projects — You can test them out on a dark or light background and interactively change size, stroke, and color to suit your needs.
forgesmith
Online Checkout Made Simple with Square’s Payments APIs and SDKs
Square Developer sponsor

Take Me On — A fun browser-based take on A-Ha’s 80s classic Take On Me. Note: This will ask to turn on your webcam.
Adam Kuhn codepen
Chrome Extension Development Kit — Is a Chrome extension in your future? This paid development kit comes complete with project files (built using React) enabling you to leverage your current skills into a new domain.
Ryan Fitzgerald
Kickstand UI: A Design System You Can Use Everywhere — This framework has a slew of components and utilities that are focused on accessibility via color contrast, HTML semantics, and use of ARIA.
Burton Smith
SurveyJS: A JavaScript Survey and Form Library — Here’s a live demo.
Devsoft Baltic OÜ
Figma to Code: Generate Responsive Pages for Tailwind, Flutter, and SwiftUI — A free design-to-code plugin for Figma that converts your layouts to responsive code.
Bernardo Ferrari
by via Frontend Focus https://ift.tt/2PNTxso
0 notes