#how to install maxcdn in wordpress
Explore tagged Tumblr posts
Visit Tumblr Blog
Explore Tumblr blogs with no restrictions, modern design and the best experience.
Last Seen Tumblr Blogs


Fun Fact
Tumblr has 411 employees.
Text
WordPress SEO optimization
WordPress is very nice and handy, but simply ‘installing WordPress’ is not enough these days. You need to ensure that you offer your users an optimal user experience and have a lightning-fast website.
In this lesson, we’re going to look at how to optimize WordPress (for free) as much as possible and with which plugins you can do this.
Read in Dutch: WordPress SEO optimaliseren
The WordPress checklist
Even before you start installing a WordPress website, there are important things to think about. Let’s make a checklist of important points to go through both before and after installation.
Web Hosting
The first key to a successful WordPress platform is setting up web hosting.
I love managing my virtual private server (VPS) and backing up my data, but there are times when you just don’t have time — and times for which you absolutely must make time.
So, when it comes to time, resources, and a website that anyone can set up, I like to choose a hosting solution that I spend a little extra money on.
If my site is slow and not responsive, my bounce rate will increase and users will drop out.
There is a huge difference between a site that loads one second versus ten seconds, and if you have the latter, you are more likely to lose users.
Engineers at Google discovered that a load time of 0.4 milliseconds is already long enough for users to search less.
Before switching to a hosting service, ask yourself these questions:
Do they provide support for plugins?
What kind of backup support do they offer?
Is there a staging area?
What is the volume of the bandwidth?
What operating system are they using? Linux? Windows?
What other sites are in your IP range?
Why is IP range important do you think? Well, for example, because you don’t want to get backlinks to your blog from the same IP address.
Suppose I have a server that is my own. I installed 4 different blogs on it, and started linking to all of them among themselves. Google then sees that the IP address is the same and will not award you any points for these backlinks because they are not natural.
At worst, it could even be seen as spam.
Some popular WordPress hosting companies:
Kinsta
My.host
Flywheel
Digital Ocean
SiteGround
Cloudways
Cloud86
Hostinger
Junda
Xel
SEO benefits

CDN (Content Distribution Network).
For anyone who wants to give their website that extra bit of speed, the power of a CDN (Content Delivery Network) is well known.
A CDN changes the way your site handles static content such as images, JavaScript, and CSS. CDN stores your static content to load pages faster, have shorter response times, and generally a faster website — which helps you rank higher in search engines.
Sounds cool? It sure is. I love anything that makes my site look faster than the effort I put into it.
After extensive testing, I have found that having a CDN is the easiest and fastest way to make your site look fast for search engines.
Some popular CDNs:
Cloudflare
MaxCDN
Amazon AWS
Google Cloud
Fastly
KeyCDN
Microsoft Azure
SEO benefits

An SEO-friendly theme
Let’s face it: Most of us are not concerned with finding the most SEO-friendly WordPress theme.
It would be nice, but in reality you probably spend more time picking out the most beautiful theme. Great appreciation for the business owners who make the effort to find an SEO-friendly theme.
Some points a good theme should meet:
Clean and fast code: With a clean code structure, you can reduce page load time and increase the crawlability of your pages.
CSS and Javascript files: With Google, less is more, and a limited number of CSS and Javascript files helps. Plus, you don’t have to worry about minimizing them later.
Simple layout: Simple design makes it easy for users to navigate from page to page.
Responsive: As we know, Google prefers responsive sites when searching from mobile devices, so choosing a responsive WordPress theme will give you a better overall user experience.
Schema Markup: Schema Markup tells search engines where the most relevant content is in your theme.
Some popular themes for WordPress are:
Divi
Genesis
Astra
Neve
OceanWP
TheGem
SEO benefits

Cache Plugin
A caching plugin transforms your website (especially on mobile) from “This is sloooooooow” to “Wow, that’s fast!” with one simple click.
Unlike most plugins, a caching plugin is rarely considered an unnecessary download.
This plugin takes your page load time to the next level, with improved website performance and converting dynamic content to static.
It may seem like a lot to handle (especially if you are not normally a plugin user), but this is one of those things for which you need to adjust your approach.
Some popular caching plugins are:
WPRocket
W3 Total Cache (My favorite)
Cache Enabler
WP Super Cache
WP Fastest Cache
SEO benefits

Permalinks
Permalinks in WordPress are great for many things — structuring your URLs with keywords, creating short links, increasing search rankings, and more.
Whether you just like to look at SEO-friendly URL structures, consider changing your URLs, or want to give a little boost to your search rankings, WordPress offers endless options for updating it.
Example of an SEO-friendly permalink:
googleseocursus.nl/how-to-optimize-wordpress/
Example of a not-so-SEO-friendly permalink:
googleseocursus.nl/?p=2043
The default WordPress setting is not SEO friendly according to Google, so adjust your settings accordingly.
The ‘Message name’ option is a safe choice because it makes URLs short
If you have a larger site, you may want to add dates or categories before the ‘Message Name’ option
Omit characters such as “&,” “?,” and “!” from the URL
Use hyphens (-) instead of dashes (_)
SEO benefits

Use an SEO plugin
Using an SEO plugin can take a lot of time off your hands, as many things are done automatically, and otherwise can be set up simply via a few clicks.
I always recommend using an SEO plugin, whether it’s the paid or free version.
Some popular SEO plugins are:
Yoast SEO
Rank Math
AIOSEO
Premium SEO pack
SEMrush
Squirrly SEO
Comments on articles
Newer versions of WordPress provide links in comments with a ‘nofollow’ attribute which is good news. This is because outbound links from your website to another website give off ‘link-juice’ and you don’t want this. So always make sure outbound links have a ‘nofollow’ attribute unless you want to pass on link-juice.
Spammers can also harm your Web site. For that matter, an abundance of spam comments in one blog post that offers nothing relevant to the topic can also harm your site. So keep spammers at bay.
Ultimately, your website will not perform well with spam comments.
Some steps you can take:
Do not allow anonymous posting
Use CAPTCHAs to prevent automated spamming
Use the ‘nofollow’ attribute
Do not allow hyperlinks
Use the Askimet plugin to monitor spam responses.
SEO benefits

Meta titles and description
It is incredibly important to have powerful titles and meta descriptions. This drives more traffic because people are more likely to click on your link in a search engine’s search results.
In WordPress, unfortunately, out of the box, you cannot enter meta descriptions. With a plugin like Yoast, however, you can. Yoast has a free version that lets you do everything you need already.
Make sure each article you write has a unique name and description to maximize your findability.
SEO benefits
Using a powerful title and description correctly makes users more likely to click through to your website.
XML sitemap
Having a sitemap is a necessary evil for SEO. A sitemap contains a list of all your posts and pages that search engines can easily interpret.
So make sure you always have a sitemap, so Google can index all your pages and not overlook any pages.
Depending on whether or not you use a plugin, and which plugin you use, you can usually find your sitemap in one of the following locations:
https://jouwsite.nl/wp-sitemap.xml
https://jouwsite.nl/sitemap_index.xml
Also, don’t forget to add your sitemap to Google Search Console. In the menu on the left, click on “Sitemap” and then enter the URL to your sitemap and that’s it.
Link to deeper pages on your website
Link as naturally as possible for the reader
Use a reasonable number of links (for example, 50 internal links for a 1,000-word blog is not reasonable)
SEO benefits

Internal links
Creating internal links is incredibly important for a host of reasons. Four of the most important reasons are:
It provides a clear structure within your website
You help search engines find your pages more easily
You provide the visitor with relevant information
You answer the user’s question to the best of your ability
Instead of creating links manually, you can also use a super handy plugin called “Internal Link Juicer.” You add your keyword to the page and the plugin will automatically create an internal link to that page in all other blog posts where the keyword appears.
Super convenient because you no longer have to search and spend time generating internal links yourself, this is done completely automatically for you.
SEO benefits
Internal links create a nice website architecture which makes it easy for users and search engines to find the different pages.
Also, with internal links, you pass on the “link-juice” and all pages will be considered “important.
Make use of alt tags
The beauty of WordPress is that you don’t need to know complicated HTML to edit your image alt tags.
Not only can you optimize images with a simple click, but you can also do this without adding a plugin.
Image alt tag recommendations:
Give your image file a name rich in natural keywords
Write a descriptive alt tag description for your image
Complete the alt attribute description of the image with your brand name if relevant
Make the alt tag no longer than 10 to 12 words
SEO benefits

Make use of header tags
It is incredibly important to use header tags. Not only does this make your text more visually appealing, but it also gives clarity to the visitor and to search engines that like to know what a piece of text is about.
Always provide your text with one H1, a few H2s, and other headers where relevant. Consider the semantics of the headers, so don’t:
<h2>Part</h2>. <p> Lorem ipsum dolor sit amet. Vel omnis quisquam qui veniam rerum hic alias fugiat rem obcaecati error. Non consequatur accusamus eos autem pariatur et atque nulla! </p> <h1>Page title</h1>. <p> Lorem ipsum dolor sit amet. Vel omnis quisquam qui veniam rerum hic alias fugiat rem obcaecati error. Non consequatur accusamus eos autem pariatur et atque nulla! </p>
But just nesting neatly in order:
<h1>Page title</h1>. <p> Lorem ipsum dolor sit amet. Vel omnis quisquam qui veniam rerum hic alias fugiat rem obcaecati error. Non consequatur accusamus eos autem pariatur et atque nulla! </p> <h2>Part</h2>. <p> Lorem ipsum dolor sit amet. Vel omnis quisquam qui veniam rerum hic alias fugiat rem obcaecati error. Non consequatur accusamus eos autem pariatur et atque nulla! </p> <h3>Subcomponent</h3>. <p> Lorem ipsum dolor sit amet. Vel omnis quisquam qui veniam rerum hic alias fugiat rem obcaecati error. Non consequatur accusamus eos autem pariatur et atque nulla! </p> <h3>Subcomponent</h3>. <p> Lorem ipsum dolor sit amet. Vel omnis quisquam qui veniam rerum hic alias fugiat rem obcaecati error. Non consequatur accusamus eos autem pariatur et atque nulla! </p> <h2>Part</h2>. <p> Lorem ipsum dolor sit amet. Vel omnis quisquam qui veniam rerum hic alias fugiat rem obcaecati error. Non consequatur accusamus eos autem pariatur et atque nulla! </p> <h3>Subcomponent</h3>. <p> Lorem ipsum dolor sit amet. Vel omnis quisquam qui veniam rerum hic alias fugiat rem obcaecati error. Non consequatur accusamus eos autem pariatur et atque nulla! </p>
Also, remember to use your most important keywords in the headers and throughout your text. Use these keywords naturally and where relevant, don’t start writing to fit the keywords as often as possible.
SEO benefits
Using headers correctly makes for a more readable article. Users can quickly scan and understand what any part of the text is about.
It also allows you to create more “user engagement.
Use the canonical tag
No one likes having their content stolen by scrapers or other bloggers.
To combat this, you can enable the rel=”canonical” tag for pages on your blog. This tag tells search engines where to find the original URLs of the content on the site. This prevents problems with duplicate content.
When you use a WordPress SEO plugin such as Yoast, for example, this is already automatically done for you.
SEO benefits
Adding a canonical tag helps prevent duplicate content.
Create a Robots.txt
For those unfamiliar with the term, robots.txt is a file that tells search engines which parts of your site they should and should not view.
On search engines like Bing and Google, where websites abound, this method of directing the SERPs (Search Engine Results Pages) can save you a lot of time and money.
Block access to wp-admin in your robots.txt file
Allow all other quality content to be indexed in the robots.txt file
Add your sitemap to the bottom of your robots.txt file
Edit your Robots.txt file via the Yoast SEO plugin
Tools and then Editor
SEO benefits
You can prevent duplicate content with this. You can also specify exactly which robots can and cannot crawl, and which directories and files can and cannot be crawled.
Fix broken links
There is nothing more irritating than getting a 404 page when you think you have found the important piece of information you were looking for. Fixing broken links on your website is not only good for user-friendliness, but also shows Google that your website is of quality.
Use tools such as Google Search Console, Screaming Frog, Ubersuggest, or another good tool to find broken links.
SEO benefits
Fixing broken links improves the user experience, but Google also thinks it shows professionalism when you don’t have broken links.
Enable breadcrumbs
SEO beginners and professionals alike know that breadcrumbs are often forgotten, even though they add a lot of value.
If you have the Yoast SEO plugin installed, you can implement breadcrumbs in less than 2 minutes.
Simply go to Yoast SEO > Search Appearance > Breadcrumbs > Enabled.

Duplicate content problems in WordPress
WordPress simplifies life for small businesses, bloggers, and large news sites. In many cases, best practices are automatically applied, such as canonical links, and there are plugins for just about everything else you need.
But with the ease of publishing content and designs also comes a new problem: Duplicate content.
Duplicated content is a common reason why a WordPress website does not rank well.
While it differs from what we traditionally know in SEO as duplicate content (an exact copy of content, from text to code), it is similar and should be addressed.
Here are the four most common types of duplicate content problems in WordPress and how to fix them.
Tags
Tags are a big problem for many WordPress websites. When you tag an article, you create a unique page filled with other content you deem relevant.
The page shows snippets of articles or full articles. If the tag is the same as a category or main page on your main website (assuming it is not a blog), then you have now created a competitor for that page on your own site.
Tags are also often modified versions of themselves, leading to very similar content competing with themselves.
When this happens, none of the pages will rank well and can potentially reduce the value of the site.
Good news! Here’s a simple solution. You can either remove the tags completely, or you can add a meta-robots noindex dofollow tag.
The noindex dofollow tag indicates to search engines that this is a page with little content, but that they should follow the links and continue to crawl and index your site.
That way, search engines know that the page is not as useful as others and you have shown them how to discover your good content — the individual posts and pages.
Categories
Category pages often look like tags because they contain many posts and articles.
They have H1 tags that are the same as the articles, they do not always answer a question or provide a good solution since they are article excerpts, and they may not be suitable for people looking for answers.
Therefore, they are often considered content of little value.
However, there is an exception. For example, a WordPress website where the categories are dedicated to channels and niches within a channel.
A user looking for general information about a channel may find a category page very useful. Therefore, approach this differently than you would with a tag.
In this case, add a meta-robot index and dofollow tags, but also create unique titles and copy for the category to introduce it — and, if relevant, add schema as well.
Now you’ve helped define the types of searches and people to whom the page should be shown.
You may be rewarded by the search engines. Just make sure they do not compete with your core website pages if you are a business.
Competing Topics
A common problem when auditing WordPress sites is the lack of unique content.
Take food bloggers, for example. Yes, recipe outlines and other things can help differentiate recipes, but what if you don’t use them or didn’t know them to begin with?
If you have 20 recipes for apple pie, chances are many of them use similar wording and ingredients, which can cause competition.
Each recipe is unique and may serve a different purpose, but if you don’t make that extra effort, they may not stand out because they compete with each other.
In this case, you may want to create a category or subcategory for the cakes. If you can’t, revise them and add modifiers (e.g., traditional, modern twist, gluten-free, for parties, for large groups).
Next, start adding text (not necessarily at the top, because you want to quickly deliver the actual recipe to the user) about the final product. Make sure the text stays relevant to the topic and shows why, how, and where it is unique from the others.
Need other examples?
Have you ever made a themed gift guide or holiday post? Has anything changed except the year? Craft ideas for Mother’s Day? Romantic Valentine’s Day gifts for XYZ?
These are not unique enough. If you have multiple posts, they can all compete.
If you add a year to your title (e.g., 2016, 2017), people may skip you in search engines because you are not relevant this year. That’s where the strategies above can help.
Searches (Search Box)
You won’t encounter this problem as often, but searches on WordPress sites can generate URLs.
If someone externally links to one of these URLs, or if search engines can crawl and find them, they may be indexable.
Although you could try to automatically add a meta-robots noindex dofollow as with tags, this probably does not cover everything.
To address this problem, find the unique identifier that the search box URLs have in common. This is usually a “?” after the main URL.

Reduce photos
Google thinks it is super important that your website is super fast. Load times should be as short as possible to keep the user experience as high as possible.
You can resize your photos manually by using TinyJPG or TinyPNG, for example. Of course, you can also use popular plugins such as:
ShortPixel
Smush
EWWW Image Optimizer
Optimole
Imagify
WP Optimize
Finally, I want to point you to a very popular plugin. The plugin has more than 17 million installs and a high rating, so the quality is undeniably good.
In addition to cleaning up and optimizing your databases so they function better, WP-Optimize also offers:
Scheduled automatic cleanups of revisions, spam responses, content moved to the trash, etc.
Defragmentation of MySQL tables
Overview of database statistics
Image compression
Detailed control over specific optimizations
Reducing files so load times improve
0 notes
Text
How to Install and Setup W3 Total Cache for Beginners
How to Install and Setup W3 Total Cache for Beginners
Want to install and configure W3 Total Cache on your WordPress website? W3 Total Cache is a popular WordPress caching plugin that helps you improve your website speed and performance. In this beginner’s guide, we’ll show you how to easily install and configure W3 Total Cache on your WordPress website. Editor’s note: We no longer use W3 Total Cache on our website and have switched to WP Rocket…
View On WordPress
#beginners guide for w3 total cache#best caching plugin for wordpress#best wordpress caching plugin#cdn in wordpress#cpanel hosting cname record#do i need w3 total cache#how to add cdn in firefox#how to create a cname record#how to improve wordpress yslow grade#how to install and setup w3 total cache and maxcdn for beginners#how to install maxcdn in wordpress#how to install w3 total cache#how to setup maxdn in wordpress#setup maxcdn#setup maxcdn in wordpress#setup w3 total cache#w3 total cache plugin
0 notes
Link
W3 seems to solve the CPU and Limit resource problem as well as improving load times which was always an issue. Disk: Basic in settings
ALSO DELETE UNWANTED PLUGINS
0 notes
Text
How to Add Affiliate Links in WordPress with ThirstyAffiliates
We are often asked about affiliate marketing tips for WordPress powered blogs and websites. What is the secret to affiliate marketing success? What is the best affiliate marketing plugin for WordPress? As we have mentioned on our disclosure page that we do make some money at WPBeginner from affiliate links. There is actually no big secret to our affiliate marketing strategy. We only recommend products and services that we use or that we would use. For example, we have recommended Sucuri for WordPress security and monitoring. You can read our article on 5 reasons why we use Sucuri. We have a blueprint page that talks about all the tools/plugins/services that we are using on WPBeginner along with an explanation of why we use them. The only affiliate marketing WordPress plugin that every blogger need is something to manage their affiliate links. In this article, we will show you how to easily manage your affiliate links in WordPress with ThirstyAffiliates.

What is ThirstyAffiliates
ThirstyAffiliates is an affiliate link management plugin for WordPress. It allows you to store your affiliate links, organize them in categories, and manage them in an efficient manner. It also helps you create branded affiliate URLs and automatically replace specific keywords with affiliate links. Most affiliate links look like this:
https://ift.tt/12NbwCz
Those URLs are hard to remember, and it also looks pretty ugly. Using ThirstyAffiliates, this can be branded or cloaked into:
https://ift.tt/16O9h0Q
Links can be sorted into categories and sub-categories. You can even add the category slug into your cloaked link.
ThirstyAffiliates uses built-in WordPress functionality by creating a custom post type. This makes it compatible with all other WordPress plugins, including backup plugins. It has a built-in search feature which allows you to easily search for an affiliate link. Inserting links into posts and pages is as simple as adding any other link into your posts. You can search for affiliate links right from the Insert Link box in the post editor.
How to Install and Set up Thirsty Affiliates plugin
Go to ThirstyAffiliates website and choose a subscription plan. At the time of writing, there are three subscription plans available. Standard, Premium and Professional. We have purchased the professional package of the plugin because it has one feature that will double if not triple your affiliate income. That feature is the auto-linker add-on.
While the other features (Importer and Stats) are nice, the auto-linker is the single most useful feature of this plugin aside from the management. No matter which plan you choose, you can use the plugin on unlimited websites. If you have multiple websites, then this is the best deal.
Once you have purchased the plugin, you need to install and activate it. If you purhased premium or professional plan, then you will get add-on plugins too. These are separate plugins and need to be installed separately. Look at our guide on how to install plugins in WordPress. Once you have activated ThirstyAffiliates plugin and add-ons, it will add a new Thirsty Affiliates menu-item in your WordPress admin sidebar. Go to plugin’s settings page located under ThirstyAffiliates » Settings.
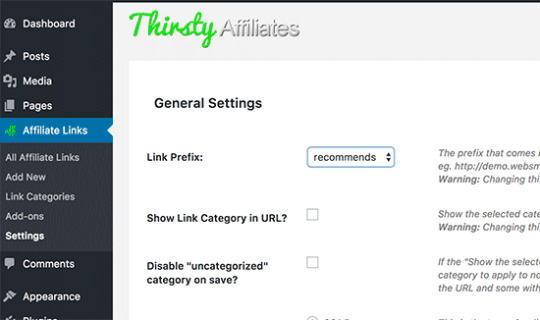
On the settings page the first option is to choose a Link Prefix. This prefix will be used in your cloaked link before your link slug. The plugin comes pre-loaded with commonly used prefixes such as: recommends, fly, proceed, goto, etc. You can choose custom prefixe as well and add your own prefix. At WPBeginner we use refer as the prefix for our affiliate links.
The second option is to show the link category in the URL. This will add the link category into the URL after the link prefix and before the link slug. We don’t use this option on our websites because we feel that it makes the link lengthier. For example:
https://ift.tt/12Nbz0W
Third option on the settings page is to add “nofollow” attribute to your affiliate links. We recommend that you check this box and add nofollow to all your affiliate links. There is also the option to open affiliate links in a new window. We would suggest that you check this too. Last option is to record logged in users. If you are running a WordPress website where users can create accounts, then we would recommend that you enable this feature. However, if you are running a site where only a few people can log in to your website, then you can leave this option unchecked. Now that you are done, click save changes and you are ready to use thirsty affiliates on your website.
How to add Affiliate Links using ThirstyAffiliates
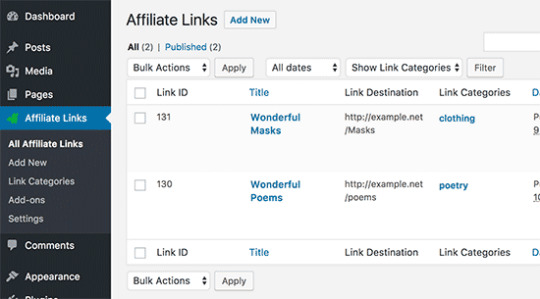
Adding affiliate links in ThirstyAffiliates is simple and straight forward. Simply go to ThirstyAffiliates » Add New to add an affiliate link.
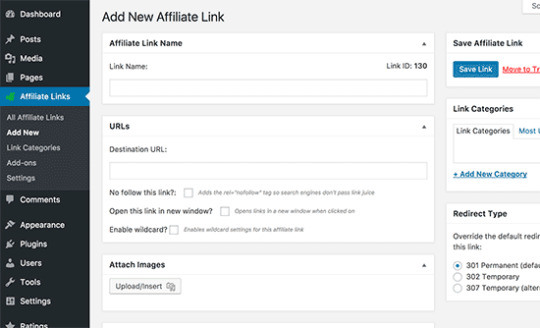
Link Name: The name of your link should be easy to identify and remember. This name will be used in the cloaked URL. Using the product name as the link title is probably the best naming practice.
Destination URL: This is the full URL of the page with your affiliate id. This is where you will paste your long affiliate link. Below this field, you will see the checkboxes to make a link nofollow and open it in a new window. If you have not enabled these on the plugin’s settings page, then you can override those settings here.
Attach Images: You can attach images to your affiliate links in Thirsty Affiliates. This is probably useful for websites that want to display affiliate links in sidebars or have templates where links can be shown with images.
Autolink Keywords This powerful feature is available as an add on plugin and comes with ThirstyAffiliates when you buy the professional package. It allows you to add a set of keywords which will be automatically linked to this particular affiliate link. This will save you a lot of time when writing on your site. You can just write your posts and not worry about adding links in the articles. For example if we mention the word , HostGatorSucuri, MaxCDN, and they will all be linked automatically.
However, we have also noticed that some publishers fail to use this feature efficiently. Make sure that you are using very focused keywords for auto-linking. Once again, adding the product name as the keyword is most common practice. Below the keywords you will see two checkboxes. The first checkbox allows ThirstyAffiliates to add links to keywords used in titles. This only applies to heading tags used inside article content not the post title itself. The second checkbox allows you to set a limit on keywords. This option is particularly helpful if the keyword is repeated through out the article and you don’t want to add the same link repteadly. We recommend that you do not link heading tags, and the number of keywords being replaced should be no more than 3.
Link Categories: You can sort your links into categories. These link categories work like post categories. You can add new categories when adding a new link, or you can go to ThirstyAffiliates » Link Categories to manually add link categories.
Adding Affiliate Links in WordPress Posts and Pages
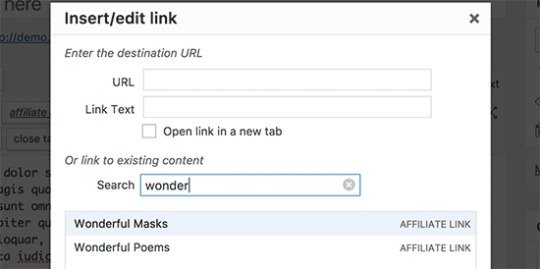
Aside from the auto-linker, sometimes you may want to manually add affiliate links in your WordPress posts and pages. ThirsstyAffiliates adds a button into WordPress visual post editor.

Clicking on the button will open ThirstyAffiliates link search in a popup. You can either select the link from the list of links or search for a link. You can then insert the plain link, a shortcode, or an image link.
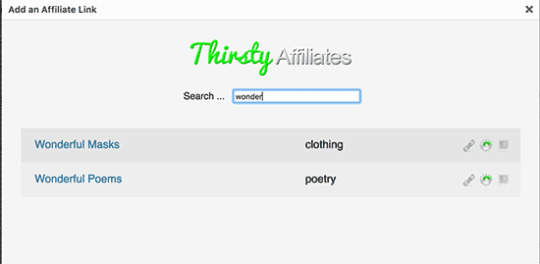
For those users who prefer to use text editor in WordPress post edit area, they can simply click on the link button and search for a link. Links added through ThirstyAffiliates will appear as affiliate link in search, like this:
Managing Affiliate Links in ThirstyAffiliates
ThirstyAffiliates uses built-in WordPress functionality to manage links. Links added via ThirstyAffiliates plugins are added into a custom post type which makes it really simple to add, edit, or delete an affiliate link. If you have statistics add-on activated, then it will also show you the number of clicks for each link broken down into daily, weekly and monthly clicks.
The statistics add-on for ThirstyAffiliates also adds detailed statistics for all your affiliate link activity on the statistics page. This can help you show which link categories are performing better, which links are getting more clicks and fewer sign-ups, which links are getting fewer clicks and more signups. You can then improve your content strategy to maximize your earning potential.

All your affiliate links can be exported in WordPress XML format and can easily be imported into any other WordPress website using the default WordPress import/export tools.
We hope that this article helped you learn how to manage affiliate links in WordPress with ThirstyAffiliates. You may also want to see our list of the best affiliate marketing tools and plugins for WordPress.
The post How to Add Affiliate Links in WordPress with ThirstyAffiliates appeared first on The Coding Bus.
from WordPress https://ift.tt/2ZIP7J3 via IFTTT
0 notes
Text
How to make money with a blog for Beginners in 2020

Ever thought about launching your own blog? Ever wondered what it is, not only to start that blog but to successfully build it over time to make money online or generate a passive income? Frankly, you are not alone. Millions of people try their hand at blogging, but never really earn enough from their efforts. However, if you are starting a blog for the purposes of making money, and you are not really passionate about writing at first, then you are wasting your time to a great extent. The art of blogging is not just scientific or formulaic. Without a deep-seated passion for your craft, you will face disappointment and upset. Why? While it is relatively simple to start a blog, it is a monumental undertaking to generate any share of traffic and profit from your hard efforts. You need laser-focus and persistence to build an audience or reach mass saturation with your prose. It takes time and a long and drawn evening to burn the cosmic midnight oil. take it from me. As a blogger who has created a substantial platform with thousands of monthly visitors, I can bask in the hot flashes of success. However, I cannot enjoy the freedom and passive income that my blog has created for so long. Without continuously adding unsaturated content, any blog can be closed. So, what does it take to start a successful blog and actually make money online? I think it depends on what you believe to be successful and whether you consider making money. If millions of other potential bloggers get out there, you want to rake it, you'll have a long road ahead. But if you are willing to put in the time and effort, and you can be consistent for years (and yes, I have said years), you can certainly generate substantial income online. In fact, your blog is probably the best center for passive income generation, and if done properly, it can attract the right customers and customers, whether you're in any industry or niche. How to start a blog: step by step Okay, if I haven't forbidden you yet, and you're serious about launching the next Mashable or TechCrunch or whatever another blog you think might be wildly successful in your vision, here's a step to you Need to do in -Step fashion. The more you prepare and plan, the longer you are likely to succeed. 1. Pick a topic Be clear on what you will write about. Define a topic or niche, and design all your content around those things. This will help you not only to focus on your writing but also to create digital products and services that compliment your content. This allows you to entice customers with your highly informative posts, then entice them with a lead magnet before dropping them into your sales funnel (more on that shortly). 2. Choose a platform While Wordpress is by far the most popular platform for blogging, there are some out there that can be leveraged to micro-blogging platforms such as Tumblr, Blogger.com, and even Medium. However, if you are serious about your blogging efforts, you might want to go with a self-hosted WordPress installation on a custom domain. When you can set up a blog on Wordpress.com with a subdomain like myblog.wordpress.com, you'll get more traction with a self-hosted solution, and then use subdomains on popular platforms for your content-marketing efforts. -The domain will be able to use it. 3. Choose a domain name Custom domain names are important if you are serious about making money from a blog, to begin with. Instead of relying on third-party-hosted subdomains, find a small but relevant keyword-rich (if possible) domain name that is descriptive of your intended topic, industry, or niche. Use BlueHost, HostGator, 1 & 1 Hosting or any other domain name provider to source your domain. If you are concerned about things like SEO while choosing your domain name, then you should follow the following suggestions: Use a known top-level domain (TLD) such as .com or .net Keep domain short, not more than 15 characters or more Do not try to buy a domain name with a hyphen, as they are more often associated with spammers Avoid using self-hosted subdomains to rank or rank posts 4. Find a good web hosting company There are loads of good hosting companies out there. If you are starting a Wordpress, self-hosted blog, there are a near-endless amount of options. The important thing is to do your due diligence and choose the one suitable for your budget and ensure that the service-level and punctuality are guaranteed. In the beginning, you might want to start with a managed Wordpress solution or a virtual private server (VPS), and scale from there. Eventually, you will need a dedicated-hosting solution with CDN (below) after a few thousand visitors arrive daily. 5. Caching and Content-Delivery Network (CDN) Use a system such as W3 Total Cache or WP Super Cache and turn on browser caching to ensure that you speed up the delivery of your webpages. In the beginning, it may not seem as important. But as you grow and your traffic increases to thousands of visitors per day, this will be important. Use Google's Page Speed Insights to test things before and after installation. It is also important that you set up a CDN, which will speed up the global distribution of your content. For example, your page may load relatively quickly in the United States, but what happens when someone in Australia tries to load your content? CDNs replicate data in many repositories around the world and make content delivery ultra-fast. This is important to the user experience because most people who are focused on waiting a few seconds to load a page often leave the website and move on to the next one in the search results. The W3 Total Cache integrates with Amazon's AWS and MaxCDN, two very good options when it comes to CDN. 6. Enable Permalinks In Wordpress, you should enable permalinks before getting things off the ground, which will give you good canonical URLs that are SEO friendly. Permalinks are located within the Settings> Permalinks section of your Wordpress admin and select the Post Name option. 7. Install the AMP plugin The Accelerated Mobile Pages (AMP) project is an initiative by Google to accelerate mobile access to a greater level of its content. The AMP specification, which you can read more about here, helps thin a webpage for its basic structural components with scaled-back JS and minimized CSS code, making for lightning-fast speeds. 8. Install Google Analytics Install Google Analytics so that you can monitor your efforts while building your blog. Leaving links in social media and other places is a great way to track your results when using the URL Campaign Builder so that you can effectively determine where your traffic is coming from. 9. Setup Google's Webmaster Tools Anyone who is serious about building a blog and making money needs to take advantage of Google's webmaster tools to see which keywords they are ranking and any messages that will improve their ability to rank Will affect It will also allow you to submit XML sitemaps and track keyword impressions with click-through rates. It is one of the most useful tools to enhance your site or blog through continuous analysis of your efforts. 10. Learn SEO the right way Although you should not start with the intention of obliterating the blog, you should definitely understand the basic principles of search engine optimization so that you pay attention to the key aspects that will affect your ability to rank on search engines like Google . . Start with Google's Webmaster Guidelines, and digest and implement that information. Learning SEO is a long and drawn journey. You should always increase your knowledge and expand your skillset. 11. Regulatory Build Useful Content If you are serious about being successful with your blog, then you need to create useful anchor content. It should be engaging, keyword-focused, practical, unique, and well written. Do not write your content for search engines. Rather, write your content for humans as well as paying homage to search engines for what they want. Simply put, it is a skill that develops over time. It is also important to publish your content on a regular weekly basis. 12. Sign up on an email marketing platform The best avenue to earn money from your blog is email marketing, plain and simple. Hands down, it provides one of the fastest and surest strategies to earn income through your blog. But before you get there, you have to sign up on email marketing platforms such as Auber, ConvertKit, MailChimp, Constant Contact, InfusionSoft, or any other platforms that are out there. 13. Create Lead Magnets If you're serious about doing anything online, rather than running ads on your blog (which won't give you real money, unless you have at least hundreds of thousands of visitors per day) or by engaging in affiliate marketing, You should manufacture an occasional lead magnet that will sell a digital product or be made by you in the back-end. The lead magnet will entice people to sign up to your list and provide you with their email address. 14. Creating a Digital Product and Positioning Your Proposals Email marketing and lead magnets are all designed to help create an automated sales machine. However, to do this you need a digital product, service, or other types of offer in the back-end. You can create many offers or products that can take people up a value chain for your high-ticket sales. 15. Create a Sales Funnel Take time to build your automated sales funnel. There is a lot involved with the sales funnel, but the basic premise is that your visitors will discover your content and show it to your site, fall into your sales funnel through offers through your lead magnet or any other tripwire, and then they will Be led through a journey with some periodically drip-fed messages that will allow you to sell your products and services on autopilot. 16. Get Social Creating a blog is not easy by any means. To help you move towards success, you have to be social. Not only by engaging with other like-minded bloggers interested in online marketing but by sharing and engaging with others on social networks such as Facebook, Instagram, and other social media platforms. 17. Market Your Content One of the most important strategies you'll find to build a blog and increase your visibility on search engines like Google, and my all-time strategy to increase search rankings on Google's SERPs, is content marketing. Marketing your content is a complex process that involves creating long, never-ending hours in the creation of more useful off-site content that connects to your primary anchor content, but it is worth it. If you do things correctly, you can use this single strategy to rank number one on Google's searches for any keyword. It definitely has art as well as a technical framework and the art of doing it properly. Do not try to spam or overstuff keywords in an attempt to market your content in any way. Content marketing can be done on sites like Medium.com or Scripped.com, it can be done by answering Reddit or Quora questions, and it can be done on YouTube or Vimeo in various other ways, along with videos is. The point is that all content needs to be useful, period. Try not to do the least amount of work for the greatest return. If you want to succeed then you have to do the opposite. 18. Monetize your content Let's face it, starting and running a blog can be expensive. Do not expect to get rich overnight. However, you can take some measures to get some of your content out of the way. Make sure you stay topical with your content and help your lead magnates leave people in a sales funnel that will eventually sell your high-ticket items. However, aside from this, you can always opt to generate cash flow by doing other things such as creating articles that will lead people to courses or audiobooks you have developed or creating video tutorials that will eventually lead to something bigger. Will sell Package or system that will help teach people that whatever it is is really good. There are many ways to monetize your content and earn money from your blog, but don't try to take shortcuts along the way. If you are serious about your long term results, do not look for a fast buck. If you want to succeed and achieve your goals then take action and be persistent. Read the full article
0 notes
Text
9 Best Managed WordPress Hosting Options Compared

In this post I take a look at the best Managed Wordpress Hosting options for businesses of any size, because running a WordPress site is not an easy task. All the content, marketing, site design, social media, maintenance, backups, updates and much more have to be taken care of, and this can be pretty time consuming. But before you do that, you have to make sure your WordPress site is running smoothly and your current WordPress hosting provider isn’t giving you any headaches or issues. Today, most of the web hosting companies out there focus on providing affordable solutions. It costs you less than $5 to get an account with a shared hosting provider. And that’s a great solution if you’re just getting started. But for a medium-sized or business site going for high-quality WordPress hosting is a better alternative. By quality hosting, I mean managed hosting, which is specifically created for WordPress users. This new breed of WordPress hosting is becoming an increasingly popular option among WordPress bloggers and developers. It all started with WordPress.com VIP, but now there are numerous different players in the market. If you’re in a hurry, here are the top 3 hosting providers I recommend! WPEngine — WPEngine is for those who want a bit of everything. They are perfect is for you if want to scale without compromising the quality of support or losing developer friendly tools, all while not spending a fortune. Don’t forget to use our special WP Engine offer link to get 20% off. SiteGround — Perfect for beginner / advance users, super easy to setup, and comes with a fantastic support. Unmatched rates & support is usually under 10 or 15 minutes, which makes them a perfect host for WordPress users. Use our Discount link to get 60% off, coupon already applied to above link. FlyWheel — Flywheel is the kind of host you wouldn’t want to change. They are perfect for bloggers, agencies, and small business. Flywheel has a ton of unique features such as billing transfer, demo site, and blueprint (a tool that basically allows you to create sites with default theme & plugin configurations of your choice). Here’s a quick comparison of the 3 managed hosting providers listed above (last updated on November 2019): Managed WordPress hosting aims to provide faster loading times, better security, and expert WordPress support. But it’s a bit costlier than shared hosting companies. Managed WordPress Host’s servers are configured to provide better and faster WordPress performance. In this article, I am going to provide some basic information on the 8 most trusted and best WordPress managed hosting services, so you can make an educated decision about what’s best for you and your business.
What is Managed WordPress Hosting?
Managed WordPress Hosting is specifically designed and optimized for WordPress websites. In other words, it takes care of all the technical aspects of WordPress for you, allowing you to focus on creating and sharing great content. You don’t have to worry about site updates, site speed, up-time, or anything like that. Many hosting companies use their own CDN and server-level caching, so you don’t have to rely on cache plugins such as W3 Total Cache or WP Super Cache. This type of hosting is perfect for those who don’t have any technical skills or time to manage a server.
The Pros of Managed Hosting for WordPress
Security – The main aim of premium managed hosting is to provide bulletproof security. They have a very tight layer of security on their servers, so you don’t have to worry about hacking, DoS attacks, malware, or other security issues. Expert Support – It wouldn’t be fair to say that shared hosting providers have poor support. In fact, most companies have excellent staff who are well-trained and possess a good knowledge of WordPress. But they can’t assist you with things like performance, site functionality, WordPress errors, etc. With managed hosting support, you will get expert WordPress assistance, always. Speed – Speed plays a significant role in site rankings and there a lot of things you can do improve it like implementing a caching plugin, using a content delivery network such as MaxCDN, and reducing image sizes. Most of the managed hosting companies out there enable content caching at the server level, so you don’t have to rely on any external caching plugins. If you’re going with a normal plan, then you might need to use a content delivery network to improve site speed. Daily Backups – They take a daily backup of your site including content, data, themes, and plugins, which you can then download from the dashboard. This can save you some money, especially if you are using a paid backup or maintenance service such as VaultPress or BlogVault. They also create a restore point. In case something goes wrong, you can easily restore your site to a previously working version with just one click. Automatic Updates – They will automatically update your WordPress Core files to the latest version, as soon as an update is released. You don’t have to pay someone extra to update your site anymore—your managed hosting provider does it for you. No Downtime – No matter how much traffic your site gets, it will never go down. That means, if you hit the homepage of Hacker News or Reddit, you site will still be up and running without any issues.
The Cons of Managed Hosting for WordPress
Expensive – There is a huge difference in the price of managed and shared hosting. An average shared hosting plan will cost you a mere $3.95 while a managed hosting plan will set you back $30. Limitations – Basically, any plugin that consumes resources isn’t allowed. They also do not allow any cache plugins including W3 Total Cache and WP Super Cache. Here’s the full list of disallowed plugins shared by most managed hosts. cPanel – If you are moving from shared hosting to Managed hosting, then you might find it difficult as they have a very different kind of user portal.
Top Managed WordPress Hosting Providers:
1. WPEngine
(Loads under 0.26s, starts at $35, and comes with fantastic support)

WPEngine hosting is one of the best managed options available out there. The price is a little bit higher compared to other managed hosting providers but that’s because the company emphasizes providing great support, fast loading times, and more secure servers. It has a team of WordPress experts who will keep your site fast and secure and it’s one of the most popular hosting companies. I mean, brands like HTC, Foursquare, and SoundCloud use it! It also has a one-click backup and restore process included with all hosting plans. WPEngine will scan and monitor for hacking attempts and if your site does get hacked, the company will fix it for free. Some other features include: Staging area – It creates replica of your live site, so you can test new themes and plugins before applying changes to your live site. One Click Restore Point – In case anything goes wrong with your site, theme, or plugins, you can use the one-click restore point to set things back to how they were when everything was working. No need for any cache plugins – WP Engine’s custom-built EverCache technology delivers WordPress fast enough for Google and at scale. Hacking scans — If your site gets hacked, the company will fix it for free. Pros: Easily add a CDN to your site with just one click, fantastic support for your WordPress site, extremely fast, and secure servers. It comes with EverCache, so no external caching plugins are needed, and regular scans for hacking attempts keep your site safe and secure. Cons: WPEngine is a bit expensive compared to other managed WordPress hosting providers. Doesn’t offer the flexibility you might require in the plugin department. Review: WPEngine Review: Does it Really Make Your Site Load Faster? Visit WP Engine
2. SiteGround
(Loads under .4s, starts at $7.95, and usually responds to support questions in 15 minutes)

Note: SiteGround support is the hands down best and super fast. But you should know that their priority support is not available in their Startup plan. Also, you won’t get access to their premium caching solution & One-click staging on the Startup plan. So if you are looking for all those features, go with the GoGeek plan. SiteGround is perfect for those who don’t have the money to spend on the more expensive hosting providers. SiteGround provides unique WordPress security and speed solutions at a very affordable price. It provides all the shared hosting features such as free WordPress installation, free domain name, support, free WordPress migration, email accounts and a lot more for just $3.95 per month. Other features include: Unique WordPress Autoinstaller — Makes for easier setup. Autoupdater — Automatically update WordPress Core files and all of your plugins WordPress SuperCacher — For improving site performance. WordPress staging — So you can easily test out new features before a live launch. HHVM — For improving site speed, it loads faster (around 200ms) than PHP. But you should know this feature is only available on cloud hosting. WP-CLI comes pre-installed — So you can take the command line route to updates and multisite management, if you wish. Pros: Offers convenient autoinstall, autoupdate, caching, and staging features for a super low price. Also comes with Git, WP-CLI pre-installed, and offers WordPress migration for no added cost. Plus, the security team is very proactive when it comes to security, they have an account isolation option, and they regularly patch security exploits, instead of just sitting back and waiting for a security release to come out. Cons: Only comes with Cloudflare, if you are like me and want to use MaxCDN, you will have to use a third-party plugin such as W3 Total Cache or WP Total Cache plugin. Review: SiteGround Review – Inexpensive WordPress Hosting with Excellent Support Visit Siteground
3. Flywheel
(Loads under 1s, costs $23, amazing dashboard, a lot of useful features, and a ton of happy customers)

Flywheel was built with designers and creatives in mind, offering managed hosting that specifically suits their needs. It’s more than just a hosting provider and instead focuses on streamlining the workflow for web designers everywhere. Some particularly nifty features include easy collaboration, billing transfers to your clients, and staging sites. Plus, you can manage all of your sites from within one attractive dashboard. The Flywheel support team is staffed with WordPress experts, many of whom are designers so your biggest problems will always be entrusted to capable hands. The pricing is very reasonable and scales up to meet your needs. It starts off with a pay-per-site plan that begins at $23/month. After that, there are bulk plans for more serious developers that start at $105/month. Custom plans are also available. Key Features: Lightning speed – Designed specifically for WordPress sites so takes various factors that could affect speed into account. CDN is available. Nightly backups – Your sites will be automatically backed up each and every night so you can rest easy. Around the clock security – Flywheel constantly monitors your sites for hacking attempts and malware and will fix any discovered problems for free. More intuitive SFTP – Collaborating with other designers and working on client sites has never been easier. Pros: Quick page load times, easy scalability, and the ability to use whatever plugins you want. Flywheel also has a highly-qualified staff of WordPress experts who can take care of your every need and concern. Cons: Lacks the clout of big names like WPEngine. More expensive than shared hosting. Might be daunting to learn a new dashboard or interface on top of all of those you already use in the management of your business. Note: I recently started using FlyWheel for a new project that I am working on, and their dashboard is super easy to use. Visit Flywheel
4. Bluehost WP Hosting
(Loads under 2s, starts at $12.49, and comes with bad customer support)

Bluehost promises fast and secure managed WordPress hosting at an affordable price. The most basic plan allows for 100 million visits per month and includes 2GB RAM, 30GB storage, and 30GB backup storage. It also offers an enhanced cPanel, 24/7 support from WordPress experts, and up to 5 ManageWP sites for added convenience. Security is top-notch, too, and comes with a SiteLock CDN and SiteLock Pro. Pricing starts at just $2.95 for the first month and switches to $24.99/month after that. Notable features include: VPS-based — Built on a VPS platform, making for enhanced performance and site speeds. Includes ManageWP — Manage and migrate multiple WordPress sites all from within one hosting plan. Robust security — Includes SiteLock, an advanced CDN, and SiteLock WAF. Expert support — All hosting plans include 24/7 access to WordPress experts. Enhanced cPanel — Makes the transition from shared to managed hosting more seamless when working within a familiar interface. Pros: Relatively affordable price, SiteLock security, VPS, and includes ManageWP for added convenience. It also has 24/7 support and an enhanced cPanel for a more robust yet familiar experience. Cons: More expensive than some managed WordPress hosting plans, might not include as many features as other plans listed here, and doesn’t scale up as high for the largest developer needs. Review: Bluehost WordPress Hosting Review and How-To Guide Visit Bluehost
5. Kinsta

Kinsta is a performance-focused managed WordPress host that’s rapidly shot up in popularity over the past couple of years. Kinsta started as a high-end host, with the cheapest plan costing $100 per month. However, that changed in late-2017 and Kinsta has now become a lot more accessible to regular WordPress users with prices starting at just $30 per month. So – why has Kinsta had so much success lately? First off, it has all the features that you’d expect from a managed WordPress host like staging sites, automatic backups, server-level caching, etc. Then, it’s built on the Premium Tier of the Google Cloud Platform. Beyond giving you access to the same infrastructure that Google uses for its own products, this also means that you can choose from 18 different data centers available on every habitable continent. Other reasons to consider Kinsta include: Custom hosting dashboard – Kinsta’s custom hosting dashboard is super user-friendly and makes it easy to manage your site/server. Smart staging/backup features – Kinsta automatically backs up your site whenever you move from staging to production which makes it easy to roll back changes if needed. Performance-focused architecture – Kinsta is powered by the Premium Tier of Google Cloud Platform and includes the latest technologies like NGINX, PHP 7+, LXD containers, MariaDB, HTTP/2, and more. You also get a KeyCDN credit and premium DNS from Amazon Route 53 for no extra cost. 24/7 live chat support – Kinsta offers 24/7 live chat support through the always-present Intercom widget. Solid security – beyond firewalls and DDoS detection, Kinsta also adds WordPress login hardening, uptime monitoring, and plenty of other important security features. Free migrations – Kinsta offers unlimited free migrations from WP Engine or Flywheel. Otherwise, the number of migrations depends on your plan. Pros: Kinsta has awesome performance, especially under scale, so your site will load fast no matter how many people are visiting. The custom dashboard also makes it easy to manage your site, and the built-in features like staging and automatic backups are really convenient. The Intercom chat widget also makes it easy to get help and the 24/7 support has quick response times. Cons: Still not as affordable as something like SiteGround, especially if you have multiple sites. No phone support. Visit Kinsta
6. Pagely Hosting
(Loads under 0.09s, starts at $299, and overall perfect hosting for big businesses)

Pagely is well-known for its managed WordPress hosting with an emphasis on security. The company focuses on providing high-class security and fast loading websites. It has a number of great features such as automatic WordPress Core updates, plugin updates, daily backups, and a PressArmor custom WordPress security configuration that will keep the bad guys out and your site safe. Plus you’re free to use any plugin or app. Pricing starts $499/month for 30 sites and 200 GB bandwidth (& all the core features), which include: Convenient updates: Automatic WordPress Core and plugin upgrades with minimal interaction required. Varnish caching: Advanced varnish caching layer for millisecond load times. Free reign on plugins: Use nearly any plugin or theme you want. Complete site scans: Includes real-time malware scanning and removal plus redundant firewalls and DDoS protection. PRESSCDN: This service starts at $9/month. Pros: Feature-rich, security-focused managed WordPress hosting with an open attitude toward plugins and themes. Also offers PRESSCDN and varnish caching for quicker site load times. Cons: More costly than some managed hosting providers. Visit Pagely
7. Pressable
(Loads under 2s and starts at $25)

Formerly known as ZippyKid, Pressable is a unique managed hosting service, and advertises itself as rated #1 in customer satisfaction. Its services are built on custom RackSpace hardware and has an appealing list of clients and testimonials. Pricing plans start at $25/month, which is capable of handling 15,000 shared pageviews per month. All plans include the following features: Rackspace Hybrid cloud — The best servers for storing your sites. Daily backups — Your content will always be backed up on-time and automatically. SFTP access — Secure file transfer protocol so your data is safe even while in transit. SSL support — So you can set up shop and keep your customers secure, too. Malware scanning and removal — Never feel the effects of malicious hackers again. Pros: Reliable, high-quality hosting designed specifically for businesses and developers. Includes malware scanning and removal, SFTP, SSL, and CDN for added convenience. Cons: On the pricier side of managed hosting providers and might not offer the largest plans for those with extraordinary hosting needs. Visit Pressable
8. Synthesis

WebSynthesis was started by CopyBlogger Media, the producers of some of the most popular WordPress-related products on the internet including the Genesis theme framework and ScribeSEO. Synthesis uses NGINX architecture to sustain twice the traffic while consuming 1/8 of the resources. It also uses the MediaTemple dedicated servers. Plans start at $47/month. Some of its features include: High quality servers — Experience superior uptime and page load speed. SEO — Keyword and social media research included. Robust security — Enhanced security defenses. Content marketing — Content and website optimization included. Site Sensor uptime monitoring — Keep tabs on site uptime at all times. Pros: Uses NGINX architecture for fast load times and comes with SEO and content marketing tools. Also includes Site Sensor uptime monitoring and enhanced security features for ultimate protection of your content. Cons: Price tag is much higher than competitors and might be out of reach of newer developers. Visit Synthesis
9. WordPress VIP

WordPress.com VIP isn’t your normal Managed WordPress hosting provider. Pricing starts at $5,000 per month and is fine-tuned for high traffic websites such as Time, GigaOM, MSNBC, and TechCrunch. The hosting is perfect fit for those who are looking for an enterprise level solution. Some features include: SaaS — Turnkey infrastructure lets you build your site with confidence. CDN — Security is a top priority. Hourly backups — So you’ll never lose a bit of data again. Flat pricing — Pay a set monthly rate and get unlimited traffic, bandwidth, and storage without paying a penny more. 24/7 support — For answering your most pressing middle-of-the-night WordPress questions. Pros: Includes SaaS, CDN, backups, 24/7 support all for a flat price. Cons: Designed for enterprise customers with a price tag to match. Definitely not appropriate for new developers or even those who build smaller websites. Visit WP VIP
Do You Really Need Managed WordPress Hosting?
It directly comes down to you and your needs. Managed Hosting is perfect for both small business owners & enterprise / high traffic websites. For bloggers & developers, SiteGround is perfect solution, costs less than other managed hosting companies and provides high quality support. You need to think about the big picture here. What do you want to achieve with your site? What’s your top priority? If you anticipate building a lot of traffic to your site very quickly, then you’ll definitely need to consider a managed host, since it will likely allow for greater traffic volume and offers greater stability for WordPress sites specifically. If you just want to dabble in building a site for the first time, a managed host might be overkill. Another thing to think about is the level of support and customization you require. While shared hosting offers one-click installations for your convenience, these can preload your site with settings you might not like, especially if you have some development know-how. Using a managed host gives you the control you need to make smart decisions during the installation process, particularly with respect to security. Again, it ultimately depends on what you want to do with your site for how you approach this hosting decision.
My Top Picks
After reviewing each of these hosting providers, I’m a strong proponent of these four hosting providers. Let’s take a look at their features, shall we? SiteGround is for developers and bloggers who want features such as Git integration, a staging area, and SSL support at low prices. They are pretty inexpensive, plus offer free migration, and their support is relatively quick. Most of support questions were answered within an hour or two. Though, the guys who handle live chat aren’t the knowledgeable bunch. Meaning you will have to use their ticket support system for technical questions, instead of live chat support. Flywheel is for people who aren’t developers. Flywheel entered the market very late, but were able to quickly establish themselves as an easy to use managed hosting solution for designers, small business owners, and bloggers. If you don’t want to deal with all the technical jargon, go with Flywheel. I don’t think any other company has a dashboard as slick and easy to use as Flywheel’s is. In a nutshell, Flywheel is for people who can configure & setup WordPress sites, but aren’t developers. Are you a developer? Go with Pagely (they are now a bit expensive, though, costs $499 / month). Last year, Pagely moved their servers to Amazon and since then they have been pioneers in providing world-class infrastructure for small blogs, major WooCommere stores, membership sites, global corporate sites, and SaaS solutions. Their infrastructure technology includes HHVM, automatic daily backups, real time malware monitoring, built-in redundancy, developer friendly tools (SSH + GIT + Staging + WP-CLI + REST API), SPDY SSL acceleration, PressCDN, and Press Armour. If you want a bit of everything, go with WPEngine or Kinsta. These options are for you if want to scale without compromising the quality of support and losing developer friendly tools…all without breaking the bank. I have been using WPEngine for a long time and never had any problems with them. So which hosting provider are you using? What do you think about managed WordPress hosting as a whole? Please share your thoughts in the comments below. Data for speed tests data was taken from designbombs.com. If you enjoyed this post, why not also check out these articles on Best Woocommerce Hosting and Wordpress Building Trends! Post by Xhostcom Wordpress & Digital Services, subscribe to newsletter for more! Read the full article
0 notes
Photo

You might have missed this. But Google brought us an interesting surprise recently. They decided to revamp their official SEO Starter Guide for the first time in over seven years. The new Search Engine Optimization (SEO) Starter Guide is full of useful and interesting information we can all benefit from. Unfortunately, some of the content in there isn’t clear or specific enough. It’s not that Google is hiding something from you, it’s that they don’t want to tell you exactly what you need to know to rank higher in their search engines. They prefer if you discover that on your own. But fear not, in this article you will learn everything you need to know from the new SEO Starter Guide and how you can implement that information on your site. What You Will Learn What Google expects to see from your website How to really make your site show up on Google Google’s guidelines on hiring SEO experts How to optimise your site the right way And so much more! Making Your Site Show Up on Google The first step to rank on Google is having your site in their index. To do so you need to make your site crawlable and indexable. To help you achieve that, Google suggests you ask yourself a few questions which will help you find out whether your site is being crawled and indexed- Is my website showing up on Google? Do I serve high quality content to users? Is my local business showing up on Google? Is my content fast and easy to access on all devices? Is my website secure? Let me help you answer each of these questions. Is Your Website Showing Up On Google? This question is easy to answer. Simply search for your company or website’s name on Google and see if it shows up. If I ran a pizza place in London called “Pizza Union” (a company that exists), and I searched for it on Google, I’d see it’s ranking in there in the first position- If you don’t find your site, make sure you check outside page 1. Also, if your name is similar to a large company or if it represents a broad term (for example, if my pizza place was called “London Pizza,” it’d be hard to rank for that term for obvious reasons), don’t despair. It’s not an SEO problem so much as a naming one. Are You Serving High Quality Content? You probably know that creating high-quality content is a prerequisite to rank these days. Defining “high-quality content” on the other hand isn’t easy. But way back in my zero link building experiment I noted that Matt Cutts had defined it as- Something that is unique/different/original Useful/helpful to the community Answers common questions in your niche Original research Create videos How to guides and tutorials Create lists of helpful resources Another way to define the quality of a piece of content is to tie it with its popularity. That means, if your content attracts links and social shares then we can define it as high-quality. At the end of the day, people don’t link or share to content they deem low-quality. So, taking this idea into consideration, let’s check how many links and shares your content is getting. We are going to check your content’s link popularity with Ahrefs. Just drop the URL in Ahrefs Site Explorer to check the number of backlinks you have received and the number of referring domains. There’s no right or wrong number of backlinks and referring domains but if you see zero links, you should review the quality of the content. Next we are going to check the social popularity with another great tool, Buzzsumo. Just drop your URL into the search bar and then check how many shares your content has gotten- As you can see with the link results above and the popularity on social media we can conclude this is high quality content. Hint: You can also use this WordPress plugin to grab the social shares of all of your content in one click Don’t worry if you dont have any links or social shares – it could just be your content promotion wasn’t very effective. But you should certainly pay close attention to these pages and review them against competing search results for relevant keywords. Is Your Local Business Showing Up On Google? Note: If you don’t have a local business, you can skip this part. Local SEO is extremely important if you run a local business, as it works differently than non-local SEO. Both local and non-local SEO need on-site optimisation and links to rank high in the search engines. The main difference lies in that local sites also need citations. A citation is an online reference to your business’s name, address and phone number (also known as NAP). Citations work like links, because Google uses them to evaluate the online authority of your business. What makes citations different from links is that the former don’t need a link pointing to your business’s website in order for you to be credited for them. Getting a NAP is already enough. To check your local business, repeat what I showed up before; that is, search your business on Google. Continuing with the pizza place example, I see they show up in the local results. You should then check to see if your business comes up in listings for popular keywords, like “Pizza London” for example. If your local business doesn’t show up for your target keywords you can use the WhiteSpark Citation Service to get a boost in local rankings. If you don’t find your place anywhere, you need to add your company with Google My Business. The process is straightforward: In the Google My Business website, click on the “Start Now” button. Once you do so, you will have to add your company’s information, including your business name, your location, the kind of business you run, and your company’s phone number and website. The process won’t take you more than 5 minutes and will help you get your company listed on Google Maps. Is My Content Fast And Easy To Access On All Devices? Your websites speed not only affects your rankings but it also has a huge impact on user experience. A 1 second delay in load time can lead to a 7% drop off in conversion and 11% fewer pageviews. To check your page speed, you can use a tool like GTmetrix. Once you have added your site, GTmetrix will tell you: The performance score The load time The page size The number of requests (i.e., how many requests did GTmetrix have to make to load all your site’s elements; the fewer requests, the better) In general, you want a load time under 2 seconds, and a page size under 1 megabyte. If you find your site to be above those two thresholds, focus on solving the problems GTmetrix shares with you. Some of the most common problems related to a site’s speed performance are the lack of browser caching, progressive rendering, HTTP compression, among other problems. If you want to learn more about the most common speed problems you can face, you can read Google’s own PageSpeed Insights rules. Fortunately, you don’t need to become an expert in speed optimisation to make your website faster. With the help of W3 Total Cache, a WordPress plugin with over 1 million downloads and 2,700 5-star reviews, you can optimise your site’s page speed in a few minutes. Once you install it, you will find there are a large number of sections within the plugin you can check. Before you get overwhelmed, remember you want to optimise for the problems your site has, not for every single possible you may face in the future. To that end, you want to go back to GTmetrix’ performance review and check the problems they found. In the case of Pizza Union, you can see they only have one problem: landing page redirects. In other words, they have a problem with duplicate content, something that can be easily fixed with the help of Yoast SEO. But if your website has other, more pressing problems, like lack of browser caching (which allows a user’s browser to “save” a page’s version in their “memory”), you want to use W3 Total Cache. If that was the case, you’d need to go to Browser Cache, which is the seventh element in the menu as shown above. Generally speaking, W3 Total Cache fixes the most common problems as default, so you may not need to do anything. As you can see in the image below, W3 Total Cache has already specified the general cache policy: Once you have installed W3 Total Cache, you should see an immediate improvement in your site’s speed. If you don’t, and you don’t know what to do, you should talk to a developer who specializes in site speed optimisation to help you out solve the problems GTmetrix indicates. Another common issue is the lack of a Content Delivery Network (or CDN), which would make the user download your site’s elements from the location of your server. That means, if your servers are located in Liverpool, and your user is in Los Angeles, Bangkok, or Cape Town, it would take their browser more time to load your page. But if you used a CDN like MaxCDN, they could download all the elements from the closest server, making the site’s download speed much faster and efficient. If you click on W3 Total Cache’s General Settings section, you can select the CDN type you want to use, and the plugin will do most of the hard work for you. Both the use of W3 Total Cache and a CDN will make your site speed much faster, improving your user experience as well as your rankings.] You could also use a free plugin like WPSmush to optimize all of your images and reduce your overall page size in just a couple of clicks. Is My Website Secure? Back in 2014, Google added the use of SSL to their ranking factors. SSL (Secure Sockets Layer) is the standard security technology for establishing an encrypted link between a web server and a browser. Basically, having a domain with SSL will certify your site’s security. Because the use of SSL impacts in your rankings, you want to make sure you are using it in your site, especially if you accept payments on your site. You can use the Let’s Encrpyt service which allows you to add a encrypted certification for free. The easiest way to add a free SSL certification to your site, is by using a server that’s already integrated with Let’s Encrypt, which includes WPXHosting, Siteground & Kinsta. Once you have the SSL certificate installed on a server level you can use a plugin like Really Simple SSL to enable it on the WordPress level. If your business is running on WordPress, check out How To Switch From HTTP To HTTPS (13 Simple Steps) from Cloudliving. Using Sitemaps Finally, Google talks about making your content easier to find. On that end, they recommend the use of sitemaps: A sitemap is a file on your site that tells search engines about new or changed pages on your site. A sitemap tells Google which pages they should crawl, as well as determine the canonical version (i.e., the correct version) of each page. Creating a sitemap is easy, you can use a tool like XML Sitemap Generator or, if you use WordPress, a plugin like Google XML Sitemaps or Yoast SEO. Both tools make creating a sitemap like this one a simple process. Once you have the sitemap, you want to add it to the Google Search Console as they explain in this article. Hiring An SEO Expert SEO takes a lot of time. If you are a busy business owner, or if you prefer to focus on other parts of your business (like sales and operations), you want to hire an SEO expert. As Google says in the Starter Guide: Many SEOs and other agencies and consultants provide useful services for website owners, including: Review of your site content or structure Technical advice on website development: for example, hosting, redirects, error pages, use of JavaScript Content development Management of online business development campaigns Keyword research SEO training Expertise in specific markets and geographies Finding a trustworthy SEO company can be hard. To help you find the right one, you want to check for the following things: The results they have gotten to their past and current clients. Ask for case studies and references. Make sure they show specific results (e.g., “Our link building campaign attracted 15 high-authority links which helped driving the organic search traffic 20% in 3 months”). The person in charge of your site. You want to make sure the company doesn’t outsource the work or give it to a junior executive with little experience. Make sure you talk to the person in charge of your site before signing off. The link building tactics they use. Make sure they don’t use black hat tactics, unless that’s what you need (for example, if you are in the gambling industry). Ask them to show you specific links they’ve gotten and how they got them. The timeline and deliverables. SEO takes time, but you want them to make progress on a month-per-month basis. At first, they should focus on keyword research, on-site optimisation, and technical SEO. Later, they’ll focus on link building and content creation. Tell them to tell you exactly what steps will be involved and the time each one will take. (If you are in doubt which company to hire, you can contact my team for help. Feel free to browse our case studies, the tactics we’ll use, and the time you can expect to see results.) Another important thing to take into consideration, is to get started with SEO before you need it. As Google mentions in the Starter Guide- If you’re thinking about hiring an SEO, the earlier the better. A great time to hire is when you’re considering a site redesign, or planning to launch a new site. That way, you and your SEO can ensure that your site is designed to be search engine-friendly from the bottom up. However, a good SEO can also help improve an existing site. Optimise Your Title Tags and Meta Description You can have the best content in the world, but if neither Google knows what your page is about nor people understand the content of it, no one will visit your site. That’s where title tags and meta descriptions come to the rescue. As you may know, title tags are one of the most important on-site elements of your site. Google weights the optimisation of your title tags heavily, so if you use the right keywords in it, Google will likely reward you with better results. Meta descriptions on the other hand will help people (and Google) understand what your page is about. If you do your job correctly, your click-through-rate (CTR) will skyrocket, increasing your organic traffic (even if you don’t rank number 1). Here’s how you optimise your title tag and meta description. Title Tag Optimisation First and foremost, your title tags need to have the main keyword of your page. You can use an exact match of the keyword (that is, the exact keyword for which you want to rank), or simply use it within a phrase. For example, if you wanted to rank for the keyword “Pizza London,” like in the case of the company we’ve been using so far, you’d need to add that keyword within the title tag. Unfortunately, that’s not the case: Long are the days where you could stuff your main keywords in your title tags and expect good results. That’s why you need to get creative and use some SEO copywriting in your title tag. In the case of the pizza place shown above, you could create a title tag that said something like: Voted The Best Pizza In London – Pizza Union If you run a local place or a company with a strong brand, you want to add your brand’s name somewhere in the title tag, especially in the main pages (like the homepage and category pages). Finally, remember that title tags have a maximum length of 60 characters. If you exceed that length, it won’t hurt your site. Rather, Google will cut your title tag short in the search results. Meta Description Optimisation While title tags matter for improving your page’s rankings, meta descriptions gives them context. It’s with the meta descriptions where you want to use copywriting to improve your page’s relevancy. Here’s a good example of a well-written meta description: You can see that the company mentions what they offer (Neapolitan pizzas), where they offer them (in central London and Oxford), and how they offer them (in their venues, takeaway, or delivery). For a local business, that’s a great structure. It’s concise and even actionable. While in the past the meta description maximum characters were around 155 characters, according to Moz, Google has extended their length to around 300 characters. Blocking Unwanted Pages Your website likely has many pages you don’t want to show up in Google, either because they generate duplicate content, show sensitive information (like user or personal information) or because your users won’t find it useful. This may not be the case if your site is small and has less than 50 pages or so. Either way, if you think there are parts of your website you want to block from Google, here’s what you need to do. First, use a robots.txt, which is a text file webmasters create to instruct search engine robots how to crawl and index pages on their website. As the name suggests, this is nothing but a simple .txt file you add in your server’s root folder. Robots.txt have some limitations in its scope. As Google explains: Robots.txt is not an appropriate or effective way of blocking sensitive or confidential material. It only instructs well-behaved crawlers that the pages are not for them, but it does not prevent your server from delivering those pages to a browser that requests them. One reason is that search engines could still reference the URLs you block (showing just the URL, no title or snippet) if there happen to be links to those URLs somewhere on the Internet (like referrer logs). Also, non-compliant or rogue search engines that don’t acknowledge the Robots Exclusion Standard could disobey the instructions of your robots.txt. Finally, a curious user could examine the directories or subdirectories in your robots.txt file and guess the URL of the content that you don’t want seen. What Google is trying to say is that using a robots.txt is only one part of the whole puzzle. If you link internally to a page you want to block, Google may crawl and index it anyway. If you want to make sure Google doesn’t index a page (even if it crawls it), you want to use a “noindex” tag, which goes in the header of a page. You can manually add them to every page you want to block, or using a plugin like Yoast SEO. By using the “noindex” tag, Google will crawl it, but avoid indexing it (and therefore, rank it). Using Structured Data Markup The way Google shows up the results has changed dramatically in the past 7 years. One of the biggest changes is the use of structured data markup. In the words of Google, structured data markup is: [A] code that you can add to your sites’ pages to describe your content to search engines, so they can better understand what’s on your pages. Search engines can use this understanding to display your content in useful (and eye-catching!) ways in search results. That, in turn, can help you attract just the right kind of customers for your business. In other words, structured data helps users find out more about a site or page without visiting it. This can impact deeply on your CTR and search engine traffic. Here are some examples to help you see how they look and work: If you look for a company like Amazon, Google will not only show their site and pages, but also the following: The information you see on the right represent two different types of structured data markup, the logos and articles ones. Finally, if you have a local business, Google can show a lot of useful information about it, like in the example below: If you aren’t sure whether to use structured data markup in your site, check what your direct and indirect competitors are doing. If you need help getting started, follow Google’s guides, which explain in more detail how they work. Once you get started implementing it on your site, use some of Google’s tools like Google Data Highlighter and Google Structured Data Markup Helper as well as some useful WordPress plugins like Yoast SEO and WP SEO Structured Data Schema. Make sure you test your new markup using Google Structured Data Testing Tool. Optimise your images While people love images, Google can’t read them. That’s why the “alt” tag exists: you describe what the image is about, and Google bases their analysis on it. In Google words: If a user is viewing your site using assistive technologies, such as a screen reader, the contents of the alt attribute provide information about the picture. Optimising your alt tags is simple: add the main keyword (and variations of it) with a descriptive sentence. Using the pizza example, if you had 10 images of your different pizzas on your homepage, you wouldn’t want to stuff all your images with the same keyword, as Google would consider that unnecessary. For example you might set an ALT tag of “The Best Margarita Pizza In London” for your main margarita pizza image. If you had 3 different images of each of your pizzas, you could add other variations, like “londons favourite margarita pizza,” “pizza margarita,” or “italian margarita pizza london.” Of course, you should do some keyword research first. Be relevant with your alt tags and Google will appropriately rank your pages for your desired keywords. Another important element to consider is the image size. That’s why I recommend using a service like Smush Image Compression and Optimization. Once you install it on your WordPress site, the plugin will automatically compress your images making them smaller and easier to load. SEO for Mobile Websites Mobile organic traffic has become as important as desktop traffic: in 2017, the latter accounted for 50.3% of all web traffic generated worldwide. That means you need to optimise your site for mobile traffic. To optimise your site for mobile traffic you should use responsive web design By using responsive web design, you are designing your site to automatically adjust itself to any kind of browser and screen size without the need to changhe URLs or your site’s structure. A lot of the best WordPress themes are responsive by default, but not everyone runs WordPress so double check if your site is responsive or not. Google recommends using the Mobile-friendly test to check if pages on your site meet the required criteria. You can also check out the Search Console Mobile Usability report to fix mobile usability issues affecting your site. Integrating AMP Another way to make your site more mobile friendly is to use the Accelerated Mobile Pages (AMP for short) format. AMP is a markup language focused on mobile phones which increases the speed your pages are served to users. If you run your website with WordPress and you want to start using AMP, you can use plugin like AMP for WP or Automattic’s own AMP for WordPress. Finally, Google recommends you provide the same functionality on all devices (which includes desktop, table, and mobile): Mobile users expect the same functionality – such as commenting and check-out – and content on mobile as well as on all other devices that your website supports. In addition to textual content, make sure that all important images and videos are embedded and accessible on mobile devices. For search engines, provide all structured data and other metadata – such as titles, descriptions, link-elements, and other meta-tags – on all versions of the pages. Wrapping It Up Google’s updated SEO starter guide doesn’t represent a new way of doing SEO. Rather, it’s an update to the things we already knew, but never heard directly from Google. Now you know what Google expects from you, it’s time to get started. Google will thank you for it. Google’s New SEO Starter Guide: What You Need To Know was originally published on Matthew Woodward
0 notes
Link
Visit What A CDN Can Mean For Your SEO for the whole story
Almost everyone has heard of the importance of site speed, even the average blogger with lackluster technical skills. In a previous article we did a comparison between two domains and found speed was the likely signal pushing one site above another in mobile searches.
Google wants to provide sites that users will actually use. You may have the absolute best content but if it takes over 3 seconds to load your page its a big problem for ranking.
Each 1 second delay reduces page views by 11%
Each 1 second delay decreases customer satisfaction by 16%
Each 1 second delay decreases 7% of conversion rate
For a store doing $100,000 a day a 1 second delay means $2.5 million in lost sales.
Google uses page load speed to help determine your sites rank.
CDNs are great resources to speed up your page speed load times. Think of it like this … if you’re a pharmacy and you have one location for the whole world people are going to have to travel great distances for your products. But if you open a pharmacy in every state people can just go to the nearest location to get all of your webpages and no one has to travel that far. This is a CDN a Content Delivery Network.
The expense of having 50 servers in 50 states is likely too much for most websites. A CDN steps in and provides the infrastructure for us to share with others.
Here are a few common questions site owners ask in regard to CDNs:
“What is a CDN?”
“What are the benefits of a CDN?”
“Do I still need to purchase hosting if I have a CDN?”
“Does my site need a CDN?”
We’re going to go over what a CDN is and thoroughly explain the important role this technology plays in the modern web.
We’ll also briefly touch base on the differences between your web server and a CDN before placing our focus on who does and does not need this technology implemented on their website.
What is a CDN?
Here’s the technical definition of a CDN, or at least a paraphrased version of it. A CDN, which stands for Content Delivery Network, is a global network of servers that deliver content to visitors of a website based on where that visitor is located.
You need to understand how regular web hosting works in order to understand this definition as well as the importance of it. In a typical web hosting environment, all of the traffic running to your website gets sent to your host’s web server, the one you installed your site on and the one that holds its data.
This often results in a slower website for all visitors as that single server struggles to stay afloat among the surge of traffic it receives on a regular basis. It can even leave your site vulnerable to DDoS attacks. Why is this bad? Here are a few quick facts to help you understand the importance of having your site run as quickly and reliably as possible:
Google made site speed a ranking factor in as early as 2010. [Source: Search Engine Land]
47% of consumers expect a web page to load in 2 seconds or less. [Source: Kissmetrics via Akamai and Gomez.com]
40% of consumers abandon a website that takes more than 3 seconds to load. [Source: Kissmetrics via Akamai and Gomez.com]
79% of shoppers who are dissatisfied with website performance are less likely to buy from the same site again. [Source: Kissmetrics via Akamai and Gomez.com]
52% of online shoppers state quick page loading is important to their site loyalty. [Source: Kissmetrics via Akamai and Gomez.com]
A 1-second delay in page response can result in a 7% reduction in conversions. [Source: Kissmetrics via Akamai and Gomez.com]
This, obviously, leads us to our next question.
What are the benefits of a CDN?
The most obvious and most important benefit of a CDN is an increase in site speed for all users of your website no matter where they’re located in the world. When you implement a CDN on your website, you’re distributing access to it to what are known as “proxy servers” located all around the world.
Let’s say the web server you purchased from your host is located in New York and you do notuse a CDN. In this environment, a visitor from Australia would need to load all of the static content on your website, which are your images, CSS stylesheets, and JavaScript files, from New York, which can take quite a bit of time.
If you use a CDN, your Australian user would be able to load that static content from a server that’s closest to them, maybe even in the same country depending on the CDN service you decide to go with. This will allow them to load the page in a much quicker manner.

Your server is orange and other servers keep copies of your site so they are closer to users.
You can see how this works in the illustration above. You still have your “origin server,” which is storing your WordPress installation and database, but you also have your “replicated web-server clusters,” which store your site’s static content. Again, static content are images, videos, CSS stylesheets, and JavaScript files.
The origin server is located toward the south of North America in the illustration above while the replicated web-server clusters are located in six continents around the world. You can see how the “user” icons demonstrate how users are served static content from the replicated web servers closest to them instead.
The impact? Some sites report seeing a decrease of more than 50% in the amount of time it takes for their site to load after implementing a CDN. [Source: KeyCDN]
If you’re still having a tough time figuring out how this technology makes your website faster, think of it like a highway:
The main lane is your origin server.
The additional lanes are your replicated web servers.
The cars are the users visiting your website.
Without those additional lanes, all of the cars on the road need to use the main lane. This will eventually result in a traffic jam as more and more cars fill the lane. Traffic will start to slow before the flow stops altogether after the lane becomes too congested.
If you open those additional lanes, cars will be able to distribute themselves among them rather than relying on a single lane. This will allow them to move at a much quicker pace, and they’ll get to their destination a lot faster than they would have if they were all using the same lane.

In other words, having your users load static content from a server that’s closest to where they’re located will allow each and every one of them to load your website much quicker than they’d be able to if they were all loading that content from the same server.
I’ve seen this site swing 20 to 30 places in it rankings…and you can over take better content with a faster site if the other site is slow.
Check out some CDNs for your site…
Maxcdn
Sucuri
Swarmify
Jetpack – Not recommended
Cloudflare – not exactly a CDN but similar
keycdn.com
rackspace
AWS Cloudfront
CDN Enabler
Cloudinary
We can review some of these in another post soon.
The post What A CDN Can Mean For Your SEO appeared first on Make An Impact | Ultimate SEO.
0 notes
Text
Maxcdn PSD Template
New Post has been published on https://www.uberbuyer.com/2018/07/27/maxcdn-psd-template/
Maxcdn PSD Template

LIVE PREVIEWBUY FOR $12
Maxcdn is our newest PSD template, that was created for a Corporate Business.
Created with a minimal design to concentrate on the most important things, this template is going to turn into a great project with the minimum of investments.
Comprehensive documentation for Maxcdn PSD Template is available in a very easy to use HTML format. Browse the documentation, search for help topics, step by step guide on how to install fonts and change images.!
Features:
One page unique design
Clean and modern design
Optimized for HTML, WordPress, Drupal and Joomla
Carefully layered PSD files
Logical structure and layers naming for better usability
Grid lines included
Named Groups and Layers
Free icons used
Free fonts used
Free textures used
Thank You!
Thank you so much for your interests. Your comments and ratings would be much appreciated.
If you purchase this template, you will get support. We will update this template time by time and we want to hear your wishes for the future updates or for complete new templates.
Fonts:
Roboto
Robotoslab
opensans
The images used in the template are not included in the main download file, they are only for the preview purpose.
BUY ON ENVATO
0 notes
Link
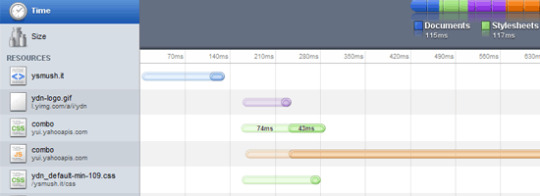
Here are just a few general website optimization tips for improving a site’s performance and speed.
1. Defer Loading Content When Possible
Ajax allows us to build web pages that can be asynchronously updated at any time. This means that instead of reloading an entire page when a user performs an action, we can simply update parts of that page.
We can use an image gallery as an example. Image files are big and heavy; they can slow down page-loading speeds of web pages. Instead of loading all of the images when a user first visits the web page, we can just display thumbnails of the images and then when the user clicks on them, we can asynchronously request the full-size images from the server and update the page. This way, if a user only wants to see a few pictures, they don’t have to suffer waiting for all of the pictures to download. This development pattern is called lazy loading.
Ajax/web development libraries like jQuery, Prototype, and MooTools can make deferred content-loading easier to implement.
2. Use External JS and CSS Files
When the user first loads your web page, the browser will cache external resources like CSS and JavaScript files. Thus, instead of inline JavaScript and CSS files, it’s best to place them in external files.
Using inline CSS also increases the rendering time of a web page; having everything defined in your main CSS file lets the browser do less work when rendering the page, since it already knows all the style rules that it needs to apply.
As a bonus, using external JavaScript and CSS files makes site maintenance easier because you only need to maintain global files instead of code scattered in multiple web pages.
3. Use Caching Systems
If you find that your site is connecting to your database in order to create the same content, it’s time to start using a caching system. By having a caching system in place, your site will only have to create the content once instead of creating the content every time the page is visited by your users. Don’t worry, caching systems periodically refresh their caches depending on how you set it up — so even constantly-changing web pages (like a blog post with comments) can be cached.
Popular content management systems like WordPress and Drupal will have static caching features that convert dynamically generated pages to static HTML files to reduce unnecessary server processing. For WordPress, check out WP Super Cache(one of the six critical WordPress plugins that Six Revisions has installed). Drupal has a page-caching feature in the core.
There are also database caching and server-side scripts caching systems that you can install on your web server (if you have the ability to do so). For example, PHP has extensions called PHP accelerators that optimize performance through caching and various other methods; one example of a PHP accelerator is APC. Database caching improves performance and scalability of your web applications by reducing the work associated with database read/write/access processes; memcached, for example, caches frequently used database queries.
4. Avoid Resizing Images in HTML
If an image is originally 1280x900px in dimension, but you need to have it be 400x280px, you should resize and resave the image using an image editor like Photoshop instead of using HTML’s width and height attributes (i.e. <img width="400" height="280" src="myimage.jpg" />). This is because, naturally, a large image will always be bigger in file size than a smaller image.
Instead of resizing an image using HTML, resize it using an image editor like Photoshop and then save it as a new file.
5. Stop Using Images to Display Text
Not only does text in an image become inaccessible to screen-readers and completely useless for SEO, but using images to display text also increases the load times of your web pages because more images mean a heavier web page.
If you need to use a lot of custom fonts in your website, learn about CSS @font-face to display text with custom fonts more efficiently. It goes without saying that you have to determine whether serving font files would be more optimal than serving images.
6. Optimize Image Sizes by Using the Correct File Format
By picking the right image format, you can optimize file sizes without losing image quality. For example, unless you need the image transparency (alpha layers) that the PNG format has to offer, the JPG format often displays photographic images at smaller file sizes.
To learn more about how to decide between JPG, PNG, and GIF, read the following guides:
The Comprehensive Guide to Saving Images for the Web
Web Designer’s Guide to PNG Image Format
JPEG 101: A Crash Course Guide on JPEG
Additionally, there are many tools you can use to further reduce the file weights of your images. Check out this list of tools for optimizing your images.
7. Optimize the Way You Write Code
Look around your source code. Do you really need all the tags you’re using or can you use CSS to help out on the display? For example, instead of using <h1><em>Your heading</em></h1>, you can easily use CSS to make your headings italics using the font-style property. Writing code efficiently not only reduces file sizes of your HTML and CSS documents, but also makes it easier to maintain.
8. Load JavaScript at the End of Your Document
It’s best if you have your scripts loading at the end of the page rather than at the beginning. It allows for the browser to render everything before getting started with the JavaScript. This makes your web pages feel more responsive because the way JavaScript works is that it blocks anything below it from rendering until it has finished downloading. If possible, reference JavaScript right before the closing <body> tag of your HTML documents. To learn more, read about deferring the loading of JavaScript.
9. Use a Content Delivery Network (CDN)
Your site’s speed is greatly affected by where the user’s location is, relative to your web server. The farther away they are, the more distance the data being transmitted has to travel. Having your content cached across multiple, strategically placed geographical locations helps take care of this problem. A CDNwill often make your operating cost a little higher, but you definitely gain a speed bonus. Check out MaxCDN or Amazon Simple Storage Service (Amazon S3).
10. Optimize Web Caching
Along with using caching systems, you should create websites that utilize web caching as much as possible. Web caching is when files are cached by the web browser for later use. Things that browsers can cache include CSS files, JavaScript files, and images.
Aside from the basics, such as putting CSS and JavaScript code that are used in multiple pages in external files, there are many ways to make sure that you are caching your files in the most efficient way possible.
For example, you can set HTTP response headers such as Expires and Last-Modified to reduce the need of re-downloading certain files when the user comes back to your site. To learn more, read about caching in HTTP and leveraging browser caching.
0 notes
Text
How to Add Free Live Chat in WordPress (The Easy Way)
Are you looking for a solution to add free live chat in WordPress?
Adding the live chat functionality to your website lets you interact with your visitors. You can answer their questions and solve their problems in real-time.
This helps you to convince your potential customers to purchase your product. It also allows you to provide faster support to your existing customers, so they stay loyal to your brand.
In this article, we will explain how to add live chat in your WordPress site, the easy way.
Why Use Live Chat on Your WordPress Site?
In this age of instant gratification, customers want to get instant answers to their questions. This helps them make a quick decision to purchase a product or service.
According to eConsultancy, live chat has the highest level of satisfaction among all the customer service channels.
Live chat has a satisfaction level of 73% where as email satisfaction is 61%, phone is at 44%, and SMS satisfaction rate is at 41%.
Live chat is an incredibly powerful tool to recover abandoned carts and improve overall conversion rate across your website, specially if you run an online store.
Aside from being a powerful sales tool, you can also use live chat to provide support to your existing customers which can help turn your loyal customers into brand ambassadors.
That being said, let’s take a look at how to easily add a free live chat in WordPress.
Adding Live Chat to WordPress
While there are many live chat solutions available for WordPress, we’ll be using LiveChat Inc. for the sake of this tutorial.
It is the best live chat software in the market. We can confidently recommend it because we use it on one of our own business websites, OptinMonster.
While the WordPress live chat plugin is free, you will need to have a paid subscription to the LiveChat service. This is one of the most cost-effective solutions in the market.
There is no good free live chat plugin for WordPress.
LiveChat Inc’s paid solution starts at $16.99 per month, but they offer a free 30-day trial for testing their product.
We believe that it is the best option for small businesses that are just starting out. It is worth spending money on it because it will help grow your business.
You can add it to your website for free and give it a try.
To get started, head over to the LiveChat website to create a new account.
Next, you need to click on the Sign up free button located at the top-right corner of the screen.
This will take you to a new page where you have to provide some basic information like your full name, email address, and password.
Click on the Continue button to move forward.
In the next step, you have to provide the URL of your website and the purpose for creating the LiveChat account. It can be for support, sales, or both.
Once done, click on the Continue button to proceed forward.
Now, you have to provide some information about your business. You can select the company size, industry of your business, and type of audience.
Once you’ve filled in the required information, you can click on the Create Account button to complete the process.
Customizing the Appearance of the Live Chat Window
Your LiveChat window needs to grab user’s attention while blending in with the rest of your website design. LiveChat allows you to make changes to the appearance of the chat window to match your needs.
To do that, you need to click on the Settings link on the left sidebar of your LiveChat account area.
This will take you to the Customization page where you can style the live chat window and see your changes applied in real-time.
On the right side of your screen, you can select a theme for the maximized window and the minimized version. You can also pick a color for the chat window to match it with your website’s colors.
To replace the LiveChat Inc. logo with your website logo, you need to click on the Advanced window tweaks link.
This will take you to a new page where you need to click on “Upload your logo”.
You can also add the links to your social media pages. Once done, click on the “I’m done editing” button.
If you want to add custom CSS, then you need to click on the “Customize using own CSS” link.
Once you are finished with the customization, click on the Save Changes button to store the settings.
Setting up Live Chat on Your WordPress Website
LiveChat comes with a free WordPress plugin that allows you to add it to your website within a few minutes.
Go ahead to install and activate the LiveChat plugin. You can check out our beginner’s guide on how to install a WordPress plugin for help.
Upon activation, head over to LiveChat » Settings from the left sidebar of your admin panel.
On the Settings page, you’ll have to connect to the LiveChat account by clicking on the “Connect with LiveChat” button.
This will open up a popup window where you need to click on the Sign in link and then log in to your LiveChat account.
Next, WordPress will ask for your permission to access your LiveChat account from the admin area. Click on Allow to complete the process.
Now you’ll find some new options on the settings page.
You may click on the “Hide chat on mobile” toggle box to display live chat on desktop only.
You can also hide the chat feature for guest visitors to test the software.
Now you can visit your website to see the Live Chat bubble added to the bottom-right corner of your screen.
You’ll receive notifications on your LiveChat account whenever someone uses it to contact you. You can then interact with them, from your account area to answer their queries.
How to Find Trained Live Chat Agents
The above method allows you to add the live chat feature to your site easily.
However, the biggest challenge for most small businesses is to maintain a team of support or sales professionals.
You’ll have to hire and train the team so that you can provide live support to your customers.
The easiest solution is to outsource the service to LTVPlus. It is a managed live chat service for online businesses.
LTVPlus is started by the co-founder of MaxCDN, the content delivery solution that we use on WPBeginner website.
They offer affordable live chat agents who can provide 24/7 support on your website. This will help reduce your expenses and grow your business without worrying about hiring more support and sales staff.
You can use the combination of LiveChat and LTVPlus to add live chat functionality to your website and take your business to the next level.
We have used the combination of these two services to increase the sales on our sister company, OptinMonster.
We hope this tutorial helped you learn how to easily add free Live Chat in WordPress. You may also want to see our list of the best CRM software for small businesses.
If you liked this article, then please subscribe to our YouTube Channel for WordPress video tutorials. You can also find us on Twitter and Facebook.
The post How to Add Free Live Chat in WordPress (The Easy Way) appeared first on WPBeginner.
😉SiliconWebX | 🌐WPBeginner
0 notes
Text
Which Is The Best WordPress Hosting? 7 Hosts
Choosing the best WordPress hosting for your site is critical.
And the most important thing you need to consider is…
How fast it is!
Why?
Because if your website loads slowly, you will suffer from-
Lower search engine rankings
Higher bounce rates
Lower page view numbers
Lower conversion rates
And last but not least…
A SLOW WEBSITE = LOWER PROFITS!
Your websites speed is critical to the bottom line of your business.
And all of that starts by making sure you choose the best WordPress hosting for you.
PRO TIP: With WordPress hosting- “best” does not mean “most expensive”
Keep reading and you’ll understand exactly what I mean…
Because the tests below will help you save $1,080 this year.
Which Is The Best WordPress Hosting?
Choosing the best WordPress hosting is easy.
You want to make sure that the host you choose-
Is super fast on the front and back end
Loads your website quickly globally
Takes security seriously (automatic backups & SSL)
Offers great support
Provides value for money
The problem is, that is much easier said than done.
So to find out who really offers the best WordPress hosting…
I setup 18 test blogs across 7 popular managed WordPress hosting providers.
And then I ran 6 tests across each of those 18 blogs-
Speed of loading from different locations around the world
Ability to cope with a plugin-heavy WP blog
Ability to handle a heavy simultaneous traffic load
How each hosts hardware benchmarks
Support speed & quality
Value for money (very surprising result!)
Note: I chose the cheapest plan with multiple sites. Cheaper plans are available.
Kinsta – Who are the current host of this blog
Cost: 2 websites, $60 monthly, $600 annually
CDN: Yes – KeyCDN included
WPX Hosting – The previous host of this blog before Kinsta
Cost: 5 websites, $24.99 monthly, $249.99 annually
CDN: Yes – WPX Cloud included
WP Engine – My host before WPX Hosting (it wasn’t great)
Cost: 5 websites, $115 monthly, $1150 annually
CDN: Yes – MaxCDN>Stackpath included
SiteGround – Specifically their managed WordPress hosting option
Cost: unlimited website, normally $19.95 monthly, $239.40 annually
CDN: No – Free CloudFlare recommended
Hostgator – The managed WordPress Hosting package
Cost: 3 websites, $27.95 monthly, $335.40 annually
CDN: No – Free CloudFlare recommended
Liquid Web – Again, their managed WordPress hosting offering
Cost: 10 websites, $99 monthly, $1,188 annually
CDN: No – Free CloudFlare recommended
Amazon EC2 – Not a managed WordPress host, but a DIY wildcard alternative
Cost: Unlimited websites, $14.99 monthly, $179.88 annually
CDN: No – Free CloudFlare recommended
So with WPEngine & LiquidWeb being the most expensive of all of them by a long way.
You would expect them to be the clear winners…
Right?
WRONG!
Not even close.
How I Tested WordPress Hosting Speed
I setup a total of 18 test sites across each of the 7 hosts.
Hosts that included a CDN as part of their package had 2 sites installed on them (WPXHosting, Kinsta & WP Engine).
Hosts that ask you to use a free CDN like CloudFlare had 3 sites installed on them (Siteground, Hostgator, Amazon EC2 & LiquidWeb).
All of the sites are hosted in the USA.
Then I created 3 different types of blog on 1 host and cloned that across each host using this plugin–
Blog Type #1 Image Heavy
Cronus Theme 11 photos 2,000 words
Blog Type #2 Plugin Heavy
Cronus Theme 30 plugins No text/images
Blog Type #3 CloudFlare
Blog Type #1 Plus Free CloudFlare CDN
And to help make things a little easier for you…
You can see the live versions of all of test blogs below-
Siteground
HostGator
LiquidWeb
Amazon EC2
WPX Hosting
Kinsta
WP Engine
Feel free to click through to any of them and run your own tests!
But if you’re too lazy to do that…
Here are the results of my 6 tests-
Test #1 – Image Heavy Site Loading Speed
In this test:
I took the Blog Type 1 (image heavy) install for each host and ran it through GTMetrix twice.
Often a sites content is cached on the hosting server and CDN.
So I ran 2 passes of GTMetrix to make sure all caches were primed.
Then I tested each site from 7 global locations and averaged out the results.
This is what it looks like-
USA
Canada
UK
Australia
China
Brazil
India
Tested From Vancouver, Canada.
Tested From London, United Kingdom.
Tested From Sydney, Australia.
Tested From Hong Kong, China.
Tested From Sao Paulo, Brazil.
Tested From Mumbai, India.
Test #1 Conclusions
But it’s fair to say that all of the hosts performed within acceptable levels in Canada and North America (except for Amazon EC2).
It’s only when you start taking a global look at things do you see dramatic differences in the load times.
But having globally fast loading times is critical in the modern economy.
Test #2 – Plugin Heavy Site Loading Speed
A plugin heavy site can cause huge problems when it comes to load times.
And it’s easy to get carried away!
This blog has 56 active plugins at the time of writing-
And plugins can have such a big impact on load time…
WP Engine maintains a list of plugins that are banned on their platform.
So for the Blog Type 2 (plugin heavy) installs, I installed 30 popular plugins with no other content whatsoever.
Thrive Architect
Yoast SEO
Smushit
Contact Form 7
All In One Schema
WooCommerce
TinyMCE Advanced
Really Simple SSL
MailChimp for WordPress
Insert Headers and Footers
Redirection
WP Statistics
AMP for WordPress
Google Analyticator
WP Sitemap Page
Login LockDown
WP-Polls
WP Google Fonts
Cookie Notice for GDPR
Social Media Share Buttons & Icons
Quiz & Survey Master
PDF Embedder
WP Project Manager
ManageWP Worker
Code Snippets
Tablepress
PrettyLinks
bbPress
WordPress Download Manager
Business Directory Plugin
This test is different because we are testing the computing power of the host, rather than the speed of delivering static image files.
Then I tested each plugin heavy install from 7 global locations & averaged out the results-
USA
Canada
UK
Australia
China
Brazil
India
Tested From Vancouver, Canada.
Tested From London, United Kingdom.
Tested From Sydney, Australia.
Tested From Hong Kong, China.
Tested From Sao Paulo, Brazil.
Tested From Mumbai, India.
Test #2 Conclusions
Like the first test, WPX Hosting is the winner here.
Although it is a marginal win over WP Engine.
It’s worth bearing in mind that the tested page had absolutely zero content.
And the slower hosts seem to have started choking with the higher number of requests.
Test #3 – WordPress Performance Tester Benchmarks
The WordPress Performance Tester plugin is specifically designed to stress test WordPress hosting servers.
It does that by running a number of tests-
Math – 100,000 math function tests
String Manipulation – 100,000 string manipulation tests
Loops – 1,000,000 loop iterations
Conditionals – 1,000,000 conditional logic checks
MySql – basic mysql functions and 1,000,000 ENCODE() iterations
$wpdb – 250 insert, select, update and delete operations
And then outputs 2 performance metrics-
Execution Time – how long it took to do all of those tests (lower is better)
Queries Per Second – how many queries per second processed (higher is better)
I ran each of the Blog Type 1 (image heavy) installs for each host through the plugin.
And these were the results…
Test #3 Conclusion
As you can see 2x of the more budget friendly hosts WPX Hosting & Siteground performed incredibly well here.
But interestingly:
The more expensive hosts like Kinsta, LiquidWeb and WP Engine failed to perform.
That is the exact opposite of what I would expect to happen…
You would think those extra $$$ translate into better hosting hardware and setups!
But the data is telling a different story.
Test #4 – Load Impact
Next I wanted to know:
How would each host perform under stress from 500 simultaneous visitors?
However I had a huge problem:
Most hosts automatically block tests like this because it reseambles a DDOS attack.
But it was critical that I conducted anonymous testing because I didn’t want the hosts to know I was testing them.
So I created a new page on each Blog Type 1 (image heavy) install with 1,000 words-
Then I set Load Impact to work by sending 500 simulated visitors to load each page on each host.
This is how it played out-
Host Maximum Page Load Time (lower is better) Maximum Requests Handled (higher is better) Test Result WPX Hosting 0.371 seconds 3,370 View Result Liquid Web 2.56 seconds 599 View Result WP Engine 3.57 seconds 2,430 View Result Amazon EC2 10.1 seconds 305 View Result
Test #4 Conclusion
From the tests I was able to complete-
WPX Hosting was the hands down winner here – it wasn’t even close.
And although WPEngine, Amazon and LiquidWeb were slower…
They did not collapse under the testing and remained online.
As for the other hosts I had problems testing with-
Kinsta – LoadImpact was reporting a problem with overloaded Amazon VPS’s
SiteGround – Either the hosting failed or they automatically blocked LoadImpact
HostGator – Fell down during testing , the site went offline with a 503 error
And while I would have loved to get a result for them…
It would have brought attention to my testing & I wanted to test anonymously.
Perhaps in the future I will be able to run this test again for the missing hosts.
Test #5 – Hosting Support
Speed of your website is one thing.
But speed (and quality) of support is another.
And given that the tested hosts are self proclaimed “WordPress Experts”…
I wanted to put that to the test.
So I opened an identical support ticket with each host to see-
How long it took to respond
If they would fix the problem for me
Here is the support ticket I sent to each host-
Hi Support,
I am not a very technical person and need help with the setup of this redirect on my site hosted with you thanks:
hostingtest2.space – all pages except hostingtest2.space/wp-admin
to redirect to
hostingtest2.space
Thanks in advance.
Matt
It’s not a super easy problem to fix…
But it’s not super difficult either.
Any WordPress expert should be able to tackle it.
In my opinion the easiest way to solve this problem is with a .htaccess edit like this-
RewriteEngine On RewriteCond %{REQUEST_URI} !^(/wp-admin|.wp-login.php.) [NC] RewriteRule (.*) http:/hostingtest3.space//$1 [R=301,L]
But:
There is always more than one way to skin a cat!
Test #5 Conclusion
As expected – the test results varied wildly here.
Some hosts took full control and deployed a solution on my behalf…
Where as others… didn’t.
Here is how they performed-
WPEngine
Siteground
Liquidweb
Hostgator
WPXHosting
Kinsta
Amazon
WP Engine
There was 14 minute delay on live chat support initially-
And ultimately…
They said it wasn’t possible to do-
Eric Roiz: This unfortunately wouldn’t be something that can work with a WordPress setup. With the way that WordPress loads out it’s content that wouldn’t be able to work
Matthew Woodward: Can it be done in the htaccess file?
Eric Roiz: No, it’s not a matter or being able to redirect or not, but rather that the way the sites individually load their content, that wouldn’t be able to work
Matthew Woodward: OK Eric, I appreciate you trying. Thanks and have a good day there.
It wasn’t that the WP Engine Support Agent didn’t necessarily want to do it for me.
But he certainly didn’t know how to do it.
Siteground
Live chat response was pretty fast!
But the support team wasn’t willing to apply the change for me and wanted me to read an article and use their tool myself:
Martin T.: Sure, we do have a tool just for that and an article dedicated to it as well: https://ift.tt/1qT7ma2
Matthew Woodward: I always s**** up things like this and would greatly appreciate you doing it for me thanks.
Martin T.: I would be able to assist you if you’re facing any difficulties, but don’t worry it’s really easy and you can’t really mess anything up 🙂
Matthew Woodward: I always find a way!
Matthew Woodward: And it will take me along time to go through the article and understand the exact steps.
Martin T.: It’s ok
Martin T.: Believe me it’s really easy and you can’t mess anything up as the redirects can always be removed 🙂
Matthew Woodward: I guess it’s not your policy to do stuff like that. It’s OK I understand.
Martin T.: As customer support representative we’re here to help whenever you’re facing any difficulties, of course, I would love to assist you with any difficulties that might come up when trying to manage your account with us 🙂
Matthew Woodward: Sure Martin, I appreciate that and have a good day there. Bye for now.
I did take comfort in the fact that if I applied the changes myself and messed them up, that the SiteGround support team would help me out if I did mess it up.
Liquid Web
Accessing live chat was very fast and the support agency was willing to help.
Although he stated that it wasn’t their normal policy-
“that is out of the scope of our support. normally that would fall under your responsibility. but as a courtesy i can attempt that. just keep in mind that we don’t normally do this.”
And as Liquid Web are one of the more expensive hosts, I was pleased to see them take control of requests like this.
Hostgator
Hostgators live chat response was very fast.
However:
Their solution failed when tested and the subsequent workaround seemed much more complex-
While it was overly complex, they did demonstrate that why were willing to take control of requests rather than palming them off on support documents.
WPX Hosting
WPX Hosting were the most impressive of the bunch.
Not only did they answer almost immediately but they also completed the request for me in about 10 minutes-
Luchezar: I have set the redirection as requested, can you please test on your end and see if it’s working?
Please clear your browser’s cache. Just press CTRL + F5 or use Incognito Mode (CTRL + SHIFT + N) for Chrome and (CTRL + SHIFT + P) for Firefox.
For reference, please check this article: https://wpxhosting.c…er-cache-chrome-firefox-edge-/
Matthew: Sure, one moment. Yes that works. Thank you and have a good day there. Bye for now.
You can’t ask for a better customer experience than that!
Kinsta
Kinsta (my current host) have always offered great, responsive support that takes control of issues.
They responded quickly to the live chat, but it seemed this issue stumped them – even though I have challenged them with much more complex issues in the past.
The Kinsta agent spent a very long time (2 hours+) trying to fix it but couldn’t get it working fully-
But they were committed to the resolution and prepared to invest significant time to help.
Amazon
Amazon is not a managed service like the other hosts here and is strictly do it yourself
I know from past experience that you have to submit a ticket/email and they reply within 24 hours typically.
However, if their hardware is working- they expect the user to do everything in terms of configuration and software so their service wasn’t relevant for this test.
And out of those 3-
It was WPXhosting that solved the problem the quickest and with minimum fuss.
However:
WPEngine & SiteGround seriously fell short here
Their “WordPress experts” were not able to solve the problem.
Test #6 – The Free CloudFlare CDN
4x of the hosts I tested did not include any kind of CDN-
SiteGround
LiquidWeb
HostGator
Amazon EC2
And it is common advice for hosting companies to recommend you setup the free version of the CloudFlare CDN.
Supposedly this will help increase site speed.
But is that really true?
To find out I cloned the Blog Type 1 (image heavy) install to a new domain on each host and then activated the free CloudFlare CDN-
Then I tested each of these installs with GTMetrix from 7 different global locations.
And the results were very interesting…
WordPress Hosting Features Compared
So far we have focused purely on speed, reliabiliy and support.
But what about other hosting features…
As you can see:
There really isn’t that much difference between them on the face of it…
Except for price!
It’s only with the nitty gritty testing that you see huge differences in quality of service.
The Worst Things About Each Host
Regardless of which host you look at, each of them have their own cons.
The best wordpress hosting for me, isn’t necessarily the best WordPress hosting for you.
For example:
WPX Hosting is clearly the fastest, but if you need phone support…
They aren’t right for you.
So here is what I didn’t like about each of the managed WordPress hosting options-
WP Engine
WPX Hosting
No phone support
No Git support
Servers are only available in USA and UK
Back end control panel could be easier to use
Hostgator
Terrible trust score
No CDN on base plan
No free SSLs, only paid
No staging area
Long list of banned plugins
Automatic backups are a paid upgrade
Terrible loading speed from non-US locations (see above tests)
Liquid Web
Very expensive
Not exactly the quickest based on my testing
No CDN on base plan (but free Cloudflare CDN worked best of tested hosts here)
No free email, costs $10 monthly extra + $1-$3 per email address
No discounts for annual subscription
Kinsta
No phone support
Expensive for multiple websites
No email support – additional costs with Google Apps etc
List of banned plugins
No live chat for pre-sales questions
No free migration on the base plan
SiteGround
Pricing virtually triples in year 2
No staging area on base plan
After first month, no monthly payment option
No real CDN on base plan (free Cloudflare doesn’t count)
Amazon
Not really a WordPress host
You need to configure everything
Very technical, requires command line
No CDN
No automatic backups
Support is for their hardware only
No cost saving reason to choose Amazon over dedicated WP hosts
Wrapping It Up
While it is usually true that “you get what you pay for” in life..
That isn’t true when it comes to choosing the best wordpress hosting.
WP Engine ($115/mo) & Liquid Web ($99/mo) are the most expensive but also failed to perform.
HostGator were also consistently poor.
That leaves SiteGround, Kinsta and WPX Hosting to consider.
Kinsta and WPX Hosting performed consistently faster than Siteground.
But Siteground did hold steady throughout all of my testing.
I suspect if you added a quality CDN to SiteGround rather than the free CloudFlare suggestion they would perform much better.
But that’s an extra cost and Kinsta & WPX Hosting already include good CDNs for free.
So if I was going to rank them…
The Best WordPress Hosting Is…
WPX Hosting – Cheap but also the fastest with the best support
Kinsta – Solid performance, fantastic support & the current host of this blog
SiteGround – Budget friendly and fast but support was lacking
The great irony of these results is that…
WPX Hosting used to host this blog (I famously ditched WPEngine for them).
Then 2 years ago…
I moved the blogs hosting over to Kinsta because I needed-
A server level backup/restore system
A staging area
Access to new technologies like HHVM (which is now deceased)
But:
Since I moved this blog to Kinsta…
The WPX Hosting team have added a bunch of new features such as-
Their own backup/restore system
A staging area
A free custom CDN called “WPX Cloud”
In fact I still have 9 sites hosted with WPX Hosting including my SEO agency site and my black friday deals site (neither of which have WPX Cloud activated right now).
Where as Kinsta are currently hosting this blog and my SEO course.
But as they say:
The proof is in the pudding.
And based on all of my testing and personal experiences…
The best WordPress hosting is WPX Hosting (assuming you don’t need phone support)
And remember this:
A faster website will result in-
Higher search engine rankings
Lower bounce rates
Higher page view numbers
Higher conversion rates
And most importantly…
HIGHER PROFITS!
So don’t waste your time and money with a slower host.
Who do you think the best WordPress host is right now?
I would love to know!
window.fbAsyncInitPredefined = window.fbAsyncInit; window.fbAsyncInit = function() { window.FB.init({ appId: 608450559206894, status: true, cookie: true, xfbml: true, version: 'v2.4' }); window.FB.init = function(){}; window.fbAsyncInitPredefined && window.fbAsyncInitPredefined(); }; (function(d, s, id) { var js, fjs = d.getElementsByTagName(s)[0]; if (d.getElementById(id)) return; js = d.createElement(s); js.id = id; js.src = "http://connect.facebook.net/en_US/sdk.js?"; fjs.parentNode.insertBefore(js, fjs); }(document, 'script', 'facebook-jssdk')); Source link
0 notes
Text
How to Add LiveChat to Your WooCommerce Store (and Boost Sales)
Do you want to add LiveChat to your WooCommerce store? Live chat helps you connect with website visitors in real-time, so you can offer help, generate leads, and convert them into a customer. In this article, we will show you how to easily add LiveChat to your WordPress eCommerce store like WooCommerce, Easy Digital Downloads, and more.
Why Add LiveChat to Your WooCommerce Store
LiveChat helps you connect with your website visitors in real-time, and it’s proven to boost satisfaction levels. According to eConsultancy, live chat has the highest satisfaction levels of any customer service channel at 73%, compared to 61% for email and 44% for phone.
This is inline with our experience at OptinMonster because our live chat satisfaction score is at 85%.
But the biggest reason for adding LiveChat on your eCommerce website is the boost in conversion.
We saw a massive increase in overall conversion when we added live chat on OptinMonster website. A person who chats with us is 11x more likely to convert than an average website visitor.
Now you might be thinking, isn’t adding live chat expensive? Don’t you need trained support and sales agents to successfully run live chat.
Yes, that’s actually the biggest challenge to Live Chat, but we solved the problem.
Solving The Biggest Challenge of Live Chat
The biggest challenge of adding live chat to your eCommerce store is to manage agents. You will need to add trained support and sales agents to run live chat.
This is where LTVPlus comes in. They provide dedicated and well-trained live chat agents to manage your pre-sales live chat and simple support inquiries. These agents work with you to understand your product / business and act as an extension of your existing team.
LTVPlus is started by the co-founder of MaxCDN, the content delivery network that we use here on WPBeginner, so we decided to give them a try.
We use LTVPlus on OptinMonster and have witnessed significant increase in our eCommerce conversions. The best part is that we don’t have to worry about hiring or training agents.
Since the entire setup is out-sourced, it’s very affordable, and setting up livechat pays for itself within the first week.
How to Easily Add LiveChat to Your WooCommerce Site
On our eCommerce website, we use LiveChat as our chat software. You can use any of the top live chat software, but for the sake of this tutorial, we’ll only show the platform that we’re using ourselves.
First, you need to visit the LiveChat website and signup for an account.
LiveChat is a paid solution (starting from $16.99 per agent). They also offer a free 30-day trial allowing you to check out the features and see if its a good fit for your business.
After registration, you will see the LiveChat dashboard. From here you need to click on the Settings button to customize the LiveChat window’s appearance.
From here, you can choose the chat window colors and theme to match your website’s color scheme. After that, click on ‘Advanced window tweaks’ link to upload your own logo and add your social media profiles.
Next, you need to select an eye-catcher. These eye-catchers are images that are displayed when the LiveChat window is minimized.
LiveChat has several eyecatcher styles that you can use. Alternatively, you can also upload your own images and use them as your eyecatcher.
Now that you are satisfied with the chat window’s appearance, its time to add LiveChat agents. Switch to the ‘Agents’ tab and then click on the ‘Invite teammates’ link.
This will bring you to add agent screen. You need to provide name, job title, and email address for the team member you want to invite.
Don’t forget to change ‘Permissions’ for the team member you are adding. You can add them as agents with limited control on your account or as an administrator with full access to the app. If you are unsure, then select agent.
Your LiveChat setup is now ready, and you can add it to your WooCommerce store.
Adding the LiveChat to Your Website
LiveChat makes it super easy to add the chat window and buttons to your online store.
In your WordPress site, you need to install and activate the LiveChat plugin. For more details, see our step by step guide on how to install a WordPress plugin.
Upon activation, the plugin will add a new menu item labeled ‘LiveChat’ to your WordPress admin. Clicking on it will take you to plugin’s settings page.
From here you need to click on the ‘Sign in with LiveChat’ button to connect your WordPress site to your LiveChat account.
Once connected, you will see some basic LiveChat settings. You can turn it off on mobile devices, turn off sounds, or hide chat window from non-logged in users.
If you are unsure, then we recommend leaving these options as they are. You can now visit your website to see live chat in action on your website.
If you are running a non-WordPress website, then you can still easily add LiveChat to your website. Click on Channels » Chat Widget under your LiveChat settings.
From here, you can copy the code snippet that you can add to your website or view other available integrations. LiveChat has apps and integrations for all popular WordPress alternatives like Shopify, Squarespace, Magento, and more.
Combined with Live Chat and LTVPlus, we’re seeing some really good results on our eCommerce website, and we will be adding LiveChat to more ofo ur websites.
We hope this article helped you add LiveChat to your WooCommerce store. You may also want to see our list of best business phone services for small businesses.
If you liked this article, then please subscribe to our YouTube Channel for WordPress video tutorials. You can also find us on Twitter and Facebook.
The post How to Add LiveChat to Your WooCommerce Store (and Boost Sales) appeared first on WPBeginner.
from WPBeginner https://www.wpbeginner.com/wp-tutorials/how-to-add-livechat-to-your-woocommerce-store-and-boost-sales/
0 notes
Text
What is a content delivery network (CDN)?
A content delivery network (CDN) is a network of servers in different geographic locations working together to get content to load faster by serving it from a location near the visitor. Here, I’ll explain what this all means and what a CDN can do for you and your SEO.
Optimize your site for search & social media and keep it optimized with Yoast SEO Premium »
$89 - Buy now »
Info What does a CDN do?
A CDN caches static content. Static content is files like HTML, CSS, JavaScript and image files that stay the same for every user. These files don’t have to be dynamically generated based on a set of rules — that’s dynamic content; static files are just there and everyone uses these. By making these static files available on a CDN with many servers all around the world, you can get them to your visitors super fast.
Picture this: you’ve hosted your site on a server in San Francisco, California. I hear you asking: “But I have a web host, why would I need a CDN?” Well, whenever you load your site from your house near Oakland, it loads lightning fast. You’re physically close by, right? But do you think someone from Mumbai, India would have the same experience if he or she were to visit your site? Probably not. Why is that? Among other things, latency.
The longer the distance between a server and client — a.k.a. your browser —, the longer the latency will be. Latency is the time needed for the server to respond to a request. In suboptimal conditions that latency will keep getting worse. You can use a content delivery network — or CDN — to move your site closer to your visitor, so to say. The result? Less latency and a fast loading site. But a CDN can do a lot more, and we’ll get to that in a minute.
On the left a typical situation without a cdn. Every visitor requests the site from the same server, no matter how far away they are. Right: with a cdn, every user requests the same site from a location near them. CC image: Wikipedia
What are the benefits of using a CDN?
There are several reasons for using a CDN for your site. Remember, you can do a lot of complicated stuff with a CDN, but most people will use it to get that nasty latency down and speed up the loading times of their sites. Here are several reasons to use a CDN:
Speeds up your site
Reduces bandwidth costs
Adds scalability: improves availability and uptime
Improves security
A CDN speeds up your site
For most people, the speed bump a CDN can deliver will be their main focus point. We’ve talked about that first reason already. Everyone wants a fast site and site owners do everything in their power to make their sites as fast as possible. A fast site offers a great experience for everyone. Plus, Google loves fast sites!
A CDN reduces bandwidth
The other reasons might be less obvious. A CDN helps you to get your bandwidth costs down because it serves up static content to users for their servers, not yours. This can have a drastic impact on your costs for web hosting. Often, traffic comes in waves and if the traffic exceeds the limits set by your hosting plan, you have to pay — big time. Of course, you have to pay for a solid CDN so you won’t keep a lot of extra cash in hand, but it does give you a firmer grip on what you’re spending.
A CDN can add a layer of security to your site
Adding a CDN in front of your site is a great way to improve security. The CDN provider has all kinds of tools that help with that. It can serve as a kind of firewall to protect your site from going down during a so-called Distributed Denial of Service attack (DDoS), for instance. It helps you guard against the most common threats out there. There are even specific settings to keep hackers out of your WordPress sites.
A CDN is scalable and improves availability and uptime
By hosting part of your website’s content, a CDN can help you enhance uptime and availability of your site. Also, many CDN providers also use tactics to make sure that your site doesn’t go down, whatever happens. Load balancing, for instance, can help your site stay online whenever you have a sudden, massive spike in your traffic.
Does using a CDN have any implications for SEO?
Your SEO won’t suffer if you activate a CDN. It might even help your rankings a bit because your site speed might get a big boost. In addition, by installing a CDN you can also use state-of-the-art technology like forcing a secure HTTPS connection and using the new HTTP/2 protocol to improve your site speed and uptime. In general, users should be happier if your site is excellent, snappy and secure. You should, however, take care that you implement it correctly. Most providers have specific instructions to set up a CDN without hurting SEO.
What CDN should I use?
There are numerous CDN providers out there. You should try and find one that offers the best mix of performance, features and price for your specific situation. We use Cloudflare at Yoast, but you could also consider some of the other well-known CDN providers like, for instance, Sucuri, MaxCDN, Microsoft Azure or Amazon CloudFront.
Most CDN providers have easy-to-follow setup instructions for WordPress sites, so you should be up and running in a couple of minutes. Some even offer WordPress plugins to improve the process even more. After setting up the account, you can get to work to improve the speed and security of your WordPress site.
Conclusion
A CDN is a great tool to improve the loading speed of your site. Not only that, but it also adds a layer of security to your site and improves uptime and reliability. If you are not using a CDN yet, you might be missing out. Pretty much every site can benefit from a CDN, so please investigate if it might help yours.
Read more: ‘What is SEO?’ »
https://ift.tt/2kxcdgd
0 notes
Photo

Choosing the best WordPress hosting for your site is critical. And the most important thing you need to consider is… How fast it is! Why? Because if your website loads slowly, you will suffer from- Lower search engine rankings Higher bounce rates Lower page view numbers Lower conversion rates And last but not least… A SLOW WEBSITE = LOWER PROFITS! Your websites speed is critical to the bottom line of your business. And all of that starts by making sure you choose the best WordPress hosting for you. PRO TIP: With WordPress hosting- “best” does not mean “most expensive” Keep reading and you’ll understand exactly what I mean… Because the tests below will help you save $,080 this year. Which Is The Best WordPress Hosting? Choosing the best WordPress hosting is easy. You want to make sure that the host you choose- Is super fast on the front and back end Loads your website quickly globally Takes security seriously (automatic backups & SSL) Offers great support Provides value for money The problem is, that is much easier said than done. So to find out who really offers the best WordPress hosting… I setup 8 test blogs across 7 popular managed WordPress hosting providers. And then I ran tests across each of those 8 blogs- Speed of loading from different locations around the world Ability to cope with a plugin-heavy WP blog Ability to handle a heavy simultaneous traffic load How each hosts hardware benchmarks Support speed & quality Value for money (very surprising result!) Note: I chose the cheapest plan with multiple sites. Cheaper plans are available. Kinsta – Who are the current host of this blog Cost: websites, $0 monthly, $00 annually CDN: Yes – KeyCDN included WPX Hosting – The previous host of this blog before Kinsta Cost: websites, $.99 monthly, $9.99 annually CDN: Yes – WPX Cloud included WP Engine – My host before WPX Hosting (it wasn’t great) Cost: websites, $ monthly, $0 annually CDN: Yes – MaxCDN>Stackpath included SiteGround – Specifically their managed WordPress hosting option Cost: unlimited website, normally $9.9 monthly, $9.0 annually CDN: No – Free CloudFlare recommended Hostgator – The managed WordPress Hosting package Cost: websites, $7.9 monthly, $.0 annually CDN: No – Free CloudFlare recommended Liquid Web – Again, their managed WordPress hosting offering Cost: 0 websites, $99 monthly, $,88 annually CDN: No – Free CloudFlare recommended Amazon EC – Not a managed WordPress host, but a DIY wildcard alternative Cost: Unlimited websites, $.99 monthly, $79.88 annually CDN: No – Free CloudFlare recommended So with WPEngine & LiquidWeb being the most expensive of all of them by a long way. You would expect them to be the clear winners… Right? WRONG! Not even close. How I Tested WordPress Hosting Speed I setup a total of 8 test sites across each of the 7 hosts. Hosts that included a CDN as part of their package had sites installed on them (WPXHosting, Kinsta & WP Engine). Hosts that ask you to use a free CDN like CloudFlare had sites installed on them (Siteground, Hostgator, Amazon EC & LiquidWeb). All of the sites are hosted in the USA. Then I created different types of blog on host and cloned that across each host using this plugin– Blog Type Heavy Cronus Theme photos ,000 words Blog Type Heavy Cronus Theme 0 plugins No text/images Blog Type Blog Type Plus Free CloudFlare CDN And to help make things a little easier for you… You can see the live versions of all of test blogs below- Siteground Blog Type (image heavy) Blog Type (plugin heavy) Blog Type (type + Cloudflare) HostGator Blog Type (image heavy) Blog Type (plugin heavy) Blog Type (type + Cloudflare) LiquidWeb Blog Type (image heavy) Blog Type (plugin heavy) Blog Type (type + Cloudflare) Amazon EC Blog Type (image heavy) Blog Type (plugin heavy) Blog Type (type + Cloudflare) WPX Hosting Blog Type (image heavy) Blog Type (plugin heavy) Kinsta Blog Type (image heavy) Blog Type (plugin heavy) WP Engine Blog Type (image heavy) Blog Type (plugin heavy) Feel free to click through to any of them and run your own tests! But if you’re too lazy to do that… Here are the results of my tests- Test – Image Heavy Site Loading Speed In this test: I took the Blog Type (image heavy) install for each host and ran it through GTMetrix twice. Often a sites content is cached on the hosting server and CDN. So I ran passes of GTMetrix to make sure all caches were primed. Then I tested each site from 7 global locations and averaged out the results. This is what it looks like- USACanadaUKAustraliaChinaBrazilIndia Tested From Dallas, USA. Host Page Load Time(lower is better) TTFB(lower is better) Test Result WPX Hosting . seconds ms View Result Kinsta . seconds 00 ms View Result SiteGround . seconds ms View Result WP Engine . seconds ms View Result Liquid Web .8 seconds ms View Result HostGator . seconds 9 ms View Result Amazon EC . seconds 900 ms View Result Tested From Vancouver, Canada. Host Page Load Time(lower is better) TTFB(lower is better) Test Result Kinsta . seconds 8 ms View Result WPX Hosting . seconds 89 ms View Result HostGator .7 seconds ms View Result SiteGround .8 seconds ms View Result WP Engine . seconds 9 ms View Result LiquidWeb . seconds ms View Result Amazon EC .8 seconds 900 ms View Result Tested From London, United Kingdom. Host Page Load Time(lower is better) TTFB(lower is better) Test Result WPX Hosting 0. seconds 7 ms View Result SiteGround . seconds 9 ms View Result WP Engine .7 seconds 8 ms View Result Kinsta .0 seconds ms View Result Liquid Web . seconds ms View Result Amazon EC . seconds 800 ms View Result HostGator .0 seconds 7 ms View Result Tested From Sydney, Australia. Host Page Load Time(lower is better) TTFB(lower is better) Test Result WPX Hosting 0.8 seconds ms View Result Kinsta . seconds 00 ms View Result SiteGround .7 seconds 800 ms View Result WP Engine . seconds 800 ms View Result Liquid Web . seconds 900 ms View Result HostGator .0 seconds 00 ms View Result Amazon EC .0 seconds 00 ms View Result Tested From Hong Kong, China. Host Page Load Time(lower is better) TTFB(lower is better) Test Result WPX Hosting . seconds 700 ms View Result Kinsta . seconds 00 ms View Result SiteGround . seconds 900 ms View Result WP Engine . seconds 900 ms View Result HostGator .8 seconds 8 ms View Result Liquid Web .0 seconds 000 ms View Result Amazon EC 9.0 seconds 800 ms View Result Tested From Sao Paulo, Brazil. Host Page Load Time(lower is better) TTFB(lower is better) Test Result WPX Hosting .7 seconds 0 ms View Result WP Engine . seconds 700 ms View Result Kinsta . seconds 00 ms View Result SiteGround . seconds 000 ms View Result Liquid Web .7 seconds 00 ms View Result HostGator . seconds 00 ms View Result Amazon EC .7 seconds 800 ms View Result Tested From Mumbai, India. Host Page Load Time(lower is better) TTFB(lower is better) Test Result WPX Hosting 0.9 seconds 0 ms View Result SiteGround . seconds 00 ms View Result Kinsta .7 seconds 00 ms View Result WP Engine .8 seconds 000 ms View Result Liquid Web . seconds 00 ms View Result Amazon EC . seconds 00 ms View Result HostGator . seconds 00 ms View Result Click Here To See The Test Data Hide The Test Data Test Conclusions The clear winner here is WPX Hosting. But it’s fair to say that all of the hosts performed within acceptable levels in Canada and North America (except for Amazon EC). It’s only when you start taking a global look at things do you see dramatic differences in the load times. But having globally fast loading times is critical in the modern economy. Test – Plugin Heavy Site Loading Speed A plugin heavy site can cause huge problems when it comes to load times. And it’s easy to get carried away! This blog has active plugins at the time of writing- And plugins can have such a big impact on load time… WP Engine maintains a list of plugins that are banned on their platform. So for the Blog Type (plugin heavy) installs, I installed 0 popular plugins with no other content whatsoever. Thrive Architect Yoast SEO Smushit Contact Form 7 All In One Schema WooCommerce TinyMCE Advanced Really Simple SSL MailChimp for WordPress Insert Headers and Footers Redirection WP Statistics AMP for WordPress Google Analyticator WP Sitemap Page Login LockDown WP-Polls WP Google Fonts Cookie Notice for GDPR Social Media Share Buttons & Icons Quiz & Survey Master PDF Embedder WP Project Manager ManageWP Worker Code Snippets Tablepress PrettyLinks bbPress WordPress Download Manager Business Directory Plugin Click Here To See All 0 Plugins Hide The Plugin List This test is different because we are testing the computing power of the host, rather than the speed of delivering static image files. Then I tested each plugin heavy install from 7 global locations & averaged out the results- USACanadaUKAustraliaChinaBrazilIndia Tested From Dallas, USA. Host Page Load Time(lower is better) Test Result WP Engine . seconds View Result Amazon EC . seconds View Result WPX Hosting .0 seconds View Result Kinsta . seconds View Result HostGator . seconds View Result SiteGround . seconds View Result Liquid Web . seconds View Result Tested From Vancouver, Canada. Host Page Load Time(lower is better) Test Result WPX Hosting . seconds View Result WP Engine .7 seconds View Result SiteGround .7 seconds View Result LiquidWeb .7 seconds View Result Kinsta .8 seconds View Result HostGator .8 seconds View Result Amazon EC .8 seconds View Result Tested From London, United Kingdom. Host Page Load Time(lower is better) Test Result WPX Hosting . seconds View Result WP Engine . seconds View Result Kinsta . seconds View Result Liquid Web . seconds View Result Amazon EC .8 seconds View Result SiteGround .0 seconds View Result HostGator . seconds View Result Tested From Sydney, Australia. Host Page Load Time(lower is better) Test Result WPX Hosting . seconds View Result WP Engine . seconds View Result SiteGround .7 seconds View Result Liquid Web . seconds View Result Kinsta .7 seconds View Result Amazon EC .7 seconds View Result HostGator . seconds View Result Tested From Hong Kong, China. Host Page Load Time(lower is better) Test Result WPX Hosting .0 seconds View Result Kinsta .8 seconds View Result SiteGround .9 seconds View Result WP Engine . seconds View Result HostGator . seconds View Result Liquid Web .9 seconds View Result Amazon EC .8 seconds View Result Tested From Sao Paulo, Brazil. Host Page Load Time(lower is better) Test Result WP Engine . seconds View Result SiteGround .0 seconds View Result Kinsta .9 seconds View Result WPX Hosting .0 seconds View Result Amazon EC . seconds View Result Liquid Web .8 seconds View Result HostGator . seconds View Result Tested From Mumbai, India. Host Page Load Time(lower is better) Test Result WPX Hosting . seconds View Result SiteGround .9 seconds View Result WP Engine .0 seconds View Result Kinsta .0 seconds View Result Amazon EC . seconds View Result Liquid Web . seconds View Result HostGator . seconds View Result Click Here To See The Test Data Hide The Test Data Test Conclusions Like the first test, WPX Hosting is the winner here. Although it is a marginal win over WP Engine. It’s worth bearing in mind that the tested page had absolutely zero content. And the slower hosts seem to have started choking with the higher number of requests. Test – WordPress Performance Tester Benchmarks The WordPress Performance Tester plugin is specifically designed to stress test WordPress hosting servers. It does that by running a number of tests- Math – 00,000 math function tests String Manipulation – 00,000 string manipulation tests Loops – ,000,000 loop iterations Conditionals – ,000,000 conditional logic checks MySql – basic mysql functions and ,000,000 ENCODE() iterations $wpdb – 0 insert, select, update and delete operations And then outputs performance metrics- Execution Time – how long it took to do all of those tests (lower is better) Queries Per Second – how many queries per second processed (higher is better) I ran each of the Blog Type (image heavy) installs for each host through the plugin. And these were the results… Host Execution Time(lower is better) Queries Per Second(higher is better) Test Result WPX Hosting 0.70 ,8 View Result SiteGround 0.7 ,0 View Result Kinsta 0.89 , View Result Liquid Web 0.98 ,0 View Result Amazon EC .00 View Result WP Engine . 9 View Result HostGator 9. 08 View Result Click Here To See The Test Data Hide The Test Data Test Conclusion As you can see x of the more budget friendly hosts WPX Hosting & Siteground performed incredibly well here. But interestingly: The more expensive hosts like Kinsta, LiquidWeb and WP Engine failed to perform. That is the exact opposite of what I would expect to happen… You would think those extra $$$ translate into better hosting hardware and setups! But the data is telling a different story. Test – Load Impact Next I wanted to know: How would each host perform under stress from 00 simultaneous visitors? However I had a huge problem: Most hosts automatically block tests like this because it reseambles a DDOS attack. But it was critical that I conducted anonymous testing because I didn’t want the hosts to know I was testing them. So I created a new page on each Blog Type (image heavy) install with ,000 words- WPX Hosting – https://hostingtest.space/load-impact/ WP Engine – https://hostingtest.space/load-impact/ Kinsta – https://hostingtest.space/load-impact/ SiteGround – https://hostingtest7.space/load-impact/ Hostgator – https://hostingtest0.space/load-impact/ Amazon – https://hostingtest.space/load-impact/ Liquid Web – https://hostingtest.space/load-impact/ Then I set Load Impact to work by sending 00 simulated visitors to load each page on each host. This is how it played out- Host Maximum Page Load Time(lower is better) Maximum Requests Handled(higher is better) Test Result WPX Hosting 0.7 seconds ,70 View Result Liquid Web . seconds 99 View Result WP Engine .7 seconds ,0 View Result Amazon EC 0. seconds 0 View Result Click Here To See The Test Data Hide The Test Data Test Conclusion From the tests I was able to complete- WPX Hosting was the hands down winner here – it wasn’t even close. And although WPEngine, Amazon and LiquidWeb were slower… They did not collapse under the testing and remained online. As for the other hosts I had problems testing with- Kinsta – LoadImpact was reporting a problem with overloaded Amazon VPS’s SiteGround – Either the hosting failed or they automatically blocked LoadImpact HostGator – Fell down during testing , the site went offline with a 0 error And while I would have loved to get a result for them… It would have brought attention to my testing & I wanted to test anonymously. Perhaps in the future I will be able to run this test again for the missing hosts. Test – Hosting Support Speed of your website is one thing. But speed (and quality) of support is another. And given that the tested hosts are self proclaimed “WordPress Experts”… I wanted to put that to the test. So I opened an identical support ticket with each host to see- How long it took to respond If they would fix the problem for me Here is the support ticket I sent to each host- Hi Support, I am not a very technical person and need help with the setup of this redirect on my site hosted with you thanks: hostingtest.space – all pages except hostingtest.space/wp-admin to redirect to hostingtest.space Thanks in advance. Matt It’s not a super easy problem to fix… But it’s not super difficult either. Any WordPress expert should be able to tackle it. In my opinion the easiest way to solve this problem is with a .htaccess edit like this- RewriteEngine On RewriteCond %{REQUEST_URI} !^(/wp-admin|.wp-login.php.) [NC] RewriteRule (.*) http:/hostingtest.space//$ [R=0,L] But: There is always more than one way to skin a cat! Test Conclusion As expected – the test results varied wildly here. Some hosts took full control and deployed a solution on my behalf… Where as others… didn’t. Here is how they performed- WPEngineSitegroundLiquidwebHostgatorWPXHostingKinstaAmazon WP Engine There was minute delay on live chat support initially- And ultimately… They said it wasn’t possible to do- Eric Roiz: This unfortunately wouldn’t be something that can work with a WordPress setup. With the way that WordPress loads out it’s content that wouldn’t be able to work Matthew Woodward: Can it be done in the htaccess file? Eric Roiz: No, it’s not a matter or being able to redirect or not, but rather that the way the sites individually load their content, that wouldn’t be able to work Matthew Woodward: OK Eric, I appreciate you trying. Thanks and have a good day there. It wasn’t that the WP Engine Support Agent didn’t necessarily want to do it for me. But he certainly didn’t know how to do it. Siteground Live chat response was pretty fast! But the support team wasn’t willing to apply the change for me and wanted me to read an article and use their tool myself: Martin T.: Sure, we do have a tool just for that and an article dedicated to it as well: https://www.siteground.com/kb/how_do_i_redirect_one_domain_to_another_domain_name/ Matthew Woodward: I always screw up things like this and would greatly appreciate you doing it for me thanks. Martin T.: I would be able to assist you if you’re facing any difficulties, but don’t worry it’s really easy and you can’t really mess anything up :) Matthew Woodward: I always find a way! Matthew Woodward: And it will take me along time to go through the article and understand the exact steps. Martin T.: It’s ok Martin T.: Believe me it’s really easy and you can’t mess anything up as the redirects can always be removed :) Matthew Woodward: I guess it’s not your policy to do stuff like that. It’s OK I understand. Martin T.: As customer support representative we’re here to help whenever you’re facing any difficulties, of course, I would love to assist you with any difficulties that might come up when trying to manage your account with us :) Matthew Woodward: Sure Martin, I appreciate that and have a good day there. Bye for now. I did take comfort in the fact that if I applied the changes myself and messed them up, that the SiteGround support team would help me out if I did mess it up. Liquid Web Accessing live chat was very fast and the support agency was willing to help. Although he stated that it wasn’t their normal policy- “that is out of the scope of our support. normally that would fall under your responsibility. but as a courtesy i can attempt that. just keep in mind that we don’t normally do this.” And as Liquid Web are one of the more expensive hosts, I was pleased to see them take control of requests like this. Hostgator Hostgators live chat response was very fast. However: Their solution failed when tested and the subsequent workaround seemed much more complex- While it was overly complex, they did demonstrate that why were willing to take control of requests rather than palming them off on support documents. WPX Hosting WPX Hosting were the most impressive of the bunch. Not only did they answer almost immediately but they also completed the request for me in about 0 minutes- Luchezar: I have set the redirection as requested, can you please test on your end and see if it’s working? Please clear your browser’s cache. Just press CTRL + F or use Incognito Mode (CTRL + SHIFT + N) for Chrome and (CTRL + SHIFT + P) for Firefox. For reference, please check this article: https://wpxhosting.c…er-cache-chrome-firefox-edge-/ Matthew: Sure, one moment. Yes that works. Thank you and have a good day there. Bye for now. You can’t ask for a better customer experience than that! Kinsta Kinsta (my current host) have always offered great, responsive support that takes control of issues. They responded quickly to the live chat, but it seemed this issue stumped them – even though I have challenged them with much more complex issues in the past. The Kinsta agent spent a very long time ( hours+) trying to fix it but couldn’t get it working fully- But they were committed to the resolution and prepared to invest significant time to help. Amazon Amazon is not a managed service like the other hosts here and is strictly do it yourself I know from past experience that you have to submit a ticket/email and they reply within hours typically. However, if their hardware is working- they expect the user to do everything in terms of configuration and software so their service wasn’t relevant for this test. Click Here To See The Support Requests Hide The Support Requests Kinsta, LiquidWeb & WPXHosting solved the problem successfully. And out of those - It was WPXhosting that solved the problem the quickest and with minimum fuss. However: WPEngine & SiteGround seriously fell short here Their “WordPress experts” were not able to solve the problem. Test – The Free CloudFlare CDN x of the hosts I tested did not include any kind of CDN- SiteGround LiquidWeb HostGator Amazon EC And it is common advice for hosting companies to recommend you setup the free version of the CloudFlare CDN. Supposedly this will help increase site speed. But is that really true? To find out I cloned the Blog Type (image heavy) install to a new domain on each host and then activated the free CloudFlare CDN- Siteground No CDN Free CloudFlare CDN HostGator No CDN Free CloudFlare CDN Amazon EC No CDN Free CloudFlare CDN LiquidWeb No CDN Free CloudFlare CDN Then I tested each of these installs with GTMetrix from 7 different global locations. And the results were very interesting… WordPress Hosting Features Compared So far we have focused purely on speed, reliabiliy and support. But what about other hosting features… As you can see: There really isn’t that much difference between them on the face of it… Except for price! It’s only with the nitty gritty testing that you see huge differences in quality of service. The Worst Things About Each Host Regardless of which host you look at, each of them have their own cons. The best wordpress hosting for me, isn’t necessarily the best WordPress hosting for you. For example: WPX Hosting is clearly the fastest, but if you need phone support… They aren’t right for you. So here is what I didn’t like about each of the managed WordPress hosting options- WP Engine They are the most expensive +$0/month for UK hosting No email support – additional costs with Google Apps etc Long banned plugins list Majority owned by GoDaddy’s owner Poor ratings & very bad experience WPX Hosting No phone support No Git support Servers are only available in USA and UK Back end control panel could be easier to use Hostgator Terrible trust score No CDN on base plan No free SSLs, only paid No staging area Long list of banned plugins Automatic backups are a paid upgrade Terrible loading speed from non-US locations (see above tests) Liquid Web Very expensive Not exactly the quickest based on my testing No CDN on base plan (but free Cloudflare CDN worked best of tested hosts here) No free email, costs $0 monthly extra + $-$ per email address No discounts for annual subscription Kinsta No phone support Expensive for multiple websites No email support – additional costs with Google Apps etc List of banned plugins No live chat for pre-sales questions No free migration on the base plan SiteGround Pricing virtually triples in year No staging area on base plan After first month, no monthly payment option No real CDN on base plan (free Cloudflare doesn’t count) Amazon Not really a WordPress host You need to configure everything Very technical, requires command line No CDN No automatic backups Support is for their hardware only No cost saving reason to choose Amazon over dedicated WP hosts Wrapping It Up While it is usually true that
0 notes