#how to create a cname record
Explore tagged Tumblr posts
Visit Tumblr Blog
Explore Tumblr blogs with no restrictions, modern design and the best experience.
Last Seen Tumblr Blogs


Fun Fact
Tumblr has a low social media market share in South America.
Link
#autoSSL#Automation#cloud#configuration#containerization#DevOps#Docker#HTTPS#Let'sEncrypt#Linux#networking#NGINX#proxyserver#reverseproxy#Security#self-hosted#servermanagement#systemadministration#TLS#Traefik#webserver
0 notes
Text
Common Issues with Google Domains Not Showing on Squarespace and How to Resolve Them

When you encounter the frustrating issue of "my Google domain is not showing up in Squarespace," it can disrupt your online presence and hinder your digital marketing efforts. This article will explore common problems associated with Google domains not appearing on Squarespace, along with effective solutions to resolve them. Additionally, we will touch upon how partnering with a digital marketing agency in Chennai, like Wonkrew, can help streamline your online strategy.
Understanding the Basics
Before diving into the issues, it's essential to understand the relationship between Google Domains and Squarespace. Google Domains is a domain registration service that allows you to purchase and manage your domain names, while Squarespace is a website building platform that enables users to create and host websites. When these two services are not properly connected, it can lead to visibility issues.
Common Issues
Domain Not Pointing to Squarespace
One of the primary reasons your Google domain might not show up on Squarespace is that it isn't correctly pointed to your Squarespace site. This misconfiguration can occur during the setup process.
DNS Settings Misconfiguration
If your DNS settings are not configured correctly, your domain will not resolve to your Squarespace site. This includes issues such as incorrect A records or CNAME records.
Domain Propagation Delay
After making changes to your DNS settings, it can take some time for these changes to propagate across the internet. This delay can lead to temporary visibility issues.
Domain Expiration
If your Google domain has expired, it will no longer be accessible on Squarespace or any other platform. Always ensure that your domain registration is up-to-date.
SSL Certificate Issues
SSL certificates are crucial for securing your website. If there are issues with the SSL certificate for your domain, it may affect how your site appears online.
Caching Issues
Sometimes, browser caching can prevent you from seeing the most recent version of your site. Clearing your cache may resolve this issue.
Step-by-Step Solutions
1. Verify Domain Connection
Log in to your Squarespace account.
Go to Settings > Domains.
Ensure that your Google domain is listed and connected.
2. Update DNS Settings
Log in to your Google Domains account.
Navigate to the DNS settings for your domain.
Ensure that you have the correct A records and CNAME records pointing to Squarespace:
A Records: Should point to Squarespace IP addresses (e.g., 198.185.159.144).
CNAME Record: Should point to ext-cust.squarespace.com.
3. Check Domain Status
Ensure that your domain is active and not expired.
If it has expired, renew it through Google Domains.
4. Wait for Propagation
After making DNS changes, wait up to 48 hours for propagation.
Use tools like WhatsMyDNS.net to check if DNS changes have propagated globally.
5. Clear Browser Cache
Clear your browser cache or try accessing your site in an incognito window.
This helps eliminate any caching issues that may prevent you from seeing updates.
6. Contact Support
If all else fails, contact Squarespace support or Google Domains support for assistance.
They can provide specific insights into any issues affecting your domain visibility.
The Role of Digital Marketing Agencies
If you're still facing challenges or want a more comprehensive approach to managing your online presence, consider partnering with a digital marketing agency in Chennai like Wonkrew. Here's how they can assist:
Expertise in Domain Management: Agencies have experience handling various domain-related issues and can ensure that everything is set up correctly.
SEO Optimization: They can optimize your website for search engines, ensuring better visibility once the domain issue is resolved.
Holistic Digital Strategy: A digital marketing agency can help create a cohesive strategy that encompasses SEO, social media marketing, and content creation, enhancing overall brand awareness.
Conclusion
Encountering issues with "my Google domain is not showing up in Squarespace" can be frustrating but understanding the common problems and their solutions can help you resolve them quickly. By ensuring proper DNS configuration and staying on top of domain management, you can maintain a seamless online presence. Furthermore, collaborating with a trusted digital marketing agency in Chennai like Wonkrew can provide additional support and expertise in navigating these challenges effectively.By following these steps and leveraging professional assistance when needed, you'll be well on your way to establishing a robust online presence that effectively represents your brand and engages your audience.
#digital marketing agency in chennai#digital marketing company#digital marketing services in chennai#seo company in chennai#creative ad film makers in chennai#branding agency in chennai#marketing agency in chennai#digital marketing agency#my Google domain is not showing up in Squarespace
0 notes
Text
How to do Office 365 tenant to tenant migration?
Office 365 tenant-to-tenant migration is vital when organizations undergo significant changes such as mergers or acquisitions. This guide will help you with the right approach to migrating your data, user accounts, and system dependencies from one Office 365 tenant to another. We will help you understand the planning, use of third-party tools, and steps for a smooth transition. We will also provide stepwise guidance with thestepwiseOffice 365 migration tool. Be with us to quickly become a pro in Office 365 tenant-to-tenant migration. Office 365 tenant to tenant migration Cross-tenant migrations are primarily used in mergers, acquisitions, or divestitures that call for strategic migration depending upon a given scenario. Migration Patterns One-Time Migration: All data on the source tenant is migrated to the target tenant in a single operation. Phased Migration: Data migration takes place in stages for a controlled transition. Split Flow/Tenant Move: Users and data are split into different target tenants. Pre-Migration Considerations - Domain Preparation: License Adequacy: You must make sure that there are enough licenses for all the migrating users within the target tenant. Administrative Accounts: Create specific admin accounts in the source and target tenants. Target Tenant Mailboxes: Create the user mailboxes, room/resource mailboxes, and distribution groups for the target tenant before migration. Optional: Active Directory Consolidation: Consolidate the Active Directory Domain Services (AD DS) if needed, then do manual or synchronized domain syncing. - Domain Verification: Start target domain verification within the Microsoft 365 admin centre. Add the source domain and set up the TXT records in the target tenant's DNS. Check the domain exclusivity; a domain must not be simultaneously associated with multiple tenants. It takes up to 3 days for successful verification. - Migration Scheduling: Generate a user mailbox list for migration and create a corresponding CSV mapping file. Identify the lowest TTL (Time to Live) value of the primary email domain's MX record. Disable directory sync on the source tenant to prevent unintended AD DS changes. - Migration Stage: Stop Inbound Mail Flow: The incoming emails with the source tenant must be blocked by changing the MX record to an unreachable value or using a third-party service. Source Tenant Preparation: Remove the primary email domain from all objects within the source tenant before mailbox migration. Reset the default email address for all objects to their initial Microsoft 365 addresses. Deactivate Lync licenses in the source tenant using the Lync Admin Portal. Reset default email addresses for distribution lists, rooms, and resources to their initial domain. Remove secondary email addresses from all tenant objects. Employ the Windows PowerShell command Get-MsolUser -DomainName xyz.com to identify objects referencing the primary email address. - Target Tenant Preparation: Verify the source tenant within the target domain (approximately one hour after source tenant preparation). Configure the auto-discovery CNAME record. Configure a new domain for AD FS within the target tenant if using AD FS. Activate new user accounts in the target domain and assign appropriate licenses. Set the source domain as the primary email address for new users using Windows PowerShell. Determine the method for communicating passwords to end-users. With active user mailboxes, update mail routing by pointing the MX record to the new Office 365 email address. - Post-Migration Validation: Conduct thorough testing of mail flow within and external to the target tenant. Now is the right time to start the final migration process. This Microsoft 365 tenant-to-tenant migration process needs high technical expertise, as the PowerShell script is the sole manual approach. It is time-consuming and needs top expertise, but you can still follow the PowerShell scripts from Microsoft at your convenience. A professional tool must be used for better migration control and quicker processes. We have developed the Kernel Office 365 migration tool to make your work easier. This tool is a valuable asset that helps with tenant-to-tenant migration with no hassle. Use advanced filters and save migration reports for further assistance. Now, let us get to the workings of this tool for Office 365 tenant-to-tenant migration. Access the tool and tap on Add Source to add your first tenant account. Enter the Microsoft 365 account details and choose List all mailboxes using the above credentials. Tap on the Get User mailboxes option. Choose the specific mailboxes now and tap on Add. After adding the source account, add the destination account. Fill in all the details and add the destination account. Map the mailboxes to each other and tap on Set Filter and Migrate. Choose the type of destination (Mailbox, Public Folder, or Archive Mailbox) and tap on Migrate. You will see the Filter Selection window. Apply the required filters and tap on I am OK Start Migration. Migration will begin now. The time taken for the migration process depends on the amount of data. After the migration, you can save the migration report in the CSV format. Conclusion For Office 365 tenant-to-tenant migration, this guide has provided relevant insights with step-wise guidance. As discussed, the only possible manual approach is to use PowerShell scripts. But, having some tech expertise for a successful migration would be best. We advise you to use the Kernel Office 365 Migration tool to avoid the hassle of such complexity. It has an easy-to-use interface, and simple yet effective features make your tenant-to-tenant migration an easy endeavor. For more insights on the tool, take the free trial today. Read the full article
0 notes
Text
Domain Name System Configuration: A Comprehensive Guide
Domain Name System Configuration of the internet, the DNS serves as a foundational pillar, translating human-readable domain names into machine-readable IP addresses. DNS configuration is a crucial aspect of managing your online presence, ensuring that visitors can easily find and access your website. In this comprehensive guide, we will unravel the intricacies of DNS configuration, exploring the key components and best practices to optimize your domain’s performance.
Understanding the Basics of DNS: Before diving into configuration details, it’s essential to grasp the fundamental concept of DNS. At its core, DNS acts as the internet’s phone book, translating user-friendly domain names like www.yourwebsite.com into the numerical IP addresses that computers use to identify each other on the network. This translation is imperative for seamless communication between devices.
Choosing a Reliable DNS Provider: The first step in DNS configuration is selecting a reliable DNS provider. While many domain registrars offer default DNS services, third-party providers like Google Cloud DNS, Amazon Route 53, and Cloudflare DNS bring additional benefits such as improved performance, security features, and advanced configuration options. Assess your specific needs to determine the provider that aligns with your requirements.
Setting Up DNS Records: DNS records are the building blocks of DNS configuration, specifying how domain names should be mapped to IP addresses. Common DNS record types include:
A Records (Address Record): Maps a domain to the corresponding IPv4 address. AAAA Records: Similar to A Records but for IPv6 addresses. CNAME Records (Canonical Name): Creates an alias for one domain to another. MX Records (Mail Exchange): Specifies mail servers responsible for receiving emails on behalf of the domain. TXT Records (Text): Holds arbitrary text information, often used for domain verification and authentication. Understanding how to create and modify these records is essential for tailoring your DNS configuration to suit your specific needs. TTL (Time-to-Live) Considerations: Time-to-Live is a crucial aspect of DNS configuration, determining how long DNS information is cached by resolving servers. Setting an appropriate TTL is a delicate balance; a longer TTL reduces the load on authoritative DNS servers but may lead to delayed updates, while a shorter TTL ensures quicker updates but increases server load. Consider your website’s update frequency and adjust the TTL accordingly.
Primary and Secondary DNS: To enhance the resilience of your DNS configuration, consider implementing primary and secondary DNS servers. Primary servers handle DNS queries, while secondary servers act as backups, ensuring continuity in case the primary server experiences downtime. This setup adds redundancy to your DNS infrastructure, improving overall reliability.
DNS Security Best Practices: Securing your DNS configuration is paramount to safeguard against various cyber threats. Implementing DNS Security Extensions (DNSSEC) adds an extra layer of protection by digitally signing DNS data, preventing tampering, and ensuring the authenticity of responses. Regularly monitoring DNS logs and staying informed about emerging threats helps maintain a secure DNS environment.
Anycast DNS for Improved Performance: For websites with a global audience, leveraging Anycast DNS can significantly enhance performance. Anycast allows multiple servers to share the same IP address, directing users to the nearest server geographically. This reduces latency and ensures a faster response time, ultimately improving the user experience.
IPv6 Adoption: As the internet transitions from IPv4 to IPv6 due to the exhaustion of IPv4 addresses, it’s crucial to ensure your DNS configuration supports IPv6. This involves adding AAAA records to your DNS settings, enabling users with IPv6-capable devices to access your website seamlessly.
DNS Monitoring and Analytics: Regularly monitoring DNS performance is essential for identifying and addressing issues promptly. Utilize DNS analytics tools to gain insights into query volumes, response times, and potential security threats. These tools empower you to make informed decisions about your DNS configuration, optimizing it for efficiency and reliability.
Conclusion: Domain Name System Configuration In the dynamic landscape of the internet, mastering DNS configuration is fundamental to establishing a robust online presence. By understanding the basics, choosing a reliable DNS provider, configuring DNS records, considering TTL, implementing security measures, and optimizing for performance, you can ensure that your website is easily accessible, secure, and resilient. As technology evolves, staying informed about emerging trends and best practices will empower you to adapt your DNS configuration for the ever-changing digital landscape.
0 notes
Text
How to Connect a Domain with AWS Route 53 and AWS Lightsail

Introduction
In today's digital age, having a strong online presence is crucial for businesses and individuals alike. One of the essential steps in establishing an online presence is connecting your domain to a reliable and scalable hosting service. Amazon Web Services (AWS) offers two powerful services for this purpose: AWS Route 53 for domain registration and management, and AWS Lightsail for hosting websites and applications. In this article, we will walk you through a step-by-step guide on how to connect your domain with AWS Route 53 and AWS Lightsail to get your website up and running efficiently.
Table of Contents
- Understanding Domain Registration - Signing Up for Amazon Web Services (AWS) - Setting Up AWS Route 53 - Creating a Hosted Zone - Configuring DNS Records - Getting Started with AWS Lightsail - Creating a Lightsail Instance - Setting Up Your Website - Connecting Your Domain to AWS Lightsail - Testing and Troubleshooting - Checking DNS Propagation - Troubleshooting Common Issues - Security Considerations - Implementing SSL Certificates - Configuring Firewall Settings - Monitoring and Scaling Your Website - Backup and Disaster Recovery - Conclusion - FAQs
1. Understanding Domain Registration
Before diving into the technical aspects, it's essential to have a registered domain name. If you don't have one already, various domain registrars allow you to search for and purchase a domain that suits your brand or business.
2. Signing Up for Amazon Web Services (AWS)
To get started, you need an AWS account. If you already have one, you can skip this step. If not, head to the AWS website and sign up for an account. You'll need to provide some basic information and a valid payment method.
3. Setting Up AWS Route 53
Creating a Hosted Zone After signing in to your AWS Management Console, navigate to the Route 53 service. Here, you'll create a hosted zone, which will act as the container for your domain's DNS records. Click on "Create Hosted Zone" and follow the prompts. Remember to note down the four nameservers assigned by AWS; you'll need them later to update your domain's nameservers. Configuring DNS Records With your hosted zone set up, it's time to configure the DNS records. This step involves adding records that map your domain to your desired AWS Lightsail instance's IP address. Common records include A records (for IPv4 addresses) and CNAME records (for subdomains).
4. Getting Started with AWS Lightsail
Creating a Lightsail Instance Once your domain's DNS records are set up, head to the AWS Lightsail service. Click on "Create Instance" and choose your preferred operating system and instance plan. You can also select pre-configured applications based on your needs. Setting Up Your Website With your Lightsail instance up and running, you can now deploy your website or application. Access the instance via SSH or use the Lightsail browser-based terminal. Upload your website files and configure the necessary settings.
5. Connecting Your Domain to AWS Lightsail
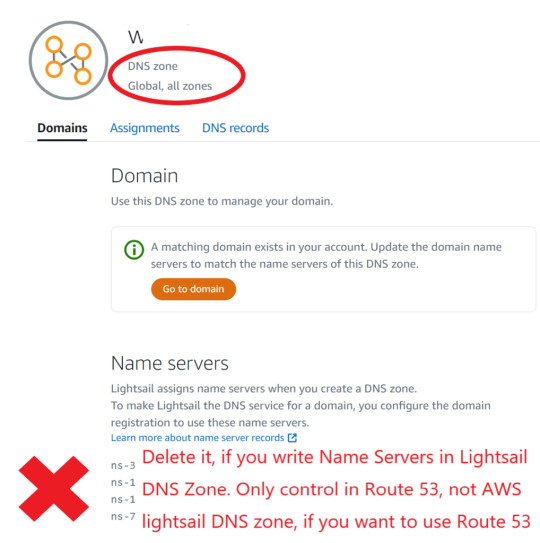
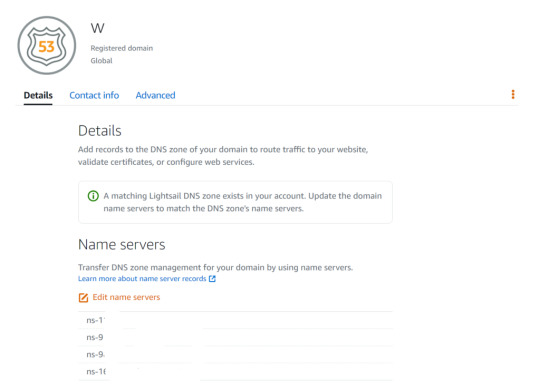
To connect your domain to AWS Lightsail, you'll need to update your domain's nameservers with the ones provided by AWS Route 53 during the hosted zone setup. This process might take some time to propagate globally, but once it's complete, your domain will point to your Lightsail instance. Control NS(NameServer) in Route 53, not Lightsail DNS Zone! At first, I couldn't connect Domain with Route 53. Because I control Name Server in Lightsail DNS Zone. So I ignore(delete) Name Server in Lightsail DNS Zone and update Domain in Lightsail like Route 53. So please must write same NS only Route 53 and Lightsail Domain, not DNZ Zone!
route 53
6. Testing and Troubleshooting
After connecting your domain, thoroughly test your website to ensure everything works as expected. Additionally, learn about common issues and how to troubleshoot them. This includes checking for correct DNS settings and ensuring SSL certificates are set up correctly.
7. Security Considerations
Securing your website is paramount. Implement SSL certificates to enable HTTPS and encrypt data between your users and the server. Also, configure firewalls to restrict unauthorized access and protect sensitive information.
8. Monitoring and Scaling Your Website
To ensure your website performs optimally, monitor its performance regularly. AWS provides various monitoring tools to help you identify and address potential bottlenecks. If your website's traffic increases significantly, consider scaling your AWS Lightsail instance to accommodate the demand.
9. Backup and Disaster Recovery
Don't overlook the importance of data backup and disaster recovery. Set up automated backups of your website's data to avoid data loss in case of any unfortunate events.
10. Conclusion
Congratulations! You've successfully connected your domain with AWS Route 53 and AWS Lightsail, creating a robust and scalable hosting environment for your website or application. By following the steps outlined in this article, you've taken a significant step towards establishing a reliable online presence.
FAQs
- Q: How long does it take for DNS propagation to complete? A: DNS propagation usually takes up to 48 hours to complete globally. However, it can be much quicker in some regions. - Q: Can I use AWS Lightsail for more than just hosting a website? A: Yes, AWS Lightsail is versatile and can be used for various purposes, including hosting web applications, game servers, and more. - Q: Do I need technical expertise to follow this guide? A: Basic knowledge of domain management and AWS services is helpful, but the guide is designed to be beginner-friendly. - Q: Can I use an existing Lightsail instance with a new domain? A: Yes, you can associate an existing Lightsail instance with a new domain by updating the DNS records in AWS Route 53. - Q: Is AWS Lightsail cost-effective? A: Yes, AWS Lightsail is known for its cost-effectiveness, providing various pricing plans to suit different needs. Read the full article
0 notes
Text
Ok so @wayfire-official I got it.
It was a SRV record and a CNAME record.
Create a SRV record like this

And create a CNAME record like this

The end result is a domain "minecraft.crowcode.de" that directs you to the AAAA record for "test.crowcode.de" at the port stated in "Your_Minecraft_Server_Port".
Extra documentation:
I've been trying to set up a minecraft server, and i'm having problems with DNS.
I've been unable to access my stuff without the cloudflare proxy for some reason and cloudflare wants money if they're gonna proxy minecraft since it isn't http(s).
It's also kind of weird that i just can't access anything without a proxy. the AAAA record is set up propperly as far as i see, and i can connect with just the ip no problem. i don't really see what the problem is, besides that there isn't an A record.
Anyone got any ideas on how to fix that?
15 notes
·
View notes
Text
How to Install and Setup W3 Total Cache for Beginners
How to Install and Setup W3 Total Cache for Beginners
Want to install and configure W3 Total Cache on your WordPress website? W3 Total Cache is a popular WordPress caching plugin that helps you improve your website speed and performance. In this beginner’s guide, we’ll show you how to easily install and configure W3 Total Cache on your WordPress website. Editor’s note: We no longer use W3 Total Cache on our website and have switched to WP Rocket…
View On WordPress
#beginners guide for w3 total cache#best caching plugin for wordpress#best wordpress caching plugin#cdn in wordpress#cpanel hosting cname record#do i need w3 total cache#how to add cdn in firefox#how to create a cname record#how to improve wordpress yslow grade#how to install and setup w3 total cache and maxcdn for beginners#how to install maxcdn in wordpress#how to install w3 total cache#how to setup maxdn in wordpress#setup maxcdn#setup maxcdn in wordpress#setup w3 total cache#w3 total cache plugin
0 notes
Text
Back, Sort Of?
Howdy all! Most of you probably weren't expecting me to update this blog again but I wanted to make a new post that expresses my future intents for this blog. To put it shortly, I'm back. With some caveats.
First off, I'm ditching the former username for my sona's likeness. As much as I'm attached to 'gameaddict30' as an alias it's also had some awkward and rough history around these parts, not to mention I feel more at home with a username that pretty much has me like *"Hey, that's me!" I've changed quite a bit since then too, so I feel like starting again on a cleaner slate.
Secondly, this isn't a guarantee that I'll be posting here often. I've come back here mostly after some realization about how a good handful of peeps I know are migrating to this site and how I... Well, pretty much want to stay in touch with everyone I know here, haha. With Tumblr possibly having ActivityPub on their roadmap, things could change in the future but I'll just have to play it by ear for now.
Furthermore, I'm going to comb through my Following list so it's tidier. Dead blogs and waning interests, mostly. Don't worry though, it's not like I've gotten tired of Sonic or the Dreamcast, heh. And please don't take it personally if I unfollow you out of the blue, just trying to have a less cluttered timeline.
Anyways, a lot of you following this blog probably remember when I posted the story about my DreamPi setup long ago! Some things have changed since then, as I've gotten not only a new computer desk + chair but a new media cabinet! More importantly, though, I've upgraded the USB modem to one that has a built-in Line Voltage Inducer. I thank pcwzrd13 of Dreamcast Live for providing this modded USB modem! No more having to swap out 9-volt batteries every now and then, heh.

Finally, my presence outside of Tumblr. On the offchance that I stop updating this blog unannounced, I'll create a masterpost where I'll list all of my active socials and websites. I'll get around to that very shortly, but you should probably follow me on these sites aside from Tumblr! I'm a lot more active on some of them; lately Twitter, Mastodon and Cohost. Though some weird stuff has been going on with the former, so you may see me flock to the latter two a little more often.
Oh, and I nearly forgot! I'm retiring the CNAME records for this blog and my art blog, so now you will see the subdomain for both blogs with Tumblr's root domain, effective immediately. I currently do not have any future plans to reuse blog.sertimus.xyz and/or art.blog.sertimus.xyz.
That said, I hope you all are having a wonderful night tonight! Nice to see you all again. :>
6 notes
·
View notes
Video
youtube
Cloudflare Redirects: How to Setup 301 Redirects (URL Forwarding) Using CloudFlare’s DNS & Page Rules
Setting up a 301 redirect at CloudFlare isn’t that self-explanatory…
And since nobody likes reading documentation I figured that a true hero needed to step up and make this easy on the rest of the world.
So here I am, the hero of the internet, come to make your life easier once again – with an article, video & SOP for you to save and use later.
Let’s get after it.
Table of Contents
Cloudflare Redirects: How to Setup 301 Redirects (URL Forwarding) Using CloudFlare’s DNS & Page Rules
How to setup a CloudFlare 301 redirect using “page rules”:
Free Gifts
1. Add Domain to CloudFlare
2. Update NameServers
3. Update CloudFlare DNS
4. Setup Page Rules for URL Forwarding
How to setup a CloudFlare 301 redirect using “page rules”:
The process of setting up redirects using Cloudflare’s DNS is pretty simple. You add your domain, point the CloudFlare DNS records (A record & CNAME record) to Cloudflare’s server, and then setup a URL forwarding rule. That’s pretty much it.
The first two steps of this walkthrough have nothing to do with the actual CloudFlare 301 setup. They are the things you need to do before any of this works. So, if you’ve already added your domain to your CF account and pointed your domain registrar’s nameservers to it – you can skip them and start at Step 3.
1. Add Domain to CloudFlare
At the dashboard (dash.cloudflare.com) of your CloudFlare account click the “Add a site” button, and enter your domain on the next screen.
Once you do that, you’ll be presented with pricing options. Just choose the free one (bottom of screen) and move on.
Cloudflare will scan for existing DNS records and bring them over.
Keep them or delete them – the choice is yours (and depends on what you’re trying to do).
Click continue, and you’ll get your account’s nameservers.
You’ll need to update your current domain’s nameservers, which you can find at the domain registrar – aka the place where you login to see your domain, and probably where you purchased it.
2. Update NameServers
I can’t make a tutorial for updating nameservers at every web hosting company, because there’s like a trillion of them.
But you’ll just need to go to your account > select your domain > choose ‘edit nameservers’ or something similar > paste in the nameservers that Cloudflare gave you in the last step.
Now, it will take anywhere from 10 minutes to 48 hours for those changes to take effect. This is called propagation.
But you don’t have to wait for that to continue. You will have to wait for it for all the things you do next to work, however.
3. Update CloudFlare DNS
This is where the actual process starts.
Go to your domain settings in CloudFlare and choose “DNS”.
If redirecting the whole domain I usually start with deleting the current DNS records that CloudFlare ported over. Don’t do that if you have records in there you need.
Yes, captain obvious I know but… Common sense isn’t always so common in these extremely tense IT settings…
Next, we’re going to add in the CloudFlare DNS records you need for your URL Forwarding to work.
Click ‘Add record’ and add the following information, and click the ‘Save’ button:
Type: A
Name: @
IPv4 Address: 192.0.2.1
Now, click the ‘Add record’ button again, add the following information, and click the ‘Save’ button:
Type: CNAME
Name: www
Target: @
4. Setup Page Rules for URL Forwarding
Navigate to the “Rules” area on the sidebar, then click “Page Rules” and click the ‘Create Page Rule` button.
Now it’s time to set your 301s!
I’m going to setup a 301 redirect to forward all traffic coming to ‘domain A’ to ‘domain B’, but you can easily just change the URL & destination to fit your needs.
Follow these steps:
Enter the URL pattern you want 301ing
Click the dropdown and choose ‘URL Forwarding’
Select your ‘Status Code’ from the drop down (probably 301)
Enter the destination
Click ‘Save and Deploy Page Rule’
I entered the root domain, and put an asterisk ( * ) at the end, which means that if anyone goes to an inner url, like “domain.com/whatever-asdfadf” it will also get redirected.
You can setup inner URL specific 301s too.
Now, I’m simply going to do the exact same thing again – but this time add the www. version.
Same steps from above:
Enter the URL pattern you want 301ing
Click the dropdown and choose ‘URL Forwarding’
Select your ‘Status Code’ from the drop down (probably 301)
Enter the destination
Click ‘Save and Deploy Page Rule’
That’s it! You’re done!
You should be able to go to your forwarded domain, and be taken to the destination.
If it doesn’t work, make sure:
You’ve given enough time for your nameservers to propagate (see step #2)
You clear the CloudFlare cache (if you transferred your domain from another Cloudflare account)
You clear your browser cache, or try in ‘incognito mode’ (press shift + command + n on most browsers (MAC) to open an incognito window)
Free Gifts
Get the free How to setup a Cloudflare 301 Redirect checklist, and run it anytime you need to repeat this process.
3 notes
·
View notes
Text
How to join your google domains to third party hosting company
Connect a google domains to a third party hosting.
webroot.com/safe
Setting up a domain name easier than you may think. Once domain name is registered, you need to connect it to your hosting server. 1. You have a hosting plan with Namecheap. 2. You have a hosting plan else where and you were provided with the name servers for your domain. 3. You were provided with a set of host records to connect the domain to your hosting. 1. You have a hosting plan with Namecheap.
If you have a Stellar, Stellar Plus or Stellar Business plan (or old Value, Professional, Ultimate, Business plan) with us, you need to point the domain to our Web Hosting DNS name servers (dns1.namecheaphosting.com and dns2.namecheaphosting.com). If the domain is registered with Namecheap, it can be easily done in your Namecheap account by below: 1) Sign into your Namecheap account its in the header of the page
2) Select Domain List from the left sidebar and click the Manage button next to your domain in the list:
3) See Nameservers section and select Namecheap Web Hosting DNS from the drop-down menu. then, use the checkmark icon to save changes:
If your domain is registered with another registrar, you will need to obtain the correct name servers from us and then configure the DNS on their side. If your domain is registered with GoDaddy, follow the steps here.
Once the name servers are changed, your website most likely will not be available. In most cases, the propagation period can take up to 24 hours (in rare cases more, since the caching time varies between ISPs). May, this process cannot be influenced or sped up because of its automatic nature.
NOTE: After setting the nameservers for domain, if the domain is not the main one for your hosting account, you will also need to add it as Addon to your cPanel. You can find a tutorial for that here.
2. You have a hosting plan else where and you were provided with the nameservers for your domain.
To connect a domain to a third party server or hosting plan by nameservers that you received from your hosting provider, you need to set these nameservers as Custom for your domain. You can do that in the following way: 1) After sign in into your account, select Domain Name from the left sidebar and click the Manage button next to your domain in the list. Now find the Nameservers section and select Custom DNS from the drop-down menu:
2) Now enter your hosting nameservers one by one in each line (if you need to set more than 2 nameservers, press the Add nameserver red button). When the nameservers are entered, press the green checkmark to save changes:
NOTE: Some hosting providers may provide with nameservers with IP addresses for them. Entering nameservers would be enough. 3. If, its own server or you were provided with a set of host records to connect the domain to your hosting.
If, you have your own hosting server and you know its IP address, you can set up A records for your domain to connect it to the server. One thing some hosting providers can provide you with the IP address that should be used for your domain for connecting to your hosting plan. A records should be created in that case as well. Note that same can be done only if the domain is using our BasicDNS/PremiumDNS/BackupDNS (a legacy option) or FreeDNS nameservers. You can set up A records in the following way: 1) After sign in into your account, select Domain List from the left sidebar and click the Manage button next to your domain in the list. Now switch to the Advanced DNS tab at the top of the page:
2) Find the Host records section and click on the Add New Record button (if the option is not available, it means that your domain is not using our BasicDNS/PremiumDNS/BackupDNS(a legacy option)/FreeDNS):
3) Select Record for the Type and enter the Host you would like to point to your server IP address:
– @ should be used as a Host to point your root domain. – www should be used to set the record. (www.domainname.tld) subdomain – [customhostname] can be used to set up a subdomain and to point it to your hosting server (for example, Host blog will point blog.domainname.tld to your hosting) – * should be entered as a Host to set up a wildcard sub domain (meaning it will point all non-existent subdomains to your hosting). 4) After that, enter the IP address of your hosting server in the Value field:
5) You can leave the TTL as Automatic or choose any custom value from the drop-down menu:
NOTE: TTL is the time during which the data of host record lingers after the record is updated or removed. If you are not sure what TTL will input, then keep as Automatic. 6) Once all details are updated, save them using the Save changes green icon:
Usually, it takes about 30 minutes for the newly created records to take effect. Some hosting providers may also ask you to create additional records, these records may be set in the same way as A records. You just need to choose the corresponding Type record from the drop-down menu and enter the Value that you received from your hosting provider:
After the records are inserted, you need to check if there are any records for the same host name and remove them as they will be conflicting with your records. The records you need to check may be of Unmarked/Masked/Permanent Redirect. A newly registered domain will have the records for our Parking page set by default. These records are URL redirect for @ host pointing to http://www.domainname.tld/ and CNAME record for www host pointing to parkingpage.namecheap.com. These records should always be removed after setting up custom host records for your domain.
Source: https://webcomsafe.com/
1 note
·
View note
Text
How to clone any website in the world and host it on a domain of your choice for Dummies
First things first - even though the title is clickbaity but the intention isn’t to help you plagiarise content. Having said that, there are some valid use cases where you can use this:
Disaster recovery - your actual website is getting DDOSed and your need a static version up and running temporarily hosted elsewhere (preferably behind Cloudfront which provides you with DDOS mitigation using AWS shield)
Backups of your blogs or content hosted on third party websites
Migrating away from third party providers. e.g. I have been thinking of migrating away from Tumblr and this can be useful if I plan to use a static site generator for my blog going forward
This works well for a static website and below are the steps to achieve it! I’ll show you how to clone this blog and host it on this subdomain: http://badd431a8703451fa409d73d2218b545.aawaara.com/
Hopefully this will not result in every other person having the same blog as mine ;)
STEP 1: Install wget and AWS CLI and set up your AWS credentials
STEP 2: Create a mirror of the website and re-write links
wget --mirror --convert-links --html-extension --wait=1 https://aawaara.com/
--wait specifies that there is a wait of 1 second after each request. Be gentle with someone else's server. Also you risk being blocked if your request rate is too high. Use -U option to spoof user agent to that of an actual browser in case the server is blocking you from making requests. This will take hours so be patient.
STEP 3: Create S3 bucket and enable "Static Website Hosting"
Create a S3 bucket with the same name as the domain (or subdomain) you want to host it on. e.g. In my case I need to create badd431a8703451fa409d73d2218b545.aawaara.com and need to allow uploading of public files (it’s a setting while creating the bucket). Then you need to enable static website hosting for you bucket and specify index document as index.html
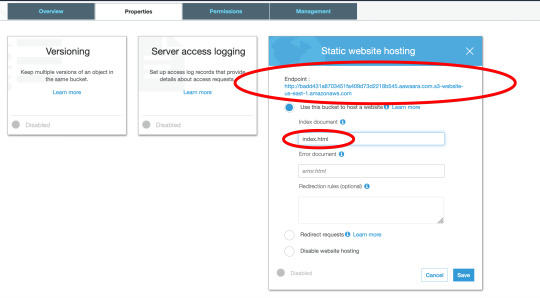
Also note the endpoint here as you will need it later.
STEP 4: Upload files to S3 bucket using AWS CLI and make them public
Go to the directory where the files have been downloaded (cd aawaara.com) and execute the following command (for your bucket):
aws s3 sync . s3://badd431a8703451fa409d73d2218b545.aawaara.com/ --acl public-read
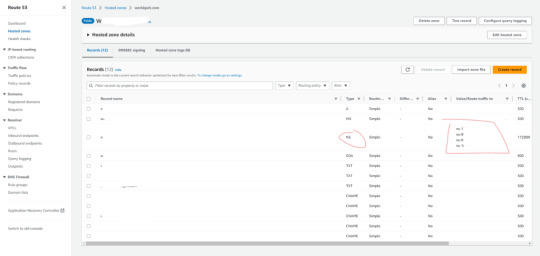
STEP 5: Add a CNAME entry in your DNS records which points to your S3 bucket
CNAME record for badd431a8703451fa409d73d2218b545.aawaara.com should point to badd431a8703451fa409d73d2218b545.aawaara.com.s3-website-us-east-1.amazonaws.com
Please note the value of CNAME record is the one you noted down at the end of step 3. In this case the CNAME record points to a subdomain, but you can very well point it to the root domain. For example you can create a bucket example.com and then the CNAME record for example.com needs to point to example.com.s3-website-us-east-1.amazonaws.com. You can find more details here.
That's it folks! Your clone should now be accessible on the domain of your choice!
via GIPHY
Reference: Gist
2 notes
·
View notes
Text
The Essential Step-By-Step Guide For Office 365 Tenant To Tenant Migrations
Migrating a tenant from one Office 365 Environment to another is a complicated task. It requires extensive planning, coordination, and execution. If not done properly, it can lead to significant disruption and loss of data. For organizations looking to move their data from one Office 365 tenant to another, this process can be daunting. duocircle.com contains useful information about migrating Office 365 to Office 365.
Tenant In Microsoft 365:
A tenant on Microsoft 365 is a unique location for storing service data. It is a specified location, such as North America or Europe, for example, for state information. An administrator for a business merger can use the available features found in the subscriber. For business merger scenarios, mailboxes need to be moved to another tenant. The process is not simply a transfer; you need to do some preparation, satisfy prerequisites, and have licenses.
Tenant To Tenant Migration In Microsoft 365:
Possibly, tenant-to-tenant migrations will provide assorted challenges depending on your migration scenario. Whatever migration scenario you select, tenant migration is a common procedure during business acquisitions, mergers, and divestitures.

Migration of Microsoft 365 tenants to tenants third-party tools is done before tenants can migrate to the cloud. Prior to migration, there is a checklist for Office 365 Pre & Post Migration that tenants should remember.
Must Do Pre-Migration Steps:
How To Get Domain Ready:
Based on your current migration pattern, you may have various considerations before you sign up with a host. The most common scenarios are:
Rebranding involves reversing a previous brand.
The cloud tenant is located somewhere.
You Will Prepare The Domain Based On Your Needs:
Make sure you have all the required licenses for Microsoft 365.
Both source and target must be set up as Admin accounts so that the migration process can run smoothly.
Build user mailboxes, room resource mailboxes, and distribution folders as needed in the target.
If made necessary, consolidate the information from Active Directory Distribution System (AD DS) using a tool like AD DS and make sure a minute is accurate between two domains manually or using synchronization.
Give your users more knowledge about the use of Microsoft 365 following migration.
Check Whether The The Domain Name Is Correct:
Verify the designated tenant platform in Microsoft 365. Go to the Microsoft 365 admin center and add a domain as a source, then create TXT records.
The domain should be assigned to just one user. Otherwise, the verification won't work. For this step, it takes approximately one day.
Emigration Can Be Scheduled?
Create a CSV file for mapping out user mailboxes that are to be transferred.
The MX value of the primary email for your domain has the lowest TTL value.
In the Microsoft 365 admin center, turn off directory sync for a tenant source from the tenant AD DS to prevent it from syncing any changes in AC Microsoft 365. It may take up to 24 hours to complete the process.

The Migration Stage:
Prevent Inbound Mail Flow From Coming To Your Mailbox:
Prevent inbound mail flow to your source tenant by changing the MX record (of their primary email address) to an inaccessible value or by making use of a third-party service. As you have noted the lowest value in TTL (of the MX record) of the inbound mail domain in your preparation step, you can easily plan when the step will be carried out.
Prepare The Source Tenant:
The primary mail domain should be removed from the mailbox in the source tenant before moving the mailbox to a different tenant.
Reset the default email address to the default address associated with Microsoft 365.
Remove all the Lync licenses from the source tenant using the Lync Admin Portal.
Reset the email address of distribution lists, rooms, and resources to their default value. Remove the secondary email address from tenants' objects.
Building A Target Domain Requires Preparation:
Schedule an automatic CNAME configuration.
You have to configure a new domain for AD FS in the target tenant for AD FS.
Create new accounts for users in the domain, and assign them to licenses.
When mailboxes are active for the user, change the mail routing and the postmaster MX record to the new address in Office 365.
In summary, Office 365 tenant to tenant migrations can be a complicated process, but with the right guidance and tools, they can be efficient and successful. By following the step-by-step guide provided, you can ensure that your tenant to tenant migration is completed safely and
1 note
·
View note
Text
Build your professional websites and e-commerce stores in just minutes. Get started for free
Are you looking to create your own website or an online store? Or are you looking to create a new online business? We are a group of Professional full stack developers that created a AI-based platform that allows users to create their own websites, blogs, e-commerce stores without coding a single line. The platform provides you with hundreds of features. We have thought of literally everything that you may need. Free Hosting, CMS, CRM included Powerful dashboard that lets you control everything connect your personal domain in seconds SSL - comes with fully secure ssl certificates Email server supported (connect your email smtp like sendgrid, mailchimp) Live chat plugin, Google analytics, Facebook , Whatsapp are already integrated Newsletter subscriptions and email sending features. Seo optimized. Just add your keywords to your page Add blog categories and write as many blogs. E-commerce with ebay and Amazon-like features and many more… Do I have to code? You don't have to write any code. We built this platform with people with limited programming knowledge. You will manage anything and everything through an AI-based dashboard. What can you build with webquo platform? You can basically build anything; landing pages, blogs, e-commerce stores, marketplaces, portfolio websites, restaurants etc. How to connect your domain to the website? Connecting your domain takes seconds, just add a CNAME record to your dns, and thats it Do i get support? Yes, you will get premium support from highly experienced programmers. From design to security, we will take care of it all. You will be amazed to see how quickly you can create your professional website and go live. The team here is very passionate about creating web experiences for people. Wait no further get your website started at www.webquo.net We are always here to help. The best time to create your website is now.
Phone: (414)301-1742 Email: [email protected] Websits:www.webquo.net

0 notes
Text
Build your professional websites and e-commerce stores in just minutes. Get started for free
Are you looking to create your own website or an online store? Or are you looking to create a new online business?
We are a group of Professional full stack developers that created an AI-based platform that allows users to create their own websites, blogs, e-commerce stores without coding a single line.
The platform provides you with hundreds of features. We have thought of literally everything that you may need.
Free Hosting, CMS, CRM included
Powerful dashboard that lets you control everything
connect your personal domain in seconds
SSL - comes with fully secure ssl certificates
Email server supported (connect your email smtp like sendgrid, mailchimp)
Live chat plugin, Google analytics, Facebook , Whatsapp are already integrated
Newsletter subscriptions and email sending features.
Seo optimized. Just add your keywords to your page
Add blog categories and write as many blogs.
E-commerce with ebay and Amazon-like features
and many more...
Do I have to code?
You don't have to write any code. We built this platform with people with limited programming knowledge. You will manage anything and everything through an AI-based dashboard.
What can you build with webquo platform?
You can basically build anything; landing pages, blogs, e-commerce stores, marketplaces, portfolio websites, restaurants etc.
How to connect your domain to the website?
Connecting your domain takes seconds, just add a CNAME record to your dns, and thats it
Do i get support?
Yes, you will get premium support from highly experienced programmers. From design to security, we will take care of it all.
You will be amazed to see how quickly you can create your professional website and go live. The team here is very passionate about creating web experiences for people.
Wait no further get your website started at www.webquo.net
We are always here to help. The best time to create your website is now.
Thanks for visiting my ad.
www.webquo.net
(414)301-1742

0 notes
Text
Join jitsi meeting

#Join jitsi meeting how to
#Join jitsi meeting install
#Join jitsi meeting android
#Join jitsi meeting password
#Join jitsi meeting download
See the screenshot below if you are still confused. You can add a specific subdomain or like me, add a wildcard entry (if you are hosting it on the main domain). After that's done, you'll also need to add a CNAME record. Once you have a domain and deployed a server (not with Jitsi, just the server), gather the server's IP addresses (IPv4 & IPv6 both), and add A and AAAA records for each respectively. Make sure you change all instances of the domain from the examples to your domain. For this tutorial, I'm going to use a domain openexperiment.in which I've had lying around for quite a while. You need to make sure the DNS records are in place as well. If Jitsi is the only application that's going to run on the server, you don't need the reverse proxy. As this will likely exit the App & potentially prematurely end the call.Optionally, our reverse proxy setup: If you want to put it behind a reverse proxy so that you can deploy several web services on the same server. Note: do not press a home button or back button on your phone to exit the messenger interface. To exit the messenger interface, please click the back icon at the top left side of the screen. Once you’re in the messenger interface, the experience should be fairly familiar to other chatting experiences. If you press that icon the messenger interface will open up. The chat icon looks like a rectangular speech bubble. Once the overlay appears you should be able to see a chat icon down in the bottom left hand corner. Alternatively you can converse using this feature if you’re experience a variety of technical issues.Īccessing the instant messenger is straight forward, simply touch on the screen to reveal the “controls” overlay. For example, our coordinator or specialist may send you a link to something pertinent to your appointment.
#Join jitsi meeting how to
The instant messenger feature is rarely used in video consultations, but being aware of it & how to access it might help in certain situations. (optional) Step 4: How to access the instant messenger Now you just need to manually enter in the test123 or what ever follows the. Then open up the Jitsi Meet application & paste in the URL ( ) Load up the bookmark we created in step 1 & copy URL. When a consultation comes, we will provide you with a "Meeting Link" (which includes the room name), for example: On your device, go to & bookmark that URL The hardest part about entering the room name is typing in “ ”, so this approach makes it a bit easier when it comes to joining your Teledermatologist meeting: Where “roomname” will vary from appointment to appointment. If you have successfully entered the room URL, you should be stopped and asked to enter the password.Īll of our meeting links should look something like this… Once you have entered or pasted in the room URL, you can then press the “CREATE / JOIN” button. Copy and pasting is the preferred method, as it often prevents data entry mistakes. You can either copy & paste the room URL, or enter it in manually.
#Join jitsi meeting password
Prior to joining the consultation, you will be sent a room URL & a password for that room. On average the amount of data transferred is significantly less than 1 GB, but for safety and simplicity we suggest that you should plan to use up to 1 GB of data. A Teledermatologist video consultation could use up to ~1 GB of data.
#Join jitsi meeting download
If you’re on a mobile plan, then please be aware of what your download limits are. Please be aware that video conference does use up data. (optional) How to access the instant messenger / chat feature (optional) Enable/Disable your microphone or camera These screenshots will guide you through the following steps: Once you have the “Jitsi” mobile app open you can follow the screenshots below. Once you have downloaded the “Jitsi” mobile client you will need to locate it on your device & open it.
#Join jitsi meeting android
The “Jitsi” mobile client is available for download on the Google Play (for Android devices) and Apple App Store (for iOS devices).
#Join jitsi meeting install
In the event that you’re on a mobile device & you can’t connect to the video conference using Chrome, then the next option we recommend is to install the “Jitsi” mobile client. However, some devices, in particular iOS devices can often experience issues accessing or sharing their camera & audio devices. Teledermatologist video consultations are typically run via the Chrome web browser on desktop, laptop, tablet & mobile devices.
0 notes
Text
Domain, Web, and Email Hosting Explained

There is a lot of confusion about what domain, web and email hosting are and the differences between them. Many online services offer all these services. Is it necessary to know the differences? You will often hire specialist contractors when you are undertaking large-scale construction projects. You can also choose the best hosting provider for you needs.
To illustrate how all these work together, I will describe the process of registering domains to sell my world-changing invention.
Domain Registration The registration is the first step in setting up a domain. This is done by ICANN-accredited registrars who together maintain the shared registration system. These services are offered by over 500 companies, including Network Solutions, Go Daddy and Register.com. Simply put, I will be notified by the registrars if JonsWidgets.com is available. If so, I can register it under my name. It turns out that it is indeed available. However, I have only reserved the right to use the domain name.
DNS Hosting Business Websites Builder the next step will be to list the domain in the "Internet telephone book," also known the Domain Name Service, (DNS). Domain names can be used to easily remember email addresses and sites while browsing the Internet. We all know computers can only comprehend one and zeros so every information must be converted into numbers. Each computer connected to the Internet, both servers and browsers, has an IP address. This is a unique number that uniquely identifies the machine and functions much like a phone number. When you enter a domain name in your browser, your computer will perform a DNS lookup. This will determine the address of the server it is looking for. Nearly all domain registrars now offer DNS hosting. The registrar will usually create a DNS listing that points at a common page once you have registered a domain name. This indicates that the domain is "parked" but does not yet contain a website.
Web Hosting Now it's time for web hosting. We've secured the domain name, and pointed all browsers to a generic page called "Under Construction". First, you need to ask yourself who should I choose as my web host. The best way to choose a web host is to match your requirements with the company hosting it. It all depends on the technology used to develop your site. These are the two most important considerations.
Environment: Linux or Windows The majority of hosting packages can be used in either a Windows-based or Linux-based environment. LAMP (Linux-Apache-MySQL-PHP) is a commonly used collection of open source software that offers inexpensive web hosting. Windows hosting generally consists of Windows Server, Internet Information Server and SQL Server. These technologies are generally more costly to license, so hosting generally costs a little more. Add-On Apps Web hosting providers are offering a growing number of apps, many of which are free. Blogs and content management systems are two of the most popular add-ons. These technologies make it easy to create professional-looking websites that look great without writing any code. It is important that you choose a provider that has specialized in hosting this particular application if you intend to use one of them for your site. A provider that specializes only in one thing or another will often deliver superior service and performance. Email Hosting Email hosting is similar in that it doesn't have to be hosted by your web host provider or registrar. Another reason to choose the right host for you is that it makes sense for your situation. As an example, many of my domains' emails are hosted by Google's Gmail. You can change the DNS records of your domain to configure this. As you can see, email routing is controlled by DNS records. It is possible to redirect different types of domain traffic towards different servers by using this method. You can actually see that there are a few entries, called CNAMEs, that create subdomains that redirect traffic to different servers and/or services such as email, calendar, shared files, etc. Conclusions This article will help you understand the basics of web and email hosting. First, you should understand that your domain registrar does not have to host your website or email. A web hosting provider should be selected based on your website's requirements, not vice versa. In many cases, you will be able to benefit from the "best of breed" providers by getting better service for a lower price.
0 notes