#how to install wordpress on local computer
Explore tagged Tumblr posts
Visit Tumblr Blog
Explore Tumblr blogs with no restrictions, modern design and the best experience.
Last Seen Tumblr Blogs


Fun Fact
Tumblr is available in 18 languages.
Text
Learn WordPress with Urban Dive Marketing’s Full Course in Mirpur

Here are a few reasons why learning WordPress is a smart choice:
Easy to Use
You don’t need to be a developer or know coding. WordPress has a simple dashboard where you can add pages, images, and content easily.
Good for SEO (Search Engine Optimization)
WordPress helps your website show up on Google. It has tools and plugins that help you get more visitors to your site.
Fully Customizable
With thousands of free themes and plugins, you can design your website the way you like. You can add contact forms, image galleries, shops, and more.
Helpful Community
There are millions of WordPress users around the world. If you have a problem, you can find help through videos, forums, and blogs online.
Perfect for All Types of Websites
You can use WordPress to make blogs, business websites, portfolios, and online stores. It grows with your needs.
Why Choose Urban Dive Marketing?
Urban Dive Marketing is one of the top digital training centers in Mirpur. We teach you with a focus on real skills, so you can use what you learn right away.
Here’s what makes UDM special:
1. Learn by Doing
We don’t just give lectures. You will actually build websites during the course and practice everything you learn.
2. Expert Teachers
Our trainers have years of experience in web development and digital marketing. They know what works in the real world.
3. Help with Freelancing and Jobs
After the course, we guide you on how to start freelancing, find online jobs, or grow your own business.
4. Affordable and Flexible
We keep our prices low and offer flexible class timings so everyone can learn—students, working people, and beginners.
What You’ll Learn in Our WordPress Full Course
Our course is divided into easy-to-follow lessons. By the end of the course, you’ll be able to build and manage your own website.
Introduction to WordPress
What is WordPress?
WordPress.org vs WordPress.com
How WordPress works
Basic tools and dashboard overview
Installing WordPress
How to install WordPress on your computer (local setup)
How to install it on a real website (live server)
Buying a domain and hosting
Setting up your website step by step
Choosing and Customizing Themes
How to pick the best theme for your website
Customizing themes using the built-in editor
Using page builders like Elementor for design
Making mobile-friendly websites
Adding Features with Plugins
What are plugins?
Installing plugins safely
Useful plugins for SEO, security, backups, and more
SEO Basics
What is SEO?
How to make your website appear in Google search
Using plugins like Yoast SEO
Adding keywords, titles, and descriptions
Making an Online Store
Introduction to WooCommerce
How to add products and prices
Setting up payment options (PayPal, cards)
Managing orders and deliveries
Website Safety and Maintenance
Keeping your website safe from hackers
Backing up your website
Updating WordPress and plugins
Checking website speed and fixing slow websites
Launching Your Website
Making your website live for the world to see
Testing on phones and computers
Sharing your site with others
Managing updates and changes
Who Can Join This Course?
This course is made for:
Students who want to learn a skill
Freelancers looking to earn online
Business owners who want to make their own websites
Job seekers who want to work in tech or marketing
Bloggers or content creators
No experience is needed. Just basic computer knowledge is enough to get started!
Course Details & Contact Information
0 notes
Text
Best WordPress Course in Jalandhar
Sure! Here's your SEO-optimized article with the target keywords strategically placed: Best WordPress Course in Jalandhar, WordPress, best WordPress course, and WordPress training — all while keeping it natural and reader-friendly. Word count is approximately 550 words.
Best WordPress Course in Jalandhar by TechCADD Computer Institute
In today’s digital-first world, having a strong foundation in WordPress can open up numerous career opportunities. If you're looking for the Best WordPress Course in Jalandhar, look no further than TechCADD Computer Institute. With a focus on practical learning and industry-relevant skills, TechCADD has earned a solid reputation for delivering top-quality WordPress training.
Why WordPress?
WordPress powers over 40% of all websites globally. Whether you’re planning to launch a blog, build an e-commerce site, or design custom websites for clients, learning WordPress is a smart move. It’s user-friendly, flexible, and doesn't require deep coding knowledge—making it perfect for both beginners and aspiring developers.
About TechCADD Computer Institute
Located in the heart of Jalandhar, TechCADD is a well-established IT training institute offering professional courses like Web Designing, Digital Marketing, Java, Python, Tally ERP 9, and more. Among these, their WordPress training program is particularly popular among students and working professionals alike.
Highlights of the Best WordPress Course in Jalandhar
TechCADD’s WordPress course is designed to transform complete beginners into confident WordPress developers. Here’s what makes it the best WordPress course in the city:
Detailed Curriculum: The course covers everything from WordPress installation and dashboard overview to theme customization, plugin integration, and SEO best practices.
Hands-On Training: Students get real-world experience by working on live projects, which helps them understand how to build and manage actual websites.
Expert Instructors: The trainers at TechCADD are experienced professionals who provide personal attention and practical insights throughout the course.
Flexible Learning Options: Classes are available in both online and offline modes to suit different learning preferences and schedules.
Placement Assistance: On completing the course, students receive job placement support and career guidance.
What You’ll Learn in WordPress Training at TechCADD
WordPress installation on local and live servers
Creating and managing posts, pages, menus, and media
Theme selection and customization using Elementor and other builders
Working with essential plugins (Yoast SEO, Contact Form 7, WooCommerce, etc.)
Securing your WordPress site and managing backups
Making websites responsive and SEO-friendly
This structured approach ensures that by the end of the course, students can create dynamic websites with complete confidence.
Student Testimonials
Students praise the institute for its practical teaching methods and friendly learning environment. One student noted, "I enrolled in the WordPress course and found the training to be extremely detailed and hands-on. The instructor made everything easy to understand, and I was building my own website within a few weeks!"
Why TechCADD Offers the Best WordPress Course in Jalandhar
With an emphasis on skill development, live projects, and continuous support, TechCADD delivers a course that goes beyond just theory. It's no surprise that it's recognized for offering the best WordPress course in the region.
0 notes
Text
AVFTCN 039 - The 2 Simple Steps To Running DeepSeek (or another AI) Locally
I did not realize how incredibly EASY it is to now run LLMs locally on your computer! Two simple steps: 1 – Go to Ollama.com and download/install the app for Mac, Windows, or Linux. 2 – Open a terminal / command shell window and run whatever LLM you want (from Ollama’s list). So to run DeepSeek, you can type this: ollama run deepseek-r1:7b That’s it! After however long it takes to download…

View On WordPress
0 notes
Text
How to Move Your WordPress Site from Localhost to a Live Server
Developing a WordPress site on localhost is a great way to build and test your website in a controlled environment. However, the real challenge arises when it's time to move the site from your local server to a live hosting environment. If not done correctly, you could encounter broken links, missing images, or even database errors.
In this blog, we'll guide you through a step-by-step process to successfully move your WordPress site from localhost to a live server.

Step 1: Choose the Right Hosting Provider
Your first step is to select a reliable web hosting provider that meets your website’s needs. Look for:
Server Speed: Fast servers for better performance.
Uptime Guarantee: At least 99.9% uptime to ensure availability.
Ease of Use: User-friendly dashboards and tools.
WordPress Support: Hosting optimized for WordPress websites.
Popular options include Bluehost, SiteGround, and WP Engine.
Step 2: Export Your Local WordPress Database
The database is the backbone of your WordPress site. To export it:
Open phpMyAdmin on your local server (e.g., XAMPP or WAMP).
Select your WordPress database.
Click on the Export tab and choose the Quick Export method.
Save the .sql file to your computer.
Step 3: Upload Your WordPress Files to the Live Server
To move your files:
Compress Your WordPress Folder: Zip your local WordPress installation folder.
Access Your Hosting Account: Use a file manager or an FTP client like FileZilla.
Upload the Files: Transfer the zipped folder to your hosting server's root directory (usually public_html).
Unzip the Folder: Extract the files once uploaded.
Step 4: Create a Database on the Live Server
Now, set up a new database on your live hosting server:
Log in to your hosting control panel (e.g., cPanel).
Navigate to the MySQL Databases section.
Create a new database, database user, and password.
Assign the user to the database with full privileges.
Step 5: Import the Database to the Live Server
Open phpMyAdmin in your hosting control panel.
Select the new database you created.
Click the Import tab.
Choose the .sql file you exported from your localhost.
Click Go to import the database.
Step 6: Update the wp-config.php File
To connect your site to the live database:
Locate the wp-config.php file in your WordPress installation.
Open the file in a text editor.
Update the following lines: define('DB_NAME', 'your_live_database_name'); define('DB_USER', 'your_live_database_user'); define('DB_PASSWORD', 'your_live_database_password'); define('DB_HOST', 'localhost'); // Keep this unless your host specifies otherwise.
Save the file and upload it to your server via FTP.
Step 7: Update URLs in the Database
Your localhost URLs need to be replaced with your live site URLs.
Use a tool like Search Replace DB or run SQL queries in phpMyAdmin.
In phpMyAdmin, run the following query: UPDATE wp_options SET option_value = 'http://your-live-site.com' WHERE option_name = 'siteurl'; UPDATE wp_options SET option_value = 'http://your-live-site.com' WHERE option_name = 'home';
Step 8: Test Your Live Website
Once everything is uploaded and configured, check your website by entering its URL in a browser. Test for:
Broken Links: Fix them using plugins like Broken Link Checker.
Missing Images: Ensure media files were uploaded correctly.
Functionality: Verify forms, buttons, and features work as expected.
Step 9: Set Up Permalinks
To ensure proper URL structure:
Log in to your WordPress admin dashboard on the live site.
Go to Settings > Permalinks.
Choose your preferred permalink structure and click Save Changes.
Step 10: Secure Your Live Website
After migrating, secure your site to prevent vulnerabilities:
Install an SSL Certificate: Most hosting providers offer free SSL certificates.
Update Plugins and Themes: Ensure everything is up to date.
Set Up Backups: Use plugins like UpdraftPlus for regular backups.
Conclusion
Moving your WordPress site from localhost to a live server may seem daunting, but by following these steps, you can ensure a smooth and error-free migration. A successful move allows you to showcase your site to the world, engage your audience, and achieve your goals.
Start today and take your WordPress project live with confidence!
0 notes
Text
How to Build Your First Application on AWS
Amazon Web Services (AWS) provides a robust platform for building, deploying, and scaling applications. Whether you're a developer or a beginner in cloud computing, AWS offers tools and services to simplify the process. This guide will walk you through building your first application on AWS step by step.
Why Build Applications on AWS?
Scalability: Handle traffic spikes effortlessly.
Cost-Efficiency: Pay only for what you use.
Reliability: AWS ensures uptime with its global infrastructure.
Ease of Use: User-friendly services like Elastic Beanstalk and Lightsail simplify development.
Step 1: Set Up Your AWS Account
Before you begin, create an AWS account if you don’t already have one.
Go to AWS Signup Page.
Enter your email, set up your password, and provide payment details (the Free Tier allows free usage for many services).
Enable MFA (Multi-Factor Authentication) for added security.
Step 2: Choose Your Application Type
Define the type of application you want to build:
Web Application: A dynamic website or backend for mobile apps.
API: Create RESTful APIs using AWS Lambda or API Gateway.
Static Website: Host HTML, CSS, and JavaScript files.
Step 3: Select the Right AWS Services
AWS offers numerous services, but for a basic application, these are the essentials:
1. Compute Service (EC2 or Elastic Beanstalk):
Amazon EC2: Virtual machines for full control over deployment.
Elastic Beanstalk: Managed service to deploy web apps quickly.
2. Storage Service (S3):
Use Amazon S3 to store application assets, such as images and data files.
3. Database Service (RDS or DynamoDB):
RDS: For relational databases like MySQL or PostgreSQL.
DynamoDB: For NoSQL databases.
4. Networking (Route 53):
Manage DNS and custom domains for your app.
Step 4: Develop Locally
Build the initial version of your application on your local machine:
Tech Stack Suggestions:
Frontend: HTML, CSS, JavaScript, or frameworks like React and Angular.
Backend: Node.js, Python (Django/Flask), or Java (Spring Boot).
Database: SQLite for development, migrate to RDS or DynamoDB for production.
Step 5: Deploy Your Application
Once your app is ready, deploy it to AWS. Here's how:
Option 1: Using Elastic Beanstalk (Easiest Method):
Log in to the AWS Management Console.
Navigate to Elastic Beanstalk.
Create a new application, upload your app’s code (ZIP file), and launch it.
AWS automatically provisions EC2 instances, sets up a load balancer, and configures scaling.
Option 2: Using Amazon EC2 (Manual Method):
Launch an EC2 instance from the AWS Console.
SSH into the instance and install necessary dependencies (e.g., Node.js or Python).
Deploy your application files to the server.
Configure a web server like Nginx or Apache to serve your application.
Option 3: Using AWS Lightsail (For Beginners):
Navigate to AWS Lightsail.
Create a new instance with pre-configured blueprints like Node.js or WordPress.
Upload and run your application files.
Step 6: Connect Your Domain
Point your domain name to your application using Route 53:
Purchase or transfer a domain to AWS Route 53.
Set up an A record to point to your application’s public IP or load balancer.
Step 7: Test Your Application
Before going live, thoroughly test your application:
Functionality Testing: Ensure all features work as intended.
Load Testing: Simulate high traffic using tools like AWS CloudWatch or Locust.
Security Testing: Check for vulnerabilities using AWS Inspector.
Step 8: Monitor and Optimize
AWS provides tools to monitor performance and optimize your application:
AWS CloudWatch: Monitor app performance and resource usage.
AWS Trusted Advisor: Optimize costs, improve performance, and ensure security.
Auto Scaling: Scale resources automatically based on traffic.
Step 9: Scale and Grow
As your application gains users, AWS makes it easy to scale:
Horizontal Scaling: Add more servers via load balancers.
Vertical Scaling: Upgrade server specifications.
Global Distribution: Use AWS CloudFront to serve content globally with low latency.
Start your AWS journey today! Watch this step-by-step YouTube Live Session on AWS Application Development for detailed guidance and live demonstrations.
0 notes
Text
How To Setup A New Computer Without A Microsoft Account on Windows 11
How To Setup A New Computer Without A Microsoft Account
How to setup a new computer without a Microsoft account If you’re not keen on using a Microsoft account with your Windows 11 installation, there’s good news: you can bypass this requirement. Despite Microsoft’s push for account integration, it’s still possible to set up Windows 11 with a local account instead of a Microsoft one. In this comprehensive guide, we’ll walk you through the steps to…

View On WordPress
#Local Account#Microsoft Windows#User Account#Windows#Windows 10#Windows 11#Windows Server#Windows Server 2016#Windows Server 2019#Windows Server 2022#Windows Setup
0 notes
Text
WordPress plugin development to transform your site
WordPress, a leading content management system, owes much of its versatility to plugins. But what exactly are WordPress plugins? In simple terms, plugins are small pieces of software that extend the functionality of a WordPress website. Think of them as add-ons or modules that you can install to enhance your site's features and capabilities.
Plugins empower WordPress users to add a wide range of functionalities to their websites without needing to write complex code from scratch. Whether you want to integrate a contact form, optimize your site for search engines, or create an online store, there's likely a plugin available to help you achieve your goal.
These plugins are developed by a diverse community of developers, ranging from hobbyists to professional software engineers. They are typically distributed through the official WordPress Plugin Development or third-party marketplaces.
Now that we've covered what WordPress plugins are, let's explore how they're developed and how you can get started creating your own plugins to customize your WordPress site further.
In the expansive world of WordPress, plugins are essential tools for enhancing the functionality of your website. Whether you're just starting or have some coding experience, understanding how to create WordPress plugins can greatly benefit you. This guide will walk you through the basics of WordPress plugin development in simple language, covering all the essential topics you need to know.
What Are WordPress Plugins?
WordPress plugins are like add-ons or extensions for your website. They allow you to add new features or modify existing ones without changing the core WordPress software. For example, you can install plugins to create contact forms, add social media sharing buttons, or optimize your site for search engines.
Why Develop Custom Plugins?
While thousands of free and paid plugins are available, sometimes you need a custom solution tailored to your specific needs. Developing your plugin gives you full control over its functionality and ensures it integrates seamlessly with your website.
Getting Started: Setting Up Your Development Environment
To begin developing WordPress plugins, you'll need a local development environment where you can test your code without affecting your live website. You can set this up using tools like XAMPP or MAMP, which allow you to run a web server on your computer. Once set up, you can install WordPress locally and start coding.
Understanding Hooks and Filters
Hooks and filters are essential concepts in WordPress plugin development. Hooks allow you to execute your code at specific points in the WordPress execution process, while filters allow you to modify data before it is displayed on the website.
Adding Functionality: Advanced Features
As you become more comfortable with plugin development, you can start adding more advanced features to your plugins. This may include creating custom post types and taxonomies, implementing shortcode functionality for inserting dynamic content or using AJAX for asynchronous interactions without page reloads.
Designing the User Interface
Creating an intuitive user interface for your plugin is important for a positive user experience. You can design custom admin pages using WordPress APIs and add settings sections for configuring your plugin. Making sure your plugin is compatible with various WordPress themes and plugins is also crucial.
Security Best Practices
Security should always be a top priority when developing WordPress plugins. Make sure to sanitize and validate user input to prevent security vulnerabilities like SQL injection or cross-site scripting (XSS). Implement proper authorization and authentication mechanisms to protect sensitive data.
Testing and Debugging Your Plugin
Before releasing your plugin to the public, it's essential to thoroughly test and debug it to ensure it works as expected. You can use tools like PHPUnit for unit testing and built-in WordPress functions for debugging. Logging and error handling are also useful for diagnosing issues effectively.
Publishing Your Plugin
Once your plugin is ready, you can publish it to the WordPress Plugin Directory for others to use. Make sure to write clear documentation and a readme file explaining how to use your plugin. Promoting your plugin through social media and engaging with the WordPress community can increase its visibility.
In conclusion,
learning how to develop WordPress plugins opens up a world of possibilities for customizing and extending your website's functionality. With practice and dedication, you can create plugins that enhance the user experience and make your website stand out. If you're looking for professional guidance and support in WordPress plugin development, consider contacting Shri Krishna Technologies. Their experienced team can help you take your WordPress projects to the next level.
#WordPressPluginDevelopmentcompany#WordPressDevelopmentCompany#ProfessionalWordPressPluginDevelopmentCompany#WordPressdevelopment#Websitedesignanddevelopment#WordPressPlugindevelopment
0 notes
Text
How do you edit WordPress on a localhost?
Editing a WordPress site on localhost involves setting up a local development environment on your computer. Here's a general guide on how to do this:
1. Install a Local Server Environment:
You can use software like XAMPP, MAMP, or Local by Flywheel. These tools provide a local server environment with Apache, MySQL, and PHP.
Download and install the software of your choice.
2. Download WordPress:
Visit the official WordPress website (https://wordpress.org/) and download the latest version of WordPress.
3. Set Up Database:
Open your local server software and start the server.
Create a new database for your WordPress installation. Note down the database name, username, and password.
4. Install WordPress:
Extract the WordPress zip file you downloaded.
Move the WordPress files to the root directory of your local server (e.g., htdocs in XAMPP).
Rename the wp-config-sample.php file to wp-config.php.
Open wp-config.php and enter your database details (database name, username, password).
5. Access Local WordPress Site:
Open your web browser and go to http://localhost/yourwordpressfolder (replace "yourwordpressfolder" with the actual folder name where you installed WordPress).
6. Edit Your WordPress Site:
Log in to your local WordPress site using the credentials you set during the installation.
You can now edit your WordPress site just like you would on a live server. Install themes, plugins, and make changes to content and settings.
7. Theme and Plugin Development:
If you are a developer and want to make theme or plugin changes, you can create a themes or plugins folder inside the wp-content directory and develop your code there.
8. Save Changes:
Any changes you make on your localhost won't affect your live site until you migrate the changes. For this, you might use a migration plugin or manually transfer files and the database.
Important Note: Always remember that changes made on your localhost won't reflect on the live site until you manually migrate the changes. Be cautious when making significant changes, and consider using a backup solution.
If you plan to move your site from localhost to a live server, you'll need to export your database and migrate your files. There are plugins and manual methods available for this purpose.
1 note
·
View note
Text
Create Backup of Wordpress Site
Most of the websites are running on WordPress & and the reason behind this is smoothness & ease of understanding. When we are thinking of creating a backup of WordPress files, it is a huge & complicated task. WordPress is not as secure as other websites like Shopify are & cause of this WordPress hack & other data loss issues. In this blog, we will explain How to Create a Backup of WordPress sites.
Here, we have written about the ways to create a backup of WordPress sites for free in simple steps. You can use these backup files to get the website back as it is. This backup contains the WordPress themes, plugins, media files, databases Database & all other data. If you have created a website where you have uploaded 1000+ Attitude Shayari for Boys & if you want to take backup all of them. Create a backup of WordPress, and all the Attitude Shayari will be saved in the backup & they can be uploaded to your new site as it is.
In this blog, we have covered all the key points you should keep in mind while backing up the data.
Methods of Creating Backup –
As we know, backing up the data is a very good practice for protecting websites & data as well. So, there are various methods available for backing up the data; you can choose any of them.
Create Backup Through Plugin –
WordPress is all about the plugins. This means if you want to make any changes or add anything to the website, you can do that with plugins. Likewise, the backup process can be performed through plugins available in WordPress & most of which are free to use, such as BlogVault, BackWup, updraftplus& many others.
In this tutorial on pastenow, we have explained how to create a WordPress backup through updraftplus. It is a very popular & recommended plugin used by millions of users with great reviews.
Create Backup Through UpdraftPlus –
To create a backup through this plugin, you should install it on your WordPress site. To install the plugin in WordPress –
Go to Plugins & then click on the Add New button on the top side of the Plugins page.
Where you will see the list of plugins & a search box to search the desired plugin & search for updraftplus.
Click on the Install Now button once you will see the plugin in the list.
Once it is installed in your WordPress, it will ask you to activate it.
Once it gets active, you can see the updraft plus at the top of your WordPress site. Move your cursor on it & a dropdown will be there. Click on the Backup / Restore.
A dedicated dashboard of the plugin will be an option with multiple options in tabs. You will see the direct Backup button & you should click on it to create a backup of WordPress.
This backup will be saved for your future to restore your data without any data loss. It is very secure to protect your data and is cost-efficient as well.
Create a Backup of WordPress Manually –
If you do not want to invest in plugins, you can create a local backup on your computer for your website. You should follow some simple steps & they all are the same for the website. Here are the top five sites to buy domains: Namecheap, Hostinger& three more.
To Create a backup of the WordPress site, you have to create two backup files. The first is for WordPress Files & second is for Database. So, follow the step-by-step guide to make both backup files for future restoration.
Backup WordPress files via FTP Client –
First of all, you should go to the domain section of your hosting website, where your website is hosted.
You should go to your website cPanel & look for File Manager.
Click on it & you will reach the WordPress Files like Themes, media files, pages, login details & other files stored.
You should select all the files here & move them into a new folder.
Now compress the newly created folder into a zip file.
Now, download this file to your computer as a backup file of your WordPress files.
Backup WordPress Database –
In this step, you have to create a backup of the Database of your WordPress website. Here are the steps –
Go to your website, cPanel, through your hosting website.
Here, you will see the PHP database & click on it.
Where you will see the database name you have created at the time of installing your website.
Click on the database name & all the database files will display on the screen.
Now select all the files & export the Database in SQL format to your computer.
It is the database file of your WordPress site & it will contain all the table content & additional codes of your website.
Here
1 note
·
View note
Text
Best WordPress Migration Plugins for 2024
Websites are no different from everything else in the digital world; they change over time. As 2024 starts, consider giving your WordPress site a new lease on life. You might be thinking about switching hosts or domains. However, let's be honest: migration can provide any website owner with cold sweats! It's like moving—it's fun and scary at the same time.
In this article, we will talk about some of the best WordPress migration plugins for 2024. Whether you're a seasoned blogger or starting with WordPress, this guide will teach you the best WordPress migration plugins for 2024.

How do WordPress migration plugins work?
A carefully thought-out WordPress migration plugin is a tool that website owners can use to quickly move their websites from one place to another online. It helps with moving from one web host to another, from a local server to a live server, and moving a name.
You don't need to perform manual tasks during migration because these tools are automation-backed. WordPress migration plugins also copy files, sort databases, try new environments, and do other things that make the migration process easier.
Most plugins come as "plug-and-play" tools that don't need to be set up in a specific way. It would help if you used the WordPress migration tool to make migration accurate, quick, and safe.
Is using migration plugins safer than moving WordPress sites by hand?
Website owners must work independently to migrate their files and take precautions manually. You might miss something important or make a mistake this way.
It can be easy to move your website if you use a reliable, up-to-date migration tool to work with the latest WordPress and other software versions. The migration tool will complete all the necessary steps to move a WordPress site.
When you install or turn on a migration tool, the website doesn't have to be down. You can keep letting people visit your website while the transfer process continues. In this way, the website is likely to stay on track. It's important to remember that the website will run more slowly during the migration process.
Using a WordPress migration plugin is safer and easier than doing it by hand.
Here are the best WordPress Migration Plugins.
1. Duplicator Pro
Duplicator is one of the most famous plugins for moving files from one place on your WordPress site to another. Along with a regular migration of a whole website, the plugin lets you copy, move, and clone files automatically. The fact that it only takes one click to choose which files to download makes it a great way to back up your files on a local computer.
Once that's done, Duplicator quickly moves all those files to a different computer or host. You can even take a live site and put it in a local setting where you can work on it more. Backups are also important; you can choose between human and automatic methods to keep your files safe.
Duplicator is one of the best migration and backup tools for all skill levels because it lets you use staging, reuse themes, and avoid messy importing and exporting.
Many of the most important tools are built into the free plugin, but you can upgrade to get even more. So, the premium plan includes scheduled backups, cloud storage, and email alerts.
Pros:
Move a WordPress blog to a different domain, web host, local server, or live server.
A step-by-step transfer wizard will help you move your site.
You can set up website backups to be saved offline on Google Drive and other cloud storage services.
You can instantly set up databases by connecting to your hosting dashboard.
Help with moving between WordPress multisite.
2. The UpdraftPlus
It is primarily used for creating backups with UpdraftPlus. Nonetheless, it has many more capabilities as well. It can move the files to a new place, making the process easier. For example, you can back up your site files with just one button click. After that, a restart can happen anywhere, not just in the first place.
UpdraftPlus may be a good choice for transfers because it has one of the fastest backups when you use cloud storage services like Google Drive and Dropbox.
UpdraftPlus lets you set up automatic backup times. The free version comes with this normal backup process. If you pay more for the premium option, you get even more features, like incremental backups, duplicates, and quick migrations.
You can also use more cloud storage services, like Azure and OneDrive. The website sells plugins that make transfers easier and let you store files in multiple places.
Pros:
You can quickly copy your site if you already have it as a backup.
You can schedule backups and store them online.
It works with WordPress multisite networks.
With incremental backups, you can save computer resources.
3. All-in-One WordPress Migration
The All-in-One WP Migration plugin is next on the list. It has a huge following, with millions of installs and thousands of excellent ratings and reviews. Need to learn about computers? This plugin's only job is to let you download your WordPress files.
If you want to move your WordPress site to a new place, All-in-One WP Migration is great because it lets you do it with a drag-and-drop interface. During the export, you can find and change words, and any problems with serialization are fixed.
When working with hosting companies, the people who made All-in-One WP Migration have done a great job. In this way, you don't have to worry about whether or not there will be disagreements or performance problems.
One more thing is that the tool does a great job of getting around some of WordPress's upload size limits. It does this by moving your site into pieces that are all less than 2MB each.
Pros:
It is compatible with a wide variety of web hosting providers.
It works with older WordPress and PHP versions.
It syncs with cloud storage services without any problems.
4. WP Migrate
WP Migrate, which changed its name from WP Migrate DB after version 2.3 came out, has a more complicated way to move a site, but it's an excellent choice for people who want more control over the process. To sum up, WP Migrate works well for many experienced users.
The core plugin finishes a MySQL data dump, which saves your website's information to a file. It replaces file paths and URLs and manages serialized data, so you don't have to do much. You get an SQL file on your machine when the process is done.
phpMyAdmin is what you need to import that SQL file to the right database so the migration can happen.
When you upgrade, you get more than just better email support. You also get many tools necessary for pulling databases and syncing media between two sites. Some of our favourite tools are the ability to exclude post types, move from a multisite to a single site, and pause and stop migrations.
Pros:
It is easy to move a WordPress database from one site to another quickly.
Features that coders can use.
You can search for and change words in your database.
It works well with big websites and server settings that need help understanding.
5. Migrate Guru
Some of the best features of Migrate Guru are that it works better with multiple sites and bigger files. Even if you have an extensive network of various sites, the plugin makes the migration process more accessible. There is also the option to move sites up to 200 GB.
The plugin claims to allow connections with just one click. Moving sites to other hosts this way is one of the fastest ways. One more thing is that the Migrate Guru computers handle all of the website transfers. In other words, you don't have to worry that the move will slow down or even crash your site.
You don't have to give Migrate Guru any storage room or power from your server. It's a clean and easy process that removes the worry that might arise if your site is too big or full of files. There is no need for add-ons, and the Migrate Guru tool can work with almost all web hosts.
One thing that can't be changed is that Migrate Guru has no backup tools, which are standard with migration tools. The whole Migrate Guru plugin is free; there are no updates or paid versions.
Pros:
Easy-to-use migration wizard with simple steps.
Helps well-known hosting businesses.
Moves updated URLs and handles serialized data easily.
Perfect for more prominent websites to avoid server speed problems.
6. BackupBuddy
With BackupBuddy, you can make copies of your WordPress site, restore files, and move the site to a new place. The people at iThemes made this backup and migration plugin, which has been on more than 500,000 sites since it came out.
BackupBuddy, like UpdraftPlus, is mainly used to back up and protect your site files. You would install it to return your old files if you delete them, get hacked, or make a mistake.
Finally, you can move all the downloaded files to a different place. One of the easiest ways to put a backup file somewhere else is to use Google Drive, Dropbox, or Amazon S3. Then, the ImportBuddy integration ensures that all your files are moved or recovered on the same site.
There is a migration tool in BackupBuddy that lets you switch hosts and servers. You can also change the name and URLs all at once. Developers can also clone files and use a tool to push or pull files to and from testing sites.
Pros:
You can back up, recover, and move your WordPress site all at the same time.
Keep backups in a safe place that is far away.
Move your site with a full backup of WordPress.
With just one click, you can quickly move your WordPress development site to a live server.
Conclusion
The best WordPress migration plugins for 2024 claim to make things easier, add more features and improve the user experience. They are made to reduce the risks and difficulties of moving websites while ensuring they run at their best. These tools will simplify your website migration process, whether you are a novice or experienced webmaster. Plugins like All-in-One WordPress Migration, WP Migrate, Migrate Guru, BackupBuddy, and Duplicator Pro were talked about. All of these things will make your experience go well.

Janet Watson MyResellerHome MyResellerhome.com We offer experienced web hosting services that are customized to your specific requirements.
Facebook Twitter YouTube
1 note
·
View note
Text
WordPress and WooCommerce
What is WordPress?
WordPress is a content management system.
WordPress is therefore analogous to “Windows” on your PC
WordPress has core functionality in allowing you to edit and design a website, but lacks the functionality to create a fully functional eCommerce store.
What is WooCommerce?
WooCommerce is a “Plugin”.
WooCommerce is therefore analogous to “Microsoft Office” on your PC or Mac – and operates as a piece of software inside your WordPress Content Management System.
How else are WordPress and WooCommerce Different and Related?
Both WordPress and WooCommerce are developed and owned by Automatic.
Automatic is like the “Microsoft” in our Analogy – both owning and developing the operating system (Windows) and the software (MS Office)
Automatic started with WordPress and over the course of time have acquired various other well known brands of opensource software.
WooCommerce was one of those acquisitions.
Why isn’t WooCommerce just integrated into WordPress?
Not all WordPress users are eCommerce store owners.
But ALL WooCommerce users are WordPress users.
A bit like all thumbs are fingers, but not all fingers are thumbs!
Bloating the core WordPress content management system with unnecessary eCommerce functionality wouldn’t make for a great user experience for WordPress users who aren’t eCommerce store owners.
WordPress is the most used content management system online. Hell, even BBC America use it to run their website and host all of their content provision – yes it’s THAT powerful.
WordPress can be used to create websites that run online courses, directories, video sharing, photo sharing, membership sites – there’s a whole bunch of things you can install on WordPress to make it do what YOU need it to. Just like installing software on your computer.
WooCommerce is just one of those pieces of Software – albeit one of the more powerful and more fundamental pieces of software.
What Is The Difference Between WordPress and WooCommerce?
In short, WordPress is a content management system, whilst WooCommerce is a piece of software (a plugin) that is designed FOR the WordPress Content Management System (or CMS for short)
You may have wondered is it possible to have more than one checkout page for different products and product categories on a WordPress website using WooCommerce?
The answer is yes – it’s completely possible and in many cases makes a lot of sense to do so.
Your next question might be “Can you create multiple checkout pages in WooCommerce without customizing the code?
The great news is – YES!
You don’t need to touch the WordPress or WooCommerce code to be able offer a different checkout page for each product with WooCommerce.
This is contrary to almost all the reading you’ll do out there on this topic. The top Google Search Result for the query “woocommerce multiple checkout pages” is a WordPress.org support thread on the WooCommerce plugin referring to custom coding being required – with no offer of an actual answer.
For more details on our products and services, please feel free to visit us at: Link Building Services, Google Adwords, Google Local Business, Web Analytics Service & Article Submission Services.
Please feel free to visit us at: https://webigg.com/
0 notes
Text
Master WordPress: Setting up your local Development Environment
WordPress is a popular and powerful platform for creating websites, blogs, and online stores. But before you can start building your WordPress site, you need to set up a development environment where you can work on your site without affecting the live version.
A development environment is a safe and private space where you can install WordPress, test new features, experiment with plugins and themes, and debug any issues. It also allows you to work offline, without relying on an internet connection or a web server.
In this article, I will show you how to set up a local development environment for WordPress using a free tool called Local by Flywheel.

Local by Flywheel is an easy-to-use application that lets you create and manage multiple WordPress sites on your own computer.
What You Need to Set up a Local Development Environment for WordPress
To set up a local development environment for WordPress, you need the following:
A computer running Windows, Mac, or Linux.
A web browser such as Google Chrome, Firefox, or Microsoft Edge.
A text editor or an integrated development environment (IDE) such as Visual Studio Code, Atom, or Sublime Text. (I personally prefer VS Code because easy to customize and use 😁)
A local server stack that includes PHP, MySQL, and Apache or Nginx. This is what powers your WordPress site locally.
A WordPress installation package that includes the core files and the database.
You can download and install all these components separately, but that can be time-consuming and complicated. That’s why I recommend using Local by Flywheel, which bundles everything you need in one convenient package.

How to Install Local by Flywheel
Local by Flywheel is a free application that you can download from the official website: https://localwp.com/
To install Local by Flywheel, follow these steps:
Download the installer for your operating system from the website.
Run the installer and follow the instructions on the screen.
Once the installation is complete, launch the application and create an account or log in with your existing account.
You will see the main dashboard of Local by Flywheel, where you can create and manage your local WordPress sites.
How to Create a Local WordPress Site with Local by Flywheel
To create a local WordPress site with Local by Flywheel, follow these steps:
Click on the + button at the top left corner of the dashboard.
Choose a name for your site and click on Advanced Options to customize the domain name, path, and environment type. You can leave the default settings if you want.
Click on Continue to proceed to the next step.
Choose a username, password, and email address for your WordPress admin account. You can also choose whether to install WordPress multisite or not.
Click on Add Site to start creating your site. This may take a few minutes depending on your internet speed and computer performance.
Once your site is ready, you will see it listed on the dashboard. You can click on Admin to access the WordPress dashboard, or click on Open Site to view the front-end of your site in your browser.
How to Work on Your Local WordPress Site
Now that you have created your local WordPress site, you can start working on it as you would on any other WordPress site. You can install plugins and themes, create posts and pages, customize settings, and more.
Some of the benefits of working on a local WordPress site are:
You can work faster and see changes instantly in your browser.
You can work offline without needing an internet connection or a web server.
You can test new features and updates without affecting the live version of your site.
You can experiment with different plugins and themes without worrying about breaking your site or losing data.
You can debug any issues more easily using tools such as WP_DEBUG or Query Monitor.
How to Make Your Site Live
Once you are happy with your local WordPress site, you may want to make it live so that other people can access it on the internet. To do this, you need to migrate your site from your local environment to a web hosting service.
There are different ways to migrate your site from Local by Flywheel to a web host, but one of the easiest ways is to use the Connect feature of Local by Flywheel.
The Connect feature allows you to connect your local site to a web host such as WP Engine or Flywheel (both owned by the same company as Local by Flywheel) and push or pull changes between them.
To use the Connect feature of Local by Flywheel, follow these steps:
Click on the name of your local site on the dashboard and go to the Connect tab.
Choose a web host that you want to connect to. You will need to have an account with them and create a site on their platform first.
Follow the instructions on the screen to link your local site and your web host site.
Once the connection is established, you can push or pull changes between your local site and your web host site. Pushing changes means sending your local site to your web host site, while pulling changes means receiving your web host site to your local site.
You can also choose whether to push or pull the entire site or only specific parts such as the database, files, or plugins and themes.
Conclusion
Setting up a local development environment for WordPress is a smart and efficient way to work on your WordPress site. It gives you more control, flexibility, and security over your site.
Using Local by Flywheel, you can easily create and manage multiple WordPress sites on your own computer, without needing any technical skills or extra software.
You can also migrate your site from Local by Flywheel to a web host using the Connect feature, and sync changes between them.
I hope this article helped you learn how to set up a local development environment for WordPress using Local by Flywheel. If you have any questions or feedback, feel free to leave a comment below. Happy WordPressing!

#wordpress#wordpress development#webdevelopment#localenvironment#flywheel#blogging#tutorial#techniki tantram#technikitantram#wordpressdeveloper
1 note
·
View note
Text
How to Install AWS Lightsail WordPress

work to be done in advance Sign up for AWS and sign up for Lightsail Introduction If you're looking to create a website or a blog using WordPress, AWS Lightsail provides a quick and easy way to set up your own virtual private server (VPS) with minimal effort. In this article, we will guide you through the step-by-step process of installing AWS Lightsail WordPress. By the end of this tutorial, you'll have your WordPress website up and running on the AWS Lightsail platform.
1. Create *Instance
First, you need to create an instance like the screen. For the platform, select Linux/Unix environment. The reason for this is that there are more blueprints and, in practice, Linux is easier to manage servers. And for Blueprint, let's choose WordPress. *(AWS) What is an instance? An AWS instance is a cloud computing resource provided by Amazon Web Services (AWS). Instances are virtual servers that provide a computing environment in which you can run multiple operating systems (OS) and software. AWS instances come in a variety of sizes and performance options, and you can choose an instance type to suit your needs. For example, a small instance may be sufficient to host a basic web server, but larger and more powerful instances may be needed to run large databases or complex applications. You can create and launch as many AWS instances as you need on demand, and you can configure instance types, operating systems, storage and networking options, and more. Users can also scale their applications by resizing instances or using multiple instances as needed. AWS instances offer the flexibility and scalability of cloud computing, and you use and pay for as many resources as you need. This reduces the burden of managing infrastructure and allows you to quickly deploy and scale applications. *(IT) What is Blue Print? An IT blueprint is a plan or design document for implementing an information technology (IT) system or solution. When starting an IT project, a business or organization must consider various factors such as overall system architecture, network configuration, hardware and software requirements, security policies, database structure, and more. An IT blueprint documents these elements in detail and provides them as a blueprint that can be used during the implementation and maintenance phases.
2. Connect SSH to the created instance

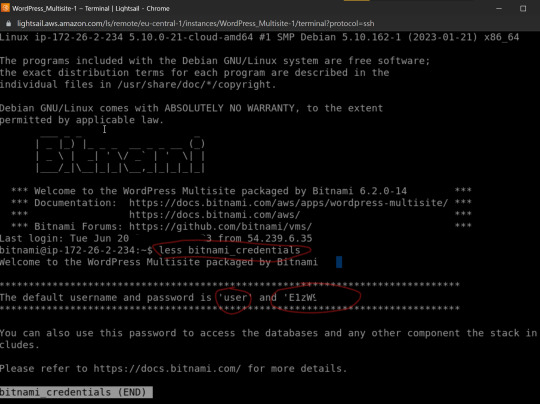
AWS Lightsail Dashboard Instances Instance is created after time passes as shown in the screen. *Click the SSH connection button to open the Lightsail Terminal (input window).
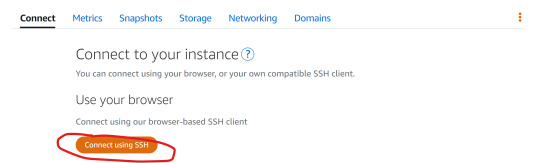
ssh connection *What is SSH SSH stands for "Secure Shell," and is a protocol that allows you to remotely access and communicate with a computer securely over a network. SSH uses encryption technology to ensure data confidentiality and integrity and provides secure access through authentication and encryption. SSH allows you to securely log in and run commands on another computer over the Internet or a local network. With SSH, you can authenticate by entering a password, or you can connect using a public/private key pair. SSH uses TCP port 22 by default, and most operating systems support SSH client and server software. SSH is used for a variety of purposes, such as remotely managing servers or transferring files. In a web hosting service, you can connect to a web server through SSH and perform tasks such as uploading files or changing settings. In addition, you can remotely connect to the server to execute commands or download files. Because SSH uses encryption technology, data transmitted over the network is safely protected to prevent leakage of important information. Then, a window appears as shown in the screen below. The important point here is that you need to enter the following command, the reason is to know the ID and password of WordPress. less bitnami_credentials
lightsail ssh
3. Visit with Public IP
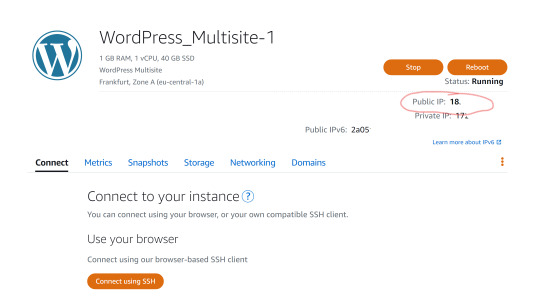
public IP If you enter Public IP (a kind of phone book on the Internet = IP address) in the URL window, you can check the created template. If you add /admin to the address, you can check the login screen. If you enter the ID and password you found above, you can check the WordPress admin screen. example - 18.15.XXX.XX/admin
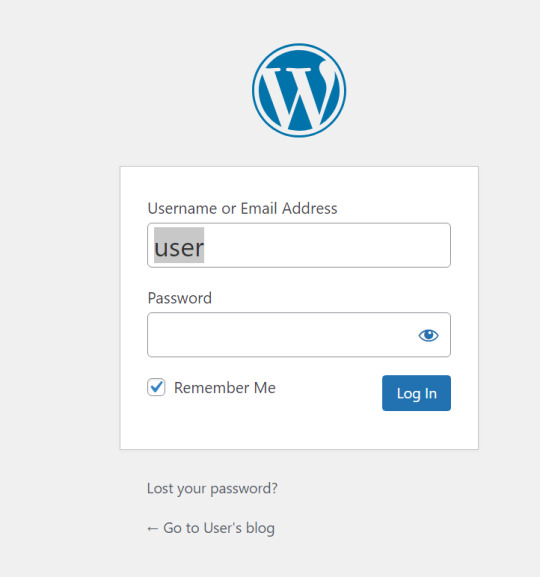
WordPress login screen

WordPress admin screen
4. How to change WordPress User password
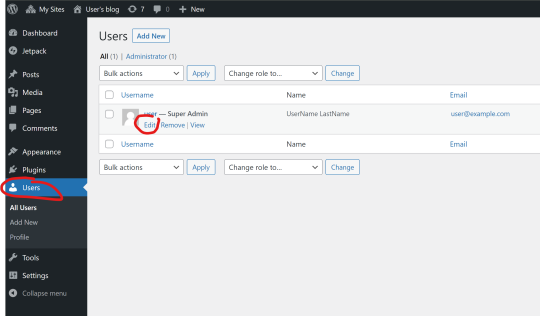
WordPress password If you want to change the password, click the Users menu on the left side of the administrator screen, and then click the Edit user button to change information such as the password. Read the full article
1 note
·
View note
Text
Web Hosting Company

How Web Hosting works?
Web hosting is the area where your website’s content files are stored. It’s similar to your website’s home page.
If your domain name is the address of your house, then your hosting server is the real house. To construct a website, you’ll need both a domain name and web hosting.
When a person attempts to visit your website by typing your web address (domain name) into the URL bar of their browser, the domain name directs them to the files on the web server.
The Difference Between a Domain Name and Web Hosting
Domain names and web hosting are distinct entities, although they are inextricably linked. To construct a website, you’ll need both a domain name and a web hosting account. This implies you can’t create a website without either of them.
To get started, select a domain name and register it with a domain registrar. Most domain registrars allow you to register a domain name for a minimum of one year. To continue using your domain, you must renew it before it expires.
After that, you may purchase a hosting package and link it to your domain name. Following that, you may install website software (such as WordPress), as well as tools and plugins.
Can I get both a domain and hosting from the same company?
You certainly can. You can purchase a name plus a hosting account from the same or other firms.
If you purchase both a domain and hosting from the same business, the setup procedure is simplified since you will not need to modify the domain name settings. As a result, several businesses have begun to offer both services concurrently.
What Is a Domain Name and What Is It Used For?
Domain names are host names that are used by the Domain Name System (DNS) to identify and map websites and other Internet Protocol (IP) resources. A fair analogy would be to compare domain names to street names. Street names are essential because they aid with navigation. The IP addresses, on the other hand, represent the physical location of the streets.
The Domain Name System (DNS) is a hierarchical naming system that assists Internet users in navigating the Internet. Each Internet-connected device, such as a computer, has a unique address, similar to a phone number, which is a sophisticated string of digits known as a “IP address” (IP stands for “Internet Protocol”).
In the DNS system, there are second and third-level domain names, such as Domain Tools or Google. End users can often reserve these domains in order to host web pages, establish publicly accessible Internet resources, and link the Internet to local area networks. Second-level domains often convey the name of the organisation and/or are descriptive of the service offered, whereas third-level domains are used to refer to a specific server inside an organisation.
Domain names are used for a variety of functions, including application-specific naming, addressing, and establishing: – Straightforward identification of host names and hosts.
Universal Resource Locators (URLs) for Web resources, such as web pages, include host names as an element.
for more :https://techparkinfosolutions.com/blog/get-better-visibility-and-exposure-on-search-engines/
0 notes
Text
Download Bitnami WordPress Local _ Need One click and Install now
Download Bitnami WordPress Local _ Need One click and Install now
Download Bitnami WordPress Local The very first thing that I discovered in WordPress was its set up course of on localhost with the help of Bitnami WordPress. (Download Bitnami WordPress Local) unknown with the opposite unique options that it has. So after the various analysis, at present I’m right here to current some helpful & easy steps of How you can Set up WordPress on Localhost so it may…

View On WordPress
#how to install plugins in wordpress#how to install theme in wordpress#how to install wordpress#how to install wordpress in cpanel#how to install wordpress in wamp server#how to install wordpress in windows 7#how to install wordpress locally#how to install wordpress on local computer#how to install wordpress on local machine#how to install wordpress on local server#how to install wordpress on localhost#how to install wordpress on windows 10#how to install wordpress on windows 8#how to install wordpress theme#how to install wordpress theme on localhost#install wordpress#install wordpress locally#install wordpress on cpanel#install wordpress on windows 10#wordpress download and install#wordpress install
0 notes
Text
I've been thinking about it lately so I wanted to blog about how Vogon handles requests.
If you have no interest in web frameworks feel free to skip this one.
Vogon as a core framework is basically nothing. It's a few functions, some starter classes, and a codified file structure. The main idea was for it to be hugely flexible without getting in the way of whatever project it was applied to.
This means that it has no static routes. By design there are no specific php URIs built into the code. And I don't mean that in the WordPress way where there are no static routes, except for the login url (and some other items). There are no static routes. If the framework is used as intended, the only PHP file your request is routed to is the main index.php file of the vogon folder structure.
What that means is that when you enter a url for a vogon instance you'll enter in something like this:
localhost/vogon/ebooks/view/53066?file=/upload/ebooks/user/hack2e_03.book/hack2e_03.book - user.pdf
If you know your URL structure we can go ahead and break this request down a little
[protocol] - http:// (implied because no protocol is specified) [hostname] - localhost (this is an alias for the local ip which is usually 127.0.0.1, or you are requesting something running on your own computer) [uri] - /vogon/ebooks/view/53066 [GET Variables] - ?file=/upload/ebooks/user/hack2e_03.book/hack2e_03.book - user.pdf
When vogon is installed, it analyzes the URI of the request that accessed the installer (though this is user overridable), this allows the framework to be aware of when it is in a subdirectory rather than an exclusive url. That is the case with this request, so we can break our URI into two sections:
[Vogon Root URI] - /vogon [Vogon Route] - /ebooks/view/53066
Before we break things down further we should talk about what's happening in the framework itself. The protocol, hostname, and Vogon Root URI tell the web server to send a request to Vogon application. The web server is then configured to route that request to the index.php file inside the web root. The exception for this is direct access to static files. This enables us to load static assets like JavaScript or CSS files. It does also mean that standalone PHP files can be accessed, but Vogon controller model and view files are all dependant on being loaded through their helper functions and will only error, if anything at all, if loaded directly. An optional security file can be prepended to ensure no unauthorized php execution occurs, but that involves some intensive configuration by the user, and sometimes results in false positives.
Getting back on topic. The request is routed to the index.php file. The index then looks for a new install flag file in the main directory. If this file exists then the install process has not been completed and the installer is loaded.
However, if that file does not exist, the system will load the bootstrap.php file from the /main/ directory, which is where 99% of the Vogon code lives.
The bootstrap loads any classes in the /main/class/autoload/ folder, establishes a database connection if one is configured, and loads our functions from the /main/functions.php file. If user sessions are enabled by the user extension, the bootstrap will attempt to establish an existing user session, if it can't a login screen is shown.
This login screen will be shown to any request, this is useful because unlike other systems with a static login route, you post your login to the same uri you requested originally, so no complicated redirects have to be done.
So far we haven't done any route parsing, and everything done by the system is the same for every request. But now we must calculate what other files need to be loaded, so we load /main/router.php
I think I'd actually like to move this to an extension so it's borders are a little better defined and it can be replaced/configured a little more easily (and so the system can include additional routers to choose from).
The media server version of Vogon is the most mature, so let's discuss that router.
In this router, the router only handles the first step of the process, the endpoint. In our example url that would be '/ebooks'. The router takes the endpoint it's been given and compares that against a database `routes` table. The routes table links controllers to endpoints. These controllers can live in the /main/controller/ folder or in a /main/ext/[ext-name]/controller/ folder. The system will attempt to load the defined controller, if no controller is found it will load the default 404 controller (404 is the http status code for "Not Found").
Then the controller is able to take over routing however it would like. This route is currently configured to use the /main/ext/ebooks extension, and loads controller.main.php from within that extension.
Vogon has a built in function called get_slug_part(); that allows parts of the URI to be accessed as if they were an array. The router uses slug[0] to determine the endpoint, so most controllers look first at slug[1] to determine what action to take. Remember, we are looking at this part of the URI /view/53066
The ebooks controller.main.php uses a switch case based on slug[1]. In this case slug[1] (view), tells the controller that we are viewing an ebook. The ebooks extension then loads controller.comic_book_reader.php.
controller.comic_book_reader.php gets slug[2], checks to ensure that it is numeric (and thus presumably a database ID), and then it attempts to look up that document by database ID. It compares the type of that document (if anything successfully comes back) against a subset of types it knows how to handle, and if it can it loads that document into a view and you are served what you requested.
In this particular instance, that view is the JS PDF library developed by Mozilla, that has been configured to read the filename of the PDF to load from the "file" GET variable.
That's it. That's a full request handled by Vogon. This is the point where output is actually returned to the user (if they have a user session).
Here's the full url again: localhost/vogon/ebooks/view/53066?file=/upload/ebooks/user/hack2e_03.book/hack2e_03.book - user.pdf
And here's a flow of documents (this is not complete and does not include classes, inline includes, ect.):
/index.php -> /main/bootstrap.php -> /main/router.php -> /main/ext/ebooks/controller/controller.main.php -> /main/ext/ebooks/controller/controller.comic_book_reader.php -> /main/ext/ebooks/view/view.js_pdf_viewer.php
4 notes
·
View notes