#how to stop automatic download in windows 10
Explore tagged Tumblr posts
Visit Tumblr Blog
Explore Tumblr blogs with no restrictions, modern design and the best experience.
Last Seen Tumblr Blogs


Fun Fact
China blocked Tumblr because of pornography and censorship problems in 2013.
Text
Fixing Windows 11 - A Masterpost
Windows 11 is absolute crap for a good bunch of stuff so yeah, have a masterpost with most of the things I've found around to fix it haha (they're not all here because I did stuff around and I don't remember what)
YES, I KNOW at this point Linux would be a better alternative, however some here can't use Linux due to some proprietary programs that are not on Linux. This Masterpost is for the people in the same situation as I, aka those who have to have Windows or they can't do their job.
I am currently unemployed and haven't worked enough for the government to help me. I have a ko-fi if ever you want to help.
Stopping W11 from making you create an account/setting up your computer without internet (with a way to create gpedit.msc if your version doesn't have it)
Fixing the Taskbar (in case you also don't like the grouped Battery/internet/sound or the way the windows look)(there's more to it, check the settings)
There is the chance that Windows can't update because of this, you just have to uninstall it and reinstall it afterwards. They also completely nuked the Windows 10 look in the 24H2 update, so use the "Windows 10 (Explorer Patcher)" option instead of the plain "Windows 10".
Removing the rounded windows (since ExplorerPatcher doesn't do it anymore on 24H2)
https://github.com/valinet/Win11DisableRoundedCorners
How to move the volume and luminosity pop ups (so you can finally see those sweet sweet subtitles)
In case ModernFlyouts doesn't automatically start up, possible solution
Fixing the Start Menu (ExplorerPatcher can do that too, btw)
How to show all options right away
A way to bring back the Calendar
https://github.com/matej137/OutlookRemover
MICROSOFT FULLY NUKED THE CALENDAR!!! Possible fix is to downgrade the app (which is fine if you don't use the Mail), but do use the OutlookRemover to stop the automatic installation of the new version.
https://github.com/matej137/OutlookRemover/issues/15
Your Bluetooth suddenly doesn't work???
It happens sometimes for no clear reasons so here are a few things you can do:
Check if the icon is in the Taskbar. If not, verify if it is available in the pop up menu (the one from the gear icon)
If it's not here, check your parameter to see if you have the option to turn it on.
If it's still not here, reboot your PC.
If it's STILL not working, update your Bluetooth driver. You can do so by looking for "driver" in the menu and opening the Device Manager, then right click on the right Bluetooth component and update its driver.
If Windows says that the driver is up to date, try checking out this helper: https://support.microsoft.com/en-us/windows/fix-bluetooth-problems-in-windows-723e092f-03fa-858b-5c80-131ec3fba75c
If really nothing help, download and install a recent Bluetooth Driver. Be careful of what you download and from where.
Someone who stumbled on this post fixed it by downloading the Bluetooth Driver 5.0.1.1500 from Softonic (https://www.softonic.nl/download/bluetooth-driver/windows).
How to remove Copilot if you have it (I don't, but it might be because I'm in Europe??)
Archive
Apparently Copilot is being forced on people so hummm
Other stuff not specifically related to the shit W11 did
Changing the size of the scroll bars
How to fully remove Cortana
Website with tools to fix W10 and W11
2K notes
·
View notes
Text
Making Gifs Part 1 - Capturing Video
I am making this for @errruvande but I thought maybe others could use this guide to. This is my own personal workflow on how I make my gifs. Everyone has their own way of doing it, and there is no right or wrong way, but I have found this works best for me, with my limited tools and since I do not have photoshop.
Please note I am not an expert lol! There are people out there making far better gifs than me, and many other gifmaking resouces on Tumblr that are probably better than mine.
Keep reading below >>>
So there are two ways that I have found that work for capturing video. If you have the discs like I do, using a program like Videobyte BD-DVD Ripper works really well to grab video clips from Blu-Rays and DVD's. I recommend only using Blu-Rays if you have them. since DVD's are much lower quality.
However I have noticed the videos I captured with this program tend to be dark and have some compression artifacts, even when rip to an MKV with high quality settings. So I use a different method which I feel produces higher quality video captures.
I use Windows Screen Recorder (I have Win11 but this will work for all versions of Windows) with the quality settings set to High. In order to do this, go to Settings > Gaming > Captures and set the following:
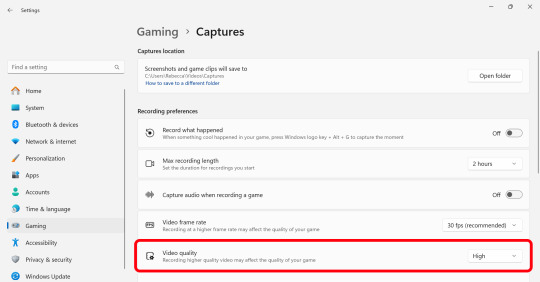
Make sure the Video Quality is set to High, set your Screenshots folder, turn off Audio (you don't need it), and keep the frame rate to 30 fps.
For Windows 11 press WIN + ALT + R to activate the screen recorder. There is usually a bit of a delay so make sure you start a few seconds before the scene you want to capture. And try to keep the length of the capture below about 90 seconds; the shorter the better.
______________________________________________________________
Capturing Sequential Caps
So, for those of you with Photoshop, you can import your video directly into the program and make your gif from there. But I found that Photopea really does not like videos, and will stall and crash if I load a video directly. So I have to capture sequential screencaps to make my gifs.
I use VLC Media Player. There are a few others out there that take sequential caps, but I have not been able to get them to work myself.
Download and install the latest version. Then go to your settings to set up the Sequential Caps function. They have a great guide on their website here but I will reiterate it in this post.
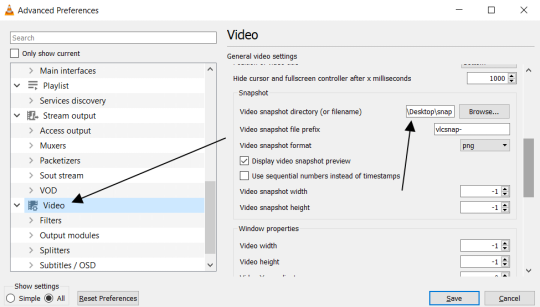
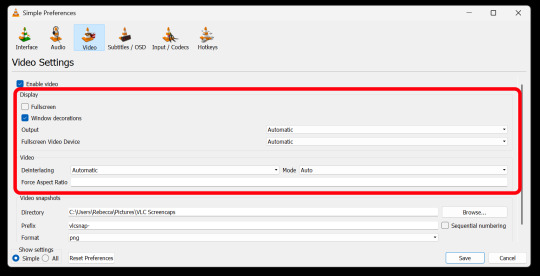
Go To Tools > Preferences and then at the bottom of the screen select the All radio button to show all settings.
Select Video from the left menu. Scroll down about halfway until you see the Snapshot section. Choose the folder where you want the caps to go.
3. Then, under Video on the left, expand the Filters list.
4. Check the "Scene Video Filter" from the list.
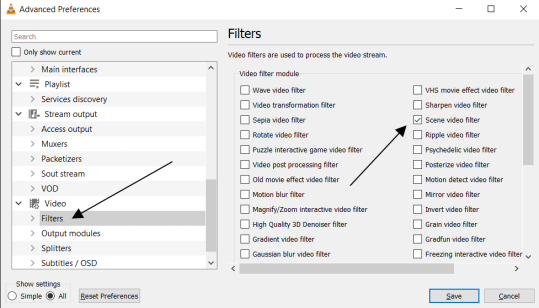
5. Then scroll down on the left menu under Filters and click on Scene Filter. This will open up the settings for that particular filter.
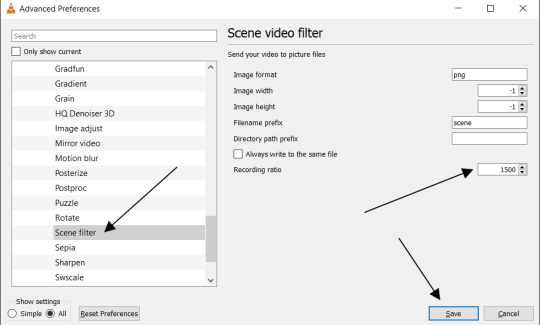
6. Set the Image Format to PNG.
7. Then for the Recording Ratio, change to "1". The Recording Ratio is the frame interval. So for example, if it was set to "300" (with a 30fps video), then it would take one cap every 10 seconds. Setting it to "1" will make it take a cap once per frame.
8. None of the other settings need to be changed.
9. One more important setting, otherwise this will not work! Close the menu, and go back to Tools > Settings and leave it on Simple. Go to the Video section and MAKE SURE the output is set to "Automatic". This is important because if it is not on Automatic the Scene Filter won't work!
Then just open your video with VLC. VLC will automatically take the screencaps while the video is playing. If you pause the video, it will stop taking caps.
NOTE: For smoother gifs, change your playback speed to be slower. Go to the top menu > Playback > Speed > Slower (fine). The more you click this the slower the video will playback, and that means more caps will be taken over that time frame. I usually set it to 0.75x, but if you want even smoother gifs for really short clips, you can set it even slower than that.
Your screenshot folder will look like this:

Then we are done with this part and onto Photopea! Which I will go into detail in another post: PART 2
#gifmakers#gifmaking#gif making#gifmaking resources#gif making resources#my guides#giffing tutorial#screencapping#sequential caps#gif making tutorial
51 notes
·
View notes
Note
love love LOVE your The Sign gifsets. im still a newbie in giffing lmao and your gifs are like reaaally pretty so i was wondering how you do your gifs? i really like how it's sharp and the colors pop up beautifully (only if you don't mind sharing ofcc <333)
bun this is the kindest thing you could have said to me, thank you so much <3 i wanted to write down my giffing process for a while in case anyone would find anything in it helpful, so thanks for giving me a push!
guzhu-furen's photoshop gifmaking process (kinda oriented on saving up time)
from

to

1. Downloading a video. i prefer to download video files instead of making screen recordings because the latter usually leaves watermarks/captions and makes image quality lower. i will not be linking the downloading websites themselves directly, but they are all easy to find through search engines if you know what to search for! i download ql dramas from:
youtube:
if the video you need is above 1080p quality, search for youtube4kdownloader
if the video is age restricted, search for 9xbuddy
both these websites work for normal videos too!
mkvdrama usually has 1080p episodes of most asian dramas.
dramacool also has downloading options in case the show is not available on other websites!
2. Screencapping (i learned it through this tutorial)
i screencap using KMPlayer. here is the installer i used, but you can find versions of this program on various websites and torrents too! install the program and proceed.
screencapping steps: open KMPlayer > press "CTRL + G" to summon the Frame Extraction window > set identical settings to these:
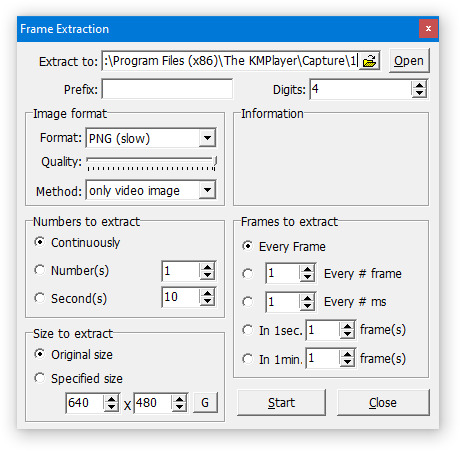
note which computer folder the screencaps will go to (it has a label "Extract to") > go to that folder on your computer and create a bunch of numbered folders there, for example ten folders named from 1 to 10, these would be our separate folders for ten gifs > write "1" or a name of another numbered folder after the backslash in "Extract to" bar in kmplayer > go the timestamp that will be the beginning of your gif in KMPlayer > press "Start" in the Frame Extraction window and press play on the video > when the moment you need to gif is over, press pause on the video and press "Stop" in the Frame Extraction window. great, you now have your folder of screencaps!
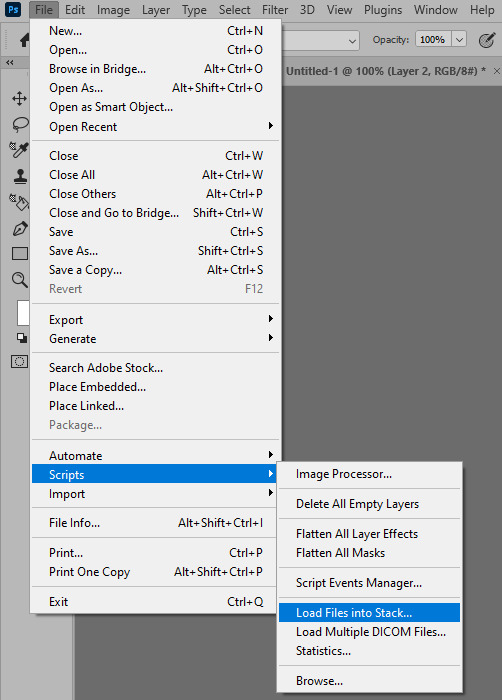
3. Importing screencaps to Photoshop
i use Adobe Photoshop 2023, but had used Adobe Photoshop CS5 for a long time before that, so you can use any version you have or find! it's available on various websites and torrents.
open Photoshop > Scripts > Load Files into Stack > press Browse in the "Load Layers" window that was opened
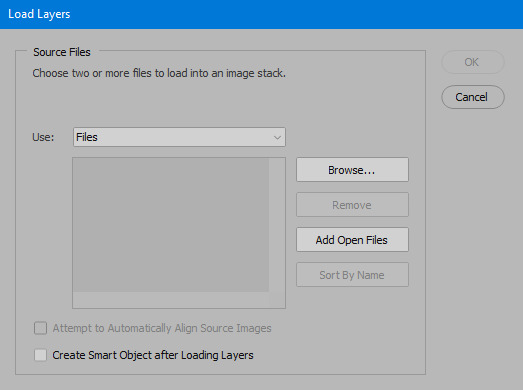
open your screencaps folder (and pin the KMPlayer Capture folder for faster future access) > pick the screencaps you want for your gif by clicking on the first one, and then clicking on the finishing one while pressing Shift on the keyboard > click OK and let them load for some time! i have 65 screencaps loading at the moment
when the screencaps finish loading go to Window > press Timeline > press Create Video Timeline in the opened sidebar > press three dots that will say "Convert to frame animation"


4. Sizing & making the base of a gif
next part will be automatic. i use actions for almost everything from this moment. download the basic action pack here and my additional action pack that we will need here. load them in your photoshop actions window (Actions > Load Actions).
play the Script action to create frames.
now onto sizing your gif. these are tumblr's width dimensions for 3 types of gifs

my gifs are usually 540 px in width and 640, 400 or 345 px in height. i added a 400 px action (Sizing 400) in the action pack, you can use it! or you can follow the steps by hand:
Image > Image Size > put in the height you want and add 4-6 pixels there (mine will be 406 for a 400 px high gif) > OK

now we need to crop the gif for it to fit tumblr's dimensions:
Image > Canvas Size > change Width to 540 (or 268 or 177) and take away the 4-6 pixels that we left in the previous step in Height
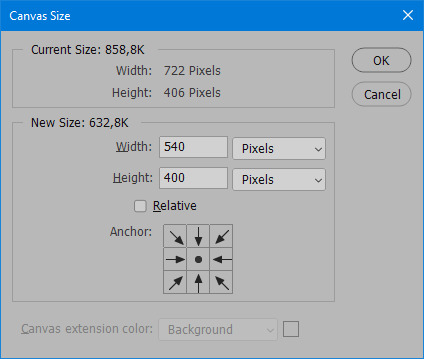
when you figure out which gif dimensions work best for you, record an action and use it to save up time!
after sizing use the action Smart Object. now we have the base of our gif!

you can move your gif left or right if you want! i will be doing this because i would like to show more hips in the gif.
press Ctrl + T > move the layer however you need (not in height though) > press Enter to save
i moved it to the right and my gif looks like this now:
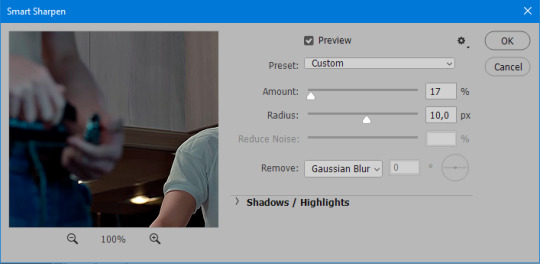
5. Sharpening (i use Tan's sharpening settings explained here)
i added two sharpening actions in the pack, they are called Sharpen Spicy and Sharpen Spicy 12. you can use one of them or you can sharpen your gif by hand, i will explain how to do it below.
Filter > Sharpen > Smart Sharpen > 500% amount, 0,2 px radius > OK
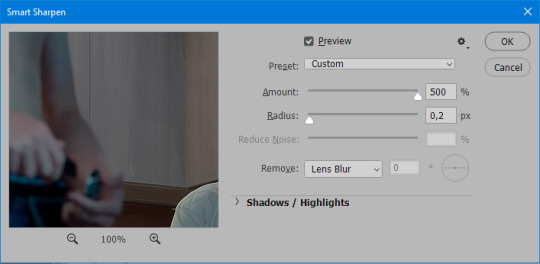
Filter > Sharpen > Smart Sharpen > 17% amount, 10,0 px radius > OK (you can change 17% to lesser or bigger, depending how intense you want your sharpening to look. i use 17% for 4k footage and 12% for 1080 px or less videos)
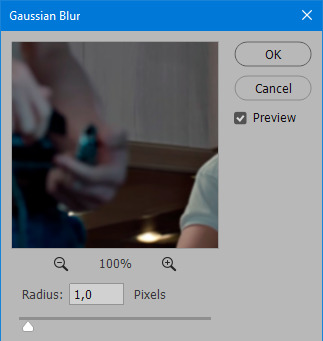
to smooth the sharpening a bit i use Gaussian Blur (this is optional, you can leave the sharpening as it is if you want your gif to be sharper).
Filter > Blur > Gaussian Blur > Radius 1,0 pixels > OK
now change blending intensity to let only a bit of the blurring effect stay (you need to change this by hand if you used the sharpening action also).
press Blending Options (the highlighted place) twice > change Opacity to 10%

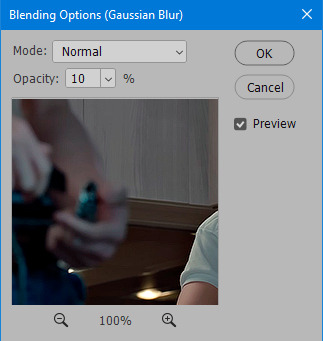
this is what my gifs looks like with sharpening now!

6. Colouring (i learned how to colour the way i do through this tutorial)
to make it easier for you to learn i will share my blank colouring file. i created it to save as much time while giffing as possible, so whenever i need to colour a gif i simply duplicate all the blank adjustment layers to the base of my every gif and start colouring! once you figure out which adjustment layers work for you best, i recommend creating a blank colouring file too to save time.
if you want to go the easy way, open my colouring file and duplicate selected layers to your gif file by Layer > Duplicate Layer > insert gif's document name

if you want to learn by hand, create the adjustment layers that i will be naming in the process on your own, you can find them all in Layer > New Adjustment Layer
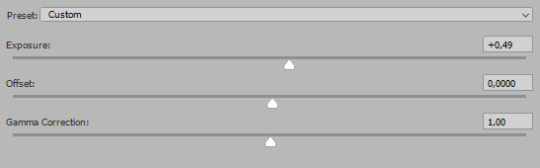
now we will use adjustment layers for our colouring from the bottom to the top! first, Exposure layer to add a bit of light to the gif. i don't always use Exposure because sometimes shots are bright enough on their own. i will, however, use it here. don't use it on your gif too much, because in the next few steps we will also be brightening the gif with other adjustment layers. i added +0,49:

next, Hue/Saturation layer. i use it in gifs with neon lighting to color correct overly bright colours. for example if your characters are standing in neon pink, you might want to lessen Saturation in Magentas and Reds to make the final gif less pixelated, and etc. i will not use Hue/Saturation on this gif, cause it doesn't need it.
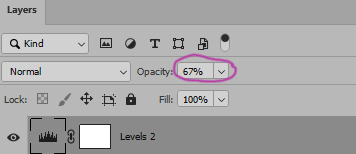
proceed to the layer Levels. this layer usually does most of my colouring. click on the lowest white dropper in your Levels window:
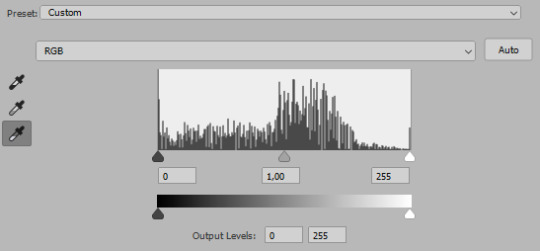
now choose a light place on your gif and click on it with the white dropper. it works especially well if you use the white dropper on the lightened parts of face skin. you can play around by choosing different bright spots and seeing what works best. here is the spot i chose and the resulting colouring:


this is too light, so now we need to balance it out with the black dropper:

choose one of the darkest places this time and click it with black dropper! once again, you can play around and click different spot to see what works best. i will be clicking the highlighted spot and you can see what my gif will look like with this Levels settings


as you can see, darkest places became darker and other colours were corrected a bit! now, this is still too bright, so i will be decreasing the opacity of Levels layer from 100% to a smaller number:

i will have to continue in another post because tumblr only allows 30 pictures per one post in the new editor now and i'd like to explain everything in visuals. click to continue
100 notes
·
View notes
Text
Boost Your Fortnite FPS in 2025: The Complete Optimization Guide
youtube
Unlock Maximum Fortnite FPS in 2025: Pro Settings & Hidden Tweaks Revealed
In 2025, achieving peak performance in Fortnite requires more than just powerful hardware. Even the most expensive gaming setups can struggle with inconsistent frame rates and input lag if the system isn’t properly optimized. This guide is designed for players who want to push their system to its limits — without spending more money. Whether you’re a competitive player or just want smoother gameplay, this comprehensive Fortnite optimization guide will walk you through the best tools and settings to significantly boost FPS, reduce input lag, and create a seamless experience.
From built-in Windows adjustments to game-specific software like Razer Cortex and AMD Adrenalin, we’ll break down each step in a clear, actionable format. Our goal is to help you reach 240+ FPS with ease and consistency, using only free tools and smart configuration choices.
Check System Resource Usage First
Before making any deep optimizations, it’s crucial to understand how your PC is currently handling resource allocation. Begin by opening Task Manager (Ctrl + Alt + Delete > Task Manager). Under the Processes tab, review which applications are consuming the most CPU and memory.
Close unused applications like web browsers or VPN services, which often run in the background and consume RAM.
Navigate to the Performance tab to verify that your CPU is operating at its intended base speed.
Confirm that your memory (RAM) is running at its advertised frequency. If it’s not, you may need to enable XMP in your BIOS.

Avoid Complex Scripts — Use Razer Cortex Instead
While there are command-line based options like Windows 10 Debloater (DBLO), they often require technical knowledge and manual PowerShell scripts. For a user-friendly alternative, consider Razer Cortex — a free tool that automates performance tuning with just a few clicks.
Here’s how to use it:
Download and install Razer Cortex.
Open the application and go to the Booster tab.
Enable all core options such as:
Disable CPU Sleep Mode
Enable Game Power Solutions
Clear Clipboard and Clean RAM
Disable Sticky Keys, Cortana, Telemetry, and Error Reporting

Use Razer Cortex Speed Optimization Features
After setting up the Booster functions, move on to the Speed Up section of Razer Cortex. This tool scans your PC for services and processes that can be safely disabled or paused to improve overall system responsiveness.
Steps to follow:
Click Optimize Now under the Speed Up tab.
Let Cortex analyze and adjust unnecessary background activities.
This process will reduce system load, freeing resources for Fortnite and other games.
You’ll also find the Booster Prime feature under the same application, allowing game-specific tweaks. For Fortnite, it lets you pick from performance-focused or quality-based settings depending on your needs.
Optimize Fortnite Graphics Settings via Booster Prime
With Booster Prime, users can apply recommended Fortnite settings without navigating the in-game menu. This simplifies the optimization process, especially for players not familiar with technical configuration.
Key settings to configure:
Resolution: Stick with native (1920x1080 for most) or drop slightly for extra performance.
Display Mode: Use Windowed Fullscreen for better compatibility with overlays and task switching.
Graphics Profile: Choose Performance Mode to prioritize FPS over visuals, or Balanced for a mix of both.
Once settings are chosen, click Optimize, and Razer Cortex will apply all changes automatically. You’ll see increased FPS and reduced stuttering almost immediately.
Track Resource Gains and Performance Impact
Once you’ve applied Razer Cortex optimizations, monitor the system changes in real-time. The software displays how much RAM is freed and which services have been stopped.
For example:
You might see 3–4 GB of RAM released, depending on how many background applications were disabled.
Services like Cortana and telemetry often consume hidden resources — disabling them can free both memory and CPU cycles.

Enable AMD Adrenalin Performance Settings (For AMD Users)
If your system is powered by an AMD GPU, the Adrenalin Software Suite offers multiple settings that improve gaming performance with minimal setup.
Recommended options to enable:
Anti-Lag: Reduces input latency, making your controls feel more immediate.
Radeon Super Resolution: Upscales games to provide smoother performance at lower system loads.
Enhanced Sync: Improves frame pacing without the drawbacks of traditional V-Sync.
Image Sharpening: Adds clarity without a major hit to performance.
Radeon Boost: Dynamically lowers resolution during fast motion to maintain smooth FPS.
Be sure to enable Borderless Fullscreen in your game settings for optimal GPU performance and lower system latency.
Match Frame Rate with Monitor Refresh Rate
One of the simplest and most effective ways to improve both performance and gameplay experience is to cap your frame rate to match your monitor’s refresh rate. For instance, if you’re using a 240Hz monitor, setting Fortnite’s max FPS to 240 will reduce unnecessary GPU strain and maintain stable frame pacing.
Benefits of FPS capping:
Lower input latency
Reduced screen tearing
Better thermals and power efficiency
This adjustment ensures your system isn’t overworking when there’s no benefit, which can lead to more stable and predictable gameplay — especially during extended play sessions.
Real-World Performance Comparison
After applying Razer Cortex and configuring system settings, players often see dramatic performance improvements. In test environments using a 2K resolution on DirectX 12, systems previously capped at 50–60 FPS with 15–20 ms response times jumped to 170–180 FPS with a 3–5 ms response time.
When switching to 1080p resolution:
Frame rates typically exceed 200 FPS
Reduced frame time results in smoother aiming and lower delay
Competitive advantage improves due to lower latency and higher visual consistency
These results are reproducible on most modern gaming rigs, regardless of brand, as long as the system has adequate hardware and is properly optimized.
Switch Between Performance Modes for Different Games
One of Razer Cortex’s strongest features is its flexibility. You can easily switch between optimization profiles depending on the type of game you’re playing. For Fortnite, choose high-performance settings to prioritize responsiveness and frame rate. But for visually rich, story-driven games, you might want higher quality visuals.
Using Booster Prime:
Choose your desired game from the list.
Select a profile such as Performance, Balanced, or Quality.
Apply settings instantly by clicking Optimize, then launch the game directly.
This quick toggle capability makes it easy to adapt your system to different gaming needs without having to manually change settings every time.
Final Performance Test: Fortnite in 2K with Performance Mode
To push your system to the limit, test Fortnite under 2K resolution and Performance Mode enabled. Without any optimizations, many systems may average 140–160 FPS. However, with all the Razer Cortex and system tweaks applied:
Frame rates can spike above 400 FPS
Input delay and frame time reduce significantly
Gameplay becomes smoother and more responsive, ideal for fast-paced shooters

Conclusion: Unlock Peak Fortnite Performance in 2025
Optimizing Fortnite for maximum FPS and minimal input lag doesn’t require expensive upgrades or advanced technical skills. With the help of tools like Razer Cortex and AMD Adrenalin, along with proper system tuning, you can dramatically enhance your gameplay experience.
Key takeaways:
Monitor and free system resources using Task Manager
Use Razer Cortex to automate performance boosts with one click
Apply optimized settings for Fortnite via Booster Prime
Match FPS to your monitor’s refresh rate for smoother visuals
Take advantage of GPU-specific software like AMD Adrenalin
Customize settings for performance or quality based on your gaming style
By following this fortnite optimization guide, you can achieve a consistent fortnite fps boost in 2025 while also reducing input lag and ensuring your system runs at peak performance. These steps are applicable not only to Fortnite but to nearly any competitive game you play. It’s time to make your hardware work smarter — not harder.
🎮 Level 99 Kitchen Conjurer | Crafting epic culinary quests where every dish is a legendary drop. Wielding spatulas and controllers with equal mastery, I’m here to guide you through recipes that give +10 to flavor and +5 to happiness. Join my party as we raid the kitchen and unlock achievement-worthy meals! 🍳✨ #GamingChef #CulinaryQuests
For More, Visit @https://haplogamingcook.com
#fortnite fps guide 2025#increase fortnite fps#fortnite performance optimization#fortnite fps boost settings#fortnite graphics settings#best fortnite settings for fps#fortnite lag fix#fortnite fps drops fix#fortnite competitive settings#fortnite performance mode#fortnite pc optimization#fortnite fps boost tips#fortnite low end pc settings#fortnite high fps config#fortnite graphics optimization#fortnite game optimization#fortnite fps unlock#fortnite performance guide#fortnite settings guide 2025#fortnite competitive fps#Youtube
0 notes
Text
How to Install XAMPP for Windows 10 - XAMPP WordPress For Beginners
To install XAMPP on Windows 10 and set it up for WordPress, follow these steps:
Step 1: Download XAMPP
Go to the official XAMPP website.
Click on the "XAMPP for Windows" button.
Once the installer is downloaded, locate the .exe file (usually in the Downloads folder).
Step 2: Install XAMPP
Double-click the .exe file to start the installation process.
Choose the components you want to install. For WordPress, you need at least Apache, MySQL, and PHP. These are selected by default, so you can leave them as is.
Choose the installation folder (default is usually fine).
Click "Next" and follow the prompts.
During installation, the installer may ask if you want to start the XAMPP Control Panel. Leave it checked and click "Finish."
Step 3: Start Apache and MySQL
Open the XAMPP Control Panel (it should have opened automatically, or you can search for it in the Start menu).
Click the "Start" button next to Apache (this will run the web server).
Click the "Start" button next to MySQL (this will start the database server).
Make sure both Apache and MySQL show "Running" in green.
Step 4: Install WordPress
Download the latest version of WordPress from the official WordPress website.
Extract the WordPress ZIP file.
Move the extracted folder (the WordPress folder) into the htdocs folder of your XAMPP installation (usually located at C:\xampp\htdocs).
Step 5: Create a Database for WordPress
Open your browser and go to http://localhost/phpmyadmin/.
In the phpMyAdmin dashboard, click on "Databases."
Create a new database for WordPress. Give it a name (e.g., wordpress_db) and click "Create."
Step 6: Configure WordPress
Open your browser and go to http://localhost/wordpress (or the folder name you chose).
The WordPress installation screen should appear.
Select your language and click "Continue."
On the next screen, enter your database details:
Database Name: The name you created (e.g., wordpress_db).
Username: root (default for XAMPP).
Password: Leave this blank (default for XAMPP).
Database Host: localhost (default).
Table Prefix: Leave as wp_ unless you want to change it.
Click Submit and then Run the Install.
Step 7: Complete the WordPress Setup
Fill in the site details (site title, admin username, password, and email).
Click "Install WordPress."
Once the installation is complete, you’ll see a success message. You can now log in to your WordPress dashboard at http://localhost/wordpress/wp-admin.
Final Notes
To stop your server, go to the XAMPP Control Panel and click "Stop" for Apache and MySQL.
If you need to make your local WordPress site public, you'll have to configure port forwarding or use a tool like Local by Flywheel or XAMPP for public access.
#installxampp#xamppforbeginners#xamppwindows10#wordpressinstallation#localserversetup#runwordpresslocally#xamppwordpress#webdevelopment#phpdevelopment#wordpressforbeginners#tutorial2025#localwordpress#xamppsetup#installingwordpress#wordpresssetup#beginnerfriendly#xamppguide#developmenttutorial#learnwordpress#wordpresslocally
0 notes
Text
Version 600
youtube
windows
zip
exe
macOS
app
linux
tar.zst
🎉 Merry 600! 🎉
I had a good week. There's a mix of all sorts of different stuff.
I made a hotfix for a typo bug when right-clicking a downloader page list. If you got the v600 early after release on Wednesday, the links above are now to a v600a that fixes this!
full changelog
macOS fix
A stupid typo snuck in the release last week, and it caused the macOS App to sometimes/always not boot. Source users on Python 3.10 ran into the same issue. It is fixed now, and I have adjusted my test regime to check for 3.10 issues in future, so this should not happen again.
highlights
If you noticed the status bar was not showing so much info on single files last week and you would like it back, please hit up the new 'show more text about one file on the status bar' checkbox under options->thumbnails.
I polished last week's new vacuum tech. There are additional safety checks, some new automatic recovery, and I forgot, last week, to move the vacuum dialog to use the new 'do we have enough free space to vacuum?' check, so that is fixed. It should stop bothering you about free space in your temp dir!
Collections now sort better by file dimensions. They now use their highest-num-pixel file as a proxy, so if you sort by width, the collection will sort by that file's width. It isn't perfect, but at least they do something now, and for collections with only one file, everything is now as expected. We have a few ways to go forward here, whether that is taking an average of the contents' heights, pre-sorting the collection and then selecting the top file, or, for something like num_pixels, where it might be appropriate, summing the contents (like we do for filesize already). I expect I'll add some options so people can choose what they want. Let me know what you think!
new SQLite and mpv on Windows
I am rolling out new dlls for SQLite (database) and mpv (video/audio playback) on Windows. We tested these a few weeks ago, and while both went well for most people, the mpv dll sometimes caused a grid of black bars over some webms on weirder OS versions like: Windows Server, under-updated Windows 10, and Windows 10 on a VM. Normal Windows 10/11 users experienced no problems, so the current hypothesis is that this is a question of whether you have x media update pack.
I am still launching the new mpv dll today, since it does have good improvements, but I am prepared to roll it back if many normal Windows users run into trouble. Let me know how you get on!
If you need to use an older or otherwise unusual version of Windows, then I am sorry to say you are about to step into the territory Windows 7 recently left. Please consider moving to running from source, where you can pick whichever mpv dll works for you and keep it there: https://hydrusnetwork.github.io/hydrus/running_from_source.html
If you run from source on Windows already, you might like to hit that page again and check the links for the new dlls yourself, too. I've noticed the new mpv dll loads and unloads much faster.
next week
I will continue the small jobs and cleanup. I'm happy with my productivity right now, and I don't want to rush out anything big in the end of year.
0 notes
Text
Dell 69KF2 Battery
Dell 69KF2 Battery
Replacement battery for original dell 69KF2 is hot sale. dell 69KF2 battery sale on website,our dell 69KF2 battery can run longer time, 69KF2 is fully Compatible with
Original dell 69KF2 Battery.New battery for dell 69KF2 v is brand new.
How to Increase dell 69KF2 Battery Life
Even the longest-lasting laptop batteries will die eventually. Here's everything you need to know to maximize the amount of time between visits to the power outlet.
Who wants to make an urgent dash to a power outlet to rescue their dell 69KF2 Battery? That's no fun, especially if your family is working and learning from home these days in various corners of the house that may not have a convenient socket nearby. Luckily, modern laptops are much more efficient than their predecessors. Nowadays, even inexpensive desktop-replacement dell 69KF2 Battery and some gaming behemoths can last for more than eight hours on a single charge.
1. If You're on a dell 69KF2 Battery, Use the Windows Performance Management Tool
The first stop on our battery-life betterment tour is your laptop's performance management tool. In Windows 10, it's a slider accessed from the battery icon in the task bar. It aims to group all of the settings that affect battery life into a few easy-to-understand categories.
Windows 10 Battery Performance Slider
In Windows 11, you'll find it in Settings > System > Power & Battery > Power Mode.
The company that made your PC determines exactly which settings the battery slider controls. But in general, keep these guidelines in mind:
2. Simplify Your Workflow: Close Apps, and Use Airplane Mode
If you spend lots of time working off the plug, it's a good habit to adjust your laptop use in more battery-conserving ways, such as by sticking to one app at a time and closing everything else when you're not using it.
In addition to shutting down other programs while you single-task, consider , if you know you'll be editing a document with no need for web access. In addition to reducing distractions, Airplane mode eliminates a significant source of battery drain: not only the wireless radios themselves, but also the background apps and processes that constantly use them, such as updaters and push notifications.
3. Close Specific Apps That Draw Lots of Power
Having multiple apps and processes running on your system at the same time will chew through battery life more quickly, and chances are you probably aren't actively using everything that's currently running on your dell 69KF2 Battery. In Windows, the Settings app is the first step to find energy-hogging programs.
Next, type "See which processes start up automatically when you start Windows" into the search bar, or open the Task Manager app. In the Startup tab, you'll see every utility that runs as soon as you start your PC. Anything with a name like "Download Assistant" or "Helper" is usually safe to disable. For example, unless you frequently open Spotify playlists, tracks, or albums from links in a web browser, you can disable the Spotify Web Helper.
4. Adjust Graphics and Display Settings to Conserve Power Usage
If you have a powerful graphics processor (a discrete GPU) in your laptop, you can ensure that only games or other graphics-intensive apps need to use it, while everything else can get by using the more efficient on-CPU silicon for graphics processing. In Windows 11, go to Settings > System > Display > Graphics, where you can adjust which graphics processor each app uses, or let Windows automatically decide which one is best. This option may not be available on all Windows 11 laptops with dedicated GPUs.
5. Review the dell 69KF2 Battery Management Settings
Some recent laptops can now automatically monitor the temperature history and charging patterns of the battery. Via software from the manufacturer, this information can be used to adjust "full" charging to remain below 100% of the battery's capacity if you don't regularly use it. (Reducing the number of charging cycles can help prolong the battery's life.)
More info.: https://www.pc-battery.co.uk/dell-69KF2-G15-battery.html
https://www.pcsbattery.co.uk/replacement-battery-for-dell-69kf2.html
https://www.battery4pc.com/replacement-for-dell-69KF2-battery.html
0 notes
Text
How to Troubleshoot Common Issues in Windows 10 Home and Pro Editions
Windows 10 is one of the most popular operating systems used by millions of users worldwide. While it is known for its stability and performance, like any other software, it can also encounter issues that may hinder its functionality. In this article, we will discuss common issues that users may face in Windows 10 Home and Pro editions and provide step-by-step troubleshooting guides to resolve them.
Issue 1: Slow Performance
One of the most common issues faced by windows 10 home users is slow performance. If your computer is taking too long to start up, launch applications, or perform tasks, it may be due to various reasons such as malware, disk errors, or outdated drivers. To troubleshoot this issue, start by checking for any malware infections using an anti-virus software. Next, run the built-in Disk Cleanup tool to remove temporary files and system files that may be consuming disk space. Additionally, update your drivers to the latest version and consider upgrading your RAM if your computer is running low on memory.
Issue 2: Wi-Fi Connectivity Problems
Wi-Fi connectivity issues are another common problem faced by Windows 10 users. If you are unable to connect to a Wi-Fi network or are experiencing frequent disconnections, try restarting your router and modem. Next, check your Wi-Fi settings to ensure that you are connected to the correct network and that your Wi-Fi adapter is enabled. If the issue persists, try resetting your TCP/IP stack by running the command "netsh int ip reset" in the Command Prompt. You can also try updating your Wi-Fi drivers to the latest version.
Issue 3: Update Errors
Windows 10 is designed to automatically download and install updates to ensure that your system remains secure and up-to-date. However, sometimes updates may fail to install, resulting in error messages. To troubleshoot update errors, start by checking the Windows Update history to identify the specific error code. Next, try running the Windows Update Troubleshooter tool, which can automatically detect and fix common issues. If the issue persists, try resetting the Windows Update components by running the command "net stop wuauserv" and "net start wuauserv" in the Command Prompt.
Issue 4: Blue Screen of Death (BSOD)
The Blue Screen of Death (BSOD) is a critical error that occurs when Windows encounters a problem that it cannot recover from. If you are experiencing frequent BSODs, try running a System File Checker (SFC) scan to identify and replace corrupted system files. Next, check for any driver updates and install the latest version. You can also try running a memory test using the built-in Windows Memory Diagnostic tool to identify any issues with your RAM.
Issue 5: Login Issues
Login issues are another common problem faced by Windows 10 users. If you are unable to log in to your account or are experiencing issues with your password, try restarting your computer in Safe Mode. Next, try running the built-in System Restore tool to restore your system to a previous point when you were able to log in successfully. If the issue persists, try resetting your password using the built-in Password Reset tool.
Issue 6: Audio Issues
Audio issues are common in Windows 10, particularly after installing updates. If you are experiencing issues with your audio, try running the built-in Audio Troubleshooter tool, which can automatically detect and fix common issues. Next, try updating your audio drivers to the latest version. You can also try disabling and re-enabling your audio device in the Device Manager.
Issue 7: Display Issues
Display issues are another common problem faced by Windows 10 users. If you are experiencing issues with your display, such as blurry text or incorrect resolution, try running the built-in Display Troubleshooter tool. Next, try updating your graphics drivers to the latest version. You can also try adjusting your display settings to ensure that they are set to the correct resolution and refresh rate.
Conclusion
Troubleshooting common issues in Windows 10 Home and Pro editions requires patience and a step-by-step approach. By following the troubleshooting guides outlined in this article, you should be able to resolve most issues and get your system up and running smoothly. Remember to always keep your system updated and run regular maintenance tasks to prevent issues from occurring in the first place. If you are still experiencing issues after trying the troubleshooting steps, consider seeking further assistance from Microsoft support or a professional technician.
0 notes
Text
Comprehensive Guide to Prepare Your iPhone for iOS 13
Apple is on the brink of unveiling its official iOS 13 in just a little over an hour, introducing a wealth of exciting new features for iPhone users. These improvements encompass a system-wide Dark Mode, a revamped Find My app, enhancements to the Photo app, updated privacy features, and more detailed street-level Maps. But the excitement doesn't stop there; numerous smaller changes and tweaks are designed to elevate your overall iPhone experience.
Preparing Your Device for iOS 13
With the impending arrival of iOS 13, Apple has made substantial advancements in how it packages apps from the App Store. They assert that app downloads can now be up to 50 percent smaller, resulting in reduced storage space requirements. However, before you can benefit from these enhancements, it's crucial to ensure that your device has ample space to accommodate the new operating system. If you're unsure, it's advisable to seek guidance from the leading iPhone service center in Kolkata.
To free up space for iOS 13, it's wise to review the apps currently residing on your device and assess whether you genuinely need all of them. Navigate through your home screen and explore your folders to identify any long-forgotten apps that are consuming valuable storage space.
You can easily remove unnecessary apps by pressing and holding your finger on their icons and then tapping the 'X' that appears in the corner. Rest assured, if you accidentally delete an app, it can be conveniently reinstalled later.
For even more efficient storage management, scrutinize the size of social media or messaging apps like Facebook and WhatsApp. These apps tend to accumulate significant data over time, including chat history and media files. Consider uninstalling and then reinstalling them to start with a clean slate.
Additionally, take heed of any recommendations provided on the iPhone Storage screen, such as storing high-resolution photos in iCloud and smaller versions on your device or granting iOS permission to automatically offload infrequently used apps.
Creating an Archived iTunes Backup
It's prudent to create an iTunes backup of your device on your computer before embarking on the iOS 13 update journey. This backup serves as a safety net in case anything goes awry during the installation or if you need to revert to a previous iOS version.
An archived iTunes backup preserves the current state of your iOS device, safeguarding it from accidental overwriting by subsequent backups. To create an archived backup on a Mac, follow these steps (please note that the process may vary slightly for Windows users, who may need to rename their iTunes backup folder or relocate it to a different location to prevent overwriting):
Launch iTunes and access 'Preferences' from the menu.
Navigate to the 'Devices' tab.
Right-click on the new backup and select 'Archive.'
Once the backup is duly archived, it will be distinctly labeled with the date and time of its creation. This archived backup serves as a safety net in case of unforeseen issues, and you can readily seek assistance from the leading iPhone service center in Kolkata if needed.
Installing iOS 13
When iOS 13 becomes available (typically around 10 AM PST/1 PM EST on the official release day), it will be seamlessly delivered to your device. You can update either through iTunes when connecting your device to your computer or via an over-the-air update. Ensure you're connected to Wi-Fi, and your device is fully charged before commencing the update process, as it may require some time to complete. If you encounter any iPhone-related issues, don't hesitate to reach out to Ctech IT Solutions for assistance.
0 notes
Link
0 notes
Text
Cricut Machine Install Setup For Windows & Mac
A Cricut device is a cutting machine that can cut several designs. They can also cut materials from delicate paper to even more rigid ones such as leather and basal wood! For their precision and speed of cutting materials, these are some of the most powerful tools to have in a crafting/designing space.
The products that can be made using Cricut machines include cardstock, printed t-shirts, stickers, etc. Cricut install setup is necessary for getting the machine to start working with Design Space. This helps establish a connection between your system and the Cricut device to do the work.
Cricut Machine Install Setup for Windows
The Cricut design space is available to download for Windows, and let’s see how to download and install the same.
1. The first step is going to the official website and downloading the App or visiting this link https://design.cricut.com/setup.
2. Here, you should select the version to download for Windows. Once the downloading stops. Open the systems download folder and tap on the Design Space setup file.
3. Next, the Cricut Install setup begins. It shows the installation progress. Once the installation ends, the Design Space icon will appear automatically on the desktop screen.
4. Open the installed App, and log in with your Cricut ID.
5. The next step is to connect your system to the Cricut device first, Open Settings from the Start menu.
6. Now, click on the Devices option. If Bluetooth is ON, tap the option of adding Bluetooth devices.
7. In the next window, Select Bluetooth to add devices to the system. Now, wait for the system to search for your Cricut device.
8. Once you have established the connection, the pairing process of the Cricut device with your system is completed.
9. Later, open your Design Space and select New Product Setup. Finally, the Cricut device will show up as connected during the setup.
Cricut Machine Install Setup for Mac
Now let’s see the Cricut Install Setup process for a Mac Computer.
1. Go to your browser. And then to the Cricut’s official site to download Design Space or visit this link: https://design.cricut.com/.
2. Then, select the Design Space software for Mac.
3. Once you select it to download, let the downloading end and then visit the Downloads folder.
4. In the Downloads folder, navigate to the downloaded file. The setup file must have a .dmg extension.
5. Next, you have to drag the Cricut icon to the Applications folder. After installation, Design Space for Desktop automatically gets added to the Mac systems Applications folder.
6. If you want to launch the App, open the Applications folder. And then, find the Design Space app and double-tap on it.
7. After the App opens, you have to log in by using the Cricut ID and password that belongs to you. You have completed the first stage in Cricut install setup.
8. The next step is to pair the Mac system to the Cricut Device.
9. Go to the Apple Menu and choose System Preferences. Here look for the Bluetooth option.
10. Once the Bluetooth menu opens, you have to turn the Bluetooth “ON” and Choose Cricut Device from the list of devices that belongs to you.
11. Now, your Cricut device is paired with your Apple computer.
12. Finally, open the Design Space and click on New Product Setup.
13. So, it ends the Cricut Install setup process for your Apple computer.
Conclusion
In conclusion, the Cricut Install Setup process on your Windows and Mac systems is quick and straightforward. You can utilize the Cricut machine for all your creative needs, and with the aid of the Design Space, things get even smoother. Since it is a cloud-based platform, it is possible to install it on several devices with the same Cricut ID. So, if you want to use Cricut to create stickers and graphic t-shirts, you must know how to install the Cricut app.
(FAQs)
Can a user utilize Design Space across several devices?
Yes. You can design with Cricut Design Space App from anywhere globally because it is cloud-based! On iOS or Android, you may start projects from your sofa and finish them there. You may access all of your photographs and projects using Design Space on any computer or device that does so.
What are the fundamental system prerequisites for Mac OS and Windows OS?
Windows 10, macOS 11, or newer versions are required for The Cricut Design Space. A minimum of 4GB of RAM and 2GB of disc space should be used. The display’s resolution should be 1024 x 768 pixels. The broadband connection for download and upload should be between 2-3 Mbps and 1-2 Mbps, respectively.
When I deactivate Design Space, will the saved photos, fonts, and images also be erased?
Yes, any pictures, fonts, or stored projects that you downloaded to your device—as opposed to the Cricut Cloud—will be deleted if you uninstall the App. To keep the tasks and content you’ve downloaded on the device, disconnect from the App.
Visit: Cricut.com/setup Cricut.com setup Cricut.com setup mac
Source: https://designspace.space/cricut-machine-install-setup-for-windows-mac/
#design space setup#cricut.com/setup#cricut design space#cricut explore air 2#cricut.com/create#design.cricut.com/setup#cricut design space login
0 notes
Video
How We Enable / Disable Automatic Driver Download option in Hindi
#How We Enable Disable Automatic Driver Download option \ Hindi#how to stop automatic download in windows 10#disable automatic driver installation windows 10#how to stop auto update on wifi in windows 10
0 notes
Note
Hello, may I ask how you can pull off that youtube magic you've mentioned?
So you want to download an entire playlist off youtube and the subtitles too
Maybe just the subtitles? Maybe just in one language? Maybe don’t want to pay for Youtube Red but want the download option
It’s actually really easy.
You need the youtube-dl tool. It’s command line, works for unix/windows/mac etc, and it’s not scary at all. I’m going to lay out how to do this in windows, but once you have that command window open the instructions are basically the same.
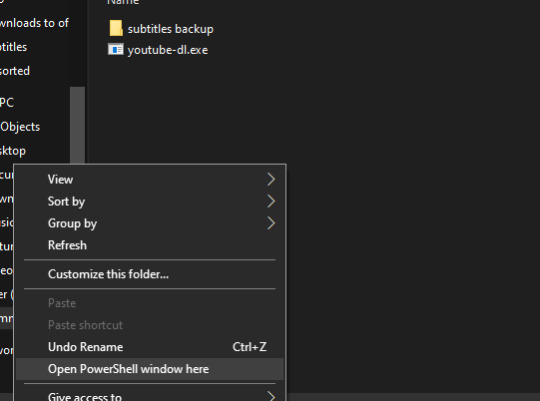
Step 1: Download youtube-dl (the exe version, for windows)
Step 2: Put it in an empty directory (you don’t have to. You can run it right out of downloads, but it’s just less messy this way.)
Step 3: go to the directory where you’ve put your youtube-dl.exe file, hold down the SHIFT key, right click anywhere empty, and choose “Open PowerShell window here”.
Step 4: Now, here’s the easy part. Just copy and paste these commands in and press enter. I’ll give you a few examples, just replace the replace_this_with_your_playlist_url with the playlist url:
1. Download every video in the playlist with English subtitles
./youtube-dl --write-sub --sub-lang en,en-GB --ignore-errors -o '%(title)s.%(ext)s' replace_this_with_your_playlist_url
2. Download all the English subtitles in the playlist without the videos
./youtube-dl --write-sub --sub-lang en,en-GB --skip-download --ignore-errors -o '%(title)s.%(ext)s' replace_this_with_your_playlist_url
3. Download all the videos in the playlist, no subtitles
./youtube-dl --ignore-errors -o '%(title)s.%(ext)s' replace_this_with_your_playlist_url
The files will end up right in that empty folder you threw the exe in. The basic format of the subtitles are .vtt files, which VLC has no problem picking up and using. They’ll be named title.language_of_sub.vtt, and the videos will just be the title.mp4. (Whatever extension it was uploaded in, I think) Youtube-dl will download at the highest quality by default.
Here’s a few notes and extra parameters to change:
the --ignore-errors parameter is there to prevent the script from stopping when you hit a private video or a video that you can’t view in your region
if you take out -o '%(title)s.%(ext)s', the filenames will be title_videoID.mp4
instead of en,en-GB you can use any of these iso codes for other languages
replace --sub-lang en,en-GB with --all-subs and it’ll download all the subs
replace --write-sub with --write-auto-sub and you get automatically generated subtitles. You follow this with the same choosing language parameter. I use this to translate simplified Chinese to traditional.
you can put in a single video link instead of a playlist url and it’ll run the command for just one vid.
the ./ is at the front of the command line because we’re using windows powershell, and that’s how you tell it to “use this directory”. I don’t know what that should be in other operating systems.
They have pretty good documentation if you want to dig in for more options.
It pulled 265 subs for me in less than 10 minutes.

778 notes
·
View notes
Text
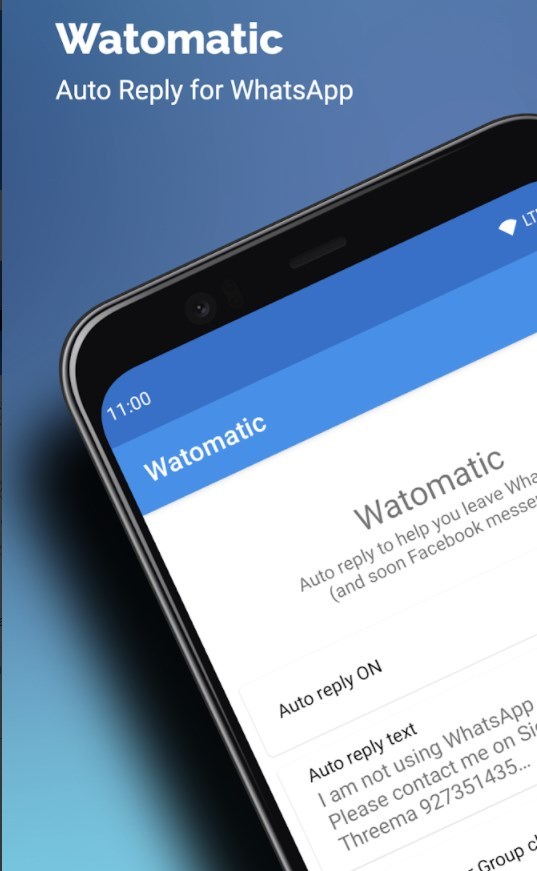
Watomatic, for lower Whatsapp switching costs
Any discussion of monopolization of the web is bound to include the term “network effects,” and its constant companion, “natural monopolies.” This econojargon is certainly relevant to the discussion, but really needs the oft-MIA idea of “switching costs.”
A technology has “network effects” when its value grows as its users increase, attracting more users, making it more valuable, attracting more users.
The classic example is the fax machine: one fax is useless, two is better, but when everyone has a fax, you need one too.
Social media and messaging obviously benefit significantly from network effects: if all your friends are on Facebook (or if it’s where your kid’s Little League games are organized, or how your work colleagues plan fun activities), you’ll feel enormous pressure to join.
Indeed, in these days of Facebook’s cratering reputation, it’s common to hear people say, “I’m only on FB because my friends are there,” and then your friends say, “I’m only there because you are there.”
It’s a form of mutual hostage-taking.
That hostage situation illustrates (yet) another economic idea: “collective action problems.” There are lots of alternatives to Facebook, but unless you can convince everyone on Facebook to pick one and move en masse, you’ll just end up with yet another social account.
This combination of network effects and collective action problems leads some apologists for tech concentration to call the whole thing a “natural monopoly” — a system that tends to be dominated by a single company, no matter how hard we try.
Railroads are canonical “natural monopolies.” Between the costs of labor and capital and the difficulty in securing pencil-straight rights-of-way across long distances, it’s hard to make the case for running a second set of parallel tracks for a competing company’s engines.
Other examples of natural monopolies include cable and telephone systems, water and gas systems, sewer systems, public roads, and electric grids.
Not coincidentally, these are often operated as public utilities, to keep natural monopolies from being abused by greedy jerks.
But the internet isn’t a railroad. Digital is different, because computers are universal in a way that railroads aren’t — all computers can run all programs that can be expressed in symbolic logic, and that means we can almost always connect new systems to existing ones.
Open up a doc in your favorite word processor and choose “Save As…” and just stare in awe and wonder at all the different file-formats you can read and write with a single program. Some of those formats are standardized, while others are proprietary and/or obsolete.
It’s easier to implement support for a standard, documented format, but even proprietary formats pose only a small challenge relative to the challenge presented by, say, railroads.
Throw some reverse-engineering and experimentation at a format like MS DOC and you can make Apple Pages, which reads and writes MS’s formats (which were standardized shortly after Pages’ release, that is, after the proprietary advantage of the format was annihilated).
This is not to dismiss the ingenuity of the Apple engineers who reversed Microsoft’s hairball of a file-format, but rather, to stress how much harder their lives would have been if they were dealing with railroads instead of word-processors.
During Australia’s colonization, every state had its own governance and its own would-be rail-barons. Each state laid its own gauge of rail-track, producing the “multi-gauge muddle” — which is why, 150+ years later, you can’t get a train from one end of Oz to the other.
Hundreds of designs for interoperable rolling stock have been tried, but it’s proven impossible to make a reliable car that retracts one set of wheels and drops a different one.
The solution to the middle-gauge muddle? Tear up and re-lay thousands of kilometers of track.
Contrast that with the Windows users who discovered that Pages would read and write the thousands of documents they’d authored and had to exchange with colleagues: if they heeded the advice of the Apple Switch ads, they could buy a Mac, move their files over, and voila!

Which brings me to switching costs. The thing that make natural monopolies out of digital goods and services are high switching costs, including the collective action problem of convincing everyone to quit Facebook or start using a different word-processor.
These switching costs aren’t naturally occurring: they are deliberately introduced by dominant firms that want to keep their users locked in.
Microsoft used file format obfuscation and dirty tricks (like making a shoddy Mac Office suite that only offered partial compatibility with Windows Word files) to keep the switching costs high.
By reverse-engineering and reimplementing Word support, Apple obliterated those switching costs — and with them, the collective action problem that created Word’s natural monopoly.
Once Pages was a thing, you didn’t have to convince your friends to switch to a Mac at the same time as you in order to continue collaborating with them.
Once you get an email-to-fax program, you can discard your fax machine without convincing everyone else to do the same.
Interoperability generally lowers switching costs. But adversarial interoperability — making something new that connects to something that already exists, without its manufacturer’s consent — specifically lowers deliberate switching costs.
Adversarial interoperability (or “competitive compatibility,” AKA “comcom”) is part of the origin story of every dominant tech company today. But those same companies have gone to extraordinary lengths to extinguish it.
https://www.eff.org/deeplinks/2019/10/adversarial-interoperability
Just as a new company may endorse standardization when it’s trying to attract customers who would otherwise be locked into a “ecosystem” of apps, service, protocols and parts, so too do new companies endorse reverse-engineering and comcom to “fix” proprietary tech.
But every pirate wants to be an admiral. Once companies attain dominance, they start adding proprietary extensions to the standard and fighting comcom-based interoperability, decrying it as “hacking” or “theft of intellectual property.”
In the decades since Microsoft, Apple, Google, and Facebook were upstarts, luring users away from the giants of their days, these same companies have labored to stretch copyright law, terms of service, trade secrecy, patents and other rules to ban the tactics they once used.
This has all but extinguished comcom as a commercial practice. Today’s comcom practitioners risk civil and criminal liability and struggle to get a sympathetic hearing from lawmakers or the press, who have generally forgotten that comcom was once a completely normal tactic.
The obliteration of comcom is why network effects produce such sturdy monopolies in tech — and there’s nothing “natural” about those monopolies.
If you could leave Facebook but still exchange messages with your friends who hadn’t wised up, there’d be no reason to stay.
In other words, the collective action problem that the prisoners of tech monopolies struggle with is the result of a deliberate strategy of imposing high technical and legal burdens to comcom, in order to impose insurmountable switching costs.
I wrote about this for Wired UK back in April, comparing the “switching costs” the USSR imposed on my grandmother when she fled to Canada in the 1940s to the low switching costs I endured when I emigrated from Canada to the UK to the USA:
https://www.wired.co.uk/article/social-media-competitive-compatibility
Today, there’s a group of tech monopoly hostages who are stuck behind their own digital iron curtain, thanks to Facebook’s deliberate lock-in tactics: the users of Whatsapp, a messaging company that FB bought in 2014.
Whatsapp was a startup success: founded by privacy-focused technologists who sensed users were growing weary of commercial surveillance, they pitched their $1 service as an alternative to Facebook and other companies whose “free” products extracted a high privacy price.
Facebook bought Whatsapp, stopped the $1 charge, and started spying. In response to public outcry, the Facebook product managers responsible for the app assured its users that the surveillance data WA extracted wouldn’t be blended with Facebook’s vast database of kompromat.
That ended this year, when every Whatsapp user in the world got a message warning them that Facebook had unilaterally changed Whatsapp’s terms of service and would henceforth use the app’s surveillance data alongside the data it acquired on billions of people by other means.
Downloads of Whatsapp alternatives like Signal and Telegram surged, and Facebook announced it would hold off on implementing the change for three months. Three months later, on May 15, Facebook implemented the change and commenced with the promised, more aggressive spying.
Why not? After all, despite all of the downloads of those rival apps, Whatsapp usage did not appreciably fall. Convincing all your friends to quit Whatsapp and switch to Signal is a lot of work.
If the holdout is — say — a beloved elder whom you haven’t seen in a year due to lockdown, then the temptation to keep Whatsapp installed is hard to resist.
What if there was a way to lower those collective action costs?
It turns out there is. Watomatic is a free/open source “autoresponder” utility for Whatsapp and Facebook that automatically replies to messages with instructions for reaching you on a rival service.
https://play.google.com/store/apps/details?id=com.parishod.watomatic
It’s not full interoperability — not a way to stay connected to those friends who won’t or can’t leave Facebook’s services behind — but it’s still a huge improvement on the nagging feeling that people you love are wondering why you aren’t replying to their messages.
The project’s sourcecode is live on Github, so you can satisfy yourself that there isn’t any sneaky spying going on here:
https://github.com/adeekshith/watomatic
It’s part of a wider constellation of Whatsapp mods, which have their origins in a Syrian reverse-engineer whose Whatsapp comcom project was picked up and extended by African modders who produced a constellation of Whatsapp-compatible apps.
https://www.eff.org/deeplinks/2020/03/african-whatsapp-modders-are-masters-worldwide-adversarial-interoperability
These apps are often targeted for legal retaliation by Facebook, so it’s hard to find them in official app stores where they might be vetted for malicious code.
It’s a strategy that imposes a new switching cost on Whatsapp’s hostages, in the form of malware risk.
Legal threats are Facebook’s default response to comcom. That’s how they responded to NYU’s Ad Observer, a plugin that lets users scrape and repost the political ads they’re served.
https://www.eff.org/deeplinks/2021/04/553000000-reasons-not-let-facebook-make-decisions-about-your-privacy
Ad Observer lets independent researchers and journalists track whether Facebook is living up to its promises to block paid political disinformation. Facebook has made dire legal threats to shut this down, arguing that we should trust the company to mark its own homework.
Whatsapp lured users in by promising privacy. It held onto them post-acquisition by promising them their data would be siloed from Facebook’s main databases.
When it reneged on both promises, it papered this over by with a dialog box where they had to click I AGREE.
This “agreement” is a prime example of “consent theater,” the laughable pretense that Facebook is “making an offer” and the public is “accepting the offer.”
https://onezero.medium.com/consent-theater-a32b98cd8d96
Most people never read terms of service — but even when they do, “agreements” are subject to unilateral “renegotiation” by companies that engineered high switching costs as a means of corralling you into clicking “I agree” to things no rational person would ever agree to.
Consent theater lays bare the fiction of agreement. Real agreement is based on negotiation, and markets are based on price-signals in which buyers and sellers make counteroffers.
A “market” isn’t a place where a dominant seller names a price and then takes it from you.
Comcom is a mechanism for making these counteroffers. Take ad-blockers, which Doc Searls calls “the largest consumer boycott in history.” More than a quarter of internet users have installed an ad-block, fed up with commercial surveillance.
This is negotiation, a counteroffer. Big Tech — and the publications it colonizes — demand you give them everything, all the data they can extract, for every purpose they can imagine, forever, as a condition of access.
Ad-block lets you say “Nah.”
https://www.eff.org/deeplinks/2019/07/adblocking-how-about-nah
The fiction that tech barons have “discovered” the “price” that the public is willing to pay for having a digital life is a parody of market doctrine. Without the ability to counteroffer — in code, as well as in law — there is no price discovery.
Rather, there is price-setting.
Not coincidentally, “the ability to set prices” is the textbook definition of an illegal monopoly.
66 notes
·
View notes
Text
Dell V6W33 Battery
Dell V6W33 Battery
Replacement battery for original dell V6W33 is hot sale. dell V6W33 battery sale on website,our dell V6W33 battery can run longer time, V6W33 is fully Compatible with
Original dell V6W33 Battery.New battery for dell V6W33 v is brand new.
How to Increase dell V6W33 Battery Life
Even the longest-lasting laptop batteries will die eventually. Here's everything you need to know to maximize the amount of time between visits to the power outlet.
Who wants to make an urgent dash to a power outlet to rescue their dell V6W33 Battery? That's no fun, especially if your family is working and learning from home these days in various corners of the house that may not have a convenient socket nearby. Luckily, modern laptops are much more efficient than their predecessors. Nowadays, even inexpensive desktop-replacement dell V6W33 Battery and some gaming behemoths can last for more than eight hours on a single charge.
1. If You're on a dell V6W33 Battery, Use the Windows Performance Management Tool
The first stop on our battery-life betterment tour is your laptop's performance management tool. In Windows 10, it's a slider accessed from the battery icon in the task bar. It aims to group all of the settings that affect battery life into a few easy-to-understand categories.
Windows 10 Battery Performance Slider
In Windows 11, you'll find it in Settings > System > Power & Battery > Power Mode.
The company that made your PC determines exactly which settings the battery slider controls. But in general, keep these guidelines in mind:
2. Simplify Your Workflow: Close Apps, and Use Airplane Mode
If you spend lots of time working off the plug, it's a good habit to adjust your laptop use in more battery-conserving ways, such as by sticking to one app at a time and closing everything else when you're not using it.
In addition to shutting down other programs while you single-task, consider , if you know you'll be editing a document with no need for web access. In addition to reducing distractions, Airplane mode eliminates a significant source of battery drain: not only the wireless radios themselves, but also the background apps and processes that constantly use them, such as updaters and push notifications.
3. Close Specific Apps That Draw Lots of Power
Having multiple apps and processes running on your system at the same time will chew through battery life more quickly, and chances are you probably aren't actively using everything that's currently running on your dell V6W33 Battery. In Windows, the Settings app is the first step to find energy-hogging programs.
Next, type "See which processes start up automatically when you start Windows" into the search bar, or open the Task Manager app. In the Startup tab, you'll see every utility that runs as soon as you start your PC. Anything with a name like "Download Assistant" or "Helper" is usually safe to disable. For example, unless you frequently open Spotify playlists, tracks, or albums from links in a web browser, you can disable the Spotify Web Helper.
4. Adjust Graphics and Display Settings to Conserve Power Usage
If you have a powerful graphics processor (a discrete GPU) in your laptop, you can ensure that only games or other graphics-intensive apps need to use it, while everything else can get by using the more efficient on-CPU silicon for graphics processing. In Windows 11, go to Settings > System > Display > Graphics, where you can adjust which graphics processor each app uses, or let Windows automatically decide which one is best. This option may not be available on all Windows 11 laptops with dedicated GPUs.
5. Review the dell V6W33 Battery Management Settings
Some recent laptops can now automatically monitor the temperature history and charging patterns of the battery. Via software from the manufacturer, this information can be used to adjust "full" charging to remain below 100% of the battery's capacity if you don't regularly use it. (Reducing the number of charging cycles can help prolong the battery's life.)
More info.: https://www.pc-battery.co.uk/dell-V6W33-battery.html
https://www.365mall.co.uk/replacement-dell-V6W33-battery.html
https://www.battery4pc.com/replacement-for-dell-V6W33-battery.html
0 notes
Note
Hi!! If you don't mind me asking, what software or website do you use to make your GIFs? Because the website that I'm using has cut down the time limit so that I can't use videos longer than 10 minutes. But I noticed that you're making GIFs from very long videos.
i don't mind at all!!
i use a program called
INSTAGIFFER
it has its own website, but looks like it has been abandoned for like five years. none of the download links or anything work anymore. it is still available from other websites though, if you google it.
or if you have problems getting it, since it was always available for free anyway, i could try to send it through a file sharing website or something.
this is what it looks like:
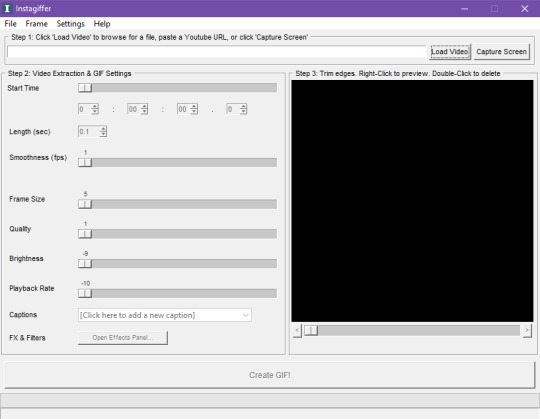
it says you can just put a youtube link in and it'll load the video, but that stopped working for me a long time ago. i prefer to download(with any youtube to mp4 website) or screen record the videos first(i use obs studio for that if i need to) and load them that way. (i don't know if that's okay to do but i am only using them to make gifs.)
OR it has its own screen capture option where you can choose where and how long you want to record for and it will turn whatever you recorded directly into gif frames. you can move it around and resize it to fit any shape video. like so:

that one still works, although i just tried recording for 2 minutes and it gave me an error and said to try recording for less time. now i'm curious what the time limit for it is. (insert many minutes of me testing it here) okay, 50 seconds works, 55 seconds does not work. on mine, at least.
anyway, it has a cropping option where you can choose how much of the frames to show in the gif, if there are edges in the video or anything that you'd like to cut out to make it look cleaner.

you can either drag the corners of the red thing around, or

if you want to be more precise

use that.
you can also add captions:

as many as you want.
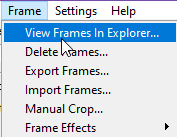
and there are other effects:
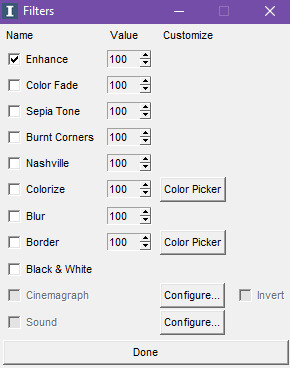
and more effects, like loop, reverse and crossfade in the "frame" dropdown, and then "frame effects". i tried to add a screenshot of that too but i can't add 11 images, oops. (yes i added this part in after i already typed and uploaded everything below)
i should probably experiment with those more often too. it could probably make some gifs look prettier.
oh, and one of the most important things to do if you use this and plan to make many gifs at a time, since it's always on by default every time the program is opened:
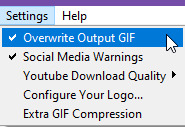
^UNCHECK THIS. there were times that i FORGOT to uncheck it and i'm sitting here thinking i'm mass producing gifs, but there it is OVERWRITING THE FIRST GIF REPEATEDLY EVERY TIME I MAKE ONE. so then i'd stop and check on them and there was only ONE GIF IN THE FOLDER. and then i had to start all over again.
this is also why i always have the save location folder always open too, above instagiffer, so i can see what's going on with my gifs while making them. you can choose where to save them here:
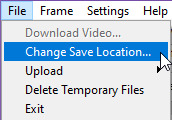
otherwise it always defaults to saving them to the desktop.
so, i have my own method of using this., i upload a whole video and i go 2 minutes at a time. so in the length(sec) part, i always have it on 120 seconds.
instagiffer has its own frame output folder(automatically named "original") where it loads the frames to, which i always have open, off to the side of the program window so i can always see it.
you can get to it here:
(this is also where frame effects options are with the loop, reverse, crossfade that i mentioned above somewhere. at the bottom of this dropdown.)
then, i create another new folder somewhere else, anywhere, name doesn’t matter, and have it open on the other side and just drag frames back and forth between the two folders as i need them, deleting the old ones that i've already turned into gifs and dragging the next scene in for the next gif.(just click on one of the arrows to get the program to recognize the different frames in its folder.)
when i get through the 2 minutes worth of frames and the last scene is cut off, i'll go forward 1 minute, find that scene, make it into a gif and then go forward 1 more minute and then continue the same as the last 2 minutes.
it also saves my progress that way too, if i have to stop and continue later, i know what scene i left off on because they're all in a different unrelated folder and won't be replaced when i load the video up again.(ANYTHING in the "original" folder WILL disappear and be replaced if you load anything else in the program, if you change the length or if you change the start time. so make sure you save anything you want to save in a different folder before doing anything else.)
and i screenshot it every time i stop so i know what all of my settings were at for that specific video. frame size, smoothness, how many minutes into the video i'm at, etc. i have one screenshot for each concert i'm working on, so i can just refer to that when i start it all up again.
and since i have the videos downloaded, i can still make them if my internet happens to go out for any reason.
oh AND it doesn't have to be a video, you can upload other gifs or image files to this program if you want.
OKAY ANYWAY, enough of my life story. yes, gifs are my life. i could ramble on and on about gifs from here to eternity. SO, if you choose to use this program and you have any questions or need any kind of help, let me know. it really does make gifs much easier once you get used to using it and i am ALL FOR the world having more gifs in it.
(i apologize if any of this is hard to understand because sometimes i'm not the best at explaining things that are like second nature to me)
#instagiffer#you can double click the frame viewer in the program to remove one frame at a time#but it doesn't go to the recycle bin like it does when you delete it manually from the folder#so you will have to reload the frames to get it back#if you need it#also if you make a gif and you don't close the popup thing telling you that the gif was made#and you remove that gif from the folder or rename or something#the program can crash and you have to close and reopen it#and set everything up again#AND using a mouse scroll wheel when your mouse is over the program will move the duration up or down#the length(sec) thing#i accidentally do that a lot and it's like 'HEY IT LOOKS LIKE YOU IMPORTED FRAMES WOULD YOU LIKE TO GENERATE A NEW SEQUENCE OF IMAGES??'#and i'm like 'WHY ARE YOU ASKING ME THIS' and then i realize i accidentally scrolled my mouse wheel and i tell it no#sorry i'm just putting random tips here that i keep thinking of#in case you or anyone else decides to use it#even if it doesn't make sense at first#it might later
14 notes
·
View notes