#i also learned how to make Actual lists with html using
- and
- and whatnot but it indents too much on the stickynotes sooo idc
Explore tagged Tumblr posts
Visit Tumblr Blog
Explore Tumblr blogs with no restrictions, modern design and the best experience.
Last Seen Tumblr Blogs


Fun Fact
Hackers stole 65M passwords from Tumblr in 2013.
Text
so far the html classes have been a mixed bag in that they have almost entirely taught things i already know pretty well by now (today i walked for 20 minutes in >20° weather to learn the wisdom of how to use <p> and <b>) but then i learn something very very basic that i absolutely should have already known that i already immediately edited into ebony's blog because i realized how stupid the original method i was using was (<br> works much better for the sticky notes than copying/pasting an invisible unicode character 10 times until the line breaks by itself)
#i also learned how to make Actual lists with html using <ul> and <li> and whatnot but it indents too much on the stickynotes sooo idc#i like dash bulletpoints over dot bulletpoints anyway. dots are too round and would look BAD with the pixel font#also learned how to do the fuckin. thing which is NOT keysmash and which is useful to fix a lil alignment in a lazy way#is it technically the same method as copy/pasting that invisible unicode character? maybe. but shut up#there is no actual visible difference in those stickynotes whatsoever btw. they look exactly the same. they're just less stupid now <3#still maybe would have preferred to not have to show up to class for it tho. it could wait. we did not need to be there today.#because the thing is technically it was 23° but it was windy so it was actually 10° and ohhhhhh that walk did not treat me well#was wearing thick plushy fleece-lined pants and my legs still went numb 👍 why did i have to do that 👍👍#also i have discovered that i'm like 80% sure my dorm room's window doesn't close properly#i have discovered that because i'm fucking COLD#sigh. and i Also learned that tumblr skills may have given me more ready knowledge on inline css than my prof. so thats something#college truly is a place of learning and discovery. it was snowing on my way back from class earlier. with just 42% humidity. cool !#i'm very very very rapidly becoming a winter hater can you tell.
0 notes
Text
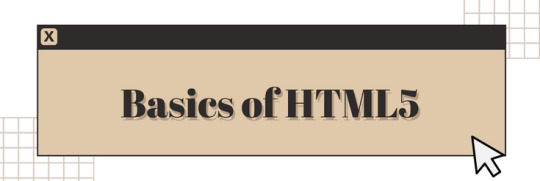
Basics of HTML5: Let's build a webpage!
I'm a huge advocate for learning HTML5 as your first coding language (remember, it's not a programming language)! HTML5 is a great and easy coding language to get you into the feel of coding, especially for complete complete beginners!
I see a lot of people on Tumblr wanting to get into just creating their own websites but don't know how to start - coding is a new thing to them! So, I'm here to help with the language I know like it's the back of my hand!
And I am also an advocate of building projects in order to learn anything in coding/programming! Thus, what better way to learn the basics of HTML5 than to actually build a simple webpage? Let's get started~!

What is HTML5?
HTML, which stands for Hypertext Markup Language, is a special coding language that is used to create webpages. With HTML, you can tell a web browser, like Google Chrome or Safari, what to display on a webpage, such as text, images, and videos. And 'HTML5' is just the latest version of HTML!
HTML tags are special words or symbols that you use to create webpages. You use these tags to tell the web browser what content to display on a webpage, like headings, paragraphs, images, links, and more. Tags come in pairs (most of the time) so you'll have an opening tag and a closing tag. An example of the syntax:

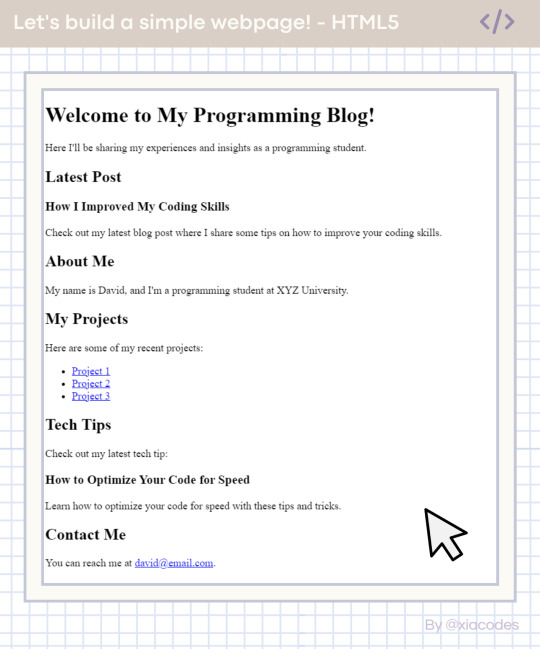
The Simple Webpage
As I mentioned, we will be making a simple webpage for a person called David - see, he needs a portfolio webpage to start off with, and we're going to help me (as well as learning HTML5, of course).
Here is the code we will be using:
Pretty code, I know but also a bit confusing - let's get into understanding the code by grouping them into chunks! But just a heads up, the code includes these tags:
!DOCTYPE html (mmh it's more of a declaration really)
html, head, body
title
h1, h2, h3
p, a
li, ul, ol
These are some of the common tags used in all webpages on the internet! Okay, let's look at the code finally~!
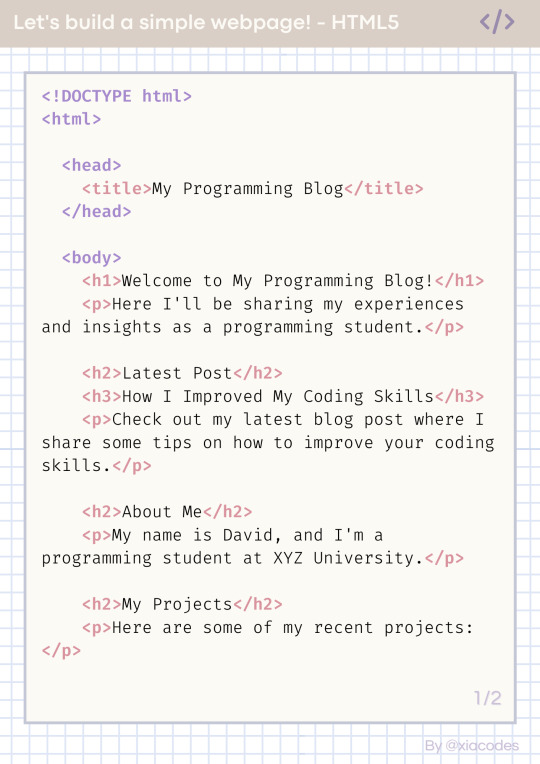
The basic structure of every HTML page
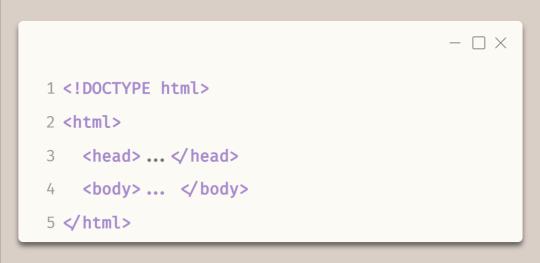
Every HTML file looks like this - it has to have all of these tags!
The first line, !DOCTYPE html tag, tells the web browser which version of HTML is being used.
The code is contained within html tags, which enclose the entire webpage.
The head tags contain information about the webpage, such as the title and links to other resources.
The body tags contain the main and visible content of the webpage, such as text, images, and videos.
Together, this code provides the basic structure for an HTML webpage, with the head tags containing metadata and the body tags containing the actual content.
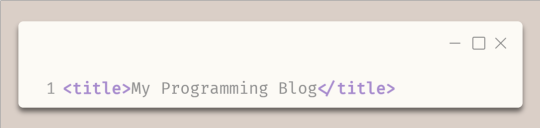
In the head tags
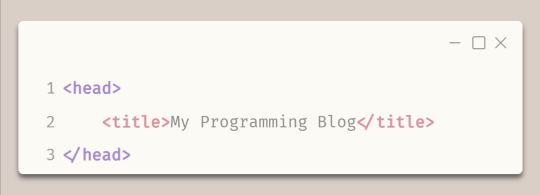
The title tags enclose the title of the webpage. In this example, the title is "My Programming Blog".
The title appears in the title bar of the web browser and is often used by search engines and social media sites to display the name of the webpage.
In the body tags - Headings and paragraphs
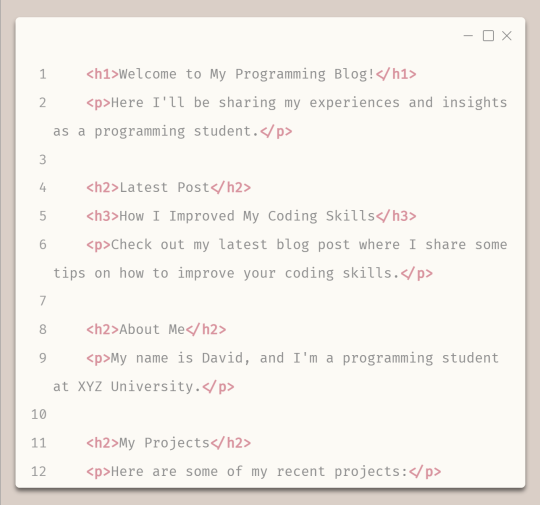
The h1 tags create a main and biggest heading, which in this case is "Welcome to My Programming Blog!" - you can only have one h1 tag on a webpage.
The h2 tags create subheadings, which in this case include "Latest Post", "About Me", and "My Projects" - you can have multiple h2 to h6 tags on a page.
The h3 tags create a sub-subheading under h2 tags, which in this case is "How I Improved My Coding Skills".
The p tags create paragraphs of text that provide more detail about the blog's content and purpose, including a summary of the latest blog post and information about the author and their projects.
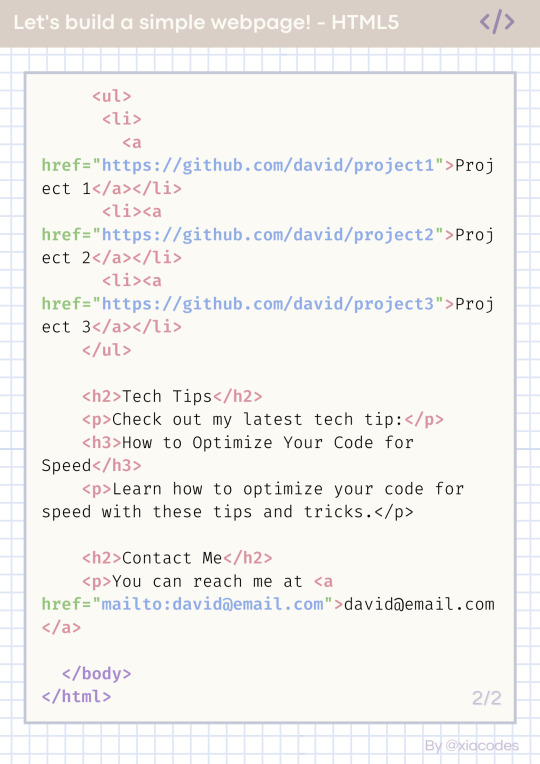
In the body tags - lists and links
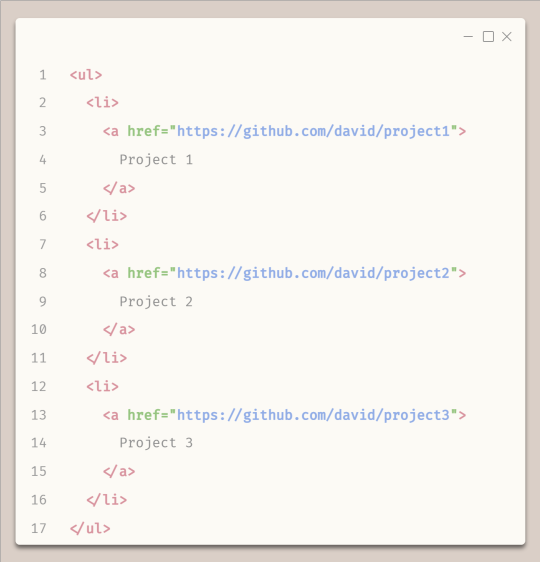
To start any list, you need to either start with ul tags or ol (ordered (numbered)) tags
The ul tags create an unordered list of items.
The li tags create list items within the unordered list.
Each list item includes a hyperlink created using the 'a' tags, with the text of the link being the name of a programming project.
The href attribute within each 'a' tag specifies the URL where the project code can be found on GitHub.
Attributes go inside the opening tags' arrows '<' and '>'.
The End Result
Boom - she's gorgeous, I know! A basic, simple webpage! We did it! You can see the page live + the code used here: [LINK]. Play around with the code, change things, experiment, break things, fix them - do what you need to learn further!
And that includes some online resources to help!
LINK 1 | LINK 2 | LINK 3
And some resources/posts I have shared about HTML
LINK 1 | LINK 2 | LINK 3
What next?
Learn CSS3! The page looks basic and looks like what pages were like when the internet was invented! You need colour, fancy fonts and layouts! CSS helps with that, as it is a styling sheet! Be sure to do some research but I also share resources on my blog under my #resources tag!
Thank you for reading and best of luck learning coding/programming! Remember, this isn't the only way to get into coding! People even recommend languages like Python to be beginners' first language, but I say that HTML5 should be the first coding language and then Python is your first programming language - don't know the difference? I made a post about it here!!
But definitely for people going into Web Development, HTML5 all the way! I don't think you can avoid learning HTML5 with Web Development (not 100% sure though...)!
Anyhoo, have a nice day/night! 👋🏾💻💕
#xc: programming blog post#my resources#codeblr#progblr#studyblr#resources#coding#programming#computer science#comp sci#technology#tech#software developer#programmer#coding resources#studyblr community#code newbie#learn to code
355 notes
·
View notes
Text
30 HTML Best Practices for Beginners
The most difficult aspect of running Nettuts+ is accounting for so many different skill levels. If we post too many advanced tutorials, our beginner audience won't benefit. The same holds true for the opposite. We do our best, but always feel free to pipe in if you feel you're being neglected. This site is for you, so speak up! With that said, today's tutorial is specifically for those who are just diving into web development. If you've one year of experience or less, hopefully some of the tips listed here will help you to become better, quicker!
You may also want to check out some of the HTML builders on Envato Market, such as the popular VSBuilder, which lets you generate the HTML and CSS for building your websites automatically by choosing options from a simple interface.
Or you can have your website built from scratch by a professional developer on Envato Studio who knows and follows all the HTML best practices.
Without further ado, let's review 30 best practices to observe when creating your markup.
1: Always Close Your Tags Back in the day, it wasn't uncommon to see things like this:
1 <li>Some text here. 2 <li>Some new text here. 3 <li>You get the idea. Notice how the wrapping UL/OL tag was omitted. Additionally, many chose to leave off the closing LI tags as well. By today's standards, this is simply bad practice and should be 100% avoided. Always, always close your tags. Otherwise, you'll encounter validation and glitch issues at every turn.
Better 1 <ul> 2 <li>Some text here. </li> 3 <li>Some new text here. </li> 4 <li>You get the idea. </li> 5 </ul> 2: Declare the Correct DocType

When I was younger, I participated quite a bit in CSS forums. Whenever a user had an issue, before we would look at their situation, they HAD to perform two things first:
Validate the CSS file. Fix any necessary errors. Add a doctype. "The DOCTYPE goes before the opening html tag at the top of the page and tells the browser whether the page contains HTML, XHTML, or a mix of both, so that it can correctly interpret the markup."
Most of us choose between four different doctypes when creating new websites.
http://www.w3.org/TR/html4/strict.dtd">
http://www.w3.org/TR/html4/loose.dtd">
http://www.w3.org/TR/xhtml1/DTD/xhtml1-transitional.dtd">
http://www.w3.org/TR/xhtml1/DTD/xhtml1-strict.dtd">
There's a big debate currently going on about the correct choice here. At one point, it was considered to be best practice to use the XHTML Strict version. However, after some research, it was realized that most browsers revert back to regular HTML when interpretting it. For that reason, many have chosen to use HTML 4.01 Strict instead. The bottom line is that any of these will keep you in check. Do some research and make up your own mind.
3: Never Use Inline Styles When you're hard at work on your markup, sometimes it can be tempting to take the easy route and sneak in a bit of styling.
1 <p style="color: red;">I'm going to make this text red so that it really stands out and makes people take notice! </p> Sure -- it looks harmless enough. However, this points to an error in your coding practices.
When creating your markup, don't even think about the styling yet. You only begin adding styles once the page has been completely coded. It's like crossing the streams in Ghostbusters. It's just not a good idea. -Chris Coyier (in reference to something completely unrelated.)
Instead, finish your markup, and then reference that P tag from your external stylesheet.
Better 1 #someElement > p { 2 color: red; 3 } 4: Place all External CSS Files Within the Head Tag Technically, you can place stylesheets anywhere you like. However, the HTML specification recommends that they be placed within the document HEAD tag. The primary benefit is that your pages will seemingly load faster.
While researching performance at Yahoo!, we discovered that moving stylesheets to the document HEAD makes pages appear to be loading faster. This is because putting stylesheets in the HEAD allows the page to render progressively. - ySlow Team
1 <head> 2 <title>My Favorites Kinds of Corn</title> 3 <link rel="stylesheet" type="text/css" media="screen" href="path/to/file.css" /> 4 <link rel="stylesheet" type="text/css" media="screen" href="path/to
/anotherFile.css" />
5 </head> 5: Consider Placing Javascript Files at the Bottom Place JS at bottom Remember -- the primary goal is to make the page load as quickly as possible for the user. When loading a script, the browser can't continue on until the entire file has been loaded. Thus, the user will have to wait longer before noticing any progress.
If you have JS files whose only purpose is to add functionality -- for example, after a button is clicked -- go ahead and place those files at the bottom, just before the closing body tag. This is absolutely a best practice.
Better
<p>And now you know my favorite kinds of corn. </p>
<script type="text/javascript" src="path/to/file.js"></script>
<script type="text/javascript" src="path/to/anotherFile.js"></script>
</body>
</html>
6: Never Use Inline Javascript. It's not 1996! Another common practice years ago was to place JS commands directly within tags. This was very common with simple image galleries. Essentially, a "onclick" attribute was appended to the tag. The value would then be equal to some JS procedure. Needless to say, you should never, ever do this. Instead, transfer this code to an external JS file and use "addEventListener/attachEvent" to "listen" for your desired event. Or, if using a framework like jQuery, just use the "click" method.
$('a#moreCornInfoLink').click(function() { alert('Want to learn more about corn?'); }); 7: Validate Continuously validate continuously I recently blogged about how the idea of validation has been completely misconstrued by those who don't completely understand its purpose. As I mention in the article, "validation should work for you, not against."
However, especially when first getting started, I highly recommend that you download the Web Developer Toolbar and use the "Validate HTML" and "Validate CSS" options continuously. While CSS is a somewhat easy to language to learn, it can also make you tear your hair out. As you'll find, many times, it's your shabby markup that's causing that strange whitespace issue on the page. Validate, validate, validate.
8: Download Firebug download firebug I can't recommend this one enough. Firebug is, without doubt, the best plugin you'll ever use when creating websites. Not only does it provide incredible Javascript debugging, but you'll also learn how to pinpoint which elements are inheriting that extra padding that you were unaware of. Download it!
9: Use Firebug! use firebug From my experiences, many users only take advantage of about 20% of Firebug's capabilities. You're truly doing yourself a disservice. Take a couple hours and scour the web for every worthy tutorial you can find on the subject.
Resources Overview of Firebug Debug Javascript With Firebug - video tutorial 10: Keep Your Tag Names Lowercase Technically, you can get away with capitalizing your tag names.
<DIV>
<P>Here's an interesting fact about corn. </P>
</DIV>
Having said that, please don't. It serves no purpose and hurts my eyes -- not to mention the fact that it reminds me of Microsoft Word's html function!
Better
<div>
<p>Here's an interesting fact about corn. </p>
</div>
11: Use H1 - H6 Tags Admittedly, this is something I tend to slack on. It's best practice to use all six of these tags. If I'm honest, I usually only implement the top four; but I'm working on it! :) For semantic and SEO reasons, force yourself to replace that P tag with an H6 when appropriate.
1 2 <h1>This is a really important corn fact! </h1> <h6>Small, but still significant corn fact goes here. </h6> 12: If Building a Blog, Save the H1 for the Article Title h1 saved for title of article Just this morning, on Twitter, I asked our followers whether they felt it was smartest to place the H1 tag as the logo, or to instead use it as the article's title. Around 80% of the returned tweets were in favor of the latter method.
As with anything, determine what's best for your own website. However, if building a blog, I'd recommend that you save your H1 tags for your article title. For SEO purposes, this is a better practice - in my opinion.
13: Download ySlow
download yslow Especially in the last few years, the Yahoo team has been doing some really great work in our field. Not too long ago, they released an extension for Firebug called ySlow. When activated, it will analyze the given website and return a "report card" of sorts which details the areas where your site needs improvement. It can be a bit harsh, but it's all for the greater good. I highly recommend it.
14: Wrap Navigation with an Unordered List Wrap navigation with unordered lists Each and every website has a navigation section of some sort. While you can definitely get away with formatting it like so:
<div id="nav"> <a href="#">Home </a> <a href="#">About </a> <a href="#">Contact </a> </div> I'd encourage you not to use this method, for semantic reasons. Your job is to write the best possible code that you're capable of.
Why would we style a list of navigation links with anything other than an unordered LIST?
The UL tag is meant to contain a list of items.
Better <ul id="nav"> <li><a href="#">Home</a></li> <li><a href="#">About</a></li> <li><a href="#">Contact</a></li> </ul> 15: Learn How to Target IE You'll undoubtedly find yourself screaming at IE during some point or another. It's actually become a bonding experience for the community. When I read on Twitter how one of my buddies is battling the forces of IE, I just smile and think, "I know how you feel, pal."
The first step, once you've completed your primary CSS file, is to create a unique "ie.css" file. You can then reference it only for IE by using the following code.
<!--[if lt IE 7]> <link rel="stylesheet" type="text/css" media="screen" href="path/to/ie.css" /> <![endif]--> This code says, "If the user's browser is Internet Explorer 6 or lower, import this stylesheet. Otherwise, do nothing." If you need to compensate for IE7 as well, simply replace "lt" with "lte" (less than or equal to).
16: Choose a Great Code Editor choose a great code editor Whether you're on Windows or a Mac, there are plenty of fantastic code editors that will work wonderfully for you. Personally, I have a Mac and PC side-by-side that I use throughout my day. As a result, I've developed a pretty good knowledge of what's available. Here are my top choices/recommendations in order:
Mac Lovers Coda Espresso TextMate Aptana DreamWeaver CS4 PC Lovers InType E-Text Editor Notepad++ Aptana Dreamweaver CS4 17: Once the Website is Complete, Compress! Compress By zipping your CSS and Javascript files, you can reduce the size of each file by a substantial 25% or so. Please don't bother doing this while still in development. However, once the site is, more-or-less, complete, utilize a few online compression programs to save yourself some bandwidth.
Javascript Compression Services Javascript Compressor JS Compressor CSS Compression Services CSS Optimiser CSS Compressor Clean CSS 18: Cut, Cut, Cut cut cut cut Looking back on my first website, I must have had a SEVERE case of divitis. Your natural instinct is to safely wrap each paragraph with a div, and then wrap it with one more div for good measure. As you'll quickly learn, this is highly inefficient.
Once you've completed your markup, go over it two more times and find ways to reduce the number of elements on the page. Does that UL really need its own wrapping div? I think not.
Just as the key to writing is to "cut, cut, cut," the same holds true for your markup.
19: All Images Require "Alt" Attributes It's easy to ignore the necessity for alt attributes within image tags. Nevertheless, it's very important, for accessibility and validation reasons, that you take an extra moment to fill these sections in.
Bad 1 <IMG SRC="cornImage.jpg" /> Better 1 <img src="cornImage.jpg" alt="A corn field I visited." /> 20: Stay up Late I highly doubt that I'm the only one who, at one point while learning, looked up and realized that I was in a pitch-dark room well into the early, early morning. If you've found yourself in a similar situation, rest assured that you've chosen the right field.
The amazing "AHHA" moments, at least for me, always occur late at night. This was the case when I first began to understand exactly what Javascript closures were. It's a great feeling that you need to experience, if you haven't already.
21: View Source view source What better way to learn HTML than to copy your heroes? Initially, we're all copiers! Then slowly, you begin to develop your own styles/methods. So visit the websites of those you respect. How did they code this and that section? Learn and copy from them. We all did it, and you should too. (Don't steal the design; just learn from the coding style.)
Notice any cool Javascript effects that you'd like to learn? It's likely that he's using a plugin to accomplish the effect. View the source and search the HEAD tag for the name of the script. Then Google it and implement it into your own site! Yay.
22: Style ALL Elements This best practice is especially true when designing for clients. Just because you haven't use a blockquote doesn't mean that the client won't. Never use ordered lists? That doesn't mean he won't! Do yourself a service and create a special page specifically to show off the styling of every element: ul, ol, p, h1-h6, blockquotes, etc.
23: Use Twitter Use Twitter Lately, I can't turn on the TV without hearing a reference to Twitter; it's really become rather obnoxious. I don't have a desire to listen to Larry King advertise his Twitter account - which we all know he doesn't manually update. Yay for assistants! Also, how many moms signed up for accounts after Oprah's approval? We can only long for the day when it was just a few of us who were aware of the service and its "water cooler" potential.
Initially, the idea behind Twitter was to post "what you were doing." Though this still holds true to a small extent, it's become much more of a networking tool in our industry. If a web dev writer that I admire posts a link to an article he found interesting, you better believe that I'm going to check it out as well - and you should too! This is the reason why sites like Digg are quickly becoming more and more nervous.
Twitter Snippet If you just signed up, don't forget to follow us: NETTUTS.
24: Learn Photoshop Learn Photoshop A recent commenter on Nettuts+ attacked us for posting a few recommendations from Psdtuts+. He argued that Photoshop tutorials have no business on a web development blog. I'm not sure about him, but Photoshop is open pretty much 24/7 on my computer.
In fact, Photoshop may very well become the more important tool you have. Once you've learned HTML and CSS, I would personally recommend that you then learn as many Photoshop techniques as possible.
Visit the Videos section at Psdtuts+ Fork over $25 to sign up for a one-month membership to Lynda.com. Watch every video you can find. Enjoy the "You Suck at Photoshop" series. Take a few hours to memorize as many PS keyboard shortcuts as you can. 25: Learn Each HTML Tag There are literally dozens of HTML tags that you won't come across every day. Nevertheless, that doesn't mean you shouldn't learn them! Are you familiar with the "abbr" tag? What about "cite"? These two alone deserve a spot in your tool-chest. Learn all of them!
By the way, in case you're unfamiliar with the two listed above:
abbr does pretty much what you'd expect. It refers to an abbreviation. "Blvd" could be wrapped in a <abbr> tag because it's an abbreviation for "boulevard". cite is used to reference the title of some work. For example, if you reference this article on your own blog, you could put "30 HTML Best Practices for Beginners" within a <cite> tag. Note that it shouldn't be used to reference the author of a quote. This is a common misconception. 26: Participate in the Community Just as sites like ours contributes greatly to further a web developer's knowledge, you should too! Finally figured out how to float your elements correctly? Make a blog posting to teach others how. There will always be those with less experience than you. Not only will you be contributing to the community, but you'll also teach yourself. Ever notice how you don't truly understand something until you're forced to teach it?
27: Use a CSS Reset This is another area that's been debated to death. CSS resets: to use or not to use; that is the question. If I were to offer my own personal advice, I'd 100% recommend that you create your own reset file. Begin by downloading a popular one, like Eric Meyer's, and then slowly, as you learn more, begin to modify it into your own. If you don't do this, you won't truly understand why your list items are receiving that extra bit of padding when you didn't specify it anywhere in your CSS file. Save yourself the anger and reset everything! This one should get you started.
html, body, div, span, h1, h2, h3, h4, h5, h6, p, blockquote, pre, a, abbr, acronym, address, big, cite, code, img, ins, kbd, q, s, samp, small, strike, strong, dl, dt, dd, ol, ul, li, fieldset, form, label, legend, table, caption, tbody, tfoot, thead, tr, th, td { margin: 0; padding: 0; border: 0; outline: 0; font-size: 100%; vertical-align: baseline; background: transparent; } body { line-height: 1; } ol, ul { list-style: none; } blockquote, q { quotes: none; } blockquote:before, blockquote:after, q:before, q:after { content: ''; content: none; }
table { border-collapse: collapse; border-spacing: 0; } 28: Line 'em Up!
Line em up Generally speaking, you should strive to line up your elements as best as possible. Take a look at you favorite designs. Did you notice how each heading, icon, paragraph, and logo lines up with something else on the page? Not doing this is one of the biggest signs of a beginner. Think of it this way: If I ask why you placed an element in that spot, you should be able to give me an exact reason.
Advertisement 29: Slice a PSD Slice a PSD Okay, so you've gained a solid grasp of HTML, CSS, and Photoshop. The next step is to convert your first PSD into a working website. Don't worry; it's not as tough as you might think. I can't think of a better way to put your skills to the test. If you need assistance, review these in depth video tutorials that show you exactly how to get the job done.
Slice and Dice that PSD From PSD to HTML/CSS 30: Don't Use a Framework...Yet Frameworks, whether they be for Javascript or CSS are fantastic; but please don't use them when first getting started. Though it could be argued that jQuery and Javascript can be learned simultaneously, the same can't be made for CSS. I've personally promoted the 960 CSS Framework, and use it often. Having said that, if you're still in the process of learning CSS -- meaning the first year -- you'll only make yourself more confused if you use one.
CSS frameworks are for experienced developers who want to save themselves a bit of time. They're not for beginners.
Original article source here : https://code.tutsplus.com/tutorials/30-html-best-practices-for-beginners--net-4957
1 note
·
View note
Text
Weekly Reflection 3: Tutorial in HTML
In this tutorial, we will learn to how make a simple Wikipedia article on a web page. Even though a web page and a website are similar, they are not the same. A web page in layman's terms is part of a website and a website is a collection of web pages.
Before writing your code on your chosen text editor, you need to develop a wireframe. A wireframe helps you organize the structure of your web page, which includes the placement of your images, paragraphs, and navigation table. If you do not make a wireframe, your website will look disjointed and you may feel that your website looks different than what you had in mind.
Once you develop a wireframe, open your desired text editor and name your file as index.html(all html files end in .html). All html files must begin with <!DOCTYPE html>.This informs the web browser which version of html the website is using.
Before you writing you need to know the some jargon. An element defines the content and structure of a web page. The most common elements are head(<head>), headings(<heading>), title(<title>), body(<body>), paragraphs(<p>), and headings(<h1> to <h6>). Angle brackets surrounding an element is known as a tag. They come in open and close pairs. A closed tag has forward slash(</h1>) while a open tag does not have the forward. They signify where content begins and end.
In addition to the <!DOCTYPE> declaration, a web page needs to have the following elements for it to exist: html, head, and body, elements in that order. Here’s an example of how your code should look like below.
<!DOCTYPE html> <html> <head> <title> Example Title</title> <!-- not needed for a functional web page --> </head> <body> </body> </html>
When you save your code as a html document and open it to your web browser you will see a blank page with exception of a title. It is blank because we did not add any content to page.
The title elements identifies the name of the web page on the tab of the browser as shown above in the example code.
First, you need a heading element( in this case use <h1>) to name your Wikipedia article for your page. After your heading element, you give a brief overview what your article will discuss by the paragraph element. You might leave yourself a few spaces between your overview paragraph and your next step by using the break <br> element. The break element does need a closing tag.
Now, you will use an unordered element to develop to bullet points for each of the topics you discuss in your article.
The syntax looks like this:
<ul> <li> List 1 </li> <li> List 2 </li> <li> List 3 </li> </ul>
The list element inside the unordered element actually makes the bullet list.
Once you have a list of topics for your Wikipedia article, you write each section with a header element other than <h1>, and each header should contain a paragraph using the paragraph element. After you finished writing the article, you would to try have your list of topics linked to where the section is located on the page without scrolling down to that section. What would you do is use the anchor tag inside the list element and i put the following inside the anchor: href=#name_of_object. Then you write the following anchor tag inside each heading element of your topic: <a name = name_of_object> name_of_object </a>. You should be aware that your page needs to be long enough to see a noticeable jump from part of the page to another.
What if you wanted to have links to other websites so your users will find you credible? You must have paragraph tags for each links and the anchor tags go inside the paragraph tags. The only difference between adding links other websites and adding links to parts of a web pages is that the pound sign goes away and the url is present.
Your code should look this:
<p><a href= www.example-site.com> www.example-site.com</p></a>
You should place your links at the bottom of the webpage the same way real Wikipedia articles places its links.
After you have all your information and links for your Wikipedia article web page, you can add pictures to your article. Pictures are optional, but for some topics they help enhance the information presented. If you decide to add a picture, you do the following:(1) start with an image(img) tag, (2) write the URL or directory of your image after your src attribute, and (3) write an alternate text for your image. The last one is important because if your images does load any reason, it will display the alternate text. Additionally, screen reader will able alternate text you provide, enabling the blind or those were poor vision to access your article. You can also adjust width or height your image by adding height or width after the alt text.
Your code should look like this:
<img src= “image.jpg” alt text= a picture of me height = 200 width = 100>
Image tag does not need is closing tag.
Where you place your image is up to you. You can place at the beginning of your web page or at the end. You need to make sure the picture adds on to the information you provide.
You may notice by now your Wikipedia article is complete but it is very bland. A solution to this is to add CSS to web page. CSS allows to change your background of the page, the font of your, and the allows for padding your images( This means the text will appear to the left side of a choosen image if you chose to pad your image to the right.) . For information on CSS click on this link.
Once you feel satisfied with your web page, you can have a web hosting service make your web page live through its server.
Additional Information on HTML :
https://www.w3schools.com/HTML/
0 notes
Link
Reading Time: 10 minutes

Have you ever wanted to learn Sass, but you didn’t find a good tutorial? Chances are that you are quite good with CSS. However, you feel like there is a better way of working with CSS. You want to take your skills and efficiency to another level. In that cases, learning how to use preprocessor like Sass is one way to achieve that goal. This will be the goal of this mini series, to help you learn Sass. Today, you will learn about topics like variables, mixins, extends, imports and more. Let’s start!
Table of Contents:
Why Sass?
The Beginner’s Guide to Learn Sass
Nesting, ampersands and variables
The power of ampersand
Variables and more maintainable code
Mixins and extends
Mixins vs Extends
Imports and partials
Closing thoughts on how to learn Sass
Why Sass?
What are the main reasons why you should learn Sass, or at leas consider doing it? CSS is great and, with time, it is getting even better. One of the biggest changes in the recent time was that CSS finally “learned” to use variables. This is a big step forward. And, I think that there is even more to come. Yes, the future of CSS seems to be quite good. Still, I think CSS is far from being perfect. The biggest disadvantages of CSS are probably lack of any way to re-use style rules.
Sure, you can create special class with set of styles and then use it repeatedly. However, even this approach is quite limited. You can’t change the styles on the fly unless you add additional CSS to override the original. Also, you can’t use any conditions or parameters to switch between “versions” of the styles. Again, the only way is adding more CSS code. Also, you need to either put on the right place in the cascade. Or, you have to increase CSS specificity.
Another common problem with CSS was that there was no way to specify variables. If you wanted to re-use specific value across the project, you had to do it in the old fashioned way. Sure, there is nothing bad with it. However, imagine you would decide to change that value. Now, you would have to find every instance. This can be quite a feat in large code base. Luckily, the majority of text editors offers search & replace functionality.
Another problem with CSS is math. When you use plain CSS, you can’t use even simple calculations, adding, subtracting, multiplication or division. This problem also disappears when you learn Sass. You can use calc(), but Sass is more advanced. And, lastly, CSS can be quite hard to maintain. Without preprocessor, you can’t use atomic Design (modular CSS), SMACSS or anything like that. You have all CSS code in a single file. And, no, @import is not really a fix for that.
The Beginner’s Guide to Learn Sass
If you want to learn Sass, you have to install it first. You can install Sass in a coupe way. In case of Mac users, this is quite fast. You only need to install Sass gem via terminal. In case of Linux, you will need to install Ruby first and then Sass gem. You can install Ruby via package manager. For computers with Windows you need to install Ruby first as well. I suggest downloading Ruby installer as this is the easiest way to do it. After installing ruby, install Sass gem.
In cmd:
gem install sass
In terminal:
sude gem install sass
You can check if you have Sass gem installed on your computer with a simple command below. It should return specific version of the Sass gem. For example, Sass 3.4.23 (Selective Steve). If you see something similar to this, congrats, you are ready not only to learn Sass, but also to start using it. However, if you want to try Sass without installing anything, you can use online Sass playground called Sassmeister. This website will allow you to use and test Sass immediately.
In cmd/terminal:
sass -v
Nesting, ampersands and variables
Let’s start this journey to learn Sass with a couple of things that are easier. These are nesting, using ampersand and variables. I guess that you already know nesting from working with HTML or JavaScript. You can nest elements inside other elements or functions inside other functions. In CSS, there is no such a thing as nesting. Sass brings this feature to CSS. When you learn Sass, you can nest CSS selectors just like you do in HTML.
Sass:
// Example of nesting nav { ul { margin: 0; display: flex; list-style-type: none; } li { padding: 16px; } a { color: #212121; text-decoration: none; } }
CSS:
nav ul { margin: 0; display: flex; list-style-type: none; } nav li { padding: 16px; } nav a { color: #212121; text-decoration: none; }
Side note: Those two slashes (//) are used to mark comments in Sass. In Sass, you can use both. The difference between Sass comment (//) and CSS comment (/**/) is that Sass comments are not compiled into CSS. So, every comment you make using Sass syntax will stay in your Sass files. Any comment you make using CSS syntax will be compiled into CSS. In other words, you will find CSS comments in final CSS file, not Sass comments.
I should warn you that it is easy to go over the board with nesting. When you fall in love with it, you can create code that will result in over-qualified CSS. And, this can make work with CSS even bigger pain that before you learn Sass and started to using it. For this reason, I suggest nesting CSS selector to three levels at max, no more.
Sass:
.level-one { .level-two { .level-three { color: red; } } }
CSS:
.level-one .level-two .level-three { color: red; }
The power of ampersand
One very useful feature you will probably use very often, after you learn Sass and nesting, is ampersand. Ampersand allows you to reference parent selector. You simply replace the parent selector with this character. You can use this for with pseudo-classes such as :before, :after, :hover, :active, :focus, etc. You can also use ampersand for adjoining, or adding, CSS classes to create selector with higher specificity.
Sass:
ul { &.nav-list { display: flex; } & li { padding: 8px 16px; } } a { position: relative; &:before { position: absolute; bottom: 0; left: 0; content: ""; border-bottom: 2px solid #3498db; } &:focus, &:hover { color: #3498db; &:before { width: 100%; } } &:active { color: #2980b9; } }
CSS:
ul.nav-list { display: flex; } ul li { padding: 8px 16px; } a { position: relative; } a:before { position: absolute; bottom: 0; left: 0; content: ""; border-bottom: 2px solid #3498db; } a:focus, a:hover { color: #3498db; } a:focus:before, a:hover:before { width: 100%; } a:active { color: #2980b9; }
I have to mention that ampersand also allows you to use CSS combinators, such as the child combinator (>), adjacent sibling combinator (+) and the general sibling combinator (~).
Sass:
section { & + & { margin-top: 16px; } & > h1 { font-size: 32px; } & ~ p { font-size: 16px; } } // You can also omit the ampersand before the combinator and the result will be the same. section { + & { margin-top: 16px; } > h1 { font-size: 32px; } ~ p { font-size: 16px; } }
CSS:
section + section { margin-top: 16px; } section > h1 { font-size: 32px; } section ~ p { font-size: 16px; }
Finally, you don’t have to put the ampersand as first. You can use it in the end to change the selector entirely.
Sass:
section { body main & { background: #fff; } }
CSS:
body main section { background: #fff; }
Variables and more maintainable code
The last of the three I mentioned are variables. I have to say that variables were one of the main reasons why I wanted to learn Sass. Actually, I think that they were the number one reason. Work with CSS gets so much easier when you can make changes on a global scale by changing a single line of code. You no longer have to search for all occurrences of this or that value. You store the value inside a variable. Then, you have to change only that variable. Sass will do the rest.
As you can guess, this can immensely simplify and speedup your work. Also, it makes your styles much easier to maintain. Variables work with numbers, strings, colors, null, lists and maps. The only thing you must remember is to use “$” symbol every time you want to define a variable. Then, when you want to use that variable, well, you know what to do.
Sass:
// Declare variables $color-primary: #9b59b6; $color-secondary: #2c3e50; // Use variables a { color: $color-secondary; &:hover { color: $color-primary; } }
CSS:
a { color: #2c3e50; } a:hover { color: #9b59b6; }
One thing to keep in mind on your journey to learn Sass and use variables is scope. Variables in Sass works like variables in any programming language. Variables declared in global scope are accessible globally, local not.
Sass:
a { // locally defined variables $color-primary: #9b59b6; $color-secondary: #2c3e50; color: $color-secondary; &:hover { color: $color-primary; } } p { color: $color-secondary;// Undefined variable: "$color-secondary". }
This also means that you can use the same name for different variables without the worry of changing some. Just make sure to declare your variables in the right scope.
Sass:
$color-primary: #9b59b6; $color-secondary: #2c3e50; a { // local variables $color-primary: #fff; $color-secondary: #212121; color: $color-secondary; } p { color: $color-secondary; }
CSS:
a { color: #212121; } p { color: #2c3e50; }
Mixins and extends
Let’s take this journey to learn Sass on another level. When you are ready for more advanced Sass, a good place to start are mixins and extends. Do you remember when we were talking about the biggest disadvantages of CSS, namely re-usability of the code? This is where mixins and extends enters the game. Both these Sass features allow you to create re-usable chunks of code. It is safe to say that mixins and extends are similar to functions you know from JavaScript.
You create new mixin using “@mixin” directive and some name and put some styles inside it (inside curly brackets). Then, when you want to use that mixin you reference to it using “@include” followed by the name of the mixin. Extends work in a similar way. The difference is that extends don’t require creating some “extend”. Instead, you use CSS classes you already created. Then, when you want to use extend you use “@extend”, not “@mixin”.
Sass:
// Example of mixin @mixin transition($prop, $duration, $timing) { transition: $prop $duration $timing; } // Use mixin a { @include transition(all, .25s, cubic-bezier(.4,0,1,1)); }
CSS:
a { transition: all 0.25s cubic-bezier(0.4, 0, 1, 1); }
Sass:
// Random CSS class .btn { padding: 6px 12px; margin-bottom: 0; display: inline-block; font-size: 16px; } Examples of extend .btn--success { @extend .btn; background-color: #2ecc71; } .btn--alert { @extend .btn; background-color: #e74c3c; }
CSS:
.btn, .btn--success, .btn--alert { padding: 6px 12px; margin-bottom: 0; display: inline-block; font-size: 16px; } .btn--success { background-color: #2ecc71; } .btn--alert { background-color: #e74c3c; }
Mixins vs Extends
The advantage of mixins is that you can use parameters to make mixins more flexible. For example, you can add a simple condition and if statement to switch between two or more sets of rules. Every parameter starts with “$” symbol. Then, use that name inside the mixin. And, you can also set a default value to make the parameter optional. Setting a default value is like assigning value to variable. Use “$” symbol followed by colons and default value. Extends don’t have this ability.
Sass:
// Example of mixin with optional parameters @mixin transition($prop: all, $duration: .25s, $timing: cubic-bezier(.4,0,1,1)) { transition: $prop $duration $timing; } a { @include transition(); }
CSS:
a { transition: all 0.25s cubic-bezier(0.4, 0, 1, 1); }
When you want to change only some parameters and use default values for the rest, you can use the name of parameter when you use that mixin.
Sass:
@mixin transition($prop: all, $duration: .25s, $timing: cubic-bezier(.4,0,1,1)) { transition: $prop $duration $timing; } // Use different value only for parameter for duration a { @include transition($duration: .55s); }
CSS:
a { transition: all 0.55s cubic-bezier(0.4, 0, 1, 1); }
Another very useful feature of mixins is to use it along with “@content” directive. This way, you can provide the mixin with block of content. A good way to use this is for creating media queries.
Sass:
// Mixin for media query @mixin media($screen-width) { @media only screen and (max-width: $screen-width) { @content; } } // Use the media query mixin with @content directive .container { @include media(768px) { max-width: 690px; } } // Mixin for retina display media query @mixin retina { @media only screen and (-webkit-min-device-pixel-ratio: 2), only screen and (min--moz-device-pixel-ratio: 2), only screen and (-o-min-device-pixel-ratio: 2/1), only screen and (min-device-pixel-ratio: 2), only screen and (min-resolution: 192dpi), only screen and (min-resolution: 2dppx) { @content; } } .hero { background-image: url(/images/image.png); @include retina { background-image: url(/images/[email protected]); } }
CSS:
@media only screen and (max-width: 768px) { .container { max-width: 690px; } } .hero { background-image: url(/images/image.png); } @media only screen and (-webkit-min-device-pixel-ratio: 2), only screen and (min--moz-device-pixel-ratio: 2), only screen and (-o-min-device-pixel-ratio: 2 / 1), only screen and (min-device-pixel-ratio: 2), only screen and (min-resolution: 192dpi), only screen and (min-resolution: 2dppx) { .hero { background-image: url(/images/[email protected]); } }
Imports and partials
The last thing we will touch upon to help you learn Sass is @import directive. Along with variables, this was another major reason for me to learn Sass. With Sass, you can split your stylesheet into unlimited number of files. Then, you use @import directive to import these chunks into single file. When you compile this file, Sass will automatically import content from all files and create one CSS stylesheet. Make sure to use correct names of files to import. Otherwise, Sass will throw an error.
Sass:
// This is _base.scss file html, body { padding: 0; margin: 0; } html { font-size: 100%; } body { font: 16px "Roboto", arial, sans-serif; color: #111; } // This is _typography.scss file h1, h2, h3 { margin-top: 0; font-weight: 200; } h1 { margin-bottom: 26px; font-size: 40px; line-height: 52px; } h2 { margin-bottom: 18px; font-size: 27px; line-height: 39px; } h3 { margin-bottom: 18px; font-size: 22px; line-height: 26px; } // This is main.scss // Note: you don’t have to use “_” in filenames when you import files /* Main stylesheet */ @import 'base'; @import 'typography';
CSS:
/* Main stylesheet */ html, body { padding: 0; margin: 0; } html { font-size: 100%; } body { font: 16px "Roboto", arial, sans-serif; color: #111; } h1, h2, h3 { margin-top: 0; font-weight: 200; } h1 { margin-bottom: 26px; font-size: 40px; line-height: 52px; } h2 { margin-bottom: 18px; font-size: 27px; line-height: 39px; } h3 { margin-bottom: 18px; font-size: 22px; line-height: 26px; }
Important thing to mention is that you can use imports whenever you want. You can import file A in the middle of the file B and then import file B into your main Sass stylesheet. The only thing you must remember is to use the right order of files.
Sass:
// File _base.scss html, body { padding: 0; margin: 0; } @import 'typography'; nav { list-style-type: none; } nav a { text-decoration: none; } // File main.scss /* Main stylesheet */ @import 'base';
CSS:
/* Main stylesheet */ html, body { padding: 0; margin: 0; } h1, h2, h3 { margin-top: 0; font-weight: 200; } nav { list-style-type: none; } nav a { text-decoration: none; }
Closing thoughts on how to learn Sass
This is all I have for you today on how to learn Sass. My intention for this article was to give you enough information to get started with Sass. Hopefully, this article makes this journey to learn Sass as easy as possible for you. Keep in mind that what we discussed today were only the basics. We barely scratched the surface. If you want to not only learn Sass, but master it, there is more we need to talk about. Don’t worry. We will cover these advanced topics in another article next week.
For now, take some time, go through the topics we discussed today and practice your new knowledge. Doing so will help you prepare for the more advanced techniques and features Sass can provide you with. So, stay tuned for the sequel. Until next time, have a great day!
Thank you very much for your time.
Want more?
If you liked this article, please subscribe or follow me on Twitter.
The post The Beginner’s Guide to Learn Sass – Mastering the Basics of Sass appeared first on Alex Devero Blog.
1 note
·
View note
Link
Progressive Web App is the new and trending way to bring a native app feeling into a normal or traditional web app. Progressive Web Apps are very much in use by some of the biggest companies like Twitter, Forbes, Alibaba, Instagram, Flipkart e.t.c and have gained popularity.
So in this tutorial, we’ll be turning our already existing website into a Progressive Web App. Let’s Get Started :)
Intro
I’m sure by now you must have heard or read about Progressive Web Applications and if you haven’t here is it.
A progressive web application (PWA) is a type of application software delivered through the web, built using common web technologies including HTML, CSS, and JavaScript. It is intended to work on any platform that uses a standards-compliant browser. Functionality includes working offline, push notifications, and device hardware access, enabling creating user experiences similar to native applications on desktop and mobile devices.
Progressive Web Apps are largely characterized by the following:
Reliable — They load instantly and never show the “No Internet Connection” page, even in uncertain network conditions with help from Service workers caching.
Fast — They respond quickly to user interactions with smooth animations.
Engaging — They feel like a natural app on the device, with immersive user experience.
Requirements for this tutorial
Basic web design skills (HTML, CSS & JS)
You need to be running on HTTPS
A working website you wish to tun to PWA.
Like I said, building a Progressive Web App is quite simple and easy if you understand the whole concept and how it actually works.
What Makes up a PWA
Web Manifest
Service Worker
Your static website
Let’s Start
For the sake of this tutorial, we’ll be turning a simple random quote web app to a PWA. All the files are hosted here on Github and the demo is available Here
So for the sake of making sure things go right, we’ll rebuild the simple random quote web app using HTML, CSS, and JavaScript.

That's how the final project will look like.
So let’s build the UI.
Make a new directory and create these files
index.html
css/style.css
js/app.js
Let's Build the Markup.
Add the below codes in the index.html
<!DOCTYPE html> <html lang="en"> <head> <meta charset="UTF-8"> <meta name="viewport" content="width=device-width, initial-scale=1.0"> <meta http-equiv="X-UA-Compatible" content="ie=edge"> <title>The Igala Facts you never knew</title> <link rel="stylesheet" href="css/style.css"> <link rel="stylesheet" href="https://maxcdn.bootstrapcdn.com/font-awesome/4.5.0/css/font-awesome.min.css"> <link href='https://fonts.googleapis.com/css?family=Roboto+Slab:400,700' rel='stylesheet' type='text/css'> <link rel="stylesheet" href="https://maxcdn.bootstrapcdn.com/bootstrap/3.3.5/css/bootstrap.min.css"> <link rel="stylesheet" href="https://cdnjs.cloudflare.com/ajax/libs/animate.css/3.2.3/animate.min.css"> </head> <body> <div class="container"> <div class="row"> <div class="col-sm-6"> <h1><span class="main-color">Random Igala</span><br />Facts</h1> <p>The best facts about Igala in one place. You can easily see the best facts and share the ones you love on twitter with one click.</p> </div> <div class="col-sm-6"> <div class="row"> <div class="col-xs-6"> <a id="next-quote" class="btn btn-lg btn-default btn-block" href="#"><i class="fa fa-refresh"></i> Next Fact</a> </div> <div class="col-xs-6"> <a id="share" class="btn btn-lg btn-default btn-block" href="#" target="_top"><i class="fa fa-twitter"></i> Share</a> </div> </div> <div id="quote-box"> <i id="quote-left" class="fa fa-quote-left"></i> <p id="quote"></p> <span id="author" class="main-color"></span> <i id="quote-right" class="fa fa-quote-right"></i> </div> <div class="row"> <div class="col-xs-12"> <ul> <li>Follow Us</li> <li><a class="main-color" href="https://facebook.com/theigaladigital" target="_blank">@theigaladigital</a></li> </ul> </div> </div> </div> </div> </div> </div> <div id="hidden"></div> <script src="https://cdnjs.cloudflare.com/ajax/libs/jquery/2.1.3/jquery.min.js"></script> <script src="js/app.js"></script> </body> </html>
Like I said earlier, this tutorial is mainly teaching you how to convert your already existing website into a Progressive Web App so I won’t be going in detail on the HTML or rest.
— Add this in css/app.css
body { background-color: rgb(0, 0, 0); color: white; padding-top: 50px; font-size: 18px; font-family: 'Roboto Slab', serif; } h1 { font-size: 4em; line-height: 70px; margin-bottom: 40px; font-weight: bold; } a:hover, a:focus, a:active { text-decoration: none; color: white; transition: color 0.8s; } .main-color { color: yellow; text-shadow: 1px 1px 0 rgba(255, 255, 255, 0.2); font-weight: bold; } #quote-box { background-color: rgba(255, 255, 255, 0.3); border-radius: 10px; padding: 100px 40px; position: relative; margin-top: 20px; } #quote-left, #quote-right { color: yellow; font-size: 3em; position: absolute; } #quote-left { top: 20px; left: 20px; } #quote-right { bottom: 20px; right: 20px; } #quote { font-size: 1.5em; text-align: center; } #author { position: absolute; font-size: 1.1em; left: 50px; bottom: 30px; } .btn { border-radius: 10px; color: yellow; border: 1px solid white !important; transition: background 0.8s, color 0.8s; line-height: 30px; margin-top: 30px; } .btn:hover, .btn:active, .btn:focus { color: white !important; background-color: yellow !important; box-shadow: none; } ul { list-style-type: none; padding: 0; margin: 10px 0 0 0; float: right; white-space: nowrap; overflow: hidden; } li { display: inline-block; margin: 0 0 0 1px; } #hidden { display: none; }
Now your app should look like this:

If you look up closely, you will discover no quote shows, so we’ll have to add JavaScript functionality that handles that.
— Add this in js/app.js
$(document).ready(function () { $("#next-quote").on("click", function (e) { e.preventDefault(); var randomQuoteNumber = getRandomQuoteNumber(); updateQuote(randomQuoteNumber); }); var q = location.search.split("?q=")[1]; if (q >= 0 && q < quotes.length) { updateQuote(q); } else { $("#next-quote").click(); } }); function updateQuote(quoteNumber) { var randomQuote = quotes[quoteNumber]; $("#quote").html(randomQuote.quote); $("#author").html(randomQuote.author); $("#quote-box").removeClass().addClass("animated bounceIn").one('webkitAnimationEnd mozAnimationEnd MSAnimationEnd oanimationend animationend', function() { $(this).removeClass(); }); $("#share").attr("href", "https://twitter.com/intent/tweet?text=\"" + encodeURIComponent($("#hidden").html(randomQuote.quote).text()) + "\" https://igalafacts.igaladigital.org?q=" + quoteNumber); } function getRandomQuoteNumber() { return Math.floor(Math.random() * quotes.length); } var quotes = [{"author": "IgalaDigital", "quote": "Did You Know That Ojaina is the place where the Attah's of Igala are burried?"}, {"author": "IgalaDigital", "quote": "Did You Know That the first aircraft that visited the Igala Kingdom landed at Idah in 1955?"}, {"author": "IgalaDigital", "quote": "Did You Know That Attah Ameh Oboni, had seen to the completion of an aerodrome in 1954 at Idah?"}, {"author": "Ilemona", "quote": "Did you know that the Igala alphabet was adopted from the English alphabet. The latter has five (5) vowels: “a,” “e,” “i,” “o,” “u.”?"}, {"author": "Achimugu Ilemona", "quote": "Did you know the Igala alphabet is made up of thirty-one (31) letters: some vowels, others consonants?"}, {"author": "IgalaDigital", "quote": "Did You Know That Ojaina is a restricted place only allowed for members from the Attah Ruling House?"}, {"author": "IgalaDigital", "quote": "Did you know that Ata Ameh Oboni speak fluently in Igala, Ebira & Hausa?"}, {"author": "Onuche Joseph", "quote": "Did you know that the Ígálá language has seven (7) vowels: “a,” “e,” “ẹ,” “i,” “o,” “ọ,” “u” (encompassing both all the 5 English vowels and two indigenous ones, ‘ẹ’ and ‘ọ’).?"}, {"author": "Naomi", "quote": "Did You Know That Idah is also called Idah Alu Ogo Oja Abutu Eje?"}, {"author": "Inikpi", "quote": "Did you know that Abutu- Eje was the first Igala Ruler?"}, {"author": "IgalaDigital", "quote": "Did you know that you may likely come home to meet one of your family member dead if you kill an animal at Ojaina?"}, {"author": "IgalaDigital", "quote": "Did you know that ata Ameh Oboni took his own life on the night of June 26, 1956?"}, {"author": "IgalaDigital", "quote": "Did you know that the mighty Ata Ameh Oboni died at the age of 51?"}, {"author": "IgalaDigital", "quote": "Did you know that attah Ameh Oboni schooled in Okene(Ebira Land) between 1934 and 1939? Learned in Hausa Literature"}, {"author": "IgalaDigital", "quote": "Did you know that ata Ameh Oboni started off as a market stall tax collector for Idah and Ejule market?"}, {"author": "IgalaDigital", "quote": "Did you know that Ata Obaje Ocheje moved Ameh Oboni from being a market stall tax collector to be come a cheif as onu ugwolawo due to his hard work?"}, {"author": "IgalaDigital", "quote": "Did you know that Ameh Oboni was moved to ankpa from ugwolawo as the judge, commonly known as *Wakali, to be in charge of seven districts?"}, {"author": "IgalaDigital", "quote": "Did you know that Patrick A. Okpanachi, Mallam Garba and Peter Achimugwu were the first in Igala Land that speaks and write in English Language?"}, {"author": "IgalaDigital", "quote": "Did you know that Peter Achimugwu was the man that led the campaign to remove Ameh Oboni as the Attah?"} ]
This is just basic JavaScript, if you have no idea what all this means, you should get JavaScript Teacher’s Grammar JavaScript book. This will teach you all the basics and contents of Modern JavaScript. Get a free copy here
Now you should have a functioning app with the facts showing.
Let’s Turn it to a PWA
The three basic criteria for a PWA:
Web Manifest
The web app manifest is a JSON file that tells the browser about your Progressive Web App and how it should behave when installed on the user’s desktop or mobile device. A typical manifest file includes the app name, the icons the app should use, and the URL that should be opened when the app is launched.
Service Worker A service worker is a script that allows your browser to run in the background, separate from a web page, opening the door to features that don’t need a web page or user interaction. Today, they already include features like push notifications and background sync.
Icons These icons control your application and are provided in different sizes for different devices. Your PWA app will not work without them.
Now let’s get started.
Before we proceed, ensure you’re using a live server Use (Web server for Chrome, or VSCode Live Server
Create the following files:
sw.js (In root directory)
manifest.json (In root directory)
img/icons (Where we’d store our icons
First, we need to check if the browser supports service workers and register a new one.
In js/app.js add
if ('serviceWorker' in navigator) { window.addEventListener('load', () => { navigator.serviceWorker.register('../sw.js').then( () => { console.log('Service Worker Registered') }) }) }


Your final app.js should look like this
$(document).ready(function () { $("#next-quote").on("click", function (e) { e.preventDefault(); var randomQuoteNumber = getRandomQuoteNumber(); updateQuote(randomQuoteNumber); }); var q = location.search.split("?q=")[1]; if (q >= 0 && q < quotes.length) { updateQuote(q); } else { $("#next-quote").click(); } }); function updateQuote(quoteNumber) { var randomQuote = quotes[quoteNumber]; $("#quote").html(randomQuote.quote); $("#author").html(randomQuote.author); $("#quote-box").removeClass().addClass("animated bounceIn").one('webkitAnimationEnd mozAnimationEnd MSAnimationEnd oanimationend animationend', function() { $(this).removeClass(); }); $("#share").attr("href", "https://twitter.com/intent/tweet?text=\"" + encodeURIComponent($("#hidden").html(randomQuote.quote).text()) + "\" https://igalafacts.igaladigital.org?q=" + quoteNumber); } function getRandomQuoteNumber() { return Math.floor(Math.random() * quotes.length); } var quotes = [{"author": "IgalaDigital", "quote": "Did You Know That Ojaina is the place where the Attah's of Igala are burried?"}, {"author": "IgalaDigital", "quote": "Did You Know That the first aircraft that visited the Igala Kingdom landed at Idah in 1955?"}, {"author": "IgalaDigital", "quote": "Did You Know That Attah Ameh Oboni, had seen to the completion of an aerodrome in 1954 at Idah?"}, {"author": "Ilemona", "quote": "Did you know that the Igala alphabet was adopted from the English alphabet. The latter has five (5) vowels: “a,” “e,” “i,” “o,” “u.”?"}, {"author": "Achimugu Ilemona", "quote": "Did you know the Igala alphabet is made up of thirty-one (31) letters: some vowels, others consonants?"}, {"author": "IgalaDigital", "quote": "Did You Know That Ojaina is a restricted place only allowed for members from the Attah Ruling House?"}, {"author": "IgalaDigital", "quote": "Did you know that Ata Ameh Oboni speak fluently in Igala, Ebira & Hausa?"}, {"author": "Onuche Joseph", "quote": "Did you know that the Ígálá language has seven (7) vowels: “a,” “e,” “ẹ,” “i,” “o,” “ọ,” “u” (encompassing both all the 5 English vowels and two indigenous ones, ‘ẹ’ and ‘ọ’).?"}, {"author": "Naomi", "quote": "Did You Know That Idah is also called Idah Alu Ogo Oja Abutu Eje?"}, {"author": "Inikpi", "quote": "Did you know that Abutu- Eje was the first Igala Ruler?"}, {"author": "IgalaDigital", "quote": "Did you know that you may likely come home to meet one of your family member dead if you kill an animal at Ojaina?"}, {"author": "IgalaDigital", "quote": "Did you know that ata Ameh Oboni took his own life on the night of June 26, 1956?"}, {"author": "IgalaDigital", "quote": "Did you know that the mighty Ata Ameh Oboni died at the age of 51?"}, {"author": "IgalaDigital", "quote": "Did you know that attah Ameh Oboni schooled in Okene(Ebira Land) between 1934 and 1939? Learned in Hausa Literature"}, {"author": "IgalaDigital", "quote": "Did you know that ata Ameh Oboni started off as a market stall tax collector for Idah and Ejule market?"}, {"author": "IgalaDigital", "quote": "Did you know that Ata Obaje Ocheje moved Ameh Oboni from being a market stall tax collector to be come a cheif as onu ugwolawo due to his hard work?"}, {"author": "IgalaDigital", "quote": "Did you know that Ameh Oboni was moved to ankpa from ugwolawo as the judge, commonly known as *Wakali, to be in charge of seven districts?"}, {"author": "IgalaDigital", "quote": "Did you know that Patrick A. Okpanachi, Mallam Garba and Peter Achimugwu were the first in Igala Land that speaks and write in English Language?"}, {"author": "IgalaDigital", "quote": "Did you know that Peter Achimugwu was the man that led the campaign to remove Ameh Oboni as the Attah?"} ] if ('serviceWorker' in navigator) { window.addEventListener('load', () => { navigator.serviceWorker.register('../sw.js').then( () => { console.log('Service Worker Registered') }) }) }
We’re going to use the Workbox library to power our service worker
Workbox is a set of libraries and Node modules developed by Google that make it easy to cache assets and take full advantage of features used to build Progressive Web Apps.
The idea of our service worker is to cache all files (Fonts, JavaScript, CSS, Images, e.t.c) so we can access them offline after the page loads.
The important thing to understand about the Service Worker is that you are in control of the network. You get to decide what is cached, how it is cached, and how it should be returned to the user.
— In sw.js add this:
importScripts('https://storage.googleapis.com/workbox-cdn/releases/4.3.1/workbox-sw.js'); if (workbox) { console.log("Yay! Workbox is loaded !"); workbox.precaching.precacheAndRoute([]); /* cache images in the e.g others folder; edit to other folders you got and config in the sw-config.js file */ workbox.routing.registerRoute( /(.*)others(.*)\.(?:png|gif|jpg)/, new workbox.strategies.CacheFirst({ cacheName: "images", plugins: [ new workbox.expiration.Plugin({ maxEntries: 50, maxAgeSeconds: 30 * 24 * 60 * 60, // 30 Days }) ] }) ); /* Make your JS and CSS ⚡ fast by returning the assets from the cache, while making sure they are updated in the background for the next use. */ workbox.routing.registerRoute( // cache js, css, scc files /.*\.(?:css|js|scss|)/, // use cache but update in the background ASAP new workbox.strategies.StaleWhileRevalidate({ // use a custom cache name cacheName: "assets", }) ); // cache google fonts workbox.routing.registerRoute( new RegExp("https://fonts.(?:googleapis|gstatic).com/(.*)"), new workbox.strategies.CacheFirst({ cacheName: "google-fonts", plugins: [ new workbox.cacheableResponse.Plugin({ statuses: [0, 200], }), ], }) ); // add offline analytics workbox.googleAnalytics.initialize(); /* Install a new service worker and have it update and control a web page as soon as possible */ workbox.core.skipWaiting(); workbox.core.clientsClaim(); } else { console.log("Oops! Workbox didn't load 👺"); }
Now our service worker works and would cache files once the page loads.
Now let’s make our app installable.
— Add this in manifest.json
{ "name": "Igala Facts", "short_name": "Igala Facts", "icons": [ { "src": "img/icons/icon-72x72.png", "sizes": "72x72", "type": "image/png" }, { "src": "img/icons/icon-96x96.png", "sizes": "96x96", "type": "image/png" }, { "src": "img/icons/icon-128x128.png", "sizes": "128x128", "type": "image/png" }, { "src": "img/icons/icon-144x144.png", "sizes": "144x144", "type": "image/png" }, { "src": "img/icons/icon-152x152.png", "sizes": "152x152", "type": "image/png" }, { "src": "img/icons/icon-192x192.png", "sizes": "192x192", "type": "image/png" }, { "src": "img/icons/icon-384x384.png", "sizes": "384x384", "type": "image/png" }, { "src": "img/icons/icon-512x512.png", "sizes": "512x512", "type": "image/png" } ], "start_url": "/index.html", "display": "standalone", "background_color": "#000", "theme_color": "#ffff00" }
Your PWA Icons sizes should be in px and in the following sizes: 72x72 , 96x96 , 128x128 , 144x144 , 152x152 , 192x192 , 384x384 , 512x512 You can use the Web Manifest Generator to generate your manifest.json

Now we need to connect our web app to the manifest to allow “add to home screen” from that page. Add this to your index.html
<link rel="manifest" href="/manifest.json" /> <meta name="theme-color" content="#333" />
If you have multiple pages, you need to add this to all of them. You can also use the same theme-color you used in manifest.json here
Now your final index.html should look like this
<!DOCTYPE html> <html lang="en"> <head> <meta charset="UTF-8"> <meta name="viewport" content="width=device-width, initial-scale=1.0"> <meta http-equiv="X-UA-Compatible" content="ie=edge"> <title>The Igala Facts you never knew</title> <link rel="stylesheet" href="css/style.css"> <link rel="stylesheet" href="https://maxcdn.bootstrapcdn.com/font-awesome/4.5.0/css/font-awesome.min.css"> <link href='https://fonts.googleapis.com/css?family=Roboto+Slab:400,700' rel='stylesheet' type='text/css'> <link rel="stylesheet" href="https://maxcdn.bootstrapcdn.com/bootstrap/3.3.5/css/bootstrap.min.css"> <link rel="stylesheet" href="https://cdnjs.cloudflare.com/ajax/libs/animate.css/3.2.3/animate.min.css"> <link rel="manifest" href="manifest.json" /> <meta name="theme-color" content="yellow" /> </head> <body> <div class="container"> <div class="row"> <div class="col-sm-6"> <h1><span class="main-color">Random Igala</span><br />Facts</h1> <p>The best facts about Igala in one place. You can easily see the best facts and share the ones you love on twitter with one click.</p> </div> <div class="col-sm-6"> <div class="row"> <div class="col-xs-6"> <a id="next-quote" class="btn btn-lg btn-default btn-block" href="#"><i class="fa fa-refresh"></i> Next Fact</a> </div> <div class="col-xs-6"> <a id="share" class="btn btn-lg btn-default btn-block" href="#" target="_top"><i class="fa fa-twitter"></i> Share</a> </div> </div> <div id="quote-box"> <i id="quote-left" class="fa fa-quote-left"></i> <p id="quote"></p> <span id="author" class="main-color"></span> <i id="quote-right" class="fa fa-quote-right"></i> </div> <div class="row"> <div class="col-xs-12"> <ul> <li>Follow Us</li> <li><a class="main-color" href="https://facebook.com/theigaladigital" target="_blank">@theigaladigital</a></li> </ul> </div> </div> </div> </div> </div> </div> <div id="hidden"></div> <script src="https://cdnjs.cloudflare.com/ajax/libs/jquery/2.1.3/jquery.min.js"></script> <script src="js/app.js"></script> </body> </html>
Congratulations, you’ve successfully turned your website to a Progressive Web App.
Conclusion
Throughout this article, we have seen how simple and fast it is to build a PWA by adding a manifest file and a service worker, it increases a lot the user experience of our traditional web app. Because PWAs are fast, secure, reliable and the most important, they support offline mode.
Many frameworks out there comes now with a service worker file already set-up for us, however, knowing how to implement it with Vanilla JavaScript can help you understand PWAs.
P.S: If you ran into issues or problem, it’s probably a problem with HTTPS. PWA doesn’t work on HTTP, so make sure you’re running this with either http-server or live-server if you’re working from your local machine
Thank you for reading!
0 notes
Text
Friday-ish Links
Learn Fast and Read Things: why (and how) we started a technical reading group
I've long wanted to facilitate a reading group or three. I'm deeply in love with reading and I think that we all need to do more of it, especially of non-fiction books.
via Issue #392, 29th May 2020 - SoftwareLeadWeekly
"Vigilance is not a strategy"
This places additional responsibilities on the open source maintainer. One law we see time and time again is “you cannot fix things with discipline.” First of all, they simply don’t work: see all the data breaches at professional, “responsible” companies. Also, discipline approaches do not scale. This problem happened because a single contributor for a single package made an error. At the time of the attack, Copay had thousands of package dependencies. That means that thousands of maintainers cannot make any mistakes or else the system is in trouble. And even if they all have perfect discipline, this still doesn’t prevent dependency attacks. A malicious actor could seed a package and use it later, or steal someone else’s account.
STAMPing on event-stream • Hillel Wayne
Showed my 2 oldest kids Jaws for the first time. I had forgotten so much of the structure of that movie, especially of the first two acts. It was a good time.
My Dad wanted to watch a scary movie with the kids but he's not a big fan of scary movies at all so he chose Rear Window. What a masterpiece. There are some comically bad acting moments though.
A friend of my wife's recommended that she watch Seventh Seal. It did not dissapoint. Definitely going to rewatch it.
I played through Antichamber with the kids. What a mind-bender! This is way up there in terms of my favorite puzzle games that I've played. I admit though that I had to cheat a bit at the end. My one critique is that you can get quite lost.
We also just finished playing To The Moon. It was a really touching story that took about 4 hours for us to get through. Well worth the investment. It definitely touched on some darker/adultish themes so you may want to think twice before taking your family through it depending on your tolerance for that stuff.
And another game we recently finished was Brothers - A Tale of Two Sons. This one was also a satisfying puzzle experience and told its story without out any actual dialog or subtitles which was quite creative. There were some very intense emotional moments. Highly recommended.
Everything You Know About Latency Is Wrong – Brave New Geek
I'm having a hard time parsing this one. I need to go through it with someone who gets the Maths better than I do.
via Stuart Sierra on Twitter: "Most latency measurements are wrong https://t.co/T30WP73Q0d" / Twitter
LPT_LISA
There's a lot of really good advice here which is why I'm linking it at all but there's also a ton of misinformation as usual with linux/shell info you find on The Internet. ¯\_(ツ)_/¯
via Devops Weekly
Technology Radar | An opinionated guide to technology frontiers | ThoughtWorks
I haven't had much of a chance yet to explore this but the Radar is always worth taking the time to go through.
From 25 Minutes to 7 Minutes: Improving the Performance of a Rails CI Pipeline
Ooo I love the idea of setting a maximum test time and marking the test as skipped in CI if it exceeds it.
Making CIDER more language agnostic? (decoupling Clojure assumptions from CIDER's nREPL client) · Issue #2848 · clojure-emacs/cider
This could be an interesting development.
The Wrong Question About Docker and Kubernetes - DEV
I wish more people could understand that if you already are deploying immutable infrastructure and already follow 12Factor then Docker/k8s demand much more than they buy.
"Wow, maybe Corey's right when he refers to Kubernetes as overly complicated nonsense" isn't what I expected to read when I clicked this link, but y'know what? I'll take it.
via This Week in AWS #163
How AWS Lambda team made my two years old talk completely irrelevant
Serverless keeps moving. I need to explore it more. The more I see of k8s the more I feel like someone just needs to hide it from me and let me use it. Oh wait, ECS…
AWS CLI with jq and Bash - circuitpeople - Medium
If you're not already convinced that jq is amazing this post should convince you or nothing will. It's not the best formatted post I've ever seen though. jq is a tool I demand on my servers.
So You Suddenly Need to Reduce Your AWS Bill: 4 Things We Did – Patientco
Some good tips here and some more evidence of the pound of flesh k8s wants from you.
Re: name of a global variable to store the result of a function
Bash Builtins (Bash Reference Manual)
printf -v ... seems useful!
"Community Driven Development" by Christine Zagrobelny - YouTube
I liked both the social angle of this talk as well as they discussion of software development as a holistic thing where support and operation is just as if not more important than initial development.
Dead man's switch - Wikipedia
Want to Understand Computer Science? Study Abstraction.
I'm a firm believer in the statement that developers should understand in detail the layer beneath the abstraction layer they usually work at. Going beneath that is rarely important.
Gergely Orosz on Twitter: "Five senior devs in the room, arguing about how to proceed, not making any headway. You’re one of them. What do you do?" / Twitter
There are plenty of cynical responses, but also a lot of great resources and advice included for us to learn from. What would you do? I'd think "can we agree at least on the pains and requirements?", and then move to "who should own it? Who will wake up at night if it goes wrong? Is the decision reversible? Can we let them move forward and support them?"
Learn to never be wrong.
OPINIONS | SHIVAM DIXIT
I'm going to get a lot out of this over the next few years I think.
via Issue #391, 22nd May 2020 - SoftwareLeadWeekly
Elided Branches: Product for Internal Platforms
"These are some things I’ve observed and learned in this process. I share them with you because I think many folks in platform-type teams, especially engineers and those of you on platform teams without formal product managers, might benefit from understanding how to approach these problems." – if you're part of an engineering Platform team or have such team in your organization, share this post by Camille Fournier with them. Think a lot about how you build relationships, create visibility and put your customers first. We build systems, but it's humans who operate them.
via Issue #391, 22nd May 2020 - SoftwareLeadWeekly
Navigating the depths of nearly failing to profitability, Part 1: A Brewing storm | Tettra
Most companies talk about how they're killin' it, growing faster than ever and raising huge rounds of money with no pain. I wanted to share Andy Cook's story from Tettra because it's important to see how the struggle looks like from the inside. I'm cheering for them and for their herculean effort to stay alive and get to profitability. I highly recommend reading all 4 parts, of course.
via Issue #391, 22nd May 2020 - SoftwareLeadWeekly
Shane Parrish's answer to How can I get better at probabilistic thinking? - Quora
For those of you who didn't read about the topic so far or follow Shane Parrish (his podcast, the Knowledge Project, is one of my favorites), this is an excellent intro into one of the pieces that made me change the way I make decisions.
via Issue #391, 22nd May 2020 - SoftwareLeadWeekly
0 notes
Text
Demystifying CSS Pseudo-Classes (:nth-child vs. :nth-of-type)
Styles are applied to a web page using CSS selectors; selectors which make it possible for you to target a specific element or sets of elements. Usually, when you are starting with CSS, you’ll make use of element selectors before pivoting to use classes and IDs.
As powerful as these selectors are, they can be quite limiting, making it impossible to select an element based on its state. If you’ve ever worked with frontend frameworks like React and Vue, you possibly understand what state means. I am not referring to the overall state of the application, but the state of elements within the HTML code.
The humble link is a simple example–it can be created using an anchor tag <a>. The link can then have different states:
before the link is clicked
when a user hovers a mouse cursor over the link
when the link has been visited
Selectors used to target elements depending on their state are called pseudo-classes. nth-child and nth-of-type are pseudo-classes which select an element based on its position (the position of the element is also considered a state). Let’s take a closer look.
How to Work with :nth-child()
The nth-child pseudo-class is used to select an element based on its position in a list of siblings. There are things to take note of here:
Siblings: where a parent and children elements are present. In selecting a sibling you’re trying to target a specific child of the chosen parent. A ul and bunch of li are examples of parent and children elements.
The position of the element in the list of its siblings is determined by values that are passed to the pseudo-class.
We’ll be making use of the HTML code below to learn how nth-child works.
<ul> <li>Ruby</li> <li>Python</li> <li>JavaScript</li> <li>Go</li> <li>PHP</li> <li>Scala</li> <li>Java</li> <li>Kotlin</li> <li>C++</li> <li>C</li> </ul>
There are two different ways of specifying the position of the element: the use of keywords and functional notations.
:nth-child(even/odd)
If using keywords you can specify elements whose position is either an even or an odd number, like this:
ul :nth-child(even) { color: red; } ul :nth-child(odd) { color: gray; }
This gives us the following:
:nth-child(2)
When we specify a particular number (like the 2 in this example), we're selecting the element in the list of siblings whose position matches the number we’ve passed. Here we’re targeting the second child of the unordered list.
ul { color: gray; } ul :nth-child(2) { color: red; }
You can probably imagine what the result looks like:
One common pitfall here is after specifying the element, you might add a new element (like a heading) to the parent without realising the selected element will change. To show this, let’s add a heading to the list like this:
<ul> <h3>Programming Languages</h3> <li>Ruby</li> <li>Python</li> <li>JavaScript</li> <li>Go</li> <li>PHP</li> <li>Scala</li> <li>Java</li> <li>Kotlin</li> <li>C++</li> <li>C</li> </ul>
Even though this is actually invalid use of HTML, browsers will still render it fine, and in this case the first li element will be selected as it is now the second child of the unordered list.
:nth-child(An)
Okay, now we’re taking it up a notch. Here the elements (plural) we select will be determined using functional notation. n denotes a counter and A represents the size of the cycle, giving us a sequence. For example, when we pass 2, it will select elements in the sequence 2, 4, 6, and so on:
ul :nth-child(2n) { color: red; }
To see it in action, let’s go back to our HTML code and add a few items to the list. We’ll also make the list an ordered list so that we can clearly see the items’ numbers:
<ol> <li>Ruby</li> <li>Python</li> <li>JavaScript</li> <li>Go</li> <li>PHP</li> <li>Scala</li> <li>Java</li> <li>Kotlin</li> <li>C++</li> <li>C</li> <li>Cobol</li> <li>Fortran</li> </ol>
Our result is as follows:
:nth-child(An+B)
Here we’ve added an extra calculation to our cycles: +B. The elements whose position in the list of siblings matches the pattern will get selected. We need to know how the calculation happens, so let’s try a functional notation like this:
ol { color: gray; } ol :nth-child(3n+1) { color: red; }
This will select the items whose position matches 1, 4, 7, 10, and so on:
The calculation starts counting from 0, which is the default value of n, and as such the elements to be styled will be calculated like this:
First Element: 3(0) + 1 = 1.
Second Element: 3(1) + 1 = 4.
Third Element: 3(2) + 1 = 7.
Fourth Element: 3(3) + 1 = 10.
Think of it as an algebraic equation where the value of n increases arithmetically, and the element to be styled is the result of the equation. Here is another example, which you can edit yourself to see what happens:
ol :nth-child(3n+2) { color: red; }
You can also use this method to select even numbers, using the formula:
ol :nth-child(2n+0) { color: red; }
And odd numbers can be selected using:
ol :nth-child(2n+1) { color: red; }
How to Work with :nth-of-type()
In all the examples we have seen for the nth-child pseudo-class, it is important to note that the goal is to select elements in a list of siblings. This does not take into account the element type. To ensure the selection is also scoped to a particular type, we can make use of the nth-of-type pseudo-class.
To see this at work let’s edit the HTML code to look like this (again, this is technically misuse of HTML, but browsers will interpret it just fine):
<ol> <p>This is a first paragraph<p> <li>Ruby</li> <li>Python</li> <li>JavaScript</li> <li>Go</li> <li>PHP</li> <p>Here is a paragraph</p> <li>Java</li> <li>Kotlin</li> <li>C++</li> <li>C</li> <li>Cobol</li> <li>Fortran</li> </ol>
To select the li elements whose position is an odd number, we can do this,
ol li:nth-of-type(odd) { color: red; }
which gives us:
To select the li elements whose position is an even number, we would do
ol li:nth-of-type(even) { color: red; }
You may think that using nth-child would work just as effectively as long as you’re specifying the li, for example:
ol li:nth-child(odd) { color: red; }
but that isn’t the case. Try it yourself!
Conclusion
These pseudo-classes come in handy when you have to select specific elements in a list of siblings. To learn more about them, check the MDN Web Docs for nth-child() and nth-of-type().
More CSS Fundamentals
Learn more about CSS, and CSS selectors with these fundamental guides:
CSS
What is CSS Specificity and How Does it Work?
Kingsley Silas Chijioke
Web Development
The 30 CSS Selectors You Must Memorize
Jeffrey Way
CSS
7 CSS Units You Might Not Know About
Jonathan Cutrell
0 notes
Text
Sitemaps & SEO: Are Sitemaps Still Important for SEO in 2019?
As SEO evolves, it gets more and more human-centered and people in the industry begin to question old techniques, targeted mostly at search engines. Such is the case with Sitemaps, which have been around for ages.
Do sitemaps still matter for SEO in 2019 or are they just a waste of time? When and why should you use them? And how can you optimize them for maximum SEO results?
In this article, you’ll find out the answers to all those questions, so keep reading!
What Are Sitemaps & How Do They Work?
Are Sitemaps Important for SEO?
How to Add a Sitemap to Your Website
How to Optimize Your Sitemaps for SEO
What Are Sitemaps & How Do They Work?
Sitemaps are files used to tell search engines about pages that are available for crawling on websites. These files are simply just a list of URLs that contain some extra information about the pages, such as when they were last updated, for example.
Sitemap Types
There are two types of sitemap formats, but they can be split into multiple categories, depending on their purpose.
First, we have HTML sitemaps and XML sitemaps.
HTML sitemaps are basically just web pages containing href tags which link to other pages. They are useful for users when seeking something but also for search engines. Crawlers discover your website by ‘clicking’ from link to link until there are no more new links to be found.
If all your website’s links are in a sitemap, be it HTML or XML, search engines will find those pages more easily.
A HTML sitemap would look something like this to a user:
The HTML code in the backend would be pretty simple as well:
<ul> <li><a href="/">Home</a></li> <ul> <li><a href="/contact">Contact</a></li> <li><a href="/about">About</a></li> <li><a href="/products">Products</a></li> <ul> <li><a href="/product-1">Product 1</a></li> <li><a href="/product-2">Product 2</a></li> </ul> </ul> </ul>
Of course, you’re free to add to the HTML sitemap page any CSS you want to style it, as well as a navigation menu, structure or titles.
A good sitemap example in HTML format can be found on the Disney Store. As you can see, all the important categories are listed there and you can basically browse the entire site from that page alone.
However, the standardized format for distributing sitemaps is the XML format. Search engines use these to read more information about the page, such as the title, directly from the sitemap file.
You can also upload XML files to tools such as the Search Console (former Google Webmaster Tools), where Google will validate it and check it from time to time.
An XML Sitemap is a little bit more difficult to write, as it contains all the metadata about the page in a standardized format. While visually the XML sitemap might not look very different, at a core level you can immediately see they are a lot more complex:
<?xml version="1.0" encoding="UTF-8"?> <urlset xmlns="http://www.sitemaps.org/schemas/sitemap/0.9"> <url> <loc>http://www.example.com/</loc> <lastmod>2005-01-01</lastmod> <changefreq>monthly</changefreq> <priority>0.8</priority> </url> </urlset>
You can see some special tags there such as <loc> and <lastmod>. These two tags are very important, so make sure you add them to your sitemap! The other two might be ignored by Google. We’ll talk about them soon.
Note that the URLs in the XML sitemaps are absolute. This means that you can’t just add /your-page but you must add https://yoursite.com/your-page instead.
If we go back to our Disney example, we can see that the site also has a XML Sitemap, targeted at search engines.
You can go one step further and show sitemaps only to Search Engines. You can differentiate via the user agent and show an HTML sitemap instead if a real person visits the page.
Yoast SEO already does this. Visiting a /sitemap_index.xml file on a WordPress website will return an HTML sitemap, while hitting CTRL + U to view the source will return the actual XML sitemap.
Sitemap Categories
As previously mentioned, sitemaps can be split into categories, depending on their purpose.
Normal sitemaps: These are by far the most common sitemaps. Pretty much every website out there tends to have one. That’s because most platforms include some sort of sitemap generation system by default.
They are delivered in XML format and can usually be found on the relative path /sitemap.xml.
Most WordPress websites have their sitemap on /sitemap_index.xml. That is the default URL for sitemaps generated by the Yoast SEO plugin.
The sitemap is delivered by Yoast SEO that way with a purpose. XML files can only become so large before it’s unreliable for crawlers to download and read them.
There’s a limit of 50,000 URLs and 50MB for an XML file, but Google limits that to only 10MB so make sure your file doesn’t have more than 50,000 URLs and 10MB.
If you have a particularly large website, you can break your sitemap into multiple smaller sitemaps and use a sitemap index file to manage them.
Search engines will know how to crawl these as long as you provide the right format for your index file.
<sitemapindex xmlns=”http://www.sitemaps.org/schemas/sitemap/0.9″> <sitemap> <loc>https://example.com/pages-sitemap.xml</loc> <lastmod>2019-04-17T15:12:13+00:00</lastmod> </sitemap> <sitemap> <loc>https://example.com/product-sitemap.xml</loc> <lastmod>2019-05-15T14:04:43+00:00</lastmod> </sitemap> </sitemapindex>
Then, on each XML sitemap, you can use the regular format mentioned above.
Image sitemaps: Normally, images can be added to a regular XML sitemap. However, if you have a lot of them, it might be a good idea to create a separate XML file only for your images.
More information on how to properly add images to your sitemaps can be found here.
Video sitemaps: You can also add videos to your sitemaps. However, similarly to images, the videos are listed in the sitemap in relation to a page / URL.
If you only have a few pages that contain video, just add that information in the normal sitemap. However, if you have an entire section of your website full with videos, then you might consider splitting them into a separate sitemap.
More info on how to properly include videos in your sitemaps can be found here.
News sitemaps: If you have a news website, then you can specify it in your sitemap. Since Google has a News section, it can really come in handy when quick indexation is a requirement.
More details about how to properly create a news sitemap can be found here.
Last but not least, Sitemaps can be static or dynamic. I would see no purpose in having a static sitemap though, as it would have to be updated simultaneously with the addition of new pages on the website.
If the goal of the sitemap is to let search engines know about new pages, then it should be updated as soon as the pages are published.
This means that you need a dynamic sitemap in order for it to be effective. Keep reading and you’ll learn how to generate a dynamic sitemap for your website.
Are Sitemaps Important for SEO?
First, let’s hear what Matt Cutts has to say about this:
youtube
But hold your horses, as you’ll want to prioritize your tasks! There are other much bigger technical SEO issues you should fix before adding a sitemap.
For example, do you have duplicate content on your website? If yes, then you should fix that first. Why? Because Google doesn’t like duplicate content and, by creating and submitting a sitemap, you’re showing it directly to Google.
Sitemaps are not required for search engines to effectively crawl your website.
However, they can come in handy, in particular cases. Since they are listed in the Search Console, it is certain that Google offers them some attention.
A sitemap will be most useful in the following scenarios:
You have a big website: Anything from eComm to big informational websites or news outlets fits here. If your site has a lot of pages, it means it will burn quickly your crawl budget. A sitemap won’t help with the crawl budget, but it can help get some deeper pages indexed faster.
A big website might also mean you make frequent updates. Maybe you post new products a lot and remove old ones. Maybe you are a news outlet. Having your XML sitemap set up properly can ensure the most important pages on your site are crawled and indexed.
Your site has a bad internal linking strategy: If you don’t regularly link in-between your pages, some of them might be hard to crawl by search engines. A sitemap could help here. But again… missing an internal linking structure is a far greater technical SEO issue than missing a sitemap. Search Engines focus on crawling your website naturally first. Even if Google does discover a page through your sitemap, without any links to it no Page Rank will flow to it so it will be considered unimportant.
Your site is new or/and has very little backlinks: Since websites are discovered from link to link, it is essential that other websites link to your site to signal its existence. If no website links to your new blog posts, a sitemap can help search engines quickly discover new pages on your site.
Sitemaps can be also used to hide pages from users while still letting search engines crawl them. I can’t really think of a good example for this… But let’s say you have a product landing page you want to show to search engines with a discount as an incentive to click, but you want to keep it hidden from users which came on your site from direct traffic.
Of course, they would be visible if the user visits the actual sitemap file.
There are things though that don’t matter in sitemaps anymore. For example, change frequency and priority don’t matter. At least that’s what John Mueller says:
youtube
We ignore priority in sitemaps.
— John (@JohnMu) August 17, 2017
https://platform.twitter.com/widgets.js
In any way, adding a sitemap to your website will not do any harm. But the truth is you might not REALLY need one, or that you have other priorities which can bring bigger SEO benefits.
Or, how Google puts it:
Source: https://support.google.com/webmasters/answer/156184?hl=en
So… if your SEO is perfect and you don’t have anything better to do… let’s add a sitemap to your website.
How to Add a Sitemap to Your Website
First, check if you already have a sitemap! As previously mentioned, it probably lurks somewhere under /sitemap.xml or /sitemap_index.xml. The files could also have the .html extension so check them as well.
If you don’t have a sitemap, you can always create one. The difficulty really depends on what type of platform your website is built on.
How to Add a Sitemap on a Custom Made Website
If it’s a custom made website, adding a sitemap might require your developers to intervene.
Of course, you can just generate a static XML sitemap and upload it to your server. You could even write one yourself, but that would take forever! However, a static sitemap means you would constantly have to generate it every time you add a new page to your website in order for it to be effective.
The developers would have to write some code. The process is pretty straight forward. As a new page/entry is added to the database, an nXML file must be updated with the required information.
If you want to go for the free option, you can generate a sitemap with https://www.xml-sitemaps.com/. The tool will simply crawl your website and structure the information it finds about the URLs in an XML file which you’ll then be able to download to your computer and upload it to your public_html folder on your server.
However, this has its flaws. Firstly, it will be static which means you’ll have to keep regenerating and reuploading it. Secondly, since the tool crawls your site like any other search engine, this means that if your internal linking is bad, the tool won’t find deep pages and thus it won’t add it to the XML file.
Luckily, https://www.xml-sitemaps.com/ also provides paid versions, one that will dynamically add your pages to your website. However, the best option is probably the PHP version, which you can plug into your website and run directly from your website.
Depending on your needs, the solutions above are the best ones for a custom website.
How to add a Sitemap to a popular CMS, such as WordPress
If you’re on a popular platform such as WordPress, you’re in luck! You can solve your issue by installing a Sitemap plugin. On WordPress, the most popular one is Yoast SEO, which generates a search engine optimized sitemap on its own. You won’t have any struggles with it.
Similar plugins/extensions/modules can be found for other platforms, such as Drupal, Joomla or Magento. Simply perform a Google search for “sitemap plugin + your platform” and you’ll find out if something is available.
How to Optimize Your Sitemaps for SEO
Now that you have a Sitemap, it’s time to make sure it’s beneficial for SEO. While Google says a sitemap will never get you in trouble, it actually can, if you do it the wrong way. For example, you might highlight some duplicate content pages which we know cause at least a little bit of issues.
A good way to check your Sitemap for Errors is the Google Search Console (former Webmaster Tools). However, before you submit your Sitemap to Google, you might want to check it with a proper set of SEO Tools. Once you upload it to Google, it will have an impact on your site, be it positive or negative.
The CognitiveSEO Site Audit comes in handy here, as it can solve for you most issues related to Sitemaps. Once you set up your campaign and run the Site Audit, the tool will crawl your entire site and analyze it for errors.
The tool will first highlight the discrepancy between the found page (which the tool was able to crawl, just as Google would) and the pages listed in the sitemap. You might do this on purpose, if you want to exclude certain pages. That’s why it’s a warning in the tool and it’s colored yellow, instead of being colored red, like actual errors are.
Secondly, you want to fix any duplicate and thin content issues on your website. You don’t want to include those in the Sitemap.
You can do this easily with the Site Audit. You can find what you’re looking for under the Content section:
So make sure you exclude those pages from the Sitemap. Even better, you can fix your issues by canonicalizing the duplicates and adding content to your thin pages.
We ‘know’ from John Mueller that the priority tag is an optional tag and doesn’t matter for Google, we can assume search engines and browsers read files from top to bottom, making the information at the top a priority, since they’re read first.
Most sitemaps are structured alphabetically or chronologically as it is simple, but nobody says you can’t structure it the way you want. Consider adding the most important pages first.
A sitemap should be structured hierarchically, similarly to an eCommerce site’s internal linking structure. However, it’s better if you focus on the site structure internal linking strategy instead of the sitemap.
Search engines prefer to crawl your website in a “human way”, which means they will go from link to link on your website until they find all your pages.
If it takes users 1 hour and 100 clicks to get to your important pages and find out what they seek, there’s a big chance Sitemaps won’t fix your problem.
Other XML Sitemap best practices that benefit SEO:
Consider adding the international hreflang attribute to your sitemaps. You can do it as such:
<url> <loc>http://www.example.com/english/page.html</loc> <xhtml:link rel=”alternate” hreflang=”de” href=”http://www.example.com/deutsch/page.html”/> <xhtml:link rel=”alternate” hreflang=”de-ch” href=”http://www.example.com/schweiz-deutsch/page.html”/> <xhtml:link rel=”alternate” hreflang=”en” href=”http://www.example.com/english/page.html”/> </url>
This will help you get your international pages indexed better as well.
You can also exclude any unimportant pages which you don’t necessarily want indexed, such as pages with thin content or archive pages and paginated content.
Make sure to exclude any pages that are blocking Google from crawling them, such as pages blocked in the robots.txt file or by a noindex meta tag. It wouldn’t be nice to invite someone at your house and then not open the door!
That also goes for 404 pages, canonicals or pages that redirect to other pages via 301.
Last but not least, although they’re also duplicate content, make sure you don’t add URLs with parameters or anchors in your sitemap (such as comment or social media tracking IDs), unless they are unique URLs with original content.
Once you finish creating and optimizing your sitemap, you can finally add it to the Google Search Console and validate it. There you can also view any previously submitted sitemaps.
The Search Console will let you know if there are any issues, such as duplicate content ones. Luckily, you’ve already fixed those with the CognitiveSEO Tool.
If your website doesn’t get crawled properly, a sitemap should definitely help, considering that all the other possible causes, such as noindex tags, have already been excluded. The sitemaps uploaded here will tell Google to crawl your site, but it’s still up to Google if it will do it or not.
Now you know when it’s important to have a sitemap and how you can properly set one up on your website.
What’s your experience with sitemaps? Have they ever helped you rank better? Have you ever fixed any sitemap related issues and ranked better after? Let us know in the comments section. Also, consider joining our Social Media group on Facebook where you can get more insights on Search Engine Optimization and Digital Marketing.
The post Sitemaps & SEO: Are Sitemaps Still Important for SEO in 2019? appeared first on SEO Blog | cognitiveSEO Blog on SEO Tactics & Strategies.
from Marketing https://cognitiveseo.com/blog/22867/seo-sitemaps/ via http://www.rssmix.com/
0 notes
Text
Sitemaps & SEO: Are Sitemaps Still Important for SEO in 2019?
As SEO evolves, it gets more and more human-centered and people in the industry begin to question old techniques, targeted mostly at search engines. Such is the case with Sitemaps, which have been around for ages.
Do sitemaps still matter for SEO in 2019 or are they just a waste of time? When and why should you use them? And how can you optimize them for maximum SEO results?
In this article, you’ll find out the answers to all those questions, so keep reading!
What Are Sitemaps & How Do They Work?
Are Sitemaps Important for SEO?
How to Add a Sitemap to Your Website
How to Optimize Your Sitemaps for SEO
What Are Sitemaps & How Do They Work?
Sitemaps are files used to tell search engines about pages that are available for crawling on websites. These files are simply just a list of URLs that contain some extra information about the pages, such as when they were last updated, for example.
Sitemap Types
There are two types of sitemap formats, but they can be split into multiple categories, depending on their purpose.
First, we have HTML sitemaps and XML sitemaps.
HTML sitemaps are basically just web pages containing href tags which link to other pages. They are useful for users when seeking something but also for search engines. Crawlers discover your website by ‘clicking’ from link to link until there are no more new links to be found.
If all your website’s links are in a sitemap, be it HTML or XML, search engines will find those pages more easily.
A HTML sitemap would look something like this to a user:
The HTML code in the backend would be pretty simple as well:
<ul> <li><a href="/">Home</a></li> <ul> <li><a href="/contact">Contact</a></li> <li><a href="/about">About</a></li> <li><a href="/products">Products</a></li> <ul> <li><a href="/product-1">Product 1</a></li> <li><a href="/product-2">Product 2</a></li> </ul> </ul> </ul>
Of course, you’re free to add to the HTML sitemap page any CSS you want to style it, as well as a navigation menu, structure or titles.
A good sitemap example in HTML format can be found on the Disney Store. As you can see, all the important categories are listed there and you can basically browse the entire site from that page alone.
However, the standardized format for distributing sitemaps is the XML format. Search engines use these to read more information about the page, such as the title, directly from the sitemap file.
You can also upload XML files to tools such as the Search Console (former Google Webmaster Tools), where Google will validate it and check it from time to time.
An XML Sitemap is a little bit more difficult to write, as it contains all the metadata about the page in a standardized format. While visually the XML sitemap might not look very different, at a core level you can immediately see they are a lot more complex:
<?xml version="1.0" encoding="UTF-8"?> <urlset xmlns="http://www.sitemaps.org/schemas/sitemap/0.9"> <url> <loc>http://www.example.com/</loc> <lastmod>2005-01-01</lastmod> <changefreq>monthly</changefreq> <priority>0.8</priority> </url> </urlset>
You can see some special tags there such as <loc> and <lastmod>. These two tags are very important, so make sure you add them to your sitemap! The other two might be ignored by Google. We’ll talk about them soon.
Note that the URLs in the XML sitemaps are absolute. This means that you can’t just add /your-page but you must add https://yoursite.com/your-page instead.
If we go back to our Disney example, we can see that the site also has a XML Sitemap, targeted at search engines.
You can go one step further and show sitemaps only to Search Engines. You can differentiate via the user agent and show an HTML sitemap instead if a real person visits the page.
Yoast SEO already does this. Visiting a /sitemap_index.xml file on a WordPress website will return an HTML sitemap, while hitting CTRL + U to view the source will return the actual XML sitemap.
Sitemap Categories
As previously mentioned, sitemaps can be split into categories, depending on their purpose.
Normal sitemaps: These are by far the most common sitemaps. Pretty much every website out there tends to have one. That’s because most platforms include some sort of sitemap generation system by default.
They are delivered in XML format and can usually be found on the relative path /sitemap.xml.
Most WordPress websites have their sitemap on /sitemap_index.xml. That is the default URL for sitemaps generated by the Yoast SEO plugin.
The sitemap is delivered by Yoast SEO that way with a purpose. XML files can only become so large before it’s unreliable for crawlers to download and read them.
There’s a limit of 50,000 URLs and 50MB for an XML file, but Google limits that to only 10MB so make sure your file doesn’t have more than 50,000 URLs and 10MB.
If you have a particularly large website, you can break your sitemap into multiple smaller sitemaps and use a sitemap index file to manage them.
Search engines will know how to crawl these as long as you provide the right format for your index file.
<sitemapindex xmlns=”http://www.sitemaps.org/schemas/sitemap/0.9″> <sitemap> <loc>https://example.com/pages-sitemap.xml</loc> <lastmod>2019-04-17T15:12:13+00:00</lastmod> </sitemap> <sitemap> <loc>https://example.com/product-sitemap.xml</loc> <lastmod>2019-05-15T14:04:43+00:00</lastmod> </sitemap> </sitemapindex>
Then, on each XML sitemap, you can use the regular format mentioned above.
Image sitemaps: Normally, images can be added to a regular XML sitemap. However, if you have a lot of them, it might be a good idea to create a separate XML file only for your images.
More information on how to properly add images to your sitemaps can be found here.
Video sitemaps: You can also add videos to your sitemaps. However, similarly to images, the videos are listed in the sitemap in relation to a page / URL.
If you only have a few pages that contain video, just add that information in the normal sitemap. However, if you have an entire section of your website full with videos, then you might consider splitting them into a separate sitemap.
More info on how to properly include videos in your sitemaps can be found here.
News sitemaps: If you have a news website, then you can specify it in your sitemap. Since Google has a News section, it can really come in handy when quick indexation is a requirement.
More details about how to properly create a news sitemap can be found here.
Last but not least, Sitemaps can be static or dynamic. I would see no purpose in having a static sitemap though, as it would have to be updated simultaneously with the addition of new pages on the website.
If the goal of the sitemap is to let search engines know about new pages, then it should be updated as soon as the pages are published.
This means that you need a dynamic sitemap in order for it to be effective. Keep reading and you’ll learn how to generate a dynamic sitemap for your website.
Are Sitemaps Important for SEO?
First, let’s hear what Matt Cutts has to say about this:
youtube
But hold your horses, as you’ll want to prioritize your tasks! There are other much bigger technical SEO issues you should fix before adding a sitemap.
For example, do you have duplicate content on your website? If yes, then you should fix that first. Why? Because Google doesn’t like duplicate content and, by creating and submitting a sitemap, you’re showing it directly to Google.
Sitemaps are not required for search engines to effectively crawl your website.
However, they can come in handy, in particular cases. Since they are listed in the Search Console, it is certain that Google offers them some attention.
A sitemap will be most useful in the following scenarios:
You have a big website: Anything from eComm to big informational websites or news outlets fits here. If your site has a lot of pages, it means it will burn quickly your crawl budget. A sitemap won’t help with the crawl budget, but it can help get some deeper pages indexed faster.
A big website might also mean you make frequent updates. Maybe you post new products a lot and remove old ones. Maybe you are a news outlet. Having your XML sitemap set up properly can ensure the most important pages on your site are crawled and indexed.
Your site has a bad internal linking strategy: If you don’t regularly link in-between your pages, some of them might be hard to crawl by search engines. A sitemap could help here. But again… missing an internal linking structure is a far greater technical SEO issue than missing a sitemap. Search Engines focus on crawling your website naturally first. Even if Google does discover a page through your sitemap, without any links to it no Page Rank will flow to it so it will be considered unimportant.
Your site is new or/and has very little backlinks: Since websites are discovered from link to link, it is essential that other websites link to your site to signal its existence. If no website links to your new blog posts, a sitemap can help search engines quickly discover new pages on your site.
Sitemaps can be also used to hide pages from users while still letting search engines crawl them. I can’t really think of a good example for this… But let’s say you have a product landing page you want to show to search engines with a discount as an incentive to click, but you want to keep it hidden from users which came on your site from direct traffic.
Of course, they would be visible if the user visits the actual sitemap file.
There are things though that don’t matter in sitemaps anymore. For example, change frequency and priority don’t matter. At least that’s what John Mueller says:
youtube
We ignore priority in sitemaps.
— John (@JohnMu) August 17, 2017
https://platform.twitter.com/widgets.js
In any way, adding a sitemap to your website will not do any harm. But the truth is you might not REALLY need one, or that you have other priorities which can bring bigger SEO benefits.
Or, how Google puts it:
Source: https://support.google.com/webmasters/answer/156184?hl=en
So… if your SEO is perfect and you don’t have anything better to do… let’s add a sitemap to your website.
How to Add a Sitemap to Your Website
First, check if you already have a sitemap! As previously mentioned, it probably lurks somewhere under /sitemap.xml or /sitemap_index.xml. The files could also have the .html extension so check them as well.
If you don’t have a sitemap, you can always create one. The difficulty really depends on what type of platform your website is built on.
How to Add a Sitemap on a Custom Made Website
If it’s a custom made website, adding a sitemap might require your developers to intervene.
Of course, you can just generate a static XML sitemap and upload it to your server. You could even write one yourself, but that would take forever! However, a static sitemap means you would constantly have to generate it every time you add a new page to your website in order for it to be effective.
The developers would have to write some code. The process is pretty straight forward. As a new page/entry is added to the database, an nXML file must be updated with the required information.
If you want to go for the free option, you can generate a sitemap with https://www.xml-sitemaps.com/. The tool will simply crawl your website and structure the information it finds about the URLs in an XML file which you’ll then be able to download to your computer and upload it to your public_html folder on your server.
However, this has its flaws. Firstly, it will be static which means you’ll have to keep regenerating and reuploading it. Secondly, since the tool crawls your site like any other search engine, this means that if your internal linking is bad, the tool won’t find deep pages and thus it won’t add it to the XML file.
Luckily, https://www.xml-sitemaps.com/ also provides paid versions, one that will dynamically add your pages to your website. However, the best option is probably the PHP version, which you can plug into your website and run directly from your website.
Depending on your needs, the solutions above are the best ones for a custom website.
How to add a Sitemap to a popular CMS, such as WordPress
If you’re on a popular platform such as WordPress, you’re in luck! You can solve your issue by installing a Sitemap plugin. On WordPress, the most popular one is Yoast SEO, which generates a search engine optimized sitemap on its own. You won’t have any struggles with it.
Similar plugins/extensions/modules can be found for other platforms, such as Drupal, Joomla or Magento. Simply perform a Google search for “sitemap plugin + your platform” and you’ll find out if something is available.
How to Optimize Your Sitemaps for SEO
Now that you have a Sitemap, it’s time to make sure it’s beneficial for SEO. While Google says a sitemap will never get you in trouble, it actually can, if you do it the wrong way. For example, you might highlight some duplicate content pages which we know cause at least a little bit of issues.
A good way to check your Sitemap for Errors is the Google Search Console (former Webmaster Tools). However, before you submit your Sitemap to Google, you might want to check it with a proper set of SEO Tools. Once you upload it to Google, it will have an impact on your site, be it positive or negative.
The CognitiveSEO Site Audit comes in handy here, as it can solve for you most issues related to Sitemaps. Once you set up your campaign and run the Site Audit, the tool will crawl your entire site and analyze it for errors.
The tool will first highlight the discrepancy between the found page (which the tool was able to crawl, just as Google would) and the pages listed in the sitemap. You might do this on purpose, if you want to exclude certain pages. That’s why it’s a warning in the tool and it’s colored yellow, instead of being colored red, like actual errors are.
Secondly, you want to fix any duplicate and thin content issues on your website. You don’t want to include those in the Sitemap.
You can do this easily with the Site Audit. You can find what you’re looking for under the Content section:
So make sure you exclude those pages from the Sitemap. Even better, you can fix your issues by canonicalizing the duplicates and adding content to your thin pages.
We ‘know’ from John Mueller that the priority tag is an optional tag and doesn’t matter for Google, we can assume search engines and browsers read files from top to bottom, making the information at the top a priority, since they’re read first.
Most sitemaps are structured alphabetically or chronologically as it is simple, but nobody says you can’t structure it the way you want. Consider adding the most important pages first.
A sitemap should be structured hierarchically, similarly to an eCommerce site’s internal linking structure. However, it’s better if you focus on the site structure internal linking strategy instead of the sitemap.
Search engines prefer to crawl your website in a “human way”, which means they will go from link to link on your website until they find all your pages.
If it takes users 1 hour and 100 clicks to get to your important pages and find out what they seek, there’s a big chance Sitemaps won’t fix your problem.
Other XML Sitemap best practices that benefit SEO:
Consider adding the international hreflang attribute to your sitemaps. You can do it as such:
<url> <loc>http://www.example.com/english/page.html</loc> <xhtml:link rel=”alternate” hreflang=”de” href=”http://www.example.com/deutsch/page.html”/> <xhtml:link rel=”alternate” hreflang=”de-ch” href=”http://www.example.com/schweiz-deutsch/page.html”/> <xhtml:link rel=”alternate” hreflang=”en” href=”http://www.example.com/english/page.html”/> </url>
This will help you get your international pages indexed better as well.
You can also exclude any unimportant pages which you don’t necessarily want indexed, such as pages with thin content or archive pages and paginated content.
Make sure to exclude any pages that are blocking Google from crawling them, such as pages blocked in the robots.txt file or by a noindex meta tag. It wouldn’t be nice to invite someone at your house and then not open the door!
That also goes for 404 pages, canonicals or pages that redirect to other pages via 301.
Last but not least, although they’re also duplicate content, make sure you don’t add URLs with parameters or anchors in your sitemap (such as comment or social media tracking IDs), unless they are unique URLs with original content.
Once you finish creating and optimizing your sitemap, you can finally add it to the Google Search Console and validate it. There you can also view any previously submitted sitemaps.
The Search Console will let you know if there are any issues, such as duplicate content ones. Luckily, you’ve already fixed those with the CognitiveSEO Tool.
If your website doesn’t get crawled properly, a sitemap should definitely help, considering that all the other possible causes, such as noindex tags, have already been excluded. The sitemaps uploaded here will tell Google to crawl your site, but it’s still up to Google if it will do it or not.
Now you know when it’s important to have a sitemap and how you can properly set one up on your website.
What’s your experience with sitemaps? Have they ever helped you rank better? Have you ever fixed any sitemap related issues and ranked better after? Let us know in the comments section. Also, consider joining our Social Media group on Facebook where you can get more insights on Search Engine Optimization and Digital Marketing.
The post Sitemaps & SEO: Are Sitemaps Still Important for SEO in 2019? appeared first on SEO Blog | cognitiveSEO Blog on SEO Tactics & Strategies.
0 notes
Photo

Introduction to the Stimulus Framework
There are lots of JavaScript frameworks out there. Sometimes I even start to think that I'm the only one who has not yet created a framework. Some solutions, like Angular, are big and complex, whereas some, like Backbone (which is more a library than a framework), are quite simple and only provide a handful of tools to speed up the development process.
In today's article I would like to present you a brand new framework called Stimulus. It was created by a Basecamp team led by David Heinemeier Hansson, a popular developer who was the father of Ruby on Rails.
Stimulus is a small framework that was never intended to grow into something big. It has its very own philosophy and attitude towards front-end development, which some programmers might like or dislike. Stimulus is young, but version 1 has already been released so it should be safe to use in production. I've played with this framework quite a bit and really liked its simplicity and elegance. Hopefully, you will enjoy it too!
In this post we'll discuss the basics of Stimulus while creating a single-page application with asynchronous data loading, events, state persistence, and other common things.
The source code can be found on GitHub.
Introduction to Stimulus
Stimulus was created by developers at Basecamp. Instead of creating single-page JavaScript applications, they decided to choose a majestic monolith powered by Turbolinks and some JavaScript. This JavaScript code evolved into a small and modest framework which does not require you to spend hours and hours learning all its concepts and caveats.
Stimulus is mostly meant to attach itself to existing DOM elements and work with them in some way. It is possible, however, to dynamically render the contents as well. All in all, this framework is quite different from other popular solutions as, for example, it persists state in HTML, not in JavaScript objects. Some developers may find it inconvenient, but do give Stimulus a chance, as it really may surprise you.
The framework has only three main concepts that you should remember, which are:
Controllers: JS classes with some methods and callbacks that attach themselves to the DOM. The attachment happens when a data-controller "magic" attribute appears on the page. The documentation explains that this attribute is a bridge between HTML and JavaScript, just like classes serve as bridges between HTML and CSS. One controller can be attached to multiple elements, and one element may be powered up by multiple controllers.
Actions: methods to be called on specific events. They are defined in special data-action attributes.
Targets: important elements that can be easily accessed and manipulated. They are specified with the help of data-target attributes.
As you can see, the attributes listed above allow you to separate content from behaviour logic in a very simple and natural way. Later in this article, we will see all these concepts in action and notice how easy it is to read an HTML document and understand what's going on.
Bootstrapping a Stimulus Application
Stimulus can be easily installed as an NPM package or loaded directly via the script tag as explained in the docs. Also note that by default this framework integrates with the Webpack asset manager, which supports goodies like controller autoloading. You are free to use any other build system, but in this case some more work will be needed.
The quickest way to get started with Stimulus is by utilizing this starter project that has Express web server and Babel already hooked up. It also depends on Yarn, so be sure to install it. To clone the project and install all its dependencies, run:
git clone https://github.com/stimulusjs/stimulus-starter.git cd stimulus-starter yarn install
If you'd prefer not to install anything locally, you may remix this project on Glitch and do all the coding right in your browser.
Great—we are all set and can proceed to the next section!
Some Markup
Suppose we are creating a small single-page application that presents a list of employees and loads information like their name, photo, position, salary, birthdate, etc.
Let's start with the list of employees. All the markup that we are going to write should be placed inside the public/index.html file, which already has some very minimal HTML. For now, we will hard-code all our employees in the following way:
<h1>Our employees</h1> <div> <ul> <li><a href="#">John Doe</a></li> <li><a href="#">Alice Smith</a></li> <li><a href="#">Will Brown</a></li> <li><a href="#">Ann Grey</a></li> </ul> </div>
Nice! Now let's add a dash of Stimulus magic.
Creating a Controller
As the official documentation explains, the main purpose of Stimulus is to connect JavaScript objects (called controllers) to the DOM elements. The controllers will then bring the page to life. As a convention, controllers' names should end with a _controller postfix (which should be very familiar to Rails developers).
There is a directory for controllers already available called src/controllers. Inside, you will find a hello_controller.js file that defines an empty class:
import { Controller } from "stimulus" export default class extends Controller { }
Let's rename this file to employees_controller.js. We don't need to specifically require it because controllers are loaded automatically thanks to the following lines of code in the src/index.js file:
const application = Application.start() const context = require.context("./controllers", true, /\.js$/) application.load(definitionsFromContext(context))
The next step is to connect our controller to the DOM. In order to do this, set a data-controller attribute and assign it an identifier (which is employees in our case):
<div data-controller="employees"> <ul> <!-- your list --> </ul> </div>
That's it! The controller is now attached to the DOM.
Lifecycle Callbacks
One important thing to know about controllers is that they have three lifecycle callbacks that get fired on specific conditions:
initialize: this callback happens only once, when the controller is instantiated.
connect: fires whenever we connect the controller to the DOM element. Since one controller may be connected to multiple elements on the page, this callback may run multiple times.
disconnect: as you've probably guessed, this callback runs whenever the controller disconnects from the DOM element.
Nothing complex, right? Let's take advantage of the initialize() and connect() callbacks to make sure our controller actually works:
// src/controllers/employees_controller.js export default class extends Controller { initialize() { console.log('Initialized') console.log(this) } connect() { console.log('Connected') console.log(this) } }
Next, start the server by running:
yarn start
Navigate to http://localhost:9000. Open your browser's console and make sure both messages are displayed. It means that everything is working as expected!
Adding Events
The next core Stimulus concept is events. Events are used to respond to various user actions on the page: clicking, hovering, focusing, etc. Stimulus does not try to reinvent a bicycle, and its event system is based on generic JS events.
For instance, let's bind a click event to our employees. Whenever this event happens, I would like to call the as yet non-existent choose() method of the employees_controller:
<ul> <li><a href="#" data-action="click->employees#choose">John Doe</a></li> <li><a href="#" data-action="click->employees#choose">Alice Smith</a></li> <li><a href="#" data-action="click->employees#choose">Will Brown</a></li> <li><a href="#" data-action="click->employees#choose">Ann Grey</a></li> </ul>
Probably, you can understand what's going on here by yourself.
data-action is the special attribute that binds an event to the element and explains what action should be called.
click, of course, is the event's name.
employees is the identifier of our controller.
choose is the name of the method that we'd like to call.
Since click is the most common event, it can be safely omitted:
<li><a href="#" data-action="employees#choose">John Doe</a></li>
In this case, click will be used implicitly.
Next, let's code the choose() method. I don't want the default action to happen (which is, obviously, opening a new page specified in the href attribute), so let's prevent it:
// src/controllers/employees_controller.js // callbacks here... choose(e) { e.preventDefault() console.log(this) console.log(e) }
e is the special event object that contains full information about the triggered event. Note, by the way, that this returns the controller itself, not an individual link! In order to gain access to the element that acts as the event's target, use e.target.
Reload the page, click on a list item, and observe the result!
Working With the State
Now that we have bound a click event handler to the employees, I'd like to store the currently chosen person. Why? Having stored this info, we can prevent the same employee from being selected the second time. This will later allow us to avoid loading the same information multiple times as well.
Stimulus instructs us to persist state in the Data API, which seems quite reasonable. First of all, let's provide some arbitrary ids for each employee using the data-id attribute:
<ul> <li><a href="#" data-id="1" data-action="employees#choose">John Doe</a></li> <li><a href="#" data-id="2" data-action="click->employees#choose">Alice Smith</a></li> <li><a href="#" data-id="3" data-action="click->employees#choose">Will Brown</a></li> <li><a href="#" data-id="4" data-action="click->employees#choose">Ann Grey</a></li> </ul>
Next, we need to fetch the id and persist it. Using the Data API is very common with Stimulus, so a special this.data object is provided for each controller. With its help, we can run the following methods:
this.data.get('name'): get the value by its attribute.
this.data.set('name', value): set the value under some attribute.
this.data.has('name'): check if the attribute exists (returns a boolean value).
Unfortunately, these shortcuts are not available for the targets of the click events, so we must stick with getAttribute() in their case:
// src/controllers/employees_controller.js choose(e) { e.preventDefault() this.data.set("current-employee", e.target.getAttribute('data-id')) }
But we can do even better by creating a getter and a setter for the currentEmployee:
// src/controllers/employees_controller.js get currentEmployee() { return this.data.get("current-employee") } set currentEmployee(id) { if (this.currentEmployee !== id) { this.data.set("current-employee", id) } }
Notice how we are using the this.currentEmployee getter and making sure that the provided id is not the same as the already stored one.
Now you may rewrite the choose() method in the following way:
// src/controllers/employees_controller.js choose(e) { e.preventDefault() this.currentEmployee = e.target.getAttribute('data-id') }
Reload the page to make sure that everything still works. You won't notice any visual changes yet, but with the help of the Inspector tool you'll notice that the ul has the data-employees-current-employee attribute with a value that changes as you click on the links. The employees part in the attribute's name is the controller's identifier and is being added automatically.
Now let's move on and highlight the currently chosen employee.
Using Targets
When an employee is selected, I would like to assign the corresponding element with a .chosen class. Of course, we might have solved this task by using some JS selector functions, but Stimulus provides a neater solution.
Meet targets, which allow you to mark one or more important elements on the page. These elements can then be easily accessed and manipulated as needed. In order to create a target, add a data-target attribute with the value of {controller}.{target_name} (which is called a target descriptor):
<ul data-controller="employees"> <li><a href="#" data-target="employees.employee" data-id="1" data-action="employees#choose">John Doe</a></li> <li><a href="#" data-target="employees.employee" data-id="2" data-action="click->employees#choose">Alice Smith</a></li> <li><a href="#" data-target="employees.employee" data-id="3" data-action="click->employees#choose">Will Brown</a></li> <li><a href="#" data-target="employees.employee" data-id="4" data-action="click->employees#choose">Ann Grey</a></li> </ul>
Now let Stimulus know about these new targets by defining a new static value:
// src/controllers/employees_controller.js export default class extends Controller { static targets = [ "employee" ] // ... }
How do we access the targets now? It's as simple as saying this.employeeTarget (to get the first element) or this.employeeTargets (to get all the elements):
// src/controllers/employees_controller.js choose(e) { e.preventDefault() this.currentEmployee = e.target.getAttribute('data-id') console.log(this.employeeTargets) console.log(this.employeeTarget) }
Great! How can these targets help us now? Well, we can use them to add and remove CSS classes with ease based on some criteria:
// src/controllers/employees_controller.js choose(e) { e.preventDefault() this.currentEmployee = e.target.getAttribute('data-id') this.employeeTargets.forEach((el, i) => { el.classList.toggle("chosen", this.currentEmployee === el.getAttribute("data-id")) }) }
The idea is simple: we iterate over an array of targets and for each target compare its data-id to the one stored under this.currentEmployee. If it matches, the element is assigned the .chosen class. Otherwise, this class is removed. You may also extract the if (this.currentEmployee !== id) { condition from the setter and use it in the chosen() method instead:
// src/controllers/employees_controller.js choose(e) { e.preventDefault() const id = e.target.getAttribute('data-id') if (this.currentEmployee !== id) { // <--- this.currentEmployee = id this.employeeTargets.forEach((el, i) => { el.classList.toggle("chosen", id === el.getAttribute("data-id")) }) } }
Looking nice! Lastly, we'll provide some very simple styling for the .chosen class inside the public/main.css:
.chosen { font-weight: bold; text-decoration: none; cursor: default; }
Reload the page once again, click on a person, and make sure that person is being highlighted properly.
Loading Data Asynchronously
Our next task is to load information about the chosen employee. In a real-world application, you would have to set up a hosting provider, a back-end powered by something like Django or Rails, and an API endpoint that responds with JSON containing all the necessary data. But we are going to make things a bit simpler and concentrate on the client side only. Create an employees directory under the public folder. Next, add four files containing data for individual employees:
1.json
{ "name": "John Doe", "gender": "male", "age": "40", "position": "CEO", "salary": "$120.000/year", "image": "https://burst.shopifycdn.com/photos/couple-in-love-at-sunset_373x.jpg" }
2.json
{ "name": "Alice Smith", "gender": "female", "age": "32", "position": "CTO", "salary": "$100.000/year", "image": "https://burst.shopifycdn.com/photos/woman-listening-at-team-meeting_373x.jpg" }
3.json
{ "name": "Will Brown", "gender": "male", "age": "30", "position": "Tech Lead", "salary": "$80.000/year", "image": "https://burst.shopifycdn.com/photos/casual-urban-menswear_373x.jpg" }
4.json
{ "name": "Ann Grey", "gender": "female", "age": "25", "position": "Junior Dev", "salary": "$20.000/year", "image": "https://burst.shopifycdn.com/photos/woman-using-tablet_373x.jpg" }
All photos were taken from the free stock photography by Shopify called Burst.
Our data is ready and waiting to be loaded! In order to do this, we'll code a separate loadInfoFor() method:
// src/controllers/employees_controller.js loadInfoFor(employee_id) { fetch(`employees/${employee_id}.json`) .then(response => response.text()) .then(json => { this.displayInfo(json) }) }
This method accepts an employee's id and sends an asynchronous fetch request to the given URI. There are also two promises: one to fetch the body and another one to display the loaded info (we'll add the corresponding method in a moment).
Utilize this new method inside choose():
// src/controllers/employees_controller.js choose(e) { e.preventDefault() const id = e.target.getAttribute('data-id') if (this.currentEmployee !== id) { this.loadInfoFor(id) // ... } }
Before coding the displayInfo() method, we need an element to actually render the data to. Why don't we take advantage of targets once again?
<!-- public/index.html --> <div data-controller="employees"> <div data-target="employees.info"></div> <ul> <!-- ... --> </ul> </div>
Define the target:
// src/controllers/employees_controller.js export default class extends Controller { static targets = [ "employee", "info" ] // ... }
And now utilize it to display all the info:
// src/controllers/employees_controller.js displayInfo(raw_json) { const info = JSON.parse(raw_json) const html = `<ul><li>Name: ${info.name}</li><li>Gender: ${info.gender}</li><li>Age: ${info.age}</li><li>Position: ${info.position}</li><li>Salary: ${info.salary}</li><li><img src="${info.image}"></li></ul>` this.infoTarget.innerHTML = html }
Of course, you are free to employ a templating engine like Handlebars, but for this simple case that would probably be overkill.
Now reload the page and choose one of the employees. His bio and image should be loaded nearly instantly, which means our app is working properly!
Dynamic List of Employees
Using the approach described above, we can go even further and load the list of employees on the fly rather than hard-coding it.
Prepare the data inside the public/employees.json file:
[ { "id": "1", "name": "John Doe" }, { "id": "2", "name": "Alice Smith" }, { "id": "3", "name": "Will Brown" }, { "id": "4", "name": "Ann Grey" } ]
Now tweak the public/index.html file by removing the hard-coded list and adding a data-employees-url attribute (note that we must provide the controller's name, otherwise the Data API won't work):
<div data-controller="employees" data-employees-url="/employees.json"> <div data-target="employees.info"></div> </div>
As soon as controller is attached to the DOM, it should send a fetch request to build a list of employees. It means that the connect() callback is the perfect place to do this:
// src/controllers/employees_controller.js connect() { this.loadFrom(this.data.get('url'), this.displayEmployees) }
I propose we create a more generic loadFrom() method that accepts a URL to load data from and a callback to actually render this data:
// src/controllers/employees_controller.js loadFrom(url, callback) { fetch(url) .then(response => response.text()) .then(json => { callback.call( this, JSON.parse(json) ) }) }
Tweak the choose() method to take advantage of the loadFrom():
// src/controllers/employees_controller.js choose(e) { e.preventDefault() const id = e.target.getAttribute('data-id') if (this.currentEmployee !== id) { this.loadFrom(`employees/${id}.json`, this.displayInfo) // <--- this.currentEmployee = id this.employeeTargets.forEach((el, i) => { el.classList.toggle("chosen", id === el.getAttribute("data-id")) }) } }
displayInfo() can be simplified as well, since JSON is now being parsed right inside the loadFrom():
// src/controllers/employees_controller.js displayInfo(info) { const html = `<ul><li>Name: ${info.name}</li><li>Gender: ${info.gender}</li><li>Age: ${info.age}</li><li>Position: ${info.position}</li><li>Salary: ${info.salary}</li><li><img src="${info.image}"></li></ul>` this.infoTarget.innerHTML = html }
Remove loadInfoFor() and code the displayEmployees() method:
// src/controllers/employees_controller.js displayEmployees(employees) { let html = "<ul>" employees.forEach((el) => { html += `<li><a href="#" data-target="employees.employee" data-id="${el.id}" data-action="employees#choose">${el.name}</a></li>` }) html += "</ul>" this.element.innerHTML += html }
That's it! We are now dynamically rendering our list of employees based on the data returned by the server.
Conclusion
In this article we have covered a modest JavaScript framework called Stimulus. We have seen how to create a new application, add a controller with a bunch of callbacks and actions, and introduce events and actions. Also, we've done some asynchronous data loading with the help of fetch requests.
All in all, that's it for the basics of Stimulus—it really does not expect you to have some arcane knowledge in order to craft web applications. Of course, the framework will probably have some new features in future, but the developers are not planning to turn it into a huge monster with hundreds of tools.
If you'd like to find more examples of using Stimulus, you may also check out this tiny handbook. And if you’re looking for additional JavaScript resources to study or to use in your work, check out what we have available in the Envato Market.
Did you like Stimulus? Would you be interested in trying to create a real-world application powered by this framework? Share your thoughts in the comments!
As always, I thank you for staying with me and until the next time.
by Ilya Bodrov via Envato Tuts+ Code https://ift.tt/2qReZQu
0 notes
Text
Friday-ish Links
Conrad Barski (author of the classic Land of Lisp, a classic and enjoyable introduction to CL) apparently shares my opinion that all the great developers are obsessed with automation.
I'm starting to realize why great programmers are so obsessed with automating all the steps in their workflows: It's not for aesthetic reasons or to save time.
It's simply because it's hard work to keep remembering all the steps.
Hillel Wayne with a hit 2 weeks in a row. This one is applicable to so many domains but the ones I'm thinking of most directly are where you put your data validation rules and generative testing. The debate between making your database dumb and your app smart or your database smart and your app dumb is a hot one. I sit firmly in the smart DB camp. I feel like Hillel's insights here are something that I came upon myself when trying to get into generative testing with test.check. It's very natural to start with generating a bunch of data and then using predicates to filter it down but it's much more constructive (har har) to explictly build the data you're looking for in a given situation. I should really do that test.check talk.
Unfortunately I have nothing to link to because their apparently working on a polished version for their blog. Maybe you should just get off your butt and sign up for the newsletter. ¯\_(ツ)_/¯
My buddy Redmond is interested in promoting intellectual humility and wondered whether there was something that could be done technologically to foster it. We're batting some ideas back and forth but of course it made me think of Eli Pariser's classic filter bubbles TED talk. I'm intrigued to learn that more recent research has at least suggested that filter bubbles don't have the effect one would intuitively expect them to. Cognitive Biases may be too strong to overcome simply with presentation of new information.
De-Coding The Technical Interview Process
This book looks really interesting. With COVID making the rounds many of us may be working through the god-awful interview process our industry continues to foist upon us.
via Kevin Sherman via Angie Jones via Emma Bostian
emacs-lsp/lsp-mode: Emacs client/library for the Language Server Protocol
Looks very interesting. I don't want an IDE necessarily but I sometimes would like to use IDE features. On the other hand I'll never forget Kyle Burton's insight that IDE's actually support the development of overly complex systems by hiding so much of the complexity away inside of the IDE features (an insight that he attributed to Aaron Feng, IIRC). If I'm writing something that can't be effectively manipulated as text I think I have a problem.
via lsp-mode 6.3 released to MELPA stable : emacs
What is it about? - Community Center / Watercooler - ClojureVerse
I think this is kind of beautiful and a direct reminder of why I still love the Clojure and its community.
Re: Use readonly wherever possible?
This is the kind of discussion that keeps me around in help-bash. It's also the kind of discussion that keeps a lot of people away from bash. I don't think that's really fair. Every language, no matter how well designed, has pitfalls and gotchas that you need to be aware of and anti-patterns that are obvious in hindsight but invisible on the way in.
Hillel Wayne's How I Write Talks Newsletter got me thinking about just how much I love How to Speak How to Listen. One of the many things recommended in that book is a particularly unorthodox style of writing presentations down with extremely significant indentation and whitespace that greatly aids the speaker.
Last Week in AWS is a great way to keep up with developments from AWS. I was said to learn that Amazon continues to disprove it's quality in issue 160 which will eventually hit the archives I'm sure that Tim Bray has resigned in protest over Amazon's treatement of it's workers during this pandemic. That Prime membership is looking less and less appealing every day.
Complexity Has to Live Somewhere
This really hits home right now. People have a tendency to look at everything everyone else is doing and come to the snap conclusion that it's too complicated. This is the kind of community anti-pattern pointed out by Evan Czaplicki in The Hard Parts of Open Source where someone most likely fresh to the community or space takes 5 minutes to look at a problem and says to themselves, in the immortal words of a HISHE Dub, "That's dumb. You're dumb." and decides that they could do it in a much simpler manner. The problem is that most people are trying to implement the simplest system they can given the constraints they have and often much more complexity has been thrown at that system than is obvious at even third or fourth blush. What you're embarking down when you've decided that some system is obviously too complex and needs to simplified is a rewrite.
Reminds me of the classic on why you really should think at least 18 times if you're considering rewriting software. And if we're linking to Joel we might as well link to his excellent character encoding post which every developer everywhere should read and my personal favorite presentation of all time on the subject, How Do I Stop the Pain?.
The Open Group / DPBoK Community Edition · GitLab
Very intriguing. I need to read this more deeply.
Amazing streaming stuff
Twelve Shows Streaming Now | News | Great Performances | PBS
Royal Opera House
The Shows Must Go On! - YouTube
One more entry for why I hang around the grey beards (and secretly wish to become one). Peng Yu makes bash do things that most people would consider unnatural but sometimes they come up with quite a good question. I'm dead sure that I will encounter a behavioral problem in the future because of the apparent difference between logical and physical paths simply because I had the misfortune of reading this thread.
What is the difference between $PWD and pwd?
Re: What is the difference between $PWD and pwd?
git - Explain which gitignore rule is ignoring my file - Stack Overflow
Really? You added *jar to .gitignore rather than *.jar!?
Angie Jones t00ted that she was playing around with Java 14 Records (currently in preview). It got me thinking about how amazingly impressed I am by Java and it's stewardship over the years. Java's just sitting their calmly trucking along while languages flash around it day and day out and developers chasing their next high flit from one new thing to the next hoping to find that silver bullet that will unlock their 10x-developer potential. And while these new languages hang around for a bit and then generally die off because the next big thing comes out, Java gets to pick through the corpse, choose the juiciest parts, and incorporate them right into itself, all on top of the JVM which is still one of the most impressive pieces of technology I've ever seen. Java, like Python as much as it pains me to say, is a Dark Matter language. As much as I love Clojure I have trouble imagining a future where I'll be writing it for the rest of my life. I already don't write only or even mostly Clojure. But I will definitely be writing Java again in my career and it will be world's better than when I left it (Java 1.5 Generics FTW BAYBEEEE) for my own dream chasing.
via Payara on Twitter
My wife and I finally got to watch The Shape of Water. What a film. It drips with Pan's Labyrinth which obviously makes sense. I think as it's settled it's become a solid ★★★★☆. What a film he would've made had he actually been given the reigns for The Hobbit.
0 notes
Text
SEO & PPC Specialist | SEO
If you want to position in Google now, there\’s a new SEO ranking factor to focus on. And if you optimize with this variable it’s possible to end up with higher rankings. And if you discount it? Well let us just say you’re missing out on A great deal of high-quality traffic. Thus check out the movie to lea
Duration:
printed:
updated:
views:
Namaskaar Dosto, is movie mein maine aapse SEO ke baare mein baat ki hai, SEO kya hota hai Search Engine Optimization ka matlab kya hai, Black Hat SEO kya hai aur aap kasie apni site beautifully fir Youtube movie ko ranking karwa sakte hai kisi search engine mein. Mujhe umeed hai ki aapko yeh movie pasand aa
Duration:
printed:
updated:
views:
Maile Ohye from Google advises your startup as if she’d just 10 minutes as a SEO consultant.
Duration:
printed:
updated:
views:
Want to know how to drive more visitors to your website? Learn about the fundamentals of SEO, or Search Engine Optimization, and how it can take your website to the next level! Get in touch with us toll-free in case you’ve got questions! -LRB-888-RRB- 401-4678. www.bluehost.com
Duration:
printed:
updated:
views:
Are you new to SEO and wish to position #1 to google this forthcoming year? Listed below are just 3 SEO strategies which can increase your rankings! Enroll here to learn more of my key SEO hints: https://www.youtube.com/subscription_center?add_user=neilvkpatel Find me on Facebook: https://www.facebook.com/neilkpatel/
Duration:
printed:
updated:
views:
GET THE BEST SEO TOOL LONG TAIL PRO HERE: http://prositetutorials.org/longtailpro SEO (Search Engine Optimization) tutorial for novices. In this informative article, you will learn all the necessary SEO techniques to rank your websites high in Google search engine. All of the training is provided at a step-by-ste
Duration:
printed:
updated:
views:
Today you\’re going to visit 9 of my all-time favorite DIY SEO techniques. The best part? Not one of these plans require an SEO agency. So if you want to get high positions and are doing SEO yourself, I suggest seeing this movie. Here\’s a few of the cool things you\’ll learn from the movie: First,
Duration:
printed:
updated:
views:
How can you get a website to appear on peak of a search results page? Squarespace link: Visit http://squarespace.com/techquickie and use provide code TECHQUICKIE to store 10% off your first order. Techquickie Merch Store: https://www.designbyhumans.com/shop/LinusTechTips/ Techquickie Movie Poster
Duration:
printed:
updated:
views:
Https://codebabes.com/courses/seo-virgin/understanding-keyword-seo Choose the QUIZ: https://codebabes.com/courses/seo-virgin/optimizing-page-seo Permit\’s take matters to the next level. Google creates a lot of tools that will help you monitor and improve your SEO. Among the largest parts of SEO is understandin
Duration:
printed:
updated:
views:
If you want high Google rankings, this SEO tutorial is for you. In my experience, success with search engine optimization comes down to getting the basics right. Then moving on innovative SEO strategies and techniques. And that\’s exactly how this SEO tutorial is organised. First, you\’ll
Duration:
printed:
updated:
views:
So what is SEO and how do you use it in order to receive your sites to rank at Google? Well in this movie I\’ll describe it all for you – in plain English. I\’ll show you the simple SEO tips and strategies that I use to get all of my niche sites to rank at the top areas of Google so that I can make continuous sales
Duration:
printed:
updated:
views:
My Youtube SEO Secrets: https://goo.gl/2YzNGL In this movie I am going to show you guys How To Do SEO For Website and it\’s an SEO Tutorial 2017. Instagram: https://www.instagram.com/michael_gohard Facebook: https://goo.gl/5P7g1I Follow me Twitter: https://twitter.com/michaelkohler20 Linkedin:
Duration:
printed:
updated:
views:
SEO tutorial for marketers, business owners or web designers – Rank #1! Get the comprehensive course: https://www.udemy.com/learn-digital-marketing-course/?couponCode=YOUTUBE19 — Find out step by step how to optimise a website, get to the peak of the search results and increase sales! Click the timestamps to
Duration:
printed:
updated:
views:
Josh comes back w/ CONTESTs and also the BEST 2017 comprehensive guide for SEO – EMAIL ME NOW FOR SEO: [email protected] — note: the 8 website experiment for your disavow can ACTUALLY be found here: https://www.youtube.com/watch?v=Vod69aXpOlc&t=1277s
Duration:
printed:
updated:
views:
Artem talks about principles of search engine optimisation (SEO) at Oulu University. Within this short talk students learn about fundamentals of SEO and importance of content. Artem describes process of optimizing articles for SEO. Beginners who know little of search engine optimisation will profit most from th
Duration:
printed:
updated:
views:
Today you\’re going to learn 9 of my favorite search-engine SEO strategies. I don\’t need to inform you that search-engine SEO has changed quite a good deal over the last few decades. Today, Google is extremely sophisticated about how they assess a webpage\’s content. . .which signifies that old school keyword optimization doesn\’t
Duration:
printed:
updated:
views:
Read full article: http://www.freebanglatutorial.com/2014/03/seo-bangla-tutorial-part-1_29.html
Duration:
printed:
updated:
views:
Belajar SEO untuk pemula serta cara paling mudah masuk page 1 google. Silahkan ikuti cara-cara membuat artikel yang SEO Friendly agar mudah masuk ke page 1 Google. Bagi teman-teman yang menggunakan Blogspot, silahkan berkomentar di bawah ini, dan saya akan memberikan tutorial yang lengkap. Cara pa
Duration:
printed:
updated:
views:
Https://moz.com/blog/craft-remarkable-seo-strategy-2017-whiteboard-friday By understanding the big-picture search trends to making sure that your SEO goals jive with your CEO\’s goals, there\’s a lot to think about when planning for 2017. Next year promises to be enormous for our business, and in today\’s White
Duration:
printed:
updated:
views:
from Shgmpm Affordable SEO Agency http://www.shgmpm.com/seo-ppc-specialist-seo/
0 notes
Link
Media playback is unsupported on your device
Media captionSee the tough questions to Theresa May and Jeremy Corbyn in a special BBC Question Time show
Theresa May and Jeremy Corbyn faced a grilling from members of the public in a BBC Question Time election special. Here are five key takeaways.
1. The audience was on fire
It might not have been the head-to-head many people wanted – which Mr Corbyn said was a “shame” – but the audience didn’t hold back when it came to asking difficult questions.
The tone was set from the get-go, when Mrs May was asked whether the public should trust anything she says given her “track record of broken promises and backtracking”.
The tough questions kept coming. The Conservative leader got: “Secretly, do you really regret calling this election, now the polls have moved against you?” And: “do you really think you actually have any real leverage with Brussels?”
Mr Corbyn didn’t get off lightly either, with the first question from the audience on why the British public should trust him to negotiate Brexit.
He was also asked to rule out a deal with the SNP, and: “Why have you never regarded the IRA as terrorists?” Mr Corbyn said he “deplored all acts of terrorism.”
2. The magic money tree was back, again
Image copyright Getty Images
Home Secretary Amber Rudd repeatedly accused Mr Corbyn of having a “magic money tree” during the seven-way debate on Wednesday, and Mrs May carried on the baton, repeating the mantra on a number of occasions.
“There isn’t a magic money tree that we can shake that suddenly provides for everything that people want,” she said.
Mr Corbyn was later asked if his manifesto was “a letter to Santa Claus.”
Waving a hard copy about, the Labour leader said it a “serious and realistic document” that addressed the issues that many people faced.
3. Theresa May had awkward moments on the NHS
Media playback is unsupported on your device
Media captionNHS workers to Theresa May: “Don’t tell us we’re getting a pay rise”
Mrs May came under fire from a nurse, Victoria Davey, over the 1% cap on annual public sector pay rises, asking how was it “fair” that her 2009 pay slip “reflected exactly” what she earned today. Mrs May said she recognised the job nurses did, but the Conservative Party “had had to take hard choices across the public sector”.
Another woman with mental health issues was close to tears as she spoke about being asked about suicide attempts during a work capability assessment. Mrs May said she would “make no excuses” for the way she had been treated and people with mental health issues had to be given “more support at an early stage.”
But BBC political correspondent Gary O’Donoghue said Mrs May seemed uneasy and was “reluctant to engage and empathise beyond a few carefully chosen words”.
Image copyright Nick Robinson
There was another awkward moment when an audience member asked Mrs May if mental health funding was “one of [her] soundbites” when asked about the NHS.
She accused her of failing to differentiate between mental health and learning difficulties when speaking to a woman while on the campaign trail in Oxfordshire – but Mrs May said the woman had spoken to her about both issues.
4. Jeremy Corbyn was put under pressure on nuclear weapons
Image copyright Getty Images
The Labour leader, who’s made no secret of his long-held opposition to Trident despite agreeing to press ahead with renewal of the system, was repeatedly asked whether he would be prepared to push the button if the UK was under attack.
After saying he thinks the “idea of anyone ever using a nuclear weapon anywhere in the world is utterly appalling and terrible”, he ruled out authorising its “first use”.
Election latest and live updates
Public hit leaders’ vulnerable spots
But he declined to give a straight answer on whether he would use nuclear weapons in retaliation, with BBC anchor David Dimbleby accusing him of dodging the question.
Media playback is unsupported on your device
Media captionJeremy Corbyn was asked what he would do in the event of nuclear war
“If we did use it, millions are going to die. You have to think this thing through,” Mr Corbyn said. “I would decide on the circumstances at the time,” he said.
The Conservative Party press office tweeted: “Corbyn’s answer on this Trident question is about as long as the 4 minute warning #bbcq,” as some of the audience heckled, but another backed the Labour leader, saying she didn’t understand why everyone in the room seemed “so keen” on killing millions of people.
Image copyright Nick Robinson
5. The biggest sparks were in the spin room
Foreign Secretary Boris Johnson called Labour’s national election co-ordinator Andrew Gwynne a “big girl’s blouse” on Sky News shortly before the BBC debate began, apparently because Mr Gwynne wanted them to make a joint appearance.
The pair then proceeded to debate, but it wasn’t long before the two men appeared to somewhat bizzarely have their arms around each other’s shoulders.
They seemed to then fall forward, before Mr Gwynne said to Mr Johnson: “Don’t be a pillock.”
…and the winner was? The audience, according to pundits
Image copyright Carl Dinnen
Image copyright Jack Blanchard
Manifesto guide 2017: Key priorities
What are the top issues for each political party at the 2017 general election?
/* Apply some default styling for core content */ .bbc-news-vj-iframe-wrapper html, .bbc-news-vj-iframe-wrapper address, .bbc-news-vj-iframe-wrapper blockquote, .bbc-news-vj-iframe-wrapper body, .bbc-news-vj-iframe-wrapper dd, .bbc-news-vj-iframe-wrapper div, .bbc-news-vj-iframe-wrapper dl, .bbc-news-vj-iframe-wrapper dt, .bbc-news-vj-iframe-wrapper fieldset, .bbc-news-vj-iframe-wrapper form, .bbc-news-vj-iframe-wrapper frame, .bbc-news-vj-iframe-wrapper frameset, .bbc-news-vj-iframe-wrapper h1, .bbc-news-vj-iframe-wrapper h2, .bbc-news-vj-iframe-wrapper h3, .bbc-news-vj-iframe-wrapper h4, .bbc-news-vj-iframe-wrapper h5, .bbc-news-vj-iframe-wrapper h6, .bbc-news-vj-iframe-wrapper noframes, .bbc-news-vj-iframe-wrapper ol, .bbc-news-vj-iframe-wrapper p, .bbc-news-vj-iframe-wrapper ul, .bbc-news-vj-iframe-wrapper center, .bbc-news-vj-iframe-wrapper dir, .bbc-news-vj-iframe-wrapper hr, .bbc-news-vj-iframe-wrapper menu, .bbc-news-vj-iframe-wrapper pre { display: block; } .bbc-news-vj-iframe-wrapper li { display: list-item; padding: 0.2em; } .bbc-news-vj-iframe-wrapper head { display: none; } .bbc-news-vj-iframe-wrapper table { display: table; } .bbc-news-vj-iframe-wrapper tr { display: table-row; } .bbc-news-vj-iframe-wrapper thead { display: table-header-group; } .bbc-news-vj-iframe-wrapper tbody { display: table-row-group; } .bbc-news-vj-iframe-wrapper tfoot { display: table-footer-group; } .bbc-news-vj-iframe-wrapper col { display: table-column; } .bbc-news-vj-iframe-wrapper colgroup { display: table-column-group; } .bbc-news-vj-iframe-wrapper td, .bbc-news-vj-iframe-wrapper th { display: table-cell; } .bbc-news-vj-iframe-wrapper caption { display: table-caption; } .bbc-news-vj-iframe-wrapper th { font-weight: bolder; text-align: center; } .bbc-news-vj-iframe-wrapper caption { text-align: center; } .bbc-news-vj-iframe-wrapper h1 { font-size: 2em; margin: 0.67em 0; } .bbc-news-vj-iframe-wrapper h2 { font-size: 1.5em; margin: 0.75em 0; } .bbc-news-vj-iframe-wrapper h3 { font-size: 1.4em; margin: 0.83em 0; margin-top: 2em; } .bbc-news-vj-iframe-wrapper h4, .bbc-news-vj-iframe-wrapper p, .bbc-news-vj-iframe-wrapper blockquote, .bbc-news-vj-iframe-wrapper ul, .bbc-news-vj-iframe-wrapper fieldset, .bbc-news-vj-iframe-wrapper form, .bbc-news-vj-iframe-wrapper ol, .bbc-news-vj-iframe-wrapper dl, .bbc-news-vj-iframe-wrapper dir, .bbc-news-vj-iframe-wrapper menu { margin: 1.12em 0; } .bbc-news-vj-iframe-wrapper h5 { font-size: .83em; margin: 1.5em 0; } .bbc-news-vj-iframe-wrapper h6 { font-size: .75em; margin: 1.67em 0; } .bbc-news-vj-iframe-wrapper h1, .bbc-news-vj-iframe-wrapper h2, .bbc-news-vj-iframe-wrapper h3, .bbc-news-vj-iframe-wrapper h4, .bbc-news-vj-iframe-wrapper h5, .bbc-news-vj-iframe-wrapper h6, .bbc-news-vj-iframe-wrapper b, .bbc-news-vj-iframe-wrapper strong { font-weight: bolder; } .bbc-news-vj-iframe-wrapper blockquote { margin-left: 2.5em; margin-right: 2.5em; } .bbc-news-vj-iframe-wrapper i, .bbc-news-vj-iframe-wrapper cite, .bbc-news-vj-iframe-wrapper em, .bbc-news-vj-iframe-wrapper var, .bbc-news-vj-iframe-wrapper address { font-style: italic; } .bbc-news-vj-iframe-wrapper pre, .bbc-news-vj-iframe-wrapper tt, .bbc-news-vj-iframe-wrapper code, .bbc-news-vj-iframe-wrapper kbd, .bbc-news-vj-iframe-wrapper samp { font-family: monospace; } .bbc-news-vj-iframe-wrapper pre { white-space: pre; } .bbc-news-vj-iframe-wrapper button, .bbc-news-vj-iframe-wrapper textarea, .bbc-news-vj-iframe-wrapper input, .bbc-news-vj-iframe-wrapper select { display: inline-block; } .bbc-news-vj-iframe-wrapper big { font-size: 1.17em; } .bbc-news-vj-iframe-wrapper small, .bbc-news-vj-iframe-wrapper sub, .bbc-news-vj-iframe-wrapper sup { font-size: 0.83em; } .bbc-news-vj-iframe-wrapper sub { vertical-align: sub; } .bbc-news-vj-iframe-wrapper sup { vertical-align: super; } .bbc-news-vj-iframe-wrapper table { border-spacing: 2px; } .bbc-news-vj-iframe-wrapper thead, .bbc-news-vj-iframe-wrapper tbody, .bbc-news-vj-iframe-wrapper tfoot { vertical-align: middle; } .bbc-news-vj-iframe-wrapper td, .bbc-news-vj-iframe-wrapper th, .bbc-news-vj-iframe-wrapper tr { vertical-align: inherit; } .bbc-news-vj-iframe-wrapper s, .bbc-news-vj-iframe-wrapper strike, .bbc-news-vj-iframe-wrapper del { text-decoration: line-through; } .bbc-news-vj-iframe-wrapper hr { border: 1px inset; } .bbc-news-vj-iframe-wrapper ol, .bbc-news-vj-iframe-wrapper ul, .bbc-news-vj-iframe-wrapper dir, .bbc-news-vj-iframe-wrapper menu, .bbc-news-vj-iframe-wrapper dd { margin-left: 1.12em; padding-left: 1.12em; } .bbc-news-vj-iframe-wrapper ol { list-style-type: decimal; } .bbc-news-vj-iframe-wrapper ul { list-style-type: disc; } .bbc-news-vj-iframe-wrapper ol ul, .bbc-news-vj-iframe-wrapper ul ol, .bbc-news-vj-iframe-wrapper ul ul, .bbc-news-vj-iframe-wrapper ol ol { margin-top: 0; margin-bottom: 0; } .bbc-news-vj-iframe-wrapper u, .bbc-news-vj-iframe-wrapper ins { text-decoration: underline; } .bbc-news-vj-iframe-wrapper center { text-align: center; } .bbc-news-vj-iframe-wrapper :link, .bbc-news-vj-iframe-wrapper :visited { text-decoration: underline; } .bbc-news-vj-iframe-wrapper :focus { outline: thin dotted invert; } .bbc-news-vj-iframe-wrapper a { font-size: 1em; } .bbc-news-vj-iframe-wrapper iframe { -webkit-overflow-scrolling: touch; /* Allow scroll when using VoiceOver */ }
Get news from the BBC in your inbox, each weekday morning
Read more: http://ift.tt/2qLlVkK
The post Election 2017: Five key things about the Question Time special – BBC News appeared first on MavWrek Marketing by Jason
http://ift.tt/2qM4fW4
0 notes
Text
Learn to make a Website! (Beginners)
This tutorial is guide to making a nice website that you can later add on to or modify and change. I made this tutorial to help my friends understand and see the work that it take to make a website.

This is the finished product that you will create!
1. Text Editor - First thing you will need is a text editor program, much like the simple notepad you have on your computer but a little more advanced to help us facilitate coding.
Download Sublime Text Editor at https://www.sublimetext.com/
This text editor is free and easy to use. This is the one I use in the tutorial but there are many others that can also work.
2. Folder Prep - In your computer find a simple place to make your folder that will contain the website. Below is an image of what folders should be included.

3. Creating our Files - Now we are going to drag this folder into our work area in sublime text and start creating our needed files.
STEP 1 Video
This is what the files need to look like in the end.

Note: Sublime gives you a guess of what you want to type. For example in the above video when I type in html I then press tab and it automatically finished everything for me. I use this feature many times during this tutorial so I suggest to get familiar with it.
Understanding HTML
HTML is the structure of the website, you can think about it as the bones of the body. When writing HTML there is always an open and close tag (<title></title>) The close tag is identified with the side slash.
The head tag is the brains of the website. This is where information is usually recieved for the website to access.
The body tag is like it says the body of the website.
Now we are going to add more pieces to this structure. The header tag, the main tag and the footer tag. These tags also play a huge role in the sections of a website.
The div tag is basically a container to keep everything in place. If you think about it div tags are like boxes inside a moving truck. The truck is what hold the boxes but each box also has content in it.
4. Adding Structure
STEP 2 Video
Now that we’ve added some boxes or div tags we are we can add some of the components of the website. Navigation is key in any website because thats is how you move around the different boxes or divs.
Also sometimes you can add more boxes inside of other boxes to get desired effects. In this case we will also be adding some boxes inside of other boxes.
5. Adding Key Components
STEP 3 Video
Now we’ve added a few new tags the img, nav, ul and li tag. The nav tag is simply the navigation. The ul tag is unordered list and the li tag is list item. The img tags simply for images.
So as you can see how its laid out we have three list times in out navigation bar.
We’ve also added more divs into some of the sections. Lets go ahead and add some classes and id to these tags that we have.
6. Adding Classes and ID
STEP 4 Video
Classes and ID are for design purposes. This is a way to telling a specific item the style you want to give it. If there are more than one div tag and you dont want all of them to have the same styling, this is how you fix it.
Classes can be used more than once on different items. ID’s can only be used once per page and on a single item.
We added an a tag this tag is a link and anything inside will be looked at as a link to another page or ID.
In this case we’ve placed # referring to ID, #home, and one of our divs is id=home.
7. Adding more tags and content
STEP 5 Video
We’ve added some content and some new tags. The content is just dummy text so you can add whatever content you think is best.
The new tags that we saw now are h1, h3 and p tags.
The h1,h2,h3 these are all header tags or title tags. They are usually the title of an article or some sort of passage. The p tag is a paragraph so it add a spacing in between and is just for text or images.
We’ve been adding quite a few things so lets take a look at what we actually have built so far! We can view our work on any browser but for this case we will use Chrome.
8. Taking a look at Chrome’s Developer Tool
We are going to take a look at Chrome’s Developer Tool that makes everything much easier when it comes to styling and also understanding how the structure is looking.
STEP 6 Video
That was a quick look at the developer tool that allows you to explore exactly where all your tags are located.
When we get to the styling portion we will be using developer tools to understand and easily make changes to the styles of the website.
9. Adding a Form and Remaining Content
STEP 7 Video
We’ve added some new tags and more content, the tags are form, label, textarea and input.
Form tag is the structure of the form its self, with out it there is no form. Label tag is the name of the input field, name, email, phone stuff like that. Input tag is where the user put their information. Textarea tag is the area for the message to be written.
There are different types of inputs and more things you can add into a form but for now we are going to stick with this.
Make sure you’re all caught up with the file and you have the same classes and id’s that I do. If you failed to keep up get the finished index.html file here.
10. Get you Images
Here we are going to start adding the few images. You can use the ones I use on Github or find your own. Make sure these files get stored in the images folder that we had set up for the beginning.
Styling the Website
1. Understanding CSS - Header Section
CSS is another language that will add style to our website. If you are to view the website now it doesn’t have an style. In css we will use all the tags, id, and classes to give each of these items a certain style.
STEP 8 Video
Make sure you link the css sheet to the html file for all the changes to be seeing. Just for saving time and make it easier to get the finished product I will copy and past from my finished product section by section. I recommend the you pause and copy the sections to get a better understanding of what each thing does.
Explaining CSS
You can choose and object by its tag. But you can also choose it and make it more specific in case you only want to effect that one object.
If you have 10 <p> tags but want to effect the one in the header you can simple do this.
p { margin: 0px } : will effect all p tags in html
header p { margin: 0px; } : will effect all p tags in header tag
Using a Class and ID
# is used to refer to ID, a dot such as “ . “ is used to refer to a class.
#important{ margin: 20px; } = will effect only this ID
.classImportant { margin: 20px; } = will effect all with the classImportant
Classes over write normal tag styles, id will over write classes styles.
If you are completely new to coding there will be many thing used here that will not be explained. I recommend googling and find more answer and specifications that you may need.
2. CSS - Header Image Section


3. CSS - Home Section
This section we will add a few changes to the structure of the website to make different columns.

The way this is working is its making the the width of the containers be half of the width of the bigger container, then making them line up side by side by making it float left this is what is happening here. If the class .half was not placed then the containers would be stacked one on top of the other.
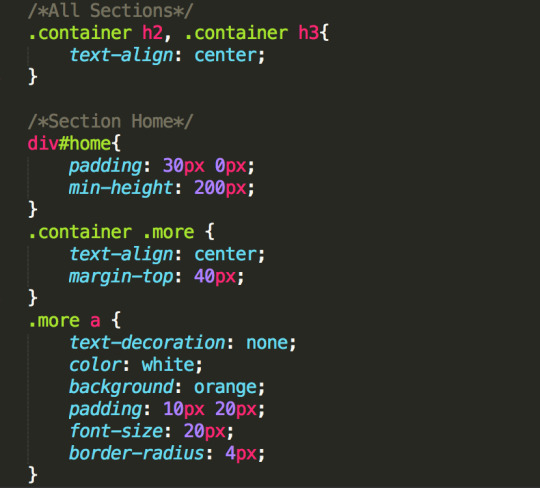
In here we are making the containers

This is the result of the home section after you add the following styles to the css file. No changes have been made to the HTML file although a few things will be added in the next few steps.
Difference Between Padding and Margin
The difference between padding and margin is simple to understand. I’m going to use an analogy that I think easily explains the difference.
Margin is like wearing clothes if you wear a big think jacket the distance between you and other objects or people has increased. If you were a t-shirt it has decreased. If you have a big large belly you have a lot of padding. The padding is usually inside the container or in this case the body. It works the same way with HTML. If an object has padding it will increase everything inside the container. So if the box was blue adding padding will show a bigger blue box, but if the you add margin instead of padding your blue box will not get any bigger because the size of the container is still the same size.

4. CSS - About Section
In this section we will be making a few changes to the about section (<div id=“about”>) Here we will add an image be next to the paragraph.
We added a title and put the paragraphs inside div tag where we added a p tag with the class side-image and an img tag inside, link this to your chosen picture.

Just like above in the home section we are doing the same thing with paragraph along with


This is the result of the about section and how the image will look next to the paragraph.
5. CSS - Contact Section
There two changes made to the HTML file in this section. Clearfix class added to the div and submit class added to the p tag.


This is the changes that should be made to the CSS file to get this result of this last section the contact page.
6. CSS - Footer Section


This is what the footer of this website should look like after the css styles are added to the footer.
7. Add Ons.
There are a few add ons that are made in the head tag. These are more optional than anything but can easily be added. Inside the script tag we have a completely different language called javascript and jquery. This just adds a nice gliding effect when you click on the navigation links.
Copy this or get it from Github
8. Congratulations!
You have just finished you very first website! You should be proud of yourself! I hope you take this project and add to it and learn more about web design and development.
0 notes