#i am testing rendering techniques
Explore tagged Tumblr posts
Visit Tumblr Blog
Explore Tumblr blogs with no restrictions, modern design and the best experience.
Last Seen Tumblr Blogs


Fun Fact
Tumblr was attacked by a cross-site scripting worm deployed by the Internet troll group GNAA on Dec 3, 2012.
Text

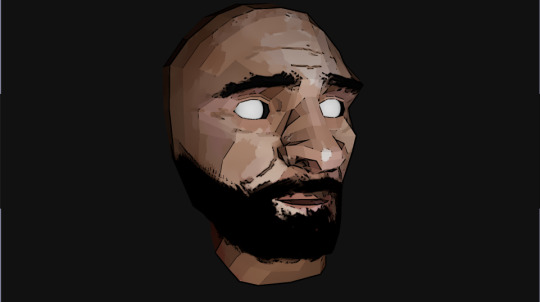
sooooooorryyyyy.........
#tf2#team fortress 2#sniper tf2#spy tf2#sniperspy#scribbles#i am testing rendering techniques#artstyle identity crisis#Also haven't drawn them properly in like 2 years#Missedf them#Goodlird
725 notes
·
View notes
Text
[Click for better quality]
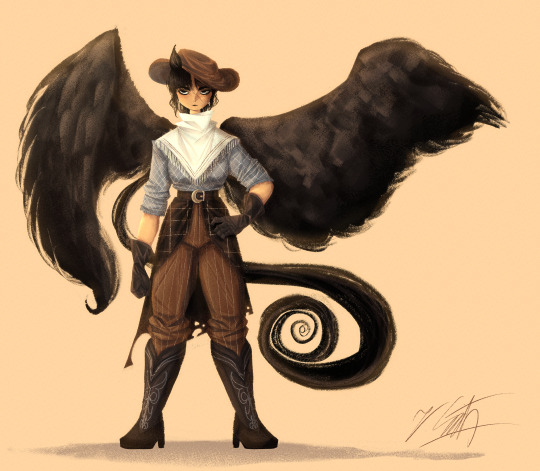
OK finally back with some more drawings! Since Touhou 17 is approaching it's 5 year anniversary soon, I wanted to draw at least one of the charatcers (hopefully I'll still be motivated to draw Keiki lol) and I had some ideas for Saki and I've never drawn her before, so that's how we got here!
Artist's Notes;
So after doing some drawings of my OCs (who I will reveal upon a later date since I still wanna finalize their designs) and finally getting out of my art funk that I've been in for a while, I started off this drawing with the mentality of "oh yeah I'm just gonna put together this quick outfit for Saki and I won't bother rendering it"
...and then I did but to be honest I am very happy I did because oh my god clothes are so fun to render for me now. I remembered the technique I used on my drawing of Reimu and applied that here. That technique being using triangles to imply shadows and highlights in clothing and then blending out those shadows to give the clothing some three dimensionality. My favourite things that I rendered in this piece were the gloves, hat and the belt buckle (since I applied a technique for rendering gold and metal objects that I remember seeing/hearing about a while ago). Don't get me wrong, I love how all the clothing turned out in this piece but the gloves are the real standout of this piece to me. I also had some fun with the cowboy boots (I couldn't figure out how to make those cool metal star things work on the boots though that is a sin I fully intend to fix later down the line) since when I looked at references for them I noticed how some of them had these intricate details embroidered (?) onto them.
Also, in the earliest phases of this drawing Saki had this really big black coat that I decided to get rid of later down the line because it really does not work with her fighting style and it did not stand out against her wings, and the logistics of her getting said jacket with her wings on confused me. Like, I can kind of imaging that on her shirt she has a little open spot for her wings that she can just put them in. That goes for Yachie to but now I'm even more confused because all her clothes must need some open backs because of her shell??? Which raises some more questions, like, can she just never be on her back when sleeping??? Looking at Yuuma we can see that the beast yakuza in Touhou can freely change their form from human to beast so can Yachie just double down on the human bit and get rid of her shell temporarily so she can sleep comfortably??? Because if she lays on her back is she just kinda wobbling around like most turtles are when they're on their backs? Can she hypothetically retreat into her shell, if so that has some weird implications to how her anatomy works. Like, what does her skeleton look like? Seriously, what are the logistics here WHERE DOES YACHIE GET HER FUCKING CLOTHES BECAUSE THEY PROBABLY NEED TO BE SPECIFICALLY TAILORED SO SHE CAN PUT IT ON TO FIT HER SHELL I DON'T NEED SLEEP I NEED ANSWERS YACHIE WHY ARE YOU LIKE THIS-
....rant aside, you can see the remnants of this idea in the tattered back of her... idk what to call it but I know she has a variant of this in her OG design. I mainly wanted to test this out because of the cursed realization that The Ghoul in Fallout Prime is just a male Saki but if Utsuho gave Saki radiation poisoning. No seriously, they're smug ass cowboys who are so sure of their own strength that have fought at least one mechanically engineered robot in some variation of a wasteland with an affinity for dogs. I'm now morbidly curious as to what would happen if you put the two of them in a room together. Would they try to kill each other? Would they become besties? Would they try to kill each other and then become besties? Who knows. But yeah jokes aside the tattered cloth was a design choice that was inspired by The Ghoul from Fallout Prime because y'know, same vibes. And also because yes I do love Fallout Prime and I am so ready for season two IT'S SO GOOD GO WATCH IT EVEN IF YOU AREN'T FAMILIAR WITH FALLOUT AS A SEIRES GO DO IT NOW, SAIL THE SEVEN SEAS FOR IT IF YOU HAVE TO JUST WATCH IT-
I knew for Saki's face I wanted to give her some thick eyebrows, it just makes sense. I also wanted to give her some scarring on her face because she's a crime boss, why wouldn't she have scars? I also had some fun with her little horse ear that's sticking out from the side of her hat since it would kinda look weird if she just had no ears period. I also went ham on stylizing her ponytail into this weird swirl, since if I were to show you some of my recent doodles from my sketchbook you would notice that that has become a common motiffe in some of my art. I don't know why but I just like it. Saki's wings were also very fun, I found a good reference for bird wings that are specifically shaped for high speeds (though I did add some stylistic touches so her one wing that's out wouldn't look like a big blob) since her whole thing is speed. From very early on in the process I knew that I wanted Saki to not look skinny, so I found some refs of female kickboxers for her legs and noticed that while parts of their upper body are maybe a bit toned, it's the legs that have a lot of power. I mainly did this because kicking is a huge part of her fighting style.
Overall, I'm really happy with this drawing, and once Touhou 17's anniversary rolls around I do want to go more in depth on my thoughts in the game, it's themes, and how the animal realm functions as a dark parallel to Gensokyo in many ways. I'll also have to get around to drawing Yachie and Keiki as well (if I still have the time and motivation to do so) since I have some ideas for their designs that I'm very excited to draw (especially Keiki).
#touhou project#art#fanart#touhou fanart#touhou 17#saki kurokoma#wily beast and weakest creature#東方project
125 notes
·
View notes
Text
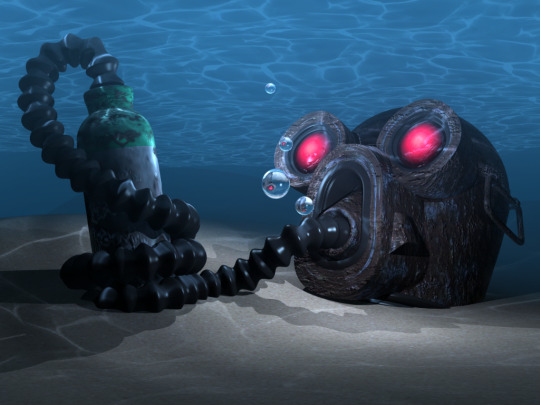
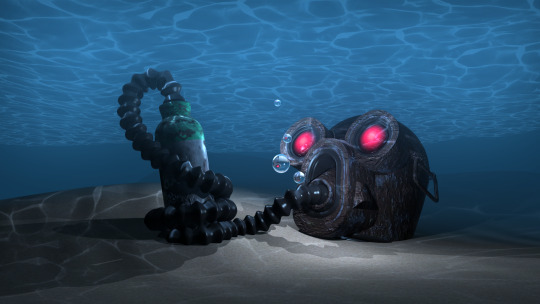
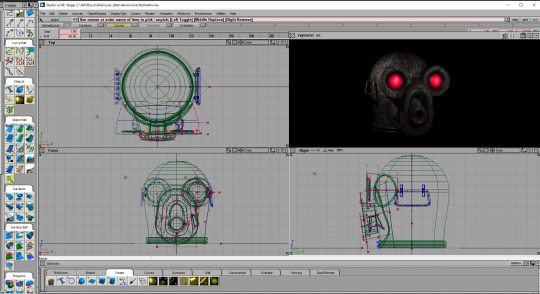
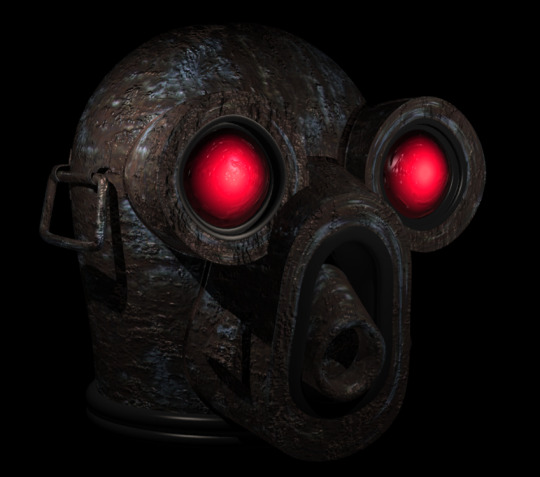
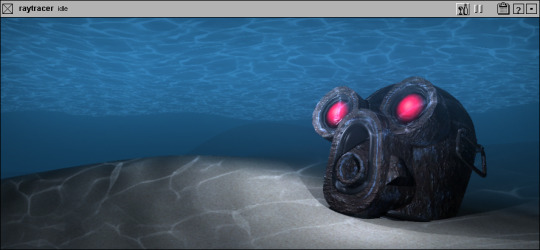
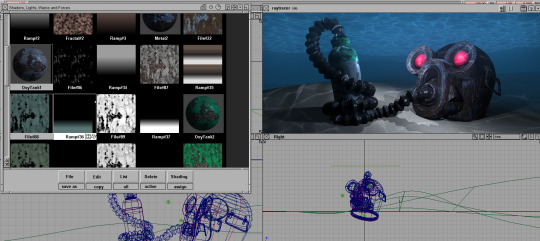
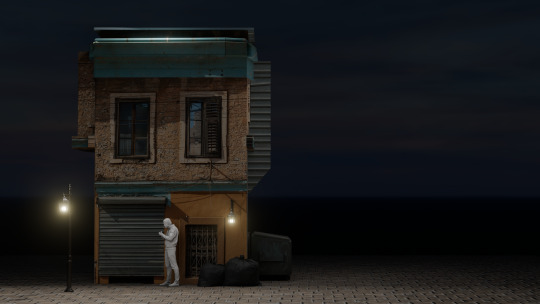
I've been feeling p sick this last week, which for some reason means that my brain really really wanted me to do nothing but focus on creating this render. I created as a means to get better at using Alias Poweranimator 9.0 because I eventually hope to use this program to make environments for games. I am really happy with the process of making this render, and I feel like I learned a whole lot! It's definitely the most detailed thing I've made in any of these old 3d programs so far, and it's given me a lot of confidence that I can pull some cool stuff off. I'm considering making some kinda video documenting some nurbs modeling techniques I learned since this kinda modeling is super dead and there is very little documentation on how they were doin it in the 90s. Lmk if that is something anyone would be interested in. (UPDATE: I did it: https://youtu.be/G8NmDeGIXZE) The only thing blocking me rn is annoying bugs that come up when running this on modern hardware, and the fact that I'm currently having issues getting it cracked on my windows xp machine. Anyway, here are some behind the scenes photos and variants of the wallpaper:
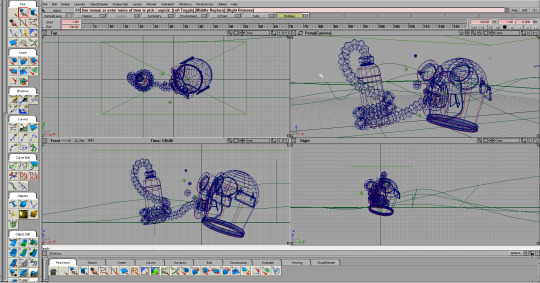
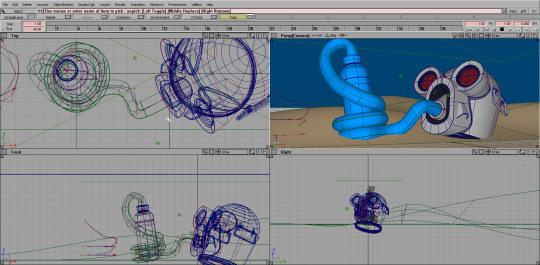
Here is what the wireframe looks like in tha program
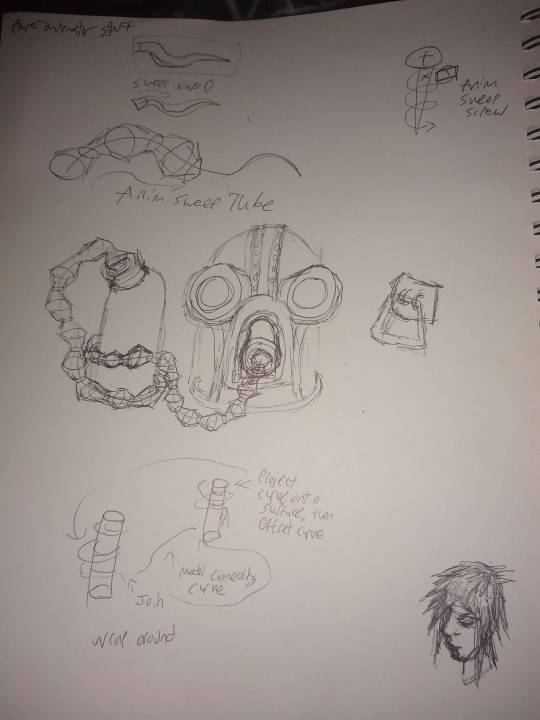
Here is my initial sketch alongside some theory crafting sketching on how to model certain shapes. Making stuff with nurbs is super fun because everything feels like some kinda open-ended puzzle lol.

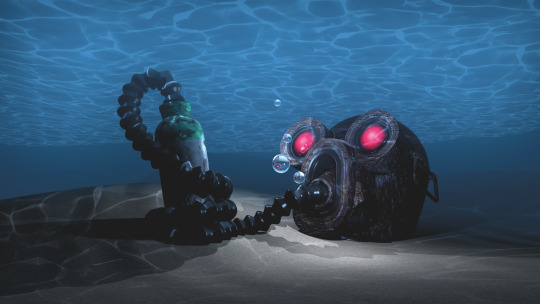
Here are a couple wallpaper variants I made with some color adjustments meant to test how they would look in printing. Modus Interactive and I figured this kinda thing is what gives a lot of 90s renders those distinct colors.

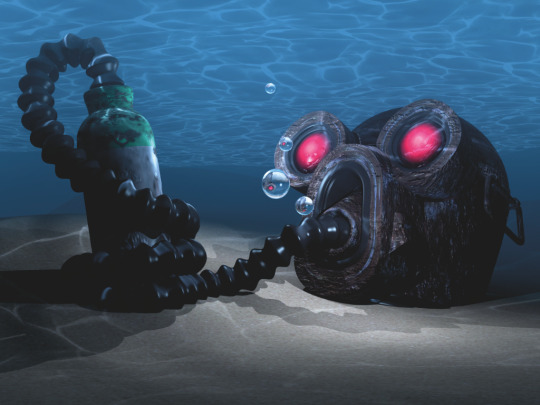
Here are some 4:3 crops for all of you out there who know what is good and true in this world.


Here are a couple high contrast ones as a treat.
Last but not least, here is just a buncha random behind the scenes screenshots:


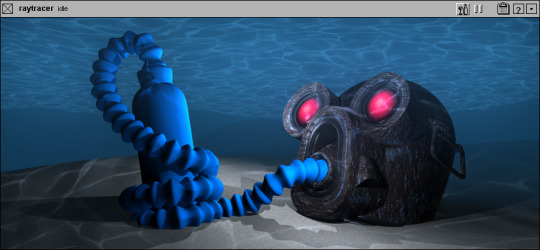

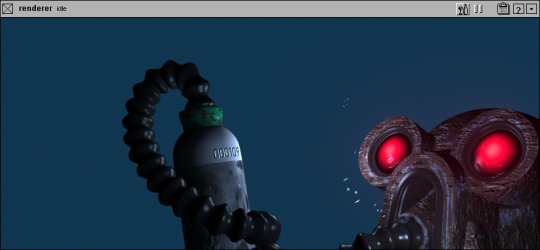
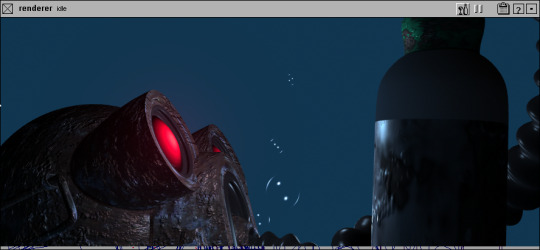

Thank u for checkin this out I spent a lotta time on it and had a good time yippe wahoo
#retrocgi#retro cgi#retro 3d#retro aesthetic#90s cgi#poweranimator#maya#raytracing#3d art#3d artwork#3d render#diver#helmet#bubbles#underwater#ocean#vintage cgi
309 notes
·
View notes
Text
@mawrrbid omg I had to make a new post cause I didn't know you couldn't add videos on reblogs, so pspspspsps—
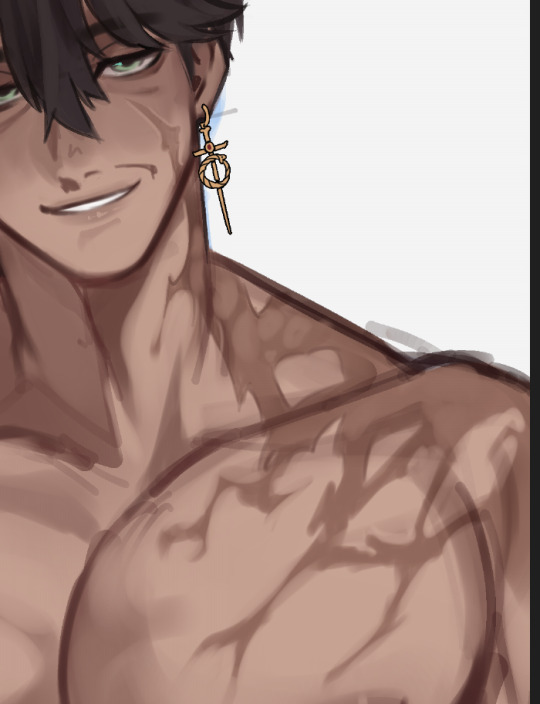
(I will like to preface that this is mostly tied to my a style, technique and preference when it comes to painting Leander and that I am bad at explaining :])
Before anything else, my absolute no. 1 tip is for painting scars—

Soft brushes. Preferably with hardness set high.
You can have a hard brush in your back pocket for rendering and refining those little pointy ends of the scar though.
While, yes, you can draw the scars in the lineart and paint over it when you render, I chose to be a dingus and freeball trying Leander's scars for fun.
With that unhelpful speedpaint out of the way...
For this study specifically, my layers went a bit like:
flats —> scars in a layer above the flat skin (a mix of blocking + erasing + refining— but you can keep them messy) —> paint over (on a new layer above lineart + color)
Depending on your technique, you may or may not have the flat scars looking messy. For me, I keep it messy and then clean them up in the paint overs. Scars don't need to be clean in general, you can have them as messy as you please
For Leander, you could get away with using a single solid color and blend/fade it into his flat skin colors.
And personal preference for me is that in some parts too, around the shoulder if you squint, the scar tissue is tight around his non-scarred skin— smth smth he got struck by lightning theory, or whatever that was.

Here are some more Leander samples I've done (apparently?) but more messy. These are earlier studies when I was testing out how tf to actually draw the guy for his birthday

If you need any clarification please tell cause I'm not sure if anything made sense rn
#I AM BAD AT EXPLAINING MY PROCESS IM SORRY#this took longer than expected but I don't mind#icedoesart#I mean I guess it is?
57 notes
·
View notes
Text
Bill Skarsgard isn’t new to the world of prosthetics in film — we all remember his horrifying turn as Pennywise in It. In Robert Eggers’ reimagining of the classic Nosferatu, the Swedish actor was back in the makeup chair, ready to be transformed into the title character, also known as Count Orlok.
“Bill’s really tall, and he’s very slim and charming and a real kind of fun guy, and he’s got this lovely, warm personality,” prosthetic lead David White tells The Hollywood Reporter. “I remember during the first makeup session, as we’re putting this makeup on, this sweet, charming young guy began to disappear and somebody else was coming in. He transformed within the space of four hours into this very dark character.”
full article at the link
White always begins his prosthetics work by hanging onto one aspect of the actor’s face. In Skarsgard’s case, it was his big eyes and “fantastic” bone structure. Around 10 prosthetics pieces were used on his face and head alone, with the body prosthetics taking the count up to 60. Sixteen people applied the pieces at a time. “It’s a bit like a pit stop in a car race,” says White. “They know exactly how to change those tires really, really fast.”
The actor was in the chair for four hours just for his head and hands. Given his experience with prosthetics, Skarsgard has learned tricks to deal with the amount of time in the chair, White says; the actor goes into “a meditation world” to preserve his energy and save it for the performance onscreen.
When the first trailer dropped, many fans were quick to point out how Orlok’s mustache and hair deviated from the character’s appearance in the original 1922 Nosferatu, which was based on Bram Stoker’s novel Dracula. White admits that Orlok’s look in Eggers’ iteration is “quite unusual” but says there’s a reason that choice was made.
“Robert would hand over these illustrations and things he found from the 16th century about these noblemen at the time, and they all had those mustaches,” he explains. “It’s highly likely that any nobleman would have had a mustache like that, even Orlok.” In terms of Orlok’s hair, White also stuck with the period in which the film was set: “You see that kind of look throughout that part of the world, and he wouldn’t stand out. When he’s in his sarcophagus, Robert was very insistent that he wants his hair all flat and matted, full of muck and dirt, and when he’s out and about, it’s a little bit more full and rich and elegant.”
For much of the movie, we see only Orlok’s silhouette or see him rising from the shadows. That also factored into the way White worked. “During the sculpt, my key sculptor, Colin Jackman, and I were very careful because Robert had mentioned that he’s going to shoot him not only in low light, but he didn’t want to reveal the decay and rot that was coming from the back of his head forward. On the one hand, you’ve got to sell him as this normal guy who is maybe a little eccentric, but on the other hand, he’s actually falling apart.” Keeping that in mind, White set up lights during the sculpt to gauge how far he could go with the prosthetics, and lots of camera tests were done to ensure nothing was revealed too soon.
Makeup head Traci Loader also used lighting to get her technique just right, especially given the film’s tinting — the movie was shot in color in 35mm but was desaturated to make it look like the action was taking place in the constant pale glow of moonlight. “I also did The Lighthouse and The Witch, so I’m familiar with [cinematographer] Jarin Blaschke’s lighting,” she tells THR. “I have lights in the trailer that I put gels on to complement his lighting so that I know that I am going in the right direction. For black and white, you have to be careful with your reds and purples — anything that has blue in it, you have to alter it. So with candlelight, any yellows or reds you use can’t be orange-based; they have to be blue-based. Otherwise it’s not going to read. So there’s a lot of color theory involved.”
31 notes
·
View notes
Text
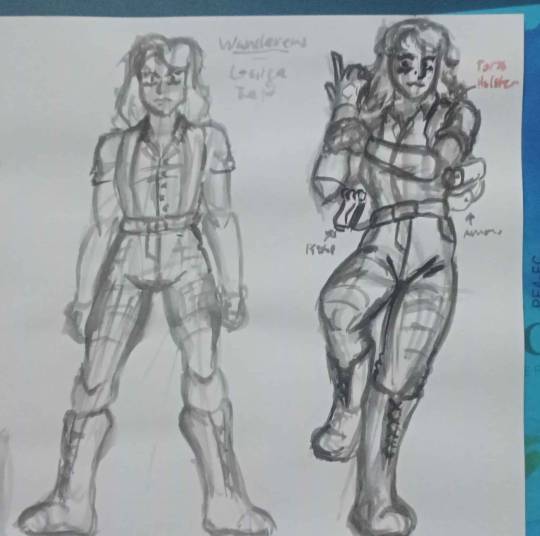
Study Sunday 19-1-2025
MY LIFE IS IN SHAMBLES GRAGHHHHHHHHH but maaaan i still need to make a living ;-; #1 New Sketching Style just dropped
Brass Beasts
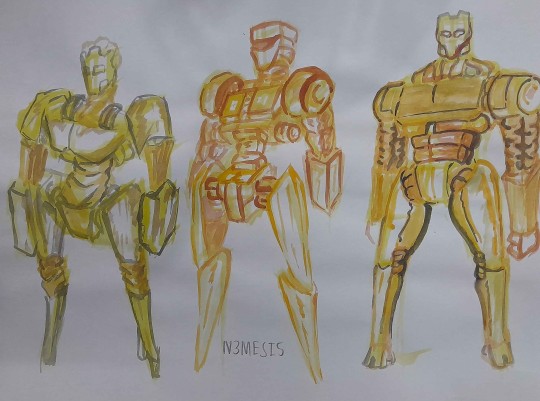
Gaige The Mage Concept Art
Sketching test (Titanfall, Fallout, Gundamn, Armored Core)
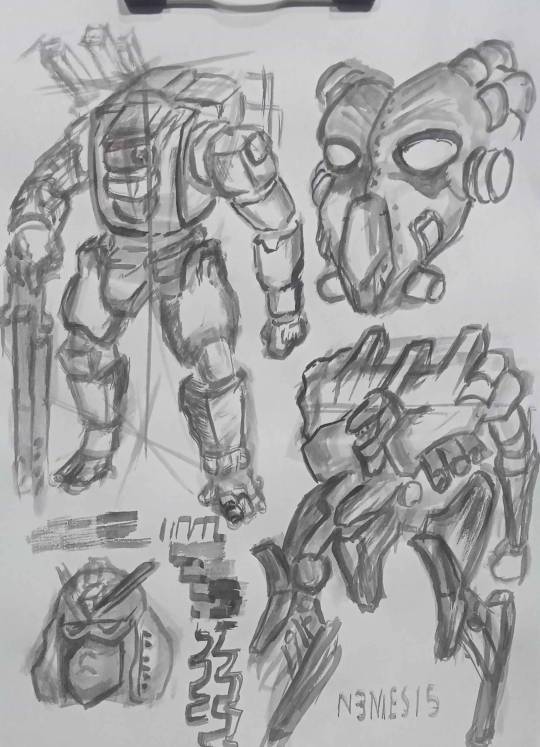
Sketching with pencils is getting pretty boring and depressing for me, I need color, I need somethin' new! so I practiced some dry brushing techniques and oh my lord I am HAVING SO MUCH FUN!!! So this might be the new norm for me, buut it's probably the hardest thing to do so far because i can't erase as much as usual aaand the wetness would warp the paper. But that's ok, it's still fun as hell.
#2 PIXEL ART ANIMATION!!
"Sacrifice" aseprite tech demo (more like my "skill demo"")
The technique I learned so far is called "warp and clean" which is tilting the sprite and cleaning the mess made from rotating and stretching.

I'm making a cleanup sketch of the giant so far, hopefully I have time to make the protagonist schmoove around. (REALLY WIP)
"so I've been active on newgrounds, for quite a while now, engagement is slooow buut the content the site provides is fun, new aaaand sometimes disturbing, thing's still hasn't changed in that site aint it? But here's what I've been making for Pixel Day which is in Jan 23, hopefully I could have some sets of animations before"
Future Plans
Meet The Artist with an all new persona that isn't a seaal!
Art about what socials I have.
Getting back to digital and learn how to render people instead of rocky robot boys.
Pride flag pfp to keep the chuds away.
Closing thoughts
When it comes to improving one's artskills, I think drawing fast and drawing good is a skill you learn through time and browsing references. Though important training we can do early on is probably the technical side like shadows and anatomy. I don't get much engagement on tumblr, except for some few close followers like 12thdoctorkazami or Lucifer (sweetsportsrebelpickle) with their support gives me some energy to keep my account alive here, buut I think I should start making a little list of socials that I possess, which I'll do after I post this study sunday. Thank you for your time reading my little art journal thing~!! Stay cool, stay awesome, champs!!!
3 notes
·
View notes
Text
Day 13 - check - G - Luvon + Nero
Luvon tests something.
--
Three polite raps sounded at his office door--or the frame, anyway, since the door was wide open.
He knew who it was even before that soothing voice reached him. Most people barged right in even if the door was closed with a 'do not disturb' sign taped to the front in big red letters, because he worked with a bunch of rude ingrates with no sense of decorum or ability to read, apparently. Only one shining star of a coworker bothered knocking even when the door was open, would wait for permission to converse. Nero could kiss him for it (he wouldn't, because it may startle the poor anxious soul, but he had thought about it more than he'd care to admit).
"Good evening, Nero. May I come in?"
Luvon stood in the hall, patiently waiting outside the room entrance with a small smile on his face. He waved as Nero turned around, his chair squeaking loudly as it swiveled--note to self, use the squeaking to annoy the hells out of Cid when he next comes by.
Luvon had opted to wear shades today, the very same Nero had made for him after discovering his extreme sensitivity to light. It always filled the garlean with pride to see his inventions being put to good use. Luvon was able to go much longer these days before needing to don his usual blindfold. The lenses were polarized with a new technique he'd developed and specially crafted to filter out gaudy spell effects too, rendering them nearly invisible. They even lessened screen fatigue! Nero had a matching pair on, partial as he ever was to wearing sunglasses indoors. They made him look cool.
"Of course, Freckles. You're always welcome." Unlike certain someones that need not be named, lest it summon him. He motioned him forward, and Luvon acquiesced. "Now, what brings you here? Need my expertise on something?"
"In a sense, yes." Luvon pitter-pattered into the room, steps so light they could barely be heard. He stopped a few films away. With Nero sitting down, they were almost eye to eye. A rare viewpoint.
"Well? You were right to come to me, I am the obvious choice." If he wasn't the first pick, he'd need to up his game.
Luvon's smile shifted, suggesting he was holding back a huff of laughter. Not too strange; Luvon found Nero amusing, which was just another of his charm points: a sense of good taste. "It is an answer only you can provide, in fact."
Nero preened. He was terrifyingly smart, true, but something only he could answer? Whatever could it be? "Don't keep me in suspense, then!"
Luvon stepped closer.
Then closer still.
If he kept going, they'd end up nose to nose, and Nero would have a lap full of the other. Certainly not unwelcome, but he was getting confused now.
"May I touch you?" He tilted his head to the side sweetly, innocently. His hands were held behind him to appear less threatening--not that the guy who barely came up to his elbow had to worry about that, Nero couldn't imagine ever being scared of the soft soul in front of him.
Wait. Back up.
Touch him? Yes. Please do. Whatever for?
"Whatever for?"
"I need to check something. I already know the answer, but I promised to get evidence to confirm."
He was curious enough to go along with it. "I am all for the scientific method. So long as it won't hurt, touch away, shorty." He held his arms out and added, "My body is yours to examine." He grinned and winked, despite his eyes being hidden by the barrier of their two pairs of shades, so there was no way the other would know that.
Luvon, despite his appearances and general anxieties, was not shy. And in fact he was a very touchy-feely individual naturally. A pat on the elbow here, squeeze of the fingers there, etcetera. He was tactile and had stopped asking in general after the Ironworks crew gave him blanket permission, as his eyesight was still poor even with the aid of spells, tonics, or shades--though not so much that he needed a cane--and touch could be useful to orient himself.
All this to say that Nero didn't expect the man to blush. His grin only widened at that; maybe his feelings were reciprocated after all. Certainly something to look into later.
Luvon nodded, then leaned in.
Waitisthisactuallyhappening--
Instead of faces meeting, the other turned his head and ducked down to press one fuzzy ear to Nero's chest. A bit disappointing, but still nice. Still much closer tysn expected, nearly intimate. A pointer and index finger pressed to his neck where his pulse point was, pressure firm but claws gentle.
It took a lot of effort to keep his heartbeat steady--wouldn't do to trigger doctor mode out of the other, and it'd be embarrassing to explain why his heart was racing. He'd have to spell it out, Luvon surprisingly bad at figuring feelings out when he was the primary target of them. No thanks, not ready for that conversation yet.
After a moment, Luvon spoke again, taking away his hand, though he kept his head where it was. The rumble of his voice vibrated pleasantly through Nero's chest. "Mhmm. It is just as I expected."
"Yeah?"
"Indeed. You do have a heart. There it is, beating just fine." Luvon pulled back, giving his chest a few pats for good measure.
Nero was taken aback. Before he could find his words again, Luvon continued.
Well, he giggled, first. Honestly giggled. "I apologize, Nero, but this was a rather silly setup of a joke. Cid bet earlier that you did not have one, so I volunteered to get proof."
Nero groaned. Of all the ridiculous jokes. Of course Luvon would follow up literally. "Of course Garlond was involved. You tell that idiot--"
"I am certain he would rather hear it from you," Luvon interrupted him. Fair. His rants and creative insults about Cid could go on a while once he got started, best served personally for their colorful language and nuanced delivery. "But the next time he suggests you are lacking in a heart, I will remind him of my hard evidence to the contrary."
Nero did laugh at that, finally. "I'd love to see the look on his face of you defending me. Can't wait, really. Where is the old grump?"
"How fortuitous, then, we are going out to get dinner soon. You can accompany us!"
Oh, and a chance to ruin Garlond's date night, one he'd never be invited to if Cid hadn't put Luvon up to such a ridiculous joke of a challenge? His name day had come early.
"It would be my pleasure, Freckles. Lead the way." He held his arm out and Luvon took it as the invitation it was, hooked his own arm around his elbow as they left the room, merrily chatting all the way.
#ffxivwrite2023#ffxivwrite#luluvon luvon#nero tol scaeva#ffxiv oc#mango writes#ooof this one is a bit. idk. writing on phone suuuuuuucks lol.#pre ot3 ohoho. nero can be a pining guy bc i said so#luvon : this a totally fun lighthearted joke and not an excuse to touch that soaghetti noodle of a man#nero wouldnt be offended at luvon . no that is all going to cid. this dinner is going to get them kicked out the restaurant#no beta we die like loiusoix
4 notes
·
View notes
Text
BLOG 6: RIGGING AND ANIMATION
Aya Khoury
Now that the model was finalised there was one last step, rigging the model and animating it. The leviathan appeared two times, in the middle of the animation just swimming around the submarine and at the end when it eats the submarine from above. I’m so glad I tested them out before going into texturing because I would’ve had to redo so many things.


The rigs worked perfectly, I had no problem with the eyes and the teeth so I started animating. The first animation was the monster swimming around the submarine. For the animation of the body, I used the technique of damped tracks. This technique allows all the bones affected by it to be influenced why the one that comes before. So, rotating one bone will make the ones that come after the move, so instead of animating each bone by itself, I was able to animate just one.

Then, I had to create a bezel circle, make its dimension 9x9, and parent the fish and the armature to the circle to make them follow the path. However, the fish and the armature having 2 different origins, assigning them to follow the same path gave very weird results. So I changed the technique and added an empty object, the plain axe. I placed that plain axe on the neck of the monster and then parented the armature to the plain axe, and made the plain axe follow the path. At that point, the only keyframes I had was the bone that influenced the rest of the body.

The second animation was the end animation, where the monster eats the submarine. I didn’t want to make the animation simple, consisting only of the jaw opening, so I checked for reference from the game to see how the fish acted. Its actions were very sharp and quick, as it opened its jaw to eat its prey the head along with the claw moved diagonally. My first try looked really bad, I believe I tried too hard and added too many keyframes. Additionally, the new blender has a new way of adding keyframes, it doesn’t give the option of adding individual X, Y, and Z keyframes, just all three at once. Not being familiar with the new system I struggled a lot with figuring out how to control them.
So I opened a new file and started over. I first placed the keyframes of the main actions, without breakdowns, and that was enough. I also learned how to delete a singular or all the keyframes of an individual axis through the item window, which helped me a lot. Afterward, I placed a camera and positioned the monster facing down to send it to my teammates. We opened a call with Muqadass to deal with the problems as the mesh was going crazy, but everything was fixed.

At last, my part of the work was done. I am happy with the way I worked for this project, I wasn’t behind and I faced the challenges well. Modeling keeps feeling more and more natural and easy, but I keep learning more and more through every project. Im also very satisfied with the final result I didn’t know what was going to happen to go into this project but I pleasantly surprised myself with my abilities. Finally, I met up with Muqadass and Robin to use the PCs in the LRC and stayed overnight to render frames and I was very happy with the end result.

0 notes
Text
Final Major Project
Building Test Render : Technical Tests

I am incredibly happy with the way this turned out. Projecting real life textures to 3D models is quite time consuming since the real life textures have to be properly aligned with the designed 3D model but the results are worth the shot.
In my project I will be using this technique as much as possible and I hope this technique will help me to blend the green screen footage well with 3D world that I create.
0 notes
Text

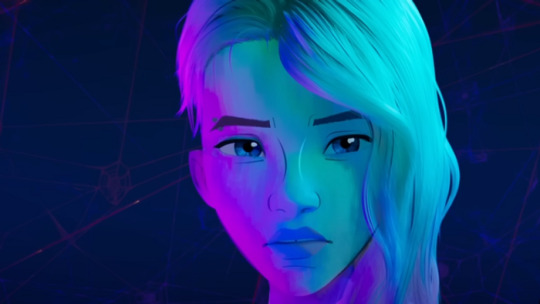
What am i doing instead pf getting ready for a tomorrow test? that's right, i'm drawing a random concept of one of two main characters for my visual novel. also trying new rendering technique. not a final version of character though, maybe change it a little later if i'll find better ideas for him
#digital art#art#artists on tumblr#oc#original character#character art#character design#ocart#originalcharacter#demon#demon oc
0 notes
Text
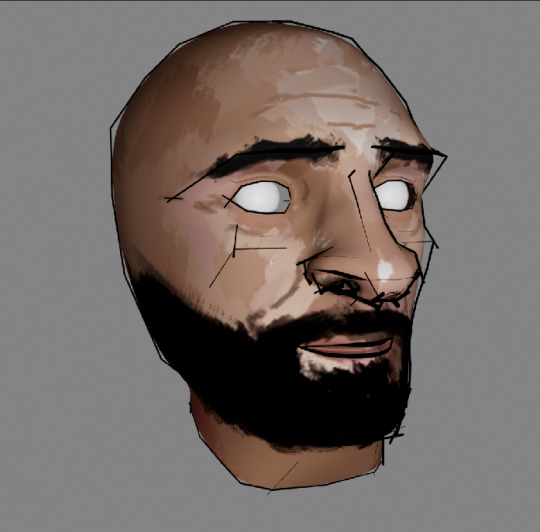
Toon outline
Thinking more out a hybrid approach to my film, I know that I will be modelling and animating everything in 3D, then layering 2D animations in and painting the backgrounds. To try get everything blending nicely together, I've been thinking of other potential ways I can use the 3D elements to this.
I have started by painting texture tests. But pushing this further I've thought about hybrid animations and what they used to create a good balance of techniques.
The first animation that came to mind is Across the Spider Verse. What caught my attention was the use of outlines on their 3D characters. This works well for the comic style of the film. So I've been curious to see how using moving outlines would work for mine, but not in a comic setting.

youtube
I came across this tutorial on toon outlines in Maya and gave it a go expecting it not to work. It actually came out quite well. It instantly gave it a hybrid look. I'm not sure whether it will create a comic look, which is not the intention. But I think it makes the character's face more intriguing to look out. Although they are used to create a 2D look, I find they've given the face a bit more depth with the painted texture.

After I tested the lines on the face, I wanted to see how it would look on the environment. The only model I had to work with is from my forest tests. Unfortunately, due to the dark lighting, it's hard to tell that there are toon lines on there, even when I made them quite thick, so maybe that won't work well for the majority of the forest environment.

I'm not sure if I'll use the toon outlines. I don't know how they'd work with a rig as I had to turn them into poly objects in order to render them in Arnold. But it's been interesting experimenting with them. Potentially I will use them if I think they'll give my animation an edge to it.
Aftereffects:
Another option, if I am keen to have a comic look is adding them in Aftereffects, which I can do in post-production, so I won't have to commit to outlines in the modelling stage and be stuck with.
I did some quick tests using the cartoon effect, which made an easy similar effect. Maybe they don't have the same depth to them as the toon outlines, but they still achieve the Spider Verse hybrid style. I also tested them on the kettle animation. The lines moved well with the flames. It also made the texture on the kettle more blocky which looks good as well.

0 notes
Text
Assignment 5 - Work with 3D
Hard surface modeling

Fig.1 Resident evil 4 Remake gameplay
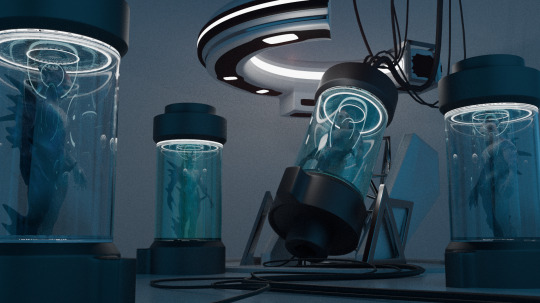
As a person who is deeply influenced by sci-fi and horror, particular apocalyptic chaos of zombie outbreaks like the game, Biohazard, I wanted to create a Sci-fi scenery for human experiment In this assignment.

I decided to give 3D hard surface modeling a try, and began to model the experiment chamber with a cylinder with 32 divisions. I extruded and scaled up the top and bottom part to be the cap and receptacle base respectively. Then, I selected and applied a solidify modifier on the middle part to create the thickness of the glass. I added the 2 torus mesh, scaling them to a reasonable size, and placed them on the cap to be the lighting. The same method was applied to the top circular light, whose shape design was inspired by surgical lighting, creating a peculiar and eerie atmosphere for the scene. I used triangular meshes with the frame modifier to create the metallic frames beside the largest chamber. Finally, I used the bezier curve to create wires connected to the main chamber. Bam! The modeling of the scene was done!
Node Shader
I decided to use a blueish colour to render the entire scene because I wanted to create an aquatic theme relating to deep sea creatures. I wanted to use colour to depict the scene into a human experiment lab of combining human and sea creatures. I turned the colour node, which is located in the scenery attribute section, to be dark blue, and applied scenery particles to elevate the eerie atmosphere. I used the colour ramp node on the glass to create some gradient colours, and finally, turned all the light sources’ material into emission attributes.
Zbrush sculpting
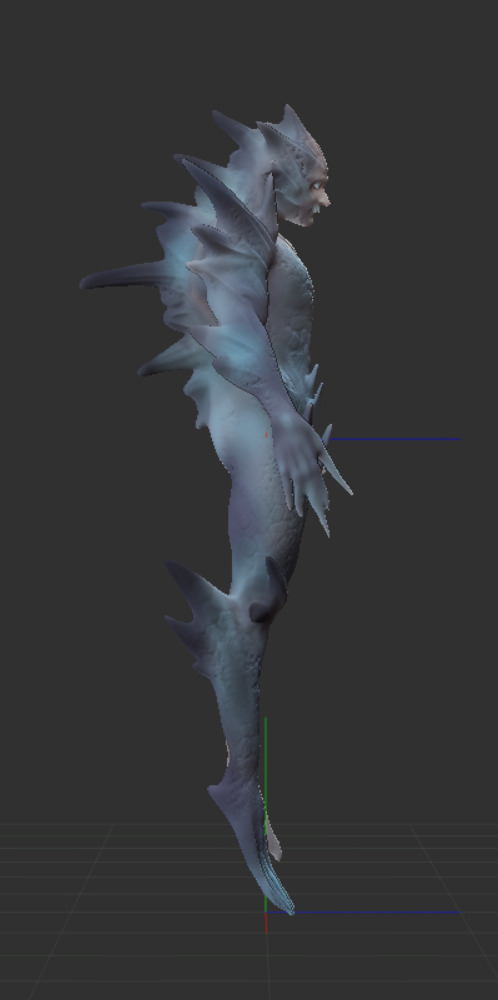

Since this is a human experiment lab, it must contain some live test subjects. I tried to explore my ideas on the test subject design using Zbrush. In the competitive and fast-paced gaming industry, efficiency is the key, and I am no exception. Instead of building a model from scratch, I sculpted on top of a default human base mesh in Zbrush to efficiently bring my concept idea to life. I used the Move tool to stretch the human mesh and created an unusual body shape on the left side. I kept the human shape on the right side and created some thorns on his back, shoulders and elbow to emphasise that his mutation is still in progress inside the cultivation chamber. After I finished the sculpting, I polypainted it in Zbrush, exporting it as .fbx and imported it to blender. I scaled the models and placed them in the chambers.
Overall, this was a very interesting assignment that helped me to understand certain operations in blender. I am satisfied with the result, and I have learned a lot about 3D modeling through this little project. In the future, I would love to explore more about topology and hard surface modeling techniques to improve the smoothness of my model, and save time.
Reference:
Fig.1: Neoseeker.com. Available at:
https://www.neoseeker.com/resident-evil-4-2023/walkthrough/Chapter_13
(Accessed: January 13, 2025)
0 notes
Text
Week 9: Fri - Fmp
For this week we was tasked to research 3 artists that we could take from in our concept art pieces. I wanted to research specifically mark making and colour in this experiment.
My first artist was Cara Wang. She uses quite flat and vibrant colours throughout her work and uses characters who are expressive and drawn in a way to convey a message through different shapes and sizes, instead of drawn to strict proportions. Her work stood out for me for the grainy mark making and effective colours. She is predominantly a physical artist who uses physical techniques to amplify her work. While her characters are a lot more flat than the ones I want to animate, I absolutely love the style and will try my best to replicate the warm and playful and almost childlike vibe her work gives off. You can see clear connection and expression in her illustrations and they come off very charming, which is something I like a lot.


My second artist is Julia Prokhotskaya. Julia uses pastels, pencils and water colours to make her work. She makes dynamic, character focused pieces that, again, have this childlike innocence to them. The staging of her work is very appealing and lends itself very well to storytelling. The main thing I liked from her work was how she portrays her characters. They are always very integrated in the scene, with a clear state of mind and predictable action. This is something I like as I know it Is something I must improve on for this project. Her work is very calming and pretty to look at, the space is used effectively and everything in her work serves to further the story the image she’s telling which I love.


My final artist is Alexandra Ball. She carries the same motif of soft colours and quite flat characters. she is very strong in her shape language and looks to use predominantly water colours for her pieces. they are all very story rich and i love how she personifies the animals in her pieces. they all have clear and exaggerated characteristics and make them extremely interesting to look at. while i have no characters in my story i will absolutely be referencing how she exaggerates these shapes to show off their personalities. Her staging is also very strong, with a clear show of depth and placement, with all characters being in interesting and leading poses, her art is super appealing to look at and its texturing adds to this.


This week i also had to progress with the physical tests by making 3 more, 2 more digital and then a final concept piece. i decided to then use a different photo to before. this was to further test how familiar i am with the technique and i feel as though it did indeed test that. i did a pencil, a black and brown brush pen rendition as this was all the materials i had at home. im quite happy with how they turned out, specifically the pen one.


i then wen ton to make the next 2 digital paintovers. i tried one in the style that i did before and then one in a style closer to the artists i have looked at and also the render i had already made. i really like the 2nd image, its very soft and calming image. i think i got the colours right which was the most important thing for me.


for the concept piece i added in the characters i had designed before running around, showcasing their personalities. Becky, chasing after and trying to control her youngest brother, who is running off on his own hastily, then their sister Olivia who is stood aloof, completely oblivious to everything. if i had more time this week i wouldve made a whole seperate image so im not feeling the best about this image but i really have been strapped for time this week. all things considered i am happy with this piece though.

0 notes
Text
Ajrakh Kurta:
Ajrakh printing is a very ancient, intricate technique with earthy tones. Originating in the Kutch region of India, it’s a very delicate block printing technique using natural dyes and time-tested processes to bring out some of the most beautiful prints. The craft has gifted us with the elegantly simple concepts of Ajrakh Kurta along with a dash of modern style and a truly sought-after garment for heritage clothing lovers with a modern twist.
I am proud of Laado for offering such a splendid collection of Ajrakh Kurtas, crafted with so much precision and authenticity. Every piece speaks out of the originality infused in Ajrakh printing without compromising on its very spirit, and each outfit turns out beautiful and heritage-wise. Laado’s designs are rich in the quality of the kurtas and richly woven along with patterns that are full of uniqueness and natural colors. Our commitment to producing an Ajrakh Kurta provides you with a stylish piece of clothing with a cultural identity.
If you want that traditional touch with a modern look in Ajrakh Kurta, then Laado’s collection is just what you need. We, at Laado, appreciate authenticity and style and bring to you the beautifully crafted Ajrakh Kurta that can add variety to your wardrobe and help make it easier for you to portray cultural charm. Learn why people choose Laado for the Ajrakh Kurta.
A Tradition Fabricated Behind the Ajrakh Kurta Ajrakh printing is one of the oldest forms of art that has been part of the culture of Kutch, a region in India. The craft is sought after due to its esthetically beautiful, symmetrical patterns and natural dyes. History: Intriguing because initially, this cloth was worn only by royalty, but still holds a cultural value today. Every Kurta is a work of great art due to the minute details involved in the process.
Wooden blocks are hand carved, and great attention is paid while applying each layer of Ajrakh’s design. However, what makes this Kurta stand apart is its use of natural dyes: indigo, madder, and pomegranate, which provide earthy colors but also ensure that the fabric is environmentally friendly. Thus, every piece of a kurta is a rich blend of tradition, beauty, and sustainability.
In Ajrakh printing, it takes about 14 stages of dyeing and washing to bring the depth and vibrancy of the patterns to life. Such an act of dedication to craft is what makes the Ajrakh Kurta so unique when it comes to aesthetic appeal as well as cultural richness.
Why Wear an Ajrakh Kurta?
For every reason, Ajrakh Kurta is one of the best choices. These kurtas are very versatile. You can wear it while going casually or formally. Whether you’re going to some event in your family or hanging around with your friends, the kurta is perfect to wear. You can dress up with some nice jewelry, or you can keep it simple for a more laid-back look.
And it is very comfortable. These Ajrakh kurtas are made from very soft natural fabric. So the material so comfortably presents itself to your skin. Not only that, it is a full-blow-breathable material, which means no sweating even in warm weather. Natural dyes like indigo and pomegranate in their uses render the material ecologically friendly, so you will feel good about your choice.
Last, but definitely not the least, the Ajrakh Kurta makes you look as traditional as it gets. You get to wear beautiful designs celebrating our culture and still look stylish. Be it a formal function or just a casual day out, an Ajrakh Kurta makes you look neat as always.
How is Laado’s Ajrakh Kurtas Different?
Special pieces will be noticed on checking out Laado’s Ajrakh Kurta collection. Our designs are exclusive, and beautiful art in the form of Ajrakh printing. Lovely patterns for every kurta give the wearer a different feel and sense of belonging to our culture. It is not just clothing; the Ajrakh Kurta from Laado has its own story.
We use quality material so that each Ajrakh Kurta is comfy and lasts long. Soft fabrics are gentle pleasures to the skin, and the bright hues retain their vibrancy while washing. Our efficient artisans put a lot of care into each piece so you know you’re getting the best
A few of our favorite pieces include a vintage blue indigo kurta and a bright red kurta with pretty flower designs. They are the most sought-after amongst our patrons as they nicely mesh traditional style with a modern look. Laado’s Ajrakh Kurta has something perfect for you, whether it be something you can wear on a casual day or something special. Each piece reflects the beauty of Ajrakh’s art, making it a wonderful addition to any wardrobe.
How to style your best ajrakh kurta from Laado
Style this amazing ajrakh kurta from Laado. Styling might become fun and easy as well. Here are simple tips for both men and women, that will help you look your best.
For women, Ajrakh Kurta can be teamed with trendy leggings or palazzo pants. These keep the individual comfortable and in style. Gorgeous accessories such as earrings or a tiny necklace give the overall set-up a touch of beauty. Adding a colorful dupatta would add a nice touch to any festival. In addition, flat sandals or traditional jutties make for an excellent pairing. For men, the Ajrakh Kurta can be paired with jeans or chinos to give a smart-casual look and even with dhotis for a more formal traditional look. That’s it; some nice styles may come from a simple watch or a simple bracelet. For footwear, loafers or sandals work well as specified by the occasion.
The Ajrakh Kurta from Laado will always catch people’s eyes, no matter how you style it. Combining different pieces will guide you to a unique look that exudes your personality!
How to Take Care of Your Ajrakh Kurta from Laado
Ajrakh Kurta from Laado: Taking proper care is so important in keeping your product looking good for many years. Here are some basic pieces of advice to help you maintain the quality of this Kurta.
First, always hand wash your Ajrakh Kurta in cold water. Cold water is advisable so as not to let the colours fade off. Use mild detergents as direct rubbing against fabrics may cause damage. Avoid using bleach since it will damage those beautiful prints on your Ajrakh. Hand wash your kurta if possible for it to stay as it was meant to be. If you cannot help but use a washing machine, just make sure to use gentle cycle when washing your Ajrakh Kurta.
Let Ajrakh Kurta dry in shade. Avoid exposing them to direct sun so that its bright colors may not fade away. Iron the Kurta on a low heat setting. If possible, do it while the fabric is somewhat moist for the final touch
Storing your Ajrakh Kurta is also required. Fold it neatly and keep it in a cool, dry area. Hanging it for extended periods should be avoided because it stretches the fabric. Using these simple tips, your Ajrakh Kurta will remain new and fresh, and you would be ready to wear it again and again.
Select Laado for Experience of an Ajrakh Kurta
Laado is here for you whenever you require the perfect Ajrakh Kurta. We promise that all the quality we will provide to our clients will be pure quality Ajrakh garments. Every item from our side should be achieved in an excellent quality, made from the best raw material, which is not only beautiful but comfortable and durable. Everyone wants to look beautiful in clothes that are fit right and feel wonderful.
Quality assurance: Laado aims at ensuring customer satisfaction. It listens to the customers to ensure their needs are met. If you have any queries or need help, our friendly team is always here to guide you. We also offer easy returns and exchanges, so shop with confidence.
Laado is committed to making you feel special. Customized sizing and personalized recommendations by Laado will guide you into the best possible choice of an Ajrakh Kurta that suits your style. We ensure fun shopping without a big hole in your pocket with regular discounts and offers. Choose Laado today for the experience of an Ajrakh Kurta — discover its beauty and comfort now.
Laado’s Best: Embracing Tradition in Perfect Ajrakh Kurta
To conclude, tradition has never been easier than with Laado’s Ajrakh Kurta collection. As each kurta reflects the rich heritage of Ajrakh printing, every addition to your wardrobe will look classy. You can always trust our promise of quality and authenticity.
Come visit Laado’s Ajrakh Kurta collection today!
Unique designs, vibrant colors, and comfortable fabrics experience it all with our Kurtas. Whether it’s dressing up for special occasions or just something for everyday wear, there’s something for everyone at Laado. Make a statement at any given platform by dressing up beautifully in an Ajrakh Kurta. Connect with culture and craftsmanship; shop along with us today to enjoy its beauty while helping the traditional artisans.
#kurta#kurtisonline#kurtis dallon#education#kurtis conner#student life#kurti set for women#kurtis stryker#ajrakh#style#harry styles#art style#high school
0 notes
Text
"Light and Shadow"-3
The brief called for the practice in Unreal, so I also played around with lighting inside Unreal. I imported a character from Parangon, and tried to apply all the new lighting konwledge I got from re rendering my past projects.
I wanted to try to create different moods and different atmospheres for the character by playing around with the lighting, and test more the adjustments one can do to lighting in Unreal as I am still a bit unfamiliar with Unreal´s lighting.


Fig.1: 3 point light and grayscale
For the first iteration, I did the simple 3 point light. It is a quite neutral light setup, with its main focus being to showcase the model and its details rather than to tell any sort of story.
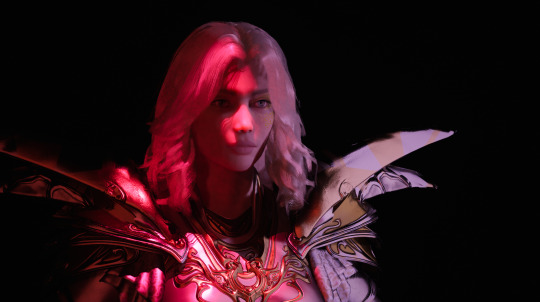
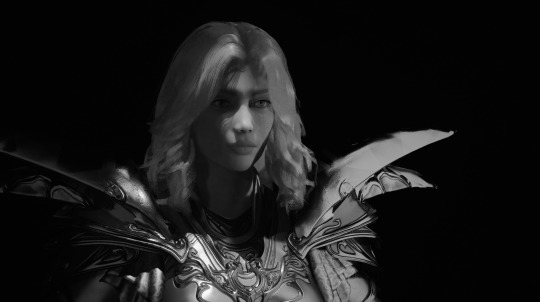
Fig.2: Dangerous lighting
For this one, I tried to convoy a sense of threat or danger for the character. I wanted her to look menacing so I tried to cover her in lots of deep shadow, including around her face, hiding some of her features to make her look as a danger. The red tones I think help with that mood I am going for. The lights set up is 3 point too but I moved around the lights to create different type of shadows, and the rim light is barely present.

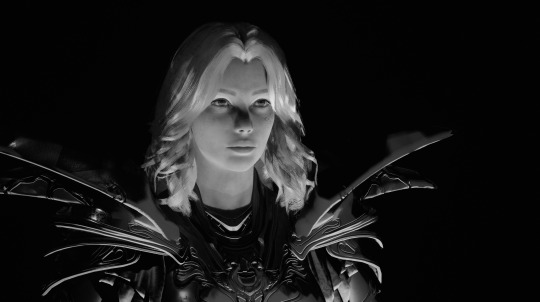
Fig.3: Water beneath lighting
When lighting comes from beneath, it is usually done with horror purposes. However, I wanted to convey a different story with those types of lighting, I was going for sort of story where she is in cave and there is water underneath her. I make the light pale blue as reflection of the water, and avoid her looking creepy, I try to make the lights bright and pale, and to not create any stark and dark shadow.
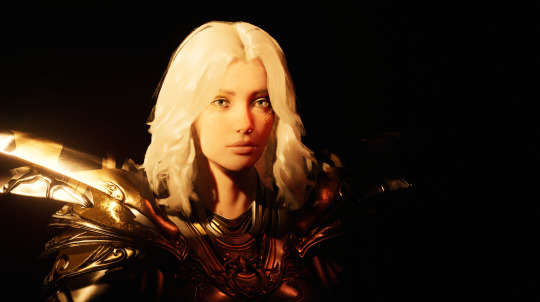

Fig.4: Sunset lighting
For the last one, I was going for a sunset ambience, the sun rays hitting you through the window just as you wake up. In order to achieve that, I only used 2 lights source this time to create the shadow area. Then for the key and rim light I increased their brightness quite a bit to make her hair, skin and armor glowy, just like how the sun would act.
Overall, this Unreal practice was quite useful as I was able to learn more lighting techniques and the different ways you can play with the settings and placement of the lights in Unreal.
0 notes
Text
Reading & Reflection 9
Type on Screen
This chapter discusses the challenges of preserving the integrity of type in on-screen design. It explains the limitations of rendering type on screens, such as the reduction in resolution and the jagged appearance of curved and diagonal edges. It also talks about techniques for displaying on-screen fonts, such as antialiasing and hinting. Which I never understood fully and I think is interesting to know about. Also it provides guidelines for selecting typefaces for on-screen use. For example, using sans serif typefaces for clarity and simplicity. The use of grids is still very important when it comes to web design and creating web pages. I pulled the quote below because every designer knows the struggle of choosing a font. A good choice (would could take a long time) can make or break a design.
"As (web) designers gain access to a greater percentage of the world’s font libraries, the need to understand typography from historical, technological, and communicative perspectives is critical."
We finished up working on our Zine projects this week and I was dreading the process as usual. That being said, I like how it turned out, especially referring to the postcard aspect of the design. I feel like it was sort of different from the others that I saw. It was very challenging as far as placement goes for several panels because you have to account for "THE FOLD." I test printed and folded so many times to get it correct and I still managed to mess it up in the end.

Anyhow, our next 2 projects are a little daunting in my opinion. I have only just begun sketches and things. But I have a vision for what the poster could become, hopefully my skill will match that. I have completed a good amount of research into the national park that I am working with. The Sequoia national park is one that is dominated by the large redwoods. I am faced with the challenge of giving the viewer some notion of scale and grandeur and trees without just obviously using a tree trunk. I added some sketches that I liked here.


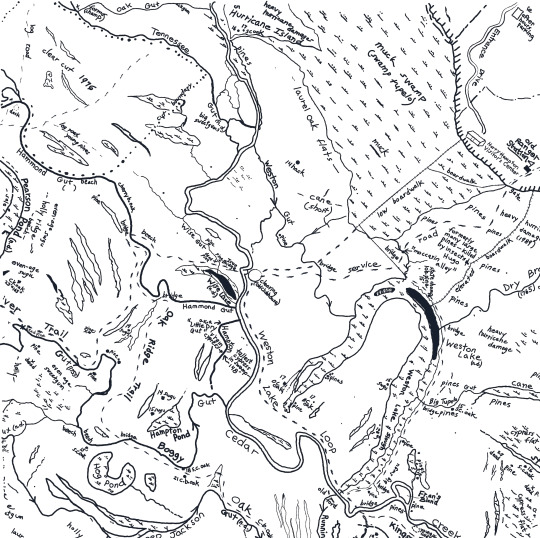
Below I added the design I made for the Friends of Congaree Swamp. I was tasked with remaking an old design, they only had a single photo of the bandanna, and they wanted it digitized. At first I tried to just pen tool it and add text with a font I chose. They wanted it all done by hand to match the original drawing style. So I used a stylus in illustrator and redrew all the lines and words by hand. I got ahead of myself and created this soundtrack and everything for the video below. I will also try to do the same thing for my current national park. But next time, I will have to make up my mind sooner.
0 notes