#i don't know what i was doing after the lineart part
Text
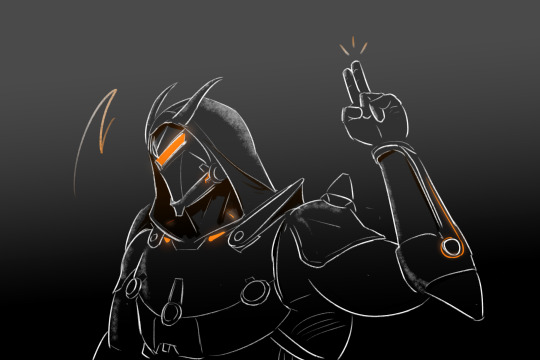
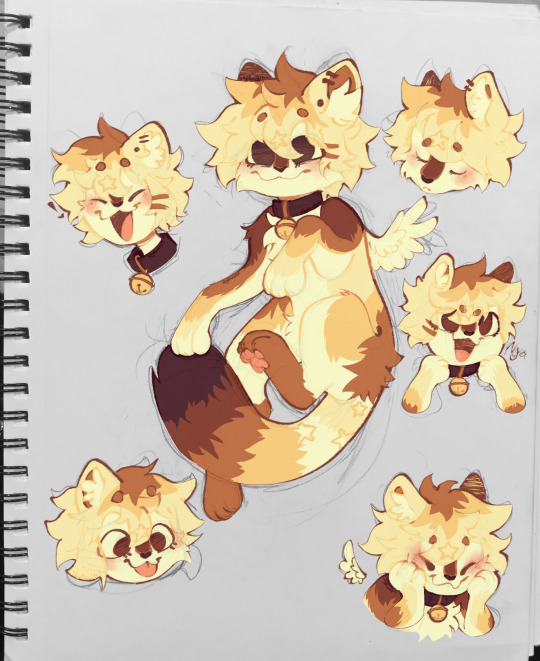
wow hunters sure have a lot of cool looking sets
#or maybe just because i like capes and hoodies#i don't really like robes and titan sets are mostly meh tbh#and sometimes titan's helmet have that human faces design#seriously just don't make helmets have human faces is that so hard?????#btw this hunter kinda looks like a ninja ngl#i don't know what i was doing after the lineart part#destiny 2#destiny hunter#destiny 2 art#my art
106 notes
·
View notes
Text
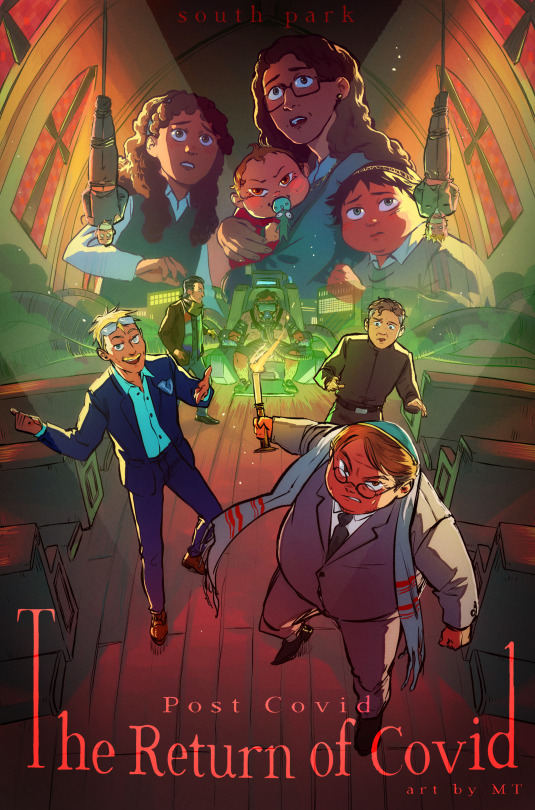
THE RETURN OF COVID
Horror/thriller movie style!! I don't think I could find enough words to express how much I love doing those posters............
For this one, I felt like the cast of "antagonists" of the movie would make for a pretty awesome composition and mood, and paired with the church setting I think I got something pretty interesting, haha.
More below!
As it happens, a fandom friend asked if I could maybe some day record my process, and therefore I did! (and went the extra mile adding goofy horror songs to it...) Check it out if you're interested :)
youtube
I've detailed it in the YT vid description as well, but my process is rather straightforward. I tend to be a "lazy person" in that I like to, ideally, spend the least time possible on anything, and so far this process is how I've best achieved that while still managing some rather complex pieces.
I like to be extremely rough with my sketches and prioritize dynamism and composition, and I usually take my time repositioning the characters until I'm satisfied before I go any further. I don't have the best mental visualization so I usually try to have a very rough idea of what I want before I directly jump to sketching and mostly ideate there.
The lineart is very straightforward as well. I come back later to adjust line thickness here and there but otherwise I just "trust my brush". The fake fisheye perspective is entirely wrong and made up so I needed some custom perspective lines to know roughly how to position the background elements.
I do come back with composition guides after I'm done with the lineart, just to check how the illustration is doing. I prefer not to use them at first because it tends to "constrain" me a bit too much, and I like to remain very free as to maintain a feeling of spontaneity, which is why I will only fix the composition afterwards (when I do).
Coloring is then fairly streamlined, with background colors/atmosphere guiding the overall color scheme followed by character coloring and additional details. The most fun part comes with the post-processing, where I go wild with additional fog and light shaft layers to add depth to the entire thing. I use a bunch of additional tone curve layers to adjust the colors and make it more uniform, as well as one blurred, flattened copy of the illustration with strengthened contrasts, in overlay mode, to add some vibrance, and a noise layer for texture.
That's it! Thanks for watching, for those interested :))
#south park#sp post covid#eric cartman#butters stotch#yentl cartman#scott malkinson#clyde donovan#sp kevin stoley#tweek tweak#craig tucker#moisha cartman#menorah cartman#hackelm cartman#Youtube
410 notes
·
View notes
Text
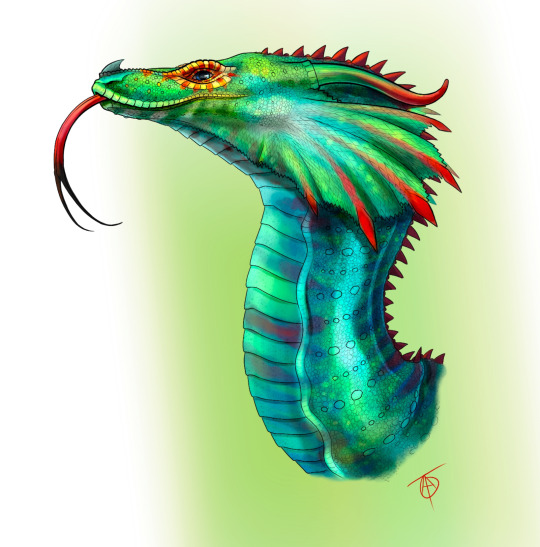
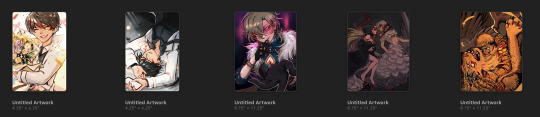
Welcome back to Overcomplicating the Pyrrhian Tribes! This week: the beloved RainWings!!
You know what's up. Joy Ang and Tui are so cool and I am just me.
Details and explanation below!
Otherwise, next week are the chilly IceWings! See you then!!!
More overcomplicated dragons.
I knew the RainWings would be really important, and I think they turned out the best of all the ones I've done. I think they're my favourite because they are basically the perfect mix of extra realism spice without altering Joy's design too much. The SkyWing design is awesome and I love it to bits, but it is one of the two that are the farthest from canon.
As for the RainWing.... I had. So. Much. FUN. I heavily used chameleons and snakes - they're basically the two main species on my research board - but there is a dash of cuttlefish and frilled lizard in there. Where, you ask? Well if you look closely, all over the RainWing are little tiny flecks of darker colour. I found a beautiful reference of a close-up on a cuttlefish eye. Its skin is dotted in thousands of little marks and I thought that would be perfect for the RainWing, who can camouflage just as well as them. I don't know if it's been discussed in canon but I bet they could animate their scales more than just colour shifting - cuttlefish are known for using their rapidly shifting patterns to hypnotize prey. RainWings could do it too, sort of like Ka from Disney's 2D animated Jungle Book.
Speaking of Ka - snakes. I love snakes. The head structure of the RainWing here is very smooth and rounded with muscles based on snakes like the python. I was even going to originally draw them in a venom striking pose and got as far as completing the lineart, but ultimately decided it wouldn't fit the calm portraits of the other tribes.
Will you see it in the future? Hell yeah! Pure, unhinged, magical death spit. Looking at it now I might try to alter it to be a full piece of Glory attacking Scarlet or Crocodile.
In the striking pose you can see the frills much better, but I still took my time on this serene pose (this is where the frilled lizard influence comes in). If you notice that I've drawn every scale (every single scale) then, yes, I am insane. If you didn't know that yet, you know it now. You have to draw guide lines and follow them meticulously while you wonder why you don't make a scale brush, and then cry because you know the randomness and imperfections that come from drawing a thousand circles is how it looks natural. The eye area is actually my favourite part, since drawing dragon eyelids was the original inspiration for doing this. Did I mention that? I wanted to draw eyelids.
EYELIDS.
I digress. Besides the eyelids, I like the frills on the action pose, but this pose is where I like the body scales more. When zooming in on my chameleon colour refs, I noticed the very rhythmical distribution of their scales and figured I would give it a try. They actually do have extra large circular scales along their bodies, which is where I guess the canon RainWing design gets it from. Very clever, Joy!
Anyway, on this version, those small circular scales appear on the face. Not only that, but I added a bit of influence from the snouts of my ref chameleons by extending the nose bridges to wrap around the nose horn. They blend in so seamlessly and that's the reason why I love this design - it's subtle, barely there, mostly Joy but a little extra.
Wow, I talk too much. If you're here, thank you! It's not mandatory to read, but very appreciated. I heard once that visitors at an art gallery look at each piece an average of 2-3 seconds. Or was it 3-6? Idk, but it was shockingly short, and ever since then I've tried to encourage myself to pay more respect to other artists and glean their work for little details I skip after that quick glance. I could talk so much more about these designs but that would be like an hour long video, each, lol. If you have questions about anything, ask away!
#wof#wings of fire#wof art#my art#digital art#art#rainwing#wof rainwing#wof fanart#Overcomplicating the WOF Tribes
436 notes
·
View notes
Text
SMG34: LIPBITE COMIC WIP UPDATE
oh boy... i know a bunch of folks are hyped for this comic... and boy oh boy are ya'll's prayers going to be heard... kind of... butt for the celebration milestone, and granted majority are from this comic, i thought it was best to give EVERYTHING that i have currently.


starting off STRONG with what you freaks most want: the completed pages. andddd yep that's it that all that i have done LMAO. i've been fixated on my own smg4 oc: tsb, and during the end of my summer was unfortunately fucked over by some personal issues that fortunately got resolved last minute good grief the anxiety prevented me from drawing the gays sigh... aNYWAYS LINEART WIPS!!!!


here are linearts i have completed / in the progress of!! want to aim like i did in the past by finishing up lineart first, and then speed through with color + minor rendering. the reason i have a few colored is to test out what it would look polished and my god... i have improved A LOT. THESE GAY PEOPLE GIVE POWER I AM NOT KIDDING BELIEVE ME IM NOT CRAY- anyways onto wip pages!


jumpscare: tsb stickman sketches. oh yeah. this is how i sketch and i blame sensei eiichiro oda /j. and in case anyone is unable to understand it {i don't blame u LMAO}, smg4 wakes up from the dream and is startled to see mario by his bed. they have a short convo before mario leaves, and we get a job to smg4 in the bathroom trying to put up a brave face. until the moment he leaves he's stunned due to seeing smg3 at his front door. will i elaborate more on specifics or unwritten dialogue? NOPE! gotta keep secrets to make it even more enjoyable at the end!!
currently at 13 sketched pages total, but this is probably gonna be reaching towards 20-ish pages, surpassing part two, but it will depend on how i come up with how to end it. additionally to confirm there will be a PART FOUR / chapter 3, to end this story. my goal is to have it done before i finish my senior year, or at least during the summer after i graduate bc good lord who knows whats gonna happen.
and lastly, before i end this crazy update, SCRAPPED PAGESSS!!!!!
CONTENT WARNING : NSFW SKETCHES !!!! PLEASE LOOK AWAY IF YOU ARE A MINOR OR DON'T LIKE THIS TYPE OF STUFF!!!


oh boy... dont draw comics while sleep-deprived at 6am... idek what i was even aiming with this ngl other than just for fun, but i scrapped it due to not being what i had in mind for the story. if it doesn't serve a purpose or narrative, its bye bye YEAH BYE BYE THIS IS THE CLOSEST NSFW UR GONNA GET FROM ME HAHAHAHAHA- i say that despite writing a nsfw jojo wattpad smh im only confident doing it in words good lord. btw not watermarking these bc i gen don't care since they're legit scrapped {left top part was kept and completed} so idk what to do with these. im just throwing it and walkin away
now to end with this update, i can hear your question, "when will this be done?" and to answer that question: i'm not entirely sure due to my heavy focus on my smg4 oc: tsb, but my best chance is postponing my oc lore a bit and complete this before november UOIYGJDSIUHJKDWSXYUGHJKCS but we shall have too see...
if you want to join the ping list comment on this post LMAO [click]
ignore below if you're not from the tsb birthday partydddjdhdhdjd
...
...
...
thurs: smg34 is canon in the tsb universe / au. though most of their encounters are platonic or best-friendy-way, they eventually express their feelings to one another and start dating 3/4’s way of the tsb storyline arc. tsb is a supporter of his friend's relationship and admires and takes inspiration from their relationship heavily to input his future love life. yearning to be in a similar position... to learn what is to really love someone... or what it's truly like to be loved...
#smg34#smg4#smg3#smg4 smg3#smg43#smg3 x smg4#smg4 x smg3#smg4 fanart#smg3 fanart#smg4 comic#smg34 comic#sketches#comic wip#comic#tsb 1k birthday party
316 notes
·
View notes
Text
Road to 3D- Sam Manson (Part 2):
Character Modeling


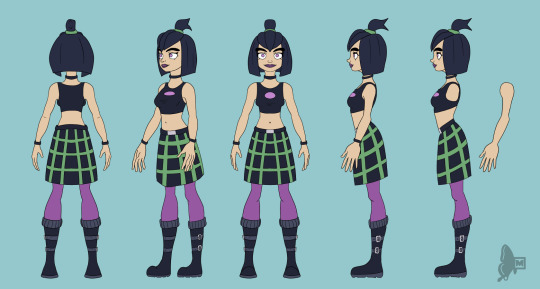
Part 1: Model Sheet
Welcome to the second and final part of this project. Since people have asked how I do my models, I decided to make a write-up on how I approach these things using the example of a model of Sam Manson. The first part focused on how I make a model sheet fo a 3d model the second part focus just on the modeling. There are many more things about how to create a fully realized 3d character that I could make whole other chapters for, like UV unwrapping, texturing, shading and rigging, but I don't have enough knowledge past the fundamentals on these topics that could warrant their own seperate posts.
Additional stuff before I continue:
I use Blender for all my model
This not a beginners guide or something similar, it would be helpful to already know the general workflow of a modeling, how to use Blender and know different terminology like edgeflow, retopology etc.
If you are a beginner and want to learn more about character modeling I recommend the videoseries "Modeling for Animation" by Dikko on Youtube
Maybe I make some reference some tricks from this videoseries
That's it, let's go!


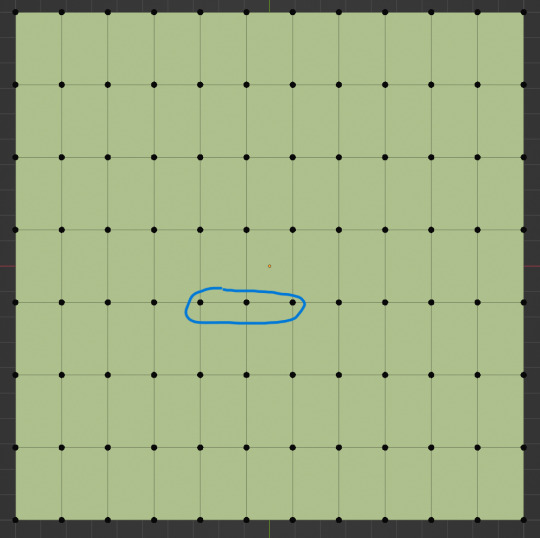
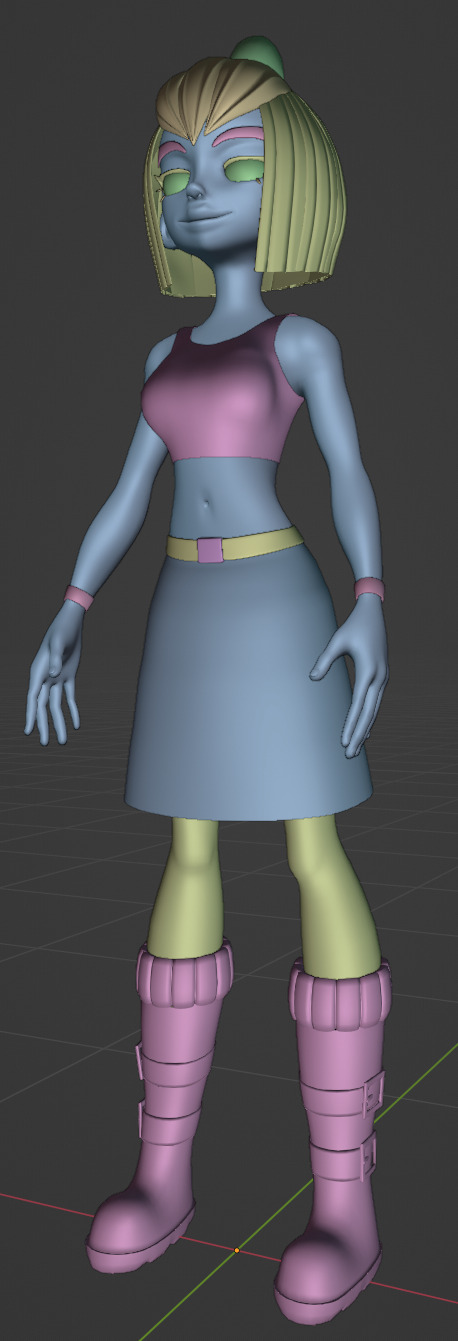
My first step is always the block-out phase. The block-out phase is what the construction lines and the first sketch in a drawing are. I align the frontview and sideview from the model sheet I made in part 1 with the z-axis (the blue line in the images above) and roughly shape out the forms with primitive forms. For this I mostly use a cube with a subdivide modifier.
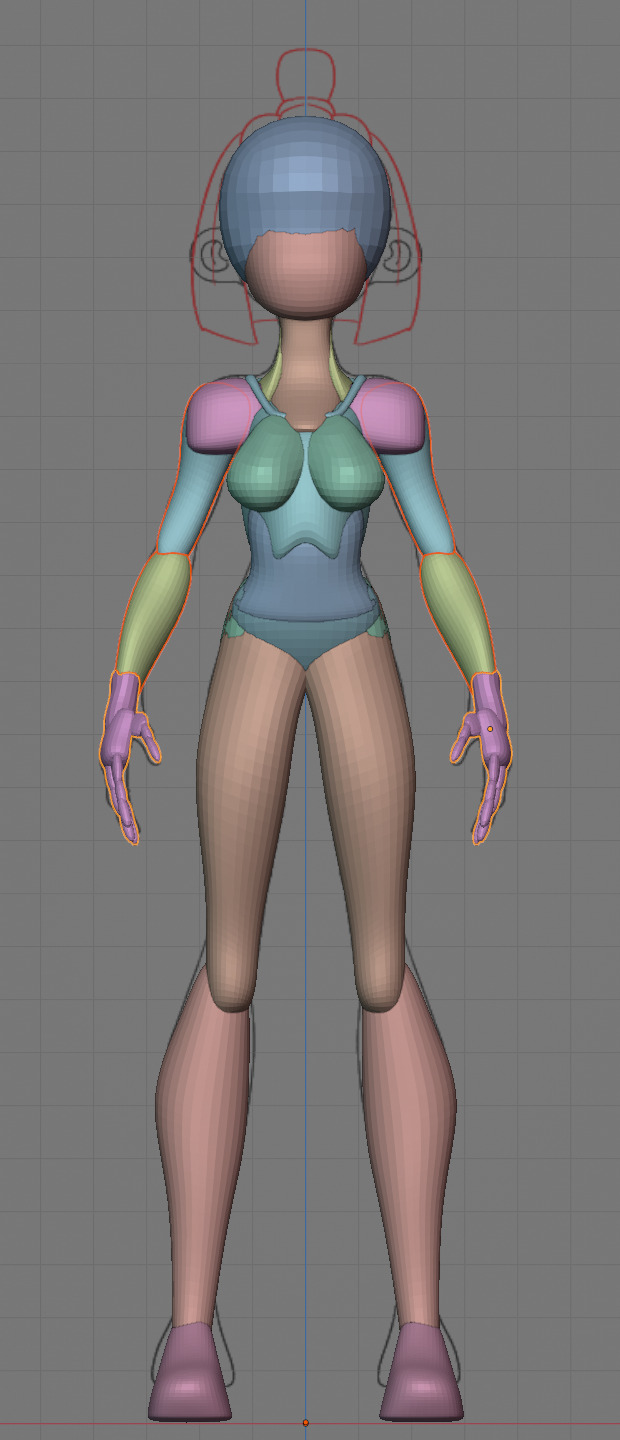


Having a modelsheet without the clothes obscuring the body makes it much easier the get the form right. The block-out phase is one of the most important steps, if it looks good than I have practically half the work done. This is also a good opportunity to practice anatomy.
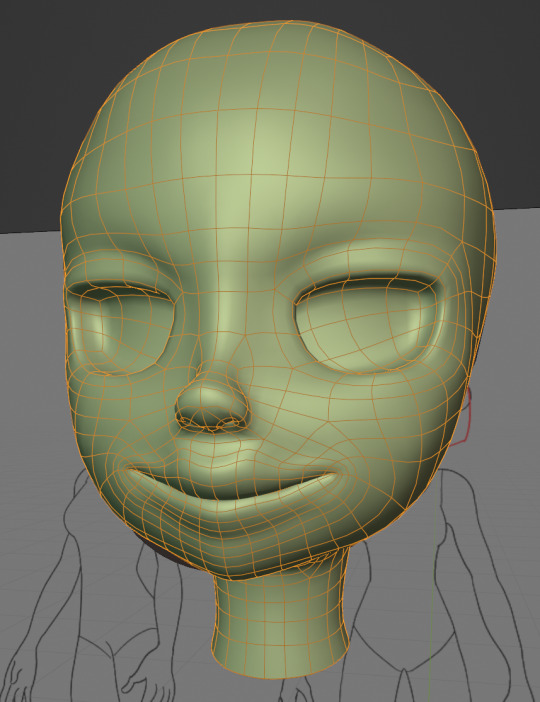

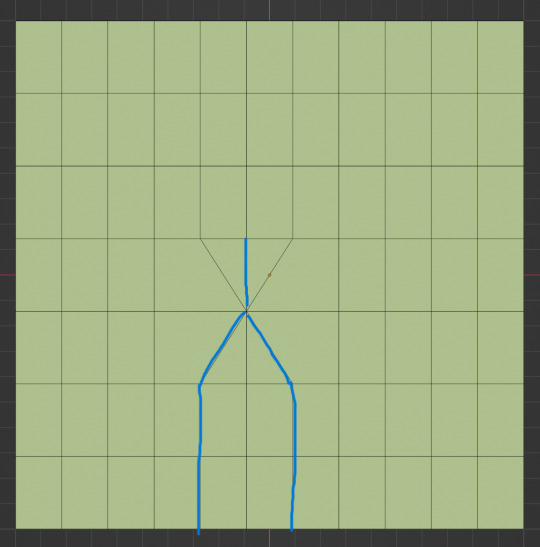
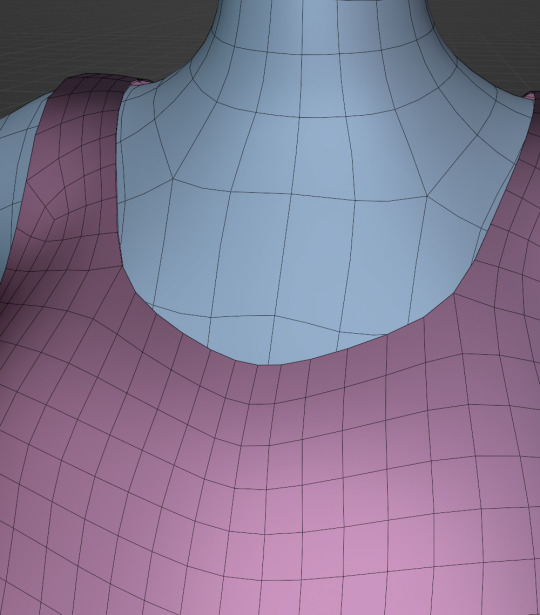
After this stage I continue with the head. First of all, don't forget to add the mirror modifier so I just need to model half of the model. There are different methods to approach modeling the head, like sculpt the head first, retopologize and than bake all the deatails onto the retopologized head. I actually prefer to polymodel the head especially when I have a good model sheet. I practially trace the lineart from the model sheet by extruding vertices, once from the frontview and once from the sideview. The most important points are the form of the eyes, the mouth, the form of the face and the jawline. The head block-out is used as an anchor point for the shrinkwrap modifier so that the traced forms actually look like they belong to a 3d form and not 2d lines floating space. From this point on it's just connecting everything, pull and push vertices so it looks like a 3d head and make sure the edgeflow is good. (It's also helpful to know how the planes of the head look like) After that I add the eyelashes, eyebrow, eyes and the ears, now it looks like something!
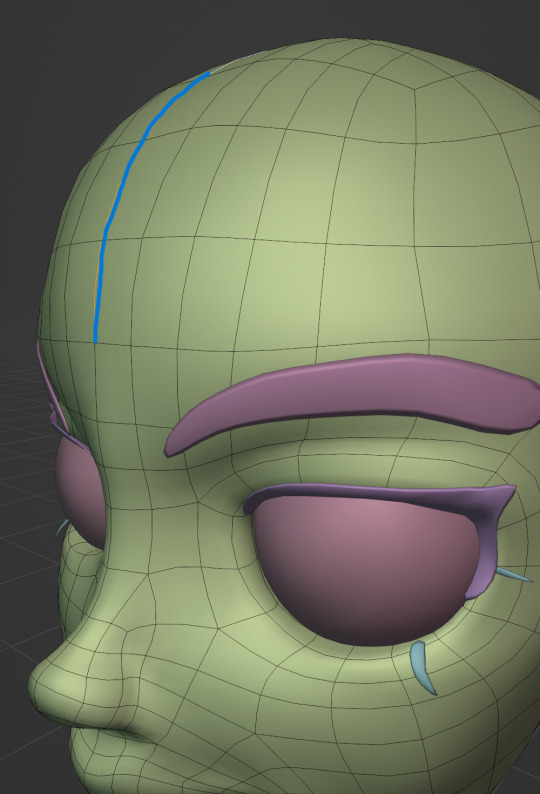
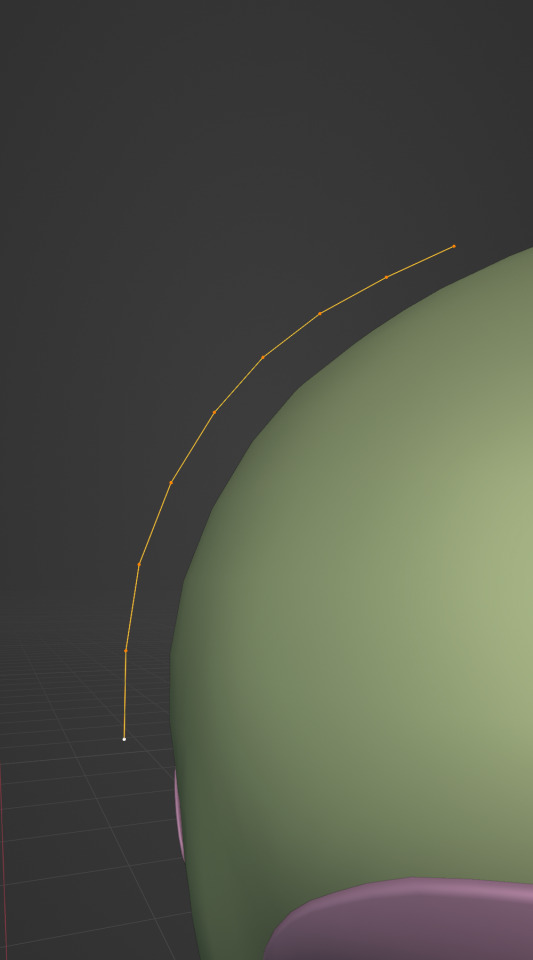
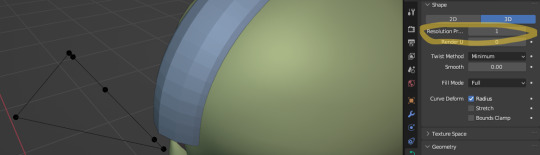
Now comes the hair. For the hair I used the "curve trick" like mentioned in the video series I recommended. Here is a tip to save time: I choose some edges from the head, duplicate and seperate it from the mesh. I convert this seperated line into a curve and choose a beziercircle as a bevel geometry. This is now the perfect foundation to model the hair further. One thing I needed a long time to notice: To get the beziercircle to a perfect square or in this case a triangle lower the Resolution U to 1 in the shape options. Now I just convert the curves into a mesh and add details and the head is done!
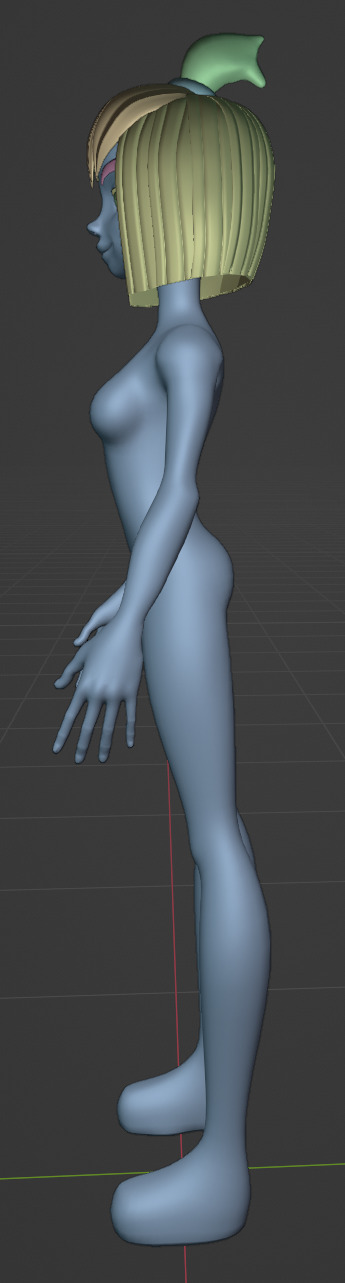
With the head finished I continue with the body. Remember how I wrote with a good block-out half of the work ist finished? Well, for this step I practically just use the smooth brush in sculpt mode and smooth everything out so everything looks connected. Then I retopologize the body and that's it. Well, ok there is a little bit more to it: Before smoothing things out I join the block-out part to a single mesh and remesh it with the remash modifier expept for the hands. I prefer to polymodel the hands seperatly without worrying about the rest of the body because they are difficult to model. I reattach them later. Speaking of reattaching, I make sure that the connection points have the same number of vertices while I retopologize/polymodel. To ensure that, I often use the following trick visualized with a simple example ( which is also described in the video series):

I want to reduce the amount of edges at the bottom of this plane, for this I merge 3 vertices from the middle into 1 vertice seen in the left image. After that I can select the blue marked edges from the center image and dissolve them. The result, which you can see on the right, is a nice clean edgeflow with a reduction in the number of edges.

After modeling every part I attach them together and I have a finished bodymesh the work with.

Now onto the clothes, for this I use the model sheet with clothes as reference. Having a retopologized body makes it easier to model simple stuff like e.g. Sam's shirt. On the left image the marked faces of the the bodymesh already looks like a shirt. I just need to duplicate and seperate this area, clean it up a little and the shirt is basically finished. The more complex stuff like the boots I need to polymodel around the bodymesh.

With that the modeling part is done! Now comes the things I said above: uv unwrapping, texture painting, rigging and shading. These are whole other topics I cannot go deeper because I'm still learning how to do these things but I hope my little write-up about how I appoach character modeling was enough to learn one thing or two.
Thank you for your time and thank for reading!
#3d modeling process#3d model#blender#danny phantom#sam manson#long post#my animation#my art#art resources
236 notes
·
View notes
Text

Just listen to your instincts and do what feels natural!
[SR Music Week] Yuhua joins the battle as a dancer and backup vocalist for Hazard/Riff! Many thanks to @raguiras2 for hosting this Music Weeks event!
Voicelines and concept sketches beneath the cut~
~
Summon: Don’t think that I’m in this to win, I’m here to have fun and do what I love. That’s fine, right?
Groovification: — LOCKED —
Set to Home Screen: A little rocking never hurt anybody, did it?
Home Transition 1: Actually, confession time, I’ve started to feel a little shy. Everyone in this group is so talented in their own way, y’know? …But I gotta keep up and pull my weight.
Home Transition 2: To think Deuce would be a leader for Hazard/Riff… Well, not what I expected, but where else would he go? It just seems right. …Sorry, just thinking out loud.
Home Transition 3: So this is what Allen looks like when he’s in his natural habitat… Ah, I’m just making some observations. I’m not trying to say anything bad, rather—the opposite of that. Like, he seems… more sincere?
Home, after login: Practice waits for no one~ I’m gonna go start warming up. Wanna join me?
Home Transition (Groovification): — LOCKED —
Tap Home 1: Eh? You didn’t think I’d ask to join this group? …Rude~ We can’t all be soft all the time.
Tap Home 2: It’s funny to me—all you have to do here is call something a competition and—boom. Even someone like Leona’s motivated. …Oops, did he hear me say that?
Tap Home 3: Working with Floyd is a double-edged sword—when he’s having fun here, I get all excited, too. But if he’s not in the mood, then… haha, we just gotta hope and pray.
Tap Home 4: Don’t worry, I’m used to wearing loose clothing when I dance. Compared to the long pants and dresses I sometimes wore, this fit is like a breath of fresh air~
Tap Home 5: I wouldn’t touch me if I were you—I’m all sweaty and tired from rehearsal.
Tap Home (Groovification): — LOCKED —
Duo Magic (yes I know SRs don't have them but let us dream):
YUHUA: How about we give them one hell of a show, Vizzie?
VIZZIE ( @twistedwonderlandshenanigans ): We’ll blow them away with the sound we’ve got, Yuhua!
~

ALRIIIIGHT let's get into the design of this bad boy

the idea was ... basically just a bit of techwear, modern street style, all that-- i was sort of winging it haha. i wanted a very loose and free style with the cargo pants, belts, and unzipped jacket, while the hood was added for dramatic effect when i started the lineart~
i felt like experimenting with his hair so once again i slicked back the right-hand side of his part, i would have given him his pre-overblot hair (for more variety w/ the long hair) but to be honest i kind of like the short hair with this look~ it kind of screams kpop idol but whatever HAHAHAHAHA
fishnet under clothing was an absolute must, and i went a little more on the ""bad boy"" look by giving him the chain and cuff earring on one side... plus the dramatic eyeliner/eyeshadow... yeah. RIP yuhua's lip gloss we will always miss you
also shoutout to V for volunteering vizzie for the duo magic-- i love me a good RIOFY friendship
(as for headcanons on how yuhua would act during this whole event, um-- he'll behave i promise 🥰🥰 he'll try not to let his inferiority complex get the best of him I MEAN WHAT WHO SAID THAAAT)
i can't think of anything else that i thought about particularly hard during the process, so uhm-- thank you for reading this far and no promises on when i'll get the groovified version out if ever LMAO
~
art taglist (ask to be added or removed, i'm very sorry if i forgot someone): @thehollowwriter @theleechyskrunkly @elenauaurs @casp1an-sea @nahelenia
@skriblee-ksk @boopshoops @scint1llat3 @nyx-of-night @nemisisnemi
@beneathsakurashade @ramcatshackle @kathxrat-01 @the-banana-0verlord
#my art#twst oc#yuusona#ragu music weeks#oc stuff#EXPLODES AHHHHH#idk why this card was so fun to make#maybe because it's showing yuhua's true personality and tastes#and he gets to be SILLY#giggling and kicking my feet#by the way. the hazard/riff playlist is like ENTIRELY TO MY TASTE i was genuinely surprised#i didn't know a lot of songs but they all go so hard#conclusion: yuhua was simply meant to be in this group <3
84 notes
·
View notes
Text
Alright so I have an insane crack theory about who Melina is, why she is the way she is, and her connection to Messmer.


I am almost 100% sure the Black Pyrefly and the Smoldering Butterfly use the same lineart, which is an even stronger connection than Miquella and Malenia's butterflies. What confirmed the Smoldering Butterfly for me is that we can find one(1) instance of them at the Forge right before we talk to Melina for the last time.
Also, item descriptions.
Smoldering Butterfly:
An eternally burning butterfly found near wildfires and elsewhere. Material used for crafting items. Serves as the kindling for a number of items.
Black Pyrefly:
Fiery butterfly with black cinder wings. Material used for crafting items. Flies in war-torn lands that have been scoured by Messmer's flame. They burn in dark and slender ribbons of fire.
I don't know enough about Messmer yet to draw conclusions from his butterfly, but Melina is the Kindling Maiden so that's fairly open and shut.
Considering these butterflies are basically the Exact Same Thing, and Melina and Messmer seem to have very similar fire-related curses, I'm looking forward to learning more about him. My current thoughts are:
Melina is burned and bodiless. By whom and why?
My initial thought was that since the Erdtree is also burned and bodiless (Leyndell is covered in ash, the Erdtree is a glowing ghost that drips no dew), she must've succeeded halfway once and then was Stopped Somehow. Her soul has to burn so the "soul" of the Erdtree can burn too, finishing the job. Her mother textually gave her this task inside the Erdtree, which can only be Marika.
With the addition of the DLC and Messmer, now I think she's part of a set. Both Melina and Messmer were destined to burn the Erdtree in some form, specifically with black flames. Messmer rejected that fate. Melina didn't. Messmer went on crusade for his mother to protect her interests- Melina acquired a whole bunch of snake-adjacent followers in the Godskins, and went on her own crusade against the Erdtree.
Marika objected to that and sicced Maliketh on her.
Then, around the time of the Shattering, Marika reconsidered her previous judgement- of all her children, Messmer and Melina were the only ones equipped to destroy the Golden Order, and Melina actually tried to do it. And since death was sealed, true death is impossible and Melina was still lingering around somewhere. Possibly in the Erdtree where all souls go.
Melina gets cut loose for Round 2: Kill the Gods electric boogaloo. She can't remember who or what she is, but clearly Marika had enough faith in Melina's utter conviction that Death should run indiscriminate to bank on her trying again, even bodiless and amnesiac. Or, perhaps, it's simply fate.
That gives me some very interesting ideas about how Melina could fit into Messmer and Marika's dynamic, because Messmer supported Marika in every way and Melina objected so strongly to the idea of eternal life that she got burned alive by Maliketh.
It'd be very, very interesting if it wasn't just Maliketh though. She was burned. Maliketh uses beast incantations, and only acquired blackflame after taking it from Melina. No flames of his own. So what fire did that?
Maybe Messmer killed his younger sister for his mother.
77 notes
·
View notes
Text
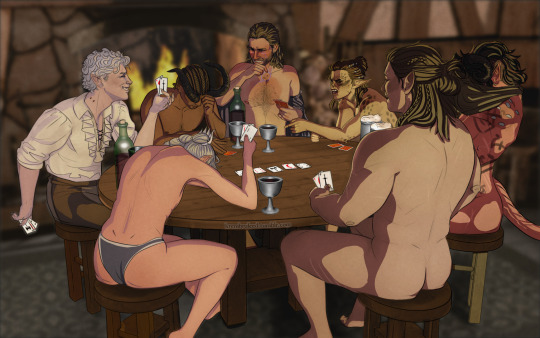
alright, the other day i loosely implied that i would make a behind the scenes/tutorial type of thing. momma didn't raise no liar, so here goes nothing i guess!
step 1) rough sketch
honestly i skip this entirely if have a really concrete idea of what i want to do. sometimes compositions are just beamed into my brain from On High and a sketch is unnecessary.
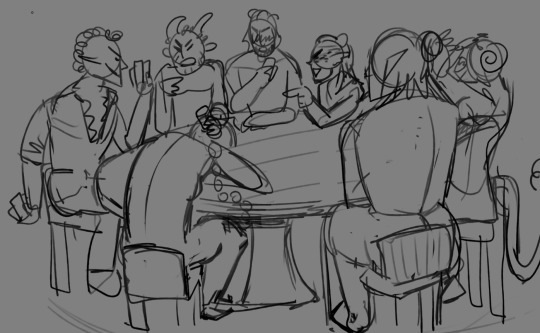
step 2) 3d ref

this is where i refine the composition, lighting, camera angles, props, etc. i use DAZ studio for model posing and blender for almost everything else (props, horns, lighting, rendering).
here's a 10 minute video on how to pose models in DAZ if you're interested in doing something like this! it's not very hard! basic posing requires almost no technical know-how.
i've heard magicposer and virt-a-mate are also good for model posing, but i don't have any experience with either program.

after i'm done posing, i transfer the models to blender so i can work on props, environment, and lighting because doing it in DAZ is ass. you can see that i went overboard on the ref for the paladin i worked on last year by modelling armor.
step 3) lineart

at this stage i'm synthesizing my 3d models, reference images, and style choices into lines.
the 3d likeness of my models is poor because I don't have time for that shit, so this is where my humongous folder full of bg3 screenshots comes into play.
for example: looking at my screenshots, astarion's forehead tilts back towards the back of his skull, much more so than my reference model. his chin and jaw are sharper and longer, and the transition between his brow ridge and nose is almost a straight line. if i combine the information from my 3d model and astarion's face, i get something like this:

3d models aren't fleshy (ie, tummy rolls, wrinkles, muscle deformations, butt squish) unless one puts in A LOT of effort like absolute madman chris jones.
you guys know bernini, right? he has a couple great examples of this. see how hades' hands press in on persephone's leg?
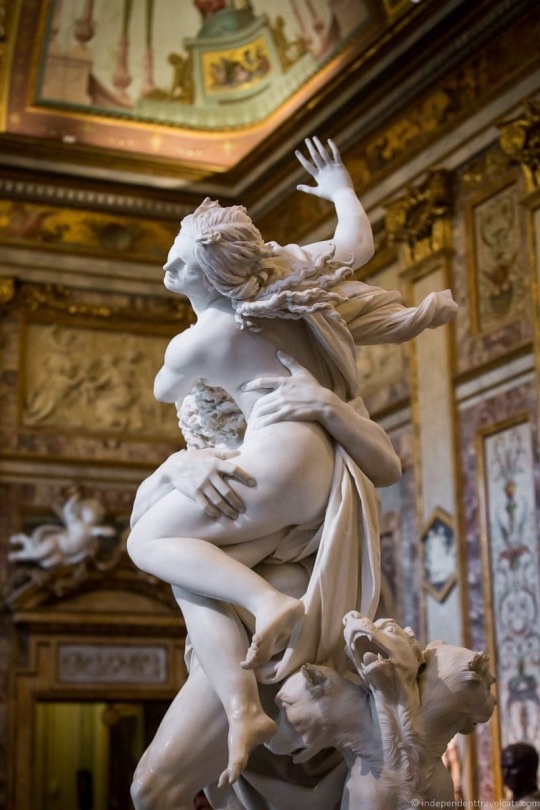

this is what we want to add in the lineart because it's too much effort for 3d. laziness is king.
i guess i draw clothes at this stage too, but for some reason there aren't many in this image. ( ͡° ͜ʖ ͡°)
step 4) base color
i have a little color picked palette that i use for everybody so i get their skintones right before i start messing with colored lighting. i'll use overlay and hard/soft light layers clipped to the base layer during the shading step later.
step 5) shading
if you thought we were done with the 3d part, guess again! i posterize my 3d reference so i can see the shapes of the shadows and highlights better. if i'm not feeling it, i can go back to 3d and change the lighting really easily.
could I make a cel shader for this? yes. am I going to? No. custom shaders are for people with intelligence and I am fresh out. posterization it is.

from there, i do a pretty standard cel shading deal that i usually blur and set to low opacity. (for this image i stuck to no blur because i had been looking at a lot of morebird's art and was really feeling the hard edges)
photoshop is what i use for final rendering because it has bangin tools. the brush customization alone make ps worth it, but i also particularly abuse puppet warp, noise generation, the camera raw filter, and layer styles.

step 6) background
i put the least effort possible into a background and then i blur it into oblivion so you can't fathom the depths of my ineptitude.
and then i have a finished image! ᕕ( ᐛ )ᕗ
#art tutorial#this got long!! the rest is under the cut#i encourage everyone to try out DAZ and blender! theyre both free!!#i love goofing around in 3d
104 notes
·
View notes
Text
OK, but hear me out
Say Ride the Cyclone were to be adapted into a film; imagine how much fun it would be to see it animated.
Because for the main plot, like the intro song and the mostly dialogue scenes in limbo, you could easily do a stylistic, but still grounded in realism style that a lot of modern animated projects are doing right now (think Arcane or Into the Spider Verse). But once each of the kids go into their respective songs/fantasies for what their life could have been? What if those were done in completely different styles?? Imagine the additional, visual storytelling that would tell about who they are as characters?
Like say, for Ocean's number, WTWN, everything became more simplified, and the characters (especially Ocean herself) turned into a more rounded, chibi-like style to enhance just how cutesy and likeable she's trying to portray herself throughout that number.
Or for Noel's Lament, everything goes black and white, and the characters become even more 2D stylized, and the film scales down to a smaller millimeter frame, more reminiscent of cartoons from the early 20's, when animation was just starting out, to enhance his idealization of "the olden days" (as Ocean puts it).
Mischa's song, This Song is Awesome could be animated with a more choppy frame rate, and the character designs turn a little more jagged around the edges, kind of like animated music videos (I'm thinking a Gorillaz band vibe). But as he transitions into singing about Talia, the colors start to bleed out over their lineart, and become more paint-like and Talia herself moves like a rotoscoped character (think Loving, Vincent that came out a few years ago) to enhance the sense that she's somewhere between a real person and a fantasy Mischa's built in his mind.
Ricky's song would, of course, be stylized after those sci-fi cartoons from the 90's, like X-Men or Captain Planet.
For the Ballad of Jane Doe, I would love to see something like what Wolfwalkers did back in 2020, where most of the characters (in this case, the other kids) are for the most part, animated like traditional, 2D characters with very clean lines and neat movements, whereas Jane herself stands out for having messier, sketchy line art, and looks more and more unfinished in her animation as the song goes on, because she can feel more and more of her own identity being lost.
Constance's Sugar Cloud I could see done in the classic 2D Disney style (i.e., the Renaissance era of Disney, like the Lion King or Little Mermaid days) because not only is it really smooth and colorful and just all around nice to look at, but it reminds the average moviegoer of their childhood growing up with those movies (among others, obviously), which ties in nicely with Constance's preceding monologue about remembering her own life, and the good that came with the bad.
I'm even tempted to envision the first half of the finale song in a different style, when the stage production would show a quick projection of Jane/Penny's life after she returned to the world of the living. Imagine watching this animated film, and for that segment alone, it becomes that really hyper-realistic, almost uncanny valley CGI animation style, to show that she really has joined the world of the living, i.e. our world, among us, the living breathing movie goers watching this, and watching the other kids still in limbo fade back to that main art style for the final number.
I don't know; it just feels like something that would be so engaging to see from an already compelling storyline and characters. Especially with more experimental animation projects on the rise right now
#random rambling#Ride the Cyclone#Ocean O'Connell Rosenberg#Noel Gruber#Mischa Bachinski#Ricky Potts#Jane Doe#Penny Lamb#Constance Blackwood#idk I just really love animation you guys#so naturally I have to bring my latest hyperfixation into that world#might even sketch these different styles#for a better visual idea#but I haven't done any sketches in a hot minute#so who knows
1K notes
·
View notes
Text
୨୧·࣭࣪̇˖ 𝆬 ᴛʜᴇɪʀ ʀᴇᴀᴄᴛɪᴏɴ ᴛᴏ ᴛᴀᴛᴛᴏᴏꜱ 𝆬 𓏸
feat.: Dazai, Chūya, Kunikida, Ranpo, Atsushi, Akutugawa, Nikolai Gogol
content: implied f!reader because of some pet names, maybe—?

DAZAI knows about your tattoo. Of course he does. Still, he makes sure to raise an eyebrow while sauntering over to where you're presenting it proudly to the other Agency members for the first time, mimicking surprise.
He doesn't hesitate to openly compliment you on it; he's a charmer by nature and syrupy-sweet words fall from his lips with ease as he traces his fingers over the swirls of ink, gaze appreciative. He can deal with all kinds of reactions from you, but he's all the more pleased if you smile bashfully or blush a bit at the cascade of compliments he's showering you in.
“My, my, bella, and here I thought you couldn't possibly get any more interesting. That suits you awfully well, you know? Ah, the fact that I'm even allowed to lay eye on a being as gorgeous as you gets me get all excited.”

While CHŪYA is surprised at the sight of your tattoos, his lips curl into a smirk almost immediately. He likes tattoos a lot, and you having some only makes you all the more irresistible. To him, they don't just look amazing, but they're also proof of you being strong enough to endure the pain of getting them — whether you've taken painkillers or not beforehand doesn't matter to him —, and that's impressive in itself. He's awfully lucky to have scored someone this gorgeous and badass.
He might just have to ask you for your tattoo artist; yours are so skillfully done, the design is nothing short of amazing and, hey, don't you think he'd look hot with a tattoo somewhere?
“Those are a damn work of art, babe. Hey, where'd you think I should get one? I'm thinkin' hip. Gotta fit into the whole tattooed mafioso cliché, right?”
Honestly, KUNIKIDA doesn't expect you to have tattoos when he first falls for you, but he grows fond of them more quickly than he ever would have thought possible. They're a part of you, which makes them perfect in his eyes; perfect, just like you are.
Even though you might assume he's not too knowledgeable when it comes to the topic of tattoos, he has a keen eye for detail — he's quick to marvel at how well done yours are, how clean the lineart is and how artfully they decorate your skin. He might just come along if you ever get more tattoos, if only to check if the place is up to standards; the risk of an artist using an old used needle on you doesn't leave his mind until he personally makes sure you're in good hands.
“I have to admit that these are very nicely done, dear, and they suit you well. Really well, even. Are you planning on getting more in the future? What? No, I'm not against it. Of course not. Quite the opposite; I'm merely interested in the things you like.”
For someone pretending not to care much about your tattoos, RANPO stares at the ink decorating your skin quite a lot. He doesn't care enough to be subtle, either; the second your eyes meet when you catch him looking, he merely turns away o so slowly, his attention once more on a document or a piece of candy.
If you let him, though, he'll gladly inspect each and every line, each dot and curve with utmost interest. You're his lover, after all; of course he's intrigued when he sees a part of you he hasn't until now. Really, he wants to know everything about it, even though he's got a few ideas about what they could mean — if they do mean anything — already.
“So, what about this one? Does it have a meaning? Yeah? Tell me, I wanna know. Actually, I know already. Well—, just tell me that I'm right, alright?”
To say that ATSUSHI is stunned when he spots your tattoos for the first time would be an understatement. Sure, it's not like he's never seen tattoos before, but he still didn't expect them on you — besides, yours look so cool, it's only fair that he's quite astounded, right?
He doesn't make the biggest deal out of it, but he'll listen eagerly if you want to explain the meaning or any design choices to him, nodding all the while and complimenting the work. If you ever get another tattoo, he might just come along — not to get one himself, he's not sure if that'd work with his quick regeneration ability, but simply to keep you company.
“These are amazing! I had no idea you had tattoos this cool! Do they have a meaning? Oh—, I mean, you don't have to tell me if it's too personal, of course. They're just so pretty.”
AKUTAGAWA isn't the type to mention your tattoos, though he is quite surprised when he sees them for the first time. Surprisingly enough, he quite likes the look of dark ink splattered artfully on your skin, and, for a moment, he even considers getting a tattoo himself, only to quickly decide against it; it'd be no use, given how he's fully covered up at all times either way.
If you want to get an actual reaction out of him, though, you have to be the one to bring the topic up, whether that's by showing your tattoos to him directly or just by mentioning them. While he's not a man of all too many words, he might eventually grunt out some appreciation — you're dear to him, after all.
“They look nice. What? You understood what I said just fine, don't play dumb. I won't repeat myself.”
Frankly said, showing NIKOLAI your tattoos is a mistake. He's immediately fond of them; really, his eyes light up at the sight and he's quick to grab you, pulling you closer to get a better look at it. It doesn't matter if you struggle — do you really think he'll let you overpower him? Besides, if you complain too much, he can simply cover the body part you've got tattooed with his coat and, well; his ability is quite useful in this situation, too. You really can't pull away when half your body is stuck mid-air.
He will get matching tattoos with you. If you ever so much as joke about it, be aware that he'll make it reality. What, you don't want a clown's grimace on your wrist? Well, too bad, because he thinks it'd suit you o so perfectly, and you wouldn't want to refuse him, now would you?
“Oh, oh, come look at this one, doll — don't you think it'd look just perfect on your skin? No? My, my, you're picky. I really don't think you could go wrong with a bird. Or, wait; could it be that you just want my name tattooed on you that badly, hm?”

notes: dedicated to @pseudowho <3 also, i'm finally watching season 4 and!! i like mushitarō lots. and jōno. jōno especially.
tag list: @pigeons-are-rad @cicada-teeth @dzaixchuu @hanakotheghost @shinwifexx @rhaeena @irethepotato @beandaifuku @the-foreigner @ranpobb , @arixsux , @dei-lilxc @atsyushi @satoruislove @pastelsbaby @marina-and-the-memes @texchou @shiggysredhead @savagemickey03 @rosepxtlz @nikolaiswife @okura-s @ladykatakuri @lunerenzo @berywritesstuff @xelia25 @yuuotosaka3 @double-black-dazai @alice0blog @fyodorstolenushanka @ttaiyaki @itsnovariella @black-rose-29 @fyodorscumsock @ayshaashaya @qxxstuff
@serenareiss @atsvsh1 @dilucshandholder @reiikonee @1-800-mocha @xvocadooo @hexiisexii @cupxfcxffee @jodidann @Happymoon16 @yumidepain @nchuuyahq @janeinerz @aaronthegreatestsimp @fanfiction-waifu @KimxKiba @Morigumy @villainouspotential @ashthemadwriter @mrsdostoevsky @nikolaisgoofyahhhat @yeonwoomyheartbelongstoyou
@hellgirlwhore @Itssara-chan @lyrstybsd @angelsrunes @wuaoqu @disa-ster @aspookyscaryghost @nikolaisboner @urgodmoon @polish-anon @arisu-chan4646 @eroscastle @somnobun @birbysaur
#honeydazai writes#Bsd#Bsd x reader#Bsd x you#Bsd x y/n#Bsd headcanons#Bsd imagines#Bungo stray dogs#Dazai x reader#Dazai x you#Dazai headcanons#Dazai imagines#Kunikida x reader#Kunikida x you#Kunikida imagines#Kunikida headcanons#Ranpo x reader#Atsushi x reader#Chuuya x reader#Chuuya headcanons#Akutagawa x reader#Nikolai Gogol x reader#Chuuya imagines#Akutagawa headcanons#Ranpo headcanons#Nikolai Gogol headcanons#Atsushi headcanons#Atsushi imagines#Ranpo imagines#Akutagawa imagines
819 notes
·
View notes
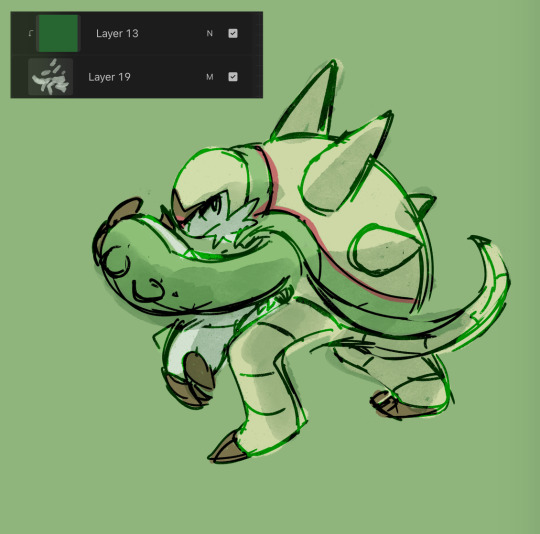
Note
I wanna know about your art style. How you draw like that??
i tried putting down considerations as well as a (very) general step by step of what i do; if there's anything more specific you want me to explain lmk i guess?
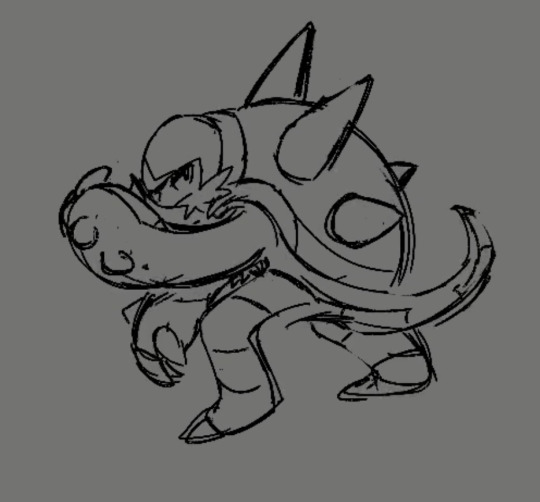
first off, general (self imposed) constraints / purpose of project -- this informs what i draw & how i draw it
i.e. "kuradex" is pretty different from my normal art (my 5 latest rough illustrations):
or my monster hunter charms:
or my pokemon tcg contest illustrations that im not allowed to show until june (😉):
although i've said its for merch purposes, ive started drawing these because i wanted to practice conveying "liveliness" and noticing key features / nuances of a given design, but i didn't want to spend a large amount of time on each one.
so what i came up with is
i want to draw things on-model in terms of proportions ( + take note of weight / tapering of shapes / etc )
no backgrounds & minimal "props"
experiment with / practice line/texture/color/flow/rhythm/etc
spend <1 hr on each pokemon on average (this is a bit more difficult for me to track, but for example, the cyndaquil line took me less than 42min to color, combined, and means at some point in time instead of focusing on cleaning up the art as much as i can, i stop after cleaning up most of it)
that said, the pose & the rhythm/flow of lines are key in conveying liveliness, and if i have a concept in mind i usually end up going with it, but i may go thru a few if i dont.
i consider pokemon origin / lore or a key point in its design, and if i'm particularly stuck, i try looking up pokemon card illustrations for inspiration. (i noticed the research i do is essentially a truncated version of how Atsushi Furusawa does research before doing an illustration.
(& even despite all this i do get stuck sometimes and don't exactly understand a pokemon and just opt for "as cute or cool as i can make it i guess?", but i think it's part of the process...?) (theoretically things that are A Shape should be really easy to draw but with what i want to practice in perspective i find them difficult...)
this is from my latest paid req but these are my first sketches of chesnaught -- i was thinking of how one of its inspirations is a warrior / tanker from RPGs, so i drew a pose where it's shielding its face.

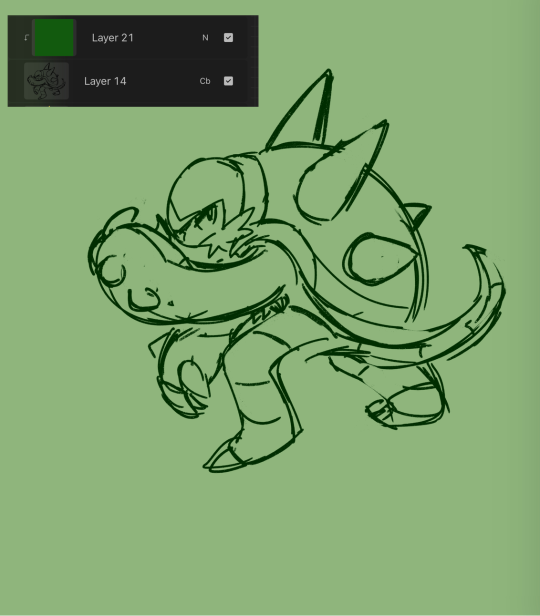
i do another pass and take note of details.
in general i draw overlapping shapes and erase (it's a bit visible on one of the spikes)
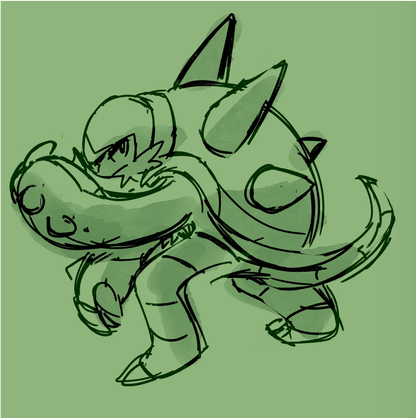
because i opt for quickness i start coloring at this point -- i just use a colored "color burn" sketch layer for the "lineart" & colorpick official art & lay down messy flats & set the color layer to 60%
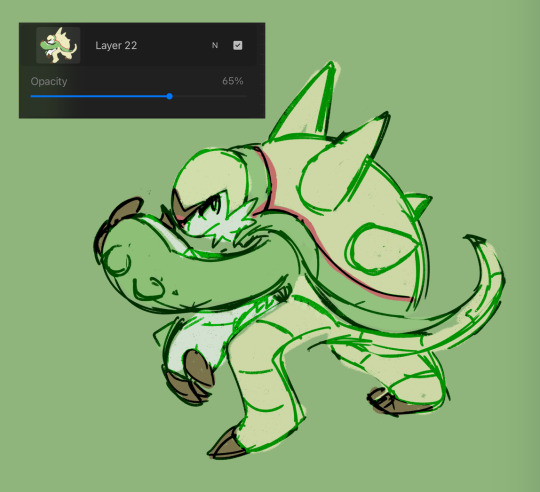
60% multiply layer for shadows. i tend to use both hard and soft brushes
for bigger projects i would use 2-3 shadow layers to create more "layered" shadows
here i use overlay layer (60%). this is just throwing colors at it and seeing what works and doesn't work. i personally prefer to throw red under the eye and a yellow or blue near the top of the head. this is mostly done with a soft brush

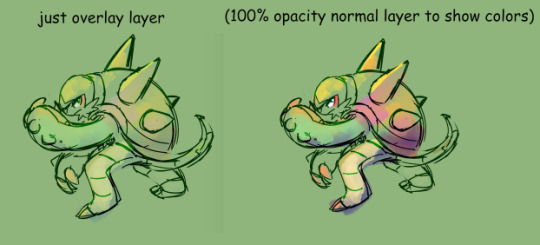
before this point, everything is under the rough lines, but now i start drawing/painting over it
i just color pick the colors that have been laid down from the previous steps and clean up / render textures (making the green on its arms look fuzzy) / fixing anything that i forgot or looks too off (i.e. the spike on its shoulder and the way the tail curves)

I could potentially keep cleaning this up, but this is where i usually stop 🫡
122 notes
·
View notes
Text
A shading with folders hack
that no one asked for~
please google if your art program allows you to use:
folders
set folders to multiply/layer modes
i am using PT SAI but if your art program utilises folders and layer modes, it should work for you as well!

Here is my drawing. The top folder is labelled "shading" and the bottom folder is my art! inside of it is my colouring layers and my lineart. Because I colour my lineart, I need my shading to clip to the lines AND the colour so the lineart doesn't end up too bright or mismatched from the colour after shading.
of course, there's many techniques, but this is my solution to this (and it could be used for a lot of other things~)

In PTS, I can clip folders to layers or other folders, and set the folder to multiply (in other programs it could be called dodge, burn, or shade, etc. you can always use whatever mode you prefer for shading, and mine is multiply!)

inside of my shading folder i pick my base colour for the shading. personally, i start with the darkest, and this layer is for all shaded areas with no direct light. so if you plan on having bounce light, don't do that in this step! (i use an erasing method for my shading so it tends to look pretty dramatic haha)

this layer is my bounce highlights, i use a lighter colour than my base, usually with more saturation to make it look tasty yumyum. the layer is clipped to the shading layer INSIDE the multiply folder. this means it acts as if clipped to the layer below it, but ALSO clipped to the art folder. this way it won't go outside of the layer below it, AND it won't go outside of the folder it's clipped to.

this step i use a third colour that stands out from the other 2, to put on the edges of my base shading layer. i use this cuz it looks cute but also cuz im obsessed with lighting that's reminiscent of sunsets or the like:

i couldn't be bothered to find a better image so you get this very strong example that has a tonne of bouncelight in blue. The orange part here is what i am referring to.

after that you can clip luminosity on top of the multiply folder which is clipped to the art folder, so the lumi layer will be technically clipped to the art folder! (folderception~). whenever you have multiple layers clipped on top of each other, they will always clip to the layer the first one is clipped to.
i know folders can be confusing and it's hard for me to explain, but if you try it out you'll figure it out for sure!! it's very easy to use once you got it, and it makes the possibilities endless~ mostly. hopefully, this explains it well enough!
#my art#long post#tut#tutorial#i dont like calling it that cuz people think if u make a tutorial u should be 100% expert who knows everything ever and it makes me nervous#but also who cares#text
45 notes
·
View notes
Note
hi !!! i wanted to know if you have a few tips on how you do your poses ? im not the greatest at them and want to see what others have to offer ^v^''
also , i absolutely ADORE your art ! it motivates me a lot
first of all thank you sm!! poses are literally my favourite thing to plan out so ill try my best to explain ghdfskl
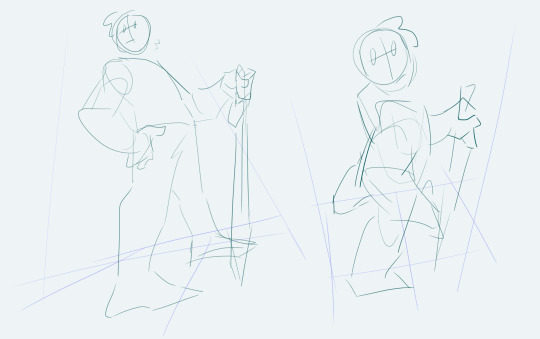
so i usually break the body shape down like this

the body is basically like a 2-part rectangle which i can push in whatever direction i want to lead the pose- i like to exaggerate the shape to emphasise the uhh force of that push ig? i just play around with it until i get the energy i want
for idle/straight on poses i try to make them seem like they're doing something so that the pose forms more of a trapezium than a stiff rectangle, let the characters have some fun!
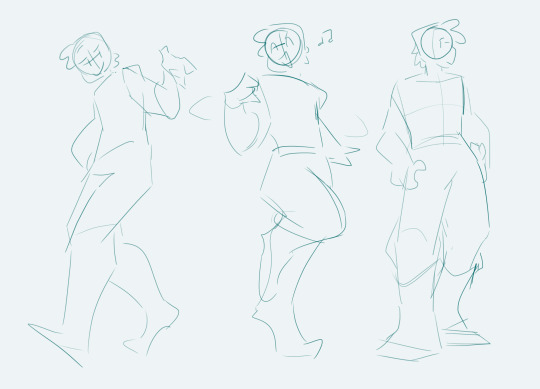

at this stage i don't really mind if the anatomy isn't completely accurate since i can fix that at the lineart/2nd sketch, im just focusing on getting the flow down so i let my lines be loose, just as long as i know which limb goes where then im good
also back poses!! most of the time you see the front of the character so drawing the back can be refreshing for me :) they flow just as well as the front ones too!

the same pose can be drawn in different angles- sometimes i put down a (very freestyled) perspective grid to define the space around the character and see where they can stand, and imagine a floating camera depending on where i want the focal point to be
you also don't really need to fret about following the grid to a T, just as long as they look grounded and the angle seems right
i like to slap down a few random grids to see how the character can interact with them, and they don't even need to be touching the character- they're just guidelines after all
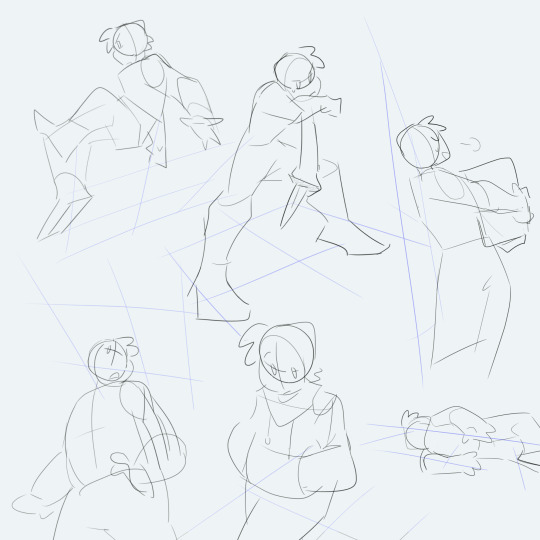
for me i think of poses with a main line of action and a secondary contrasting motion (though sometimes one main line is enough), the second line adds a little flair and weight while the main is what you see at first glance
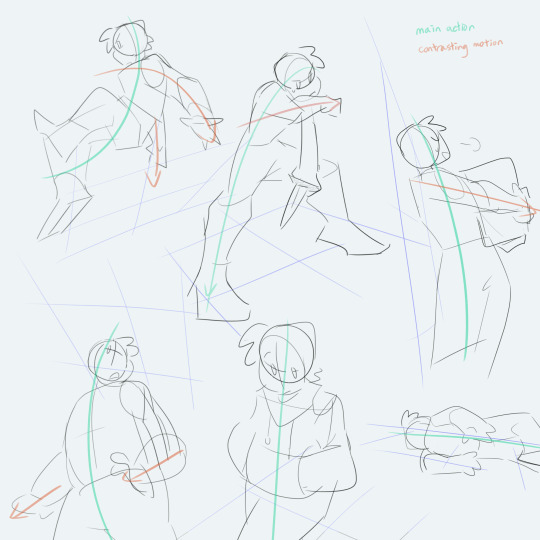
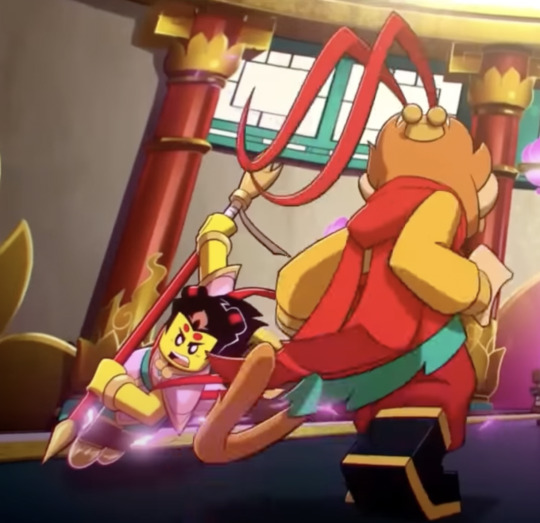
use references also! i can't emphasise that enough!! there's always pinterest or (especially for action poses) fight scenes from storyboards or from the finished film, which i love looking through frame-by-frame bc the keyframes and in-betweens are gold mines for inspiration- lego monkie kid is one of my go-to's for high energy poses!


aand that's all i got for now, hope this helps ^_^
304 notes
·
View notes
Text
Commissions Open!
Thank you for your interest! Heres what you need to know:
I Will do:
Humans/Humanoids (object heads/elves/mermaids/etc)
Anthros
Ferals
Ponies
cannon x oc or self ship
fanart
complex/detailed designs
and more!
I will not do:
nsfw
rude/offensive gestures
hateful or bigoted art
Maybe:
• Gore (depends)
I maintain the right to turn down any commission for any reason
Pricing
I currently accept PayPal and Cashapp only. All prices are in USD
Full bodies:
Flat color: $50
Shaded: $65
Colored lineart: +$10
Half bodies:
Flat color: $35
Shaded: $45
Colored lineart: +$8
Busts:
Flat color: $20
Shaded: $25
Colored lineart: +$5
Each additional character is +50% of the base price*
*(except for busts, which are +75%)
If you have an idea for something not listed here, please ask!
Backgrounds
I have recently changed my tune about backgrounds. If you would like a background, let me know and i will tell you if i think im up to it. Complex backgrounds are a fee of +%50 as they take a lot of time. If you have multiple characters, the background price is calculated AFTER the price of the additional characters. It is up to me to decide what a complex background is.
Simple/abstract backgrounds remain free of charge. If i think a work would benefit from it, i will put a solid or swirly colored shape behind it and send you a version with and without the background so you can decide which you like better. You may request a basic background on your own.
TOS:
I retain the right to post your completed piece to any of my social medias to use as an example of my work and a testament to my reliability. I will credit you when I do.
All payments are non-refundable unless for some reason i am unable to finish your piece, or we get part way through the process and i feel that i am unable to do your character(s) justice.
You MAY:
Post your completed piece wherever you please WITH appropriate credit by either linking my page or simply stating my name and platform.
edit my art in regards to cropping for profile pictures, adding an overlay to fit a theme, and resizing to fit a platform better
You may NOT:
feed my hard work to ai
use it for anything NFT related
claim it as your own
remove my watermarks
use it commercially
What is the process?
It's pretty simple! Send me a dm with a photo of your character(s) and tell me what you'd like. Let me know if you need a few days to get the money, or if there's a time constraint (like if the piece is a birthday or holiday gift). If you don't have an idea for a pose, please include a brief description of their personality. If there's characters interacting, let me know their relationship to one another and their dynamic.
I will respond with a price and if you're ok with proceeding I will mock up a vague sketch so you can get an idea of what it would look like. This will be watermarked and it will not even be very recognizable as your character. That's because I have been scammed and ghosted in the past, even with a very rough and watermarked sketch.
After that you will send 100% of the payment in order for me to proceed. Do not send payment via friends and family. I don't want to be banned from paypal lol
I work on a first come first serve basis, but i may work on a piece while waiting for approval on another. I will let you know if there is someone ahead of you. Once payment is received i will message you frequently with updates and for approval. Once lineart is finalized, i will update less often in order to creater a better final reveal. Your final piece will already be glazed to fight against ai stealing my style.
Depending on my life circumstances, this whole process could take from 1-3 days up to a month. The later is very unlikely, and i will message you with updates if i feel i am taking too long.
Examples of my work:
These are simply commissions that ive done in the past! I have many more examples of personal art on my blog


top to bottom: Bunyo and Sasha who belong to @/ilikecorndogs, Honey who belongs to to @/mei, and Solace who belongs to @/sundryd
61 notes
·
View notes
Note
Hi!! Fellow clan gen comic creator here, i check your blog regularly and you are so fast with updates! And nothing looks rushed or messy (well, messy in a bad way, i know your style is sketchy and sort of glitchy which is why i like it) how do you keep everything so updated all the time?? I struggle makeing one comic in just a week.
ArE yOu A wIzZaRd???
HAHA so FULL disclosure for everyone reading this: My upload schedule is about to change because I'm moving in a week and am going to be searching for a job 😭
BUT to answer your question: I have ALWAYS drawn fast. From when I started art some 8 years ago, I had no trouble whipping out 4-5 drawings every day, sometimes more. DOESN'T MEAN THEY WERE GOOD but I just hit the ground running when it came to art. AND because of that, I've built up more line confidence, and have been able to teach myself to draw cleaner even as I draw faster. In 2021 I even made 1+ finished drawings every single day 😭 (here's that if you wanna see it). Also last February I drew one OC 69 times in like 20 days.... TLDR: I've always been this way, and so I've just kind of adapted to it. PLUS it helps that cats are faster to draw than people (in my mind; people are my primary subject matter)
Here are some tips, if you Do wanna draw a little faster:
1. Nail down an art style, in general, and for each individual character. It's WAY easier to draw quickly if you already known how each part of the drawing is going to look (i.e. You draw eyes This way and you draw bangs This way and you shade skin This way and you use These colors)(I personally have one color pallet I use in every drawing)
2. If you can't clearly picture a drawing in your head going into it, let it marinate for a little longer, and come into focus. If you know down to the linework how you want your piece to look, you don't have to hesitate as much going into it.
3. FORGO the sketch, even if its just for practice! Try to draw your character starting with the lineart, thats what I do for my asks especially
4. Take breaks! Don't always force yourself to make art. Some of my best improvement happens after I've quit art cold turkey for weeks or months at a time. You draw faster when you're inspired and have a fresh, clear picture in your head
Hope this helps!
52 notes
·
View notes
Text

@drawmanda ik I already dmed you about this but my inbox ate your ask up so I'm responding to it this way now! <3
first of all thank you so much!! sdkjhsdkfh
And well, technically I also draw almost everything by hand too :o
I understand the frustration of being slow, but "fast" digital drawing actually has very little to do with not drawing things by hand (a trap most people infatuated with this terrible AI ""art"" trend unfortunately keep falling into) so much as optimizing your workflow!
admittedly a lot of this is also a matter of both personal preference and practice - but you can hardly practice and have preferences on what you can't know should be a focus right?
Under the cut is a list of the things I do that speed up my own digital art workflow (this one got hella long, sorry):
1) I sketch very loosely and often often skip the lineart entirely.
Something that's imo really important for actually almost all artists to practice is reducing sketches to their essentials!
A good working sketch should be rough and block in the shapes and placement of the features you have in your mind - the details don't come in until later, so they actually have very little business being put in at this stage!
It's meant to be a guideline and foundation for the upcoming detail work after all, not a finished, tidy drawing in and of itself.
Use quick, airy brush strokes to roughly pencil in some vague shapes and don't be afraid of indecipherable scribbles or flyaway lines! All that isn't needed won't be visible later anyways (either bc you turned off the sketch layer or erase the offending bit of sketch away)
Naturally, cleaned sketches are a thing people post plenty of online too (me included), but I promise you most artists that do proper lineart and/or render out insanely polished pieces have a very rough and probably barely legible sketch underneath those pieces lmao
And guess what! Most of my own "lineart" is nothing but cleaned sketches! :'D

I erase the construction lines like the circles for the heads and redraw a few bits and bops, re-trace some lines for legibility and/or to make them more visible and voila! Sometimes this is faster than lineart and keeps the original flow and energy that's in the sketches, other times this takes me just as long as lineart would lmao (highly depends on the amount of details and how lost you get in those).
Note how I didn't even "finish" a lot of the lines in the rough versions and many pieces of the og sketch were kept unaltered? I also tend to focus more on detailing out the faces than the rest - this is one part pure laziness and one part knowing that the faces will draw the eye's focus the most lmao
But see, sometimes I don't even bother with all of that noise! I just color the sketch as is:

This is a bit of a "trust the process" thing sometimes because a sketch can look utterly incomprehensible until you block out some colors and/or silhouettes to give your eyes context!
All in all most sketches take me between 10 minutes and half an hour, if it's a more complex pose or set of poses of interacting characters it can take closer to 2 hours, but in that case I also tend to use multiple layers for various iterations of rough sketching and to separate the characters on their own layers so it's a bit easier to keep track of the limb placements etc - it's best to keep a flexible mind when it comes to your approach to sketches.
Not every drawing will need the same level of care put into its sketches, don't be afraid of being rough with it and trying out different things if your usual way of doing things doesn't feel right!
2) Understanding the tools at my disposal!
Imo something every learning digital artist needs to get in the habit of is experimenting around with the tools at their disposal :D
It can seem incredibly daunting, especially when a program is absolutely packed with functions, but the more you work with different things and figure out what you like using and find ways to use them in your workflow, the easier it gets and the quicker you become! You'll be surprised what knowing your way around well can do to your work speed :D
Dick around with different presets, settings, colors, layer blend modes, filters etc
One of the first things I did when I first downloaded CSP was to just pick up every tool in the list one by one and doodle a few strokes across the empty canvas - no real goal or direction in mind, just getting a feel for it and then did a few drawings using different sets.
Imo even if you end up never using certain tools, it's still handy to know how they work!
3) HOTKEYS!!!!
I use my pc's keyboard hotkeys for. Every. Fucking. Thing. Mind you I'll be mostly talking in the terms and list hotkeys specifically for Clip Studio Paint since that's the program I use for my art, so if you use something else please do your own research on what the corresponding hotkeys are for your program if the ones I tell don't work!!!
I promise you most of them have very similar functions just on different key combinations and will also usually let you edit them in the settings :D
(this comes from someone who's at least tried out most of the available ones - Such as Medibang, FireAlpaca, Gimp, Krita, Rebelle 5, Paint Tool SAI (this one used to be my main before CSP) and I even tried photoshop and procreate on someone else's devices in the past)
The reason I use hotkeys is so I don't have to drag my curser around and click things by hand unnecessarily, the hotkeys save me a ton of time in the drawing process!
some examples of hotkeys I use for basically every drawing:
the classic undo (ctrl+Z) and redo (ctrl+alt+Z, other programs often use ctrl+Y for this tho); on touch-input compatible screen tablets you can often tap with two fingers to undo and 3 fingers to redo
zooming (this has multiple methods, you can use the ctrl+"+" and ctrl+"-" combo to zoom in and out, you can use the scrollwheel on a mouse or you use what my personal preference is: hold ctrl+space and drag the stylus to zoom in and out; if you have a touch-input compatible screen tablet you can also use two fingers to zoom in and out like you would on phone!)
rotating the canvas (technically has more than one way as well but I'm ngl I can't remember the way that isn't what I use anymore lmao, hold shift+space and drag the stylus - pro tip, you can reset the rotation with the Pos1 button, in the navigation window if you have it docked or in CSP's case also at the bottom of the screen!)

mirror canvas (in the viewport only! permanent rotation requires a transform!) using the M button (this is handy for checking proportions and when you just can't get your hand to do a curved line that goes against the natural range of rotation of your dominant hand's wrist)
drag viewport (i.e. move along the canvas by holding space button, then clicking and dragging)
merging layers (ctrl+E)
selecting multiple layers (click on layer, then hold ctrl and click on any other layers you want selected individually; if you want to quickly select a long and uninterrupted list you can also click on the first layer, then hold shift when you click on the last, this will select all layers in between too)
grouping selected layers (ctrl+G)
deselect all (ctrl+D)
transform selection (ctrl+T)
bring up hue/saturation/luminosity sliders for currently selected layer for quick color adjustments (ctrl+U)
switching between tools (I memorized which keys correspond to which tool categories in CSP and then use the "," and "." keys to move between presets within the category; I also have my CSP set up to have multiple presets in my tool bar that I can cycle between using the same tool button)
changing brush size (hold AltGr and drag cursor to increase or decrease brush size)
switching between drawing colors
This is an especially big one for me!!!
Did you know that using the little transparent color underneath or near your front and back colors turns your currently selected tool into an eraser? It keeps all of the texturing and blending settings too!
I often use larger round brushes to block out an area and using this I can just use the same brush as an eraser to taper the strokes or refine corners without losing the texture using the C-key :D
When I'm coloring switching between front and back colors helps a ton too, and for that I use the X-key!
Here an example of how that looks executed in practice:
Notice how I never have to stop moving my cursor away from the drawing unless I'm picking new colors? :D
I also use this a lot for my shading process! I will often use two tones on a layer with its blending mode set to add or multiply in order to shade and quickly switch between them for easy blocking and blending! Tumblr doesn't allow more than one vid per post so here's a youtube link to a little demo to show what I mean!
4) I aim for vibes > visual accuracy, especially in backgrounds!
(though this applies to how I approach character illustrations too)
A background doesn't have to be mega detailed or coherent to get across what you need it to!
I often use blurred photographs and video game screenshots as backdrops for my art, other times I roughly block in some squares and silhouettes to give the viewer some implied context of where they're at


Detailed backgrounds, unfortunately, will almost always cost you tons of time to do, so the speed with those unfortunately really does come from extended practice more than any shortcuts I can offer :')

for at least big room layouts like this tho I can recommend building the scene in sims 4 or something similar first and roughly tracing the screenshot for proportional guidance, something I've done in this one^ for example!
5) STENCIL BRUSHES <3
BOY THESE THINGS CAN BE DAMN USEFUL!
None of the things in this image below were hand-drawn by me!

These are just some of the ones CSP comes with by default! I downloaded quite a few handy custom ones over time too lol

I really implore you to not get too overly reliant on them however, they can be a huge help for when it doesn't need to be super accurate, but unless you're really good at making them match your style they can stick out a little sorely, so use them sparingly and only where you can easily make them blend in with the rest of your piece!
Also I've seen your lovely art in the tags I frequent a few times now and while the insane amount of detail you lovingly pour into it makes it a really cool and recognizable style that genuinely wows me anytime I see it, I can also see how time consuming it'd be to create it!
I do however think it's a gorgeous style that is worth every minute you put into it, so please don't be discouraged by any slowness! :3
I do of course still hope that any of my tips helped even just a little bit!!!
Keep up the amazing work and take care <3<3<3
21 notes
·
View notes
Last Seen Blogs

hanalearnshangul
Polyglot in the making
poiastris
heartache.

ninishistory-blog
anonim

monseherrera
Sin título

subinjanelim
_Limsubin