#ibispaint x tutorial
Explore tagged Tumblr posts
Visit Tumblr Blog
Explore Tumblr blogs with no restrictions, modern design and the best experience.
Last Seen Tumblr Blogs


Fun Fact
Tumblr was attacked by a cross-site scripting worm deployed by the Internet troll group GNAA on Dec 3, 2012.
Text
͏͏ ͏ ͏͏ ͏ ͏ ͏͏ ͏ ͏ ͏͏ ͏ ͏ ͏͏ ͏͏ ͏ ͏͏ ͏𓊆❥ིꨩ𓊇 ͏͏ ͏ ͏͏ ͏mini ͏͏ ͏♫ ͏♫ ͏♫ ͏ 𝚃𝚄𝚃𝙾𝚁𝙸𝙰𝙻 ͏͏ ͏ ͏͏ ͏🍰 ͏͏ ͏
un pequeño tutorial solicitado por una semillita de manzana dulce ✩ ✉️
͏ ͏͏ ͏
son dos maneras súper fáciles de hacer pngs a imágenes simples, solo se necesita tener estas dos aplicaciones, ibispaint y picsart 𓆉︎ abajito voy a dejar el link del apk de picsart pro que es el que necesitarían para borrar el fondo con esa opción !!
͏ ͏͏ ͏✩ ͏ ͏͏ ͏✩ ͏ ͏͏ ͏picsart
#͏͏͏ ͏ ͏͏ tommy heavenly6's ͏͏ ͏͏͏ ͏ ͏͏quaderno ͏͏͏ ͏͏ 𝄞 ͏ ͏͏ 𝄞 ͏ ͏͏ 𝄞#͏ ͏͏ ͏ ͏ ͏͏ ͏ ͏ ͏͏ ͏ ͏ ͏͏ ͏ ͏ ͏͏ ͏ ͏ ͏͏ ͏ ͏ ͏͏ ͏ ͏ ͏͏ ͏ ͏ ͏͏ ͏ ͏ ͏͏ ͏ ͏ ͏͏ ͏ ͏ ͏͏ ͏ ͏ ͏͏ ͏ ͏ ͏͏ ͏ ͏ ͏͏ ͏ ͏ ͏͏ ͏ ͏ ͏͏ ͏ ͏ ͏͏ ͏ ͏ ͏͏ ͏#tutoriales#kpop edits#mini tutorial#picsart tutorial#ibispaint x tutorial#kpop moodboard#cute edits#png cute#png edit#random pngs#soft pngs#kaomojis soft#cute kaomojis#cute moodboard#soft moodboard#kpop messy moodboard#kpop girls#kpop girls moodboard#simple moodboard#cute symbols#moodboard#kpop boys#kpop icons
125 notes
·
View notes
Text
Arcane Grey Metal Tutorial (Ibispaint X)
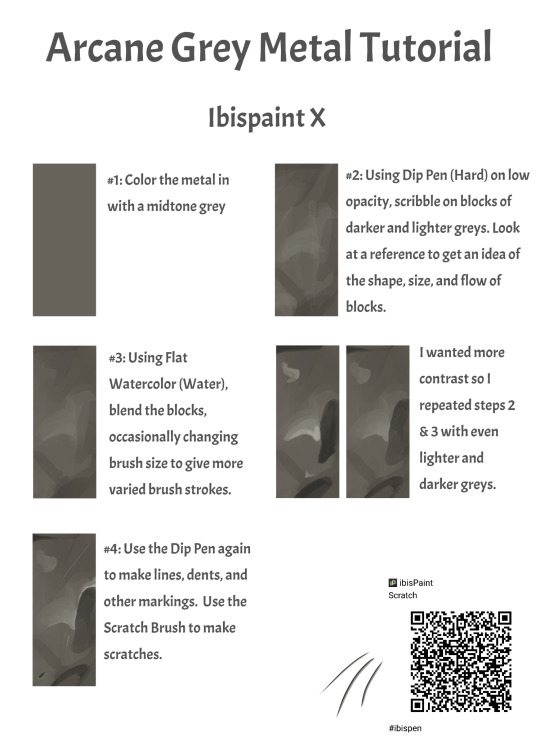
#arcane#art tutorial#metal texture#arcane metal#arcane art#arcane art tutorial#arcane fanart#arcane reference#texture reference#ibispaint#ibispaintx#ibispaint art#ibispaint x tutorial#ibispaint x#digital arwork#digital fanart#digital art tutorials
26 notes
·
View notes
Note
What program do you use for your edits? And can you give us a crash course on how to use it? I'm kinda stupid so it'd help a lot
I use two programs mainly! Photopea for gifs and psds && ibis paint X for making my edits!
CRASHCOURSE(?):
okay so idk rlly how to ‘crashcourse’ ibis paint x since it’s rlly easy to use but here’s the basics uu rlly need to know for editing in that app.
It only lets you add one image at a time. unlike other websites/apps that allow uu to import multiple photos at a time, ibis paint only allows u to import one! With this is mind you want to be careful on what you click cuz if you click the wrong thing it takes up more time!!
GIFS DO NOT WORK!! I repeat, GIFs do NOT work!! Trust me, I failed miserably trying to add GIFs into the app the first time I used it. Do not try to do it, it’s very time consuming! Unless you’d rather figure it out, then be my guest!
you may see edits all over with nice gradient patterns and think “wow, that looks great I wanna try that”. It is, but you’ll need the apps premium purchase which is a monthly pay thing. BUT THERE IS A SOLUTION. You can use the clipping button and put a color in. After that you can mess around with the opacity and blending mode of the color! example:


Then you’ll be left with a beautiful product like this:


This is just the crashcourse for ibis paint x rn, I’ll do a photopea one tomorrow !! :3
#rentry#rentry graphics#— ⟢ talking !!#requests open#crashcourse#tut#tutorial#rentry tutorial#ibispaint art#ibispaint x#ibis paint tut#Photopea tut#Crashcourse tutorial
39 notes
·
View notes
Text

Chappell Roan |Fanart
#This was a quick one tbh#Also this hair(drawing) style is not my thing BUT then Chinese tutorials r haunting meeeeeee#drawing#fanart#Chapell roan#artists of tumblr#art style#Digital art#VMS#chappell fanart#artwork#Ibispaint x#yeolldraw#chappell roan
20 notes
·
View notes
Text
Did a couple more edits and fixed the shadow a bit still figuring out where to position the shadow.
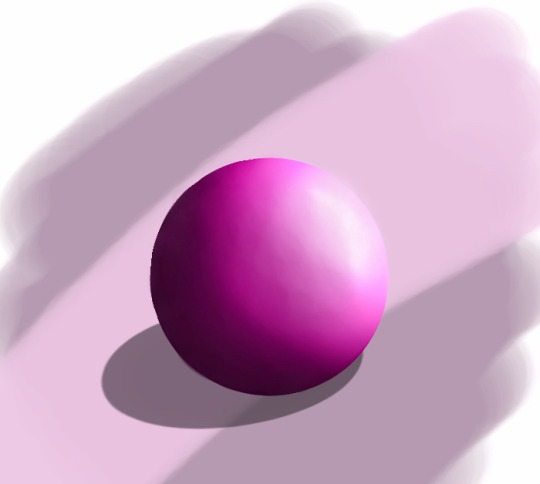
Time: 30min roughly
#art#digital art#digital aritst#digital drawing#digital painting#digital sketch#how to draw#drawing tutorial#drawing#ibispaint art#ibispaintapp#made in ibis paint#ibispaintdrawing#ibispaintx#sphere#shading#realist art#artists on tumblr#my art#artwork#digital arwork#satisfying#girlblogging#this is a girlblog#rendered art#art tutorial#art tumblr#painting#ibis paint x
9 notes
·
View notes
Text
Trying out that one IbisPaint trick to make traditional sketches more vibrant
Good for if you wanna color your sketches digitally
You can also use it in other art programs too
#ibispaint#ibispaint art#art#pen sketch#ballpoint pen sketch#traditional art#super mario bros#megaman x#megaman#art tutorial#tutorial#silly sketch saturday sunday#silly-fly
8 notes
·
View notes
Text
A tutorial on how I do the VHS effect
25 notes
·
View notes
Text
2 notes
·
View notes
Text

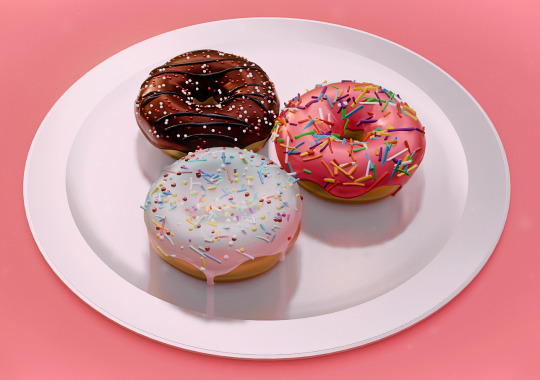
🍩 my tutorial donuts are finally done 🍩
i completely ignored the rendering part because it changed everything about the lighting and my base colors and i just took a screenshot of the 3D viewport i think it looks nicer, i'll learn rendering soon :]
i touched this up in Ibispaint a little bit
edit: these look way more saturated on my phone than on my computer :( I tried lowering it (although it's fairly similar), also here's a posterized version cause I like how it looks:

#blender donut#donut posting#blender#learning blender#3D model#3D modelling#donut 3D model#donut tutorial#ibispaint x#donutboxers art#blender 3d#3d modelling software#food#donut#donuts#desserts
11 notes
·
View notes
Text
this is a PSA.
ALL IBIS PAINT USERS, ESPECIALLY THOSE WORKING WITH ALIASED ART, READ THIS!!!
whenever you click the ⬅️ icon exit a drawing you'll see some settings...

now you need to click on those settings, and either on the bottom or middle you'll see THIS!!!

"interpolate on zoom in". it's the thing that makes your pixels all FUZZY and STUPID.
now all you need to do is TURN IT OFF!!!!

TADAH!!!!! YOUR PIXELS ARE NOW CLEAR and CRISPY!!!! BEST DECISION EVER!!!!!!
hope yous enjoyes
#ibispaint#ibis paint#ibispaint tips#ibis paint tips#ibis paint x#ibispaint x#ibispaint tutorial#ibis paint tutorial
36 notes
·
View notes
Text
@tiredsleep @loptido @raincxtter @chichikoi @ladyadii @soulsanta @sheiiths @genshinparty @eowinthetraveler @moonbyunniee @legitnoi @lemontum @manager-of-the-pudding-bank @starz222 @ilyuu @cherry-colored-petals @mondaymelon @tartaglia-apologist @soleillunne @m1shapanda @aimynx @smokipoki @adeptuscharm @diorlumx @vennnnn-diagram @ryuryuryuyurboat @yuminako @st0pthatsgay @aqualesha @sixtynintharchon @supernova25 @kunikuda-simp @starglitterz @rin-nyrasti-writes @mxyarylla @haliyamori @mondaymelon @mccnstruck @ryuryuryuyurboat
send ask/comment to be added to taglist!
#experimenting with ibispaint x !!!! my first time hehe#had to follow a youtube tutorial#but i think its not that bad hehe#if anyo has advice do feel free to share!!#[📍regular broadcast!]
11 notes
·
View notes
Text


You may also follow the official channel of ibisPaint X for cool tutorials! Most of there videos are in Japanese but with English captions so it's not a problem to comprehend. Besides, they post regularly on their community tab in both English and Japanese! Channel Link.
2 notes
·
View notes
Text
3 notes
·
View notes
Text

learning to sketch and color eyes digitally on ibis paint
i'm open to any constructive critism
#how to draw eyes on ibis paint x#ibis paint x#ibis paint x tutorial#ibis paint#how to paint eyes digital art#how to draw eyes#how to draw eyes in ibispaint x#how to draw digital hair ibis paint#how to paint hair digitally ibispaint#how to draw anime eyes#ibis paint color palette#how to draw on ibis paint#following a kooleen tutorial on ibis paint#how to paint realistic hair digitally#how to paint hair digitally anime#how to paint hair digitally
0 notes
Text
How to erase those small mistakes in your art when you don't know what layer it's in:
(this video isn't mine btw)
1 note
·
View note
Text
Graphics Tutorial
I've gotten asked a few times on discord how I make graphics (since I primarily share my works there), so this is a lil' tutorial post :p
╳ This is the way I make graphics. Others might do it differently and thats okay.
Images provided!!!
Here's what we'll make for the tutorial:
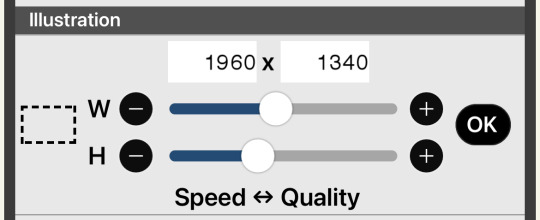
Okay so, I use ibisPaint X, and my canvas size is usually 1960x1340.
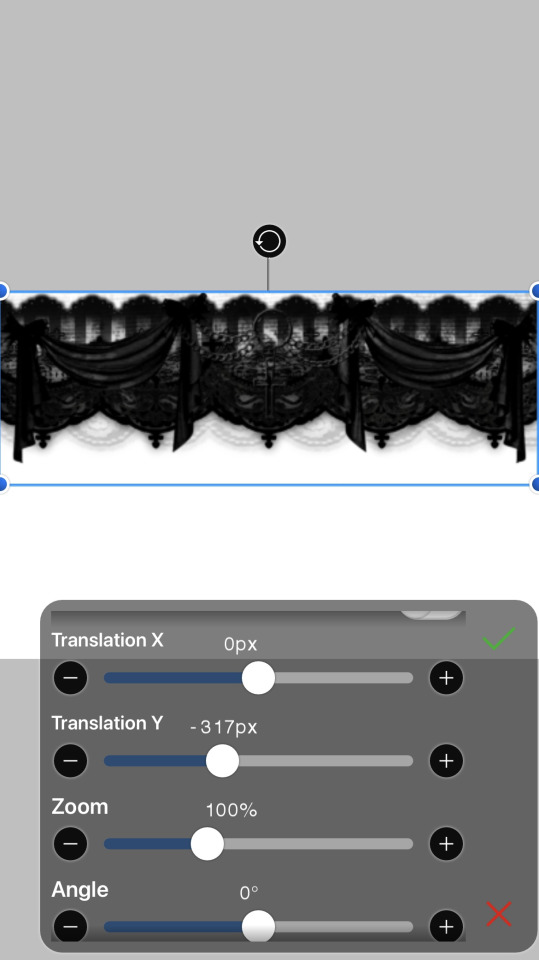
Theres many different ways you can "frame" your graphics (see my [The Herta] and [Acheron] graphics) but I usually use a divider on the top and bottom.
╳ You can find dividers under various tags on tumblr, and there are many Rentrys/Carrds with resources that have dividers (I LOVE the blogs [lavendergalactic], [selysie], [laylaplush], and [lucentmaiden], and the rentries [lavender-resources] and [border]).

Then, get your character render - Theres tumblr blogs and other social media accounts that do primarily make and post renders of characters (Like [hoyo-transparents] I LOVE THEM SO MUCH they are also where I got the Yanagi render from for this example), you can even look around online for renders by search, but sometimes you WILL have to erase and cut renders out yourself (I usually use the background removal tool, then I go in and erase the closer parts myself)).
╳ If your character has any accessories on their head that make it hard to fit them on the canvas, you can change the height or width dimensions of the canvas to have them pop out of it more (See my [Miku] and [Nicole Demara] graphics).
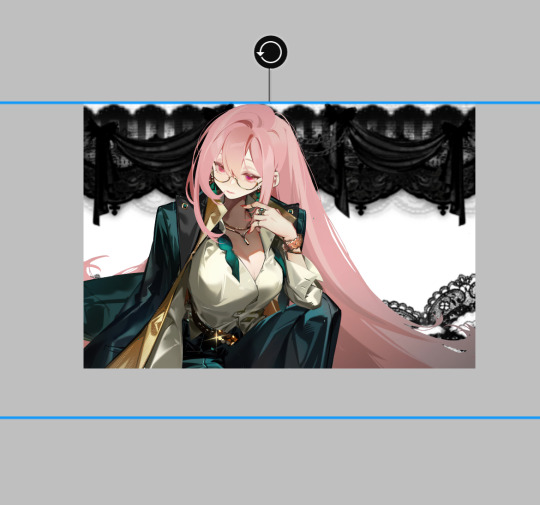
Now, duplicate the render and put the dupe under the dividers.

(Optional in some cases) - Hide the top render, and erase parts of the bottom render that are showing underneath the renders.
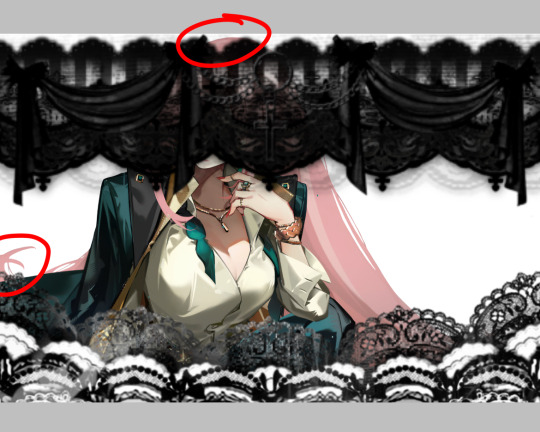

Go back to the top render and erase the lower part so the bottom divider appears to be in front of the render (As if it was a 3d space).
╳ If the render has (a) body part(s) going over the dividers that you'd like to keep, you can erase around it (See my [Agaela] and [Yae Miko] graphics).

Time to add background elements (if you want)!!! I usually add patterns(?) in the background (I also usually merge them and make them all the same color but you can do whatever you wish).
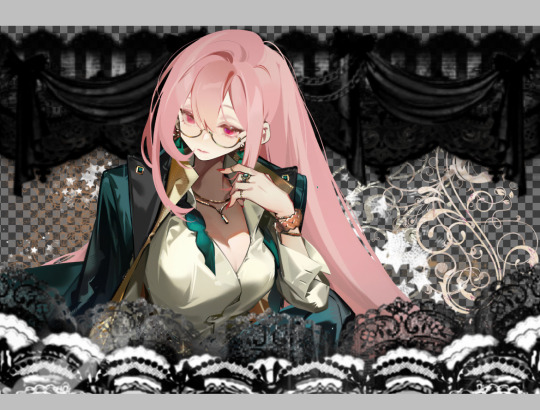
OR you can add pngs! Its the same way to find dividers I mentioned earlier, I love the ones [adjpngs], [suturical], and [pngblog] post, but I usually search up keywords like "flower png" on tumblr to find some.
╳ You can also get pngs off of Pinterest and remove the backgrounds either manually, through ibisPaint X's "Clear White" functions (Three dots on the lower right when in Layers tab), or through background remover websites (of which there are MANY).
╳ You can also put pngs over the render or on the dividers, they don't just have to be background elements.
OOOR you can mash them together (And thats what we'll be doing with our example graphic)!

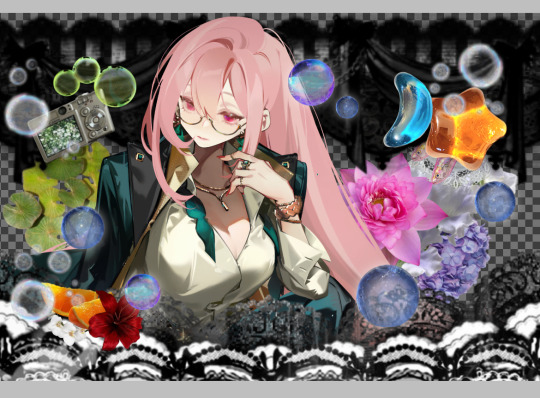
Now… COLORING!!!!!! Move EVERY part of the graphic into the folder (make sure to keep every layer in the same place).


╳ You do not have to do this step, but I usually press "Add layer from folder", which mashes everything in the folder together in a NEW layer- so you have everything on one layer, but still have all your other layers in the folder. then, I hide the folder. I do this to keep things clean AND in case I want to change anything.
╳ This is also an optional step, but I usually use the "Grayscale" filter on our "almost-finished-product". Some colors might clash or not work with the filters and colors I'm trying to use, so I grayscale it all so I dont have to deal with that. BUT, you can absolutely keep things in color and still be able to work with it (See my [Mulani] graphic)!

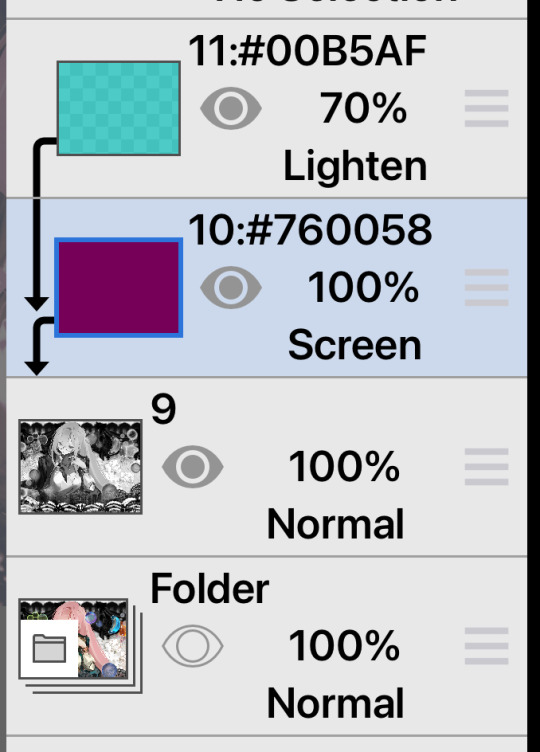
Now, we want COLOR! there are many ways to do this, but I usually use the Overlay/Lighten/Screen blending modes.
╳ There is a Gradient Map filter in ibisPaint X but I don't use it since I don't have premium. I've heard of a few websites (Including Photopea) having gradient maps and whatever else, but they're confusing for me to use so I don't know how to use them- theres probably tutorials out there for those programs though. Photoshop probably also has a gradient map but I don't actually know I don't have it.
╳ Theres also some users out there who make color combos for ibisPaint X that you can use (I don't have any recommendations though)!
You'll definitely want to explore and mess with colors to see what you want.
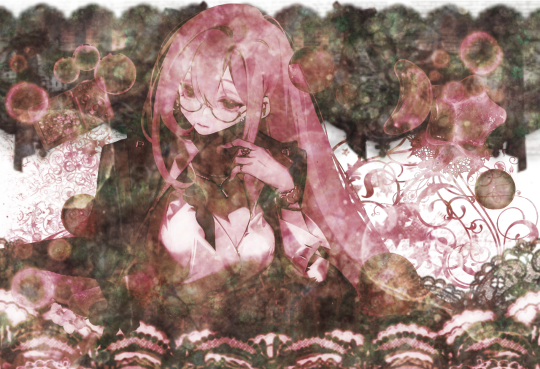
I chose this:

Now, textures. OOO DO I LOVE TEXTURES. Usually I use textures through overlays, but ibisPaint X has an ENTIRE PAGE dedicated to patterns, textures, and presets. I CANNOT EXPRESS HOW MUCH I LOVE THIS FUNCTION!!!

I usually use the paper/old paper textures when I use ibisPaint X's materials, but you can scroll around and use what you find!
╳ An optional step I do is duplicate the grayscaled layer, blur it, and make it a clipping layer- then adjust the opacity to my liking. It makes the graphic look a little fuzzy and I love it.
I ended up with this:


(I also realized midway at this point that I did not color the background patterns so I went and did that)
Last step is to add your watermark. I HIGHLY. HIIIIGHLY recommend watermarking your works, because there are snatchers everywhere on the internet. Too many times I have seen people steal other peoples stuff. You do not have to watermark your stuff, but its probably recommended by every version of artist there is on our Earth. Plus, people will probably want to know who made the work! I add my watermark by putting the grayscaled layer in a folder, making a new layer IN the folder, and putting my watermark in there- somewhere on the graphic. This makes it so both the watermark and the graphic are affected by the clipping layers (But you can always merge the watermark and graphic together. I usually don't incase I want to move the watermark elsewhere).

Then, we have our finished product!
(Remember to enable "Transparent" when you download it!)
61 notes
·
View notes