#install mongodb docker linux
Explore tagged Tumblr posts
Visit Tumblr Blog
Explore Tumblr blogs with no restrictions, modern design and the best experience.
Last Seen Tumblr Blogs


Fun Fact
Tumblr has 16.74 million mobile monthly users in the US.
Text
Docker Tutorial for Beginners: Learn Docker Step by Step
What is Docker?
Docker is an open-source platform that enables developers to automate the deployment of applications inside lightweight, portable containers. These containers include everything the application needs to run—code, runtime, system tools, libraries, and settings—so that it can work reliably in any environment.
Before Docker, developers faced the age-old problem: “It works on my machine!” Docker solves this by providing a consistent runtime environment across development, testing, and production.
Why Learn Docker?
Docker is used by organizations of all sizes to simplify software delivery and improve scalability. As more companies shift to microservices, cloud computing, and DevOps practices, Docker has become a must-have skill. Learning Docker helps you:
Package applications quickly and consistently
Deploy apps across different environments with confidence
Reduce system conflicts and configuration issues
Improve collaboration between development and operations teams
Work more effectively with modern cloud platforms like AWS, Azure, and GCP
Who Is This Docker Tutorial For?
This Docker tutorial is designed for absolute beginners. Whether you're a developer, system administrator, QA engineer, or DevOps enthusiast, you’ll find step-by-step instructions to help you:
Understand the basics of Docker
Install Docker on your machine
Create and manage Docker containers
Build custom Docker images
Use Docker commands and best practices
No prior knowledge of containers is required, but basic familiarity with the command line and a programming language (like Python, Java, or Node.js) will be helpful.
What You Will Learn: Step-by-Step Breakdown
1. Introduction to Docker
We start with the fundamentals. You’ll learn:
What Docker is and why it’s useful
The difference between containers and virtual machines
Key Docker components: Docker Engine, Docker Hub, Dockerfile, Docker Compose
2. Installing Docker
Next, we guide you through installing Docker on:
Windows
macOS
Linux
You’ll set up Docker Desktop or Docker CLI and run your first container using the hello-world image.
3. Working with Docker Images and Containers
You’ll explore:
How to pull images from Docker Hub
How to run containers using docker run
Inspecting containers with docker ps, docker inspect, and docker logs
Stopping and removing containers
4. Building Custom Docker Images
You’ll learn how to:
Write a Dockerfile
Use docker build to create a custom image
Add dependencies and environment variables
Optimize Docker images for performance
5. Docker Volumes and Networking
Understand how to:
Use volumes to persist data outside containers
Create custom networks for container communication
Link multiple containers (e.g., a Node.js app with a MongoDB container)
6. Docker Compose (Bonus Section)
Docker Compose lets you define multi-container applications. You’ll learn how to:
Write a docker-compose.yml file
Start multiple services with a single command
Manage application stacks easily
Real-World Examples Included
Throughout the tutorial, we use real-world examples to reinforce each concept. You’ll deploy a simple web application using Docker, connect it to a database, and scale services with Docker Compose.
Example Projects:
Dockerizing a static HTML website
Creating a REST API with Node.js and Express inside a container
Running a MySQL or MongoDB database container
Building a full-stack web app with Docker Compose
Best Practices and Tips
As you progress, you’ll also learn:
Naming conventions for containers and images
How to clean up unused images and containers
Tagging and pushing images to Docker Hub
Security basics when using Docker in production
What’s Next After This Tutorial?
After completing this Docker tutorial, you’ll be well-equipped to:
Use Docker in personal or professional projects
Learn Kubernetes and container orchestration
Apply Docker in CI/CD pipelines
Deploy containers to cloud platforms
Conclusion
Docker is an essential tool in the modern developer's toolbox. By learning Docker step by step in this beginner-friendly tutorial, you’ll gain the skills and confidence to build, deploy, and manage applications efficiently and consistently across different environments.
Whether you’re building simple web apps or complex microservices, Docker provides the flexibility, speed, and scalability needed for success. So dive in, follow along with the hands-on examples, and start your journey to mastering containerization with Docker tpoint-tech!
0 notes
Text
PROJETO
Passo a Passo da Implementação da NeoSphere
1. Configuração do Ambiente de Desenvolvimento
Ferramentas Necessárias:
Python 3.10+ para backend Web2 (FastAPI, Redis).
Node.js 18+ para serviços Web3 e frontend.
Solidity para smart contracts.
Docker para conteinerização de serviços (Redis, MongoDB, RabbitMQ).
Truffle/Hardhat para desenvolvimento de smart contracts.
# Instalação de dependências básicas (Linux/Ubuntu) sudo apt-get update sudo apt-get install -y python3.10 nodejs npm docker.io
2. Implementação da API Web2 com FastAPI
Estrutura do Projeto:
/neosphere-api ├── app/ │ ├── __init__.py │ ├── main.py # Ponto de entrada da API │ ├── models.py # Modelos Pydantic │ └── database.py # Conexão com MongoDB └── requirements.txt
Código Expandido (app/main.py):
from fastapi import FastAPI, Depends, HTTPException from pymongo import MongoClient from pymongo.errors import DuplicateKeyError from app.models import PostCreate, PostResponse from app.database import get_db import uuid import datetime app = FastAPI(title="NeoSphere API", version="0.2.0") @app.post("/posts/", response_model=PostResponse, status_code=201) async def create_post(post: PostCreate, db=Depends(get_db)): post_id = str(uuid.uuid4()) post_data = { "post_id": post_id, "user_id": post.user_id, "content": post.content, "media_urls": post.media_urls or [], "related_nft_id": post.related_nft_id, "created_at": datetime.datetime.utcnow(), "likes": 0, "comments_count": 0 } try: db.posts.insert_one(post_data) except DuplicateKeyError: raise HTTPException(status_code=400, detail="Post ID já existe") return post_data @app.get("/posts/{post_id}", response_model=PostResponse) async def get_post(post_id: str, db=Depends(get_db)): post = db.posts.find_one({"post_id": post_id}) if not post: raise HTTPException(status_code=404, detail="Post não encontrado") return post
3. Sistema de Cache com Redis para NFTs
Implementação Avançada (services/nft_cache.py):
import redis from tenacity import retry, stop_after_attempt, wait_fixed from config import settings class NFTCache: def __init__(self): self.client = redis.Redis( host=settings.REDIS_HOST, port=settings.REDIS_PORT, decode_responses=True ) @retry(stop=stop_after_attempt(3), wait=wait_fixed(0.5)) async def get_metadata(self, contract_address: str, token_id: str) -> dict: cache_key = f"nft:{contract_address}:{token_id}" cached_data = self.client.get(cache_key) if cached_data: return json.loads(cached_data) # Lógica de busca na blockchain metadata = await BlockchainService.fetch_metadata(contract_address, token_id) if metadata: self.client.setex( cache_key, settings.NFT_CACHE_TTL, json.dumps(metadata) ) return metadata def invalidate_cache(self, contract_address: str, token_id: str): self.client.delete(f"nft:{contract_address}:{token_id}")
4. Smart Contract para NFTs com Royalties (Arquivo Completo)
Contrato Completo (contracts/NeoSphereNFT.sol):
// SPDX-License-Identifier: MIT pragma solidity ^0.8.20; import "@openzeppelin/contracts/token/ERC721/ERC721.sol"; import "@openzeppelin/contracts/access/Ownable.sol"; import "@openzeppelin/contracts/interfaces/IERC2981.sol"; contract NeoSphereNFT is ERC721, Ownable, IERC2981 { using Counters for Counters.Counter; Counters.Counter private _tokenIdCounter; struct RoyaltyInfo { address recipient; uint96 percentage; } mapping(uint256 => RoyaltyInfo) private _royalties; mapping(uint256 => string) private _tokenURIs; event NFTMinted( uint256 indexed tokenId, address indexed owner, string tokenURI, address creator ); constructor() ERC721("NeoSphereNFT", "NSPH") Ownable(msg.sender) {} function mint( address to, string memory uri, address royaltyRecipient, uint96 royaltyPercentage ) external onlyOwner returns (uint256) { require(royaltyPercentage <= 10000, "Royalties max 100%"); uint256 tokenId = _tokenIdCounter.current(); _tokenIdCounter.increment(); _safeMint(to, tokenId); _setTokenURI(tokenId, uri); _setRoyaltyInfo(tokenId, royaltyRecipient, royaltyPercentage); emit NFTMinted(tokenId, to, uri, msg.sender); return tokenId; } function royaltyInfo( uint256 tokenId, uint256 salePrice ) external view override returns (address, uint256) { RoyaltyInfo memory info = _royalties[tokenId]; return ( info.recipient, (salePrice * info.percentage) / 10000 ); } function _setTokenURI(uint256 tokenId, string memory uri) internal { _tokenURIs[tokenId] = uri; } function _setRoyaltyInfo( uint256 tokenId, address recipient, uint96 percentage ) internal { _royalties[tokenId] = RoyaltyInfo(recipient, percentage); } }
5. Sistema de Pagamentos com Gateway Unificado
Implementação Completa (payment/gateway.py):
from abc import ABC, abstractmethod from typing import Dict, Optional from pydantic import BaseModel class PaymentRequest(BaseModel): amount: float currency: str method: str user_metadata: Dict payment_metadata: Dict class PaymentProvider(ABC): @abstractmethod def process_payment(self, request: PaymentRequest) -> Dict: pass class StripeACHProvider(PaymentProvider): def process_payment(self, request: PaymentRequest) -> Dict: # Implementação real usando a SDK do Stripe return { "status": "success", "transaction_id": "stripe_tx_123", "fee": request.amount * 0.02 } class NeoPaymentGateway: def __init__(self): self.providers = { "ach": StripeACHProvider(), # Adicionar outros provedores } def process_payment(self, request: PaymentRequest) -> Dict: provider = self.providers.get(request.method.lower()) if not provider: raise ValueError("Método de pagamento não suportado") # Validação adicional if request.currency not in ["USD", "BRL"]: raise ValueError("Moeda não suportada") return provider.process_payment(request) # Exemplo de uso: # gateway = NeoPaymentGateway() # resultado = gateway.process_payment(PaymentRequest( # amount=100.00, # currency="USD", # method="ACH", # user_metadata={"country": "US"}, # payment_metadata={"account_number": "..."} # ))
6. Autenticação Web3 com SIWE
Implementação no Frontend (React):
import { useSigner } from 'wagmi' import { SiweMessage } from 'siwe' const AuthButton = () => { const { data: signer } = useSigner() const handleLogin = async () => { const message = new SiweMessage({ domain: window.location.host, address: await signer.getAddress(), statement: 'Bem-vindo à NeoSphere!', uri: window.location.origin, version: '1', chainId: 137 // Polygon Mainnet }) const signature = await signer.signMessage(message.prepareMessage()) // Verificação no backend const response = await fetch('/api/auth/login', { method: 'POST', headers: { 'Content-Type': 'application/json' }, body: JSON.stringify({ message, signature }) }) if (response.ok) { console.log('Autenticado com sucesso!') } } return ( <button onClick={handleLogin}> Conectar Wallet </button> ) }
7. Estratégia de Implantação
Infraestrutura com Terraform:
# infra/main.tf provider "aws" { region = "us-east-1" } module "neosphere_cluster" { source = "terraform-aws-modules/ecs/aws" cluster_name = "neosphere-prod" fargate_capacity_providers = ["FARGATE"] services = { api = { cpu = 512 memory = 1024 port = 8000 } payment = { cpu = 256 memory = 512 port = 3000 } } } resource "aws_elasticache_cluster" "redis" { cluster_id = "neosphere-redis" engine = "redis" node_type = "cache.t3.micro" num_cache_nodes = 1 parameter_group_name = "default.redis6.x" }
Considerações Finais
Testes Automatizados:
Implementar testes end-to-end com Cypress para fluxos de usuário
Testes de carga com k6 para validar escalabilidade
Testes de segurança com OWASP ZAP
Monitoramento:
Configurar Prometheus + Grafana para métricas em tempo real
Integrar Sentry para captura de erros no frontend
CI/CD:
Pipeline com GitHub Actions para deploy automático
Verificação de smart contracts com Slither
Documentação:
Swagger para API REST
Storybook para componentes UI
Archimate para documentação de arquitetura
Este esqueleto técnico fornece a base para uma implementação robusta da NeoSphere, combinando as melhores práticas de desenvolvimento Web2 com as inovações da Web3.
0 notes
Text
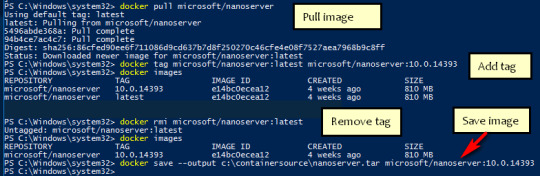
How to Install MongoDB on Docker Container linux.
How to Install MongoDB on Docker Container linux.
Hi Guys! Hope you are doing well. Let’s Learn about “How to Install MongoDB on Docker Container Linux”. The Docker is an open source platform, where developers can package there application and run that application into the Docker Container. So It is PAAS (Platform as a Service), which uses a OS virtualisation to deliver software in packages called containers. The containers are the bundle of…

View On WordPress
#docker hub#install mongodb#install mongodb docker#install mongodb docker container#install mongodb docker image#install mongodb docker linux#install mongodb docker ubuntu#install mongodb on docker container#mongodb docker install#mongodb docker tutorial#run docker on mongodb container
0 notes
Photo

hydralisk98′s web projects tracker:
Core principles=
Fail faster
‘Learn, Tweak, Make’ loop
This is meant to be a quick reference for tracking progress made over my various projects, organized by their “ultimate target” goal:
(START)
(Website)=
Install Firefox
Install Chrome
Install Microsoft newest browser
Install Lynx
Learn about contemporary web browsers
Install a very basic text editor
Install Notepad++
Install Nano
Install Powershell
Install Bash
Install Git
Learn HTML
Elements and attributes
Commenting (single line comment, multi-line comment)
Head (title, meta, charset, language, link, style, description, keywords, author, viewport, script, base, url-encode, )
Hyperlinks (local, external, link titles, relative filepaths, absolute filepaths)
Headings (h1-h6, horizontal rules)
Paragraphs (pre, line breaks)
Text formatting (bold, italic, deleted, inserted, subscript, superscript, marked)
Quotations (quote, blockquote, abbreviations, address, cite, bidirectional override)
Entities & symbols (&entity_name, &entity_number,  , useful HTML character entities, diacritical marks, mathematical symbols, greek letters, currency symbols, )
Id (bookmarks)
Classes (select elements, multiple classes, different tags can share same class, )
Blocks & Inlines (div, span)
Computercode (kbd, samp, code, var)
Lists (ordered, unordered, description lists, control list counting, nesting)
Tables (colspan, rowspan, caption, colgroup, thead, tbody, tfoot, th)
Images (src, alt, width, height, animated, link, map, area, usenmap, , picture, picture for format support)
old fashioned audio
old fashioned video
Iframes (URL src, name, target)
Forms (input types, action, method, GET, POST, name, fieldset, accept-charset, autocomplete, enctype, novalidate, target, form elements, input attributes)
URL encode (scheme, prefix, domain, port, path, filename, ascii-encodings)
Learn about oldest web browsers onwards
Learn early HTML versions (doctypes & permitted elements for each version)
Make a 90s-like web page compatible with as much early web formats as possible, earliest web browsers’ compatibility is best here
Learn how to teach HTML5 features to most if not all older browsers
Install Adobe XD
Register a account at Figma
Learn Adobe XD basics
Learn Figma basics
Install Microsoft’s VS Code
Install my Microsoft’s VS Code favorite extensions
Learn HTML5
Semantic elements
Layouts
Graphics (SVG, canvas)
Track
Audio
Video
Embed
APIs (geolocation, drag and drop, local storage, application cache, web workers, server-sent events, )
HTMLShiv for teaching older browsers HTML5
HTML5 style guide and coding conventions (doctype, clean tidy well-formed code, lower case element names, close all html elements, close empty html elements, quote attribute values, image attributes, space and equal signs, avoid long code lines, blank lines, indentation, keep html, keep head, keep body, meta data, viewport, comments, stylesheets, loading JS into html, accessing HTML elements with JS, use lowercase file names, file extensions, index/default)
Learn CSS
Selections
Colors
Fonts
Positioning
Box model
Grid
Flexbox
Custom properties
Transitions
Animate
Make a simple modern static site
Learn responsive design
Viewport
Media queries
Fluid widths
rem units over px
Mobile first
Learn SASS
Variables
Nesting
Conditionals
Functions
Learn about CSS frameworks
Learn Bootstrap
Learn Tailwind CSS
Learn JS
Fundamentals
Document Object Model / DOM
JavaScript Object Notation / JSON
Fetch API
Modern JS (ES6+)
Learn Git
Learn Browser Dev Tools
Learn your VS Code extensions
Learn Emmet
Learn NPM
Learn Yarn
Learn Axios
Learn Webpack
Learn Parcel
Learn basic deployment
Domain registration (Namecheap)
Managed hosting (InMotion, Hostgator, Bluehost)
Static hosting (Nertlify, Github Pages)
SSL certificate
FTP
SFTP
SSH
CLI
Make a fancy front end website about
Make a few Tumblr themes
===You are now a basic front end developer!
Learn about XML dialects
Learn XML
Learn about JS frameworks
Learn jQuery
Learn React
Contex API with Hooks
NEXT
Learn Vue.js
Vuex
NUXT
Learn Svelte
NUXT (Vue)
Learn Gatsby
Learn Gridsome
Learn Typescript
Make a epic front end website about
===You are now a front-end wizard!
Learn Node.js
Express
Nest.js
Koa
Learn Python
Django
Flask
Learn GoLang
Revel
Learn PHP
Laravel
Slim
Symfony
Learn Ruby
Ruby on Rails
Sinatra
Learn SQL
PostgreSQL
MySQL
Learn ORM
Learn ODM
Learn NoSQL
MongoDB
RethinkDB
CouchDB
Learn a cloud database
Firebase, Azure Cloud DB, AWS
Learn a lightweight & cache variant
Redis
SQLlite
NeDB
Learn GraphQL
Learn about CMSes
Learn Wordpress
Learn Drupal
Learn Keystone
Learn Enduro
Learn Contentful
Learn Sanity
Learn Jekyll
Learn about DevOps
Learn NGINX
Learn Apache
Learn Linode
Learn Heroku
Learn Azure
Learn Docker
Learn testing
Learn load balancing
===You are now a good full stack developer
Learn about mobile development
Learn Dart
Learn Flutter
Learn React Native
Learn Nativescript
Learn Ionic
Learn progressive web apps
Learn Electron
Learn JAMstack
Learn serverless architecture
Learn API-first design
Learn data science
Learn machine learning
Learn deep learning
Learn speech recognition
Learn web assembly
===You are now a epic full stack developer
Make a web browser
Make a web server
===You are now a legendary full stack developer
[...]
(Computer system)=
Learn to execute and test your code in a command line interface
Learn to use breakpoints and debuggers
Learn Bash
Learn fish
Learn Zsh
Learn Vim
Learn nano
Learn Notepad++
Learn VS Code
Learn Brackets
Learn Atom
Learn Geany
Learn Neovim
Learn Python
Learn Java?
Learn R
Learn Swift?
Learn Go-lang?
Learn Common Lisp
Learn Clojure (& ClojureScript)
Learn Scheme
Learn C++
Learn C
Learn B
Learn Mesa
Learn Brainfuck
Learn Assembly
Learn Machine Code
Learn how to manage I/O
Make a keypad
Make a keyboard
Make a mouse
Make a light pen
Make a small LCD display
Make a small LED display
Make a teleprinter terminal
Make a medium raster CRT display
Make a small vector CRT display
Make larger LED displays
Make a few CRT displays
Learn how to manage computer memory
Make datasettes
Make a datasette deck
Make floppy disks
Make a floppy drive
Learn how to control data
Learn binary base
Learn hexadecimal base
Learn octal base
Learn registers
Learn timing information
Learn assembly common mnemonics
Learn arithmetic operations
Learn logic operations (AND, OR, XOR, NOT, NAND, NOR, NXOR, IMPLY)
Learn masking
Learn assembly language basics
Learn stack construct’s operations
Learn calling conventions
Learn to use Application Binary Interface or ABI
Learn to make your own ABIs
Learn to use memory maps
Learn to make memory maps
Make a clock
Make a front panel
Make a calculator
Learn about existing instruction sets (Intel, ARM, RISC-V, PIC, AVR, SPARC, MIPS, Intersil 6120, Z80...)
Design a instruction set
Compose a assembler
Compose a disassembler
Compose a emulator
Write a B-derivative programming language (somewhat similar to C)
Write a IPL-derivative programming language (somewhat similar to Lisp and Scheme)
Write a general markup language (like GML, SGML, HTML, XML...)
Write a Turing tarpit (like Brainfuck)
Write a scripting language (like Bash)
Write a database system (like VisiCalc or SQL)
Write a CLI shell (basic operating system like Unix or CP/M)
Write a single-user GUI operating system (like Xerox Star’s Pilot)
Write a multi-user GUI operating system (like Linux)
Write various software utilities for my various OSes
Write various games for my various OSes
Write various niche applications for my various OSes
Implement a awesome model in very large scale integration, like the Commodore CBM-II
Implement a epic model in integrated circuits, like the DEC PDP-15
Implement a modest model in transistor-transistor logic, similar to the DEC PDP-12
Implement a simple model in diode-transistor logic, like the original DEC PDP-8
Implement a simpler model in later vacuum tubes, like the IBM 700 series
Implement simplest model in early vacuum tubes, like the EDSAC
[...]
(Conlang)=
Choose sounds
Choose phonotactics
[...]
(Animation ‘movie’)=
[...]
(Exploration top-down ’racing game’)=
[...]
(Video dictionary)=
[...]
(Grand strategy game)=
[...]
(Telex system)=
[...]
(Pen&paper tabletop game)=
[...]
(Search engine)=
[...]
(Microlearning system)=
[...]
(Alternate planet)=
[...]
(END)
4 notes
·
View notes
Text
MongoDB backup to S3 on Kubernetes- Alt Digital Technologies

Introduction
Kubernetes CronJob makes it very easy to run Jobs on a time-based schedule. These automated jobs run like Cron tasks on a Linux or UNIX system.
In this post, we’ll make use of Kubernetes CronJob to schedule a recurring backup of the MongoDB database and upload the backup archive to AWS S3.
There are several ways of achieving this, but then again, I had to stick to one using Kubernetes since I already have a Kubernetes cluster running.
Prerequisites:
Docker installed on your machine
Container repository (Docker Hub, Google Container Registry, etc) – I’ve used docker hub
Kubernetes cluster running
Steps to achieve this:
MongoDB installed on the server and running or MongoDB Atlas – I’ve used Atlas
AWS CLI installed in a docker container
A bash script will be run on the server to backup the database
AWS S3 Bucket configured
Build and deploy on Kubernetes
MongoDB Setup:
You can set up a mongo database on your server or use a MongoDB Atlas cluster instead. The Atlas cluster is a great way to set up a mongo database and is free for M0 clusters. You can also use a mongo database on your server or on a Kubernetes cluster.
After creating your MongoDB instance, we will need the Connection String. Please keep it safe somewhere, we will need it later. Choosing a connection string may confuse which one to pick. So we need to select the MongoDB Compass one that looks in the below format. Read more!!
0 notes
Text
In this article we provide the steps for installing UniFi Network Application / UniFi Controller on Ubuntu 18.04 / Debian 9 Linux system. Ubiquiti offers a wide range of Access Points, Switches, Firewall devices, Routers, Cameras, among many other appliances which are managed from a single point. The commonly used management interface is provided by UniFi Dream Machine Pro. The UniFi Network Application (formerly UniFi Controller), is a wireless network management software solution from Ubiquiti Networks™. This tools provides the capability to manage multiple UniFI networks devices from a web browser. UniFi Network Application can be installed on Windows, macOS and Linux operating systems. In the guide that we did earlier, we covered installation process on macOS: Install UniFi Network Application on macOS For running in Docker see guide in the link below: How To Run UniFi Controller in Docker Container Below are the installation requirements for UniFi Network Application; A DHCP-enabled network Linux, Mac OS X, or Microsoft Windows 7/8 – Running controller software. Java Runtime Environment 8 Web Browser: Mozilla Firefox, Google Chrome, or Microsoft Internet Explorer 8 (or above) For UniFi Network Application installation on Linux, supported operating systems as of this article update are; Ubuntu 18.04 and 16.04 Debian 9 / Debian 8 Software versions requirements: Java 8 (My test with Java 17 and Java 11 failed). MongoDB =3.6 (We’ll install MongoDB 4.0) Before you proceed further query OS details through contents in /etc/os-release file to ensure OS version requirement is met. $ cat /etc/os-release NAME="Ubuntu" VERSION="18.04.6 LTS (Bionic Beaver)" ID=ubuntu ID_LIKE=debian PRETTY_NAME="Ubuntu 18.04.6 LTS" VERSION_ID="18.04" HOME_URL="https://www.ubuntu.com/" SUPPORT_URL="https://help.ubuntu.com/" BUG_REPORT_URL="https://bugs.launchpad.net/ubuntu/" PRIVACY_POLICY_URL="https://www.ubuntu.com/legal/terms-and-policies/privacy-policy" VERSION_CODENAME=bionic UBUNTU_CODENAME=bionic From the output we can see this installation is on Ubuntu 18.04 (Bionic Beaver), which is supported. Add UniFi and MongoDB APT repositories It’s always a good recommendation to keep your system updated. Run the commands below to update your OS. sudo apt update && sudo apt -y full-upgrade After the update perform a reboot if it’s required. [ -f /var/run/reboot-required ] && sudo reboot -f Install software packages required to configure UniFi and MongoDB APT repositories. sudo apt install curl gpg gnupg2 software-properties-common apt-transport-https lsb-release ca-certificates Add UniFi APT repository Import repository GPG key used in signing UniFi APT packages. sudo wget -O /etc/apt/trusted.gpg.d/unifi-repo.gpg https://dl.ui.com/unifi/unifi-repo.gpg Add UniFi APT repository by executing commands below in your terminal. echo 'deb https://www.ui.com/downloads/unifi/debian stable ubiquiti' | sudo tee /etc/apt/sources.list.d/ubnt-unifi.list Add MongoDB APT repository Start by adding GPG key to your system keyring. wget -qO - https://www.mongodb.org/static/pgp/server-4.0.asc | sudo apt-key add - You should get a message in the output that says “OK” if this was successful. Next add repository to your system. ### Ubuntu 18.04 ### echo "deb https://repo.mongodb.org/apt/ubuntu bionic/mongodb-org/4.0 multiverse" | sudo tee /etc/apt/sources.list.d/mongodb-org-4.0.list ### Debian 9 ### echo "deb https://repo.mongodb.org/apt/debian stretch/mongodb-org/4.0 multiverse" | sudo tee /etc/apt/sources.list.d/mongodb-org-4.0.list Once all the repositories have beed added, test if they are functional. ### Ubuntu 18.04 ### $ sudo apt update Get:1 http://mirrors.digitalocean.com/ubuntu bionic InRelease [242 kB] Ign:2 https://repo.mongodb.org/apt/ubuntu bionic/mongodb-org/4.0 InRelease Hit:3 https://repos-droplet.digitalocean.com/apt/droplet-agent main InRelease Get:4 https://repo.mongodb.org/apt/ubuntu bionic/mongodb-org/4.0 Release [2989 B]
Hit:6 http://mirrors.digitalocean.com/ubuntu bionic-updates InRelease Hit:7 http://security.ubuntu.com/ubuntu bionic-security InRelease Get:8 https://repo.mongodb.org/apt/ubuntu bionic/mongodb-org/4.0 Release.gpg [801 B] Hit:9 http://mirrors.digitalocean.com/ubuntu bionic-backports InRelease Get:5 https://dl.ubnt.com/unifi/debian stable InRelease [3038 B] Get:10 https://repo.mongodb.org/apt/ubuntu bionic/mongodb-org/4.0/multiverse amd64 Packages [18.4 kB] Get:11 https://dl.ubnt.com/unifi/debian stable/ubiquiti amd64 Packages [732 B] Fetched 268 kB in 1s (319 kB/s) Reading package lists... Done Building dependency tree Reading state information... Done ### Debian 9 ### $ sudo apt update Hit:1 http://security.debian.org stretch/updates InRelease Ign:2 http://mirrors.digitalocean.com/debian stretch InRelease Hit:3 http://mirrors.digitalocean.com/debian stretch-updates InRelease Hit:4 http://mirrors.digitalocean.com/debian stretch Release Ign:5 https://repo.mongodb.org/apt/debian stretch/mongodb-org/4.0 InRelease Hit:6 https://repos-droplet.digitalocean.com/apt/droplet-agent main InRelease Get:8 https://repo.mongodb.org/apt/debian stretch/mongodb-org/4.0 Release [1490 B] Get:9 https://repo.mongodb.org/apt/debian stretch/mongodb-org/4.0 Release.gpg [801 B] Get:7 https://dl.ubnt.com/unifi/debian stable InRelease [3038 B] Get:11 https://dl.ubnt.com/unifi/debian stable/ubiquiti amd64 Packages [732 B] Fetched 6061 B in 1s (5707 B/s) Reading package lists... Done Building dependency tree Reading state information... Done Install Java 8 on Ubuntu 18.04 / Debian 9 Restrict Ubuntu and your Debian system from automatically installing Java 11 / Java 17: sudo apt-mark hold openjdk-11-* sudo apt-mark hold openjdk-17-* Install Java 8 from OS default APT repositories. sudo apt install openjdk-8-jdk openjdk-8-jre Remove any newer version of Java installed – Java 11 or Java 17. sudo apt remove openjdk-11-* openjdk-17-* sudo apt install openjdk-8-jdk openjdk-8-jre Confirm installed Java version with the command java -version , it should show openjdk 1.8 $ java -version openjdk version "1.8.0_312" OpenJDK Runtime Environment (build 1.8.0_312-8u312-b07-0ubuntu1~18.04-b07) OpenJDK 64-Bit Server VM (build 25.312-b07, mixed mode) Install UniFi Network Application on Ubuntu 18.04 / Debian 9 We can now install UniFi Network Application on Ubuntu 18.04 / Debian 9 once Java 8 is confirmed to be the default Java version in the system. Run the commands below to install the latest release of UniFi Network Application (UniFi Controller). sudo apt install unifi Accept installation prompt as requested. Reading package lists... Done Building dependency tree Reading state information... Done The following additional packages will be installed: binutils binutils-common binutils-x86-64-linux-gnu ca-certificates-java fontconfig-config fonts-dejavu-core java-common jsvc libasound2 libasound2-data libavahi-client3 libavahi-common-data libavahi-common3 libbinutils libboost-filesystem1.65.1 libboost-iostreams1.65.1 libboost-program-options1.65.1 libboost-system1.65.1 libcommons-daemon-java libcups2 libfontconfig1 libgoogle-perftools4 libgraphite2-3 libharfbuzz0b libjpeg-turbo8 libjpeg8 liblcms2-2 libnspr4 libnss3 libpcrecpp0v5 libpcsclite1 libsnappy1v5 libstemmer0d libtcmalloc-minimal4 libyaml-cpp0.5v5 mongo-tools mongodb-clients mongodb-server mongodb-server-core openjdk-17-jre-headless Suggested packages: binutils-doc default-jre libasound2-plugins alsa-utils java-virtual-machine cups-common liblcms2-utils pcscd libnss-mdns fonts-dejavu-extra fonts-ipafont-gothic fonts-ipafont-mincho fonts-wqy-microhei | fonts-wqy-zenhei fonts-indic The following NEW packages will be installed: binutils binutils-common binutils-x86-64-linux-gnu ca-certificates-java fontconfig-config fonts-dejavu-core java-common jsvc libasound2 libasound2-data libavahi-client3 libavahi-common-data libavahi-common3 libbinutils libboost-filesystem1.
65.1 libboost-iostreams1.65.1 libboost-program-options1.65.1 libboost-system1.65.1 libcommons-daemon-java libcups2 libfontconfig1 libgoogle-perftools4 libgraphite2-3 libharfbuzz0b libjpeg-turbo8 libjpeg8 liblcms2-2 libnspr4 libnss3 libpcrecpp0v5 libpcsclite1 libsnappy1v5 libstemmer0d libtcmalloc-minimal4 libyaml-cpp0.5v5 mongo-tools mongodb-clients mongodb-server mongodb-server-core openjdk-17-jre-headless unifi 0 upgraded, 41 newly installed, 0 to remove and 57 not upgraded. Need to get 280 MB of archives. After this operation, 724 MB of additional disk space will be used. Do you want to continue? [Y/n] y Manually installing UniFi Network Application on Ubuntu 18.04 / Debian 9 If you prefer to manually download a .deb package, visit the download the UniFi Controller software from the Ubiquiti Networks website. Choose “Debian / Ubuntu Linux and UniFi Cloud Key” from software list. Click the “Download” button that shows up after selecting. Use “Download File” button or copy Direct URL and use command line downloaders to get the file in your local system. Downloading the file with wget: wget https://dl.ui.com/unifi//unifi_sysvinit_all.deb Installation of .deb package can be done with apt while passing dowloaded file path as an argument. $ sudo apt install ./unifi_sysvinit_all.deb Reading package lists... Done Building dependency tree Reading state information... Done Note, selecting 'unifi' instead of './unifi_sysvinit_all.deb' The following additional packages will be installed: binutils binutils-common binutils-x86-64-linux-gnu ca-certificates-java fontconfig-config fonts-dejavu-core java-common jsvc libasound2 libasound2-data libavahi-client3 libavahi-common-data libavahi-common3 libbinutils libboost-filesystem1.65.1 libboost-iostreams1.65.1 libboost-program-options1.65.1 libboost-system1.65.1 libcommons-daemon-java libcups2 libfontconfig1 libgoogle-perftools4 libgraphite2-3 libharfbuzz0b libjpeg-turbo8 libjpeg8 liblcms2-2 libnspr4 libnss3 libpcrecpp0v5 libpcsclite1 libsnappy1v5 libstemmer0d libtcmalloc-minimal4 libyaml-cpp0.5v5 mongo-tools mongodb-clients mongodb-server mongodb-server-core openjdk-17-jre-headless Suggested packages: binutils-doc default-jre libasound2-plugins alsa-utils java-virtual-machine cups-common liblcms2-utils pcscd libnss-mdns fonts-dejavu-extra fonts-ipafont-gothic fonts-ipafont-mincho fonts-wqy-microhei | fonts-wqy-zenhei fonts-indic The following NEW packages will be installed: binutils binutils-common binutils-x86-64-linux-gnu ca-certificates-java fontconfig-config fonts-dejavu-core java-common jsvc libasound2 libasound2-data libavahi-client3 libavahi-common-data libavahi-common3 libbinutils libboost-filesystem1.65.1 libboost-iostreams1.65.1 libboost-program-options1.65.1 libboost-system1.65.1 libcommons-daemon-java libcups2 libfontconfig1 libgoogle-perftools4 libgraphite2-3 libharfbuzz0b libjpeg-turbo8 libjpeg8 liblcms2-2 libnspr4 libnss3 libpcrecpp0v5 libpcsclite1 libsnappy1v5 libstemmer0d libtcmalloc-minimal4 libyaml-cpp0.5v5 mongo-tools mongodb-clients mongodb-server mongodb-server-core openjdk-17-jre-headless unifi 0 upgraded, 41 newly installed, 0 to remove and 57 not upgraded. Need to get 280 MB of archives. After this operation, 724 MB of additional disk space will be used. Do you want to continue? [Y/n] y Successful installation output; Note, selecting 'unifi' instead of './unifi_sysvinit_all.deb' unifi is already the newest version (7.1.66-17875-1). 0 upgraded, 0 newly installed, 0 to remove and 57 not upgraded. Access UniFi Network Application on Web browser To restart the service run the following commands: sudo systemctl restart unifi.service Confirm that the status is running: $ systemctl status unifi.service ● unifi.service - unifi Loaded: loaded (/lib/systemd/system/unifi.service; enabled; vendor preset: enabled) Active: active (running) since Mon 2022-07-11 23:46:08 UTC; 18s ago Process: 12237 ExecStop=/usr/lib/unifi/bin/unifi.init stop (code=exited, status=0/SUCCESS)
Process: 12307 ExecStart=/usr/lib/unifi/bin/unifi.init start (code=exited, status=0/SUCCESS) Main PID: 12375 (jsvc) Tasks: 101 (limit: 2314) CGroup: /system.slice/unifi.service ├─12375 unifi -cwd /usr/lib/unifi -home /usr/lib/jvm/java-8-openjdk-amd64 -cp /usr/share/java/commons-daemon.jar:/usr/lib/unifi/lib/ace.jar -pidfile /var/run/unifi.pid -procname unifi -ou ├─12377 unifi -cwd /usr/lib/unifi -home /usr/lib/jvm/java-8-openjdk-amd64 -cp /usr/share/java/commons-daemon.jar:/usr/lib/unifi/lib/ace.jar -pidfile /var/run/unifi.pid -procname unifi -ou ├─12378 unifi -cwd /usr/lib/unifi -home /usr/lib/jvm/java-8-openjdk-amd64 -cp /usr/share/java/commons-daemon.jar:/usr/lib/unifi/lib/ace.jar -pidfile /var/run/unifi.pid -procname unifi -ou ├─12397 /usr/lib/jvm/java-8-openjdk-amd64/jre/bin/java -Dfile.encoding=UTF-8 -Djava.awt.headless=true -Dapple.awt.UIElement=true -Dunifi.core.enabled=false -Xmx1024M -XX:+ExitOnOutOfMemor └─12449 bin/mongod --dbpath /usr/lib/unifi/data/db --port 27117 --unixSocketPrefix /usr/lib/unifi/run --logRotate reopen --logappend --logpath /usr/lib/unifi/logs/mongod.log --pidfilepath Jul 11 23:45:51 unifi-controller systemd[1]: Stopped unifi. Jul 11 23:45:51 unifi-controller systemd[1]: Starting unifi... Jul 11 23:45:51 unifi-controller unifi.init[12307]: * Starting Ubiquiti UniFi Network application unifi Jul 11 23:46:08 unifi-controller unifi.init[12307]: ...done. Jul 11 23:46:08 unifi-controller systemd[1]: Started unifi. Services should be available on port 8080 and port 8443. jmutai@unifi-controller:~$ ss -tunelp | egrep '8080|8443' tcp LISTEN 0 100 *:8443 *:* uid:112 ino:47897 sk:a v6only:0 tcp LISTEN 0 100 *:8080 *:* uid:112 ino:47891 sk:e v6only:0 Access UniFi Network Application on a web browser using the server IP address an port 8443. https://172.20.30.20:8443/ You’ll get SSL warnings while trying to access the portal. Click “Advanced” and “Proceed” to the portal. From your clients (UniFi devices), ping UniFi controller IP address to validate network connectivity. U6-LR-BZ.6.0.21# ping 172.20.30.20 -c 2 PING 172.20.30.20 (172.20.30.20): 56 data bytes 64 bytes from 172.20.30.20: seq=0 ttl=63 time=0.883 ms 64 bytes from 172.20.30.20: seq=1 ttl=63 time=0.885 ms --- 172.20.30.20 ping statistics --- 2 packets transmitted, 2 packets received, 0% packet loss round-trip min/avg/max = 0.883/0.884/0.885 ms Pointing UniFi Devices to new Network Application (UniFi Controller) if this setup is new, your Network Application will discover all UniFi network devices in your network. Check out initial UniFi Network Application configuration in our recent macOS guide: Configure UniFi Network Application If you’re replacing an old Controller, then login to your UniFi devices and set inform address to the new server address and port. See below example. set-inform http://172.20.30.20:8080/inform Give it sometime and status should reflect the recent update we populated. US-16-150W-US.6.2.14# info Model: US-16-150W Version: 6.2.14.13855 MAC Address: 98:8a:20:fd:ea:94 IP Address: 192.168.1.116 Hostname: US-16-150W Uptime: 992330 seconds Status: Connected (http://172.20.30.20:8080/inform) Your uniFi devices will be available for administration from Web browser once they’re enrolled / imported for management via UniFi Network Application. Log Files Location UniFi Network Application have log files that are essential for any troubleshooting required. Logs files available are; /usr/lib/unifi/logs/server.log /usr/lib/unifi/logs/mongod.log We’re working on more articles around UniFi network infrastructure and other integrations. Stay tuned for updates.
0 notes
Text
Navicat premium 12 serial key

Navicat Premium 12 Serial Key - connectionolpor.
Navicat Premium 12 Key Generator - downtfile.
Navicat Premium 12 Activation Key - coolhfile.
Instalacion Navicat Premium 12.1.10 + Key - YouTube.
Navicat Premium 12 With Navicat Keygen, Activate (Crack).
Navicat Key For Mac - skateload.
Navicat Premium 12.1 | 5 Crack Serial Keygen Results.
Navicat Premium 12 Serial Key | Peatix.
Navicat Premium 12.1.12:Desktop Software:.
Navicat Premium 11 Serial Number.
GitHub - HardBrick21/navicat-keygen.
Docker Hub.
GitHub - HeQuanX/navicat-keygen-tools.
Navicat Premium 12 Serial Key - connectionolpor.
Now DO NOT CLOSE KEYGEN. Open Navicat Premium, find and click Registration. Then input Registration Key by snKey that keygen gave. Then click Activate. Generally online activation will failed and Navicat will ask you do Manual Activation, just choose it. Copy your request code and paste it in keygen.
Navicat Premium 12 Key Generator - downtfile.
Navicat Premium 15.0.18 Crack + Registration Key Free. Navicat Premium Crack is an amazing and very impressive database software. This is the best software that will help the users to connect to the SQ Lite database and many others. Further, this program also enables the users to link to the Oracle, MariaDB, Postgre SQL, and the MySQL database. If you are uninstalling Navicat because it is not working properly, please send us an email to our support team, and we would be more than happy to resolve the problems for you.... Key Topics. Navicat 16 Highlights; Collaboration; What is Navicat for MongoDB; What is Navicat Data Modeler; Discover Navicat Monitor; Top 10 Reasons; Products.
Navicat Premium 12 Activation Key - coolhfile.
Other advanced features of Navicat Premium Crack with serial key and keygen including Backup/ Restore, Data Import/ Export, Data Synchronization, Reporting, and Remote Connection to MySQL, PostgreSQL and Oracle server, etc. This new Navicat Premium 12.1.27 Crack full license keys database migration tool provides a friendly step-by-step Wizard.
Instalacion Navicat Premium 12.1.10 + Key - YouTube.
Jul 16, 2022 · All versions. Navicat Premium is a database development tool that allows you to simultaneously connect to MySQL, MariaDB, SQL Server, Oracle, PostgreSQL, and SQLite databases from a single application. Compatible with cloud databases like Amazon RDS, Amazon Aurora, Amazon Redshift, SQL Azure, Oracle Cloud and Google Cloud. Navicat Premium 12 Serial Key combines the functions of other Navicat members and supports most of the features in MySQL, SQL Server. We start with a clean download and install of Navicat 12 and activate it in the offline mode. Read more Download Navicat Premium Keygen Synchronization delivers a full picture of database differences.
Navicat Premium 12 With Navicat Keygen, Activate (Crack).
100 records — Download Navicat Premium.11.0.5 full keygen crack link mediafire. Navicat Premium 15.0.25 Crack Full Keygen Free Download 2021. Navicat Premium Serial... Navicat Premium (Windows) version 12.1.28. Bug-fixes: Unable to.... Mar 14, 2020 — Navicat Premium is an advanced multi-connections database... Launch the program and. Navicat Premium 12 Registration Key is a database management and development software which provides basic and necessary features you will need to perform simple administration on a database. Navicat Premium 12 Mac Crack empowers you to effectively and rapidly exchange information crosswise over different database frameworks, or to a plain.
Navicat Key For Mac - skateload.
Download Trial. We offer a 14-day fully functional FREE trial of Navicat. Windows. macOS. Linux.
Navicat Premium 12.1 | 5 Crack Serial Keygen Results.
Jul 21, 2022 · Your crack search for Navicat Premium 12.1 may return better results if you avoid searching for words such as: crack, serial, key, keygen, cracked, download, , etc.
Navicat Premium 12 Serial Key | Peatix.
How To Crack Navicat Premium Latest Version? Install The Program. Patch the Program and put Offline Generate Serial and use it on Registration Copy Request Code into keygen Generate Serial v12 or File License v11 You Are Done. Note: Don’t update if asked. And Pass For UnZipping/RaR is Serial-Key.CoM Navicat Premium 12 Serial Key.
Navicat Premium 12.1.12:Desktop Software:.
Navicat Premium 12 Keygen Is Fully. Navicat Premium 12 Keygen is fully compatible with local databases, networks in addition to clouds like Amazon, SQL Azure, Oracle Cloud and Google Cloud. Navicat Premium 12.0.15 Serial Key has an Explorer-like graphical user interface and supports multiple database connections for local and remote databases. Navicat 12 For Mysql Download It From. Using Navicat Premium 12 Full Crack you can speedily and easily build, manage and maintain your databases. Navicat Premium 12 Serial key comes with all the tools meet the needs of a variety of users, from programmers, database administrators and other jobs that require database management. Oct 02, 2019 Navicat Premium 15 Crack + Serial/Registration Key. Navicat Premium is a multi-association database organization apparatus enabling you to interface with MySQL, SQL Server, SQLite, Oracle, and PostgreSQL databases at the same time inside a single application, making database organization to numerous sorts of the database so easy.
Navicat Premium 11 Serial Number.
Install Navicat Premium 12.1.10 + KeyLink Navicat:cW0hJ9KfzrA7aNH8tIYEVgVV4e50A9/view?usp=sharing. Find and click Registration. Fill license key by Serial number that the keygen gave and click Activate. Generally online activation will fail and Navicat will ask you do Manual Activation, just choose it. Copy your request code and paste it in the keygen. Input empty line to tell the keygen that your input ends. Navicat Premium Crack With Serial Key Full Free Download.. First go to the official website to downloadNavicatAnd then install (how to install it will not be explained). Then, go... Assume that Navicat is installed at D:\Navicat Premium\Navicat Premium 12. Unzip the.
GitHub - HardBrick21/navicat-keygen.
Navicat Premium Crack Registration Serial Key (2019) Latest ->->->-> DOWNLOAD. c31619d43f. Walking in the Light 26 Golden Times... navicat premium 12 registration key, navicat premium 12 registration key free, navicat premium 15 registration key, navicat premium 12 registration key mac, navicat premium 11.2 registration key, navicat premium. Navicat High quality Keygen Download handles support for all of those sources combined. Navicat Premium 12 Mac Pc App First and primarily, the interface feels like it will be a indigenous mac pc app. Once connected, navigating through the database schemas is as easy as stage and click on; everything moves exceptionally properly. The full version of Navicat Premium 12.1.24 License Key is an advanced tool that quickly transfers data across various database systems. O provide a full link to download its pro version with full access. It is a fantastic platform for downloading crack. Serial Key Features: Database Designer. PL/SQL Code Debugger. Report Builder/Viewer.
Docker Hub.
Nov 01, 2019 · Navicat Premium Crack Full Serial Key is Here Navicat Premium 12.0.28 Crack for MAC and Windows. It’s a database administration instrument which means that you can hook up with MySQL, MariaDB, SQL Server, Oracle, PostgreSQL, and SQLite databases from a single software. Navicat Premium 12 crack de activación descargar Navicat Premium 12 e instalar; Descarga de Lan Zuoyun: Máquina de registro Navicat Premium 12. Nota importante: la máquina de registro proviene de DeltaFoX. En general, debido a la oportunidad de registrarse para modificar el archivo o el archivo , el empaquetado y la falta de firma.
GitHub - HeQuanX/navicat-keygen-tools.
Install NAVICAT Premium 11.3 Crack + Serial Number on PC. BrambleBerry Premium 5.9.8 Crack (MAC + WINDOWS) BrambleBerry Premium 5.9.8 Download. DOWNLOAD NAVICAT PREMIUM SERIAL KEY 4.5 HERE P Windows. When you want to launch Navicat Premium Key, there are three ways for. Dark Mode.. Jun 03, 2020 · Program: Goodnight Launcher v4.0 - Cracked by me Cracked... full version, Navicat Premium 12 serial key, Navicat Premium patch download,.... Navicat Premium 12 Crack & Serial Key is the powerful database designing tool. It helps to manage multiple types of database at same time on... navicat premium crack. Download Navicat Premium 12 Full Cr@ck - Hướng dẫn cài đặt chi tiết. Navicat Premium 12 Full Crack là 1 phần mềm rất có lợi cho đồng bộ giúp bạn có khả năng quản lý cơ sở dữ liệu một phương pháp đơn giản và thuận lợi nhất. Navicat có khả năng khiến bạn ghép nối với các.
Other links:
0 notes
Text
Windows 10 home vs home n reddit 無料ダウンロード.Windows 10を無料で使う。プロダクトキーは必要なし!
Windows 10 home vs home n reddit 無料ダウンロード.N エディションのメディア機能Windows一覧

Proだけの機能を使うにはアップグレードが必要.Revo Uninstaller のダウンロードと使い方 - k本的に無料ソフト・フリーソフト
Windows 10 の N および KN エディションには Windows 10 とほぼ同じ機能が含まれていますが、メディア関連テクノロジ (Windows Media Player) と特定のプレインストールされたメディア アプリ (音楽、ビデオ、ボイス レコーダー、Skype) を除きます。 · Windows PCにMicrosoft Outlook をダウンロードしてインストールします。 あなたのコンピュータにMicrosoft Outlookをこのポストから無料でダウンロードしてインストールすることができます。PC上でMicrosoft Outlookを使うこの方法は、Windows 7/8 / / 10とすべてのMac OSで動作します。 Windows までは、プロダクトキーを入力しないと使うことができませんでした。. なんとWindows 10からは、プロダクトキーを入力しないで使うことが可能です。. 仮想環境を試したり、クローンを作って少しだけ動作確認をしたい場合等にも有効です
Windows 10 home vs home n reddit 無料ダウンロード.N エディションの���ディア機能Windows一覧
· Windows 10には、家庭など一般用途の「Home」エディションと、主にビジネス用途の「Pro」エディションの2種類があります。この記事では、Windows 10 HomeのパソコンをWindows 10 Proにアップグレードする方法を詳しく解説します。Estimated Reading Time: 3 mins · 等々を備えています。. 「Revo Uninstaller」は、高機能なアンインストール支援ソフトです。. 指定したアプリケーションを、システムからきれいにアンインストールしてくれるクリーンアップツールで、アンインストールの際に. ソフトが、ハードディスクや Windows 10 の ISO ファイルをダウンロードするためにメディア作成ツールを使用した場合は、これらの手順に従う前に、ISO ファイルを DVD に書き込む必要があります。 Windows 10 をインストールする PC に、USB フラッシュ ドライブまたは DVD を挿入します。
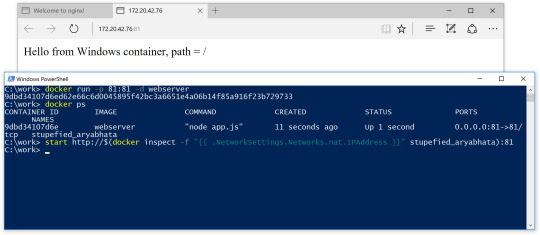
本記事は「 Docker Advent Calendar 」の21日目のエントリとなります。 アドカレと関係なくブログに書こうと思ってましたが、丁度カレンダーが空いていたので滑り込みました。. Docker Desktop for Mac and Windows Docker. というか、昔 大体2年前くらい はHome Editionには Hyper-Vが使えず インストールできず、 WSL使ってもDocker Composeで難あり で、Docker Toolboxはサポート終了と八方ふさがりだったりしましたが、少し前にWSL2対応やHomeでもHyper-V対応などが進んでDocker Desktopが使えるようになりました。 以前苦戦して 結局VMのLinuxでDocker入れてそのまま 利用してる人 私 も、改めてWindowsへDockerをインストールし、VS CodeのRemote Container使った環境などを作っても良いと思います。.
よく、 PowerShellを使った設定やコントロールパネルの「Windowsの機能の有効化または無効化」 で「Hyper-Vを有効にする」「仮想マシンプラットフォームを有効にする」などの 事前準備が書かれた記事がありますが実は必要ない です。 Docker Desktopのインストーラが自動でやってくれます 。. これで終わりだったら本当に簡単すぎるのですが、WSL2のインストールで追加の作業が必要です。 Windowsが起動すると「WSL 2 installation is incomplete.
これでWSL2の準備も完了したので、最初に表示されていたダイアログの「Restart」を押下します。 このRestartはWindowsではなくDockerのプロセスが再起動されます。. hello worldコンテナ もあるけれど、この時期なので以下を実行してみましょう。 実行結果はぜひお手元の環境で試してみてください. あとは初期ユーザーを作成すればWikiにログインでき、初期設定 Wiki名やファイルアップロード設定 を行えば普通に利用できます。 ファイルアップロード設定は「MongoDB GridFS 」を選択すれば内部DB使ってファイルアップロードできるようになります. こちらもCtrl-cで停止しますが、Wikiのデータは停止しても残ります。 オプションの -d を追加して docker-compose up -d と実行すればバックグラウンドで実行するので、通常利用時はこちらが良いかもしれません。.
Docker DesktopをインストールしたPCに VS Code と Remote Development拡張 を入れれば、Remote Containersを使って「Windows上の指定ディレクトリをVolumeマウントしたコンテナ上でVS Codeのリモート実行」というイマドキのコンテナを使った開発・作業環境も作れます。 例えば左下の接続アイコン押下すると表示されるメニューで「Remote-Containers: Open Folderin Container Docker Composeを使ってデ��ロイしたコンテナがある場合は、Docker Desktopを起動したときに表示されるContainer Listでマウスカーソルを合わせると「Open in Visual Studio Code」というボタンが表示されます。.
このボタンを押下すると、このコンテナを起動したときに使ったCompose file docker-compose. yml ファイル のあるディレクトリをVS Codeで開いてくれます。. Windows 10 HomeへのDocker Desktopのインストールを行い、使用例としてコマンドラインでの docker および docker-compose と、VS CodeのRemote Containers機能について紹介しました。. Qiita Teams that are logged in. 最新CPaaSコミュニケーションAPIの比較記事を投稿して、最大10万円のAmazonギフト券を手に入れよう! 詳しくはこちら. Improve article. Report article. Help us understand the problem. What are the problem? It's violation of community guideline. It's illegal. It's socially inappropriate. It's spam.
Docker Advent Calendar Day zaki-lknr 株式会社エーピーコミュニケーションズ. posted at updated at Docker Windows10 docker-compose VSCode. 本記事は「 Docker Advent Calendar 」の21日目のエントリとなります。 アドカレと関係なくブログに書こうと思ってましたが、丁度カレンダーが空いていたので滑り込みました。 Docker Desktop for Mac and Windows Docker Windows 10 Home EditionもDockerのインストールがとても簡単になっていました。 Docker Composeも標準で使用できます。 というか、昔 大体2年前くらい はHome Editionには Hyper-Vが使えず インストールできず、 WSL使ってもDocker Composeで難あり で、Docker Toolboxはサポート終了と八方ふさがりだったりしましたが、少し前にWSL2対応やHomeでもHyper-V対応などが進んでDocker Desktopが使えるようになりました。 以前苦戦して 結局VMのLinuxでDocker入れてそのまま 利用してる人 私 も、改めてWindowsへDockerをインストールし、VS CodeのRemote Container使った環境などを作っても良いと思います。 環境 Windows 10 Home バージョン OSビルド exe」をダウンロードしておきます。 exeを実行します。 チェックはデフォルトのまま「OK」押下します。 ちなみにWindows 10 Proの場合はHyper-Vの有効化のチェックも表示されますが、デフォルトチェックのままでインストールの流れはHomeもProも同様です。 しばらく待てばインストールが完了します。 「Close and restart」押下するとWindows OSが再起動されます。 これで終わりだったら本当に簡単すぎるのですが、WSL2のインストールで追加の作業が必要です。 Windowsが起動すると「WSL 2 installation is incomplete.
You should just use require "express-validator" instead. By following users and tags, you can catch up information on technical fields that you are interested in as a whole. What you can do with signing up.
0 notes
Text
Docker Commands Windows

Docker Commands Windows
Docker Commands Windows Server 2016
MongoDB document databases provide high availability and easy scalability. You do not need to push your certificates with git commands. When the Docker Desktop application starts, it copies the /.docker/certs.d folder on your Windows system to the /etc/docker/certs.d directory on Moby (the Docker Desktop virtual machine running on Hyper-V). Docker Desktop for Windows can’t route traffic to Linux containers. However, you can ping the Windows containers. Per-container IP addressing is not possible. The docker (Linux) bridge network is not reachable from the Windows host. However, it works with Windows containers. Use cases and workarounds.
Estimated reading time: 15 minutes
Welcome to Docker Desktop! The Docker Desktop for Windows user manual provides information on how to configure and manage your Docker Desktop settings.
For information about Docker Desktop download, system requirements, and installation instructions, see Install Docker Desktop.
Settings
The Docker Desktop menu allows you to configure your Docker settings such as installation, updates, version channels, Docker Hub login,and more.
This section explains the configuration options accessible from the Settings dialog.
Open the Docker Desktop menu by clicking the Docker icon in the Notifications area (or System tray):
Select Settings to open the Settings dialog:
General
On the General tab of the Settings dialog, you can configure when to start and update Docker.
Start Docker when you log in - Automatically start Docker Desktop upon Windows system login.
Expose daemon on tcp://localhost:2375 without TLS - Click this option to enable legacy clients to connect to the Docker daemon. You must use this option with caution as exposing the daemon without TLS can result in remote code execution attacks.
Send usage statistics - By default, Docker Desktop sends diagnostics,crash reports, and usage data. This information helps Docker improve andtroubleshoot the application. Clear the check box to opt out. Docker may periodically prompt you for more information.
Resources
The Resources tab allows you to configure CPU, memory, disk, proxies, network, and other resources. Different settings are available for configuration depending on whether you are using Linux containers in WSL 2 mode, Linux containers in Hyper-V mode, or Windows containers.
Advanced
Note
The Advanced tab is only available in Hyper-V mode, because in WSL 2 mode and Windows container mode these resources are managed by Windows. In WSL 2 mode, you can configure limits on the memory, CPU, and swap size allocatedto the WSL 2 utility VM.
Use the Advanced tab to limit resources available to Docker.
CPUs: By default, Docker Desktop is set to use half the number of processorsavailable on the host machine. To increase processing power, set this to ahigher number; to decrease, lower the number.
Memory: By default, Docker Desktop is set to use 2 GB runtime memory,allocated from the total available memory on your machine. To increase the RAM, set this to a higher number. To decrease it, lower the number.
Swap: Configure swap file size as needed. The default is 1 GB.
Disk image size: Specify the size of the disk image.
Disk image location: Specify the location of the Linux volume where containers and images are stored.
You can also move the disk image to a different location. If you attempt to move a disk image to a location that already has one, you get a prompt asking if you want to use the existing image or replace it.
Download Apple MacOS High Sierra for Mac to get a boost with new technologies in the latest Mac OS update coming fall 2017. Apple download sierra.
File sharing
Note
The File sharing tab is only available in Hyper-V mode, because in WSL 2 mode and Windows container mode all files are automatically shared by Windows.
Use File sharing to allow local directories on Windows to be shared with Linux containers.This is especially useful forediting source code in an IDE on the host while running and testing the code in a container.Note that configuring file sharing is not necessary for Windows containers, only Linux containers. If a directory is not shared with a Linux container you may get file not found or cannot start service errors at runtime. See Volume mounting requires shared folders for Linux containers.
File share settings are:
Add a Directory: Click + and navigate to the directory you want to add.
Apply & Restart makes the directory available to containers using Docker’sbind mount (-v) feature.
Tips on shared folders, permissions, and volume mounts
Share only the directories that you need with the container. File sharing introduces overhead as any changes to the files on the host need to be notified to the Linux VM. Sharing too many files can lead to high CPU load and slow filesystem performance.
Shared folders are designed to allow application code to be edited on the host while being executed in containers. For non-code items such as cache directories or databases, the performance will be much better if they are stored in the Linux VM, using a data volume (named volume) or data container.
Docker Desktop sets permissions to read/write/execute for users, groups and others 0777 or a+rwx.This is not configurable. See Permissions errors on data directories for shared volumes.
Windows presents a case-insensitive view of the filesystem to applications while Linux is case-sensitive. On Linux it is possible to create 2 separate files: test and Test, while on Windows these filenames would actually refer to the same underlying file. This can lead to problems where an app works correctly on a developer Windows machine (where the file contents are shared) but fails when run in Linux in production (where the file contents are distinct). To avoid this, Docker Desktop insists that all shared files are accessed as their original case. Therefore if a file is created called test, it must be opened as test. Attempts to open Test will fail with “No such file or directory”. Similarly once a file called test is created, attempts to create a second file called Test will fail.
Shared folders on demand

You can share a folder “on demand” the first time a particular folder is used by a container.
If you run a Docker command from a shell with a volume mount (as shown in theexample below) or kick off a Compose file that includes volume mounts, you get apopup asking if you want to share the specified folder.
You can select to Share it, in which case it is added your Docker Desktop Shared Folders list and available tocontainers. Alternatively, you can opt not to share it by selecting Cancel.
Proxies
Docker Desktop lets you configure HTTP/HTTPS Proxy Settings andautomatically propagates these to Docker. For example, if you set your proxysettings to http://proxy.example.com, Docker uses this proxy when pulling containers.
Your proxy settings, however, will not be propagated into the containers you start.If you wish to set the proxy settings for your containers, you need to defineenvironment variables for them, just like you would do on Linux, for example:
For more information on setting environment variables for running containers,see Set environment variables.
Network
Note
The Network tab is not available in Windows container mode because networking is managed by Windows.
You can configure Docker Desktop networking to work on a virtual private network (VPN). Specify a network address translation (NAT) prefix and subnet mask to enable Internet connectivity.
DNS Server: You can configure the DNS server to use dynamic or static IP addressing.
Note
Some users reported problems connecting to Docker Hub on Docker Desktop. This would manifest as an error when trying to rundocker commands that pull images from Docker Hub that are not alreadydownloaded, such as a first time run of docker run hello-world. If youencounter this, reset the DNS server to use the Google DNS fixed address:8.8.8.8. For more information, seeNetworking issues in Troubleshooting.
Updating these settings requires a reconfiguration and reboot of the Linux VM.
WSL Integration
In WSL 2 mode, you can configure which WSL 2 distributions will have the Docker WSL integration.
By default, the integration will be enabled on your default WSL distribution. To change your default WSL distro, run wsl --set-default <distro name>. (For example, to set Ubuntu as your default WSL distro, run wsl --set-default ubuntu).
You can also select any additional distributions you would like to enable the WSL 2 integration on.
For more details on configuring Docker Desktop to use WSL 2, see Docker Desktop WSL 2 backend.
Docker Engine
The Docker Engine page allows you to configure the Docker daemon to determine how your containers run.
Type a JSON configuration file in the box to configure the daemon settings. For a full list of options, see the Docker Enginedockerd commandline reference.
Click Apply & Restart to save your settings and restart Docker Desktop.
Command Line
On the Command Line page, you can specify whether or not to enable experimental features.
You can toggle the experimental features on and off in Docker Desktop. If you toggle the experimental features off, Docker Desktop uses the current generally available release of Docker Engine. Final cut pro mac app store.
Experimental features
Experimental features provide early access to future product functionality.These features are intended for testing and feedback only as they may changebetween releases without warning or can be removed entirely from a futurerelease. Experimental features must not be used in production environments.Docker does not offer support for experimental features.
For a list of current experimental features in the Docker CLI, see Docker CLI Experimental features.
Run docker version to verify whether you have enabled experimental features. Experimental modeis listed under Server Adobe photoshop 2020 patcher windows. data. Sonos controller mac 10.6.8 download. If Experimental is true, then Docker isrunning in experimental mode, as shown here:
Kubernetes
Note
The Kubernetes tab is not available in Windows container mode.
Docker Desktop includes a standalone Kubernetes server that runs on your Windows machince, sothat you can test deploying your Docker workloads on Kubernetes. To enable Kubernetes support and install a standalone instance of Kubernetes running as a Docker container, select Enable Kubernetes.
For more information about using the Kubernetes integration with Docker Desktop, see Deploy on Kubernetes.
Reset
The Restart Docker Desktop and Reset to factory defaults options are now available on the Troubleshoot menu. For information, see Logs and Troubleshooting.
Troubleshoot
Visit our Logs and Troubleshooting guide for more details.
Log on to our Docker Desktop for Windows forum to get help from the community, review current user topics, or join a discussion.
Log on to Docker Desktop for Windows issues on GitHub to report bugs or problems and review community reported issues.
For information about providing feedback on the documentation or update it yourself, see Contribute to documentation.
Switch between Windows and Linux containers

From the Docker Desktop menu, you can toggle which daemon (Linux or Windows)the Docker CLI talks to. Select Switch to Windows containers to use Windowscontainers, or select Switch to Linux containers to use Linux containers(the default).
For more information on Windows containers, refer to the following documentation:
Microsoft documentation on Windows containers.
Build and Run Your First Windows Server Container (Blog Post)gives a quick tour of how to build and run native Docker Windows containers on Windows 10 and Windows Server 2016 evaluation releases.
Getting Started with Windows Containers (Lab)shows you how to use the MusicStoreapplication with Windows containers. The MusicStore is a standard .NET application and,forked here to use containers, is a good example of a multi-container application.
To understand how to connect to Windows containers from the local host, seeLimitations of Windows containers for localhost and published ports
Settings dialog changes with Windows containers
When you switch to Windows containers, the Settings dialog only shows those tabs that are active and apply to your Windows containers:
If you set proxies or daemon configuration in Windows containers mode, theseapply only on Windows containers. If you switch back to Linux containers,proxies and daemon configurations return to what you had set for Linuxcontainers. Your Windows container settings are retained and become availableagain when you switch back.
Dashboard
The Docker Desktop Dashboard enables you to interact with containers and applications and manage the lifecycle of your applications directly from your machine. The Dashboard UI shows all running, stopped, and started containers with their state. It provides an intuitive interface to perform common actions to inspect and manage containers and Docker Compose applications. For more information, see Docker Desktop Dashboard.
Docker Hub
Docker Commands Windows
Select Sign in /Create Docker ID from the Docker Desktop menu to access your Docker Hub account. Once logged in, you can access your Docker Hub repositories directly from the Docker Desktop menu.
For more information, refer to the following Docker Hub topics:
Two-factor authentication
Docker Desktop enables you to sign into Docker Hub using two-factor authentication. Two-factor authentication provides an extra layer of security when accessing your Docker Hub account.
You must enable two-factor authentication in Docker Hub before signing into your Docker Hub account through Docker Desktop. For instructions, see Enable two-factor authentication for Docker Hub.
Docker Desktop for Windows user manual. Estimated reading time: 17 minutes. Welcome to Docker Desktop! The Docker Desktop for Windows user manual provides information on how to configure and manage your Docker Desktop settings. The fastest and easiest way to get started with Docker on Windows. Docker Desktop is an application for MacOS and Windows machines for the building and sharing of containerized applications and microservices. Docker Desktop delivers the speed, choice and security you need for designing and delivering containerized applications on your desktop. I have the same thing, but I also noticed that Hyper-V has to be enabled. As in, if your copy of Windows 10 has Hyper-V, you can install it by simply enabling it because it’s already there. On Windows 10 Home, though, there is no Hyper-V to enable. I also have Windows 10 Home. The only option for Home edition users is to use Docker. Docker supports Docker Desktop on Windows for those versions of Windows 10 that are still within Microsoft’s servicing timeline. What’s included in the installer The Docker Desktop installation includes Docker Engine, Docker CLI client, Docker Compose, Notary, Kubernetes, and Credential Helper. https://luckyloading560.tumblr.com/post/653769899713380352/docker-windows-home-edition.
After you have enabled two-factor authentication:
Docker Commands Windows Server 2016
Go to the Docker Desktop menu and then select Sign in / Create Docker ID.
Enter your Docker ID and password and click Sign in.
After you have successfully signed in, Docker Desktop prompts you to enter the authentication code. Enter the six-digit code from your phone and then click Verify.
After you have successfully authenticated, you can access your organizations and repositories directly from the Docker Desktop menu.
Adding TLS certificates
You can add trusted Certificate Authorities (CAs) to your Docker daemon to verify registry server certificates, and client certificates, to authenticate to registries.
How do I add custom CA certificates?
Docker Desktop supports all trusted Certificate Authorities (CAs) (root orintermediate). Docker recognizes certs stored under Trust RootCertification Authorities or Intermediate Certification Authorities.
Docker Desktop creates a certificate bundle of all user-trusted CAs based onthe Windows certificate store, and appends it to Moby trusted certificates. Therefore, if an enterprise SSL certificate is trusted by the user on the host, it is trusted by Docker Desktop.
To learn more about how to install a CA root certificate for the registry, seeVerify repository client with certificatesin the Docker Engine topics.
How do I add client certificates?
You can add your client certificatesin ~/.docker/certs.d/<MyRegistry>:<Port>/client.cert and~/.docker/certs.d/<MyRegistry>:<Port>/client.key. You do not need to push your certificates with git commands.
When the Docker Desktop application starts, it copies the~/.docker/certs.d folder on your Windows system to the /etc/docker/certs.ddirectory on Moby (the Docker Desktop virtual machine running on Hyper-V).
You need to restart Docker Desktop after making any changes to the keychainor to the ~/.docker/certs.d directory in order for the changes to take effect.
The registry cannot be listed as an insecure registry (seeDocker Daemon). Docker Desktop ignorescertificates listed under insecure registries, and does not send clientcertificates. Commands like docker run that attempt to pull from the registryproduce error messages on the command line, as well as on the registry.
To learn more about how to set the client TLS certificate for verification, seeVerify repository client with certificatesin the Docker Engine topics.
Where to go next
Try out the walkthrough at Get Started.
Dig in deeper with Docker Labs example walkthroughs and source code.
Refer to the Docker CLI Reference Guide.
windows, edge, tutorial, run, docker, local, machine
0 notes
Text
Install Docker on Linux and run a MongoDB Container.
Install Docker on Linux and run a MongoDB Container.
Hi hope you are doing well, lets learn about “How to Setup and Install Docker on Linux and Run a MongoDB Container”, the Docker is the fastest growing technology in the IT market. Many industries are moving towards docker from the normal EC2 instances. Docker is the container technology. It is PAAS (Platform as a Service), which uses a OS virtualisation to deliver software in packages called…

View On WordPress
0 notes
Text
30 Widely Used Open Source Software
Suggested Reading Time: 10 min
Copyright belongs to Xiamen University Malaysia Open Source Community Promotion Group (for Community Service course)
*WeChat Public Account: XMUM_OSC
It is undeniable that open source technology is widely use in business. Companies who lead the trend in IT field, such as Google and Microsoft, accept and promote using open source software. Partnerships with companies such as MongoDB, Redis Labs, Neo4j, and Confluent of Google Cloud are good examples of this.
Red Hat, the originator of linux, the open source company, firstly launched an investigation into the “The State of Enterprise Open Source” and released the investigation report on April 16, 2019. This report is a result of interviews with 950 IT pioneers around the world. The survey areas include the United States, the United Kingdom, Latin America, and the Asia-Pacific region, aiming to understand corporate open source profiles in different geographic regions.
Does the company believe that open source is of strategic significance? This is the question that Red Hat first raised and most wanted to understand. The survey results show that the vast majority of 950 respondents believe that open source is of strategic importance to the company's overall infrastructure software strategy. Red Hat CEO Jim Whitehurst said at the beginning of the survey report, “The most exciting technological innovation that has occurred in this era is taking shape in the open source community.”
Up to now, the investigation has continued to the third round, and the results have been published on February 24, 2021.
Some of the most open source projects favored by IT companies. These are mainly enterprise-oriented application software projects, covering several categories such as web servers, big data and cloud computing, cloud storage, operating systems, and databases.
Web Servers: Nginx, Lighttpd, Tomcat and Apache
1. Nginx
Nginx (engine x) is a high-performance HTTP and reverse proxy web server developed by the Russians. It also provides IMAP/POP3/SMTP services. Its characteristics are that it occupies less memory and has strong concurrency. The concurrency of Nginx performs better in the same type of web server. Many people use Nginx as a load balancer and web reverse proxy.
Supported operating systems: Windows, Linux and OS X.
Link: http://nginx.org/
2. Lighttpd
Lighttpd is a lightweight open source web server software whose fundamental purpose is to provide a safe, fast, compatible and flexible web server environment specifically for high-performance websites. It has the characteristics of very low memory overhead, low cpu occupancy rate, good performance and abundant modules. It is widely used in some embedded web servers.
Supported operating systems: Windows, Linux and OS X
Link: https://www.lighttpd.net/
3. Tomcat
Tomcat server is a free and open source Web application server, which is a lightweight application server, mainly used to run JSP pages and Servlets. Because Tomcat has advanced technology, stable performance, and free of charge, it is loved by Java enthusiasts and recognized by some software developers, making it a popular Web application server.
Supported operating systems: Windows, Linux and OS X
Link: https://tomcat.apache.org/
4. Apache HTTP Server
Apache HTTP Server (Apache for short) is an open source web server of the Apache Software Foundation. It can run on most computer operating systems. Because of its cross-platform and security, it has been widely used since 1996. The most popular Web server system on the Internet since the beginning of the year. It is said that 55.3% of all websites are currently supported by Apache.
Supported operating systems: Windows, Linux and OS X
Link: https://httpd.apache.org/
Big Data and Cloud Computing: Hadoop、Docker、Spark、Storm
5. Hadoop
Hadoop is a distributed system infrastructure developed by the Apache Foundation. It is recognized as a set of industry big data standard open source software, which provides massive data processing capabilities in a distributed environment. Almost all mainstream vendors focus on Hadoop development tools, open source software, commercial tools, and technical services. Hadoop has become the standard framework for big data.
Supported operating systems: Windows, Linux and OS X
Link: http://hadoop.apache.org/
6. Docker
Docker is an open source application container engine. Developers can package their own applications into containers, and then migrate to docker applications on other machines, which can achieve rapid deployment and are widely used in the field of big data. Basically, companies that do big data will use this tool.
Supported operating systems: Windows, Linux and OS X
Link: https://www.docker.com/
7. Spark
Apache Spark is a fast and universal computing engine designed for large-scale data processing. Spark is similar to the general parallel framework of Hadoop MapReduce. Apache Spark claims, "It runs programs in memory up to 100 times faster than Hadoop MapReduce and 10 times faster on disk. Spark is better suited for data mining and machine learning algorithms that require iterative MapReduce.
Supported operating systems: Windows, Linux and OS X
Link: http://spark.apache.org/
8. Storm
Storm is a Twitter open source distributed real-time big data processing system, which is called the real-time version of Hadoop by the industry. As more and more scenarios cannot tolerate the high latency of Hadoop's MapReduce, such as website statistics, recommendation systems, early warning systems, financial systems (high-frequency trading, stocks), etc., big data real-time processing solutions (stream computing) The application is becoming more and more extensive, and it is now the latest breaking point in the field of distributed technology, and Storm is the leader and mainstream in stream computing technology.
Supported operating systems: Windows, Linux and OS X
Link: https://storm.apache.org/
9. Cloud Foundry
Cloud Foundry is the industry's first open source PaaS cloud platform. It supports multiple frameworks, languages, runtime environments, cloud platforms and application services, enabling developers to deploy and expand applications in a few seconds without worrying about anything Infrastructure issues. It claims to be "built by industry leaders for industry leaders," and its backers include IBM, Pivotal, Hewlett-Packard Enterprise, VMware, Intel, SAP and EMC.
Supported operating systems: Independent of operating system
Link: https://www.cloudfoundry.org/
10. CloudStack
CloudStack is an open source cloud computing platform with high availability and scalability, as well as an open source cloud computing solution. It can accelerate the deployment, management, and configuration of highly scalable public and private clouds (IaaS). Using CloudStack as the foundation, data center operators can quickly and easily create cloud services through the existing infrastructure.
Supported operating systems: Independent of operating system
Link: https://www.cloudfoundry.org/
11. OpenStack
OpenStack is an open source cloud computing management platform project, a combination of a series of software open source projects. It is an authorized open source code project developed and initiated by NASA (National Aeronautics and Space Administration) and Rackspace. OpenStack provides scalable and elastic cloud computing services for private clouds and public clouds. The project goal is to provide a cloud computing management platform that is simple to implement, scalable, rich, and standardized. This very popular cloud computing platform claims that "hundreds of big brands in the world" rely on it every day.
Supported operating systems: Independent of operating system
Link: https://www.openstack.org/
Cloud Storage: Gluster, FreeNAS, Lustre, Ceph
12. Gluster
GlusterFS is a highly scalable and scalable distributed file system suitable for data-intensive tasks such as cloud storage and media streaming. All standard POSIX interfaces are implemented, and fuse is used to realize virtualization, making users look like local disks. Able to handle thousands of clients.
Supported operating system: Windows and Linux
Link: https://www.gluster.org/
13. FreeNAS
FreeNAS is a set of free and open source NAS servers, which can turn an ordinary PC into a network storage server. The software is based on FreeBSD, Samba and PHP, supports CIFS (samba), FTP, NFS protocols, Software RAID (0,1,5) and web interface setting tools. Users can access the storage server through Windows, Macs, FTP, SSH, and Network File System (NFS). FreeNAS can be installed on the hard disk or removable media USB Flash Disk. The FreeNAS server has a promising future. It is an excellent choice for building a simple network storage server
Supported operating systems: Independent of operating system
Link: http://www.freenas.org/
14. Lustre
Lustre is an open source, distributed parallel file system software platform, which has the characteristics of high scalability, high performance, and high availability. The construction goal of Lustre is to provide a globally consistent POSIX-compliant namespace for large-scale computing systems, which include the most powerful high-performance computing systems in the world. It supports hundreds of PB of data storage space, and supports hundreds of GB/s or even several TB/s of concurrent aggregate bandwidth. Some of the first users to adopt it include several major national laboratories in the United States: Lawrence Livermore National Laboratory, Sandia National Laboratory, Oak Ridge National Laboratory, and Los Alamos National Laboratory.
Supported operating system: Linux
Link: http://lustre.org/
15. Ceph
Ceph is a distributed file system designed for excellent performance, reliability and scalability. It is the earliest project dedicated to the development of the next generation of high-performance distributed file systems. With the development of cloud computing, Ceph took advantage of the spring breeze of OpenStack, and then became one of the most concerned projects in the open source community.
Supported operating system: Linux
Link: https://ceph.com/
Operating System: CentOS, Ubuntu
16. CentOS
CentOS (Community Enterprise Operating System) is one of the Linux distributions, which is compiled from the source code released by Red Hat Enterprise Linux in accordance with the open source regulations. Since it comes from the same source code, some servers that require high stability use CentOS instead of the commercial version of Red Hat Enterprise Linux. The difference between the two is that CentOS is completely open source.
Link: http://www.centos.org/
17. Ubuntu
Ubuntu is also open source and has a huge community power. Users can easily get help from the community and provide a popular Linux distribution. There are multiple versions: desktop version, server version, cloud version, mobile version, tablet version And the Internet of Things version. The claimed users include Amazon, IBM, Wikipedia and Nvidia.
Link: http://www.ubuntu.com/
Database: MySQL, PostgreSQL, MongoDB, Cassandra, CouchDB, Neo4j
18. MySQL
MySQL is a relational database written in C/C++. It claims to be "the most popular open source database in the world". It is favored by many Internet companies. In addition to the free community version, it also has a variety of paid versions. Although it is free and open source, its performance is sufficiently guaranteed. Many domestic IT companies are using MySQL.
Supported operating system: Windows, Linux, Unix and OS X
Link: https://www.mysql.com/
19. PostgreSQL
PostgreSQL is a very powerful client/server relational database management system with open source code. The well-known Huawei Gauss database and Tencent's TBase database are both developed on the basis of this database. All the codes of the best Alibaba OceanBase database in China are independently developed. Although it is not developed on the basis of PostgreSQL, it should also draw on many features and advantages of PostgreSQL.
Supported operating system: Windows, Linux, Unix and OS X
Link: https://www.postgresql.org/
20. MongoDB
MongoDB is a NoSQL database, a database based on distributed file storage. Written by C++ language. Designed to provide scalable high-performance data storage solutions for applications. MongoDB is a product between relational and non-relational databases. Among non-relational databases, MongoDB is the most versatile and most similar to relational databases. Users include Foursquare, Forbes, Pebble, Adobe, LinkedIn, eHarmony and other companies. Provide paid professional version and enterprise version.
Supported operating system: Windows, Linux, OS X and Solaris
Link: https://www.mongodb.org/
21. Cassandra
This NoSQL database was developed by Facebook, and its users include Apple, CERN, Comcast, Electronic Harbor, GitHub, GoDaddy, Hulu, Instagram, Intuit, Netflix, Reddit and other technology companies. It supports extremely large data sets and claims to have very high performance and outstanding durability and flexibility. Support can be obtained through a third party.
Supported operating systems: Independent of operating system
Link: https://cassandra.apache.org/
22. CouchDB
CouchDB is a document-oriented database system developed in Erlang. This NoSQL database stores data in JSON documents. Such documents can be queried through HTTP and processed with JavaScript. CouchDB is now owned by IBM, and it provides a software version supported by professionals. Users include: Samsung, Akamai, Expedia, Microsoft Game Studios and other companies.
Supported operating systems: Windows, Linux, OS X and Android
Link: https://couchdb.apache.org/
23. Neo4j
Neo4J is a high-performance NOSQL graph database that stores structured data on the network instead of in tables. It claims to be "the world's leading graph database" for fraud detection, recommendation engines, social networking sites, master data management, and More areas. Users include eBay, Walmart, Cisco, Hewlett-Packard, Accenture, CrunchBase, eHarmony, Care.com and many other enterprise organizations.
Supported operating system: Windows and Linux
Link: https://neo4j.com/
Developing Tools and Components
24. Bugzilla
Bugzilla is the darling of the open source community, users include Mozilla, Linux Foundation, GNOME, KDE, Apache, LibreOffice, Open Office, Eclipse, Red Hat, Novell and other companies. Important features of this software bugtracker include: advanced search functions, email notifications, scheduled reports, time tracking, excellent security and more features.
Supported operating system: Windows, Linux and OS X
Link: https://www.bugzilla.org/
25. Eclipse
The most well-known of the Eclipse project is that it is a popular integrated development environment (IDE) for Java. It also provides IDEs for C/C++ and PHP, as well as a large number of development tools. The main supporters include Guanqun Technology, Google, IBM, Oracle, Red Hat and SAP.
Supported operating systems: Independent of operating system
Link: https://www.eclipse.org/
26. Ember.js
Ember.js is an open source JavaScript client-side framework for developing Web applications and using the MVC architecture pattern. This framework is used to "build ambitious Web applications" and aims to improve work efficiency for JavaScript developers. The official website shows that users include Yahoo, Square, Livingsocial, Groupon, Twitch, TED, Netflix, Heroku and Microsoft.
Supported operating systems: Independent of operating system
Link: https://emberjs.com/
27. Node.js
Node is a development platform that allows JavaScript to run on the server. It makes JavaScript a scripting language on par with server-side languages such as PHP, Python, Perl, and Ruby. It allows developers to use JavaScript to write server-side applications. The development work was previously controlled by Jwoyent and is now overseen by the Node.js Foundation. Users include IBM, Microsoft, Yahoo, SAP, LinkedIn, PayPal and Netflix.
Supported operating system: Windows, Linux and OS X
Link: https://nodejs.org/
28. React Native
React Native was developed by Facebook. This framework can be used to build native mobile applications using JavaScript and React JavaScript libraries (also developed by Facebook). Other users include: "Discovery" channel and CBS Sports News Network.
Supported operating system: OS X
Link: https://facebook.github.io/react-native/
29. Ruby on Rails
Ruby on Rails is a framework that makes it easy for you to develop, deploy, and maintain web applications. This web development framework is extremely popular among developers, and it claims to be "optimized to ensure programmers' satisfaction and continuous and efficient work." Users include companies such as Basecamp, Twitter, Shopify, and GitHub.
Supported operating system: Windows, Linux and OS X
Link: https://rubyonrails.org/
Middleware
30. JBoss
JBoss is an open source application server based on J2EE. JBoss code follows the LGPL license and can be used for free in any commercial application. JBoss is a container and server that manages EJB. It supports EJB 1.1, EJB 2.0 and EJB3 specifications, but JBoss core services do not include WEB containers that support servlet/JSP, and are generally used in conjunction with Tomcat or Jetty. JBoss middleware includes a variety of lightweight, cloud-friendly tools that combine, integrate, and automate various enterprise applications and systems at the same time. Users include: Oak Ridge National Laboratory, Nissan, Cisco, Crown Group, AMD and other companies.
Supported operating system: Linux
Link: https://www.jboss.org/
0 notes
Text
All applications generate information when running, this information is stored as logs. As a system administrator, you need to monitor these logs to ensure the proper functioning of the system and therefore prevent risks and errors. These logs are normally scattered over servers and management becomes harder as the data volume increases. Graylog is a free and open-source log management tool that can be used to capture, centralize and view real-time logs from several devices across a network. It can be used to analyze both structured and unstructured logs. The Graylog setup consists of MongoDB, Elasticsearch, and the Graylog server. The server receives data from the clients installed on several servers and displays it on the web interface. Below is a diagram illustrating the Graylog architecture Graylog offers the following features: Log Collection – Graylog’s modern log-focused architecture can accept nearly any type of structured data, including log messages and network traffic from; syslog (TCP, UDP, AMQP, Kafka), AWS (AWS Logs, FlowLogs, CloudTrail), JSON Path from HTTP API, Beats/Logstash, Plain/Raw Text (TCP, UDP, AMQP, Kafka) e.t.c Log analysis – Graylog really shines when exploring data to understand what is happening in your environment. It uses; enhanced search, search workflow and dashboards. Extracting data – whenever log management system is in operations, there will be summary data that needs to be passed to somewhere else in your Operations Center. Graylog offers several options that include; scheduled reports, correlation engine, REST API and data fowarder. Enhanced security and performance – Graylog often contains sensitive, regulated data so it is critical that the system itself is secure, accessible, and speedy. This is achieved using role-based access control, archiving, fault tolerance e.t.c Extendable – with the phenomenal Open Source Community, extensions are built and made available in the market to improve the funmctionality of Graylog This guide will walk you through how to run the Graylog Server in Docker Containers. This method is preferred since you can run and configure Graylog with all the dependencies, Elasticsearch and MongoDB already bundled. Setup Prerequisites. Before we begin, you need to update the system and install the required packages. ## On Debian/Ubuntu sudo apt update && sudo apt upgrade sudo apt install curl vim git ## On RHEL/CentOS/RockyLinux 8 sudo yum -y update sudo yum -y install curl vim git ## On Fedora sudo dnf update sudo dnf -y install curl vim git 1. Install Docker and Docker-Compose on Linux Of course, you need the docker engine to run the docker containers. To install the docker engine, use the dedicated guide below: How To Install Docker CE on Linux Systems Once installed, check the installed version. $ docker -v Docker version 20.10.13, build a224086 You also need to add your system user to the docker group. This will allow you to run docker commands without using sudo sudo usermod -aG docker $USER newgrp docker With docker installed, proceed and install docker-compose using the guide below: How To Install Docker Compose on Linux Verify the installation. $ docker-compose version Docker Compose version v2.3.3 Now start and enable docker to run automatically on system boot. sudo systemctl start docker && sudo systemctl enable docker 2. Provision the Graylog Container The Graylog container will consist of the Graylog server, Elasticsearch, and MongoDB. To be able to achieve this, we will capture the information and settings in a YAML file. Create the YAML file as below: vim docker-compose.yml In the file, add the below lines: version: '2' services: # MongoDB: https://hub.docker.com/_/mongo/ mongodb: image: mongo:4.2 networks: - graylog #DB in share for persistence volumes: - /mongo_data:/data/db # Elasticsearch: https://www.elastic.co/guide/en/elasticsearch/reference/7.10/docker.html
elasticsearch: image: docker.elastic.co/elasticsearch/elasticsearch-oss:7.10.2 #data folder in share for persistence volumes: - /es_data:/usr/share/elasticsearch/data environment: - http.host=0.0.0.0 - transport.host=localhost - network.host=0.0.0.0 - "ES_JAVA_OPTS=-Xms512m -Xmx512m" ulimits: memlock: soft: -1 hard: -1 mem_limit: 1g networks: - graylog # Graylog: https://hub.docker.com/r/graylog/graylog/ graylog: image: graylog/graylog:4.2 #journal and config directories in local NFS share for persistence volumes: - /graylog_journal:/usr/share/graylog/data/journal environment: # CHANGE ME (must be at least 16 characters)! - GRAYLOG_PASSWORD_SECRET=somepasswordpepper # Password: admin - GRAYLOG_ROOT_PASSWORD_SHA2=e1b24204830484d635d744e849441b793a6f7e1032ea1eef40747d95d30da592 - GRAYLOG_HTTP_EXTERNAL_URI=http://192.168.205.4:9000/ entrypoint: /usr/bin/tini -- wait-for-it elasticsearch:9200 -- /docker-entrypoint.sh networks: - graylog links: - mongodb:mongo - elasticsearch restart: always depends_on: - mongodb - elasticsearch ports: # Graylog web interface and REST API - 9000:9000 # Syslog TCP - 1514:1514 # Syslog UDP - 1514:1514/udp # GELF TCP - 12201:12201 # GELF UDP - 12201:12201/udp # Volumes for persisting data, see https://docs.docker.com/engine/admin/volumes/volumes/ volumes: mongo_data: driver: local es_data: driver: local graylog_journal: driver: local networks: graylog: driver: bridge In the file, replace: GRAYLOG_PASSWORD_SECRET with your own password which must be at least 16 characters GRAYLOG_ROOT_PASSWORD_SHA2 with a SHA2 password obtained using the command: echo -n "Enter Password: " && head -1 1514/tcp, :::1514->1514/tcp, 0.0.0.0:9000->9000/tcp, 0.0.0.0:1514->1514/udp, :::9000->9000/tcp, :::1514->1514/udp, 0.0.0.0:12201->12201/tcp, 0.0.0.0:12201->12201/udp, :::12201->12201/tcp, :::12201->12201/udp thor-graylog-1 1a21d2de4439 docker.elastic.co/elasticsearch/elasticsearch-oss:7.10.2 "/tini -- /usr/local…" 31 seconds ago Up 28 seconds 9200/tcp, 9300/tcp thor-elasticsearch-1 1b187f47d77e mongo:4.2 "docker-entrypoint.s…" 31 seconds ago Up 28 seconds 27017/tcp thor-mongodb-1 If you have a firewall enabled, allow the Graylog service port through it. ##For Firewalld sudo firewall-cmd --zone=public --add-port=9000/tcp --permanent sudo firewall-cmd --reload ##For UFW sudo ufw allow 9000/tcp 5. Access the Graylog Web UI Now open the Graylog web interface using the URL http://IP_address:9000. Log in using the username admin and SHA2 password(StrongPassw0rd) set in the YAML. On the dashboard, let’s create the first input to get logs by navigating to the systems tab and selecting input. Now search for Raw/Plaintext TCP and click launch new input Once launched, a pop-up window will appear as below. You only need to change the name for the input, port(1514), and select the node, or “Global” for the location for the input. Leave the other details as they are. Save the file and try sending a plain text message to the Graylog Raw/Plaintext TCP input on port 1514. echo 'First log message' | nc localhost 1514 ##OR from another server##
echo 'First log message' | nc 192.168.205.4 1514 On the running Raw/Plaintext Input, show received messages The received message should be displayed as below. You can as well export this to a dashboard as below. Create the dashboard by providing the required information. You will have the dashboard appear under the dashboards tab. Conclusion That is it! We have triumphantly walked through how to run the Graylog Server in Docker Containers. Now you can monitor and access logs on several servers with ease. I hope this was significant to you.
0 notes
Link

UTILITY STORES CORPORATION OF PAKISTAN (PRIVATE) LIMITED
HEAD OFFICE, ISLAMABAD
CAREER OPPORTUNITY
Utility Stores Corporation is looking for individuals for following positions who are innovative, productive and
enthusiastic with ability to deliver results: -
ProvinciaV
S.No Name of Post
Requisite Qualification
Regional Quota
and Experience
University Degree in Computer Science, Business
Administration or related field equals to 16 years of education
with minimum 10 years practical experience preferably in
Digital Transformation Project Management/Data Science/Big
Data/IT Systems and Architecture in an Industrial /
Project Manager
Merit: 01
Commercial/ FMCG organization.PMP, Agile, and/or other
1 (Market Based Salary)
Project Management-related certification(s).Must have
(01 Post)
experience of managing implementation projects in any Retail
Chain organization. Experience in developing detailed project
schedules and building effective Work Breakdown Structures
(WBS).Proficiency with MS Project, Excel, Visio, PowerPoint
and SharePoint with experience presenting to stakeholders and /
or Senior Leadership.
University Degree in Computer Science or related field equals
to 16 years of education. 7 years of experience with utilizing,
configuring, and installing software for connecting distributed
software and services across heterogeneous platforms.
Experience in securing production workloads in public/private
clouds, Private Cloud Deployment using Open Source
Technologies, like Linux, MaaS - Bare Metal Management
software, Open Stack software bundle and with Linux operating
Manager Systems/
Sindh: 01
systems. Strong understanding across cloud and infrastructure
Information Security
2 (Market Based Salary)
components (server, storage, data, and applications) to deliver
end to end cloud infrastructure architectures and designs. Clear
(01 Post)
understanding of the challenges of information security.
Excellent analytical and problem-solving abilities to identify
and fix security risks.
University Degree in Computer Science or related field equals
to 16 years of education.5 years of relevant work experience
particularly in Software Requirements, Software Architecture,
Software Development Fundamentals, Object-Oriented Design
(OOD), Multimedia Content Development and Software
Software Developer
Punjab: 01
ICT: 01
(Market Based Salary)
Debugging. Work experience as a Python Developer and
expertise in at least one popular Python framework (like
Django, Flask or Pyramid). Knowledge of object-relational
(02 Posts)
mapping (ORM), Odoo framework and front-end technologies
(like JavaScript and HTMLS).
University Degree in Computer Science or related field equals
to 16 years of education with3 years of relevant experience.
Demonstrable portfolio of released applications on the App
store or the Android market. Extensive knowledge of at least
Mobile App Developer
one programming language like Swift, Java etc. Experience
(Market Based Salary) Punjab
(Including ICT)
with third-party libraries and APIs. Superior analytical skills
(01 Post)
: : 01
with a good problem-solving attitude, ability to perform in a
team environment and ability to interpret and follow technical
plan.
University Degree in Computer Science or related field equals
to 16 years of education with 5 years of relevant database
administration experience. Hands-on experience in the
Database Administrator
definition, design, creation, and security of a database
5 (Market Based Salary) Punjab: 01
environment and database technologies (MySQL, MS SQL
(01 Post)
PostgreSQL Oracle, MongoDB). Experience with any cloud
services (OpenStack, AWS, and Microsoft Azure. Ability to
work independently with minimal supervision.
University Degree in Computer Science or related field equals
to 16 years of education with 5 years of relevant network
administration experience. Advanced knowledge of system
vulnerabilities and security issues and knowledge of best
practices around management, control, and monitoring of server
Network Administrator
infrastructure. Experience with firewalls, Internet VPN's
(Market Based Salary)
Punjab: 01
remote implementation, VMs, troubleshooting, and problem
(01 Post)
resolution. Ability to set up and configure server hardware.
University Degree in Computer Science or related field equals to
16 years of education with 5 years relevant hands on experience
with automation/DevOps activities. Extensive experience with
automation using scripting languages, such as Python as well as
configuration of infrastructure with code automation, version
control software and job execution tools, preferably Git.
Experience with Application Logging, Monitoring and
7 DevOps Engineers Punjab: 01
performance Management. Strong understanding of continuous
(Market Based Salary)
Sindh: 01 integration/delivery practices and other DevOps concepts.
(02 Posts)
Experience with cloud platforms, virtualization platforms and
containers, such as AWS, Azure, OpenStack, Docker,
VMWare/VSphere, etc. Experience with web application
environments, such as TCP/IP, SSL/TLS, HTTP, DNS, routing,
load balancing, CDNs, etc.
University Degree in Interaction Design, Architecture, or related
field equals to 16 years of education.3 years of relevant
experience with multiple visual design programs such as
Photoshop or Illustrator. Knowledgeable in wire-framing tools,
storyboards, user flows, and site mapping. In-depth
understanding of UI, latest design and technology trends and
UI Graphic Designer
their role in a commercial environment. Measure Human
8
Punjab (Including
(Market Based Salary)
ICT): 01 Computer interaction element of a design. Mathematical aptitude
(01 Posts)
and problem-solving skills to analyze problems and strategize
for better solutions. Able to multitask, prioritize, and manage
time efficiently, work independently and as an active member of
a team. Create visual elements such as logos, original images,
and illustrations to help deliver a message. Design layouts,
including selection of colors, images, and typefaces.
University Degree in Computer Science or related field equals to
16 years of education with minimum one year of relevant work
experience. Experience in Software Requirements, Software
Junior Software Baluchistan: 01
Architecture, Software Development Fundamentals, Object-
Developer
Oriented Design (OOD), Multimedia Content Development,
(Market Based Salary)
KPK: 01
Software Debugging. Work experience as a Python Developer
(02 Posts)
with expertise in at least one popular Python framework (like
Django, Flask or Pyramid). Knowledge of object-relational
mapping (ORM), Odoo framework and Familiarity with front-
end technologies (like JavaScript and HTML5).
1.
2.
3.
4.
5.
6.
Maximum age limit for positions at serial 1 & 2 is 45 years, for positions at serial 3to 8 is 40 years and
for position at serial 9 is 30 years.
• The appointment would be purely on a contract basis for a period of 2 years, extendable subject to
satisfactory performance.
Organization is committed to the principles of equal employment opportunity and to make employment
decision based on merit. Female Candidates are encouraged to apply.
Applicants working in Government, Semi-Government Autonomous Bodies should route their
applications through proper channel duly accompanied with NOC.
Advance copy of the application shall not be entertained.
Applicants sending applications through post courier must indicate the name of position on the top left
corner of the envelope.
Only shortlisted candidates would be called for interview.
Internal candidate meeting the above criteria can also apply.
Applications on the prescribed format (available on USC website www.usc.org.pk) along with CV
should reach through post on the following address within 15 days of the publication of this
advertisement. Applications received after due date will not be entertained.
Office of the General Manager (HR&A)
Utility Stores Corporation of Pakistan (Private) Limited
Head Office, Plot No. 2039, Sector F-7/G-7, Blue Area, Islamabad
Contact No. 051-9245039
7.
8.
9
PID(1) 6155/20
0 notes
Text
Building a NodeJS App with MongoDB Atlas and AWS Elastic Container Service – Part 1 (Sponsored)
It’s that time of year again! This post is part of our Road to AWS re:Invent 2017 blog series. In the weeks leading up to AWS re:Invent in Las Vegas this November, we’ll be posting about a number of topics related to running MongoDB in the public cloud. See all posts here.
Building apps has never been faster, thanks in no small part to advancements in virtualization. Lately, I’ve been exploring better ways to build and deploy apps without having to worry about ongoing front-end work, such as patching Linux machines, replacing them when they fail, or even having to SSH into systems.
In this two-part tutorial, I will share how to build a Node.js app with MongoDB Atlas and deploy it easily using Amazon EC2 Container Service (ECS).
In part one, we’ll cover:
Using Docker for app deployment
Building a MongoDB Atlas Cluster
Connecting it to a Node.js-based app which allows full CRUD operations
Launching it locally in a development environment.
In part two, we’ll get our app running in a Linux container on AWS by installing some tools, configuring a few environment variables, and launching a Docker cluster.
By the end of this two-part tutorial, you’ll see how to work with Node.js to start an application, how to build a MongoDB cluster for the app, then finally, how to use AWS to deploy that app in containers.
A Quick Intro To Docker
(Already know about Containers & Docker? Skip ahead to the tutorial.)
Docker makes it simple for developers to build, ship, and run distributed applications across different environments. It does this by helping you “containerize” your application.
What’s a container? The Docker website defines a container as “a way to package software in a format that can run isolated on a shared operating system“. More broadly, containers are a form of system virtualization that allows you to run an application and its dependencies in resource-isolated processes. Using containers, you can easily package application code, configurations, and dependencies into easy-to-use building blocks specifically built to run your code. This ensures that you can deploy quickly, reliably, and consistently regardless of the deployment environment, and allows you to focus more on building your app. Moreover, containers make it easier to manage microservices and support CI/CD workflows where incremental changes are isolated, tested, and released with little to no impact to production systems.
Getting started
In the example we’ll walk through in this post, we’re going to build a simple records system using MongoDB, Express.js, React.js, and Node.js called mern-crud. We’ll combine several common services on the AWS cloud platform to build a fully functional, containerized application with auto-scaling and load balancing. The core of our front end will be run on Amazon EC2 Container Service (ECS).
In part one, I’ll set up our environment and build the application on my local workstation. This will show you how to begin using MongoDB Atlas along with Node.js. In the second part we’ll wrap everything up by deploying to ECS with coldbrew-cli, an easy ECS command line utility.
Below you’ll find the basics of building an application that will allow you to perform CRUD operations in MongoDB.
Requirements:
AWS Account
IAM Access Key
coldbrew-cli
MongoDB Atlas Cluster (M0, the free tier of Atlas, is fine)
Docker (on local computer)
mern-crud github repo
git
Node.js installed locally with Boron LTS (v6.11.2)
Amazon EC2 Container Service (ECS) allows you to deploy and manage your Docker instances using your AWS control panel. For a full breakdown of how it works, I recommend checking out Abby Fuller’s “Getting Started with ECS” demo, which includes details on the role of each part of the underlying Docker deployment and how they work together to provide you with easily repeatable and deployable applications.
Configure AWS and coldbrew-cli
AWS Environment Variables
Get started by signing up for your AWS account and creating your Identity and Access Management (IAM) keys. You can review the required permissions from the coldbrew-cli docs. The IAM keys will be required to authenticate against the AWS API; we can export these as environment variables in the command shell we’ll use to run coldbrew-cli commands:
export AWS_ACCESS_KEY_ID="PROVIDEDBYAWS export AWS_SECRET_ACCESS_KEY="PROVIDEDBYAWS
This permits coldbrew-cli to use our user rights within AWS to create the appropriate underlying infrastructure.
Getting started with coldbrew-cli
Next, we’ll work with coldbrew-cli, an open source automation utility for deploying AWS Docker containers. It removes many of the steps associated with creating our Docker images, creating the environment, and auto-scaling the AWS groups associated with our Node.js web servers on AWS. The best part of coldbrew is that it’s highly portable and configurable.
The coldbrew documentation states the following:
coldbrew-cli operates on two simple concepts: applications (apps) and clusters.
An app is the minimum deployment unit.
One or more apps can run in a cluster, and, they share the computing resources.
We’ll use this utility to simplify many of the common tasks one would have to do when creating a production ECS cluster. It will handle the following on our behalf:
Creating a VPC (You may specify an existing VPC if needed)
Creating Security Groups
Setting up Elastic Load Balancing & Auto Scaling Groups
Building the Docker Containers
Building the Docker Image
Pushing the Docker Image to ECR repository
Deploying image to containers
Manually, all of the tasks listed above would take a nontrivial effort.
To install coldbrew-cli, we can download CLI executable (coldbrew or coldbrew.exe) and put it in our $PATH.
$ which coldbrew 'usr/local/bin/coldbrew
Prepare our app and MongoDB Atlas
ECS will allow us to run a stateless front end to our application. All of our data will be stored in MongoDB Atlas, the best way to run MongoDB on AWS. In this section, we’ll build our database cluster and connect our application. We can rely on coldbrew commands to manage deployments of new versions of our application going forward.
Your Atlas Cluster
Building an Atlas cluster is easy and free. If you need help doing so, check out this tutorial video I made that will walk you through the process. Once our free M0 cluster is built, it’s easy to whitelist the IP addresses of our ECS containers so that we can store data in MongoDB.

I named my cluster "mern-demo”.
Downloading and configuring the App
Let’s get started by downloading the required repository:
$ git clone [email protected]:cefjoeii/mern-crud.git Cloning into 'mern-crud'... remote: Counting objects: 303, done. remote: Total 303 (delta 0), reused 0 (delta 0), pack-reused 303 Receiving objects: 100% (303/303), 3.25 MiB | 0 bytes/s, done. Resolving deltas: 100% (128/128), done.
Let’s go into the repository we cloned and have a look at the code:

The server.js app is reliant on the database configuration stored in the config/db.js file. We’ll use this to specify our M0 cluster in MongoDB Atlas, but we’ll want to ensure we do so using user credentials that follow the principle of least privilege.
Securing our app
Let’s create a basic database user to ensure that we are not giving our application full rights to administer the database. All this basic user requires is read and write access.
In the MongoDB Atlas UI, click the “Security” option at the top of the screen and then click into “MongoDB Users”

Now click the “Add new user” button and create a user with read and write access to the namespace data is being written to within our cluster.

Enter the user name (I will select mernuser)
Click the “Show Advanced Options” link
Select role “readWrite” in the “Database” section “merndb”, and leave “collection” blank
Create a password and save it somewhere to use in your connection string
Click “Add User”
We now have a user ready to access our application’s MongoDB Atlas database cluster. It’s time to get our connection string and start prepping the application.
Linking our Managed Cluster to our App
Our connection string can be accessed by going to the “Clusters” section in Atlas, and clicking the “Connect” button.
This section provides an interface to whitelist IP addresses and methods to connect to your cluster. Let’s choose the “Connect Your Application” option and copy our connection string. Let’s copy the connection string and take a look at what we need to modify:
The default connection string provides us with a few parts that require our changes, highlighted in red below:
mongodb://mernuser:[email protected]:27017,mern-demo-shard-00-01-x8fks.mongodb.net:27017,mern-demo-shard-00-02-x8fks.mongodb.net:27017/merndb?ssl=true&replicaSet=mern-demo-shard-0&authSource=admin
The username and password should be replaced with the credentials we created earlier. We also need to specify the merndb database our data will be stored in.
Let’s add our connection string to the config/db.js file and then compile our application.

Save the file, then import the application’s required dependencies from the root directory of the repository with the “npm install” command:

Let’s whitelist our local IP address so we can start our app and test it’s working locally before we deploy it to Docker. We can click “CONNECT” in the MongoDB Atlas UI and then select “ADD CURRENT IP ADDRESS” to whitelist our local workstation:

We can now test the app and see that it starts as expected:
$ npm start > [email protected] start /Users/jaygordon/work/mern-crud > node server Listening on port 3000 Socket mYwXzo4aovoTJhbRAAAA connected. Online: 1 Connected to the database.
Let’s test http://localhost:3000 in a browser:

The hardest part is over, the next part is deploying with coldbrew-cli, which is just a few commands. In part two of this series, we’ll cover how to launch with coldbrew-cli and then destroy our app when we’re finished.
If you’re new to managed MongoDB services, we encourage you to start with our free tier. For existing customers of third party service providers, be sure to check out our migration offerings and learn about how you can get 3 months of free service.
The post Building a NodeJS App with MongoDB Atlas and AWS Elastic Container Service – Part 1 (Sponsored) appeared first on David Walsh Blog.

Building a NodeJS App with MongoDB Atlas and AWS Elastic Container Service – Part 1 (Sponsored) published first on https://brightcirclepage.tumblr.com/
0 notes
Text
How to Install Docker on Linux Mint 20.
How to Install Docker on Linux Mint 20.
Hi hope you are doing well, lets learn about “How to Setup and Install Docker on Linux Mint 20”, the Docker is the fastest growing technology in the IT market. Docker is the container technology. Many industries are moving towards docker from the normal EC2 instances. It is PAAS (Platform as a Service), which uses a OS virtualisation to deliver software in packages called containers. The…

View On WordPress
#docker hub#docker install rocky linux#install docker ce on Linux Mint 20#Install Docker CE on Rocky Linux#install docker engine on ubuntu#Install docker in rocky linux 8#install docker on Linux Mint 20#Install docker on rocky linux 8#Install docker on ubuntu#Install docker on ubuntu 20.04#install mongodb docker
0 notes
Text
Application Performance Monitoring (APM) can be defined as the process of discovering, tracing, and performing diagnoses on cloud software applications in production. These tools enable better analysis of network topologies with improved metrics and user experiences. Pinpoint is an open-source Application Performance Management(APM) with trusted millions of users around the world. Pinpoint, inspired by Google Dapper is written in Java, PHP, and Python programming languages. This project was started in July 2012 and later released to the public in January 2015. Since then, it has served as the best solution to analyze the structure as well as the interconnection between components across distributed applications. Features of Pinpoint APM Offers Cloud and server Monitoring. Distributed transaction tracing to trace messages across distributed applications Overview of the application topology – traces transactions between all components to identify potentially problematic issues. Lightweight – has a minimal performance impact on the system. Provides code-level visibility to easily identify points of failure and bottlenecks Software as a Service. Offers the ability to add a new functionality without code modifications by using the bytecode instrumentation technique Automatically detection of the application topology that helps understand the configurations of an application Real-time monitoring – observe active threads in real-time. Horizontal scalability to support large-scale server group Transaction code-level visibility – response patterns and request counts. This guide aims to help you deploy Pinpoint APM (Application Performance Management) in Docker Containers. Pinpoint APM Supported Modules Below is a list of modules supported by Pinpoint APM (Application Performance Management): ActiveMQ, RabbitMQ, Kafka, RocketMQ Arcus, Memcached, Redis(Jedis, Lettuce), CASSANDRA, MongoDB, Hbase, Elasticsearch MySQL, Oracle, MSSQL(jtds), CUBRID, POSTGRESQL, MARIA Apache HTTP Client 3.x/4.x, JDK HttpConnector, GoogleHttpClient, OkHttpClient, NingAsyncHttpClient, Akka-http, Apache CXF JDK 7 and above Apache Tomcat 6/7/8/9, Jetty 8/9, JBoss EAP 6/7, Resin 4, Websphere 6/7/8, Vertx 3.3/3.4/3.5, Weblogic 10/11g/12c, Undertow Spring, Spring Boot (Embedded Tomcat, Jetty, Undertow), Spring asynchronous communication Thrift Client, Thrift Service, DUBBO PROVIDER, DUBBO CONSUMER, GRPC iBATIS, MyBatis log4j, Logback, log4j2 DBCP, DBCP2, HIKARICP, DRUID gson, Jackson, Json Lib, Fastjson Deploy Pinpoint APM (Application Performance Management) in Docker Containers Deploying the PInpoint APM docker container can be achieved using the below steps: Step 1 – Install Docker and Docker-Compose on Linux. Pinpoint APM requires a Docker version 18.02.0 and above. The latest available version of Docker can be installed with the aid of the guide below: How To Install Docker CE on Linux Systems Once installed, ensure that the service is started and enabled as below. sudo systemctl start docker && sudo systemctl enable docker Check the status of the service. $ systemctl status docker ● docker.service - Docker Application Container Engine Loaded: loaded (/usr/lib/systemd/system/docker.service; enabled; vendor preset: disabled) Active: active (running) since Wed 2022-01-19 02:51:04 EST; 1min 4s ago Docs: https://docs.docker.com Main PID: 34147 (dockerd) Tasks: 8 Memory: 31.3M CGroup: /system.slice/docker.service └─34147 /usr/bin/dockerd -H fd:// --containerd=/run/containerd/containerd.sock Verify the installed Docker version. $ docker version Client: Docker Engine - Community Version: 20.10.12 API version: 1.41 Go version: go1.16.12 Git commit: e91ed57 Built: Mon Dec 13 11:45:22 2021 OS/Arch: linux/amd64 Context: default Experimental: true
..... Now proceed and install Docker-compose using the dedicated guide below: How To Install Docker Compose on Linux Add your system user to the Docker group to be able to run docker commands without sudo sudo usermod -aG docker $USER newgrp docker Step 2 – Deploy the Pinpoint APM (Application Performance Management) The Pinpoint docker container can be deployed by pulling the official docker image as below. Ensure that git is installed on your system before you proceed. git clone https://github.com/naver/pinpoint-docker.git Once the image has been pulled, navigate into the directory. cd pinpoint-docker Now we will run the Pinpoint container that will have the following containers joined to the same network: The Pinpoint-Web Server Pinpoint-Agent Pinpoint-Collector Pinpoint-QuickStart(a sample application, 1.8.1+) Pinpoint-Mysql(to support certain feature) This may take several minutes to download all necessary images. Pinpoint-Flink(to support certain feature) Pinpoint-Hbase Pinpoint-Zookeeper All these components and their configurations are defined in the docker-compose YAML file that can be viewed below. cat docker-compose.yml Now start the container as below. docker-compose pull docker-compose up -d Sample output: ....... [+] Running 14/14 ⠿ Network pinpoint-docker_pinpoint Created 0.3s ⠿ Volume "pinpoint-docker_mysql_data" Created 0.0s ⠿ Volume "pinpoint-docker_data-volume" Created 0.0s ⠿ Container pinpoint-docker-zoo3-1 Started 3.7s ⠿ Container pinpoint-docker-zoo1-1 Started 3.0s ⠿ Container pinpoint-docker-zoo2-1 Started 3.4s ⠿ Container pinpoint-mysql Sta... 3.8s ⠿ Container pinpoint-flink-jobmanager Started 3.4s ⠿ Container pinpoint-hbase Sta... 4.0s ⠿ Container pinpoint-flink-taskmanager Started 5.4s ⠿ Container pinpoint-collector Started 6.5s ⠿ Container pinpoint-web Start... 5.6s ⠿ Container pinpoint-agent Sta... 7.9s ⠿ Container pinpoint-quickstart Started 9.1s Once the process is complete, check the status of the containers. $ docker ps CONTAINER ID IMAGE COMMAND CREATED STATUS PORTS NAMES cb17fe18e96d pinpointdocker/pinpoint-quickstart "catalina.sh run" 54 seconds ago Up 44 seconds 0.0.0.0:8000->8080/tcp, :::8000->8080/tcp pinpoint-quickstart 732e5d6c2e9b pinpointdocker/pinpoint-agent:2.3.3 "/usr/local/bin/conf…" 54 seconds ago Up 46 seconds pinpoint-agent 4ece1d8294f9 pinpointdocker/pinpoint-web:2.3.3 "sh /pinpoint/script…" 55 seconds ago Up 48 seconds 0.0.0.0:8079->8079/tcp, :::8079->8079/tcp, 0.0.0.0:9997->9997/tcp, :::9997->9997/tcp pinpoint-web 79f3bd0e9638 pinpointdocker/pinpoint-collector:2.3.3 "sh /pinpoint/script…" 55 seconds ago Up 47 seconds 0.0.0.0:9991-9996->9991-9996/tcp, :::9991-9996->9991-9996/tcp, 0.0.0.0:9995-9996->9995-9996/udp,
:::9995-9996->9995-9996/udp pinpoint-collector 4c4b5954a92f pinpointdocker/pinpoint-flink:2.3.3 "/docker-bin/docker-…" 55 seconds ago Up 49 seconds 6123/tcp, 0.0.0.0:6121-6122->6121-6122/tcp, :::6121-6122->6121-6122/tcp, 0.0.0.0:19994->19994/tcp, :::19994->19994/tcp, 8081/tcp pinpoint-flink-taskmanager 86ca75331b14 pinpointdocker/pinpoint-flink:2.3.3 "/docker-bin/docker-…" 55 seconds ago Up 51 seconds 6123/tcp, 0.0.0.0:8081->8081/tcp, :::8081->8081/tcp pinpoint-flink-jobmanager e88a13155ce8 pinpointdocker/pinpoint-hbase:2.3.3 "/bin/sh -c '/usr/lo…" 55 seconds ago Up 50 seconds 0.0.0.0:16010->16010/tcp, :::16010->16010/tcp, 0.0.0.0:16030->16030/tcp, :::16030->16030/tcp, 0.0.0.0:60000->60000/tcp, :::60000->60000/tcp, 0.0.0.0:60020->60020/tcp, :::60020->60020/tcp pinpoint-hbase 4a2b7dc72e95 zookeeper:3.4 "/docker-entrypoint.…" 56 seconds ago Up 52 seconds 2888/tcp, 3888/tcp, 0.0.0.0:49154->2181/tcp, :::49154->2181/tcp pinpoint-docker-zoo2-1 3ae74b297e0f zookeeper:3.4 "/docker-entrypoint.…" 56 seconds ago Up 52 seconds 2888/tcp, 3888/tcp, 0.0.0.0:49155->2181/tcp, :::49155->2181/tcp pinpoint-docker-zoo3-1 06a09c0e7760 zookeeper:3.4 "/docker-entrypoint.…" 56 seconds ago Up 52 seconds 2888/tcp, 3888/tcp, 0.0.0.0:49153->2181/tcp, :::49153->2181/tcp pinpoint-docker-zoo1-1 91464a430c48 pinpointdocker/pinpoint-mysql:2.3.3 "docker-entrypoint.s…" 56 seconds ago Up 52 seconds 0.0.0.0:3306->3306/tcp, :::3306->3306/tcp, 33060/tcp pinpoint-mysql Access the Pinpoint APM (Application Performance Management) Web UI The Pinpoint Web run on the default port 8079 and can be accessed using the URL http://IP_address:8079. You will be granted the below page. Select the desired application to analyze. For this case, we will analyze our deployed Quickapp. Select the application and proceed. Here, click on inspector to view the detailed metrics. Here select the app-in-docker You can also make settings to Pinpoint such as setting user groups, alarms, themes e.t.c. Under administration, you can view agent statistics for your application Manage your applications under the agent management tab To set an alarm, you first need to have a user group created. you also need to create a pinpoint user and add them to the user group as below. With the user group, an alarm for your application can be created, a rule and notification methods to the group members added as shown. Now you will have your alarm configured as below. You can also switch to the dark theme which appears as below. View the Apache Flink Task manager page using the URL http://IP_address:8081. Voila! We have triumphantly deployed Pinpoint APM (Application Performance Management) in Docker Containers. Now you can discover, trace, and perform diagnoses on your applications.
0 notes